Exterior Woodwork FD - New Orleans of New Orleans HDLC – Guidelines for Exterior Woodwork 06‐3...
16
Guidelines for Exterior Woodwork City of New Orleans HDLC – Guidelines for Exterior Woodwork 06‐1 All applicants must obtain a Certificate of Appropriateness (CofA) as well as all necessary permits prior to proceeding with any work. Please review this information during the early stages of planning your project. Familiarity with this material can assist in moving a project quickly through the approval process, saving applicants both time and money. Staff review of all details is required to ensure proposed work is appropriate to the specific property. Additional Guidelines addressing other historic building topics are available at the HDLC office and on its web site at www.nola.gov. For more information, to clarify whether a proposed project requires Historic District Landmarks Commission (HDLC) review, to obtain property ratings or permit applications, please call the HDLC at (504) 658‐7040. USING THESE GUIDELINES The first step in using these Guidelines is to understand the rating. The rating corresponds to the historical and/or architectural significance of properties and determines what will be permitted within local Historic Districts or at local Landmarks under the jurisdiction of the HDLC. Significant Properties – Retain the highest degree of architectural and historical merit. Contributing Properties – Contribute to the overall District and city character. Non‐Contributing Properties – Do not contribute to the overall District character. EXTERIOR WOODWORK Wood siding, shingles and trim on a building’s wall surface serve both functional and aesthetic purposes. Functionally, exterior woodwork acts as the “skin” of the building, shedding water and deflecting sunlight and wind. Aesthetically, woodwork is an important design feature that helps define the style, period and character of a building. Exterior woodwork: Establishes a weather‐tight enclosure, providing protection from rain, wind and sun Acts as an important design feature, helping to define a building’s architectural style and adding pattern and casting shadows on wall surfaces SECTION INDEX The HDLC reviews all alterations to and replacement of visible exterior woodwork including: Exterior Woodwork Glossary – Page 06‐2 Wood Trim and Ornament – Page 06‐3 Common Siding and Shingle Types – Page 06‐4 Woodwork Maintenance and Repair – Page 06‐5 Termites – Page 06‐8 Artificial Siding and Veneer – Page 06‐10 Siding and Shingle Replacement – Page 06‐13 Exterior Paint – Page 06‐14 While the HDLC does require that exterior woodwork be painted, the HDLC does not regulate paint color.
Transcript of Exterior Woodwork FD - New Orleans of New Orleans HDLC – Guidelines for Exterior Woodwork 06‐3...

Guidel ines for Exter ior Woodwork
City of New Orleans HDLC – Guidelines for Exterior Woodwork 06‐1
All applicants must obtain a Certificate of Appropriateness (CofA) as well as all necessary permits prior to proceeding with any work. Please review this information during the early stages of planning your project. Familiarity with this material can assist in moving a project quickly through the approval process, saving applicants both time and money. Staff review of all details is required to ensure proposed work is appropriate to the specific property.
Additional Guidelines addressing other historic building topics are available at the HDLC office and on its web site at www.nola.gov. For more information, to clarify whether a proposed project requires Historic District Landmarks Commission (HDLC) review, to obtain property ratings or permit applications, please call the HDLC at (504) 658‐7040.
USING THESE GUIDELINES The first step in using these Guidelines is to understand therating. The rating corresponds to the historical and/orarchitectural significance of properties and determineswhat will be permitted within local Historic Districts or atlocal Landmarks under the jurisdiction of the HDLC.
Significant Properties – Retain the highest degree of architectural and historical merit.
Contributing Properties – Contribute to the overall District and city character.
Non‐Contributing Properties – Do not contribute to the overall District character.
EXTERIOR WOODWORK Wood siding, shingles and trim on a building’s wall surface serve both functional and aesthetic purposes. Functionally, exterior woodwork acts as the “skin” of the building, shedding water and deflecting sunlight and wind. Aesthetically, woodwork is an important design feature that helps define the style, period and character of a building. Exterior woodwork:
Establishes a weather‐tight enclosure, providing protection from rain, wind and sun
Acts as an important design feature, helping to define a building’s architectural style and adding pattern and casting shadows on wall surfaces
SECTION INDEX The HDLC reviews all alterations to and replacement of visible exterior woodwork including:
Exterior Woodwork Glossary – Page 06‐2
Wood Trim and Ornament – Page 06‐3
Common Siding and Shingle Types – Page 06‐4
Woodwork Maintenance and Repair – Page 06‐5
Termites – Page 06‐8
Artificial Siding and Veneer – Page 06‐10
Siding and Shingle Replacement – Page 06‐13
Exterior Paint – Page 06‐14
While the HDLC does require that exterior woodwork be painted, the HDLC does not regulate paint color.

06‐2 City of New Orleans HDLC – Guidelines for Exterior Woodwork
EXTERIOR WOODWORK GLOSSARY Wood is used for various structural elements, siding types and decorative trim such as brackets, cornices, parapets, window and door surrounds, soffits and fascias.
Decorative rake board
Fish scale shingles
Half round gutter
Gutter molding
Bead board soffit
Soffit vent
Bracket
Door cornice
Door casing or trim
Louvered shutters
Drop lap siding
Quoin
Verge board
Window trim or casing
Bracket
Weatherboard siding
Rafter tail
Porch beam
Door casing or trim
Chamfered posts
Corner board
Weatherboard siding
City of New Orleans HDLC – Guidelines for Exterior Woodwork 06‐3
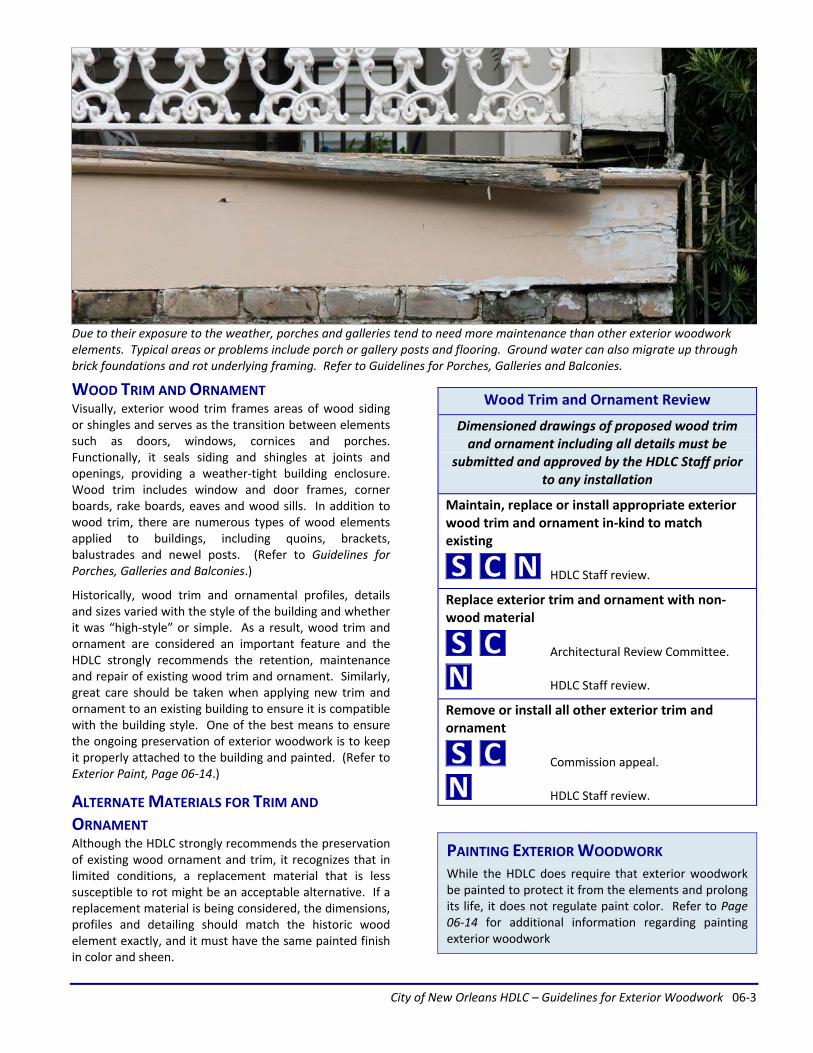
WOOD TRIM AND ORNAMENT Visually, exterior wood trim frames areas of wood siding or shingles and serves as the transition between elements such as doors, windows, cornices and porches. Functionally, it seals siding and shingles at joints and openings, providing a weather‐tight building enclosure. Wood trim includes window and door frames, corner boards, rake boards, eaves and wood sills. In addition to wood trim, there are numerous types of wood elements applied to buildings, including quoins, brackets, balustrades and newel posts. (Refer to Guidelines for Porches, Galleries and Balconies.)
Historically, wood trim and ornamental profiles, details and sizes varied with the style of the building and whether it was “high‐style” or simple. As a result, wood trim and ornament are considered an important feature and the HDLC strongly recommends the retention, maintenance and repair of existing wood trim and ornament. Similarly, great care should be taken when applying new trim and ornament to an existing building to ensure it is compatible with the building style. One of the best means to ensure the ongoing preservation of exterior woodwork is to keep it properly attached to the building and painted. (Refer to Exterior Paint, Page 06‐14.)
ALTERNATE MATERIALS FOR TRIM AND
ORNAMENT Although the HDLC strongly recommends the preservation of existing wood ornament and trim, it recognizes that in limited conditions, a replacement material that is less susceptible to rot might be an acceptable alternative. If a replacement material is being considered, the dimensions, profiles and detailing should match the historic wood element exactly, and it must have the same painted finish in color and sheen.
Wood Trim and Ornament Review
Dimensioned drawings of proposed wood trim and ornament including all details must be
submitted and approved by the HDLC Staff prior to any installation
Maintain, replace or install appropriate exterior wood trim and ornament in‐kind to match existing
HDLC Staff review.
Replace exterior trim and ornament with non‐wood material
Architectural Review Committee.
HDLC Staff review.
Remove or install all other exterior trim and ornament
Commission appeal.
HDLC Staff review.
PAINTING EXTERIOR WOODWORK While the HDLC does require that exterior woodwork be painted to protect it from the elements and prolong its life, it does not regulate paint color. Refer to Page 06‐14 for additional information regarding painting exterior woodwork
Due to their exposure to the weather, porches and galleries tend to need more maintenance than other exterior woodwork elements. Typical areas or problems include porch or gallery posts and flooring. Ground water can also migrate up through brick foundations and rot underlying framing. Refer to Guidelines for Porches, Galleries and Balconies.

06‐4 City of New Orleans HDLC – Guidelines for Exterior Woodwork
Weatherboard Drop Lap Flush Siding Siding Siding
COMMON SIDING TYPES The most common type of wood siding for residences in the City of New Orleans is weatherboard siding followed by drop lap siding.
Weatherboard Siding, also known as clapboard or beveled siding, is made from long boards, tapered across the width. Weatherboards are installed by nailing an upper board overlapping a lower board with joints staggered across the wall surface. Historically, the boards were square, and in the second half of the 19th century tapered siding became common. The profile of replacement siding should be historically appropriate and should be consistent and align around building corners.
Drop Lap Siding, also known as ship lap siding, is a flat faced board, about 12” wide with a concave top and notched bottom. Drop lap siding is installed by nailing the notched bottom of the upper board over the concave top of the lower board in a staggered joint pattern. It is typically found only on the fronts of buildings.
Flush Siding is flat faced boards nailed edge to edge to form the appearance of a flat wall. It is generally limited to Greek Revival residences and installed at front façades under protective porches or galleries.
COMMON SHINGLE TYPES Although generally limited to the front gable ends, there are a variety of decorative wood shingles in New Orleans. Similar to weatherboard siding, wood shingles are tapered and installed in an overlapping pattern with staggered joints to minimize potential moisture infiltration. Types of wood shingles include:
Chisel or Bevel: Rectangular shape, similar to roof shingles
Fishscale: Bottom edge of shingle cut in a U shape with multiple rows forming a fishscale pattern
Diamond: Bottom edge of shingle cut in a V shape with multiple rows forming a diamond pattern
Staggered: Chisel or bevel shingles with alternating greater and lesser exposure
Octagonal: Bottom corner of shingle cut with 45˚ angle with multiple rows forming an octagonal pattern
Sawtooth: Bottom corner of shingle cut in a W shape with adjacent shingles forming a sawtooth pattern
Chisel or Bevel Fishscale
Diamond Staggered
Octagonal Sawtooth
Decorative wood shingles are most often found in the front gables of residential buildings in New Orleans.

City of New Orleans HDLC – Guidelines for Exterior Woodwork 06‐5
Porches, galleries and other areas where the woodwork is laid horizontally or located close to the ground are often first to deteriorate. Ongoing exposure to moisture can lead to rot of the column bases, porch deck and apron.
WOODWORK MAINTENANCE AND REPAIR Exterior woodwork is a significant feature in defining the style, period and character of a building. However, property owners generally do not notice their exterior woodwork unless a problem occurs, or there is desire to improve the appearance or to reduce maintenance. Typical exterior woodwork concerns include peeling paint, infestation, rot or deterioration often due to the lack of regular maintenance. Property owners will often hide these problems with materials, such as vinyl, without addressing the root cause of the problem, resulting in further deterioration.
The actual condition of un‐maintained exterior wood is generally better than its appearance. In addition, a deteriorated component or area typically does not necessitate the replacement or covering of all exterior woodwork. In most instances, selective repair or replacement of damaged parts and implementation of a regular maintenance program is all that is required. Full exterior woodwork replacement or encapsulation with artificial siding or another material is rarely necessary and should be avoided whenever possible.
The side elevation has been covered with vinyl siding. The appearance is much flatter particularly at the windows.
WOODWORK MAINTENANCE GUIDE
THE HDLC REQUIRES: Conducting semi‐annual inspections of all exterior
wood elements to verify condition and determine maintenance needs. Look for signs of deterioration including peeling paint that might indicate moisture problems. Look for veins of dirt on the exterior walls that might be termites. (Refer to Wood Rot, Page 06‐6 and Termites, Page 06‐8.) Clean exterior surfaces annually in warm weather with a garden hose, household detergent and a bristle brush. Avoid using power washers that can force water into wall cavities through crevices and damage decorative details and accentuate the grain of the wood.
Maintaining and repainting exterior woodwork on a regular basis. A high quality paint job can last 5 to 8 years. Address any moisture or deterioration problems prior to painting. Hand scrape and sand where possible to avoid removing or damaging decorative details. Apply high quality and compatible primer and paint to clean and dry surfaces.
Repairing smaller areas of deterioration by reinforcing or patching. Small cracks and checks can be repaired with an exterior wood filler, glue or epoxy. Loose elements can be refastened with careful nailing or drilling.
Selective replacement of deteriorated elements when they are beyond repair. Replacement wood pieces should be the same size, shape and design as the historic wood element. It might be helpful to take a sample of the historic wood to the lumber yard or millwork shop to ensure the best match. Wood filler between the seams of the new and old wood will help provide a smooth finish.
Replacement of exterior wood might be necessary if deterioration of exterior woodwork is severe and extensive. Decorative woodwork should be retained whenever possible since it is a character defining element. Replacement wood elements should have the same appearance as the historic woodwork including the size, profile and visual characteristics. Replacement siding materials should be installed in the original pattern, matching the original exposure and alignment relative to historic building elements such as door and window frames. Select appropriate replacement wood species for use and location.
THE HDLC DOES NOT PERMIT: Removing or encapsulating of siding, trim,
decorative features and trim elements such as brackets, spindles, cornices, columns, posts, etc.

06‐6 City of New Orleans HDLC – Guidelines for Exterior Woodwork
WOOD ROT Almost all wood rot is caused by fungi that break down dead wood to return it back to the earth. Spores of decaying fungi are continuously produced and airborne at the interior and exterior of buildings. Rot‐causing fungi need four basic elements to thrive: oxygen, moisture, food and moderate temperatures. If one of these elements is missing, rot can be controlled.
Since oxygen and moderate temperatures are prevalent in the environment and most historic buildings are full of wood, an excellent food source, the best hope to minimize rot is to control moisture. Moisture that leads to wood rot generally comes from one of four sources: ground water, precipitation, plumbing leaks and condensation.
Ground water can migrate from the soil into a building by: direct contact between wood and soil; improper drainage away from the foundation; vegetation that is too close to the foundation or growing on the building; and capillary action or rising damp in masonry foundation walls or piers carrying water several inches up to wood sills.
Precipitation in all of its forms, such as rain, snow, hail, mist, etc. can find its way into a building through small openings and crevices, trapping moisture within a wall cavity. Painted surfaces and caulked joints can reduce the potential for moisture infiltration. Blocked or undersized gutters and downspouts can overflow and direct water towards building surfaces. Rainwater splashing on hard ground surfaces can rebound, saturating exterior woodwork. In cold weather, ice build‐up along roof eaves without appropriate flashing could back‐up under shingles and melt.
Leaky plumbing can be both sudden, such as a cracked pipe; or slow, where a gradual, unnoticed leak can soak a wood structure until significant damage occurs. Cracks in grout and tiles on floors and around bathtubs, sinks and washing machines can discharge enough water to rot wood framing. Periodic inspections for signs of leaking behind bathtub access panels, within sink vanities and around washing machines and dishwashers can help catch a problem before it becomes serious.
Condensation is an insidious source of moisture since the water comes from air vapor rather than an obvious source such as rain or a cracked pipe. Condensation occurs when warm moist air contacts a cold surface. Warm air can hold more moisture than cold air. If warm moist air comes in contact with a cold surface that is below the dew point temperature, the excess moisture changes to water droplets on the cold surface. Some common areas for condensation and possible solutions include:
High humidity in kitchens, bathrooms and laundries – Consider: Exhaust fans directing humid air to the outside and exterior clothes dryer vents
Crawl spaces beneath a building where water can condense on framing members such as sills and joists, especially in corners with poor air circulation or if occupied spaces above are air conditioned – Consider: Plastic sheathing on the ground
Cold water pipes in humid weather – Consider: Pipe insulation
Exterior wood framed wall on top of foundation wall or piers – Consider: Exterior wall insulation with no vapor barrier or an exterior‐facing vapor barrier, painting of interior wall surface with latex paint and installation of interior humidity control
The vertical wood corner boards were removed adjacent to the downspout exposing the structural wood post. Additional exploration revealed that there was significant rot of the post that extended deep into the thickness of the wood, compromising its structural capacity. It is likely that a persistent leak at the juncture of the roof gutter and downspout made the situation much worse.
City of New Orleans HDLC – Guidelines for Exterior Woodwork 06‐7
CONDENSATION As a result of changes in our living standards, condensation has become a significant problem in historic buildings. Today’s buildings include central heating and air conditioning to stabilize temperatures and relative humidity, as well as insulation that can trap moisture. Buildings also include moisture‐intensive conveniences such as plumbing, bathrooms, laundry and cooking facilities. While interior conditions have stabilized and moisture laden activities increased, exterior temperatures and relative humidity are continuously changing.
The differences in temperature and relative humidity between the interior and exterior of our buildings are “bridged” through the thicknesses of exterior building walls. If the temperature is below the dew point at any location within the wall, condensation will occur causing the moisture to change into water droplets. Installing artificial siding or impervious coatings over wood can make this problem much worse and hide deterioration until it is severe.
Unlike wood, vinyl and aluminum do not “breathe” and can trap moisture within a building’s wall cavity, leading to rot, mold and insect damage of the wood structure. As a result, it is important to inspect and repair potential water sources to minimize the moisture within the wall cavity.
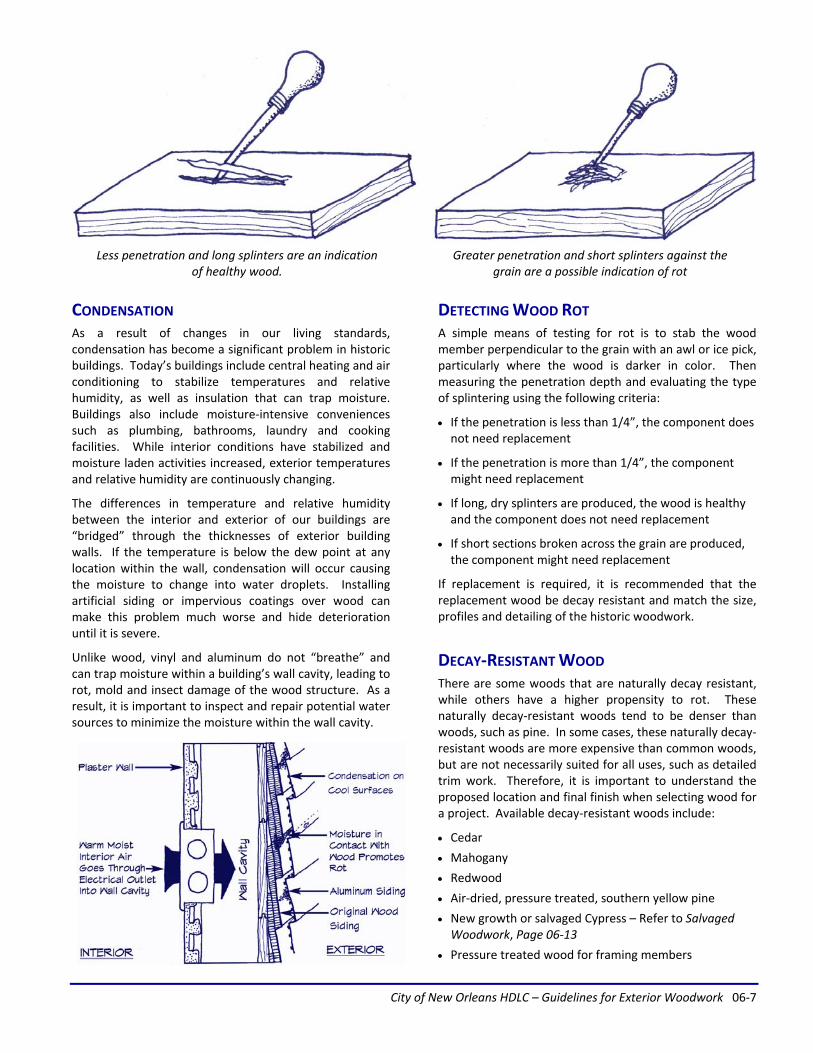
DETECTING WOOD ROT A simple means of testing for rot is to stab the wood member perpendicular to the grain with an awl or ice pick, particularly where the wood is darker in color. Then measuring the penetration depth and evaluating the type of splintering using the following criteria:
If the penetration is less than 1/4”, the component does not need replacement
If the penetration is more than 1/4”, the component might need replacement
If long, dry splinters are produced, the wood is healthy and the component does not need replacement
If short sections broken across the grain are produced, the component might need replacement
If replacement is required, it is recommended that the replacement wood be decay resistant and match the size, profiles and detailing of the historic woodwork.
DECAY‐RESISTANT WOOD There are some woods that are naturally decay resistant, while others have a higher propensity to rot. These naturally decay‐resistant woods tend to be denser than woods, such as pine. In some cases, these naturally decay‐resistant woods are more expensive than common woods, but are not necessarily suited for all uses, such as detailed trim work. Therefore, it is important to understand the proposed location and final finish when selecting wood for a project. Available decay‐resistant woods include:
Cedar
Mahogany
Redwood
Air‐dried, pressure treated, southern yellow pine
New growth or salvaged Cypress – Refer to Salvaged Woodwork, Page 06‐13
Pressure treated wood for framing members
Less penetration and long splinters are an indication Greater penetration and short splinters against the of healthy wood. grain are a possible indication of rot

06‐8 City of New Orleans HDLC – Guidelines for Exterior Woodwork
TERMITES1
Termites eat wood and wood‐based materials. This job is a natural part of the environment, but termites become destructive pests when they try to recycle houses or living trees. There are about 2,500 species of termites worldwide. Although only about 2% of them are frequent invaders of wood structures used by humans, termites must be managed because they can and will cause great damage.
There are two major groups of termites in Louisiana: drywood and subterranean termites. The subterranean termites are divided into two subgroups: the native subterranean termites and the Formosan subterranean termite. The former is native to Louisiana and includes several species; the latter was introduced into the state and refers to one species.
Drywood Termites: They are always found inside dry wood and require neither soil contact nor external moisture. They do not build mud tubes and there is no soil in the wood they infest, but they eat and build galleries both across and within the wood grain and produce dry, six‐sided seed‐like fecal pellets. The pellets are often ejected from their galleries.
Subterranean Termites: They can be found in both the wood and the soil. They start colonies in the soil, require moisture, build mud tubes to access above‐ground wood, and bring soil into the wood they infest. Most prefer to eat wood along the grain. They do not produce fecal pellets, but may build cartons to make aboveground nests. A carton is composed of chewed wood, saliva and excrement.
1 All information on Termites is extracted from: A Guide for Integrated Pest Management of Termites, www.agctr.lsu.edu, Publication 2979. April 2000. Refer to the original publication for more specific information.
Termites have eaten the wood along the grain, weakening the strength of the wood sill. The pressure from the wood stud has crushed the top of the weakened wood sill causing structural problems at the wall above.
UNDERSTANDING THE THREAT FROM TERMITES The damage termites cause might not be as dramatic as a fire or tornado, but eventually it can threaten the structural integrity of a building. Their presence is not readily noticed, and damage is often discovered before the termites are seen.
Drywood Termites
Drywood termites live entirely in dry wood, have small colonies containing a few thousand individuals. Thus, it takes a long time before drywood termites cause much structural damage. Structures may be infested with drywood termites for years without being noticed. Drywood termites disperse naturally through alates that take flight. Shipment of infested wood or furniture may relocate entire colonies or nests.
Subterranean Termites
Subterranean termites usually make their nests in the ground, excavate passageways connecting nests and tunnel through the soil in search of moisture and food. They break into houses through construction elements such as expansion joints, hollow bricks, crevices in walls, support structures, concrete slabs, plumbing and utility penetrations, under exterior facings such as stucco and wooden siding as small as 1/32 of an inch. They build mud tubes to reach aboveground wood and are capable of establishing isolated aboveground infestations in buildings where they have access to water from condensation, leaking pipes, roofs or other sources. Subterranean termites have large colonies ranging from hundreds to thousands of millions. Termites from a single colony may attack more than one structure. They cause serious damage much faster than drywood termites. Subterranean termites feed on dead wood, and often injure living trees and shrubs.
City of New Orleans HDLC – Guidelines for Exterior Woodwork 06‐9
Native subterranean termites have colonies ranging up to several hundreds of thousand termites and forage territories up to 1/3 acre. The foraging distance from the colony may be over 200 feet. They may be found injuring living trees, but usually feed on dead tissue.
Formosan subterranean termites eat wood much faster than native subterranean termites and grow the largest colonies of termite species in North America. A mature colony has up to 10 million termites or more and may extend passageways 10 feet underground and over ½ acre in area. Formosan termites are more likely than native subterranean termites to be in a structure without ground contact. Although an infested tree is not usually killed by Formosan subterranean termites, the injury weakens the trunk, branches and roots, making them susceptible to breakage during high winds. To reach cellulose materials or a water source, Formosan subterranean termites will chew through and destroy many non‐cellulosic materials, such as thin sheets of soft metal, electric lines, plastics, mortar, plaster, rubber insulation, stucco, neoprene and seals on water lines.
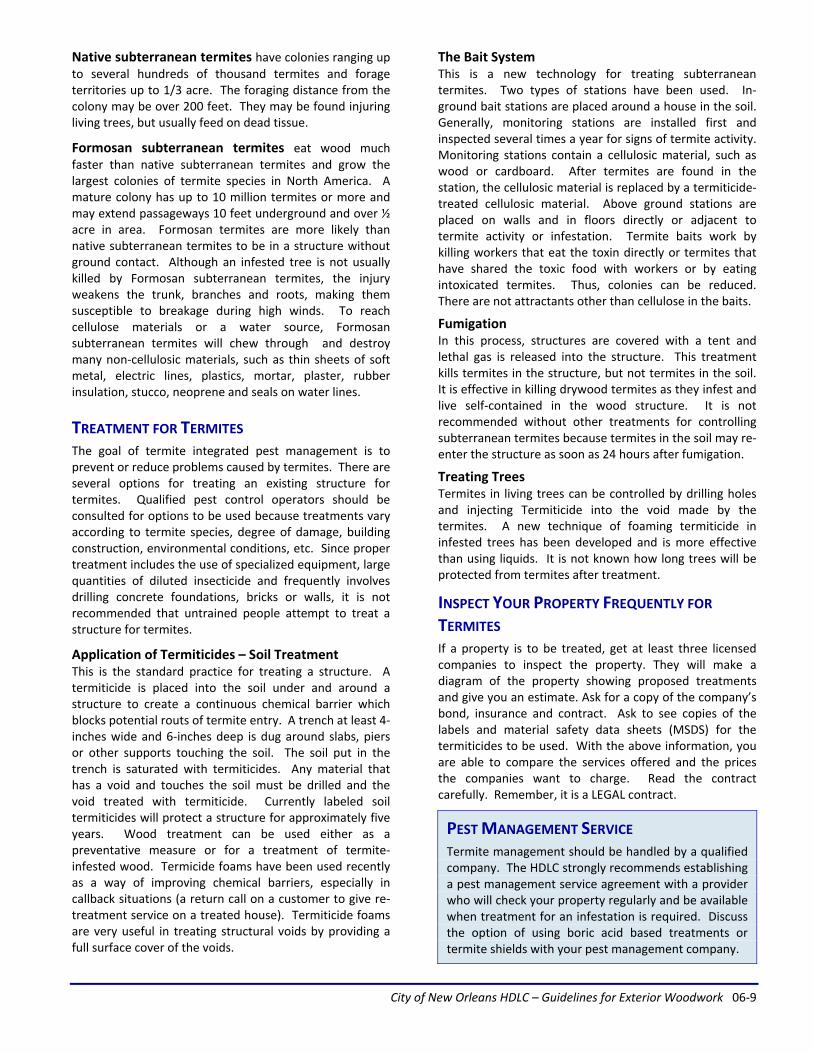
TREATMENT FOR TERMITES The goal of termite integrated pest management is to prevent or reduce problems caused by termites. There are several options for treating an existing structure for termites. Qualified pest control operators should be consulted for options to be used because treatments vary according to termite species, degree of damage, building construction, environmental conditions, etc. Since proper treatment includes the use of specialized equipment, large quantities of diluted insecticide and frequently involves drilling concrete foundations, bricks or walls, it is not recommended that untrained people attempt to treat a structure for termites.
Application of Termiticides – Soil Treatment This is the standard practice for treating a structure. A termiticide is placed into the soil under and around a structure to create a continuous chemical barrier which blocks potential routs of termite entry. A trench at least 4‐inches wide and 6‐inches deep is dug around slabs, piers or other supports touching the soil. The soil put in the trench is saturated with termiticides. Any material that has a void and touches the soil must be drilled and the void treated with termiticide. Currently labeled soil termiticides will protect a structure for approximately five years. Wood treatment can be used either as a preventative measure or for a treatment of termite‐infested wood. Termicide foams have been used recently as a way of improving chemical barriers, especially in callback situations (a return call on a customer to give re‐treatment service on a treated house). Termiticide foams are very useful in treating structural voids by providing a full surface cover of the voids.
The Bait System This is a new technology for treating subterranean termites. Two types of stations have been used. In‐ground bait stations are placed around a house in the soil. Generally, monitoring stations are installed first and inspected several times a year for signs of termite activity. Monitoring stations contain a cellulosic material, such as wood or cardboard. After termites are found in the station, the cellulosic material is replaced by a termiticide‐treated cellulosic material. Above ground stations are placed on walls and in floors directly or adjacent to termite activity or infestation. Termite baits work by killing workers that eat the toxin directly or termites that have shared the toxic food with workers or by eating intoxicated termites. Thus, colonies can be reduced. There are not attractants other than cellulose in the baits.
Fumigation In this process, structures are covered with a tent and lethal gas is released into the structure. This treatment kills termites in the structure, but not termites in the soil. It is effective in killing drywood termites as they infest and live self‐contained in the wood structure. It is not recommended without other treatments for controlling subterranean termites because termites in the soil may re‐enter the structure as soon as 24 hours after fumigation.
Treating Trees Termites in living trees can be controlled by drilling holes and injecting Termiticide into the void made by the termites. A new technique of foaming termiticide in infested trees has been developed and is more effective than using liquids. It is not known how long trees will be protected from termites after treatment.
INSPECT YOUR PROPERTY FREQUENTLY FOR TERMITES If a property is to be treated, get at least three licensed companies to inspect the property. They will make a diagram of the property showing proposed treatments and give you an estimate. Ask for a copy of the company’s bond, insurance and contract. Ask to see copies of the labels and material safety data sheets (MSDS) for the termiticides to be used. With the above information, you are able to compare the services offered and the prices the companies want to charge. Read the contract carefully. Remember, it is a LEGAL contract.
PEST MANAGEMENT SERVICE Termite management should be handled by a qualified company. The HDLC strongly recommends establishing a pest management service agreement with a provider who will check your property regularly and be available when treatment for an infestation is required. Discuss the option of using boric acid based treatments or termite shields with your pest management company.

06‐10 City of New Orleans HDLC – Guidelines for Exterior Woodwork
The installation of a brick façade on a wood framed building can dramatically change the historic appearance and is not appropriate.
ARTIFICIAL SIDING AND VENEER Artificial siding materials include asbestos siding, asphalt and more commonly vinyl and aluminum siding and capping. Veneer includes stucco, brick or stone applied at or over traditionally wood sided buildings. These materials can significantly change a building’s character and appearance and are not necessarily maintenance free. Contrary to manufacturer’s claims, most forms of artificial siding can trap moisture within a wall thickness, accelerating rot and decay of underlying framing.
Asbestos siding is often embossed with a wood grain pattern. The removal of asbestos siding can be hazardous and should be undertaken by trained professionals.
ASBESTOS SIDING Asbestos became a popular wall surface material at the beginning of the 20th century. Asbestos wall shingles are made from asbestos mineral fibers and either Portland or hydraulic cement and they provide a durable, lightweight, economical, fireproof, rot and termite resistant alternative to wood siding and shingles.
With appropriate maintenance, asbestos shingles can be expected to last well over 30 years with cracking and rusting nails being the most typical cause of failure.
The manufacturing of asbestos shingles essentially ceased when asbestos was banned by the EPA in 1973. If the shingles are damaged, consultation with a professional to determine whether repair is feasible is recommended. It should also be noted that asbestos shingles are often available at architectural salvage suppliers. The HDLC encourages the removal of asbestos siding and restoration of underlying wood siding.
Typical localized problems and possible repairs for asbestos shingles:
Split or puncture – Install sheet metal under shingle, fill split or hole with grout of Portland cement and water
Loosening or corrosion of fasteners for asbestos shingle or accessories – Reattach or replace fastener
Moss or fungi on surface – Trim back adjacent trees allowing sun to dry out surface
Missing or damaged shingles– Replace shingles with non‐asbestos shingles to match original and wall surface in‐kind
If over 20% of the asbestos shingles on a wall surface are damaged or missing, replacement of the wall material might be necessary. Property owners can install salvaged asbestos shingles or non‐asbestos fiber‐cement products that visually duplicate traditional asbestos tiles. Other alternative wall surfaces include wood clapboard or drop siding or smooth finish cementious siding.
Wood siding is located on the front elevation to the left and asbestos siding, with the wavy bottom edge, on the side elevation to the right.
REPAIR AND REMOVAL OF ASBESTOS SHINGLES Great care should be taken when working with broken asbestos products and during its removal. It is recommended that all asbestos related work be undertaken by a licensed contractor.
Property owners are responsible for ensuring that all asbestos removal and disposal is handled in accordance with all applicable regulations and procedures.
City of New Orleans HDLC – Guidelines for Exterior Woodwork 06‐11
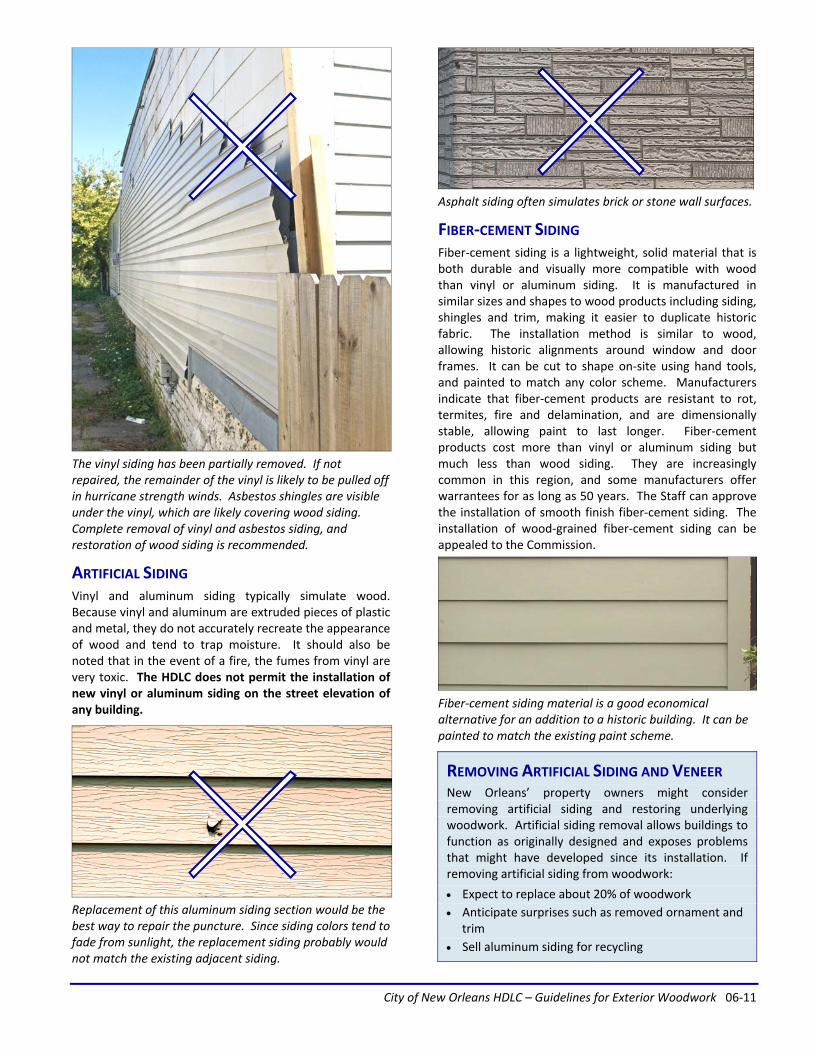
The vinyl siding has been partially removed. If not repaired, the remainder of the vinyl is likely to be pulled off in hurricane strength winds. Asbestos shingles are visible under the vinyl, which are likely covering wood siding. Complete removal of vinyl and asbestos siding, and restoration of wood siding is recommended.
ARTIFICIAL SIDING Vinyl and aluminum siding typically simulate wood. Because vinyl and aluminum are extruded pieces of plastic and metal, they do not accurately recreate the appearance of wood and tend to trap moisture. It should also be noted that in the event of a fire, the fumes from vinyl are very toxic. The HDLC does not permit the installation of new vinyl or aluminum siding on the street elevation of any building.
Replacement of this aluminum siding section would be the best way to repair the puncture. Since siding colors tend to fade from sunlight, the replacement siding probably would not match the existing adjacent siding.
Asphalt siding often simulates brick or stone wall surfaces.
FIBER‐CEMENT SIDING Fiber‐cement siding is a lightweight, solid material that is both durable and visually more compatible with wood than vinyl or aluminum siding. It is manufactured in similar sizes and shapes to wood products including siding, shingles and trim, making it easier to duplicate historic fabric. The installation method is similar to wood, allowing historic alignments around window and door frames. It can be cut to shape on‐site using hand tools, and painted to match any color scheme. Manufacturers indicate that fiber‐cement products are resistant to rot, termites, fire and delamination, and are dimensionally stable, allowing paint to last longer. Fiber‐cement products cost more than vinyl or aluminum siding but much less than wood siding. They are increasingly common in this region, and some manufacturers offer warrantees for as long as 50 years. The Staff can approve the installation of smooth finish fiber‐cement siding. The installation of wood‐grained fiber‐cement siding can be appealed to the Commission.
Fiber‐cement siding material is a good economical alternative for an addition to a historic building. It can be painted to match the existing paint scheme.
REMOVING ARTIFICIAL SIDING AND VENEER New Orleans’ property owners might consider removing artificial siding and restoring underlying woodwork. Artificial siding removal allows buildings to function as originally designed and exposes problems that might have developed since its installation. If removing artificial siding from woodwork:
Expect to replace about 20% of woodwork
Anticipate surprises such as removed ornament and trim
Sell aluminum siding for recycling

06‐12 City of New Orleans HDLC – Guidelines for Exterior Woodwork
EXTERIOR WOODWORK OR ARTIFICIAL SIDING Property owners generally install artificial siding to avoid maintenance issues associated with repainting and because of aggressive claims made by the vinyl or aluminum industry. They believe that artificial siding provides a maintenance free solution that will solve their exterior building problems for a lifetime. The table below contrasts common statements by the vinyl and aluminum industry with the viewpoint of preservation professionals.
ARTIFICIAL SIDING VIEW PRESERVATION VIEW
“Vinyl and aluminum siding is a cost effective alternative to wood”
Vinyl siding and aluminum is usually guaranteed for 20 years and costs approximately the same as two quality paint jobs. (Guarantees over 20 years are usually prorated.) Properly maintained wood siding has been found to last hundreds of years.
Vinyl or aluminum siding installed over existing woodwork can trap moisture and lead to costly hidden structural repairs. (See weatherproof section below.)
Artificial siding can reduce home values by covering distinctive qualities and details.
“Vinyl or aluminum siding improves the appearance of a building”
Exposures, shadow lines, joint layout, texture and the sheen of vinyl or aluminum siding typically do not match wood.
Historic or decorative trim is often covered or removed in the installation process. Installation typically requires damage to historic wall materials.
Stock vinyl and aluminum trim is generally narrower than historic wood trim.
Historic details and decorative elements are generally not available in vinyl or aluminum.
Available colors are limited and might not be appropriate for the building style.
Colors are difficult to change. (If change is desired, the type of paint should be compatible in material and color to minimize peeling, warping and curling.)
“Vinyl or aluminum siding is weatherproof”
They can be weatherproof if properly installed, but at many historic buildings there are crevices and uneven surfaces that allow moisture behind the artificial siding or capping. (Generally, new buildings with vinyl or aluminum siding are constructed with an internal vapor barrier to exhaust moisture‐laden air.)
Unlike wood, vinyl or aluminum siding does not breathe and can trap moisture within a building’s wall cavity. Trapped moisture condenses when it reaches the dew point, changing to water droplets that can drip and run through the wall’s structure. This can lead to rotting of sills and structural components and potential mold and insect damage. (To reduce trapped moisture, install continuous wall vents under eaves and add weep holes to artificial siding.)
Installing vinyl or aluminum over deteriorated wood will not make the problem disappear. (Generally, by trapping additional moisture, the deterioration could accelerate and lead to costly hidden structural repairs.)
“Vinyl or aluminum siding conserves energy”
Insulation value of vinyl or aluminum siding is minimal, even when it is backed by a thin layer of insulating foam or rigid board insulation. Furthermore, the insulation could trap additional moisture within the wall cavity.
Studies have shown that as much as 75% of a building’s heat loss can be through its roof. Installing attic insulation is a more cost effective method of reducing a heating bill.
“Vinyl or aluminum siding is maintenance free”
Like wood, vinyl and aluminum siding needs regular cleaning.
Vinyl and aluminum siding is subject to denting, warping, cupping and fading from sunlight exposure. Vinyl siding is prone to cracking in cold weather. Replacement patches usually do not match the earlier installation.
The painting of vinyl or aluminum siding to change or to freshen the appearance typically voids the manufacturer’s warrantee. (Type and color of paint used over vinyl siding should be compatible to minimize potential peeling, warping and curling. Once painted, artificial siding will need to be repainted as or more often as wood.)

City of New Orleans HDLC – Guidelines for Exterior Woodwork 06‐13
SIDING AND SHINGLE REPLACEMENT In New Orleans, many of the historic buildings were originally clad with wood siding. As a result, the installation of artificial siding over a traditional wood sided building alters the overall character of the building. In addition, most artificial siding materials, particularly vinyl and aluminum siding, must be installed at a consistent vertical spacing, as defined by the manufacturer. They do not allow flexibility to accommodate historic spacing or exposure.
The installation of artificial siding or veneers can often damage or require the removal of significant wood casings and trim. The loss of these features can significantly alter the character of a building. Artificial siding installation over existing materials can also increase the wall thickness, causing the existing wood trim to appear set back from the wall rather than projecting from it. This can further diminish the visual characteristics of the building.
Aluminum capping has been installed over the window frame. Aluminum capping usually lacks the profile and
detail of wood trim. It can also trap moisture within the wall
surface that can accelerate rot and deterioration.
The window frame has been completely covered with the vinyl siding. The depth and articulation formerly provided by the frame has been eliminated. The visual dimensions of the window are changed and character of the building diminished.
SALVAGED WOODWORK To find the best quality replacement woodwork a good place to start might be an architectural salvage store. Because of the quality of the wood historically used in New Orleans’ buildings, salvaged and repaired woodwork will often outlast new replacement woodwork.
Similar to when installing new replacement woodwork, take care with salvaged woodwork to match the size, shape, type, profiles and detailing of existing historic woodwork. Just because it is old does not mean it is appropriate. Caution should also be taken when installing salvaged woodwork to prevent introduction of termites into a building.
Siding should not extend past face of window trim. The window should also have a sill.
KEEP IN MIND… Changes in siding materials and characteristics
should correspond with natural breaks in buildings such as corner boards
Buildings that traditionally had wood siding should not have veneers of stucco, brick or stone
When replacing siding it might be necessary to install temporary bracing to prevent racking of the structure in high winds
Repair, maintenance, installation and painting of woodwork can be potentially dangerous work
Verify whether contractor is licensed in New Orleans
Request a written estimate detailing the work, verify extents of warranty for materials and labor and check references
Hold final payment, such as 25%‐30% of project cost, until all work has been completed properly
Siding and Shingle Replacement Review
Maintain or replace existing exterior siding or shingles in‐kind to match existing; Replace existing asbestos siding with vinyl or aluminum
HDLC Staff review.
Replace exterior wood siding or shingles with smooth finish fiber‐cement siding or shingles to match existing wood siding or shingles
Commission review.
HDLC Staff review.
Replace exterior wood siding or shingles with vinyl or aluminum siding; install veneer at traditionally wood sided building; Install wood‐grained fiber‐cement siding
Commission appeal.
HDLC Staff review.

06‐14 City of New Orleans HDLC – Guidelines for Exterior Woodwork
EXTERIOR PAINT Paint is one of the most common ways to protect exterior materials, particularly wood without natural or chemical preservatives, from the elements. When the painted surface has been compromised, moisture and the elements can infiltrate the underlying material and potentially accelerate deterioration.
Exterior paint provides a layer of protection to a building by adding a barrier that limits moisture infiltration and damage from the sun, pests and other forms of deterioration. Exterior woodwork without natural or chemical preservatives is susceptible to moisture‐related wood deterioration of the exterior envelope and underlying framing. Although paint is an important protective layer that improves the longevity of a historic resource, it must be viewed as a temporary barrier that is subject to deterioration through cyclical temperature and humidity changes and requires re‐application to maintain its protective properties.
In addition to providing a protective layer, paint colors can highlight a building’s architectural features and style, visually tie the parts of a building together, as well as reflect personal taste. A building’s style, period of construction, materials and setting can all help identify appropriate paint colors.
In general, exterior surfaces should be repainted every five to eight years, with potential touch‐ups of high traffic, worn or deteriorated areas. If a building requires frequent repainting, it might be an indication of another problem including moisture, inadequate surface preparation and non‐compatible paint. The HDLC cautions against the use of encapsulating paints that can trap moisture in woodwork and promote rot. These are often referred to as “liquid siding,” “liquid stucco” and “liquid ceramic coatings.” The HDLC does not allow the painting of previously unpainted masonry. Refer to Guidelines for Masonry and Stucco for more information on masonry paint removal and application.
PAINT COLORS The choice of paint colors are not subject to HDLC review. However, the HDLC does mandate minimum requirements for building maintenance including painting. (Refer to Demolition by Neglect, Page 01‐13 of the Guidelines Introduction for additional information.)
The HDLC requires that all new exterior siding, shingles, ornament and trim be painted at the time of installation.
REPAINTING When considering repainting, the following five steps are recommended:
1. Determine whether repainting is necessary: Prior to beginning a painting project, it is appropriate to determine whether complete repainting is required or if cleaning and/or spot repainting is more appropriate. By painting more often than is necessary, paint layers can build up, increasing the potential for future paint failure. A dingy finish might only require washing with a mild detergent solution and natural bristle brushes to freshen the appearance.
2. Inspect existing paint for causes of failure: To assure the new paint will last as long as possible, property owners should inspect the existing paint for causes of failure. Some common paint problems are:
Peeling – possible causes are painting under adverse conditions, inadequate surface preparation or moisture infiltration
Cracking or crazing – typically the sign of a hard surface that does not expand and contract with underlying material; sand and repaint if cracking and crazing is limited to the surface; remove paint if it extends down to the wood
These paint colors are non‐traditional but highlight the various architectural features of this residence.

City of New Orleans HDLC – Guidelines for Exterior Woodwork 06‐15
Wrinkling – typically the result of the top coat drying before the underlying coat; sand smooth, repaint
Blistering – air bubbles under the paint; cut into blister, and if wood is visible the problem is probably moisture related; if paint is visible, the problem area was probably painted in direct hot sun
Alligatoring – severe cracking and crazing; remove all paint down to bare wood
3. Repair causes of failure: Before repainting, the causes of paint failure should be repaired. The most common cause of paint failure is due to moisture. The most typical causes of moisture problems are ground water; rain or storm water; leaking plumbing; and condensation. (Refer to Page 06‐10 of this section and the Guidelines for Exterior Maintenance for additional information on how to identify moisture‐related problems and some suggestions that might alleviate the situation.)
Portions of the building that are most susceptible to moisture and its related problems include: areas near rooflines, gutters and downspouts; areas near the ground; horizontal surfaces such as window and door sills, porches and wood steps; and areas or walls adjacent to high humidity including kitchens, bathrooms and laundry rooms.
4. Prepare surface: To ensure a long‐lasting painted surface, appropriate surface preparation should be undertaken before repainting.
Begin by washing the painted surfaces with a mild detergent solution and natural bristle brushes
Carefully scrape and sand for a smooth finish, removing any paint that is not tightly bonded to the surface
Putty or caulk countersunk nails, window glazing, gaps, joints and openings
Allow substrate to thoroughly dry before applying primer or paint
Spot prime bare wood, areas of repair and wood replacement
5. Repaint: High quality paint appropriate for the substrate applied in accordance with manufacturer’s recommendations should improve the longevity of a paint job. In general, it is best to use compatible primer and paint from the same manufacturer, and apply two coats of paint to previously bare wood.
For best results, apply paint during appropriate weather conditions, generally 50˚F to 90˚F, less than 60% relative humidity, avoiding direct sunlight
The paint on this door has alligatored, and severe cracking is visible. Removal of paint down to bare wood and proper door repair are recommended prior to repainting.
COMPLETE PAINT REMOVAL It is important to remember that any method of paint
removal can result in harm to historic building fabric.
Therefore, complete paint removal from a surface should
only occur under limited circumstances.
Complete paint removal might be necessary in
circumstances in which the existing paint on a surface has
completely failed. Examples where complete paint
removal would be appropriate include:
Wholesale blistering or peeling that reveals the
underlying substrate
Continuous patterns of deep cracks in the surface of
painted wood
When windows, doors or shutters have been painted
shut
To achieve a smooth transition when a new wood
element is being installed as a repair
To prevent deterioration of historic building features
To prevent deterioration of masonry for historically
unpainted masonry surfaces

This material is based upon work assisted by a grant from the Department of the Interior, National Park Service. Any opinions, findings, and conclusions or recommendations expressed in this material are those of the authors and do not necessarily reflect the views of the Department of the Interior. © Prepared by Dominique M. Hawkins, AIA, LEED AP of Preservation Design Partnership, LLC in Philadelphia, PA.
06‐16 City of New Orleans HDLC – Guidelines for Exterior Woodwork May 2011
STRIPPING PAINT If the existing paint has failed, it might be necessary to strip all or portions of the paint from the surface. Although there are a variety of tools and chemicals available to strip paint, many of them are potentially hazardous and can cause significant damage to exterior surfaces. All manufacturers’ recommendations should be followed during the paint removal process.
PAINT REMOVAL GUIDE
THE HDLC RECOMMENDS: Hand washing with mild detergent and bristle brush Hand scraping Hand sanding
THE HDLC SUGGESTS CARE USING: Rotary tools – disks can leave circular marks and
wires can tear into surface Heat guns and heat plate – can ignite paint or
underlying surface if left in one location too long Chemical paint removers – can raise grains, be
expensive and potentially volatile; runoff can be hazardous and should be collected to reduce harm to children, pets, vegetation and ground water
THE HDLC STRONGLY DISCOURAGES: Flame tools such as blowtorches to soften paint –
smoldering sparks can start a potentially devastating fire; lead components in paint can vaporize and create highly toxic fumes
Sandblasting – can be abrasive to surface, wear away protective exterior coating and raise the wood grain
High pressure water wash – forces water into open joints affecting interior finishes and structural framing; can be abrasive to exterior surface and raise the grain
PAINTING REFERENCES Paint colors can highlight a building’s architectural features and reflect personal taste. Generally, Colonial Revival homes would historically have a two‐color paint scheme; Victorian homes might have a three‐ or four‐color, earth‐tone, paint scheme. Please refer to the appropriate Guidelines and the Guidelines for Exterior Maintenance for information on painting additional materials. The following book is a good source for appropriate historic building paint colors:
Moss, Roger W. ed. Paint in America: The Colors of Historic Buildings. New York: John Wylie & Sons, 1995.
Paint color can highlight architectural features and materials. The choice of paint colors and application locations should complement a building’s architectural style, as in this Italianate example.
PAINT REMOVAL SAFETY Paint removal is potentially hazardous work. Keep children and pets clear of work areas. Property owners should consult a professional for work that is unfamiliar or potentially unsafe.
Paint removal, particularly lead based paint removal, must comply with City requirements – Owners should contact the Department of Safety and Permits prior to paint removal at www.nola.gov
Always wear safety goggles and a dust mask
With heat tools, always wear appropriate clothing and keep a fire extinguisher nearby
Paint dust from older buildings can contain lead – wear a dust mask, avoid open food or beverage containers in area of paint removal, and thoroughly clean exposed skin and launder work clothes