Stair Coverings Entry Flooring Floor Coverings Raised Design Tile

GLOBAL PROPERTY INSPECTIONS
TECHNICAL BULLETIN
June 1, 2002
TOPIC: Exterior Coverings
This is the sixth in a series of technical bulletins in which an over-all examination of the home
will be discussed as viewed through the inspection process. Some of the items in this series will
not be able to be seen through the visual process of inspection, but will be presented to give a
better understanding of how a home is constructed and items to address during the inspection
process.
So far in this series of bulletins we have discussed the basic components and construction
practices for building a home starting with basic foundations and following through with floor,
wall, and roof framing. In this bulletin we will briefly discuss basic types of exterior surface
coverings, their installation techniques and what an inspector looks for during the course of an
inspection.
Wood Siding
Up until the late 1960’s if a home had actual wood siding on it, the siding material was probably
either cedar wood or sometimes redwood. Because of supply and demand and the expense of
real wood siding the material has been replaced with a composite look alike materials. True
wood siding was available in a “horizontal lap,” varied from 6 to 8 inch widths, and was
available in up to 16-foot lengths. When properly installed and properly maintained (caulk and
painted), true wood siding can last a very long time.
TM

The previous drawing is an example of the various types of true cedar wood siding and of how
they are to be properly lapped, installed and nailed. Life expectancy of this type of siding when
properly maintained (caulked, sealed and painted) can be as much as fifty (50) to sixty (60)
years.
Inspecting Wood Siding
When inspecting wood siding the main thing to look for is proper nailing or fastening techniques.
Was the siding installed properly?
Although not visible, it is difficult to tell whether or not wood siding has been properly nailed.
Nail heads may not always be visible. What to look for are signs of excessive cracking of the
boards.
Composite Wood Siding
Composite siding was introduced to the construction industry in the mid to late 70’s. It is a type
of exterior cladding that is available in many different styles, designs, and patterns. It is made
from wood by-products such as sawdust, cardboard, paper, wafers, and glue. The different
materials are mixed together, coated in resin and formed in a mold under heat and pressure to
form individual clapboards varying from 6 to 8 inch widths and up to 16 foot long or 4X8 sheets.
Some of the 4X8 sheets have been formed to look like stucco.
Louisiana Pacific (LP), Masonite, Georgia Pacific (GP), and Weyerhaeuser Corporation are
among the top four producers for composite siding. All of the manufacturers at one time have
been or are currently under class action lawsuits in regards to the defectiveness of the materials
and the way the products have been produced.
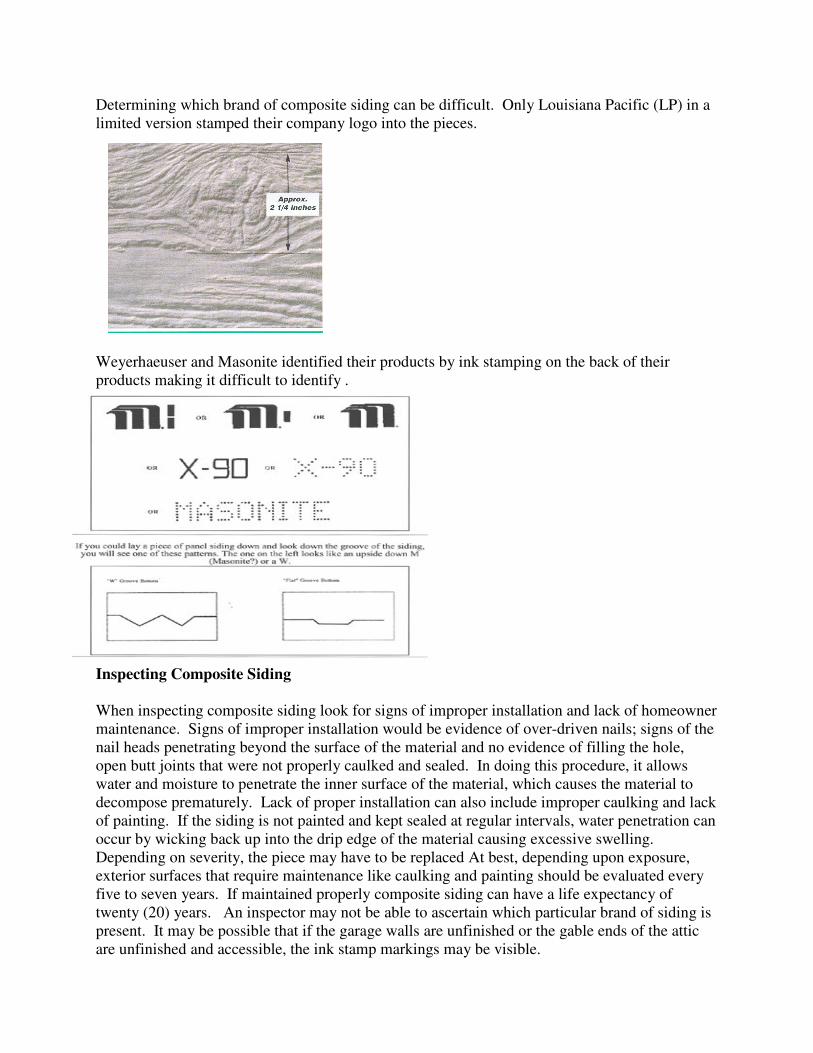
Determining which brand of composite siding can be difficult. Only Louisiana Pacific (LP) in a
limited version stamped their company logo into the pieces.
Weyerhaeuser and Masonite identified their products by ink stamping on the back of their
products making it difficult to identify .
Inspecting Composite Siding
When inspecting composite siding look for signs of improper installation and lack of homeowner
maintenance. Signs of improper installation would be evidence of over-driven nails; signs of the
nail heads penetrating beyond the surface of the material and no evidence of filling the hole,
open butt joints that were not properly caulked and sealed. In doing this procedure, it allows
water and moisture to penetrate the inner surface of the material, which causes the material to
decompose prematurely. Lack of proper installation can also include improper caulking and lack
of painting. If the siding is not painted and kept sealed at regular intervals, water penetration can
occur by wicking back up into the drip edge of the material causing excessive swelling.
Depending on severity, the piece may have to be replaced At best, depending upon exposure,
exterior surfaces that require maintenance like caulking and painting should be evaluated every
five to seven years. If maintained properly composite siding can have a life expectancy of
twenty (20) years. An inspector may not be able to ascertain which particular brand of siding is
present. It may be possible that if the garage walls are unfinished or the gable ends of the attic
are unfinished and accessible, the ink stamp markings may be visible.
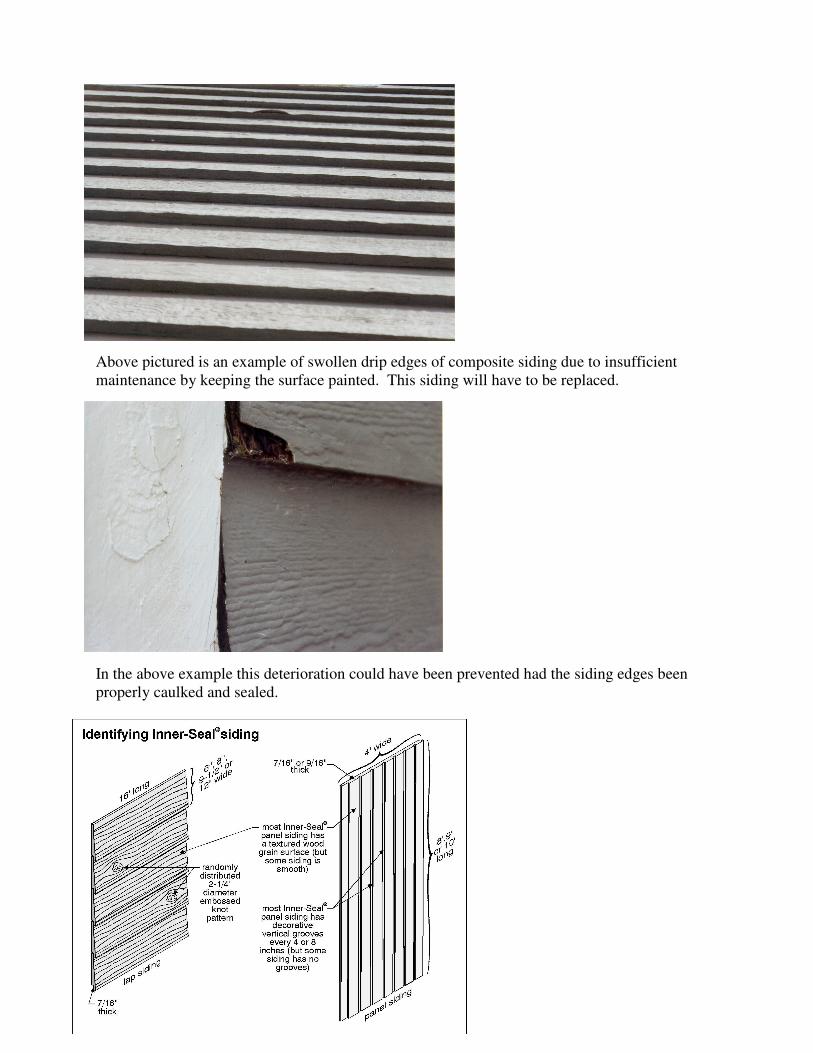
Above pictured is an example of swollen drip edges of composite siding due to insufficient
maintenance by keeping the surface painted. This siding will have to be replaced.
In the above example this deterioration could have been prevented had the siding edges been
properly caulked and sealed.

Hardcoat and Synthetic (EIFS) Stucco
Hardcoat stucco in one form or another has been around for over 100 years. Traditional stucco,
AKA Hardcoat is also known as FRP stucco, (fiber-reinforced plaster). System applications are
as follows: the substrate surface or underlayment can be either brick or cement block, plywood
or oriented strand board, (OSB). A layer of asphalt impregnated moisture barrier, AKA tarpaper
or builders’ felt is applied. Metal lathe or wire mesh is applied which actually holds the mortar
to the structure and then the mortar is applied in a one to three coat process. Typically there are
less problems associated with this type of stucco system as apposed to EIFS stucco. Cracking
can occur due to age and sometimes excessive settlement of the home. It is difficult to conduct
moisture tests on hardcoat stucco due to the presence of the wire mesh system. Moisture meters
are used to conduct these tests, which if the moisture probes come in contact with the wire mesh
can result in a positive moisture reading.
The above diagram is an example of a hardcoat stucco system installation. Hardcoat stucco
systems are breathable, drainable and durable exterior finish systems. A moisture barrier is
typically installed inside or underneath the system. These types of systems can be identified by a
solid sound when tapping on the wall. Often times it can be identified on the ends of the system
by exposed metal lathe. It is a very hard system based upon the thickness of the mortar finish.
Synthetic stucco AKA EIFS, which stands for Exterior Insulated Finish Surfaces has been
installed in residential applications since the early 1980’s here in the United States. Synthetic
stucco has been around since after World War II, introduced primarily in Europe to help speed
up the process of recovery and rebuilding after the war.

Synthetic stucco looks great, is easy to shape to create decorative coins and corner keystones on
a home. It is a very good insulating system primarily due to the 1 ½ to 2-inch thick styrofoam
insulation that is incorporated into the system. It is one of the most expensive exterior cladding
systems on the market provided it has been installed correctly. That is the apparent problem; no
one seems to know how to install it correctly. Some of the bigger manufactures of these types of
systems are: Dryvit, Sto, Bonsol and United States Gypsum to name a few. The typical
installation for EIFS is as follows: the systems can be applied over brick or concrete block or
plywood or OSB, just like a hardcoat system. The styrofoam is then applied by either gluing or
mechanical fasteners per manufactures details of the systems. A fiberglass mesh is applied with
a skim coat of mortar and then secondary mortar coat applied over the styrofoam to complete the
finish. All manufacturers of the system recommend proper back wrapping and appropriate usage
of backer rods and caulk at all penetrations. These penetrations to include all outside electrical
outlets and light fixtures, windows and door trim terminations, A/C refrigerant lines or
termination where two dissimilar materials meet.

Above is an example of the appropriate usage of backer rods and efficient use of caulk. This
method of installation should be visible at all window and door terminations and terminations
where two dissimilar materials meet.
Another installation detail often times overlooked is the appropriate usage of flashing material,
especially “kick-out” flashing.
Kick out flashings should be installed to prevent water intrusion by re-direction. Another
important detail is step flashing (shown in the previous drawing along with kick out). These
types of details should be incorporated in all types of exterior finish systems regardless of what
type of system is present. The biggest problem with EIFS systems is that if moisture and water
are allowed to penetrate the surface, it can remain trapped inside the surface causing extensive
damage to wood substrates and framing members.
Inspecting EIFS:
WHEN EVER EIFS SYSTEMS ARE PRESENT ON THE HOME, IT IS STRONGLY
RECOMMENDED TO HAVE THE EXTERIOR OF THE HOME FURTHER
EVALUATED BY A QUALIFIED EIFS INSPECTOR OR CONTRACTOR!!!!!!!!!
When inspecting a home as a General Home Inspector, the areas in the previous drawing are
potential areas for problems associated with EIFS homes.
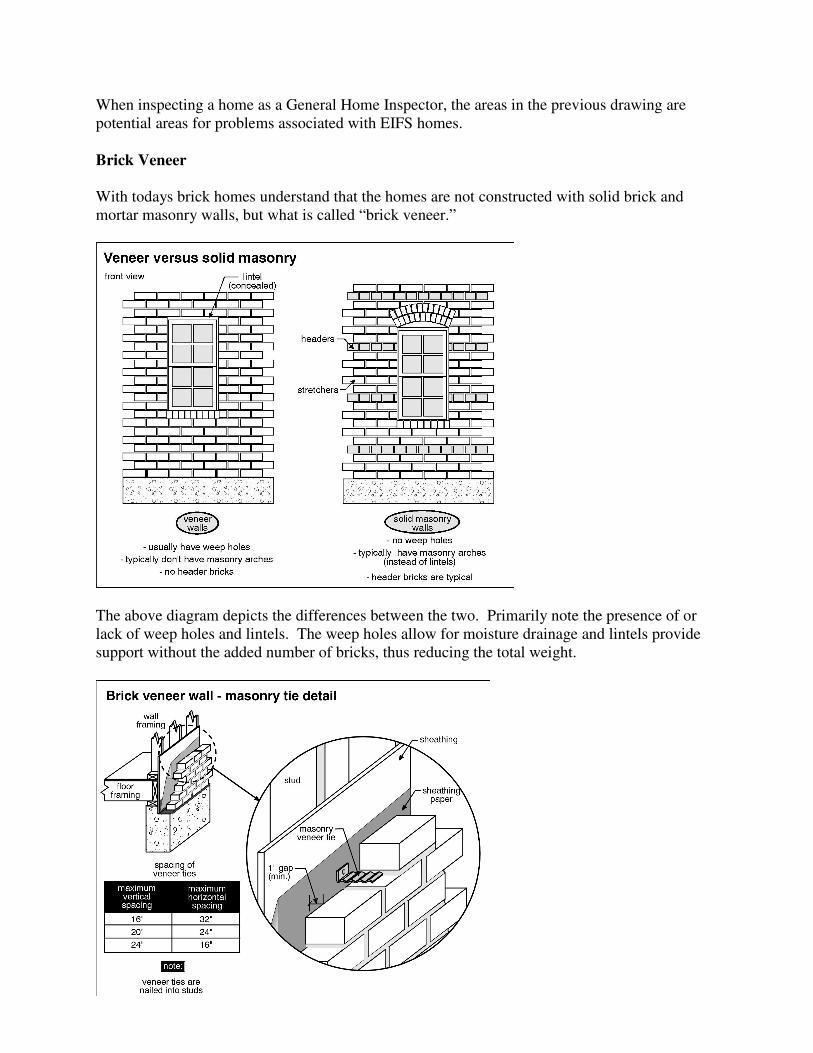
Brick Veneer
With todays brick homes understand that the homes are not constructed with solid brick and
mortar masonry walls, but what is called “brick veneer.”
The above diagram depicts the differences between the two. Primarily note the presence of or
lack of weep holes and lintels. The weep holes allow for moisture drainage and lintels provide
support without the added number of bricks, thus reducing the total weight.
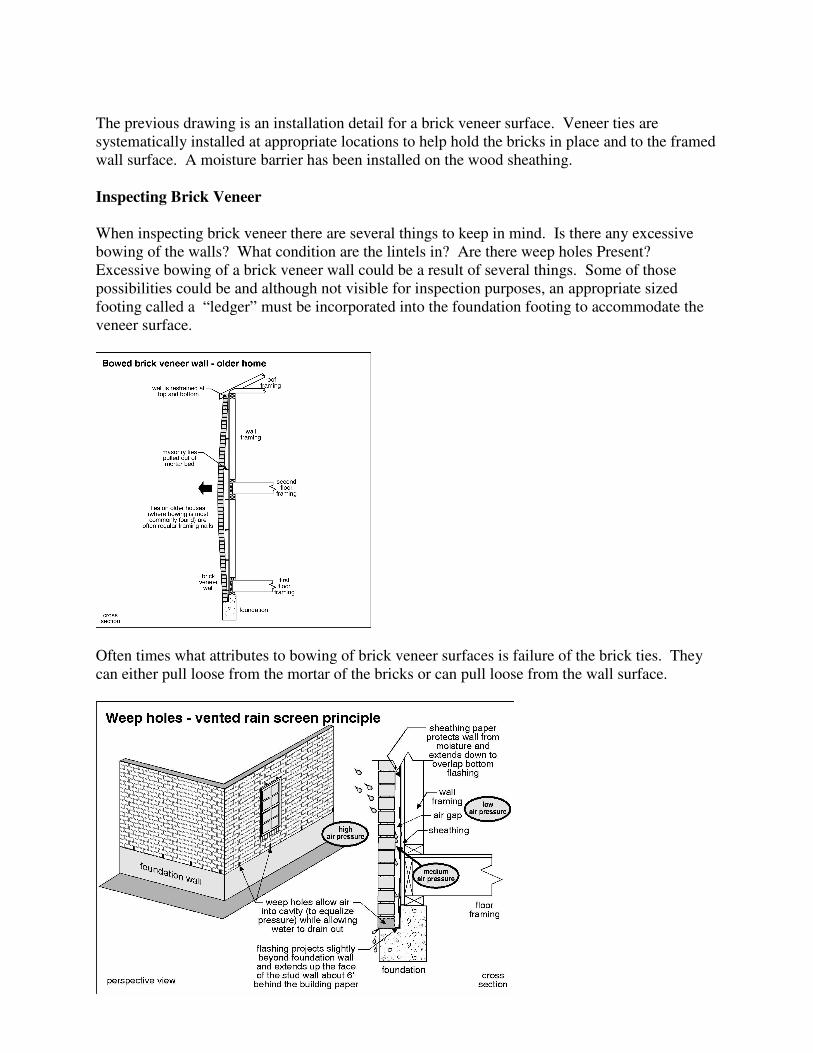
The previous drawing is an installation detail for a brick veneer surface. Veneer ties are
systematically installed at appropriate locations to help hold the bricks in place and to the framed
wall surface. A moisture barrier has been installed on the wood sheathing.
Inspecting Brick Veneer
When inspecting brick veneer there are several things to keep in mind. Is there any excessive
bowing of the walls? What condition are the lintels in? Are there weep holes Present?
Excessive bowing of a brick veneer wall could be a result of several things. Some of those
possibilities could be and although not visible for inspection purposes, an appropriate sized
footing called a “ledger” must be incorporated into the foundation footing to accommodate the
veneer surface.
Often times what attributes to bowing of brick veneer surfaces is failure of the brick ties. They
can either pull loose from the mortar of the bricks or can pull loose from the wall surface.
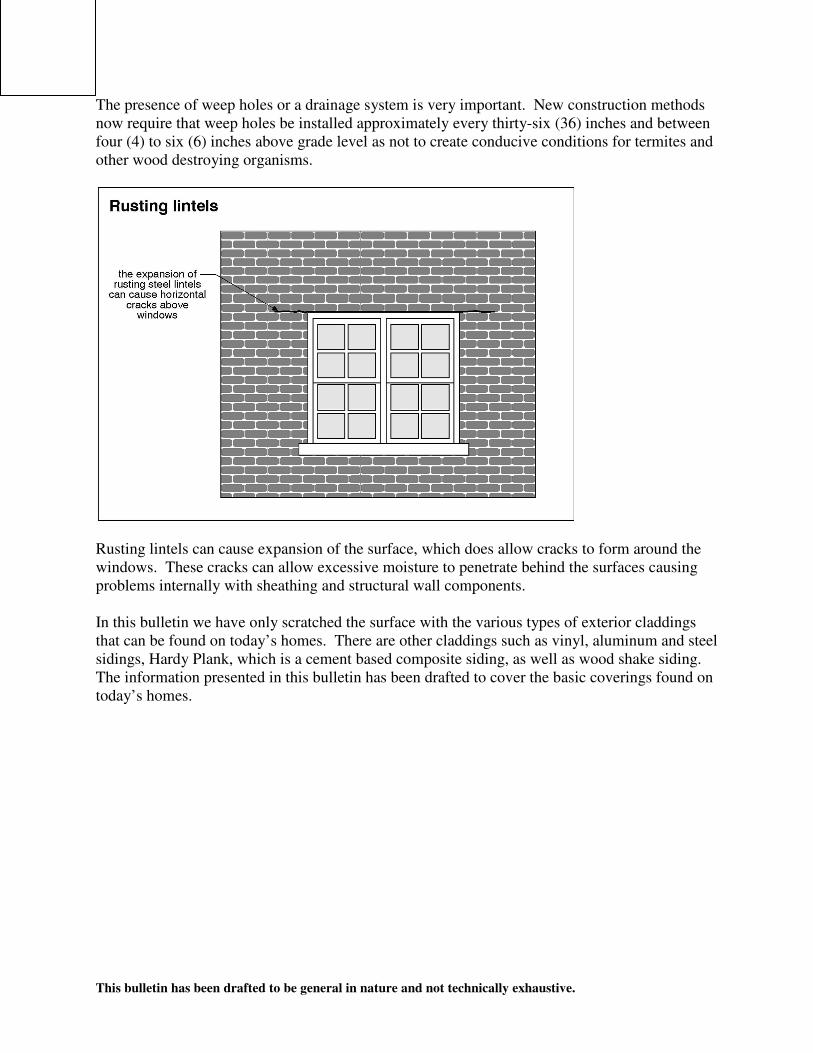
The presence of weep holes or a drainage system is very important. New construction methods
now require that weep holes be installed approximately every thirty-six (36) inches and between
four (4) to six (6) inches above grade level as not to create conducive conditions for termites and
other wood destroying organisms.
Rusting lintels can cause expansion of the surface, which does allow cracks to form around the
windows. These cracks can allow excessive moisture to penetrate behind the surfaces causing
problems internally with sheathing and structural wall components.
In this bulletin we have only scratched the surface with the various types of exterior claddings
that can be found on today’s homes. There are other claddings such as vinyl, aluminum and steel
sidings, Hardy Plank, which is a cement based composite siding, as well as wood shake siding.
The information presented in this bulletin has been drafted to cover the basic coverings found on
today’s homes.
This bulletin has been drafted to be general in nature and not technically exhaustive.