Express Frame 20 x 30 - TopTec Event...
4
Form # 20061222 © 2000 TopTec Installation Instructions Express Frame 20 x 30 TopTec Products, LLC 7601 Highway 221 Moore, SC 29369 Phone: (800) 845-2830 Fax: (800) 921-7750 e-mail: [email protected] www.TopTecProducts.com
Transcript of Express Frame 20 x 30 - TopTec Event...

Form # 20061222
© 2000 TopTec
Installation Instructions
Express Frame20 x 30
TopTec Products, LLC7601 Highway 221 Moore, SC 29369Phone: (800) 845-2830Fax: (800) 921-7750e-mail: [email protected]
Form # 20061222
Installation Instructions
Express 2030
• Inspect the tent site thoroughly for obstacles, underground and overhead wires, pipes, etc. If necessary, consult with your local utility company prior to installation.
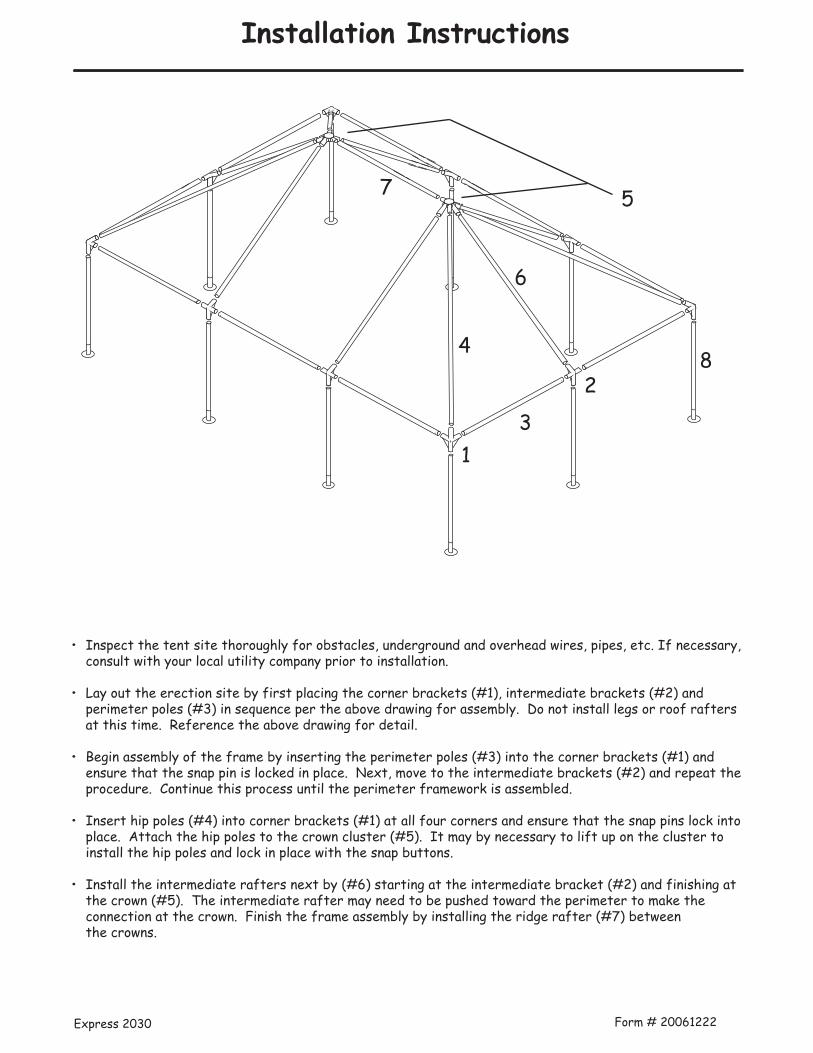
• Lay out the erection site by first placing the corner brackets (#1), intermediate brackets (#2) and perimeter poles (#3) in sequence per the above drawing for assembly. Do not install legs or roof rafters at this time. Reference the above drawing for detail.
• Begin assembly of the frame by inserting the perimeter poles (#3) into the corner brackets (#1) and ensure that the snap pin is locked in place. Next, move to the intermediate brackets (#2) and repeat the procedure. Continue this process until the perimeter framework is assembled.
• Insert hip poles (#4) into corner brackets (#1) at all four corners and ensure that the snap pins lock into place. Attach the hip poles to the crown cluster (#5). It may by necessary to lift up on the cluster to install the hip poles and lock in place with the snap buttons.
• Install the intermediate rafters next by (#6) starting at the intermediate bracket (#2) and finishing at the crown (#5). The intermediate rafter may need to be pushed toward the perimeter to make the connection at the crown. Finish the frame assembly by installing the ridge rafter (#7) betweenthe crowns.
1
2
3
4
5
6
7
8

Form # 20061222
Installation Instructions
Express 2030
Tent Sq. Anchor Safety Anchor Holding PowerSize Ft. Power Factor Locations Required at Each
Required Anchor Location
20x30 600 5,760 1.5 10 576 lbs.*
*Holding power is based on firm soil conditions. If other conditions prevail, the holding power will decrease and alternate anchoring methods are required.
Top Installation
• Use a ground cover to protect the vinyly top during its installation.
• Lay the top over the frame and pull over the peak. Fasten over the eye bolts in the corner brackets.
• Lift one side of the frame and install the legs (#7) along that side. Install the corner legs before the intermediate legs.
• Lift the opposite side of the tent and insert the legs into the brackets as in the previous step. Finish by installing the legs in the final two intermediate brackets. Make sure all snap pins are locked in place.
• Attach tent top to the frame with the cam buckles and straps that are provided with the tent. Clip the flat snap at the top of the strap to the ring at the corner of each valance. Then insert the hook on the bottom of the strap into the hole at the bottom of each leg. Tighten cam buckles alternately until the top is fully tensioned.
• Stake the tent appropriately for existing conditions.
• Reverse the steps to disassemble the tent.
Anchoring Requirements (Non-Certified Tents)
Non-certified tents are not engineered to meet specific wind loads. Wind loads are approximate and are generally rule of thumb calculations used in the industry based on actual field experience. Windload of a non-certified tent will very to a maximum of approximately 30 to 50 mph dependent upon the style of type of tent. The structural integrity of the tent may exceed the soil's holding capacity even at wind loads of 30 to 50 mph.
Frame tents require approximately 1000 to 2000 lbs of holding power per anchor location (dependent on the size and style of the tent). For safety of all occupants, evacuation is recommended if weather becomes severe.
Severe storms have micro bursts of wind that may be recorded far in excess of the storm's highest winds. The installer is responsible for properly securing the temporary structure (tent). Soil conditions will vary and the wind loads that the temporary structure can handle could be significantly below its wind load capabilities.
Note: The tent must be anchored properly for safe installation. Additonal guys and stakes may be required depending on soil and/or wind conditions. Refer to the IFAI Procedural Handbook for Safe Installation and Maintenance of Tentage for calculating the proper anchoring capacity for soil and or ground conditions. Always follow manufacturer's recommended anchoring techniques.

Form # 20061222
Installation Instructions
Express 2030
END VIEW
12.5'
7'
10'
20'
TOP VIEW
5'36" Stake driven within 6" from the top of the ground straight down or a maximum 10 degree angle
Guy Data:3/8 Poly Rope - 2700 # rating or1" Polyester Web - 3600 # rating
1. Surface: Compacted soil2. Standard pull-out rate 800 lb/sq ft.3. Normal staking configuration/conditions
SIDE VIEW