Exporting and Importing Surfaces using the LandXML … Formats for Digital Data Exchange The ODOT...
5
1 Exporting and Importing Surfaces using the LandXML Translator InRoads V8i provides us the ability to both export and import intelligent surface information using LandXML. The LandXML translator has been available in previous versions of InRoads, also. So, why should we use LandXML now and how? File Formats for Digital Data Exchange The ODOT “Construction Surveying Manual for Contractors” sets the preferred format for exchanging data between ODOT and contractors as LandXML for alignments, coordinates, and digital terrain models or surfaces. The LandXML format is probably the easiest way to transfer data – and retain intelligence – between many civil design and survey programs. Some automated machine guidance systems take input directly in the LandXML format. LandXML separates the data into blocks where specific information is delivered in a particular order that is widely known. LandXML files may be opened in any text editor, Notepad++ is recommended. What is Inside a LandXML File? The LandXML file has two major separations of the data. Intelligent data is stored in the first “SourceData” block and contains linear features or <Breaklines>, and random features called <DataPoints> – this is where the feature names, styles, and locations (YXZ of vertices) are stored. The second large block of information contains the YXZ location of the vertices <Pnts> and the membership of the <Faces> of the triangulated irregular network (TIN) – the names of the points that are connected to form a triangle. The images below illustrate the LandXML format of surface information. LandXML formatting for coordinate point information is Northing, Easting, Elevation or YXZ. Data is rolled up to show the four sections in the surface LandXML file
Transcript of Exporting and Importing Surfaces using the LandXML … Formats for Digital Data Exchange The ODOT...

1
Exporting and Importing Surfaces using the LandXML Translator InRoads V8i provides us the ability to both export and import intelligent surface information using LandXML. The LandXML translator has been available in previous versions of InRoads, also. So, why should we use LandXML now and how?
File Formats for Digital Data Exchange The ODOT “Construction Surveying Manual for Contractors” sets the preferred format for exchanging data between ODOT and contractors as LandXML for alignments, coordinates, and digital terrain models or surfaces. The LandXML format is probably the easiest way to transfer data – and retain intelligence – between many civil design and survey programs. Some automated machine guidance systems take input directly in the LandXML format. LandXML separates the data into blocks where specific information is delivered in a particular order that is widely known. LandXML files may be opened in any text editor, Notepad++ is recommended.
What is Inside a LandXML File? The LandXML file has two major separations of the data. Intelligent data is stored in the first “SourceData” block and contains linear features or <Breaklines>, and random features called <DataPoints> – this is where the feature names, styles, and locations (YXZ of vertices) are stored. The second large block of information contains the YXZ location of the vertices <Pnts> and the membership of the <Faces> of the triangulated irregular network (TIN) – the names of the points that are connected to form a triangle. The images below illustrate the LandXML format of surface information. LandXML formatting for coordinate point information is Northing, Easting, Elevation or YXZ.
Data is rolled up to show the four sections in the surface LandXML file

2
The intelligent information (Features) in <Breaklines> includes name, YXZ vertices, and style
(Triangles) YXZ vertices in <Pnts> on the left and the <Faces> info on the right
It is important to recognize the different types of information that can be delivered in LandXML format so that you can relate that to options when exporting or importing surfaces. How InRoads handles the different types of LandXML data when importing may cause you to reconsider how you edit your surface information when it comes to deleting triangles or changing a triangle edge as you prepare to export.
3
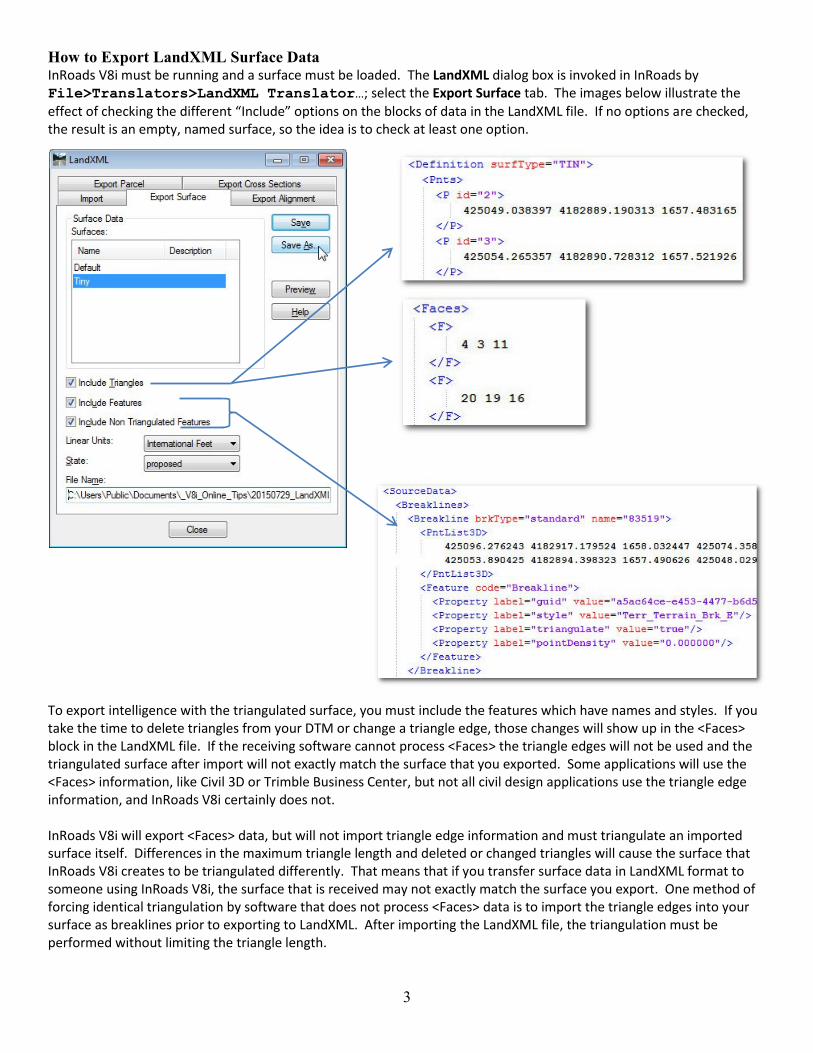
How to Export LandXML Surface Data InRoads V8i must be running and a surface must be loaded. The LandXML dialog box is invoked in InRoads by File>Translators>LandXML Translator…; select the Export Surface tab. The images below illustrate the
effect of checking the different “Include” options on the blocks of data in the LandXML file. If no options are checked, the result is an empty, named surface, so the idea is to check at least one option.
To export intelligence with the triangulated surface, you must include the features which have names and styles. If you take the time to delete triangles from your DTM or change a triangle edge, those changes will show up in the <Faces> block in the LandXML file. If the receiving software cannot process <Faces> the triangle edges will not be used and the triangulated surface after import will not exactly match the surface that you exported. Some applications will use the <Faces> information, like Civil 3D or Trimble Business Center, but not all civil design applications use the triangle edge information, and InRoads V8i certainly does not. InRoads V8i will export <Faces> data, but will not import triangle edge information and must triangulate an imported surface itself. Differences in the maximum triangle length and deleted or changed triangles will cause the surface that InRoads V8i creates to be triangulated differently. That means that if you transfer surface data in LandXML format to someone using InRoads V8i, the surface that is received may not exactly match the surface you export. One method of forcing identical triangulation by software that does not process <Faces> data is to import the triangle edges into your surface as breaklines prior to exporting to LandXML. After importing the LandXML file, the triangulation must be performed without limiting the triangle length.

4
How to Import Triangle Edges into your Surface as Breaklines You can force identical triangulation by software that doesn’t use <Faces> data by importing triangle edges as breaklines into your surface before you export it to LandXML. To minimize the file size, the triangle shapes should be dropped to lines and duplicate elements should be deleted. In an empty MicroStation model, display the surface triangles using InRoads Surface>View Surface>Triangles…. Select all of the elements in the model and
choose Drop Element from the Groups toolbox in MicroStation; check the tool setting “Line Strings/Shapes” as shown at right; left-click in the view window to perform the command. Clear the selection set. Remove the duplicate triangle edges with the MicroStation Design File Cleanup tool by selecting Utilities>Data Cleanup. On the General tab, I prefer to set the
“Cleanup Actions for Duplicates” to “Select” – this gives me a chance to check the cleanup before deleting. On the Duplicates tab – the “Action” is already set to “Select”. “Element Types” may be limited to just “Line” with no “Match” options checked. All of the triangle edges have identical symbology. After the [Apply] button is clicked, the number of duplicates found will be displayed on the General tab. The duplicates are selected in the view and highlighted, and their number may be compared to the size of the selection set in the lower right corner of the MicroStation status bar. In the image below you can see that 126 duplicates were found and exactly half that number is selected, ready for deletion. A tap on the <Delete> key on your keyboard will delete the duplicates. Now you are ready to import the triangle edges into your surface as breaklines using InRoads.
Number of elements selected is exactly half of the duplicates found
In MicroStation, make a selection set of the remaining graphics. On the InRoads Explorer, choose File>Import>Surface… and set the From Graphics tab up
as shown at right. These breaklines are imported into the same surface that will be exported to LandXML. Accept the selection set after clicking the [Apply] button. You can verify that the breaklines were added by using the command Surface>Feature>Feature Properties…. These additional features can be exported to LandXML with the rest of the surface features and points, as shown in the previous section, by checking the box “Include Features” on the LandXML dialog.

5
How to Import LandXML Surface Data InRoads V8i must be running. Importing creates a new surface! The LandXML dialog box is invoked in InRoads by File>Translators>LandXML Translator…; select the Import Surface tab.
It is a good idea to open the LandXML file in a text editor prior to importing to determine if you have been given dumb or intelligent data. The type of data in the LandXML file may affect how you import the data. If the LandXML file contains only a <Pnts> block, then there are no intelligent features and you must check the box “Include Triangle Points” to import anything at all. InRoads V8i will import one random feature with as many vertices as there are TIN points, which you will then triangulate – remember, the <Faces> are ignored.
If only <Pnts> in LandXML, “Include Triangle Points”
If the LandXML file contains <Breaklines>, then the breaklines will be imported as features with their intelligence and you may leave “Include Triangle Points” unchecked. Again, you will have to manually triangulate the surface to get triangles, but you can view the intelligent data.
If <Breaklines> in LandXML, no need to include triangle points