explosions and other particle effects in interactive...
29
Master´s Thesis by Jakob Schyberg: explosions and other particle effects in interactive environments - using Shader-technology Lund Institute of Technology, Sweden Institution of Computer Science in cooperation with SouthEnd Interactive AB, Malmö, Sweden Abstract A study on how to create visually appealing particle effects for interactive 3D-applications such as computer games, using a shader-application approach. Simplicity and efficiency are the primary goals. This report is intended to be written in a platform-independent manner, however, examples are tested on a Direct X-based platform. If you are curious on how shader technology can be used to create particle effects, you are the target reader of this paper. It should also be interesting for programmers seeking inspiration within the subject as well as understandable and informative for those who are completely new to particle effects. It is recommended that the reader is familiar with the shader concept and has experience within 3D computer graphics development. Jakob Schyberg, Registered: D-00, Lund Institution of Technology, Sweden [email protected] 1
Transcript of explosions and other particle effects in interactive...

Master´s Thesis by Jakob Schyberg:
explosions and other particle effects in interactive environments
- using Shader-technology
Lund Institute of Technology, SwedenInstitution of Computer Science
in cooperation with SouthEnd Interactive AB, Malmö, Sweden
AbstractA study on how to create visually appealing particle effects for interactive 3D-applications such as computer games, using a shader-application approach. Simplicity and efficiency are the primary goals. This report is intended to be written in a platform-independent manner, however, examples are tested on a Direct X-based platform.If you are curious on how shader technology can be used to create particle effects, you are the target reader of this paper. It should also be interesting for programmers seeking inspiration within the subject as well as understandable and informative for those who are completely new to particle effects.It is recommended that the reader is familiar with the shader concept and has experience within 3D computer graphics development.
Jakob Schyberg,Registered: D-00,Lund Institution of Technology, [email protected]
1

Table of Contents 1 Introduction...................................................................................................................................... 3
1.1 Goals......................................................................................................................................... 3 1.2 Comments................................................................................................................................. 4
2 Basics and background..................................................................................................................... 4 2.1 Particle Systems........................................................................................................................ 4 2.2 Shaders......................................................................................................................................5
3 Research: Analyze of Particle Systems............................................................................................ 6 3.1 Particle Representation............................................................................................................. 6 3.2 Particle motion..........................................................................................................................7 3.3 Particle size............................................................................................................................... 8 3.4 Particle color............................................................................................................................. 9 3.5 Using Shaders........................................................................................................................... 9
3.5.1 Render-to-texture............................................................................................................ 10 3.6 From 2D to 3D........................................................................................................................10
3.6.1 Rendering the images...................................................................................................... 10 3.7 3D-objects as particles?.......................................................................................................... 14
4 Creating an application with Particle Effects using shaders...........................................................14 4.1 Separating tasks...................................................................................................................... 14 4.2 Main program......................................................................................................................... 15
4.2.1 Vertex declaration........................................................................................................... 15 4.2.2 Particle data values and global data................................................................................ 17 4.2.3 Particle management....................................................................................................... 18
4.3 Vertex and Pixel shader.......................................................................................................... 18 4.4 Particle editor / viewer............................................................................................................ 20 4.5 Effect representation in a game engine................................................................................... 21
5 Creating specific effects................................................................................................................. 22 5.1 Smoke..................................................................................................................................... 22 5.2 Fire.......................................................................................................................................... 23 5.3 Explosions...............................................................................................................................24
5.3.1 Basic explosion............................................................................................................... 24 6 Discussion and Evaluation............................................................................................................. 26
6.1 Accomplishments....................................................................................................................26 6.2 Evaluation............................................................................................................................... 27
7 Acknowledgments.......................................................................................................................... 28 8 References...................................................................................................................................... 29
2

1 IntroductionEver since the release of Asteroids from Atari, particle effects have been an essential part of computer games. Within computer graphics, particle effects are groups of moving objects trying to imitate natural phenomena like smoke, fire, drops of water, explosions, swarms of insects etc. and also supernatural phenomena like energy weapons. Stunning and action-filled particle effects may play a conclusive role when people choose between different games.
No matter what kind of game you are developing, particle effects will make your 3-dimensional environment look better and full of life. Special effects attract the eye and give the graphics a nice appeal, especially at a first glance. That is why good looking particle effects in a demonstration video or trailer of a new game will be of great help when publishing it – we see examples of this every day in TV-commercials.
This thesis is about creating particle effects suitable for interactive applications such as computer games. The focus is completely on technology, meaning that it is written for programmers rather than designers. Although we have tried to create as nice effects as possible during our work, that was never the main goal. The main goal is, as specified below, to find out good ways of implementing and integrating particle effects for games using shader-technology, and hopefully make some nice discoveries on the way, like shortcuts and ways of optimizing. It is important to remember that computer games are not simulations, they are entertainment. This means that as long as our effects look good, we do not need our effects to be physically correct as much as we need to make them optimized.
So, what is shader-technology and why use it? Well, it's the latest thing – but there are also great advantages that is important to know about. In the “Basics and Background”-chapter, we will make an attempt to explain what shaders are and why they are good. There you will also find some background on particle effects. If you are well familiar with these subjects, you may skip this chapter or parts of it.
The third chapter is focused on how particle effects can be created in theory, independently of what technology is used to obtain them. It was a research necessary to do before beginning to create particle system software that uses shader-technology.
Chapter four describes step by step how a program with particle effects can be created using shaders, and the fifth chapter describes how to create different types of effects.
While we still have your attention, let us introduce the goals of this thesis.
1.1 GoalsThe main question to be answered during this thesis is:
How can we create visually appealing particle effects for interactive environments using Shader-technology suitable for a game running on Xbox 360?To answer this question, we will:
● Find and explain advantages and disadvantages of using shader-technology when creating particle effects.
● Find and describe several ways of how to create particle effects with shader-technology.
● Create a demo application where particle effects can be viewed and edited and use it for testing.
● Create and describe how to create different effects such as smoke, fire, lightning, rain and
3

explosions.
● Try to answer the following questions along the way:
• What parts of the effect should be calculated in the shader program, and what parts should be handled by the main application?
• When do we use single-pass and multi-pass shaders, respectively?• How can we make external forces like wind to have an effect on the particles?
1.2 CommentsThis thesis is based on information from the resources found in the section References (last chapter), as well as own experimenting and experiences. We have done our best to refer to these sources through out the text.
In some cases there is added a footnote enclosed to a word or phrase. These footnotes are there for readers who are not familiar with that certain terminology, containing a short description or a link to a web page. These links should not be seen as sources, rather a verified link to where the reader can find more information about this therm. So, if you find a link to Wikipedia, this is not a source we have been using, however, it contains an appropriate description.
2 Basics and backgroundThe entire work on this thesis is made at a company called SouthEnd Interactive located in Malmö, Sweden. They were interested in particle effects for one of their Direct X-based games, and they introduced the subject. Since they are very concerned with efficiency together with using the latest graphics technology, they wanted to find a way to use Shader-technology for creating particle effects, which finally became the main goal of this Master´s Thesis within Computer Science.
Next comes a short background on particle systems, followed by a section containing the basics on shader technology.
2.1 Particle SystemsIn 1983, William T. Reeves at Lucasfilm described particle systems as “A Technique for Modeling a Class of Fuzzy Objects” in his article with the same name [6]. The “fuzzy” objects he is referring to is natural phenomena like clouds, smoke, water and fire, objects that lack well-defined faces. In this paper, Reeves describes how to model these kinds of objects with help from clouds of primitive particles, where each cloud´s position and shape change over time.
The models described were designed for creating particle effects in movies, for example it is described how particle systems were used in the movie Star Trek II, released in 1982. The methods still have very much in common with today´s particle effects that are rendered in real-time applications, and anyone who needs inspiration for creating particle effects can read this classic article.
When it comes to particle systems in computer games, the phenomena became pretty well established in 1979 when the arcade game Asteroid were released by Atari. A shattered asteroid where simulated by a collection of moving dots on the screen, a very basic type of particle effect.
Quite a lot has happened since then; thanks to special designed processors dedicated for graphics calculations in as good as every computer or video game console, some of the real-time particle effects appearing in computer games could fit just as well in a Hollywood movie.
The technology is constantly evolving, and the concept of calculating entire particle effects using the graphics processor is rather new, only the latest generation of graphics accelerators are designed
4

for this kind of operations. To make this possible, we use something called shader technology. This technology was not designed especially with particle effects in mind, instead, the existing shader technology inspired innovative developers to use it for particle effects, and the technology has now adapted for their needs. The basics of shader technology is described in the next section.
2.2 ShadersIn order to create 3D-images on a 2-dimensional computer screen, vertex geometry data are sent through a rendering pipeline. This task is usually performed by a GPU1 to lower the amount of work for the CPU2 in a real-time graphics application. The old standard to adjust how this pipeline handles geometry data has been to adjust different device states to control how vertices and pixels are processed. This kind of pipeline is called a fixed-function pipeline.Today, the standard has evolved to a new kind of rendering pipeline that is programmable, simply, the programmable pipeline. The tasks to be performed for each vertex and each pixel are controlled through small programs that is downloaded to the graphics memory, such programs are called shaders. Shaders are divided into two parts, vertex shader and pixel shader. The vertex shader prepares the vertices for rasterization, i.e, it manipulates the vertex data before it is interpolated and converted into pixel data. Standard vertex shader tasks are world and view transformation and Ghourad shading if used. After that, it is up to the programmer´s imagination to decide what to do with the vertices before their data is interpolated into pixel data.
The pixel shader is used to calculate the final color of each pixel, for instance through Phong shading. Many other tasks are possible, but do not forget that it is generally more efficient to use the vertex shader if possible, since there should always be more pixels than vertices to process. The pixel shader may however give more accurate results in some cases due to data interpolation, take Phong shading vs. Ghourad shading as an example.
It is also worth to mention that with Direct3D 10, Microsoft introduces a new type of shader, the Geometry Shader [3]. It adds more possibilities since this type of shader will have access to all vertices of each primitive, making it possible to calculate geometric attributes such as a triangle´s plane.
By using the programmable pipeline, you will have many advantages. Usually, hardware manufacturers are not optimizing the fixed pipeline any longer. In some cases your fixed pipeline code will be emulated using the programmable pipeline. The reason for this is that overhead state-changes3 require communication and coordination between GPU and CPU, reducing the possibility of parallel processing of data. The programmable pipeline allow the GPU to work independently with less communication between it and the CPU.
You might also be able to move other tasks from the CPU to the GPU. This may for example be tasks like changing vertex positions, vertex and pixel color and so on over time. Something that might come in handy when creating particle effects. It is also possible to let a vertex or pixel shader render data to a texture, thus letting the GPU handle tasks not directly related to graphics.
In the beginning, vertex and pixel shaders had to be written in assembly code. Nowadays, several high-level languages are available for shader programming. Examples of those are HLSL – High Level Shader Language, used with Direct3d4 and GLSL – OpenGL Shader Language, used with
1 Graphics Processing Unit, see http://en.wikipedia.org/wiki/Graphics_processing_unit2 Central Processing Unit, see http://en.wikipedia.org/wiki/Central_processing_unit3 “Changing any type of state (vertex formats, textures, shaders, shader parameters, blending modes, etc.) incurs a high overhead.“, described in [3] page 1.4 3D-graphics API from Microsoft, see http://en.wikipedia.org/wiki/Direct3D and http://msdn.microsoft.com/directx/
5

OpenGL5. We have been using HLSL, we will however not go into any details on how to use this language. Information about that can be found in Microsoft DirectX9.0 SDK Documentation[2] and the MSDN web page6.
If you intend to use HLSL, we recommend you to use an editor that can find errors in your code, so that you do not have to be prevented by simple errors at run-time. We have been using the FX Composer by NVidia and it works just fine, however, at this day it does not support previewing particle effects
For more specific information, please refer to the following sources:
[1] Chapter 8 [3] Chapter 1
3 Research: Analyze of Particle SystemsNatural phenomena like smoke and fire are visible to the human eye because large concentrated amounts of particles are moving around in an area. Sometimes they are also emitting energy. This kind of behavior can not be imitated by static models; each particle has to be simulated in some way to be able to convince the human eye.
In this chapter, we will talk about two kinds of particles. Physical and virtual particles. With a physical particle, we refer to the kind of particle that exists in real the world; smoke, dust, water particles etc. Virtual particles however, are the ones that build up a particle effect in a 3-dimensional computer application. The difference will become clear in this chapter.
3.1 Particle RepresentationTo give you a clue of how we can visualize particle effects on a computer screen, we give you the following statements:
1. Particle effects can always be visualized using several 2D-images, where each image is a virtual particle.
Motivation:Since physical particles are so small, they do not have a visible width or depth. Therefore, the eye cannot tell if a virtual particle have a depth or not, which is why we may use 2D-images in multiple layers to create virtual depth in the model.
2. Each virtual particle in a particle system always represent a group of physical particles, rather than a single one.
Motivation:A physical particle is so small that it can not be seen by the naked eye by its own. On the computer screen, we have pixels, which can be seen by their own. Because of this, independently on how we choose to represent our physical particles in our particle system, each virtual particle will represent a group of physical particles.
3. One virtual particle in our particle system can cover everything from one to thousands of pixels on the computer screen.
5 3D-graphics API from Silicon Graphics, see http://en.wikipedia.org/wiki/Open_GL and http://www.opengl.org6 MSDN web page: http://www.msdn.com
6

Motivation:A 3-dimensional model can be visualized by showing 2D-images facing the viewer, as if the model were sliced into thin slices. A big cloud of particles can be sliced the same way, each slice can in this way represent a smaller cloud of particles. To make the model look 3-dimensional related to the environment, the distance between the viewer and the slices should be varying. The movement of these clouds will however behave like 2D-images when moving, that is why transparency is very important. We will explain this in more detail in chapter 3.6.
The conclusion of this is that particles in a 3-dimensional particle system should not be 3D-objects. Instead, they should be groups of 2D-images that together look like a 3-dimensional model. The 2-dimensional properties of each particle can be hidden in several ways; for example, they can be very small, or have a high transparency factor, etc. The way these 2D-images look vary between different particle effects, so we need to experiment to create the best size and look for each particle type.
Once we have found a way of representing our particles, we have to move them around and give them color. Depending of what kind of effect we are trying to create, movement and color can be generated by everything from random functions to mathematical functions describing natural behavior.
Movement can for example be described with physical laws, with velocity, acceleration and gravity for each particle. These functions can also be simplified to save the computer some work. For example, when using large virtual particles representing clouds of physical particles, rotation is a good way to create a “whirling” effect. You could also use texture twisting7.
Nice colors can be created with different kinds of alpha blending8. You will find more information about these things later in this chapter.
3.2 Particle motionHow particles move is an essential part of a particle effect. A physically realistic way is preferred in most cases. The most correct way to achieve this is using following method, called a state-based particle effect:
● Store velocity and acceleration data for each particle every frame (alternatively store velocity per particle and let acceleration be the same for all particles).
● Update particle position each frame by measuring the time passed between the frames, using the velocity data for each particle.
● Also update velocity data using the acceleration data each frame. Calculate acceleration data according to gravity, friction etc.
However, it is also possible to make a good approximation of this kind of motion. Luna [1] suggests that for particles undergoing constant acceleration, the position at a certain time t, is given by
p(t) = ½ * a * t^2 + v0 * t + p0where p is the position vector, a is the acceleration vector, t is the time, v0 is the initial velocity vector and p0 is the initial position vector. The constant acceleration could be approximated with
a = a1+ a2
7 Remapping of texture coordinates to create a whirl.8 The use of a transparency value as a part of a color. In an RGB-color representation, the actual color of a pixel is
represented with 3 values, (Red, Green and Blue), and then a fourth value is used for the transparency. This value is called the alpha value, and the method the application handles this value is called alpha blending.See [1] Chapter 12.
7

where a1 is the acceleration from gravity, such as the vector (0, -9.8, 0) and where a2 is the deceleration caused by friction, which could be approximated with
a2 = -v0 * fwhere f is a constant between 0 and 1 describing the power of air resistance relatively. This is of course only an approximated value, so be sure to use it in situations where accuracy is not too important.
By using the formulas above, we may create a completely stateless particle effect. We do not need to save data for the position, velocity or acceleration of our particles, we only need each particle´s initial velocity and position. The current position is now calculated only using the current time. This also means that we can slow down or speed up the effect, or even play it backwards. We may also trigger an effect in the middle of its progress, without needing to calculate it from the beginning.
In some cases, physically correct movement per virtual particle is not the best choice. Let us take the example discussed earlier, where we suggested that a larger cloud of physical particles could be represented as one virtual particle. It is not very likely that every particle in the same cloud moves in the exact same direction and speed, or that they rotate around the middle point of the cloud. When a big virtual particle moves like described above, it may look very unrealistic.
Using this kind of movement might still be a good way, but since we are not working with realistic particles, the solution is not obvious. A lot of fine adjustments and tweaking is necessary to create a good looking effect when working with bigger particles.
3.3 Particle sizeHow do we decide whether to use big or small virtual particles? Previously, (section 3.1 statement number 2) we claimed that each virtual particle always represent a group of physical particles. But how large should our virtual particles be? In statement (3), same chapter, we also claim that particle size may vary from one to thousands of pixels. So when will they be small and when will they be large?
To find an answer to this question, we need to use some good imagination, and perhaps some help from a particle editor. Before writing a particle editor of our own using shaders and all the latest technology, we can find inspiration of how particle effects can be created by using an already existing editor. There are surely many free examples out there, we have only tried one, and it is a particle editor included in an open source 3D-engine called Delta3D9. We have only used this engine for inspiration on particle movement, size and color. No code examples or algorithms are taken from this engine.
We will not go into details on how to use this editor, but simply describe some experimentation and the results of it.
The editor allows the setting of particle emittance frequency, particle velocity functions, size functions and color functions. By choosing an appropriate texture for your particles, sending them in different directions, letting them grow (or shrink) differently and change their transparency and color over time, different effects are created. How specific types of textures are made is discussed later. It shows that some effects turn out especially good with heavily growing particles, some are better with small. Here are some examples:
Effects using big particles: Smoke, explosion fire, explosion shock wave, dust clouds etc.
Effects using medium sized particles: Fire flames, gunfire, energy weapons, raindrops etc.
Effects using small particles: Fireworks, bug swarms, flying sparkles etc.
9 Read about it and download it at http://www.delta3d.org/
8
So, how does the size of our particles affect the performance? Well, there are two aspects of this. Larger particles usually means that we don't need to use very many particles, and that may save resources. However, when using big particles, the risk of overdraw10 is larger, which may become very expensive.
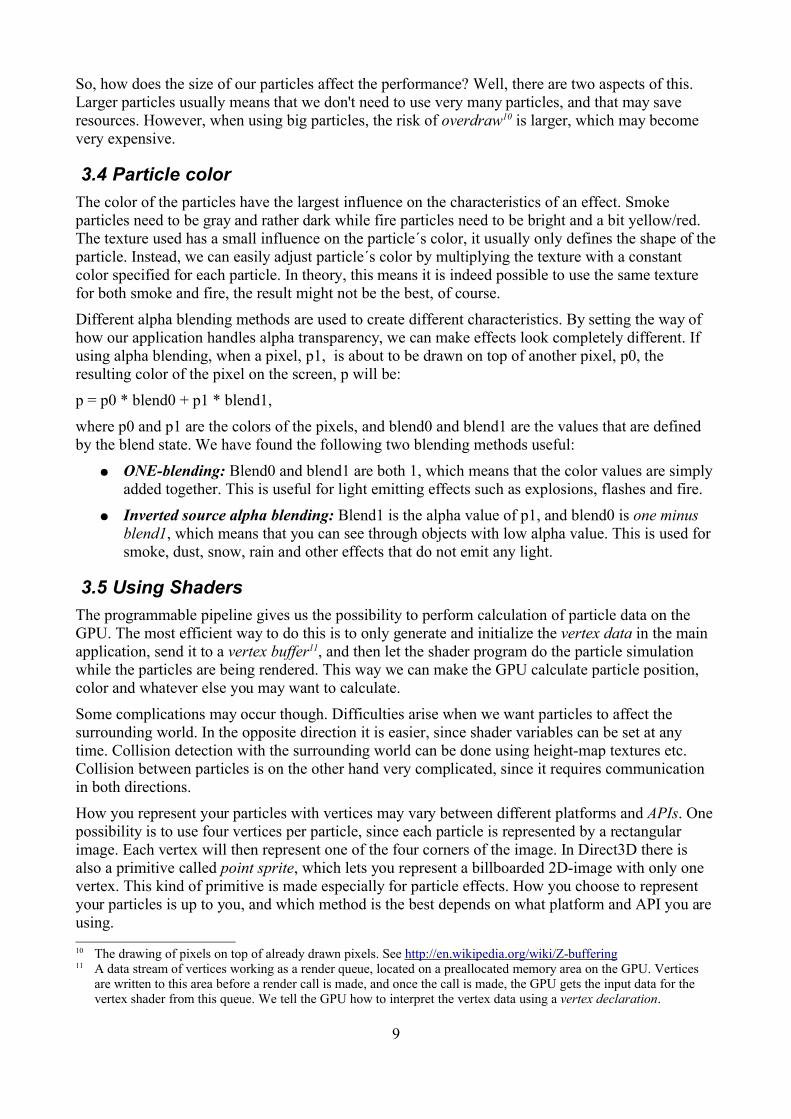
3.4 Particle colorThe color of the particles have the largest influence on the characteristics of an effect. Smoke particles need to be gray and rather dark while fire particles need to be bright and a bit yellow/red. The texture used has a small influence on the particle´s color, it usually only defines the shape of the particle. Instead, we can easily adjust particle´s color by multiplying the texture with a constant color specified for each particle. In theory, this means it is indeed possible to use the same texture for both smoke and fire, the result might not be the best, of course.
Different alpha blending methods are used to create different characteristics. By setting the way of how our application handles alpha transparency, we can make effects look completely different. If using alpha blending, when a pixel, p1, is about to be drawn on top of another pixel, p0, the resulting color of the pixel on the screen, p will be:
p = p0 * blend0 + p1 * blend1,
where p0 and p1 are the colors of the pixels, and blend0 and blend1 are the values that are defined by the blend state. We have found the following two blending methods useful:
● ONE-blending: Blend0 and blend1 are both 1, which means that the color values are simply added together. This is useful for light emitting effects such as explosions, flashes and fire.
● Inverted source alpha blending: Blend1 is the alpha value of p1, and blend0 is one minus blend1, which means that you can see through objects with low alpha value. This is used for smoke, dust, snow, rain and other effects that do not emit any light.
3.5 Using ShadersThe programmable pipeline gives us the possibility to perform calculation of particle data on the GPU. The most efficient way to do this is to only generate and initialize the vertex data in the main application, send it to a vertex buffer11, and then let the shader program do the particle simulation while the particles are being rendered. This way we can make the GPU calculate particle position, color and whatever else you may want to calculate.
Some complications may occur though. Difficulties arise when we want particles to affect the surrounding world. In the opposite direction it is easier, since shader variables can be set at any time. Collision detection with the surrounding world can be done using height-map textures etc. Collision between particles is on the other hand very complicated, since it requires communication in both directions.
How you represent your particles with vertices may vary between different platforms and APIs. One possibility is to use four vertices per particle, since each particle is represented by a rectangular image. Each vertex will then represent one of the four corners of the image. In Direct3D there is also a primitive called point sprite, which lets you represent a billboarded 2D-image with only one vertex. This kind of primitive is made especially for particle effects. How you choose to represent your particles is up to you, and which method is the best depends on what platform and API you are using.10 The drawing of pixels on top of already drawn pixels. See http://en.wikipedia.org/wiki/Z-buffering11 A data stream of vertices working as a render queue, located on a preallocated memory area on the GPU. Vertices
are written to this area before a render call is made, and once the call is made, the GPU gets the input data for the vertex shader from this queue. We tell the GPU how to interpret the vertex data using a vertex declaration.
9
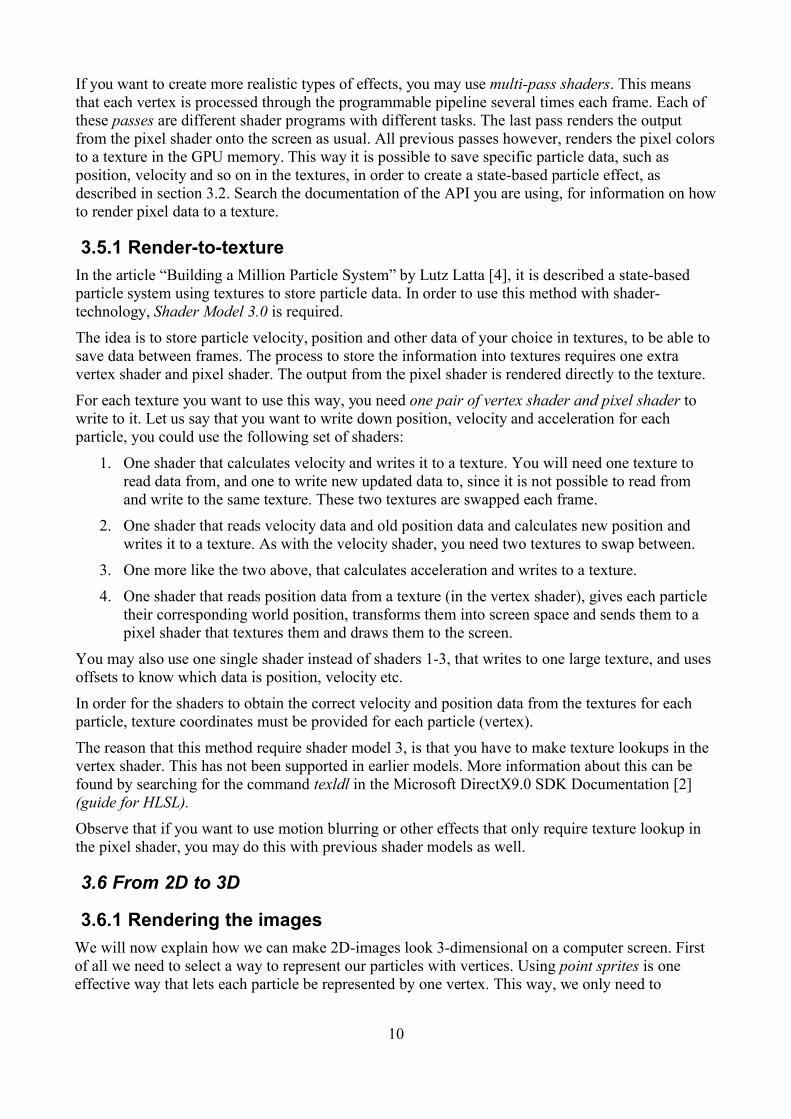
If you want to create more realistic types of effects, you may use multi-pass shaders. This means that each vertex is processed through the programmable pipeline several times each frame. Each of these passes are different shader programs with different tasks. The last pass renders the output from the pixel shader onto the screen as usual. All previous passes however, renders the pixel colors to a texture in the GPU memory. This way it is possible to save specific particle data, such as position, velocity and so on in the textures, in order to create a state-based particle effect, as described in section 3.2. Search the documentation of the API you are using, for information on how to render pixel data to a texture.
3.5.1 Render-to-textureIn the article “Building a Million Particle System” by Lutz Latta [4], it is described a state-based particle system using textures to store particle data. In order to use this method with shader-technology, Shader Model 3.0 is required.
The idea is to store particle velocity, position and other data of your choice in textures, to be able to save data between frames. The process to store the information into textures requires one extra vertex shader and pixel shader. The output from the pixel shader is rendered directly to the texture.
For each texture you want to use this way, you need one pair of vertex shader and pixel shader to write to it. Let us say that you want to write down position, velocity and acceleration for each particle, you could use the following set of shaders:
1. One shader that calculates velocity and writes it to a texture. You will need one texture to read data from, and one to write new updated data to, since it is not possible to read from and write to the same texture. These two textures are swapped each frame.
2. One shader that reads velocity data and old position data and calculates new position and writes it to a texture. As with the velocity shader, you need two textures to swap between.
3. One more like the two above, that calculates acceleration and writes to a texture.
4. One shader that reads position data from a texture (in the vertex shader), gives each particle their corresponding world position, transforms them into screen space and sends them to a pixel shader that textures them and draws them to the screen.
You may also use one single shader instead of shaders 1-3, that writes to one large texture, and uses offsets to know which data is position, velocity etc.
In order for the shaders to obtain the correct velocity and position data from the textures for each particle, texture coordinates must be provided for each particle (vertex).
The reason that this method require shader model 3, is that you have to make texture lookups in the vertex shader. This has not been supported in earlier models. More information about this can be found by searching for the command texldl in the Microsoft DirectX9.0 SDK Documentation [2] (guide for HLSL).Observe that if you want to use motion blurring or other effects that only require texture lookup in the pixel shader, you may do this with previous shader models as well.
3.6 From 2D to 3D
3.6.1 Rendering the imagesWe will now explain how we can make 2D-images look 3-dimensional on a computer screen. First of all we need to select a way to represent our particles with vertices. Using point sprites is one effective way that lets each particle be represented by one vertex. This way, we only need to
10

transform each vertex to screen space, and the vertex is automatically transformed into the corresponding pixels on the screen using the entire point sprite texture. The size of the particle is decided by a size attribute in the vertex data.
Point sprites have some limitations though. For example, they usually can not be rotated. In a more advanced particle system we might want to represent each particle with 4 vertices. Here is an algorithm that can be used to convert 4 vertices into a 2D-image billboarded upon the screen:
1. Let vertices be divided into groups of 4, each representing the corners of a quad, or the corners of two triangles next to each other representing a quad (sending the data to the GPU as two separate triangles is sometimes more efficient than sending it as a triangle strip). Let each vertex store information about which corner it represents. Store this data as texture coordinates.
2. Transform vertices to the correct position in world space. All vertices in a particle should have the same position for now. We are only interested in the position of the entire particle in this step. Calculate a size for the particle. See image below.
3. Transform all vertices into screen space (a). All vertices in each particle will end up at the same spot. With help from the vertex data, move the vertices in x- and y-direction to the correct corners in the quad. Use the size calculated in step 2. See image below.
Sometimes we need to use asymmetrical particles. In these cases we usually use a texture that is still symmetrical in one dimension, like a drop of water. To make these particles look good, we want to rotate the 2D-image towards the camera around the axis of the dimension that is not symmetrical. It can be done like this:
1. Same as (1) above.
2. Transform vertices to the correct position in world space as above (a). Now, move the vertices that have different texture coordinates in the dimension of the texture that is not symmetrical to different directions (b). The vertices of each particle will now represent a line. See image below.
3. Calculate the vector pointing between the particle´s center and the camera. The direction to move the particles in the symmetrical dimension of the texture is found by calculating the cross-product between the camera vector and the direction used in 2. See image below.
11
Transformation of 4 vertices into a billboarded square, as described in step 2-3 above.
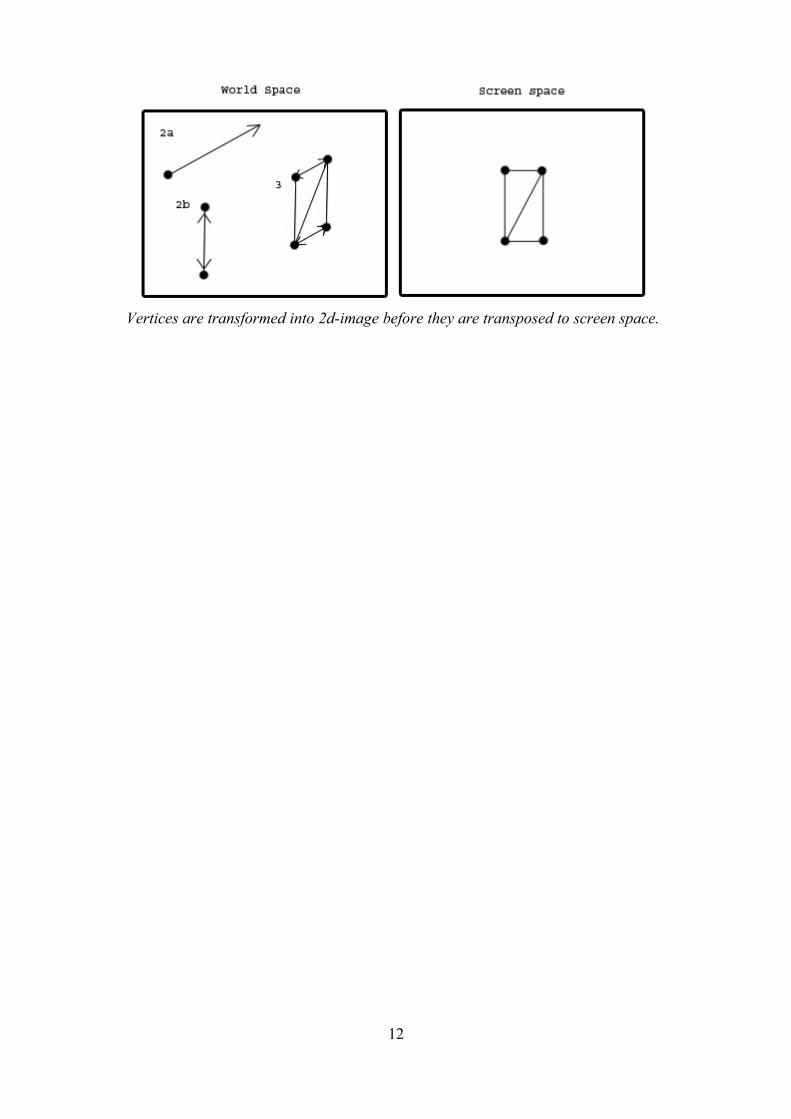
Vertices are transformed into 2d-image before they are transposed to screen space.
12
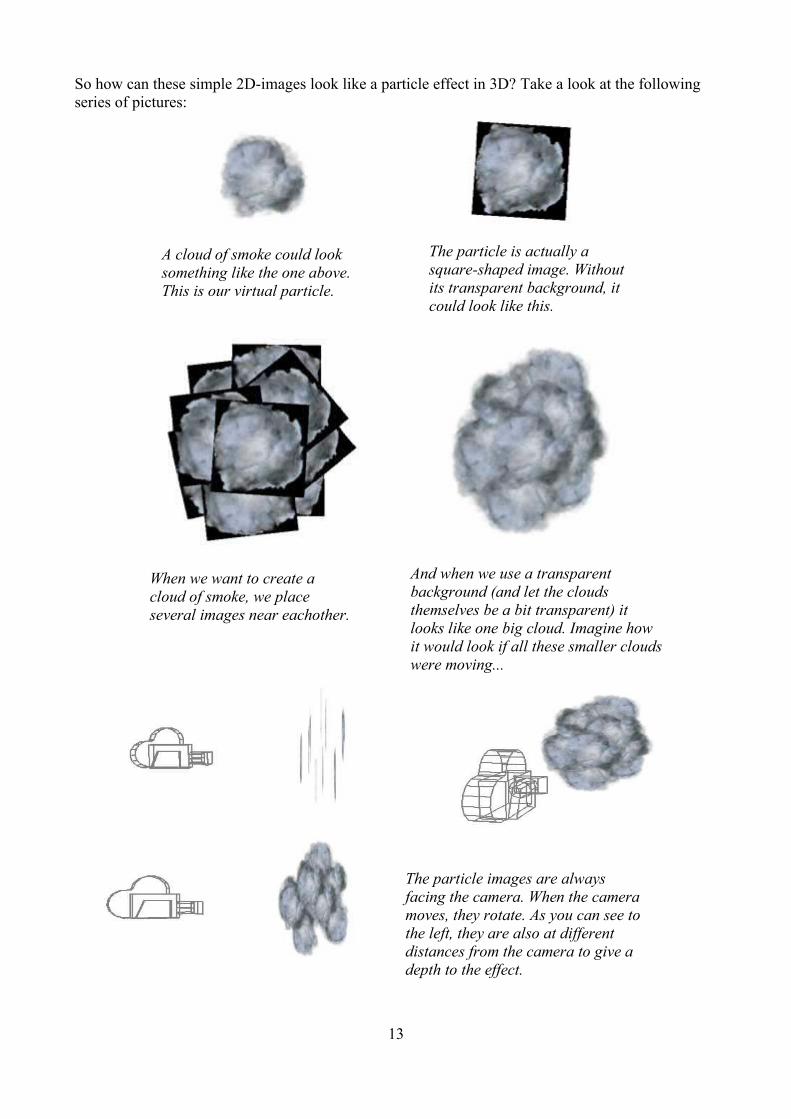
So how can these simple 2D-images look like a particle effect in 3D? Take a look at the following series of pictures:
13
A cloud of smoke could look something like the one above. This is our virtual particle.
The particle is actually a square-shaped image. Without its transparent background, it could look like this.
When we want to create a cloud of smoke, we place several images near eachother.
And when we use a transparent background (and let the clouds themselves be a bit transparent) it looks like one big cloud. Imagine how it would look if all these smaller clouds were moving...
The particle images are always facing the camera. When the camera moves, they rotate. As you can see to the left, they are also at different distances from the camera to give a depth to the effect.
3.7 3D-objects as particles?For explosion effects, it is common to let parts of an exploded object to fly away from the explosion scene. These kind of objects are not 2D-images but of course real 3D-objects. Using shaders, we may move these objects fairly cheap. We can make them fly away and rotate in a realistic manner.
The only problem we get is collision detection when the object lands on the ground, which complicates the use of shaders. One way to solve this could be to use a texture that describes the terrain so that the shader can make a lookup to see if the object has hit the ground. Maybe the new geometry shader in Direct X 10 will make such things simpler to calculate with a more accurate result.
4 Creating an application with Particle Effects using shadersDuring the work with this thesis we created an application for viewing and editing of real-time rendered particle effects. The application uses the programmable pipeline exclusively for all rendering. Also, the behavior of the particle effects are created with shaders, which means that movement and color of vertices is completely controlled with shaders. In this chapter, we describe how this application works.
This program uses the Direct3D-API and .fx-files with HLSL code. Implementation with other API:s may be done with the same structure.
4.1 Separating tasksOur application need to do the following:
• Handle 3D-graphics. In Direct3D this means initialize a Direct3D-device and handle resources such as textures, vertex buffers and shaders. They all need to be initialized, cleaned up and reinitialized upon certain events.
• Communicate with the user. Use a GUI that allows the user to change shader programs, textures, number of particles among other things.
• Load shader programs from file and upload them to GPU.
• Generate input data to graphics pipeline. Declare and initialize vertex data, create vertex buffers, set the correct shader and send draw calls to the GPU.
The parts of the program essential for the actual particle effect are the shader program and the input to it. In general, the main application is responsible for creating particle data, and the shader program´s responsibility is to make sure it is presented on the screen. The rest of the job, such as moving particles, changing their colors etc, can be made by either of these parts of the program. The most efficient choice is to let the shader handle all of it.
There are examples of particle effects where particles are created, moved and colored each frame in the application code. After this, it is sent to the shader, and all the shader does is to simply draw the vertices to the screen by making the proper transformations. You may wonder why the programmer bothered to use the programmable pipeline at all. Sure, you have nothing to lose when it comes to programming your own shaders, but why not use the advantages that it may give when you are at it?
Instead, let us make the work of the main program as minimal as possible. Let us only initiate the particle data, and let the shader do the rest. Let us define what we need to do before we let the shader take over the job.
Things that we can not do within the shader:
● Declare and create vertex data and initiate vertex buffer.
14

● Set vertex data values.
● Handle dependencies between vertices. (dependencies between particles could be handled by reading and writing textures. See the render-to-texture method, described in section 3.5.1)
● Decide how many particles that needs to be used at a certain time, and when each particle comes to life.
● Set and handle render surfaces, that is, decide whether to render to a texture or to the screen.
In other words, we need to decide how many particles we want to draw and then create them successively or all of them at once. We need to define how long each particle needs to live and make sure that we do not draw the ones that are dead. Finally we need to create a set of vertices containing the proper data for our particles, put them into a vertex buffer on the GPU memory, then do a render call for this vertex buffer. We call this part of the program a Particle Emitter. From this, we extract two thumb rules that may be worth to remember:
1. The particle emitter creates particles.2. The shader program defines the behavior of each particle.
4.2 Main programNow that it is clear what we need to do in the main program, let us go through it step by step.
4.2.1 Vertex declarationFor particle systems with shader-controlled behavior, we need our vertices to contain certain information. Without this information, it is impossible for the shader program to control each particle´s behavior in a way that is useful to us.
Already in 1983, Reeves [6] defined a particle structure used when randomly generating a new particle with the following attributes:
1. Initial position
2. Initial velocity (both speed and direction)
3. Initial size
4. Initial color
5. Initial transparency
6. Shape
7. Lifetime
This model was not primarily created for real-time applications, but was meant to suit several purposes. We will see that this definition still is very useful.
Lander [5] uses the following particle structure in his article from 1998:
● Next and Previous particle – Pointers to next and previous objects. This is used because they use a linked list to store particles in, but it could possibly be used for special features too.
● Position – Position vector.
● Previous Position – The position of the particle in the previous frame.
● Direction – Moving direction with speed included.
● Life – How long the particle lives in milliseconds using an integer.
15

● Color – The color of the particle.
● Previous Color – The color in the previous frame. Used for anti-aliasing12. (Note: the technique that is called anti-aliasing in this article is very similar to motion blurring. It is described how a gouraud-shaded line is drawn between the new and the old particle position to create an anti-aliasing effect, which means that the particle leaves a trail. The result is that the particle looks like a shape with smooth characteristics, instead of just a dot on the screen).
● DeltaColor – How the color changed since last frame.
Here we understand that much have changed since 1998. First of all, particles were not directly represented as vertices in this example. It was rather a linked list of objects. We use a specifically defined particle-struct as well, but to save both work and resources we want to let those objects be directly transformable into vertex data. This means that it is not possible to refer to other particles on the system memory, so we need to skip information about next and previous particle. It is unfortunate, since interesting things could be done with this information, for example when simulating gravity between physical particles.
Other adaptations must be done when using shaders. For example it is not possible to store data about previous position and color, color change etc. in the vertex data. Instead we would need to render this data to a texture on the GPU-memory. In the case with the previous color we do not need it, as another thing has changed since 1998; we use textures to represent our particles which means that we can give them any shape we want. If we want them to have a nice smooth shape, we simply give the texture these characteristics. The anti-aliasing can also be handled automatically by the GPU.
Current position can not be stored either. Instead the current position is calculated in each frame, either based on previous position or with an approximation. By using a method we call the render-to-texture method, we may save position data in a texture on the graphics memory, and get a bonus in the form of the possibility to use motion blurring13 and other features. More about this method in section 3.5.1. We may also use the approximation described in section 3.2.
Luna [1] suggests using the following particle attributes:
● Initial Position – Expressed in a 3-dimensional float vector. This is the original position, the current position is adjusted in the shader program.
● Initial Velocity – Expressed in a 3-dimensional float vector. This is original velocity, the current velocity may be adjusted in the shader program.
● Initial Size – The size of the particle in pixels expressed in one float. Particles may grow or shrink over time, but like the attributes above, this contains the original size.
● Initial Time – The time stamp when the particle was created.
● Life Time – How long the particle lives after it is created.
● Mass – Luna[1] describes this as “just another parameter that we can use to customize our particle system inside the vertex shader”. It is used to add random behavior so that different particles will behave differently.
● Initial Color – Expressed in a 4-dimensional vector.
If you are not using point sprites like Luna [1] do, you will also need the following attribute:
● Texture Coordinates – should be a 2D-vector with the value (0,0), (0,1), (1,0) or (1,1) to
12 Technique used for smoothing out edges. In this case it is used to give the particle a smooth shape.13 When you let moving objects leave trails to make movement look more smooth.
16

keep track of in which corner of the particle image this vertex is located in. This data is used by the shader to map the particle texture on the square. With point sprites, the texture is mapped automatically with the vector in the middle, the size is decided by the “point size”-attribute. If you are using the render-to-texture method in section 3.5.1, you need to include coordinates for these extra textures too.
The attributes above turns out to be a good generalization of what is needed in a particle effect, since the behavior of a particle can be described by its position, velocity, size and lifetime. Note that acceleration is not a particle attribute in Luna´s model. This is because Luna uses the approximation described in section 3.2 where all particles are under constant acceleration, which means that they do not need to store any individual acceleration data.
When we take a look on how these attributes are used, we will find something interesting. It turns out that the following model is also very useful in general. We will discuss why in the next section.
● Position – normalized vector of 3 dimensions.
● 3-4 normalized vectors of 4 dimensions.
● 3-4 single floats.
● Texture Coordinates (if necessary) – vector of 2 dimensions.
4.2.2 Particle data values and global dataMost particle effects are based on randomness. The behavior of each particle is controlled from the shader through different formulas. Different types of effects use different ways of movement, some may use oscillating particles, some simply move the particles in one direction, some accelerate particles and some decelerate them and so on. The only thing that is in common for almost all effects, is that every particle move differently from all other particles in the effect. That is were randomness comes in.
The particle attributes declared in the previous section are the variables that generate randomness. Those values are unique for each particle, and one of the key stones of particle effects is that no particles are doing the same thing. To make this possible, when initiating the particles in our main program, we give them all random values.
To make things easy and consequent when programming the shader later on, we only assign values between 0 and 1. (-1 to 1 works just as fine if you prefer that). When assigning vector values, we only use normalized vectors.
Due to this method of assigning random values, it is not really necessary to say what these values are going to be used for. It is up to the shader program to decide what the particles do with their assigned values, and that is why we suggested a generalized particle structure in the end of the previous section.
If you are using more than one vertex per particle, you have a dependency between vertices you have to deal with. It is quite easy, simply let all vertices representing the same particle have exactly the same vertex data, except for one attribute, telling which corner of the particle the vertex is located in. This is the texture coordinate attribute mentioned above.
In a particle effect, there will also be a set of variables that applies to all particles. Those can be handled through global variables in the shader. These variables should be set by the main program once per frame (unless a default value is used inside the shader). What these variables contain depends on the effect, but most effects need:
● Time – float with time in seconds.
17

● WorldViewProjection – 4x4 matrix with transformation data used for transforming particles from object space into screen space.
● AspectRatio – The proportions of the screen to make it possible to draw particles with the right proportions. (not needed with point sprites)
Some effects might have use of other information such as inverse transform, camera position etc.
4.2.3 Particle managementLuna [1] suggests that all particles can be stored in a vector on system memory, and then two vectors with pointers/references to alive and dead particles keep track on which particles should be rendered and which should not.
Once each frame, all particles referenced in the “alive-list” are written to a vertex buffer and a render call is made to the effect shader with this vertex buffer as stream source. This method works well but its efficiency could be compared with another approach that we have found during this work.
Instead of keeping track of dead or alive particles, we simply write all particles we are going to use in an effect to a vertex buffer. We then make the render call for all particles, dead or alive does not matter. This means that the vertex shader is run also for dead particles, so it is important to make sure that the vertex shader does not send dead particles to the pixel shader. This is made possible by setting a global time variable in the shader and letting vertices have a life time and a time stamp in the vertex data.
As long as no unnecessary pixel shader calls are made in this second approach, there should be no significant loss in performance. By optimizing the number of particles used for the effect we should instead be able to gain a lot of performance, since the number of overhead state changes is reduced. When the effect is triggered, we only perform the render call to the shader once per frame, no upload of vertices to the GPU is needed. How much difference this makes is of course hard to tell.
4.3 Vertex and Pixel shaderThe shader program controls the behavior of particles. The vertex shader will be executed once for each vertex and this is very important to have in mind when writing a particle shader. If every particle contains more than one vertex, for example 4 or 6, all vertices that represent the same particle should have the same vertex data, except for the texture coordinates, as described earlier.
When the vertex shader has done its operations on each vertex, the pixel shader will execute once for each pixel generated by the vertex shader. This means that it important to remember that:
● Only perform operations in the pixel shader that can not be made in the vertex shader, and that are absolutely necessary The vertex shader is called between 1-6 times per particle (depending on how your particles are represented) while the pixel shader is performed once per each pixel in your particle, which may end up in millions of calls.
● Make sure that dead particles have the size of 0 pixels to avoid unnecessary pixel shader calls. Big invisible particles requires a lot of performance but does not contribute to the resulting image
We may handle each vertex as if it was a particle. When you write your shader, use your imagination and try to define how you think a particle in your effect would act. Then describe it in a program like this one (pseudo-code):
#Particle effect described in a shader#Beginning of file: define global variables common for all particles
18

//Variables set from outside the shaderfloat Time;
float4x4 WorldViewProjection;
texture particleTexture;
Initiate texture sampler;
//Variables that might be useful and may be changed from outside the shaderfloat scale = 1.0f
float radius = 6.0f
.... and so on
//Structs for input and output from vertex shaderstruct vertexInput {
float3 Pos : POSITION;
float4 texCoord : TEXCOORD0;
float psize : PSIZE;
float4 rand : TEXCOORD1;
.... other vertex data
};
struct vertexOutput {
float4 Pos : POSITION;
float4 texCoord : TEXCOORD0;
float4 blend : COLOR0;
float4 diff : COLOR1;
};
#Vertex shader, modifies and returns vertex datavertexOutput VertexShader(vertexInput IN)
{
vertexOutput OUT;
//The following values are calculated based on the Time variable (in the best suitable order). //The necessary data is stored in the OUT-object. If particle is not dead { //it is very important not to process dead particles Calculate particle velocity;
Calculate particle size;
Calculate particle transparency;
Calculate particle rotation;
Calculate particle position;
Calculate particle color;
19
//To make the particle visible on the screen Transform position to screen space using the WorldViewProjection-matrix.
//If you do not use point sprites Transform vertices in screen space according to texture coordinates.
}
//Setting the size of a dead particle to 0 means that the pixel shader will process 0 pixels. else { set all OUT-data to 0. }
//Vertex calculation finished return OUT;
};
//The output from the vertex shader is transformed into pixels. The data in the position //register must be defined in screen space, the vertex data is automatically interpolated into //pixel data.#Pixel shader, returns a pixel color which is put on the render surface.float4 PixelShader(vertexOutput IN) : COLOR
{
return texture lookup(IN.texCoord.x, IN.texCoord.y) * IN.color;
};
#Declaration of techniques. //Here it is possible to specify different techniques for executing the shader. Which technique //to use is specified outside the shader program, here it is only specified which vertex and //pixel shader that each technique should use and what version of the shader model it should //be compiled with. It is also possible to set different render states on the GPU.technique normal
{
//A shader may be divided into several passes. This may be used for different reasons, for //example when different render targets are used. In the first technique you may want to //render to a texture, and to the screen in the next. In this example we only use one technique. pass p0
{
VertexShader = compile vs_3_0 VertexShader();
PixelShader = compile ps_3_0 PixelShader();
}
}
#End of shader
4.4 Particle editor / viewerThe final result of the application described above was a viewer with some editing capabilities. We
20
write the shaders for different effects manually and load them into our program where we can view them in different modes. With a GUI, we can change number of particles, the time factor, different render states etc. When using shader effects, it is not recommended to try to create an editor that completely exclude programming. This could lead to a great loss when it comes to performance.
It is however possible to change global variables and attributes in a shader from an application, and that is something that you could use to make it more efficient to create effects. A complete particle editor for shaders should contain:
● Text editor for writing, saving and compiling shaders.
● Boxes and sliders that identify the variables in the shader and let you change them.
● Possibility to change number of particles, time factor, scale, delays etc.
● Possibility to use different kinds of emitters for different purposes. Set particle data etc.
Author´s comment: If you know of such application, or if you decide to write one yourself, I will be very grateful if you contact me. My e-mail can be found in the preface.
4.5 Effect representation in a game engineWhen integrating particle effects into a computer game, it is a good idea to write information about the effects to a file. We do not want to specify for each effect, what shader is used, how many particles we need etc. directly in the program code. Instead, we save this data into a configuration file.
The file type we have used makes it possible to specify the following for each effect (more than one effect can be specified in each file, since one special effect in the game is usually built up from many smaller effects):
● Shader file.
● Technique to use in the shader.
● Texture for particles.
● Number of particles.
● Lifetime for the effect.
● Delay – if the one effect in the file should trigger later that the others.
● Blend state to be used.
● Scale – important to have because it is hard to make an effect have the correct size from the beginning.
● Time scale – if the effect needs to be slower or faster.
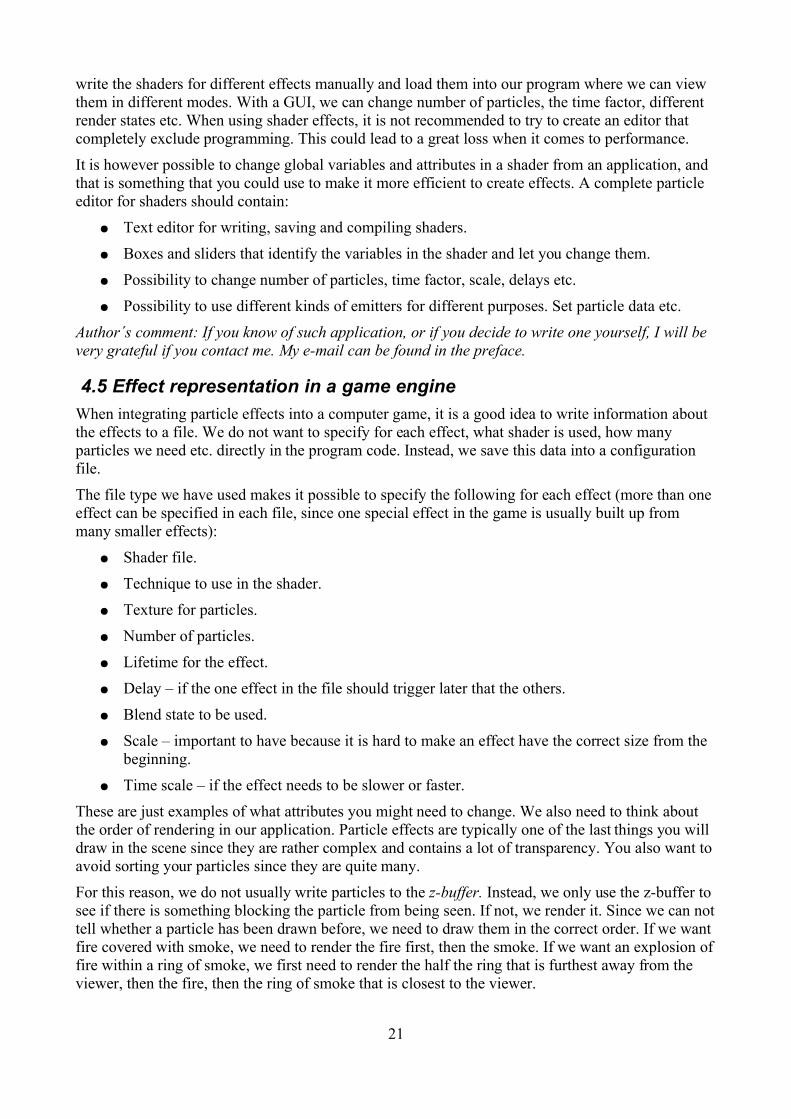
These are just examples of what attributes you might need to change. We also need to think about the order of rendering in our application. Particle effects are typically one of the last things you will draw in the scene since they are rather complex and contains a lot of transparency. You also want to avoid sorting your particles since they are quite many.
For this reason, we do not usually write particles to the z-buffer. Instead, we only use the z-buffer to see if there is something blocking the particle from being seen. If not, we render it. Since we can not tell whether a particle has been drawn before, we need to draw them in the correct order. If we want fire covered with smoke, we need to render the fire first, then the smoke. If we want an explosion of fire within a ring of smoke, we first need to render the half the ring that is furthest away from the viewer, then the fire, then the ring of smoke that is closest to the viewer.
21
The rendering order of the effect could be determined in the configuration file by simply rendering effects in the given order. That is why you need to consider the rendering order already when you are creating the effect.
5 Creating specific effectsWe have gone through the technical difficulties of creating particle effects. Now we have reached the really tough part: to create an effect that actually looks good. Fine adjusting the looks of effects has not been a focus point in this thesis, since we wanted to keep the focus at the technology parts. However, it is important for a programmer to at least know the basic of how different phenomena can be created, so we have come up with a pretty satisfying collection of examples. In this chapter we describe how to create them.
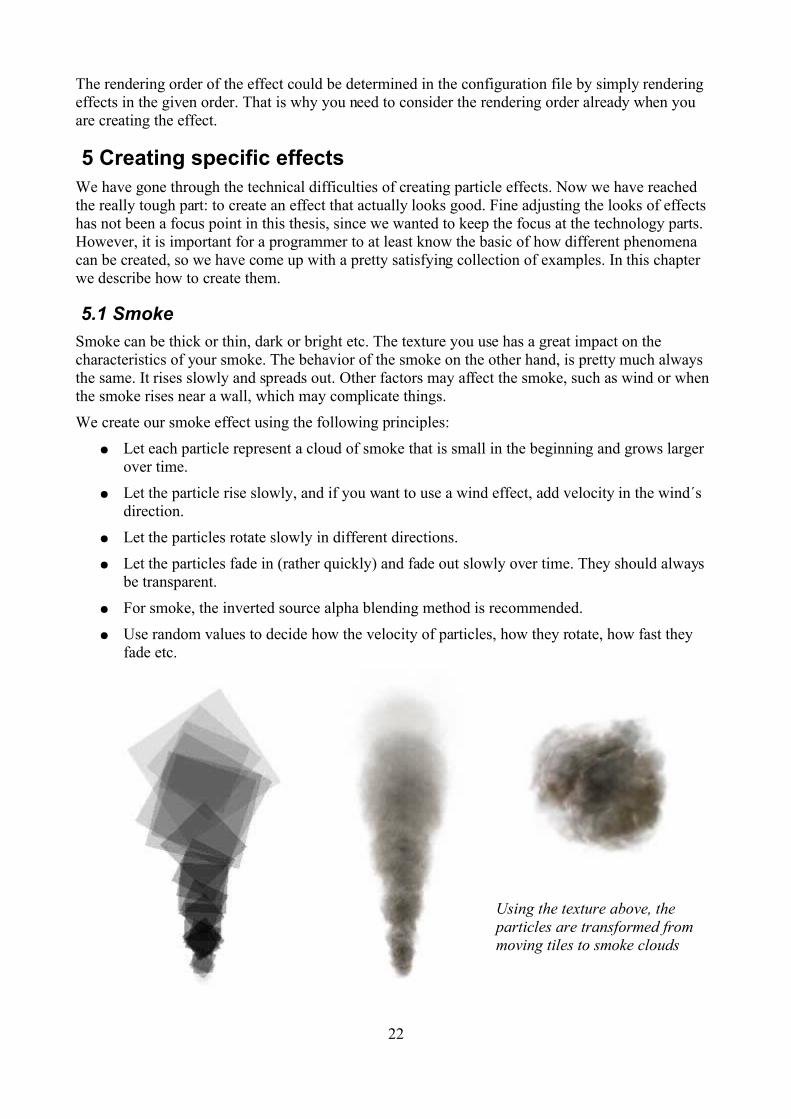
5.1 SmokeSmoke can be thick or thin, dark or bright etc. The texture you use has a great impact on the characteristics of your smoke. The behavior of the smoke on the other hand, is pretty much always the same. It rises slowly and spreads out. Other factors may affect the smoke, such as wind or when the smoke rises near a wall, which may complicate things.
We create our smoke effect using the following principles:
● Let each particle represent a cloud of smoke that is small in the beginning and grows larger over time.
● Let the particle rise slowly, and if you want to use a wind effect, add velocity in the wind´s direction.
● Let the particles rotate slowly in different directions.
● Let the particles fade in (rather quickly) and fade out slowly over time. They should always be transparent.
● For smoke, the inverted source alpha blending method is recommended.
● Use random values to decide how the velocity of particles, how they rotate, how fast they fade etc.
22
Using the texture above, the particles are transformed from moving tiles to smoke clouds

In the pictures above, we can see the smoke particles as tiles on the left side (modified to black so that they can be seen on white paper, in the program they are white with different transparency values). As you can see, they are slightly overlapping and they have different orientation and transparency. To the right, we have multiplied the particles with the particle texture´s color values. The picture to the right is the actual texture. The texture has the alpha value of zero in the outline, so the background color does not matter.
As you can see, the texture is very dark and thick, and it actually looks like a cloud of smoke. Because the particles add transparency, we still get a nice effect. Still, this kind of texture is best if you want real thick smoke, since the particles tend to be quite obvious if you use too few particles. This is a good way to create a more “comic-style” smoke. If you want more realistic smoke, use a texture with more transparency like this one:
5.2 FireCreating a continuously burning fire is far more difficult that creating a smoke effect. Fire particles need to move faster and simulate whirls and other random behavior in the flames. You may experiment with texture twisting and other methods. For now, we have only created a very basic form of fire. It uses a round texture that gives it unnaturally smooth edges. The particles moves quickly upwards with decreasing size, and a whirling motion generated by a sinus-function. Their speed and initial position on the XZ-plane is random. Finally some dark smoke is added.
23
The fire to the right uses the texture above, another texture that is not so symmetrical could give a better result.
The texture above shows a smoke cloud that is much thinner than the one above, which makes the particles more difficult to see. This is good since it gives the impression that the smoke pillar is actually a great mass of smoke particles rather than a collection of smoke balls.

5.3 ExplosionsExplosions are created through a combination of various effects. We need flames, smoke, bright flashes etc. Here are a couple of examples of how you can combine effects to create an explosion.
5.3.1 Basic explosion1. Flash
To make an explosion look powerful, we need something that brightens up the screen when it triggers. In this example, we use a bright particle covering a big part of the screen, quickly shrinking into the center of the explosion. The texture is the same that we used in the fire example above (it was actually designed for this purpose).
2. Bright coreTo give the impression that the explosion is really intense, we need something that moves quickly out from the center of it. This effect can be done like the flash above, except that it is growing instead of shrinking, and it uses another texture. Of course these two effect should not happen at the same time, so timing is essential. We do not use one particle here, instead we use several particles emitted rapidly each after another.
24
A flash effect to create bright light on the screen when the explosion triggers. The texture above is drawn in big scale over the screen, fastly shrinking into the center of the explosion.
A rapid series of flashes growing from the core of the explosion. The texture above gives a nice sparkling effect.

3. FireNow we will add some fire to the explosion. This can be made in more ways than we can imagine, so let us just try something easy. Here, we let small particles of fire grow from an area around the center of the explosion. The particles are emitted in random location, with random size, random colors (mix yellow and red) and with random timing.
Some flames in the fire could also give an extra touch. We use a shader similar to the one we used for the fire in section 5.2.
25
Small balls of fire growing at different locations around the center of the explosion. The color is randomized, and the texture – it kind of looks like the smoke texture but a bit more gray, dont you think?
A flame burning behind the balls of fire gives a more realistic feel
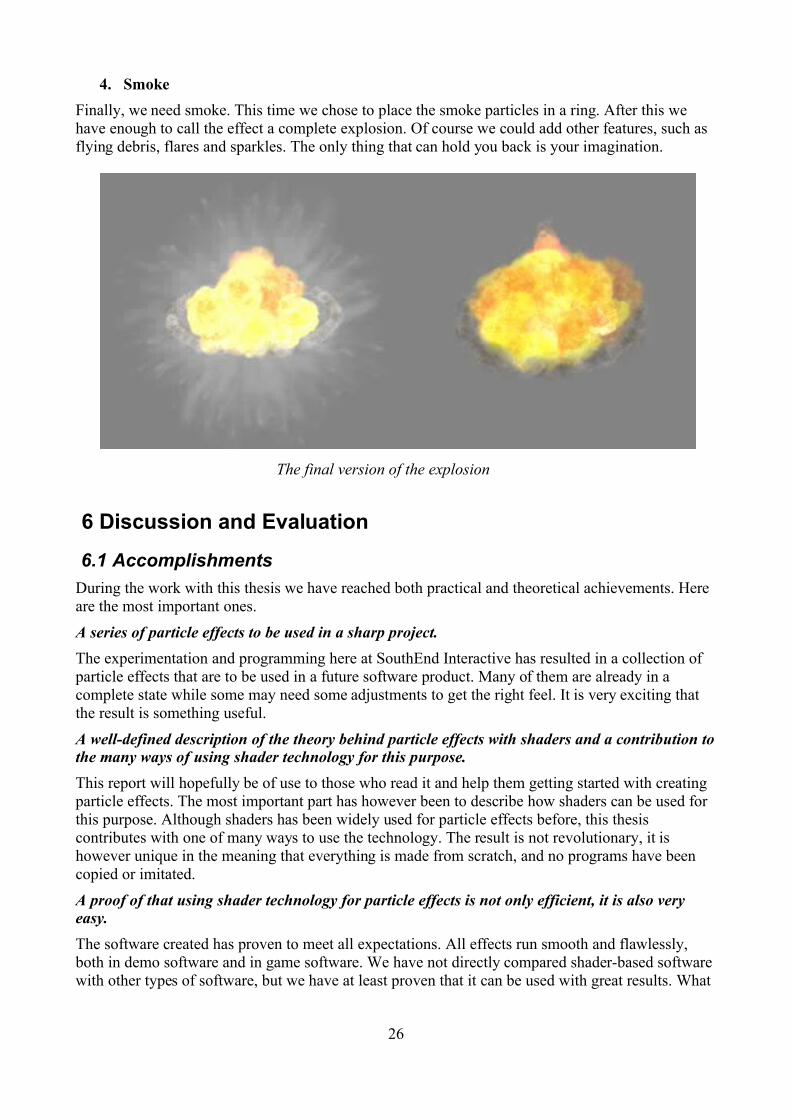
4. SmokeFinally, we need smoke. This time we chose to place the smoke particles in a ring. After this we have enough to call the effect a complete explosion. Of course we could add other features, such as flying debris, flares and sparkles. The only thing that can hold you back is your imagination.
6 Discussion and Evaluation
6.1 AccomplishmentsDuring the work with this thesis we have reached both practical and theoretical achievements. Here are the most important ones.
A series of particle effects to be used in a sharp project.The experimentation and programming here at SouthEnd Interactive has resulted in a collection of particle effects that are to be used in a future software product. Many of them are already in a complete state while some may need some adjustments to get the right feel. It is very exciting that the result is something useful.
A well-defined description of the theory behind particle effects with shaders and a contribution to the many ways of using shader technology for this purpose.This report will hopefully be of use to those who read it and help them getting started with creating particle effects. The most important part has however been to describe how shaders can be used for this purpose. Although shaders has been widely used for particle effects before, this thesis contributes with one of many ways to use the technology. The result is not revolutionary, it is however unique in the meaning that everything is made from scratch, and no programs have been copied or imitated.
A proof of that using shader technology for particle effects is not only efficient, it is also very easy.The software created has proven to meet all expectations. All effects run smooth and flawlessly, both in demo software and in game software. We have not directly compared shader-based software with other types of software, but we have at least proven that it can be used with great results. What
26
The final version of the explosion

is even more interesting is how simple the technology is to use. Thanks to how easy the technique has been to learn, the results has been over expectations. The shader technology also provide a great plug-and-play type of design, where if planned wisely, shaders can simply be replaced to obtain totally different results. Integration of particle system in larger software has also been very straight forward.
A great development of personal experience.Before starting with this work, I – the author, had no experience with particle effects what so ever. As if that was not enough, I did not have any experience with Direct X/Direct3D development either. During these 19 weeks I have now created my own particle system together with a viewer/editor developed from scratch. For me, the work with this master´s thesis has been a far greater experience than I could have hoped for.
6.2 EvaluationIn the “Goals”-section in the beginning of this report, we listed some goals with this thesis. Did we reach those goals? The main goal was to answer the following question:
How can we create visually appealing particle effects for interactive environments using Shader-technology suitable for a game running on Xbox 360?This question is answered throughout this entire report since it describes a way of how to create visually appealing particle effects for interactive environments using shader technology. If the effects we created is “visually appealing” is of course a matter of taste. They certainly not the most amazing effects you have ever seen, but the goal was not to create those appealing effects, rather to describe how to do it.
Some other questions were also asked:
1. What parts of the effect should be calculated in the shader program, and what parts should be handled by the main application?
2. When do we use single-pass and multi-pass shaders, respectively?3. How can we make external forces like wind have effect on the particles?
Question (1) is answered in section 4.2 with a detailed description.
Question (2) is also answered, but not as clearly. The answer to this question is that when we want to use the render-to-texture method described in section 3.5.1, we use multi-pass shaders. Multi-pass shaders are in theory the same thing as multiple shaders, except that they are collected and structured into one file. The structure is described as different passes. We may also use multi-pass shaders when we want to use certain post render effects, such as motion blurring.
The subject of question (3) has unfortunately not been more than briefly examined. We have said that when using state-based effect, such as the type that writes data to a texture, these forces should be very easy to apply. Using our framework it is quite simple to apply external forces in some simple cases, but quick changes of acceleration might give bad results since the approximation is based upon constant acceleration. Adding a wind direction from a pillar of smoke is no problem at all.
One of the things that could have been explored more is the possibility to do more physically realistic particle effects, with more but smaller particles. The render-to-texture method allows simulation of physical behavior with a large amount of particles, and this would be interesting to experiment with. From the beginning this thesis were meant to focus on such effects, but it turned out that the subject of creating effects at all were to complex to begin with.
27

This lead to that the part of creating effects with shaders required a great effort, and the focus became to create simple and efficient effects with a nice feeling, not focusing so much on simulating physical behavior of particles. As this nicely match the description of “creating visually appealing particle effects for interactive environments”, the results still became satisfactory.
7 AcknowledgmentsI would like to thank the following persons for their great help and support during the work with this thesis:
● Daniel Jeppsson at SouthEnd for his great support with programming and many theoretic discussions.
● Peter Ekstrand at SouthEnd for creating many of the particle textures, and for valuable feedback and suggestions for my particle effects.
● Jon Hasselgren and Tomas Akenine-Möller at the Institution of Computer Science for their helpful suggestions.
● Daniel Olsén at SouthEnd for creating the pictures on page 11.
● Mikael Dahlström at SouthEnd for help with solving math problems.
● My colleagues at SouthEnd for great company and support.
28
8 References[1] Frank D. Luna, “Introduction to 3D Game Programming with DirectX9.0c a Shader
Approach”, 2006, Worldware Publishing Inc.
[2] Microsoft DirectX9.0 SDK Documentation
[3] David Blythe, “The Direct3D 10 System (SIGGraph 2006)”, 2006, Microsoft Corporation, http://download.microsoft.com/download/f/2/d/f2d5ee2c-b7ba-4cd0-9686-b6508b5479a1/Direct3D10_web.pdf
[4] Lutz Latta, “Building a Million Particle System”, Game Developers Conference 2004, 2L Digital, http://www.2ld.de/gdc2004/
[5] Jeff Lander, “The Ocean Spray in your Face”, 1998, Game Developer Magazine (issue of July 1998), http://www.double.co.nz/dust/col0798.pdf
[6] William T. Reeves, “Particle Systems – a Technique for Modeling a Class of Fuzzy Objects”, 1983, Lucasfilm Ltd, http://portal.acm.org/citation.cfm?id=357320
29