Exploring Science Working Scientifically KS3 Chemistry 2.5 ... · Exploring Science Working...
52
Exploring Science Working Scientifically – KS3 Chemistry 2.5-year scheme of work This document provides a scheme of work for teaching the Chemistry content from the 2014 Key Stage 3 Science National Curriculum in 2 and a half years, using the Exploring Science course. Exploring Science: Working Scientifically has been designed with flexibility at its heart. We appreciate that some teachers will want to complete Key Stage 3 in two years and then move on to GCSEs. Others prefer to spend two and a half years on Key Stage 3, and others prefer to teach Key Stage 3 in three years. Exploring Science is designed to work with all of these approaches. Years 7 and 8 are divided into 12 units, and Year 9 is divided into 6 units; each unit contains 5 topics. Each topic is divided into Starters, Exploring tasks, Explaining tasks and Plenaries. This scheme of work is designed so that each topic is a lesson.
Transcript of Exploring Science Working Scientifically KS3 Chemistry 2.5 ... · Exploring Science Working...
Exploring Science Working Scientifically – KS3 Chemistry 2.5-year scheme of work
This document provides a scheme of work for teaching the Chemistry content from the 2014 Key Stage 3 Science National
Curriculum in 2 and a half years, using the Exploring Science course.
Exploring Science: Working Scientifically has been designed with flexibility at its heart. We appreciate that some teachers will want
to complete Key Stage 3 in two years and then move on to GCSEs. Others prefer to spend two and a half years on Key Stage 3, and
others prefer to teach Key Stage 3 in three years. Exploring Science is designed to work with all of these approaches.
Years 7 and 8 are divided into 12 units, and Year 9 is divided into 6 units; each unit contains 5 topics. Each topic is divided into
Starters, Exploring tasks, Explaining tasks and Plenaries.
This scheme of work is designed so that each topic is a lesson.
Exploring Science Working Scientifically – KS3 Chemistry, 2.5-year scheme of work
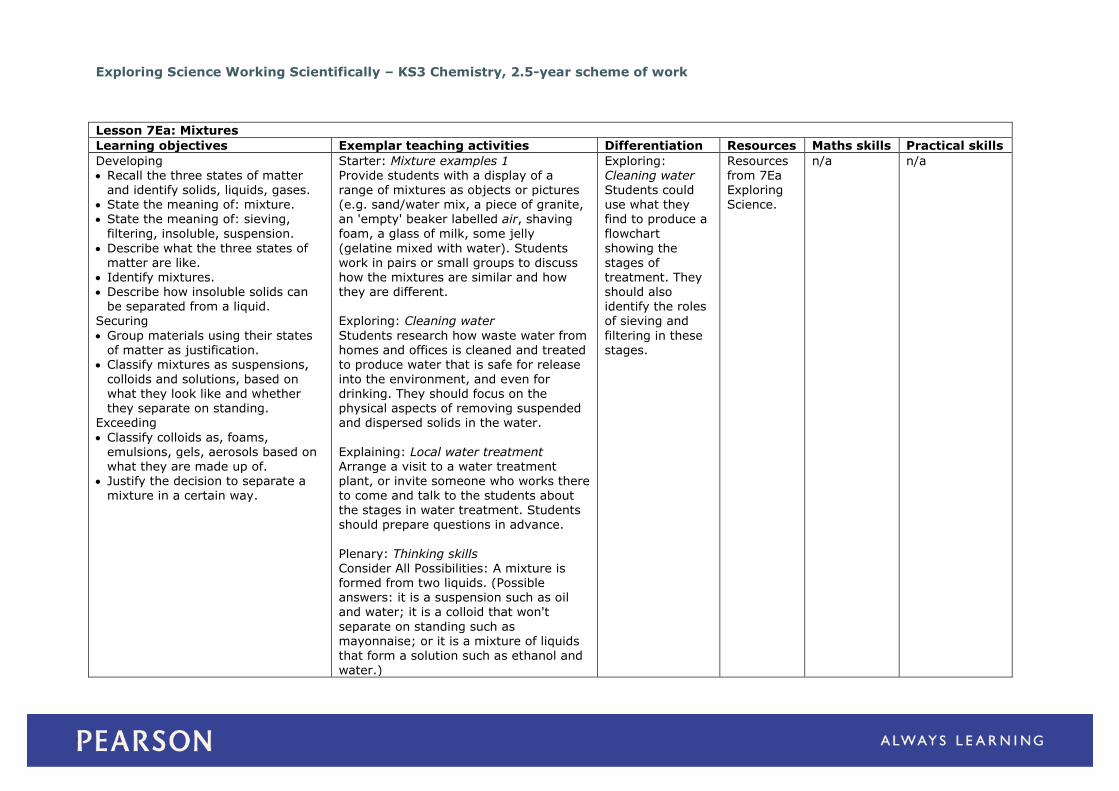
Lesson 7Ea: Mixtures
Learning objectives Exemplar teaching activities Differentiation Resources Maths skills Practical skills
Developing Recall the three states of matter
and identify solids, liquids, gases. State the meaning of: mixture. State the meaning of: sieving,
filtering, insoluble, suspension.
Describe what the three states of matter are like.
Identify mixtures. Describe how insoluble solids can
be separated from a liquid. Securing
Group materials using their states of matter as justification.
Classify mixtures as suspensions,
colloids and solutions, based on what they look like and whether they separate on standing.
Exceeding
Classify colloids as, foams, emulsions, gels, aerosols based on what they are made up of.
Justify the decision to separate a mixture in a certain way.
Starter: Mixture examples 1 Provide students with a display of a range of mixtures as objects or pictures (e.g. sand/water mix, a piece of granite, an 'empty' beaker labelled air, shaving
foam, a glass of milk, some jelly
(gelatine mixed with water). Students work in pairs or small groups to discuss how the mixtures are similar and how they are different. Exploring: Cleaning water
Students research how waste water from homes and offices is cleaned and treated to produce water that is safe for release
into the environment, and even for drinking. They should focus on the physical aspects of removing suspended and dispersed solids in the water.
Explaining: Local water treatment Arrange a visit to a water treatment plant, or invite someone who works there to come and talk to the students about the stages in water treatment. Students
should prepare questions in advance.
Plenary: Thinking skills Consider All Possibilities: A mixture is formed from two liquids. (Possible answers: it is a suspension such as oil and water; it is a colloid that won't
separate on standing such as mayonnaise; or it is a mixture of liquids that form a solution such as ethanol and
water.)
Exploring: Cleaning water Students could use what they find to produce a
flowchart
showing the stages of treatment. They should also identify the roles of sieving and
filtering in these stages.
Resources from 7Ea Exploring Science.
n/a n/a
Exploring Science Working Scientifically – KS3 Chemistry, 2.5-year scheme of work
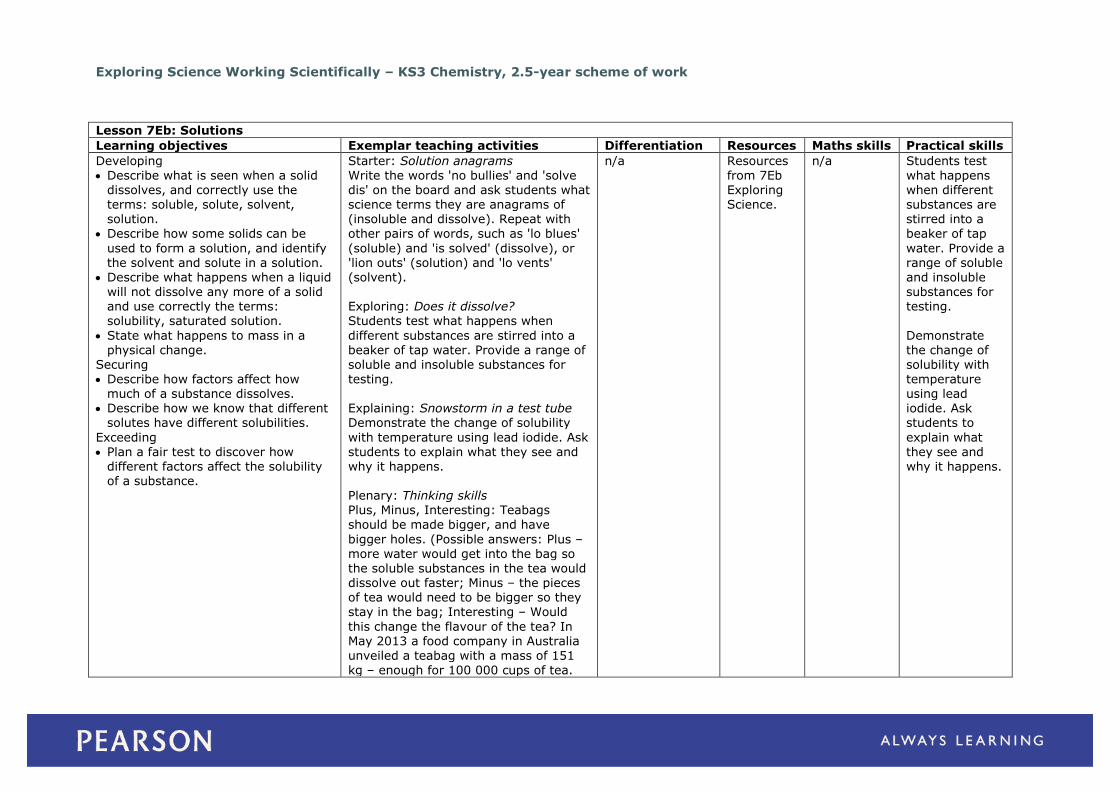
Lesson 7Eb: Solutions
Learning objectives Exemplar teaching activities Differentiation Resources Maths skills Practical skills
Developing Describe what is seen when a solid
dissolves, and correctly use the terms: soluble, solute, solvent, solution.
Describe how some solids can be
used to form a solution, and identify the solvent and solute in a solution.
Describe what happens when a liquid will not dissolve any more of a solid and use correctly the terms: solubility, saturated solution.
State what happens to mass in a physical change.
Securing
Describe how factors affect how much of a substance dissolves.
Describe how we know that different solutes have different solubilities.
Exceeding Plan a fair test to discover how
different factors affect the solubility of a substance.
Starter: Solution anagrams Write the words 'no bullies' and 'solve dis' on the board and ask students what science terms they are anagrams of (insoluble and dissolve). Repeat with
other pairs of words, such as 'lo blues'
(soluble) and 'is solved' (dissolve), or 'lion outs' (solution) and 'lo vents' (solvent). Exploring: Does it dissolve? Students test what happens when
different substances are stirred into a beaker of tap water. Provide a range of soluble and insoluble substances for
testing. Explaining: Snowstorm in a test tube Demonstrate the change of solubility
with temperature using lead iodide. Ask students to explain what they see and why it happens. Plenary: Thinking skills Plus, Minus, Interesting: Teabags
should be made bigger, and have
bigger holes. (Possible answers: Plus – more water would get into the bag so the soluble substances in the tea would dissolve out faster; Minus – the pieces of tea would need to be bigger so they stay in the bag; Interesting – Would
this change the flavour of the tea? In May 2013 a food company in Australia unveiled a teabag with a mass of 151
kg – enough for 100 000 cups of tea.
n/a Resources from 7Eb Exploring Science.
n/a Students test what happens when different substances are stirred into a
beaker of tap
water. Provide a range of soluble and insoluble substances for testing.
Demonstrate the change of solubility with
temperature using lead iodide. Ask students to
explain what they see and why it happens.
Exploring Science Working Scientifically – KS3 Chemistry, 2.5-year scheme of work
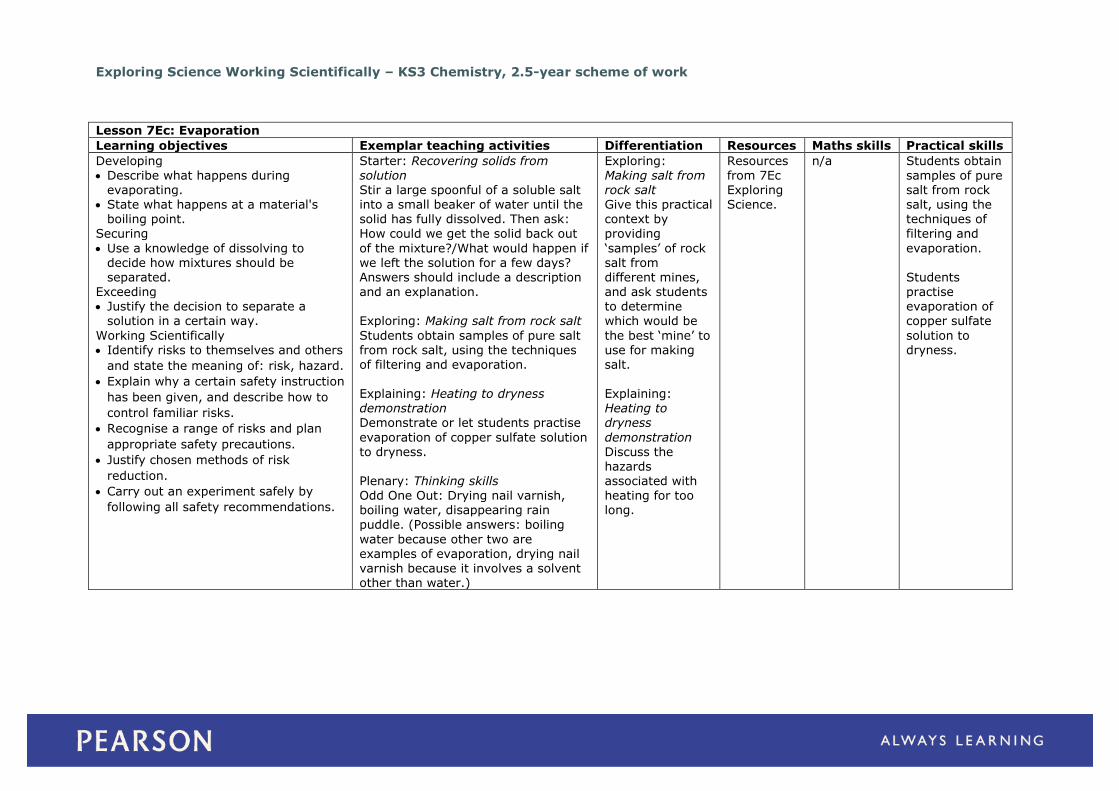
Lesson 7Ec: Evaporation
Learning objectives Exemplar teaching activities Differentiation Resources Maths skills Practical skills
Developing Describe what happens during
evaporating. State what happens at a material's
boiling point.
Securing
Use a knowledge of dissolving to decide how mixtures should be separated.
Exceeding Justify the decision to separate a
solution in a certain way.
Working Scientifically Identify risks to themselves and others
and state the meaning of: risk, hazard.
Explain why a certain safety instruction
has been given, and describe how to
control familiar risks.
Recognise a range of risks and plan
appropriate safety precautions.
Justify chosen methods of risk
reduction.
Carry out an experiment safely by
following all safety recommendations.
Starter: Recovering solids from solution Stir a large spoonful of a soluble salt into a small beaker of water until the solid has fully dissolved. Then ask:
How could we get the solid back out
of the mixture?/What would happen if we left the solution for a few days? Answers should include a description and an explanation. Exploring: Making salt from rock salt
Students obtain samples of pure salt from rock salt, using the techniques of filtering and evaporation.
Explaining: Heating to dryness demonstration Demonstrate or let students practise
evaporation of copper sulfate solution to dryness. Plenary: Thinking skills Odd One Out: Drying nail varnish, boiling water, disappearing rain
puddle. (Possible answers: boiling
water because other two are examples of evaporation, drying nail varnish because it involves a solvent other than water.)
Exploring: Making salt from rock salt Give this practical context by
providing
‘samples’ of rock salt from different mines, and ask students to determine which would be
the best ‘mine’ to use for making salt.
Explaining: Heating to dryness
demonstration Discuss the hazards associated with heating for too long.
Resources from 7Ec Exploring Science.
n/a Students obtain samples of pure salt from rock salt, using the techniques of
filtering and
evaporation. Students practise evaporation of copper sulfate
solution to dryness.
Exploring Science Working Scientifically – KS3 Chemistry, 2.5-year scheme of work
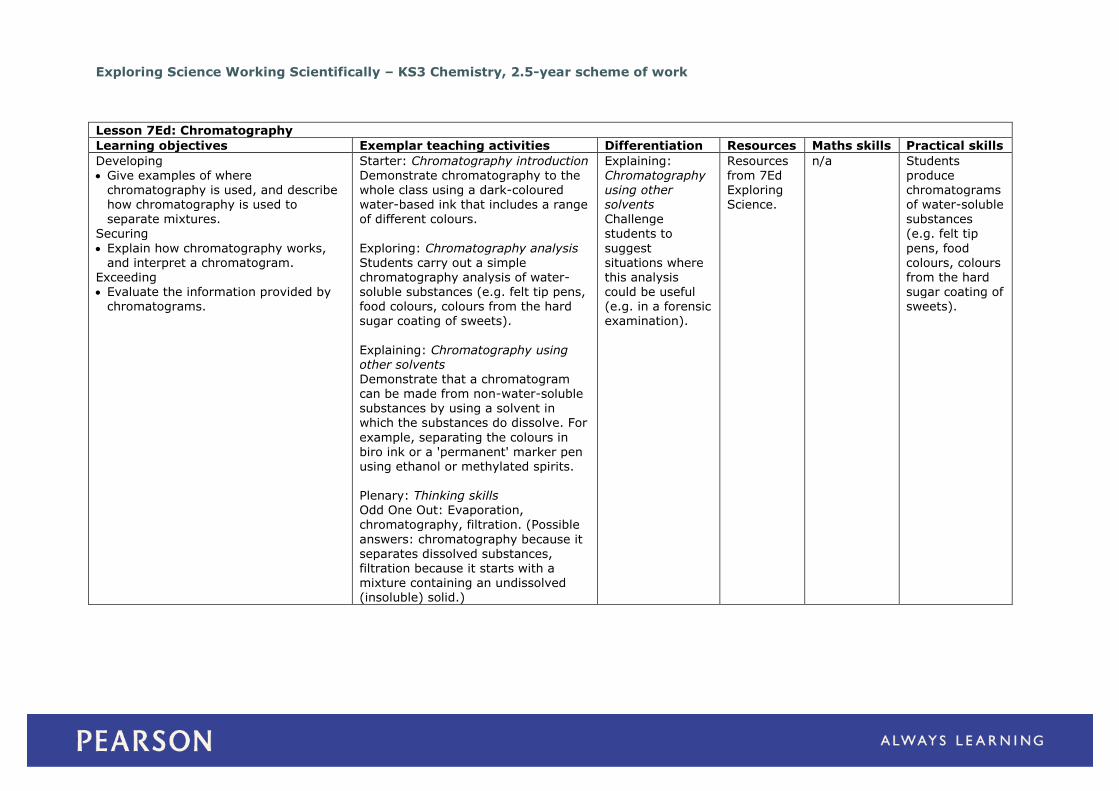
Lesson 7Ed: Chromatography
Learning objectives Exemplar teaching activities Differentiation Resources Maths skills Practical skills
Developing Give examples of where
chromatography is used, and describe how chromatography is used to separate mixtures.
Securing
Explain how chromatography works, and interpret a chromatogram.
Exceeding Evaluate the information provided by
chromatograms.
Starter: Chromatography introduction Demonstrate chromatography to the whole class using a dark-coloured water-based ink that includes a range of different colours.
Exploring: Chromatography analysis Students carry out a simple chromatography analysis of water-soluble substances (e.g. felt tip pens, food colours, colours from the hard sugar coating of sweets).
Explaining: Chromatography using other solvents
Demonstrate that a chromatogram can be made from non-water-soluble substances by using a solvent in which the substances do dissolve. For
example, separating the colours in biro ink or a 'permanent' marker pen using ethanol or methylated spirits. Plenary: Thinking skills Odd One Out: Evaporation,
chromatography, filtration. (Possible
answers: chromatography because it separates dissolved substances, filtration because it starts with a mixture containing an undissolved (insoluble) solid.)
Explaining: Chromatography using other solvents Challenge
students to
suggest situations where this analysis could be useful (e.g. in a forensic examination).
Resources from 7Ed Exploring Science.
n/a Students produce chromatograms of water-soluble substances
(e.g. felt tip
pens, food colours, colours from the hard sugar coating of sweets).
Exploring Science Working Scientifically – KS3 Chemistry, 2.5-year scheme of work
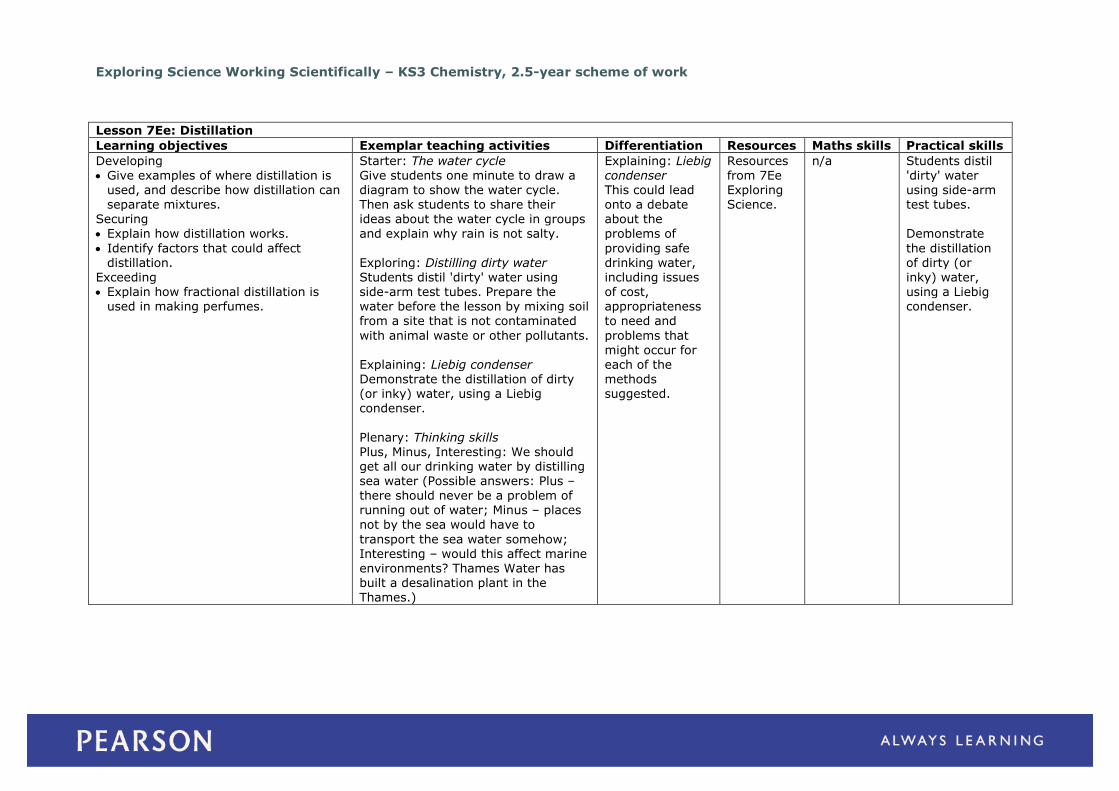
Lesson 7Ee: Distillation
Learning objectives Exemplar teaching activities Differentiation Resources Maths skills Practical skills
Developing Give examples of where distillation is
used, and describe how distillation can separate mixtures.
Securing
Explain how distillation works.
Identify factors that could affect distillation.
Exceeding Explain how fractional distillation is
used in making perfumes.
Starter: The water cycle Give students one minute to draw a diagram to show the water cycle. Then ask students to share their ideas about the water cycle in groups
and explain why rain is not salty.
Exploring: Distilling dirty water Students distil 'dirty' water using side-arm test tubes. Prepare the water before the lesson by mixing soil from a site that is not contaminated
with animal waste or other pollutants. Explaining: Liebig condenser
Demonstrate the distillation of dirty (or inky) water, using a Liebig condenser.
Plenary: Thinking skills Plus, Minus, Interesting: We should get all our drinking water by distilling sea water (Possible answers: Plus – there should never be a problem of running out of water; Minus – places
not by the sea would have to
transport the sea water somehow; Interesting – would this affect marine environments? Thames Water has built a desalination plant in the Thames.)
Explaining: Liebig condenser This could lead onto a debate about the
problems of
providing safe drinking water, including issues of cost, appropriateness to need and
problems that might occur for each of the
methods suggested.
Resources from 7Ee Exploring Science.
n/a Students distil 'dirty' water using side-arm test tubes.
Demonstrate
the distillation of dirty (or inky) water, using a Liebig condenser.
Exploring Science Working Scientifically – KS3 Chemistry, 2.5-year scheme of work
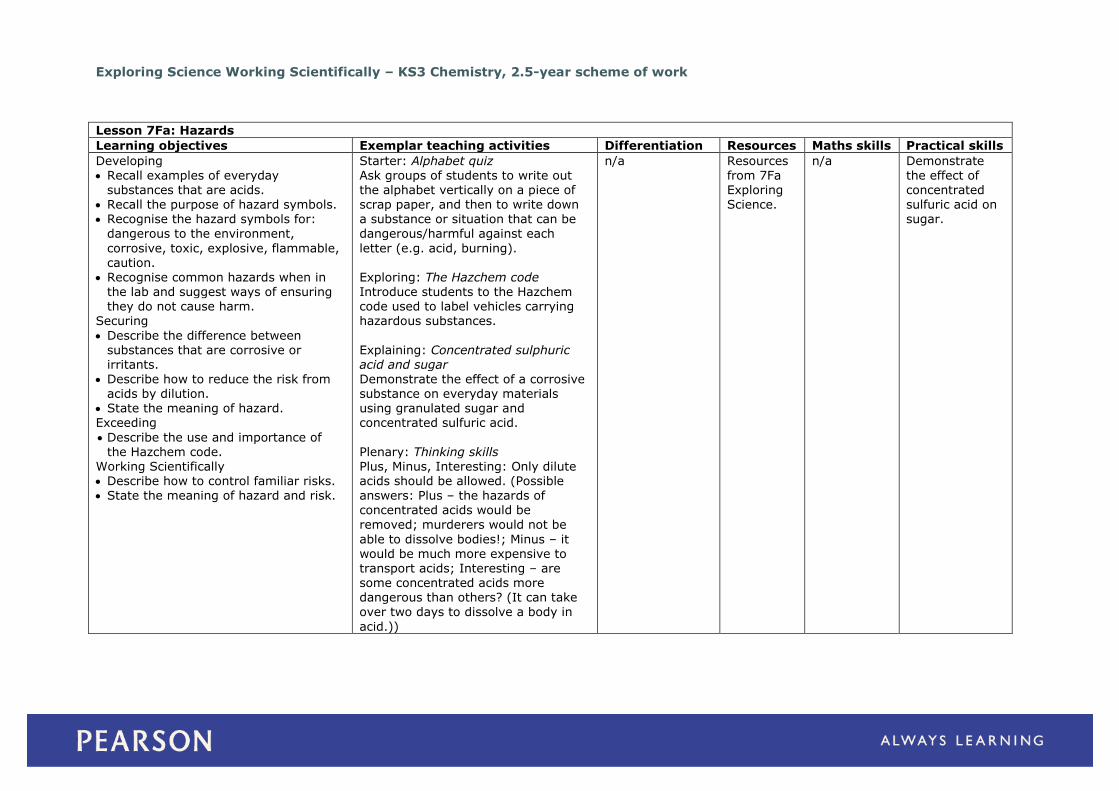
Lesson 7Fa: Hazards
Learning objectives Exemplar teaching activities Differentiation Resources Maths skills Practical skills
Developing Recall examples of everyday
substances that are acids. Recall the purpose of hazard symbols. Recognise the hazard symbols for:
dangerous to the environment,
corrosive, toxic, explosive, flammable, caution.
Recognise common hazards when in the lab and suggest ways of ensuring they do not cause harm.
Securing
Describe the difference between substances that are corrosive or irritants.
Describe how to reduce the risk from acids by dilution.
State the meaning of hazard. Exceeding
Describe the use and importance of the Hazchem code.
Working Scientifically Describe how to control familiar risks. State the meaning of hazard and risk.
Starter: Alphabet quiz Ask groups of students to write out the alphabet vertically on a piece of scrap paper, and then to write down a substance or situation that can be
dangerous/harmful against each
letter (e.g. acid, burning). Exploring: The Hazchem code Introduce students to the Hazchem code used to label vehicles carrying hazardous substances.
Explaining: Concentrated sulphuric acid and sugar
Demonstrate the effect of a corrosive substance on everyday materials using granulated sugar and concentrated sulfuric acid.
Plenary: Thinking skills Plus, Minus, Interesting: Only dilute acids should be allowed. (Possible answers: Plus – the hazards of concentrated acids would be
removed; murderers would not be
able to dissolve bodies!; Minus – it would be much more expensive to transport acids; Interesting – are some concentrated acids more dangerous than others? (It can take over two days to dissolve a body in
acid.))
n/a Resources from 7Fa Exploring Science.
n/a Demonstrate the effect of concentrated sulfuric acid on sugar.

Exploring Science Working Scientifically – KS3 Chemistry, 2.5-year scheme of work
Lesson 7Fb: Indicators
Learning objectives Exemplar teaching activities Differentiation Resources Maths skills Practical skills
Developing Recall examples of everyday
substances that are alkalis. Recall the colour changes associated
with litmus indicator.
Describe how indicators are used to
distinguish between acidic, alkaline and neutral solutions.
Securing Use solutions of known
acidity/alkalinity in order to deduce a colour chart for an indicator.
Explain why litmus is purple in neutral solutions.
Exceeding
Evaluate the effectiveness of different indicators.
Starter: Water into ‘wine’ demonstration Demonstrate the ‘water into wine’ trick. Pour a beaker of ‘water’ (in fact dilute sodium hydroxide solution) into
an apparently empty beaker (which
has a few drops of phenolphthalein indicator at the bottom of the beaker). Exploring: Using red cabbage as an indicator
A two-part practical: students first extract the colour from red cabbage leaves by crushing, dissolving and
filtering. The solution obtained from this process is then used to test a variety of household chemical substances, allowing students to
classify these as acids or alkalis. Explaining: Laboratory indicators Set up a row of test tubes in pairs, with a different indicator in each pair. Demonstrate what happens when the
indictors are mixed together.
Plenary: Thinking skills Odd One Out: water, vinegar, orange juice. (Possible answers: water is the only neutral substance or not an acid.)
Exploring: Using red cabbage as an indicator Students could use other fruit or
vegetables and
assess them for their usefulness as indicators.
Resources from 7Fb Exploring Science.
n/a A two-part practical: students first extract the colour from red
cabbage leaves
by crushing, dissolving and filtering. The solution obtained from this process is
then used to test a variety of household
chemical substances, allowing students to
classify these as acids or alkalis.
Exploring Science Working Scientifically – KS3 Chemistry, 2.5-year scheme of work
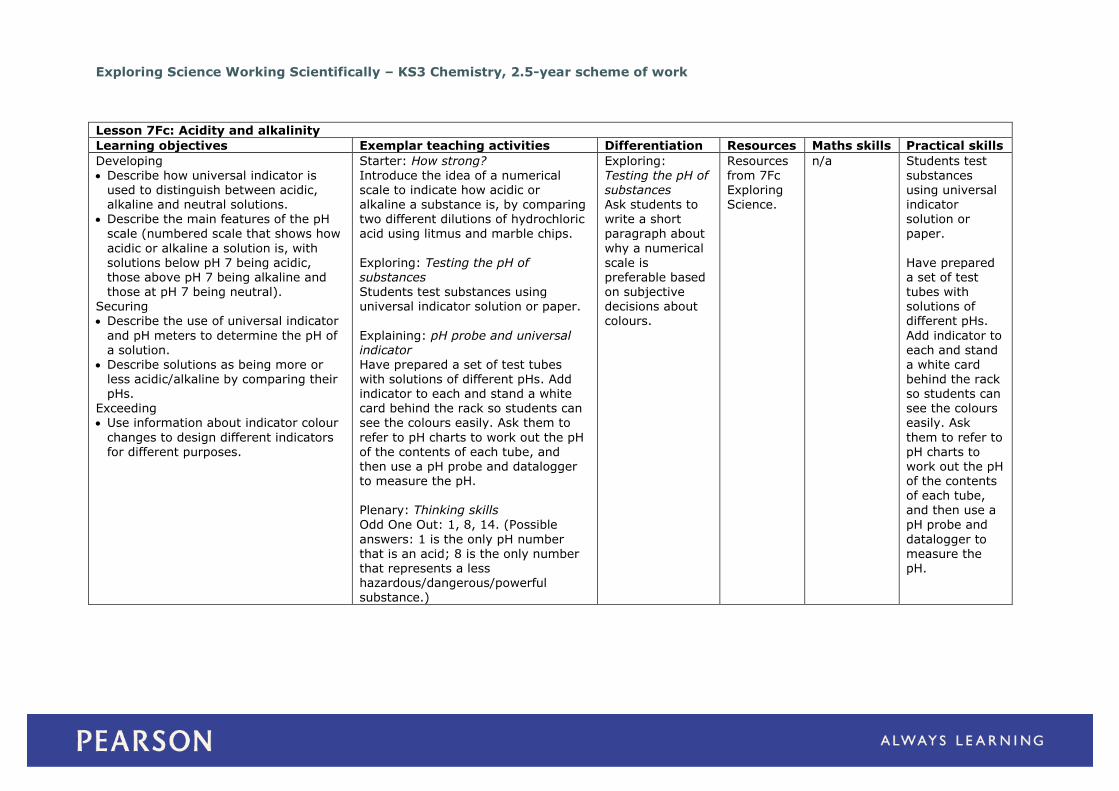
Lesson 7Fc: Acidity and alkalinity
Learning objectives Exemplar teaching activities Differentiation Resources Maths skills Practical skills
Developing Describe how universal indicator is
used to distinguish between acidic, alkaline and neutral solutions.
Describe the main features of the pH
scale (numbered scale that shows how
acidic or alkaline a solution is, with solutions below pH 7 being acidic, those above pH 7 being alkaline and those at pH 7 being neutral).
Securing Describe the use of universal indicator
and pH meters to determine the pH of a solution.
Describe solutions as being more or
less acidic/alkaline by comparing their pHs.
Exceeding Use information about indicator colour
changes to design different indicators for different purposes.
Starter: How strong? Introduce the idea of a numerical scale to indicate how acidic or alkaline a substance is, by comparing two different dilutions of hydrochloric
acid using litmus and marble chips.
Exploring: Testing the pH of substances Students test substances using universal indicator solution or paper.
Explaining: pH probe and universal indicator Have prepared a set of test tubes
with solutions of different pHs. Add indicator to each and stand a white card behind the rack so students can see the colours easily. Ask them to
refer to pH charts to work out the pH of the contents of each tube, and then use a pH probe and datalogger to measure the pH. Plenary: Thinking skills
Odd One Out: 1, 8, 14. (Possible
answers: 1 is the only pH number that is an acid; 8 is the only number that represents a less hazardous/dangerous/powerful substance.)
Exploring: Testing the pH of substances Ask students to write a short
paragraph about
why a numerical scale is preferable based on subjective decisions about colours.
Resources from 7Fc Exploring Science.
n/a Students test substances using universal indicator solution or
paper.
Have prepared a set of test tubes with solutions of different pHs.
Add indicator to each and stand a white card
behind the rack so students can see the colours easily. Ask
them to refer to pH charts to work out the pH of the contents of each tube, and then use a
pH probe and
datalogger to measure the pH.
Exploring Science Working Scientifically – KS3 Chemistry, 2.5-year scheme of work
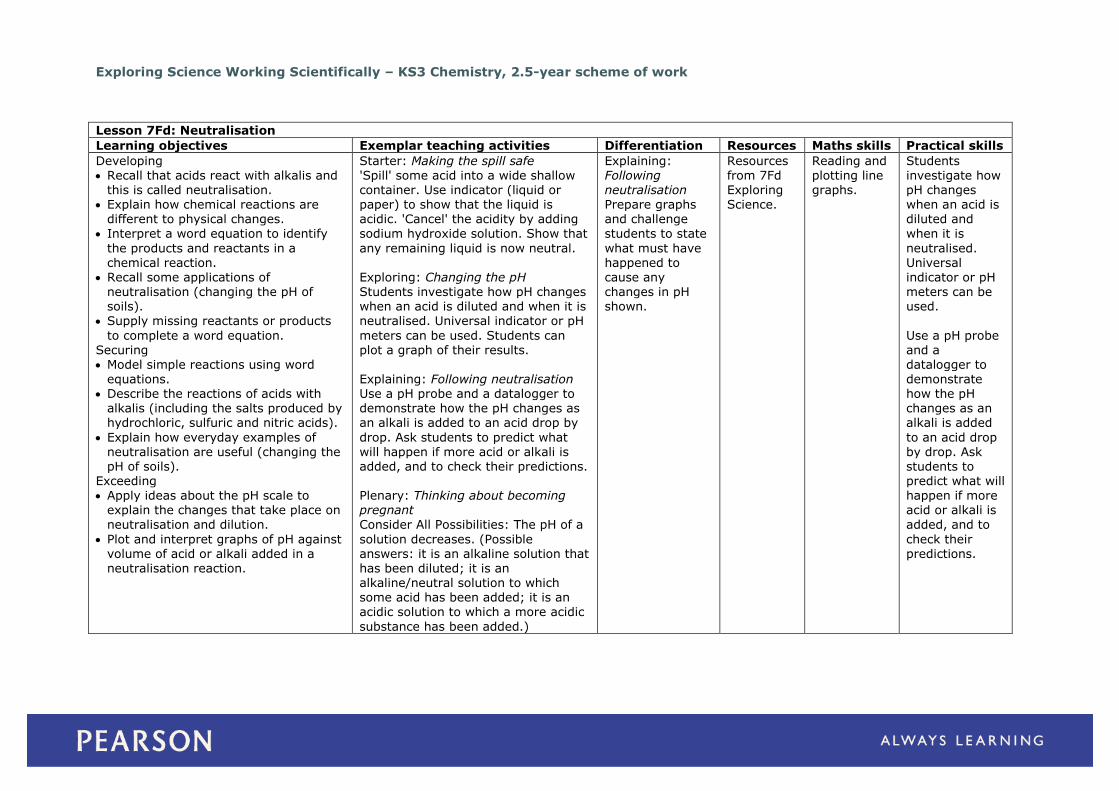
Lesson 7Fd: Neutralisation
Learning objectives Exemplar teaching activities Differentiation Resources Maths skills Practical skills
Developing Recall that acids react with alkalis and
this is called neutralisation. Explain how chemical reactions are
different to physical changes.
Interpret a word equation to identify
the products and reactants in a chemical reaction.
Recall some applications of neutralisation (changing the pH of soils).
Supply missing reactants or products
to complete a word equation. Securing Model simple reactions using word
equations. Describe the reactions of acids with
alkalis (including the salts produced by hydrochloric, sulfuric and nitric acids).
Explain how everyday examples of neutralisation are useful (changing the pH of soils).
Exceeding Apply ideas about the pH scale to
explain the changes that take place on
neutralisation and dilution.
Plot and interpret graphs of pH against volume of acid or alkali added in a neutralisation reaction.
Starter: Making the spill safe 'Spill' some acid into a wide shallow container. Use indicator (liquid or paper) to show that the liquid is acidic. 'Cancel' the acidity by adding
sodium hydroxide solution. Show that
any remaining liquid is now neutral. Exploring: Changing the pH Students investigate how pH changes when an acid is diluted and when it is neutralised. Universal indicator or pH
meters can be used. Students can plot a graph of their results.
Explaining: Following neutralisation Use a pH probe and a datalogger to demonstrate how the pH changes as an alkali is added to an acid drop by
drop. Ask students to predict what will happen if more acid or alkali is added, and to check their predictions. Plenary: Thinking about becoming pregnant
Consider All Possibilities: The pH of a
solution decreases. (Possible answers: it is an alkaline solution that has been diluted; it is an alkaline/neutral solution to which some acid has been added; it is an acidic solution to which a more acidic
substance has been added.)
Explaining: Following neutralisation Prepare graphs and challenge
students to state
what must have happened to cause any changes in pH shown.
Resources from 7Fd Exploring Science.
Reading and plotting line graphs.
Students investigate how pH changes when an acid is diluted and
when it is
neutralised. Universal indicator or pH meters can be used.
Use a pH probe and a datalogger to
demonstrate how the pH changes as an alkali is added
to an acid drop by drop. Ask students to predict what will happen if more acid or alkali is
added, and to
check their predictions.
Exploring Science Working Scientifically – KS3 Chemistry, 2.5-year scheme of work
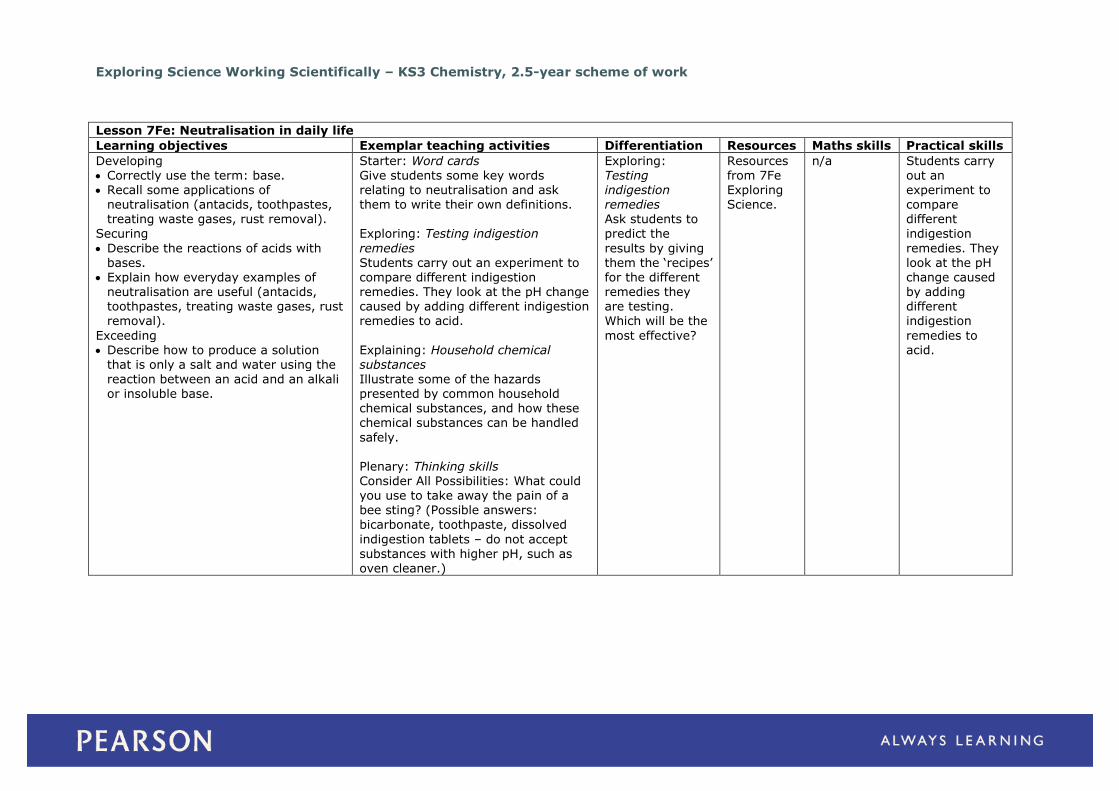
Lesson 7Fe: Neutralisation in daily life
Learning objectives Exemplar teaching activities Differentiation Resources Maths skills Practical skills
Developing Correctly use the term: base. Recall some applications of
neutralisation (antacids, toothpastes, treating waste gases, rust removal).
Securing
Describe the reactions of acids with bases.
Explain how everyday examples of neutralisation are useful (antacids, toothpastes, treating waste gases, rust removal).
Exceeding Describe how to produce a solution
that is only a salt and water using the
reaction between an acid and an alkali or insoluble base.
Starter: Word cards Give students some key words relating to neutralisation and ask them to write their own definitions.
Exploring: Testing indigestion
remedies Students carry out an experiment to compare different indigestion remedies. They look at the pH change caused by adding different indigestion remedies to acid.
Explaining: Household chemical substances
Illustrate some of the hazards presented by common household chemical substances, and how these chemical substances can be handled
safely. Plenary: Thinking skills Consider All Possibilities: What could you use to take away the pain of a bee sting? (Possible answers:
bicarbonate, toothpaste, dissolved
indigestion tablets – do not accept substances with higher pH, such as oven cleaner.)
Exploring: Testing indigestion remedies Ask students to
predict the
results by giving them the ‘recipes’ for the different remedies they are testing. Which will be the
most effective?
Resources from 7Fe Exploring Science.
n/a Students carry out an experiment to compare different
indigestion
remedies. They look at the pH change caused by adding different indigestion
remedies to acid.
Exploring Science Working Scientifically – KS3 Chemistry, 2.5-year scheme of work
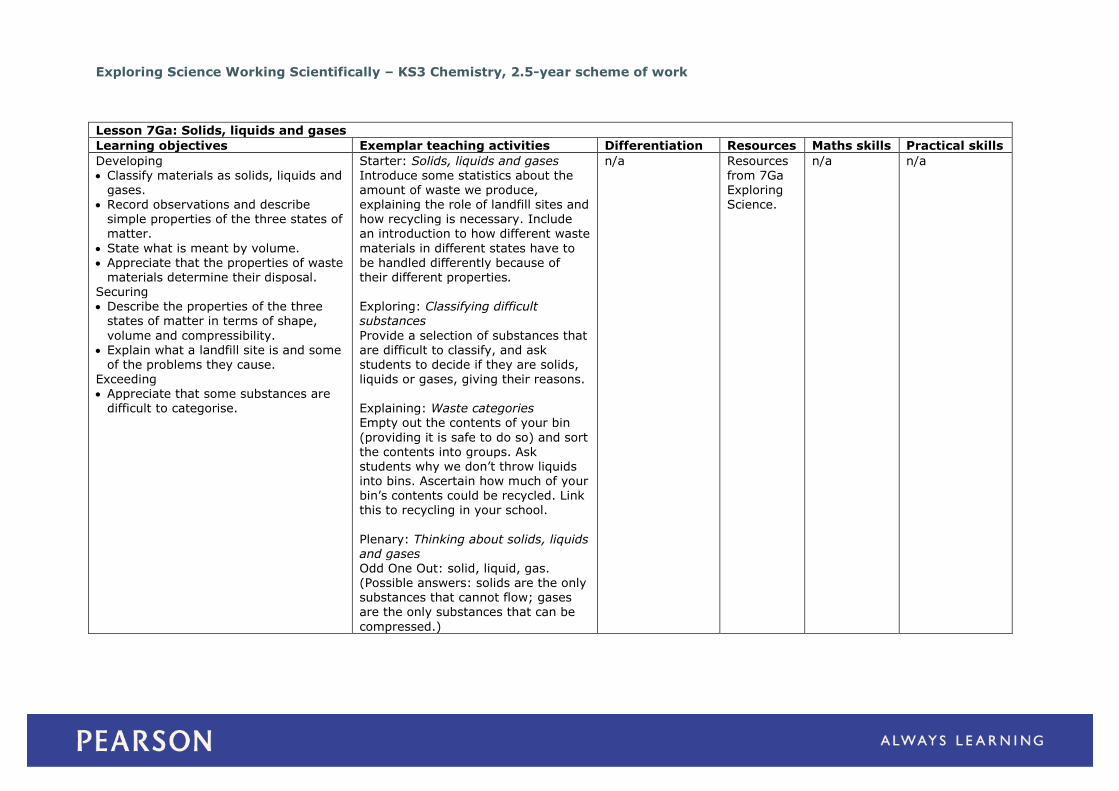
Lesson 7Ga: Solids, liquids and gases
Learning objectives Exemplar teaching activities Differentiation Resources Maths skills Practical skills
Developing Classify materials as solids, liquids and
gases. Record observations and describe
simple properties of the three states of
matter.
State what is meant by volume. Appreciate that the properties of waste
materials determine their disposal. Securing Describe the properties of the three
states of matter in terms of shape,
volume and compressibility. Explain what a landfill site is and some
of the problems they cause.
Exceeding Appreciate that some substances are
difficult to categorise.
Starter: Solids, liquids and gases Introduce some statistics about the amount of waste we produce, explaining the role of landfill sites and how recycling is necessary. Include
an introduction to how different waste
materials in different states have to be handled differently because of their different properties. Exploring: Classifying difficult substances
Provide a selection of substances that are difficult to classify, and ask students to decide if they are solids,
liquids or gases, giving their reasons. Explaining: Waste categories Empty out the contents of your bin
(providing it is safe to do so) and sort the contents into groups. Ask students why we don’t throw liquids into bins. Ascertain how much of your bin’s contents could be recycled. Link this to recycling in your school.
Plenary: Thinking about solids, liquids and gases Odd One Out: solid, liquid, gas. (Possible answers: solids are the only substances that cannot flow; gases are the only substances that can be
compressed.)
n/a Resources from 7Ga Exploring Science.
n/a n/a
Exploring Science Working Scientifically – KS3 Chemistry, 2.5-year scheme of work
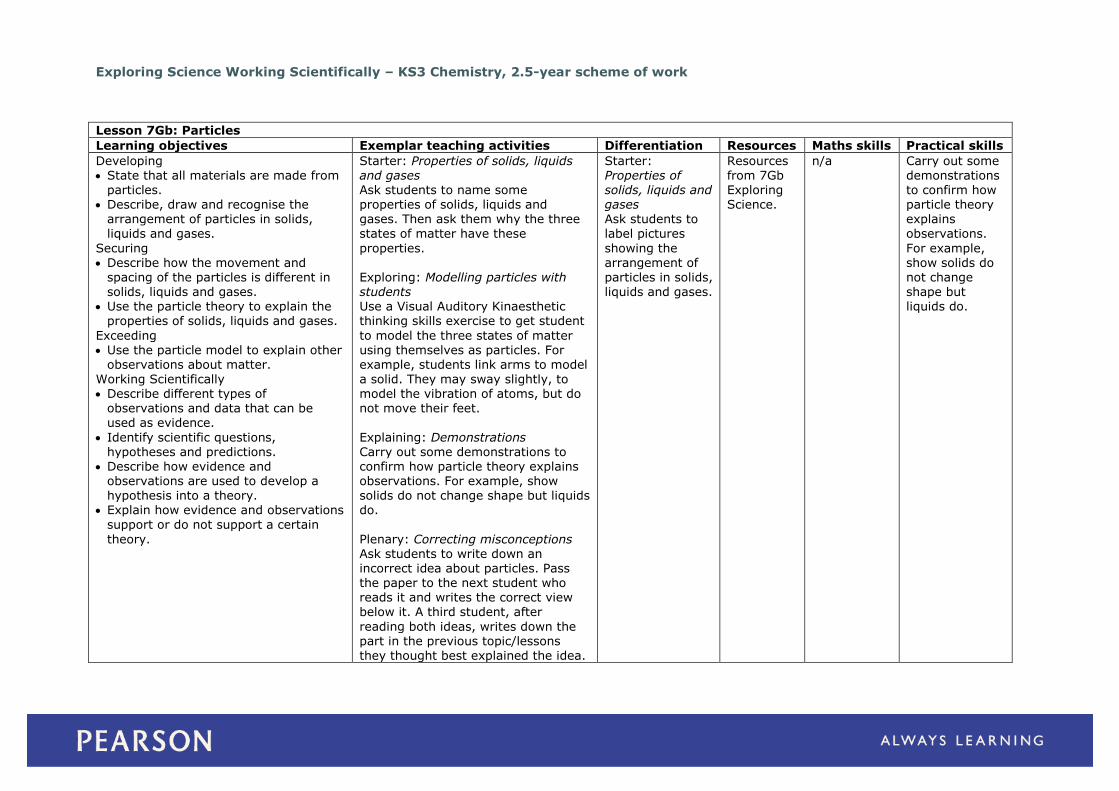
Lesson 7Gb: Particles
Learning objectives Exemplar teaching activities Differentiation Resources Maths skills Practical skills
Developing State that all materials are made from
particles. Describe, draw and recognise the
arrangement of particles in solids,
liquids and gases.
Securing Describe how the movement and
spacing of the particles is different in solids, liquids and gases.
Use the particle theory to explain the properties of solids, liquids and gases.
Exceeding Use the particle model to explain other
observations about matter.
Working Scientifically Describe different types of
observations and data that can be used as evidence.
Identify scientific questions, hypotheses and predictions.
Describe how evidence and observations are used to develop a hypothesis into a theory.
Explain how evidence and observations
support or do not support a certain
theory.
Starter: Properties of solids, liquids and gases Ask students to name some properties of solids, liquids and gases. Then ask them why the three
states of matter have these
properties. Exploring: Modelling particles with students Use a Visual Auditory Kinaesthetic thinking skills exercise to get student
to model the three states of matter using themselves as particles. For example, students link arms to model
a solid. They may sway slightly, to model the vibration of atoms, but do not move their feet.
Explaining: Demonstrations Carry out some demonstrations to confirm how particle theory explains observations. For example, show solids do not change shape but liquids do.
Plenary: Correcting misconceptions Ask students to write down an incorrect idea about particles. Pass the paper to the next student who reads it and writes the correct view below it. A third student, after
reading both ideas, writes down the part in the previous topic/lessons they thought best explained the idea.
Starter: Properties of solids, liquids and gases Ask students to
label pictures
showing the arrangement of particles in solids, liquids and gases.
Resources from 7Gb Exploring Science.
n/a Carry out some demonstrations to confirm how particle theory explains
observations.
For example, show solids do not change shape but liquids do.

Exploring Science Working Scientifically – KS3 Chemistry, 2.5-year scheme of work
Lesson 7Gc: Brownian motion
Learning objectives Exemplar teaching activities Differentiation Resources Maths skills Practical skills
Developing Describe Brownian motion. State where Brownian motion can be
observed. Securing
Explain how Brownian motion occurs,
using particle theory. Convert metres to nanometres and
vice versa. Exceeding Explain how evidence from Brownian
motion is used to support the particle
theory.
Starter: Thinking about particles Consider All Possibilities: A tiny speck floating on some water is seen to be moving slightly. What ideas could explain this movement? (Possible
answers: it is being blown by the
wind; someone is blowing on it; the speck is a tiny organism that is moving; water particles are bumping into it.) Exploring: Measuring the very small
Introduce ideas of units and scales. Give students measurements to convert, including the nano-scale:
metres to millimetres, micrometres and nanometres. Explaining: Investigating Brownian
motions Set up a demonstration of Brownian motion using a smoke cell. Plenary: Thinking about theories Odd One Out: the Sun and Moon
circle the Earth, Rajesh will go
shopping tomorrow, all things can exist in one of three states, shadows are formed when light cannot pass through something. (Possible answers: ‘the Sun and Moon circle the Earth’ has been disproved;
‘Rajesh …’ is a prediction whereas the others are theories.)
Exploring: Measuring the very small Extend this activity by asking
students to
measure some objects and ask them to convert their measurements in metres and
centimetres into millimetres, micrometres and
nanometres.
Resources from 7Gc Exploring Science.
Converting between metres and nanometres.
Set up a demonstration of Brownian motion using a smoke cell.
Exploring Science Working Scientifically – KS3 Chemistry, 2.5-year scheme of work
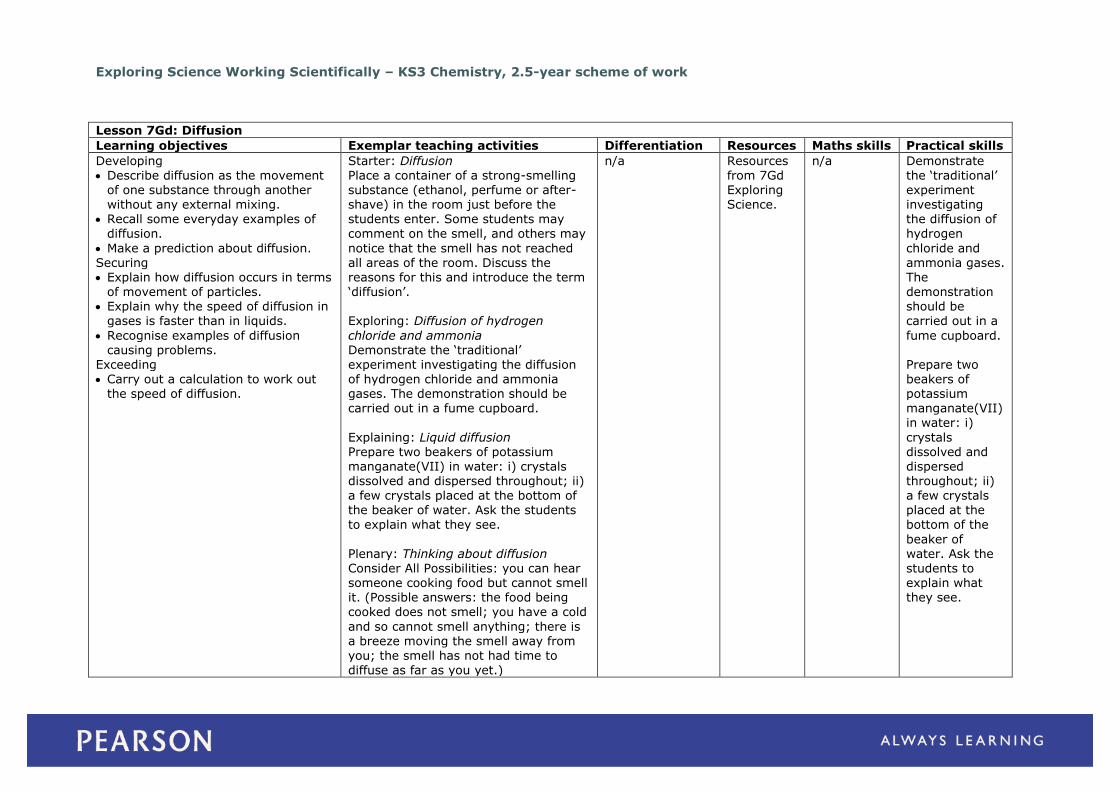
Lesson 7Gd: Diffusion
Learning objectives Exemplar teaching activities Differentiation Resources Maths skills Practical skills
Developing Describe diffusion as the movement
of one substance through another without any external mixing.
Recall some everyday examples of
diffusion.
Make a prediction about diffusion. Securing Explain how diffusion occurs in terms
of movement of particles. Explain why the speed of diffusion in
gases is faster than in liquids.
Recognise examples of diffusion causing problems.
Exceeding
Carry out a calculation to work out the speed of diffusion.
Starter: Diffusion Place a container of a strong-smelling substance (ethanol, perfume or after-shave) in the room just before the students enter. Some students may
comment on the smell, and others may
notice that the smell has not reached all areas of the room. Discuss the reasons for this and introduce the term ‘diffusion’. Exploring: Diffusion of hydrogen
chloride and ammonia Demonstrate the ‘traditional’ experiment investigating the diffusion
of hydrogen chloride and ammonia gases. The demonstration should be carried out in a fume cupboard.
Explaining: Liquid diffusion Prepare two beakers of potassium manganate(VII) in water: i) crystals dissolved and dispersed throughout; ii) a few crystals placed at the bottom of the beaker of water. Ask the students
to explain what they see.
Plenary: Thinking about diffusion Consider All Possibilities: you can hear someone cooking food but cannot smell it. (Possible answers: the food being cooked does not smell; you have a cold
and so cannot smell anything; there is a breeze moving the smell away from you; the smell has not had time to
diffuse as far as you yet.)
n/a Resources from 7Gd Exploring Science.
n/a Demonstrate the ‘traditional’ experiment investigating the diffusion of
hydrogen
chloride and ammonia gases. The demonstration should be carried out in a
fume cupboard. Prepare two
beakers of potassium manganate(VII) in water: i)
crystals dissolved and dispersed throughout; ii) a few crystals placed at the
bottom of the
beaker of water. Ask the students to explain what they see.
Exploring Science Working Scientifically – KS3 Chemistry, 2.5-year scheme of work
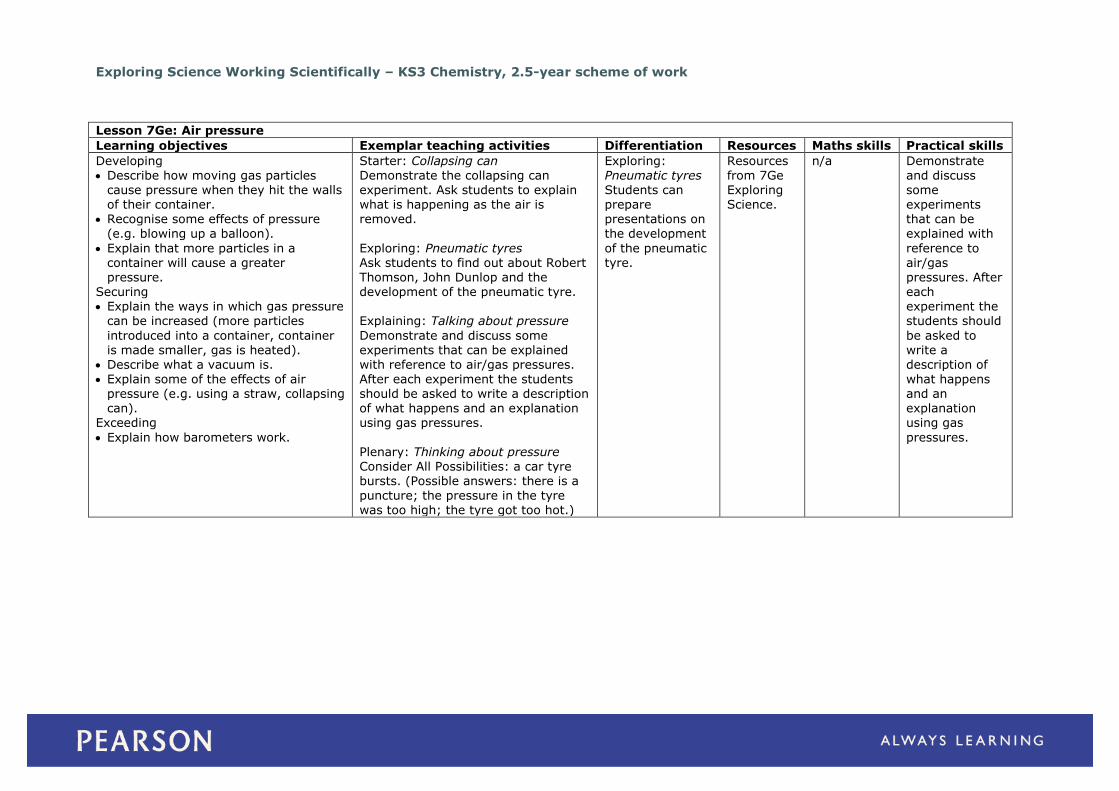
Lesson 7Ge: Air pressure
Learning objectives Exemplar teaching activities Differentiation Resources Maths skills Practical skills
Developing Describe how moving gas particles
cause pressure when they hit the walls of their container.
Recognise some effects of pressure
(e.g. blowing up a balloon).
Explain that more particles in a container will cause a greater pressure.
Securing Explain the ways in which gas pressure
can be increased (more particles
introduced into a container, container is made smaller, gas is heated).
Describe what a vacuum is.
Explain some of the effects of air pressure (e.g. using a straw, collapsing can).
Exceeding
Explain how barometers work.
Starter: Collapsing can Demonstrate the collapsing can experiment. Ask students to explain what is happening as the air is removed.
Exploring: Pneumatic tyres Ask students to find out about Robert Thomson, John Dunlop and the development of the pneumatic tyre. Explaining: Talking about pressure
Demonstrate and discuss some experiments that can be explained with reference to air/gas pressures.
After each experiment the students should be asked to write a description of what happens and an explanation using gas pressures.
Plenary: Thinking about pressure Consider All Possibilities: a car tyre bursts. (Possible answers: there is a puncture; the pressure in the tyre was too high; the tyre got too hot.)
Exploring: Pneumatic tyres Students can prepare presentations on
the development
of the pneumatic tyre.
Resources from 7Ge Exploring Science.
n/a Demonstrate and discuss some experiments that can be
explained with
reference to air/gas pressures. After each experiment the students should
be asked to write a description of
what happens and an explanation using gas
pressures.

Exploring Science Working Scientifically – KS3 Chemistry, 2.5-year scheme of work
Lesson 7Ha: The air we breathe
Learning objectives Exemplar teaching activities Differentiation Resources Maths skills Practical skills
Developing Describe the difference between a
mixture and pure substance. Recall the names of the most
important gases that are mixed
together in air.
State that all matter is made up of tiny particles called atoms.
Explain the differences between elements, compounds and mixtures (with reference to elements being substances that cannot be broken
down into anything simpler by chemical means).
Explain the difference between an
atom and a molecule. Interpret particle models of mixtures,
atoms, molecules, elements and compounds.
Securing Explain, in terms of atoms and
particles, how air is a mixture of elements, compounds, atoms and molecules.
Represent atoms, molecules of
elements and simple compounds using
a model. Exceeding Recall that atoms can be joined
together by bonds and that bonds affect the shape of a molecule.
Working Scientifically
Draw and use tables, bar charts, pie charts, scatter graphs and line graphs.
State the difference between
quantitative and qualitative data. State the difference between discrete
Starter: About purity Students draw up a table on a piece of paper with two columns headed ‘pure’ and ‘mixture’/‘impure’. They define the terms and list as many
words or phrases connected with the
headings as possible. Discuss the meaning of the terms when referring to matter. Exploring: Displaying data Tell students about a series of
investigations that could be done about air and ask them to sketch the type of chart or graph that they
would draw for each. Students should be encouraged to add labels to the axes to show which variable goes where.
Explaining: Elements, compounds and mixtures Display a variety of space-filling models showing elements, mixtures and compounds. Explain to students
what to look for when deciding
whether something is an element or a compound. Plenary: Thinking about mixtures Odd One Out: nitrogen, oxygen, carbon dioxide. (Possible answers:
carbon dioxide is a compound and the other two are elements.)
Explaining: Elements, compounds and mixtures Extend this by
asking students
to pick appropriate terms to describe models as you display them (e.g. pure,
mixture, atoms, molecules, element and
compound).
Resources from 7Ha Exploring Science.
The use of: tables; line graphs; scatter graphs; pie
charts; and
bar charts.
n/a
Exploring Science Working Scientifically – KS3 Chemistry, 2.5-year scheme of work
and continuous quantitative data. Interpret tables, bar charts, pie charts
and scatter graphs.
Identify the best way to present different types of data.
Exploring Science Working Scientifically – KS3 Chemistry, 2.5-year scheme of work
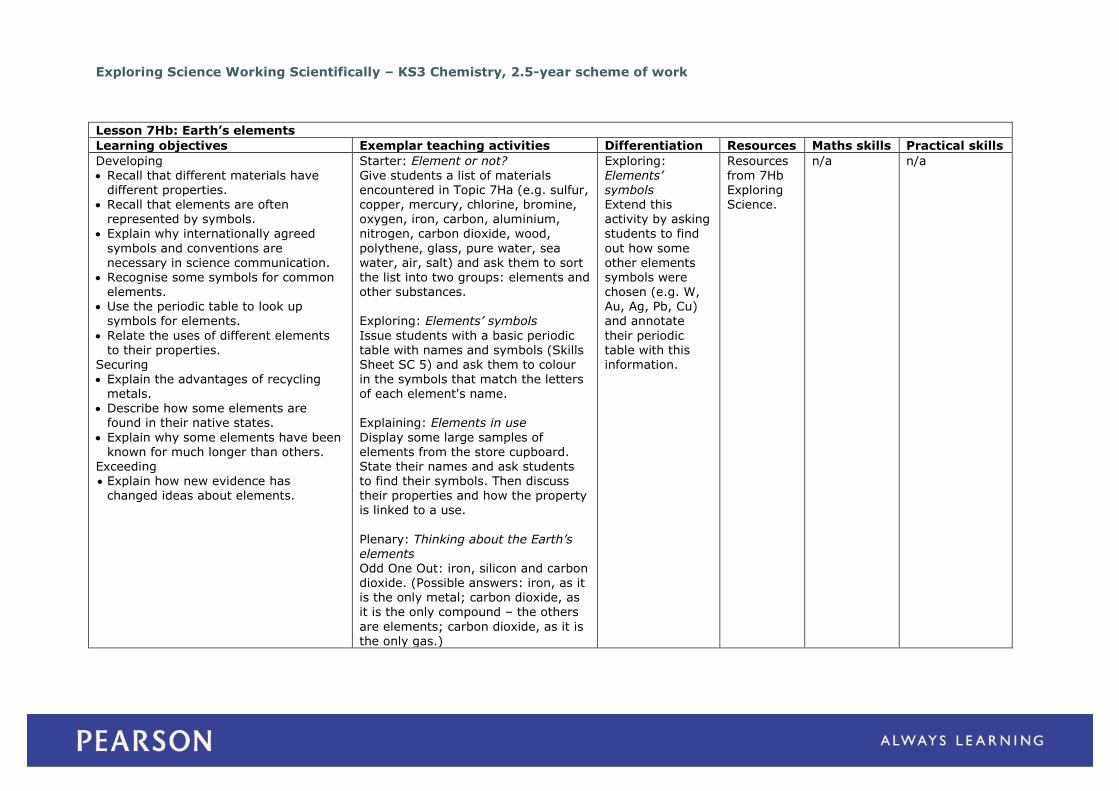
Lesson 7Hb: Earth’s elements
Learning objectives Exemplar teaching activities Differentiation Resources Maths skills Practical skills
Developing Recall that different materials have
different properties. Recall that elements are often
represented by symbols.
Explain why internationally agreed
symbols and conventions are necessary in science communication.
Recognise some symbols for common elements.
Use the periodic table to look up symbols for elements.
Relate the uses of different elements to their properties.
Securing
Explain the advantages of recycling metals.
Describe how some elements are found in their native states.
Explain why some elements have been known for much longer than others.
Exceeding Explain how new evidence has
changed ideas about elements.
Starter: Element or not? Give students a list of materials encountered in Topic 7Ha (e.g. sulfur, copper, mercury, chlorine, bromine, oxygen, iron, carbon, aluminium,
nitrogen, carbon dioxide, wood,
polythene, glass, pure water, sea water, air, salt) and ask them to sort the list into two groups: elements and other substances. Exploring: Elements’ symbols
Issue students with a basic periodic table with names and symbols (Skills Sheet SC 5) and ask them to colour
in the symbols that match the letters of each element's name. Explaining: Elements in use
Display some large samples of elements from the store cupboard. State their names and ask students to find their symbols. Then discuss their properties and how the property is linked to a use.
Plenary: Thinking about the Earth’s elements Odd One Out: iron, silicon and carbon dioxide. (Possible answers: iron, as it is the only metal; carbon dioxide, as it is the only compound – the others
are elements; carbon dioxide, as it is the only gas.)
Exploring: Elements’ symbols Extend this activity by asking
students to find
out how some other elements symbols were chosen (e.g. W, Au, Ag, Pb, Cu) and annotate
their periodic table with this information.
Resources from 7Hb Exploring Science.
n/a n/a

Exploring Science Working Scientifically – KS3 Chemistry, 2.5-year scheme of work
Lesson 7Hc: Metals and non-metals
Learning objectives Exemplar teaching activities Differentiation Resources Maths skills Practical skills
Developing Identify some common materials as
being metals or not. Describe some common properties of
metallic and non-metallic materials.
Describe the evidence needed to
decide whether an element is a metal or a non-metal.
Relate the uses of different elements to their properties (includes magnetism).
Securing
Use ideas about the periodic table to identify the positions of metal and non-metal elements.
Use evidence to classify unfamiliar materials as being metal elements, metallic, non-metal elements, non-metallic.
Exceeding Interpret experimental evidence to
identify elements.
Starter: Uses of metals Introduce a display of different metals to the class and ask students to match each metal with a possible use.
Exploring: What is a metal? Students carry out three tests to examine the thermal conduction, electrical conduction and density of metals.
Explaining: Linking properties to uses Demonstrate some of the other properties of metals (malleability,
flexibility, ductility. In each case, link the property of the metal with a use. Plenary: Poster plenary
Ask students to summarise the properties of metals and non-metals as a poster display showing examples of metals and non-metals, along with important properties and how those properties are related to the uses of
the elements.
Starter: Uses of metals Extend to discuss the properties of the metals for a
particular use.
Resources from 7Hc Exploring Science.
n/a Students carry out three tests to examine the thermal conduction,
electrical
conduction and density of metals.
Exploring Science Working Scientifically – KS3 Chemistry, 2.5-year scheme of work
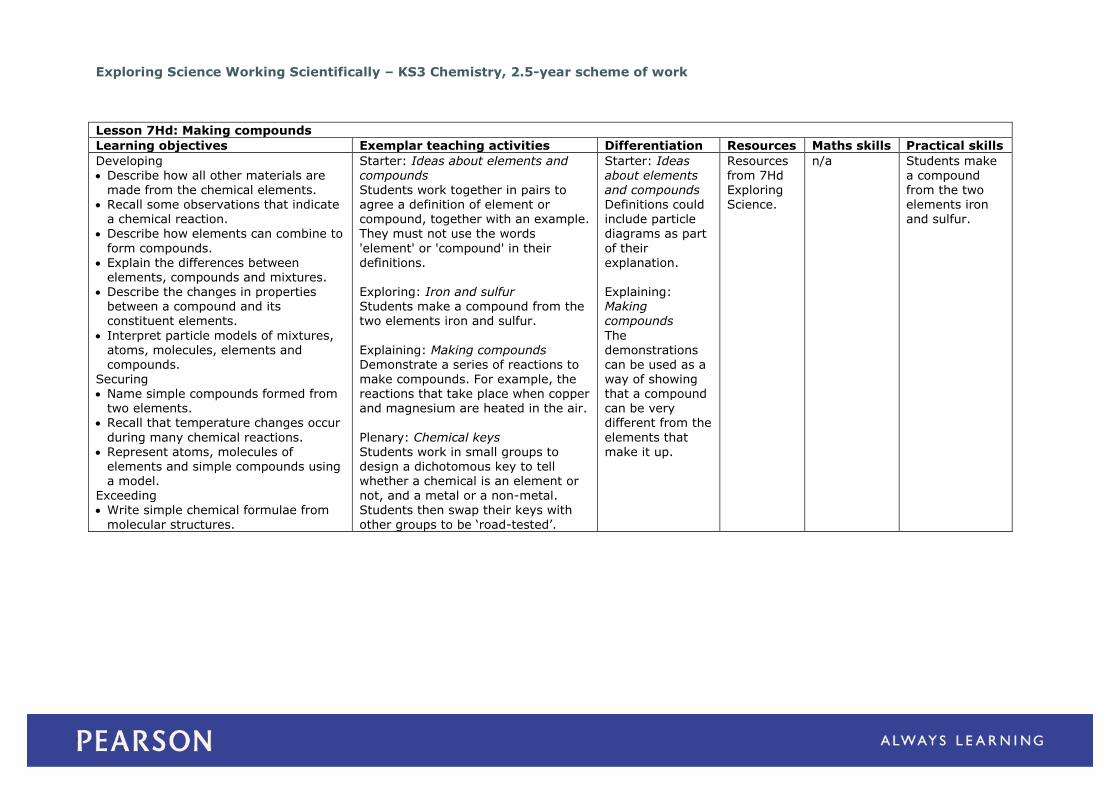
Lesson 7Hd: Making compounds
Learning objectives Exemplar teaching activities Differentiation Resources Maths skills Practical skills
Developing Describe how all other materials are
made from the chemical elements. Recall some observations that indicate
a chemical reaction.
Describe how elements can combine to
form compounds. Explain the differences between
elements, compounds and mixtures. Describe the changes in properties
between a compound and its constituent elements.
Interpret particle models of mixtures, atoms, molecules, elements and compounds.
Securing Name simple compounds formed from
two elements. Recall that temperature changes occur
during many chemical reactions. Represent atoms, molecules of
elements and simple compounds using a model.
Exceeding Write simple chemical formulae from
molecular structures.
Starter: Ideas about elements and compounds Students work together in pairs to agree a definition of element or compound, together with an example.
They must not use the words
'element' or 'compound' in their definitions. Exploring: Iron and sulfur Students make a compound from the two elements iron and sulfur.
Explaining: Making compounds Demonstrate a series of reactions to
make compounds. For example, the reactions that take place when copper and magnesium are heated in the air.
Plenary: Chemical keys Students work in small groups to design a dichotomous key to tell whether a chemical is an element or not, and a metal or a non-metal. Students then swap their keys with
other groups to be ‘road-tested’.
Starter: Ideas about elements and compounds Definitions could include particle
diagrams as part
of their explanation. Explaining: Making compounds
The demonstrations can be used as a
way of showing that a compound can be very different from the
elements that make it up.
Resources from 7Hd Exploring Science.
n/a Students make a compound from the two elements iron and sulfur.
Exploring Science Working Scientifically – KS3 Chemistry, 2.5-year scheme of work
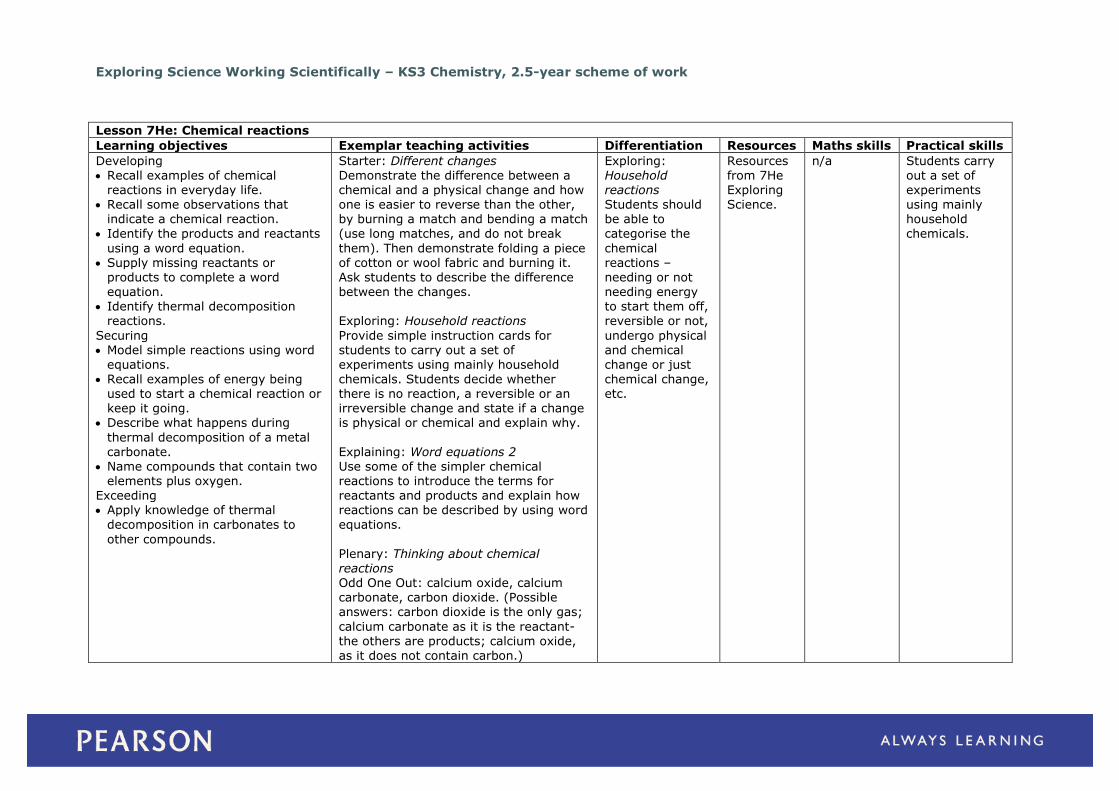
Lesson 7He: Chemical reactions
Learning objectives Exemplar teaching activities Differentiation Resources Maths skills Practical skills
Developing Recall examples of chemical
reactions in everyday life. Recall some observations that
indicate a chemical reaction.
Identify the products and reactants
using a word equation. Supply missing reactants or
products to complete a word equation.
Identify thermal decomposition reactions.
Securing Model simple reactions using word
equations.
Recall examples of energy being used to start a chemical reaction or keep it going.
Describe what happens during
thermal decomposition of a metal carbonate.
Name compounds that contain two elements plus oxygen.
Exceeding Apply knowledge of thermal
decomposition in carbonates to
other compounds.
Starter: Different changes Demonstrate the difference between a chemical and a physical change and how one is easier to reverse than the other, by burning a match and bending a match
(use long matches, and do not break
them). Then demonstrate folding a piece of cotton or wool fabric and burning it. Ask students to describe the difference between the changes. Exploring: Household reactions
Provide simple instruction cards for students to carry out a set of experiments using mainly household
chemicals. Students decide whether there is no reaction, a reversible or an irreversible change and state if a change is physical or chemical and explain why.
Explaining: Word equations 2 Use some of the simpler chemical reactions to introduce the terms for reactants and products and explain how reactions can be described by using word
equations.
Plenary: Thinking about chemical reactions Odd One Out: calcium oxide, calcium carbonate, carbon dioxide. (Possible answers: carbon dioxide is the only gas;
calcium carbonate as it is the reactant- the others are products; calcium oxide, as it does not contain carbon.)
Exploring: Household reactions Students should be able to
categorise the
chemical reactions – needing or not needing energy to start them off, reversible or not,
undergo physical and chemical change or just
chemical change, etc.
Resources from 7He Exploring Science.
n/a Students carry out a set of experiments using mainly household
chemicals.
Exploring Science Working Scientifically – KS3 Chemistry, 2.5-year scheme of work
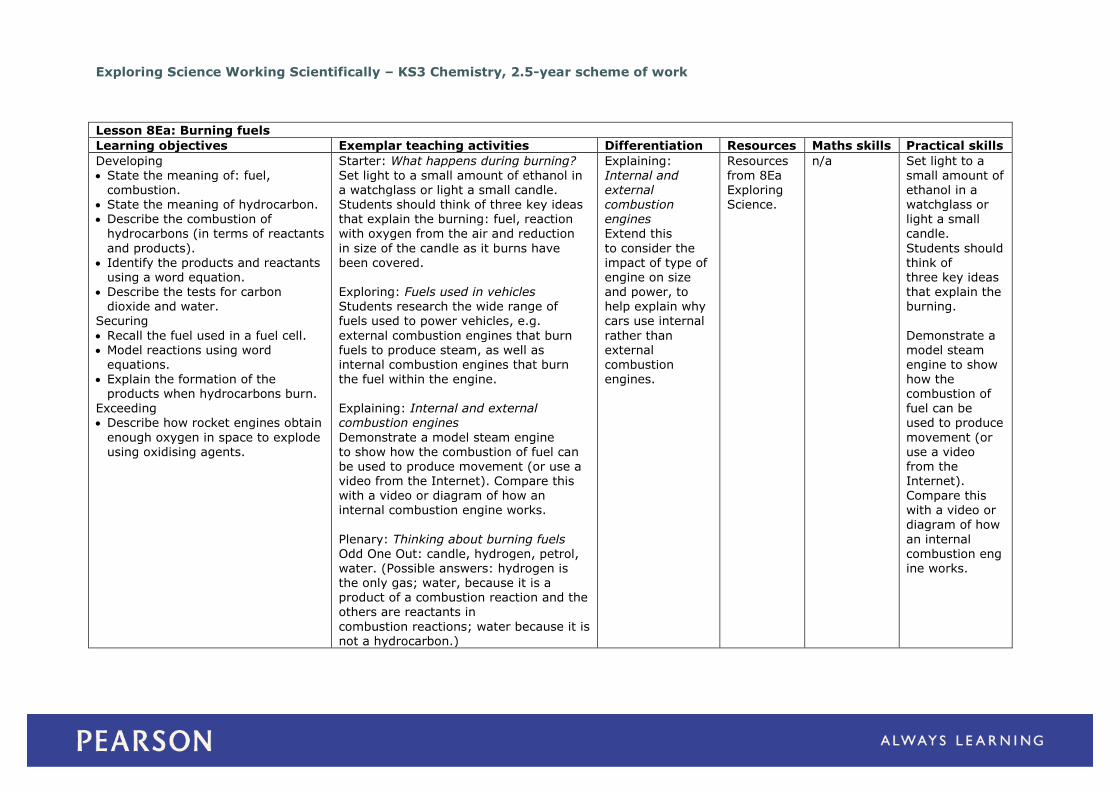
Lesson 8Ea: Burning fuels
Learning objectives Exemplar teaching activities Differentiation Resources Maths skills Practical skills
Developing State the meaning of: fuel,
combustion. State the meaning of hydrocarbon. Describe the combustion of
hydrocarbons (in terms of reactants
and products). Identify the products and reactants
using a word equation. Describe the tests for carbon
dioxide and water. Securing
Recall the fuel used in a fuel cell. Model reactions using word
equations.
Explain the formation of the products when hydrocarbons burn.
Exceeding Describe how rocket engines obtain
enough oxygen in space to explode using oxidising agents.
Starter: What happens during burning? Set light to a small amount of ethanol in a watchglass or light a small candle. Students should think of three key ideas that explain the burning: fuel, reaction
with oxygen from the air and reduction
in size of the candle as it burns have been covered. Exploring: Fuels used in vehicles Students research the wide range of fuels used to power vehicles, e.g.
external combustion engines that burn fuels to produce steam, as well as internal combustion engines that burn
the fuel within the engine. Explaining: Internal and external combustion engines
Demonstrate a model steam engine to show how the combustion of fuel can be used to produce movement (or use a video from the Internet). Compare this with a video or diagram of how an internal combustion engine works.
Plenary: Thinking about burning fuels Odd One Out: candle, hydrogen, petrol, water. (Possible answers: hydrogen is the only gas; water, because it is a product of a combustion reaction and the others are reactants in
combustion reactions; water because it is not a hydrocarbon.)
Explaining: Internal and external combustion engines
Extend this
to consider the impact of type of engine on size and power, to help explain why cars use internal
rather than external combustion
engines.
Resources from 8Ea Exploring Science.
n/a Set light to a small amount of ethanol in a watchglass or light a small
candle.
Students should think of three key ideas that explain the burning.
Demonstrate a model steam engine to show
how the combustion of fuel can be used to produce
movement (or use a video from the Internet). Compare this with a video or
diagram of how
an internal combustion engine works.
Exploring Science Working Scientifically – KS3 Chemistry, 2.5-year scheme of work
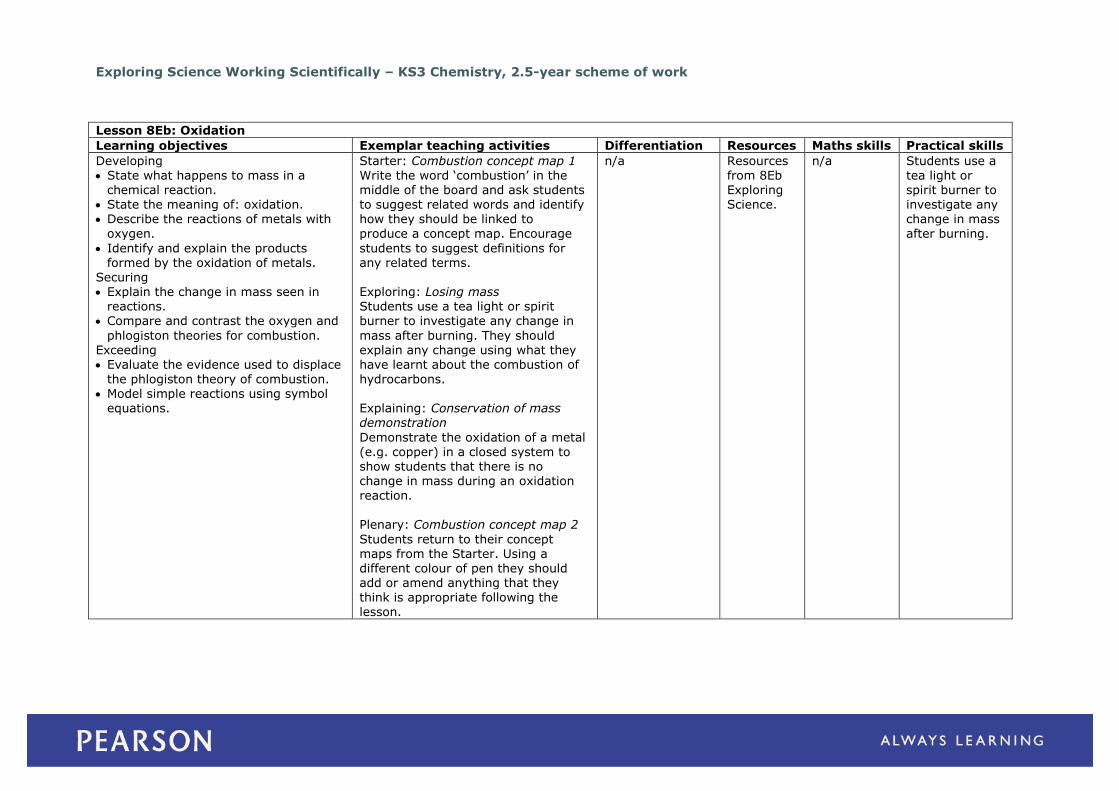
Lesson 8Eb: Oxidation
Learning objectives Exemplar teaching activities Differentiation Resources Maths skills Practical skills
Developing State what happens to mass in a
chemical reaction. State the meaning of: oxidation. Describe the reactions of metals with
oxygen.
Identify and explain the products formed by the oxidation of metals.
Securing Explain the change in mass seen in
reactions. Compare and contrast the oxygen and
phlogiston theories for combustion. Exceeding Evaluate the evidence used to displace
the phlogiston theory of combustion. Model simple reactions using symbol
equations.
Starter: Combustion concept map 1 Write the word ‘combustion’ in the middle of the board and ask students to suggest related words and identify how they should be linked to
produce a concept map. Encourage
students to suggest definitions for any related terms. Exploring: Losing mass Students use a tea light or spirit burner to investigate any change in
mass after burning. They should explain any change using what they have learnt about the combustion of
hydrocarbons. Explaining: Conservation of mass demonstration
Demonstrate the oxidation of a metal (e.g. copper) in a closed system to show students that there is no change in mass during an oxidation reaction.
Plenary: Combustion concept map 2
Students return to their concept maps from the Starter. Using a different colour of pen they should add or amend anything that they think is appropriate following the lesson.
n/a Resources from 8Eb Exploring Science.
n/a Students use a tea light or spirit burner to investigate any change in mass
after burning.
Exploring Science Working Scientifically – KS3 Chemistry, 2.5-year scheme of work
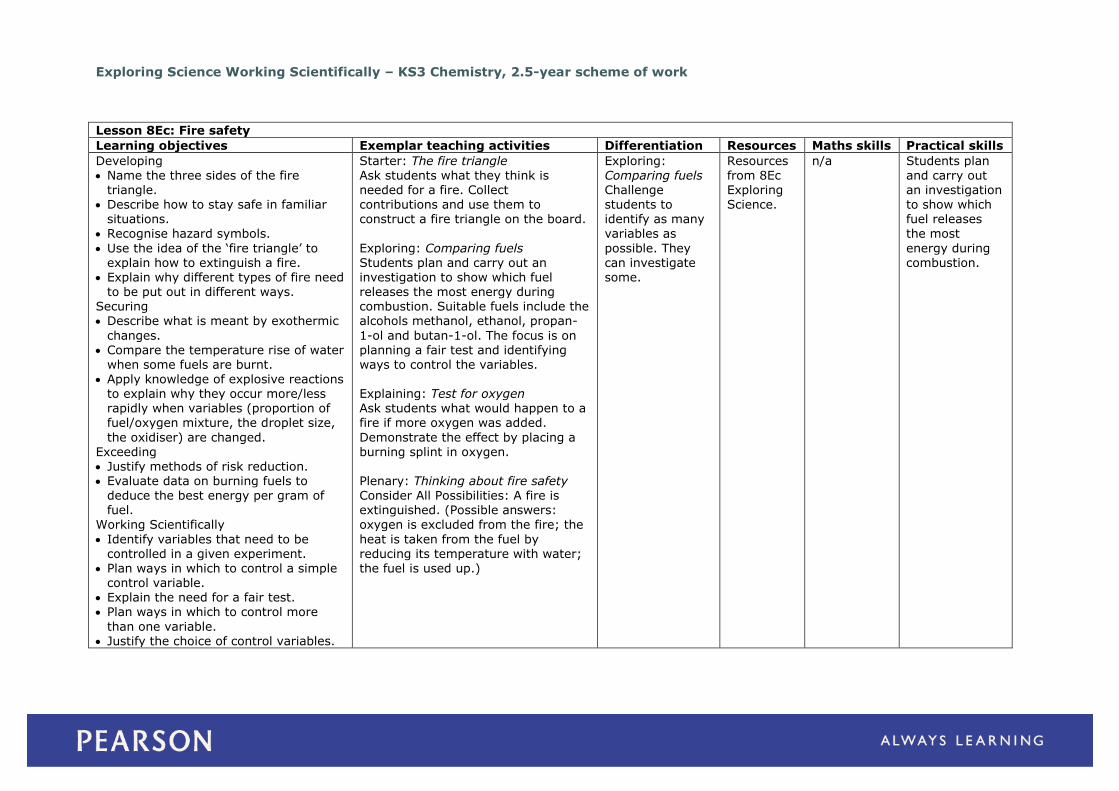
Lesson 8Ec: Fire safety
Learning objectives Exemplar teaching activities Differentiation Resources Maths skills Practical skills
Developing Name the three sides of the fire
triangle. Describe how to stay safe in familiar
situations.
Recognise hazard symbols.
Use the idea of the ‘fire triangle’ to explain how to extinguish a fire.
Explain why different types of fire need to be put out in different ways.
Securing Describe what is meant by exothermic
changes. Compare the temperature rise of water
when some fuels are burnt.
Apply knowledge of explosive reactions to explain why they occur more/less rapidly when variables (proportion of fuel/oxygen mixture, the droplet size,
the oxidiser) are changed. Exceeding Justify methods of risk reduction. Evaluate data on burning fuels to
deduce the best energy per gram of fuel.
Working Scientifically
Identify variables that need to be controlled in a given experiment.
Plan ways in which to control a simple control variable.
Explain the need for a fair test. Plan ways in which to control more
than one variable. Justify the choice of control variables.
Starter: The fire triangle Ask students what they think is needed for a fire. Collect contributions and use them to construct a fire triangle on the board.
Exploring: Comparing fuels Students plan and carry out an investigation to show which fuel releases the most energy during combustion. Suitable fuels include the alcohols methanol, ethanol, propan-
1-ol and butan-1-ol. The focus is on planning a fair test and identifying ways to control the variables.
Explaining: Test for oxygen Ask students what would happen to a fire if more oxygen was added.
Demonstrate the effect by placing a burning splint in oxygen. Plenary: Thinking about fire safety Consider All Possibilities: A fire is extinguished. (Possible answers:
oxygen is excluded from the fire; the
heat is taken from the fuel by reducing its temperature with water; the fuel is used up.)
Exploring: Comparing fuels Challenge students to identify as many
variables as
possible. They can investigate some.
Resources from 8Ec Exploring Science.
n/a Students plan and carry out an investigation to show which fuel releases
the most
energy during combustion.
Exploring Science Working Scientifically – KS3 Chemistry, 2.5-year scheme of work
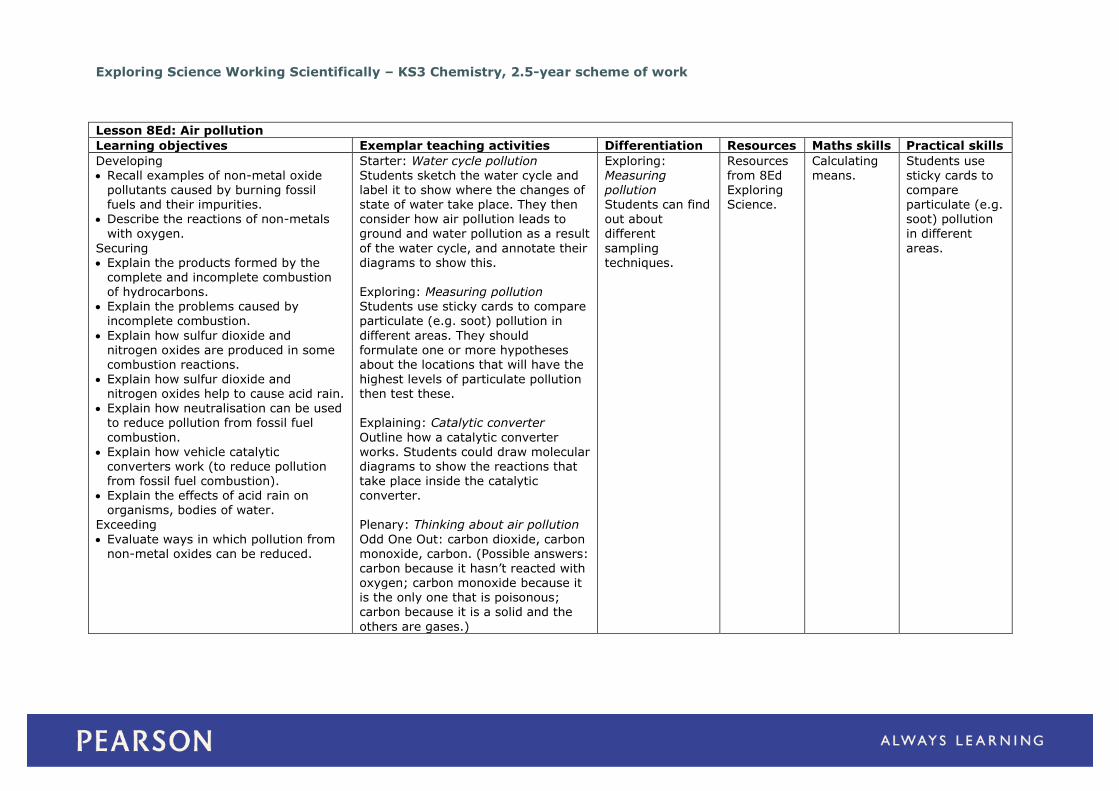
Lesson 8Ed: Air pollution
Learning objectives Exemplar teaching activities Differentiation Resources Maths skills Practical skills
Developing Recall examples of non-metal oxide
pollutants caused by burning fossil fuels and their impurities.
Describe the reactions of non-metals
with oxygen.
Securing Explain the products formed by the
complete and incomplete combustion of hydrocarbons.
Explain the problems caused by incomplete combustion.
Explain how sulfur dioxide and nitrogen oxides are produced in some combustion reactions.
Explain how sulfur dioxide and nitrogen oxides help to cause acid rain.
Explain how neutralisation can be used to reduce pollution from fossil fuel
combustion. Explain how vehicle catalytic
converters work (to reduce pollution from fossil fuel combustion).
Explain the effects of acid rain on organisms, bodies of water.
Exceeding
Evaluate ways in which pollution from non-metal oxides can be reduced.
Starter: Water cycle pollution Students sketch the water cycle and label it to show where the changes of state of water take place. They then consider how air pollution leads to
ground and water pollution as a result
of the water cycle, and annotate their diagrams to show this. Exploring: Measuring pollution Students use sticky cards to compare particulate (e.g. soot) pollution in
different areas. They should formulate one or more hypotheses about the locations that will have the
highest levels of particulate pollution then test these. Explaining: Catalytic converter
Outline how a catalytic converter works. Students could draw molecular diagrams to show the reactions that take place inside the catalytic converter.
Plenary: Thinking about air pollution
Odd One Out: carbon dioxide, carbon monoxide, carbon. (Possible answers: carbon because it hasn’t reacted with oxygen; carbon monoxide because it is the only one that is poisonous; carbon because it is a solid and the
others are gases.)
Exploring: Measuring pollution Students can find out about
different
sampling techniques.
Resources from 8Ed Exploring Science.
Calculating means.
Students use sticky cards to compare particulate (e.g. soot) pollution
in different
areas.
Exploring Science Working Scientifically – KS3 Chemistry, 2.5-year scheme of work
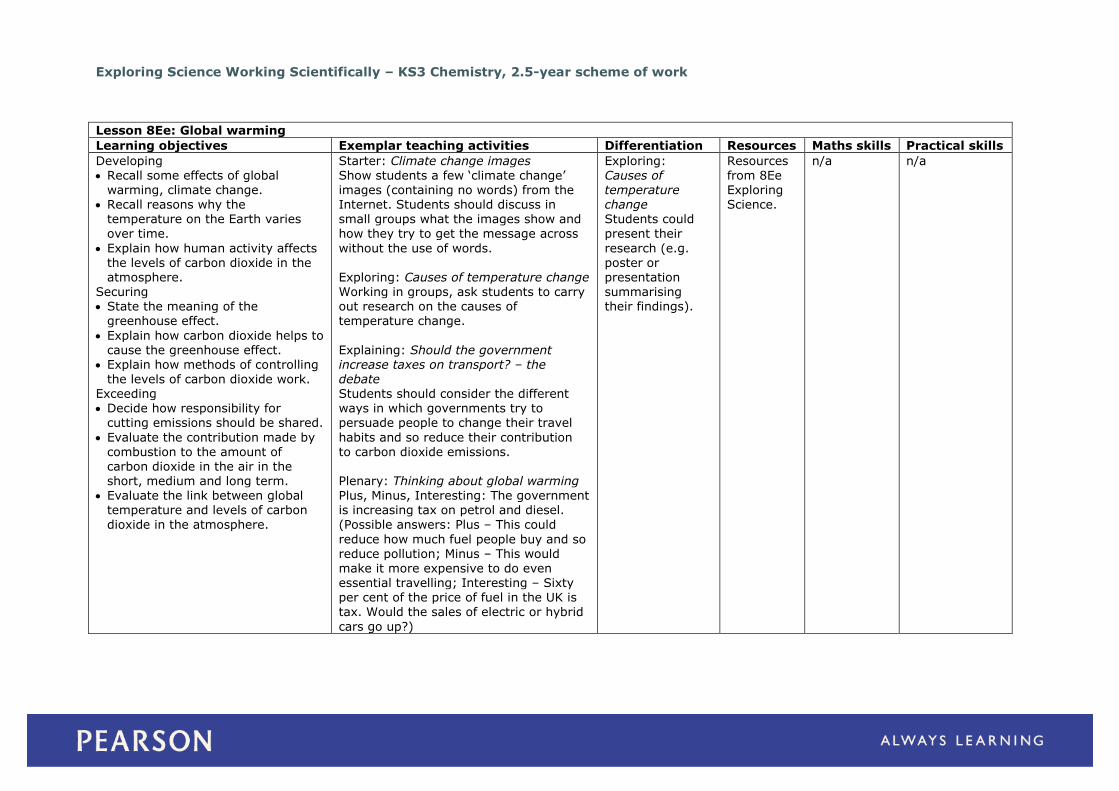
Lesson 8Ee: Global warming
Learning objectives Exemplar teaching activities Differentiation Resources Maths skills Practical skills
Developing Recall some effects of global
warming, climate change. Recall reasons why the
temperature on the Earth varies
over time.
Explain how human activity affects the levels of carbon dioxide in the atmosphere.
Securing State the meaning of the
greenhouse effect.
Explain how carbon dioxide helps to cause the greenhouse effect.
Explain how methods of controlling
the levels of carbon dioxide work. Exceeding Decide how responsibility for
cutting emissions should be shared.
Evaluate the contribution made by combustion to the amount of carbon dioxide in the air in the short, medium and long term.
Evaluate the link between global temperature and levels of carbon
dioxide in the atmosphere.
Starter: Climate change images Show students a few ‘climate change’ images (containing no words) from the Internet. Students should discuss in small groups what the images show and
how they try to get the message across
without the use of words. Exploring: Causes of temperature change Working in groups, ask students to carry out research on the causes of temperature change.
Explaining: Should the government increase taxes on transport? – the
debate Students should consider the different ways in which governments try to persuade people to change their travel
habits and so reduce their contribution to carbon dioxide emissions. Plenary: Thinking about global warming Plus, Minus, Interesting: The government is increasing tax on petrol and diesel.
(Possible answers: Plus – This could
reduce how much fuel people buy and so reduce pollution; Minus – This would make it more expensive to do even essential travelling; Interesting – Sixty per cent of the price of fuel in the UK is tax. Would the sales of electric or hybrid
cars go up?)
Exploring: Causes of temperature change Students could
present their
research (e.g. poster or presentation summarising their findings).
Resources from 8Ee Exploring Science.
n/a n/a

Exploring Science Working Scientifically – KS3 Chemistry, 2.5-year scheme of work
Lesson 8Fa: Dalton’s atomic model
Learning objectives Exemplar teaching activities Differentiation Resources Maths skills Practical skills
Developing Recall that different elements have
different physical properties. Identify the chemical symbols for some
common elements and vice versa.
Record two-letter symbols correctly.
Describe Dalton’s ideas about atoms. Use a simple (Dalton’s) atomic model
to describe an element. Use a simple (Dalton’s) atomic model
to describe a compound. Securing
Use the idea of atoms to explain why different elements have different physical properties.
Exceeding Use information about reaction ratios
to calculate atomic masses.
Starter: Element or not Ask students to recall the definition of an element. Give students a list of substances (e.g., carbon, gum, aluminium, wax, oxygen, iron, paper,
potassium nitrate, water, copper,
sulfur, carbon dioxide, magnesium, iron oxide). Ask them to sort the list into two groups, elements and ‘non-elements’. Exploring: Atoms from Democritus to
Dalton Ask students to research how our ideas about matter changed over the
2000 years from Democritus to Dalton. Students should produce a report of their findings.
Explaining: Calculating relative masses Demonstrate, using a double-pan balance, how one large nail can be balanced in mass by several small nails. Relate this to how we compare
the masses of atoms of different
elements. Plenary: Thinking about Dalton’s atomic model Consider All Possibilities: A substance contains the atoms of three different
elements. (Possible answers: it is a mixture of three separate elements; a mixture of one element and one
compound; a single compound.)
n/a Resources from 8Fa Exploring Science.
n/a n/a
Exploring Science Working Scientifically – KS3 Chemistry, 2.5-year scheme of work
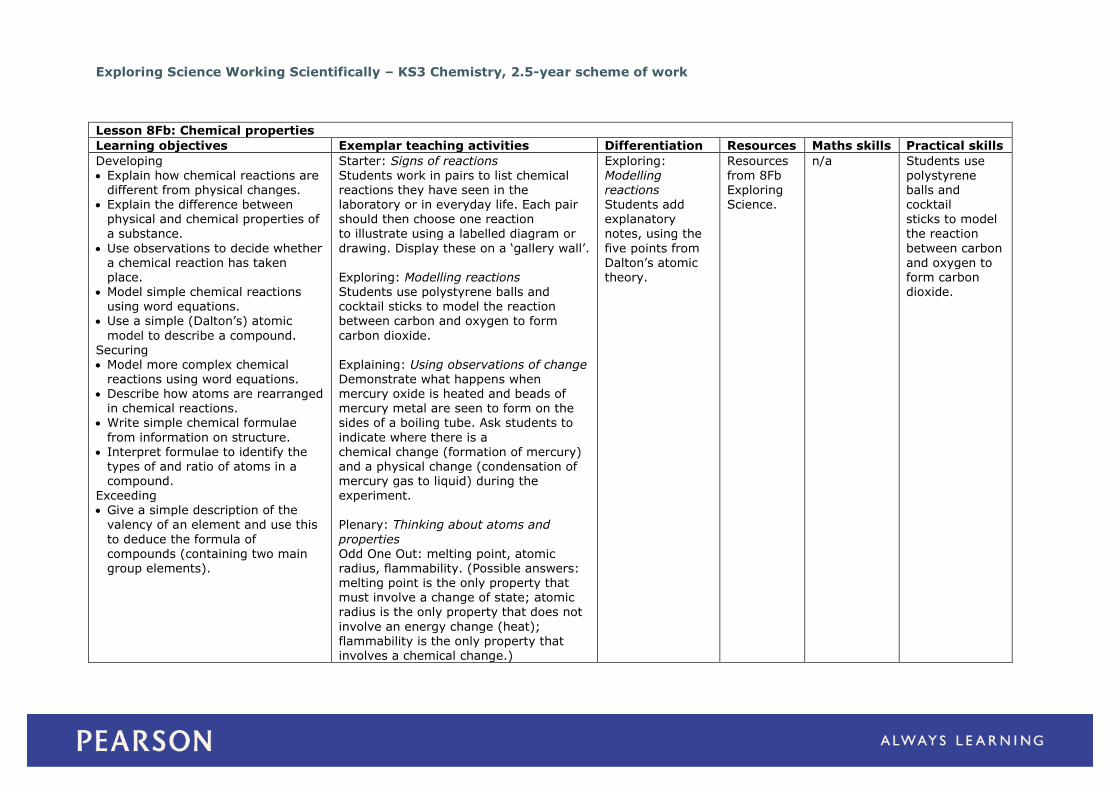
Lesson 8Fb: Chemical properties
Learning objectives Exemplar teaching activities Differentiation Resources Maths skills Practical skills
Developing Explain how chemical reactions are
different from physical changes. Explain the difference between
physical and chemical properties of
a substance.
Use observations to decide whether a chemical reaction has taken place.
Model simple chemical reactions using word equations.
Use a simple (Dalton’s) atomic
model to describe a compound. Securing Model more complex chemical
reactions using word equations. Describe how atoms are rearranged
in chemical reactions. Write simple chemical formulae
from information on structure. Interpret formulae to identify the
types of and ratio of atoms in a compound.
Exceeding Give a simple description of the
valency of an element and use this
to deduce the formula of compounds (containing two main group elements).
Starter: Signs of reactions Students work in pairs to list chemical reactions they have seen in the laboratory or in everyday life. Each pair should then choose one reaction
to illustrate using a labelled diagram or
drawing. Display these on a ‘gallery wall’. Exploring: Modelling reactions Students use polystyrene balls and cocktail sticks to model the reaction between carbon and oxygen to form
carbon dioxide. Explaining: Using observations of change
Demonstrate what happens when mercury oxide is heated and beads of mercury metal are seen to form on the sides of a boiling tube. Ask students to
indicate where there is a chemical change (formation of mercury) and a physical change (condensation of mercury gas to liquid) during the experiment.
Plenary: Thinking about atoms and
properties Odd One Out: melting point, atomic radius, flammability. (Possible answers: melting point is the only property that must involve a change of state; atomic radius is the only property that does not
involve an energy change (heat); flammability is the only property that involves a chemical change.)
Exploring: Modelling reactions Students add explanatory
notes, using the
five points from Dalton’s atomic theory.
Resources from 8Fb Exploring Science.
n/a Students use polystyrene balls and cocktail sticks to model
the reaction
between carbon and oxygen to form carbon dioxide.

Exploring Science Working Scientifically – KS3 Chemistry, 2.5-year scheme of work
Lesson 8Fc: Mendeleev’s table
Learning objectives Exemplar teaching activities Differentiation Resources Maths skills Practical skills
Developing Use the periodic table to look up
symbols. Identify the alkali metals, halogens,
(transition metals) and noble gases in
the periodic table.
State what elements in the same group of the periodic table share.
Recall that the noble gases are chemically inert compared with other elements.
Securing
Recall the typical properties of alkali metals.
Recall the typical properties of
halogens. Explain how Mendeleev made
predictions using his table. Describe how the periodic table is
arranged (in terms of elements in groups of similar properties).
Exceeding Explain how Mendeleev originally
arranged the periodic table by placing the elements in order of atomic
weight.
Working Scientifically Identify the range of readings in an
experiment. State the meaning of: anomalous
result, outlier. Identify anomalous results/outliers in
data. Suggest scientific reasons for
anomalous results/outliers.
Starter: Elements code Working in small groups, students use a copy of the periodic table to make up five ‘code’ words using the symbols of three or four elements,
e.g., casters: calcium, strontium,
erbium and sulfur. Groups take turns to read out their list of elements and ask other groups to work out the ‘code’ word. Exploring: Groups in the periodic
table Give students some exercises to complete about the main groups in
the periodic table (alkali metals, halogens and noble gases) and how elements in the same groups are similar.
Explaining: The alkali metals Demonstrate the properties of the first three alkali metals, including how they are stored under oil, how they do not look shiny until cut then
quickly go dull, their reaction with
water. Plenary: Taboo: periodic table Play taboo (a game that involves defining a term or phrase without using the most natural words
that come to mind) based on terms or phrases used in this topic.
n/a Resources from 8Fc Exploring Science.
n/a Demonstrate the properties of the first three alkali metals, including how
they are stored
under oil, how they do not look shiny until cut then quickly go dull, their reaction with
water.
Exploring Science Working Scientifically – KS3 Chemistry, 2.5-year scheme of work
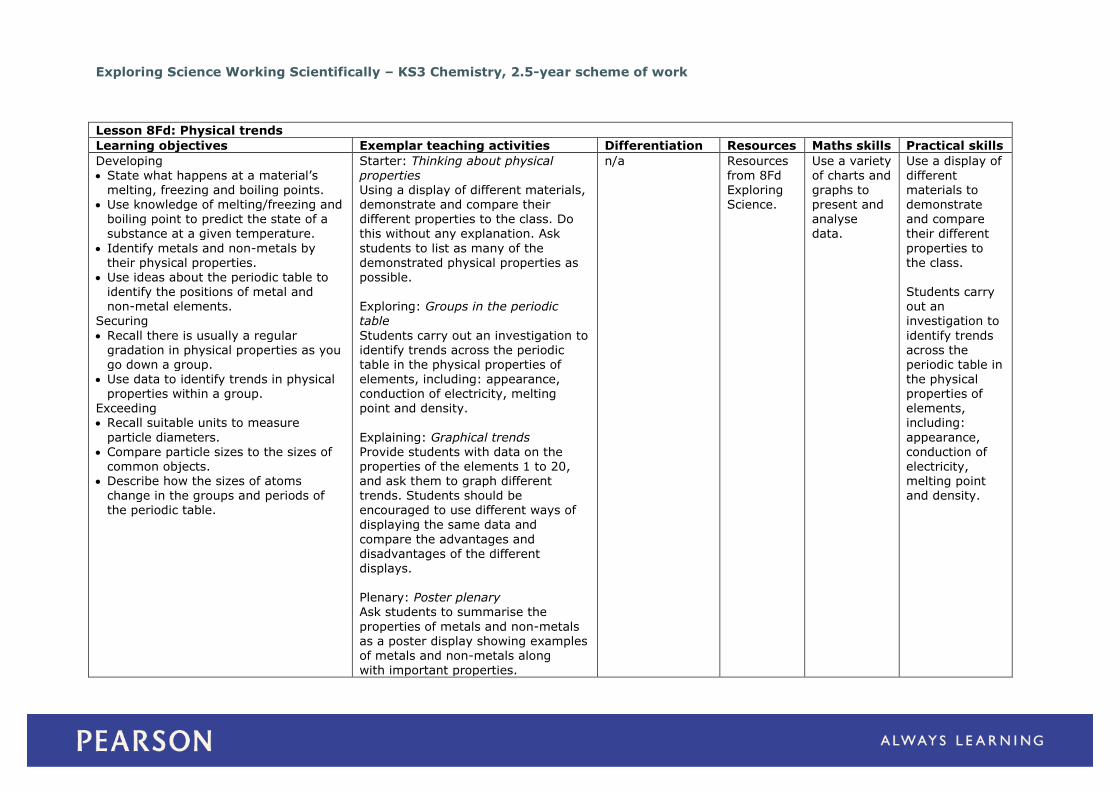
Lesson 8Fd: Physical trends
Learning objectives Exemplar teaching activities Differentiation Resources Maths skills Practical skills
Developing State what happens at a material’s
melting, freezing and boiling points. Use knowledge of melting/freezing and
boiling point to predict the state of a
substance at a given temperature.
Identify metals and non-metals by their physical properties.
Use ideas about the periodic table to identify the positions of metal and non-metal elements.
Securing
Recall there is usually a regular gradation in physical properties as you go down a group.
Use data to identify trends in physical properties within a group.
Exceeding Recall suitable units to measure
particle diameters. Compare particle sizes to the sizes of
common objects. Describe how the sizes of atoms
change in the groups and periods of the periodic table.
Starter: Thinking about physical properties Using a display of different materials, demonstrate and compare their different properties to the class. Do
this without any explanation. Ask
students to list as many of the demonstrated physical properties as possible. Exploring: Groups in the periodic table
Students carry out an investigation to identify trends across the periodic table in the physical properties of
elements, including: appearance, conduction of electricity, melting point and density.
Explaining: Graphical trends Provide students with data on the properties of the elements 1 to 20, and ask them to graph different trends. Students should be encouraged to use different ways of
displaying the same data and
compare the advantages and disadvantages of the different displays. Plenary: Poster plenary Ask students to summarise the
properties of metals and non-metals as a poster display showing examples of metals and non-metals along
with important properties.
n/a Resources from 8Fd Exploring Science.
Use a variety of charts and graphs to present and analyse
data.
Use a display of different materials to demonstrate and compare
their different
properties to the class. Students carry out an investigation to
identify trends across the periodic table in
the physical properties of elements, including:
appearance, conduction of electricity, melting point and density.
Exploring Science Working Scientifically – KS3 Chemistry, 2.5-year scheme of work
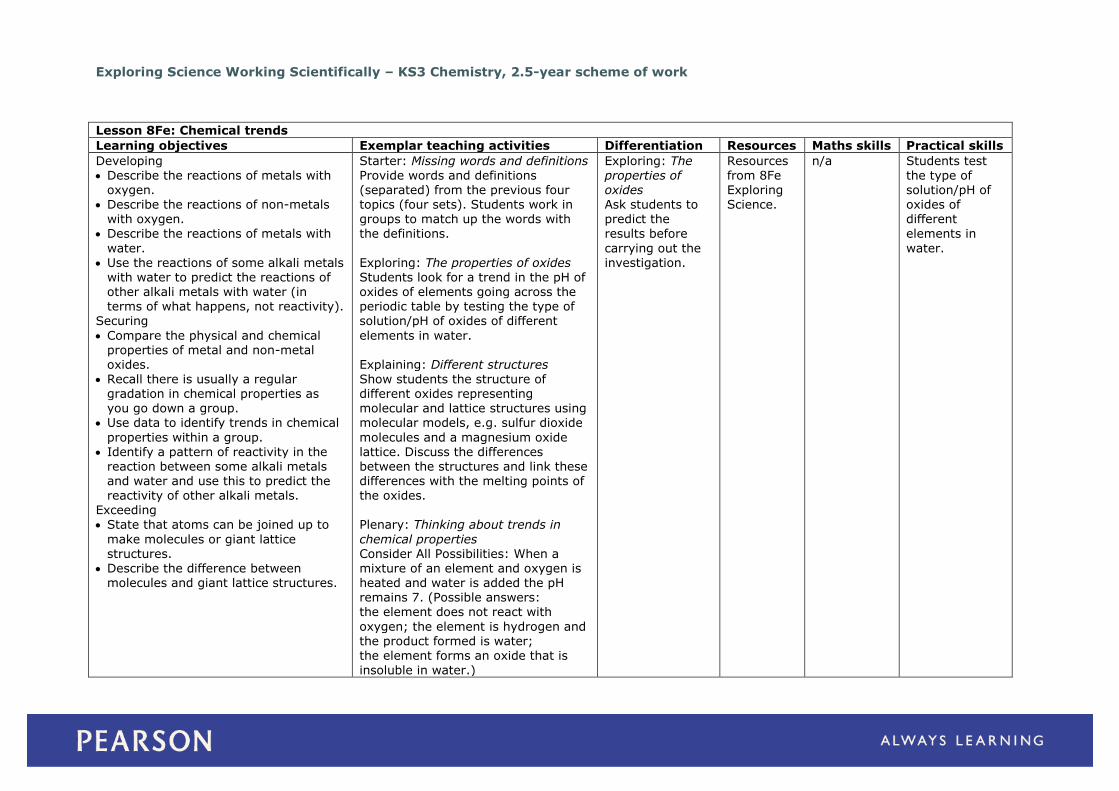
Lesson 8Fe: Chemical trends
Learning objectives Exemplar teaching activities Differentiation Resources Maths skills Practical skills
Developing Describe the reactions of metals with
oxygen. Describe the reactions of non-metals
with oxygen.
Describe the reactions of metals with
water. Use the reactions of some alkali metals
with water to predict the reactions of other alkali metals with water (in terms of what happens, not reactivity).
Securing
Compare the physical and chemical properties of metal and non-metal oxides.
Recall there is usually a regular gradation in chemical properties as you go down a group.
Use data to identify trends in chemical
properties within a group. Identify a pattern of reactivity in the
reaction between some alkali metals and water and use this to predict the reactivity of other alkali metals.
Exceeding
State that atoms can be joined up to
make molecules or giant lattice structures.
Describe the difference between molecules and giant lattice structures.
Starter: Missing words and definitions Provide words and definitions (separated) from the previous four topics (four sets). Students work in groups to match up the words with
the definitions.
Exploring: The properties of oxides Students look for a trend in the pH of oxides of elements going across the periodic table by testing the type of solution/pH of oxides of different
elements in water. Explaining: Different structures
Show students the structure of different oxides representing molecular and lattice structures using molecular models, e.g. sulfur dioxide
molecules and a magnesium oxide lattice. Discuss the differences between the structures and link these differences with the melting points of the oxides.
Plenary: Thinking about trends in
chemical properties Consider All Possibilities: When a mixture of an element and oxygen is heated and water is added the pH remains 7. (Possible answers: the element does not react with
oxygen; the element is hydrogen and the product formed is water; the element forms an oxide that is
insoluble in water.)
Exploring: The properties of oxides Ask students to predict the
results before
carrying out the investigation.
Resources from 8Fe Exploring Science.
n/a Students test the type of solution/pH of oxides of different
elements in
water.
Exploring Science Working Scientifically – KS3 Chemistry, 2.5-year scheme of work
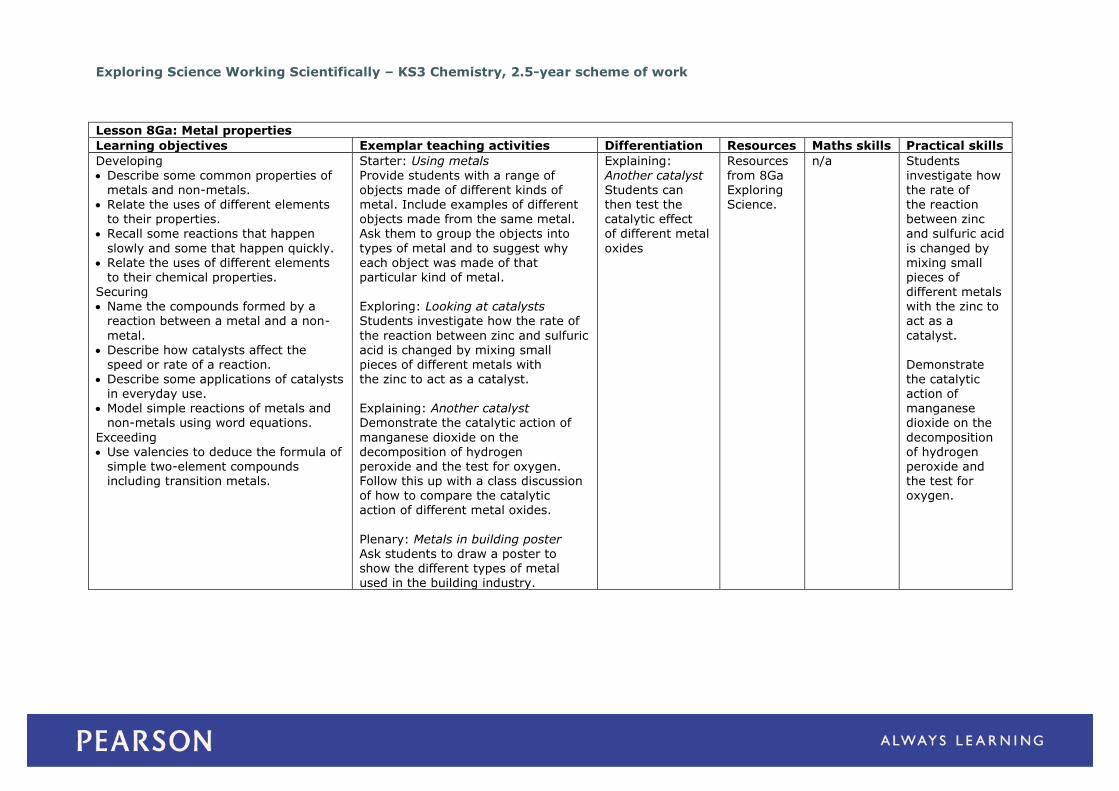
Lesson 8Ga: Metal properties
Learning objectives Exemplar teaching activities Differentiation Resources Maths skills Practical skills
Developing Describe some common properties of
metals and non-metals. Relate the uses of different elements
to their properties.
Recall some reactions that happen
slowly and some that happen quickly. Relate the uses of different elements
to their chemical properties. Securing Name the compounds formed by a
reaction between a metal and a non-
metal. Describe how catalysts affect the
speed or rate of a reaction.
Describe some applications of catalysts in everyday use.
Model simple reactions of metals and non-metals using word equations.
Exceeding Use valencies to deduce the formula of
simple two-element compounds including transition metals.
Starter: Using metals Provide students with a range of objects made of different kinds of metal. Include examples of different objects made from the same metal.
Ask them to group the objects into
types of metal and to suggest why each object was made of that particular kind of metal. Exploring: Looking at catalysts Students investigate how the rate of
the reaction between zinc and sulfuric acid is changed by mixing small pieces of different metals with
the zinc to act as a catalyst. Explaining: Another catalyst Demonstrate the catalytic action of
manganese dioxide on the decomposition of hydrogen peroxide and the test for oxygen. Follow this up with a class discussion of how to compare the catalytic action of different metal oxides.
Plenary: Metals in building poster Ask students to draw a poster to show the different types of metal used in the building industry.
Explaining: Another catalyst Students can then test the catalytic effect
of different metal
oxides
Resources from 8Ga Exploring Science.
n/a Students investigate how the rate of the reaction between zinc
and sulfuric acid
is changed by mixing small pieces of different metals with the zinc to act as a
catalyst. Demonstrate
the catalytic action of manganese dioxide on the
decomposition of hydrogen peroxide and the test for oxygen.
Exploring Science Working Scientifically – KS3 Chemistry, 2.5-year scheme of work
Lesson 8Gb: Corrosion
Learning objectives Exemplar teaching activities Differentiation Resources Maths skills Practical skills
Developing Describe the corrosion of metals by
reactions with oxygen. Identify and explain the products
formed by the oxidation of metals.
State the meaning of: rusting.
Recall ways in which iron can be prevented from rusting.
Recall some reactions that happen slowly and some that happen quickly.
Relate the uses of different elements to their chemical properties.
Securing Model simple oxidation reactions using
word equations.
Explain how barrier methods protect iron from rust.
Identify the products and reactants using a symbol equation.
Exceeding Model simple reactions using balanced
symbol equations.
Starter: Describing substances Arrange a number of different objects made of different materials, in ‘stations’, around the room. Working in pairs, ask students to list
adjectives that describe the
appearance or properties of each of the objects. Exploring: Investigating rusting Ask students to set up an experiment to investigate the conditions required
for iron to rust. Explaining: Symbol equations for
combustion Give students the formulae of some metal oxides and ask them to construct balanced symbol equations
for the reactions that have occurred, e.g. the balanced equation for magnesium is: 2Mg + O2 → 2MgO.
Work through the format with the students.
Plenary: Thinking about corrosion Odd One Out: copper, magnesium, gold. (Possible answers: gold is the only metal which does not corrode/ react with oxygen; magnesium is the only one that burns in air; copper is
the only one that could be used for water pipes; magnesium is the only silver-coloured metal.)
Explaining: Symbol equations for combustion Equations for the reactions of zinc
and copper will
follow a similar format, while those for sodium oxide (Na2O) and iron oxide (Fe2O3) are more
challenging. Aluminium oxide has a similar
formula to iron oxide.
Resources from 8Gb Exploring Science.
n/a Students set up an experiment to investigate the conditions required for iron
to rust.
Exploring Science Working Scientifically – KS3 Chemistry, 2.5-year scheme of work
Lesson 8Gc: Metals and water
Learning objectives Exemplar teaching activities Differentiation Resources Maths skills Practical skills
Developing Describe the reactions of different
metals with water. Describe the gas test for hydrogen. Relate the uses of different elements
to their chemical properties.
Securing Identify and explain the products
formed by the reactions of metals with water.
Model simple reactions of metals and water using word equations.
Use information on the reactions of metals with water to place them in an order of reactivity.
Supply missing reactants or products to complete a symbol equation.
Exceeding Use ideas about reactivity to explain
how sacrificial metals can protect iron from rusting.
Starter: What reacts? Give students a list of 10 metals, including the metals used in building (i.e. aluminium, calcium, copper, gold, iron, magnesium, potassium,
silver, sodium and zinc). Ask them to
split the metals up into two groups according to whether they are predicted to react with water or not. Exploring: Investigating metals and water
Students investigate the reactions of calcium, copper and magnesium with water, their reactivity and the
gas produced. Explaining: Outside metals Using a trough of water, add pieces of
sodium, lithium, calcium, aluminium, iron and copper to water to demonstrate how some of the metals react with water and others don’t react. Discuss which metals might be suitable to be used in building and
why.
Plenary: Thinking about metals and water Odd One Out: sodium, magnesium, copper. (Possible answers: sodium is the only metal that reacts quickly
with water; magnesium is the only metal that reacts slowly with water; copper is the only metal that has no
visible reaction with water.)
n/a Resources from 8Gc Exploring Science.
n/a Students investigate the reactions of calcium, copper and magnesium
with water,
their reactivity and the gas produced. Using a trough of water, add
pieces of sodium, lithium, calcium,
aluminium, iron and copper to water to demonstrate
how some of the metals react with water and others don’t react. Discuss
which metals
might be suitable to be used in building and why.
Exploring Science Working Scientifically – KS3 Chemistry, 2.5-year scheme of work
Lesson 8Gd: Metal and acids
Learning objectives Exemplar teaching activities Differentiation Resources Maths skills Practical skills
Developing Describe the reactions of acids with
metals. Recall which salts are produced by which
acids.
Recall some reactions that happen slowly
and some that happen quickly. Relate the uses of different elements to
their chemical properties. Securing Model simple reactions of metals and
acids using word equations.
Use information on the reactions of metals with acids to place them in order of reactivity.
Model simple reactions using symbol equations.
Exceeding Write and derive the formulae for
common acids and simple salts, given the ratios of atoms or the formulae of reactants.
Model simple reactions using balanced symbol equations.
Working Scientifically
Identify the range of readings in an
experiment. Identify repeated measurements. Identify data that is repeatable, not
repeatable, reproducible, not reproducible, reliable and not reliable.
Explain why repeatable, reproducible,
reliable data is better quality. Suggest a simple way to improve an
investigation.
Explain how to improve an investigation.
Starter: Water and other solutions Show the students magnesium reacting with water. Then add magnesium ribbon to dilute acid and ask students what the
difference is and to suggest
reasons for this difference. Exploring: Investigating metals and acids Students carry out an investigation to find the order of reactivity of the
metals calcium, magnesium and zinc with hydrochloric acid, by measuring the volumes of gas
produced over a set time interval. Explaining: Salts Demonstrate how salts can
be obtained by the reaction of metals and acids. Use magnesium and hydrochloric acid. Plenary: Thinking about metals and acids
Odd One Out: magnesium,
calcium, copper. (Possible answers: magnesium is the only metal that reacts with dilute acids but doesn’t react with cold water; calcium is the only metal that reacts quickly with cold water;
copper is the only metal that doesn’t react with acids or water; copper is the only metal that isn’t
silver in colour.)
Exploring: Investigating metals and acids The investigation can also be used
to consider the
quality of evidence obtained.
Resources from 8Gd Exploring Science.
n/a Show the students magnesium reacting with water.
Students carry out an investigation to find the order of reactivity of the metals calcium,
magnesium and zinc with hydrochloric
acid, by measuring the volumes of gas produced over a
set time interval. Demonstrate how salts can be obtained by
the reaction of
metals and acids. Use magnesium and hydrochloric acid.
Exploring Science Working Scientifically – KS3 Chemistry, 2.5-year scheme of work
Lesson 8Ge: Pure metals and alloys
Learning objectives Exemplar teaching activities Differentiation Resources Maths skills Practical skills
Developing Describe what happens during changes
of state. State what happens at a material’s
melting, freezing and boiling point.
State what is meant by: pure.
State the meaning of: alloy. Explain why metals are often alloyed
with other elements. Securing State that a pure material has a fixed
melting point and boiling point.
Describe how impurities alter melting, freezing and boiling points.
Identify a pure substance from its
melting or boiling point. Use models to explain why converting
pure metals into alloys often increases the strength of the product.
Exceeding Describe some ways in which purity is
stated. Plot and interpret graphs of melting
point or boiling point for mixtures of varying compositions.
Starter: Alloy demonstration Demonstrate melting solder, allowing the molten metal to drip into a tin lid. If possible, demonstrate how solder is used to join copper pipes or
wires together.
Exploring: Researching alloys Ask students to use books and/or the Internet to find out about alloys. Explaining: Harder alloys
Explain how the introduction of different atoms into a metal structure to make an alloy can make
it harder and more rigid. Illustrate the idea by using marbles in a tray. Plenary: Thinking about pure metals
and alloys Plus, Minus, Interesting: Alloys should have the same properties as the pure metal. (Possible answers: Plus – properties of metals would be consistent and well known; Minus
– there would be no point in making
alloys as you could not improve their properties; Interesting – would metals have so many uses?)
Exploring: Researching alloys Students could compare the
properties of the
alloy with the properties of the component metals and add information about how the purity of
alloys is stated.
Resources from 8Ge Exploring Science.
n/a Demonstrate melting solder, allowing the molten metal to drip into a tin
lid. If possible,
demonstrate how solder is used to join copper pipes or wires together.
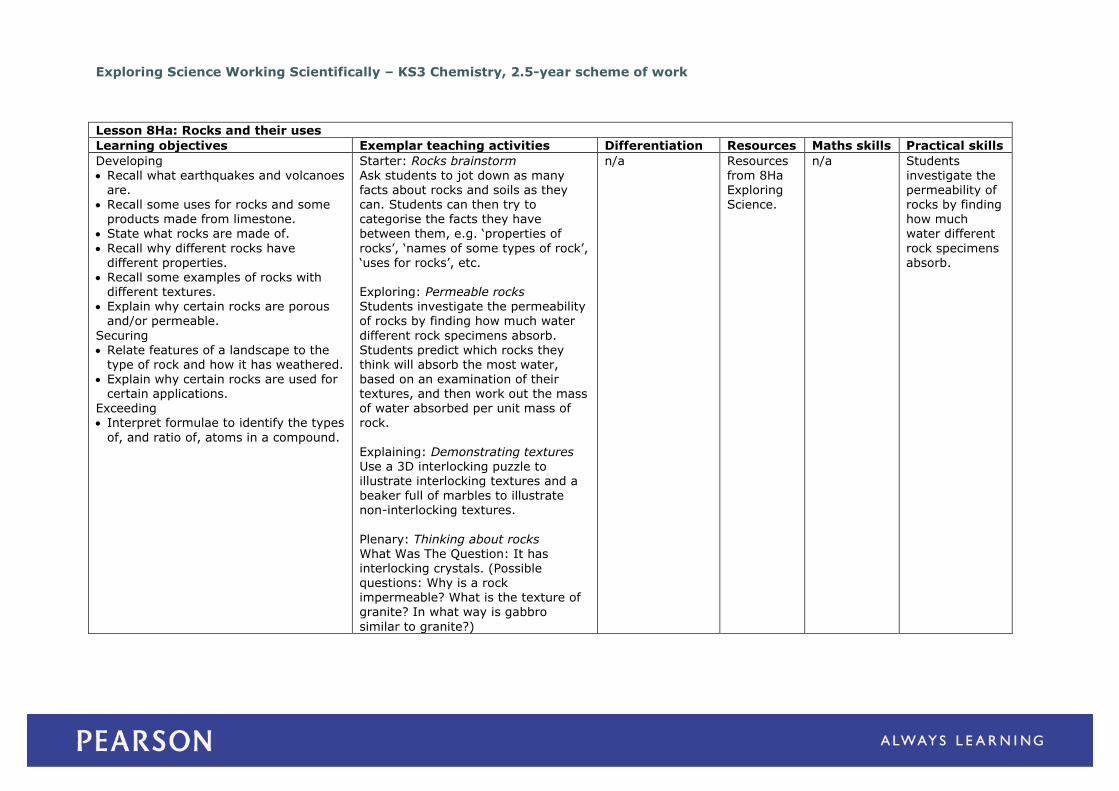
Exploring Science Working Scientifically – KS3 Chemistry, 2.5-year scheme of work
Lesson 8Ha: Rocks and their uses
Learning objectives Exemplar teaching activities Differentiation Resources Maths skills Practical skills
Developing Recall what earthquakes and volcanoes
are. Recall some uses for rocks and some
products made from limestone.
State what rocks are made of.
Recall why different rocks have different properties.
Recall some examples of rocks with different textures.
Explain why certain rocks are porous and/or permeable.
Securing Relate features of a landscape to the
type of rock and how it has weathered.
Explain why certain rocks are used for certain applications.
Exceeding Interpret formulae to identify the types
of, and ratio of, atoms in a compound.
Starter: Rocks brainstorm Ask students to jot down as many facts about rocks and soils as they can. Students can then try to categorise the facts they have
between them, e.g. ‘properties of
rocks’, ‘names of some types of rock’, ‘uses for rocks’, etc. Exploring: Permeable rocks Students investigate the permeability of rocks by finding how much water
different rock specimens absorb. Students predict which rocks they think will absorb the most water,
based on an examination of their textures, and then work out the mass of water absorbed per unit mass of rock.
Explaining: Demonstrating textures Use a 3D interlocking puzzle to illustrate interlocking textures and a beaker full of marbles to illustrate non-interlocking textures.
Plenary: Thinking about rocks What Was The Question: It has interlocking crystals. (Possible questions: Why is a rock impermeable? What is the texture of granite? In what way is gabbro
similar to granite?)
n/a Resources from 8Ha Exploring Science.
n/a Students investigate the permeability of rocks by finding how much
water different
rock specimens absorb.
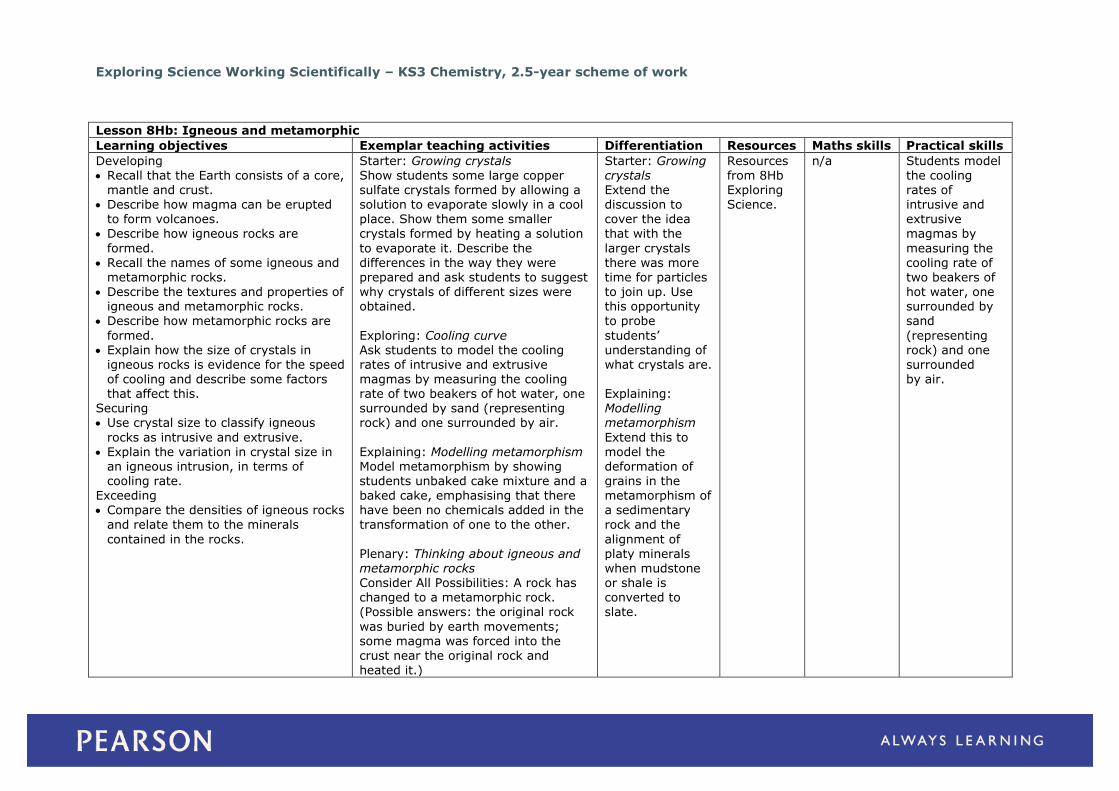
Exploring Science Working Scientifically – KS3 Chemistry, 2.5-year scheme of work
Lesson 8Hb: Igneous and metamorphic
Learning objectives Exemplar teaching activities Differentiation Resources Maths skills Practical skills
Developing Recall that the Earth consists of a core,
mantle and crust. Describe how magma can be erupted
to form volcanoes.
Describe how igneous rocks are
formed. Recall the names of some igneous and
metamorphic rocks. Describe the textures and properties of
igneous and metamorphic rocks. Describe how metamorphic rocks are
formed. Explain how the size of crystals in
igneous rocks is evidence for the speed
of cooling and describe some factors that affect this.
Securing Use crystal size to classify igneous
rocks as intrusive and extrusive. Explain the variation in crystal size in
an igneous intrusion, in terms of cooling rate.
Exceeding Compare the densities of igneous rocks
and relate them to the minerals
contained in the rocks.
Starter: Growing crystals Show students some large copper sulfate crystals formed by allowing a solution to evaporate slowly in a cool place. Show them some smaller
crystals formed by heating a solution
to evaporate it. Describe the differences in the way they were prepared and ask students to suggest why crystals of different sizes were obtained.
Exploring: Cooling curve Ask students to model the cooling rates of intrusive and extrusive
magmas by measuring the cooling rate of two beakers of hot water, one surrounded by sand (representing rock) and one surrounded by air.
Explaining: Modelling metamorphism Model metamorphism by showing students unbaked cake mixture and a baked cake, emphasising that there have been no chemicals added in the
transformation of one to the other.
Plenary: Thinking about igneous and metamorphic rocks Consider All Possibilities: A rock has changed to a metamorphic rock. (Possible answers: the original rock
was buried by earth movements; some magma was forced into the crust near the original rock and
heated it.)
Starter: Growing crystals Extend the discussion to cover the idea
that with the
larger crystals there was more time for particles to join up. Use this opportunity to probe
students’ understanding of what crystals are.
Explaining: Modelling metamorphism
Extend this to model the deformation of grains in the metamorphism of a sedimentary
rock and the
alignment of platy minerals when mudstone or shale is converted to slate.
Resources from 8Hb Exploring Science.
n/a Students model the cooling rates of intrusive and extrusive
magmas by
measuring the cooling rate of two beakers of hot water, one surrounded by sand
(representing rock) and one surrounded
by air.
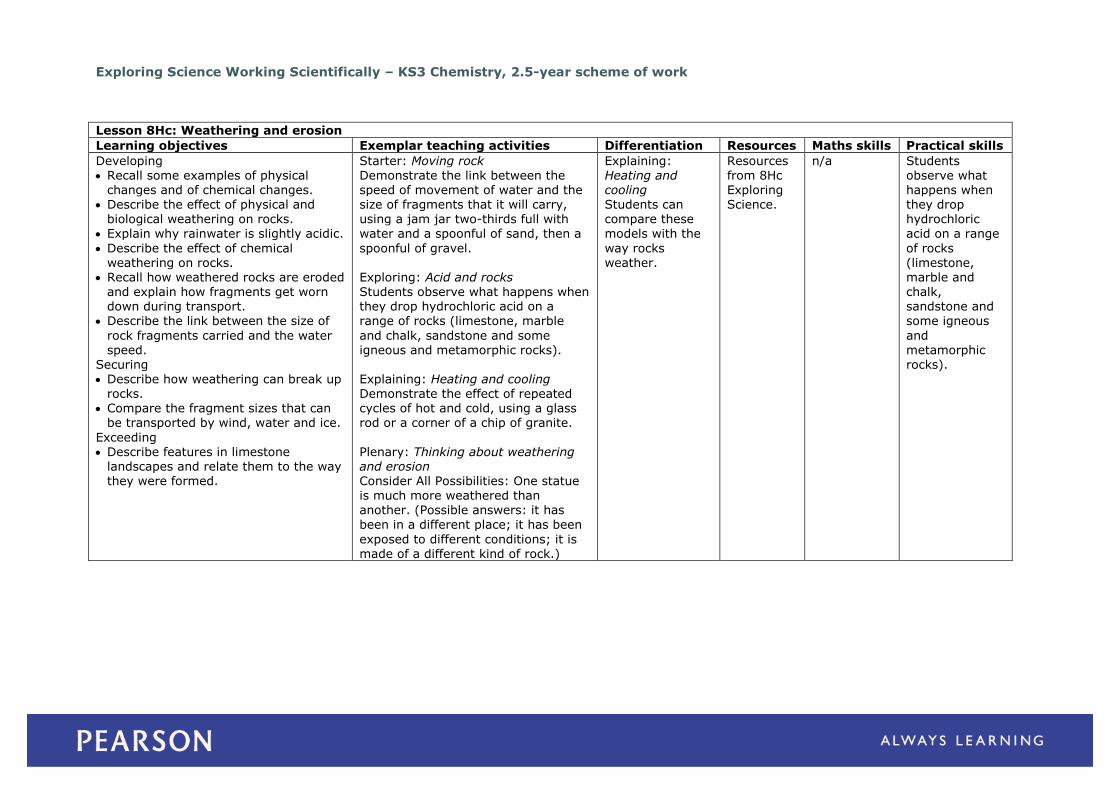
Exploring Science Working Scientifically – KS3 Chemistry, 2.5-year scheme of work
Lesson 8Hc: Weathering and erosion
Learning objectives Exemplar teaching activities Differentiation Resources Maths skills Practical skills
Developing Recall some examples of physical
changes and of chemical changes. Describe the effect of physical and
biological weathering on rocks.
Explain why rainwater is slightly acidic.
Describe the effect of chemical weathering on rocks.
Recall how weathered rocks are eroded and explain how fragments get worn down during transport.
Describe the link between the size of
rock fragments carried and the water speed.
Securing
Describe how weathering can break up rocks.
Compare the fragment sizes that can be transported by wind, water and ice.
Exceeding Describe features in limestone
landscapes and relate them to the way they were formed.
Starter: Moving rock Demonstrate the link between the speed of movement of water and the size of fragments that it will carry, using a jam jar two-thirds full with
water and a spoonful of sand, then a
spoonful of gravel. Exploring: Acid and rocks Students observe what happens when they drop hydrochloric acid on a range of rocks (limestone, marble
and chalk, sandstone and some igneous and metamorphic rocks).
Explaining: Heating and cooling Demonstrate the effect of repeated cycles of hot and cold, using a glass rod or a corner of a chip of granite.
Plenary: Thinking about weathering and erosion Consider All Possibilities: One statue is much more weathered than another. (Possible answers: it has
been in a different place; it has been
exposed to different conditions; it is made of a different kind of rock.)
Explaining: Heating and cooling Students can compare these
models with the
way rocks weather.
Resources from 8Hc Exploring Science.
n/a Students observe what happens when they drop hydrochloric
acid on a range
of rocks (limestone, marble and chalk, sandstone and some igneous
and metamorphic rocks).
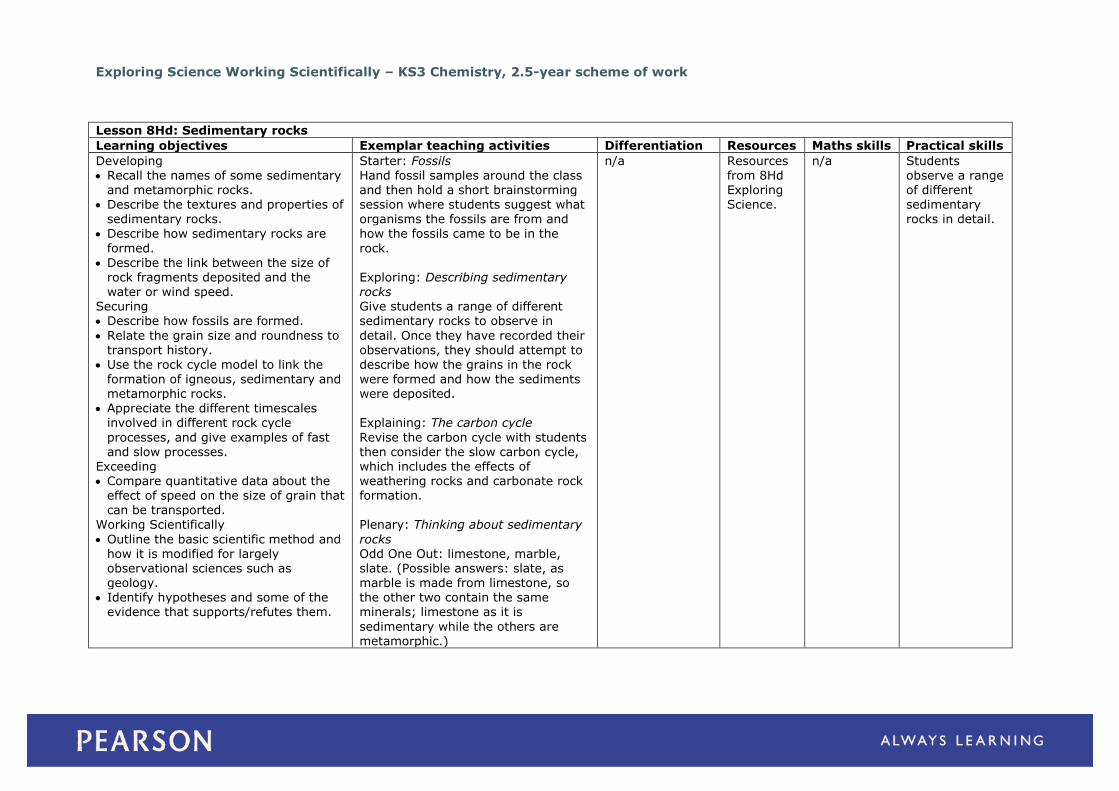
Exploring Science Working Scientifically – KS3 Chemistry, 2.5-year scheme of work
Lesson 8Hd: Sedimentary rocks
Learning objectives Exemplar teaching activities Differentiation Resources Maths skills Practical skills
Developing Recall the names of some sedimentary
and metamorphic rocks. Describe the textures and properties of
sedimentary rocks.
Describe how sedimentary rocks are
formed. Describe the link between the size of
rock fragments deposited and the water or wind speed.
Securing Describe how fossils are formed.
Relate the grain size and roundness to transport history.
Use the rock cycle model to link the
formation of igneous, sedimentary and metamorphic rocks.
Appreciate the different timescales involved in different rock cycle
processes, and give examples of fast and slow processes.
Exceeding Compare quantitative data about the
effect of speed on the size of grain that can be transported.
Working Scientifically
Outline the basic scientific method and how it is modified for largely observational sciences such as geology.
Identify hypotheses and some of the evidence that supports/refutes them.
Starter: Fossils Hand fossil samples around the class and then hold a short brainstorming session where students suggest what organisms the fossils are from and
how the fossils came to be in the
rock. Exploring: Describing sedimentary rocks Give students a range of different sedimentary rocks to observe in
detail. Once they have recorded their observations, they should attempt to describe how the grains in the rock
were formed and how the sediments were deposited. Explaining: The carbon cycle
Revise the carbon cycle with students then consider the slow carbon cycle, which includes the effects of weathering rocks and carbonate rock formation.
Plenary: Thinking about sedimentary
rocks Odd One Out: limestone, marble, slate. (Possible answers: slate, as marble is made from limestone, so the other two contain the same minerals; limestone as it is
sedimentary while the others are metamorphic.)
n/a Resources from 8Hd Exploring Science.
n/a Students observe a range of different sedimentary rocks in detail.
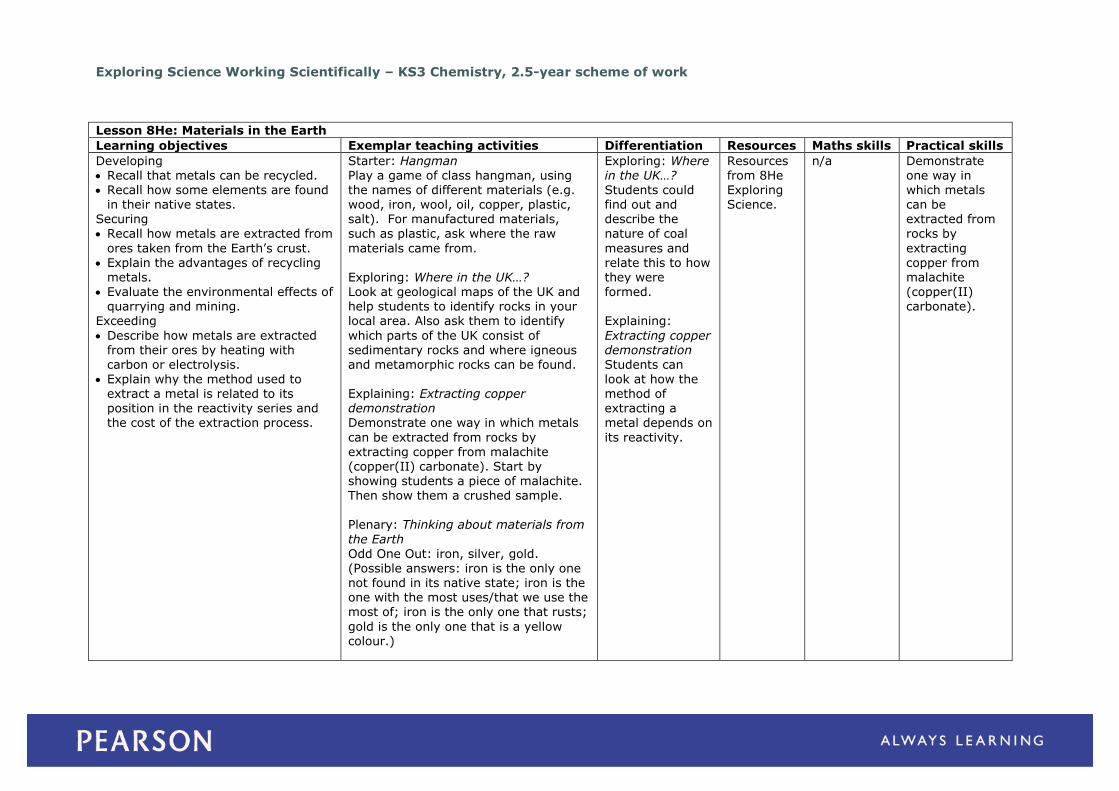
Exploring Science Working Scientifically – KS3 Chemistry, 2.5-year scheme of work
Lesson 8He: Materials in the Earth
Learning objectives Exemplar teaching activities Differentiation Resources Maths skills Practical skills
Developing Recall that metals can be recycled. Recall how some elements are found
in their native states. Securing
Recall how metals are extracted from
ores taken from the Earth’s crust. Explain the advantages of recycling
metals. Evaluate the environmental effects of
quarrying and mining. Exceeding
Describe how metals are extracted from their ores by heating with carbon or electrolysis.
Explain why the method used to extract a metal is related to its position in the reactivity series and the cost of the extraction process.
Starter: Hangman Play a game of class hangman, using the names of different materials (e.g. wood, iron, wool, oil, copper, plastic, salt). For manufactured materials,
such as plastic, ask where the raw
materials came from. Exploring: Where in the UK…? Look at geological maps of the UK and help students to identify rocks in your local area. Also ask them to identify
which parts of the UK consist of sedimentary rocks and where igneous and metamorphic rocks can be found.
Explaining: Extracting copper demonstration Demonstrate one way in which metals
can be extracted from rocks by extracting copper from malachite (copper(II) carbonate). Start by showing students a piece of malachite. Then show them a crushed sample.
Plenary: Thinking about materials from
the Earth Odd One Out: iron, silver, gold. (Possible answers: iron is the only one not found in its native state; iron is the one with the most uses/that we use the most of; iron is the only one that rusts;
gold is the only one that is a yellow colour.)
Exploring: Where in the UK…? Students could find out and describe the
nature of coal
measures and relate this to how they were formed. Explaining:
Extracting copper demonstration Students can
look at how the method of extracting a metal depends on
its reactivity.
Resources from 8He Exploring Science.
n/a Demonstrate one way in which metals can be extracted from
rocks by
extracting copper from malachite (copper(II) carbonate).
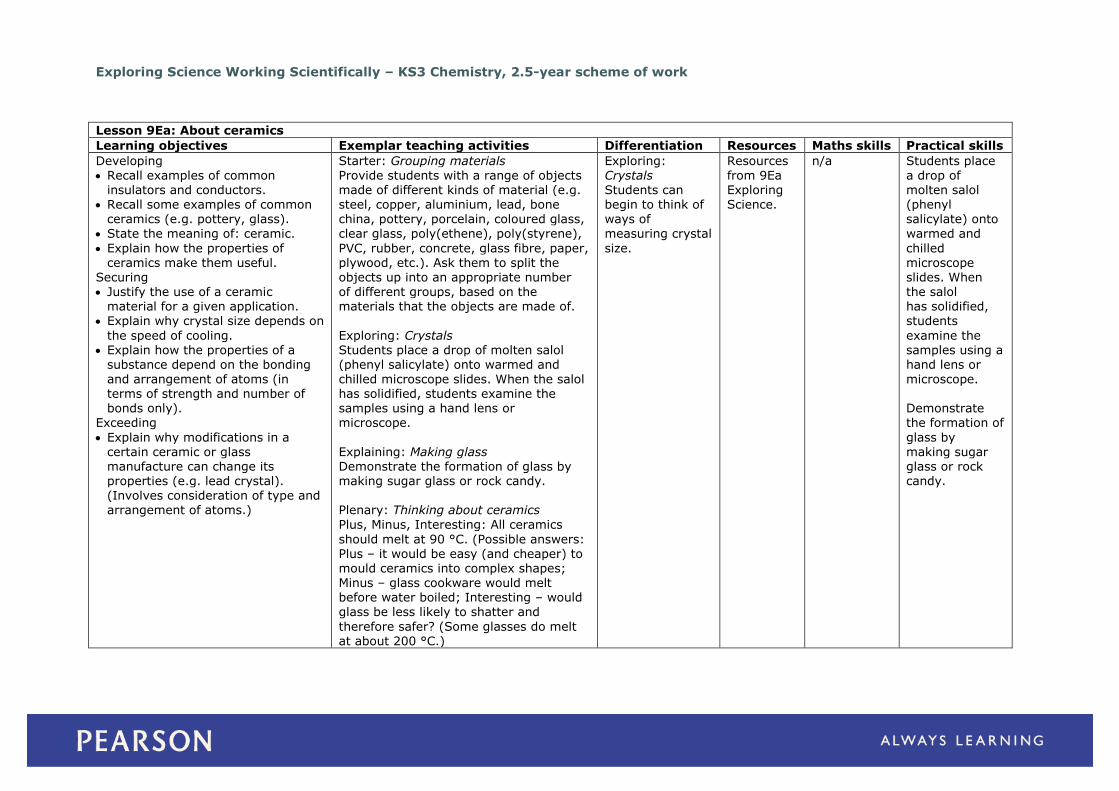
Exploring Science Working Scientifically – KS3 Chemistry, 2.5-year scheme of work
Lesson 9Ea: About ceramics
Learning objectives Exemplar teaching activities Differentiation Resources Maths skills Practical skills
Developing Recall examples of common
insulators and conductors. Recall some examples of common
ceramics (e.g. pottery, glass).
State the meaning of: ceramic.
Explain how the properties of ceramics make them useful.
Securing Justify the use of a ceramic
material for a given application. Explain why crystal size depends on
the speed of cooling. Explain how the properties of a
substance depend on the bonding
and arrangement of atoms (in terms of strength and number of bonds only).
Exceeding
Explain why modifications in a certain ceramic or glass manufacture can change its properties (e.g. lead crystal). (Involves consideration of type and arrangement of atoms.)
Starter: Grouping materials Provide students with a range of objects made of different kinds of material (e.g. steel, copper, aluminium, lead, bone china, pottery, porcelain, coloured glass,
clear glass, poly(ethene), poly(styrene),
PVC, rubber, concrete, glass fibre, paper, plywood, etc.). Ask them to split the objects up into an appropriate number of different groups, based on the materials that the objects are made of.
Exploring: Crystals Students place a drop of molten salol (phenyl salicylate) onto warmed and
chilled microscope slides. When the salol has solidified, students examine the samples using a hand lens or microscope.
Explaining: Making glass Demonstrate the formation of glass by making sugar glass or rock candy. Plenary: Thinking about ceramics
Plus, Minus, Interesting: All ceramics
should melt at 90 °C. (Possible answers: Plus – it would be easy (and cheaper) to mould ceramics into complex shapes; Minus – glass cookware would melt before water boiled; Interesting – would glass be less likely to shatter and
therefore safer? (Some glasses do melt at about 200 °C.)
Exploring: Crystals Students can begin to think of ways of
measuring crystal
size.
Resources from 9Ea Exploring Science.
n/a Students place a drop of molten salol (phenyl salicylate) onto
warmed and
chilled microscope slides. When the salol has solidified, students
examine the samples using a hand lens or
microscope. Demonstrate the formation of
glass by making sugar glass or rock candy.
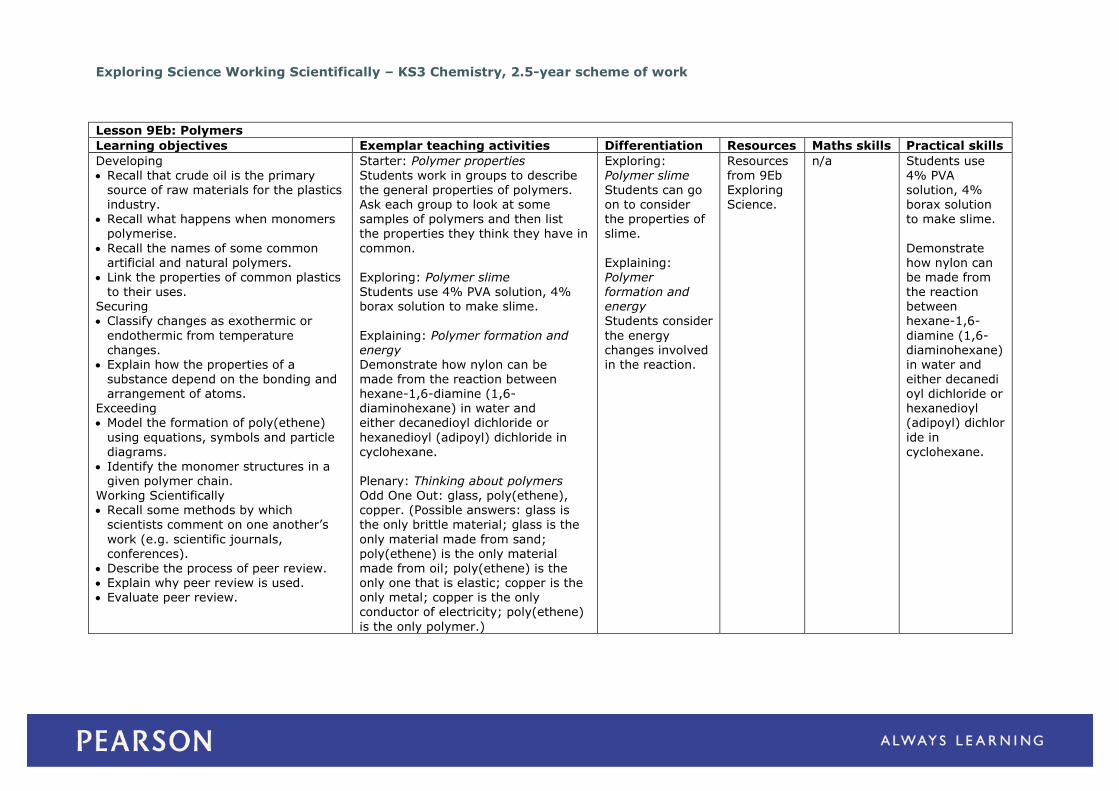
Exploring Science Working Scientifically – KS3 Chemistry, 2.5-year scheme of work
Lesson 9Eb: Polymers
Learning objectives Exemplar teaching activities Differentiation Resources Maths skills Practical skills
Developing Recall that crude oil is the primary
source of raw materials for the plastics industry.
Recall what happens when monomers
polymerise.
Recall the names of some common artificial and natural polymers.
Link the properties of common plastics to their uses.
Securing Classify changes as exothermic or
endothermic from temperature changes.
Explain how the properties of a
substance depend on the bonding and arrangement of atoms.
Exceeding Model the formation of poly(ethene)
using equations, symbols and particle diagrams.
Identify the monomer structures in a given polymer chain.
Working Scientifically Recall some methods by which
scientists comment on one another’s
work (e.g. scientific journals, conferences).
Describe the process of peer review. Explain why peer review is used. Evaluate peer review.
Starter: Polymer properties Students work in groups to describe the general properties of polymers. Ask each group to look at some samples of polymers and then list
the properties they think they have in
common. Exploring: Polymer slime Students use 4% PVA solution, 4% borax solution to make slime.
Explaining: Polymer formation and energy Demonstrate how nylon can be
made from the reaction between hexane-1,6-diamine (1,6-diaminohexane) in water and either decanedioyl dichloride or
hexanedioyl (adipoyl) dichloride in cyclohexane. Plenary: Thinking about polymers Odd One Out: glass, poly(ethene), copper. (Possible answers: glass is
the only brittle material; glass is the
only material made from sand; poly(ethene) is the only material made from oil; poly(ethene) is the only one that is elastic; copper is the only metal; copper is the only conductor of electricity; poly(ethene)
is the only polymer.)
Exploring: Polymer slime Students can go on to consider the properties of
slime.
Explaining: Polymer formation and energy Students consider
the energy changes involved in the reaction.
Resources from 9Eb Exploring Science.
n/a Students use 4% PVA solution, 4% borax solution to make slime.
Demonstrate how nylon can be made from the reaction between hexane-1,6-
diamine (1,6-diaminohexane) in water and
either decanedioyl dichloride or hexanedioyl (adipoyl) dichlor
ide in cyclohexane.
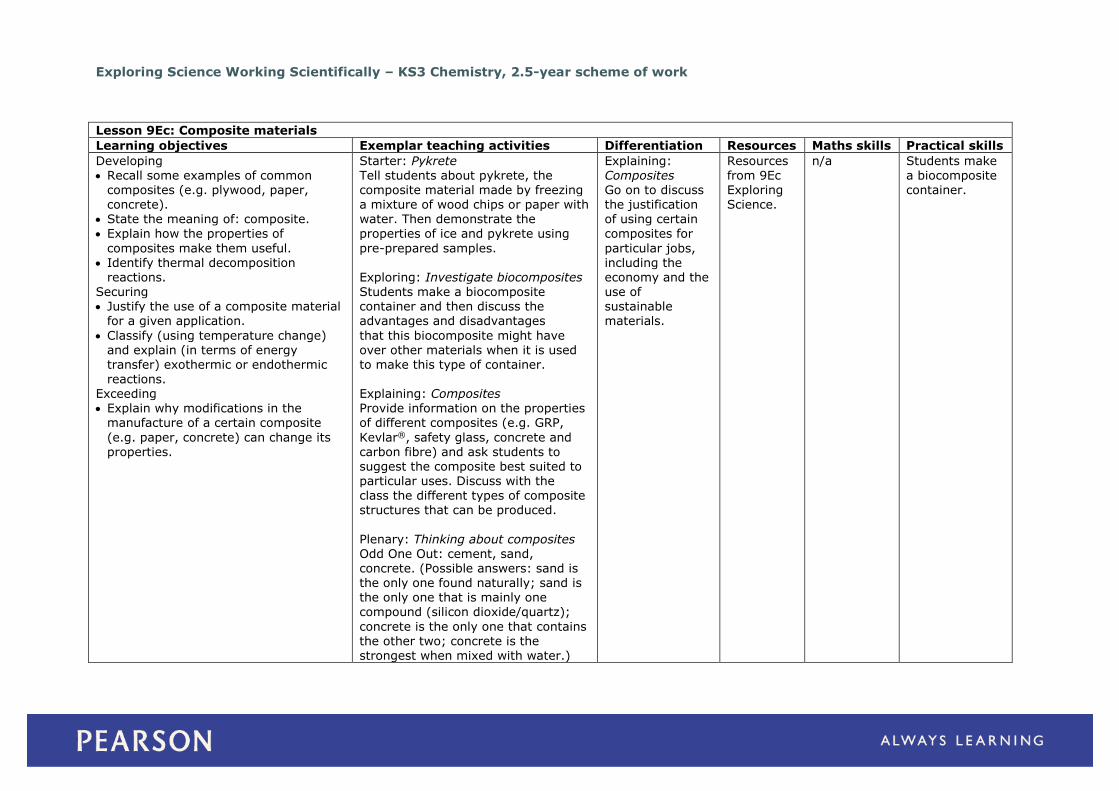
Exploring Science Working Scientifically – KS3 Chemistry, 2.5-year scheme of work
Lesson 9Ec: Composite materials
Learning objectives Exemplar teaching activities Differentiation Resources Maths skills Practical skills
Developing Recall some examples of common
composites (e.g. plywood, paper, concrete).
State the meaning of: composite.
Explain how the properties of
composites make them useful. Identify thermal decomposition
reactions. Securing Justify the use of a composite material
for a given application.
Classify (using temperature change) and explain (in terms of energy transfer) exothermic or endothermic
reactions. Exceeding Explain why modifications in the
manufacture of a certain composite
(e.g. paper, concrete) can change its properties.
Starter: Pykrete Tell students about pykrete, the composite material made by freezing a mixture of wood chips or paper with water. Then demonstrate the
properties of ice and pykrete using
pre-prepared samples. Exploring: Investigate biocomposites Students make a biocomposite container and then discuss the advantages and disadvantages
that this biocomposite might have over other materials when it is used to make this type of container.
Explaining: Composites Provide information on the properties of different composites (e.g. GRP,
Kevlar®, safety glass, concrete and carbon fibre) and ask students to suggest the composite best suited to particular uses. Discuss with the class the different types of composite structures that can be produced.
Plenary: Thinking about composites Odd One Out: cement, sand, concrete. (Possible answers: sand is the only one found naturally; sand is the only one that is mainly one compound (silicon dioxide/quartz);
concrete is the only one that contains the other two; concrete is the strongest when mixed with water.)
Explaining: Composites Go on to discuss the justification of using certain
composites for
particular jobs, including the economy and the use of sustainable materials.
Resources from 9Ec Exploring Science.
n/a Students make a biocomposite container.
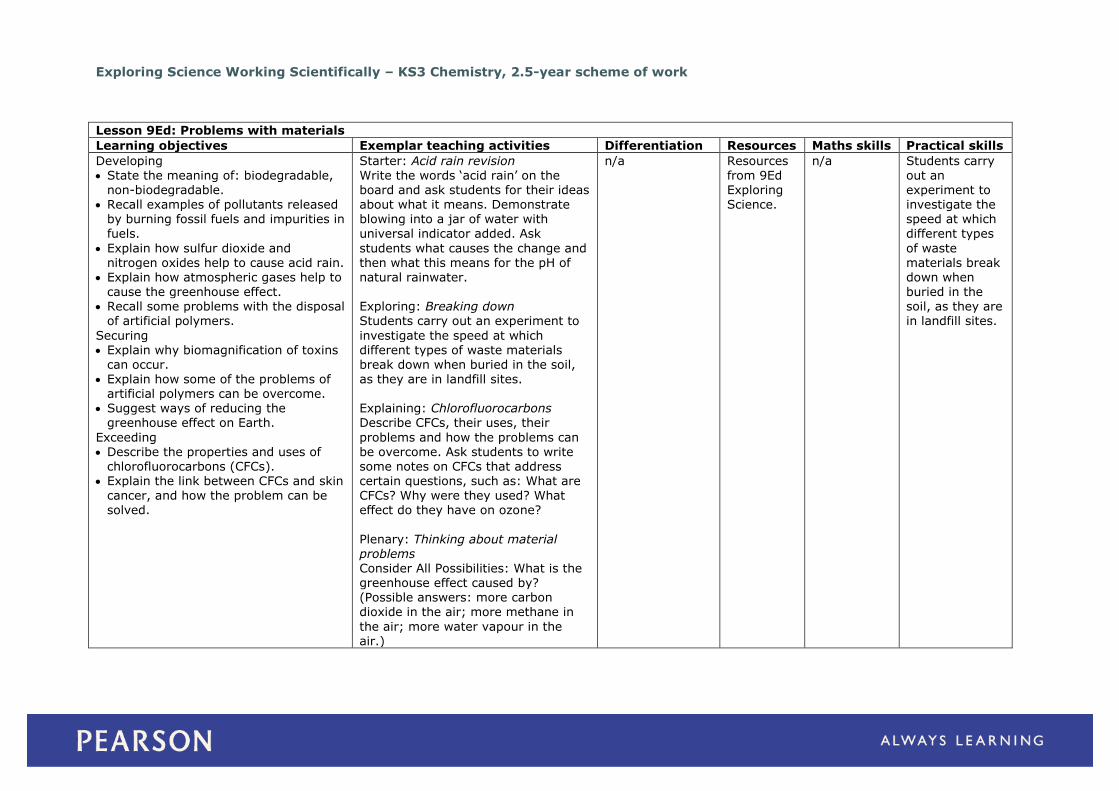
Exploring Science Working Scientifically – KS3 Chemistry, 2.5-year scheme of work
Lesson 9Ed: Problems with materials
Learning objectives Exemplar teaching activities Differentiation Resources Maths skills Practical skills
Developing State the meaning of: biodegradable,
non-biodegradable. Recall examples of pollutants released
by burning fossil fuels and impurities in
fuels.
Explain how sulfur dioxide and nitrogen oxides help to cause acid rain.
Explain how atmospheric gases help to cause the greenhouse effect.
Recall some problems with the disposal of artificial polymers.
Securing Explain why biomagnification of toxins
can occur.
Explain how some of the problems of artificial polymers can be overcome.
Suggest ways of reducing the greenhouse effect on Earth.
Exceeding Describe the properties and uses of
chlorofluorocarbons (CFCs). Explain the link between CFCs and skin
cancer, and how the problem can be solved.
Starter: Acid rain revision Write the words ‘acid rain’ on the board and ask students for their ideas about what it means. Demonstrate blowing into a jar of water with
universal indicator added. Ask
students what causes the change and then what this means for the pH of natural rainwater. Exploring: Breaking down Students carry out an experiment to
investigate the speed at which different types of waste materials break down when buried in the soil,
as they are in landfill sites. Explaining: Chlorofluorocarbons Describe CFCs, their uses, their
problems and how the problems can be overcome. Ask students to write some notes on CFCs that address certain questions, such as: What are CFCs? Why were they used? What effect do they have on ozone?
Plenary: Thinking about material problems Consider All Possibilities: What is the greenhouse effect caused by? (Possible answers: more carbon dioxide in the air; more methane in
the air; more water vapour in the air.)
n/a Resources from 9Ed Exploring Science.
n/a Students carry out an experiment to investigate the speed at which
different types
of waste materials break down when buried in the soil, as they are in landfill sites.
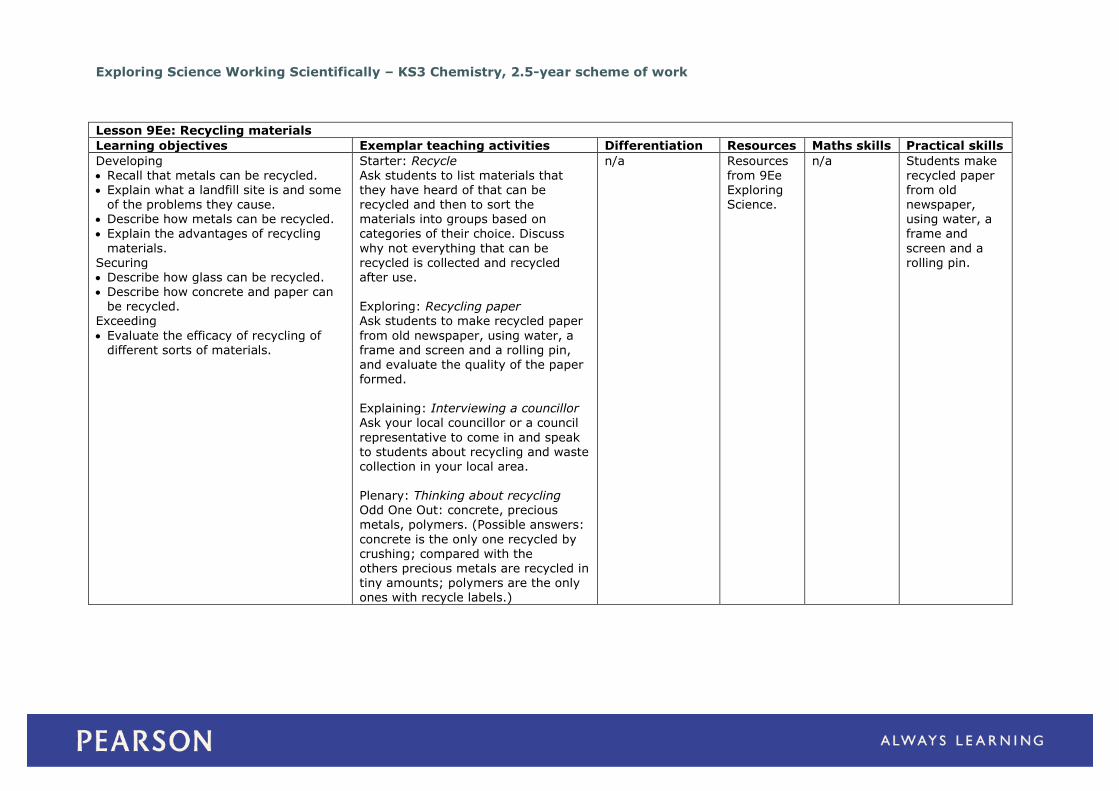
Exploring Science Working Scientifically – KS3 Chemistry, 2.5-year scheme of work
Lesson 9Ee: Recycling materials
Learning objectives Exemplar teaching activities Differentiation Resources Maths skills Practical skills
Developing Recall that metals can be recycled. Explain what a landfill site is and some
of the problems they cause. Describe how metals can be recycled.
Explain the advantages of recycling
materials. Securing Describe how glass can be recycled. Describe how concrete and paper can
be recycled. Exceeding
Evaluate the efficacy of recycling of different sorts of materials.
Starter: Recycle Ask students to list materials that they have heard of that can be recycled and then to sort the materials into groups based on
categories of their choice. Discuss
why not everything that can be recycled is collected and recycled after use. Exploring: Recycling paper Ask students to make recycled paper
from old newspaper, using water, a frame and screen and a rolling pin, and evaluate the quality of the paper
formed. Explaining: Interviewing a councillor Ask your local councillor or a council
representative to come in and speak to students about recycling and waste collection in your local area. Plenary: Thinking about recycling Odd One Out: concrete, precious
metals, polymers. (Possible answers:
concrete is the only one recycled by crushing; compared with the others precious metals are recycled in tiny amounts; polymers are the only ones with recycle labels.)
n/a Resources from 9Ee Exploring Science.
n/a Students make recycled paper from old newspaper, using water, a
frame and
screen and a rolling pin.
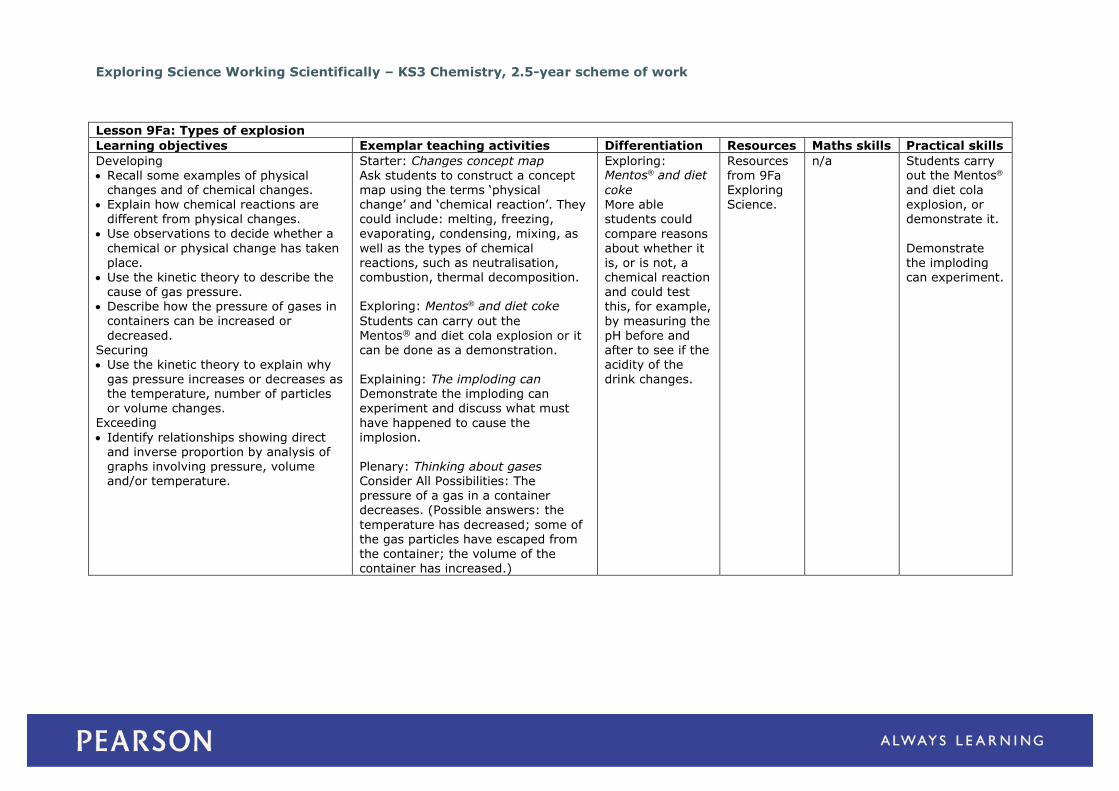
Exploring Science Working Scientifically – KS3 Chemistry, 2.5-year scheme of work
Lesson 9Fa: Types of explosion
Learning objectives Exemplar teaching activities Differentiation Resources Maths skills Practical skills
Developing Recall some examples of physical
changes and of chemical changes. Explain how chemical reactions are
different from physical changes.
Use observations to decide whether a
chemical or physical change has taken place.
Use the kinetic theory to describe the cause of gas pressure.
Describe how the pressure of gases in containers can be increased or
decreased. Securing Use the kinetic theory to explain why
gas pressure increases or decreases as the temperature, number of particles or volume changes.
Exceeding
Identify relationships showing direct and inverse proportion by analysis of graphs involving pressure, volume and/or temperature.
Starter: Changes concept map Ask students to construct a concept map using the terms ‘physical change’ and ‘chemical reaction’. They could include: melting, freezing,
evaporating, condensing, mixing, as
well as the types of chemical reactions, such as neutralisation, combustion, thermal decomposition. Exploring: Mentos® and diet coke
Students can carry out the Mentos® and diet cola explosion or it can be done as a demonstration.
Explaining: The imploding can Demonstrate the imploding can experiment and discuss what must
have happened to cause the implosion. Plenary: Thinking about gases Consider All Possibilities: The pressure of a gas in a container decreases. (Possible answers: the
temperature has decreased; some of the gas particles have escaped from the container; the volume of the container has increased.)
Exploring: Mentos® and diet
coke More able students could
compare reasons about whether it is, or is not, a chemical reaction and could test this, for example,
by measuring the pH before and after to see if the acidity of the
drink changes.
Resources from 9Fa Exploring Science.
n/a Students carry out the Mentos®
and diet cola explosion, or demonstrate it.
Demonstrate the imploding can experiment.
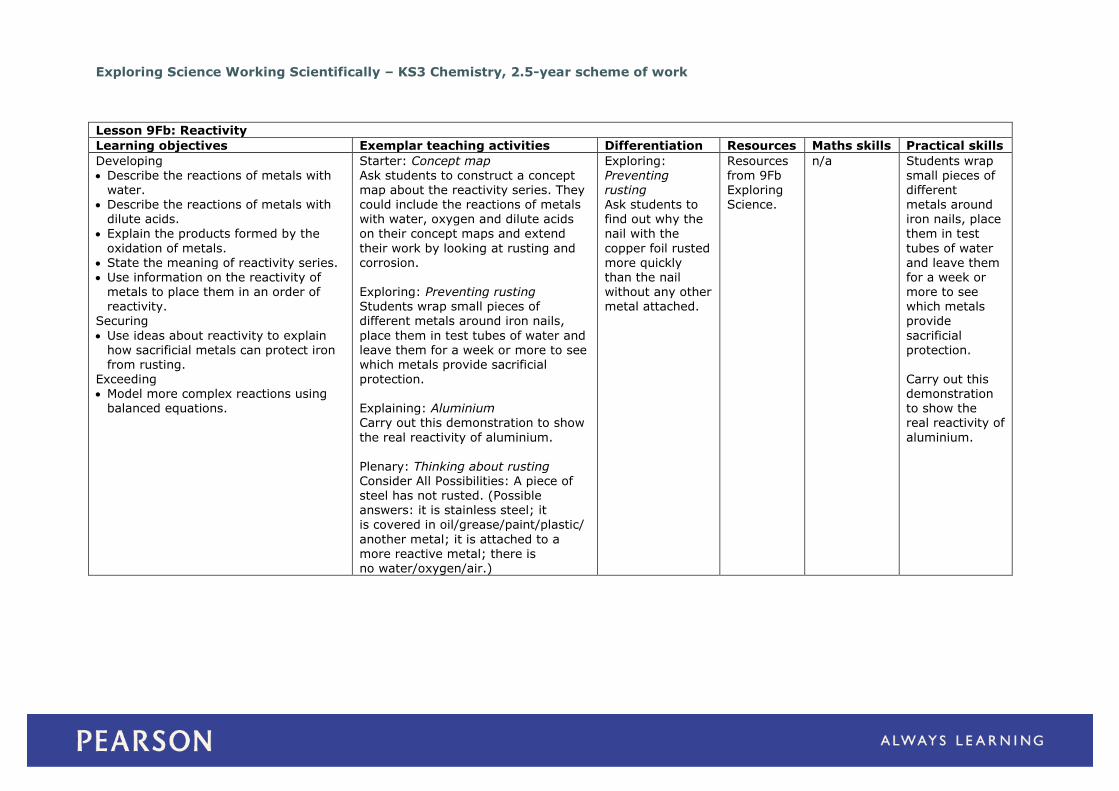
Exploring Science Working Scientifically – KS3 Chemistry, 2.5-year scheme of work
Lesson 9Fb: Reactivity
Learning objectives Exemplar teaching activities Differentiation Resources Maths skills Practical skills
Developing Describe the reactions of metals with
water. Describe the reactions of metals with
dilute acids.
Explain the products formed by the
oxidation of metals. State the meaning of reactivity series. Use information on the reactivity of
metals to place them in an order of reactivity.
Securing
Use ideas about reactivity to explain how sacrificial metals can protect iron from rusting.
Exceeding Model more complex reactions using
balanced equations.
Starter: Concept map Ask students to construct a concept map about the reactivity series. They could include the reactions of metals with water, oxygen and dilute acids
on their concept maps and extend
their work by looking at rusting and corrosion. Exploring: Preventing rusting Students wrap small pieces of different metals around iron nails,
place them in test tubes of water and leave them for a week or more to see which metals provide sacrificial
protection. Explaining: Aluminium Carry out this demonstration to show
the real reactivity of aluminium. Plenary: Thinking about rusting Consider All Possibilities: A piece of steel has not rusted. (Possible answers: it is stainless steel; it
is covered in oil/grease/paint/plastic/
another metal; it is attached to a more reactive metal; there is no water/oxygen/air.)
Exploring: Preventing rusting Ask students to find out why the
nail with the
copper foil rusted more quickly than the nail without any other metal attached.
Resources from 9Fb Exploring Science.
n/a Students wrap small pieces of different metals around iron nails, place
them in test
tubes of water and leave them for a week or more to see which metals provide
sacrificial protection.
Carry out this demonstration to show the real reactivity of
aluminium.
Exploring Science Working Scientifically – KS3 Chemistry, 2.5-year scheme of work
Lesson 9Fc: Energy and reactions
Learning objectives Exemplar teaching activities Differentiation Resources Maths skills Practical skills
Developing Describe the test for oxygen. Describe the combustion of
hydrocarbons (in terms of reactants and products).
Describe examples of energy being
used to start a chemical reaction or keep it going.
Securing Apply knowledge of explosive reactions
to explain why they occur more or less rapidly when the particle size or the
oxidiser is changed. Describe how some explosive mixtures
obtain enough oxygen to explode.
Classify changes as exothermic or endothermic from temperature changes.
Explain why energy input may be
needed to start some reactions or keep them going.
Exceeding Describe bond breaking and making in
terms of energy transfer. Summarise energy changes by
drawing simple energy level diagrams.
Working scientifically Calculate percentages. Express one number as a percentage
of another. Calculate the outcome of a percentage
increase or decrease.
Calculate percentage change.
Starter: Just a minute Select one student to speak about anything they know about energy and start a stop clock when they start. At the first repetition, pause or
mistake, another student takes over.
Continue until the minute is up. Exploring: Everyday exothermic and endothermic reactions Ask students to design a non-drug-containing medical pack to ease joint
stiffness in older people. They need to present their designs, together with ingredients and details of how they
would make their packs and how they work. Explaining: Shrieking jelly baby
experiment Demonstrate how potassium chlorate(V) oxidises the sugar in a jelly baby into carbon dioxide and water.
Plenary: Thinking about energy
changes What Was The Question: carbon dioxide and water. (Possible question: What is made when a hydrocarbon burns? What is the product when wood/paper/sugar burns?)
n/a Resources from 9Fc Exploring Science.
n/a Demonstrate how potassium chlorate(V) oxidises the sugar in a jelly
baby into
carbon dioxide and water.
Exploring Science Working Scientifically – KS3 Chemistry, 2.5-year scheme of work
Lesson 9Fd: Displacement
Learning objectives Exemplar teaching activities Differentiation Resources Maths skills Practical skills
Developing State the meaning of displacement
reaction. Describe what happens when a given
displacement reaction occurs.
Securing
Explain why a displacement reaction may or may not occur.
Use evidence to decide whether a displacement reaction has or has not occurred.
Use results from displacement
reactions to produce an order of reactivity.
Exceeding
Write balanced equations for displacement reactions.
Starter: I’m the answer Provide students with a card that has a word written on it. The words relate to metals, such as ‘reactivity series’, ‘potassium’, ‘magnesium’,
‘copper’, ‘gold’, ‘hydrogen’, ‘metal
hydroxide’, ‘metal oxide’, ‘salt’, ‘metal chloride’, ‘sacrificial protection’. Ask the students a question and get them to stand up if they think they have a card that gives the answer to your question.
Exploring: Investigating displacement reactions
Students investigate temperature changes during displacement reactions of copper sulfate solution, by adding different metals to the
copper sulfate solution. Explaining: Displacement of silver Demonstrate the displacement of silver under a microscope, using silver nitrate solution and copper foil.
Plenary: Thinking displacement Put In Order: copper, potassium, magnesium, platinum, zinc. (Possible answers: alphabetical order; order in the periodic table; order of reactivity.)
Explaining: Displacement of silver More able students can
write word and
balanced equations for the reaction.
Resources from 9Fd Exploring Science.
n/a Students investigate temperature changes during displacement
reactions of
copper sulfate solution, by adding different metals to the copper sulfate solution.
Demonstrate the
displacement of silver under a microscope, using silver
nitrate solution and copper foil.
Exploring Science Working Scientifically – KS3 Chemistry, 2.5-year scheme of work
Lesson 9Fe: Extracting materials
Learning objectives Exemplar teaching activities Differentiation Resources Maths skills Practical skills
Developing Recall how metals are extracted from
ores taken from the Earth’s crust. Recall that the extraction of some
metals is more difficult than others,
depending on the metal’s reactivity.
Explain why some elements have been isolated for much longer than others.
Securing Explain what happens in oxidation and
reduction. Describe how metals are extracted
from their ores by heating with carbon and electrolysis.
Explain why the method used to
extract a metal is related to its position in the reactivity series and cost of the extraction process.
Exceeding
Describe the movement of ions in electrolysis.
Explain how oxidation and reduction happen during electrolysis.
Starter: Extracting metals brainstorm Ask students to work in pairs to list bullet points about how metals occur in the Earth’s crust and how to obtain pure metals. Form groups and
ask for group list of bullet points.
Exploring: Extracting metals from metal oxides Students carry out experiments to extract metals from four metal oxides, by heating with carbon
(powdered charcoal). Explaining: Electrolysis of molten zinc
chloride Demonstrate the decomposition of zinc chloride into zinc and chlorine using electrical energy.
Plenary: Thinking about metals Plus, Minus, Interesting: Aluminium is extracted from aluminium oxide using electricity. (Possible answers: Plus – aluminium is available to make many
objects, such as aircraft, foil, drinks
cans; Minus – the extraction is expensive; Interesting – when aluminium was first extracted, it was more valuable than silver.)
Exploring: Extracting metals from metal oxides Students can
write balanced
equations for the reactions taking place.
Resources from 9Fe Exploring Science.
n/a Students carry out experiments to extract metals from four metal
oxides, by
heating with carbon (powdered charcoal). Demonstrate
the decomposition of zinc
chloride into zinc and chlorine using electrical
energy.
Written by Mark Levesley, Iain Brand, Penny Johnson, Sue Kearsey and Sue Robilliard.