Explorer 3 Light Manual - SEIWA · Copyright 2011 Seiwa S.R.L. Explorer 3 Light Manual ... Explorer...
8
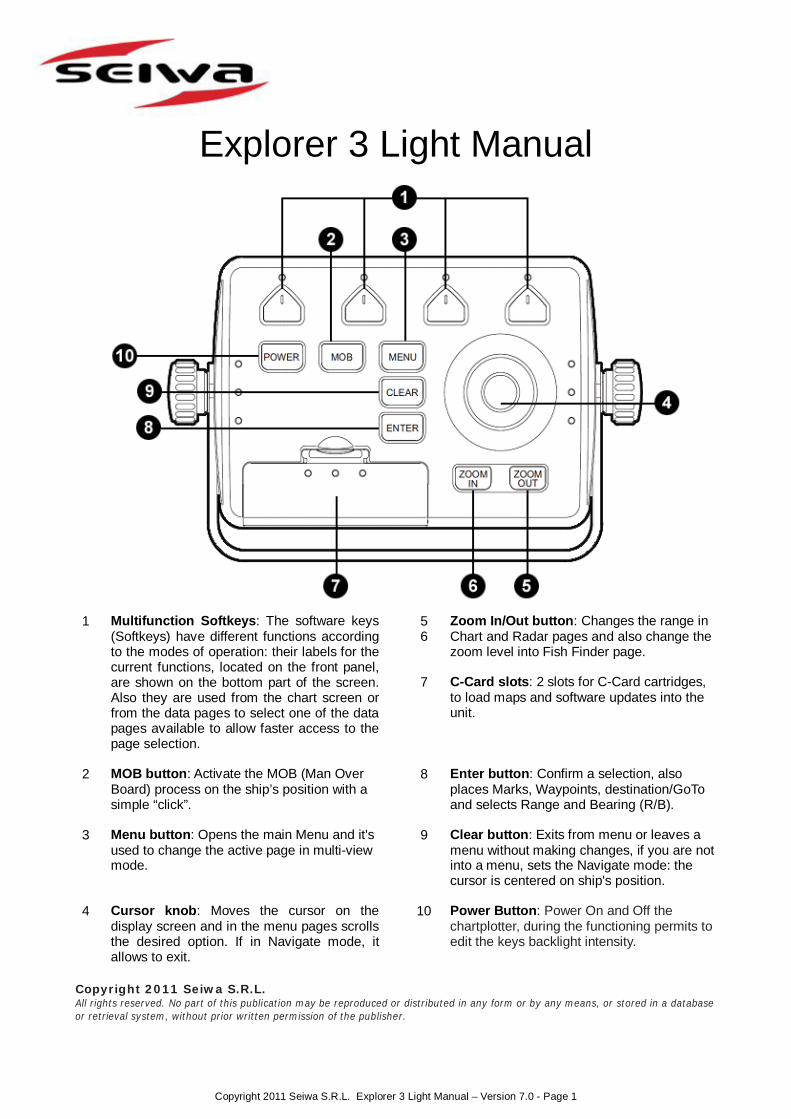
Copyright 2011 Seiwa S.R.L. Explorer 3 Light Manual – Version 7.0 - Page 1 Explorer 3 Light Manual 5 6 Zoom In/Out button: Changes the range in Chart and Radar pages and also change the zoom level into Fish Finder page. 1 Multifunction Softkeys: The software keys (Softkeys) have different functions according to the modes of operation: their labels for the current functions, located on the front panel, are shown on the bottom part of the screen. Also they are used from the chart screen or from the data pages to select one of the data pages available to allow faster access to the page selection. 7 C-Card slots: 2 slots for C-Card cartridges, to load maps and software updates into the unit. 2 MOB button: Activate the MOB (Man Over Board) process on the ship’s position with a simple “click”. 8 Enter button: Confirm a selection, also places Marks, Waypoints, destination/GoTo and selects Range and Bearing (R/B). 3 Menu button: Opens the main Menu and it's used to change the active page in multi-view mode. 9 Clear button: Exits from menu or leaves a menu without making changes, if you are not into a menu, sets the Navigate mode: the cursor is centered on ship's position. 4 Cursor knob: Moves the cursor on the display screen and in the menu pages scrolls the desired option. If in Navigate mode, it allows to exit. 10 Power Button: Power On and Off the chartplotter, during the functioning permits to edit the keys backlight intensity. Copyright 2011 Seiwa S.R.L. All rights reserved. No part of this publication may be reproduced or distributed in any form or by any means, or stored in a database or retrieval system, without prior written permission of the publisher.
-
Upload
hoangkhanh -
Category
Documents
-
view
233 -
download
6
Transcript of Explorer 3 Light Manual - SEIWA · Copyright 2011 Seiwa S.R.L. Explorer 3 Light Manual ... Explorer...
Copyright 2011 Seiwa S.R.L. Explorer 3 Light Manual – Version 7.0 - Page 1
Explorer 3 Light Manual
5
6 Zoom In/Out button: Changes the range in Chart and Radar pages and also change the zoom level into Fish Finder page.
1 Multifunction Softkeys: The software keys (Softkeys) have different functions according to the modes of operation: their labels for the current functions, located on the front panel, are shown on the bottom part of the screen. Also they are used from the chart screen or from the data pages to select one of the data pages available to allow faster access to the page selection.
7 C-Card slots: 2 slots for C-Card cartridges, to load maps and software updates into the unit.
2 MOB button: Activate the MOB (Man Over Board) process on the ship’s position with a simple “click”.
8 Enter button: Confirm a selection, also places Marks, Waypoints, destination/GoTo and selects Range and Bearing (R/B).
3 Menu button: Opens the main Menu and it's used to change the active page in multi-view mode.
9 Clear button: Exits from menu or leaves a menu without making changes, if you are not into a menu, sets the Navigate mode: the cursor is centered on ship's position.
4 Cursor knob: Moves the cursor on the display screen and in the menu pages scrolls the desired option. If in Navigate mode, it allows to exit.
10 Power Button: Power On and Off the chartplotter, during the functioning permits to edit the keys backlight intensity.
Copyright 2011 Seiwa S.R.L. All rights reserved. No part of this publication may be reproduced or distributed in any form or by any means, or stored in a database or retrieval system, without prior written permission of the publisher.
Copyright 2011 Seiwa S.R.L. Explorer 3 Light Manual – Version 7.0 - Page 2
Power On/Off Power On: To switch the unit On, press the POWER button (10). The first page showed it's the First setup configuration Power Off: To switch the unit Off, press POWER button (10) and take pressed until the countdown ends (3-2-1).
NMEA CONNECTIVITY Thanks to his NMEA 0183 interface, you can connect up to 5 input devices and virtually no limits output devices, every NMEA sentence handled are sent out to all your instruments.
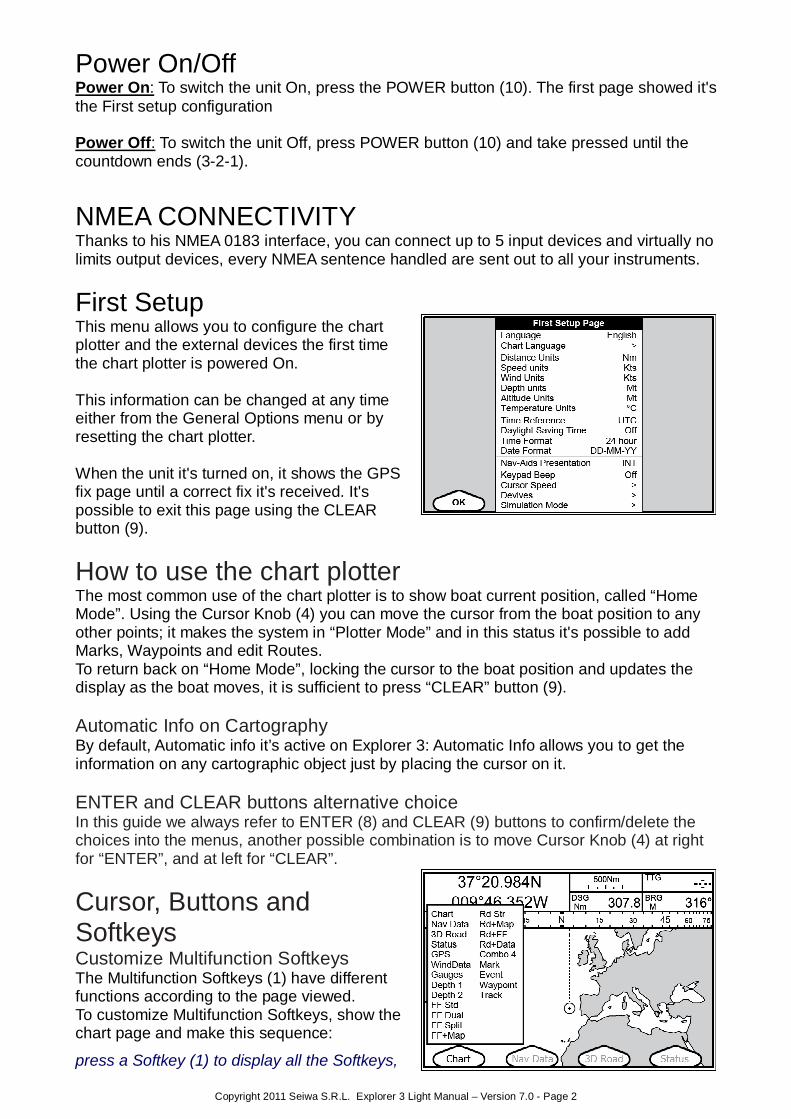
First Setup This menu allows you to configure the chart plotter and the external devices the first time the chart plotter is powered On. This information can be changed at any time either from the General Options menu or by resetting the chart plotter. When the unit it's turned on, it shows the GPS fix page until a correct fix it's received. It's possible to exit this page using the CLEAR button (9).
How to use the chart plotter The most common use of the chart plotter is to show boat current position, called “Home Mode”. Using the Cursor Knob (4) you can move the cursor from the boat position to any other points; it makes the system in “Plotter Mode” and in this status it's possible to add Marks, Waypoints and edit Routes. To return back on “Home Mode”, locking the cursor to the boat position and updates the display as the boat moves, it is sufficient to press “CLEAR” button (9). Automatic Info on Cartography By default, Automatic info it’s active on Explorer 3: Automatic Info allows you to get the information on any cartographic object just by placing the cursor on it. ENTER and CLEAR buttons alternative choice In this guide we always refer to ENTER (8) and CLEAR (9) buttons to confirm/delete the choices into the menus, another possible combination is to move Cursor Knob (4) at right for “ENTER”, and at left for “CLEAR”.
Cursor, Buttons and Softkeys Customize Multifunction Softkeys The Multifunction Softkeys (1) have different functions according to the page viewed. To customize Multifunction Softkeys, show the chart page and make this sequence:
press a Softkey (1) to display all the Softkeys,

Copyright 2011 Seiwa S.R.L. Explorer 3 Light Manual – Version 7.0 - Page 3
press and take pressed the Softkey (1) you want to edit till a POP UP MENU appears, moving the Cursor Knob (4) select the Page you want to assign to the Softkey, press ENTER button (8) to confirm the selection
GoTo function Create a GoTo Move the cursor on the destination and then make this sequence:
press ENTER button (8), select “GOTO”, press ENTER button (8) again Delete a GoTo To delete a GoTo make this sequence:
move the cursor on the GoTo position, press the Softkey “Stop”
User Points: Marks and Waypoints (Objects) Place an User Point (Mark, Waypoint) To place an User Point, move the cursor on the desired position and make this sequence:
press ENTER button (8), select “MARK” or ”Waypoint”, press the ENTER button (8) The User Point position is automatically registered in the chart plotter memory. Repeat this procedure for any other User Point you need. Delete an User Point (Mark, Waypoint) To delete an User Point, move the cursor on it and then make this sequence:
press the Softkey “Delete”, press ENTER button (8), press the Softkey “Accept” Move an User Point (Mark, Waypoint) To move an User Point, move the cursor on it and make this sequence:
press the Softkey “Move”, move the cursor on the new position, press the Softkey “Accept” Edit an User Point (Mark, Waypoint) To edit an User Point (change symbol, name, color, lat/long), move the cursor on it and make this sequence:
press the Softkey “Edit”, select field you want to edit, press the ENTER button (8)
Route Create a Routes To create a Route you have to position at least two Waypoints. To create a Waypoint, move the cursor on the position you want to navigate trough, then make this sequence:
press ENTER button (8), select “Waypoint”, press ENTER button (8) again The Waypoint position is automatically registered in the chart plotter memory. Repeat this procedure for any other Waypoint you need to create your Route. Add a Waypoint To add a Waypoint in an existing Route, move the cursor on the leg between two Waypoints and make this sequence:
press the Softkey “Insert”, move the cursor to the new position (the Route will be automatically updated), press the Softkey “Accept”

Copyright 2011 Seiwa S.R.L. Explorer 3 Light Manual – Version 7.0 - Page 4
The Active Route The Active Route is the working Route: it can be edited by adding, removing or moving Waypoints. To change the Active Route, press MENU (3) button, then make this sequence:
select “Route”, press ENTER button (8), select the desired Route, press ENTER button (8) Follow an Active Route To follow an Active Route, move the cursor on a Route's first Waypoint, then make this sequence:
press ENTER button (8), select “GOTO”, press the ENTER button (8)
MOB (Man Over Board) Plot a MOB To plot a MOB, simply press the MOB (2) button any time needed. ATTENTION: You can plot one MOB only, at the time. To cancel the MOB To cancel the MOB make this sequence:
press MOB button (2) and press the Softkey “Confirm”
Tracks Edit Track Preferences To edit Track preferences (such as Step Units) make this sequence:
press MENU button (3), select “Track”, press ENTER button (8), select “Config”, press ENTER button (8), select which value change, press ENTER button (8) Select Active Track Explorer 3 can store 10.000 track points and 5 total tracks. It's possible to use the whole 10.000 track points in one track, but a different Active Track can be selected. To select the Active Track, make this sequence:
press MENU button (3), select “Track”, press ENTER button (8), select “Config”, press ENTER button (8), select “Active Track”, select Track number, press ENTER button (8) Register a Track To start registering a Track using the selected choices, make this sequence:
press MENU button (3), select “Track”, press ENTER button (8), select “Activate”, press ENTER button (8) Delete Track Points from an active Track To delete Track Points from the active Track, make this sequence:
press MENU button (3), select “Track”, press ENTER button (8), select “Delete”, press ENTER button (8), select one of the 3 Softkeys “Begin” “End” “Whole” (selecting the Softkey “Whole” the System will ask you a confirmation)
Copyright 2011 Seiwa S.R.L. Explorer 3 Light Manual – Version 7.0 - Page 5
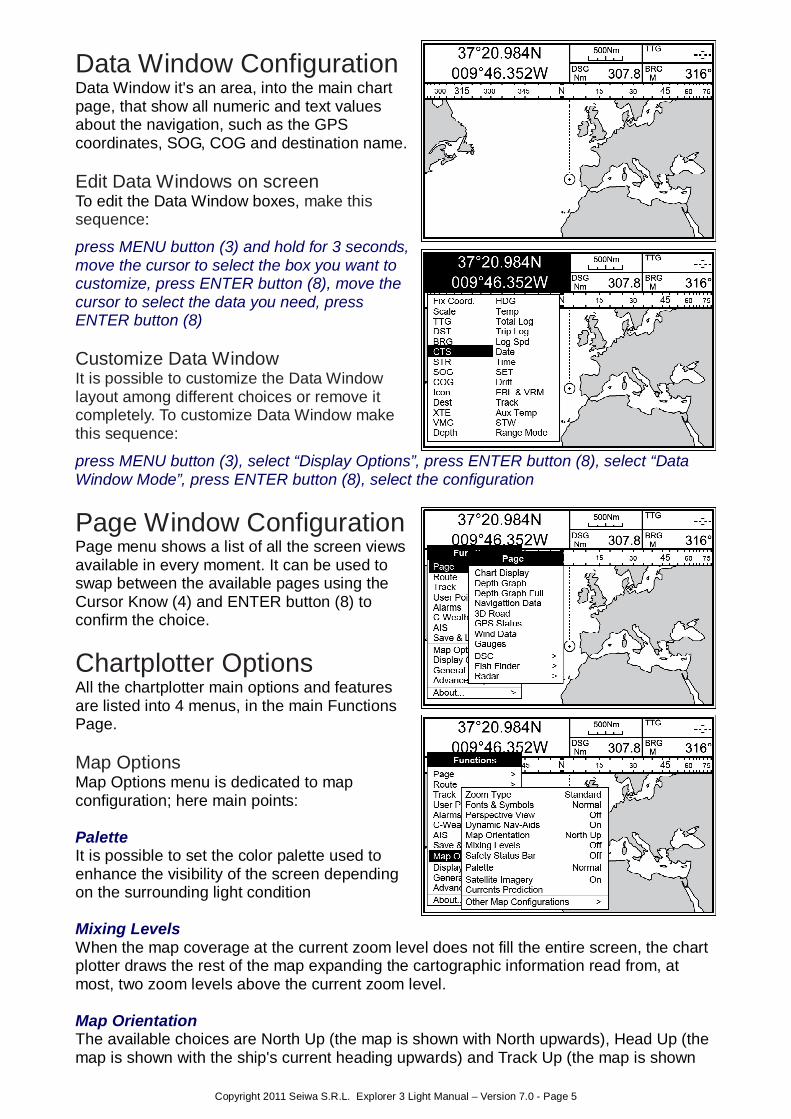
Data Window Configuration Data Window it's an area, into the main chart page, that show all numeric and text values about the navigation, such as the GPS coordinates, SOG, COG and destination name. Edit Data Windows on screen To edit the Data Window boxes, make this sequence:
press MENU button (3) and hold for 3 seconds, move the cursor to select the box you want to customize, press ENTER button (8), move the cursor to select the data you need, press ENTER button (8) Customize Data Window It is possible to customize the Data Window layout among different choices or remove it completely. To customize Data Window make this sequence:
press MENU button (3), select “Display Options”, press ENTER button (8), select “Data Window Mode”, press ENTER button (8), select the configuration
Page Window Configuration Page menu shows a list of all the screen views available in every moment. It can be used to swap between the available pages using the Cursor Know (4) and ENTER button (8) to confirm the choice.
Chartplotter Options All the chartplotter main options and features are listed into 4 menus, in the main Functions Page. Map Options Map Options menu is dedicated to map configuration; here main points: Palette It is possible to set the color palette used to enhance the visibility of the screen depending on the surrounding light condition Mixing Levels When the map coverage at the current zoom level does not fill the entire screen, the chart plotter draws the rest of the map expanding the cartographic information read from, at most, two zoom levels above the current zoom level. Map Orientation The available choices are North Up (the map is shown with North upwards), Head Up (the map is shown with the ship's current heading upwards) and Track Up (the map is shown
Copyright 2011 Seiwa S.R.L. Explorer 3 Light Manual – Version 7.0 - Page 6
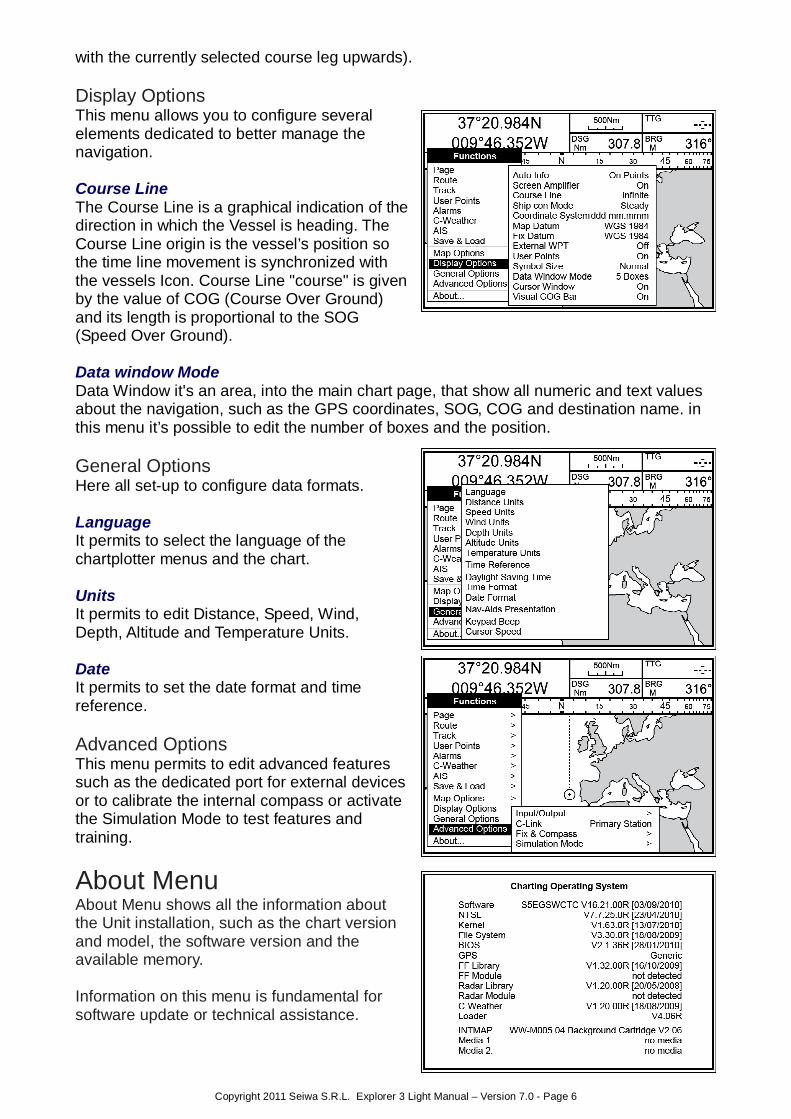
with the currently selected course leg upwards). Display Options This menu allows you to configure several elements dedicated to better manage the navigation. Course Line The Course Line is a graphical indication of the direction in which the Vessel is heading. The Course Line origin is the vessel’s position so the time line movement is synchronized with the vessels Icon. Course Line "course" is given by the value of COG (Course Over Ground) and its length is proportional to the SOG (Speed Over Ground). Data window Mode Data Window it's an area, into the main chart page, that show all numeric and text values about the navigation, such as the GPS coordinates, SOG, COG and destination name. in this menu it’s possible to edit the number of boxes and the position. General Options Here all set-up to configure data formats. Language It permits to select the language of the chartplotter menus and the chart. Units It permits to edit Distance, Speed, Wind, Depth, Altitude and Temperature Units. Date It permits to set the date format and time reference. Advanced Options This menu permits to edit advanced features such as the dedicated port for external devices or to calibrate the internal compass or activate the Simulation Mode to test features and training.
About Menu About Menu shows all the information about the Unit installation, such as the chart version and model, the software version and the available memory. Information on this menu is fundamental for software update or technical assistance.
Copyright 2011 Seiwa S.R.L. Explorer 3 Light Manual – Version 7.0 - Page 7
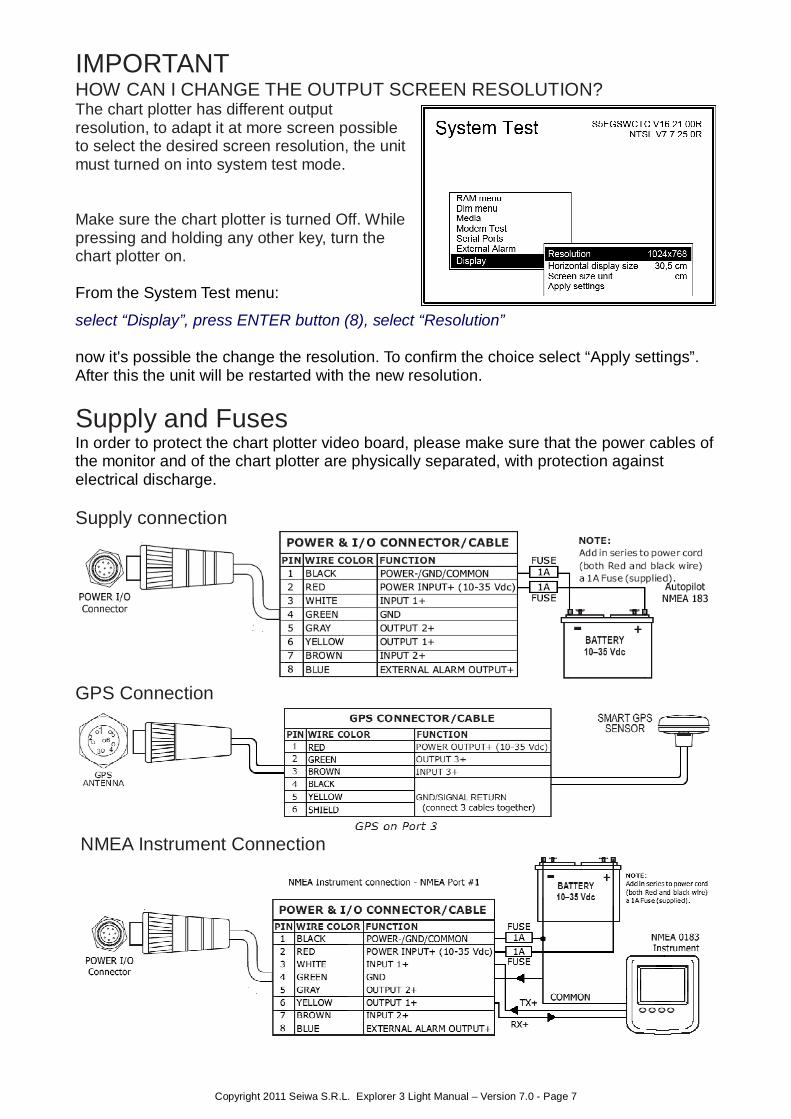
IMPORTANT HOW CAN I CHANGE THE OUTPUT SCREEN RESOLUTION? The chart plotter has different output resolution, to adapt it at more screen possible to select the desired screen resolution, the unit must turned on into system test mode. Make sure the chart plotter is turned Off. While pressing and holding any other key, turn the chart plotter on. From the System Test menu:
select “Display”, press ENTER button (8), select “Resolution” now it's possible the change the resolution. To confirm the choice select “Apply settings”. After this the unit will be restarted with the new resolution.
Supply and Fuses In order to protect the chart plotter video board, please make sure that the power cables of the monitor and of the chart plotter are physically separated, with protection against electrical discharge. Supply connection
GPS Connection
NMEA Instrument Connection
Copyright 2011 Seiwa S.R.L. Explorer 3 Light Manual – Version 7.0 - Page 8
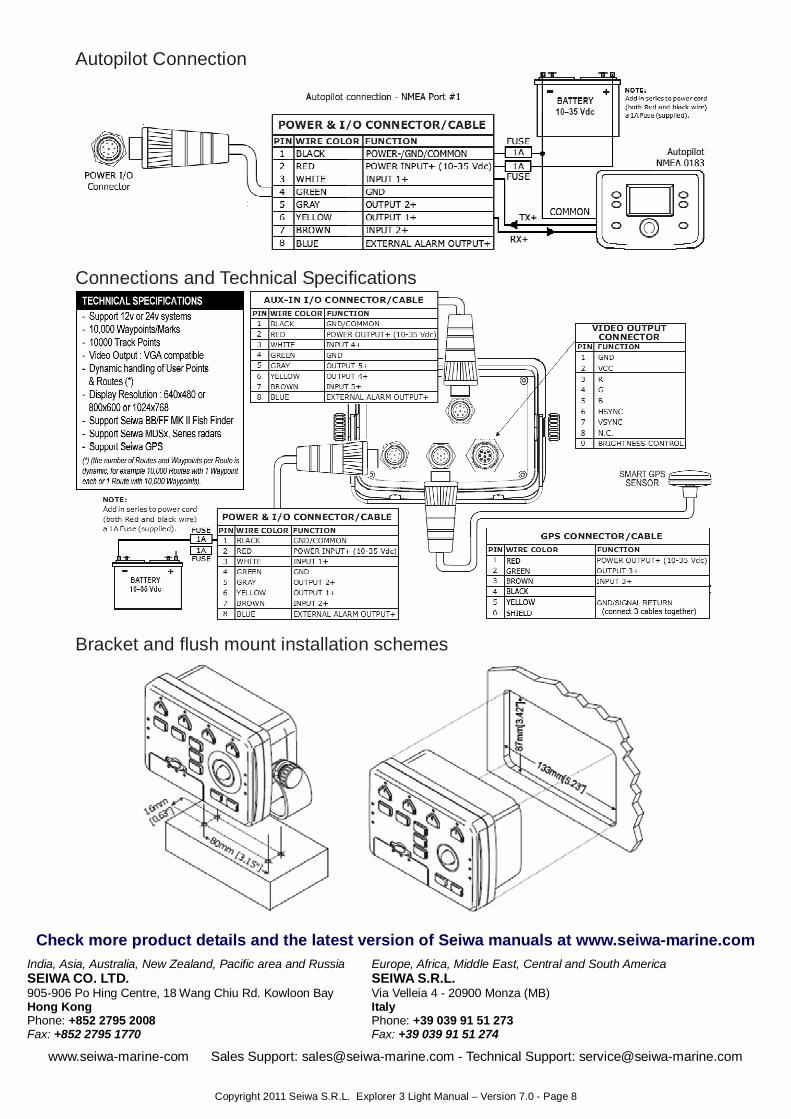
Autopilot Connection
Connections and Technical Specifications
Bracket and flush mount installation schemes
Check more product details and the latest version of Seiwa manuals at www.seiwa-marine.com India, Asia, Australia, New Zealand, Pacific area and Russia SEIWA CO. LTD. 905-906 Po Hing Centre, 18 Wang Chiu Rd. Kowloon Bay Hong Kong Phone: +852 2795 2008 Fax: +852 2795 1770
Europe, Africa, Middle East, Central and South America SEIWA S.R.L. Via Velleia 4 - 20900 Monza (MB) Italy Phone: +39 039 91 51 273 Fax: +39 039 91 51 274
www.seiwa-marine-com Sales Support: [email protected] - Technical Support: [email protected]