Experiment EP-2: The Effect of Exercise on Metabolism...
12
Experiment EP-2: The Effect of Exercise on Metabolism and Body Temperature Assistants and Their Duties. 1. At least two other students, who are not subjects, should join each pair of subjects to form a lab group. While one of the subjects is performing the exercises, the other subject and the other students in the group will perform the various duties needed to run the experiment successfully. 2. One member of the group should: • Time the rest, exercise, and recovery periods; • Tell the subject when to get ready for rest, exercise, or recovery periods; • Tell the subject when to start and stop exercising; • Tell the other assistants when to record the subjects’ vital numbers. 3. Another member of the group should: • Measure the core temperature of the subject with the thermometer, • Determine the active sweat gland density with iodine paper. • Set the metronome for the required step rhythm. 4. The third member of the group should: • Operate the computer system that records heart rate and skin temperature; • Record the values for the core temperature and the sweat gland density of the subject in the Journal or on a separate data table. Preparation Needed before Exercise Begins Calibration of Temperature Probe 1. Place the tip of the temperature probe in cold water of a known temperature (~10 o C). Type the Calibration <Cold Water Temperature> in the Mark box to the right of the Mark button on the LabScribe Main window. 2. Click on the Record button and press the Enter key on the keyboard. Record data until the voltage on temperature channel reaches a plateau; this usually takes about 20 seconds. While recording at this temperature, type the Calibration <Warm Water Temperature> in the Mark box. 3. Without stopping the recording, move the tip of the probe from cold to warm water of a known temperature (~40 o C). 4. Press the Enter key on the keyboard. Record the change in voltage on the Temperature channel until a plateau is reached (Figure EP-2-L1 ). Click on the Stop button to halt the recording. Exercise Physiology-Exercise-Metabolism-Temp-Labs EP-2-1
Transcript of Experiment EP-2: The Effect of Exercise on Metabolism...

Experiment EP-2: The Effect of Exercise on Metabolism and Body Temperature
Assistants and Their Duties.
1. At least two other students, who are not subjects, should join each pair of subjects to form a lab
group. While one of the subjects is performing the exercises, the other subject and the other
students in the group will perform the various duties needed to run the experiment successfully.
2. One member of the group should:
• Time the rest, exercise, and recovery periods;
• Tell the subject when to get ready for rest, exercise, or recovery periods;
• Tell the subject when to start and stop exercising;
• Tell the other assistants when to record the subjects’ vital numbers.
3. Another member of the group should:
• Measure the core temperature of the subject with the thermometer,
• Determine the active sweat gland density with iodine paper.
• Set the metronome for the required step rhythm.
4. The third member of the group should:
• Operate the computer system that records heart rate and skin temperature;
• Record the values for the core temperature and the sweat gland density of the subject in the
Journal or on a separate data table.
Preparation Needed before Exercise Begins
Calibration of Temperature Probe
1. Place the tip of the temperature probe in cold water of a known temperature (~10oC). Type the
Calibration <Cold Water Temperature> in the Mark box to the right of the Mark button on the
LabScribe Main window.
2. Click on the Record button and press the Enter key on the keyboard. Record data until the
voltage on temperature channel reaches a plateau; this usually takes about 20 seconds. While
recording at this temperature, type the Calibration <Warm Water Temperature> in the Mark box.
3. Without stopping the recording, move the tip of the probe from cold to warm water of a known
temperature (~40oC).
4. Press the Enter key on the keyboard. Record the change in voltage on the Temperature channel
until a plateau is reached (Figure EP-2-L1). Click on the Stop button to halt the recording.
Exercise Physiology-Exercise-Metabolism-Temp-Labs EP-2-1

Figure EP-2-L1: The output of the TM-100 temperature probe recorded at two different temperatures.
Data is used to calibrate the TM-100.
5. Select Save As in the File menu, type a name for the file. Choose a destination on the computer
in which to save the file, like your lab group folder). Designate the file type as *.iwxdata. Click
on the Save button to save the data file.
6. Use the Display Time icons (Figure EP-2-L2) to adjust the Display Time of the Main window to
show the recording at both temperatures in the same window.
7. Click the 2-Cursor icon (Figure EP-2-L2) so that two blue cursors appear on the Main window.
Place a cursor on the plateau of the temperature recording taken from cold water and the other
cursor on the plateau of the temperature recording from the warm water.
Figure EP-2-2: The LabScribe toolbar.
8. To convert the voltages at the positions of the cursors to temperatures, use the Simple Units
Conversion dialogue window (Figure EP-2-L3). To access this dialogue window, click on the
arrow to the left of the channel title, Skin Temp, to open the channel menu. Select Units from
the channel menu, and select Simple from the Units submenu.
9. On the Simple Units Conversion window, make sure 2 point calibration is selected in the pull-
down menu in the upper-left corner of the window.
• Put a check mark in the box next to Apply units to all blocks.
• Notice that the voltages from the positions of the cursors are automatically entered into the
value equations.
• Enter the two temperatures used in the calibration recording in the corresponding boxes on
Exercise Physiology-Exercise-Metabolism-Temp-Labs EP-2-2

the right side of the conversion equations.
• Enter the name of the units, oC, in box below the pressures.
• Click the OK button to activate the units conversion.
Figure EP-2-L3: The Simple Units Conversion dialogue window with the voltages at the cursors set to
equal the temperatures of the water used to calibrate the temperature probe.
Weighing the Subjects before Exercise
1. Each subject should change into a t-shirt and shorts (no socks or shoes), and weigh-in before the
initial rest period. Record the initial weight of each subject.
2. Use surgical tape to attach the temperature probe to the skin on the right thigh of the subject.
The tip of the probe should be over the large muscle (quadriceps) on the front of the thigh, in
the center of the thigh midway between the knee and the hip.
3. The subject should put on his or her socks and shoes in preparation to exercise.
4. Place the plethysmograph on the volar surface (where the fingerprints are located) of the distal
segment of the left middle finger of the subject, and wrap the Velcro strap around the end of the
finger to attach the unit firmly in place.
5. The subject should sit in a chair and rest for at least 5 minutes before recording data from the
time right before the beginning of the first exercise period.
6. It is the job of the timekeeper to keep the experiment on pace so it can be completed in a timely
manner.
7. The subject assigned to wear sweat clothes while exercising should not dress in those items or
put the knit cap until he or she is ready to begin the first exercise period.
Exercise Physiology-Exercise-Metabolism-Temp-Labs EP-2-3

Rest and Exercise Periods Used in the Experiment
1. Each subject will perform four 3-minute periods of stepping exercises. In addition to the 5-
minute rest period before the first 3-minute exercise period, there are 5-minute recovery periods
between the exercise periods and a 5-minute recovery period after the last exercise period.
Warning: The Step Test should not be attempted by individuals with a very poor level of
physical fitness, or individuals taking a beta blocker medication or any medication affecting
heart rate.
2. The amount of work completed in each exercise period will increase progressively as do the
step rates (steps/min) The step rates are 12, 18, 24, and 30 steps per minute.
3. Each step is a four-beat cadence, so the metronome will be set to 48, 72, 96, and 120 beats per
minute, respectively.
4. The movements for each of the four beats in a step are:
• 1st beat: Left foot up on step.
• 2nd beat: Use the left leg to lift body, and place right foot on step
• 3rd beat: Lower the left foot to the ground.
• 4th beat: Lower the right foot to the ground.
5. The subject can begin stepping with his or her right foot if he or she is more comfortable with
that arrangement.
6. It is important to secure the step against the side of a lab bench or up against a wall to prevent it
from slipping from under the feet of the subject.
Exercise 1: Resting Heart Rate, Temperatures, and Sweat Gland Density (SGD)
Aim: To measure the heart rate, skin and core temperatures, and active sweat gland density of
resting subject.
Procedure
1. Record the subject’s resting heart rate and skin temperature after the subject has rested for five
minutes.
2. Type <Subject’s Name> Resting HR and Skin Temp in the Mark box that is to the right of the
Mark button.
3. At the end of the rest period, click on the Record button, located on the upper right side of the
LabScribe Main window. The signal should begin scrolling across the screen. Press the Enter
key on the keyboard to mark the recording.
4. Click on the AutoScale buttons at the upper margins of the Pulse, Skin Temp, and Heart Rate
channels. The pulse, skin temperature, and heart rate recordings should expand to fill the
channel windows (Figure EP-2-L4).
• If the signal on the Pulse channel is upside down when compared to trace in Figure EP-2-
L4, click on the downward arrow to the left of the channel title and select the Invert
Exercise Physiology-Exercise-Metabolism-Temp-Labs EP-2-4

function. The trace should now look similar to the one in the figure.
• If the pulse signal is small or noisy, adjust the tension on the strap holding the pulse
plethysmograph to the finger.
Note: If the user clicks the Record button and there is no communication between the iWorx unit
and computer, an error window will appear in the center of the Main window. Make sure the
iWorx unit is turned on and connected to the USB port of the computer. Click OK and select the
Find Hardware function from the LabScribe Tools menu.
Figure EP-2-L4: Pulse, skin temperature, and heart rate recordings while subject is at rest, displayed
in the Main window.
5. Record the subject’s resting heart rate and skin temperature for one minute. Then, click Stop to
halt the recording.
6. Determine the subject’s core temperature by using thermometer provided. Please follow the
directions for using the thermometer in order to take accurate measurements and to avoid injury
to the subject
7. Determine the subject’s active sweat gland density (SGD):
• Wipe an area of the forehead dry with a lab wipe.
• Wrap a piece of the iodine paper around the small wood block, so a 2.5cm x 2.5cm surface
is available for use as a blotter.
• Gently press the iodine paper blotter on the skin of the forehead for 1 second.
• Place a 5mm x 5mm grid over the iodine paper blotter. Count the number of blue dots in the
5mm2 grid. Each blue dot indicates an active sweat gland. The carbohydrates in sweat
combine with iodine to create the blue dye in the dot.
8. Multiply the number of dots in the 5mm2 box by 4 to determine the number of active sweat
glands in 1 cm2.
Exercise Physiology-Exercise-Metabolism-Temp-Labs EP-2-5
9. Record the subject’s core temperature and sweat gland density (SGD) in the on-line notebook of
LabScribe by typing the name and value of the parameter directly into the Journal, or on a
separate data table. You can open and close the Journal by clicking on its icon on the LabScribe
toolbar (Figure EP-2-L5).
10. Select Save As in the File menu, type a name for the file. Choose a destination on the computer
in which to save the file, like your lab group folder). Designate the file type as *.iwxdata. Click
on the Save button to save the data file.
11. Remove the pulse plethysmograph from the subject’s finger. If the subject is able to keep the
connector of the temperature probe in the belt of their shorts or sweat pants (after the probe has
been disconnected from its extension cable), let them do so. If the connector of the temperature
probe cannot be secured on the subject, the probe must be removed from the subject’s skin
before the exercise period and reattached at the beginning of the recovery period.
Data Analysis
1. Scroll to the beginning of the recording of the subject’s heart rate while at rest. Display a ten
second section of data that is free of artifacts in the Main window.
2. Use the Display Time icons to adjust the Display Time of the Main window to show ten seconds
of data on the Main window. The ten second section of data can also be selected by:
• Placing the cursors on either side of the ten seconds of data; and
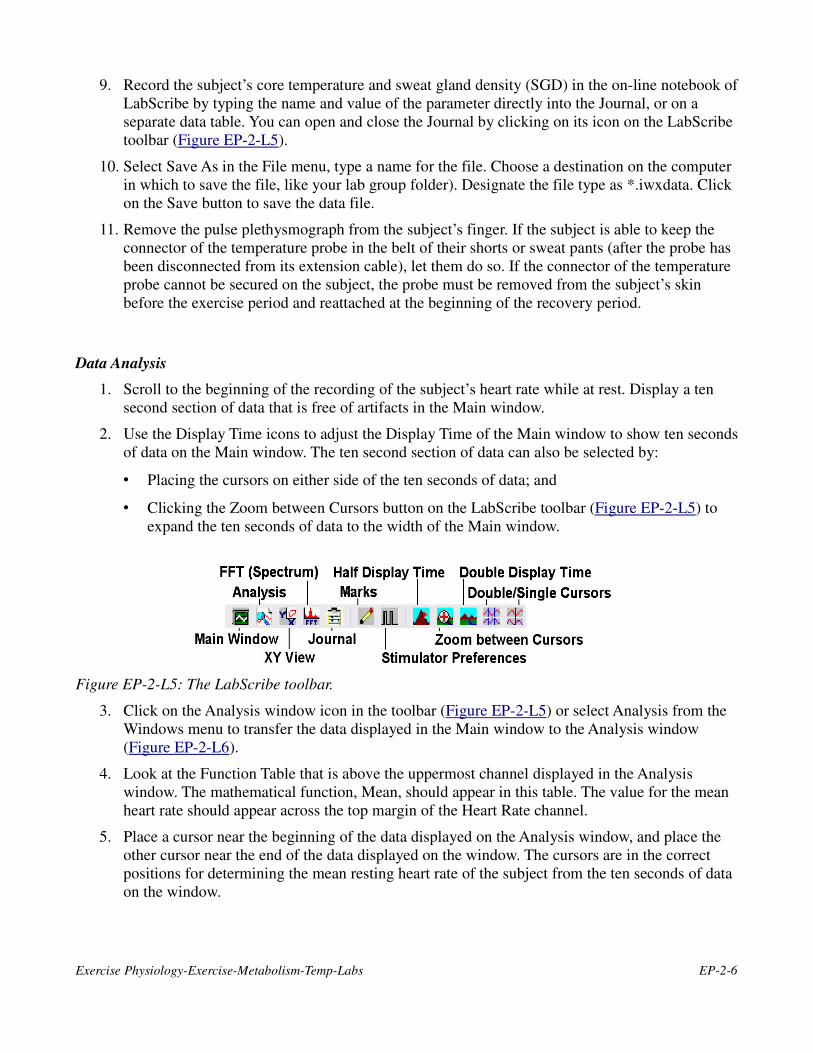
• Clicking the Zoom between Cursors button on the LabScribe toolbar (Figure EP-2-L5) to
expand the ten seconds of data to the width of the Main window.
Figure EP-2-L5: The LabScribe toolbar.
3. Click on the Analysis window icon in the toolbar (Figure EP-2-L5) or select Analysis from the
Windows menu to transfer the data displayed in the Main window to the Analysis window
(Figure EP-2-L6).
4. Look at the Function Table that is above the uppermost channel displayed in the Analysis
window. The mathematical function, Mean, should appear in this table. The value for the mean
heart rate should appear across the top margin of the Heart Rate channel.
5. Place a cursor near the beginning of the data displayed on the Analysis window, and place the
other cursor near the end of the data displayed on the window. The cursors are in the correct
positions for determining the mean resting heart rate of the subject from the ten seconds of data
on the window.
Exercise Physiology-Exercise-Metabolism-Temp-Labs EP-2-6

6. Record the mean resting heart rate of the subject in the on-line notebook of LabScribe by typing
the name and value of the parameter directly into the Journal. You can open and close the
Journal by clicking on its icon on the LabScribe toolbar (Figure EP-2-L5).
Figure EP-2-L6: Pulse, skin temperature, and heart rate recordings while subject is at rest, displayed
in the Analysis window.
7. The functions in the channel pull-down menus of the Analysis window can also be used to enter
the names and values of parameters from the recording to the Journal. To use these functions:
• Transfer the names of the mathematical functions used to determine the volumes and rates
to the Journal using the Add Title to Journal function in the Heart Rate Channel pull-down
menu.
• Transfer the values for the volumes and rates to the Journal using the Add All Data to
Journal function in the Heart Rate pull-down menu.
8. Record the mean resting heart rate for in Table EP-1-L2.
Exercise 2: Changes during Exercise and Recovery Periods
Aim: To measure the changes in the heart rate, skin temperature, core temperature, and active
sweat gland density of a subject exercising and recovering from exercise.
Procedure
1. When the measurements from the rest period have been completed, the timekeeper should
inform the subject and the assistants when the first exercise period will begin.
2. The metronome should be ticking at the proper cadence, 48 beats/minute, for about 30 seconds
before the exercise period begins. The subject should be standing in front of the step at that
time. Any subject dressed in sweat clothes should put on his or her knit cap.
3. The timekeeper should give the subject a 10-second countdown before calling “Start!”. Once
“Start” is called the subject should begin stepping.
Exercise Physiology-Exercise-Metabolism-Temp-Labs EP-2-7

4. The subject will step up and down for 3 minutes at the pace designated for the exercise period.
While the subject is stepping, the assistants can measure and enter pertinent data into the
Journal, or on a separate data table.
5. Thirty seconds before the end of the exercise period, the timekeeper should alert the assistants
to be ready to take measurements of heart rate, skin temperature, core temperature, and sweat
gland density. Type HR and Skin Temp at End of 12 Steps/min in the Mark box that is to the
right of the Mark button.
6. At the end of the 3-minute exercise period, the timekeeper should give the subject and assistants
a 10-second countdown before calling “Stop!”. At the end of the 3-minute stepping exercise, the
subject should immediately sit in a chair and attach the pulse plethysmograph to the same finger
with the same tension used earlier.
7. As soon as the subject is seated and the pulse plethysmograph is in place, click on the Record
button. Click on the AutoScale buttons on all channels.
8. The assistants should record the subject’s core temperature with the thermometer, and active
sweat gland density with iodine paper. Remember to wipe off a section of the subject’s forehead
before blotting the skin for 1 second with iodine paper.
9. Continue to record the subject’s heart rate and skin temperature until the 4-minute mark of the
recovery period. Click on the Stop button. Select Save in the File menu.
10. Remove the pulse plethysmograph from the subject’s finger and disconnect the temperature
probe from its extension cable at the 4.5-minute mark of the recovery period.
11. Measure and record the subject’s core temperature and active sweat gland density between the 4
and 4.5-minute marks of the recovery period.
12. The timekeeper should set the metronome to the beat cadence for the next exercise period and
have the device ready to begin ticking 30 seconds before the start of the next exercise period:
• Exercise Period 2 - 72 beats/minute = 18 steps/minute.
• Exercise Period 3 - 96 beats/minute = 24 steps/minute.
• Exercise period 4 - 120 beats/minute = 30 steps/minute.
13. Repeat Steps 1 through 12 of these directions for the remaining exercise and recovery periods.
14. When the subject has finished his or her last recovery period, the subject should quickly move
to the restrooms, dry off, and change into a dry t-shirt and shorts. The subject should return to
the lab, take off his or her shoes and socks, weigh-in, and record his or her post-exercise weight.
Data Analysis
1. Scroll to the beginning of the recording of the subject’s heart rate during the first recovery
period. Display a ten second section of data that is free of artifacts in the Main window.
2. Use the Display Time icons to adjust the Display Time of the Main window to show ten seconds
of data on the Main window. The ten second section of data can also be selected by:
• Placing the cursors on either side of the ten seconds of data; and
Exercise Physiology-Exercise-Metabolism-Temp-Labs EP-2-8

• Clicking the Zoom between Cursors button on the LabScribe toolbar (Figure EP-2-L5) to
expand the ten seconds of data to the width of the Main window.
3. Click on the Analysis window icon in the toolbar (Figure EP-2-L5) or select Analysis from the
Windows menu to transfer the data displayed in the Main window to the Analysis window.
4. Position a cursor on either side of the five pulses on the Pulse channel. The value for Mean in
the table across the upper margin of the Heart Rate channel is the subject’s mean heart rate at
the start of the first recovery period. The value for Mean in the table across the upper margin of
the Skin Temp channel is the subject’s mean skin temperature at the start of the first recovery
period.
5. Record these values in the Journal using one of the two techniques described in Exercise 1.
Enter these values in Table EP-2-L1.
6. Go to the 4-minute mark of the data from the first recovery period and find a section of five
adjacent pulse waves that are free of artifacts.
7. Measure and record the mean heart rate and mean skin temperature from this section of the
recovery period using the same techniques used in Steps 1 through 5.
8. Scroll to the beginning and 4-minute marks of the three other recovery periods, and measure
and record the mean heart rate and mean skin temperature for each section of the remaining
recovery phases using the same techniques used earlier.
Calculations
Fill in a data table (Table EP-2-L1) for each subject using the data recorded and the following
calculations:
1. Determine the amount of Work completed in a minute by each subject during each exercise
period using the following equation:
Work (kg-m/min) = Body Weight of Subject (kg) x Step Height (m/step) x Step Rate (steps/min)
For example, a 70kg person stepping on a 30cm step, 30 times in a minute, will perform 630kg-
m/min of work:
630kg-m/min = 70kg x 0.3m/step x 30 steps/min
2. Use the following equation to convert Work from units of mass and distance to units of energy:
Work (kcal/min) = Work (kg-m/min) x (0.00234kcal/kg-m)
In our example, 630kg-m/min of work equals 1.474 kcal/min of work:
1.474 kcal/min = 630kg-m/min x 0.00234kcal/kg-m.
3. Energy cost can be measured as the amount of Oxygen Consumed (VO2). Calculate the relative
VO2 (ml O2/kg body weight/min), a parameter which takes into account the body weight of the
subject, for each subject during each exercise period using the following equations: (Developed
by American College of Sports Medicine)
Exercise Physiology-Exercise-Metabolism-Temp-Labs EP-2-9

Relative VO2 (ml O2/kg body weight/min) = H + V + R
H = Step Rate (steps/min) x 0.2
V = Step Height (m) x Step Rate (step/min) x 2.39 R = 3.5
In our example, a subject stepping on a 30cm step, 30 times in a minute, will consume 31.01ml
O2/kg body weight/min:
31.01ml O2/kg body weight/min = 6 + 21.51 + 3.5
H = 6.00 = 30 steps/min x 0.2
V = 21.51 = 0.3m x 30 steps/min x 2.39
R = 3.5
4. Energy cost can also be expressed as the amount of Energy Consumed. Convert each subject’s
relative VO2 for each exercise period to Energy Consumed (E) per minute in the same period
by the following equation:
E (kcal/min) = VO2 (ml O
2/kg body weight/min) x Body Weight (kg) x 5 kcal/1000ml O
2
In our example, the 70 kg subject consuming 31.01ml O2/kg body weight/min will consume
energy at the rate of 10.85 kcal/min:
10.85 kcal/min =31.01ml O2/kg/min x 70kg x 5kcal/1L O
2
5. Determine the Net Mechanical Efficiency (MEnet
) for each exercise period. Mechanical
Efficiency (ME) is a ratio of the amount of Work performed to the amount of Energy
Consumed. If the energy consumed during rest is subtracted from the total energy consumed,
MEnet
can be determined. Use the following equation to determine MEnet
for each subject in
each exercise period:
MEnet
(%) = Work (kcal/min) x 100
Eexercise
- Erest
(kcal/min)
Erest
= 3.5ml O2/kg body weight/min x Body Weight (kg)
In our example, the 70 kg subject consuming Energy at the rate of 10.85 kcal/min and doing
Work at the rate of 1.474 kcal/min, has a Net Mechanical Efficiency of 15.32%.
15.32% = 1.474 kcal/min x 100
10.85 - 1.225 kcal/min
Exercise Physiology-Exercise-Metabolism-Temp-Labs EP-2-10

6. Heat Storage (S) in a body normally increases during exercise, unless heat loss is high. Use the
core temperatures recorded in the initial rest period and in the last exercise period, and the
following equation to calculate the Change in Heat Storage (∆S) of the subject:
∆S (kcal) = 0.83 kcal/kg body weight/oC x 0.6 x Body Wt. (kg) x Change in Core Temperature (∆oC)
In our example, if the 70 kg subject had a core temperature of 37oC at rest and 39oC after the
last exercise period, the ∆S is 69.7 kcal.
69.7kcal = 0.83kcal/kg/oC x 70kg x 0.6 x 2.0oC
7. Determine the amount of Evaporative Heat Loss (E) for each subject from the amount of weight
loss that each subject experiences during the experiment. Evaporative cooling removes 0.58
kcal/gram H2O evaporated. So,
E = 0.58kcal/g H2O x Weight Loss (g)
In our example, the 70kg subject, who loses 150g of weight while exercising, loses 87 kcal of
heat through evaporative heat loss.
87 kcal = 0.58kcal/g H2O x 150g
Questions
Use graphs to demonstrate any trends in the data.
1. Does the mechanical efficiency of a lightly clothed subject improve or decline with the increase
in exercise?
2. Does the mechanical efficiency of a heavily clothed subject improve or decline with the
increase in exercise?
3. How does the net mechanical efficiency of a subject in heavy clothing compare to that of a
subject in lighter clothing?
4. How does the change in stored heat of a heavily clothed subject compare to that of a lightly
clothed subject?
5. How does the evaporative heat loss of a lightly clothed subject compare to that of a heavily
clothed subject?
Additional Equations
1. The equation that is usually used to determine the maximum heart rate is:
Maximum heart rate (BPM) = 220 - age (years).
The standard deviation for this parameter is 10 to 12 beats per minute (BPM).
Exercise Physiology-Exercise-Metabolism-Temp-Labs EP-2-11

2. The upper and lower limits of a subject’s heart rate during exercise is determined by the
following equations:
Lower-limit exercise HR (BPM) = Max. heart rate x 0.6.
Upper-limit exercise HR (BPM) = Max. heart rate x 0.9.
Table EP-2-L1: Data Table - Subject’s Metabolic and Thermal Responses to Exercise
Clothing = Heavy or Light Body Wt = Pre_____kg Post______kg Age =
Work E Used MEnet Core T Skin T SGD HR HR/Max
Period/Units kcal/min kcal/min % oC oC #/cm2 BPM %
Rest
End of Exercise 1
End of Recovery 1
End of Exercise 2
End of Recovery 2
End of Exercise 3
End of Recovery 3
End of Exercise 4
End of Recovery 4
∆S = _____ kcal E = _____ kca
Exercise Physiology-Exercise-Metabolism-Temp-Labs EP-2-12