Expense Report Entry-Job Aid - umb.edu
16
1 Expense Report Entry-Job Aid Contents Creating an Expense Report (ER) ............................................................................................................. 1 Select employee for whom ER is being entered ................................................................................... 1 Copy from Travel Authorization (if applicable) ..................................................................................... 3 Enter Header Information ..................................................................................................................... 5 Enter Expense Line information ............................................................................................................ 6 Default Accounting ............................................................................................................................... 9 Accounting Information for Specific Line(s)........................................................................................ 10 Entering Notes .................................................................................................................................... 10 Save Expense Report for Later ............................................................................................................ 12 Add Attachments ................................................................................................................................ 12 Submitting an Expense Report for Approval ......................................................................................... 13 Print Expense Report.............................................................................................................................. 14 Send Notification to Approver ............................................................................................................... 15 Withdrawing an Expense Report ........................................................................................................... 15 Other options available under the Expense Report menu ............................................................... 16 This is a CLA Dean's Office adaptation of UPST form for use in 2021 for CLA RES & FSU Reimbursements ONLY. Please WORK WITH YOUR DEPARTMENT ADMIN if you need help. RED text indicates hints/comments from the CLA Dean's Office* and are NOT part of the original Job Aid from UPST. Some content has been removed from that document as it is considered superfluous to 2021 RES & FSU reimbursement expense reports. Please refer to original found here: https://umassp.my.salesforce.com/sfc/p/6A000001Wo9s/a/3s000000PZbk/ DHMFQbewL_XoFlbH6J_fG2vJFjsHyE3NY8zA.lcZrYo *contact Louise Putnam for corrections -- -- -- -- -- -- -- -- -- -- -- -- -- -- --
Transcript of Expense Report Entry-Job Aid - umb.edu

1
Expense Report Entry-Job AidContents
Creating an Expense Report (ER) ............................................................................................................. 1
Select employee for whom ER is being entered ................................................................................... 1
Copy from Travel Authorization (if applicable) ..................................................................................... 3
Enter Header Information ..................................................................................................................... 5
Enter Expense Line information ............................................................................................................ 6
Default Accounting ............................................................................................................................... 9
Accounting Information for Specific Line(s) ........................................................................................ 10
Entering Notes .................................................................................................................................... 10
Save Expense Report for Later ............................................................................................................ 12
Add Attachments ................................................................................................................................ 12
Submitting an Expense Report for Approval ......................................................................................... 13
Print Expense Report .............................................................................................................................. 14
Send Notification to Approver ............................................................................................................... 15
Withdrawing an Expense Report ........................................................................................................... 15
Other options available under the Expense Report menu ............................................................... 16
This is a CLA Dean's Office adaptation of UPST form for use in 2021 for CLA RES & FSU Reimbursements ONLY. Please WORK WITH YOUR DEPARTMENT ADMIN
if you need help.
RED text indicates hints/comments from the CLA Dean's Office* and are NOT part of the original Job Aid from UPST. Some content has been removed from that document as it is considered superfluous to 2021 RES & FSU reimbursement
expense reports. Please refer to original found here:
https://umassp.my.salesforce.com/sfc/p/6A000001Wo9s/a/3s000000PZbk/DHMFQbewL_XoFlbH6J_fG2vJFjsHyE3NY8zA.lcZrYo
*contact Louise Putnam for corrections
--
----
----------
--
----
--------

Creating an Expense Report (ER)
You have to log in to the PPLSoft finance system to complete the expense report now (https://it.umassp.edu/s/product-catalog). Go to "Popular Products", select "Finance System" and log in with your User ID (First.LastName) and password is your UMB email.
Select employee for whom ER is being entered
Popular Products
Finance System
Aectsslinanc.altransactionsand�porting
1. Once you are logged in to the Finance application, click on the Employee Self Service tilewhich is located on the Financial page.NOTE: The tiles available to you depend on your security.
2. Under expense reports, select create/modify
1
Hint: To hide the navigation on the left side of the page, click the double bars on the edge of the menu.
Louise.Putnam
Highlight
Louise.Putnam
Highlight

2
3. If you are entering an expense report for yourself, your Employee ID will automaticallydefault in the Empl ID field. Simply click Add.
4. If you are entering an expense report for another employee:a. Click on the (magnifying glass) to see a list of employees for whom you are
authorized.b. Click on the desired Employee ID.
c. Click Add.
We assume you are only entering information for yourself.
Most Department Admins can edit expense reports on your behalf (be sure to "Save" your report and note the number so they can assist you), but faculty will generally only be able to create, see, or edit their own expense reimbursements in this system.

3
Copy from Travel Authorization (if applicable)
5. If a Travel Authorization was required per policy, the TA must be populated into theExpense Report:
a. Adjust the ‘From Date’ & ‘To Date’ as needed to return the applicable TAb. Click Search. A list of the the employee’s approved TAs will appear in the ‘Travel
Authorization Description’ field.
c. Click on the Select button for the desired TA. The Expense Report will automaticallybe populated with the lines entered on the TA.
d. If a Travel Authorization was not required per policy for the incurred expenses, theExpense Report can be created without a TA by clicking the Return button.
It is unlikely that you have done a Travel Authorization "TA" form in the system, but if so, this section is applicable.
If you have not done thisand your reimbursement request includes travel expenses, you MUST have a Terra Dotta ID and screenshot of the page with the Terra Dotta ID# on it to attach along with your receipts. There will be a place to enter the Terra Dotta ID number in the next step.

5
Enter Header Information 6. On the Create Expense Report page, complete the following (*required):
a. *Business Purpose – Choose the reason for this travel from the drop-down list.NOTE: If ‘Other’ is chosen, you need to enter the description of the purpose oftravel on the Notes section. (See step XXXXX)
b. *Report Description - Enter the description of the purpose of travel.c. Terra Dotta ID – Enter the 5-digit itinerary ID from Terra Dotta. (Note: If the
Expense Report was created by copying a Travel Authorization, this field will becopied over from the TA.)
NOTE: You cannot enter default accounting information until at least one detail line has been entered.

6
Enter Expense Line information 7. Enter the expense lines as follows (*required fields):
If the ER has been populated from a Travel Authorization, be sure to update expense lines with applicable dates, amounts and detail as needed to reflect actual expenses incurred a. *Expense Date - date of expense/travel date.b. *Expense Type – Choose appropriate expense type from drop-down list.
− The expense type Taxable Reimbursement should be selected if an expense isbeing reported 120 days or more past the date of the expense. It isconsidered taxable income per IRS regulations.
− The expense type Business Meeting should be selected if reimbursement isfor food purchased for a business meeting. A completed EntertainmentExpense Form must be attached to the ER.
c. Description – Enter details related to the expense. NOTE: A full description of thetype of expense incurred must be included here for Expense Type ‘TaxableReimbursement’.
d. *Payment Type - Choose form of payment of ‘Paid via Procard’ or ‘Out of Pocket’from the drop-down.
e. *Amount - Amount of expense. See ‘Additional Entry Notes’ below for informationregarding Mileage and Per Diem.
f. *Billing Type - Identify the travel as In-State, Out-of-State or Foreign. Non-Travelshould be used for supplies or business meals. If ‘Paid via ProCard’ is chosen as thePayment Type, ‘ProCard’ must be chosen for the Billing Type.
Additional Entry Notes: • After at least one line has been entered, you can enter information for Default
Accounting. (See Step #13)• To add another line, click the (plus) icon at the end of the detail line.• To remove a line:
- Click on the (minus) icon.- Click OK when the Delete Confirmation box appears
• When the Expense Type is ‘Mileage’, the Miles field becomes available.a. Refer to the Travel Manual for the policy to calculate mileage.b. Enter the total miles for the travel date.
You should NOT enter ANY accounting info unless you are toldspecifically otherwise!! This info will be addedAFTER you have finished your part by theperson who controls the fund account codes!

7
c. Mileage amount will automatically be calculated when tabbing out of the‘Miles‘ field.
• When the Expense Type is Meals, click the GSA Per Diem Rates link.You will be taken to the GSA website to access a table of Per Diem rates basedon the travel destination. Refer to your campus travel policy documentation fordetails about Per Diem.
• When the Expense Type is Business Meeting, all meeting attendees must beidentified when reimbursement is for food purchased for a business meeting perIRS regulations.a. Click on the Attendees hyperlink, which becomes available when Expense
Type is ‘Business Meeting’.
• When the Expense Type is Business Meeting, all meeting attendees must beidentified when reimbursement is for food purchased for a business meeting perIRS regulations.a. Click on the Attendees hyperlink, which becomes available when Expense
Type is ‘Business Meeting’.
Please note that this may be edited by the accounting folks at
UMass Boston as there are certain campus-set maximiums
which we cannot exceed.

8
b. The Expense Report’s employee’s name will be displayed.− Click on the (plus) sign to add the other attendees.− Click on the OK button when all names have been added.
• No Receipt: The ‘No Receipt ‘ box should not be checked if a receipt is not available.a. Missing Receipt Affidavit must be completed and attached to the
ER for expenses over $25 if required by your campus’s travel policy.b. A notation of the Missing Receipt Affidavit should be added to the Notes for
the ER. (See Entering Notes section of this document.)

9
Default Accounting 8. Default accounting information will be applied to any Expense Report line where the
accounting information was not manually updated. To add default accounting for thisExpense Report:
a. Select Default Accounting from the Actions drop-down list in the upper right cornerof the page.
b. Click GO.
c. Some accounting fields may have default values in them based on your profile.d. Enter the appropriate value in the ‘Speedchart’ field and press the <Tab> key.
When you tab out of the ‘SpeedChart’ field, the appropriate values for thespeedtype will be populated and the SpeedChart value will disappear from the field.
e. Click OK.
You should NOT enter ANY accounting information unless you are specifically told otherwise!!
XAFTER you have finished your part,this info will be added by the person who controls the fund account codes, usually a dept. Admin or the Dean’s Office.

10
Entering Notes 9. To add Notes to your Expense Report, click on Summary and Submit in the upper right
corner of the page.
10. Click on the Notes hyperlink.

11
12. After adding your comments/notes regarding travel, click the Add Notes button.NOTE: The first note entered should contain additional information related to the travelthat is not included in any of the other description fields.
13. Notes are displayed in chronological order. Click OK to return to the Summary page.
12
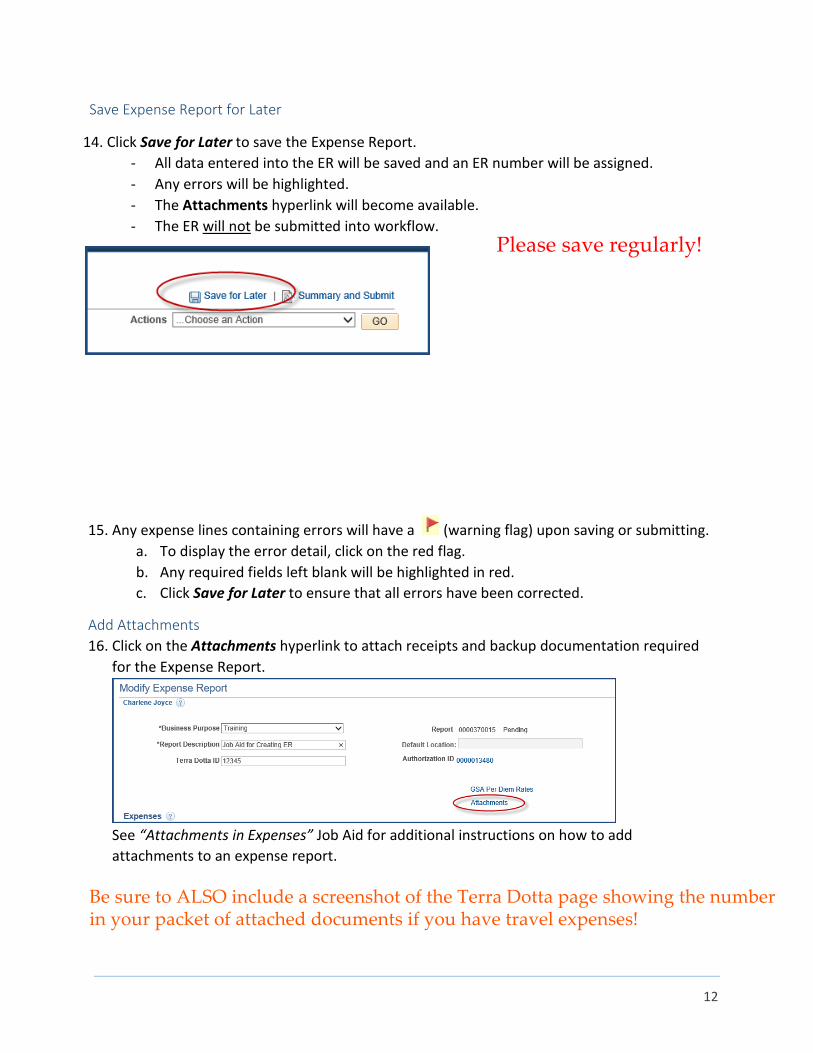
Save Expense Report for Later
14. Click Save for Later to save the Expense Report.- All data entered into the ER will be saved and an ER number will be assigned.- Any errors will be highlighted.- The Attachments hyperlink will become available.- The ER will not be submitted into workflow.
15. Any expense lines containing errors will have a (warning flag) upon saving or submitting.a. To display the error detail, click on the red flag.b. Any required fields left blank will be highlighted in red.c. Click Save for Later to ensure that all errors have been corrected.
Add Attachments 16. Click on the Attachments hyperlink to attach receipts and backup documentation required
for the Expense Report.
See “Attachments in Expenses” Job Aid for additional instructions on how to add attachments to an expense report.
Be sure to ALSO include a screenshot of the Terra Dotta page showing the numberin your packet of attached documents if you have travel expenses!
Please save regularly!

13
Submitting an Expense Report for Approval 17. When you are ready to submit the Expense Report for approval, click the Summary and
Submit in the upper right corner of the page. (If you do not see Summary and Submit, youare already on that page.)
18. Select the check box in the certification section of the page and click the Submit ExpenseReport button.
...but NEVER hit this button!!X X
ALWAYS click "Save for Later. Use "Summary & Submit" to get to "view Printable Version" and other options...

14
19. If there are any remaining errors, you will be taken back to the Expense Details page.
After errors are corrected, go back to Summary and Submit page (Step #21)
20. The Save Confirmation page will appear to confirm submission. Click OK.
21. Make a note of the Expense Report ID that has been submitted. You will need to includethis in the email notification you send to the appropriate approver(s).
*Note- Once an Expense Report is submitted, it can no longer be accessed by theemployee or authorized user unless it is either Withdrawn or “Sent Back” by anapprover.
Print Expense Report 22. A printable version of the report can be produced by clicking the View Printable Version
hyperlink on the Summary and Submit page.
You can print the report from here if you need/want to do so but it is not necessary; FOR RES or FSU reimbursements, make note of the Expense Report ID # and send it to [email protected].
THIS IS AS FAR AS YOU NEED TO GO!!
SAVE, but, once again, CLA RES & FSU reimbursements should NEVER be "SUBMITTED."

15
Send Notification to Approver 23. Once an ER has been submitted for approval, the Notify button becomes available at the
bottom of the page. This button is used to notify the traveler’s designated approvers viaemail that the expense report is ready for approval.
Refer to the job aid titled ‘How to Use Notify on EX Docs’ to use the Notify functionality.
Withdrawing an Expense Report 24. If an Expense Report has been submitted but has not been approved, it can be withdrawn
from workflow.a. From the Main Menu, navigate to Employee Self Service tile.b. Under the ‘Expense Report’ header, click on View.c. Pull up the ER to be withdrawn.d. Click the Withdraw Expense Report button.
25. You will receive a message that the ER has been withdrawn.
xXX

16
Other options available under the Expense Report menu − From the Financials page, select the Employee Self Service tile.− Under the Expense Reports header, click on the desired action.
Additional notes regarding actions on an ER:
- An Expense Report cannot be deleted or modified if it has been fully approved.- An ER can be closed if it has been fully approved, but not published to Payroll.- If an ER has been submitted but not fully approved, the ER can be Sent Back by an approver
for modification or deletion.- An ER can be viewed and printed at any phase of the approval process including after it has
been fully approved.
This is a CLA Dean's Office adaptation of UPST form for use in 2021 for CLA RES & FSU Reimbursements ONLY. Please WORK WITH YOUR DEPARTMENT ADMIN
if you need help.
RED text indicates hints/comments from the CLA Dean's Office* and are NOT part of the original Job Aid from UPST. Some content has been removed as it is considered superfluous to the 2021 CLA RES & FSU reimbursement expense reports.a
Please refer to original found here:https://umassp.my.salesforce.com/sfc/p/6A000001Wo9s/a/3s000000PZbk/
DHMFQbewL_XoFlbH6J_fG2vJFjsHyE3NY8zA.lcZrYo
*contact Louise Putnam for corrections