
Exeter X3 RimFit - Orthowood | Helping Our Patients Get ... · 5 Introduction This surgical...
20
Exeter ® X3 ® RimFit ™ Acetabular Cup Surgical Protocol
Transcript of Exeter X3 RimFit - Orthowood | Helping Our Patients Get ... · 5 Introduction This surgical...

Exeter® X3® RimFit™ Acetabular Cup Surgical Protocol

2

3
Table of Contents
Indications and Contraindications ....................................................................... 4
Introduction ............................................................................................................... 5
Surgical Protocol ....................................................................................................... 6
Step 1 - Pre-Operative Planning .................................................................... 6
Step 2 - Acetabular Preparation ..................................................................... 7
Step 3 - Socket Preparation ............................................................................. 8
Step 4 - Use Of Rim Cutter ........................................................................... 10
Step 5 - Cement Fixation Bone Preparation .............................................. 12
Step 6 - Cement Introduction ....................................................................... 13
Step 7 - Cup Implantation .............................................................................. 14
Catalogue Information ..........................................................................................16
Instrument Listing ..................................................................................................16
Implant Listing ........................................................................................................18
Exeter X3 RimFit Surgical Protocol

4
Exeter X3 RimFit Surgical Protocol
Indications for Exeter X3 RimFit Acetabular Cup
The indications for use for total hip arthroplasty include:• Painful, disabling joint disease of the hip resulting from: degenerative arthritis,
rheumatoid arthritis, post-traumatic arthritis or late stage avascular necrosis.• Revision of previous unsuccessful femoral head replacement, cup arthroplasty
or other procedure.• Clinical management problems where arthrodesis or alternative reconstruc-
tive techniques are less likely to achieve satisfactory results.• Where bone stock is of poor quality or inadequate for other reconstructive
techniques as indicated by deficiencies of the acetabulum.• The Exeter X3 RimFit Acetabular cup is intended for Cemented use only.
Contraindications for Exeter X3 RimFit Acetabular Cup
• Any active or suspected latent infection in or about the hip joint.• Any mental or neuromuscular disorder which would create an unacceptable
risk of prosthesis instability, prosthesis fixation failure, or complications in postoperative care.
• Bone stock compromised by disease, infection or prior implantation which cannot provide adequate support and/or fixation to the prosthesis.
• Skeletal immaturity.• Obesity. An overweight or obese patient can produce loads on the prosthesis
which can lead to failure of the fixation of the device or to failure of the device itself.
Warnings and Precautions
See implant package insert for warnings, precautions, adverse effects and other essential product information.
Before using instrumentation, verify:• Instruments have been properly disassembled prior to cleaning
and sterilisation• Instruments have been properly assembled post sterilization• Instruments have maintained design integrity• Proper size configuration is available
This publication sets forth detailed recommended procedures for using Stryker Orthopaedics devices and instruments. It offers guidance that you should heed, but, as with any such technical guide, each surgeon must consider the particular needs of each patient and make appropriate adjustments when and as required.
5
Introduction
This surgical protocol is a guide to preparing the acetabulum for the Exeter X3 RimFit cup utilizing Exeter Contemporary instrumentation. There is the option for the surgeon to use the Rim Cutter instrument, as discussed in the protocol.
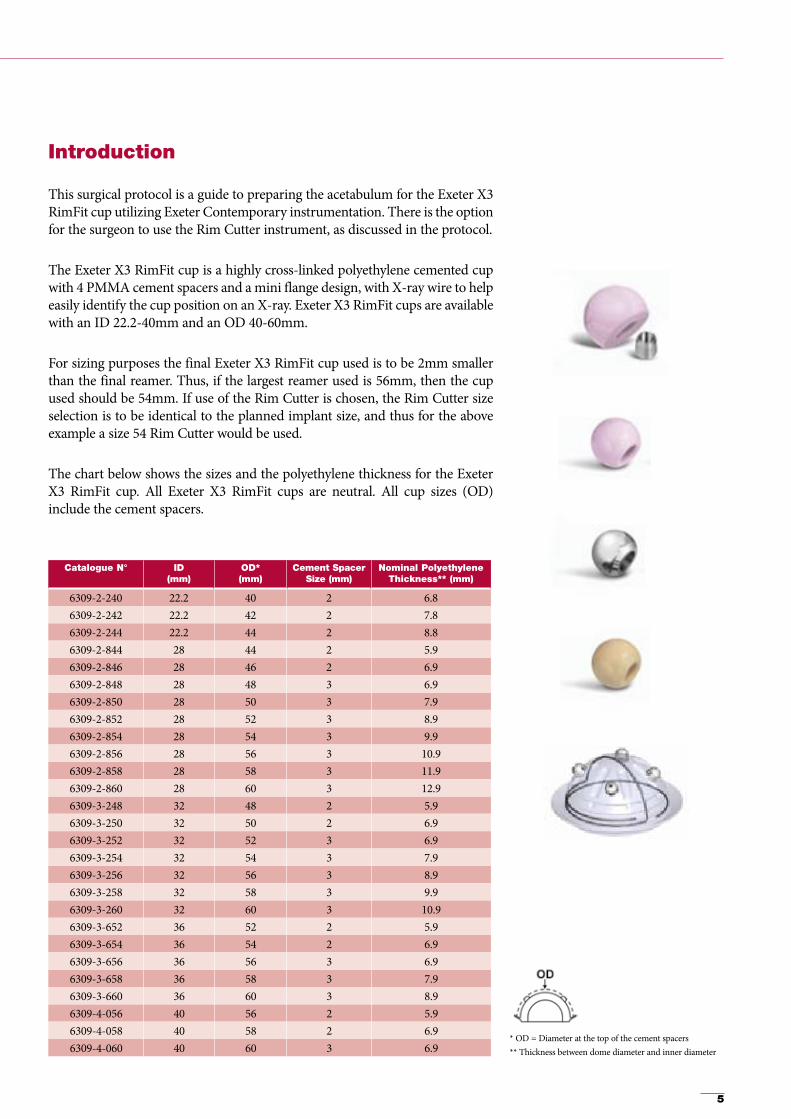
The Exeter X3 RimFit cup is a highly cross-linked polyethylene cemented cup with 4 PMMA cement spacers and a mini flange design, with X-ray wire to help easily identify the cup position on an X-ray. Exeter X3 RimFit cups are available with an ID 22.2-40mm and an OD 40-60mm.
For sizing purposes the final Exeter X3 RimFit cup used is to be 2mm smaller than the final reamer. Thus, if the largest reamer used is 56mm, then the cup used should be 54mm. If use of the Rim Cutter is chosen, the Rim Cutter size selection is to be identical to the planned implant size, and thus for the above example a size 54 Rim Cutter would be used.
The chart below shows the sizes and the polyethylene thickness for the Exeter X3 RimFit cup. All Exeter X3 RimFit cups are neutral. All cup sizes (OD) include the cement spacers.
* OD = Diameter at the top of the cement spacers** Thickness between dome diameter and inner diameter
Catalogue N° ID (mm)
OD* (mm)
Cement Spacer Size (mm)
Nominal Polyethylene Thickness** (mm)
6309-2-240 22.2 40 2 6.86309-2-242 22.2 42 2 7.86309-2-244 22.2 44 2 8.86309-2-844 28 44 2 5.96309-2-846 28 46 2 6.96309-2-848 28 48 3 6.96309-2-850 28 50 3 7.96309-2-852 28 52 3 8.96309-2-854 28 54 3 9.96309-2-856 28 56 3 10.96309-2-858 28 58 3 11.96309-2-860 28 60 3 12.96309-3-248 32 48 2 5.96309-3-250 32 50 2 6.96309-3-252 32 52 3 6.96309-3-254 32 54 3 7.96309-3-256 32 56 3 8.96309-3-258 32 58 3 9.96309-3-260 32 60 3 10.96309-3-652 36 52 2 5.96309-3-654 36 54 2 6.96309-3-656 36 56 3 6.96309-3-658 36 58 3 7.96309-3-660 36 60 3 8.96309-4-056 40 56 2 5.96309-4-058 40 58 2 6.96309-4-060 40 60 3 6.9

6
Exeter X3 RimFit
Step 1: Pre-Operative Planning and X-ray Evaluation Preoperative planning and X-ray evaluation aids in the selection of the most favorable implant style and optimal size for the patient’s anatomy and hip pathology. Selecting potential implant styles and sizes can facilitate operating room preparation and assure availability of an appro-priate size selection. X-ray evaluation may also help detect anatomic anomalies that could pre-vent the intraoperative achievement of the estab-lished preoperative goals.
Check all instruments and implants for any dam-age or defects before beginning the procedure.
Surgical Protocol Pre-Operative Planning

7
Step 2: Acetabular Preparation
The acetabulum is prepared by the release and removal of soft tissue using the surgeon’s preferred technique to gain adequate exposure for reaming. Excision of the labrum and osteophytes allows for proper visualization of the bony anatomy, and improves ease of reaming (Fig. 1).
Note: Careful identification and removal of osteophytes can help reduce the possibility of bone-to-bone or component-to-bone impingement.
With the acetabulum exposed, bony defects can be identified. If necessary, bone grafting options may be considered prior to reaming.
Fig. 1
Fig. 2
Exeter Designer Surgeon Group
“For potentially improved expo-sure, a knife can be introduced between the labrum and capsule to release the reflected head of rectus femoris and the illiofemo-ral ligament from the wing of the ilium” (Fig. 2)

8
Exeter X3 RimFit Surgical Protocol
Step 3: Socket Preparation
A. Spherical ReamingTo obtain optimal component positioning in the reaming process the reamer handle should be at 45 degrees of abduction and 25 degrees of ante-version (Fig. 3).
It is recommended that the initial reaming begin with a Reamer that is 4mm smaller than the templated or gauged size. Continue to ream up in 2mm increments (Fig. 4).
Fig. 3
Fig. 4

9
B. Final ReamingThe full profile of the Stryker Spherical Reamer necessitates reaming to the full depth.
Care should be taken so as not to enlarge or distort the acetabulum by eccentric reaming. Final acetabular reaming ideally shows the hemi-spherical acetabulum denuded of cartilage, with the subchondral plate preferably intact. Where the subchondral bone is breached, cancellous bone will be exposed, which is an ideal surface for cement application. Holes will later be drilled into preserved subchondral bone for cement interdigitation.
Particular attention is paid to clear the rim of the acetabulum of cartilage and soft tissue and subchondral bone where possible, since it is important to achieve interdigitation of cement with bone in this area.
Fig. 5
Exeter Designer Surgeon Group
“After final reaming, it is useful to leave the final reamer in the socket in the correct orientation. The edge acts as a guide for the removal of excess osteophytes with an osteotome” (Fig. 5)

10
Exeter X3 RimFit Surgical Protocol
Fig. 6
Fig. 7
Step 4: Use of Rim Cutter
A. Optional Use of Rim Cutter InstrumentThe Rim Cutter (an instrument, for cup sizes O.D. 44-60, which cuts a rim into the acetabulum and is not intended to cut the rim of the implant) marked with the same size as the cup OD to be inserted is attached to the power reamer. The Rim Cutter is designed to cut a groove in the periphery of the acetabulum of the appropriate diameter for the flange.
Do not use Rim Cutter if there is inadequate bone stock. The hemisphere on the Rim Cutter centralises the cutter in the reamed socket and sets the depth of the rim and thus the position of the cup. Each Rim Cutter has to be used with its correct hemispherical guide. If the acetabulum is reamed to 56mm, use Rim Cutter size 54 with 54 green hemispherical guide. The orientation of the Rim Cutter is shown by the alignment rod on the device to obtain optimal component positioning (Fig 6).
The cup should be orientated in a position of 45 degrees abduction (the handle of the Charnley-style introducer will point vertically upwards) and 25 degrees flexion (the handle in the longi-tudinal axis of the patient is rotated around the transverse axis of the patient by 25 degrees). The Rim Cutter is advanced to the fullest extent allowed by exerting pressure against the spring between the dome and cutting ring (Fig. 7). Any debris created, including the innermost fibers of the transverse ligament, are removed.
Trial positioning is carried out to ensure that the cup can be introduced without difficulty through the soft tissues into the correct position, with flange resting on the rim. If the rim of the acetabulum has been cut in an incorrect position then the flange of the cup can be cut up to the line so it will sit within the Rim Cutter shelf.
Note: For the cups O.D. 40 & 42, the associated rim cutter is not available yet. This option will be offered at a later date.
11
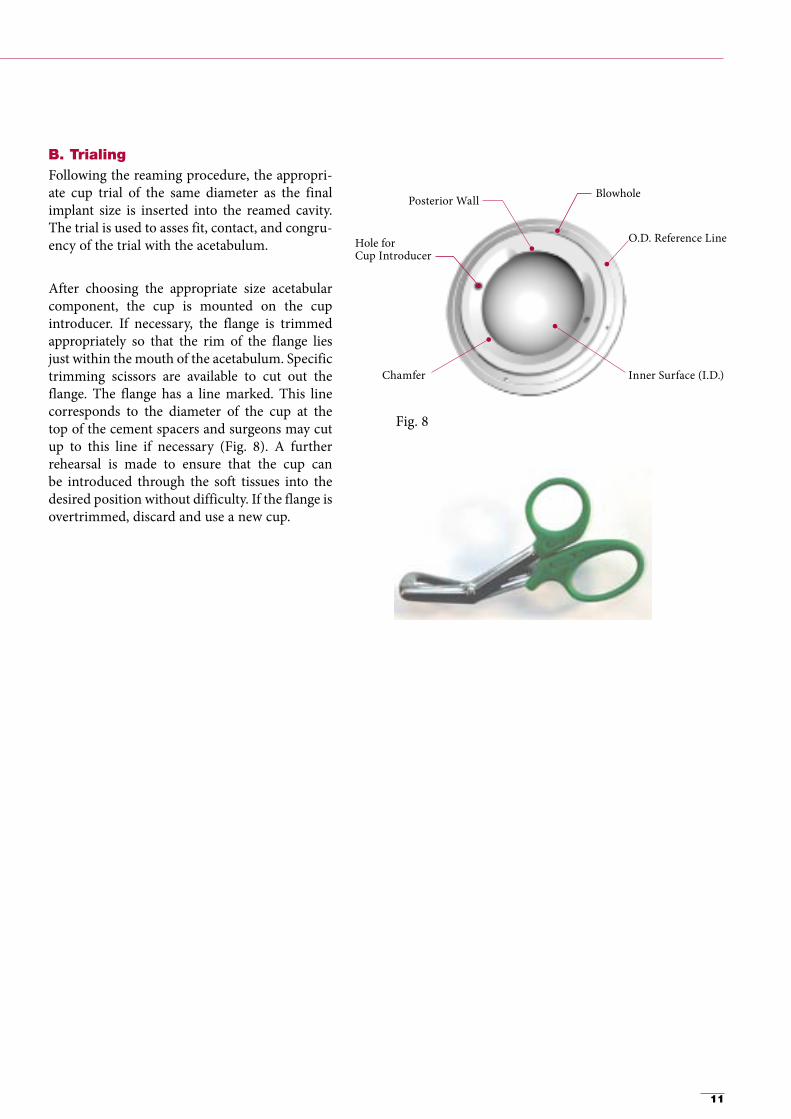
B. TrialingFollowing the reaming procedure, the appropri-ate cup trial of the same diameter as the final implant size is inserted into the reamed cavity. The trial is used to asses fit, contact, and congru-ency of the trial with the acetabulum.
After choosing the appropriate size acetabular component, the cup is mounted on the cup introducer. If necessary, the flange is trimmed appropriately so that the rim of the flange lies just within the mouth of the acetabulum. Specific trimming scissors are available to cut out the flange. The flange has a line marked. This line corresponds to the diameter of the cup at the top of the cement spacers and surgeons may cut up to this line if necessary (Fig. 8). A further rehearsal is made to ensure that the cup can be introduced through the soft tissues into the desired position without difficulty. If the flange is overtrimmed, discard and use a new cup.
Fig. 8
BlowholePosterior Wall
O.D. Reference Line
Inner Surface (I.D.)
Hole for Cup Introducer
Chamfer
12
Exeter X3 RimFit Surgical Protocol
Step 5:Cement Fixation Bone Preparation
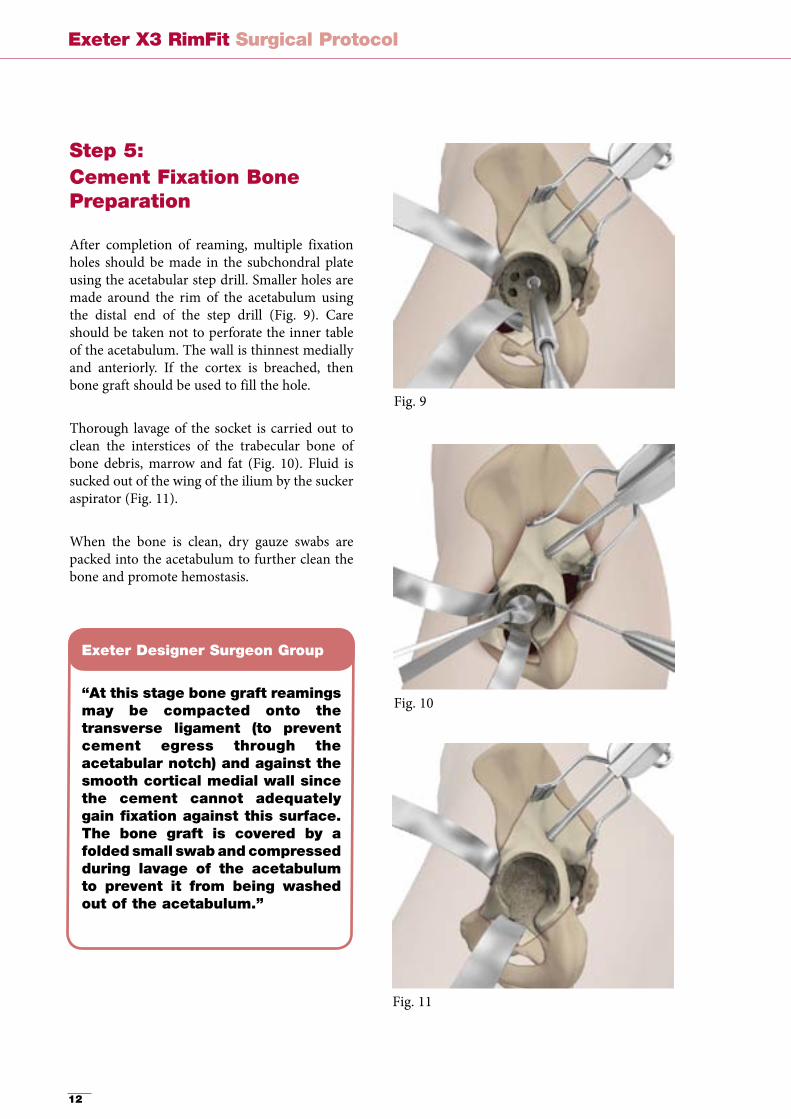
After completion of reaming, multiple fixation holes should be made in the subchondral plate using the acetabular step drill. Smaller holes are made around the rim of the acetabulum using the distal end of the step drill (Fig. 9). Care should be taken not to perforate the inner table of the acetabulum. The wall is thinnest medially and anteriorly. If the cortex is breached, then bone graft should be used to fill the hole.
Thorough lavage of the socket is carried out to clean the interstices of the trabecular bone of bone debris, marrow and fat (Fig. 10). Fluid is sucked out of the wing of the ilium by the sucker aspirator (Fig. 11).
When the bone is clean, dry gauze swabs are packed into the acetabulum to further clean the bone and promote hemostasis.
Fig. 9
Fig. 10
Fig. 11
Exeter Designer Surgeon Group
“At this stage bone graft reamings may be compacted onto the transverse ligament (to prevent cement egress through the acetabular notch) and against the smooth cortical medial wall since the cement cannot adequately gain fixation against this surface. The bone graft is covered by a folded small swab and compressed during lavage of the acetabulum to prevent it from being washed out of the acetabulum.”

13
Step 6: Cement Introduction
Cement mixing is commenced during the final bony preparation of the acetabulum. The cement may be handled approximately 3.5 minutes after commencement of mixing (Simplex cement at 20 degrees centigrade). After introduction of the cement bolus, excess material is removed so the surface of the cement lies with a slightly concave surface within the mouth of the acetabulum. This step prevents escape of surplus cement into the soft tissues when the acetabular pressuriser is used.
Pressurisation of the cement is carried out using a disposable acetabular pressuriser on a handle (Fig. 12). Three diameters are available so that an adequate seal can always be established at the socket rim. The pressurising technique entails applying sig-nificant force onto the device to drive the cement into the bone and, by maintaining pressure, protect the bone cement interface from back-bleeding from the host bone. The pressuriser is applied as soon as the cement has been placed in the acetabulum and full pressure is maintained until the cement viscosity has risen to a level suitable for cup insertion (Fig. 13), usually about 5 minutes after the commencement of mixing. In the elderly, or where a large surface area of open trabecular bone has been exposed, excess cement is pressurised into the acetabulum and a further bolus is required on top of the initial cement. This will become apparent when the pressuriser is removed. If more cement is to be used, then the existing cement should be clean and dry before it is applied.
Fig. 12
Fig. 13

14
Exeter X3 RimFit Surgical Protocol
Step 7: Cup Implantation
A. If the Rim Cutter has been used the orientation of the implant has already been established (Fig. 14). The flanged cup is inserted using the introducer (Fig. 15) and an axial pusher with head diameter corresponding to the cup ID to drive the cup to the stable seated position with the flange engaged in the cut rim. This exercise should require significant force and there should be a constant flow of cement around the edge of the cup. The introducer can now be removed and the axial pusher (with appropriate size head attached) should be applied. Constant pressure can be maintained until polymerization is complete (Fig. 16).
B. If the Rim Cutter has not been used then extra care should be taken to ensure the cup orientation is appropriately maintained and that the final position of the flange is at the pre-rehearsed position just within the mouth of the acetabulum. An axial cup pusher with head diameter corresponding to the cup ID is used to drive the cup into a stable seated position. Insertion is complete after the flange is flush with the acetabular rim and it becomes impossible to advance the cup further into the viscous cement (Fig. 16).
Note 1: The posterior wall of the cup has to be placed on the side of the cup introducer plate with the identification corresponding to the side of the operated hip.Note 2: Cup has to be assembled on the appropriate size of lateral cup introducer:• For cups I.D. 36/40mm, use cup introducer
identified as I.D. 36/40• For cups O.D. 40/42mm, use cup introducer
identified as O.D. 40/42• For all other cups, use the standard
cup introducer.• The posterior wall of the cup has to be placed
on the side of the cup introducer plate with the identification corresponding to the side of the operated hip (« POST RIGHT » or « POST LEFT ») (Fig.17).
Fig. 14
Fig. 15
Fig. 16
Posterior Wall
Post Right
Fig. 17

15
Step 8: Final Step
Clear any excess cement with a small curette (Fig. 18).
The post-operative radiograph should show good cement penetration and no radiolucent lines in any zone. The X-ray wire will allow the surgeon to see the correct position of the cup (Fig. 19).
Fig. 18
Fig. 19
Posterior Wall
Post Right
16
Exeter X3 RimFit Surgical Protocol
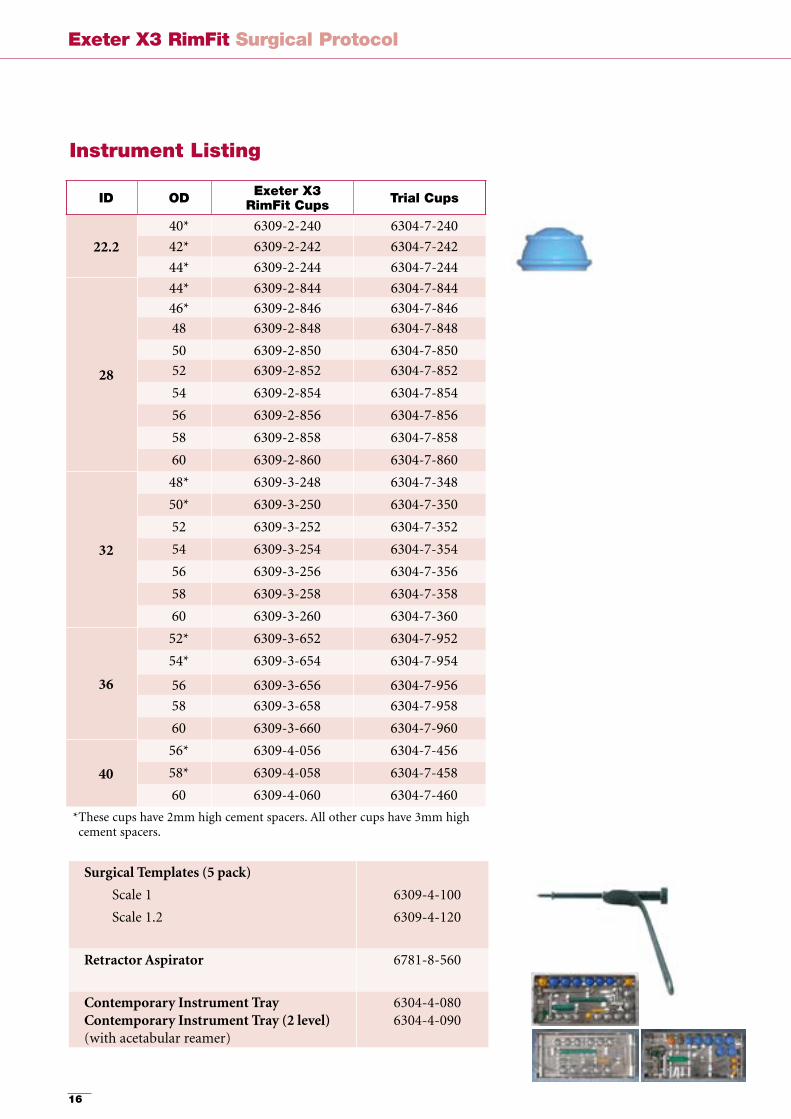
Instrument Listing
ID OD Exeter X3RimFit Cups Trial Cups
22.240* 6309-2-240 6304-7-24042* 6309-2-242 6304-7-24244* 6309-2-244 6304-7-244
28
44* 6309-2-844 6304-7-84446* 6309-2-846 6304-7-84648 6309-2-848 6304-7-84850 6309-2-850 6304-7-85052 6309-2-852 6304-7-85254 6309-2-854 6304-7-85456 6309-2-856 6304-7-85658 6309-2-858 6304-7-85860 6309-2-860 6304-7-860
32
48* 6309-3-248 6304-7-34850* 6309-3-250 6304-7-35052 6309-3-252 6304-7-35254 6309-3-254 6304-7-35456 6309-3-256 6304-7-35658 6309-3-258 6304-7-35860 6309-3-260 6304-7-360
36
52* 6309-3-652 6304-7-95254* 6309-3-654 6304-7-954
56 6309-3-656 6304-7-95658 6309-3-658 6304-7-95860 6309-3-660 6304-7-960
4056* 6309-4-056 6304-7-45658* 6309-4-058 6304-7-45860 6309-4-060 6304-7-460
* These cups have 2mm high cement spacers. All other cups have 3mm high cement spacers.
Surgical Templates (5 pack)
Scale 1
Scale 1.2
6309-4-100
6309-4-120
Retractor Aspirator 6781-8-560
Contemporary Instrument TrayContemporary Instrument Tray (2 level)(with acetabular reamer)
6304-4-0806304-4-090
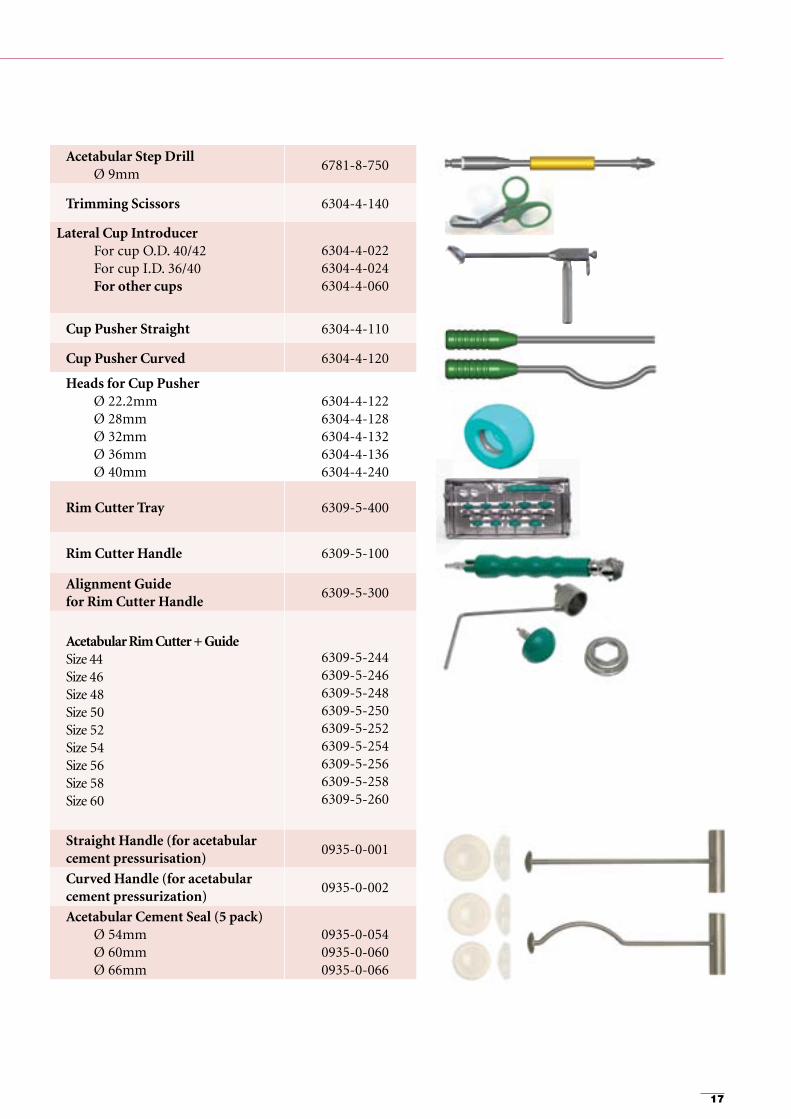
17
Acetabular Step DrillØ 9mm
6781-8-750
Trimming Scissors 6304-4-140
Lateral Cup IntroducerFor cup O.D. 40/42For cup I.D. 36/40For other cups
6304-4-022 6304-4-024 6304-4-060
Cup Pusher Straight 6304-4-110
Cup Pusher Curved 6304-4-120
Heads for Cup PusherØ 22.2mmØ 28mmØ 32mm Ø 36mm Ø 40mm
6304-4-1226304-4-1286304-4-132 6304-4-136 6304-4-240
Rim Cutter Tray 6309-5-400
Rim Cutter Handle 6309-5-100
Alignment Guide for Rim Cutter Handle
6309-5-300
Acetabular Rim Cutter + Guide Size 44 Size 46 Size 48 Size 50 Size 52 Size 54 Size 56 Size 58 Size 60
6309-5-2446309-5-2466309-5-2486309-5-2506309-5-2526309-5-2546309-5-2566309-5-2586309-5-260
Straight Handle (for acetabular cement pressurisation)
0935-0-001
Curved Handle (for acetabular cement pressurization)
0935-0-002
Acetabular Cement Seal (5 pack)Ø 54mmØ 60mmØ 66mm
0935-0-0540935-0-0600935-0-066

18
Exeter X3 RimFit Surgical Protocol
Implant Listing
ID OD Exeter X3 RimFit Cups
22.240* 6309-2-24042* 6309-2-24244* 6309-2-244
28
44* 6309-2-84446* 6309-2-84648 6309-2-84850 6309-2-85052 6309-2-85254 6309-2-85456 6309-2-85658 6309-2-85860 6309-2-860
32
48* 6309-3-24850* 6309-3-25052 6309-3-25254 6309-3-25456 6309-3-25658 6309-3-25860 6309-3-260
36
52* 6309-3-65254* 6309-3-65456 6309-3-65658 6309-3-65860 6309-3-660
4056* 6309-4-05658* 6309-4-05860 6309-4-060
* These cups have 2mm high cement spacers. All other cups have 3mm high cement spacers.
References: US Patent 7,517,919

19
Notes:
_________________________________________________________________________________________________________________
_________________________________________________________________________________________________________________
_________________________________________________________________________________________________________________
_________________________________________________________________________________________________________________
_________________________________________________________________________________________________________________
_________________________________________________________________________________________________________________
_________________________________________________________________________________________________________________
_________________________________________________________________________________________________________________
_________________________________________________________________________________________________________________
_________________________________________________________________________________________________________________
_________________________________________________________________________________________________________________
_________________________________________________________________________________________________________________
_________________________________________________________________________________________________________________
_________________________________________________________________________________________________________________
_________________________________________________________________________________________________________________
_________________________________________________________________________________________________________________
_________________________________________________________________________________________________________________
_________________________________________________________________________________________________________________
_________________________________________________________________________________________________________________
_________________________________________________________________________________________________________________
_________________________________________________________________________________________________________________
_________________________________________________________________________________________________________________
_________________________________________________________________________________________________________________
_________________________________________________________________________________________________________________
_________________________________________________________________________________________________________________
_________________________________________________________________________________________________________________
_________________________________________________________________________________________________________________
_________________________________________________________________________________________________________________
_________________________________________________________________________________________________________________
_________________________________________________________________________________________________________________
20
Exeter X3 RimFit Surgical Protocol
This document is intended solely for the use of healthcare professionals.
A surgeon must always rely on his or her own professional clinical judgment when deciding whether to use a particular product when treating a particular patient. Stryker does not dispense medical advice and recommends that surgeons be trained in the use of any particular product before using it in surgery.
The information presented is intended to demonstrate the breadth of Stryker product offerings. A surgeon must always refer to the package insert, product label and/or instructions for use before using any Stryker product.
Products may not be available in all markets because product availability is subject to the regulatory and/or medical practices in individual markets. Please contact your Stryker representative if you have questions about the availability of Stryker products in your area.
Stryker Corporation or its divisions or other corporate affiliated entities own, use or have applied for the follow-ing trademarks or service marks: Exeter, RimFit, Simplex, Stryker, X3. All other trademarks are trademarks of their respective owners or holders.
Literature Number: MTXEXERFOT01EN Rev. 1 MS/GS 08/10
Copyright © 2010 Stryker
Stryker SACité CentreGrand-Rue 901820 MontreuxSwitzerland
t: +41 21 966 12 01 f: +41 21 966 12 00
www.stryker.eu