EXCHANGE TRANSFUSION - · PDF fileradiant heater if not in an incubator. ... Pre-exchange...
16
ROYAL HOSPITAL FOR WOMEN APPROVED: NCC QUALITY COMMITTEE DEPARTMENT MANUAL: DIVISION OF NEWBORN SERVICES DATE: 8 th April 2013 EXCHANGE TRANSFUSION This LOP is developed to guide clinical practice at the Royal Hospital for Women. Individual patient circumstances may mean that practice diverges from this LOP. PURPOSE & SCOPE: To replace an infant’s blood volume with cross-matched blood that is appropriate (See note) to treat severe Haemolytic Disease of the Newborn EQUIPMENT: Hat, mask, Sterile gown Surgical gloves & Goggles Cross-matched blood/packed cells Vygon Set or REM System Level 2 Set Extension Set (WB35000) [for use with Biegler Dry Heat Infusing Warmer] Blood & Infusion Warmer (Biegler BW 485L) Pathology tubes for biochemistry & haematology Exchange Transfusion Record Chart/s Cardiorespiratory monitor Oximeter Servo control and skin probe cover. NSW Newborn Screen Card Consent form for parents Viraclean Solution Antiseptic solution for line insertion:- 28 weeks gestation = Chlorhexidine 0.5% in 70% alcohol (Pink solution) ≤ 28 weeks gestation = Chlorhexidine Acetate Aqueaous Solution 0.05%w/v (Blue solution) PROCEDURE Process Rationale 1 Ensure the procedure is explained to parent/s and a written consent is obtained. Written consent for use of blood product is required . 2 Identify the infant for exchange transfusion. Proceduralist performs a “Time Out” on the infant. Time Out”: Correct Patient; Correct Procedure; Correct Site; Correct equipment. 3 Transfer infant to Level 3. Place infant on an open bed under radiant heater if not in an incubator. To allow for easy access during the procedure. 4 Ensure an appropriate vascular access is established to allow infusion and withdrawal of infant’s blood. Umbilical venous access is recommended for single exchange access. NOTE: Blood and Plasma from Blood Bank • Red Blood Cells (RBCs) less than 5 days old • Type O Rh negative RBCs and cross-matched against infant and mother • 10% Dilution of RBCs with FFP or Albumin is recommended e.g 90mL RBC + 10mL FFP or Albumin. [ [ R R e e f f e e r r t t o o A A p p p p e e n n d d i i x x 1 1 ( ( p p 7 7 / / 1 1 5 5 ) ) f f o o r r i i n n s s t t r r u u c c t t i i o o n n s s o o n n d d i i l l u u t t i i o o n n ] ] . . • Medical Staff is to re-constitute the blood with nursing assistant/s (Ref.: Minutes of NCC Clinical Management Meeting of 26 th August & 6 th October 2004) Volume of RBCs and FFP to be Prescribed:- ESTIMATED SINGLE VOLUME EXCHANGE = 85mL x weight (kg). ESTIMATED DOUBLE VOLUME EXCHANGE = 85 x2 x weight (kg) = 170 mL x weight (kg). Standard Precautions (Ref. In Intranet; Southern Sector Intranet; Infection Control Procedures; Standard Precautions – S.8) T7 – 1/15
Transcript of EXCHANGE TRANSFUSION - · PDF fileradiant heater if not in an incubator. ... Pre-exchange...

ROYAL HOSPITAL FOR WOMEN APPROVED: NCC QUALITY COMMITTEE
DEPARTMENT MANUAL: DIVISION OF NEWBORN SERVICES DATE: 8th
April 2013
EXCHANGE TRANSFUSION
This LOP is developed to guide clinical practice at the Royal Hospital for Women. Individual patient circumstances may mean that practice diverges from this LOP.
PURPOSE & SCOPE: To replace an infant’s blood volume with cross-matched blood that is appropriate (See note) to treat severe Haemolytic Disease of the Newborn EQUIPMENT: Hat, mask, Sterile gown Surgical gloves & Goggles
Cross-matched blood/packed cells Vygon Set or REM System Level 2 Set Extension Set (WB35000) [for use with Biegler Dry Heat Infusing Warmer] Blood & Infusion Warmer (Biegler BW 485L) Pathology tubes for biochemistry & haematology Exchange Transfusion Record Chart/s Cardiorespiratory monitor Oximeter Servo control and skin probe cover. NSW Newborn Screen Card
Consent form for parents Viraclean Solution Antiseptic solution for line insertion:-
28 weeks gestation = Chlorhexidine 0.5% in 70% alcohol (Pink solution) ≤ 28 weeks gestation = Chlorhexidine Acetate Aqueaous Solution 0.05%w/v (Blue solution)
PROCEDURE
Process
Rationale
1
Ensure the procedure is explained to parent/s and a written consent is obtained.
Written consent for use of blood product is required .
2
Identify the infant for exchange transfusion. Proceduralist performs a “Time Out” on the infant.
Time Out”: Correct Patient; Correct Procedure; Correct Site; Correct equipment.
3
Transfer infant to Level 3. Place infant on an open bed under radiant heater if not in an incubator.
To allow for easy access during the procedure.
4
Ensure an appropriate vascular access is established to allow infusion and withdrawal of infant’s blood.
Umbilical venous access is recommended for single exchange access.
NOTE: Blood and Plasma from Blood Bank
• Red Blood Cells (RBCs) less than 5 days old • Type O Rh negative RBCs and cross-matched against infant and mother
• 10% Dilution of RBCs with FFP or Albumin is recommended e.g 90mL RBC + 10mL FFP or Albumin.
[[[RRReeefffeeerrr tttooo AAAppppppeeennndddiiixxx 111 (((ppp 777///111555))) fffooorrr iiinnnssstttrrruuuccctttiiiooonnnsss ooonnn dddiiillluuutttiiiooonnn]]]...
• Medical Staff is to re-constitute the blood with nursing assistant/s
(Ref.: Minutes of NCC Clinical Management Meeting of 26th August & 6
th October 2004)
Volume of RBCs and FFP to be Prescribed:-
ESTIMATED SINGLE VOLUME EXCHANGE = 85mL x weight (kg). ESTIMATED DOUBLE VOLUME EXCHANGE = 85 x2 x weight (kg) = 170 mL x weight (kg).
Standard Precautions (Ref. In Intranet; Southern Sector Intranet; Infection Control Procedures; Standard Precautions – S.8)
T7 – 1/15
ROYAL HOSPITAL FOR WOMEN APPROVED: NCC QUALITY COMMITTEE
DEPARTMENT MANUAL: DIVISION OF NEWBORN SERVICES DATE: 8th
April 2013
EXCHANGE TRANSFUSION cont’d…
5
Ensure that pathology request forms are printed for pre-exchange SBR & Biochemistry.
6
Pre-exchange transfusion Preparation and Requirements
6.1 Nurse the infant in a comfortable position.
To keep the infant comfortable during the procedure.
6.2 Attach temperature probe and set it on servo control.
To monitor the infant’s body temperature during the procedure.
6.3 Attach cardio-respiratory monitor and oximeter to infant to establish a good QRS trace. Set alarms as appropriate for the infant.
To provide vital signs monitoring during the procedure. To establish a set of baseline observation to reference for deviation during the exchange procedure
6.4 Ensure access line/s for exchange procedure are secured.
To prevent the risk of accidental dislodgement.
6.5 Check the infant’s identification label with nursing notes, parenteral fluid chart and the bag of blood with particulars on the Blood and Blood Products Administration Form together with the SEALS Blood Bank Issue Report. Check with the Medical Officer:
Name of infant CMV Negative MRN Irradiated Blood Group – Patient and Product Expiry Date & Time
Product No. of Blood
To correctly identify the infant and the product that is to be used and seek clarification for any mismatch.
6.6 MO and nurse must sign the appropriate charts.
To verify and record the checks that is done.
NOTE: Performing the Exchange via an Umbilical Access:
See Procedure on Insertion of an Umbilical Venous catheter to establish the access.
NOTE: Ensure the nurse who commences the procedure must complete the
exchange procedure with the MO. This is a safety “rule” to monitor the
procedure and the infant’s behaviour.
T7 – 2/15

ROYAL HOSPITAL FOR WOMEN APPROVED: NCC QUALITY COMMITTEE
DEPARTMENT MANUAL: DIVISION OF NEWBORN SERVICES DATE: 8th
April 2013
EXCHANGE TRANSFUSION cont’d…
6.7 Before commencing exchange transfusion, obtain a set
of observations: Provide a baseline for reference.
Axilla temperature (Temp)
Heart rate (HR)
Respiratory Rate (RR)
Saturation reading (Spo2)
Blood pressure (BP)
Blood sugar level (BSL)
Colour of infant
ABG (as appropriate for infant)
Girth measurement
7
EXCHANGE TRANSFUSION VIA AN UMBILICAL ACCESS
7.1 Wash hands
To adhere to the 5-Moments of Hand Hygiene. To ensure PPE.
7.2 MO puts hat, mask and protective eye goggles on before performing a surgical scrub. Dons sterile gown and sterile gloves after scrub.
Exchange transfusion via the umbilical access is a sterile procedure.
8
Using a Vygon Exchange Transfusion Set
8.1 RN open and pass the green pack of Vygon exchange transfusion set to MO. (See picture 1 & 2).
To maintain Sterility of equipment.
Picture 1
T7 – 3/15

ROYAL HOSPITAL FOR WOMEN APPROVED: NCC QUALITY COMMITTEE
DEPARTMENT MANUAL: DIVISION OF NEWBORN SERVICES DATE: 8th
April 2013
EXCHANGE TRANSFUSION cont’d…
Picture 2
9
MO :
connect the blood giving set (with filter) to the heating tubing (Picture 3)
then connect the heating tubing end to the 4-way tap (Picture 4)
connect the plastic tubing for the waste bag to the 4-way tap (Picture 4)
Picture 3
Picture 4
UUmmbbiilliiccaall ccaatthheetteerrss
((NNoott rreeqquuiirreedd)) BBlloooodd GGiivviinngg sseett
wwiitthh ffiilltteerr)
WWaassttee BBaagg wwiitthh hhaannggiinngg hhooookkss
FFoorr ““iinnffaanntt’’ss bblloooodd””
GGlloovveess,, bblluuee ddrraappee &&
GGaauuzzee
((NNoott RReeqquuiirreedd)
44--WWaayy ttaapp
SSyyrriinnggeess wwiitthh lluueerr
nnoozzzzlleess
))
Blood transfusion line
Waste Line
Umbilical Catheter
4-way Tap
T7 – 4/15

ROYAL HOSPITAL FOR WOMEN APPROVED: NCC QUALITY COMMITTEE
DEPARTMENT MANUAL: DIVISION OF NEWBORN SERVICES DATE: 8th
April 2013
EXCHANGE TRANSFUSION cont’d…
10
MO pass the spike-end of the blood giving set to RN. to connect to the bag of blood (Picture 5).
Picture 5
11
Prime the blood giving set with blood (Picture 6).
Picture 6
T7 – 5/15

ROYAL HOSPITAL FOR WOMEN APPROVED: NCC QUALITY COMMITTEE
DEPARTMENT MANUAL: DIVISION OF NEWBORN SERVICES DATE: 8th
April 2013
EXCHANGE TRANSFUSION cont’d…
12
Using a REM Level 3 – SINGLE Access Exchange Transfusion Set (See Appendix 1) via an Umbilicus
12.1 Attach the bag of Plasma and Blood to the Y-filter set.
12.2 Mix the RBCs and FFP (See Note on Page 7) in the burette..
12.3 Connect burette to the infusion line.
To mix blood and plasma before priming the line.
12.4 Connect Warming circuit to the infusion line.
12.5 Prime the line and attach to 4-Way Tap.
12.6 Prime the 4-way tap and attach to the Umbilical catheter.
12.7 Attach the Waste-line to the 4-Way Tap.
12.9 Connect a 5mL luer syringe to the nozzle of the 4- way Tap that has a “Flag” (Picture 6).
Picture 6
12.10 Ensure that there is no trapped air in the line.
13
The Blood Warmer
13.1 Connect power cable to power supply and switch on. A short beep (control of alarm) sounds and the standby LED (Picture 7 – No. 1) lights up.
13.2 Adjust the desired temperature to 37ºC: Use buttons and (Picture 7 – No. 2) in Standby mode to adjust temperature. Temperature can only be adjusted in Standby Mode.
Picture 7
13.3 Press button (Picture 7 – No. 3) to start the
heating.
To set the blood warmer ready for use.
13.4 Position the tube in the groove of the heat exchanger. (Picture 8).
13.5 Starting from rear of heat exchanger, coil the tube forward without tension in a clockwise direction – x 4 coils. (Picture 8). (Caution: Length of tubing between the instrument and patient must not be shorter than 40 cm or be under tension) (Ref.: BW 685/685S Instruction Manual, Edition 08/2010).
Picture 8
“Flag”
1
2
3
T7 – 6/15

ROYAL HOSPITAL FOR WOMEN APPROVED: NCC QUALITY COMMITTEE
DEPARTMENT MANUAL: DIVISION OF NEWBORN SERVICES DATE: 8th
April 2013
EXCHANGE TRANSFUSION cont’d…
13.6 Ensure that the temperature reading on the BW 458 L is at 37ºC during the procedure. (Ref. Haematological Registrar, Blood Bank, Extn. 29041).
To avoid lysing of red blood cells
EXCHANGE TRANSFUSION cont’d…
NOTE: 1. Load the burette with 135 mL of RBCs and 15 mL of FFP = 10% dilution 2. Prime the line. (Only a small amount of blood will be left in the burette) 3. Re-load the burette with 126mL RBC and 14mL FFP = 10% dilution to the remainder
of blood in the burette.
4. Gently rotate the burette every 10 minutes to minimise sedimentation of RBCs in the burette.
5. Gently rotate the RBCs pack before using for the burette.
ME-B481 Codan IV set with One-way valve
Codan Blood Warming set CO-71.4419 (350cms) Connects burette to blood warmer circuit.
Umbilical venous Catheter - UVC
Ref: Exchange Transfusion Set, Level 2, REM Systems Pty.Ltd.
4
APPENDIX 1 – SINGLE ACCESS EXCHANGE SET-UP
10 mL
T7 – 7/15
ROYAL HOSPITAL FOR WOMEN APPROVED: NCC QUALITY COMMITTEE
DEPARTMENT MANUAL: DIVISION OF NEWBORN SERVICES DATE: 8th
April 2013
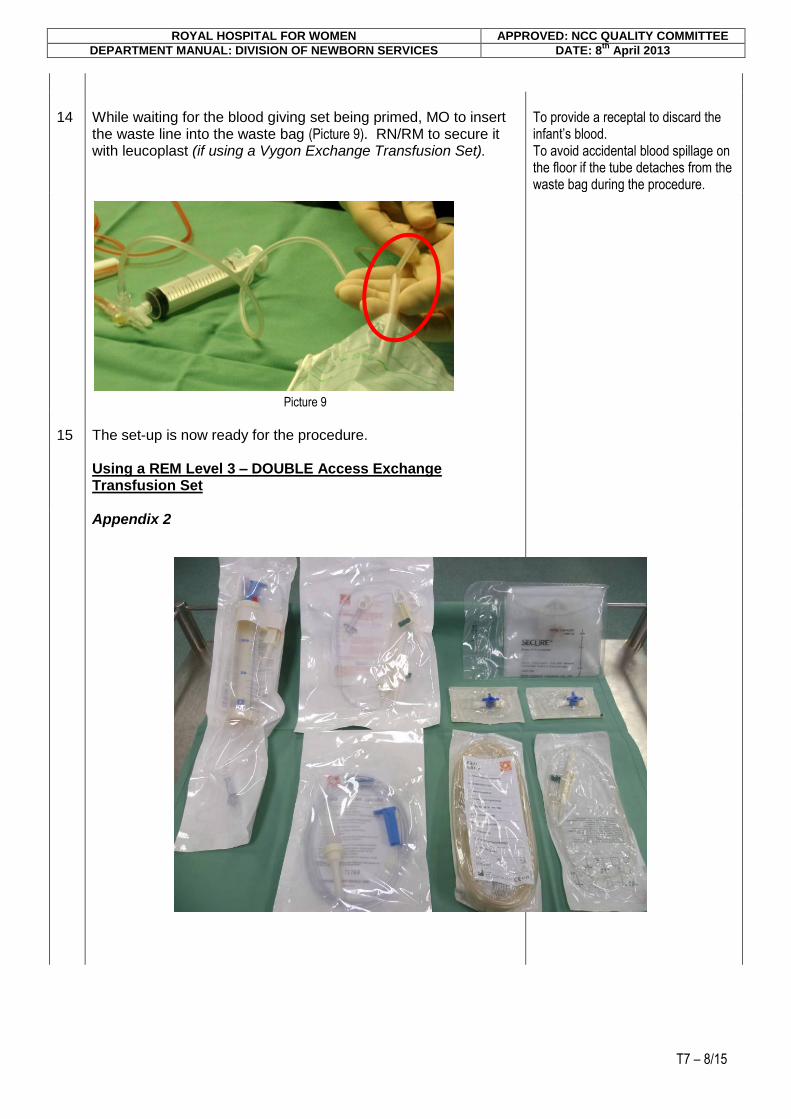
14
While waiting for the blood giving set being primed, MO to insert the waste line into the waste bag (Picture 9). RN/RM to secure it with leucoplast (if using a Vygon Exchange Transfusion Set).
To provide a receptal to discard the infant’s blood. To avoid accidental blood spillage on the floor if the tube detaches from the waste bag during the procedure.
Picture 9
15
The set-up is now ready for the procedure.
Using a REM Level 3 – DOUBLE Access Exchange Transfusion Set
Appendix 2
T7 – 8/15

ROYAL HOSPITAL FOR WOMEN APPROVED: NCC QUALITY COMMITTEE
DEPARTMENT MANUAL: DIVISION OF NEWBORN SERVICES DATE: 8th
April 2013
EXCHANGE TRANSFUSION cont’d…
16
Use the REM Systems Pty. Ltd.: Two Vessel Exchange Transfusion Kit (see Appendix 2).
16
Establish an arterial access (umbilical or radial access) aseptically. Maintain patency with an infusion until the second intravenous access(peripheral) is established and exchange transfusion blood is available to start the procedure.
17
Establish a peripheral venous access. Maintain patency with an infusion while waiting for the availability of exchange transfusion blood to start the exchange procedure.
Picture 10
18
Ensure that Pre-exchange transfusion Preparation and Requirements are done and the intravenous cannula is correctly strapped (Picture10).
To avoid dislodgement of intravenous cannula.
19
Set up equipment when blood is available. (See Appendix 3).
xxx
xxx
Removing blood from infant via
an Umbilical arterial access.
Transfusing infant with fresh blood
APPENDIX 3 – DOUBLE ACCESS EXCHANGE SET-UP
3-way tap
T7 – 9/15

ROYAL HOSPITAL FOR WOMEN APPROVED: NCC QUALITY COMMITTEE
DEPARTMENT MANUAL: DIVISION OF NEWBORN SERVICES DATE: 8th
April 2013
EXCHANGE TRANSFUSION cont’d…
THE EXCHANGE PROCEDURE
20
Double Access Procedure
20.1 Establish an arterial access: umbilical or radial,.
21.1 Attach 3-way tap to umbilical catheter and tubing from waste-bag.
21.2 Attach a 20 mL syringe to 3-way tap.
20.1 Turn the 3-way tap in a clockwise direction to the umbilical/radial catheter.
20.2 Draw blood sample for serum bilirubin, serum electrolytes, haemoglobin measurement and NSW Newborn Screen (if not previously collected) via a 5 mL syringe.
20.3 Turn 3-way tap to the OFF position before disconnecting the 5 mL syringe. Change syringe to a 20 mL luer-lock syringe before commencing the exchange transfusion.
20.4 Assisting RN/RM is required to send blood samples to pathology immediately and ensure samples and pathology forms are marked “Urgent”.
20.5 Record amount of blood taken for pathology on Observation Chart.
20.6 Turn the 3-way tap in a clockwise direction to the 20 mL syringe: OPEN to the umbilical catheter /radial arterial cannula.
3-way tap
Removing blood from infant via
a radial access.
APPENDIX 3 – DOUBLE ACCESS EXCHANGE SET-UP cont’d…
T7 – 10/15

ROYAL HOSPITAL FOR WOMEN APPROVED: NCC QUALITY COMMITTEE
DEPARTMENT MANUAL: DIVISION OF NEWBORN SERVICES DATE: 8th
April 2013
EXCHANGE TRANSFUSION cont’d…
20.7 Draw 5 mL of infant’s blood into 20 mL syringe.
20.8 Turn the 3-way tap (clockwise direction) to the waste line and discard the blood.
20.9 While the infant’s blood is withdrawn, simultaneously, turn the 3-way tap (clockwise direction) of the venous access to the bag of blood.
An assistant to infuse the blood is required.
20.11 Withdraw 5mL of new blood from the blood bag into the 20 mL syringe.
20.12 Turn 20 mL syringe (clockwise direction) to the venous cannula, slowly push the new blood into the peripheral vein as the infant’s blood is withdrawn from the arterial access. Wait for 2 seconds.
Blood must be withdrawn and infused simultaneously during the exchange procedure to minimise pressure changes in the arterial and venous circulatory system.
20.14 Continue withdrawing and infusing simultaneously blood during the exchange procedure..
20.17 Repeat actions from No. 20.6 to No. 20.14 until the procedure is complete.
21
Double Access Procedure
Peripheral Intravenous Access
21.1 Attach the bag of Plasma and Blood to the Y-filter line.
21.2 Mix the RBCs and FFP (See Note on Page 7).
21.3 Connect burette to the Y-filter line.
21.4 Connect the infusion line to the burette.
21.5 Connect Warming circuit to the infusion line.
NOTE:
Calcium Gluconate is no longer required during exchange transfusion.
T7 – 11/15

ROYAL HOSPITAL FOR WOMEN APPROVED: NCC QUALITY COMMITTEE
DEPARTMENT MANUAL: DIVISION OF NEWBORN SERVICES DATE: 8th
April 2013
EXCHANGE TRANSFUSION cont’d…
21.6 Prime the line and attach to 3-Way tap.
21.7 Attach a 20mL syringe to 3-way tap and then to the infant’s peripheral intravenous cannula.
ALTERNATIVELY
NOTE: A staff is required to assist with the procedure by drawing blood into the syringe and infusing slowing and simultaneously with the blood that is withdrawn from the umbilical access.
21.8 Attach the primed line to the infant’s peripheral intravenous cannula.
21.9 Insert the infusion line into an infusion pump
21.10 Calculate the infusion rate and set the infusion pump to transfuse the infant simultaneously with the blood withdrawal via the umbilicus.
22
Observations during the Exchange Procedure
22.1 Ensure continuous monitoring of the infant via the cardio- respiratory monitor. Observations to be written on Exchange Transfusion Record (Page T7 – 12/14 & T7 – 13/14)
are: 15 minutely readings from the monitor of: -
Heart Rate
Respiratory Rate Hourly readings of –
Servo temperature
Temperature of Blood & Infusion Warmer (Biegler BW 685) – maintain at 37ºC
Blood Pressure (Cuff Reading)
Hourly saturation reading
Observe infant’s behaviour during the procedure.
22.2 RN/RM is required to record the amount of blood removed and infused on the Blood Exchange Chart (Appendix 4).
22.3 Collect blood sample for: serum electrolytes at half-way through the procedure. Send to pathology with samples and pathology forms marked “Urgent”.
To assess the post-exchange biochemistry and haematology of the infant.
T7 – 12/15

ROYAL HOSPITAL FOR WOMEN APPROVED: NCC QUALITY COMMITTEE
DEPARTMENT MANUAL: DIVISION OF NEWBORN SERVICES DATE: 8th
April 2013
EXCHANGE TRANSFUSION cont’d…
23
On completion of the procedure:-
detach the exchange transfusion set from the umbilical catheter
To discard the exchange transfusion set.
connect a maintenance infusion line to the umbilical catheter and continue infusing as prescribed
To maintain patency of the access in anticipation of a repeat procedure depending on post-exchange SBR.
remove all the sterile drapes
To tidy the infant after the procedure.
insert blood pack in a plastic bag.
To have available for follow-up of adverse reaction/s.
Keep by the infant’s bed for 24 hours. Dispose the bag in the contaminated waste bin thereafter.
remove and dispose sharps
To prevent accidental sharps injury.
discard disposable equipment
ensure access line is secured.
To prevent dislodgement of catheter.
check access site for bleeding
clean work area.
24
Wash hands.
To adhere to the 5-Moments of Hand Hygiene.
25
Document the infant’s notes
To record the event in the infant’s notes.
26
Post-Exchange Transfusion
24.1. Monitor the infant’s BSL immediately post- exchange transfusion.
To monitor for adverse reaction/s to the procedure.
24.2 If stable, monitor the infant as per Unit Protocol.
24.3 Measure the infant’s girth and record (See Page ….. ).
To monitor for gut distension.
24.4 Auscultate and assess for bowel sounds.
To monitor for static bowel peristalsis.
24.5 Observe all stools for blood.
To monitor for bowel action/s.
24.6 Maintain a strict intake and output record .
To monitor the infant’s fluid status.
24.7 Ensure phototherapy lights are on the infant.
To continue to treat the infant’s jaundice.
T7 – 13/15

ROYAL HOSPITAL FOR WOMEN APPROVED: NCC QUALITY COMMITTEE
DEPARTMENT MANUAL: DIVISION OF NEWBORN SERVICES DATE: 8th
April 2013
EXCHANGE TRANSFUSION cont’d…
24.8 Inform parent/s of the completed procedure. Invite parent/s to visit the infant.
24.9 Document the procedure in the nursing notes. Include the infant’s behaviour, response and related incidence/s to the procedure.
To provide data for reference of the infant’s state during the procedure.
NO
References
Australian Red Cross Blood Services, Use of Blood Filters, Transfusion Medicine Manual, www.AustralianRedCrossBloodService, 2009, ARC. American Academy of Pediatrics. Clinical Practice Guideline: Management of Hyperbilirubinemia in the newborn infant of 35 weeks or more. Pediatrics 2004; 114: 297-316. Bloodflash Newsletter, Northern Network, SESIAHS, January 2010, Issue No. 6. NSW Health, Policy Directive PD2005_406, Consent to Medical Treatment – Patient Information, Publication Date: 27th January 2005. NSW Health Policy Directive PD2007 079. Correct Patient, Correct Procedure and Correct Site. Publication Date: 30th October 2007.
NSW Health GL2007_001 Neonatal Exchange Transfusions in NSW: http://www.health.nsw.gov.au/policies/gl/2007/pdf/GL2007_001.pdf accessed 24th January 2011. Pre transfusion laboratory practice ANZBT Guidelines; Mar 2007: http://www.anzsbt.org.au/publications/index.cfm#societyg
SESIAH Clinical Policy Directive, Doc. No. Area PD 141, June 2007. Blood and Blood Products in Clinical Operations. SESIAHS Clinical Policy Directive, PD 015, March 2007. Consent for medical treatment – patient information
Date
Revised No.
Author; Revised by
2005
Primary
CNC K.B. Lindrea
2013
3
CNC K.B. Lindrea & NCC Policy/ Procedure Working Group
T7 – 14/15

ROYAL HOSPITAL FOR WOMEN APPROVED: NCC QUALITY COMMITTEE
DEPARTMENT MANUAL: DIVISION OF NEWBORN SERVICES DATE: 8th
April 2013
APPENDIX 4
T7 – 15/15

ROYAL HOSPITAL FOR WOMEN APPROVED: NCC QUALITY COMMITTEE
DEPARTMENT MANUAL: DIVISION OF NEWBORN SERVICES DATE: 8th
April 2013