
EVPROG MANUAL ITA V1.0 - everycontrol.com.br MANUAL ITA-ENG V1.0.pdf · Le figure seguenti (tratte...
28
MANUALE EVPROG EVPROG MANUAL Programmazione flash controllori famiglia EVK996, EVD996 con il software Open Source PONYPROG EVK996, EVD996 flash controller Programming using Open Source software PONYPROG
Transcript of EVPROG MANUAL ITA V1.0 - everycontrol.com.br MANUAL ITA-ENG V1.0.pdf · Le figure seguenti (tratte...
MANUALE EVPROG
EVPROG MANUAL
Programmazione flash controllori famiglia EVK996, EVD996 con il software Open Source PONYPROG
EVK996, EVD996 flash controller Programming
using Open Source software PONYPROG

EVPROG V1.0 06/12/2006
Evco Srl Pagina 2 di 28

EVPROG V1.0 06/12/2006
Evco Srl Pagina 3 di 28
1. Collegamento al Personal Computer............................................................................................4 2. Installazione di PonyProg ............................................................................................................5 3. Avvio di PonyProg.......................................................................................................................6 4. Impostazione configurazioni........................................................................................................7 5. Bit di sicurezza e configurazione ...............................................................................................10 6. Programmazione della flash utilizzando i comandi ...................................................................12 7. Programmazione della flash utilizzando un file script...............................................................16 8. Risoluzione problemi .................................................................................................................19 9. Link utili.....................................................................................................................................20 10. Fuse bit...................................................................................................................................21 11. Command reference ...............................................................................................................22

EVPROG V1.0 06/12/2006
Evco Srl Pagina 4 di 28
1. Collegamento al Personal Computer Il kit EVPROG permette il download del programma nella flash del controllore EVK996, EVD996 (anche con controllore non alimentato). Predisposizione dell'hardware del kit EVPROG: Collegare l'adattatore a vaschetta (9Poli - RJ11) codice 1256800202 (PonyProg) alla seriale del computer. Collegare l’adattatore codice EVIF20TRX per la programmazione al controllore EVK/EVD996 tramite il cavetto con connettore Micro-Match 6 vie dato in dotazione. Collegare i due adattatori tramite il cavetto telefonico codice1256800042 fornito in dotazione Lo strumento è pronto per essere alimentato.
This Kit it is used to program the EVK996, EVD996 flash memory (also with controller not powered). The module must be connected to the EVK996, EVD996 controller using the 6 circuits Micro-Match connector also used for the supervisor modules and parameters key. Hardware kit EVPROG installation: Connect the DB-9 to RJ11 adapter code 1256800202 (PonyProg) to the computer serial interface. Connect the EVIF20TRX programmer adapter to the EVK/EVD996 controller using the 6 way Micro-Match connector provided. Connect the two adapter using the 6 way telephone cable code 1256800042 supplied with the kit The controller is ready to be powered.
ABCDEF
12
34
5
67
89
RJ11 / DB-9 Micro-Match / RJ11
EVPROG

EVPROG V1.0 06/12/2006
Evco Srl Pagina 5 di 28
2. Installazione di PonyProg Per installare sul computer l'utility per la programmazione utilizzare il CD di installazione del sistema di sviluppo UCJ. La figura seguente mostra il menù principale dell’Autorun di Universal Control Jet dove è possibile lanciare l'installazione dell'utility PonyProg (“PonyProg ControlMicro”).
Use the Universal Control Jet UCJ installation CD to install on your computer the flash programming utility . The next figure show the main UCJ Autorun menu where it is possible to start the PonyProg utility installation (“PonyProg ControlMicro”).
.

EVPROG V1.0 06/12/2006
Evco Srl Pagina 6 di 28
3. Avvio di PonyProg Lanciare il programma PonyProg2000.
Start the PonyProg2000 program.

EVPROG V1.0 06/12/2006
Evco Srl Pagina 7 di 28
4. Impostazione configurazioni Solo la prima volta viene scelta la porta di comunicazione, la polarità delle linee di controllo e il tipo di microcontrollore usato. Dal menù “Setup” scegliere “Interface Setup…”; si apre un dialog box dove si impostano: “SI ProgI/O” come tipo di interfaccia, la seriale come interfaccia di programmazione, com1 o com2 come porta di comunicazione e la polarità delle linee di controllo. L’impostazione corretta è evidenziata nella figura seguente:
Only the first time you must select the communication port, the line control polarity and the type of microcontroller used. From the menu “Setup” chose “Interface Setup…”; open a dialog box where you can select the interface type and the port number where the hardware is connected: “SI ProgI/O as interface type, serial as programming interface, com1 or com2 as communication port and line control polarity. The next figure show the correct configuration.

EVPROG V1.0 06/12/2006
Evco Srl Pagina 8 di 28
Per settare i valori ottimali per la velocità di programmazione potrebbe essere utile eseguire almeno una volta una calibrazione della velocità del bus del PC. Dal menù “Setup” scegliere “Calibration :
Calibration tunes the computer serial bus speed. From “Setup” menu chose “Calibration”:
EVPROG V1.0 06/12/2006
Evco Srl Pagina 9 di 28
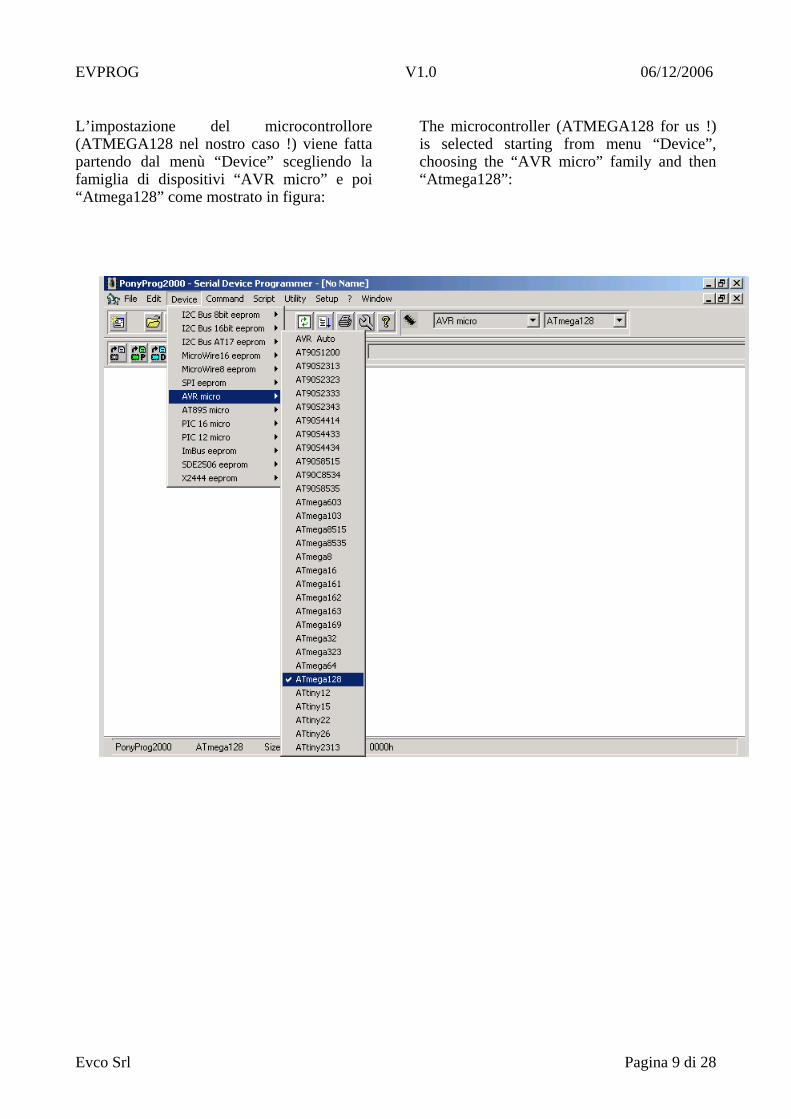
L’impostazione del microcontrollore (ATMEGA128 nel nostro caso !) viene fatta partendo dal menù “Device” scegliendo la famiglia di dispositivi “AVR micro” e poi “Atmega128” come mostrato in figura:
The microcontroller (ATMEGA128 for us !) is selected starting from menu “Device”, choosing the “AVR micro” family and then “Atmega128”:
EVPROG V1.0 06/12/2006
Evco Srl Pagina 10 di 28
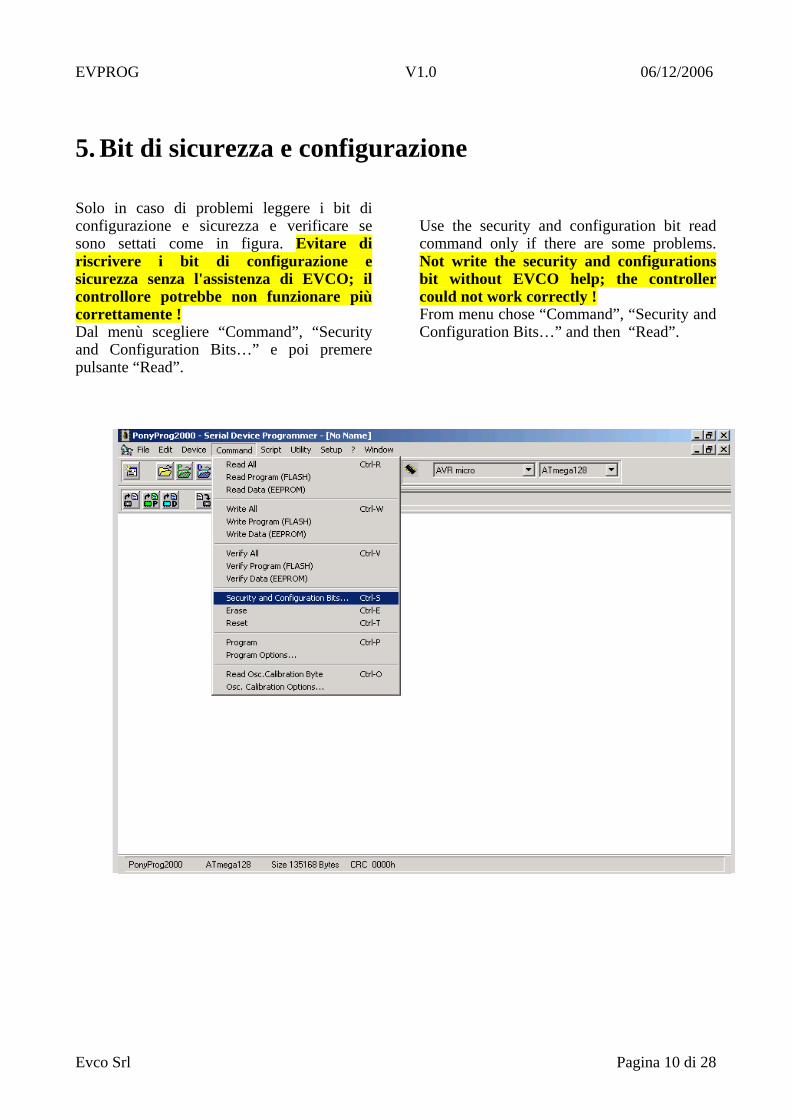
5. Bit di sicurezza e configurazione Solo in caso di problemi leggere i bit di configurazione e sicurezza e verificare se sono settati come in figura. Evitare di riscrivere i bit di configurazione e sicurezza senza l'assistenza di EVCO; il controllore potrebbe non funzionare più correttamente ! Dal menù scegliere “Command”, “Security and Configuration Bits…” e poi premere pulsante “Read”.
Use the security and configuration bit read command only if there are some problems. Not write the security and configurations bit without EVCO help; the controller could not work correctly ! From menu chose “Command”, “Security and Configuration Bits…” and then “Read”.

EVPROG V1.0 06/12/2006
Evco Srl Pagina 11 di 28

EVPROG V1.0 06/12/2006
Evco Srl Pagina 12 di 28
6. Programmazione della flash utilizzando i comandi I comandi disponibili sono rappresentati nella figura seguente e sono spiegati in maggior dettaglio alla fine del documento oppure nel sito del fornitore del software.
Next figure show the “command” menu; at the and of the document there is an explanation of each menu command.
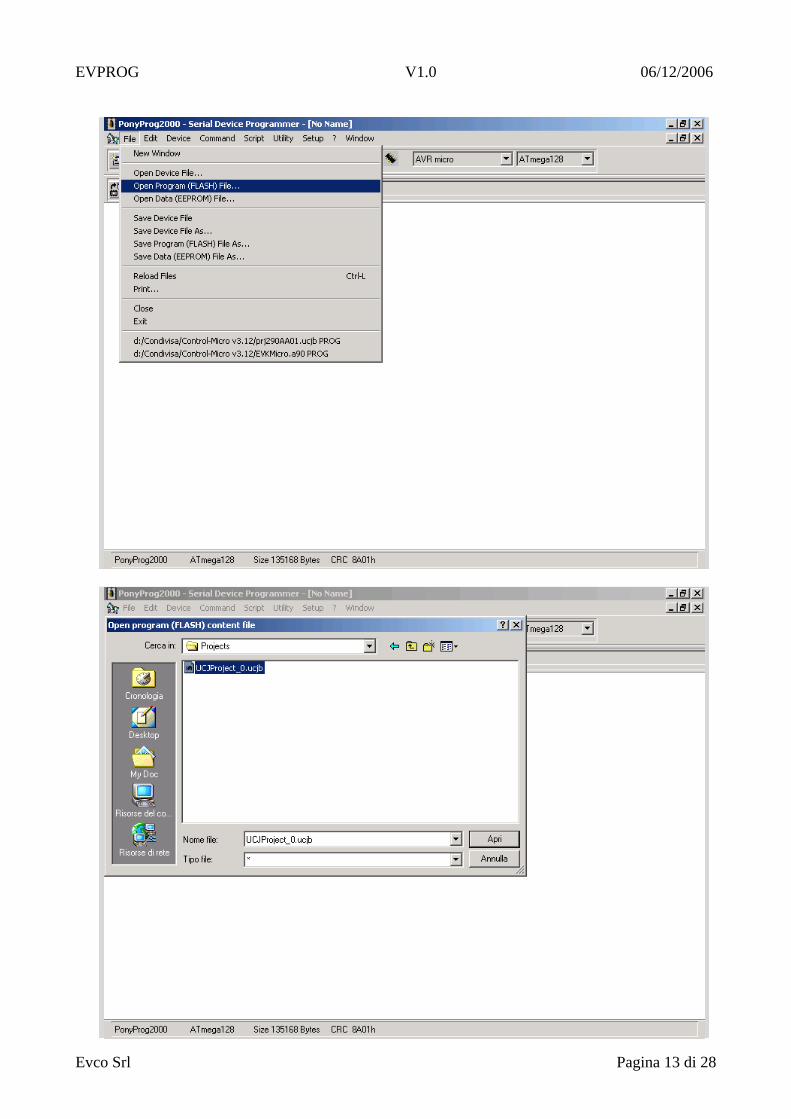
Le 5 figure seguenti rappresentato in sequenza le operazioni da fare per scrivere la memoria flash del controllore. Rappresentano rispettivamente: l’operazione di apertura del file con estensione .ucjb generato dal sistema di sviluppo UCJ che contiene il software da scaricare nella flash del controllore, il dump della memoria, il comando di cancellazione della flash del controllore e il comando di scrittura della stessa. Se qualche operazione non va a buon fine, provare a dare un comando di “Reset” e poi riprovare la scrittura.
The 5 next figure represent the sequence of operations to do in order to write the controller flash memory. They represent the open file with .ucjb extension generated from the UCJ develop system, the memory dump, the flash erase command and the flash write command. If some operation is wrong, use the “Reset”command and then try programming again.
EVPROG V1.0 06/12/2006
Evco Srl Pagina 13 di 28

EVPROG V1.0 06/12/2006
Evco Srl Pagina 14 di 28

EVPROG V1.0 06/12/2006
Evco Srl Pagina 15 di 28

EVPROG V1.0 06/12/2006
Evco Srl Pagina 16 di 28
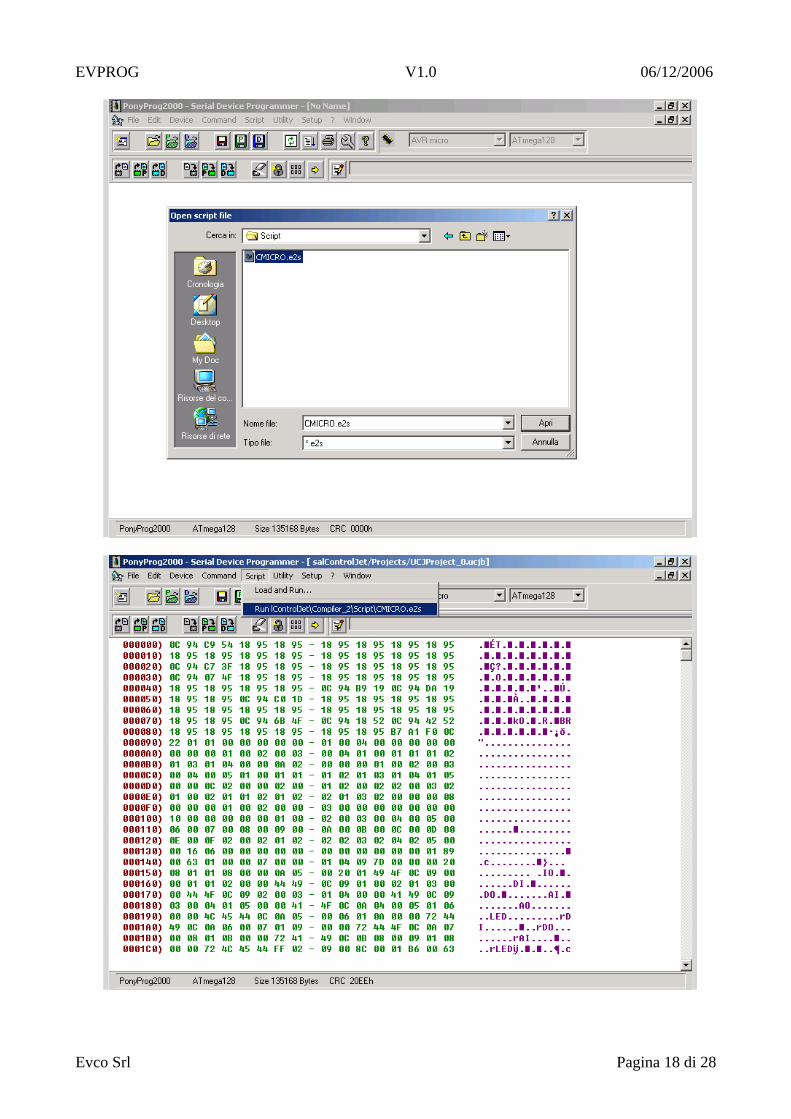
7. Programmazione della flash utilizzando un file script Lo Scipt è un tool per automatizzare la programmazione; questa modalità permette l'esecuzione della programmazione con un unico comando. Esiste il file di testo CMICRO.e2s in UniversalControljet/Compiler_2/Script che contiene una sequenza di comandi che verranno eseguiti automaticamente. Solo la prima volta, con un editor di testo, aprire il file CMICRO.e2s ed inserire il giusto percorso e nome del file eseguibile generato da UCJ (se diverso da quello di default) da utilizzare per il download nella flash del controllore.
The Script is a tool to automate programming. A script is a text file with extension .e2s containing a sequence of commands to execute. Every line contain a command. You can use an existing file CMICRO.e2s in UniversalControljet/Compiler_2/Script. Using a text editor you can change the .ucjb file name and pattern if they are different from default.

EVPROG V1.0 06/12/2006
Evco Srl Pagina 17 di 28
Per lanciare il download, solo la prima volta scegliere “Script”, “Load and Run”, CMICRO.e2s ed automaticamente partirà l'operazione di download. Successivamente sarà sufficiente scegliere “Script” e poi “Run Programming”.
To start download, only the first time chose “Script”, “Load and Run”, CMICRO.e2s and automatically will start the download; afterwords will be sufficient to choose “Script” and then “Run Programming”.
EVPROG V1.0 06/12/2006
Evco Srl Pagina 18 di 28

EVPROG V1.0 06/12/2006
Evco Srl Pagina 19 di 28
8. Risoluzione problemi Problema: non riesco a programmare il controllore e compare un messaggio del tipo: Risoluzione: questo messaggio potrebbe essere dovuto a una delle seguenti cause:
- controllore non alimentato - errato collegamento del kit EVPROG - errato setup dell’interfaccia seriale del
PC
Problem: I can’t program the controller and there is a message box like this: Solution: this message could be due to one of the next problem:
- controller not powered - wrong connection of EVPROG kit - bad PC serial interface setup

EVPROG V1.0 06/12/2006
Evco Srl Pagina 20 di 28
9. Link utili Per ulteriori informazioni visitare i seguenti link:
For other information visit the next link:
http://www.lancos.com http://www.lancos.com/prog.html http://www.lancos.com/ppwin95.html http://www.lancos.com/e2p/ponyprog2000.html

EVPROG V1.0 06/12/2006
Evco Srl Pagina 21 di 28
10. Fuse bit Le figure seguenti (tratte dal manuale del microcontrollore ATMEGA128) descrivono brevemente il significato dei bit di fuse. (Nota: fuse bit selezionato ==> 0)
Fuse High Byte Bit No. Description Default Value OCDEN(4) 7 Enable OCD 1 (unprogrammed, OCD
disabled)
JTAGEN(5) 6 Enable JTAG 0 (programmed, JTAG enabled) SPIEN(1) 5 Enable Serial Program and Data
Downloading 0 (programmed, SPI prog. enabled)
CKOPT(2) 4 Oscillator options 1 (unprogrammed) EESAVE 3 EEPROM memory is preserved
through the Chip Erase 1 (unprogrammed, EEPROM not preserved)
BOOTSZ1 2 Select Boot Size (see Table 112 for details)
0 (programmed)(3)
BOOTSZ0 1 Select Boot Size (see Table 112 for details)
0 (programmed)(3)
BOOTRST 0 Select Reset Vector 1 (unprogrammed)
Notes: 1. The SPIEN fuse is not accessible in SPI Serial Programming mode. 2. The CKOPT fuse functionality depends on the setting of the CKSEL bits. See “Clock Sources” on page 35 for details. 3. The default value of BOOTSZ1..0 results in maximum Boot Size. See Table 112 on page 286 4. Never ship a product with the OCDEN Fuse programmed regardless of the setting of lock bits and the JTAGEN Fuse. A programmed OCDEN Fuse enables some parts of the clock system to be running in all sleep modes. This may increase the power consumption. 5. If the JTAG interface is left unconnected, the JTAGEN fuse should if possible be disabled. This to avoid static current at the TDO pin in the JTAG interface.
Fuse Low Byte Bit No. Description Default Value
BODLEVEL 7 Brown out detector trigger level 1 (unprogrammed)
BODEN 6 Brown out detector enable 1 (unprogrammed, BOD disabled)
SUT1 5 Select start-up time 1 (unprogrammed)(1)
SUT0 4 Select start-up time 0 (programmed)(1)
CKSEL3 3 Select Clock source 0 (programmed)(2)
CKSEL2 2 Select Clock source 0 (programmed)(2)
CKSEL1 1 Select Clock source 0 (programmed)(2)
CKSEL0 0 Select Clock source 1 (unprogrammed)(2)
Notes: 1. The default value of SUT1..0 results in maximum start-up time. See Table 14 on page 39 for details. 2. The default setting of CKSEL3..0 results in Internal RC Oscillator @ 1 MHz. See Table 6 on page 35 for details.

EVPROG V1.0 06/12/2006
Evco Srl Pagina 22 di 28
11. Command reference Segue elenco dei comandi disponibili con relativa breve spiegazione:
# BYTESWAP CALL <command> CLEARBUFFER DELAY <msec> EDIT-SECURITY ERASE-ALL FILLBUFFER [val][from][to] LOAD-ALL [file][relocation_offset] LOAD-PROG [file][relocation_offset] LOAD-DATA [file][relocation_offset] PAUSE [message] READ-ALL READ-CALIBRATION <address>[mem][osc_index] READ-DATA READ-PROG READ-FUSE READ-LOCK RESET SAVE-ALL [file | '--'][file_type] SAVE-DATA [file | '--'][file_type] SAVE-PROG [file | '--'][file_type] SELECTDEVICE <device> SERIALNUMBER [value][start][size][mem][format][autoinc] VERIFY-ALL VERIFY-DATA VERIFY-PROG WRITE-ALL WRITE-DATA WRITE-PROG WRITE-FUSE [bits] WRITE-LOCK [bits] WRITE&VERIFY-ALL WRITE&VERIFY-DATA WRITE&VERIFY-PROG [ ] optional argument < > required argument
EVPROG V1.0 06/12/2006
Evco Srl Pagina 23 di 28
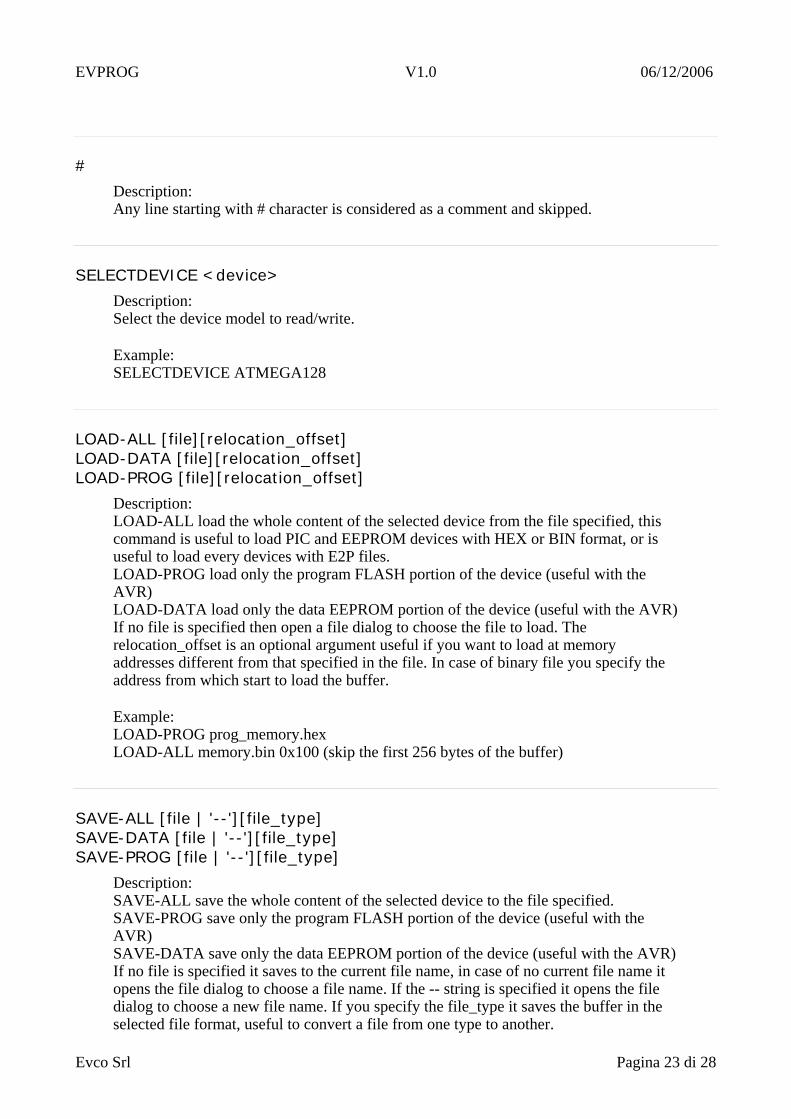
#
Description: Any line starting with # character is considered as a comment and skipped.
SELECTDEVICE <device>
Description: Select the device model to read/write.
Example: SELECTDEVICE ATMEGA128
LOAD-ALL [file][relocation_offset] LOAD-DATA [file][relocation_offset] LOAD-PROG [file][relocation_offset]
Description: LOAD-ALL load the whole content of the selected device from the file specified, this command is useful to load PIC and EEPROM devices with HEX or BIN format, or is useful to load every devices with E2P files. LOAD-PROG load only the program FLASH portion of the device (useful with the AVR) LOAD-DATA load only the data EEPROM portion of the device (useful with the AVR) If no file is specified then open a file dialog to choose the file to load. The relocation_offset is an optional argument useful if you want to load at memory addresses different from that specified in the file. In case of binary file you specify the address from which start to load the buffer.
Example: LOAD-PROG prog_memory.hex LOAD-ALL memory.bin 0x100 (skip the first 256 bytes of the buffer)
SAVE-ALL [file | '--'][file_type] SAVE-DATA [file | '--'][file_type] SAVE-PROG [file | '--'][file_type]
Description: SAVE-ALL save the whole content of the selected device to the file specified. SAVE-PROG save only the program FLASH portion of the device (useful with the AVR) SAVE-DATA save only the data EEPROM portion of the device (useful with the AVR) If no file is specified it saves to the current file name, in case of no current file name it opens the file dialog to choose a file name. If the -- string is specified it opens the file dialog to choose a new file name. If you specify the file_type it saves the buffer in the selected file format, useful to convert a file from one type to another.

EVPROG V1.0 06/12/2006
Evco Srl Pagina 24 di 28
file_type can be: - e2p to select the default E2P file used by PonyProg - bin to select a raw binary format - csm to select a custom CSM file format used by some TV repairer - intel-hex to select standard INTEX-HEX text format - mot-srec to select standard MOTOROLA SREC text format
Example: SAVE-DATA data_memory.hex intel-hex SAVE-ALL -- (save all the device and ask the file name)
READ-ALL READ-DATA READ-PROG
Description: READ-ALL read the whole content of the selected device to the current buffer READ-PROG read only the program FLASH portion of the device (useful with the AVR or PIC) READ-DATA read only the data EEPROM portion of the device (useful with the AVR or PIC)
Example: READ-ALL
WRITE&VERIFY-ALL WRITE&VERIFY-DATA WRITE&VERIFY-PROG
Description: WRITE&VERIFY-ALL write and then verify the whole content of the selected device reading from the buffer WRITE&VERIFY-PROG write and then verify only the program FLASH portion of the device (useful with the AVR or PIC) WRITE&VERIFY-DATA write and then verify only the data EEPROM portion of the device (useful with the AVR or PIC) WRITE&VERIFY commands require PonyProg version 2.05 or more recent. Usually you will use the WRITE&VERIFY, not the WRITE and then the VERIFY command because the former verify only programmed locations instead the latter verify all the buffer (slower).
Example: WRITE&VERIFY-PROG
WRITE-ALL WRITE-DATA WRITE-PROG

EVPROG V1.0 06/12/2006
Evco Srl Pagina 25 di 28
Description: WRITE-ALL write the whole content of the selected device reading from the buffer WRITE-PROG write only the program FLASH portion of the device (useful with the AVR or PIC) WRITE-DATA write only the data EEPROM portion of the device (useful with the AVR or PIC)
Example: WRITE-ALL
VERIFY-ALL VERIFY-DATA VERIFY-PROG
Description: VERIFY-ALL read and compare the whole content of the selected device against the buffer VERIFY-PROG verify only the program FLASH portion of the device (useful with the AVR or PIC) VERIFY-DATA verify only the data EEPROM portion of the device (useful with the AVR or PIC)
Example: VERIFY-ALL
ERASE-ALL Description: ERASE-ALL erase the whole content of the selected device. Usually this operation bring all the locations of the selected device to FF.
Example: ERASE-ALL
EDIT-SECURITY Description: Open the fuse and lock bits dialog to edit them.
READ-FUSE READ-LOCK
Description: READ-FUSE read the fuse bits (device dependant) and open the fuse and lock bits dialog READ-LOCK read the lock bits (device dependant) and open the fuse and lock bits dialog

EVPROG V1.0 06/12/2006
Evco Srl Pagina 26 di 28
Example: READ-FUSE
WRITE-FUSE [bits] WRITE-LOCK [bits]
Description: WRITE-FUSE write the fuse bits (device dependant). WRITE-LOCK write the lock bits (device dependant). If the argument is specified it is the numeric value of the bits rapresentation (note that a 1 means programmed). If no argument is specified the current value is programmed. Pay Attention to program the FUSE bits with the AVR, you can specify a wrong bit combination that will prevent you to access the AVR device in the future. Refer to the datasheets for the meaning of every bit.
Example: SELECTDEVICE AT90S1200 #Lock: {X,X,X,X,X,"Lock2 ","Lock1 ",X} # 0 0 0 0 0 1 1 0 WRITE-LOCK 0x06
SERIALNUMBER [value][start][size][mem][format][autoinc] Description: Used to set a serial number in a location in the buffer before to write the device. This number can be specified every time or autoincremented from the previous one.
Example: SERIALNUMBER 136 0x100 2 DATA LITTLEENDIAN NO Set the serial number of '2' bytes and value '136' at address '0x100' starting from 'DATA' memory. The format should be LITTLEENDIAN without autoincrement
READ-CALIBRATION <address>[mem][osc_index] Description: Read the internal oscillator calibration value from the AVR and write it to a location in the buffer at the specified address (and memory type DATA or PROG). The osc_index argument specify which calibration value should be read since some AVR have several oscillator frequencies. The osc_index argument is available only from the 2.06c version
Example: SELECTDEVICE ATMEGA128 READ-CALIBRATION 0x100 DATA 3 Read the oscillator calibration value for 8MHz frequency
BYTESWAP

EVPROG V1.0 06/12/2006
Evco Srl Pagina 27 di 28
Description: Swap the order of bytes within a word in the buffer (low byte <--> high byte)
RESET Description: Reset the device
CLEARBUFFER Description: Clear the buffer (all bytes to FF)
FILLBUFFER [val][from][to] Description: Fill the buffer from location 'from' to location 'to' with the 'val' value. If no argument is specified a dialog ask for these values.
Example: FILLBUFFER 24 0x100 0x200
PAUSE [message] Description: Pause the program and show a message dialog asking confirmation to continue.
CALL <command> Description: Call an external program and wait for it terminates.
Example: CALL notepad.exe
DELAY <msec> Description: Wait for the specified amount fo milliseconds.
Example: DELAY 1000 Suspend the script and wait for 1 second

EVPROG V1.0 06/12/2006
Evco Srl Pagina 28 di 28
EVCO S.r.l. Via Mezzaterra 6 32036 Sedico Belluno Italia Tel +39 0437 852468 Fax +39 0437 83648 E-mail [email protected] Web www.evco.it


![[Manuali - ITA] - Warhammer 40k ITA - Codex Cataciani](https://static.fdocuments.in/doc/165x107/5571f85549795991698d2f00/manuali-ita-warhammer-40k-ita-codex-cataciani.jpg)