
Every Woman Counts - Medi-Cal...services, please refer to the Every Woman Counts (ev woman) section...
64
Every Woman Counts Step-by-Step Provider User Guide California Department of Health Care Services Cancer Detection and Treatment Branch and California MMIS Fiscal Intermediary PROPubs 01/2019
Transcript of Every Woman Counts - Medi-Cal...services, please refer to the Every Woman Counts (ev woman) section...

Every Woman Counts Step-by-Step Provider User Guide
California Department of Health Care Services Cancer Detection and Treatment Branch and
California MMIS Fiscal Intermediary
PROPubs 01/2019

TABLE OF CONTENTS
INTRODUCTION .................................................................................................................................. 4
SCOPE OF BENEFITS ......................................................................................................................... 4
PROVIDER PARTICIPATION .............................................................................................................. 4 Primary Care Providers ............................................................................................................................. 4 Referral Providers ...................................................................................................................................... 5 Data Requirements .................................................................................................................................... 5 Recipient Eligibility .................................................................................................................................... 5 Income ........................................................................................................................................................ 5 Health Insurance ........................................................................................................................................ 5
THE DETEC APPLICATION ................................................................................................................ 6 Accessing Online Forms ........................................................................................................................... 6 Accessing the DETEC Application ........................................................................................................... 6
EVERY WOMAN COUNTS DOCUMENTS .......................................................................................... 9 Step-By-Step Provider User Guide ........................................................................................................... 9 Consent to Participate in Program .......................................................................................................... 9 Recipient Eligibility Forms ........................................................................................................................ 9 Breast and Cervical Screening Cycle Data Worksheets & Instructions ................................................. 9 Covered Procedures .................................................................................................................................. 9
QUICK REFERENCE GUIDE: DETEC – SEARCH RECIPIENT ........................................................ 11
ENTERING A NEW RECIPIENT ........................................................................................................ 12 DETEC – Search Recipient ...................................................................................................................... 12
COMPLETING THE DETEC – ENROLL RECIPIENT ONLINE FORM .............................................. 15 Recipient Info ........................................................................................................................................... 16 Certification Section ................................................................................................................................ 18 Breast and Cervical Cancer Treatment Program (BCCTP) Enrollment ................................................ 18 How to Add Recipient When Matches are Found .................................................................................. 20 Valid Reasons for New Recipient Enrollment ........................................................................................ 21 Invalid Reasons for New Recipient Enrollment ..................................................................................... 21 Existing Recipient .................................................................................................................................... 22 Previous Enrollment by Other Providers ............................................................................................... 22 Recertification of Recipients ................................................................................................................... 22 Print .......................................................................................................................................................... 25
NAVIGATION BAR REFERENCES AND FUNCTIONS ..................................................................... 27 EWC Documents ...................................................................................................................................... 27 DETEC FAQs ............................................................................................................................................ 27 DETEC Help .............................................................................................................................................. 27 Search/Add Recipient .............................................................................................................................. 27 Breast and Cervical Cycles ..................................................................................................................... 27 Add New ................................................................................................................................................... 27

ADDING NEW BREAST AND CERVICAL CANCER SCREENING RECORDS ............................... 29
COMPLETING THE DETEC BREAST CANCER SCREENING CYCLE DATA ONLINE FORM ....... 31 Risk ........................................................................................................................................................... 32 Clinical Breast Exam ............................................................................................................................... 32 Mammogram ............................................................................................................................................ 33 Additional Procedures Needed to Complete Breast Cycle ................................................................... 36 Breast Imaging Procedures .................................................................................................................... 38 Breast Diagnostic Procedures ................................................................................................................ 40 Breast Work-up Status and Final Diagnosis Information...................................................................... 42 Breast Cancer Treatment Information .................................................................................................... 44 Print .......................................................................................................................................................... 44
COMPLETING THE DETEC CERVICAL CANCER SCREENING CYCLE DATA ONLINE FORM ... 46 Risk ........................................................................................................................................................... 47 Pap Test.................................................................................................................................................... 50 Additional Procedures Needed to Complete Cervical Cycle ................................................................ 50 Cervical Diagnostic Procedures ............................................................................................................. 51 Cervical Work-up Status and Final Diagnosis Information ................................................................... 53 Cervical Cancer Treatment Information ................................................................................................. 56 Print .......................................................................................................................................................... 56
EDITING RECORDS .......................................................................................................................... 58 Issues With This Cycle ............................................................................................................................ 58
CLAIM SUBMISSION ......................................................................................................................... 60
DATA SUBMISSION .......................................................................................................................... 60
BREAST AND CERVICAL CANCER TREATMENT PROGRAM (BCCTP)....................................... 60
TERMS AND ACRONYMS ................................................................................................................. 61
PROVIDER RESOURCES.................................................................................................................. 62
MEDI-CAL DIRECTORY .................................................................................................................... 63

4
Introduction The Step-by-Step User Guide is an instruction manual for enrolling individuals and entering data via the internet for the California Department of Health Care Services (DHCS) Cancer Detection and Treatment Branch’s (CDTB) breast and cervical cancer screening program known as Every Woman Counts (EWC). The online data entry system is DETecting Early Cancer (DETEC). Only Primary Care Providers (PCPs) will complete the online DETEC Enroll Recipient, Recipient Information, Breast Cancer Screening Cycle Data and Cervical Cancer Screening Cycle Data forms. PCPs will need computers with internet access to complete these forms. Recipient information is mandated by the Centers for Disease Control and Prevention (CDC) and the National Breast and Cervical Cancer Early Detection Program (NBCCEDP) to monitor clinical outcomes. PCPs are eligible for Case Management (CM) payment upon submission of complete and accurate recipient data using the appropriate online forms. This complete and accurate data is necessary for continued NBCCEDP funding of EWC.
Scope of Benefits EWC is a breast and cervical cancer screening program with benefits paid to all enrolled CDTB providers. CM payment will be offered only to PCPs when they perform CM services and submit recipient information using the online DETEC Recipient Information form and the DETEC Breast Cancer Screening Cycle Data and Cervical Cancer Screening Cycle Data forms. CM fees are paid after complete and accurate data submission and paid only once per recipient per PCP per calendar year. A complete review of the online DETEC forms will be covered later in this user guide. For a complete list of covered services, please refer to the Every Woman Counts (ev woman) section of the Medi-Cal provider manual found on the Medi-Cal website at www.medi-cal.ca.gov.
Provider Participation
Primary Care Providers PCPs are providers who are enrolled through one of the Regional Contractors (RC) and have a Primary Care Provider Enrollment Agreement (PCPEA) on file with CDTB. Some PCPs only enroll for breast cancer screening services, while other enrolled PCPs conduct breast and cervical cancer screening services. PCPs perform clinical breast exams (CBE) and/or pelvic exams/Pap tests, and coordinate recipient care. PCPs are the screening entry point for recipients and are the only providers who can enroll recipients through the DETEC Enroll Recipient and Recipient Information online forms and complete and submit the Breast Cancer Screening Cycle Data and/or Cervical Cancer Screening Cycle Data forms. Each PCP must complete a Medi-Cal Point of Service (POS) Network/Internet Agreement and have internet access to participate in this program. Reporting the final outcome for each recipient of the screening and diagnostic service provided is very important for future program funding. PCPs are required to inform the referral providers of the billing requirements, covered services, recipient’s eligibility status and the 14-digit recipient identification (ID) number. PCPs remain responsible for ensuring that clinical standards of the program are met. PCPs are responsible for obtaining and submitting data (e.g., diagnostic procedures, final diagnosis and treatment status) from referral providers.
5
Referral Providers Referral providers are any providers to whom PCPs refer EWC patients, including radiologists, surgeons, anesthesiologists and pathologists. PCPs can refer recipients to any appropriate Medi-Cal provider in good standing. Referral providers must comply with the following:
Accept individuals referred by the PCP
Provide services according to the program clinical standards
Report all screening and diagnostic findings to the PCP in a timely manner
Bill Medi-Cal using the Recipient ID number given to them by the PCP
Accept Medi-Cal rate of payment as payment in full
Data Requirements As part of ongoing quality improvement, PCPs are responsible for reporting screening and outcome data within 30 days of receiving final results. This time frame is preferable and recommended. However, PCPs may enter data for 365 days after a recipient’s certification period ends. PCPs are also able to enter data for services that have occurred 180 days prior to the recipient’s enrollment into EWC. Recipient Eligibility For current eligibility information and criteria, refer to the Every Woman Counts (ev woman) section of the appropriate Part 2 provider manual. Income Federal poverty level incomes are adjusted on an annual basis (in April) and are published every year in the Medi-Cal Update bulletins and manual pages. Health Insurance To be eligible for the EWC program, PCPs must certify that the recipient is uninsured or underinsured by recipient self-report. For current insurance information and income criteria, refer to the Every Woman Counts (ev woman) section of the Medi-Cal provider manual.
6
The DETEC Application Accessing Online Forms PCPs complete online forms in order to:
Certify recipient eligibility.
Obtain a Recipient ID number for billing.
Enter screening results of all recipients.
Enter diagnostic procedures, work-up status, final diagnosis and treatment information, as required, of recipients with abnormal screening results.
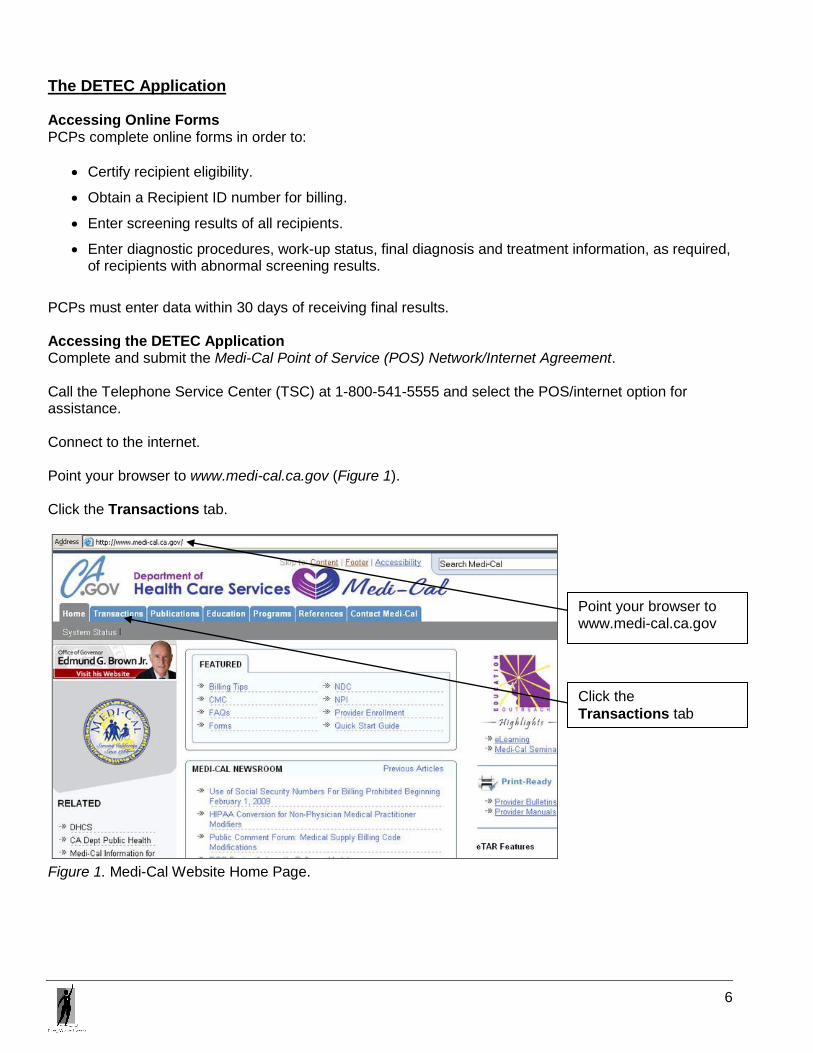
PCPs must enter data within 30 days of receiving final results. Accessing the DETEC Application Complete and submit the Medi-Cal Point of Service (POS) Network/Internet Agreement. Call the Telephone Service Center (TSC) at 1-800-541-5555 and select the POS/internet option for assistance. Connect to the internet. Point your browser to www.medi-cal.ca.gov (Figure 1). Click the Transactions tab.
Figure 1. Medi-Cal Website Home Page.
Click the
Transactions tab
Point your browser to www.medi-cal.ca.gov

7
Type in the National Provider Identifier (NPI) number of the site where the recipient is enrolling to receive EWC services (Figure 2). Type in the Provider ID Number (PIN) associated with the above NPI number. Click the Submit button.
Figure 2. Login Page for Transaction Services.
Figure 3. Transaction Services Page After Logging In.
Type in the NPI number
Type in the PIN number
Click the Submit button
8
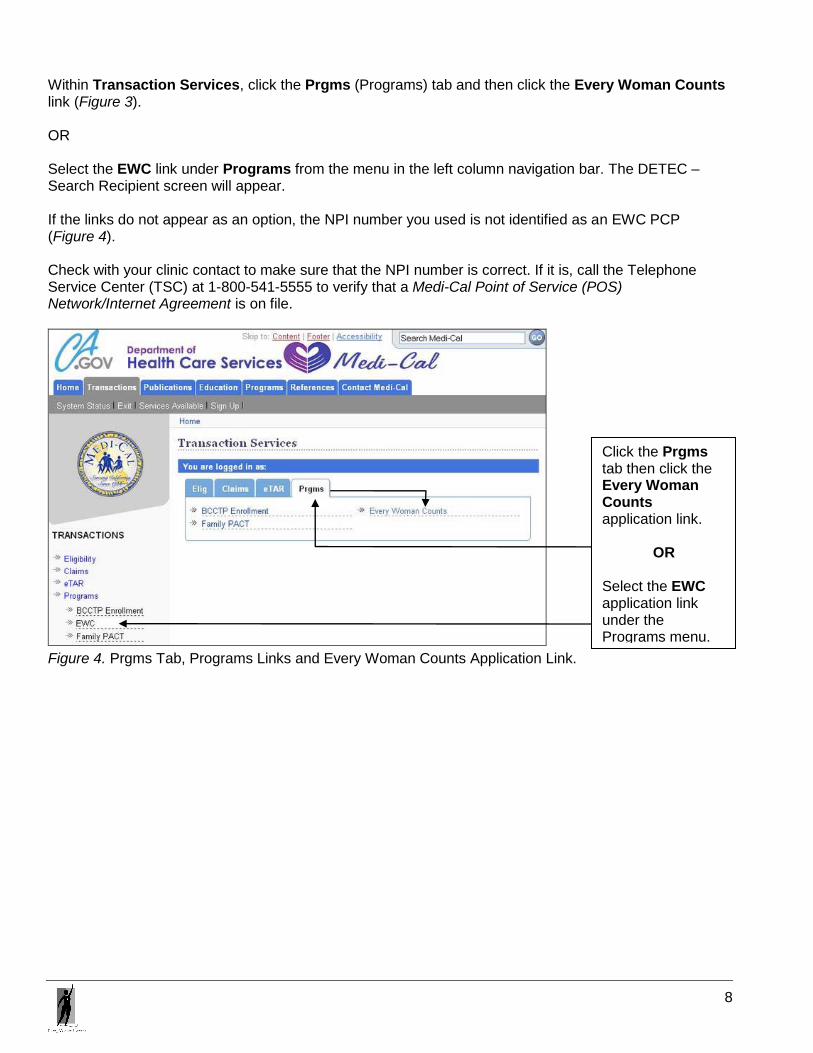
Within Transaction Services, click the Prgms (Programs) tab and then click the Every Woman Counts link (Figure 3). OR Select the EWC link under Programs from the menu in the left column navigation bar. The DETEC – Search Recipient screen will appear. If the links do not appear as an option, the NPI number you used is not identified as an EWC PCP (Figure 4). Check with your clinic contact to make sure that the NPI number is correct. If it is, call the Telephone Service Center (TSC) at 1-800-541-5555 to verify that a Medi-Cal Point of Service (POS) Network/Internet Agreement is on file.
Figure 4. Prgms Tab, Programs Links and Every Woman Counts Application Link.
Click the Prgms tab then click the Every Woman Counts application link.
OR
Select the EWC application link under the Programs menu.

9
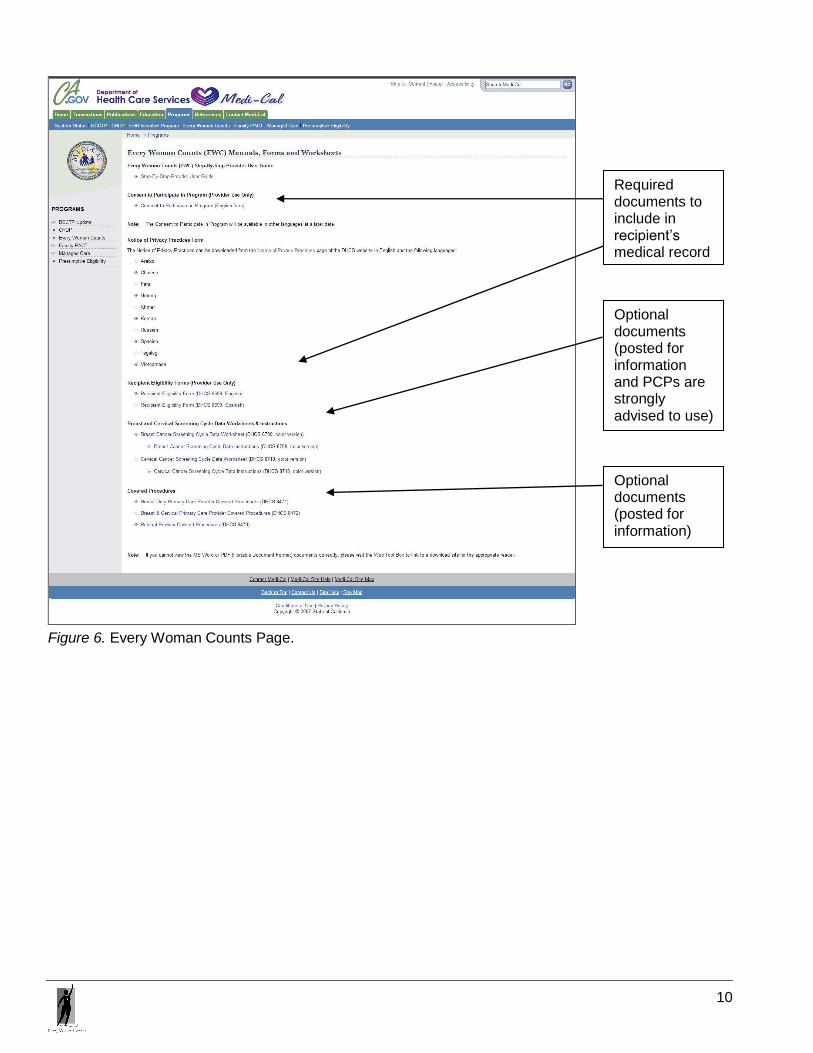
Every Woman Counts Documents In addition to completing the online DETEC forms, PCPs and recipients are required to complete paper forms to enroll recipients. From the left column navigation bar, click EWC Documents (Figure 5) to download the required forms from the Every Woman Counts page. An initial step in the enrollment process is having the recipient complete their portion of the required Recipient Eligibility form, currently available in English and Spanish, and the Consent to Participate in Program form currently available in English only. In addition to obtaining a signed consent form, providers must ensure that the recipient receives and reads the Notice of Privacy Practices (NPP), which is available on the DHCS website in several different languages at www.dhcs.ca.gov/formsandpubs/laws/priv/Pages/NoticeofPrivacyPractices.aspx. The originals of the signed Recipient Eligibility and Consent to Participate in Program forms must be kept in the recipient’s medical record.
Figure 5. EWC Documents Link. Click the documents that you need to download and print them as required. As optional documents are added or newer versions of the documents are published, they will be available on this page (Figure 6).
Note: Every recipient enrolled in EWC is required to receive the Consent to Participate in Program and NPP forms. The NPP is available on the DHCS website.
Step-By-Step Provider User Guide Consent to Participate in Program and Privacy Statement Forms Recipient Eligibility Forms Breast and Cervical Screening Cycle Data Worksheets & Instructions Covered Procedures
Click the EWC Documents link to access the “downloads” page
10
Figure 6. Every Woman Counts Page.
Required documents to include in recipient’s medical record
Optional documents (posted for information and PCPs are strongly advised to use)
Optional documents (posted for information)
11
For detailed information on any of these steps, see pages 12 – 26.
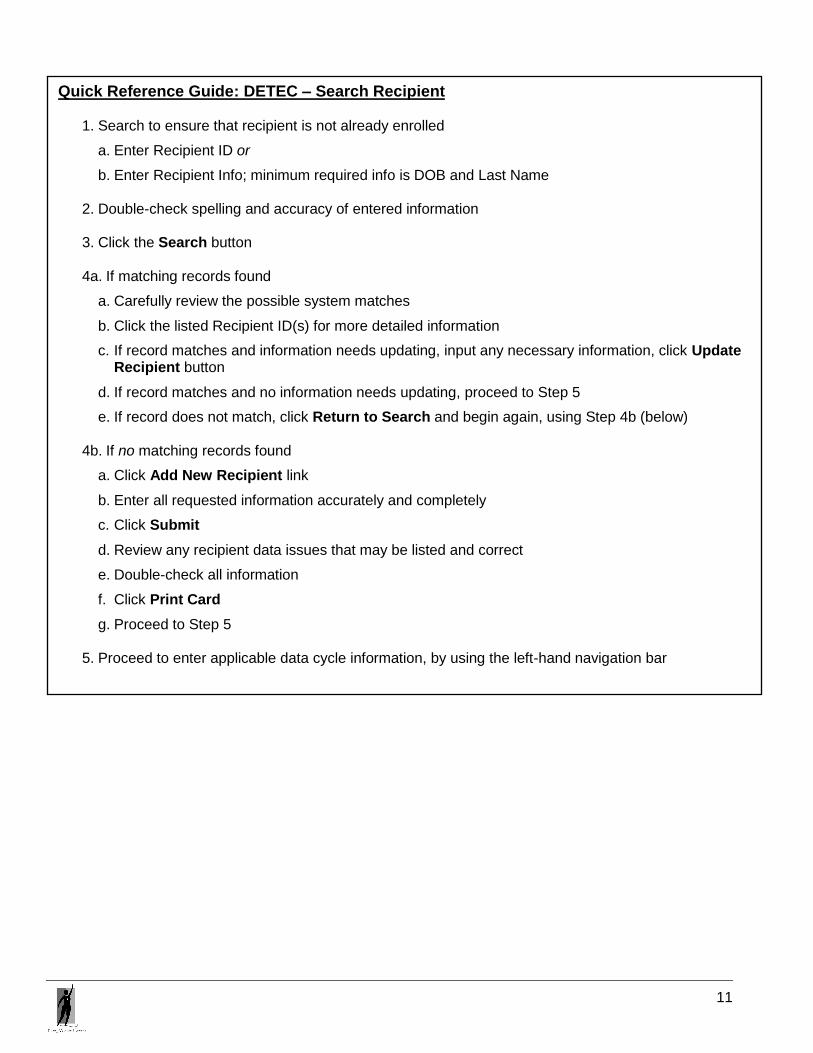
Quick Reference Guide: DETEC – Search Recipient
1. Search to ensure that recipient is not already enrolled
a. Enter Recipient ID or
b. Enter Recipient Info; minimum required info is DOB and Last Name
2. Double-check spelling and accuracy of entered information
3. Click the Search button 4a. If matching records found
a. Carefully review the possible system matches
b. Click the listed Recipient ID(s) for more detailed information
c. If record matches and information needs updating, input any necessary information, click Update Recipient button
d. If record matches and no information needs updating, proceed to Step 5
e. If record does not match, click Return to Search and begin again, using Step 4b (below) 4b. If no matching records found
a. Click Add New Recipient link
b. Enter all requested information accurately and completely
c. Click Submit
d. Review any recipient data issues that may be listed and correct
e. Double-check all information
f. Click Print Card
g. Proceed to Step 5 5. Proceed to enter applicable data cycle information, by using the left-hand navigation bar

12
Entering a new recipient DETEC – Search Recipient To access the DETEC Enroll Recipient online form, you must first search for the recipient being enrolled. Enter at least the first two letters of their last name, enter their date of birth and click the Search button (Figure 7). Enter the date of birth in the following format: MM/DD/YYYY. For example, November 1, 1953, would be entered as 11/01/1953. When you search, a number of things can happen:
1. If the recipient is found in the database, the recipient information will be shown at the bottom of the DETEC – Search Recipient screen. Click the Recipient ID number to access the recipient’s DETEC – Recipient Information screen.
2. If the recipient is not found in the database, a message will appear suggesting a new search switching the month and day of birth (if the day is between 1 and 12) and/or switching the first and last names, if both have been entered (Figure 8).
3. If after switching birth month and day, and/or first and last name, the recipient is still not found, you may click the Add New Recipient link at the bottom right of the screen to access the DETEC Enroll Recipient online form. See page 18 of this user guide for instructions on completing the DETEC Enroll Recipient online form.
4. If multiple recipients are identified as a result of the search, click the Recipient ID to access the DETEC – Recipient Information screen for any previously enrolled recipient to compare the recipient information with the recipient being searched.
Search results are matched to the provider and marked “You” and “Other” (Figure 9).
If the Recipient ID number and name is a match and marked “You,” select the record by clicking the Recipient ID.
If the recipient information matches but the record is marked “Other,” select the record and see page 29 for instructions on creating a record for this recipient.
Note: Unless you are sure this is a new recipient, use the Existing Recipient ID and record. If you
continue with a new enrollment of someone matching an Existing Recipient, you will be required to provide a reason you are not using the existing record.

13
If the recipient is not found, but you know they were enrolled previously, here are some tips before enrolling them again and creating a new ID number:
If your search included more than two letters of the last name, re-enter using just the first two letters of the last name in the Last Name field.
Ask the recipient if they have a copy of their old ID card.
Check the medical chart for a copy of the old ID card.
If the recipient’s ID card is available, enter the complete Recipient ID in the Recipient ID field and click Search.
Ask if the recipient may have used another last name or date of birth.
Try entering the first two letters of the first name in the Last Name field (the last and first names may have been reversed when entered previously).
Try switching the month and day of birth, if the day of birth is between 1 and 12 (the month and day may have been reversed when entered previously).
Note: The PCP will only have access to recipient data which that PCP has entered.
Figure 7. DETEC – Search Recipient Screen.
To enroll a recipient:
Enter at least the first two letters of their last name (not case sensitive)
Enter their date of birth in the format as shown
Click the Search button

14
Figure 8. DETEC – Search Recipient Screen with no Match Found.
Figure 9. DETEC – Search Recipient Screen Showing a Match.
This record was created by another provider.
This record was created by you.

15
Completing the DETEC – Enroll Recipient Online Form
Figure 10. DETEC Enroll Recipient Online Form.
16
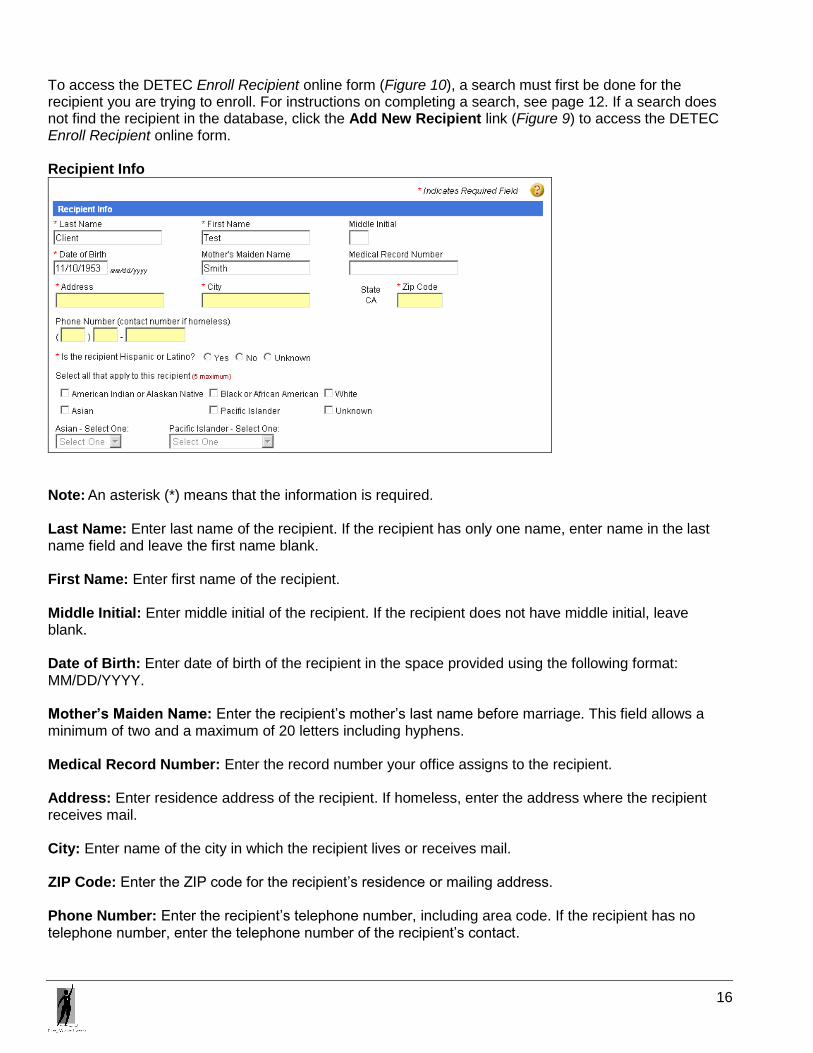
To access the DETEC Enroll Recipient online form (Figure 10), a search must first be done for the recipient you are trying to enroll. For instructions on completing a search, see page 12. If a search does not find the recipient in the database, click the Add New Recipient link (Figure 9) to access the DETEC Enroll Recipient online form. Recipient Info
Note: An asterisk (*) means that the information is required. Last Name: Enter last name of the recipient. If the recipient has only one name, enter name in the last name field and leave the first name blank. First Name: Enter first name of the recipient. Middle Initial: Enter middle initial of the recipient. If the recipient does not have middle initial, leave blank. Date of Birth: Enter date of birth of the recipient in the space provided using the following format: MM/DD/YYYY. Mother’s Maiden Name: Enter the recipient’s mother’s last name before marriage. This field allows a minimum of two and a maximum of 20 letters including hyphens. Medical Record Number: Enter the record number your office assigns to the recipient. Address: Enter residence address of the recipient. If homeless, enter the address where the recipient receives mail. City: Enter name of the city in which the recipient lives or receives mail. ZIP Code: Enter the ZIP code for the recipient’s residence or mailing address. Phone Number: Enter the recipient’s telephone number, including area code. If the recipient has no telephone number, enter the telephone number of the recipient’s contact.

17
Is the recipient Hispanic or Latino? Enter the recipient’s response to this question. This information is required. Please encourage applicants to provide race and ethnicity information.
Even if the recipient responds “yes,” additional race information is desired.
Select all that apply to this recipient: Use the selection box to choose one or more race designation(s) that apply to the recipient. Selecting up to five race designations is allowed.
If possible, avoid selecting “Unknown” for race. Complete race information is desired.
Asian – Select one: Use the drop-down box to select the sub-category of Asian if the recipient indicates that they are “Asian.” Pacific Islander – Select one: Use the drop-down box to select the sub-category of Pacific Islander if the recipient indicates that they are “Pacific Islander.”
18
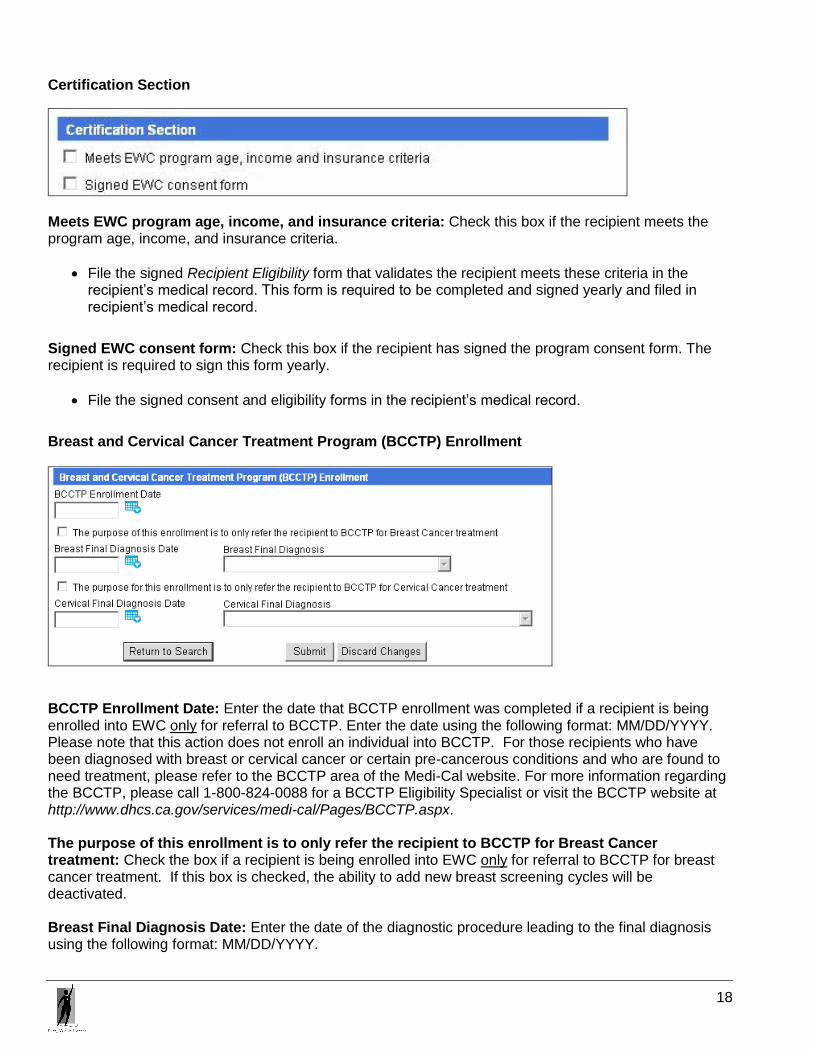
Certification Section
Meets EWC program age, income, and insurance criteria: Check this box if the recipient meets the program age, income, and insurance criteria.
File the signed Recipient Eligibility form that validates the recipient meets these criteria in the recipient’s medical record. This form is required to be completed and signed yearly and filed in recipient’s medical record.
Signed EWC consent form: Check this box if the recipient has signed the program consent form. The recipient is required to sign this form yearly.
File the signed consent and eligibility forms in the recipient’s medical record.
Breast and Cervical Cancer Treatment Program (BCCTP) Enrollment
BCCTP Enrollment Date: Enter the date that BCCTP enrollment was completed if a recipient is being enrolled into EWC only for referral to BCCTP. Enter the date using the following format: MM/DD/YYYY. Please note that this action does not enroll an individual into BCCTP. For those recipients who have been diagnosed with breast or cervical cancer or certain pre-cancerous conditions and who are found to need treatment, please refer to the BCCTP area of the Medi-Cal website. For more information regarding the BCCTP, please call 1-800-824-0088 for a BCCTP Eligibility Specialist or visit the BCCTP website at http://www.dhcs.ca.gov/services/medi-cal/Pages/BCCTP.aspx. The purpose of this enrollment is to only refer the recipient to BCCTP for Breast Cancer treatment: Check the box if a recipient is being enrolled into EWC only for referral to BCCTP for breast cancer treatment. If this box is checked, the ability to add new breast screening cycles will be deactivated. Breast Final Diagnosis Date: Enter the date of the diagnostic procedure leading to the final diagnosis using the following format: MM/DD/YYYY.
19
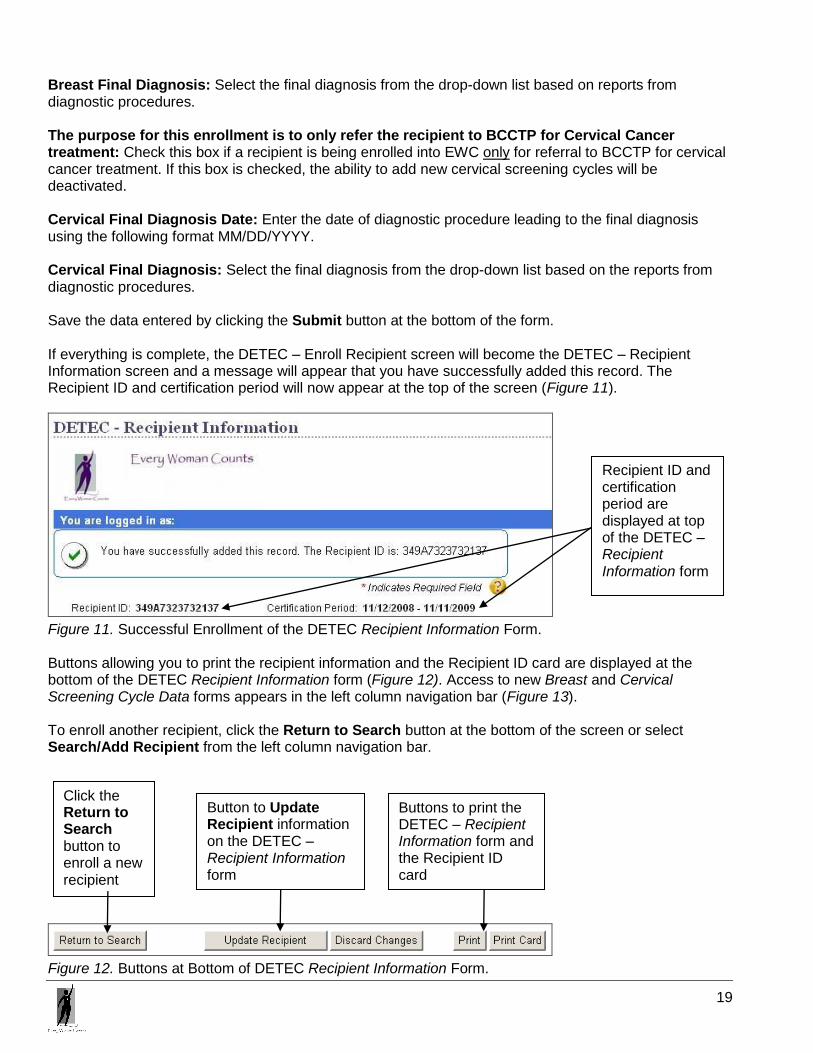
Breast Final Diagnosis: Select the final diagnosis from the drop-down list based on reports from diagnostic procedures. The purpose for this enrollment is to only refer the recipient to BCCTP for Cervical Cancer treatment: Check this box if a recipient is being enrolled into EWC only for referral to BCCTP for cervical cancer treatment. If this box is checked, the ability to add new cervical screening cycles will be deactivated. Cervical Final Diagnosis Date: Enter the date of diagnostic procedure leading to the final diagnosis using the following format MM/DD/YYYY. Cervical Final Diagnosis: Select the final diagnosis from the drop-down list based on the reports from diagnostic procedures. Save the data entered by clicking the Submit button at the bottom of the form. If everything is complete, the DETEC – Enroll Recipient screen will become the DETEC – Recipient Information screen and a message will appear that you have successfully added this record. The Recipient ID and certification period will now appear at the top of the screen (Figure 11).
Figure 11. Successful Enrollment of the DETEC Recipient Information Form. Buttons allowing you to print the recipient information and the Recipient ID card are displayed at the bottom of the DETEC Recipient Information form (Figure 12). Access to new Breast and Cervical Screening Cycle Data forms appears in the left column navigation bar (Figure 13). To enroll another recipient, click the Return to Search button at the bottom of the screen or select Search/Add Recipient from the left column navigation bar.
Figure 12. Buttons at Bottom of DETEC Recipient Information Form.
Recipient ID and certification period are displayed at top of the DETEC – Recipient Information form
Button to Update Recipient information on the DETEC – Recipient Information form
Click the Return to Search button to enroll a new recipient
Buttons to print the DETEC – Recipient Information form and the Recipient ID card

20
Figure 13. DETEC Left Column Navigation Bar After Completing Enrollment. How to Add Recipient When Matches are Found If, during the enrollment process, an existing record was found in the database matching the recipient information entered on the DETEC Enroll Recipient form, a notification of a close match will be displayed (Figure 14) and a side-by-side comparison of Recipient Information can be done by clicking the Recipient ID of the already existing record (Figure 15). If, after comparing the “Entered Recipient” with the “Existing Recipient,” you still want to proceed with enrollment of the entered recipient, a pop-up box will appear asking for a reason for the enrollment (Figure 16). If you select the “Existing Recipient,” see page 29 for instructions on creating a record for this recipient.
Figure 14. Existing Recipient Information Closely Matches Entered Recipient Information.
Select Search/Add Recipient to search for and/or enroll a new recipient Select Add New under Breast Cycle to add a new breast screening cycle Select Add New under Cervical Cycle to add a new cervical screening cycle
Click the Recipient ID for a side-by-side comparison of the Entered Recipient and the Existing Recipient

21
Figure 15. Side-by-Side Comparison of Entered Recipient and Existing Recipient Information.
Figure 16. Pop-up Box for Reason for Enrollment. Valid Reasons for New Recipient Enrollment Enrollment of a recipient in DETEC creates a new Recipient ID number. A recipient should only have ONE Recipient ID number whether they move, get married, need recertification, find a new PCP, etc. Continue with the enrollment of a recipient in DETEC (resulting in a new Recipient ID number) only if the potential new recipient is a completely different individual than the existing recipient (e.g., based on different mother’s maiden name, and/or different birth date). Invalid Reasons for New Recipient Enrollment The following are invalid reasons for enrolling a recipient who matches an existing recipient in DETEC:
Change of address, including moving to another county
Marriage/divorce
Recertification
Changing PCPs
Needs CBE, Pap, Mammogram, etc.
Returning for annual mammogram, CBE, Pap, or screening
Recipient is new to the PCP
Lost Recipient Card
Click Select to continue with enrollment of the Entered Recipient. Click Select to use the Existing Recipient. Click Return to Enrollment to return to the DETEC – Enroll Recipient form
Please see valid reasons for enrollment below

22
Existing Recipient When performing a recipient search and the recipient information matches, click the 14-digit ID number to select the recipient. Verify and update their information (e.g., new address if they have moved) and click the Update Recipient button. Previous Enrollment by Other Providers When performing a recipient search, the recipient information may show “other” as the enrolling provider. This means that another provider previously enrolled the recipient. When you click the record, you will see a warning message at the top of the DETEC – Recipient Information screen (Figure 17). Do not re-enroll an existing recipient under a new Recipient ID. If you want to be associated with this recipient, you must:
Re-verify that the recipient is eligible.
Have the recipient complete and sign the eligibility and consent forms for the medical record. Keep the original forms in their medical record.
Verify and update the information as needed.
Select the appropriate eligibility check boxes.
Click the Certify Recipient button.
Note: The search result list shows all providers (identified as “other”) with records for this recipient. It is
the policy of CDTB to have a recipient's care managed by a single provider at any one time. CDTB will monitor situations where more than one provider is actively associated with a recipient.
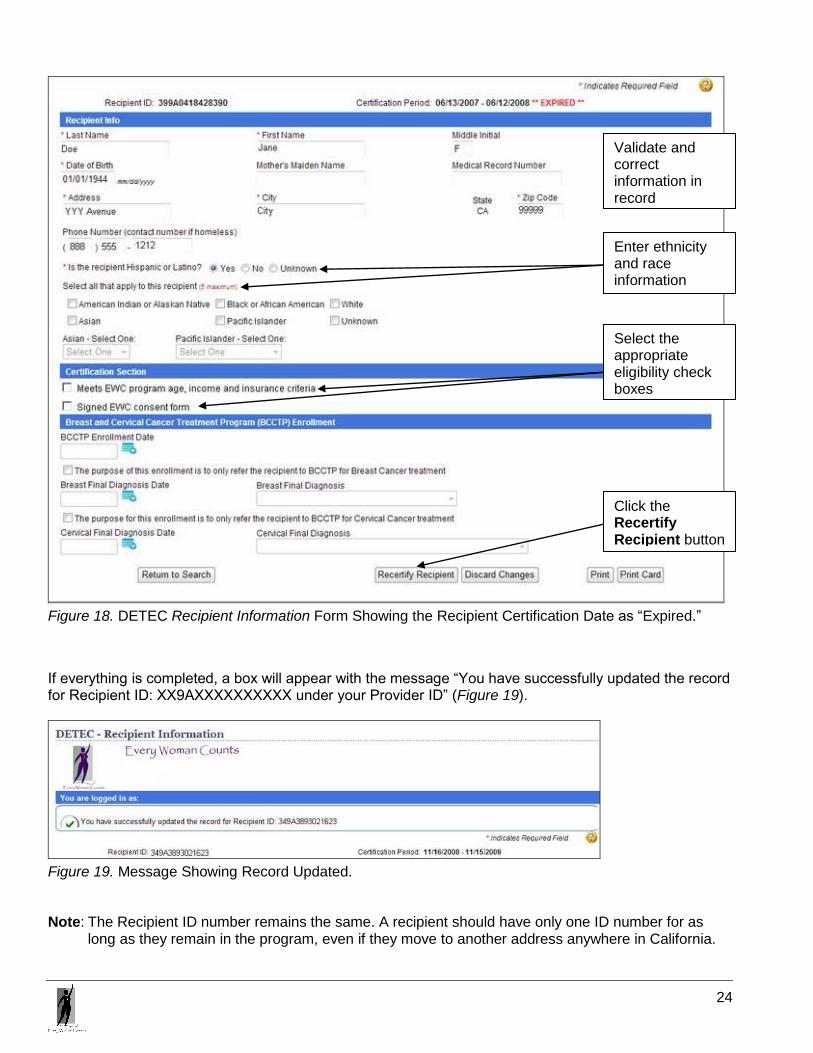
Figure 17. Message on DETEC Recipient Information Form About Previous Enrollment by Other Provider. Recertification of Recipients If the recipient’s Recipient Certification Date is “expired” (Figure 18), the DETEC Recipient Information form will be populated with the information that you entered plus the information that is already in the

23
database for this recipient. A Recipient ID will be displayed. This Recipient ID is not active until the online form is completed and the recipient information is updated. Do not re-enroll an existing recipient under a new Recipient ID to recertify, update or edit recipient information. If you want to recertify this recipient, you must:
Re-verify that the recipient is eligible.
Have the recipient complete and sign the eligibility and consent forms for the medical record. Keep the original forms in their medical record.
Verify and update the information as needed (e.g., name, address, telephone number, ethnicity, and race).
Select the appropriate eligibility check boxes.
Click the Recertify Recipient button.
Note: File the original signed forms in the recipient’s medical record.
24
Figure 18. DETEC Recipient Information Form Showing the Recipient Certification Date as “Expired.”
If everything is completed, a box will appear with the message “You have successfully updated the record for Recipient ID: XX9AXXXXXXXXXX under your Provider ID” (Figure 19).
Figure 19. Message Showing Record Updated. Note: The Recipient ID number remains the same. A recipient should have only one ID number for as
long as they remain in the program, even if they move to another address anywhere in California.
Validate and correct information in record
Select the appropriate eligibility check boxes
Click the Recertify Recipient button
Enter ethnicity and race information

25
Print Click the Print button at the bottom of the online DETEC Recipient Information form to print a copy of the Recipient Information. When you click the Print button the following message will pop-up:
The information below reflects only data that has been saved. Be sure to save/submit the recipient information before printing.
Note: The Print button prints only what is visible on the screen. There is a Print button on every DETEC
screen.
Figure 20. Printing the Recipient Information. Click the Print Card button on the DETEC Recipient Information form to print a copy of the EWC card to give to the recipient and place a copy in the medical record (Figure 20).
Click the Print button to print a copy of Recipient Information for recipient’s medical records

26
Figure 21. Printing the Recipient ID Card. Note: Multiple copies of the ID card are recommended for:
The recipient, in order to instruct them on what services are covered with the ID card.
The medical record (not required, but recommended).
The mammogram provider, as required.
The Pap test lab requisition, as required.
Click the Print button to print a copy of the Recipient ID card.
Click the Close button to go back to Recipient Information form.

27
Navigation Bar References and Functions EWC Documents
Click this link to connect to program documents. DETEC FAQs
Click this link to access frequently asked questions about the data entry system. DETEC Help
Click this link to access HELP text for all DETEC screens. Search/Add Recipient
Click this link to search for a recipient.
You will be able to enroll a recipient once a search is complete and the recipient is not found in DETEC.
Breast and Cervical Cycles
Up to three screening cycles (breast and cervical) may be shown on the navigation bar (Figure 22).
If there is a lock ( ) next to the cycle, you will be able to open the cycle and view data entered, but will not be able to make any changes to the data.
If there is an exclamation point ( ) next to the cycle, this indicates that there is at least one CM data entry error in the cycle data. See page 57 for an explanation of data entry error display and correction.
Add New
To add a new breast or cervical cycle, click the Add New button under either the Breast Cycle or Cervical Cycle heading.
Figure 22. Left Column Navigation Bar Showing Three Screening Breast Cycles. If the oldest open cycle is identified with an exclamation point ( ), you must fix the CM data entry error for this cycle or override the error prior to adding a new cycle. If you choose to override the CM data entry error for this cycle, you must submit a reason for overriding the error (Figure 23).
Figure 23. Submitting Reason for Overriding Error.

28
Figure 24. Left Column Navigation Bar.
Figure 25. Left Column Navigation Bar Showing Open Cycle.
When a screening cycle record is open for data entry, the left navigation bar will show the open cycle in gray text
To start a new cycle, click the Add New links
Available references
Click here to search and/or add another recipient
Up to three previously entered cycles will be displayed in these areas
Locked cycles may be viewed but not edited Cycles with Case Management errors are indicated

29
Adding New Breast and Cervical Cancer Screening Records This is applicable for the DETEC Breast Cancer Screening Cycle Data and Cervical Cancer Screening Cycle Data online forms:
Click the Add New link (Figure 24) under either the Breast Cycle heading (for a new breast screening cycle) or the Cervical Cycle heading (for a new cervical screening cycle) in the left column navigation bar (Figure 25). Enter data into the Breast Cancer Screening Cycle Data or Cervical Cancer Screening Cycle Data online form.
Click the Check Data button to check for any data entry errors. If no errors were made, you will receive a message that no errors were found (Figure 26). If errors were made, you will receive a message showing all errors detected (Figure 27). See page 57 for a description of possible data entry error types.
Click the Submit button to save the screening record. A message will be displayed showing successful submission (Figure 28).
Click the Cancel button to exit out of the screening cycle data form without saving changes OR to return to the Recipient Information page.
Click the Print button to print a copy of data entered on the screening cycle data form.
Note: A record that has been detected to have a “Save Error” cannot be saved. This error must be
resolved before the record can be saved. A record with a CM error can be saved, but the error must be resolved before CM can be billed for the recipient.
Figure 26. No Data Entry Errors Found.

30
Figure 27. Data Entry Errors Found.
Figure 28. Record Successfully Submitted.
31
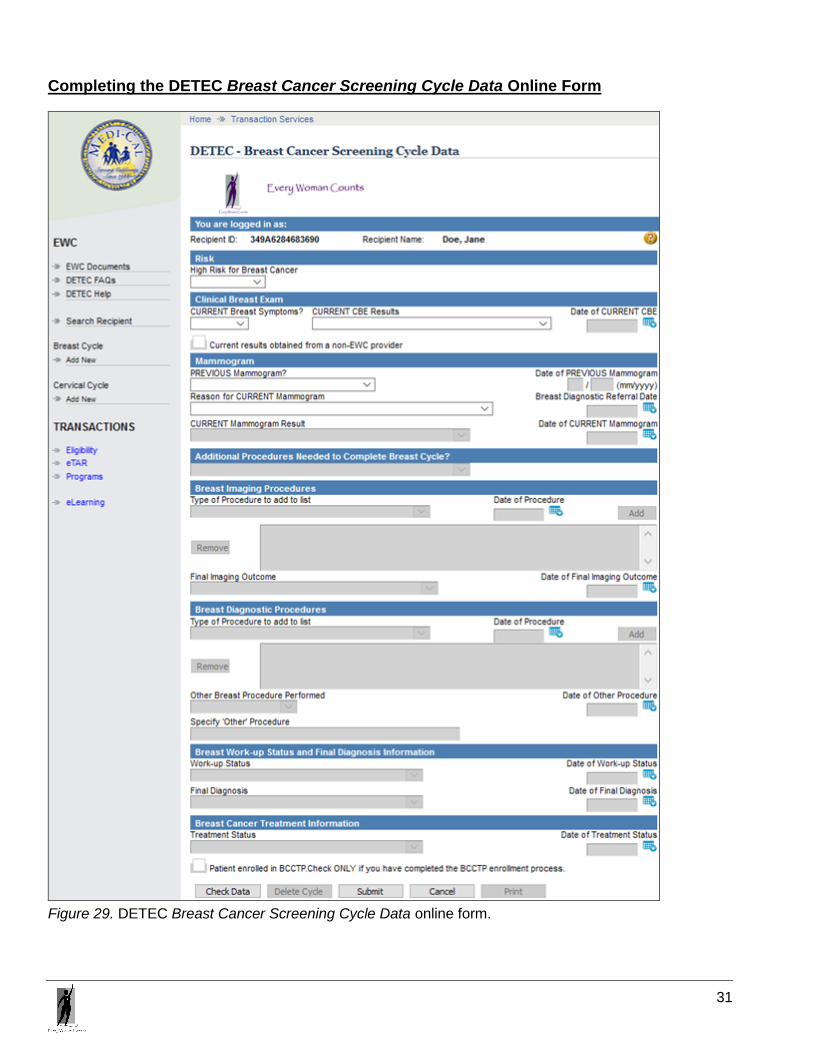
Completing the DETEC Breast Cancer Screening Cycle Data Online Form
Figure 29. DETEC Breast Cancer Screening Cycle Data online form.

32
Risk
High Risk for Breast Cancer: Select the appropriate response from the drop-down list.
Yes: Select if risk was assessed, and determined to be high.
No: Select if risk was assessed, and determined not to be high.
Not Assessed: Select if risk was not assessed.
Unknown: Select if risk is unknown. Screening cycle was started before request for risk assessment, risk cannot be determined or not applicable.
Clinical Breast Exam
CURRENT Breast Symptoms: Select the appropriate response from the drop-down list.
Yes: Select if the recipient reports any breast symptoms.
No: Select if the recipient does not report breast symptoms.
Unknown: Select if (1) the recipient wasn’t asked; (2) the answer wasn’t recorded; (3) the recipient does not know; or (4) the recipient refused to answer.

33
Examples of breast symptoms include:
Discrete mass/lump
Non-cyclical breast pain
Spontaneous unilateral nipple discharge
Skin scaliness
Skin dimpling or puckering
Skin ulceration
Skin inflammation
CURRENT CBE Results: Select the CBE result from the drop-down list that corresponds to the result of the CBE or reason if a CBE was not performed.
Normal: Select if the CBE was performed and the finding was within normal limits.
Benign findings: Select if the CBE revealed a finding not of concern for breast cancer.
Abnormality, suspicious for cancer: Select if the CBE revealed a finding that is suspicious for breast cancer and requires an immediate diagnostic procedure, in addition to the initial mammogram, to rule out breast cancer.
Not needed: Select if the recipient had a normal CBE within the last 12 months or per PCP discretion.
Needed but not performed at this visit (includes refused);
– Select if the recipient is due for a CBE but one was not performed.
– Select if recipient refused examination or if due to other unknown reasons, the CBE was not performed.
Note: For a screening CBE with abnormal results and negative/benign mammogram result, complete and
submit breast cancer diagnostic procedure(s), work-up status, final diagnosis and treatment status, as required.
Date of CURRENT CBE: Enter the date of the current CBE, using the following format: MM/DD/YYYY. Current Results obtained from a non-EWC program provider: Select this box if the CBE results reported above have been obtained from a non-EWC provider (e.g., an outside provider and/or not paid by EWC). Mammogram

34
PREVIOUS Mammogram: Select the appropriate response from the drop-down list.
Yes – Date known: Select if the recipient has had a previous mammogram and date is known.
Yes – Date unknown: Select if the recipient has had a previous mammogram and date is unknown.
No: Select if the recipient has not had a previous mammogram.
Unknown – The recipient doesn’t know: Select if the recipient does not know if they have had a previous mammogram.
Unknown – The recipient wasn’t asked/recorded: Select if PCP did not ask the recipient or if recipient’s answer was not recorded.
Unknown – The recipient refused to answer: Select if the recipient refused to answer the question.
Date of PREVIOUS Mammogram:
Enter the month and year of the recipient’s initial mammogram from the prior cycle, using the following format: MM/YYYY.
If the month of the previous mammogram is not known, enter the year only and leave the month blank.
If the year of the previous mammogram is not known, select Yes - Date Unknown in the PREVIOUS Mammogram field.
Note: To demonstrate program success in re-screening, please make every attempt to find the year of
the previous mammogram, if one was done. To obtain the date of the previous mammogram:
Check the mammogram report. It includes dates of prior mammograms used for comparison.
Check the chart for copies of old reports.
Reason for CURRENT Mammogram: Select the reason for starting a breast cancer screening cycle from the drop-down list.
Routine screening mammogram: Select if the current mammogram was performed as part of a routine or annual screening schedule.
Initial mammogram for symptoms, abnormal CBE, or previous abnormal mammogram: Select if the current mammogram was performed as evaluation of current symptoms or abnormal CBE finding or as additional evaluation of a recent mammogram prior to this cycle.
No initial mammogram. CBE only or sent to other imaging or diagnostics: Select if the recipient received only a CBE; or if the current mammogram was not performed and recipient goes directly for diagnostic procedures. Select this if the recipient refuses to have a mammogram.
Initial mammogram not paid by EWC. Client referred for diagnostics only: Select if the current mammogram was not paid by EWC (e.g., Family PACT) and the recipient was enrolled into EWC for diagnostic procedures.
Note: The initial mammogram could be a screening or diagnostic mammogram.
35
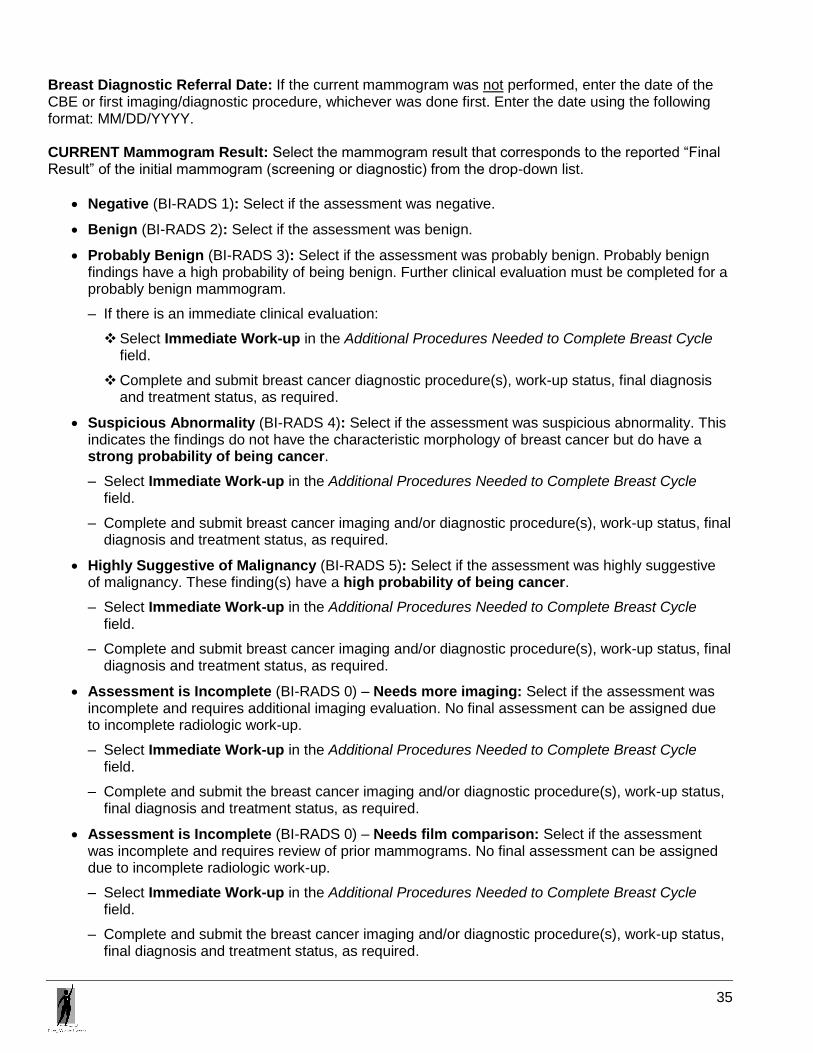
Breast Diagnostic Referral Date: If the current mammogram was not performed, enter the date of the CBE or first imaging/diagnostic procedure, whichever was done first. Enter the date using the following format: MM/DD/YYYY. CURRENT Mammogram Result: Select the mammogram result that corresponds to the reported “Final Result” of the initial mammogram (screening or diagnostic) from the drop-down list.
Negative (BI-RADS 1): Select if the assessment was negative.
Benign (BI-RADS 2): Select if the assessment was benign.
Probably Benign (BI-RADS 3): Select if the assessment was probably benign. Probably benign findings have a high probability of being benign. Further clinical evaluation must be completed for a probably benign mammogram.
– If there is an immediate clinical evaluation:
Select Immediate Work-up in the Additional Procedures Needed to Complete Breast Cycle field.
Complete and submit breast cancer diagnostic procedure(s), work-up status, final diagnosis and treatment status, as required.
Suspicious Abnormality (BI-RADS 4): Select if the assessment was suspicious abnormality. This indicates the findings do not have the characteristic morphology of breast cancer but do have a strong probability of being cancer.
– Select Immediate Work-up in the Additional Procedures Needed to Complete Breast Cycle field.
– Complete and submit breast cancer imaging and/or diagnostic procedure(s), work-up status, final diagnosis and treatment status, as required.
Highly Suggestive of Malignancy (BI-RADS 5): Select if the assessment was highly suggestive of malignancy. These finding(s) have a high probability of being cancer.
– Select Immediate Work-up in the Additional Procedures Needed to Complete Breast Cycle field.
– Complete and submit breast cancer imaging and/or diagnostic procedure(s), work-up status, final diagnosis and treatment status, as required.
Assessment is Incomplete (BI-RADS 0) – Needs more imaging: Select if the assessment was incomplete and requires additional imaging evaluation. No final assessment can be assigned due to incomplete radiologic work-up.
– Select Immediate Work-up in the Additional Procedures Needed to Complete Breast Cycle field.
– Complete and submit the breast cancer imaging and/or diagnostic procedure(s), work-up status, final diagnosis and treatment status, as required.
Assessment is Incomplete (BI-RADS 0) – Needs film comparison: Select if the assessment was incomplete and requires review of prior mammograms. No final assessment can be assigned due to incomplete radiologic work-up.
– Select Immediate Work-up in the Additional Procedures Needed to Complete Breast Cycle field.
– Complete and submit the breast cancer imaging and/or diagnostic procedure(s), work-up status, final diagnosis and treatment status, as required.

36
Unsatisfactory: Select this if the assessment was unsatisfactory.
– Select Short Term Follow-Up in the Additional Procedures Needed to Complete Breast Cycle field.
– After the repeat mammogram is completed, submit repeated mammogram using a new DETEC Breast Cancer Screening Cycle Data form.
Date of CURRENT Mammogram: Enter the date of the recipient’s initial mammogram using the following format: MM/DD/YYYY. Additional Procedures Needed to Complete Breast Cycle
Additional Procedures Needed to Complete Breast Cycle: Select one from the drop-down list.
Not needed or planned – Routine rescreen:
– Select this when both the CBE and mammogram are normal/benign.
– Submit next breast screening (CBE and mammogram) using a new DETEC Breast Cancer Screening Cycle Data form.
Not needed or planned – Short-term follow-up:
– Select this when additional diagnostic procedures/exams are required after a planned delay but within the next 12 months.
– Submit next procedure(s)/exam(s) using a new DETEC Breast Cancer Screening Cycle Data form.
Needed or planned – Immediate work-up:
– Select this when additional diagnostic procedures are required without delay to rule out breast cancer.
– Same-day ultrasound is considered an immediate work-up.
– Complete and submit breast cancer diagnostic procedures, work-up status, final diagnosis and treatment status, as required.

37
Note: For the following abnormal breast screening results, EWC requires Immediate Work-Up in the Additional Procedures Needed to Complete Breast Cycle field and data for Breast Cancer Imaging and Diagnostic Procedures, Work-up Status and Final Diagnosis and treatment status, as required.
CBE: Abnormality suspicious for breast cancer
Mammogram: Suspicious abnormality (BI-RADS 4)
Mammogram: Highly suggestive of malignancy (BI-RADS 5)
Mammogram Assessment is incomplete (BI-RADS 0) – Needs more imaging (follow-up consisting of further imaging procedures)
Mammogram: - Assessment is incomplete (BI-RADS 0) – Needs film comparison (follow-up consisting of review of prior mammogram)

38
Breast Imaging Procedures Complete Breast Imaging and Diagnostic Procedures only if the breast screening results were abnormal and/or “Immediate Work-up” is selected in the Additional Procedures Needed to Complete Breast Cycle field.
Type of Procedure: Select procedure performed from the drop-down list. Additional Mammographic Views: If additional views (e.g., spot compression, etc.) were performed, enter the date.
Ultrasound: If an ultrasound was performed, enter the date.
Film Comparison to evaluate an Assessment Incomplete: If comparison to previous mammogram performed, enter the date of the addendum report.
Date of Procedure: Enter the date the imaging procedure was performed, not the date of the results. All dates should be entered using the following format: MM/DD/YYYY. Add: Double click the Add button after selecting each imaging procedure from the drop-down list and entering the date of imaging procedure. The procedure will not be saved if the Add button is not clicked. Note: Report all imaging procedures performed. Multiple entries including the same procedure are
allowed. Remove: Highlight the procedure you would like to remove from the list, and click Remove button. Final Imaging Outcome: Select the final imaging outcome from the drop-down list that corresponds to the reported final overall assessment based on all imaging procedures.
Negative (BI-RADS 1)
Benign Finding (BI-RADS 2)
Probably Benign (BI-RADS 3)
Suspicious Abnormality (BI-RADS 4)
Highly Suggestive of Malignancy (BI-RADS 5)
Unsatisfactory – Radiologist could not read; no final outcome

39
Date of Final Imaging Outcome: Enter the date of the final imaging outcome using the following format: MM/DD/YYYY. Use the date of the last diagnostic procedure as the date of this final imaging outcome.
Note: If MRI provides the definitive final imaging outcome, please enter results of MRI as the Final Imaging Outcome, using the date of the MRI as the Date of Final Imaging Outcome. Also, select MRI in Other Breast Procedure Performed.

40
Breast Diagnostic Procedures Complete Breast Imaging and Diagnostic Procedures only if the breast screening results were abnormal and/or “Immediate Work-up” is selected in the Additional Procedures Needed to Complete Breast Cycle field.
Type of Procedure: Select type of diagnostic procedure performed from the drop-down list.
Repeat Breast Exam: If a repeat CBE was performed, enter the date.
Surgical Consultation: If a surgical consultation was performed, enter the date.
Biopsy / Lumpectomy: If a biopsy or lumpectomy was performed, enter the date. If both were performed, enter the date of the procedure performed resulting in a final diagnosis.
Fine needle / Cyst aspiration: If a fine needle aspiration or a cyst aspiration was performed, enter the date.
Date of Procedure: Enter the date the diagnostic procedure was performed, not the date of the results. All dates should be entered using the following format: MM/DD/YYYY. Add: Double click the Add button after selecting each diagnostic procedure from the drop-down list and entering date of diagnostic procedure. The procedure will not be saved if the Add button is not clicked. Note: Report all diagnostic procedures performed. Multiple entries including the same procedure are
allowed. Remove: Highlight the procedure you would like to remove from the list and click Remove. Other Breast Procedure Performed: Select only one diagnostic procedure, which can provide a diagnosis of cancer or not cancer as an “Other Breast Diagnostic Procedure.” If a diagnostic procedure not listed in the Type of Procedure drop-down list was performed, select applicable option below. Select procedure performed, even if not covered by EWC.
MRI
Skin biopsy
Other medical consults
Other – Please specify

41
Note: If MRI provides the definitive final imaging outcome, please enter results of MRI as the Final
Imaging Outcome and use the date of the MRI as the Date of Final Imaging Outcome. Date of Other Procedure: Enter the date the other diagnostic procedure was performed, not the date of the results. All dates should be entered using the following format: MM/DD/YYYY. Specify “Other” Procedure: Enter a description of the other diagnostic procedure performed.
Please report an “Other Breast Diagnostic Procedure” even though it may not be covered by EWC.
Do not enter the following as “Other Breast Diagnostic Procedure,” as they are already listed on the form:
– Additional mammogram
– Repeat CBE
– Surgical consult
– Ultrasound
– Biopsy/lumpectomy
– Fine needle/cyst aspiration
Do not enter the following as “Other Breast Diagnostic Procedure”:
– CT scan
– PET scan
– Ductogram
– Chest X-Ray
– Galactogram
– DEXA scan
– Bone scan
– Radical or simple mastectomy
– Stereotactic localization
– Sentinel lymph node biopsy
– Nipple discharge cytology
– Prolactin level checks
– Cannulization
– Nuclear or Miraluma scan
– Ultrasound to rule out metastases

42
Breast Work-up Status and Final Diagnosis Information Complete Breast Work-up Status only if the breast screening results were abnormal and/or “Immediate Work-up” is selected in the Additional Procedures Needed to Complete Breast Cycle field.
Work-up Status: Select the work-up status from the drop-down list.
Work-up Complete: Select this if no immediate diagnostic procedures are needed to determine the diagnosis. It is also appropriate to select Work-up complete if the recipient is advised to return for further evaluation (e.g., CBE, mammogram, etc.) in 3 to 6 months after current diagnostic procedures.
– If work-up is complete, enter the date of this work-up status. Use the date of the imaging/diagnostic procedure used to complete the work-up and not the date of the report or of data entry.
DETEC “Lost to Follow-up”: This status is for recipients who required immediate diagnostic work-up but who cannot be reached because they do not reside at the stated address, their telephone is disconnected or they are no longer at that telephone number. The provider should document three or more contacts including a certified letter that "returned undeliverable" is in the medical records. Documenting that a certified letter was "sent" is not sufficient information. Recipients are not considered Lost to Follow-up if they can be located.
DETEC “Refused Care”: This status is for recipients who required immediate diagnostic work up but who
– Refused procedure
– Changed PCP for any reason
– Fail to respond to letter and telephone messages
– Fail to schedule or keep appointments
The provider should document three or more contacts including a certified letter that was "sent" and a reason for refusing care in the medical records.
Died before Work-up Complete: Select this if the recipient died before the imaging/diagnostic procedure(s) was performed.
Note: If work-up was not completed (recipient was Lost to Follow-up, Work-up Refused, or Died before
work-up complete), enter the date this was determined as the Date of this Work-up Status. Date of Work-up Status: Enter the date of the work-up status using the following format: MM/DD/YYYY. Use the date of the final imaging/diagnostic procedure as the date of this work-up status.

43
Complete Breast Final Diagnosis only when the Work-up Status is “Work-up Complete.” Final Diagnosis: A final diagnosis of breast cancer can only be determined by a pathology report from histologic examination of tissue/cells. Select a final diagnosis from the drop-down list if the Breast Cancer Work-up Status was “Work-up Complete.”
No Breast Cancer/Benign – resume annual screening: Select this if cancer is not found during current diagnostic procedures. Resume annual screening.
No Breast Cancer/Benign – short-term follow-up: Select this if cancer is not found during current diagnostic procedures and short-term follow-up will be needed.
Lobular Carcinoma In Situ (LCIS): Select this if the pathology report indicates the diagnosis is lobular carcinoma in situ or lobular neoplasia.
Ductal Carcinoma In Situ (DCIS): Select this if the pathology report indicates the diagnosis is ductal carcinoma in situ.
Note: Data for Breast Cancer Treatment Status is required.
Invasive Breast Cancer: Select this if the pathology report indicates any of the following:
– Invasive or infiltrating ductal or lobular carcinoma
– Both invasive and in-situ components
– Paget’s disease (of the nipple with no tumor).
Note: Data for Breast Cancer Treatment Status is required. Date of Final Diagnosis: Enter the date of the final diagnosis using the following format: MM/DD/YYYY. Use the date of the definitive diagnostic procedure performed as the date of the final diagnosis. Note: If only diagnostic imaging procedure(s) performed, use the date of the final imaging outcome as the
date of the final diagnosis.

44
Breast Cancer Treatment Information Complete Breast Cancer Treatment Status if Breast Final Diagnosis is Invasive Breast Cancer or DCIS.
Treatment Status: Select the appropriate treatment status from the drop-down list.
Treatment started: Select this if the clinic staff can verify from the recipient or treatment facility that treatment has been initiated regardless of recipient’s insurance status.
Lost to follow-up: Select this if the recipient did not begin treatment and the clinic staff cannot locate the recipient. Three attempts must be made to contact the recipient (two phone calls and certified letter sent). The third attempt must be by certified letter. Attempts to contact recipient must be documented in their medical record.
Treatment refused: Select this if the recipient refused treatment or only received non-standard or alternative treatments.
Treatment not needed: Select this if the medical provider and recipient agree that treatment would adversely affect the recipient’s quality of life (with late or end-stage cancers) and that treatment is not recommended or needed at this time.
Died before treatment started: Select this if the recipient died before beginning treatment.
Date of Treatment Status: Enter the date when treatment was initiated or other treatment status was determined using the following format: MM/DD/YYYY. Note: In some cases, a diagnostic procedure (e.g., lumpectomy) may result in a final diagnosis and serve
as treatment. When this occurs, enter data in the following fields:
The diagnostic procedure and date in the Breast Cancer Diagnostic Procedures section.
Use the date of the diagnostic procedure in the Date of Work-up status field.
Use the date of the diagnostic procedure in the Date of Final diagnosis field.
Select Treatment Initiated for breast cancer treatment status.
Use the date of the diagnostic procedure (e.g., lumpectomy) in the Date of Treatment status field.
Patient enrolled in BCCTP. Check ONLY when you have completed the BCCTP enrollment process: See DETEC help or DETEC Recipient Eligibility form for a list of BCCTP qualifying diagnoses. If the breast diagnosis is not listed on the drop-down list, contact a BCCTP manager at 1-800-824-0088 for information on how to proceed. Print Click the Print button at the bottom of the online DETEC Breast Cancer Screening Cycle Data form to print a copy of it. When you click the Print button the following message will pop-up: Note: The information below reflects only data that has been saved. Be sure to save/submit the recipient information before printing.

45
Note: The Print button prints only what is visible on the screen. There is a Print button on every DETEC
screen. Use the Print button found on bottom of this screen to print the Breast Cancer Screening Cycle Data form.
46
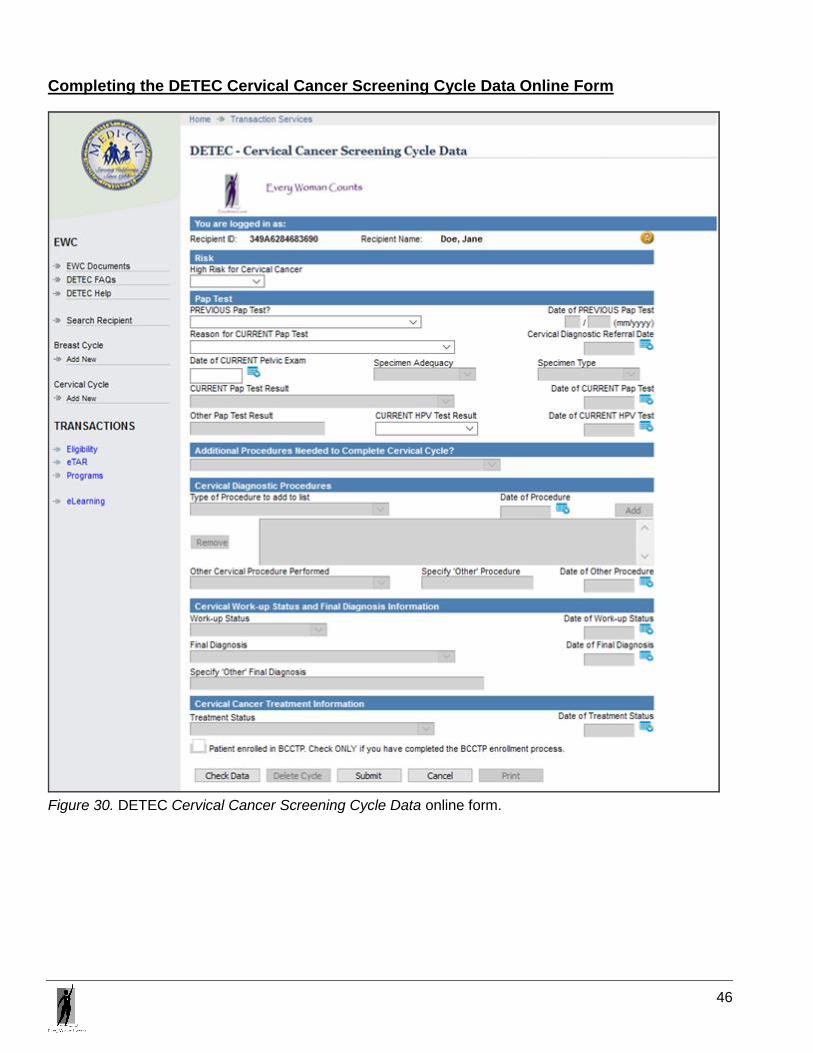
Completing the DETEC Cervical Cancer Screening Cycle Data Online Form
Figure 30. DETEC Cervical Cancer Screening Cycle Data online form.
47
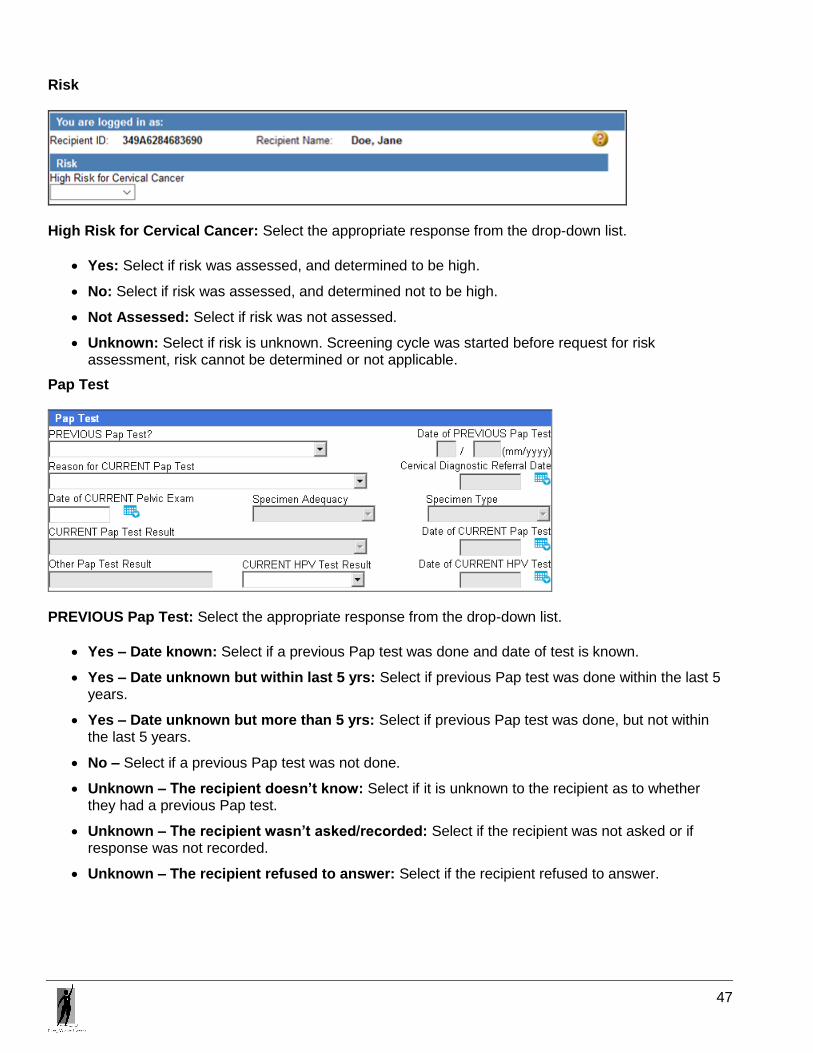
Risk
High Risk for Cervical Cancer: Select the appropriate response from the drop-down list.
Yes: Select if risk was assessed, and determined to be high.
No: Select if risk was assessed, and determined not to be high.
Not Assessed: Select if risk was not assessed.
Unknown: Select if risk is unknown. Screening cycle was started before request for risk assessment, risk cannot be determined or not applicable.
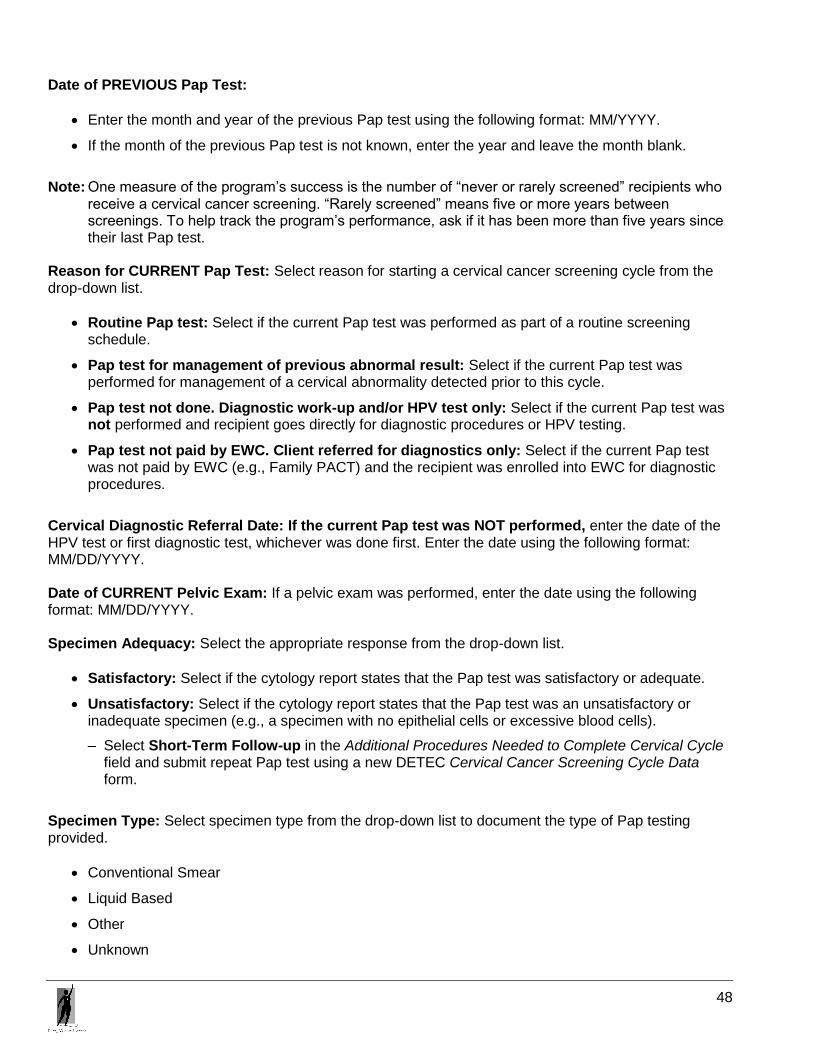
Pap Test
PREVIOUS Pap Test: Select the appropriate response from the drop-down list.
Yes – Date known: Select if a previous Pap test was done and date of test is known.
Yes – Date unknown but within last 5 yrs: Select if previous Pap test was done within the last 5 years.
Yes – Date unknown but more than 5 yrs: Select if previous Pap test was done, but not within the last 5 years.
No – Select if a previous Pap test was not done.
Unknown – The recipient doesn’t know: Select if it is unknown to the recipient as to whether they had a previous Pap test.
Unknown – The recipient wasn’t asked/recorded: Select if the recipient was not asked or if response was not recorded.
Unknown – The recipient refused to answer: Select if the recipient refused to answer.
48
Date of PREVIOUS Pap Test:
Enter the month and year of the previous Pap test using the following format: MM/YYYY.
If the month of the previous Pap test is not known, enter the year and leave the month blank.
Note: One measure of the program’s success is the number of “never or rarely screened” recipients who
receive a cervical cancer screening. “Rarely screened” means five or more years between screenings. To help track the program’s performance, ask if it has been more than five years since their last Pap test.
Reason for CURRENT Pap Test: Select reason for starting a cervical cancer screening cycle from the drop-down list.
Routine Pap test: Select if the current Pap test was performed as part of a routine screening schedule.
Pap test for management of previous abnormal result: Select if the current Pap test was performed for management of a cervical abnormality detected prior to this cycle.
Pap test not done. Diagnostic work-up and/or HPV test only: Select if the current Pap test was not performed and recipient goes directly for diagnostic procedures or HPV testing.
Pap test not paid by EWC. Client referred for diagnostics only: Select if the current Pap test was not paid by EWC (e.g., Family PACT) and the recipient was enrolled into EWC for diagnostic procedures.
Cervical Diagnostic Referral Date: If the current Pap test was NOT performed, enter the date of the HPV test or first diagnostic test, whichever was done first. Enter the date using the following format: MM/DD/YYYY. Date of CURRENT Pelvic Exam: If a pelvic exam was performed, enter the date using the following format: MM/DD/YYYY. Specimen Adequacy: Select the appropriate response from the drop-down list.
Satisfactory: Select if the cytology report states that the Pap test was satisfactory or adequate.
Unsatisfactory: Select if the cytology report states that the Pap test was an unsatisfactory or inadequate specimen (e.g., a specimen with no epithelial cells or excessive blood cells).
– Select Short-Term Follow-up in the Additional Procedures Needed to Complete Cervical Cycle field and submit repeat Pap test using a new DETEC Cervical Cancer Screening Cycle Data form.
Specimen Type: Select specimen type from the drop-down list to document the type of Pap testing provided.
Conventional Smear
Liquid Based
Other
Unknown

49
CURRENT Pap Test Result: Select the Pap test result that best corresponds to the reported Pap test result from the drop-down list.
Negative for intraepithelial lesion or malignancy
Atypical squamous cells of undetermined significance (ASC-US)
Low grade SIL (LSIL) including HPV changes
Atypical squamous cells, cannot exclude HSIL (ASC-H)
High grade SIL (HSIL)
Squamous Cell Carcinoma
Atypical Glandular Cells (AGC)
AGC – Neoplastic
Adenocarcinoma In Situ (AIS)
Adenocarcinoma
Other
– Example of an appropriate entry for “Other” Pap Test Results is Endometrial cells
Date of CURRENT Pap Test: Enter the date the Pap test was performed using the following format: MM/DD/YYYY.
Use the date the Pap test was performed, not the date of the results.
A Pap test (initial or follow-up) starts a new screening cycle and is reported using a new DETEC Cervical Cancer Screening Cycle Data form.
CURRENT HPV Test Result: Select the following from the drop-down list:
Test Not Done
Positive
Negative
Note: HPV DNA testing is an EWC-covered procedure if it is used in triage and/or follow-up of an
abnormal result from the screening examination, or for surveillance at one year following an abnormal Pap test without evidence of CIN on the colposcopy-directed biopsy. HPV DNA testing is not covered as a screening test. Providers should specify the high-risk HPV DNA panel; screening for low-risk genotypes HPV is not permitted
For more information, please see the EWC program manual for Primary Care Providers (PCPs). Date of CURRENT HPV Test: Enter the date the HPV test was performed using the following format: MM/DD/YYYY.
50
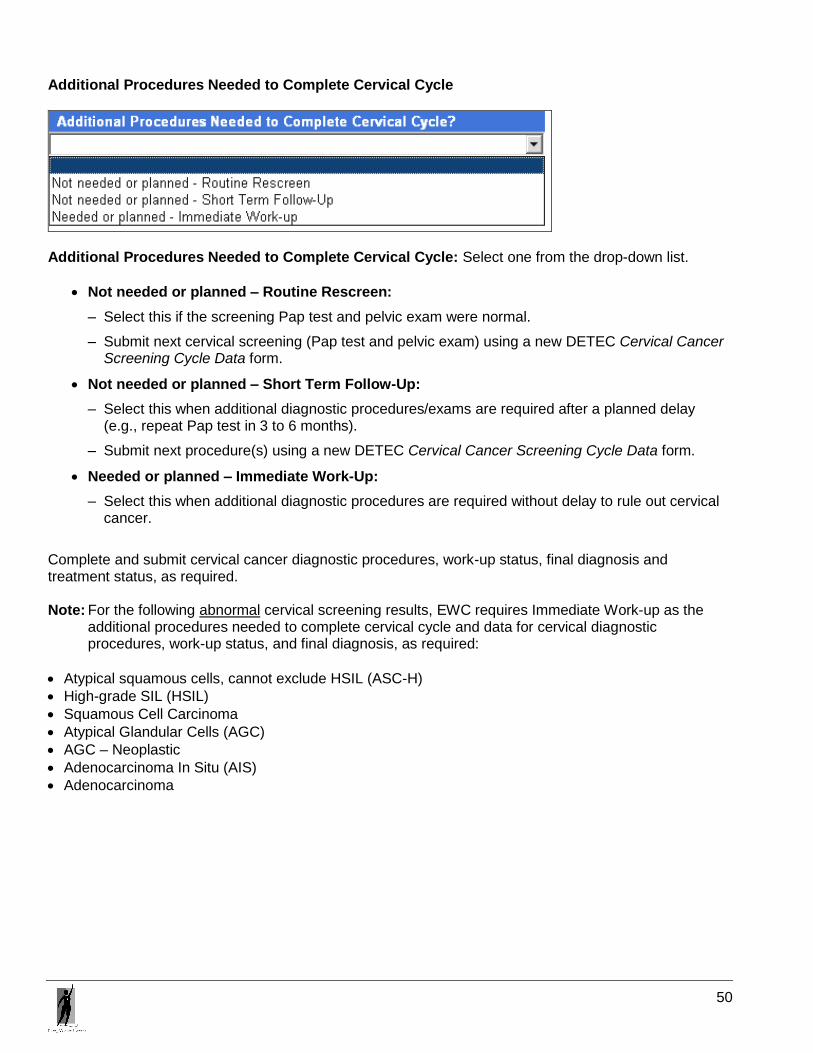
Additional Procedures Needed to Complete Cervical Cycle
Additional Procedures Needed to Complete Cervical Cycle: Select one from the drop-down list.
Not needed or planned – Routine Rescreen:
– Select this if the screening Pap test and pelvic exam were normal.
– Submit next cervical screening (Pap test and pelvic exam) using a new DETEC Cervical Cancer Screening Cycle Data form.
Not needed or planned – Short Term Follow-Up:
– Select this when additional diagnostic procedures/exams are required after a planned delay (e.g., repeat Pap test in 3 to 6 months).
– Submit next procedure(s) using a new DETEC Cervical Cancer Screening Cycle Data form.
Needed or planned – Immediate Work-Up:
– Select this when additional diagnostic procedures are required without delay to rule out cervical cancer.
Complete and submit cervical cancer diagnostic procedures, work-up status, final diagnosis and treatment status, as required. Note: For the following abnormal cervical screening results, EWC requires Immediate Work-up as the
additional procedures needed to complete cervical cycle and data for cervical diagnostic procedures, work-up status, and final diagnosis, as required:
Atypical squamous cells, cannot exclude HSIL (ASC-H)
High-grade SIL (HSIL)
Squamous Cell Carcinoma
Atypical Glandular Cells (AGC)
AGC – Neoplastic
Adenocarcinoma In Situ (AIS)
Adenocarcinoma

51
Cervical Diagnostic Procedures Complete Cervical Diagnostic Procedures if there were abnormal cervical screening results and/or “Immediate Work-up” is selected in the Additional Procedures Needed to Complete Cervical Cycle field.
Type of Procedure: Select type of diagnostic procedure performed from the drop-down list.
Colposcopy without Biopsy: If colposcopy without biopsy was performed, enter the date.
Colposcopy with Biopsy and/or endocervical curettage (ECC): If colposcopy with biopsy and/or ECC was performed, enter the date.
Loop Electrosurgical Excision Procedure (LEEP): If LEEP was performed, enter the date.
Cold Knife Cone (CKC): If CKC was performed, enter the date.
ECC alone: If a stand-alone ECC was performed, enter the date.
Date of Procedure: Enter the date the diagnostic procedure was performed, not the date of the results. All dates should be entered using the following format: MM/DD/YYYY. Add: Double Click the Add button after selecting each diagnostic procedure from the drop-down list and entering date of diagnostic procedure. The procedure will not be saved if the Add button is not clicked. Note: Report all diagnostic procedures performed. Multiple entries including the same procedure are
allowed. Remove: Highlight the procedure you would like to remove from the list then click Remove. Other Cervical Procedure Performed: Enter only one diagnostic procedure that can provide a diagnosis of cancer or not cancer as an “Other Cervical Diagnostic Procedure.” Select the procedure performed, even if not covered by EWC. If a diagnostic procedure not listed above was performed, select applicable option below:
Excision of endocervical polyps
Endometrial biopsy (EMB)
Biopsy of other structure (e.g., vagina, vulva) – Report only for recipient who does not have a cervix.
Other gynecologic consults
Other – Please specify

52
Specify “Other” Procedure: Enter a description of the other diagnostic procedure performed.
Please report any “Other Cervical Diagnostic Procedures” even though they may not be covered by EWC.
Do not enter the following as “Other Cervical Cancer Diagnostic Procedure,” as they are already listed on the form:
– Colposcopy without biopsy
– Colposcopy with biopsy and/or ECC, LEEP, CKC, ECC alone
Note: ECC and EMB are covered when done as the initial evaluation for Pap test result of AGC-Atypical Endometrial Cells. For more information, please see the Every Woman Counts (ev woman) section of the appropriate Part 2 provider manual.
Do not enter the following as an “Other Cervical Cancer Diagnostic Procedure”:
– Pap Test results
– Cervicography
– HPV testing
– Pelvic ultrasound
– Cervical CT scan
– Cryosurgery
– Hysterectomy
– Laser
– Cautery
Date of Other Procedure: Enter the date the other diagnostic procedure was performed, not the date of the results. All dates should be entered using the following format: MM/DD/YYYY.
53
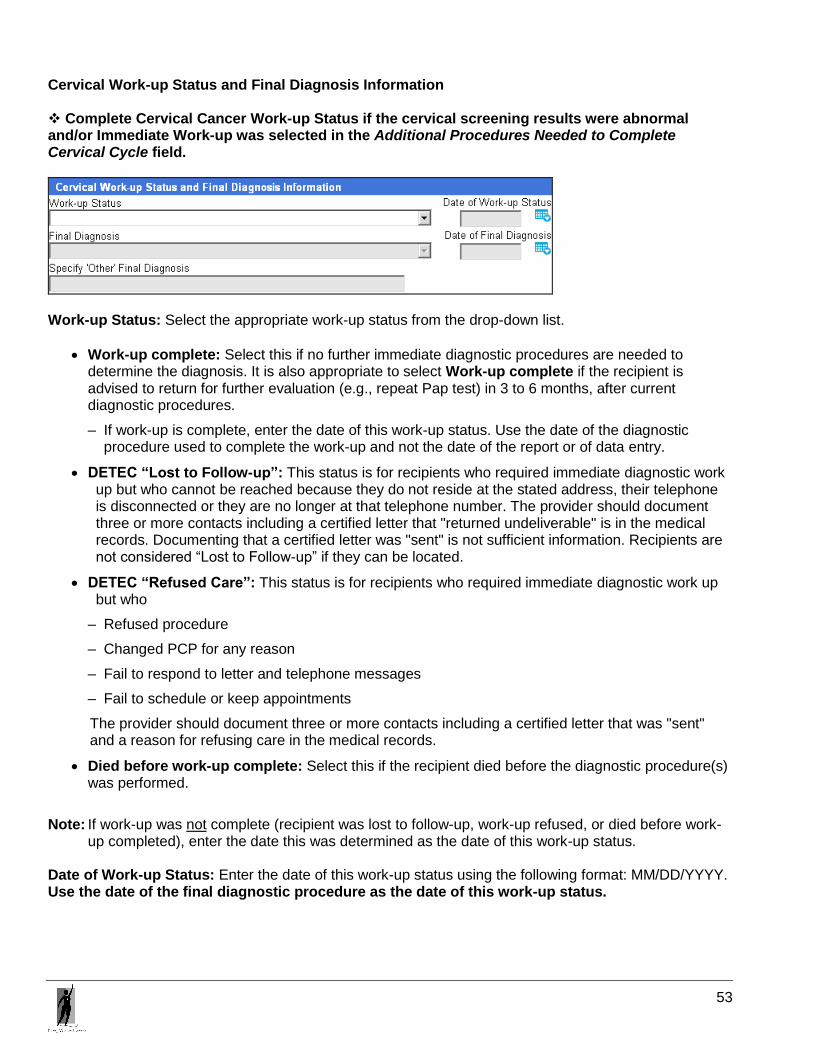
Cervical Work-up Status and Final Diagnosis Information Complete Cervical Cancer Work-up Status if the cervical screening results were abnormal and/or Immediate Work-up was selected in the Additional Procedures Needed to Complete Cervical Cycle field.
Work-up Status: Select the appropriate work-up status from the drop-down list.
Work-up complete: Select this if no further immediate diagnostic procedures are needed to determine the diagnosis. It is also appropriate to select Work-up complete if the recipient is advised to return for further evaluation (e.g., repeat Pap test) in 3 to 6 months, after current diagnostic procedures.
– If work-up is complete, enter the date of this work-up status. Use the date of the diagnostic procedure used to complete the work-up and not the date of the report or of data entry.
DETEC “Lost to Follow-up”: This status is for recipients who required immediate diagnostic work up but who cannot be reached because they do not reside at the stated address, their telephone is disconnected or they are no longer at that telephone number. The provider should document three or more contacts including a certified letter that "returned undeliverable" is in the medical records. Documenting that a certified letter was "sent" is not sufficient information. Recipients are not considered “Lost to Follow-up” if they can be located.
DETEC “Refused Care”: This status is for recipients who required immediate diagnostic work up but who
– Refused procedure
– Changed PCP for any reason
– Fail to respond to letter and telephone messages
– Fail to schedule or keep appointments
The provider should document three or more contacts including a certified letter that was "sent" and a reason for refusing care in the medical records.
Died before work-up complete: Select this if the recipient died before the diagnostic procedure(s) was performed.
Note: If work-up was not complete (recipient was lost to follow-up, work-up refused, or died before work-
up completed), enter the date this was determined as the date of this work-up status. Date of Work-up Status: Enter the date of this work-up status using the following format: MM/DD/YYYY. Use the date of the final diagnostic procedure as the date of this work-up status.

54
Complete Cervical Final Diagnosis only when the Work-up Status is Work-up Complete Final Diagnosis: Select the diagnosis from the drop-down list that most closely documents the reported result of the cervical final diagnosis. The final diagnosis of cervical cancer is usually determined by a pathology report from histologic examination of tissue/cells. Select a Cervical Cancer Final Diagnosis when cervical cancer diagnosis status was “Work-up complete.” Note: Do not submit a repeat Pap test result in the final diagnosis field.
Normal / Benign reaction/inflammation:
– Select this if the colposcopic examination is normal and the entire squamocolumnar junction is seen.
– Select this if the biopsy results are negative and the endocervical curettage is negative.
HPV / Condylomata/Atypia: Select this when the cytology report notes cellular changes associated with the HPV and no higher-grade atypia.
CIN I / mild dysplasia (biopsy diagnosis): Select this when the pathology report notes findings consistent with a mild dysplasia or cervical intraepithelial neoplasia (CIN I).
CIN II / moderate dysplasia (biopsy diagnosis): Select this if the pathology report indicates findings consistent with a moderate dysplasia or cervical intraepithelial neoplasia (CIN II).
– Data for Cervical Cancer Treatment Status is required.
CIN III / severe dysplasia/CIS or AIS of cervix (biopsy diagnosis): Select this if the pathology report indicates findings consistent with severe dysplasia, cervical intraepithelial neoplasia (CIN III), Carcinoma in situ (CIS) or Adenocarcinoma in situ (AIS).
– Data for Cervical Cancer Treatment Status is required.
Invasive Cervical Carcinoma (biopsy diagnosis): Select this if the pathology report indicates Adenocarcinoma, Invasive Adenocarcinoma, or squamous cell carcinoma of the cervix.
– Data for Cervical Cancer Treatment data is required.
Low grade SIL (biopsy diagnosis): Select this if the pathology report indicates low-grade squamous intraepithelial lesion
High grade SIL (biopsy diagnosis): Select this if the pathology report indicates high-grade squamous intraepithelial lesion
– Data for Cervical Cancer Treatment Status is required.
Other: Select this if the pathology report indicates a different cancer or if the result is not listed above.
Specify “Other” Final Diagnosis: Enter a description of the other final diagnosis in the space provided.
– Enter the following diagnoses as an “Other” cervical cancer final diagnosis:
Cervical polyps
Vaginal intraepithelial neoplasia (VAIN) – Report only for recipient who does not have a cervix
Other cancers of the endometrium, vagina, ovaries or vulva (including primary and metastatic disease) – Report only for recipient who does not have a cervix
Note: Do not enter a repeat Pap test result as an “Other” cervical cancer final diagnosis.

55
Date of Final Diagnosis: Enter the date of this diagnosis using the following format: MM/DD/YYYY. Use the date of the definitive diagnostic procedure performed as the date of the final diagnosis.

56
Cervical Cancer Treatment Information Complete Cervical Treatment Status if Cervical Cancer Final Diagnosis is CIN II, CIN III / Carcinoma in situ / Adenocarcinoma in situ, HSIL or invasive cervical carcinoma.
Treatment Status:
Treatment started: Select this if the recipient accepted a referral for treatment and the clinic staff can verify from either the recipient or treatment facility that treatment has been initiated – regardless of recipient’s insurance status.
Lost to follow-up: Select this if the recipient did not begin treatment and the clinic staff cannot locate the recipient. Three attempts must be made to contact the recipient. The third attempt must be by certified letter. Attempts to contact recipient must be documented in the recipient’s medical record.
Treatment refused: Select this if the recipient refused treatment. If the recipient only receives non-standard or alternative treatments, select Treatment refused.
Treatment not needed: Select this if the medical provider and recipient agree that treatment would adversely affect the recipient’s quality of life (with late or end-stage cancers) and that treatment is not recommended or needed at this time.
Died before treatment started: Select this if the recipient died before beginning treatment.
Date of Treatment Status: Enter the date when treatment was initiated or other treatment status was determined using the following format: MM/DD/YYYY. Note: In some cases, a diagnostic procedure may also serve as treatment (e.g., LEEP; Conization).
When this occurs, enter data in the following fields:
Specify other procedure(s) performed and date(s) in the Cervical Diagnostic Procedures section.
Use the date of the diagnostic procedure in the Date of Work-up status field.
Use the date of the diagnostic procedure in the Date of Final diagnosis field.
Select Treatment Initiated for cervical cancer treatment status.
Use the date of the diagnostic procedure (e.g., LEEP; Conization) in the Date of Treatment status field. Patient enrolled in BCCTP. Check ONLY when you have completed the BCCTP enrollment process. See DETEC HELP or DETEC Recipient Eligibility form for a list of BCCTP qualifying diagnoses. If the cervical diagnosis is not listed on the drop-down list, contact a BCCTP manager at 1-800-824-0088 for information on how to proceed. Print Click the Print button at the bottom of the online DETEC Cervical Cancer Screening Cycle Data form to print a copy of it. When you click the Print button the following message will pop-up:

57
Note: The information below reflects only data that has been saved. Be sure to save/submit the recipient information before printing. Note: The Print button prints only what is visible on the screen. There is a Print button on every DETEC
screen. Use the Print button found at the bottom of the screen to print the DETEC Cervical Cancer Screening Cycle Data form.

58
Editing Records This is applicable for both the Breast Cancer Screening Cycle Data and Cervical Cancer Screening Cycle Data online forms. Issues With This Cycle Both the Breast Cancer Screening Cycle Data and the Cervical Cancer Screening Cycle Data screens have an option for data entry staff to “Check Data” prior to submission. When the Check Data button is clicked, three types of errors may be detected.
Warnings
Case Management Errors
Save Errors
All warnings, “Case Management” errors and “Save Errors” will be listed in the Issues With This Cycle box that will appear at the top of the Breast Cancer Screening Cycle Data and Cervical Cancer Screening Cycle Data forms if there are errors. A cycle with “Case Management” errors may be submitted, but the cycle will appear in the navigation bar with an exclamation ( ) next to it. A CM fee is not paid for the recipient until all errors are resolved. Once errors are resolved, the exclamation ( ) will no longer appear next to that cycle record in the left column navigation bar. A cycle cannot be saved if any “Save Errors” are detected. These errors must be resolved before the record can be submitted.
To enter additional data or correct data on previously submitted screening cycle form:
In the left column navigation bar, click the cycle you want to either provide additional data for or correct previously entered data.
Correct or enter additional data to cycle form that displays previously submitted data.
Click the Check Data button to check for any data entry errors.
Cycles that are locked will not be accessible to enter additional data or to correct data.
Click the Delete Cycle button to delete cycle previously entered. A pop-up box requesting a reason to delete a cycle will appear (Figure 32). After entering reason, click the Confirm button. A message will display that the record was successfully deleted (Figure 33).
Click the Submit button to save the edits to the screening record. A message will display that the record was successfully submitted (Figure 31).
Click the Cancel button to exit out of the data entry screen without saving OR to return to the Recipient Information page.
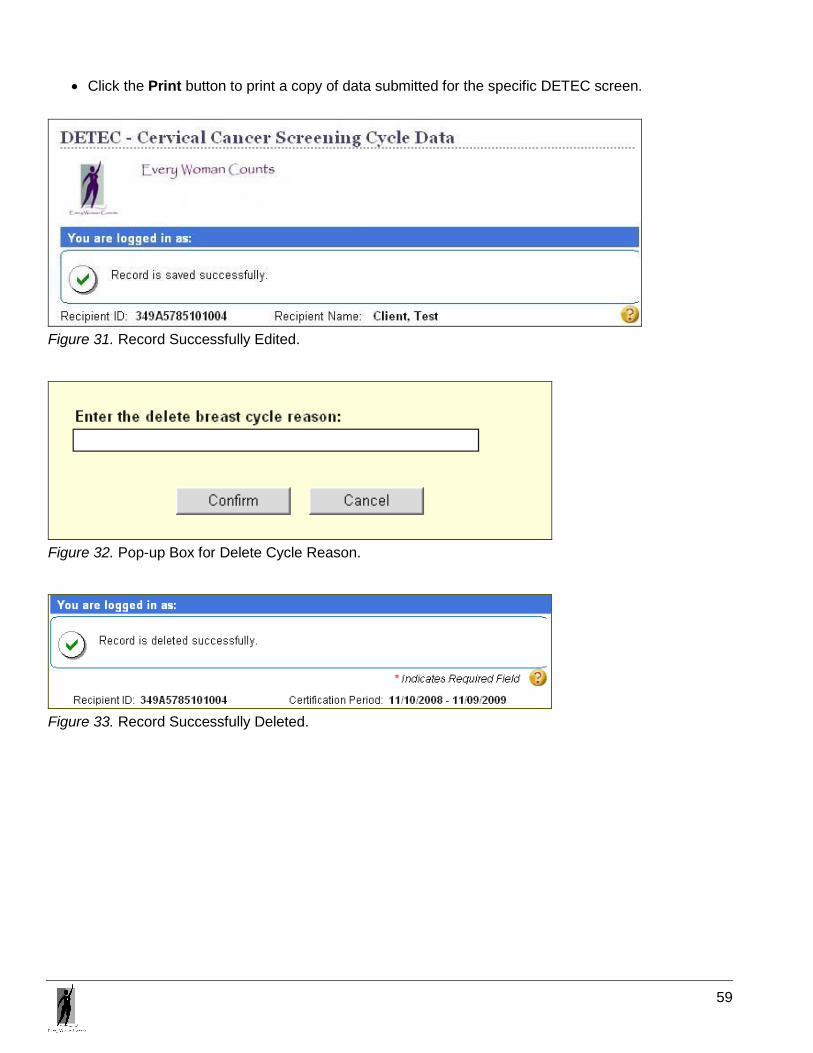
59
Click the Print button to print a copy of data submitted for the specific DETEC screen.
Figure 31. Record Successfully Edited.
Figure 32. Pop-up Box for Delete Cycle Reason.
Figure 33. Record Successfully Deleted.

60
Claim Submission Claims for service may be submitted either hard copy or electronically through usual Medi-Cal channels. Claims must be submitted with the14-digit ID number that is received after the recipient has been enrolled via DETEC. All claims submitted without the 14-digit ID number will be denied. All other Medi-Cal criteria will apply (e.g., timeliness guidelines, modifier requirements, etc.). Claims must be submitted with a valid EWC ICD-10 diagnosis code to be eligible for payment. Prior to submitting the claim for CM, providers must complete and submit via DETEC, the necessary Breast Cancer Screening Cycle Data and/or Cervical Cancer Screening Cycle Data forms for the recipient for the certification time period being billed. For more information regarding claims, call the TSC at 1-800-541-5555.
Data Submission As an EWC enrolled provider, the PCP is required to submit demographic information, screening, diagnostic procedures, workup status, final diagnosis and treatment data using DETEC, the online data collection system. EWC program policy requires data submission within 30 days after receipt of results.
Breast and Cervical Cancer Treatment Program (BCCTP) For those recipients who have been diagnosed with breast or cervical cancer or certain pre-cancerous conditions and are found to need treatment, please refer to the BCCTP area of the Medi-Cal website. For more information regarding the BCCTP, please call 1-800-824-0088 for a BCCTP Eligibility Specialist or visit the BCCTP website at http://www.dhcs.ca.gov/services/medi-cal/Pages/BCCTP.aspx.

61
Terms and Acronyms
Acronym Definition
BCCTP Breast and Cervical Cancer Treatment Program
BCTG Beneficiary Correspondence and Telephone Group
CBE Clinical Breast Exam
CDC Centers for Disease Control and Prevention
CDTB Cancer Detection and Treatment Branch
CMC Computer Media Claims
COS Category of Service
CPIC Cancer Prevention Institute of California (EWC patient referral call center)
DETEC DETecting Early Cancer
DHCS Department of Health Care Services
EWC Every Woman Counts
FI DHCS Fiscal Intermediary
Family PACT Family PACT (Family Planning, Access, Care and Treatment)
HIPAA Health Insurance Portability and Accountability Act
HPV Human Papillomavirus
ID Identification
MDE Minimum Data Elements
NBCCEDP National Breast and Cervical Cancer Early Detection Program
NPI National Provider Identifier
NPP Notice of Privacy Practices
OHC Other Health Coverage
OOS Out-Of-State Provider Line
PCP Primary Care Provider
PCPEA Primary Care Provider Enrollment Agreement
PIN Provider Identification Number
POS Point of Service
PSC Provider Support Center
PTN Provider Telecommunications Network
RAD Remittance Advice Details
RC Regional Contractor, a local resource for Every Woman Counts
TSC Telephone Service Center (FI provider support call center)
Note: For a complete list of Medi-Cal acronyms, please refer to the Acronyms and Abbreviations
Glossary in the Medi-Cal Indexes and Glossary Manual.
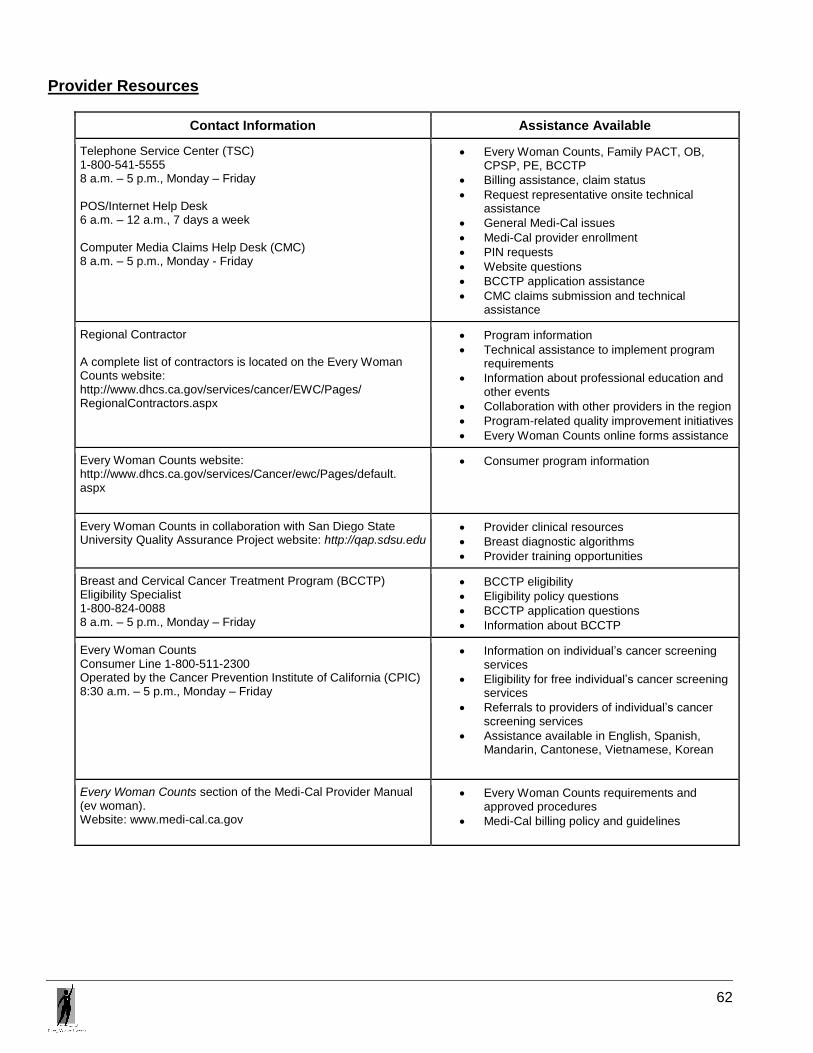
62
Provider Resources
Contact Information Assistance Available
Telephone Service Center (TSC) 1-800-541-5555 8 a.m. – 5 p.m., Monday – Friday POS/Internet Help Desk 6 a.m. – 12 a.m., 7 days a week Computer Media Claims Help Desk (CMC) 8 a.m. – 5 p.m., Monday - Friday
Every Woman Counts, Family PACT, OB, CPSP, PE, BCCTP
Billing assistance, claim status
Request representative onsite technical assistance
General Medi-Cal issues
Medi-Cal provider enrollment
PIN requests
Website questions
BCCTP application assistance
CMC claims submission and technical assistance
Regional Contractor A complete list of contractors is located on the Every Woman Counts website: http://www.dhcs.ca.gov/services/cancer/EWC/Pages/ RegionalContractors.aspx
Program information
Technical assistance to implement program requirements
Information about professional education and other events
Collaboration with other providers in the region
Program-related quality improvement initiatives
Every Woman Counts online forms assistance
Every Woman Counts website: http://www.dhcs.ca.gov/services/Cancer/ewc/Pages/default. aspx
Consumer program information
Every Woman Counts in collaboration with San Diego State University Quality Assurance Project website: http://qap.sdsu.edu
Provider clinical resources
Breast diagnostic algorithms
Provider training opportunities
Breast and Cervical Cancer Treatment Program (BCCTP) Eligibility Specialist 1-800-824-0088 8 a.m. – 5 p.m., Monday – Friday
BCCTP eligibility
Eligibility policy questions
BCCTP application questions
Information about BCCTP
Every Woman Counts Consumer Line 1-800-511-2300 Operated by the Cancer Prevention Institute of California (CPIC) 8:30 a.m. – 5 p.m., Monday – Friday
Information on individual’s cancer screening services
Eligibility for free individual’s cancer screening services
Referrals to providers of individual’s cancer screening services
Assistance available in English, Spanish, Mandarin, Cantonese, Vietnamese, Korean
Every Woman Counts section of the Medi-Cal Provider Manual (ev woman). Website: www.medi-cal.ca.gov
Every Woman Counts requirements and approved procedures
Medi-Cal billing policy and guidelines
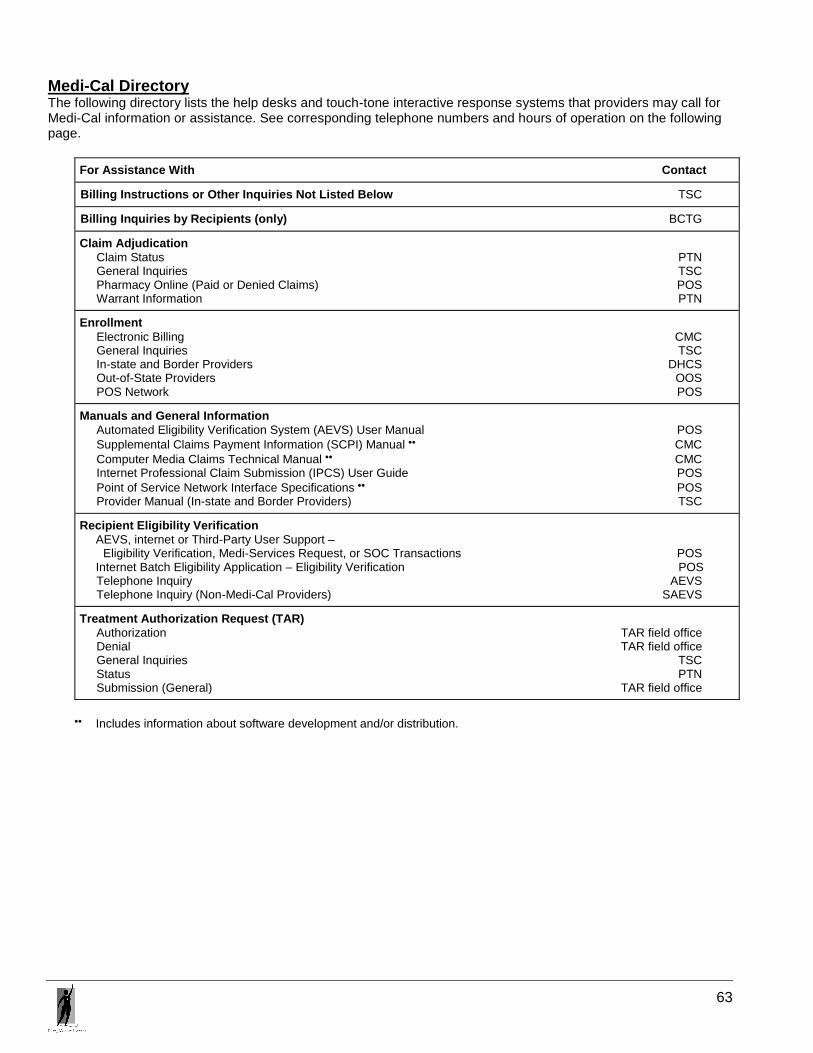
63
Medi-Cal Directory The following directory lists the help desks and touch-tone interactive response systems that providers may call for Medi-Cal information or assistance. See corresponding telephone numbers and hours of operation on the following page.
For Assistance With Contact
Billing Instructions or Other Inquiries Not Listed Below TSC
Billing Inquiries by Recipients (only) BCTG
Claim Adjudication
Claim Status PTN General Inquiries TSC Pharmacy Online (Paid or Denied Claims) POS Warrant Information PTN
Enrollment
Electronic Billing CMC General Inquiries TSC In-state and Border Providers DHCS Out-of-State Providers OOS POS Network POS
Manuals and General Information
Automated Eligibility Verification System (AEVS) User Manual POS
Supplemental Claims Payment Information (SCPI) Manual CMC
Computer Media Claims Technical Manual CMC Internet Professional Claim Submission (IPCS) User Guide POS
Point of Service Network Interface Specifications POS Provider Manual (In-state and Border Providers) TSC
Recipient Eligibility Verification
AEVS, internet or Third-Party User Support – Eligibility Verification, Medi-Services Request, or SOC Transactions POS Internet Batch Eligibility Application – Eligibility Verification POS Telephone Inquiry AEVS Telephone Inquiry (Non-Medi-Cal Providers) SAEVS
Treatment Authorization Request (TAR)
Authorization TAR field office Denial TAR field office General Inquiries TSC Status PTN Submission (General) TAR field office
Includes information about software development and/or distribution.
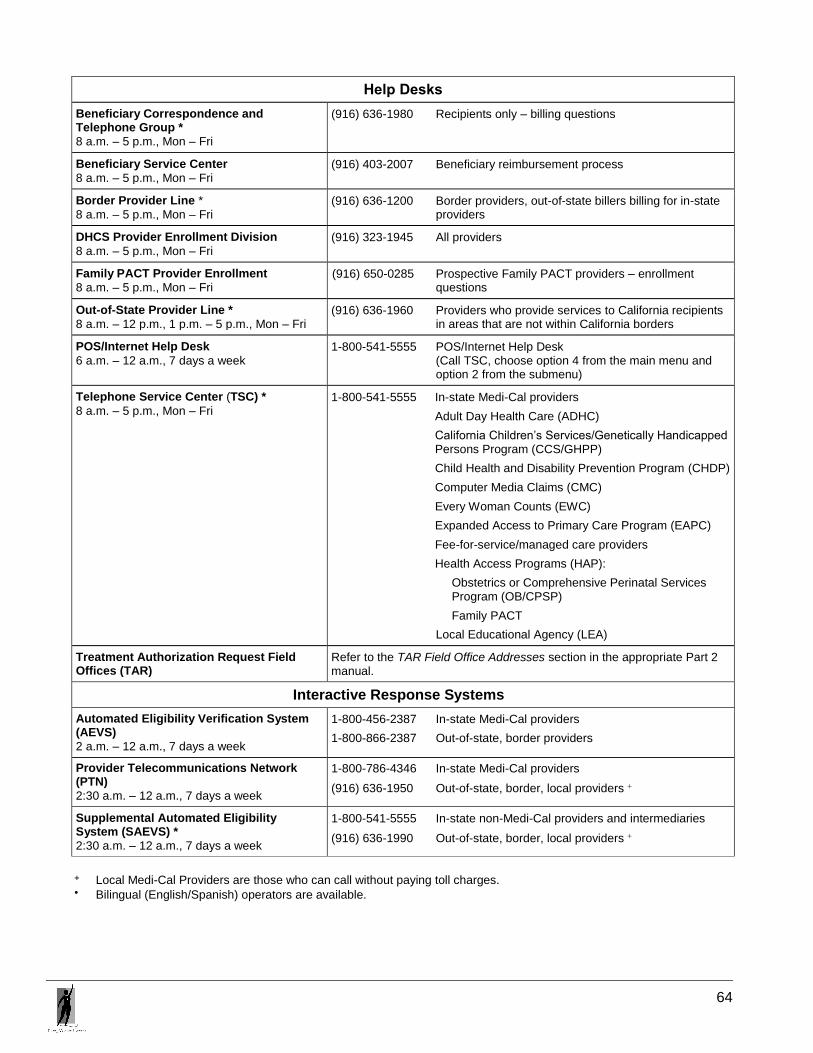
64
Help Desks
Beneficiary Correspondence and Telephone Group *
8 a.m. – 5 p.m., Mon – Fri
(916) 636-1980 Recipients only – billing questions
Beneficiary Service Center
8 a.m. – 5 p.m., Mon – Fri (916) 403-2007 Beneficiary reimbursement process
Border Provider Line *
8 a.m. – 5 p.m., Mon – Fri (916) 636-1200 Border providers, out-of-state billers billing for in-state
providers
DHCS Provider Enrollment Division
8 a.m. – 5 p.m., Mon – Fri (916) 323-1945 All providers
Family PACT Provider Enrollment
8 a.m. – 5 p.m., Mon – Fri (916) 650-0285 Prospective Family PACT providers – enrollment
questions
Out-of-State Provider Line *
8 a.m. – 12 p.m., 1 p.m. – 5 p.m., Mon – Fri (916) 636-1960 Providers who provide services to California recipients
in areas that are not within California borders
POS/Internet Help Desk
6 a.m. – 12 a.m., 7 days a week 1-800-541-5555 POS/Internet Help Desk (Call TSC, choose option 4 from the main menu and
option 2 from the submenu)
Telephone Service Center (TSC) *
8 a.m. – 5 p.m., Mon – Fri
1-800-541-5555 In-state Medi-Cal providers
Adult Day Health Care (ADHC)
California Children’s Services/Genetically Handicapped Persons Program (CCS/GHPP)
Child Health and Disability Prevention Program (CHDP)
Computer Media Claims (CMC)
Every Woman Counts (EWC)
Expanded Access to Primary Care Program (EAPC)
Fee-for-service/managed care providers
Health Access Programs (HAP):
Obstetrics or Comprehensive Perinatal Services Program (OB/CPSP)
Family PACT
Local Educational Agency (LEA)
Treatment Authorization Request Field Offices (TAR)
Refer to the TAR Field Office Addresses section in the appropriate Part 2 manual.
Interactive Response Systems
Automated Eligibility Verification System (AEVS)
2 a.m. – 12 a.m., 7 days a week
1-800-456-2387 In-state Medi-Cal providers
1-800-866-2387 Out-of-state, border providers
Provider Telecommunications Network (PTN)
2:30 a.m. – 12 a.m., 7 days a week
1-800-786-4346 In-state Medi-Cal providers
(916) 636-1950 Out-of-state, border, local providers
Supplemental Automated Eligibility System (SAEVS) *
2:30 a.m. – 12 a.m., 7 days a week
1-800-541-5555 In-state non-Medi-Cal providers and intermediaries
(916) 636-1990 Out-of-state, border, local providers
Local Medi-Cal Providers are those who can call without paying toll charges. Bilingual (English/Spanish) operators are available.