Even Better Acoustical System Installation Guide Better Acoustical System Installation Guide 2 w....
52
www.fellert.com Fellert Acoustical Ceilings AB I Kyrkängsgatan 6 I 503 38 Borås I Sweden [email protected] I +46 (0)33 430 23 10 Even Better Acoustical System Installation Guide
Transcript of Even Better Acoustical System Installation Guide Better Acoustical System Installation Guide 2 w....

www.fellert.comFellert Acoustical Ceilings AB I Kyrkängsgatan 6 I 503 38 Borås I [email protected] I +46 (0)33 430 23 10
Even Better Acoustical System Installation Guide
© All Rights Reserved Fellert Acoustical Ceilings AB 12015001 V.52
INTRODUCTION 3
GENERAL CONDITIONS FOR INSTALLATION Limitations & Guidelines 4 Job Conditions 4 Control Joints 5 Effects Of Lighting 5
MOCK UP CONDITIONS 6
STANDARD FINISHES 7
INSTALLATION TYPES 8 MATERIALS 9
TOOLS & EQUIPMENT 13
CHECKLIST 19
PRINCIPLES OF INSTALLATION OF EVEN BETTER ACOUSTICAL SYSTEMS Even Better Acoustical Board & Substrate Preparation 20 A. GWB B. Plaster only (no EB Acoustical Board) C. Ceiling Grid 400 mm c/c or 16”o.c. (no GWB) Coverage and Mixing Guide 30 Application of Standard Finishes 31 A. EB1 “Basecoat” Plaster B. EB1 “Finish” Plaster for Secern C. EB1 “Finish” Plaster for Sahara D. EB2 “Finish” Plaster for Silk E. EB Acoustical coating 38 Vertical Surfaces 39 Curved Surfaces 41 KEY INSTALLATION NOTES 42
HEALTH & SAFETY GUIDELINES 43
FINAL APPEARANCE 44
DRY STAINS - ALL FELLERT FINISHES 45
SOLUBLE STAINS - ALL FELLERT FINISHES 46
HOLES, DAMAGES, & WATER DAMAGED AREAS 47
CONSTRUCTION DETAILS 50
TABLE OF CONTENTS
© All Rights Reserved Fellert Acoustical Ceilings AB 12015001 V.53
INTRODUCTION
Even Better is a seamless designer ceiling system with sound absorbing properties. The main components are: acoustical board, acoustical plaster and acoustical coating. These components individually contribute towards sound absorption and the desired look. The purpose of this installation guide is to provide the reader with the basic fundamentals of how to install Fellert’s Even Better system. The guide consists of mainly pictures, descriptions, and notes.
This document serves as a guide and not a specific instruction manual. As almost no construction project is identical, each Fellert installation will have different circumstances; however, the basic principles of installing the product remain the same.
All Fellert Installers are required to attend a training class prior to purchasing materials and applying the Even Better system. Installers are required to perform quality installations of the Even Better Acoustial System on every project.
The Even Better specifications and policy documents state the requirement of a project mock up. Installers need to obtain approval of a project mock up prior to commencing with the installation. The installer is 100% responsible for the quality of the project installation.
Notice: Fellert retains the right to edit, modify, or delete the contents of this document and other related installation information without the consent or approval from any other party. Please con-tact Fellert to ensure you have the latest installation and/or technical information on the Even Better Acoustical System. Always make sure to use the latest version of the Even Better In-stallation Guide published on www.fellert.com.
© All Rights Reserved Fellert Acoustical Ceilings AB 12015001 V.54
GENERAL CONDITIONS FOR INSTALLATION
LIMITATIONS & GUIDELINESAs with any hand-crafted plaster, the final appearance of the Even Better Acoustical System may vary slightly throughout the expanse of the surface area especially under critical lighting conditions. The installer should always follow local building codes and regulations and is fully responsible for the quality of the installation.
JOB CONDITIONS• All windows and exterior doors shall be in place and glazed. The building shall be watertight prior to the start of the installation. This condition should be maintained during and after the installation. All GWB substrates must be “sealed air tight” to a level one finish. All HVAC, electrical, fire sprinkler and other penetrations shall be sealed with traditional drywall tape or a self-adhesive fire-tape to prevent air movement between the occupied space and the plenum. For direct attachment to ceiling grid applications ensure that the HVAC system in the occupied space is properly balanced.• Fixtures such as MEP, lighting, sprinklers, ventilation, etc., should be in place prior to the start of the installation.• The Fellert materials are for interior use only. The installation should be done within typical occupancy temperature ranges of 15–32 °C (60–90 °F) and at a maximum of 70% relative humidity.• The use of fans to circulate the air and heaters will reduce the drying time significantly.• Even Better Acoustical Boards shall be protected from exposure to sunlight. Keep the boards in the packaging until ready for use. Ensure that the there are no delays in spraying the first coat of Even Better acoustical plaster to the boards within 48 hours.• It is not recommended to have cold joints in the finish plaster. The final application of the Even Better Acoustical plaster has to be completed in a single work step—done corner-to-corner or to a break stopping point.

© All Rights Reserved Fellert Acoustical Ceilings AB 12015001 V.55
GENERAL CONDITIONS FOR INSTALLATION
CONTROL JOINTS Fundamentally speaking, the elastic nature of the Even Better Acoustical System means that there is no engineering requirement of control joints except when a building is under excessive structural stress. Structural expansions joints are observed however. There are practical limitations of how large of an expanse the Fellert contractor can complete in a single work day.
The following are guidelines:• Up to 250 m2 (2,500 sqft) achievable with a Fellert contractor under normal working conditions.• Up to 500 m2 (5,000 sqft) achievable with an experienced Fellert contractor; however, additional spray crews will be required. Additional working hours may be required.• Over 500 m2 (5,000 sqft) achievable with an experienced Fellert contractor; however, additional spray crews will be required. Additional working hours will be required. Proper planning is required when attempting very large expanses.
EFFECTS OF LIGHTINGIt is advisable to consider that the lighting selected be complementary to the ceiling finish. The most critical factor is the direction of the light source. A critical horizontal light that strikes any ceiling surface at an acute angle accentuates normal ceiling irregularities, affecting the final ap-pearance of any finish. Exterior lighting from windows can highlight the natural variations of hand-crafted plaster.
© All Rights Reserved Fellert Acoustical Ceilings AB 12015001 V.56
MOCK UP CONDITIONSMOCKUP CHECKLIST:Per the Fellert specifications and installation guide a mockup must be approved by the architect or client prior to the commencement of the installation. The mockup can be part of the scope of work. The contractor is fully responsible for ensuring a quality installation of the Even Better system.
Installer has attended a Fellert training seminar and is currently listed as an authorized installer with Fellert.
Installer has contacted Fellert at least three weeks in advance if onsite labor assistance if needed for the mockup.
Samples of the Even Better finish, color and thickness have been approved.
Location of Even Better Acoustical System mockup has been confirmed with general contractor which should be at least 9m2 (100sqft) in size. The mockup shall remain intact throughout the project.
Ensure the following site conditions have been met prior to mockup installation:
All windows and exterior doors shall be in place and glazed. The building shall be watertight prior to the start of the installation. All GWB substrates must be “sealed air tight” to a level one finish. All HVAC, electrical, fire sprinkler and other penetrations shall be sealed with traditional drywall tape or a self-adhesive fire-tape to prevent air movement between the occupied space and the plenum. For direct attachment to ceiling grid applications ensure that the HVAC system in the occupied space is properly balanced. The installation should be done within typical occupancy temperature ranges of 15–32 °C (60–90 °F) and at a maximum of 70% relative humidity. All permanent fixtures such as lights, diffusers, speakers, etc. are to be included in the mockup. The intended lighting conditions for the building are to be used or simulated in the mockup. Ensure that the building is ventilated to assist with the drying process if the HVAC is
not operational.
Deliver materials to project site in original, unopened packages and store them in a fully enclosed space where they will be protected against damage from moisture and other harmful conditions. Protect materials from freezing.
Installer has recommended tools and equipment on site
Installer has access to potable water.
Install the mockup per the recommendations listed in the Fellert installation guide.
Mockup approved by architect/client.
Any additional costs incurred to Fellert as a result of changes to the mockup schedule and/or scope of work will be borne by the installing contractor. The Even Better Acoustical system must be installed per the specifi-cations and manufacturer’s installation guide in order to qualify for the product warranty.
© All Rights Reserved Fellert Acoustical Ceilings AB 12015001 V.57
STANDARD FINISHES
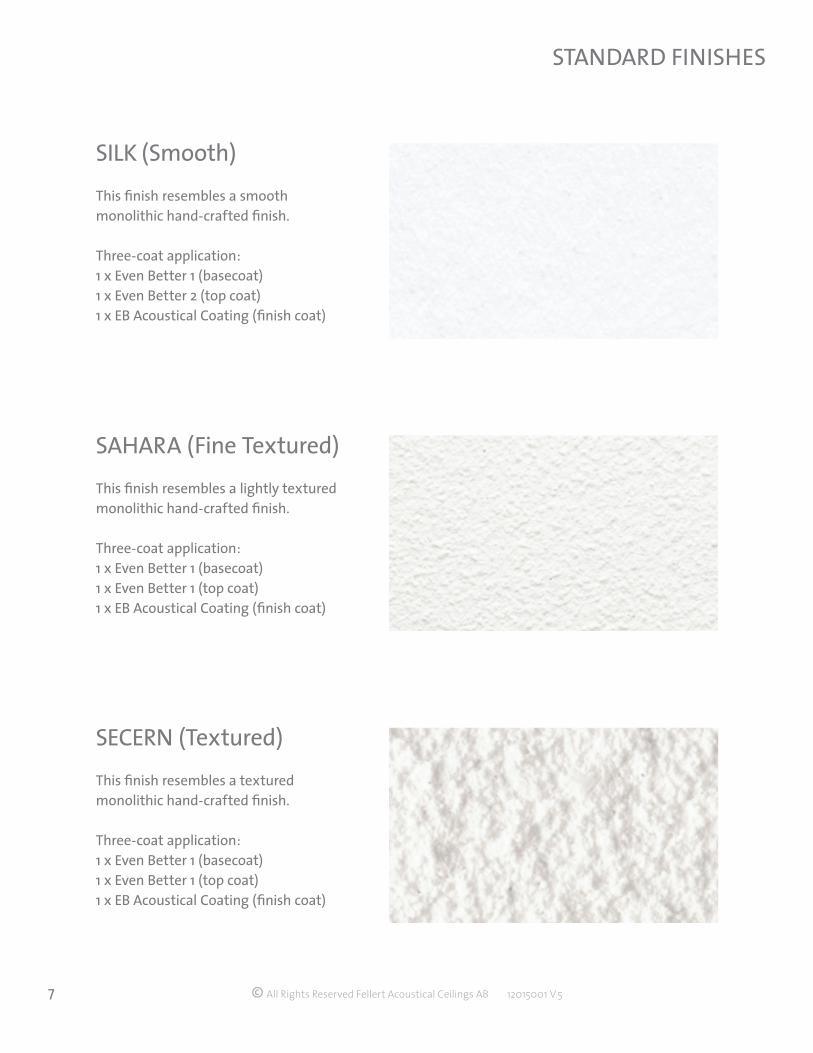
SILK (Smooth)This finish resembles a smooth monolithic hand-crafted finish.
Three-coat application:1 x Even Better 1 (basecoat)1 x Even Better 2 (top coat)1 x EB Acoustical Coating (finish coat)
SAHARA (Fine Textured)This finish resembles a lightly textured monolithic hand-crafted finish.
Three-coat application:1 x Even Better 1 (basecoat)1 x Even Better 1 (top coat)1 x EB Acoustical Coating (finish coat)
SECERN (Textured)This finish resembles a textured monolithic hand-crafted finish.
Three-coat application:1 x Even Better 1 (basecoat)1 x Even Better 1 (top coat)1 x EB Acoustical Coating (finish coat)
© All Rights Reserved Fellert Acoustical Ceilings AB 12015001 V.58
INSTALLATION TYPES
A. New GWB (Fully Adhered System)
The Even Better Acoustical Board is adhered to GWB substrate that must be “sealed air tight” to a level one finish. All HVAC, electrical, fire sprinkler and other penetrations shall be sealed with traditional drywall tape or a self-adhesive fire tape to prevent air movement between the occupied space and the plenum. Mesh tape and Even Better Primer are applied to the plastic C- channel, GWB rippers, corner beads, etc. The Even Better Acoustical Board is then sprayed with the Even Better acoustical plaster.
Alternative substrates the Even Better may be applied to are: concrete, existing plaster, GFRG surfaces, and previously painted GWB. These substrates will need to be tested for bond strength, cleaned and sanded smooth. The Even Better Acoustical Board is attached to the substrates with the Even Better Board Adhesive and secured with a minimal amount of Fellert Spring Washers if required.
B. Ceiling Grid (Direct to Framing – No GWB)
The Even Better designer ceiling system can be installed to 400 mm c/c or 16” o.c. depending on the size of the Even Better Acoustical Boards and drywall grid. The substrate is constructed without a layer of GWB. The acoustical boards are mechanically attached to drywall grid thereby eliminating the need and cost for a layer of GWB. There is an increase in sound absorption performance in the low frequency range with the direct-to grid installation method which is commonly referred to as the E-400 or E-200 mount and/or air gap behind. There are limitations to what types of substrate designs that can be done with the Fellert direct-to-grid method. The following are guidelines:
• Flat shapes are achievable with the normal Even Better direct-to grid installation method. This includes angled ceilings and walls 1.82 m (6 ft) above FFL. This is the standard Fellert direct-to-grid application method and is expected from all trained installers.• Barrel vaulted ceilings are possible providing the drywall grid is 400 mm c/c or 16” o.c.. However, note that this installation method will be more time consuming as more Fellert Spring Washers will be needed. Consult with your local Fellert agent prior to specifying the Even Better direct-to-grid system on a barrel shaped ceiling.• Domes and vaulted ceilings are not possible with the direct-to-grid system. Note that the HVAC system in the occupied space is to be properly balanced.
C. Plaster only (No Even Better Acoustical Board)
Even Better Primer is applied to a drywall substrate prepared to a level 4 standard. The primed surface is then sprayed with the Even Better Acoustical plaster and coating. Alternative substrates such as concrete, existing plaster and previously painted GWB will need to be prepped accordingly and ensure they are sound and free from cracking.
© All Rights Reserved Fellert Acoustical Ceilings AB 12015001 V.59
MATERIALS
USE ONLY PROPRIETARY MATERIALS AND ACCESSORIES DISTRIBUTED OR RECOMMENDED BY FELLERT.
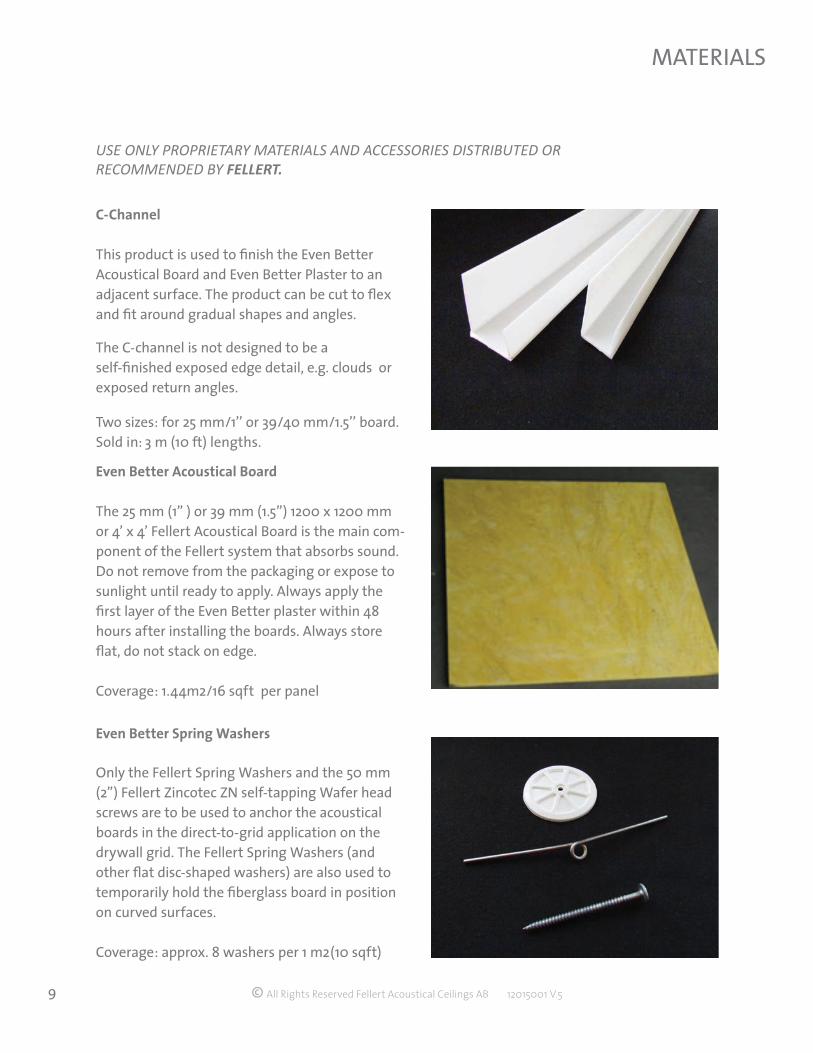
C-Channel
This product is used to finish the Even Better Acoustical Board and Even Better Plaster to an adjacent surface. The product can be cut to flex and fit around gradual shapes and angles.
The C-channel is not designed to be a self-finished exposed edge detail, e.g. clouds or exposed return angles.
Two sizes: for 25 mm/1’’ or 39/40 mm/1.5’’ board.Sold in: 3 m (10 ft) lengths.
Even Better Acoustical Board
The 25 mm (1” ) or 39 mm (1.5”) 1200 x 1200 mm or 4’ x 4’ Fellert Acoustical Board is the main com-ponent of the Fellert system that absorbs sound. Do not remove from the packaging or expose to sunlight until ready to apply. Always apply the first layer of the Even Better plaster within 48 hours after installing the boards. Always store flat, do not stack on edge.
Coverage: 1.44m2/16 sqft per panel
Even Better Spring Washers
Only the Fellert Spring Washers and the 50 mm (2”) Fellert Zincotec ZN self-tapping Wafer head screws are to be used to anchor the acoustical boards in the direct-to-grid application on the drywall grid. The Fellert Spring Washers (and other flat disc-shaped washers) are also used to temporarily hold the fiberglass board in position on curved surfaces.
Coverage: approx. 8 washers per 1 m2(10 sqft)
© All Rights Reserved Fellert Acoustical Ceilings AB 12015001 V.510
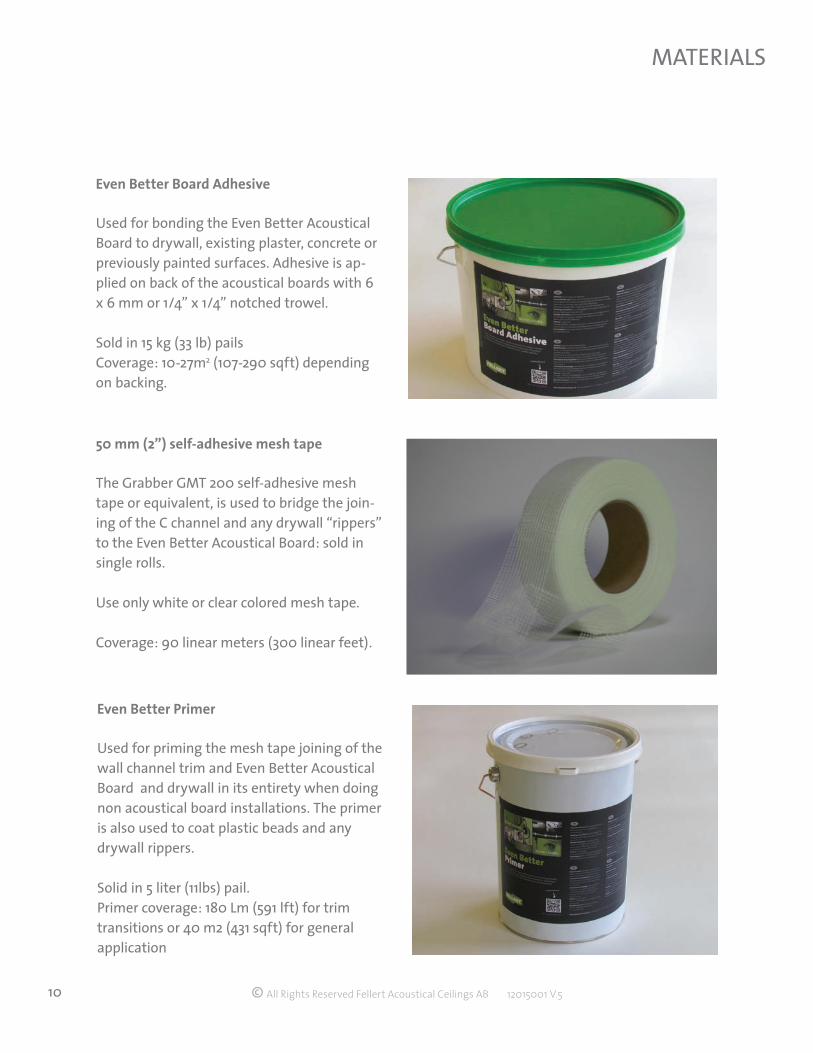
Even Better Board Adhesive
Used for bonding the Even Better Acoustical Board to drywall, existing plaster, concrete or previously painted surfaces. Adhesive is ap-plied on back of the acoustical boards with 6 x 6 mm or 1/4” x 1/4” notched trowel.
Sold in 15 kg (33 lb) pailsCoverage: 10-27m2 (107-290 sqft) dependingon backing.
50 mm (2”) self-adhesive mesh tape
The Grabber GMT 200 self-adhesive mesh tape or equivalent, is used to bridge the join-ing of the C channel and any drywall “rippers” to the Even Better Acoustical Board: sold in single rolls.
Use only white or clear colored mesh tape.
Coverage: 90 linear meters (300 linear feet).
MATERIALS
Even Better Primer
Used for priming the mesh tape joining of the wall channel trim and Even Better Acoustical Board and drywall in its entirety when doing non acoustical board installations. The primer is also used to coat plastic beads and any drywall rippers.
Solid in 5 liter (11lbs) pail.Primer coverage: 180 Lm (591 lft) for trimtransitions or 40 m2 (431 sqft) for generalapplication

© All Rights Reserved Fellert Acoustical Ceilings AB 12015001 V.511
MATERIALS
Even Better Primer Additive The primer and the Even Better Primer Additiveare always purchased together.
Sanding Pads
Full sized (hook & loop) sanding pads and discs that are used with the #7800 orbital style vacu-um sander. Used in the sanding of the acoustical board and the basecoat. Sold in five (5) sanding discs per pack. The power pads they stick to are sold individually.
80 grade: sanding the acoustical board 220 grade: sanding the basecoats.
Even Better Access Panel
A discrete, fully integrated access panel to fit the 25 mm(1”) and 39 mm (1,5”) Fellert Even Better Acous-tical System.
The Even Better Access Panel is available in three different standard sizes:300 x 300 mm (11.8” x 11.8”)400 x 400 mm (15.7” x 15.7”)600 x 600 mm (23.6” x 23.6”)
© All Rights Reserved Fellert Acoustical Ceilings AB 12015001 V.512
MATERIALS
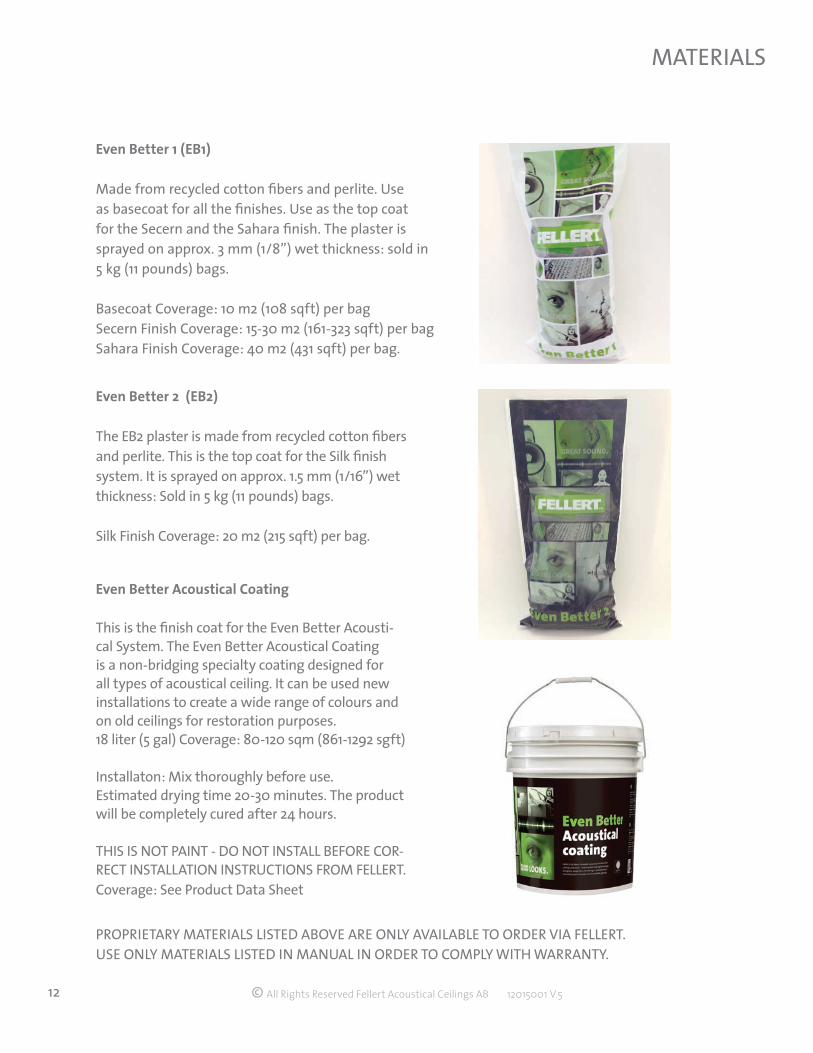
Even Better 2 (EB2)
The EB2 plaster is made from recycled cotton fibers and perlite. This is the top coat for the Silk finish system. It is sprayed on approx. 1.5 mm (1/16”) wet thickness: Sold in 5 kg (11 pounds) bags.
Silk Finish Coverage: 20 m2 (215 sqft) per bag.
Even Better 1 (EB1)
Made from recycled cotton fibers and perlite. Use as basecoat for all the finishes. Use as the top coat for the Secern and the Sahara finish. The plaster is sprayed on approx. 3 mm (1/8”) wet thickness: sold in 5 kg (11 pounds) bags.
Basecoat Coverage: 10 m2 (108 sqft) per bagSecern Finish Coverage: 15-30 m2 (161-323 sqft) per bag Sahara Finish Coverage: 40 m2 (431 sqft) per bag.
PROPRIETARY MATERIALS LISTED ABOVE ARE ONLY AVAILABLE TO ORDER VIA FELLERT. USE ONLY MATERIALS LISTED IN MANUAL IN ORDER TO COMPLY WITH WARRANTY.
Even Better Acoustical Coating
This is the finish coat for the Even Better Acousti-cal System. The Even Better Acoustical Coating is a non-bridging specialty coating designed for all types of acoustical ceiling. It can be used new installations to create a wide range of colours and on old ceilings for restoration purposes.18 liter (5 gal) Coverage: 80-120 sqm (861-1292 sgft)
Installaton: Mix thoroughly before use.Estimated drying time 20-30 minutes. The product will be completely cured after 24 hours.
THIS IS NOT PAINT - DO NOT INSTALL BEFORE COR-RECT INSTALLATION INSTRUCTIONS FROM FELLERT. Coverage: See Product Data Sheet
© All Rights Reserved Fellert Acoustical Ceilings AB 12015001 V.513
TOOLS & EQUIPMENT
Listed below are typically the tools and equipment you will need to install the Even Better Acoustical System.USE ONLY TOOLS AND EQUIPMENT AS DISTRIBUTED OR RECOMMENDED BY FELLERT.
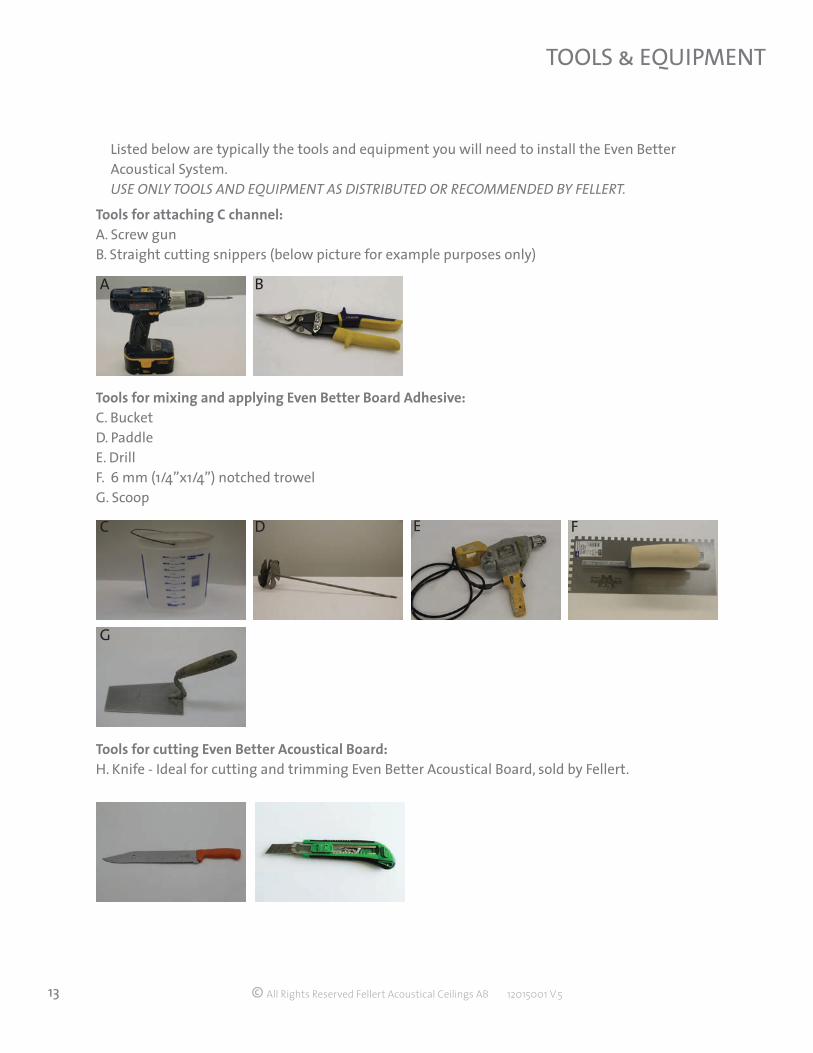
Tools for attaching C channel:A. Screw gun B. Straight cutting snippers (below picture for example purposes only)
Tools for mixing and applying Even Better Board Adhesive:C. Bucket D. PaddleE. Drill F. 6 mm (1/4’’x1/4”) notched trowel G. Scoop
Tools for cutting Even Better Acoustical Board:H. Knife - Ideal for cutting and trimming Even Better Acoustical Board, sold by Fellert.
A B
C D E F
G

© All Rights Reserved Fellert Acoustical Ceilings AB 12015001 V.514
TOOLS & EQUIPMENT
Tools for detailed cutting & installation of Even Better Acoustical Board:I. Tape measure J. T-squareK. Scissors (not pictured)L. Small utility knifeM. Spray adhesive (may use double-sided tape when applicable)N. Sanding spongeO. Putty knifeP. Joint knifeQ. TapeR. Chalk line reel
I J L M
N O P Q
R
Tools for applying Alcro Primer:S. Paint Brush
S

© All Rights Reserved Fellert Acoustical Ceilings AB 12015001 V.515
TOOLS & EQUIPMENT
Fellert Whisk
Only the Fellert Mixing Paddle can be used to mix the Even Better Acoustical Plaster. The prod-uct must be mixed to an even consistency.
Do not leave the paddle in the plaster after initial mixing, remove and rinse off.
Fellert Whisk is sold by Fellert.
Flat Base Mixing Container
Use white or natural colored plastic mixing con-tainers with a flat base.
200 L (55 gal) containers sold by Fellert.
Used mixing drills that can operate at a mini-mum of 300 rpm.
Suitable drills:
Makita DA4031DeWalt DWD460KMilwaukee 1676 (Holehawg)Flex R 500 FR Festool MX 100
© All Rights Reserved Fellert Acoustical Ceilings AB 12015001 V.516
TOOLS & EQUIPMENT
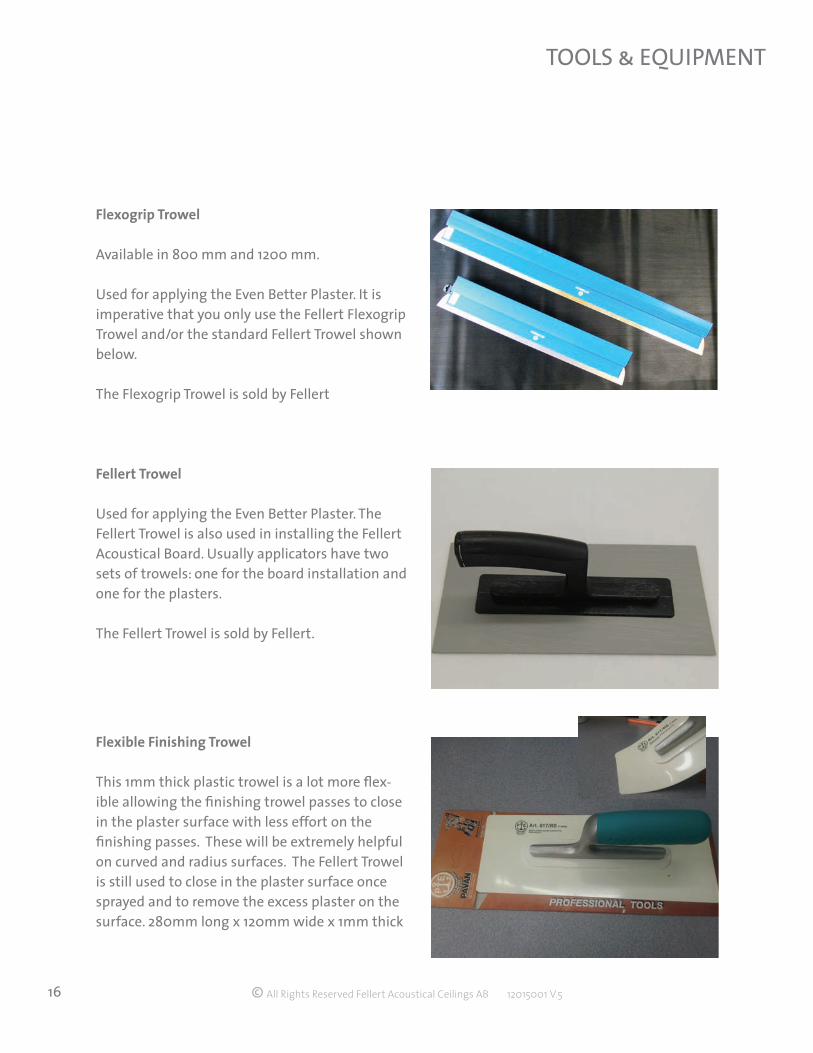
Fellert Trowel
Used for applying the Even Better Plaster. The Fellert Trowel is also used in installing the Fellert Acoustical Board. Usually applicators have two sets of trowels: one for the board installation and one for the plasters.
The Fellert Trowel is sold by Fellert.
Flexible Finishing Trowel
This 1mm thick plastic trowel is a lot more flex-ible allowing the finishing trowel passes to close in the plaster surface with less effort on the finishing passes. These will be extremely helpful on curved and radius surfaces. The Fellert Trowel is still used to close in the plaster surface once sprayed and to remove the excess plaster on the surface. 280mm long x 120mm wide x 1mm thick
*different colors but same trowel
Flexogrip Trowel Available in 800 mm and 1200 mm.
Used for applying the Even Better Plaster. It is imperative that you only use the Fellert Flexogrip Trowel and/or the standard Fellert Trowel shown below.
The Flexogrip Trowel is sold by Fellert

© All Rights Reserved Fellert Acoustical Ceilings AB 12015001 V.517
TOOLS & EQUIPMENT
Porter Cable 7800 “Orbital” Vacuum Sander - North America Only
Used for sanding the Even Better Acoustical Board substrate and the Even Better Acoustical Plaster basecoat. You must use the full size hook and loop sanding discs and pads compatible for the 7800 model to ensure consistent sanding.
Sander and vacuum are sold by Fellert.
Festool Long-reach sander PLANEX LHS
Used for sanding the Even Better Acoustical Board substrate and the Even Better Acoustical Plaster basecoat. You must use the full size hook and loop sanding discs and compatible pads to ensure consistent sanding.
Sander and vacuum are sold by Fellert.
Kremlin EOS 30-C25
An air mix spray gun, as the Kremlin 30:25 is recommended. Or Graco FinishPro II 395 PC(Air assisted with the G15 flat cap tips.)
Kremlin requires external air compressorunit for the air assist.
© All Rights Reserved Fellert Acoustical Ceilings AB 12015001 V.518
TOOLS & EQUIPMENT
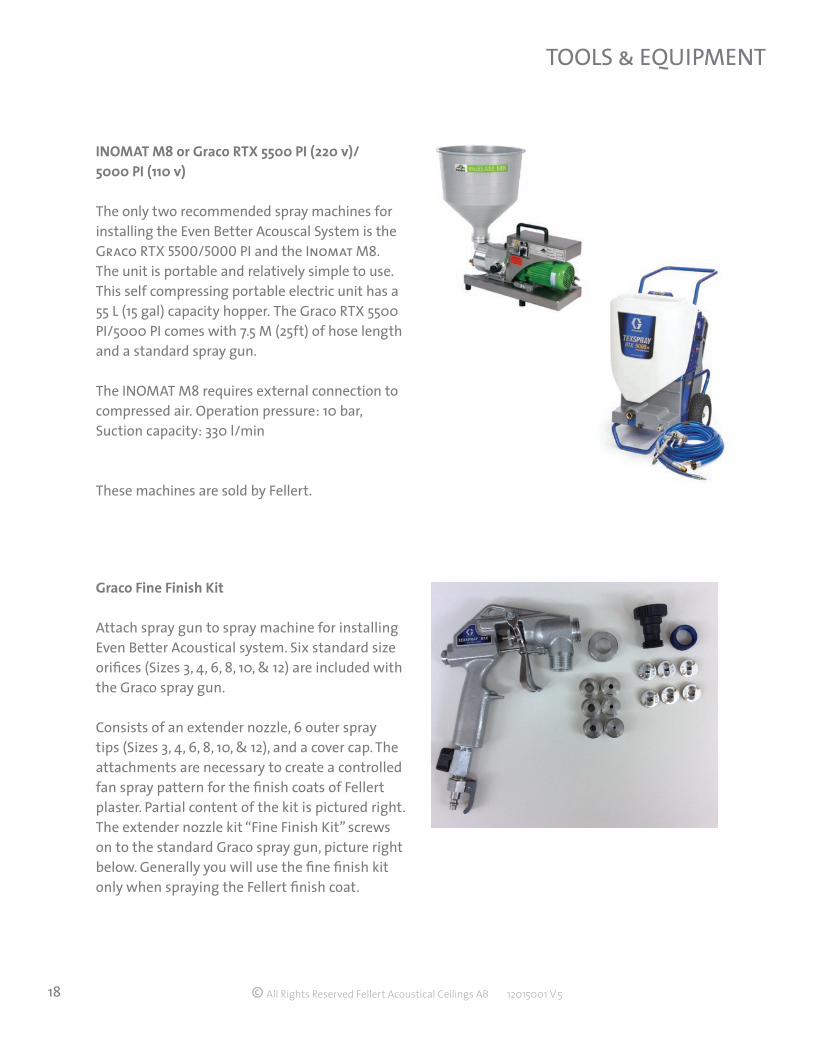
Graco Fine Finish Kit
Attach spray gun to spray machine for installing Even Better Acoustical system. Six standard size orifices (Sizes 3, 4, 6, 8, 10, & 12) are included with the Graco spray gun.
Consists of an extender nozzle, 6 outer spray tips (Sizes 3, 4, 6, 8, 10, & 12), and a cover cap. The attachments are necessary to create a controlled fan spray pattern for the finish coats of Fellert plaster. Partial content of the kit is pictured right. The extender nozzle kit “Fine Finish Kit” screws on to the standard Graco spray gun, picture right below. Generally you will use the fine finish kit only when spraying the Fellert finish coat.
INOMAT M8 or Graco RTX 5500 PI (220 v)/5000 PI (110 v)
The only two recommended spray machines for installing the Even Better Acouscal System is the Graco RTX 5500/5000 PI and the Inomat M8. The unit is portable and relatively simple to use. This self compressing portable electric unit has a 55 L (15 gal) capacity hopper. The Graco RTX 5500 PI/5000 PI comes with 7.5 M (25ft) of hose length and a standard spray gun.
The INOMAT M8 requires external connection to compressed air. Operation pressure: 10 bar, Suction capacity: 330 l/min
These machines are sold by Fellert.
© All Rights Reserved Fellert Acoustical Ceilings AB 12015001 V.519
CHECKLIST
Sold Only by Fellert• Plastic C-Channel • Even Better Acoustical Board• Fellert Spring Washers• Even Better Board Adhesive• Even Better Primer• Even Better 1 - basecoat for all and finish
coat for Secern and Sahara• Even Better 2 - finish coat for Silk• Even Better Acoustical Coating • Fellert Mixing Paddle • Flexogrip Trowel• Fellert Trowel• Flexible Finishing Trowel• Knife
Available to order by Fellert• Sanding Pads – 80 & 220 grit • 6 mm (1/4”) notched trowel• Porter Cable 7800 “giraffe” vacuum sander • Makati DA4031 Drill with 300rpm • 200 L (55 gal) white or natural plastic mix-
ing containers • Graco RTX 5500 PI/5000 PI Spray machine or Inomat M8• Fine finish spray kit • Kremlin EOS 30-C25.• 50 mm (2”) Self-Adhesive mesh tape• 122 cm (48”) mesh (for vertical applications
below 3 M (10 ft))• Power pad
PRIOR TO STARTING ANY INSTALLATION VERIFY THAT YOU HAVE THE CORRECT MATERIALS, TOOLS AND EQUIPMENT FOR YOUR PROJECT.
Sundry items• masking tape• plastic masking film• floor protection if applicable• rags (use white colored rags only)• 400 grit sandpaper/sanding sponges• brushes for primer• dust masks and respirators• trash bags• drywall screws to attach plastic C-chan-
nel to studwork
Typical tools and equipment• Screw gun• Straight cutting snippers• Small plastic breakaway utility knifes• tape measure• Chalk Line• straight edge• Measuring buckets• Five gallon buckets
© All Rights Reserved Fellert Acoustical Ceilings AB 12015001 V.520
PRINCIPLES OF INSTALLATION Even Better Acoustical Board & Substrate Preparation
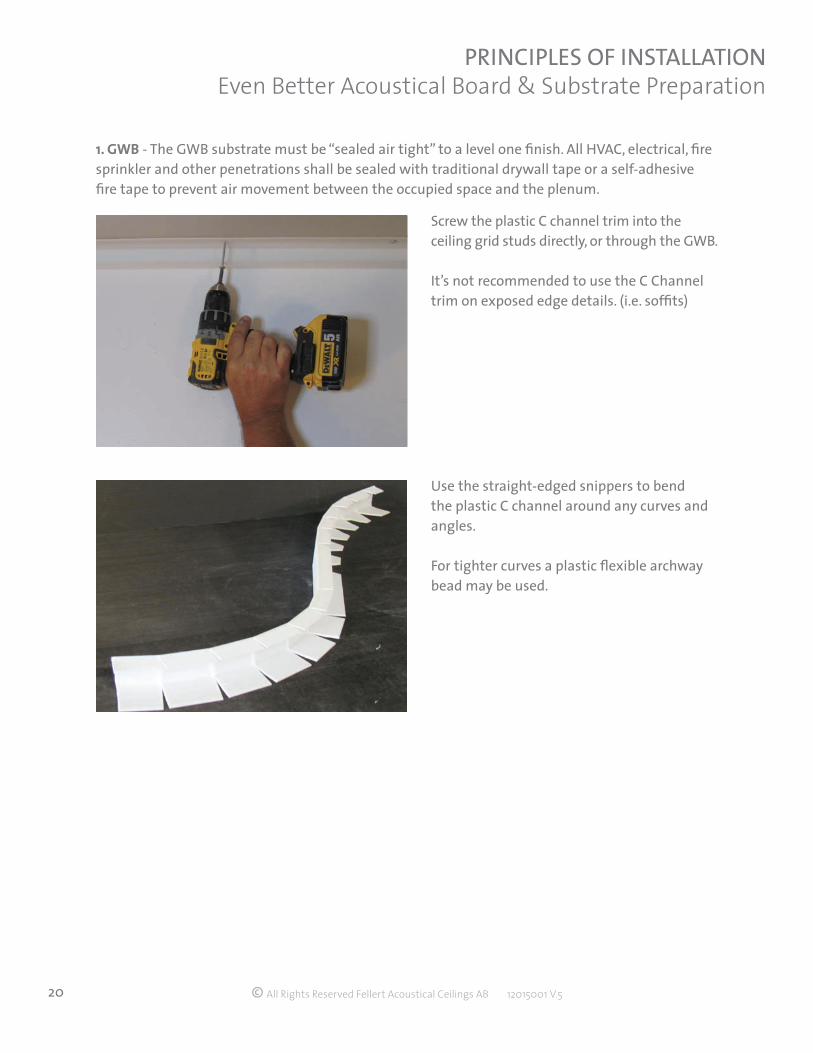
1. GWB - The GWB substrate must be “sealed air tight” to a level one finish. All HVAC, electrical, fire sprinkler and other penetrations shall be sealed with traditional drywall tape or a self-adhesive fire tape to prevent air movement between the occupied space and the plenum.
Screw the plastic C channel trim into the ceiling grid studs directly, or through the GWB.
It’s not recommended to use the C Channel trim on exposed edge details. (i.e. soffits)
Use the straight-edged snippers to bend the plastic C channel around any curves and angles.
For tighter curves a plastic flexible archway bead may be used.
© All Rights Reserved Fellert Acoustical Ceilings AB 12015001 V.521
PRINCIPLES OF INSTALLATION Even Better Acoustical Board & Substrate Preparation
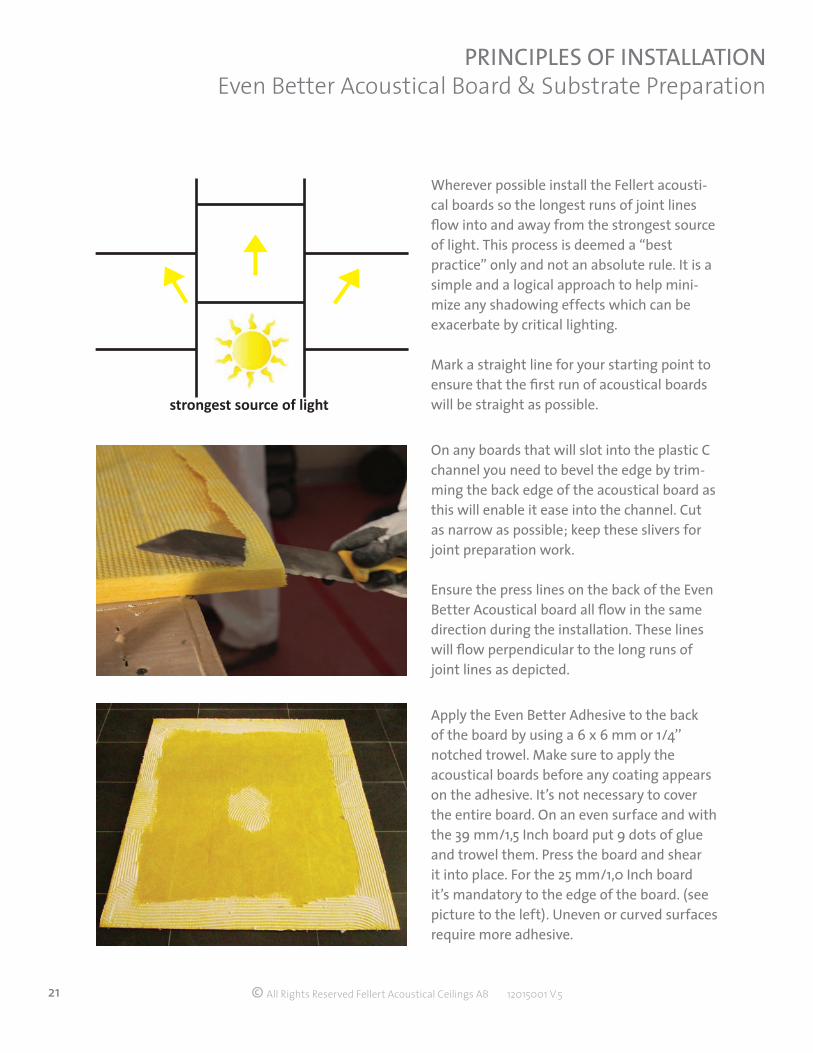
Wherever possible install the Fellert acousti-cal boards so the longest runs of joint lines flow into and away from the strongest source of light. This process is deemed a “best practice” only and not an absolute rule. It is a simple and a logical approach to help mini-mize any shadowing effects which can be exacerbate by critical lighting.
Mark a straight line for your starting point to ensure that the first run of acoustical boards will be straight as possible.
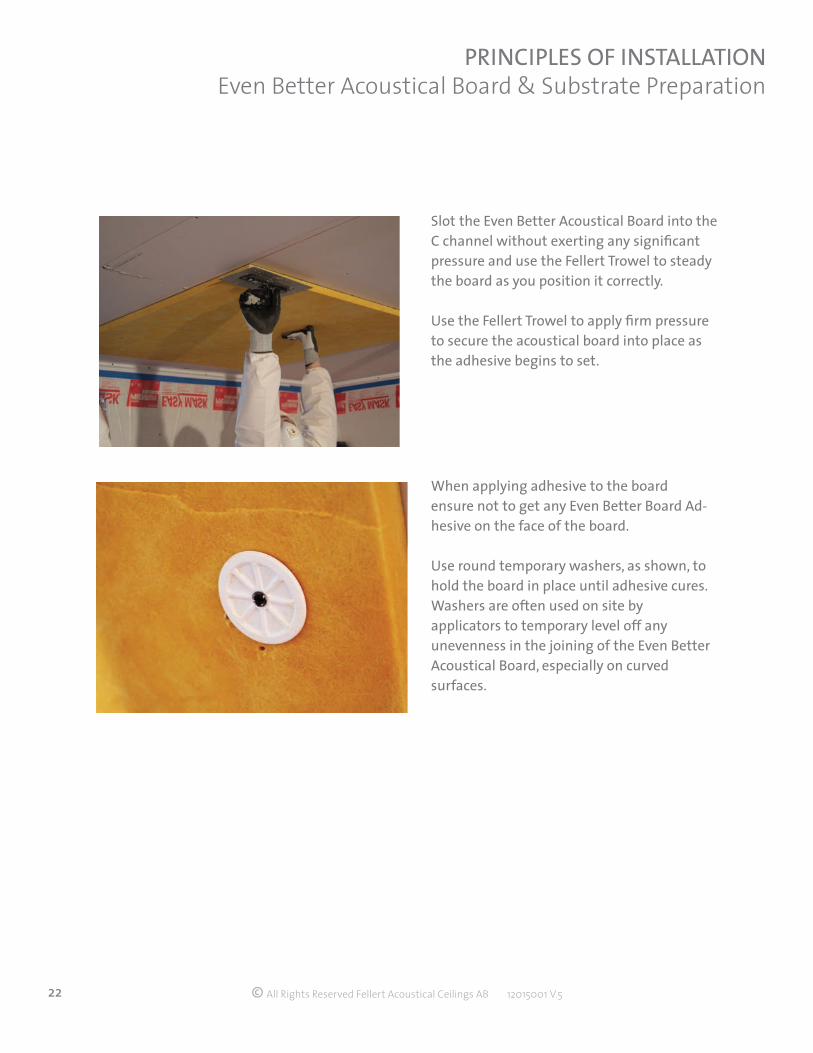
On any boards that will slot into the plastic C channel you need to bevel the edge by trim-ming the back edge of the acoustical board as this will enable it ease into the channel. Cut as narrow as possible; keep these slivers for joint preparation work.
Ensure the press lines on the back of the Even Better Acoustical board all flow in the same direction during the installation. These lines will flow perpendicular to the long runs of joint lines as depicted.
Apply the Even Better Adhesive to the back of the board by using a 6 x 6 mm or 1/4’’ notched trowel. Make sure to apply the acoustical boards before any coating appears on the adhesive. It’s not necessary to cover the entire board. On an even surface and with the 39 mm/1,5 Inch board put 9 dots of glue and trowel them. Press the board and shear it into place. For the 25 mm/1,0 Inch board it’s mandatory to the edge of the board. (see picture to the left). Uneven or curved surfaces require more adhesive.
strongest source of light
© All Rights Reserved Fellert Acoustical Ceilings AB 12015001 V.522
PRINCIPLES OF INSTALLATION Even Better Acoustical Board & Substrate Preparation
Slot the Even Better Acoustical Board into the C channel without exerting any significant pressure and use the Fellert Trowel to steady the board as you position it correctly.
Use the Fellert Trowel to apply firm pressure to secure the acoustical board into place as the adhesive begins to set.
When applying adhesive to the board ensure not to get any Even Better Board Ad-hesive on the face of the board.
Use round temporary washers, as shown, to hold the board in place until adhesive cures. Washers are often used on site by applicators to temporary level off any unevenness in the joining of the Even Better Acoustical Board, especially on curved surfaces.
© All Rights Reserved Fellert Acoustical Ceilings AB 12015001 V.523
PRINCIPLES OF INSTALLATION Even Better Acoustical Board & Substrate Preparation
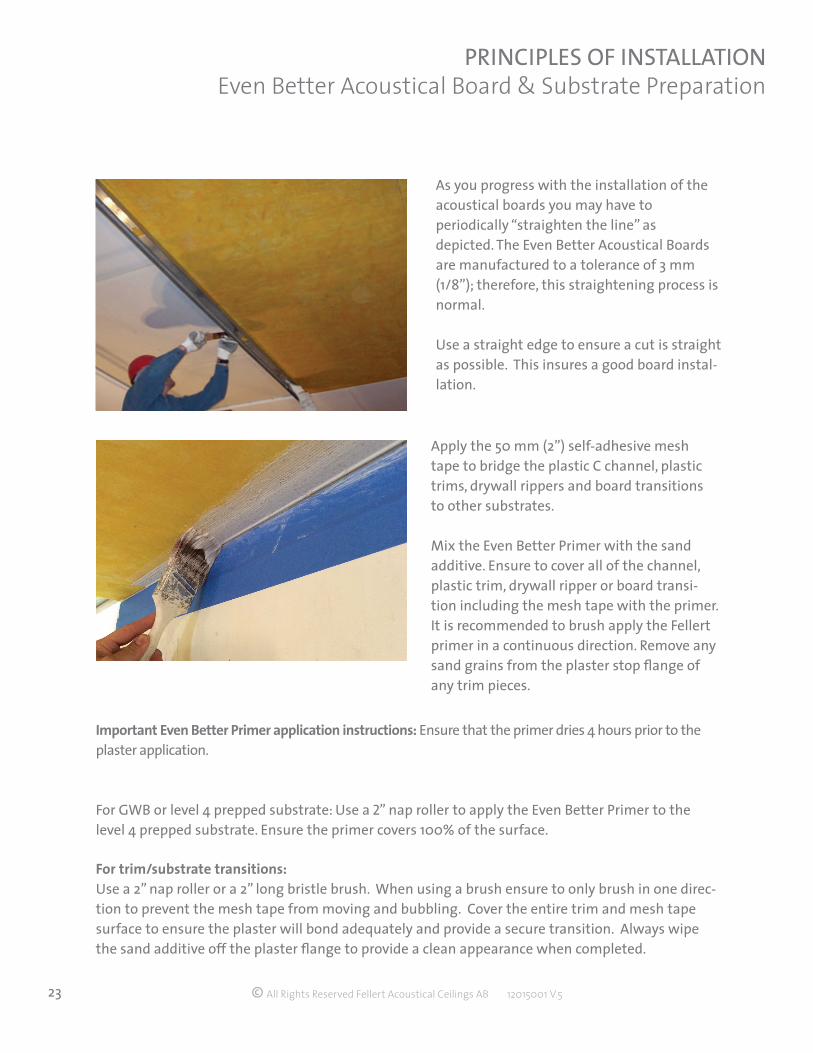
As you progress with the installation of the acoustical boards you may have to periodically “straighten the line” as depicted. The Even Better Acoustical Boards are manufactured to a tolerance of 3 mm (1/8”); therefore, this straightening process is normal.
Use a straight edge to ensure a cut is straight as possible. This insures a good board instal-lation.
Apply the 50 mm (2”) self-adhesive mesh tape to bridge the plastic C channel, plastic trims, drywall rippers and board transitions to other substrates.
Mix the Even Better Primer with the sand additive. Ensure to cover all of the channel, plastic trim, drywall ripper or board transi-tion including the mesh tape with the primer. It is recommended to brush apply the Fellert primer in a continuous direction. Remove any sand grains from the plaster stop flange of any trim pieces.
Important Even Better Primer application instructions: Ensure that the primer dries 4 hours prior to the plaster application.
For GWB or level 4 prepped substrate: Use a 2” nap roller to apply the Even Better Primer to the level 4 prepped substrate. Ensure the primer covers 100% of the surface.
For trim/substrate transitions:Use a 2” nap roller or a 2” long bristle brush. When using a brush ensure to only brush in one direc-tion to prevent the mesh tape from moving and bubbling. Cover the entire trim and mesh tape surface to ensure the plaster will bond adequately and provide a secure transition. Always wipe the sand additive off the plaster flange to provide a clean appearance when completed.
© All Rights Reserved Fellert Acoustical Ceilings AB 12015001 V.524
PRINCIPLES OF INSTALLATION Even Better Acoustical Board & Substrate Preparation
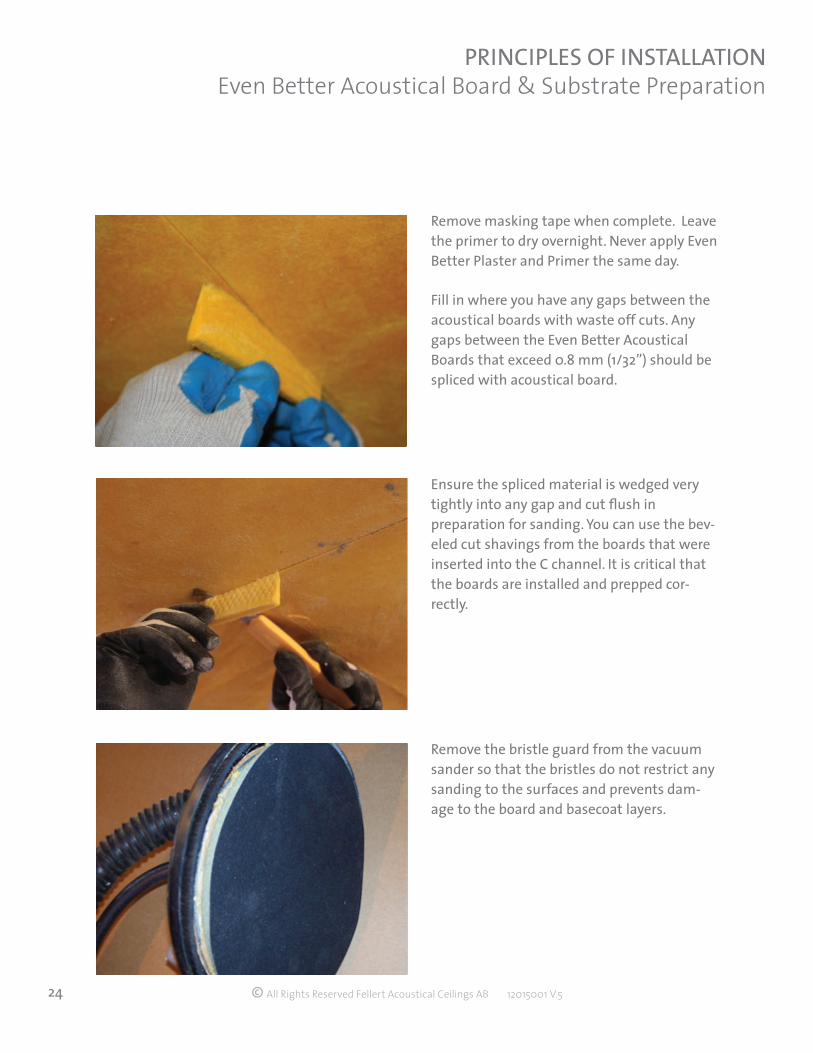
Remove masking tape when complete. Leave the primer to dry overnight. Never apply Even Better Plaster and Primer the same day.
Fill in where you have any gaps between the acoustical boards with waste off cuts. Any gaps between the Even Better Acoustical Boards that exceed 0.8 mm (1/32”) should be spliced with acoustical board.
Ensure the spliced material is wedged very tightly into any gap and cut flush in preparation for sanding. You can use the bev-eled cut shavings from the boards that were inserted into the C channel. It is critical that the boards are installed and prepped cor-rectly.
Remove the bristle guard from the vacuum sander so that the bristles do not restrict any sanding to the surfaces and prevents dam-age to the board and basecoat layers.
© All Rights Reserved Fellert Acoustical Ceilings AB 12015001 V.525
PRINCIPLES OF INSTALLATION Even Better Acoustical Board & Substrate Preparation
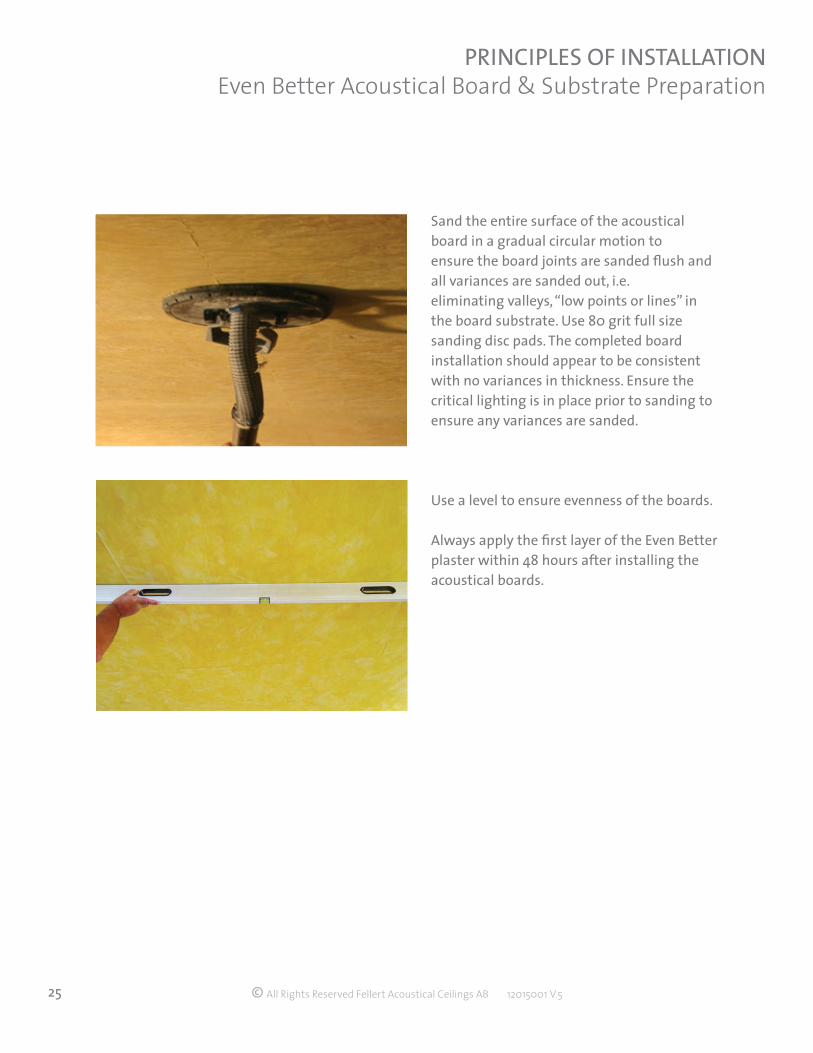
Sand the entire surface of the acoustical board in a gradual circular motion to ensure the board joints are sanded flush and all variances are sanded out, i.e.eliminating valleys, “low points or lines” in the board substrate. Use 80 grit full size sanding disc pads. The completed board installation should appear to be consistent with no variances in thickness. Ensure the critical lighting is in place prior to sanding to ensure any variances are sanded.
Use a level to ensure evenness of the boards.
Always apply the first layer of the Even Better plaster within 48 hours after installing the acoustical boards.
© All Rights Reserved Fellert Acoustical Ceilings AB 12015001 V.526
PRINCIPLES OF INSTALLATION Even Better Acoustical Board & Substrate Preparation
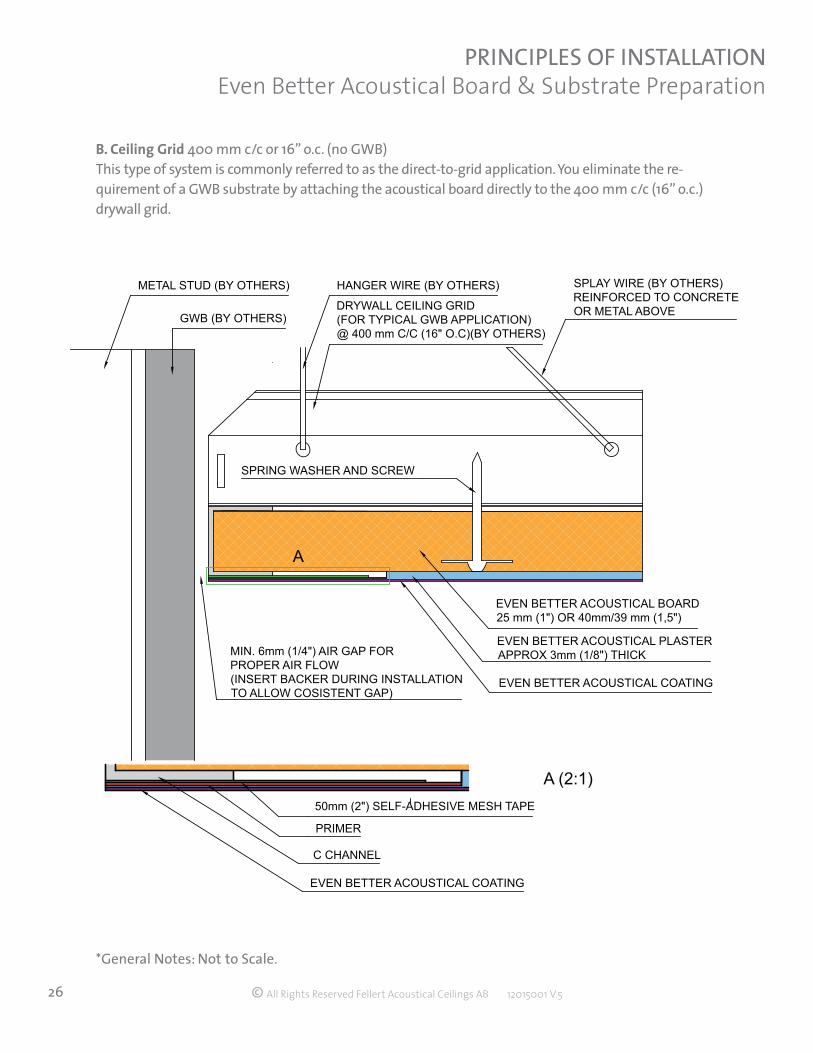
B. Ceiling Grid 400 mm c/c or 16” o.c. (no GWB)This type of system is commonly referred to as the direct-to-grid application. You eliminate the re-quirement of a GWB substrate by attaching the acoustical board directly to the 400 mm c/c (16” o.c.) drywall grid.
A (2:1)
A
C CHANNEL
DRYWALL CEILING GRID(FOR TYPICAL GWB APPLICATION)@ 400 mm C/C (16" O.C)(BY OTHERS)
EVEN BETTER ACOUSTICAL BOARD25 mm (1") OR 40mm/39 mm (1,5")
EVEN BETTER ACOUSTICAL COATING
EVEN BETTER ACOUSTICAL PLASTERAPPROX 3mm (1/8") THICK
HANGER WIRE (BY OTHERS)
50mm (2") SELF-ADHESIVE MESH TAPE
PRIMER
SPLAY WIRE (BY OTHERS)REINFORCED TO CONCRETEOR METAL ABOVE
MIN. 6mm (1/4") AIR GAP FORPROPER AIR FLOW(INSERT BACKER DURING INSTALLATIONTO ALLOW COSISTENT GAP)
GWB (BY OTHERS)
METAL STUD (BY OTHERS)
SPRING WASHER AND SCREW
EVEN BETTER ACOUSTICAL COATING
*General Notes: Not to Scale.
© All Rights Reserved Fellert Acoustical Ceilings AB 12015001 V.527
PRINCIPLES OF INSTALLATION Even Better Acoustical Board & Substrate Preparation
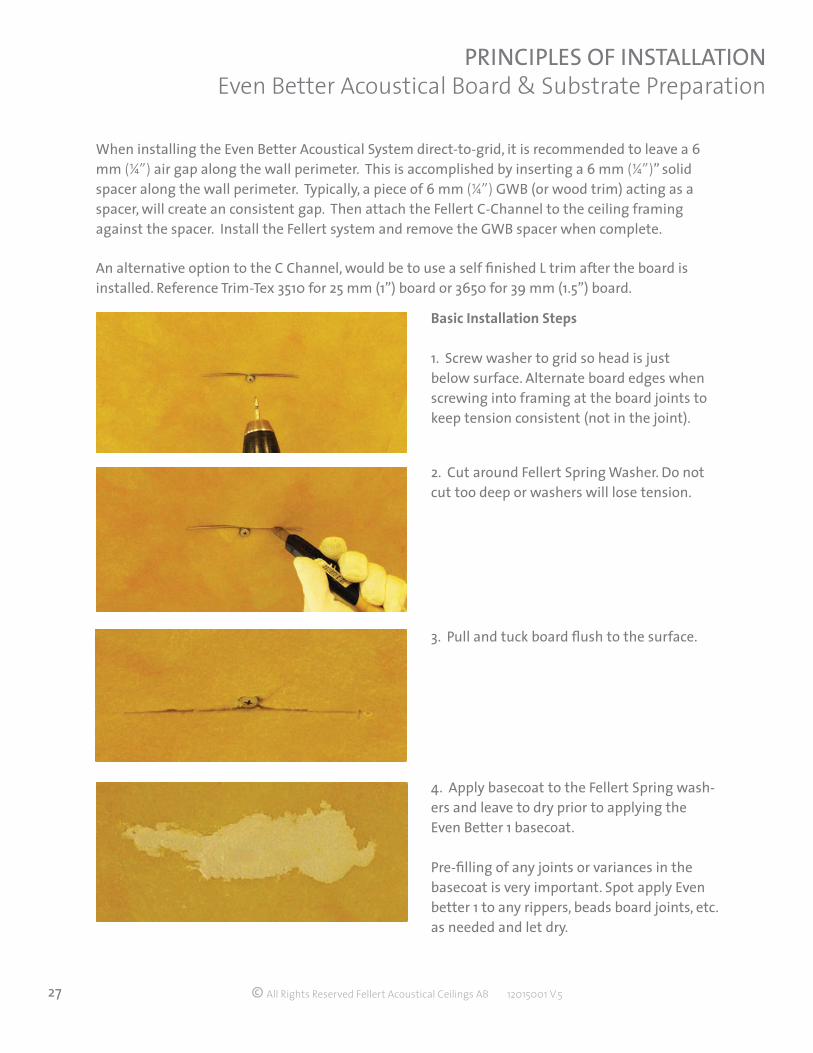
When installing the Even Better Acoustical System direct-to-grid, it is recommended to leave a 6 mm (¼”) air gap along the wall perimeter. This is accomplished by inserting a 6 mm (¼”)” solid spacer along the wall perimeter. Typically, a piece of 6 mm (¼”) GWB (or wood trim) acting as a spacer, will create an consistent gap. Then attach the Fellert C-Channel to the ceiling framing against the spacer. Install the Fellert system and remove the GWB spacer when complete.
An alternative option to the C Channel, would be to use a self finished L trim after the board is installed. Reference Trim-Tex 3510 for 25 mm (1”) board or 3650 for 39 mm (1.5”) board.
Basic Installation Steps
1. Screw washer to grid so head is just below surface. Alternate board edges when screwing into framing at the board joints to keep tension consistent (not in the joint).
2. Cut around Fellert Spring Washer. Do not cut too deep or washers will lose tension.
3. Pull and tuck board flush to the surface.
4. Apply basecoat to the Fellert Spring wash-ers and leave to dry prior to applying the Even Better 1 basecoat.
Pre-filling of any joints or variances in the basecoat is very important. Spot apply Even better 1 to any rippers, beads board joints, etc. as needed and let dry.
© All Rights Reserved Fellert Acoustical Ceilings AB 12015001 V.528
PRINCIPLES OF INSTALLATION Even Better Acoustical Board & Substrate Preparation
16’ x 16 (256sqft)4.9m x 4.9m (24m2)
ceiling grid at 16” o.c.400mm
example of Fellert Spring Washer layout
(washer size enlarged for viewing purposes)
ceiling grid
spring washer
C channel
206 washers used in 256sqft.23.75m2
1 washer every 1.24 sqft avg.0.12m2
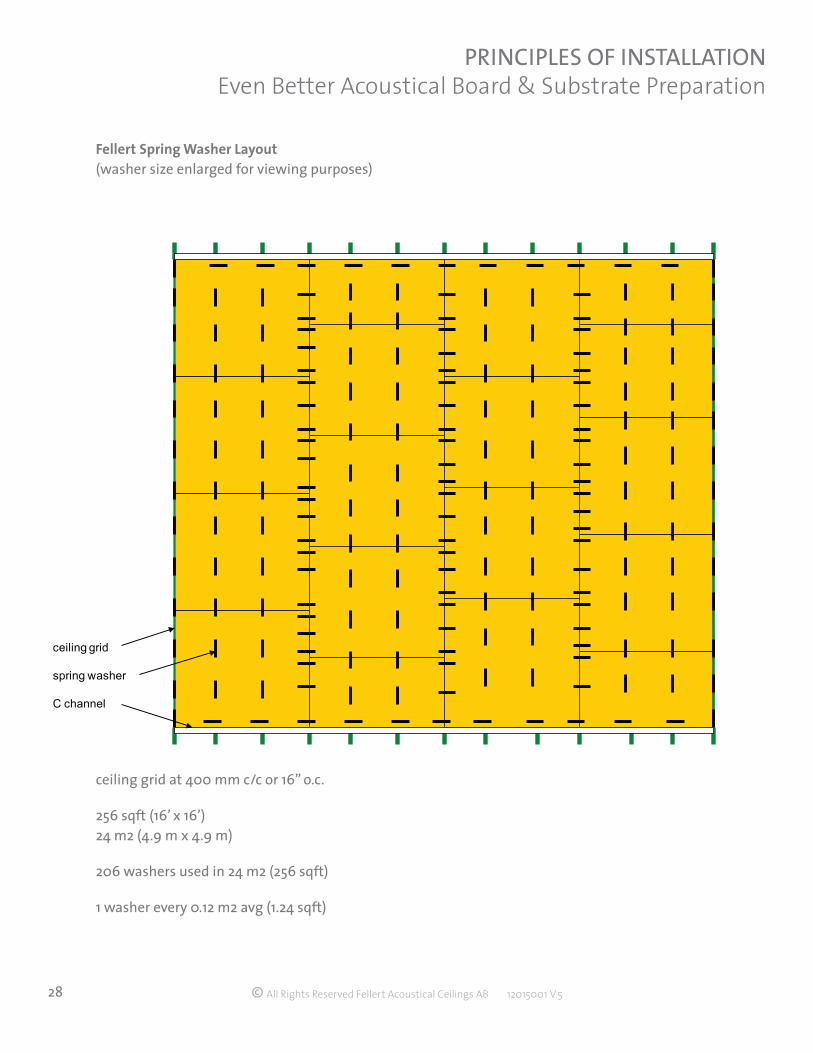
Fellert Spring Washer Layout(washer size enlarged for viewing purposes)
ceiling grid at 400 mm c/c or 16” o.c.
256 sqft (16’ x 16’) 24 m2 (4.9 m x 4.9 m)
206 washers used in 24 m2 (256 sqft)
1 washer every 0.12 m2 avg (1.24 sqft)
© All Rights Reserved Fellert Acoustical Ceilings AB 12015001 V.529
PRINCIPLES OF INSTALLATION Even Better Acoustical Board & Substrate Preparation
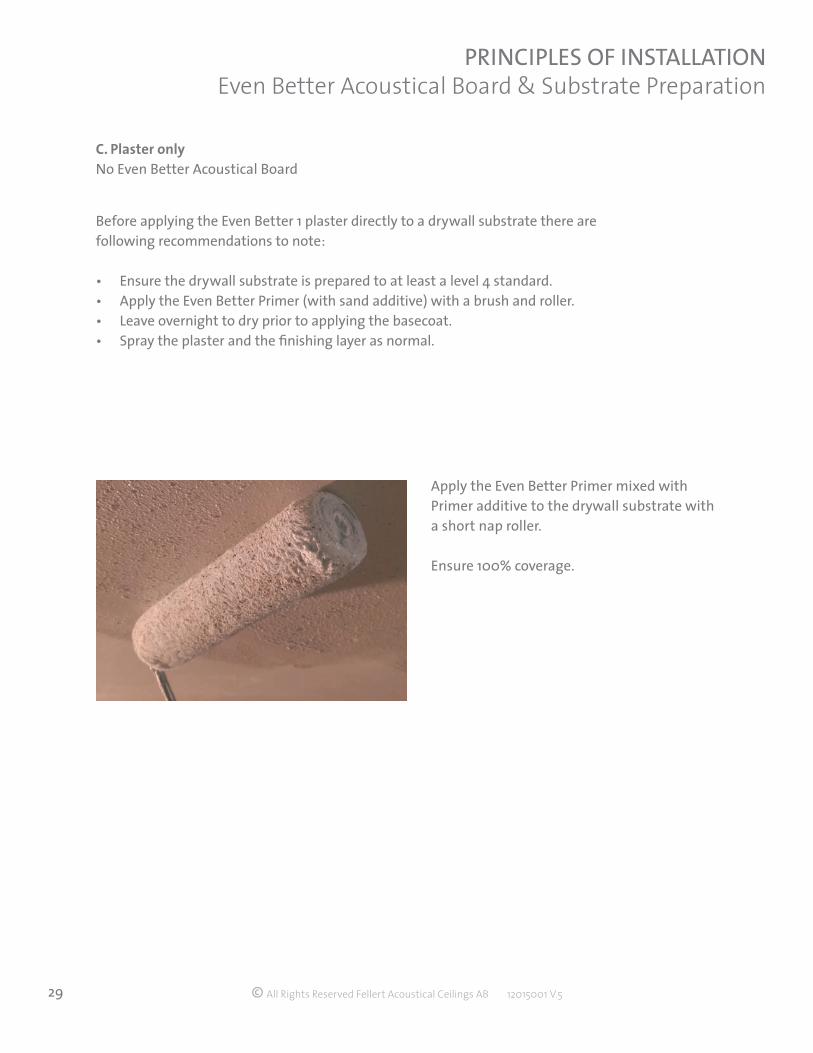
Apply the Even Better Primer mixed with Primer additive to the drywall substrate with a short nap roller.
Ensure 100% coverage.
C. Plaster onlyNo Even Better Acoustical Board
Before applying the Even Better 1 plaster directly to a drywall substrate there are following recommendations to note:
• Ensure the drywall substrate is prepared to at least a level 4 standard.• Apply the Even Better Primer (with sand additive) with a brush and roller.• Leave overnight to dry prior to applying the basecoat.• Spray the plaster and the finishing layer as normal.
© All Rights Reserved Fellert Acoustical Ceilings AB 12015001 V.530
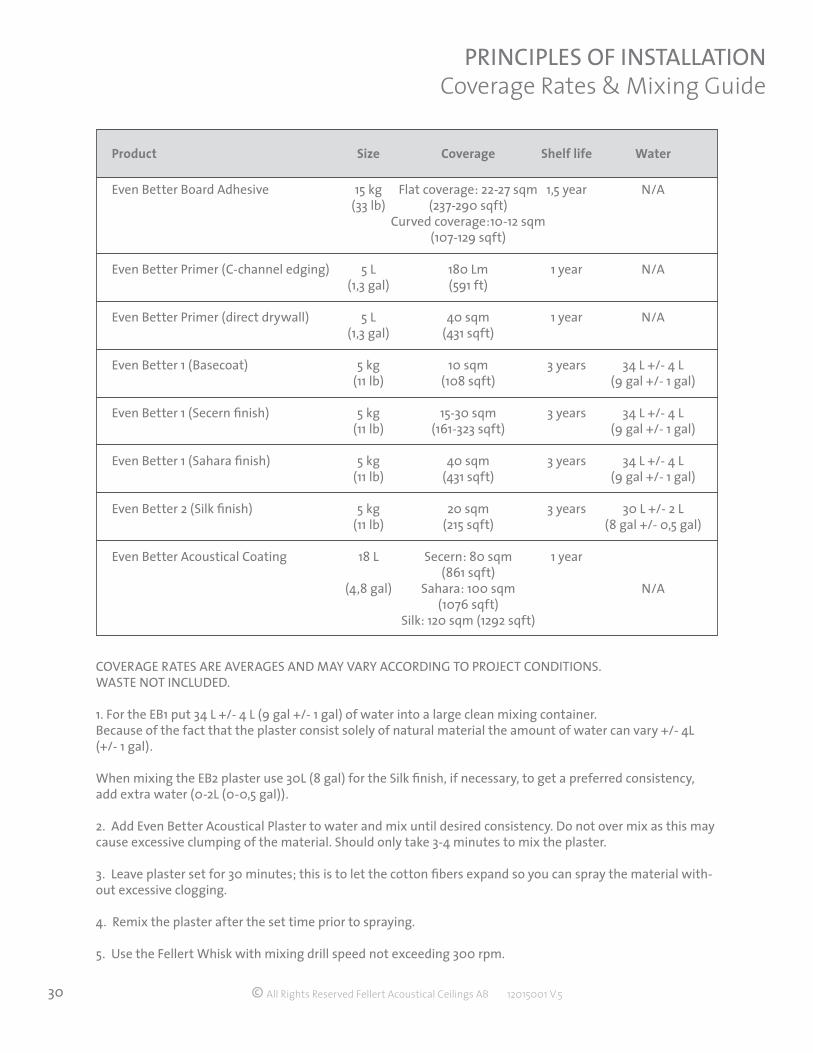
PRINCIPLES OF INSTALLATION Coverage Rates & Mixing Guide
COVERAGE RATES ARE AVERAGES AND MAY VARY ACCORDING TO PROJECT CONDITIONS. WASTE NOT INCLUDED. 1. For the EB1 put 34 L +/- 4 L (9 gal +/- 1 gal) of water into a large clean mixing container.Because of the fact that the plaster consist solely of natural material the amount of water can vary +/- 4L (+/- 1 gal).
When mixing the EB2 plaster use 30L (8 gal) for the Silk finish, if necessary, to get a preferred consistency, add extra water (0-2L (0-0,5 gal)).
2. Add Even Better Acoustical Plaster to water and mix until desired consistency. Do not over mix as this may cause excessive clumping of the material. Should only take 3-4 minutes to mix the plaster.
3. Leave plaster set for 30 minutes; this is to let the cotton fibers expand so you can spray the material with-out excessive clogging.
4. Remix the plaster after the set time prior to spraying.
5. Use the Fellert Whisk with mixing drill speed not exceeding 300 rpm.
Product Size Coverage Shelf life Water
Even Better Board Adhesive 15 kg Flat coverage: 22-27 sqm 1,5 year N/A (33 lb) (237-290 sqft) Curved coverage:10-12 sqm (107-129 sqft)
Even Better Primer (C-channel edging) 5 L 180 Lm 1 year N/A (1,3 gal) (591 ft)
Even Better Primer (direct drywall) 5 L 40 sqm 1 year N/A (1,3 gal) (431 sqft)
Even Better 1 (Basecoat) 5 kg 10 sqm 3 years 34 L +/- 4 L (11 lb) (108 sqft) (9 gal +/- 1 gal)
Even Better 1 (Secern finish) 5 kg 15-30 sqm 3 years 34 L +/- 4 L (11 lb) (161-323 sqft) (9 gal +/- 1 gal)
Even Better 1 (Sahara finish) 5 kg 40 sqm 3 years 34 L +/- 4 L (11 lb) (431 sqft) (9 gal +/- 1 gal)
Even Better 2 (Silk finish) 5 kg 20 sqm 3 years 30 L +/- 2 L (11 lb) (215 sqft) (8 gal +/- 0,5 gal)
Even Better Acoustical Coating 18 L Secern: 80 sqm 1 year (861 sqft) (4,8 gal) Sahara: 100 sqm N/A (1076 sqft) Silk: 120 sqm (1292 sqft)
© All Rights Reserved Fellert Acoustical Ceilings AB 12015001 V.531
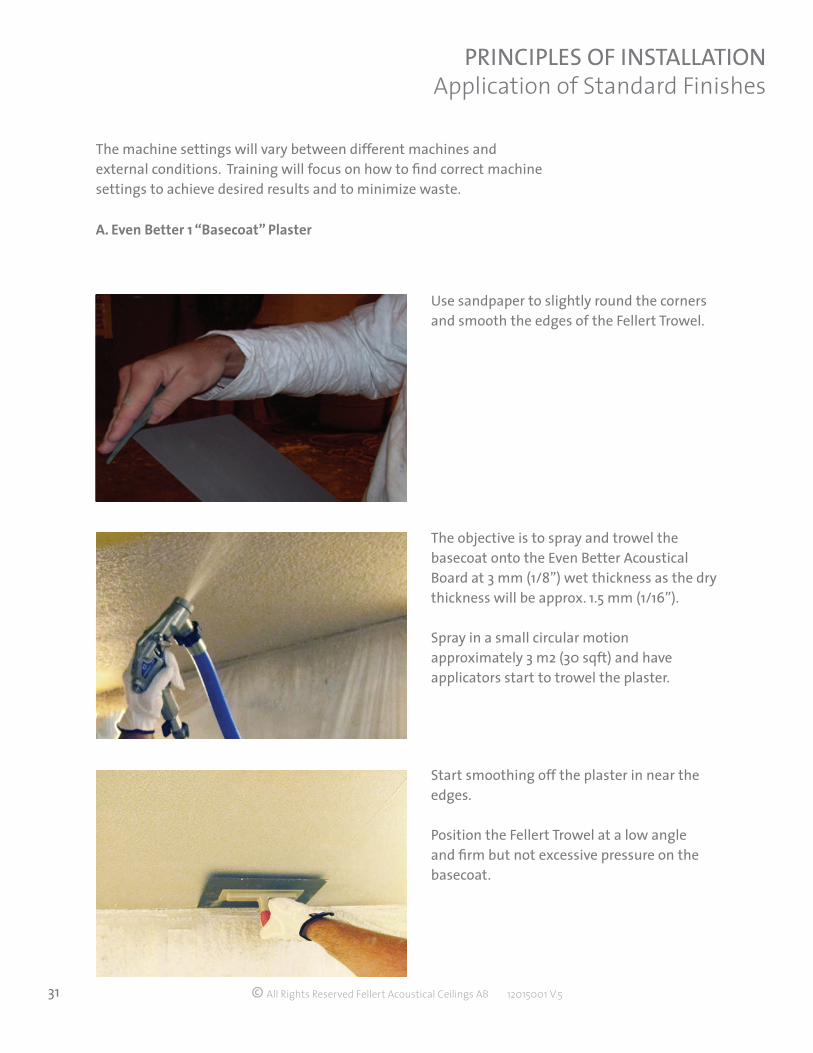
PRINCIPLES OF INSTALLATION Application of Standard Finishes
Use sandpaper to slightly round the corners and smooth the edges of the Fellert Trowel.
The objective is to spray and trowel the basecoat onto the Even Better Acoustical Board at 3 mm (1/8”) wet thickness as the dry thickness will be approx. 1.5 mm (1/16”).
Spray in a small circular motion approximately 3 m2 (30 sqft) and have applicators start to trowel the plaster.
Start smoothing off the plaster in near the edges.
Position the Fellert Trowel at a low angle and firm but not excessive pressure on the basecoat.
The machine settings will vary between different machines and external conditions. Training will focus on how to find correct machine settings to achieve desired results and to minimize waste.
A. Even Better 1 “Basecoat” Plaster
© All Rights Reserved Fellert Acoustical Ceilings AB 12015001 V.532
PRINCIPLES OF INSTALLATION Application of Standard Finishes
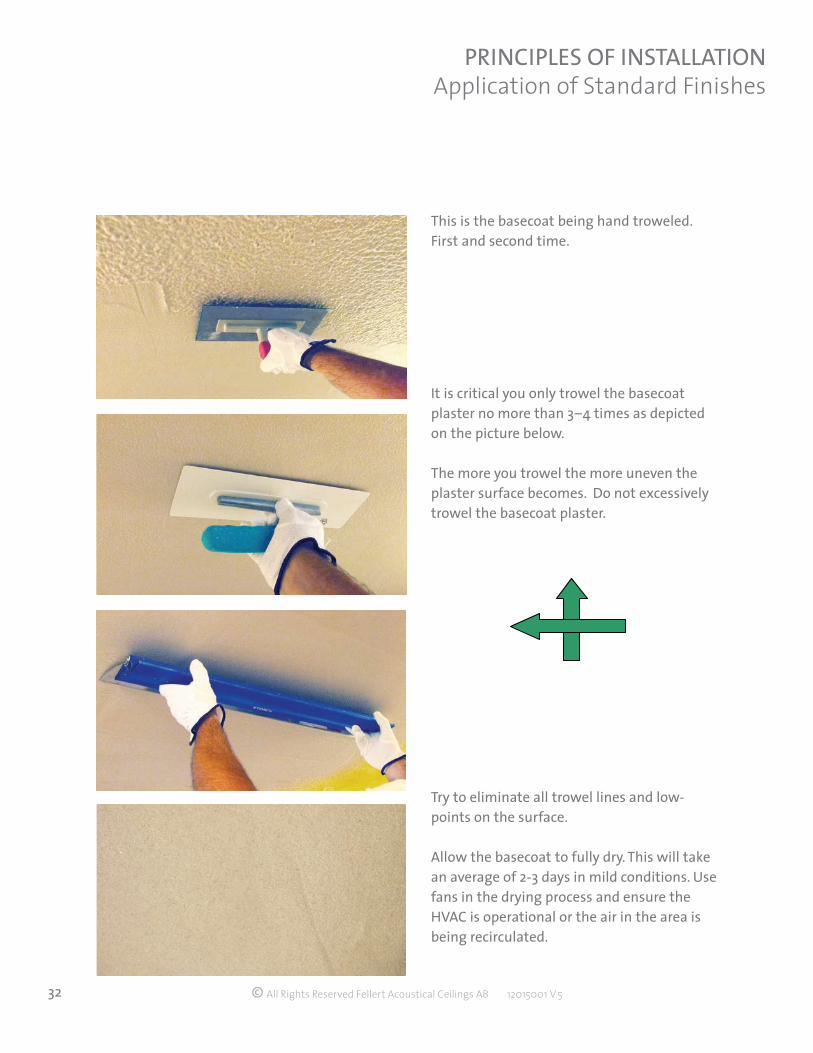
It is critical you only trowel the basecoat plaster no more than 3–4 times as depicted on the picture below.
The more you trowel the more uneven the plaster surface becomes. Do not excessively trowel the basecoat plaster.
This is the basecoat being hand troweled. First and second time.
Try to eliminate all trowel lines and low-points on the surface.
Allow the basecoat to fully dry. This will take an average of 2-3 days in mild conditions. Use fans in the drying process and ensure the HVAC is operational or the air in the area is being recirculated.
© All Rights Reserved Fellert Acoustical Ceilings AB 12015001 V.533
PRINCIPLES OF INSTALLATION Application of Standard Finishes
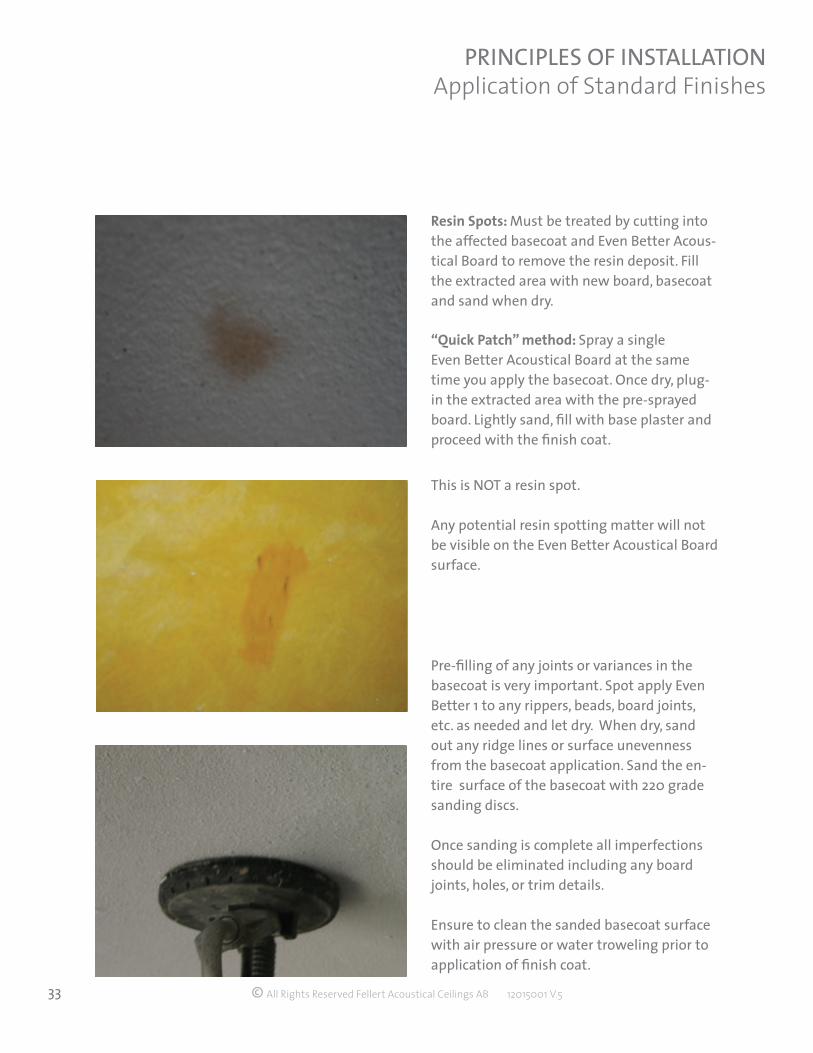
Resin Spots: Must be treated by cutting into the affected basecoat and Even Better Acous-tical Board to remove the resin deposit. Fill the extracted area with new board, basecoat and sand when dry.
“Quick Patch” method: Spray a single Even Better Acoustical Board at the same time you apply the basecoat. Once dry, plug-in the extracted area with the pre-sprayed board. Lightly sand, fill with base plaster and proceed with the finish coat.
This is NOT a resin spot.
Any potential resin spotting matter will not be visible on the Even Better Acoustical Board surface.
Pre-filling of any joints or variances in the basecoat is very important. Spot apply Even Better 1 to any rippers, beads, board joints, etc. as needed and let dry. When dry, sand out any ridge lines or surface unevenness from the basecoat application. Sand the en-tire surface of the basecoat with 220 grade sanding discs.
Once sanding is complete all imperfections should be eliminated including any board joints, holes, or trim details.
Ensure to clean the sanded basecoat surface with air pressure or water troweling prior to application of finish coat.

© All Rights Reserved Fellert Acoustical Ceilings AB 12015001 V.534
PRINCIPLES OF INSTALLATION Application of Standard Finishes
B. Even Better 1 top coat plaster for Secern
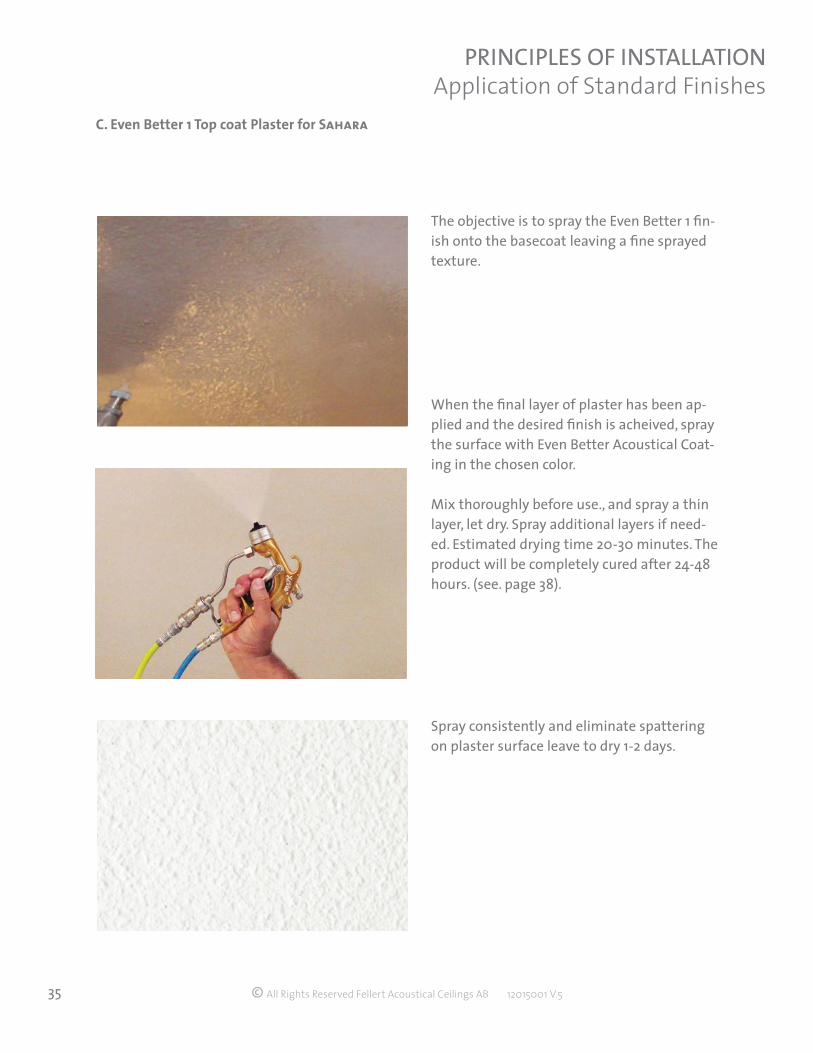
The objective is to spray the Even Better 1 finish onto the basecoat leaving a medium to rough sprayed texture.
When the final layer of plaster has been ap-plied and the desired finish is acheived, spray the surface with Even Better Acoustical Coat-ing in the chosen color.
Mix thoroughly before use. Spray a thin layer, let dry. Spray additional layers if needed. Estimated drying time 20-30 minutes. The product will be completely cured after 24-48 hours. (see. page 38).
Spray consistently and eliminate spattering on plaster surface. Leave to dry 1-2 days.
© All Rights Reserved Fellert Acoustical Ceilings AB 12015001 V.535
PRINCIPLES OF INSTALLATION Application of Standard Finishes
The objective is to spray the Even Better 1 fin-ish onto the basecoat leaving a fine sprayed texture.
Spray consistently and eliminate spattering on plaster surface leave to dry 1-2 days.
C. Even Better 1 Top coat Plaster for Sahara
When the final layer of plaster has been ap-plied and the desired finish is acheived, spray the surface with Even Better Acoustical Coat-ing in the chosen color.
Mix thoroughly before use., and spray a thin layer, let dry. Spray additional layers if need-ed. Estimated drying time 20-30 minutes. The product will be completely cured after 24-48 hours. (see. page 38).
© All Rights Reserved Fellert Acoustical Ceilings AB 12015001 V.536
PRINCIPLES OF INSTALLATION Application of Standard Finishes
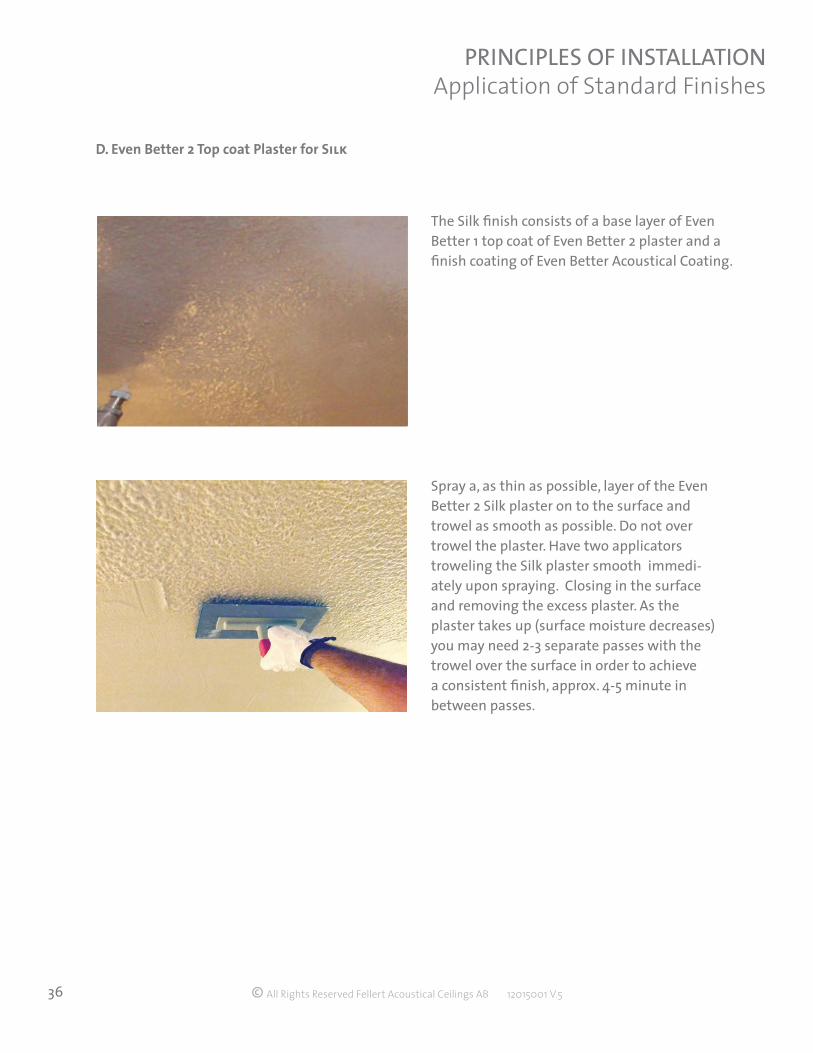
Spray a, as thin as possible, layer of the Even Better 2 Silk plaster on to the surface and trowel as smooth as possible. Do not over trowel the plaster. Have two applicators troweling the Silk plaster smooth immedi-ately upon spraying. Closing in the surface and removing the excess plaster. As the plaster takes up (surface moisture decreases) you may need 2-3 separate passes with the trowel over the surface in order to achieve a consistent finish, approx. 4-5 minute in between passes.
The Silk finish consists of a base layer of Even Better 1 top coat of Even Better 2 plaster and a finish coating of Even Better Acoustical Coating.
D. Even Better 2 Top coat Plaster for Silk

© All Rights Reserved Fellert Acoustical Ceilings AB 12015001 V.537
PRINCIPLES OF INSTALLATION Application of Standard Finishes
Completed Silk finish
The Silk finish is intended not to be sanded.
Have third applicator make a final pass over the Even Better 2 plaster within 15–20 minutes of the initial application, using the flexible finishing trowel.
This will ensure a consistently smooth hand-crafted finish
Ensure to keep your trowels clean at all times during the troweling of the plaster by con-stantly wiping with damp rags.
When the final layer of plaster has been ap-plied and the desired finish is acheived, spray the surface with Even Better Acoustical Coat-ing in the chosen color.
Mix thoroughly before use. Spray a thin layer, let dry. Spray additional layers if needed. Estimated drying time 20-30 minutes. The product will be completely cured after 24-48 hours. (see. page 38).
© All Rights Reserved Fellert Acoustical Ceilings AB 12015001 V.538
PRINCIPLES OF INSTALLATION Application of Standard Finishes
E. Even Better Acoustical Coating
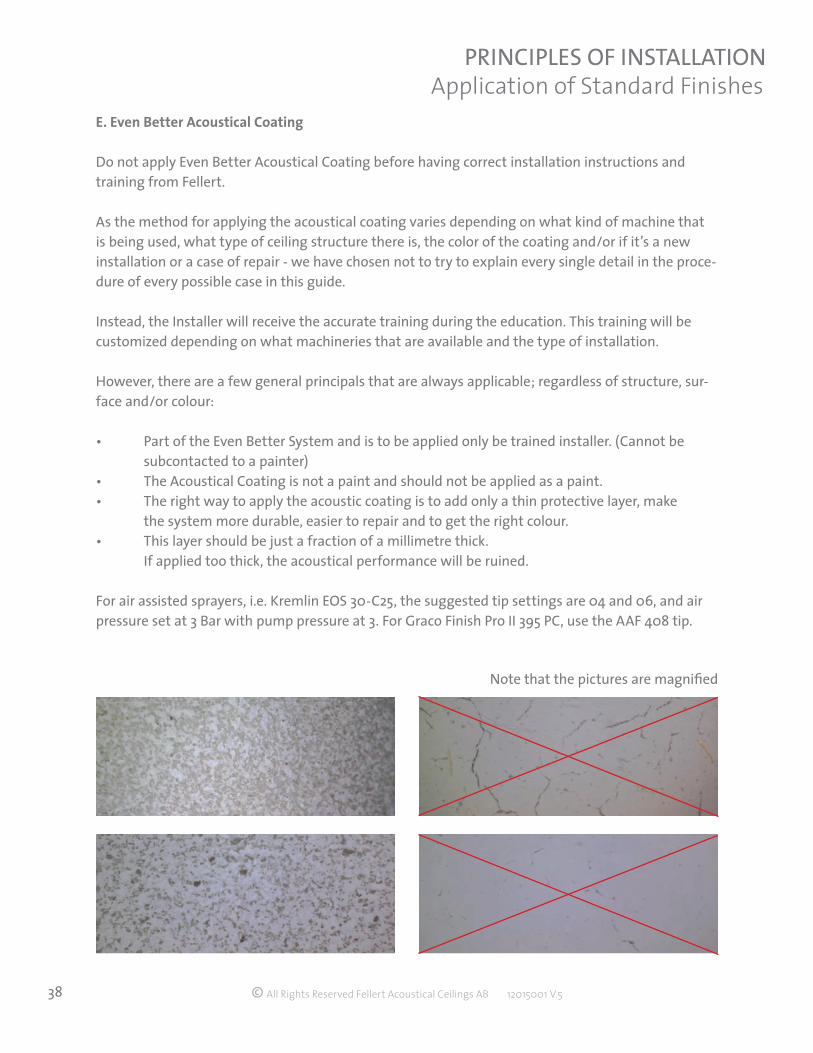
Do not apply Even Better Acoustical Coating before having correct installation instructions and training from Fellert.
As the method for applying the acoustical coating varies depending on what kind of machine that is being used, what type of ceiling structure there is, the color of the coating and/or if it’s a new installation or a case of repair - we have chosen not to try to explain every single detail in the proce-dure of every possible case in this guide.
Instead, the Installer will receive the accurate training during the education. This training will be customized depending on what machineries that are available and the type of installation.
However, there are a few general principals that are always applicable; regardless of structure, sur-face and/or colour:
• Part of the Even Better System and is to be applied only be trained installer. (Cannot be subcontacted to a painter)• The Acoustical Coating is not a paint and should not be applied as a paint.• The right way to apply the acoustic coating is to add only a thin protective layer, make the system more durable, easier to repair and to get the right colour.• This layer should be just a fraction of a millimetre thick. If applied too thick, the acoustical performance will be ruined.
For air assisted sprayers, i.e. Kremlin EOS 30-C25, the suggested tip settings are 04 and 06, and air pressure set at 3 Bar with pump pressure at 3. For Graco Finish Pro II 395 PC, use the AAF 408 tip.
Note that the pictures are magnified
© All Rights Reserved Fellert Acoustical Ceilings AB 12015001 V.539
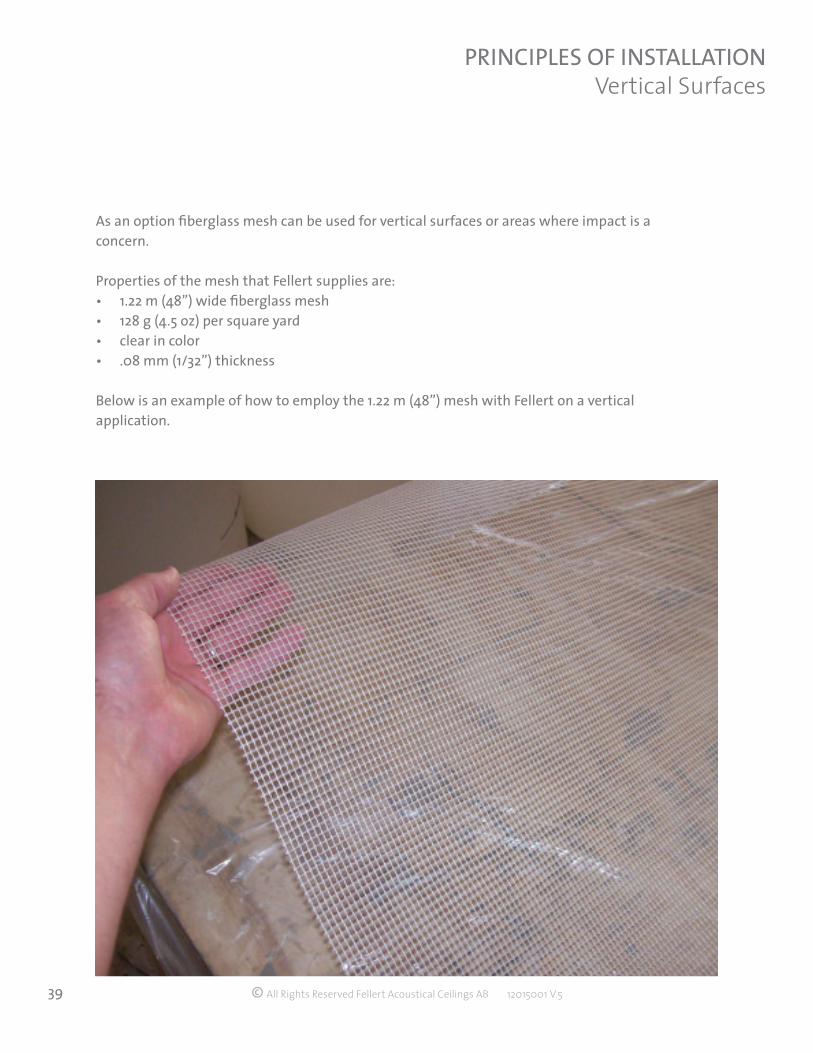
PRINCIPLES OF INSTALLATION Vertical Surfaces
As an option fiberglass mesh can be used for vertical surfaces or areas where impact is a concern.
Properties of the mesh that Fellert supplies are:• 1.22 m (48”) wide fiberglass mesh• 128 g (4.5 oz) per square yard• clear in color • .08 mm (1/32”) thickness
Below is an example of how to employ the 1.22 m (48”) mesh with Fellert on a vertical application.
© All Rights Reserved Fellert Acoustical Ceilings AB 12015001 V.540
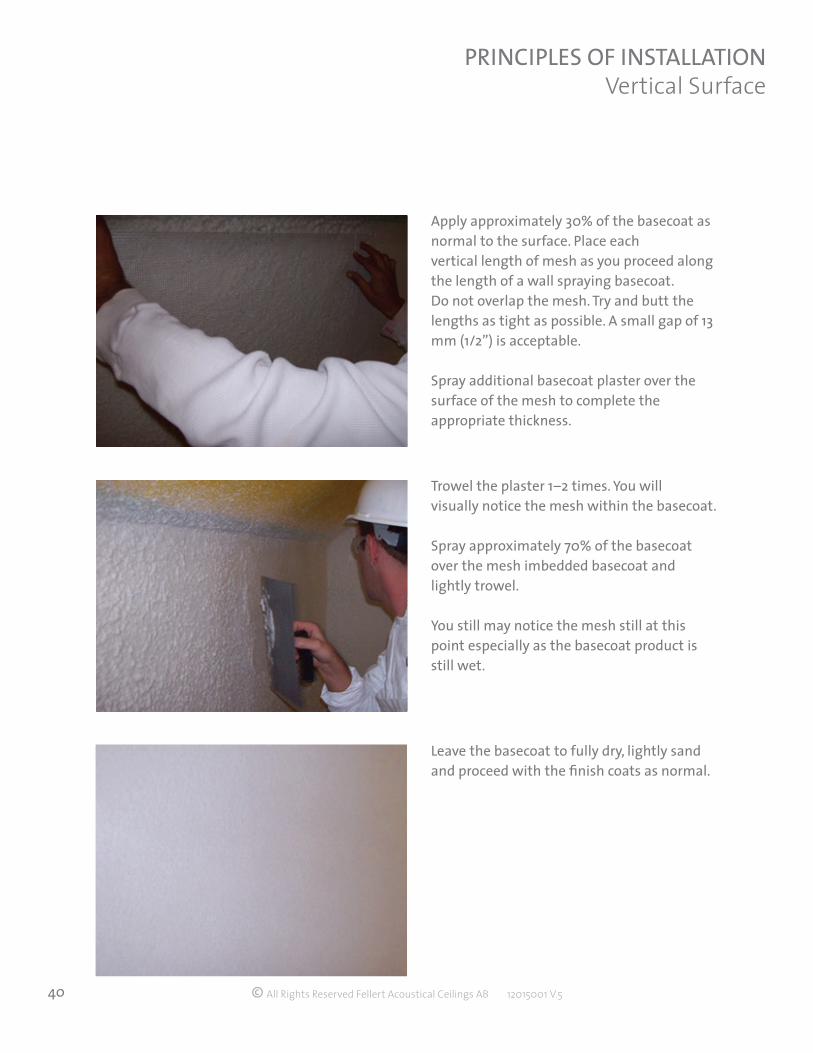
PRINCIPLES OF INSTALLATION Vertical Surface
Trowel the plaster 1–2 times. You will visually notice the mesh within the basecoat.
Spray approximately 70% of the basecoat over the mesh imbedded basecoat and lightly trowel.
You still may notice the mesh still at this point especially as the basecoat product is still wet.
Leave the basecoat to fully dry, lightly sand and proceed with the finish coats as normal.
Apply approximately 30% of the basecoat as normal to the surface. Place each vertical length of mesh as you proceed along the length of a wall spraying basecoat. Do not overlap the mesh. Try and butt the lengths as tight as possible. A small gap of 13 mm (1/2”) is acceptable.
Spray additional basecoat plaster over the surface of the mesh to complete the appropriate thickness.
© All Rights Reserved Fellert Acoustical Ceilings AB 12015001 V.541
PRINCIPLES OF INSTALLATION Curved Surfaces
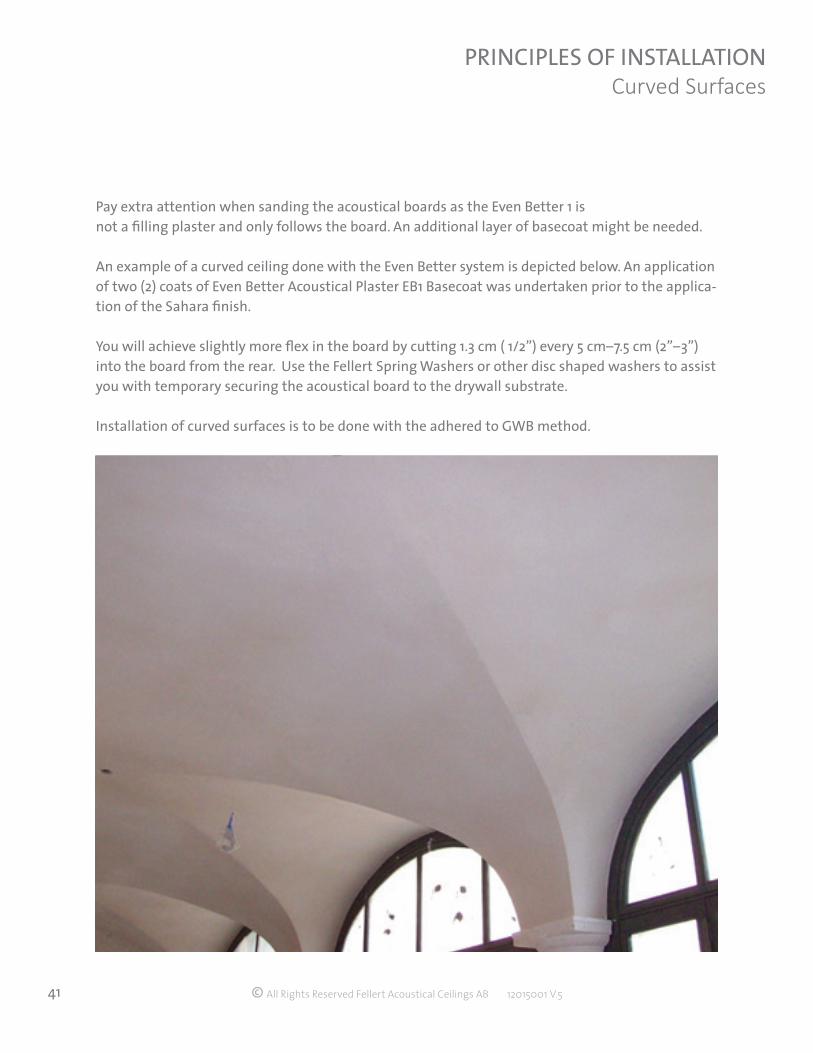
Pay extra attention when sanding the acoustical boards as the Even Better 1 isnot a filling plaster and only follows the board. An additional layer of basecoat might be needed.
An example of a curved ceiling done with the Even Better system is depicted below. An application of two (2) coats of Even Better Acoustical Plaster EB1 Basecoat was undertaken prior to the applica-tion of the Sahara finish.
You will achieve slightly more flex in the board by cutting 1.3 cm ( 1/2”) every 5 cm–7.5 cm (2”–3”) into the board from the rear. Use the Fellert Spring Washers or other disc shaped washers to assist you with temporary securing the acoustical board to the drywall substrate.
Installation of curved surfaces is to be done with the adhered to GWB method.
© All Rights Reserved Fellert Acoustical Ceilings AB 12015001 V.542
PRINCIPLES OF INSTALLATION Key Installation Notes
• Obtain the approval of a mock-up prior to commencing with the installation—the golden rule of Fellert. Mock-up approval is Fellert policy and is in the product specifications.
• Always stage sufficient lighting to illuminate work area as if duplicating the true critical lighting environment.
• Keep the Even Better Acoustical Board in the boxes until they ready for installation to ensure edges are protected from damage and exposure to sunlight. Always store flat, do not stack on edge.
• Ensure the manufacturing press lines on the back of the board remain perpendicular to the long runs of board.
• If possible align the continuous join lines of Even Better Acoustical Boards towards the strongest source of light to maintain straight lines and keeps board joints tighter on full pieces.
• Fill in board joint gaps more than 0.8 mm (1/32”) wide with Even Better Acoustical Board splices.
• Sand the entire surface of the Even Better Acoustical Board , not just the joints. Notice: More sand-ing will be needed for curved installations as you will need to sand more on the centers of the board as well.
• Remove the protective masking tape after priming the transitions and re-mask accordingly.
• Always leave the Fellert Primer to dry overnight.
• Do not over mix the plaster. Add the correct amount of water to achieve desired consistency.
• Always use the Flexogrip or Fellert Trowel.
• Do not excessively trowel the basecoat.
• Leave basecoat until fully dry which is approx. 2-3 days but may be quicker with forced air.
• Spot apply EB1 to any rippers, beads, board joints, etc. as needed and let dry.
• Always spray the top coat plaster corner-to-corner and spray in an irregular pattern to eliminate plaster cold joints.
• For any repairs or touchups being done to the plaster surface that involves sanding, you need to ensure to perform a water trowel technique prior to spraying the final acoustical coating.
• Do not apply too much Even Better Acoustical Coating.
• Ensure that appropriate scaffolding, fans, dehumidifiers are available.
• Available air-compressor (for the Kremlin) needs to start at 5,5 bar and to constantly deliver 4 bar pressure to the connected machines.

© All Rights Reserved Fellert Acoustical Ceilings AB 12015001 V.543
HEALTH & SAFETY RECOMMENDATIONS
• When mixing any of the dry powder products wear a double strapped dust mask.
• When handling and installing any Even Better Acoustical Boards or other system components follow regional government enforced health and safety codes including OSHA.
• When using any of the Fellert products wear protective clothing and avoid contact with your skin whenever possible.
• Wear eye protection at all times. If eye contact occurs irrigate eye with clean water and seek immediate medical attention.
• If any of the materials are swallowed, seek immediate medical attention.
• All current MSDS documents are available online.
© All Rights Reserved Fellert Acoustical Ceilings AB 12015001 V.544
FINAL APPEARANCE STATEMENT
The Even Better Acoustical Plaster system is designed to be an acoustical sound absorption system with architectural aesthetic design capabilities. The visual appearance is intended to be a monolithic and natural looking hand-crafted plaster.
As the plaster is sprayed and hand troweled product, it allows sound to be absorbed while retaining an attractive, wall-to-wall seamless appearance.
The final appearance of any Textured, Fine Textured, or Smooth finishes will vary slightly through-out the expanse of the surface as with any hand-crafted plaster, especially under critical lighting conditions. The product should be monolithic and natural plaster looking in final appearance.
As per Fellert policies and specifications, an approved project mock up is required.

© All Rights Reserved Fellert Acoustical Ceilings AB 12015001 V.545
DRY STAINS - ALL FELLERT FINISHES(NON-SOLUBLE)
Step #1Use pressured air and/or vacuum with a soft brush nozzle.If there are remaining stains use a cleaning sponge (see picture below) or lightly scrape with a soft brush or if necessary with a sharp edge.
Step #2If necessary, re-spray the surface with Even Better Acoustical Coating in the chosen color.

© All Rights Reserved Fellert Acoustical Ceilings AB 12015001 V.546
SOLUBLE STAINS - ALL FELLERT FINISHES
Step #1Damp a soft sponge with fresh water. Press the sponge on the stain and let the water soak into the surface. Release the pressure, letting the water soak back into the sponge. Rinse sponge and repeat if necessary.
Step #2If necessary, spray the surface with Even Better Acoustical Coating in the chosen color.
© All Rights Reserved Fellert Acoustical Ceilings AB 12015001 V.547
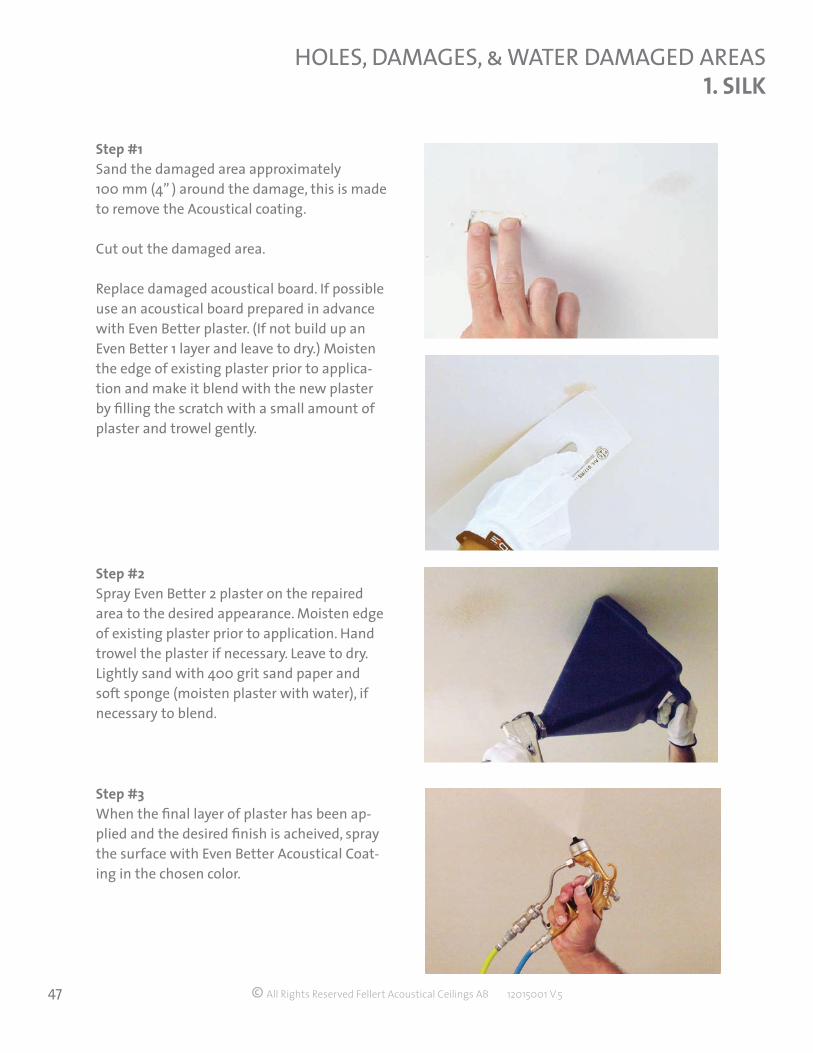
HOLES, DAMAGES, & WATER DAMAGED AREAS1. SILK
Step #1Sand the damaged area approximately 100 mm (4” ) around the damage, this is made to remove the Acoustical coating.
Cut out the damaged area.
Replace damaged acoustical board. If possible use an acoustical board prepared in advance with Even Better plaster. (If not build up an Even Better 1 layer and leave to dry.) Moisten the edge of existing plaster prior to applica-tion and make it blend with the new plaster by filling the scratch with a small amount of plaster and trowel gently.
Step #2Spray Even Better 2 plaster on the repaired area to the desired appearance. Moisten edge of existing plaster prior to application. Hand trowel the plaster if necessary. Leave to dry. Lightly sand with 400 grit sand paper and soft sponge (moisten plaster with water), if necessary to blend.
Step #3When the final layer of plaster has been ap-plied and the desired finish is acheived, spray the surface with Even Better Acoustical Coat-ing in the chosen color.

© All Rights Reserved Fellert Acoustical Ceilings AB 12015001 V.548
HOLES, DAMAGES, & WATER DAMAGED AREAS2. SAHARA
Step #1Sand the damaged area approximately 100 mm (4” ) around the damage, this is made to remove the Acoustical coating.
Cut out the damaged area.
Replace damaged acoustical board. If possible use an acoustical board prepared in advance with Even Better plaster. (If not build up an Even Better 1 layer and leave to dry.) Moisten the edge of existing plaster prior to applica-tion and make it blend with the new plaster by filling the scratch with a small amount of plaster and trowel gently.
Step #2In a circular motion, spray Even Better 1 plaster on the repaired area to the desired appear-ance. Moisten edge of existing plaster prior to application. Leave to dry. Lightly sand with 400 grit sand paper and brush (moisten plaster with water), if necessary to blend.
Step #3When the final layer of plaster has been ap-plied and the desired finish is acheived, spray the surface with Even Better Acoustical Coat-ing in the chosen color.
© All Rights Reserved Fellert Acoustical Ceilings AB 12015001 V.549
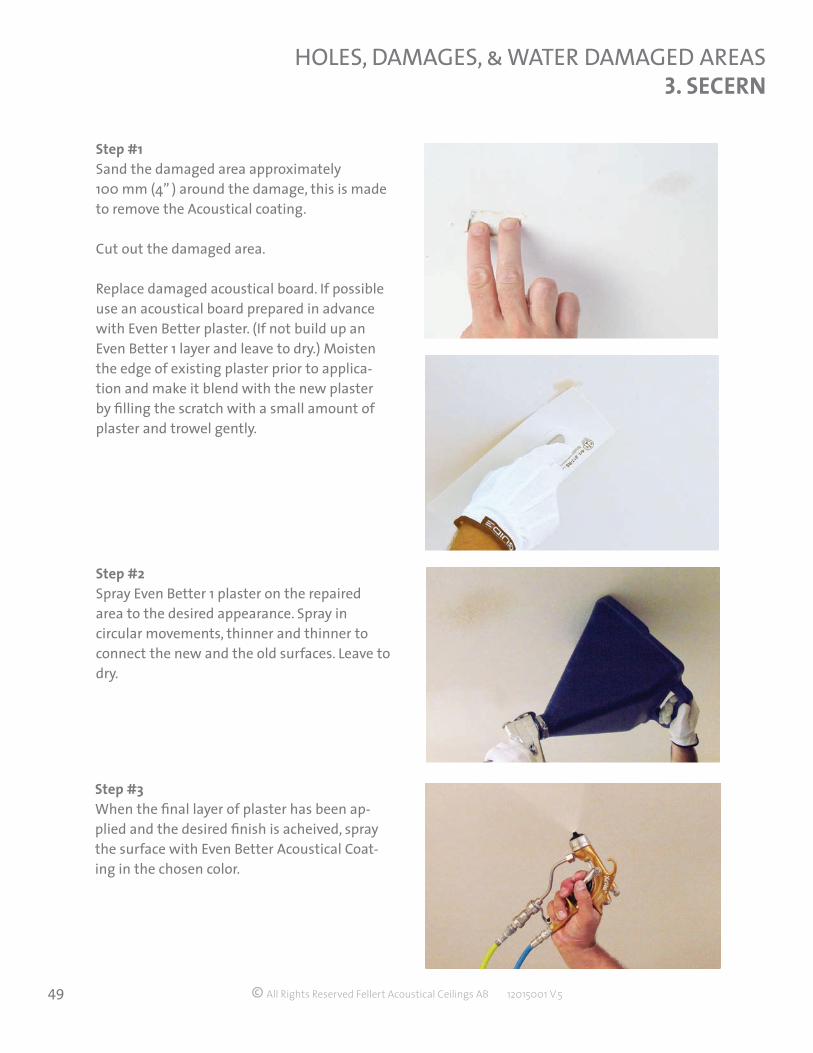
HOLES, DAMAGES, & WATER DAMAGED AREAS3. SECERN
Step #1Sand the damaged area approximately 100 mm (4” ) around the damage, this is made to remove the Acoustical coating.
Cut out the damaged area.
Replace damaged acoustical board. If possible use an acoustical board prepared in advance with Even Better plaster. (If not build up an Even Better 1 layer and leave to dry.) Moisten the edge of existing plaster prior to applica-tion and make it blend with the new plaster by filling the scratch with a small amount of plaster and trowel gently.
Step #2Spray Even Better 1 plaster on the repaired area to the desired appearance. Spray in circular movements, thinner and thinner to connect the new and the old surfaces. Leave to dry.
Step #3When the final layer of plaster has been ap-plied and the desired finish is acheived, spray the surface with Even Better Acoustical Coat-ing in the chosen color.
© All Rights Reserved Fellert Acoustical Ceilings AB 12015001 V.550
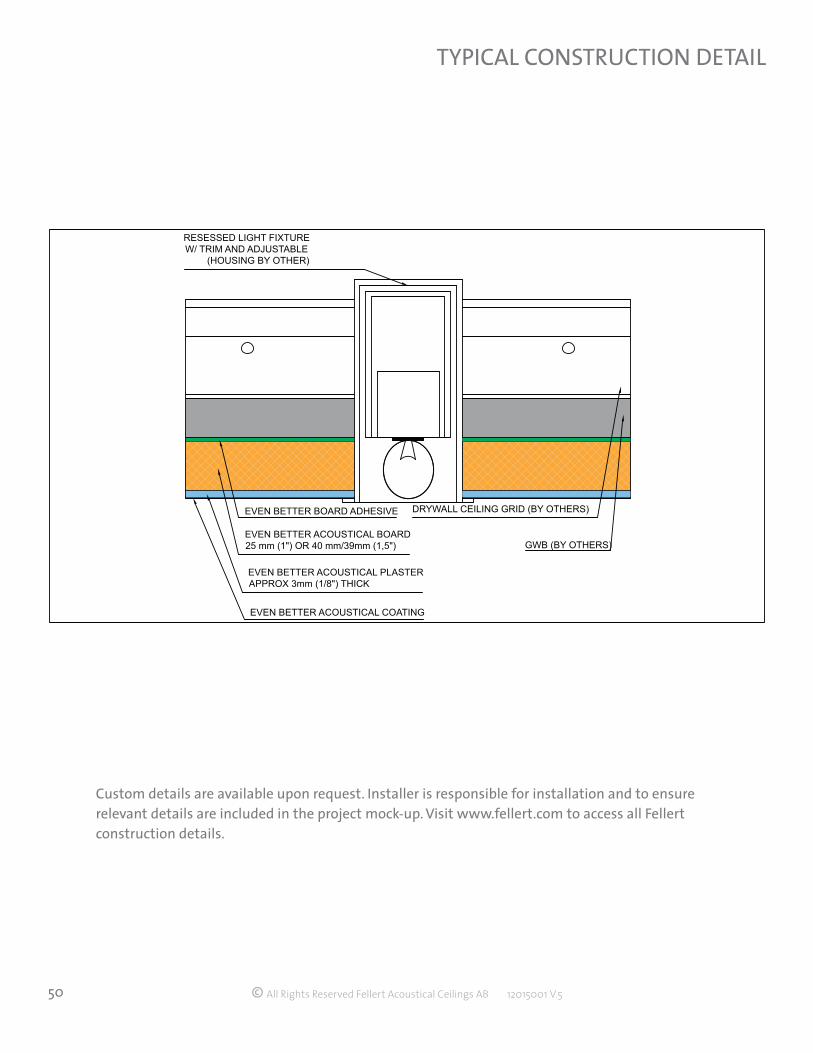
TYPICAL CONSTRUCTION DETAIL
Custom details are available upon request. Installer is responsible for installation and to ensure relevant details are included in the project mock-up. Visit www.fellert.com to access all Fellert construction details.
EVEN BETTER ACOUSTICAL PLASTERAPPROX 3mm (1/8") THICK
EVEN BETTER ACOUSTICAL BOARD25 mm (1") OR 40 mm/39mm (1,5")
EVEN BETTER BOARD ADHESIVE
EVEN BETTER ACOUSTICAL COATING
GWB (BY OTHERS)
RESESSED LIGHT FIXTUREW/ TRIM AND ADJUSTABLE
(HOUSING BY OTHER)
DRYWALL CEILING GRID (BY OTHERS)

© All Rights Reserved Fellert Acoustical Ceilings AB 12015001 V.551
NOTES

© All Rights Reserved Fellert Acoustical Ceilings AB 12015001 V.552
Notice: Fellert retains the right to edit, modify, or delete the contents of this document and other related installation information without the consent or approval from any other party. Please con-tact Fellert to ensure you have the latest installation and/or technical information on the Even Better Acoustical System. Always make sure to use the latest version of the Even Better In-stallation Guide published on www.fellert.com.
12015001 v.3