Eve of Chaos - HeroQuest by Phoenixheroquestbyphoenix.yeoldeinn.com/quests/EoCPreview.pdf · If...
14
Eve of Chaos A Group Quest by Phoenix
Transcript of Eve of Chaos - HeroQuest by Phoenixheroquestbyphoenix.yeoldeinn.com/quests/EoCPreview.pdf · If...

Eve of Chaos
A Group Quest by Phoenix

oretome has been faithful in aiding you on your Quests, but I have grave news my Heroes. Zargon has cast a most powerful spell on my Medallion. This Medallion grants me access to Loretome's knowledge and has been whisked away to lands unknown. I know not its location, nor the number of pieces it is in. You must recover the medallion or I fear that we will not
win the battle against Chaos. Without Loretome's guidance, I can not divine the whereabouts of my Medallion, however, I still have a few tricks up my sleeve.
Mentor
L
1
A Message from Mentor

The Eye of the StormQuest 1
“Zargon's Wizard, Zanwrath, was training Chaos Death. I believe that you may learn more Sorcerers before you destroyed him. His followers information there. Start here at Zanwrath’s Castle were only encouraged to train harder after his and do what you must.”
NOTES:
Wandering Monster in this Quest:
This Orc is equipped with a Crossbow and attacks with 3 Combat Dice. This door does not attacked by the mist and ends his turn.appear until after the Teleport Trap has been set off in Room 'G'.
If a Hero searches for treasure, he will find a quiver of Spirit Darts (10) and a Blow Gun. This Swing Blade Trap does not activate until a Hero steps on the square marked 'X'. (See Phoenix Armory for details.)
When this door opens a brief alarm sounds and all doors marked with an arrow are opened. This is a classroom of Skaven Shaman, being taught by a Goblin Shaman. Each Skaven Zargon must place all monsters and furniture on the board for these rooms at this time. knows the Chaos Spell Fear. The Goblin Shaman knows Fear and Command.
This is a sorcerer's study. If searched for, there is a Pass Through Rock and Heal Body This is a classroom of Goblin Shaman, being taught by an Orc Shaman. Each Goblin Spell Scroll on the table. knows Tempest. The Orc knows Summon Orcs, Fear and Tempest.
This is a mage's library. If searched for, there are two (random) Spell Scrolls on the This is a classroom of Orc Shaman, being taught by a Fimir Mage. Each Orc knows Rust. bookshelves. The Fimir knows 3 Chaos Spells.
This is an alchemist's lab. If searched for, there are 2 Potions of Healing (1d6) and 1 Potion This is a classroom of Fimir Mages, being taught by a Chaos Sorcerer. Each Fimir knows 2 of Dexterity on the bench. Chaos Spells. The Chaos Sorcerer knows 6 Chaos Spells.
When any Hero steps on the Teleport Trap, he is immediately sent to Room 'H'. If searched This is the armory. If the Heroes search for treasure, they will find 1 Longsword, a Helmet for, the outer chests each contain 200 Gold Coins. The middle chest is trapped with poison and a Shield. (These are exactly as they are described in the Armory.)gas and all Heroes in the room will take 2 Body Points of damage, if not disarmed. The chest contains a pair of Speed Boots and an Elixir of Life (see Phoenix Armory and Artifact This is the Storm Master's inner sanctum. He knows all 6 of the Storm Master Spells. Card for details). Upon searching the room for treasure, the Heroes discover the name of a powerful wizard,
Brona. The information here suggests that Brona is in a place called Stone Gate Keep. The Whenever a Hero enters this room a strange mist attacks the Hero with 1 Combat Die that Heroes also find a Treasure Without Doom Spell Scroll, a Heal Body Spell Scroll and a cannot be defended. When a Hero attempts to leave this room, he must roll 1d6. On a roll Ball of Flame Spell Scroll.of 1-5, he will exit through the marked door, however, on a roll of 6, the Hero is once again
Mummy 2
N
O

All Goblins in this Quest have shoddy crossbows and may make ranged attacks with 2 Combat Dice.
This chest contains 200 Gold Coins and a Potion of Healing (4). If Brona casts Transport, this is the room that the Heroes will end up. He knows the following Chaos Spells: Command, Summon Orcs,
Summon Goblins, Firestorm, Escape and Transport (see new Chaos This door has an exploding lock on it. If a Hero tries to open this door Spell Card). When the going gets tough, Brona will Escape to Room 'G'.without first searching for traps, he will be inflicted with 2 Body Points of damage. Any Hero or monster standing in proximity to the door will This is Brona's Library. If searched, 2 scrolls of Enchantment can be be stuck and take 1 Body Point of damage. found (see new Artifact Card). Also, the Heroes will find a pouch of
Dust of Disappearance and a Command Spell Scroll.This cupboard contains a small sack of gems worth 50 Gold Coins. It also has 2 Potions of Dexterity. This is Brona's inner sanctum and is where he will Escape to. Upon his
defeat, Brona will reveal to the Heroes that he created 2 similar spell This is Brona's throne room. These Chaos Warriors are part of the scrolls a long time ago and his apprentice, Castillion, stole them. The Doomguard. The Dark Warriors here are all Halberdiers with a +1 to all two locations were far apart from one another. And Brona draws his last stats. Brona has the following stats: breath.
NOTES:
3
Stone Gate KeepQuest 2
“Stone Gate Keep sits on the southern reaches of the perhaps the enemy of an enemy, is not necessarily an World's Edge Mountains. It looks as if Brona and his enemy. Brona may hold the key to finding Mentor's minions have been hard at work building this fortress. amulet, you must question him at all costs and discern There have been reports that this is a rebellious faction of all that he will reveal.”Zargon's forces. Allies will not likely be found here, but
Wandering Monster in this Quest: Fimir
Movement Attack Defend Body Mind
9 5 7 4 5

This is a dense fog, and a Death Mist is flittering about. At the beginning This door is rotted off it's hinges with age. It stands as a testament to the of the Quest, the Death Mist tile is placed on the gameboard as shown. keep's abandonment.This mist is a breath of Chaos which will harm all who are not evil. The Death Mist tile moves up to 6 squares on each of your (Zargon’s) turns and A random spell scroll is found in the bookcase.can only move within the shaded corridors.
This chest is trapped with poison gas. If a Hero searches for treasure When the Death Mist tile passes over a Hero, he loses 1 Body Point. The before searching for traps, a poisonous gas will flood the room inflicting 2 mist may affect 1 or more Heroes each time it is moved on your (Zargon’s) Body Points of damage to all Heroes. Inside the chest is the Mace of turn. It will not affect monsters. Disruption (see new Artifact Card).
The mist cannot move onto the same square twice in 1 turn. It also cannot This secret door may only be opened from this room.end its turn on the same square with a Hero. (If this happens, the Death Mist tile must stop short on the square in front of the Hero.) This chest contains 1 Potion of Dexterity and 1 Potion of Strength.
The mist is not affected by normal weapons. It can only be destroyed by a This chest contains 300 Gold Coins.Tempest spell, the Spirit Blade or the Soul Seeker. (Don’t tell this to the Heroes!)
NOTES:
3
Chaos WastelandQuest 3
“The first location that Brona gave is on the army. The evil warriors had no time to react edge of the Chaos Wasteland. It is so named, and died instantly. I fear that Zargon has because, many years ago, in a fit of rage, decided to re-animate those fallen comrades to Zargon destroyed the remainder of his losing his service once again.”
Wandering Monster in this Quest: Fimir
Movement Attack Defend Body Mind
7 3 4 4 6
All Wolves in this Quest are Frost Wolves. (See He also knows the following Chaos Spells: Deep atching Monster Card for details.) Freeze, Chill, Ice Storm, Sleep and Escape.
Upon his defeat, Castillion reveals that he This chest contains a Potion of Warmth and 75 modified Brona's spell and not only did it relocate Gold Coins. Mentor's Medallion, it also broke it into pieces.
Upon revealing this, Castillion casts a spell and This is where Castillion is. His stats are as disappears. Upon searching for treasure, the follows: Heroes find ¼ of Mentor's Medallion in the chest.
Any Hero carrying this ¼ piece of the Medallion will have one extra Mind and Body Point, while in the Hero's possession.
NOTES:
3
The Northern ReachesQuest 4
“Seeing as how the previous location was a aid us on our Quest, then we will have bust, Mentor suggests visiting the second difficulties recovering the Medallion. Perhaps location that Brona divulged. If this does not better luck will be had this time…”
Wandering Monster in this Quest: Fimir

This chest contains 3 Potions of Healing (4) Once the doors are opened, a great gust of wind blows the Heroes into the room. They are
This chest contains 50 Gold Coins. immediately surrounded by a large force of monsters, there is no escape. Castillion glares at
This chest contains 100 Gold Coins you gloatingly and says, “Well met, heroes. HA! It would appear that I have you surrounded. You
This falling block trap will not go off until all have just secured my status in Zargon's army and I Heroes have passed the square marked 'X'. thank you for that! Take them away!!”
These doors will not open until the 2 Chaos Zargon, you may substitute other monster of equal Warriors are defeated. or less strength in ‘Room F’.
NOTES:
3
Bad FeelingQuest 5
“You have tracked down Castillion and located You feel as if you are being watched. Take his hideout. It would appear that it is relatively caution and heed your instincts. There is unguarded. But something doesn't feel right. something amiss…”
Wandering Monster in this Quest: Fimir
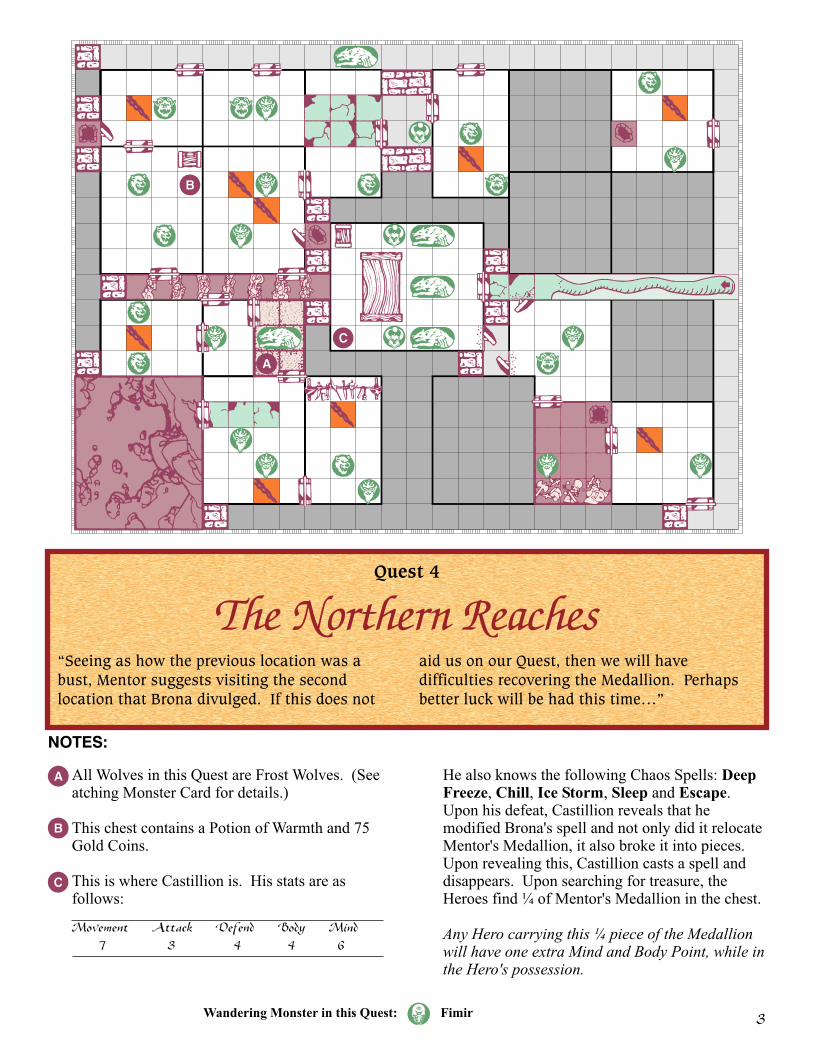
The Heroes have been badly mistreated and begin the Quest with 1 less Once all of the Heroes have past the square marked 'X', Zargon will put a Body Point than their maximum. A Dark Warrior is held prisoner in a cell single blocked-wall tile down. Castillion will then stand and say to the next to the Heroes. He tells the Heroes that he can break them out of their Heroes, “I see my sniveling servant has freed you. No matter, I think I will cell and get their equipment, as long as they promise to take him with them. enjoy watching this fight. Kill them All!!” Play will continue. On Zargon's
turn, the Ogres will try to pair off with the Heroes.The Heroes have no weapons or armor and may only attack with 1 Combat Die and defend with 2 Combat Dice. The Heroes do not notice the stairs until all of the Ogres are dead. At
which point the Chaos Warriors will rush the Heroes and Castillion will The Heroes find all of their equipment and supplies here as does the Dark attack. Castillion's stats are: M: 7, A: 3, D: 4, BP: 4, MP: 6; and can cast Warrior. All of the Heroes' Gold is missing. There is an extra Potion of the following spells: Head Rush, Rust, Ball of Flame, Tempest and Healing (4) mixed in with the rest of the equipment. Firestorm.
If the Heroes search for treasure in this room, one of the Orcs was carrying 15 Gold Coins and a Potion of Healing (2). If the Heroes escape with the Dark Warrior alive, he will return their Gold
to them and pledge his life to them for saving his. He will remain a free As soon as the Heroes round the corner, they see the Ogres standing there, Mercenary for the Heroes, until he dies. This Mercenary will have 3 awaiting their arrival. The Ogres will not attack until they are ordered to Quests under his belt at the completion of this Quest.do so. See Note 'F'.
NOTES:
3
The ArenaQuest 6
“You have been captured by Castillion and die in. If you could only get to your weapons, imprisoned with no hope of escape. Castillion you would stand a chance to battle your way has an arena that he wishes you to fight in and free.”
Wandering Monster in this Quest: Fimir
Movement Attack Defend Body Mind
6 5 4 4 1
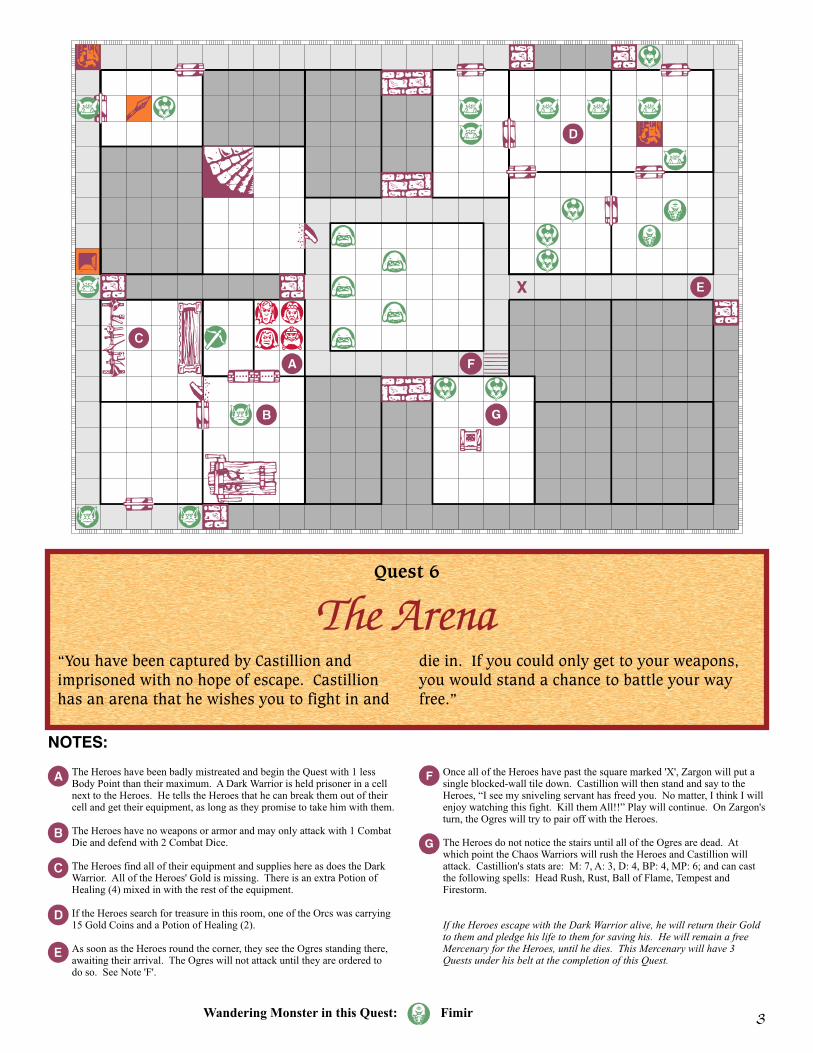
This Black Orc is carrying 2 long swords identical to those Strength and ¼ of Mentor's Medallion inside the chest. in the Armory. He can attack diagonally. They will also set off a trap, that cannot be searched for (See
Note 'F'). This Medallion piece will grant the Hero In this chest is 100 Gold Coins, a Potion of Healing and a possessing it +1 Mind Points. If either the Wizard or the Elf Potion of Dexterity. carries both pieces, they will be able to cast 2 spells per
round (but will not have any other bonuses).On this weapons rack, the Heroes will find 3 Daggers and 1 Magical Dagger (see matching Artifact Card). These are Stone Warriors. They will not move, attack or
take damage (see Note 'E'). Once they have been activated, This Gargoyle is a stone statue. It will not move or attack, the will have the following stats:period (but don't tell the Heroes this).
The outside of this chest reads: “Stone to Flesh”. If the Heroes search for treasure they will find a Potion of
NOTES:
3
Iron Mountain (Base Camp)Quest 7
“Your new Mercenary friend has mentioned that search next, as it is our only lead. Take caution there has been some increased activity near and watch your step. I will await your return.”Iron Mountain. This is probably a good place to
Wandering Monster in this Quest: Fimir
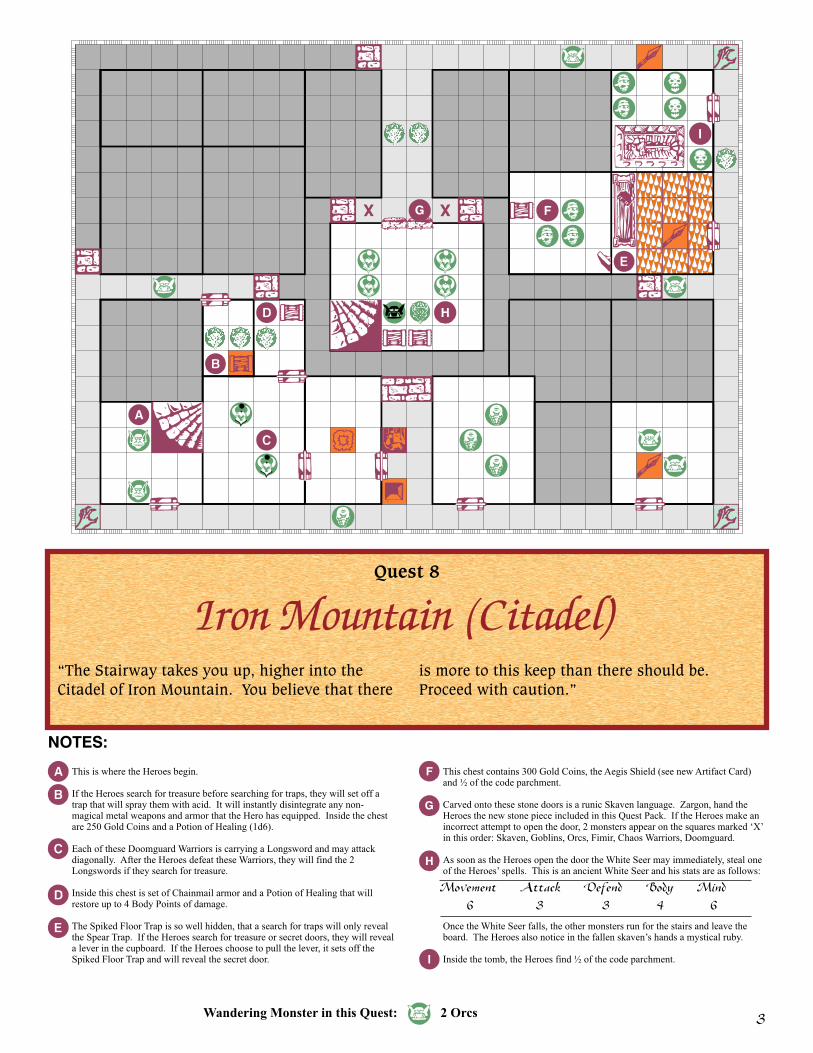
This is where the Heroes begin. This chest contains 300 Gold Coins, the Aegis Shield (see new Artifact Card) and ½ of the code parchment.
If the Heroes search for treasure before searching for traps, they will set off a trap that will spray them with acid. It will instantly disintegrate any non- Carved onto these stone doors is a runic Skaven language. Zargon, hand the magical metal weapons and armor that the Hero has equipped. Inside the chest Heroes the new stone piece included in this Quest Pack. If the Heroes make an are 250 Gold Coins and a Potion of Healing (1d6). incorrect attempt to open the door, 2 monsters appear on the squares marked ‘X’
in this order: Skaven, Goblins, Orcs, Fimir, Chaos Warriors, Doomguard.Each of these Doomguard Warriors is carrying a Longsword and may attack diagonally. After the Heroes defeat these Warriors, they will find the 2 As soon as the Heroes open the door the White Seer may immediately, steal one Longswords if they search for treasure. of the Heroes’ spells. This is an ancient White Seer and his stats are as follows:
Inside this chest is set of Chainmail armor and a Potion of Healing that will restore up to 4 Body Points of damage.
The Spiked Floor Trap is so well hidden, that a search for traps will only reveal Once the White Seer falls, the other monsters run for the stairs and leave the the Spear Trap. If the Heroes search for treasure or secret doors, they will reveal board. The Heroes also notice in the fallen skaven’s hands a mystical ruby. a lever in the cupboard. If the Heroes choose to pull the lever, it sets off the Spiked Floor Trap and will reveal the secret door. Inside the tomb, the Heroes find ½ of the code parchment.
NOTES:
3
Iron Mountain (Citadel)Quest 8
“The Stairway takes you up, higher into the is more to this keep than there should be. Citadel of Iron Mountain. You believe that there Proceed with caution.”
Wandering Monster in this Quest: 2 Orcs
Movement Attack Defend Body Mind
6 3 3 4 6

ZARGON
REIGNS
SUPREME
A B C D E F G H I J K L M
A B C D E F G H I J K L M
N O P Q R S T U V W X Y Z
N O P Q R S T U V W X Y Z

Thi
s sp
ell
wil
l ad
d an
enc
han
tmen
t O
n an
y no
n-m
agic
al m
elee
wea
pon
or
arm
or.
Wea
pon/
Arm
or1)
-1
AD
/-1
DD
2) +
1 A
D/+
1 D
D3)
+2
vs. G
reen
/+1
vs.E
dged
4) +
2 vs
. U
ndea
d/+
1 vs
. B
lunt
5) +
2 vs
. C.W
arri
ors
& G
argo
yles
/+1
vs.
Mag
ic6)
+2
vs. C
.Sor
cere
rs/+
2 D
D


Maps & Icons generated with HeroScribe.
HeroQuest (c) Milton BradleyGames, 1989-1993
These images have been created for personal use only. By viewing these images you
agree to use them for said purpose.
Created by: