European Center Cupholder - dolau.pagesperso-orange.fr · Golf & Jetta V (13) Passat B6 (11) Passat...
27
Top » Volkswagen » Golf & Jetta V » European Center Cupholder DIY Installations Volkswagen -> (46) Golf & Jetta V (13) Passat B6 (11) Passat B5.5 (4) Phaeton (8) Eurovan (7) Touareg (3) Audi European Center Cupholder by the.ronin Overview: This article is intended to provide a step-by-step installation guide for enthusiasts wanting to install the European center console cupholder into their Mk5 chassis vehicle; including GTI, GLI, Rabbit/Golf and Jetta. Author's Note: This document is for informational purposes only. Any vehicle modifications should be done by a certified VW mechanic. Neither the author nor this site will be held liable for actions taken resulting from the information set forth herein. Retrofit may take you up to 4 hours depending on how comfortable and familiar you are with the interior cabin components. Others have done it in 2 hours - I finished it in almost exactly 3 hours trying to be as careful as possible. A lot of components will be removed along the center console from the rear cooling unit to the ash tray to the side footwell fascias and ultimately the entire center console itself. Be organized and methodical but first and foremost be patient. This DIY will walk you through (or at least try to) the removal of (i) the rear cooling unit, (ii) the gear shift, (iii) the ashtray, (iv) the side footwell fascias, and ultimately (v) the center console itself - in that order. The DIY will not walk you through the second half of the installation which is simply the foregoing in the exact reverse order. Difficulty Level: Parts Needed: Center Cupholder Tools Needed: T20 torx bit Wrench w/ adapter for T20 Trim removal tool (or equivalent) Mechanics mirror or magnetized rod to deal with screws in tight places Plastic credit card or similiar Phase One: Removal Rear Cooling Unit Stock U.S. cupholder from a MY06 2.5L Jetta 6sp tiptronic package 1. OEMpl.us - How-To’s - Golf & Jetta V - European Headlight Switch file:///Z:/_Arkiv/_Bil/_VW%20Scirocco/Covered%20Cupholder/How%20to%20install%20G... 1 of 27 28-01-2010 11:53
Transcript of European Center Cupholder - dolau.pagesperso-orange.fr · Golf & Jetta V (13) Passat B6 (11) Passat...

Top » Volkswagen » Golf & Jetta V » European Center Cupholder
DIY Installations
Volkswagen -> (46) Golf & Jetta V (13)
Passat B6 (11) Passat B5.5 (4)
Phaeton (8) Eurovan (7)
Touareg (3)Audi
European Center Cupholder by the.ronin
Overview:
This article is intended to provide a step-by-step installation guide for enthusiasts wanting to install the European center console cupholder into their
Mk5 chassis vehicle; including GTI, GLI, Rabbit/Golf and Jetta.
Author's Note: This document is for informational purposes only. Any vehicle modifications should be done by a certified VW mechanic. Neither the
author nor this site will be held liable for actions taken resulting from the information set forth herein.
Retrofit may take you up to 4 hours depending on how comfortable and familiar you are with the interior cabin components. Others have done it in 2
hours - I finished it in almost exactly 3 hours trying to be as careful as possible. A lot of components will be removed along the center console from the
rear cooling unit to the ash tray to the side footwell fascias and ultimately the entire center console itself. Be organized and methodical but first and
foremost be patient.
This DIY will walk you through (or at least try to) the removal of (i) the rear cooling unit, (ii) the gear shift, (iii) the ashtray, (iv) the side footwell
fascias, and ultimately (v) the center console itself - in that order. The DIY will not walk you through the second half of the installation which is simply
the foregoing in the exact reverse order.
Difficulty Level:
Parts Needed:
Center Cupholder
Tools Needed:
T20 torx bit
Wrench w/ adapter for T20
Trim removal tool (or equivalent)
Mechanics mirror or magnetized rod to deal with screws in tight places
Plastic credit card or similiar
Phase One: Removal Rear Cooling Unit
Stock U.S. cupholder from a MY06 2.5L Jetta 6sp tiptronic package 1.
OEMpl.us - How-To’s - Golf & Jetta V - European Headlight Switch file:///Z:/_Arkiv/_Bil/_VW%20Scirocco/Covered%20Cupholder/How%20to%20install%20G...
1 of 27 28-01-2010 11:53

1.1 Turn up the armrest cover and use the trim tool to remove the black rubber mat at the floor of the cooling unit.
OEMpl.us - How-To’s - Golf & Jetta V - European Headlight Switch file:///Z:/_Arkiv/_Bil/_VW%20Scirocco/Covered%20Cupholder/How%20to%20install%20G...
2 of 27 28-01-2010 11:53

1.2 Use the trim tool to pry off the panel containing the internal air vent.
OEMpl.us - How-To’s - Golf & Jetta V - European Headlight Switch file:///Z:/_Arkiv/_Bil/_VW%20Scirocco/Covered%20Cupholder/How%20to%20install%20G...
3 of 27 28-01-2010 11:53

1.3 Behind the panel, you will find your first torx screw of many many many many many torx screws. If you look real close, you can see engraved,
"Abandon All Hope Ye Who Enter Here" ... silly Germans.
OEMpl.us - How-To’s - Golf & Jetta V - European Headlight Switch file:///Z:/_Arkiv/_Bil/_VW%20Scirocco/Covered%20Cupholder/How%20to%20install%20G...
4 of 27 28-01-2010 11:53
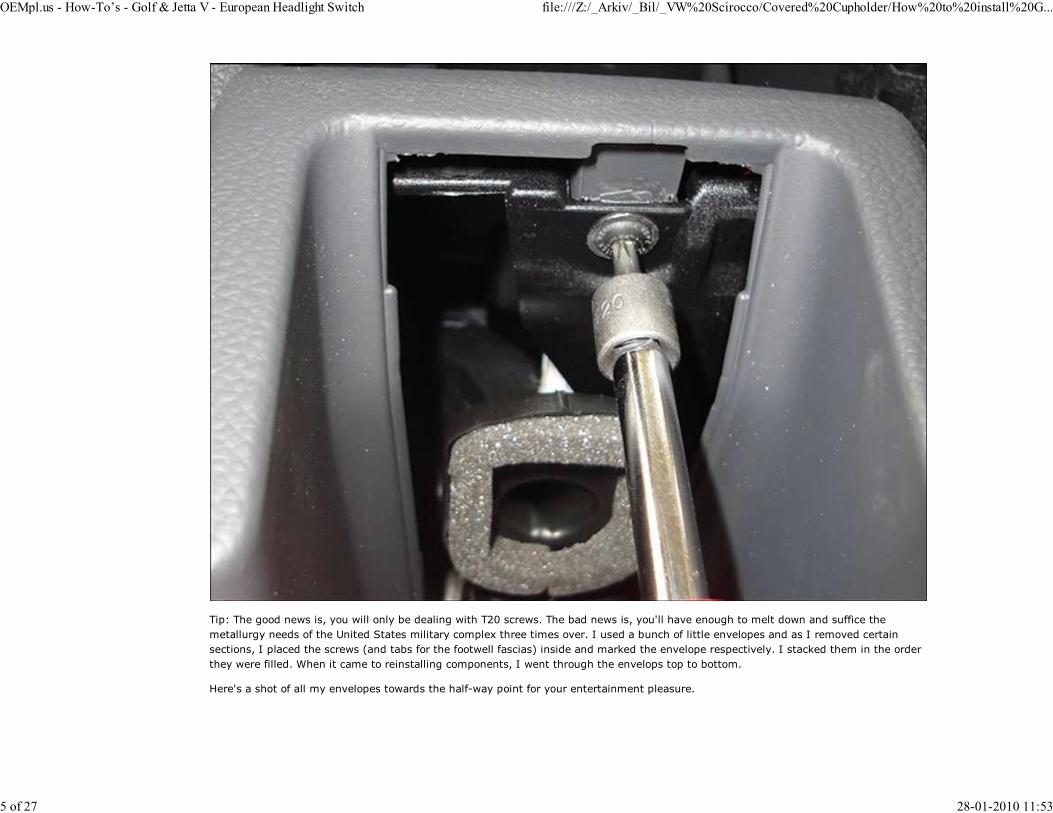
Tip: The good news is, you will only be dealing with T20 screws. The bad news is, you'll have enough to melt down and suffice the
metallurgy needs of the United States military complex three times over. I used a bunch of little envelopes and as I removed certain
sections, I placed the screws (and tabs for the footwell fascias) inside and marked the envelope respectively. I stacked them in the order
they were filled. When it came to reinstalling components, I went through the envelops top to bottom.
Here's a shot of all my envelopes towards the half-way point for your entertainment pleasure.
OEMpl.us - How-To’s - Golf & Jetta V - European Headlight Switch file:///Z:/_Arkiv/_Bil/_VW%20Scirocco/Covered%20Cupholder/How%20to%20install%20G...
5 of 27 28-01-2010 11:53

Yeah, Martha Stewart ain't got nothin on me!
1.4 Move onto the small rear storage compartment where you'll find two more torx screws (red circles).
OEMpl.us - How-To’s - Golf & Jetta V - European Headlight Switch file:///Z:/_Arkiv/_Bil/_VW%20Scirocco/Covered%20Cupholder/How%20to%20install%20G...
6 of 27 28-01-2010 11:53
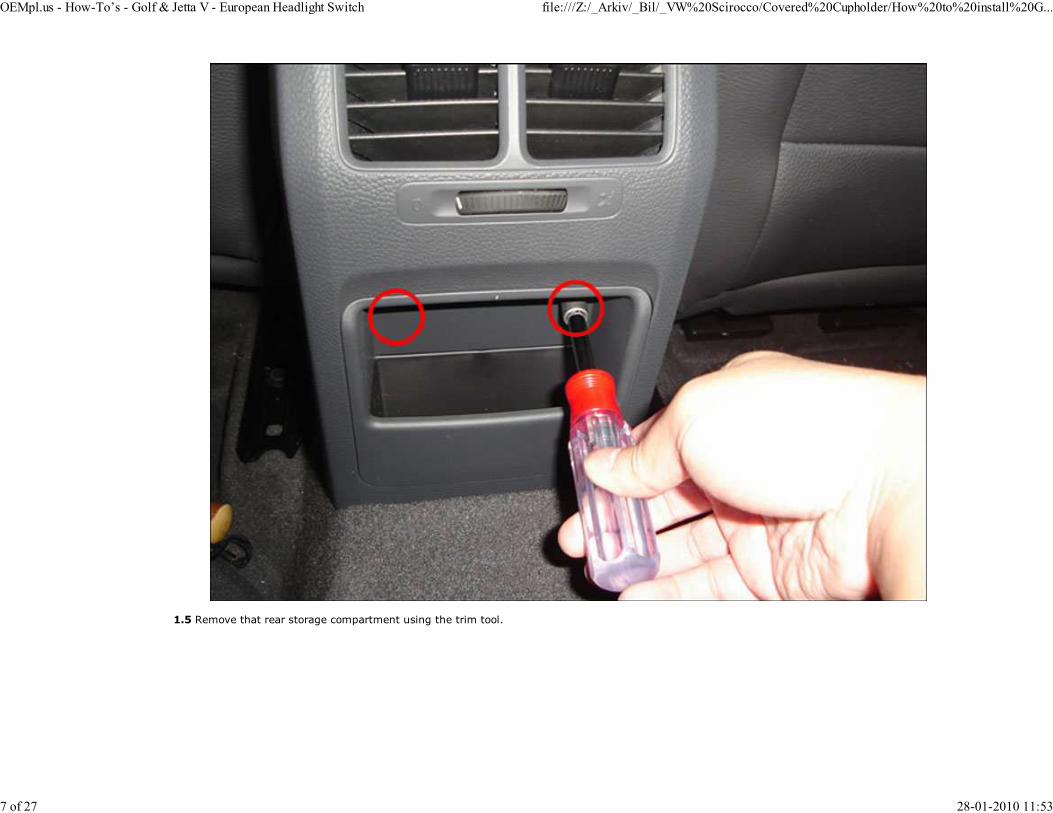
1.5 Remove that rear storage compartment using the trim tool.
OEMpl.us - How-To’s - Golf & Jetta V - European Headlight Switch file:///Z:/_Arkiv/_Bil/_VW%20Scirocco/Covered%20Cupholder/How%20to%20install%20G...
7 of 27 28-01-2010 11:53

1.6 Remove the rear air-conditioning unit by pulling in the direction of the red arrows.
OEMpl.us - How-To’s - Golf & Jetta V - European Headlight Switch file:///Z:/_Arkiv/_Bil/_VW%20Scirocco/Covered%20Cupholder/How%20to%20install%20G...
8 of 27 28-01-2010 11:53

1.7 With the rear air-conditioning removed, you'll find two more torx screws on the lower sides - one on each side.
OEMpl.us - How-To’s - Golf & Jetta V - European Headlight Switch file:///Z:/_Arkiv/_Bil/_VW%20Scirocco/Covered%20Cupholder/How%20to%20install%20G...
9 of 27 28-01-2010 11:53

1.8 The rear coolant unit can now be removed - except you still need to detach the harness connecting to the power outlet. Lift up the coolant unit
carefully just so you can get in there and detach the harness (see next step).
OEMpl.us - How-To’s - Golf & Jetta V - European Headlight Switch file:///Z:/_Arkiv/_Bil/_VW%20Scirocco/Covered%20Cupholder/How%20to%20install%20G...
10 of 27 28-01-2010 11:53

1.9 Remove the power outlet harness by pushing in the locking lever as indicated by the red arrow. Once that is disconnected, pull on the parking
brake as far up as it will go - it can be lifted surprisingly far! Proceed to fully remove the rear coolant unit and put it aside.
OEMpl.us - How-To’s - Golf & Jetta V - European Headlight Switch file:///Z:/_Arkiv/_Bil/_VW%20Scirocco/Covered%20Cupholder/How%20to%20install%20G...
11 of 27 28-01-2010 11:53

Phase Two: Removal of Gear Shift Selector
2.1 Use a credit card or similar tool to pry up the front end of the base of the gear shift selector. I found that starting near the middle and working to
the right works out. I also found that the trim tool I have was not thin enough to get under there and my trusty pocket knife seemed too sharp for my
comfort.
OEMpl.us - How-To’s - Golf & Jetta V - European Headlight Switch file:///Z:/_Arkiv/_Bil/_VW%20Scirocco/Covered%20Cupholder/How%20to%20install%20G...
12 of 27 28-01-2010 11:53

2.2 Before removing the shifter itself, lift up the base to reveal the wiring harness. Disconnect this harness first in case you get overzealous and yank
that sucker so far out off that you rip the harness right out. That would be bad juju. Remove the harness by pushing in where the red arrow indicates
and slowly and carefully wiggling the harness out.
OEMpl.us - How-To’s - Golf & Jetta V - European Headlight Switch file:///Z:/_Arkiv/_Bil/_VW%20Scirocco/Covered%20Cupholder/How%20to%20install%20G...
13 of 27 28-01-2010 11:53

Once removed, pull the shifter button out as far as possible - you might feel or hear an audible click but you will know that it is out (see
next step for a good tip). Next simply pull the shifter itself straight out. Pull in the general parallel direction of the metal shaft
underneath. For example, if you are in "N", pull straight up. It takes a little bit of force but it will come out and come out hard. No
wiggling or shifting right and left - just pull straight out.
Tip: Once you've pulled out the shift button, wrap a rubber band around it to keep it from pushing all the way back in. You cannot
re-install that knob with the button depressed. If you do, you may damage your shift mechanism!!
OEMpl.us - How-To’s - Golf & Jetta V - European Headlight Switch file:///Z:/_Arkiv/_Bil/_VW%20Scirocco/Covered%20Cupholder/How%20to%20install%20G...
14 of 27 28-01-2010 11:53

Phase Three: Removal of Ash Tray
3.1 With the gear selector removed, you'll find two torx screws holding down the front of the ashtray. Get at it, son!! You're now almost one-third of the
way through!! Woot!!!
OEMpl.us - How-To’s - Golf & Jetta V - European Headlight Switch file:///Z:/_Arkiv/_Bil/_VW%20Scirocco/Covered%20Cupholder/How%20to%20install%20G...
15 of 27 28-01-2010 11:53

3.2 Carefully lift up the ash tray and find two wiring harnesses. Remove the white connector in the same fashion you removed the gear selector harness
(step 11) and the power outlet harness in the same fashion you removed the power outlet harness from the rear cooling unit (step 9). Note that the
wiring bundle for the white connector is attached to a guide (red arrow) which cannot be seen in the photo below. This is easily removed by pulling out
to the right (not down).
OEMpl.us - How-To’s - Golf & Jetta V - European Headlight Switch file:///Z:/_Arkiv/_Bil/_VW%20Scirocco/Covered%20Cupholder/How%20to%20install%20G...
16 of 27 28-01-2010 11:53
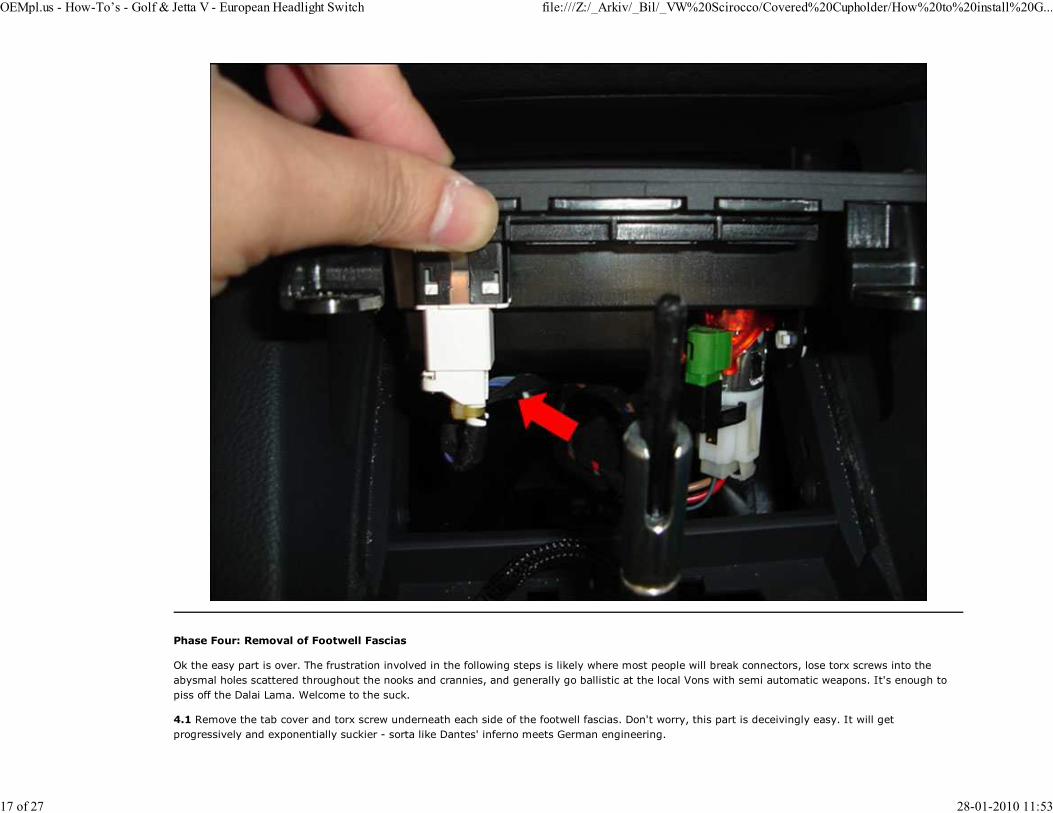
Phase Four: Removal of Footwell Fascias
Ok the easy part is over. The frustration involved in the following steps is likely where most people will break connectors, lose torx screws into the
abysmal holes scattered throughout the nooks and crannies, and generally go ballistic at the local Vons with semi automatic weapons. It's enough to
piss off the Dalai Lama. Welcome to the suck.
4.1 Remove the tab cover and torx screw underneath each side of the footwell fascias. Don't worry, this part is deceivingly easy. It will get
progressively and exponentially suckier - sorta like Dantes' inferno meets German engineering.
OEMpl.us - How-To’s - Golf & Jetta V - European Headlight Switch file:///Z:/_Arkiv/_Bil/_VW%20Scirocco/Covered%20Cupholder/How%20to%20install%20G...
17 of 27 28-01-2010 11:53

Once these are removed you should be able to pull out and down on the fascias and remove them entirely ... this part is tough. It helps to
move the seats as far as as they will go. The fascia only extends just past the front of the seats when they are in the furthest rear
position.
With the footwell fascias removed, we can proceed to remove the 10 screws securing the center console. There is 1 in the rear, 1 in the rear cupholder,
2 on each side in the footwells once hidden underneath the fascias, and 2 God forsaken ones deep in the far end on each of the "oh sh*t" bars.
4.2 Let's go ahead and start with the straight-forward rear screw so we can build up a false sense of confidence.
OEMpl.us - How-To’s - Golf & Jetta V - European Headlight Switch file:///Z:/_Arkiv/_Bil/_VW%20Scirocco/Covered%20Cupholder/How%20to%20install%20G...
18 of 27 28-01-2010 11:53

4.3 Use the trim tool to lift out the rear cupholder pad and remove the screw underneath that pad. 2 down, 8 to go. Ha! That's like getting to the
basecamp of Everest and claiming you are 1/4 of the way to the summit.
OEMpl.us - How-To’s - Golf & Jetta V - European Headlight Switch file:///Z:/_Arkiv/_Bil/_VW%20Scirocco/Covered%20Cupholder/How%20to%20install%20G...
19 of 27 28-01-2010 11:53

4.4 Proceed to remove the two screws on either side of the footwells that were previously hidden by the footwell fascias.
OEMpl.us - How-To’s - Golf & Jetta V - European Headlight Switch file:///Z:/_Arkiv/_Bil/_VW%20Scirocco/Covered%20Cupholder/How%20to%20install%20G...
20 of 27 28-01-2010 11:53

Wow you're just on a roll now right? Not so much. Prepare to hate life ...
4.5 Use the trim tool to remove the contoured sides of the oh ship bars. I found that starting from the bottom corners helped out. Once you have a side
out, you can reach in there and pull with some force to remove it.
OEMpl.us - How-To’s - Golf & Jetta V - European Headlight Switch file:///Z:/_Arkiv/_Bil/_VW%20Scirocco/Covered%20Cupholder/How%20to%20install%20G...
21 of 27 28-01-2010 11:53

4.6 With the contoured trim removed, you can, evidently, get at the two final screws on both of the oh ship bars. If it gets too tight in there, use the
ratchet with an adapter. Be very careful when removing these screws as they are apt to fall into the opening seen below never to be seen again until
the fourth horseman of the Apocalypse.
OEMpl.us - How-To’s - Golf & Jetta V - European Headlight Switch file:///Z:/_Arkiv/_Bil/_VW%20Scirocco/Covered%20Cupholder/How%20to%20install%20G...
22 of 27 28-01-2010 11:53

Note that there are four screws on the sides where the ash tray used to be. I am pretty sure, in retrospect, these did not require removal
in order to remove the center console. Be advised I am not 100% sure - if it turns out they require removal, then giddy up, Quimosabe!!
4.7 You will now be able to remove the entire center console from the rear (below) all the way to and including the oh ship bars. What manner of
witchcraft is this, say you? Arcana it is not, young padawan. Adjust the seats as necessary - they do not have to be removed. Slightly bend the rear end
to the extent necessary to pull it out and around the emergency brake. Do not worry, it's plastic and likely more malleable than you give it credit for -
just don't get all medieval on its ass.
OEMpl.us - How-To’s - Golf & Jetta V - European Headlight Switch file:///Z:/_Arkiv/_Bil/_VW%20Scirocco/Covered%20Cupholder/How%20to%20install%20G...
23 of 27 28-01-2010 11:53

You can see one of the two screws that secures the cupholder above circled in red.
4.8 With the center console removed, you can undo the two screws securing the cupholder one of which was circled in red above and the other circled
in red below. Proceed to easily remove the cupholder by sliding in the direction of the arrow.
OEMpl.us - How-To’s - Golf & Jetta V - European Headlight Switch file:///Z:/_Arkiv/_Bil/_VW%20Scirocco/Covered%20Cupholder/How%20to%20install%20G...
24 of 27 28-01-2010 11:53

Note: You can try and replace the cupholder without removing the center console by stretching the hole where the cupholder is and
easing it out. I do not recommend it. It was very difficult to insert the euro cupholder. While I was able to remove and replace the rear
screw, the front screw was nearly impossible.
That's it!! You are now HALFWAY done. BUHAHAHA ... have fun, guys!
Phase Five: Reinstallation
5.1 Editors Note: the.ronin fails to mention that reassembly is essentially the reverse of removal. Start from 4.8 above and work backwards.
OEMpl.us - How-To’s - Golf & Jetta V - European Headlight Switch file:///Z:/_Arkiv/_Bil/_VW%20Scirocco/Covered%20Cupholder/How%20to%20install%20G...
25 of 27 28-01-2010 11:53
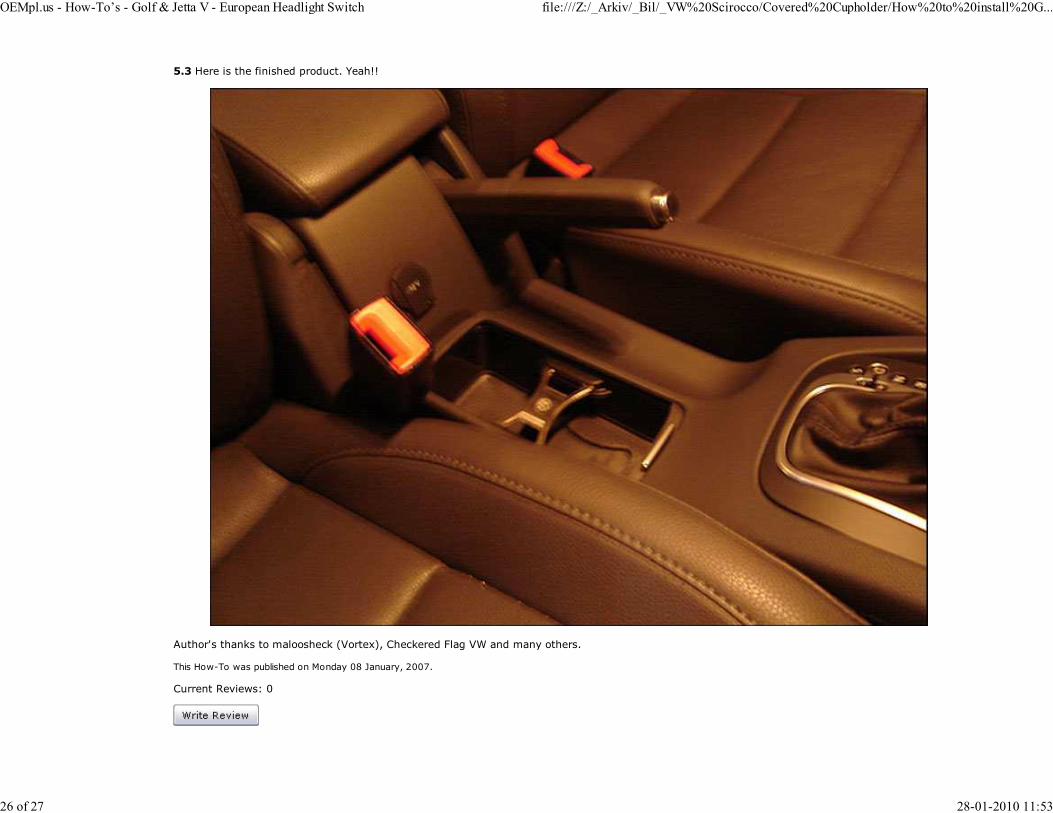
5.3 Here is the finished product. Yeah!!
Author's thanks to maloosheck (Vortex), Checkered Flag VW and many others.
This How-To was published on Monday 08 January, 2007.
Current Reviews: 0
OEMpl.us - How-To’s - Golf & Jetta V - European Headlight Switch file:///Z:/_Arkiv/_Bil/_VW%20Scirocco/Covered%20Cupholder/How%20to%20install%20G...
26 of 27 28-01-2010 11:53

Tell a friend
Tell a friend about this How-To:
Sunday 05 April, 2009 5355188 requests since Tuesday 29 November, 2005
This website is not affiliated with Volkswagen of America, Inc., Audi of America, Inc., Volkswagen AG, Audi AG orany of their subsidiary holdings. Vehicle names and images are used for reference purposes only.
Copyright © 2005-2009 by OEMpl.us, a division of RFI.
OEMpl.us - How-To’s - Golf & Jetta V - European Headlight Switch file:///Z:/_Arkiv/_Bil/_VW%20Scirocco/Covered%20Cupholder/How%20to%20install%20G...
27 of 27 28-01-2010 11:53