ESLC Testing Tool Student (EN) · · 2011-11-11For a student taking both Listening and Reading...
17
ESLC Testing Tool Student Guidelines (EN)
Transcript of ESLC Testing Tool Student (EN) · · 2011-11-11For a student taking both Listening and Reading...
ESLC Testing Tool Student Guidelines
(EN)

Table of Contents
1 INTRODUCTION 3
2 TAKING THE TESTS 3
2.1 Logging in 3
2.2 Checking the audio for the Listening test 5
2.3 Taking a test 5
3 Test task information 7
3.1 Listening tasks 7
3.2 Reading tasks 12
ESLC Testing Tool Student Guidelines EN
2

1 INTRODUCTION
1. These Guidelines are designed to give you information about how to do the language tasks in the
European Survey on Language Competences (ESLC) using the computer-based testing tool specially designed for this survey. These guidelines are not intended as practice material and are not intended as an indicator of the level of the material you will see in the survey.
2. These Guidelines should be used together with the student demonstration tool which can be downloaded from the SurveyLang website at http://www.surveylang.org.
3. The computer-based testing tool will be used for Reading and Listening tests, as well as for the
Student Questionnaire. The Writing test will be done on paper rather than on the computer-based testing tool. There are six different task types in the Reading test and five different task types in the Listening test. Examples of all these task types are provided in the student demonstration tool on
the SurveyLang website. Instructions on how to complete the tasks are provided in this Guide.
2 TAKING THE TESTS
2.1 Logging in
4. To start the test you must type in the password which will be given to you by the Test Administrator. When this is done, click ‘SUBMIT’.
Figure 1. Log-in Screen
5. To start the student demonstration tool on the website use the following password and then click ‘SUBMIT’: 9999
6. After successfully logging in, you will see a screen with your name (or ID), the name of your school and the name of your country at the top. Please check that these are correct. If not, you should immediately notify the Test Administrator.
7. Below this information, you will find buttons for the test(s) you will be taking on the computer-based testing tool. As each student will only be tested in two of the three skills (Reading, Listening and Writing), the number of buttons will vary from student to student depending on the combination of
tests you have been assigned.
ESLC Testing Tool Student Guidelines EN
3

8. For a student taking both Listening and Reading tests, the screen will look like this:
Figure 2. Screen shown after successful log-in
9. Note that the buttons are placed from left to right in the order they will be used. In the example above, the Listening test will be taken first, then the Reading test and then the Student Questionnaire. If a button is grey, it can not be opened at this stage. If a button is green, it means it
is active at that time. In the example above, the Audio Check is active.
10. The ‘Audio Check’ button is used to test and adjust the volume of the audio. This must always be done before starting the Listening test.
11. Use the Listening test, Reading test and Questionnaire buttons to start the various sections. Note: Make sure you do not click on the Listening or Reading test buttons before you are told to do so by the Test Administrator. Clicking on these buttons will start the test and the test time
will start running.
12. After completing each test, you will return to the screen shown above in Figure 2. The next test in the sequence will then have changed from grey to green, ready for you to use.
ESLC Testing Tool Student Guidelines EN
4
2.2 Checking the audio for the Listening test
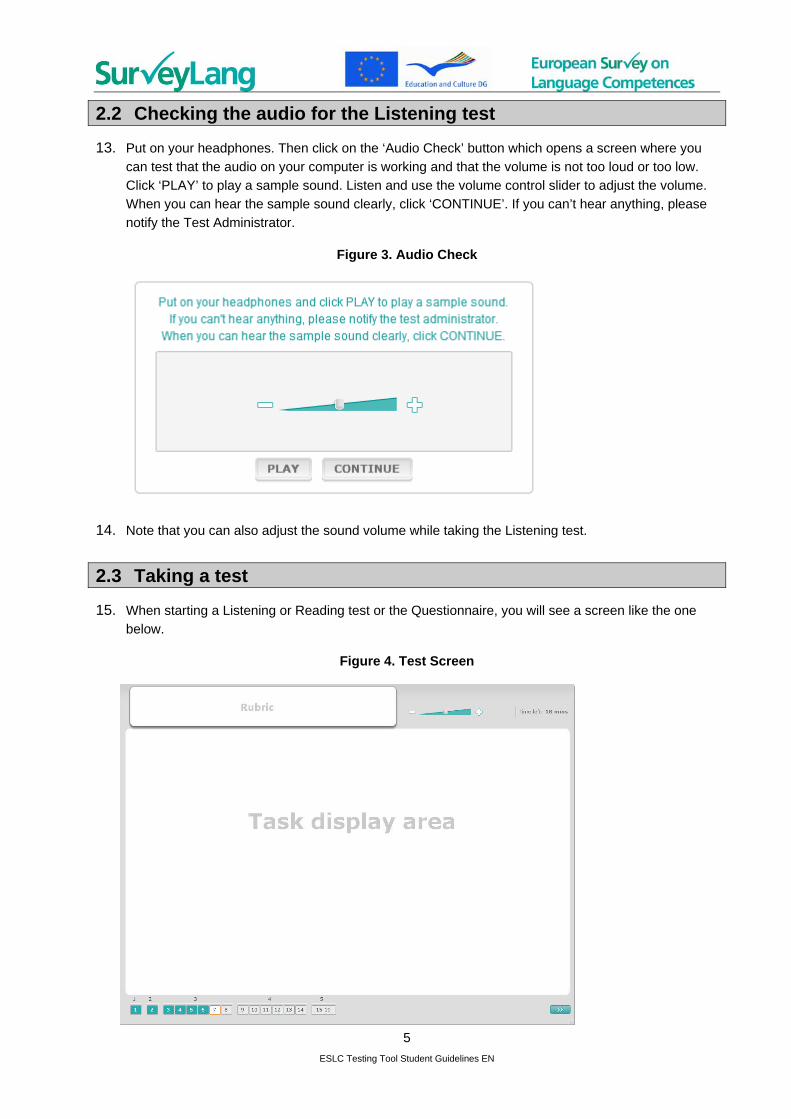
13. Put on your headphones. Then click on the ‘Audio Check’ button which opens a screen where you
can test that the audio on your computer is working and that the volume is not too loud or too low. Click ‘PLAY’ to play a sample sound. Listen and use the volume control slider to adjust the volume. When you can hear the sample sound clearly, click ‘CONTINUE’. If you can’t hear anything, please
notify the Test Administrator.
Figure 3. Audio Check
14. Note that you can also adjust the sound volume while taking the Listening test.
2.3 Taking a test
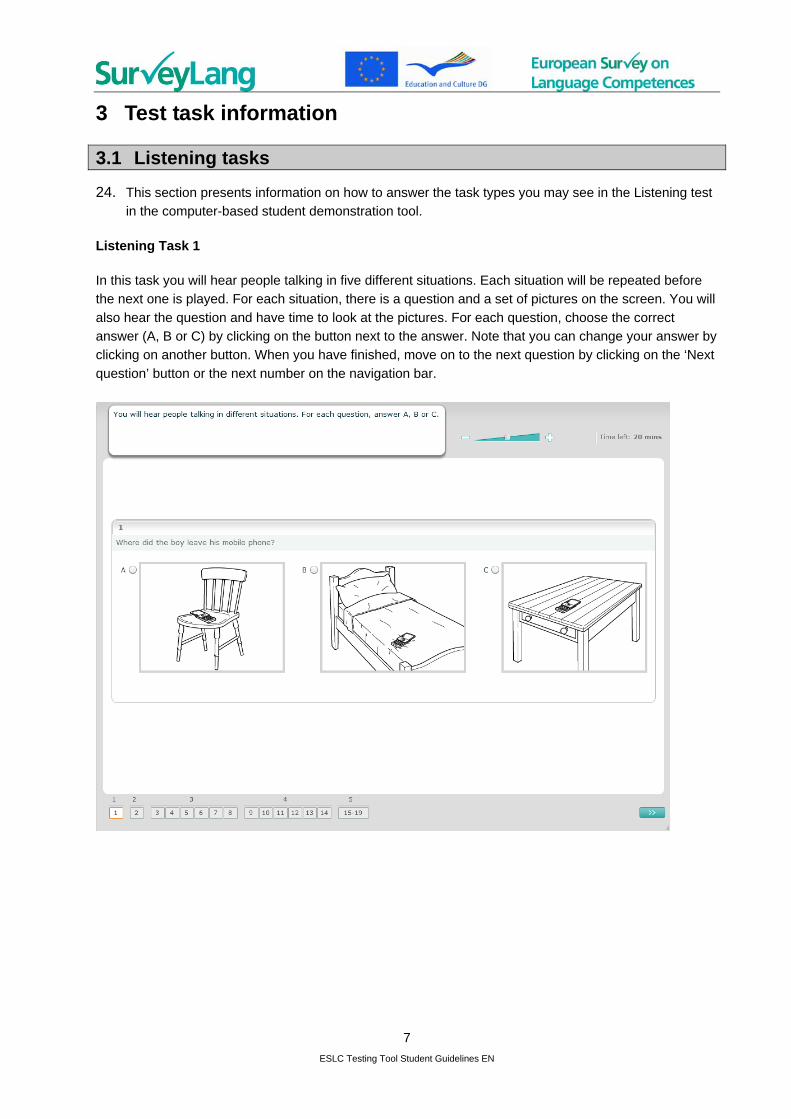
15. When starting a Listening or Reading test or the Questionnaire, you will see a screen like the one below.
Figure 4. Test Screen
ESLC Testing Tool Student Guidelines EN
5

16. The bottom bar shows the number of tasks in the test you are currently taking. The tasks are shown
in the ‘Task display area’ one by one. Note: The various task types are described later in this Guide. The current focus is on the elements of the test screen.
17. The ‘Rubric’ box in the upper left corner provides instructions on how to answer a task. Always read
these instructions before proceeding.
18. The ‘Time left’ button in the top right corner lets you know how much time is left of the current test. It displays the time left in minutes until there is one minute left, then in seconds. The test clock will
show you when there are 10 minutes and 5 minutes left. Note that the Reading test is exactly 30 minutes long. The Listening test is approximately 30 minutes depending on the length of the recording. When the timer stops at 0 seconds, you will have an extra 30 seconds to complete the
test before the test screen automatically closes.
19. The navigation bar at the bottom of the screen shows where you are in the test and which tasks and questions have already been completed. There is a numbered square for each question in the test
you are taking. The question you are currently working on has a red box around it, for example number 7 in Figure 4. The colour blue indicates that the question has already been answered. The colour grey indicates that this question still requires an answer.
20. You can use the navigation bar to move backwards and forwards in the test. By clicking on a numbered square the corresponding question is then displayed. You can then answer this question. You can also change the answer to any question you have already completed if you wish. You can
change your answers at any time during the test until the time limit is reached and the test is closed.
21. When you start a test, all squares are grey and you will be positioned on the first question of the first task. We recommend that you work through the test sequentially from left to right on the navigation
bar. You can do this by clicking on the ’Next question’ button at the bottom right of the screen or by clicking on the numbered squares at the bottom.
22. Working through the test in order is especially important for the Listening test as the audio track
presents the questions in the numbered order. When the audio tells you to move to the next task, you must use the navigation bar or the 'Next question' button to move to the next task. The screen will not change automatically.
23. All Listening texts are played twice. You will be given time to read the questions and you will also have time to check your answers after each task.
ESLC Testing Tool Student Guidelines EN
6
3 Test task information
3.1 Listening tasks
24. This section presents information on how to answer the task types you may see in the Listening test in the computer-based student demonstration tool.
Listening Task 1
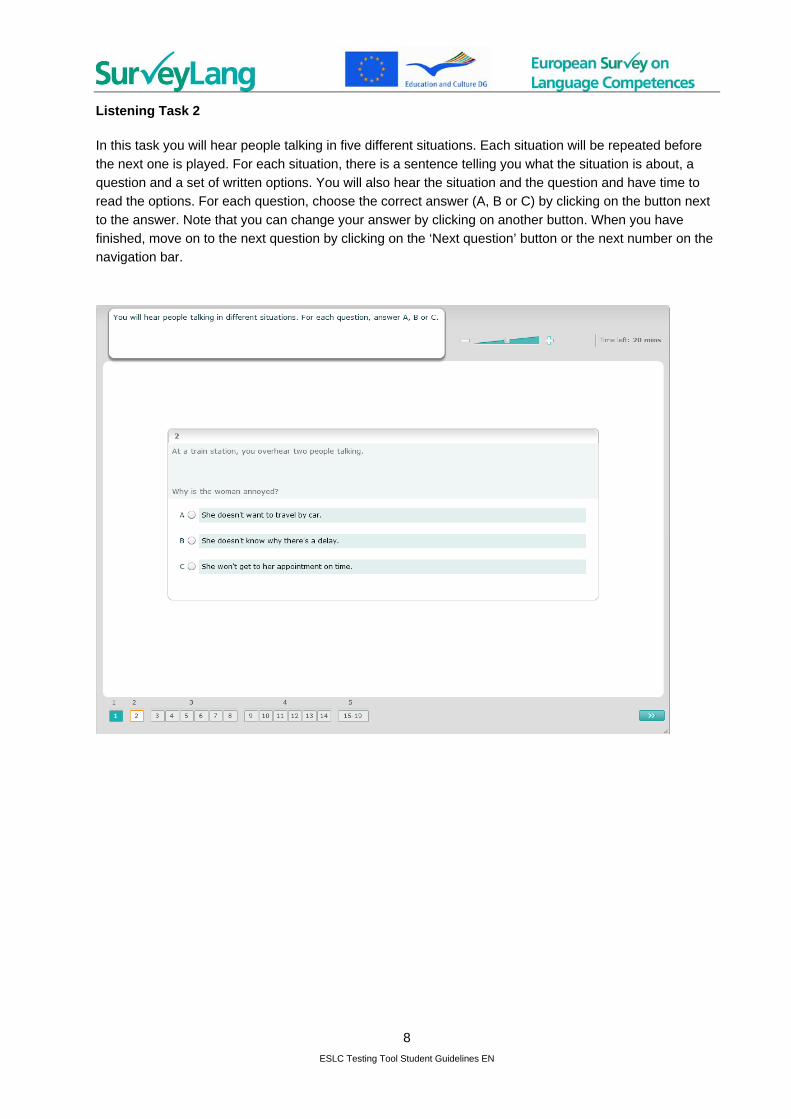
In this task you will hear people talking in five different situations. Each situation will be repeated before the next one is played. For each situation, there is a question and a set of pictures on the screen. You will
also hear the question and have time to look at the pictures. For each question, choose the correct answer (A, B or C) by clicking on the button next to the answer. Note that you can change your answer by clicking on another button. When you have finished, move on to the next question by clicking on the ‘Next
question’ button or the next number on the navigation bar.
ESLC Testing Tool Student Guidelines EN
7
Listening Task 2
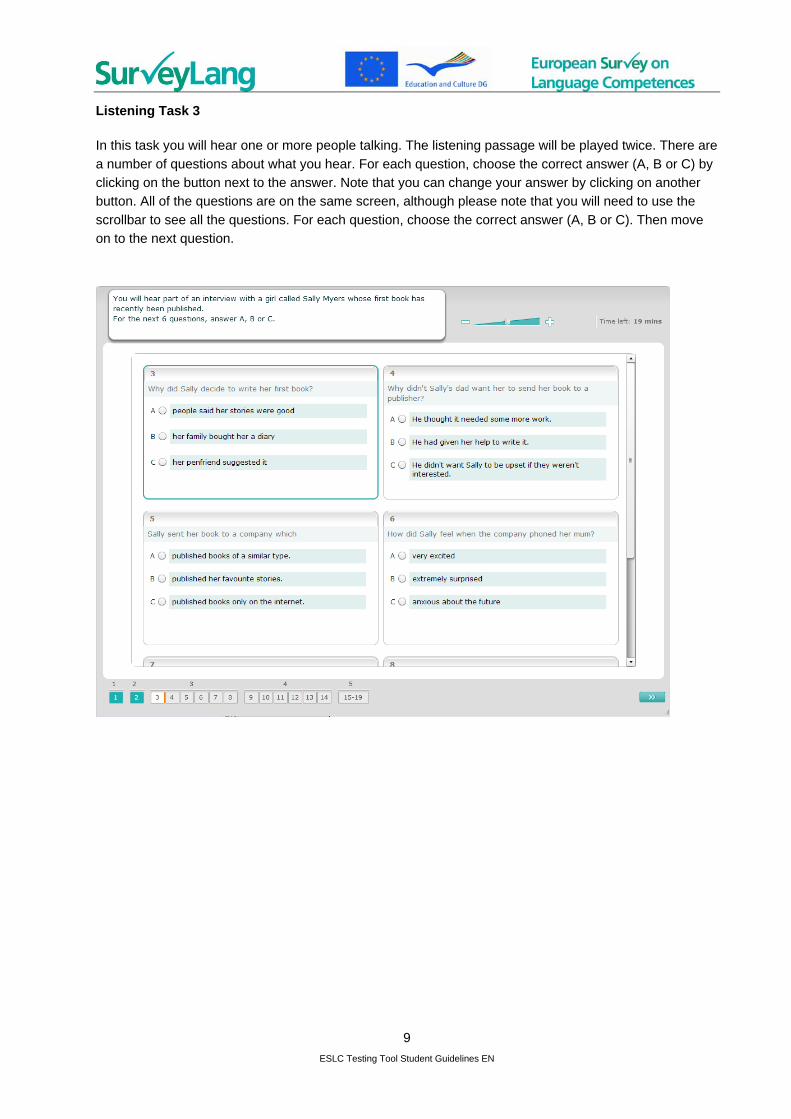
In this task you will hear people talking in five different situations. Each situation will be repeated before
the next one is played. For each situation, there is a sentence telling you what the situation is about, a question and a set of written options. You will also hear the situation and the question and have time to read the options. For each question, choose the correct answer (A, B or C) by clicking on the button next
to the answer. Note that you can change your answer by clicking on another button. When you have finished, move on to the next question by clicking on the ‘Next question’ button or the next number on the navigation bar.
ESLC Testing Tool Student Guidelines EN
8
Listening Task 3
In this task you will hear one or more people talking. The listening passage will be played twice. There are
a number of questions about what you hear. For each question, choose the correct answer (A, B or C) by clicking on the button next to the answer. Note that you can change your answer by clicking on another button. All of the questions are on the same screen, although please note that you will need to use the
scrollbar to see all the questions. For each question, choose the correct answer (A, B or C). Then move on to the next question.
ESLC Testing Tool Student Guidelines EN
9

Listening Task 4
In this task you will hear two people talking. The listening passage will be played twice. There are a
number of statements about what you hear. For each question, decide if the statement is Correct or Incorrect. For example, if you think the answer to question 9 is Incorrect, click on the button next to No. If you think the answer to question 1 is correct, click on the button next to Yes. Then move on to the next
question. All of the questions are on the same screen.
ESLC Testing Tool Student Guidelines EN
10
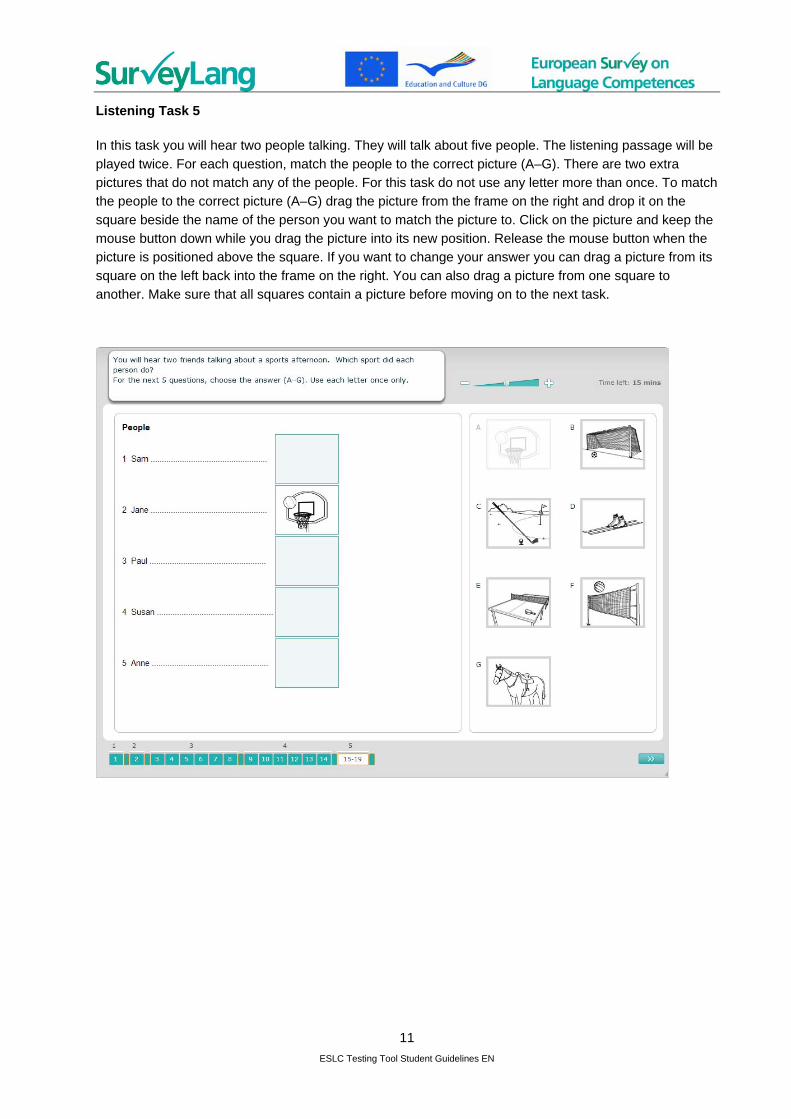
Listening Task 5
In this task you will hear two people talking. They will talk about five people. The listening passage will be
played twice. For each question, match the people to the correct picture (A–G). There are two extra pictures that do not match any of the people. For this task do not use any letter more than once. To match the people to the correct picture (A–G) drag the picture from the frame on the right and drop it on the
square beside the name of the person you want to match the picture to. Click on the picture and keep the mouse button down while you drag the picture into its new position. Release the mouse button when the picture is positioned above the square. If you want to change your answer you can drag a picture from its
square on the left back into the frame on the right. You can also drag a picture from one square to another. Make sure that all squares contain a picture before moving on to the next task.
ESLC Testing Tool Student Guidelines EN
11
3.2 Reading tasks
25. This section presents information on how to answer the task types you may see in the Reading test
in the computer-based student demonstration tool.
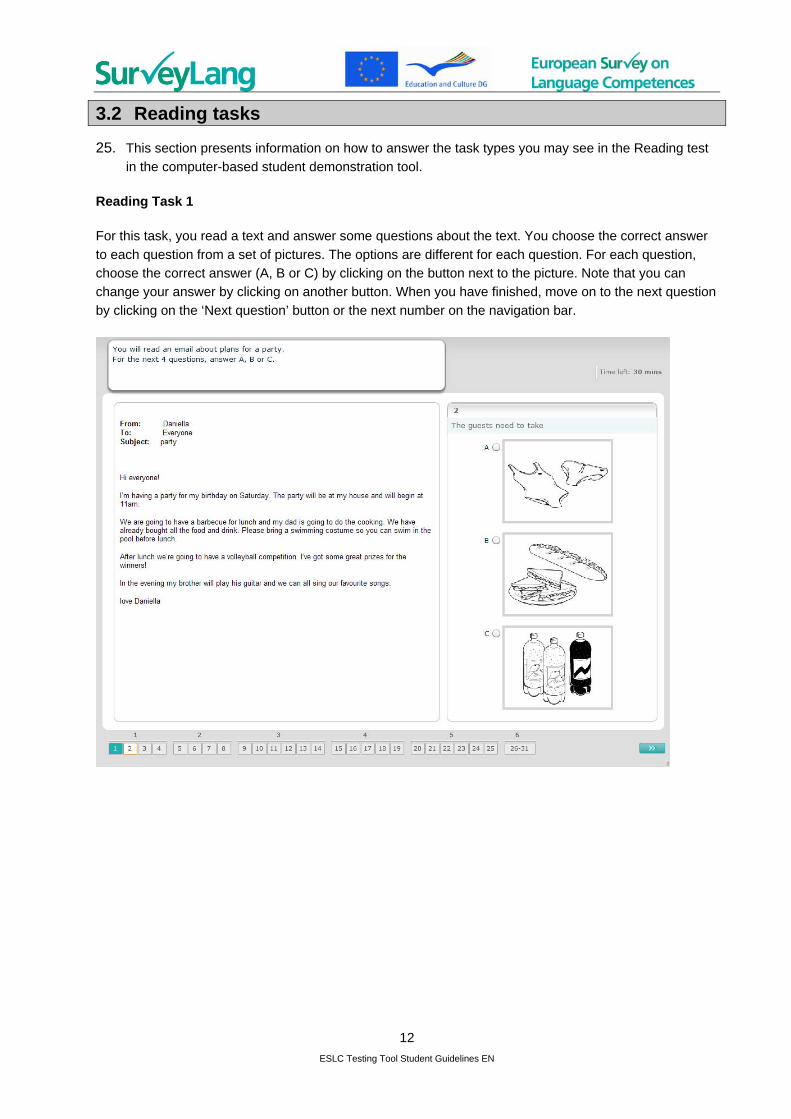
Reading Task 1
For this task, you read a text and answer some questions about the text. You choose the correct answer
to each question from a set of pictures. The options are different for each question. For each question, choose the correct answer (A, B or C) by clicking on the button next to the picture. Note that you can change your answer by clicking on another button. When you have finished, move on to the next question
by clicking on the ‘Next question’ button or the next number on the navigation bar.
ESLC Testing Tool Student Guidelines EN
12
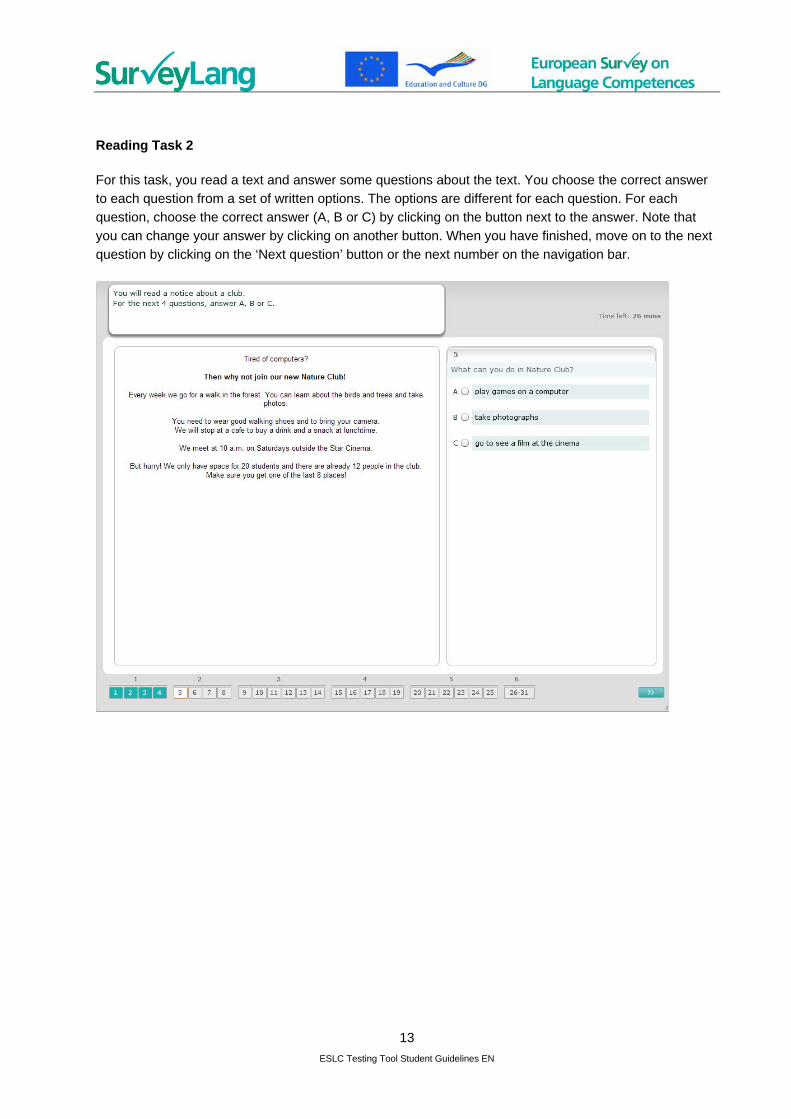
Reading Task 2
For this task, you read a text and answer some questions about the text. You choose the correct answer to each question from a set of written options. The options are different for each question. For each question, choose the correct answer (A, B or C) by clicking on the button next to the answer. Note that
you can change your answer by clicking on another button. When you have finished, move on to the next question by clicking on the ‘Next question’ button or the next number on the navigation bar.
ESLC Testing Tool Student Guidelines EN
13
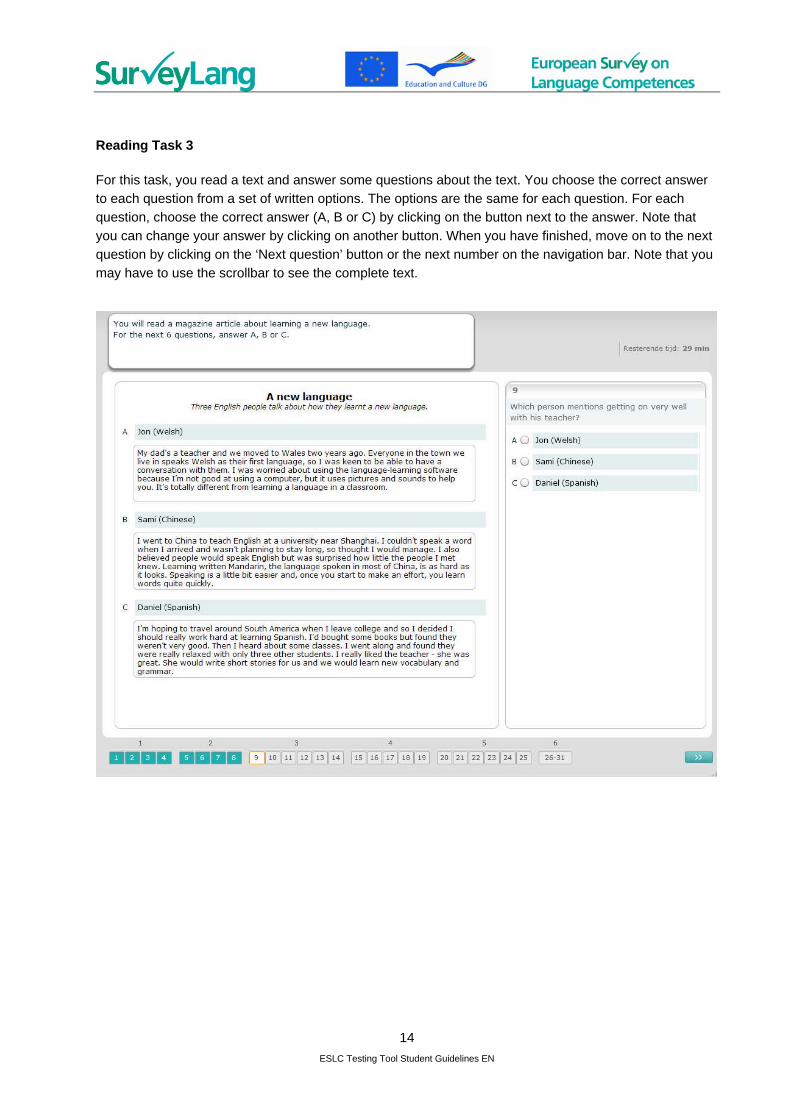
Reading Task 3
For this task, you read a text and answer some questions about the text. You choose the correct answer to each question from a set of written options. The options are the same for each question. For each question, choose the correct answer (A, B or C) by clicking on the button next to the answer. Note that
you can change your answer by clicking on another button. When you have finished, move on to the next question by clicking on the ‘Next question’ button or the next number on the navigation bar. Note that you may have to use the scrollbar to see the complete text.
ESLC Testing Tool Student Guidelines EN
14
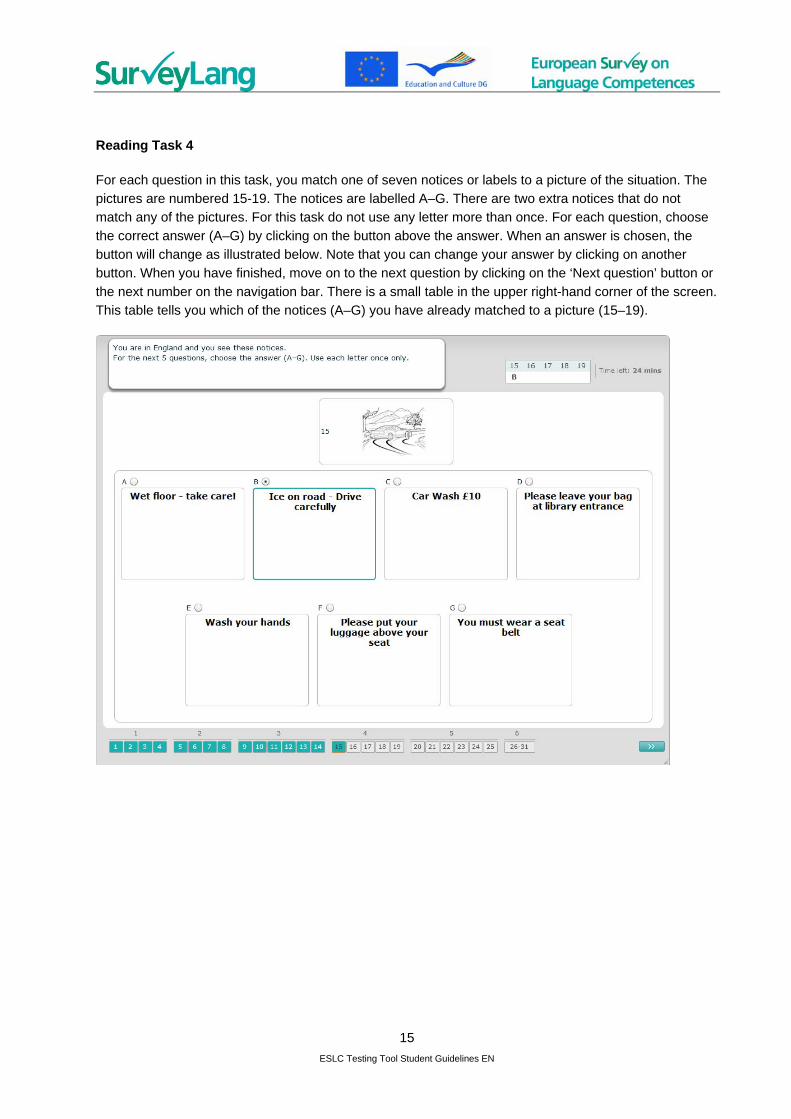
Reading Task 4
For each question in this task, you match one of seven notices or labels to a picture of the situation. The pictures are numbered 15-19. The notices are labelled A–G. There are two extra notices that do not match any of the pictures. For this task do not use any letter more than once. For each question, choose
the correct answer (A–G) by clicking on the button above the answer. When an answer is chosen, the button will change as illustrated below. Note that you can change your answer by clicking on another button. When you have finished, move on to the next question by clicking on the ‘Next question’ button or
the next number on the navigation bar. There is a small table in the upper right-hand corner of the screen. This table tells you which of the notices (A–G) you have already matched to a picture (15–19).
ESLC Testing Tool Student Guidelines EN
15
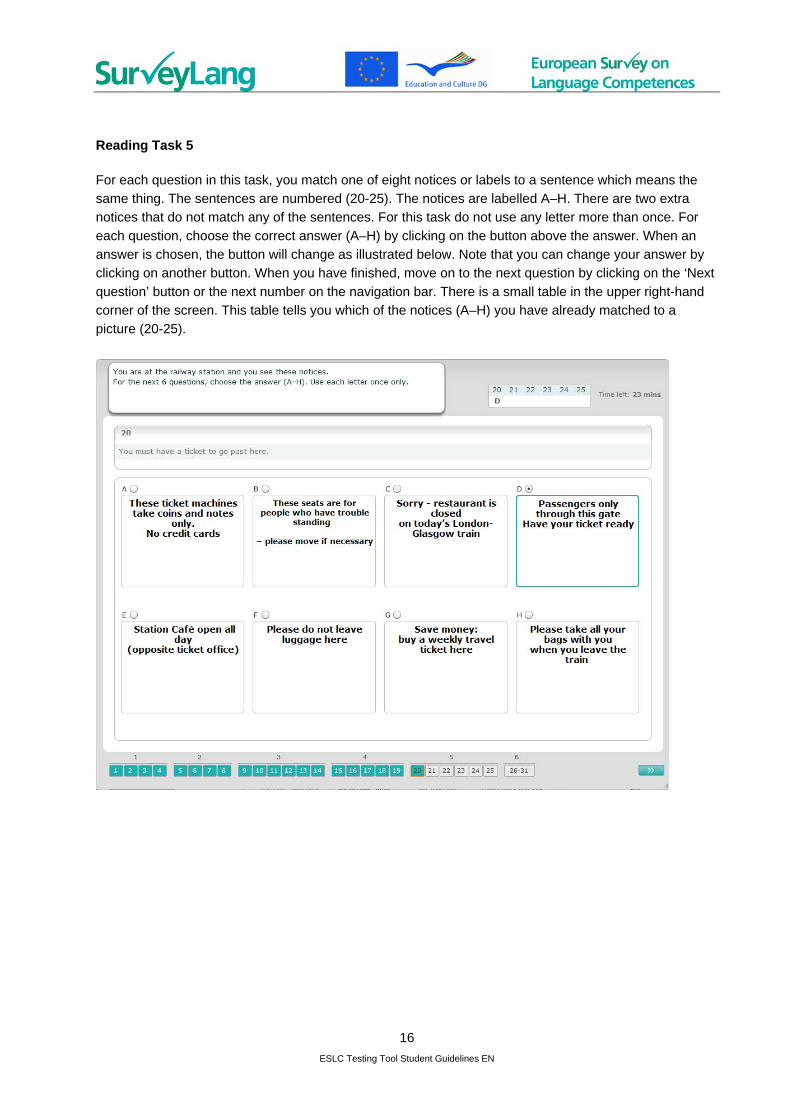
Reading Task 5
For each question in this task, you match one of eight notices or labels to a sentence which means the same thing. The sentences are numbered (20-25). The notices are labelled A–H. There are two extra notices that do not match any of the sentences. For this task do not use any letter more than once. For
each question, choose the correct answer (A–H) by clicking on the button above the answer. When an answer is chosen, the button will change as illustrated below. Note that you can change your answer by clicking on another button. When you have finished, move on to the next question by clicking on the ‘Next
question’ button or the next number on the navigation bar. There is a small table in the upper right-hand corner of the screen. This table tells you which of the notices (A–H) you have already matched to a picture (20-25).
ESLC Testing Tool Student Guidelines EN
16
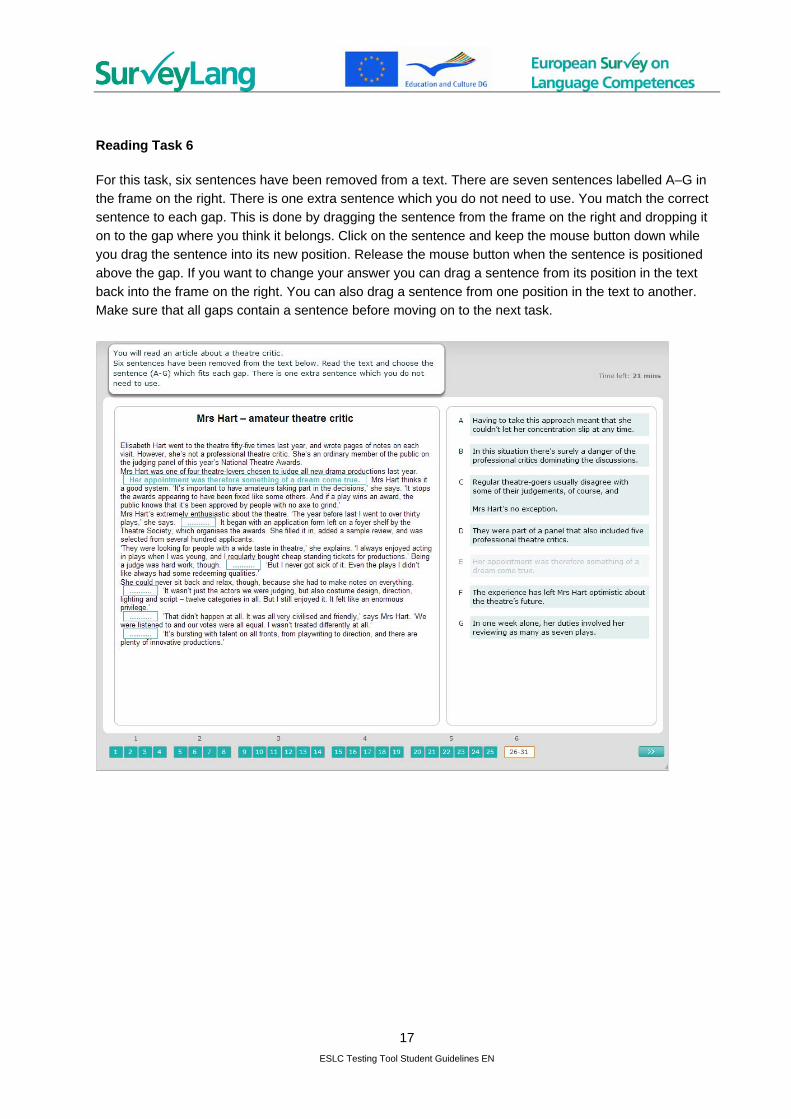
Reading Task 6
For this task, six sentences have been removed from a text. There are seven sentences labelled A–G in the frame on the right. There is one extra sentence which you do not need to use. You match the correct sentence to each gap. This is done by dragging the sentence from the frame on the right and dropping it
on to the gap where you think it belongs. Click on the sentence and keep the mouse button down while you drag the sentence into its new position. Release the mouse button when the sentence is positioned above the gap. If you want to change your answer you can drag a sentence from its position in the text
back into the frame on the right. You can also drag a sentence from one position in the text to another. Make sure that all gaps contain a sentence before moving on to the next task.
ESLC Testing Tool Student Guidelines EN
17