ESET REMOTE ADMINISTRATOR 6 · ESET REMOTE ADMINISTRATOR 6 ... ESET Remote Administrator does not...
29
ESET REMOTE ADMINISTRATOR 6 Guide for Small and Medium-sized Businesses Click here to navigate to the most recent PDF version of this document Click here to display Online help version of this document
-
Upload
hoanghuong -
Category
Documents
-
view
260 -
download
0
Transcript of ESET REMOTE ADMINISTRATOR 6 · ESET REMOTE ADMINISTRATOR 6 ... ESET Remote Administrator does not...
ESETREMOTEADMINISTRATOR 6Guide for Small and Medium-sized Businesses
Click here to navigate to the most recent PDF version of this documentClick here to display Online help version of this document
ESET REMOTE ADMINISTRATOR 6Copyright 2016 by ESET, spol. s r.o.ESET Remote Adminis trator 6 was developed by ESET, spol . s r.o.
For more information vis i t www.eset.com.Al l rights reserved. No part of this documentation may be reproduced, s tored in aretrieva l system or transmitted in any form or by any means , electronic, mechanica l ,photocopying, recording, scanning, or otherwise without permiss ion in wri ting fromthe author.ESET, spol . s r.o. reserves the right to change any of the described appl ication softwarewithout prior notice.
Customer Care: www.eset.com/support
REV. 12.08.2016
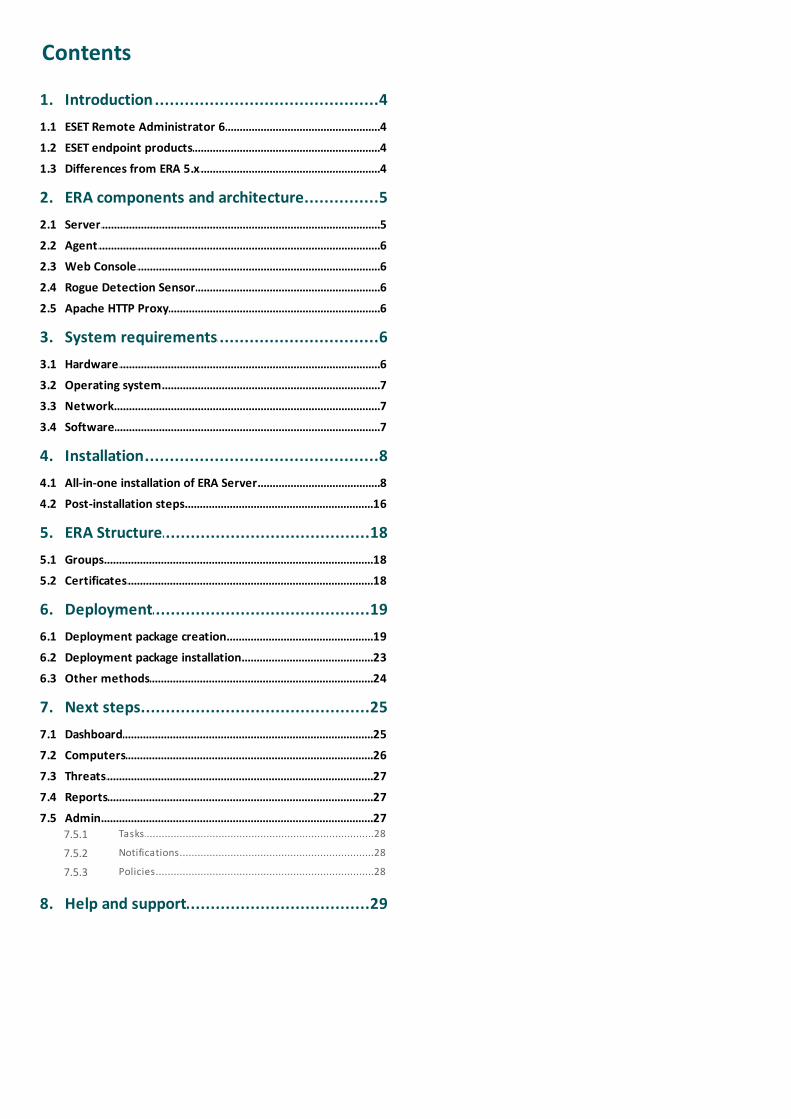
Contents
.......................................................4Introduction1.
....................................................................................................4ESET Remote Administrator 61.1
....................................................................................................4ESET endpoint products1.2
....................................................................................................4Differences from ERA 5.x1.3
.......................................................5ERA components and architecture2.
....................................................................................................5Server2.1
....................................................................................................6Agent2.2
....................................................................................................6Web Console2.3
....................................................................................................6Rogue Detection Sensor2.4
....................................................................................................6Apache HTTP Proxy2.5
.......................................................6System requirements3.
....................................................................................................6Hardware3.1
....................................................................................................7Operating system3.2
....................................................................................................7Network3.3
....................................................................................................7Software3.4
.......................................................8Installation4.
....................................................................................................8All-in-one installation of ERA Server4.1
....................................................................................................16Post-installation steps4.2
.......................................................18ERA Structure5.
....................................................................................................18Groups5.1
....................................................................................................18Certificates5.2
.......................................................19Deployment6.
....................................................................................................19Deployment package creation6.1
....................................................................................................23Deployment package installation6.2
....................................................................................................24Other methods6.3
.......................................................25Next steps7.
....................................................................................................25Dashboard7.1
....................................................................................................26Computers7.2
....................................................................................................27Threats7.3
....................................................................................................27Reports7.4
....................................................................................................27Admin7.5..............................................................................28Tasks7.5.1
..............................................................................28Notifications7.5.2
..............................................................................28Policies7.5.3
.......................................................29Help and support8.
4
1. IntroductionThis guide is intended for a small to medium-sized businesses that manage up to 250 Windows ESET endpointproducts using ESET Remote Administrator 6.It will explain basic concepts important for deploying and using ESET security products.
1.1 ESET Remote Administrator 6
ESET Remote Administrator 6 (ERA) is an application that allows you to manage ESET products on client workstations,servers and mobile devices in a networked environment from one central location. The built-in task managementsystem in ESET Remote Administrator, allows you to install ESET security solutions on remote computers and quicklyrespond to new problems and threats.
ESET Remote Administrator does not provide protection against malicious code by itself. Protection of yourenvironment depends on the presence of an ESET security solution such as ESET Endpoint Security on workstations.
1.2 ESET endpoint products
ESET endpoint products are primarily designed for use on workstations in a small business/enterprise environmentand can can be used with ESET Remote Administrator
ESET Remote Administrator 6 is able to deploy, activate or manage the following ESET endpoint products:
Manageable via ESET Remote Administrator 6 Product version
ESET Endpoint Security for Windows 6.x & 5.x
ESET Endpoint Antivirus for Windows 6.x & 5.x
ESET Endpoint Security for OS X 6.x
ESET Endpoint Antivirus for OS X 6.x
ESET Endpoint Security for Android 2.x
1.3 Differences from ERA 5.x
The table below includes descriptions of the major differences between ESET Remote Administrator version 6.x and5.x.
Difference Version 6.x Version 5.x
Console Web Console (browser-based) Console (Windows application)
Components Server, Web Console (web interface,Java and Apache Tomcat needed onserver side), Agent, Proxy, RogueDetection Sensor, Mobile DeviceConnector, Apache HTTP Proxy forupdate caching
Server and Console (Windowsprogram GUI)
Computer discovery Rogue Detection Sensor locates newcomputers automatically
Network Search Task can be run tolocate new computers
Remote installation Once deployed to clients, the ERAAgent can facilitate installation ofESET solutions
Push installation task can be run toinstall ESET solutions on clients
Remote installation methods Remote push installation, LiveInstaller scripts (delivered via e-mailor removable media), GPO, SCCM
Remote push installation, SSH, WMI,mail delivery, WSUS, GPO, LogOnscript
Support forESET business products (6.x)
Yes No
5
Policies Redesigned policy editor can force /apply flags. ERA Agent mergespolicies according to parent/childconfiguration and group settings andapplies the final client configuration
Tree-structured policy configurationeditor
Groups Static and Dynamic groups. One staticgroup per computer. Dynamic groupsare evaluated by ERA Agentregardless of connectivity to theServer. Membership is reported tothe Server.
Static and Parametric groups
Reporting Redesigned reporting kit can createcustom charts containing user-selected system data. Reports can besaved locally and/or delivered by e-mail in CSV or PDF formats.
Separate report set for web-baseddashboard and extendedcustomizable general reporttemplates. Export to HTML, ZIP andPDF.
Mirror Apache HTTP Proxy acts as atransparent proxy/cache for filesdownloaded from ESET servers. Theoffline mirror tool is available as analternative.
Mirror functionality allows for storageof updates/files locally on the ERAServer hard-disk
OS platform support Windows, Linux, Mac and Virtualenvironments (ability to import avirtual appliance). Server to serverreplication is deprecated.
Windows only
Database MSSQL Express (default), MSSQL,MySQL (only MySQL supported onLinux)
ODBC-connected MSAccess (default),MSSQL, MySQL, Oracle
2. ERA components and architectureTo perform a complete deployment of the ESET security solutions portfolio, the following components must beinstalled:
ERA Server (controls the communication with client computers)
ERA Web Console (browser-based user interface for the ERA Server)
ERA Agent (deployed on client computers, communicates with ERA server)
The following supporting components are optional, we recommend that you install them for best performance ofthe application on the network:
Apache HTTP Proxy
RD Sensor (can detect unmanaged computers on the network)
2.1 Server
ESET Remote Administrator Server (ERA Server) is the application that processes all data received from clients thatconnect to the Server (through the ERA Agent).

6
2.2 Agent
The ESET Remote Administrator Agent (ERA Agent) is an essential part of ESET Remote Administrator 6. Clients donot communicate with the Server directly, rather the Agent facilitates this communication. The Agent collectsinformation from the client and sends it to the ERA Server. If the ERA Server sends a task for the client - it is sent tothe Agent which then sends this task to the ESET endpoint product running on the client.
2.3 Web Console
ERA Web Console is a browser-based user interface that allows you to manage ESET security solutions in yourenvironment. It displays an overview of the status of clients on your network and can be used to deploy ESETsolutions to unmanaged computers remotely. If you choose to make the web server accessible from the internet,you can use ESET Remote Administrator from virtually any place and device.
2.4 Rogue Detection Sensor
Rogue Detection Sensor (RD Sensor) searches your network for computers not registered in ESET RemoteAdministrator. This component can locate new computers and add them in ESET Remote Administratorautomatically.
Remote detection sensor can take up to 24 hours to locate new computers on your network.
Newly discovered machines are listed in a predefined report, making it easy to assign them to specific static groupsand begin assigning them tasks.
2.5 Apache HTTP Proxy
Apache HTTP Proxy is a service that can be used in combination with ESET Remote Administrator 6.x to distributeinstallation packages and updates to client computers. It acts as a transparent proxy, meaning it caches files thathave already been downloaded to minimize Internet traffic on your network.
3. System requirementsBefore you install ESET Remote Administrator, verify that all hardware, operating system, network and softwareprerequisites are met.
3.1 Hardware
For seamless operation of ESET Remote Administrator, your system should meet the following hardwarerequirements:
Memory 4 GB RAM
Hard Drive At least 20 GB of free space
Processor Dual-Core, 2.0 GHz or faster
Network connection 1 Gbit/s

7
3.2 Operating system
The table below displays the supported operating systems for each ESET Remote Administrator componentrecommended for small and medium-sized business. See also a full list of supported operating systems.
Operating System Server Agent RD Sensor MDM
Windows Server 2003 SP2 and R2 X X X
Windows Server 2008 R2 SP1 and Core X X X X
Windows Server 2008 SP2 X X X X
Windows Server 2012 (including R2) X X X X
Microsoft SBS 2003 SP2 and R2 ** X X X
Microsoft SBS 2008 SP2 ** X X
Microsoft SBS 2011 Standard and Essential X X X X
Windows 7 SP1 X* X X X*
Windows 8 / 8.1 X* X X X*
Windows 10 X* X X X*
* Installing ERA components on a client OS might not be aligned with Microsoft licensing policy. Check Microsoftlicensing policy or consult your software supplier for details.
** Microsoft SQL Server Express included with Microsoft Small Business Server (SBS) is not supported by ESETRemote Administrator. If you want to run your ERA database on SBS, you must use a newer version of Microsoft SQLServer Express or MySQL. For more details and instructions, see Installation on Windows SBS / Essentials.
3.3 Network
It is essential that both ERA Server and client computers managed by ERA have a working Internet connection so thatthey can reach the ESET repository and activation servers. If you prefer not to have clients connect directly to theInternet, you can use a proxy server (not the same as Apache HTTP Proxy or ERA Proxy) to facilitate communicationwith your network and the Internet.
Computers managed by ERA should be connected to the same LAN and/or should be in the same Active Directorydomain as your ERA Server. The ERA Server must be visible by client computers. Additionally, Client computers mustbe able to communicate with your ERA Server to use remote deployment and the wake-up call feature.
Ports used
If your network uses a firewall, see our list of possible network communication ports used when ESET RemoteAdministrator and its components are installed in your infrastructure.
3.4 Software
The following prerequisites must be met to install ERA Server on Windows:
Microsoft .NET Framework 3.5 must be installed
Java Runtime Environment (JRE) must be installed (you can download it from http://java.com/en/download/),always use the latest officially released version of Java
ESET Remote Administrator supports two types of database servers, however we recommend that you use Microsoft SQL Server Express 2008 R2, 2012 and 2014, which is included with ESET Remote Administrator
8
4. InstallationESET Remote Administrator installers are available in different formats to support different install methods. Werecommend the All-in-one installer for small deployments.
4.1 All-in-one installation of ERA Server
Upgrading from a previous version of ERA?
Follow the instructions from the video to upgrade/migrate from ESET Remote Administrator 5 to ESET RemoteAdministrator 6 with the Migration tool.
To perform a new installation of ESET Remote Administrator 6, download the All-in-one installer from the downloadsection of the ESET website under Remote Administrator 6 (click to expand the category).
This feature allows you to install all ERA components using the ERA installation Wizard.
1. Make sure you have met all installation requirements before you proceed.
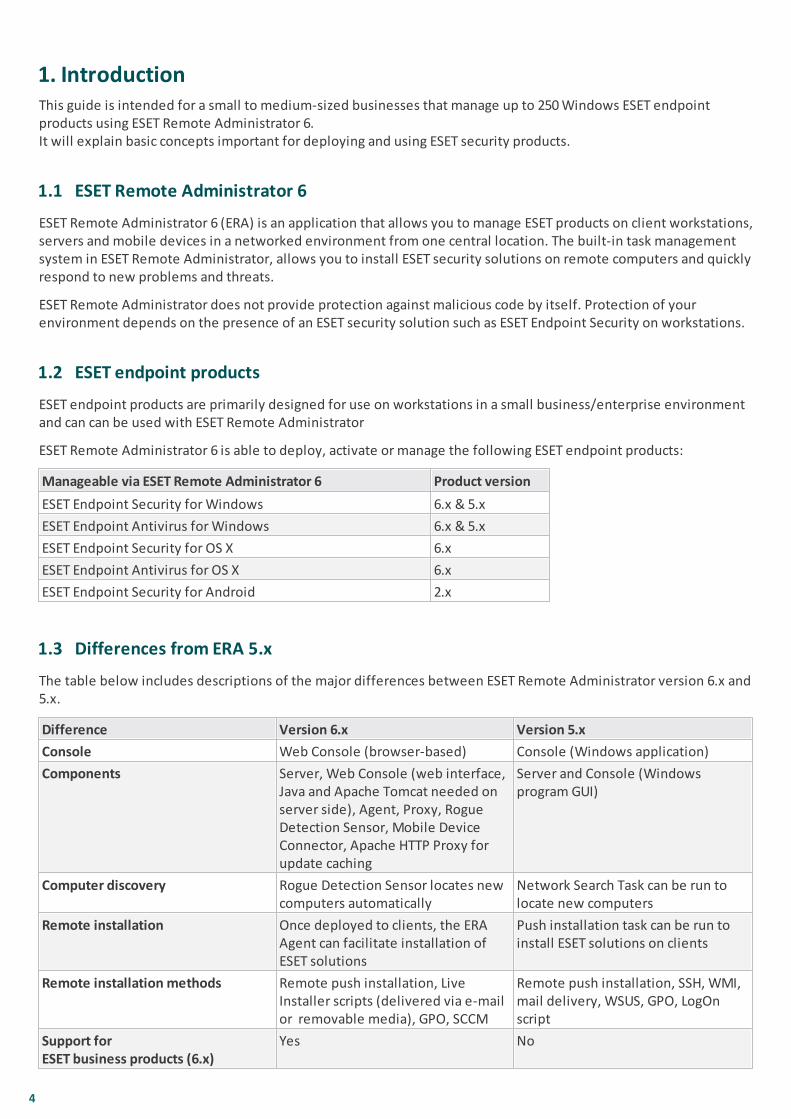
2. Open the installation package and click Next on the Welcome screen.
9
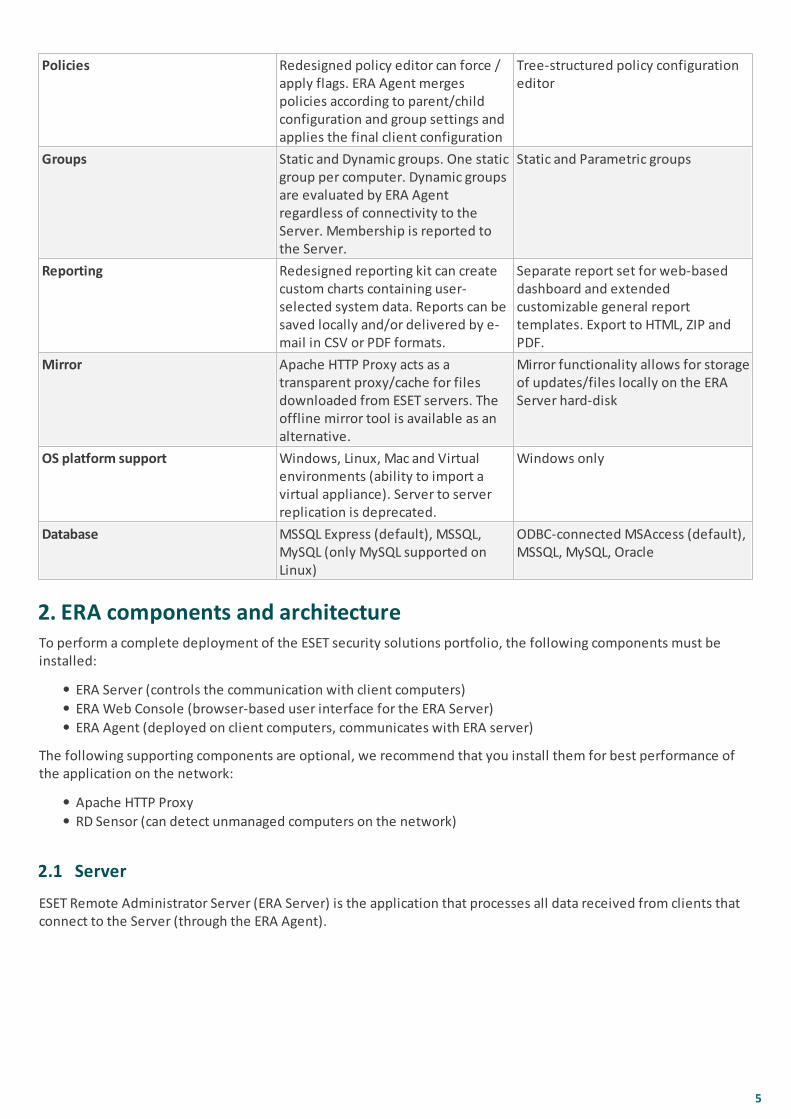
3. Select Install Remote Administrator Server and click Next. If necessary, you can adjust the language settings inthe Language drop-down menu before proceeding.
4. After accepting the EULA, click Next. Select the applicable components to install and click Install.
MICROSOFT SQL SERVER EXPRESS:
If you already have another version of Microsoft SQL Server or MySQL installed, or you plan to connect todifferent SQL Server, deselect this component.
You will not be able to install Microsoft SQL Server Express on a Domain Controller. This is likely to happen ifyou are using Windows SBS / Essentials. We recommend that you install ESET Remote Administrator on adifferent server or to use Microsoft SQL Server or MySQL Server to run the ERA database. More information.

10
If errors are found during the prerequisites check, address them accordingly. Make sure your system meets all installation requirements.
11
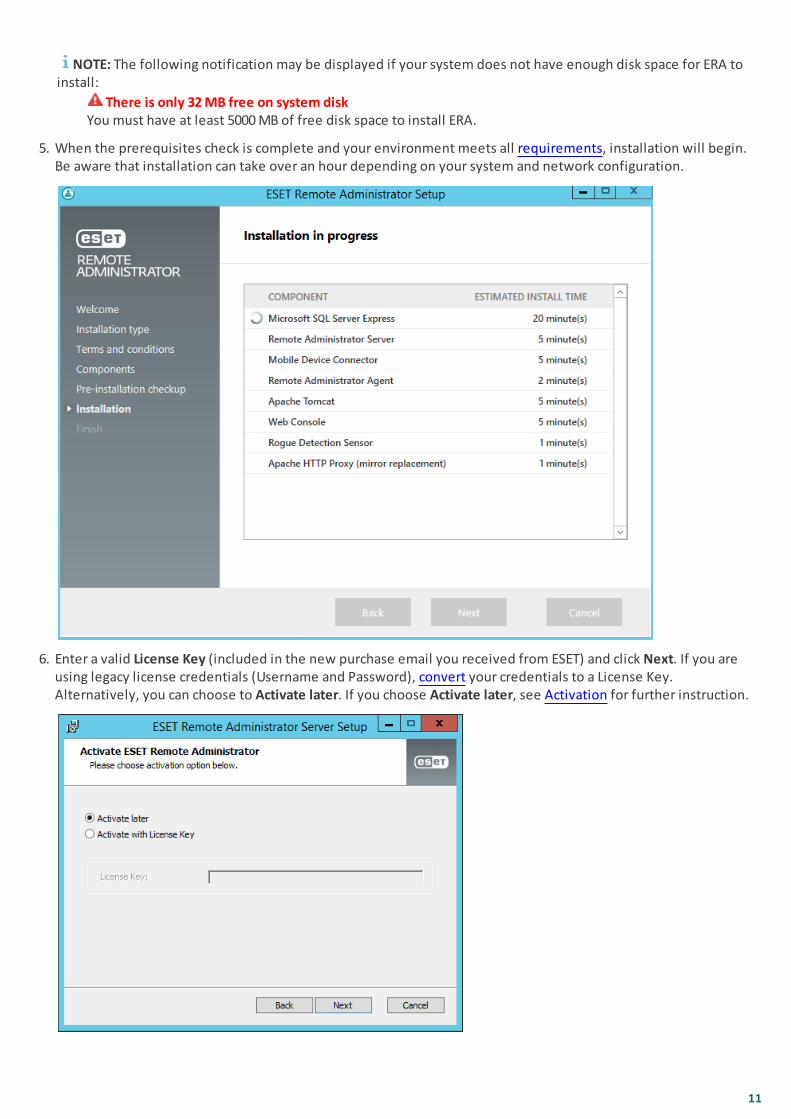
NOTE: The following notification may be displayed if your system does not have enough disk space for ERA toinstall:
There is only 32 MB free on system diskYou must have at least 5000 MB of free disk space to install ERA.
5. When the prerequisites check is complete and your environment meets all requirements, installation will begin.Be aware that installation can take over an hour depending on your system and network configuration.
6. Enter a valid License Key (included in the new purchase email you received from ESET) and click Next. If you areusing legacy license credentials (Username and Password), convert your credentials to a License Key.Alternatively, you can choose to Activate later. If you choose Activate later, see Activation for further instruction.
12
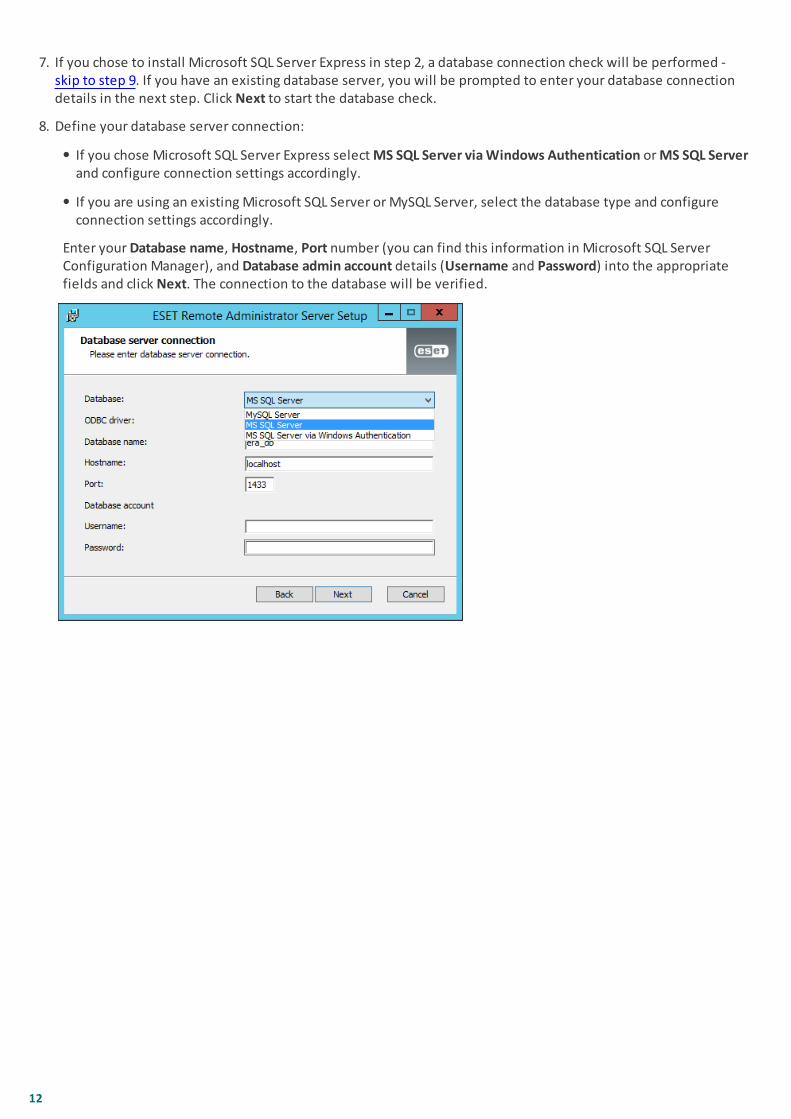
7. If you chose to install Microsoft SQL Server Express in step 2, a database connection check will be performed - skip to step 9. If you have an existing database server, you will be prompted to enter your database connectiondetails in the next step. Click Next to start the database check.
8. Define your database server connection:
If you chose Microsoft SQL Server Express select MS SQL Server via Windows Authentication or MS SQL Serverand configure connection settings accordingly.
If you are using an existing Microsoft SQL Server or MySQL Server, select the database type and configureconnection settings accordingly.
Enter your Database name, Hostname, Port number (you can find this information in Microsoft SQL ServerConfiguration Manager), and Database admin account details (Username and Password) into the appropriatefields and click Next. The connection to the database will be verified.
13
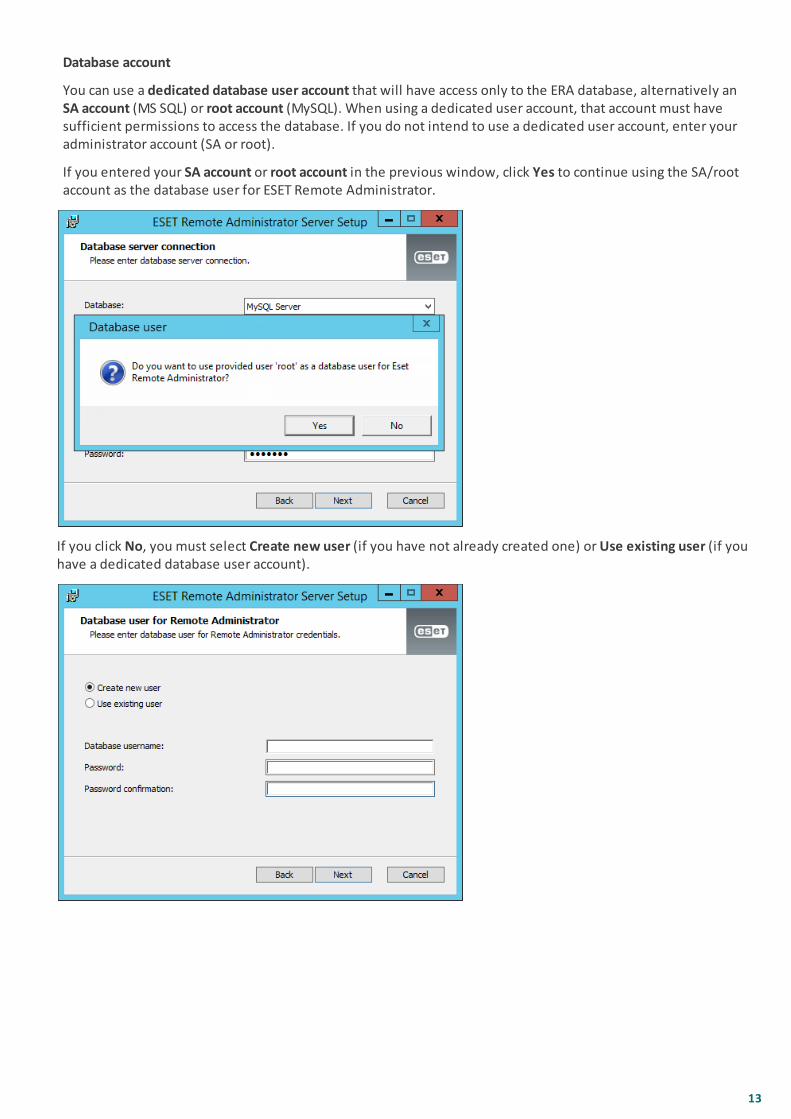
Database account
You can use a dedicated database user account that will have access only to the ERA database, alternatively anSA account (MS SQL) or root account (MySQL). When using a dedicated user account, that account must havesufficient permissions to access the database. If you do not intend to use a dedicated user account, enter youradministrator account (SA or root).
If you entered your SA account or root account in the previous window, click Yes to continue using the SA/rootaccount as the database user for ESET Remote Administrator.
If you click No, you must select Create new user (if you have not already created one) or Use existing user (if youhave a dedicated database user account).
14
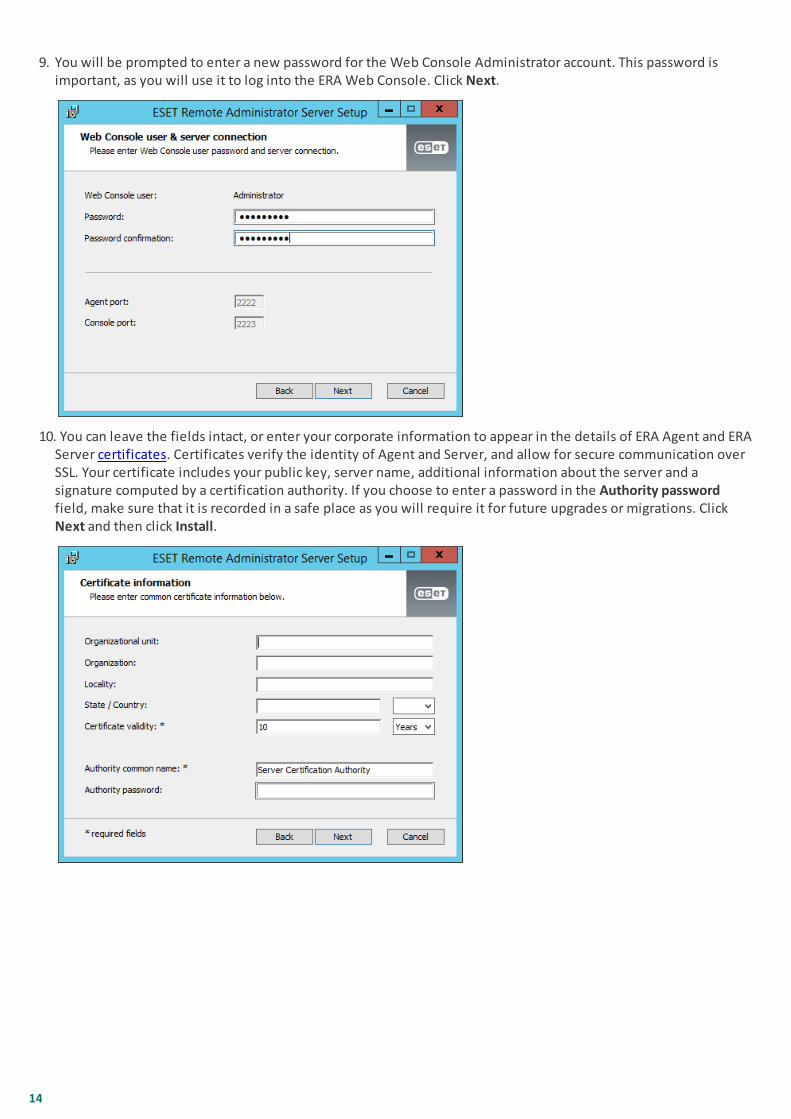
9. You will be prompted to enter a new password for the Web Console Administrator account. This password isimportant, as you will use it to log into the ERA Web Console. Click Next.
10. You can leave the fields intact, or enter your corporate information to appear in the details of ERA Agent and ERAServer certificates. Certificates verify the identity of Agent and Server, and allow for secure communication overSSL. Your certificate includes your public key, server name, additional information about the server and asignature computed by a certification authority. If you choose to enter a password in the Authority passwordfield, make sure that it is recorded in a safe place as you will require it for future upgrades or migrations. ClickNext and then click Install.
15
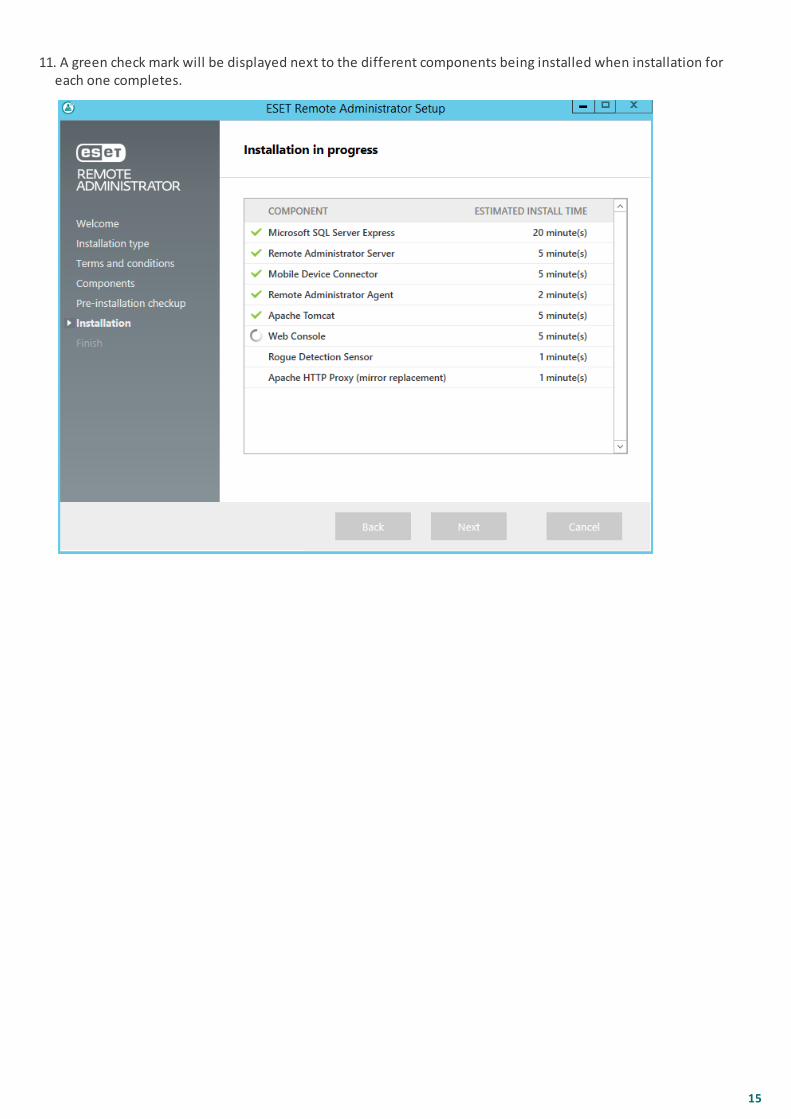
11. A green check mark will be displayed next to the different components being installed when installation foreach one completes.
16
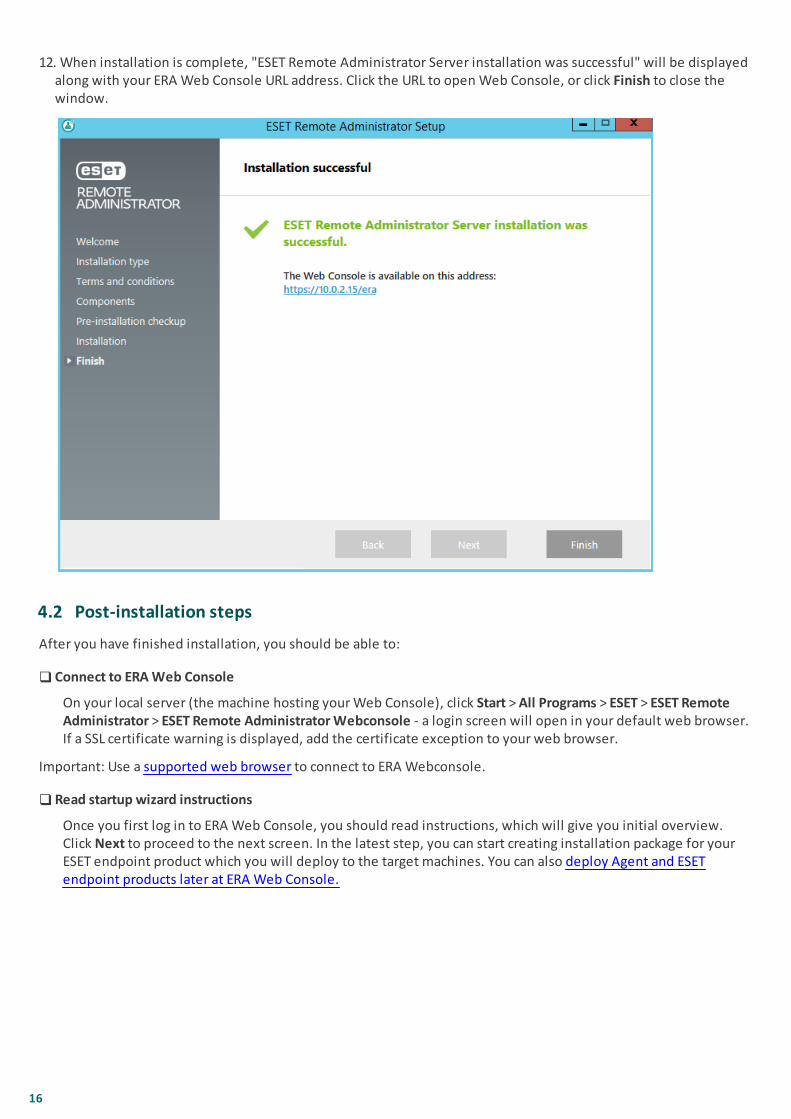
12. When installation is complete, "ESET Remote Administrator Server installation was successful" will be displayedalong with your ERA Web Console URL address. Click the URL to open Web Console, or click Finish to close thewindow.
4.2 Post-installation steps
After you have finished installation, you should be able to:
Connect to ERA Web Console
On your local server (the machine hosting your Web Console), click Start > All Programs > ESET > ESET RemoteAdministrator > ESET Remote Administrator Webconsole - a login screen will open in your default web browser.If a SSL certificate warning is displayed, add the certificate exception to your web browser.
Important: Use a supported web browser to connect to ERA Webconsole.
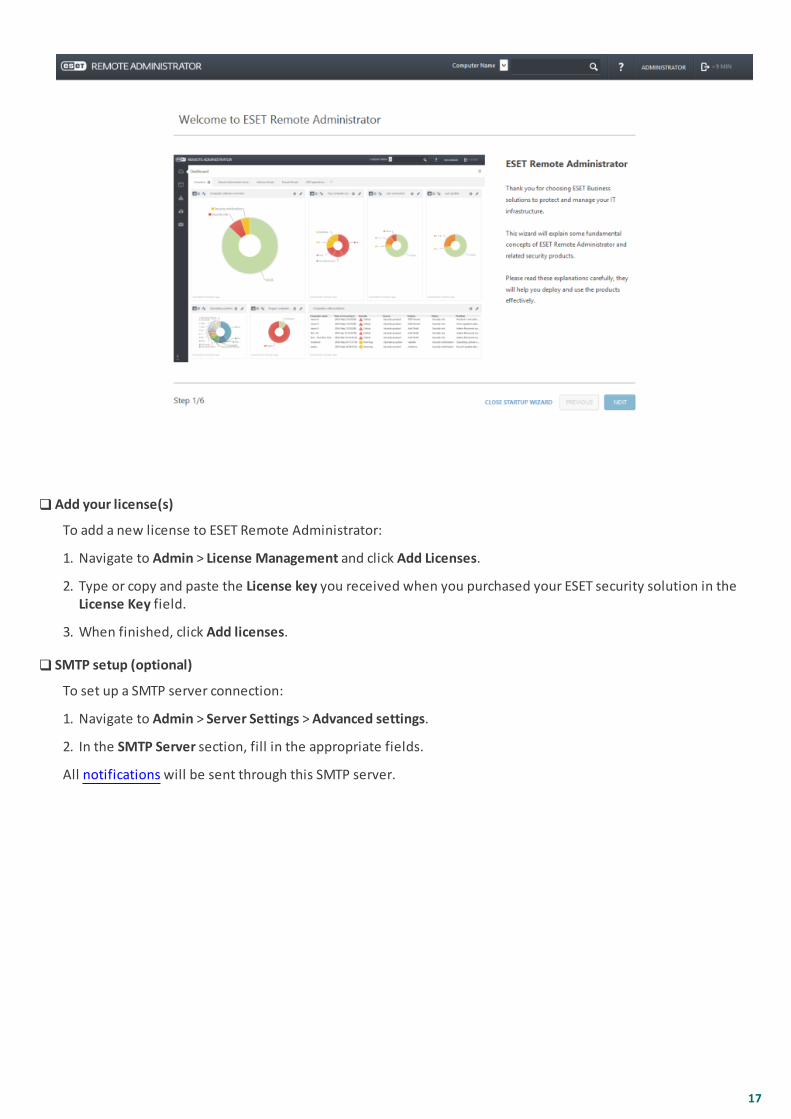
Read startup wizard instructions
Once you first log in to ERA Web Console, you should read instructions, which will give you initial overview.Click Next to proceed to the next screen. In the latest step, you can start creating installation package for yourESET endpoint product which you will deploy to the target machines. You can also deploy Agent and ESETendpoint products later at ERA Web Console.
17
Add your license(s)
To add a new license to ESET Remote Administrator:
1. Navigate to Admin > License Management and click Add Licenses.
2. Type or copy and paste the License key you received when you purchased your ESET security solution in theLicense Key field.
3. When finished, click Add licenses.
SMTP setup (optional)
To set up a SMTP server connection:
1. Navigate to Admin > Server Settings > Advanced settings.
2. In the SMTP Server section, fill in the appropriate fields.
All notifications will be sent through this SMTP server.
18
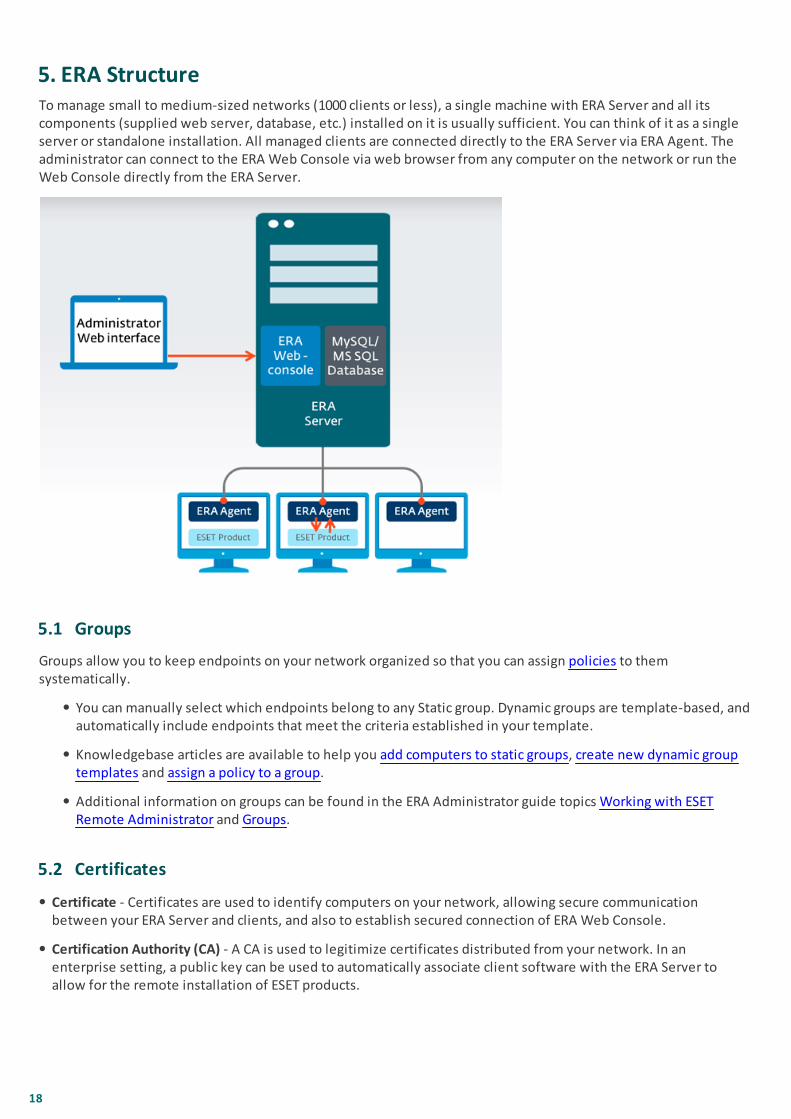
5. ERA StructureTo manage small to medium-sized networks (1000 clients or less), a single machine with ERA Server and all itscomponents (supplied web server, database, etc.) installed on it is usually sufficient. You can think of it as a singleserver or standalone installation. All managed clients are connected directly to the ERA Server via ERA Agent. Theadministrator can connect to the ERA Web Console via web browser from any computer on the network or run theWeb Console directly from the ERA Server.
5.1 Groups
Groups allow you to keep endpoints on your network organized so that you can assign policies to themsystematically.
You can manually select which endpoints belong to any Static group. Dynamic groups are template-based, andautomatically include endpoints that meet the criteria established in your template.
Knowledgebase articles are available to help you add computers to static groups, create new dynamic grouptemplates and assign a policy to a group.
Additional information on groups can be found in the ERA Administrator guide topics Working with ESETRemote Administrator and Groups.
5.2 Certificates
Certificate - Certificates are used to identify computers on your network, allowing secure communicationbetween your ERA Server and clients, and also to establish secured connection of ERA Web Console.
Certification Authority (CA) - A CA is used to legitimize certificates distributed from your network. In anenterprise setting, a public key can be used to automatically associate client software with the ERA Server toallow for the remote installation of ESET products.
19
6. DeploymentAfter the successful installation of ESET Remote Administrator, it is necessary to deploy the ERA Agent and ESETEndpoint protection (EES, EEA...) to computers in your network.
Deployment consists of following steps:
Part I: Create the deployment package
Part II: Install the deployment package
6.1 Deployment package creation
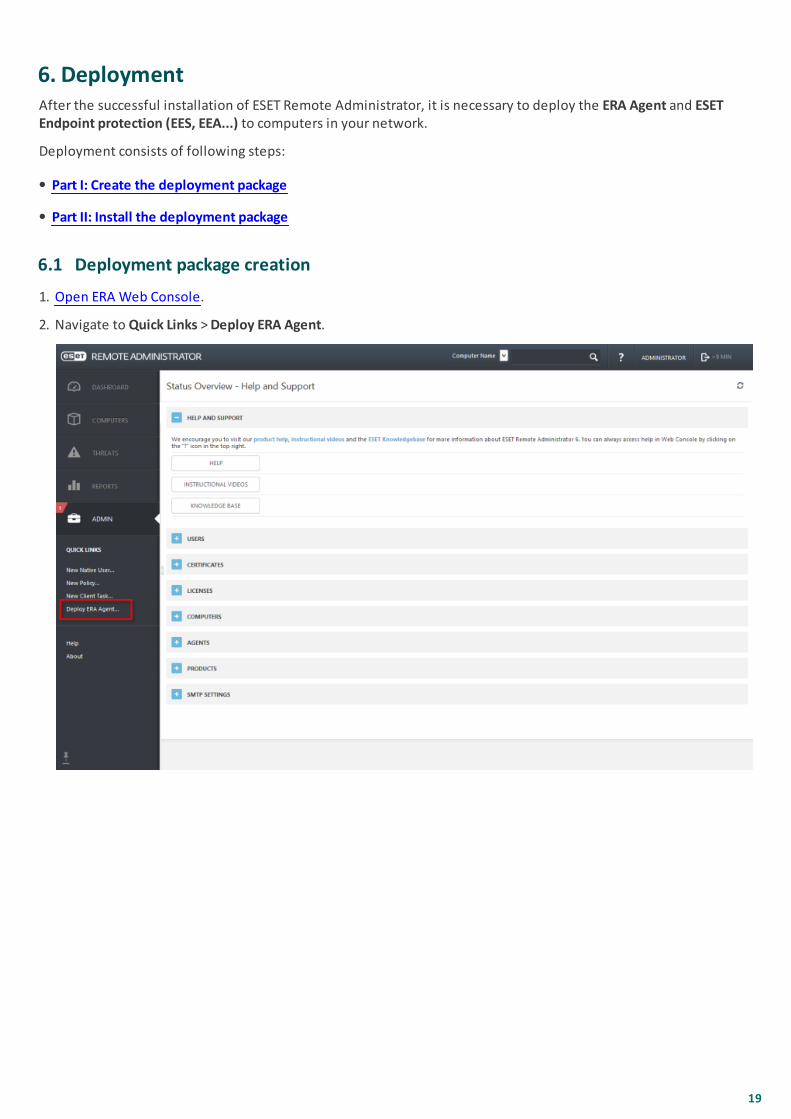
1. Open ERA Web Console.
2. Navigate to Quick Links > Deploy ERA Agent.
20
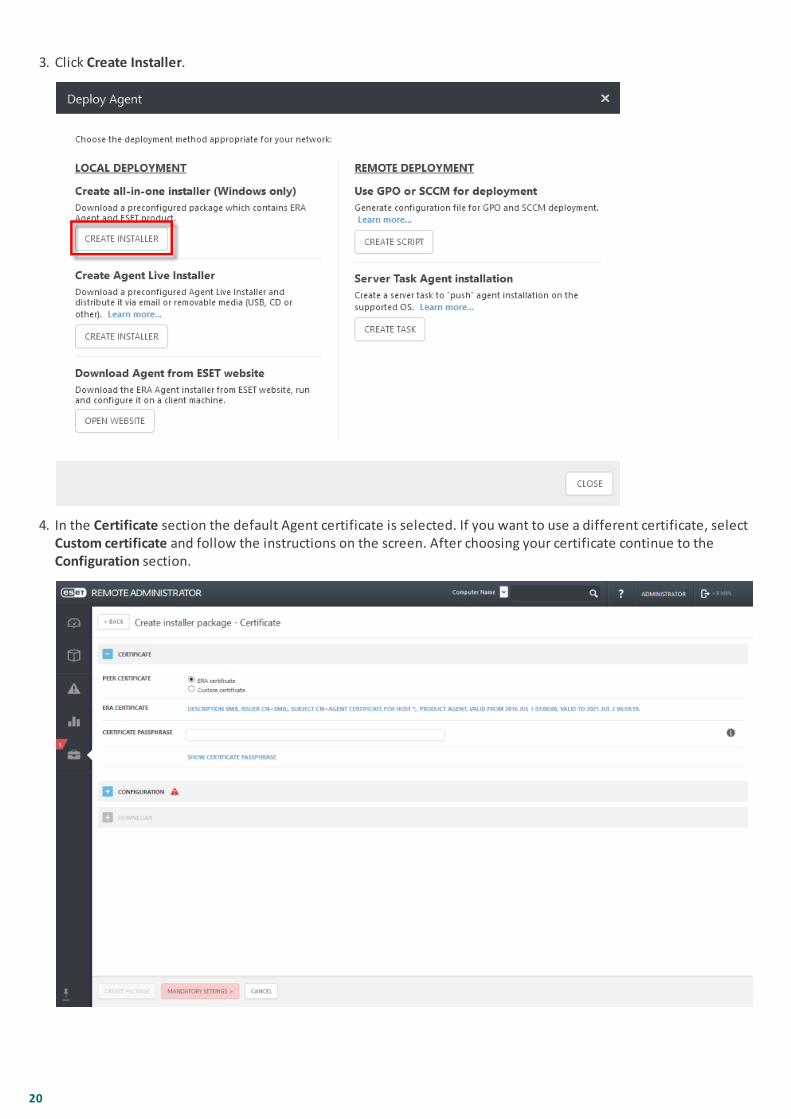
3. Click Create Installer.
4. In the Certificate section the default Agent certificate is selected. If you want to use a different certificate, selectCustom certificate and follow the instructions on the screen. After choosing your certificate continue to theConfiguration section.

21
5. Expanding the Configuration section, you can choose among other things the Package to install.
North American customers: You must change the repository URL to accommodate North American firewallpolicies.
6. Ensure you have selected correct license in the License. If you have added your license during the ERA Serverinstallation, this license will be pre-selected.
7. You can select Parental Group for your ERA Agents where they will be assigned after deployment. If nothing isselected, Agents will be assigned under the Lost & found group.
8. Click Create Package to finish the deployment configuration.

22
9. In the Download section you will be offered two versions of the package to download. Click and download theversion compatible with your Agent computer.
10.The download package will be prepared for download.
11.Click Close and the file will be downloaded in your web browser.
Continue with installation of the deployment package.
23
6.2 Deployment package installation
If you have successfully created the deployment package and copied the file to the machine where the ERA Agentand ESET Endpoint product is going to be installed follow these steps:
NOTE: You can perform the installation of deployment package also in the silent mode. More information can befound in this Knowledgebase article.
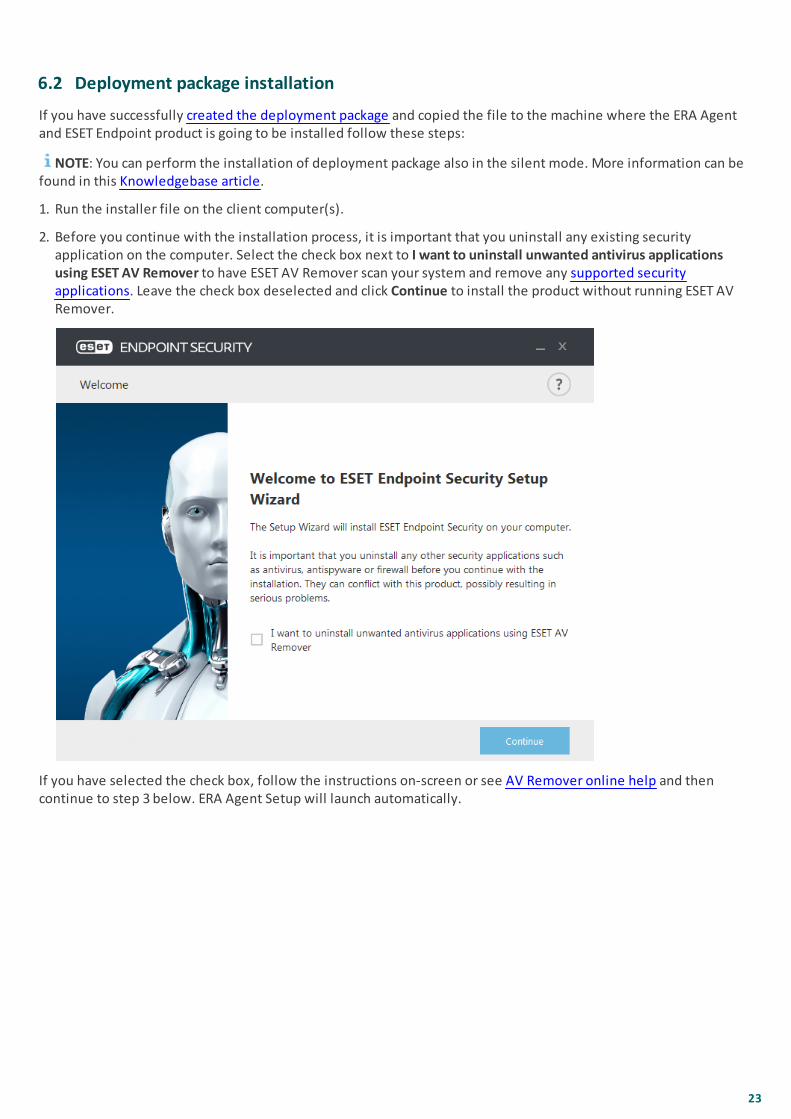
1. Run the installer file on the client computer(s).
2. Before you continue with the installation process, it is important that you uninstall any existing securityapplication on the computer. Select the check box next to I want to uninstall unwanted antivirus applicationsusing ESET AV Remover to have ESET AV Remover scan your system and remove any supported securityapplications. Leave the check box deselected and click Continue to install the product without running ESET AVRemover.
If you have selected the check box, follow the instructions on-screen or see AV Remover online help and thencontinue to step 3 below. ERA Agent Setup will launch automatically.
24
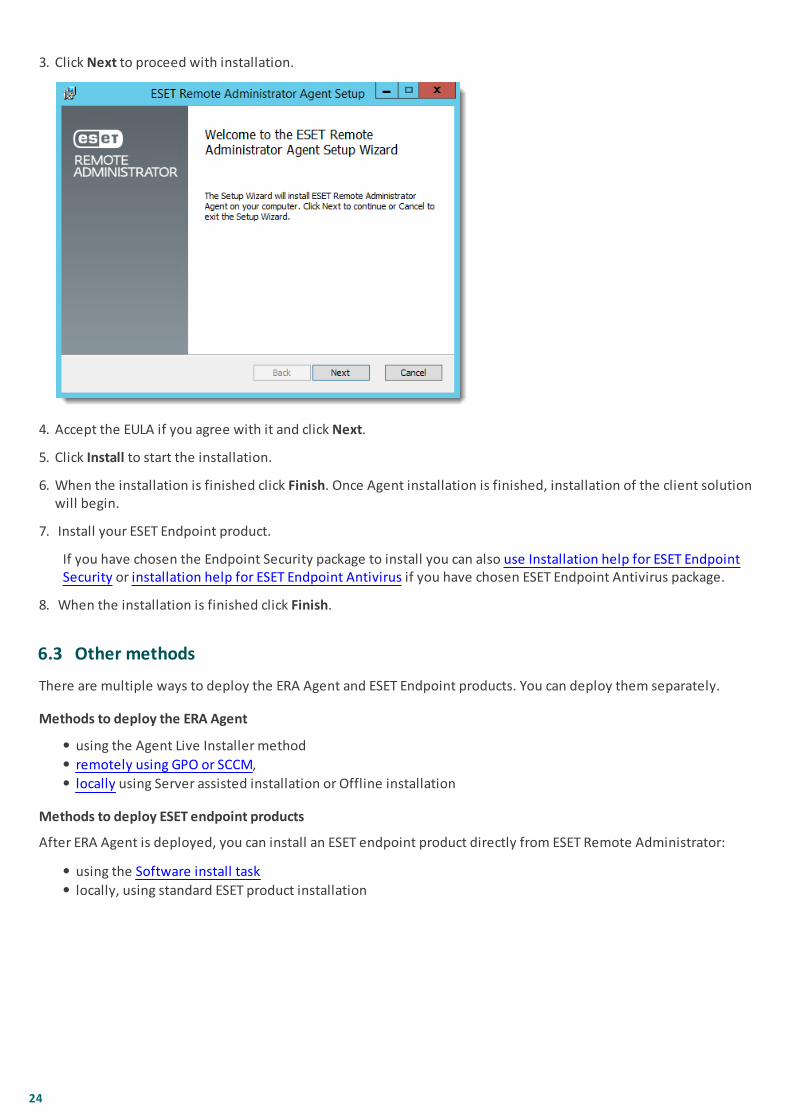
3. Click Next to proceed with installation.
4. Accept the EULA if you agree with it and click Next.
5. Click Install to start the installation.
6. When the installation is finished click Finish. Once Agent installation is finished, installation of the client solutionwill begin.
7. Install your ESET Endpoint product.
If you have chosen the Endpoint Security package to install you can also use Installation help for ESET EndpointSecurity or installation help for ESET Endpoint Antivirus if you have chosen ESET Endpoint Antivirus package.
8. When the installation is finished click Finish.
6.3 Other methods
There are multiple ways to deploy the ERA Agent and ESET Endpoint products. You can deploy them separately.
Methods to deploy the ERA Agent
using the Agent Live Installer method
remotely using GPO or SCCM,
locally using Server assisted installation or Offline installation
Methods to deploy ESET endpoint products
After ERA Agent is deployed, you can install an ESET endpoint product directly from ESET Remote Administrator:
using the Software install task
locally, using standard ESET product installation
25
7. Next stepsWith ERA Server installed and endpoint solutions on clients, you are ready to begin managing your network!
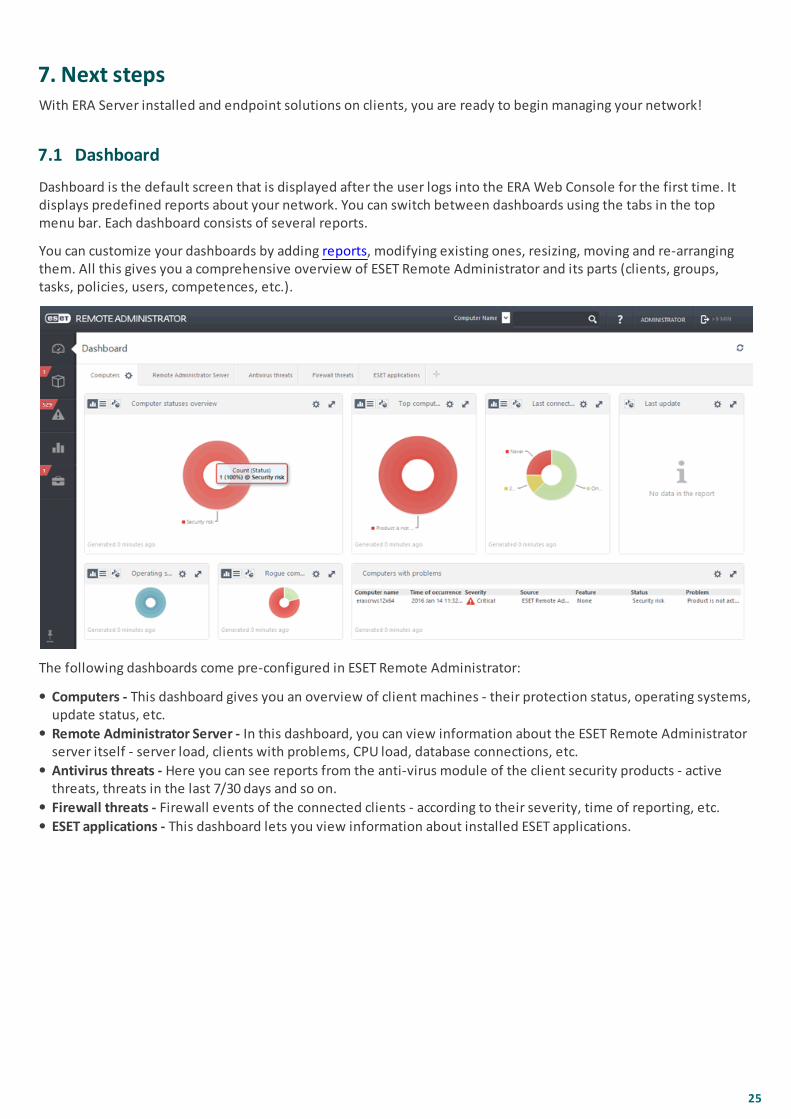
7.1 Dashboard
Dashboard is the default screen that is displayed after the user logs into the ERA Web Console for the first time. It displays predefined reports about your network. You can switch between dashboards using the tabs in the topmenu bar. Each dashboard consists of several reports.
You can customize your dashboards by adding reports, modifying existing ones, resizing, moving and re-arrangingthem. All this gives you a comprehensive overview of ESET Remote Administrator and its parts (clients, groups,tasks, policies, users, competences, etc.).
The following dashboards come pre-configured in ESET Remote Administrator:
Computers - This dashboard gives you an overview of client machines - their protection status, operating systems,update status, etc.
Remote Administrator Server - In this dashboard, you can view information about the ESET Remote Administratorserver itself - server load, clients with problems, CPU load, database connections, etc.
Antivirus threats - Here you can see reports from the anti-virus module of the client security products - activethreats, threats in the last 7/30 days and so on.
Firewall threats - Firewall events of the connected clients - according to their severity, time of reporting, etc.
ESET applications - This dashboard lets you view information about installed ESET applications.
26
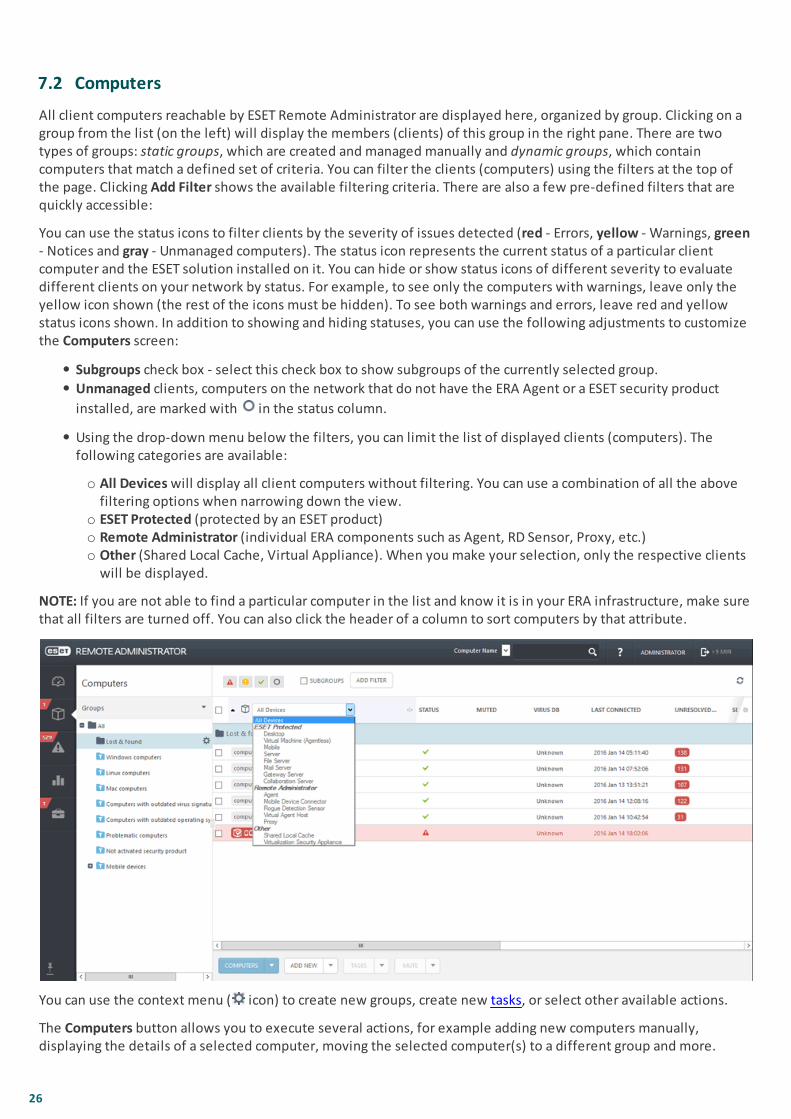
7.2 Computers
All client computers reachable by ESET Remote Administrator are displayed here, organized by group. Clicking on agroup from the list (on the left) will display the members (clients) of this group in the right pane. There are twotypes of groups: static groups, which are created and managed manually and dynamic groups, which containcomputers that match a defined set of criteria. You can filter the clients (computers) using the filters at the top ofthe page. Clicking Add Filter shows the available filtering criteria. There are also a few pre-defined filters that arequickly accessible:
You can use the status icons to filter clients by the severity of issues detected (red - Errors, yellow - Warnings, green- Notices and gray - Unmanaged computers). The status icon represents the current status of a particular clientcomputer and the ESET solution installed on it. You can hide or show status icons of different severity to evaluatedifferent clients on your network by status. For example, to see only the computers with warnings, leave only theyellow icon shown (the rest of the icons must be hidden). To see both warnings and errors, leave red and yellowstatus icons shown. In addition to showing and hiding statuses, you can use the following adjustments to customizethe Computers screen:
Subgroups check box - select this check box to show subgroups of the currently selected group.
Unmanaged clients, computers on the network that do not have the ERA Agent or a ESET security product
installed, are marked with in the status column.
Using the drop-down menu below the filters, you can limit the list of displayed clients (computers). Thefollowing categories are available:
o All Devices will display all client computers without filtering. You can use a combination of all the abovefiltering options when narrowing down the view.
o ESET Protected (protected by an ESET product)o Remote Administrator (individual ERA components such as Agent, RD Sensor, Proxy, etc.)o Other (Shared Local Cache, Virtual Appliance). When you make your selection, only the respective clients
will be displayed.
NOTE: If you are not able to find a particular computer in the list and know it is in your ERA infrastructure, make surethat all filters are turned off. You can also click the header of a column to sort computers by that attribute.
You can use the context menu ( icon) to create new groups, create new tasks, or select other available actions.
The Computers button allows you to execute several actions, for example adding new computers manually,displaying the details of a selected computer, moving the selected computer(s) to a different group and more.
27
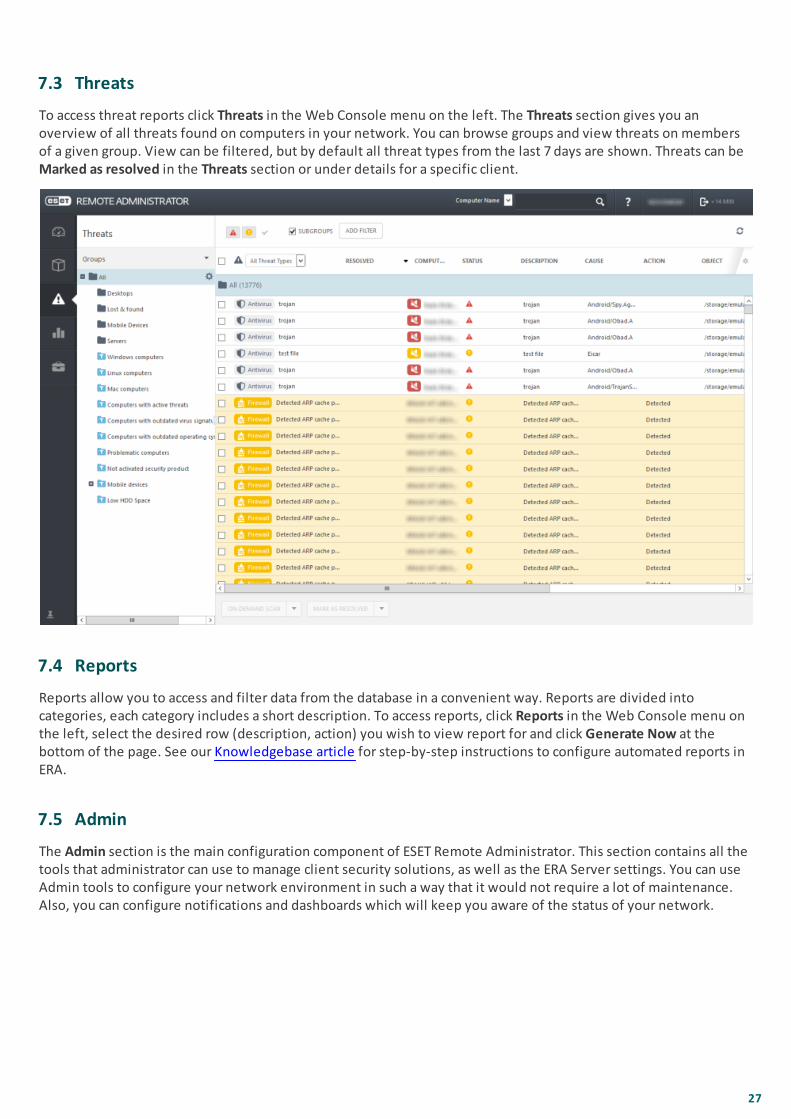
7.3 Threats
To access threat reports click Threats in the Web Console menu on the left. The Threats section gives you anoverview of all threats found on computers in your network. You can browse groups and view threats on membersof a given group. View can be filtered, but by default all threat types from the last 7 days are shown. Threats can beMarked as resolved in the Threats section or under details for a specific client.
7.4 Reports
Reports allow you to access and filter data from the database in a convenient way. Reports are divided intocategories, each category includes a short description. To access reports, click Reports in the Web Console menu onthe left, select the desired row (description, action) you wish to view report for and click Generate Now at thebottom of the page. See our Knowledgebase article for step-by-step instructions to configure automated reports inERA.
7.5 Admin
The Admin section is the main configuration component of ESET Remote Administrator. This section contains all thetools that administrator can use to manage client security solutions, as well as the ERA Server settings. You can useAdmin tools to configure your network environment in such a way that it would not require a lot of maintenance.Also, you can configure notifications and dashboards which will keep you aware of the status of your network.
28
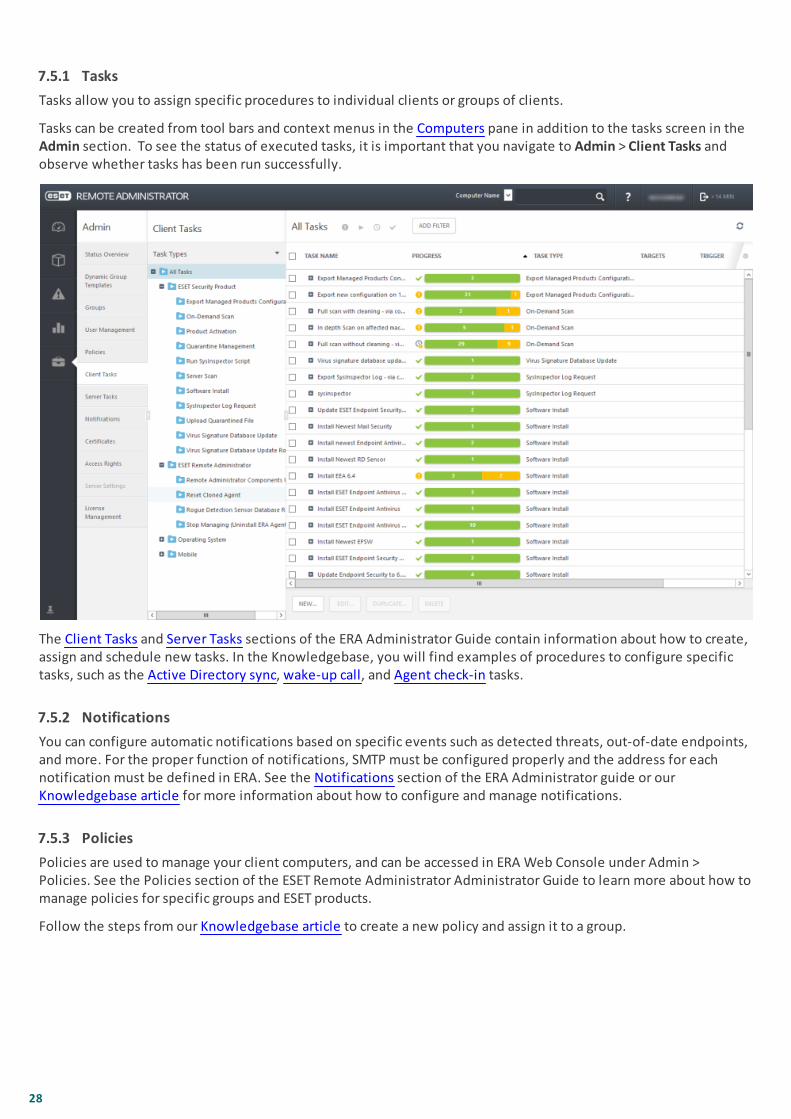
7.5.1 Tasks
Tasks allow you to assign specific procedures to individual clients or groups of clients.
Tasks can be created from tool bars and context menus in the Computers pane in addition to the tasks screen in theAdmin section. To see the status of executed tasks, it is important that you navigate to Admin > Client Tasks andobserve whether tasks has been run successfully.
The Client Tasks and Server Tasks sections of the ERA Administrator Guide contain information about how to create,assign and schedule new tasks. In the Knowledgebase, you will find examples of procedures to configure specifictasks, such as the Active Directory sync, wake-up call, and Agent check-in tasks.
7.5.2 Notifications
You can configure automatic notifications based on specific events such as detected threats, out-of-date endpoints,and more. For the proper function of notifications, SMTP must be configured properly and the address for eachnotification must be defined in ERA. See the Notifications section of the ERA Administrator guide or ourKnowledgebase article for more information about how to configure and manage notifications.
7.5.3 Policies
Policies are used to manage your client computers, and can be accessed in ERA Web Console under Admin >Policies. See the Policies section of the ESET Remote Administrator Administrator Guide to learn more about how tomanage policies for specific groups and ESET products.
Follow the steps from our Knowledgebase article to create a new policy and assign it to a group.
29
8. Help and supportESET is constantly working to update and improve ERA and ESET endpoint products.
The ESET Knowledgebase is a searchable repository of support articles designed to help you resolve issuesand answer questions
The ESET user Forum is monitored by ESET staff and allows ESET users to share issues they are having and findsolutions
The ESET Knowledgebase video channel contains video walkthroughs of common procedures for ESETproducts
Visit ESET Support News and Customer Advisories for the latest announcements about ESET product featuresand upgrades
You can open a case with ESET Customer Care at any time if you are not able to resolve an issue or find theanswer to your question
You can also refer to the ERA Installation guide (including upgrade, migration and troubleshooting), Administratorguide (especially how to manage ERA with ERA Web Console) and Virtual Appliance guide (to use ERA in VMwareetc.) for more detailed information.