ERHMS Info Manager version 2.0 User Guide - cdc.gov · • Renée Funk (ONDIEH/EPRO) • Anirban...
58
1 Version 2.0 February 2018 User Guide
Transcript of ERHMS Info Manager version 2.0 User Guide - cdc.gov · • Renée Funk (ONDIEH/EPRO) • Anirban...
1
Version 2.0 February 2018
User Guide
i
This document is in the public domain and may be freely copied or reprinted.
DISCLAIMER Mention of any company or product does not constitute endorsement by the National Institute for Occupational Safety and Health (NIOSH), Centers for Disease Control and Prevention (CDC). In addition, citations to websites external to NIOSH do not constitute NIOSH endorsement of the sponsoring organizations or their programs or products. Furthermore, NIOSH is not responsible for the content of these websites. All web addresses referenced in this document were accessible as of the publication date.
ORDERING INFORMATION To receive documents or other information about occupational safety and health topics, contact NIOSH: Telephone: 1–800–CDC–INFO (1–800–232–4636) TTY: 1–888–232–6348 CDC INFO: www.cdc.gov/info
or visit the NIOSH website at www.cdc.gov/niosh/.
For a monthly update on news at NIOSH, subscribe to NIOSH eNews by visiting www.cdc.gov/niosh/eNews
SUGGESTED CITATION NIOSH [2018]. ERMHS info manager user guide version 2.0. By Shugart JM, McGarvey A, Williams S, Dowell CH. Cincinnati, OH: U.S. Department of Health and Human Services, Centers for Disease Control and Prevention, National Institute for Occupational Safety and Health, DHHS (NIOSH) Publication 2018-115.
DOI: https://doi.org/10.26616/NIOSHPUB2018115 DHHS (NIOSH) Publication No. 2018-115 February 2018

ERHMS Info Manager™
ii
ACKNOWLEDGEMENTS
CDC/NIOSH CORE TEAM (in alphabetical order)
• Rayfus (Ray) Buckner (OCOO/OCIO) • Harold Collins (CDC/OPHSS) • Chad Dowell (NIOSH/EPRO) • Renée Funk (ONDIEH/EPRO) • Anirban Ghosh (Deloitte) • Karen Hales (CACI) • Mohammad (Asad) Islam (FDA/CDER) • Tracina Jackson (NIOSH/WTCHP) • Johnathan Keith (ATTAIN) • Amita McGarvey (CACI) • Leslyn McNabb (OPHSS/CSELS) • Ken McNeeley (NIOSH/OD) • Roger Mir (CDC/OPHSS) • John (Jay) Schroeder (IHS/ABR) • Jill Shugart (NIOSH/EPRO) • Arianna Smith (Deloitte) • Steven Williams (ATTAIN) • Matt Young (NIOSH/HELD)
*Associated programs of Core Team members are from time of their contribution
ERHMS Info Manager™
iii
CONVENTIONS USED IN THIS MANUAL Convention Explanation
Boldface type Emphasizes heading levels, column headings, and the following literals when writing procedures:
• Names of options and elements that appear on screens. • Keys on the keyboard.
Italic type Emphasizes titles within subsections that a user should enter context.
Hyperlink Provides quick and easy access to cross-referenced topics. Hyperlinks are highlighted in blue and may be underlined.
“ ” Quotation marks must surround all text values.
Underlined Provides emphasis that an action not recommended for a user to take.

ERHMS Info Manager™
iv
Table of Contents DISCLAIMER............................................................................................................................ I
ORDERING INFORMATION ..................................................................................................... I
SUGGESTED CITATION .......................................................................................................... I
ACKNOWLEDGEMENTS ........................................................................................................ II
CONVENTIONS USED IN THIS MANUAL ............................................................................. III
QUICK START ........................................................................................................................ 1
BACKGROUND ....................................................................................................................... 1 ERHMS™ Framework ....................................................................................................... 1
SETUP ..................................................................................................................................... 3 ERHMS Info Manager™ Installation .................................................................................. 3 Optional Components ....................................................................................................... 4 Automatic Updates ............................................................................................................ 4 First-Time Setup ............................................................................................................... 4 User Interface Navigation .................................................................................................. 5 Settings 6 Roles 7 Email Settings ................................................................................................................... 8 Mapping Settings .............................................................................................................. 8 Web Survey Settings ......................................................................................................... 8
DATA SOURCES .................................................................................................................... 9 Adding a New Data Source ............................................................................................... 9 Changing Data Sources .................................................................................................. 11
RESPONDERS ...................................................................................................................... 11 Creating a Responder Profile .......................................................................................... 11 Editing a Responder Profile ............................................................................................. 12 Merging Responders ....................................................................................................... 12
INCIDENTS ........................................................................................................................... 13 Creating Incidents ........................................................................................................... 14 Viewing and Adding Notes .............................................................................................. 16 Managing an Incident Roster .......................................................................................... 16 Incident Roles ................................................................................................................. 18 Teams 19 Locations ........................................................................................................................ 20 Jobs 22
FORMS .................................................................................................................................. 23 Creating a Form .............................................................................................................. 23
ERHMS Info Manager™
v
Collecting Data ................................................................................................................ 24 Publishing Forms to the Web .......................................................................................... 25 Templates ....................................................................................................................... 27 Creating a Form from a Template ................................................................................... 27 Creating a Template from a Form ................................................................................... 29 Data Import/Export .......................................................................................................... 30
ASSIGNMENTS ..................................................................................................................... 34 Distributing Surveys ........................................................................................................ 34 Downloading Forms from Web Survey ............................................................................ 36
ANALYSIS ............................................................................................................................. 37
SECURITY ............................................................................................................................. 39 Recommended Technical controls .................................................................................. 40 Auditing 40 Access Control ................................................................................................................ 41 Integrity 41 Encryption ....................................................................................................................... 41 Automatic Timeout .......................................................................................................... 42
HELP 42 ERHMS Info Manager™ Support .................................................................................... 42 Logs 43 Viewing Logs ................................................................................................................... 43 Deleting Logs .................................................................................................................. 43 Packaging Logs .............................................................................................................. 43 ERHMS Info Manager™ Uninstall ................................................................................... 43
ABOUT .................................................................................................................................. 44 License Information ......................................................................................................... 44
APPENDIX A: KEY TERMS .................................................................................................. 48
APPENDIX B: REFERENCES ............................................................................................... 50

ERHMS Info Manager™
1
QUICK START Use Internet Explorer or another web browser to go to
http://www.cdc.gov/niosh/erhms/software. Click the button labeled Click here to access the software to start ERHMS Info
Manager™ installation. Note that the software requires at least Microsoft Windows® XP and Microsoft® .NET Framework 4.
Click Install and follow any prompts to complete the installation. The first time you open ERHMS Info Manager™ it will ask you to select a default
location for your application files; browse to a location where you want to keep your application files.
Under the Tools menu select Settings to configure email, mapping, and web survey settings.
Under the File menu select Data Sources to open the sample data source. ERHMS Info Manager™ will check for updates each time it is opened and ask if you
would like to install the updates.
BACKGROUND The collapse of the World Trade Center and the subsequent persistent and complex health problems experienced by the emergency responders illustrated the need for improved health monitoring and surveillance of emergency responders. As a result, a multi-agency task force was created to address the problem. This task force worked with the U.S. National Response Team (NRT) to develop the Emergency Responder Health Monitoring and Surveillance™ (ERHMS™) Technical Assistance Document (TAD). The TAD details best practices and contains tools, examples, and forms that have been used by various agencies when responding to incidents. The TAD is available at https://www.cdc.gov/niosh/topics/erhms/ under Additional Resources, ERHMS Documents.
ERHMS™ FRAMEWORK ERHMS™ is a framework designed to help protect emergency responders throughout the pre-deployment, deployment, and post-deployment phases of a response as depicted in this diagram.

ERHMS Info Manager™
2
The intent of medical monitoring and surveillance of emergency response and recovery workers is to identify exposures, signs, and symptoms of health outcomes early in the course of an emergency. Early identification will prevent or mitigate adverse outcomes as well as ensure that workers maintain their ability to respond effectively and are not harmed in the course of their work. Monitoring and ongoing assessment can help determine whether protective measures are adequately being provided to the workforce and are sufficient to prevent or reduce harmful exposures to workers. Data collected during the pre-, during-, and post-deployment phases will also help to identify which responders would benefit from medical referral and possible enrollment in a long-term health surveillance program. Key concepts identified within the ERHMS™ framework include:
• Pre-deployment Phase: Rostering and credentialing of emergency response and recovery workers, health screening for emergency responders, health and safety training, data management, and information security
• Deployment Phase: On-site responder in-processing, health monitoring and surveillance during response operations, integration of exposure assessment, responder activity documentation and controls, and communications of exposure, health monitoring, and surveillance data during an emergency response
• Post-Deployment Phase: Responder out-processing assessment, post-event tracking of emergency responder health and function, lessons-learned, and after-action assessments
This framework builds on systems and practices currently in use and can be used in both small and large scale incidents depending on the needs of the organization and event.
ERHMS Info Manager™ is a free software platform to track and monitor emergency response and recovery worker activities before, during, and after their deployment to an incident site. ERHMS Info Manager™ enables organizations to implement the ERHMS™ framework. For
ERHMS Info Manager™
3
more information on how to implement the ERHMS™ framework, install ERHMS Info Manager™, online training courses, and additional resources, visit the ERHMS™ website at https://www.cdc.gov/niosh/erhms/.
Using ERHMS Info Manager™, you can: • Create responder profiles • Record response incidents and map incident locations • Assign responders to an incident roster • Assign responders to teams and track the jobs they perform • Design forms and surveys using custom and pre-built templates • Request information from responders by using forms and surveys • View and analyze forms and survey responses
ERHMS Info Manager™ uses the free and publically-accessible software application, Epi Info™. ERHMS Info Manager™ uses Epi Info™ for creating forms, capturing data, and analyzing data. Epi Info™ is automatically installed with the installation of ERMHS Info Manager™. To efficiently utilize ERHMS Info Manager™, users should familiarize themselves with the functions and features of Epi Info™. The Epi Info™ User Guide, User Community Q & A, FAQs, and Tutorials are excellent resources available on the Epi Info™ website at https://www.cdc.gov/epiinfo/index.html.
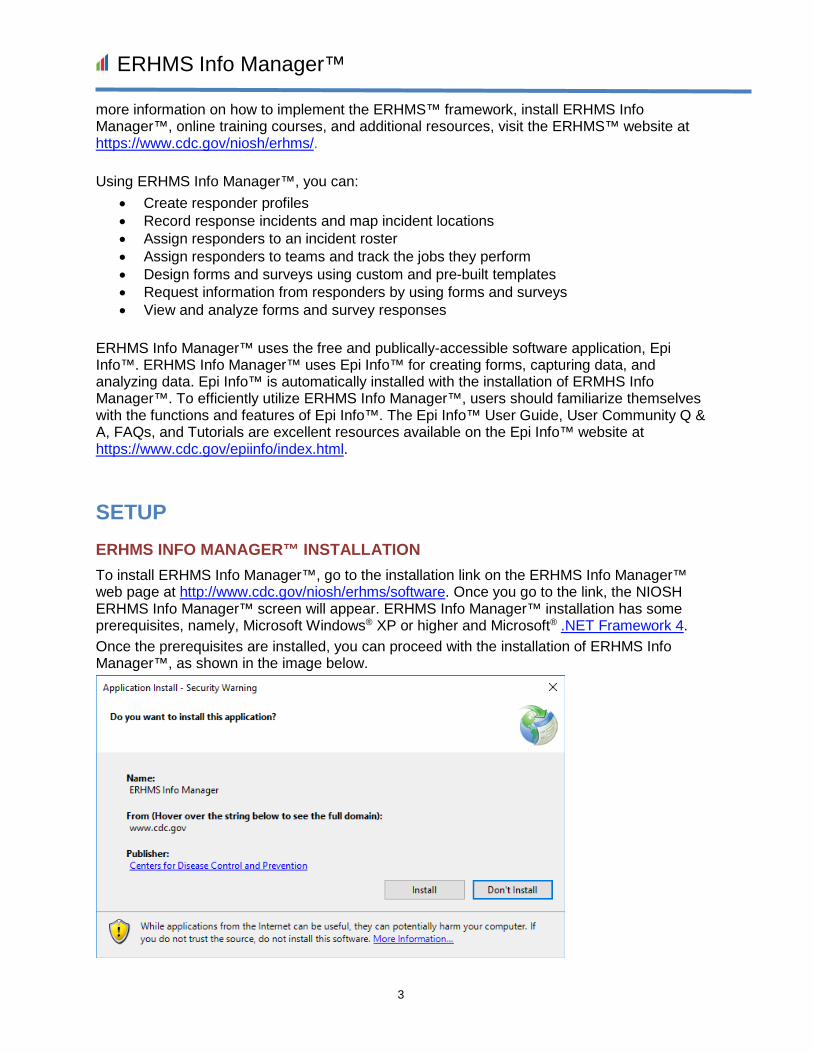
SETUP ERHMS INFO MANAGER™ INSTALLATION To install ERHMS Info Manager™, go to the installation link on the ERHMS Info Manager™ web page at http://www.cdc.gov/niosh/erhms/software. Once you go to the link, the NIOSH ERHMS Info Manager™ screen will appear. ERHMS Info Manager™ installation has some prerequisites, namely, Microsoft Windows® XP or higher and Microsoft® .NET Framework 4. Once the prerequisites are installed, you can proceed with the installation of ERHMS Info Manager™, as shown in the image below.
ERHMS Info Manager™
4
To uninstall ERHMS Info Manager™, go to the Uninstall section of this User Guide.
OPTIONAL COMPONENTS ERHMS Info Manager™ includes some advanced features which require interaction with other software components. Installing these components is only necessary if you would like to make use of these features. To see more information on Microsoft SQL Server®, visit the Adding a New Data Source section of this Manual.
• Microsoft SQL Server® may be used as the underlying database management system for ERHMS Info Manager™.
• Epi Info™ Web Survey is a server-based software component that consists of a website and a database. It allows collection of information from responders through the internet by using a responsive web interface. Refer to the Epi Info™ website at https://www.cdc.gov/epiinfo/cloud.html for more instructions on downloading, installing, and configuring Epi Info™ Web Survey.
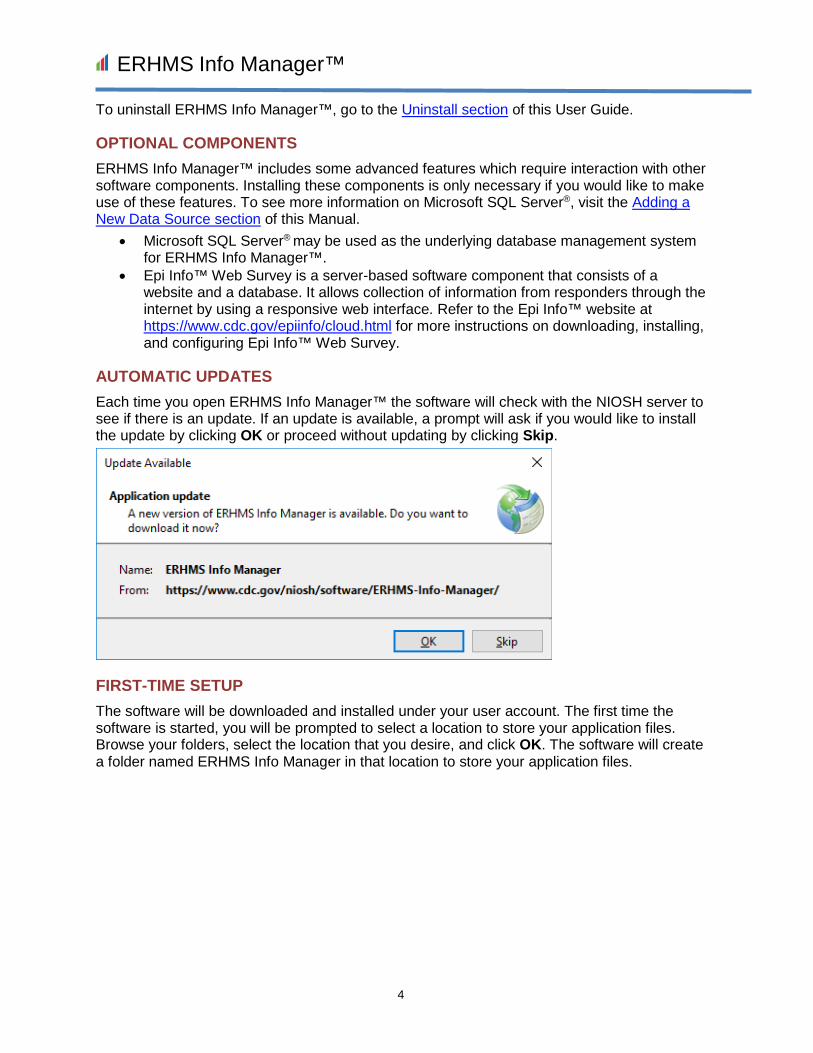
AUTOMATIC UPDATES Each time you open ERHMS Info Manager™ the software will check with the NIOSH server to see if there is an update. If an update is available, a prompt will ask if you would like to install the update by clicking OK or proceed without updating by clicking Skip.
FIRST-TIME SETUP The software will be downloaded and installed under your user account. The first time the software is started, you will be prompted to select a location to store your application files. Browse your folders, select the location that you desire, and click OK. The software will create a folder named ERHMS Info Manager in that location to store your application files.

ERHMS Info Manager™
5
USER INTERFACE NAVIGATION ERHMS Info Manager™ includes a tabbed user interface that allows simultaneous access to multiple screens. As each screen is opened, new tabs appear at the top of the window just below the ribbon. Each tab may contain subsections that are listed along the left-hand side of the window. See the screenshot below for an example.
To navigate between screens or subsections using the mouse, simply select the desired heading. To navigate between screens using the keyboard, press and hold the Ctrl key, then press Tab. This brings up a dialog that lists the screens that are currently open (see below). While continuing to hold Ctrl, press Tab until the desired screen is selected, then release Ctrl to display it.
Subsections
Tabs
Ribbon

ERHMS Info Manager™
6
To navigate between subsections using the keyboard, press and hold the Ctrl key, then press Page Up or Page Down to cycle backward or forward through the available subsections. Note that, on the Help screen, each subsection represents a link to the corresponding section of this user guide located on the ERHMS website. To close a screen using the mouse, select the close button on its corresponding tab, or select File – Close Tab from the ribbon. To close a screen using the keyboard, press Ctrl+W. ERHMS Info Manager™ also supports other standard mechanisms for keyboard navigation. For example, to cycle keyboard focus through the elements within a screen, press Tab to move forward or Shift+Tab to move backward. Many elements are also directly accessible without having to cycle to them. Press and hold the Alt key to show any available shortcuts, which appear as underlined letters. While continuing to hold Alt, press the key corresponding to the underlined letter to activate the element.
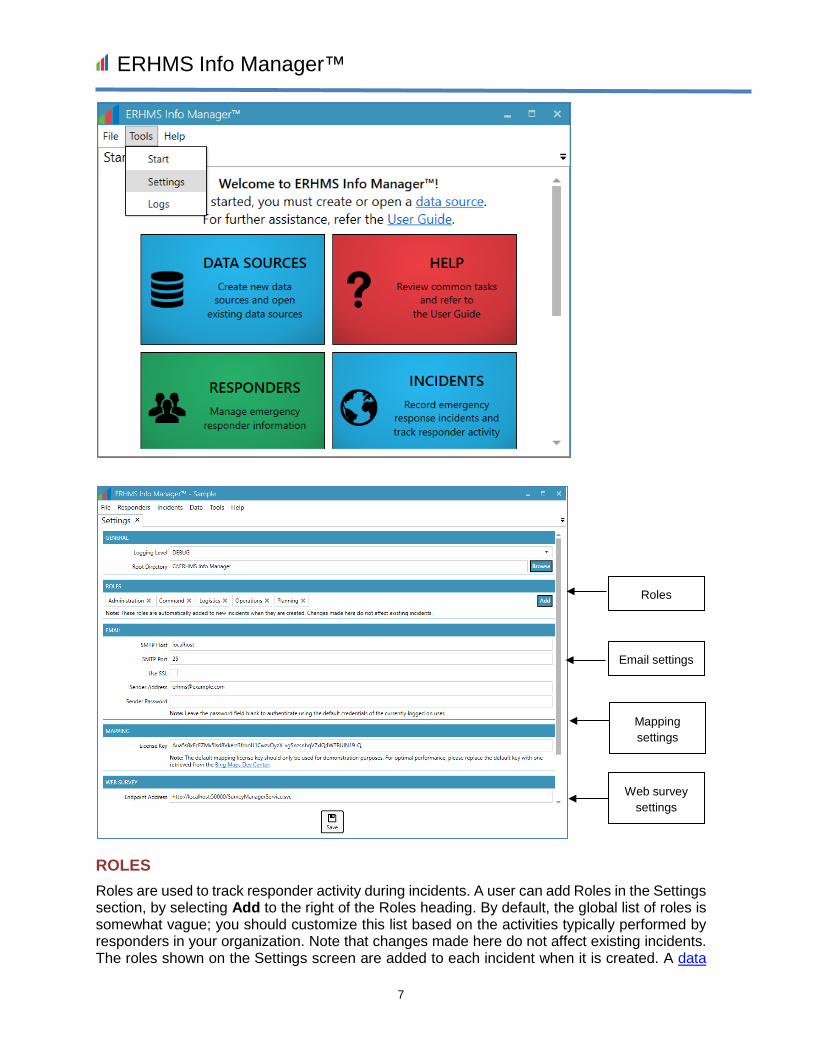
SETTINGS The first time using ERHMS Info Manager™, configure its settings by selecting, Tools – Settings from the Ribbon. This tab will give you the ability to configure your Roles, Email Settings, Mapping Settings, and Web Survey Settings, each of which will be described further below. The General Settings (Logging Level and Root Directory) should not be changed during the routine operation of ERHMS Info Manager™.
ERHMS Info Manager™
7
ROLES Roles are used to track responder activity during incidents. A user can add Roles in the Settings section, by selecting Add to the right of the Roles heading. By default, the global list of roles is somewhat vague; you should customize this list based on the activities typically performed by responders in your organization. Note that changes made here do not affect existing incidents. The roles shown on the Settings screen are added to each incident when it is created. A data
Roles
Email settings
Mapping settings
Web survey settings
ERHMS Info Manager™
8
source must be open in order to view and customize this global list. Incident roles can be further customized (via addition and removal of roles) without affecting either this “global” list of roles on the Settings screen or other incidents’ roles. Further instructions on how to add incident roles are described in the Incident Roles section below.
EMAIL SETTINGS ERHMS Info Manager™ allows communication with responders via email. To configure this feature, enter the following in the Email Settings section (your System Administrator can provide you with this information):
• SMTP Host: The name or IP address of the host used to send email • SMTP Port: The port used to send email • Use SSL: Whether or not to use Secure Sockets Layer (SSL) to encrypt the
connection • Sender Address: A valid email address that will be used for ERHMS™ administration • Sender Password: The password used to log in to the mail server (If you would like to
use the default credentials of the currently logged in user, leave this section blank.)
When you have finished entering the Settings information, select the Save button.
MAPPING SETTINGS ERHMS Info Manager™ uses Bing Maps to plot incident locations. The default Map Service Key should only be used for demo purposes. For optimal performance with mapping and geocoding, replace the default key with one retrieved from Microsoft’s Bing service Bing Maps Portal at https://www.bingmapsportal.com/. To request a key, you will need to create a Microsoft® or Azure account, or log in using an existing account. When you have finished entering the Settings information, select the Save button.
WEB SURVEY SETTINGS Epi Info™ Web Survey is a server-based software component (separate from ERHMS Info Manager™) that consists of a website and a database. If you are using Epi Info™ Web Survey, enter your connection information in the Web Survey settings section. Refer to the Epi Info™ website at https://www.cdc.gov/epiinfo/index.html for more instructions on downloading, installing, and configuring Epi Info™ Web Survey. For information on completing the Web Survey fields, visit the Web Survey Section of the Epi Info™’s User Guide at https://wwwn.cdc.gov/epiinfo/user-guide/survey/initial-setup.html. When you have finished entering the Settings information, select the Save button.
A description of each field that appears in the Web Survey section of the Settings screen, is provided below:
• Endpoint Address: The URL that ERHMS Info Manager™ uses to connect to the Epi Info™ Web Survey server.
• Windows® Authentication: Whether or not to pass your Microsoft Windows® credentials to the Epi Info™ Web Survey server for authentication.
• Binding Protocol: The protocol used to communicate with the Epi Info™ Web Survey server.
• Organization Name: The name of your organization in the Epi Info™ Web Survey database.
• Organization Key: The password for your Epi Info™ Web Survey.

ERHMS Info Manager™
9
DATA SOURCES A Data Source is a repository that stores the information that is entered through the ERHMS Info Manager™ software. When the software opens, it displays a list of the data sources available for use and offers to open the previously used data source (if any). Each data source represents a separate repository or workspace for ERHMS™ data, including responders, incidents, forms and surveys. A data source is typically maintained by a single emergency response organization. However, there are situations in which multiple Data Sources might be necessary. See the following list of options available on the Data Sources screen, which includes descriptions of when you might use each option:
• Add a new data source Use this option if you would like to create a new, empty data source. This data source will initially contain no responders, incidents, or custom forms, so you will need to add these items once the data source is created. You would typically choose this option when first starting to use ERHMS Info Manager™ in your organization.
• Open an existing data source from the list Use this option if you would like to open a previously created data source that already appears in the list of data sources.
• Add an existing data source previously created in ERHMS Info Manager™ Use this option if you would like to open a previously created data source that does not appear in the list of data sources. You would typically choose this option when there are multiple users in your organization using ERHMS Info Manager™. In order to connect to a data source created by another user, first use this option to add the data source to your list. Then open the data source normally.
ERHMS Info Manager™ includes a “sample” data source that you may use to familiarize yourself with the software. We recommend that you create a separate data source to store your organization’s data. A typical organization will use a single data source to store all their responders, incidents, forms, and surveys. However, you may choose to create additional data sources for a variety of reasons:
• You may create a “test” data source in order to test the features of ERHMS Info Manager™ without modifying your organization’s actual data. You may also use the sample data source for this purpose.
• If you are managing data for multiple organizations, you may create a different data source for each organization.
• If you would like to keep data separate for organizational purposes, you could, for example, create a new data source every year, using it to store data related to the incidents that occur during that year. Note that the new data source would initially be empty, meaning that responders would need to be reentered. To avoid manual reentry, responders could be exported from the old data source and imported into the new data source. For more information on importing and exporting data, visit the Import/ Export section of this manual.
ADDING A NEW DATA SOURCE When ERHMS Info Manager™ opens, select Data Sources from the start screen. This screen will display a sample data source that you can use to familiarize yourself with the software. Note the Quick Filter that appears at the top of this screen and many other screens in ERHMS Info Manager™. You may use the Quick Filter to search through a list for items matching a given string of text.

ERHMS Info Manager™
10
Add a new data source by selecting Add – New. In the pop-up window, enter the Name, Description, and Location of the new Data Source. Specify the Database Type from the dropdown list of options:
• Microsoft Access®—Select this option when a single user will be accessing the data source. ERHMS Info Manager™ will create a new Microsoft Access® database in the specified location. Note that the user does not need Microsoft Access® installed in order to use this option.
• Microsoft SQL Server®—Select this option when multiple users will be accessing the data source. Using a Microsoft SQL Server® database requires server connection information from your database administrator. Each individual using a Microsoft SQL Server® data source will need to install ERHMS Info Manager™ on their computer, and all users will use the same server connection information.
If a user would like to use the Microsoft Access® option, select it, provide a Name for the Data Source, and go to Create. For Microsoft SQL Server®, additional options (such as the server and database names) must be provided before selecting Create. When the data source creation is complete, the user will select the new data source from the Data Sources list and select Open. The next time ERHMS Info Manager™ is opened, the new data source will be included in the list of previously opened data sources.
ERHMS Info Manager™
11
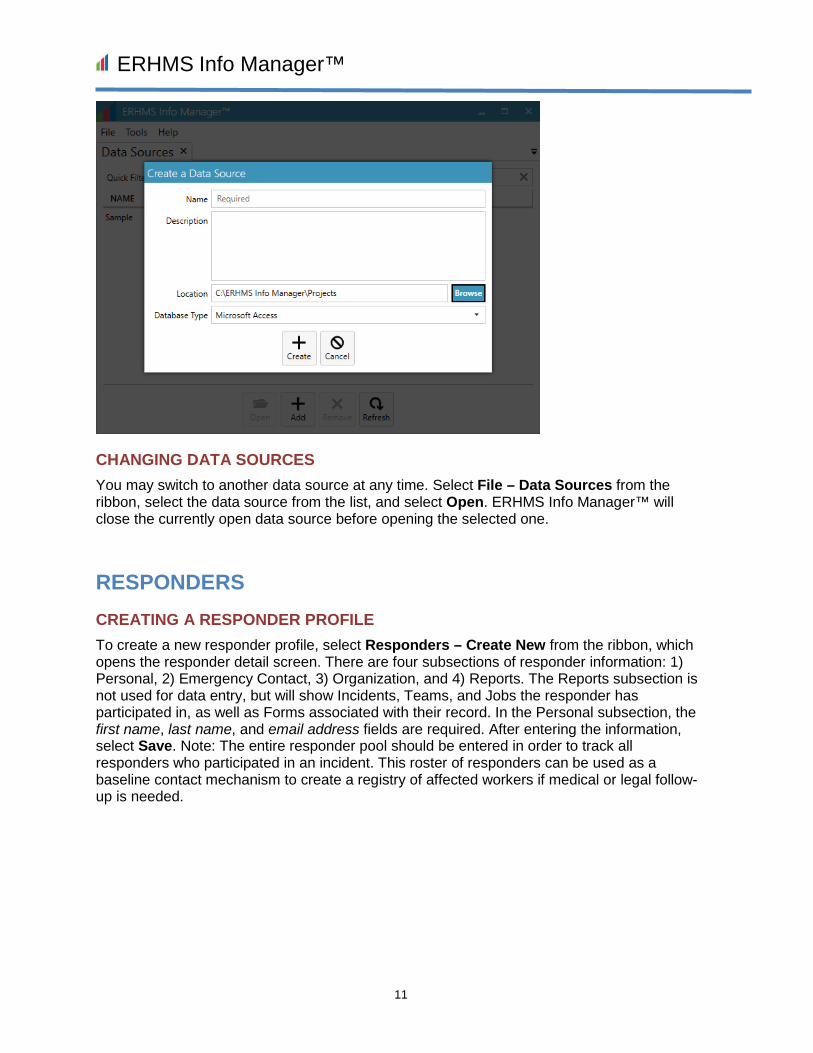
CHANGING DATA SOURCES You may switch to another data source at any time. Select File – Data Sources from the ribbon, select the data source from the list, and select Open. ERHMS Info Manager™ will close the currently open data source before opening the selected one.
RESPONDERS CREATING A RESPONDER PROFILE To create a new responder profile, select Responders – Create New from the ribbon, which opens the responder detail screen. There are four subsections of responder information: 1) Personal, 2) Emergency Contact, 3) Organization, and 4) Reports. The Reports subsection is not used for data entry, but will show Incidents, Teams, and Jobs the responder has participated in, as well as Forms associated with their record. In the Personal subsection, the first name, last name, and email address fields are required. After entering the information, select Save. Note: The entire responder pool should be entered in order to track all responders who participated in an incident. This roster of responders can be used as a baseline contact mechanism to create a registry of affected workers if medical or legal follow-up is needed.
ERHMS Info Manager™
12
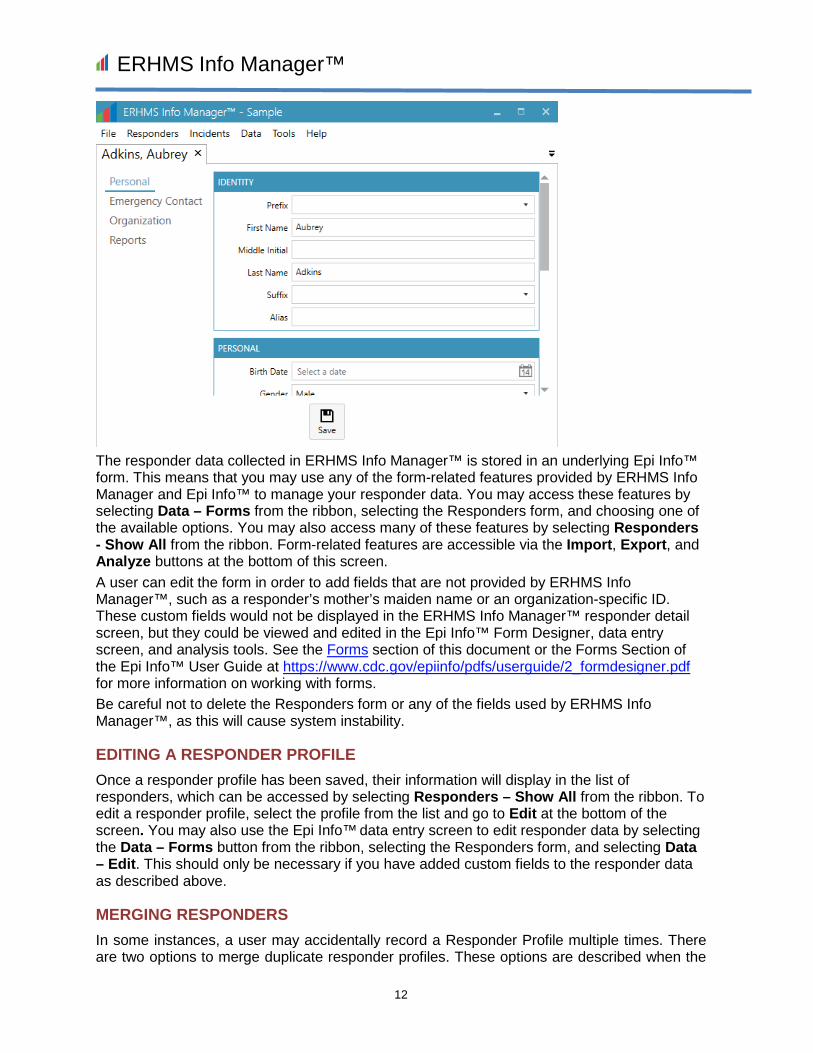
The responder data collected in ERHMS Info Manager™ is stored in an underlying Epi Info™ form. This means that you may use any of the form-related features provided by ERHMS Info Manager and Epi Info™ to manage your responder data. You may access these features by selecting Data – Forms from the ribbon, selecting the Responders form, and choosing one of the available options. You may also access many of these features by selecting Responders - Show All from the ribbon. Form-related features are accessible via the Import, Export, and Analyze buttons at the bottom of this screen. A user can edit the form in order to add fields that are not provided by ERHMS Info Manager™, such as a responder’s mother’s maiden name or an organization-specific ID. These custom fields would not be displayed in the ERHMS Info Manager™ responder detail screen, but they could be viewed and edited in the Epi Info™ Form Designer, data entry screen, and analysis tools. See the Forms section of this document or the Forms Section of the Epi Info™ User Guide at https://www.cdc.gov/epiinfo/pdfs/userguide/2_formdesigner.pdf for more information on working with forms. Be careful not to delete the Responders form or any of the fields used by ERHMS Info Manager™, as this will cause system instability.
EDITING A RESPONDER PROFILE Once a responder profile has been saved, their information will display in the list of responders, which can be accessed by selecting Responders – Show All from the ribbon. To edit a responder profile, select the profile from the list and go to Edit at the bottom of the screen. You may also use the Epi Info™ data entry screen to edit responder data by selecting the Data – Forms button from the ribbon, selecting the Responders form, and selecting Data – Edit. This should only be necessary if you have added custom fields to the responder data as described above.
MERGING RESPONDERS In some instances, a user may accidentally record a Responder Profile multiple times. There are two options to merge duplicate responder profiles. These options are described when the
ERHMS Info Manager™
13
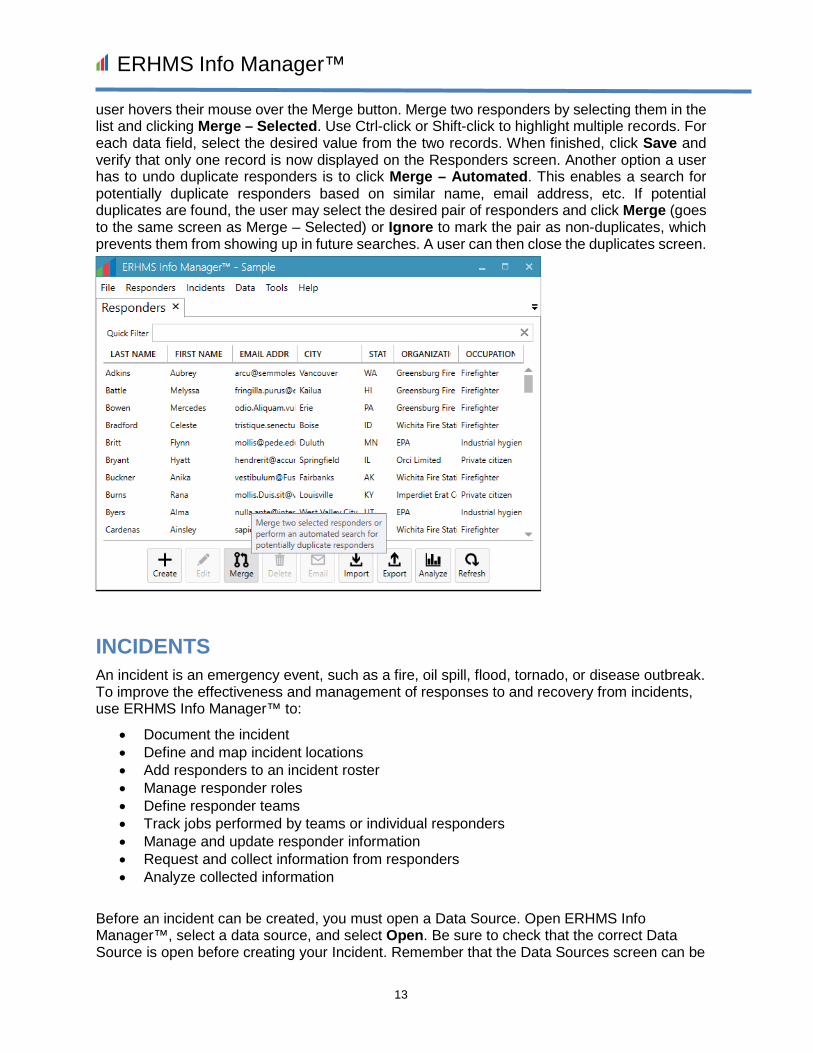
user hovers their mouse over the Merge button. Merge two responders by selecting them in the list and clicking Merge – Selected. Use Ctrl-click or Shift-click to highlight multiple records. For each data field, select the desired value from the two records. When finished, click Save and verify that only one record is now displayed on the Responders screen. Another option a user has to undo duplicate responders is to click Merge – Automated. This enables a search for potentially duplicate responders based on similar name, email address, etc. If potential duplicates are found, the user may select the desired pair of responders and click Merge (goes to the same screen as Merge – Selected) or Ignore to mark the pair as non-duplicates, which prevents them from showing up in future searches. A user can then close the duplicates screen.
INCIDENTS An incident is an emergency event, such as a fire, oil spill, flood, tornado, or disease outbreak. To improve the effectiveness and management of responses to and recovery from incidents, use ERHMS Info Manager™ to:
• Document the incident • Define and map incident locations • Add responders to an incident roster • Manage responder roles • Define responder teams • Track jobs performed by teams or individual responders • Manage and update responder information • Request and collect information from responders • Analyze collected information
Before an incident can be created, you must open a Data Source. Open ERHMS Info Manager™, select a data source, and select Open. Be sure to check that the correct Data Source is open before creating your Incident. Remember that the Data Sources screen can be

ERHMS Info Manager™
14
accessed at any time by selecting File – Data Sources from the ribbon, or by selecting Data Sources from the start screen.
CREATING INCIDENTS To create a new incident, select Incident – Create New from the ribbon or select Incidents from the start screen.
On the New Incident screen, enter the following:
• Name

ERHMS Info Manager™
15
• Description • Phase (Pre-Deployment, Deployment, Post-Deployment) • Start Date • End Date (Estimated) • End Date (Actual) – Leave blank until the incident is closed.
Select the Save button. If you would like to record additional information about the incident, you may do so by using the Notes functionality described below.
After clicking save, new incident subsections are displayed on the left sidebar, as shown in the figure below. The information provided by these subsections is incident-specific. For example, the Forms subsection displays only forms that have been assigned to the current incident. To view information that applies to any incident or that is non-incident-specific use the ribbon items (such as Data – Forms) or by selecting Forms from the start screen. Note that forms, analyses, and dashboards that are created from the incident screen are automatically linked to that incident. Those that are created from screens opened via the Data ribbon item or from the start screen are not linked to any incident by default. To link a form, analysis, or dashboard to a different incident, first open the appropriate screen by selecting an option (Forms, Analyses, or Dashboards) under the Data ribbon item or from the start screen. Choose the desired item and select Incident. To associate the item with an incident, choose the desired incident and select Link, or select Unlink to remove an existing association with an incident.

ERHMS Info Manager™
16
VIEWING AND ADDING NOTES Go to the Notes subsection to enter incident information. Whenever new notes are added, a date and timestamp are also added to each record. To effectively document responses, enter as many notes as needed.
MANAGING AN INCIDENT ROSTER From the list of incident subsections, select Roster to create a list of responders assigned to the incident. The list at the top of the screen includes the entire responder pool (all responders
ERHMS Info Manager™
17
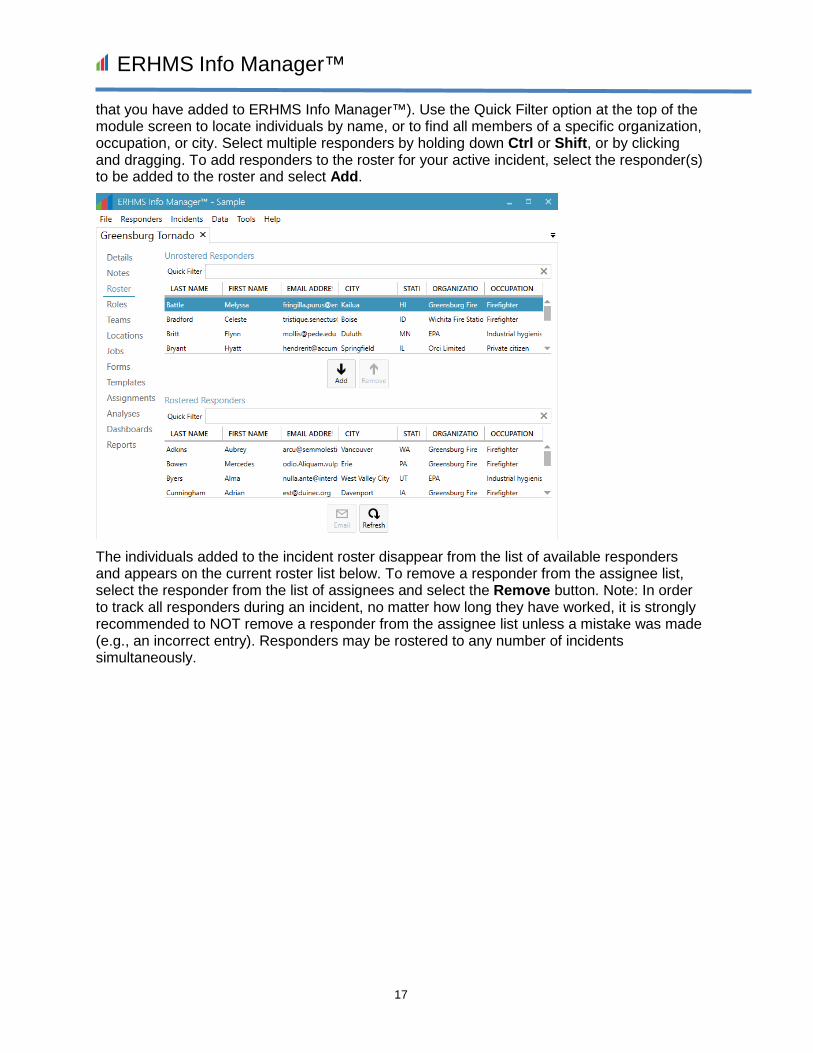
that you have added to ERHMS Info Manager™). Use the Quick Filter option at the top of the module screen to locate individuals by name, or to find all members of a specific organization, occupation, or city. Select multiple responders by holding down Ctrl or Shift, or by clicking and dragging. To add responders to the roster for your active incident, select the responder(s) to be added to the roster and select Add.
The individuals added to the incident roster disappear from the list of available responders and appears on the current roster list below. To remove a responder from the assignee list, select the responder from the list of assignees and select the Remove button. Note: In order to track all responders during an incident, no matter how long they have worked, it is strongly recommended to NOT remove a responder from the assignee list unless a mistake was made (e.g., an incorrect entry). Responders may be rostered to any number of incidents simultaneously.

ERHMS Info Manager™
18
INCIDENT ROLES The roles displayed under the Roles subsection are specific to the current incident and may be used when adding responders to a team or job. Incident roles can be customized (via addition and removal of roles) without affecting either the “global” list of roles on the Settings screen or other incidents’ roles. Click the Roles subsection within the specific incident screen. Click Add to start adding a new role. This will allow a user to add a name and a description for the Role and select Save. Verify that the new role is added to the list.

ERHMS Info Manager™
19
TEAMS Teams are used to group an incident’s responders for the purpose of tracking their job activity (i.e., job ticketing). Responders who are currently rostered to the incident (as described in the previous section) are available to be added to a team. A role may be selected for each responder to indicate his or her typical duties as part of the team. A responder’s role may vary from team to team. To add a team, a user may select Create at the bottom of the page for the Teams subsection within an incident. This will allow a user to add a name (the role) and a description (to describe the responsibilities) for the Team and select Save. Additional subsections should appear on the left-hand side of the specific team screen. A user also has the ability to Edit or Delete a team by selecting these options at the bottom of the Teams page.
Once a team has been saved, responders may be added to it by selecting the Responders section on a specific team screen. Start by selecting a Role (optional), then highlight the desired responders in the upper list. Click Add to associate the selected responders with this team. These responders are moved to the bottom list. If necessary, responders may be removed from a team by highlighting their records in the bottom list and clicking Remove.
ERHMS Info Manager™
20
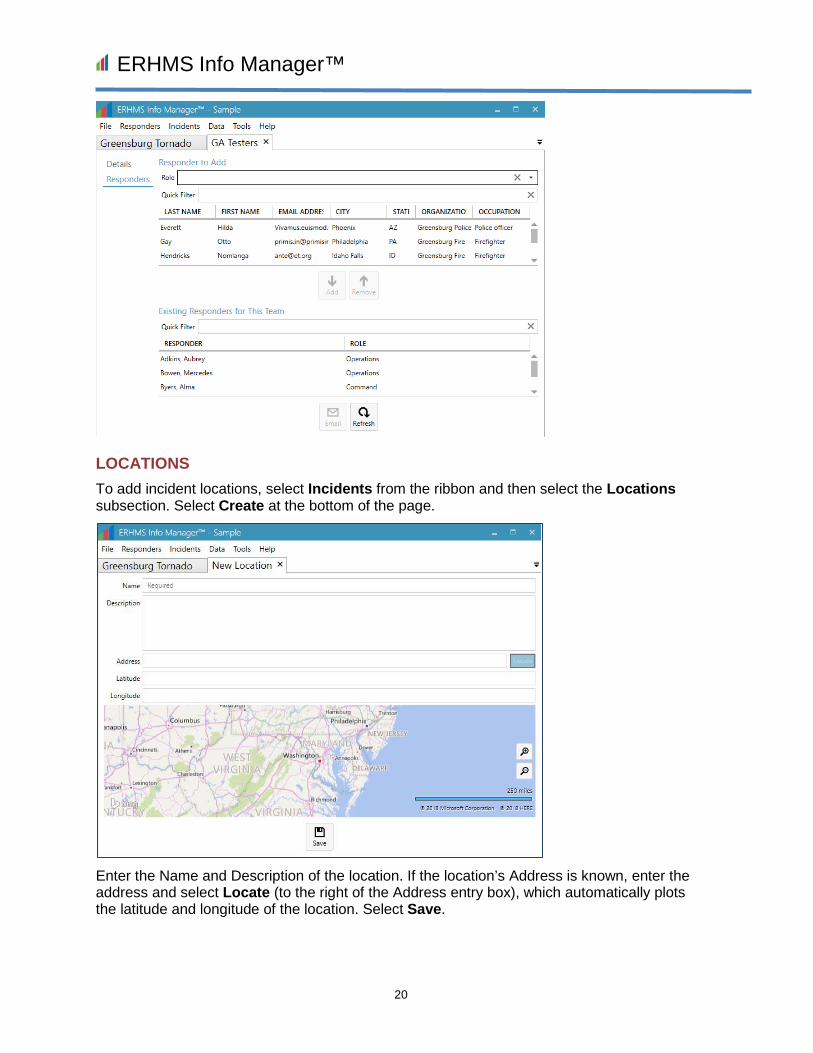
LOCATIONS To add incident locations, select Incidents from the ribbon and then select the Locations subsection. Select Create at the bottom of the page.
Enter the Name and Description of the location. If the location’s Address is known, enter the address and select Locate (to the right of the Address entry box), which automatically plots the latitude and longitude of the location. Select Save.

ERHMS Info Manager™
21
Use the Map feature when an address is unknown or unavailable. To get an approximate location of an unknown address, enter the nearest city or known address in the Address field and select the Locate button. Zoom by rolling the mouse wheel while hovering over the map or by selecting the plus and minus buttons. Double-click the spot corresponding to your location, which drops a pin on the spot and automatically plots the latitude and longitude. Select Save.
The Locations subsection in the Incident tab will contain all locations associated with the incident. If a new location has been entered but is not displaying, select the Refresh button at the bottom of the screen.

ERHMS Info Manager™
22
JOBS Jobs are used to track the activity or tasks of responders during an incident. Each job associates teams of responders with the locations at which they are working. Individual responders may also be added to jobs in an ad-hoc fashion without first adding them to a team. Job notes may be used (similar to incident notes as described above) to track a job’s progression. To manage Jobs, select Create at the bottom of the page. This will allow a user to add a name, description, start date and end date for the Job and select Save. A user also has the ability to Edit or Delete a Job by selecting these options at the bottom of the Job’s subsection.

ERHMS Info Manager™
23
Once a job has been saved, you may associate notes, teams, responders, and locations with it via the corresponding subsections within the specific job’s tab.
FORMS ERHMS Info Manager™ uses a built-in version of Epi Info™ for creating and editing forms, entering data into forms, viewing form responses, and analyzing the data. Visit the Form Designer Section of the Epi Info™ User Guide for more information on Forms. Many forms have been included in ERHMS Info Manager™ as templates. To view these, select Data – Templates from the ribbon or select Templates from the start screen. Visit the Templates section below for an explanation of how to open the templates. You may also create forms from scratch if these templates do not meet your needs.
Many pre-deployment forms, such as those completed by potential responders during registration and credentialing, contain information that is not tied to a specific incident. It is strongly recommended that this information be updated at least annually, including in ERHMS Info Manager™.
Other forms are incident-specific and help us understand the impact of the incident on the responder. These can include check-in forms, exposure assessments, site specific training rosters, and sampling results.
CREATING A FORM To manage incident-specific forms, select the Forms item from the incident subsections. To manage all forms, select Data – Forms from the ribbon or select Forms from the start screen. You may create a new form by selecting Create. In the Epi Info™ Form Designer, give the form a Name, then select OK. It is suggested that the name for an incident-specific form be prefixed by the name of the incident, but this is not a requirement. If the form that has been
ERHMS Info Manager™
24
created meets your needs, select yes on the prompt that comes up asking whether Epi Info™ should be closed. If you intend to make changes, press no and proceed with making edits using the Epi Info™ Form Designer.
By default, forms created in ERHMS Info Manager™ contain fields for a responder ID, email address, first name, and last name. These fields allow you to link form responses back to the responders who provided them. If you do not require this functionality, you may delete the responder data fields.
Once a form has been designed, you may enter data into it directly or (using Epi Info™ Web Survey) publish it to the web and request data from responders via email as described in the following sections. Alternatively, you may print blank copies of the form and distribute them to responders to be filled out by hand. In the Form Designer, select File – Print, choose a page range, and select Print. Note that data collected in this manner will still need to be entered into ERHMS Info Manager™ in order to perform subsequent analysis.
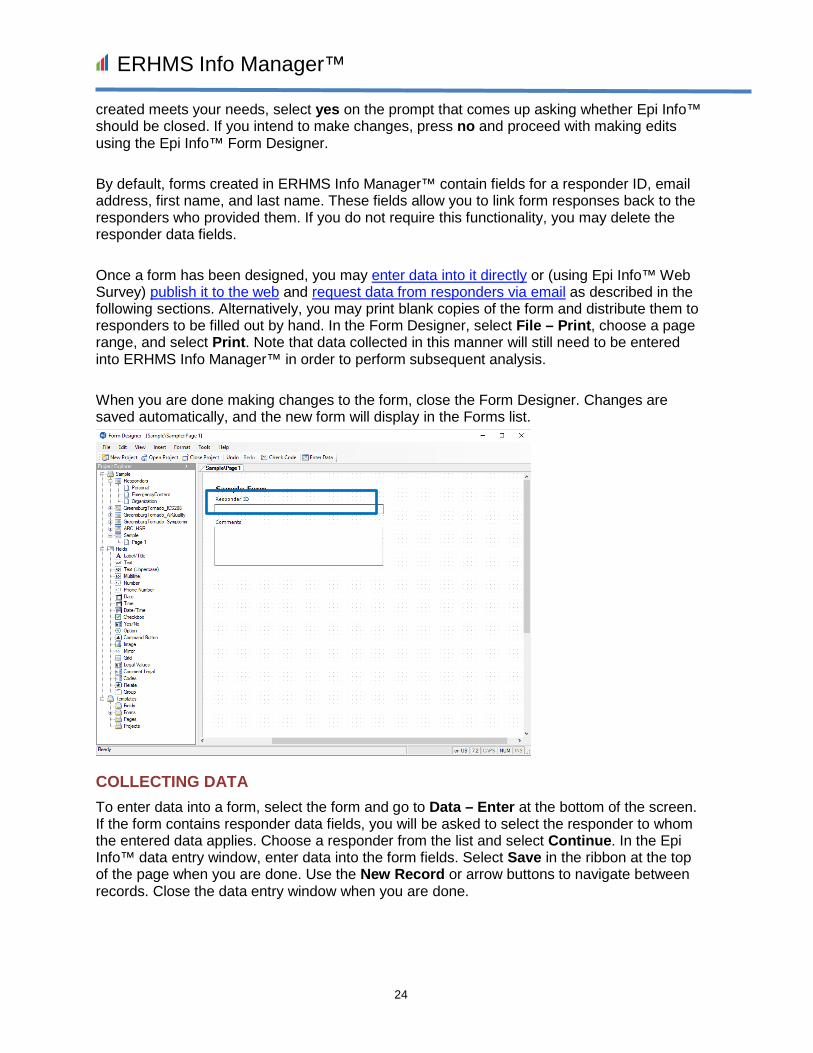
When you are done making changes to the form, close the Form Designer. Changes are saved automatically, and the new form will display in the Forms list.
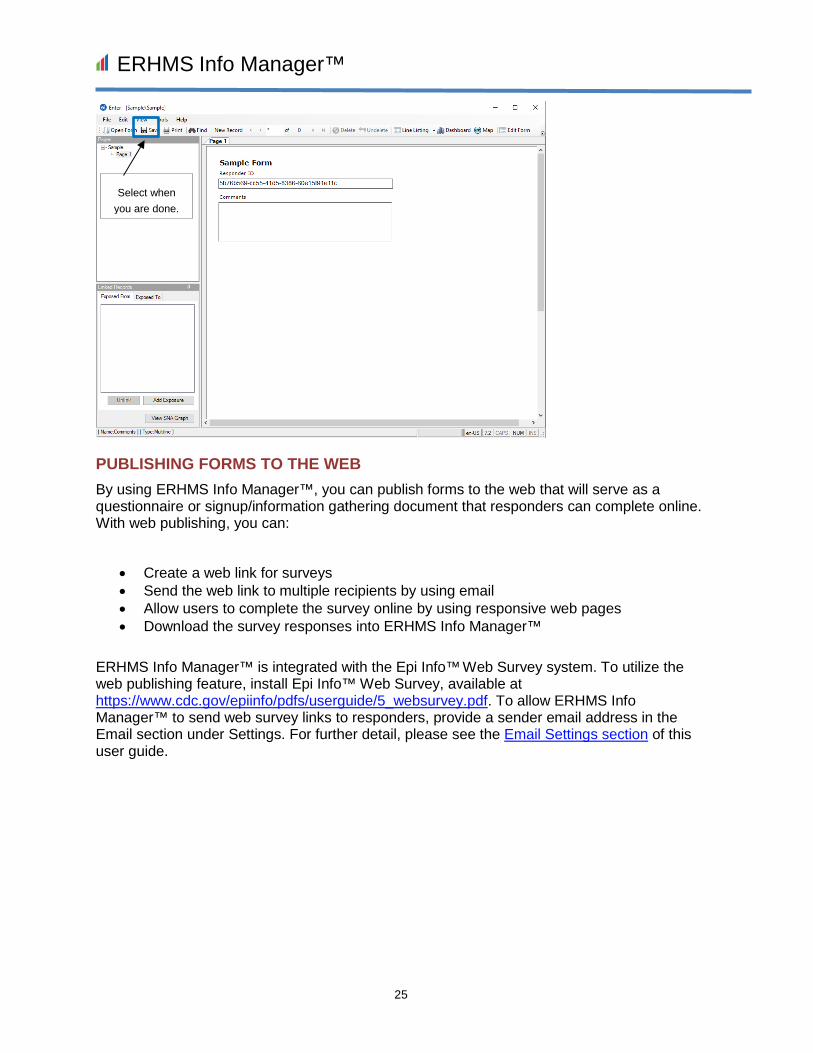
COLLECTING DATA To enter data into a form, select the form and go to Data – Enter at the bottom of the screen. If the form contains responder data fields, you will be asked to select the responder to whom the entered data applies. Choose a responder from the list and select Continue. In the Epi Info™ data entry window, enter data into the form fields. Select Save in the ribbon at the top of the page when you are done. Use the New Record or arrow buttons to navigate between records. Close the data entry window when you are done.
ERHMS Info Manager™
25
PUBLISHING FORMS TO THE WEB By using ERHMS Info Manager™, you can publish forms to the web that will serve as a questionnaire or signup/information gathering document that responders can complete online. With web publishing, you can:
• Create a web link for surveys • Send the web link to multiple recipients by using email • Allow users to complete the survey online by using responsive web pages • Download the survey responses into ERHMS Info Manager™
ERHMS Info Manager™ is integrated with the Epi Info™ Web Survey system. To utilize the web publishing feature, install Epi Info™ Web Survey, available at https://www.cdc.gov/epiinfo/pdfs/userguide/5_websurvey.pdf. To allow ERHMS Info Manager™ to send web survey links to responders, provide a sender email address in the Email section under Settings. For further detail, please see the Email Settings section of this user guide.
Select when you are done.

ERHMS Info Manager™
26
To publish a survey to the web, first choose a form to publish. To locate forms, select Data – Forms from the ribbon or select Forms from the start screen. Forms related to individual incidents are also found by selecting Forms in the subsection of the specific incident screen. Select the form and go to Publish – To Web.
You can customize the survey publication options listed below. For more information on customizing these options, visit Epi Info™’s User Guide, Publish Form to the Web Section at https://wwwn.cdc.gov/epiinfo/user-guide/survey/publish-form-to-web.html.
• Title: The name of the survey that will be displayed to users. • Start Date: The first date on which the survey is available to be filled out. • End Date: The last date on which the survey is available to be filled out.

ERHMS Info Manager™
27
• Response Type: Whether Epi Info™ Web Survey prompts the user for additional responses when the survey is completed.
• Welcome Text: The text that is displayed when the user starts the survey. • Completion Text: The text that is displayed when the user finishes the survey.
After entering the appropriate information in the Publish to Web window, select Publish.
TEMPLATES There are various standardized form templates in the ERHMS Info Manager™ Templates tab, including forms from Federal Emergency Management Agency (FEMA), American Red Cross, Occupational Safety and Health Administration (OSHA), and other organizations that frequently send emergency responders to incident sites. These are just a few examples of forms that are available. You can use these form templates unchanged, edit them for your purposes, or create an original form to meet the needs of your organization. Information that could be collected when responders report for duty at the incident, include: exposures, work activities, personal protective equipment (PPE) use, contact information, and other pertinent information from the incident. This information can allow for prompt recognition of risks, understanding the health effects of ongoing or new exposures, setting up medical surveillance, or performing follow-up related to work at an incident.
CREATING A FORM FROM A TEMPLATE A template can accelerate the creation of a form. To create a form that is not linked to a specific incident, begin by selecting Data – Templates from the ribbon or select Templates from the start screen. To create an incident-linked form, begin by opening the incident and navigate to the Templates subsection. Then choose the template that fits your needs and select Create.

ERHMS Info Manager™
28
Once you press the Create button, the Epi Info™ Form Designer window opens up. A pop-up prompts for the name of the new form. It is suggested that the name for an incident-specific form be prefixed by the name of the incident, but this is not a requirement. After you enter a name and select OK, Epi Info™ creates the form using the template selected. It may take a few moments for Epi Info™ to add all the template fields to the new form.
If the form that has been created meets your needs, select yes on the prompt that comes up asking whether Epi Info™ should be closed.

ERHMS Info Manager™
29
If you intend to make changes, press no and proceed with making edits by using the Epi Info™ Form Designer. Once the changes are finalized, close the Epi Info™ Form Designer window. Changes will be saved automatically.
CREATING A TEMPLATE FROM A FORM Existing forms may also be converted into templates. You would typically do this if you have an incident-specific form that you would like to reuse for future incidents. Start by selecting the desired Form. Press the Publish button and choose the To Template option.
The Epi Info™ Screen opens up the newly created template with the option to rename the template. Also, the user is able to provide a more detailed description within the template if

ERHMS Info Manager™
30
necessary. Once the template has been created, select yes when prompted to close Epi Info™. Note that templates cannot be edited. In order to make changes to a template, you must create a form using the template, edit that form, and republish it to a new template.
DATA IMPORT/EXPORT The Data Packager tool allows users to share data with other users or to merge data collected by multiple users into a single database for analyses. The Data Packager does this by offering the option to package and export, as well as import data safely and securely. If you would like to import data, go to Data – Forms and select the desired form. Press the Import button to see the multiple options available.
ERHMS Info Manager™
31
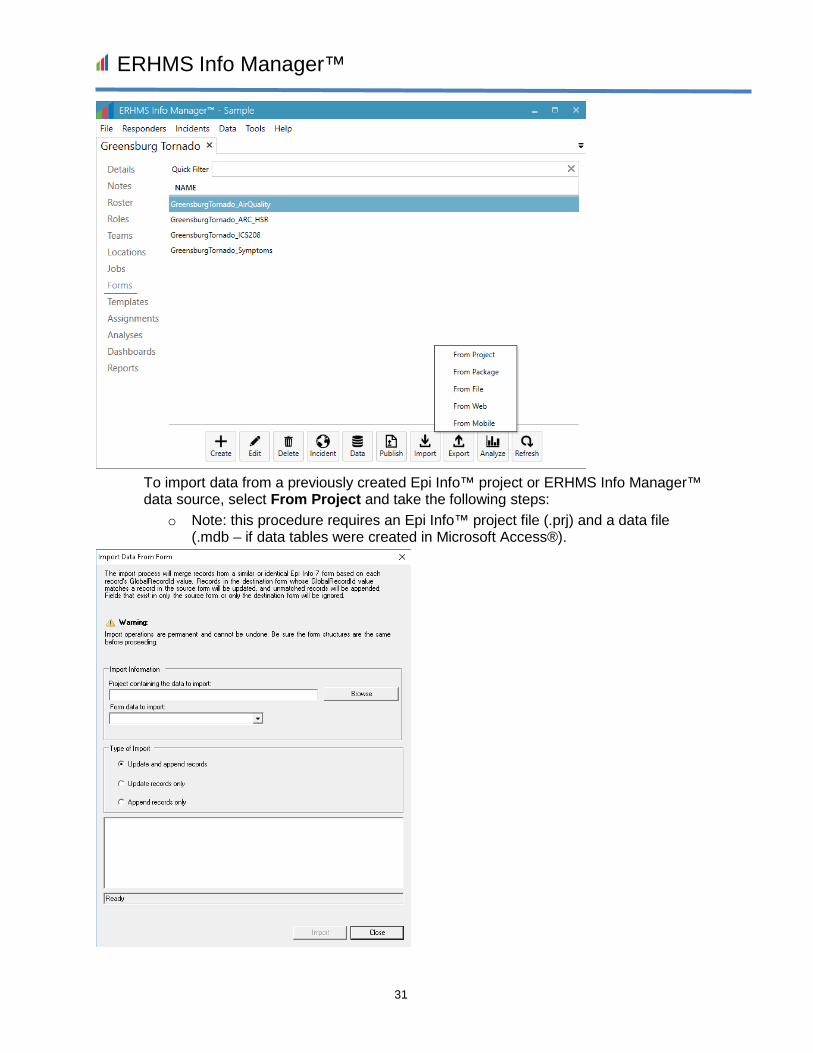
To import data from a previously created Epi Info™ project or ERHMS Info Manager™ data source, select From Project and take the following steps:
o Note: this procedure requires an Epi Info™ project file (.prj) and a data file (.mdb – if data tables were created in Microsoft Access®).

ERHMS Info Manager™
32
o Browse for the Epi Info™ project file by clicking the Browse button next to the Project containing the data to import field. Select the .prj file
o Select the Form from the Form data to import drop-down list. o Select the manner in which you would like the data imported from the Type of
Import list. - Update and append records – Records in the destination form containing the
same GlobalRecordId values as the source form will be updated (overwritten) if there is new information. However, values in the destination table will never be overwritten with a null or missing value. All other records will be appended (added) to the end of the table.
- Update records only – Records in the destination form containing the same GlobalRecordId values as the source form will be updated (overwritten) if there is new information. However, values in the destination table will never be overwritten with a null or missing value. All other records will be ignored.
- Append records only – All records in the source form will be appended (added) to the end of the table. No records will be updated (overwritten).
o Click Import. Import Complete will appear at the bottom of the dialog box upon successful completion of the import.
o Click Close. The data is imported into the form.
To import data from an Epi Info™ data package, select From Package and reference the Data Packager section of the Epi Info™ User Guide at https://www.cdc.gov/epiinfo/pdfs/userguide/7_DataPackager.pdf. Note that this requires a data package that was previously exported from an Epi Info™ project or ERHMS Info Manager™ data source as described later in this section.
To import data from a file (such as a CSV file, Microsoft Excel® spreadsheet, or Microsoft Access® database), select From File. An Epi Info™ Classic Analysis window will open. Step through the dialogs for selecting the file and mapping its variables to the fields of the selected form.
To import data from the web, select From Web and refer to the Distributing Surveys Section of this User Guide. Note that this will only work for forms that have been previously published to the web.
To import data from an Android mobile device, select From Mobile and refer to the Companion for Android section of the Epi Info™ User Guide at https://www.cdc.gov/epiinfo/pdfs/userguide/6_android.pdf. Data cannot be imported from an iPhone.
If you would like to export data, go to Data – Forms and select the desired form. Press the Export button to see the multiple options available.
ERHMS Info Manager™
33
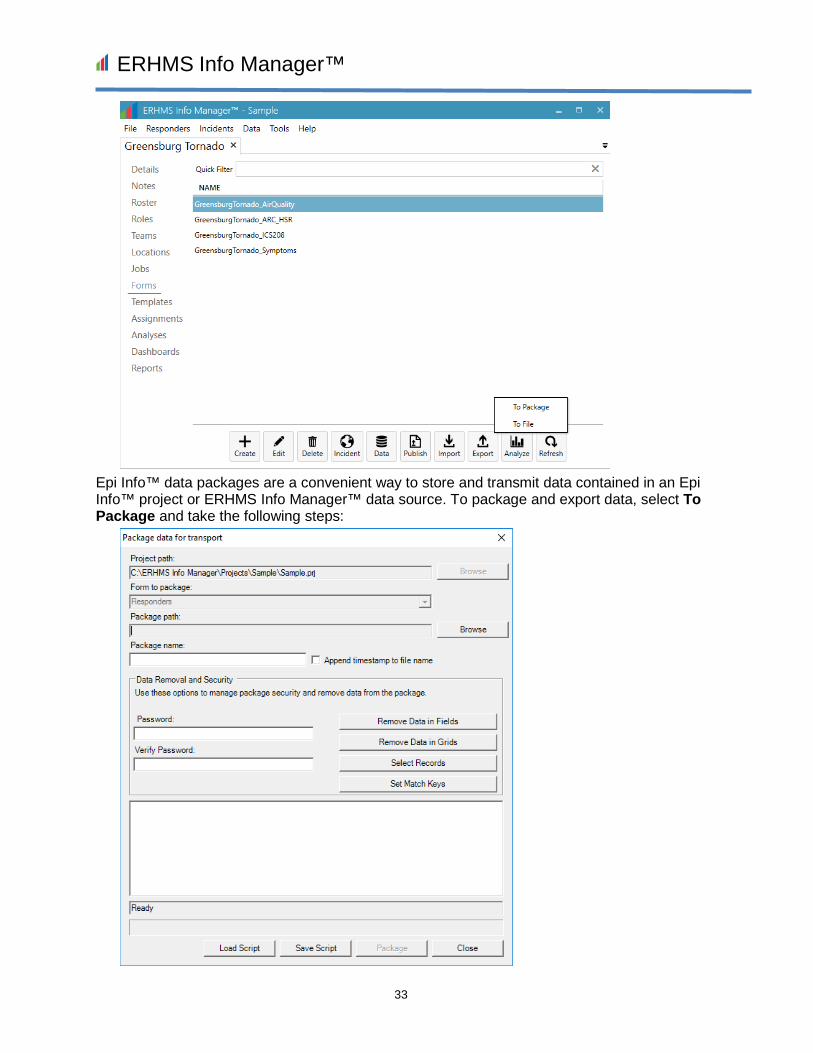
Epi Info™ data packages are a convenient way to store and transmit data contained in an Epi Info™ project or ERHMS Info Manager™ data source. To package and export data, select To Package and take the following steps:

ERHMS Info Manager™
34
o The Package data for Transport dialog box appears. o The Project path and Form to package textboxes automatically populate with the
project and form information. Click Browse and select a Package Path. The package path designates where the data package will be saved. Click OK.
o Enter a name for the data package in the Package Name field. o Check the Append Timestamp to File Name checkbox if you wish to add a
timestamp to the file name. The default setting is unselected. o Enter Password if you wish to encrypt the data package. This increases the
security of your data transmission. Save your password in a safe location as this password will be required to access the data package. If you do not wish to encrypt your data, leave the Password field blank and skip the following step.
o To Verify Password, re-enter the password from the step above. o Click the Remove Data in Fields button to omit specific fields from the data
package. o Click the Remove Data in Grids button to remove data from columns in the
selected grid. o Click the Select Records button to select specific records to include in the data
package. o Click the Package button. When complete, the Package Creation Complete
verbiage will appear at the bottom of the dialog box. o Click Close to exit. o The data package appears at the location (Package Path) specified in step one.
For more information on importing or exporting data, visit the Entering and Editing Data Section of the Epi Info™ User Guide at https://www.cdc.gov/epiinfo/pdfs/userguide/4_enter.pdf.
ASSIGNMENTS DISTRIBUTING SURVEYS If you have previously published a form as a web survey, you can distribute the survey to your responders by first assigning the survey to them, and then sending the assigned responders an email that contains a web link to the survey. To assign forms, select Data – Assignments in the ribbon, or for an incident-specific form, you may also select the Assignments subsection in the incident screen. First, select a Form from the dropdown box at the top of the screen, then select the responders you wish to give the survey to. To select multiple responders, hold down the Ctrl or Shift key while clicking. To quickly select all responders, select any responder in the list then press Ctrl+A. Select Add to confirm the responders you wish to provide the survey to, who are then added to the list at the bottom of the screen. To notify responders of their pending surveys via email, hold down the control key and select all responders who need to fill out the survey and go to Email. If there are two different surveys that a user wants to send, they will need to select the responders for the first survey and email and repeat the process for the second survey.

ERHMS Info Manager™
35
The email will display all of the selected recipients. To send a survey to individuals who are not in your list of responders, there is an option to add more email addresses manually. Click the Add button to the right and enter each of their email addresses manually by choosing the Email address option in the Add a Recipient pop-up window. Note: These individuals’ survey responses will not be automatically linked back to a responder record. This option is therefore not recommended. It is best to add the individual to the list of responders and assign them to an incident first.
Enter the Subject and Body of your email. When sending an assignment email for a web survey, the box labeled Append web survey URL should be automatically checked, and the assigned form will already be selected. Only forms that have been published to the web will appear in this dropdown. You can also attach documents to the email if desired by using the Add button in the Attachments section. When you are finished, send the email by selecting Send.
ERHMS Info Manager™
36
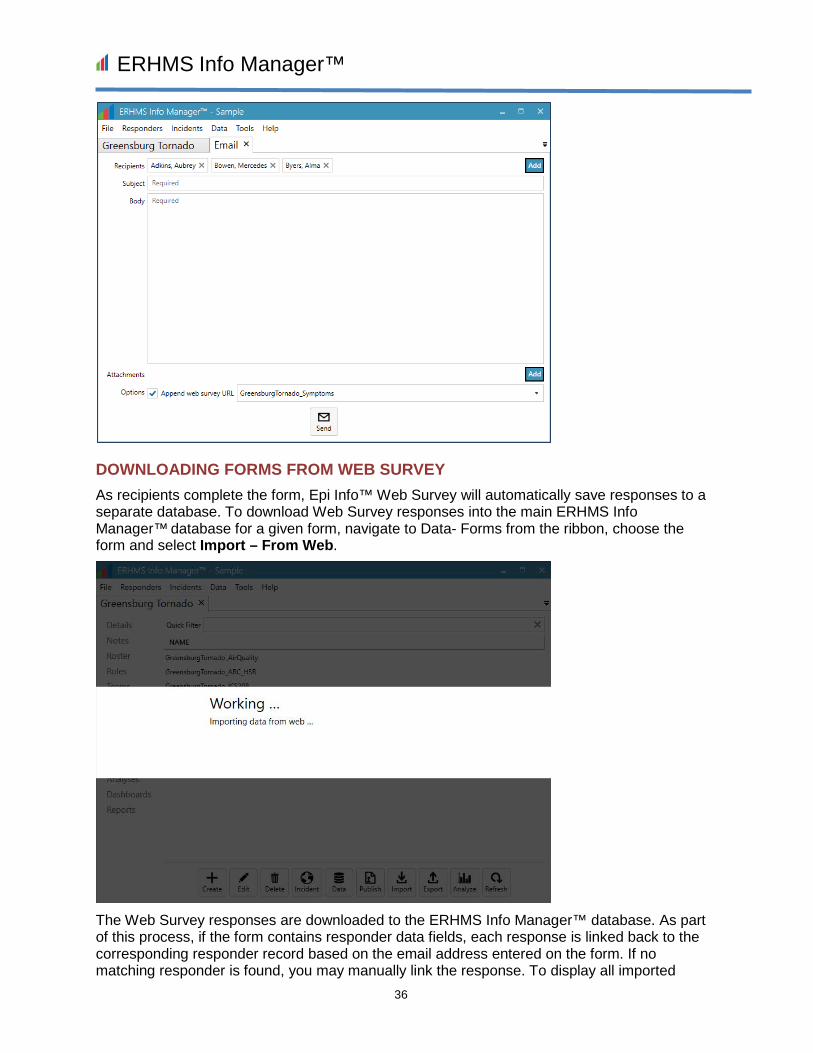
DOWNLOADING FORMS FROM WEB SURVEY As recipients complete the form, Epi Info™ Web Survey will automatically save responses to a separate database. To download Web Survey responses into the main ERHMS Info Manager™ database for a given form, navigate to Data- Forms from the ribbon, choose the form and select Import – From Web.
The Web Survey responses are downloaded to the ERHMS Info Manager™ database. As part of this process, if the form contains responder data fields, each response is linked back to the corresponding responder record based on the email address entered on the form. If no matching responder is found, you may manually link the response. To display all imported

ERHMS Info Manager™
37
survey responses (including any data already in the selected form prior to the import procedure), select the form again, and select Data – View. If necessary, you may manually link responses to a corresponding responder by selecting the record, selecting Responder, choosing a responder from the list, and selecting Link.
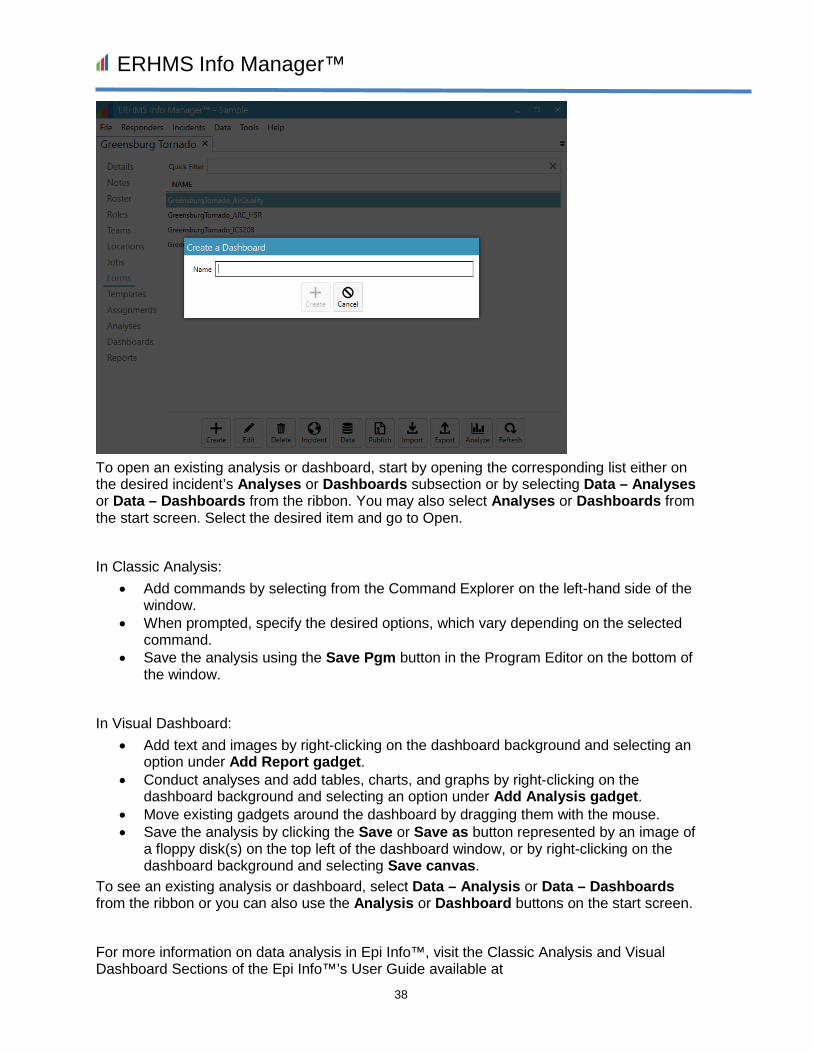
ANALYSIS Epi Info™’s Classic Analysis and Visual Dashboard screens may be used to analyze data collected through forms. To create a new analysis or dashboard, start by opening the list of forms either on the desired incident’s Forms subsection or by selecting Data – Forms from the ribbon. You may also select Forms from the start screen. Select the form, then go to Analyze – Classic or Analyze – Visual. Provide a Name for the analysis or the dashboard in the resulting pop-up window and select Create.
ERHMS Info Manager™
38
To open an existing analysis or dashboard, start by opening the corresponding list either on the desired incident’s Analyses or Dashboards subsection or by selecting Data – Analyses or Data – Dashboards from the ribbon. You may also select Analyses or Dashboards from the start screen. Select the desired item and go to Open.
In Classic Analysis: • Add commands by selecting from the Command Explorer on the left-hand side of the
window. • When prompted, specify the desired options, which vary depending on the selected
command. • Save the analysis using the Save Pgm button in the Program Editor on the bottom of
the window.
In Visual Dashboard: • Add text and images by right-clicking on the dashboard background and selecting an
option under Add Report gadget. • Conduct analyses and add tables, charts, and graphs by right-clicking on the
dashboard background and selecting an option under Add Analysis gadget. • Move existing gadgets around the dashboard by dragging them with the mouse. • Save the analysis by clicking the Save or Save as button represented by an image of
a floppy disk(s) on the top left of the dashboard window, or by right-clicking on the dashboard background and selecting Save canvas.
To see an existing analysis or dashboard, select Data – Analysis or Data – Dashboards from the ribbon or you can also use the Analysis or Dashboard buttons on the start screen.
For more information on data analysis in Epi Info™, visit the Classic Analysis and Visual Dashboard Sections of the Epi Info™’s User Guide available at

ERHMS Info Manager™
39
https://www.cdc.gov/epiinfo/pdfs/userguide/9_classicanalysis.pdf and https://www.cdc.gov/epiinfo/pdfs/userguide/8_visualdashboard.pdf.
SECURITY The following section describes how to configure your operating system and database server for data privacy and security. Each organization or end user must provide their own security environment and follow their policies and procedures to ensure data security. Additional information can be found in the License Information. To take advantage of the full set of features and to ensure data security, it is recommended to use a recent version of Microsoft Windows® and an enterprise edition of Microsoft SQL Server® as the underlying database management system. Additional information on using Microsoft Access® and Microsoft SQL Server® can be found in the Adding a New Data Source section. Recommended controls you can use for both Microsoft Access® and Microsoft SQL Server®, include: ADMINISTRATIVE SAFEGUARDS
• Designate a security official • Identify and analyze potential risks to sensitive data • Implement and periodically review policies and procedures that reduce these risks
o Take into account the principle of least privilege (restrict user access to the minimum necessary information and resources)
o Provide authorization, training, and supervision for users of sensitive data o Impose sanctions for users who violate these policies and procedures
PHYSICAL SAFEGUARDS • Restrict physical access to the organization’s facility • Within the facility, restrict physical access to the computer workstation
BEST PRACTICES TO HELP SECURE YOUR MICROSOFT ACCESS® DATABASE • Ensure that you have the latest Microsoft Access® security update installed
• Password-protect the system. For example, password-protect the system's screensaver feature. Microsoft Windows'® screensaver kicks in when the system sits idle. If you password-protect the feature, the user must enter a login password to regain access to the system. Additional information can be found in the Automatic Timeout Section below.
• Store your Microsoft Access® database in secure folders, limited to qualified users. Using integrated Microsoft Windows® login authentication, to limit which users have access to files all over your network, is currently the industry standard.
• Distribute runtime versions to your end users and install full-time versions of Microsoft Access® only on application developer or administrator machines.
• Use the Trust Center Settings. Specifically, trust center settings allow Microsoft Access® application administrator to limit the file path a Microsoft Access® application can be used from.
• Hide objects — a subtle form of protection - It's a good idea to hide objects — tables, queries, forms, and so on — from users. Doing so won't protect these objects in the traditional sense, because if the user can find them, the user can alter them. To hide an object in the Database window (or Navigation pane), right-click it and choose Properties. Then, check the Hidden Attribute option.

ERHMS Info Manager™
40
The following technical controls are only recommended for Microsoft SQL Server®, because Microsoft Access® does not support many of the privacy and security capabilities discussed below. As always, it is important to keep all software fully patched for security purposes. If your organization is a covered entity under the Health Insurance Portability and Accountability Act (HIPAA) or requires higher levels of data security than what is provided by Microsoft Access®, we recommend you use Microsoft SQL Server® as the underlying database management system.
RECOMMENDED TECHNICAL CONTROLS
AUDITING ERHMS Info Manager™ logs many activities performed by the user throughout the course of normal operation. Log files may be accessed by selecting Tools – Logs from the ribbon. Additionally, it is possible to configure Microsoft Windows® and Microsoft SQL Server® to track activities that fall outside the scope of the ERHMS Info Manager™ software itself.
Use Group Policy to perform security auditing in Microsoft Windows®. Review the following security audit policies to determine which ones are relevant for your organization:
• System events (including startup and shutdown) • Logon events (including both successful and failed logon attempts, as well as logoffs) • Account management (creating, changing, or deleting user accounts or groups) • Policy changes (including changes to user rights) • Object access (e.g., to files, directories, etc.) • Privilege use (attempts to exercise user rights, whether successful or not)
Audited activities, along with other alerts and error messages, are logged to the Event Viewer.
Use SQL Server Audit to perform security auditing in Microsoft SQL Server®. The following abbreviated list of audit action groups may be relevant for your organization:
Description Audit action group
Instance start or stop SERVER_STATE_CHANGE_GROUP
Logon to instance *_LOGIN_GROUP (prefixed by SUCCESSFUL or FAILED)
Logon to database *_DATABASE_AUTHENTICATION_GROUP (prefixed by SUCCESSFUL or FAILED)
Logout of instance LOGOUT_GROUP
Logout of database DATABASE_LOGOUT_GROUP
Instance configuration SERVER_OPERATION_GROUP
User created, altered, or dropped
*_PRINCIPAL_CHANGE_GROUP (prefixed by scope)
User added to or removed from role
*_ROLE_MEMBER_CHANGE_GROUP (prefixed by scope)

ERHMS Info Manager™
41
Description Audit action group
Object owner changed *_OWNERSHIP_CHANGE_GROUP (prefixed by scope)
Access to object granted, revoked, or denied
*_PERMISSION_CHANGE_GROUP (prefixed by scope)
Object created, altered, or dropped
*_CHANGE_GROUP (prefixed by scope)
Object accessed *_ACCESS_GROUP (prefixed by scope)
Note: Auditing based on SQL statement type (e.g., SELECT, UPDATE, INSERT, or DELETE) is also supported. *A shortened version of the audit action group name is included.
Alerts and error messages may be logged to the Event Viewer or the SQL Server Log.
ACCESS CONTROL Access to ERHMS Info Manager™ data sources may be controlled by placing them in access-controlled directories (e.g., on a shared network drive). Individual users should have separate Microsoft Windows® accounts, allowing access to these directories to be managed using the standard Microsoft Windows® access controls.
Access to underlying databases in Microsoft SQL Server® may be managed similarly, by granting or revoking privileges on these databases for the desired Microsoft Windows® accounts. Note that this requires the ERHMS Info Manager™ data sources to be set up to use integrated security (i.e., Microsoft Windows® authentication). To accomplish this, be sure to check the Windows Authentication box when creating the data source. Alternatively, password-protected logins that are not associated with Microsoft Windows® accounts may be created directly in Microsoft SQL Server®. Provide the User Name and Password in ERHMS Info Manager™ to connect using these logins.
When performing access control, it is recommended to exercise the principle of least privilege, meaning that user accounts are only granted the privileges necessary to perform their intended function. In general, application of this principle will result in enhanced security and stability.
INTEGRITY Recent versions of Microsoft Windows® include preinstalled utilities for file integrity checking. Use CertUtil with the -hashfile option to generate a cryptographic hash for a desired file. This hash may be compared to a previously generated hash (calculated over the file in a known good state) to verify file integrity. Additionally, third-party applications may be used to perform file integrity checking at scheduled intervals or in real time.
ENCRYPTION Data “at rest” may be encrypted via Transparent Data Encryption (TDE). This ensures data security even in a scenario where the physical media containing the data (e.g., disk drives) are compromised. Note that TDE must be applied on the underlying database after it has been created as a data source in ERHMS Info Manager™.
ERHMS Info Manager™
42
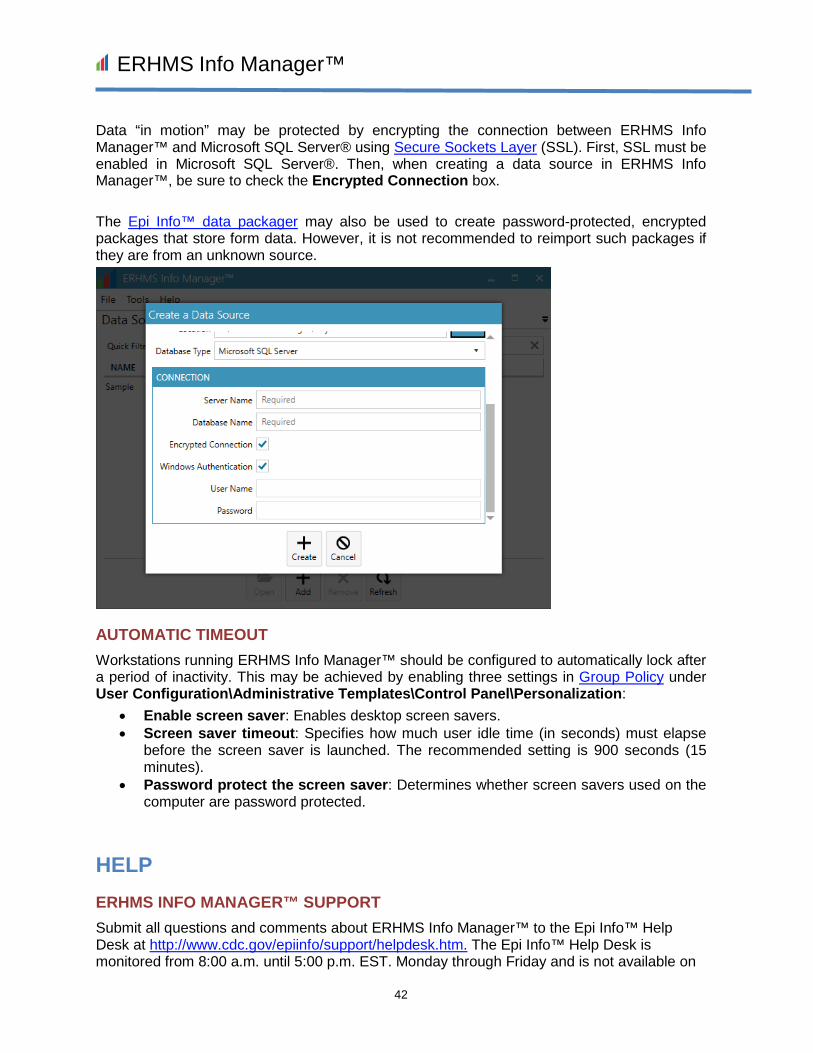
Data “in motion” may be protected by encrypting the connection between ERHMS Info Manager™ and Microsoft SQL Server® using Secure Sockets Layer (SSL). First, SSL must be enabled in Microsoft SQL Server®. Then, when creating a data source in ERHMS Info Manager™, be sure to check the Encrypted Connection box.
The Epi Info™ data packager may also be used to create password-protected, encrypted packages that store form data. However, it is not recommended to reimport such packages if they are from an unknown source.
AUTOMATIC TIMEOUT Workstations running ERHMS Info Manager™ should be configured to automatically lock after a period of inactivity. This may be achieved by enabling three settings in Group Policy under User Configuration\Administrative Templates\Control Panel\Personalization:
• Enable screen saver: Enables desktop screen savers. • Screen saver timeout: Specifies how much user idle time (in seconds) must elapse
before the screen saver is launched. The recommended setting is 900 seconds (15 minutes).
• Password protect the screen saver: Determines whether screen savers used on the computer are password protected.
HELP ERHMS INFO MANAGER™ SUPPORT Submit all questions and comments about ERHMS Info Manager™ to the Epi Info™ Help Desk at http://www.cdc.gov/epiinfo/support/helpdesk.htm. The Epi Info™ Help Desk is monitored from 8:00 a.m. until 5:00 p.m. EST. Monday through Friday and is not available on

ERHMS Info Manager™
43
weekends or federal holidays. Users should expect to receive a response back to their inquiries within 48 hours.
LOGS During the course of normal operation, ERHMS Info Manager™ creates log files that track user activity and record debugging information. To manage these files, select Tools – Logs from the screens ribbon.
VIEWING LOGS To view a log file, select it from the list of available files within the Logs screen (Tools – Logs) in the Logs tab and go to Open. The file will open in your default text editor.
DELETING LOGS If you would like to reclaim the hard drive space used by a log file, you may delete it by selecting it from the list of available files and going to Delete. The file will be recreated the next time ERHMS Info Manager™ attempts to write logging information.
PACKAGING LOGS Logging information may be easily shared with software support staff by packaging log files into a zip file. To package one or more log files, select them from the list of available files and go to Package. ERHMS Info Manager™ will create a zip file that contains all the selected log files. You may then save this file to its default location (usually the desktop) or another location of your choice.
ERHMS INFO MANAGER™ UNINSTALL To uninstall ERHMS Info Manager™, follow the steps below:
• Go to the Control Panel of your computer. • Open Programs and Features in the Control Panel.

ERHMS Info Manager™
44
• Select ERHMS Info Manager™ from the list of installed software. • Select Uninstall/Change from the ribbon above the list of installed software. • In the popup that appears, select Remove the application from this computer. • Select OK.
ABOUT LICENSE INFORMATION
ERHMS Info Manager™ and Epi Info™ tools are in the public domain and free to download and use. ERHMS Info Manger™ is licensed under the Apache License Version 2.0, January 2004 at http://www.apache.org/licenses/
TERMS AND CONDITIONS FOR USE, REPRODUCTION, AND DISTRIBUTION
1. Definitions.
"License" shall mean the terms and conditions for use, reproduction, and distribution as defined by Sections 1 through 9 of this document.
"Licensor" shall mean the copyright owner or entity authorized by the copyright owner that is granting the License.
"Legal Entity" shall mean the union of the acting entity and all other entities that control, are controlled by, or are under common control with that entity. For the purposes of this definition, "control" means (i) the power, direct or indirect, to cause the direction or management of such entity, whether by contract or otherwise, or (ii) ownership of fifty percent (50%) or more of the outstanding shares, or (iii) beneficial ownership of such entity.
"You" (or "Your") shall mean an individual or Legal Entity exercising permissions granted by this License.
"Source" form shall mean the preferred form for making modifications, including but not limited to software source code, documentation source, and configuration files.
"Object" form shall mean any form resulting from mechanical transformation or translation of a Source form, including but not limited to compiled object code, generated documentation, and conversions to other media types.
"Work" shall mean the work of authorship, whether in Source or Object form, made available under the License, as indicated by a copyright notice that is included in or attached to the work (an example is provided in the Appendix below).
"Derivative Works" shall mean any work, whether in Source or Object form, that is based on (or derived from) the Work and for which the editorial revisions, annotations, elaborations, or other modifications represent, as a whole, an original work of authorship. For the purposes of this License, Derivative Works shall not include works that remain separable from, or merely link (or bind by name) to the interfaces of, the Work and Derivative Works thereof.
ERHMS Info Manager™
45
"Contribution" shall mean any work of authorship, including the original version of the Work and any modifications or additions to that Work or Derivative Works thereof, that is intentionally submitted to Licensor for inclusion in the Work by the copyright owner or by an individual or Legal Entity authorized to submit on behalf of the copyright owner. For the purposes of this definition, "submitted" means any form of electronic, verbal, or written communication sent to the Licensor or its representatives, including but not limited to communication on electronic mailing lists, source code control systems, and issue tracking systems that are managed by, or on behalf of, the Licensor for the purpose of discussing and improving the Work, but excluding communication that is conspicuously marked or otherwise designated in writing by the copyright owner as "Not a Contribution."
"Contributor" shall mean Licensor and any individual or Legal Entity on behalf of whom a Contribution has been received by Licensor and subsequently incorporated within the Work.
2. Grant of Copyright License. Subject to the terms and conditions of this License, each Contributor hereby grants to You a perpetual, worldwide, non-exclusive, no-charge, royalty-free, irrevocable copyright license to reproduce, prepare Derivative Works of, publicly display, publicly perform, sublicense, and distribute the Work and such Derivative Works in Source or Object form.
3. Grant of Patent License. Subject to the terms and conditions of this License, each Contributor hereby grants to You a perpetual, worldwide, non-exclusive, no-charge, royalty-free, irrevocable (except as stated in this section) patent license to make, have made, use, offer to sell, sell, import, and otherwise transfer the Work, where such license applies only to those patent claims licensable by such Contributor that are necessarily infringed by their Contribution(s) alone or by combination of their Contribution(s) with the Work to which such Contribution(s) was submitted. If You institute patent litigation against any entity (including a cross-claim or counterclaim in a lawsuit) alleging that the Work or a Contribution incorporated within the Work constitutes direct or contributory patent infringement, then any patent licenses granted to You under this License for that Work shall terminate as of the date such litigation is filed.
4. Redistribution. You may reproduce and distribute copies of the Work or Derivative Works thereof in any medium, with or without modifications, and in Source or Object form, provided that You meet the following conditions:
1. You must give any other recipients of the Work or Derivative Works a copy of this License; and
2. You must cause any modified files to carry prominent notices stating that You changed the files; and
3. You must retain, in the Source form of any Derivative Works that You distribute, all copyright, patent, trademark, and attribution notices from the Source form of the Work, excluding those notices that do not pertain to any part of the Derivative Works; and
4. If the Work includes a "NOTICE" text file as part of its distribution, then any Derivative Works that You distribute must include a readable copy of the attribution notices contained within such NOTICE file, excluding those notices that do not pertain to any part of the Derivative Works, in at least one of the following places: within a NOTICE text file distributed as part of the Derivative Works; within the Source form or documentation, if provided along with the Derivative Works; or, within a display generated by the Derivative Works, if and wherever such third-party notices normally appear. The contents of the NOTICE file are for informational purposes only and do
ERHMS Info Manager™
46
not modify the License. You may add Your own attribution notices within Derivative Works that You distribute, alongside or as an addendum to the NOTICE text from the Work, provided that such additional attribution notices cannot be construed as modifying the License. You may add Your own copyright statement to Your modifications and may provide additional or different license terms and conditions for use, reproduction, or distribution of Your modifications, or for any such Derivative Works as a whole, provided Your use, reproduction, and distribution of the Work otherwise complies with the conditions stated in this License.
5. Submission of Contributions. Unless You explicitly state otherwise, any Contribution intentionally submitted for inclusion in the Work by You to the Licensor shall be under the terms and conditions of this License, without any additional terms or conditions. Notwithstanding the above, nothing herein shall supersede or modify the terms of any separate license agreement you may have executed with Licensor regarding such Contributions.
6. Trademarks. This License does not grant permission to use the trade names, trademarks, service marks, or product names of the Licensor, except as required for reasonable and customary use in describing the origin of the Work and reproducing the content of the NOTICE file.
7. Disclaimer of Warranty. Unless required by applicable law or agreed to in writing, Licensor provides the Work (and each Contributor provides its Contributions) on an "AS IS" BASIS, WITHOUT WARRANTIES OR CONDITIONS OF ANY KIND, either express or implied, including, without limitation, any warranties or conditions of TITLE, NON-INFRINGEMENT, MERCHANTABILITY, or FITNESS FOR A PARTICULAR PURPOSE. You are solely responsible for determining the appropriateness of using or redistributing the Work and assume any risks associated with Your exercise of permissions under this License.
8. Limitation of Liability. In no event and under no legal theory, whether in tort (including negligence), contract, or otherwise, unless required by applicable law (such as deliberate and grossly negligent acts) or agreed to in writing, shall any Contributor be liable to You for damages, including any direct, indirect, special, incidental, or consequential damages of any character arising as a result of this License or out of the use or inability to use the Work (including but not limited to damages for loss of goodwill, work stoppage, computer failure or malfunction, or any and all other commercial damages or losses), even if such Contributor has been advised of the possibility of such damages.
9. Accepting Warranty or Additional Liability. While redistributing the Work or Derivative Works thereof, You may choose to offer, and charge a fee for, acceptance of support, warranty, indemnity, or other liability obligations and/or rights consistent with this License. However, in accepting such obligations, You may act only on Your own behalf and on Your sole responsibility, not on behalf of any other Contributor, and only if You agree to indemnify, defend, and hold each Contributor harmless for any liability incurred by, or claims asserted against, such Contributor by reason of your accepting any such warranty or additional liability.
NOTICE The end-user documentation included with the redistribution, if any, must include the following acknowledgment: "This derivative product includes ERHMS Info Manager™ and Epi Info™

ERHMS Info Manager™
47
software developed by NIOSH and CDC, which can be found at http://www.cdc.gov/niosh/topics/erhms/ and http://www.cdc.gov/epiinfo/index.html.”

ERHMS Info Manager™
48
APPENDIX A: KEY TERMS
Term Definition
Epi Info™ A software application created by CDC and available to the public via the internet. It is used by physicians, nurses, epidemiologists, and other public health workers who might lack a background in information technology who often have a need for simple tools that allow the rapid creation of data collection instruments and data analysis, visualization, and reporting using epidemiologic methods. Epi Info™, a suite of easy to use software tools, delivers epidemiologic functionality without the complexity or expense of large, enterprise applications.
Emergency Responder Health Monitoring and Surveillance™ (ERHMS™)
A framework of activities designed to allow for the monitoring and surveillance of emergency response and recovery safety and health during all phases of emergency response: pre-deployment, deployment, and post-deployment.
Incident Command System (ICS)
A standardized on-scene incident management construct specifically designed to provide an integrated organizational structure that reflects the complexity and demands of single or multiple incidents, without being hindered by jurisdictional boundaries. ICS is the combination of facilities, equipment, personnel, procurements, and communications operating within a common organizational structure and designed to aid in the management of resources during incidents. It is used for all kinds of emergencies and is applicable to small, as well as large and complex, incidents. ICS is used by various jurisdictions and functional agencies, both public and private, to organize field-level incident management operations. For more information visit https://training.fema.gov/EMIWeb/IS/ICSResource/index.htm
Medical Monitoring Ongoing clinical assessment of physical and behavioral health in an individual worker to detect emerging health and injury effects that may be work-related (e.g., physiological, psychological), and to inform needs for medical treatment or other services and/or worker exposure control(s). Once the baseline clinical status has been established, participants in the program are periodically assessed for changes in their clinical status.
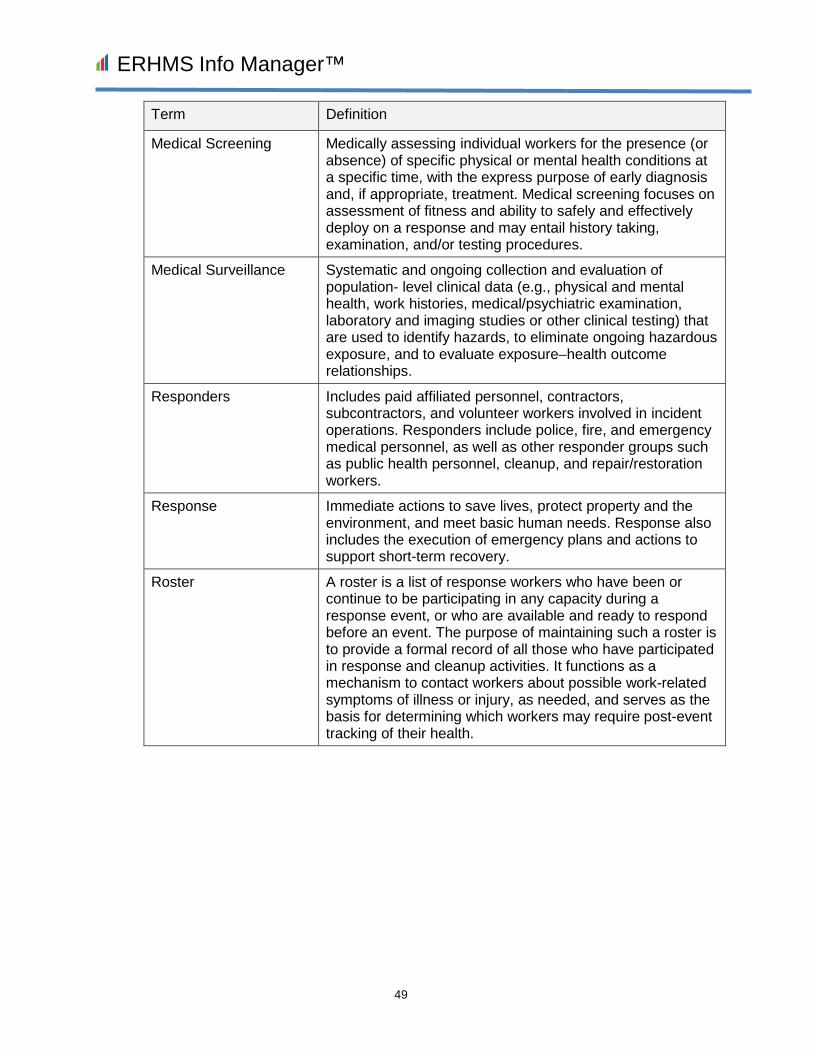
ERHMS Info Manager™
49
Term Definition
Medical Screening Medically assessing individual workers for the presence (or absence) of specific physical or mental health conditions at a specific time, with the express purpose of early diagnosis and, if appropriate, treatment. Medical screening focuses on assessment of fitness and ability to safely and effectively deploy on a response and may entail history taking, examination, and/or testing procedures.
Medical Surveillance Systematic and ongoing collection and evaluation of population- level clinical data (e.g., physical and mental health, work histories, medical/psychiatric examination, laboratory and imaging studies or other clinical testing) that are used to identify hazards, to eliminate ongoing hazardous exposure, and to evaluate exposure–health outcome relationships.
Responders Includes paid affiliated personnel, contractors, subcontractors, and volunteer workers involved in incident operations. Responders include police, fire, and emergency medical personnel, as well as other responder groups such as public health personnel, cleanup, and repair/restoration workers.
Response Immediate actions to save lives, protect property and the environment, and meet basic human needs. Response also includes the execution of emergency plans and actions to support short-term recovery.
Roster A roster is a list of response workers who have been or continue to be participating in any capacity during a response event, or who are available and ready to respond before an event. The purpose of maintaining such a roster is to provide a formal record of all those who have participated in response and cleanup activities. It functions as a mechanism to contact workers about possible work-related symptoms of illness or injury, as needed, and serves as the basis for determining which workers may require post-event tracking of their health.

ERHMS Info Manager™
50
APPENDIX B: REFERENCES
NIOSH Emergency Responder Health Monitoring and Surveillance™ topic page: https://www.cdc.gov/niosh/erhms/
Emergency Responder Health Monitoring and Surveillance™ National Response Team Technical Assistance Document (TAD): https://www.nrt.org/sites/2/files/ERHMS_Final_060512.pdf
Epi Info™ https://www.cdc.gov/epiinfo/index.html

ERHMS Info Manager™
51
PAGE LEFT INTENTIONALLY BLANK

Delivering on the Nation’s promise: safety and health at work for all people through research and prevention
To receive NIOSH documents or more information about occupational safety and health topics, contact NIOSH at
1-800-CDC-INFO (1-800-232-4636)TTY: 1-888-232-6348CDC INFO: www.cdc.gov/info
or visit the NIOSH website at www.cdc.gov/niosh.
For a monthly update on news at NIOSH, subscribe to NIOSH eNews by visiting www.cdc.gov/niosh/eNews.
DHHS (NIOSH) Publication No. 2018-115