EQUIPMENT MANUAL - gciconnect.net Books/SOP Book-4 Equipment.pdf · IHOP Standard Operating...
91
STANDARD OPERATING PROCEDURES Published by International House of Pancakes, Inc. EQUIPMENT MANUAL © 2002 International House of Pancakes, Inc. All rights reserved. No part of this publication may be disclosed, reproduced, stored in a retrieval system, or transmitted, in any form or by any means, electronic, mechanical, photocopying, recording, or otherwise, without the prior written permission of International House of Pancakes, Inc.
Transcript of EQUIPMENT MANUAL - gciconnect.net Books/SOP Book-4 Equipment.pdf · IHOP Standard Operating...

STANDARD OPERATING PROCEDURESPublished by International House of Pancakes, Inc.
EQUIPMENTMANUAL
© 2002 International House of Pancakes, Inc. All rights reserved. No part of this publication may bedisclosed, reproduced, stored in a retrieval system, or transmitted, in any form or by any means,electronic, mechanical, photocopying, recording, or otherwise, without the prior written permission ofInternational House of Pancakes, Inc.
IHOP Standard Operating Procedures
EQUIPMENT MANUAL
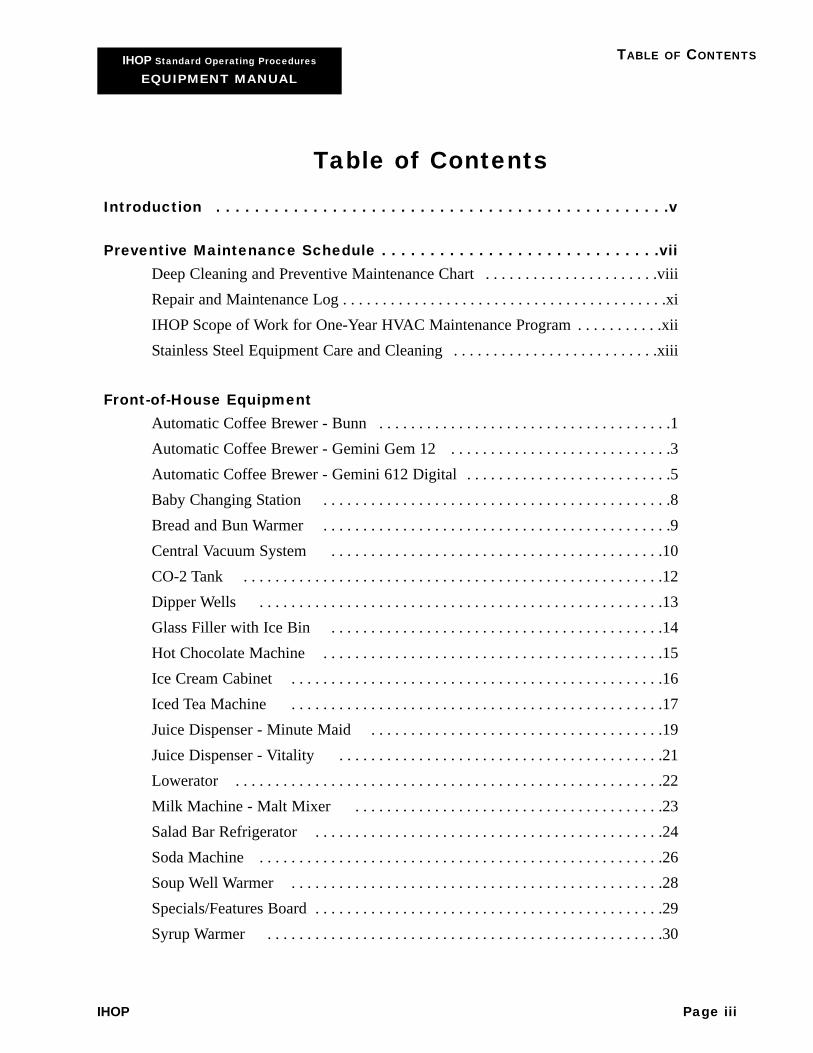
TABLE OF CONTENTS
Table of Contents
Introduction . . . . . . . . . . . . . . . . . . . . . . . . . . . . . . . . . . . . . . . . . . . . . . .v
Preventive Maintenance Schedule . . . . . . . . . . . . . . . . . . . . . . . . . . . . .viiDeep Cleaning and Preventive Maintenance Chart . . . . . . . . . . . . . . . . . . . . . .viiiRepair and Maintenance Log . . . . . . . . . . . . . . . . . . . . . . . . . . . . . . . . . . . . . . . . .xiIHOP Scope of Work for One-Year HVAC Maintenance Program . . . . . . . . . . .xiiStainless Steel Equipment Care and Cleaning . . . . . . . . . . . . . . . . . . . . . . . . . .xiii
Front-of-House EquipmentAutomatic Coffee Brewer - Bunn . . . . . . . . . . . . . . . . . . . . . . . . . . . . . . . . . . . . .1Automatic Coffee Brewer - Gemini Gem 12 . . . . . . . . . . . . . . . . . . . . . . . . . . . .3Automatic Coffee Brewer - Gemini 612 Digital . . . . . . . . . . . . . . . . . . . . . . . . . .5Baby Changing Station . . . . . . . . . . . . . . . . . . . . . . . . . . . . . . . . . . . . . . . . . . . .8Bread and Bun Warmer . . . . . . . . . . . . . . . . . . . . . . . . . . . . . . . . . . . . . . . . . . . .9Central Vacuum System . . . . . . . . . . . . . . . . . . . . . . . . . . . . . . . . . . . . . . . . . .10CO-2 Tank . . . . . . . . . . . . . . . . . . . . . . . . . . . . . . . . . . . . . . . . . . . . . . . . . . . . .12Dipper Wells . . . . . . . . . . . . . . . . . . . . . . . . . . . . . . . . . . . . . . . . . . . . . . . . . . .13Glass Filler with Ice Bin . . . . . . . . . . . . . . . . . . . . . . . . . . . . . . . . . . . . . . . . . .14Hot Chocolate Machine . . . . . . . . . . . . . . . . . . . . . . . . . . . . . . . . . . . . . . . . . . .15Ice Cream Cabinet . . . . . . . . . . . . . . . . . . . . . . . . . . . . . . . . . . . . . . . . . . . . . . .16Iced Tea Machine . . . . . . . . . . . . . . . . . . . . . . . . . . . . . . . . . . . . . . . . . . . . . . .17Juice Dispenser - Minute Maid . . . . . . . . . . . . . . . . . . . . . . . . . . . . . . . . . . . . .19Juice Dispenser - Vitality . . . . . . . . . . . . . . . . . . . . . . . . . . . . . . . . . . . . . . . . .21Lowerator . . . . . . . . . . . . . . . . . . . . . . . . . . . . . . . . . . . . . . . . . . . . . . . . . . . . . .22Milk Machine - Malt Mixer . . . . . . . . . . . . . . . . . . . . . . . . . . . . . . . . . . . . . . .23Salad Bar Refrigerator . . . . . . . . . . . . . . . . . . . . . . . . . . . . . . . . . . . . . . . . . . . .24Soda Machine . . . . . . . . . . . . . . . . . . . . . . . . . . . . . . . . . . . . . . . . . . . . . . . . . . .26Soup Well Warmer . . . . . . . . . . . . . . . . . . . . . . . . . . . . . . . . . . . . . . . . . . . . . . .28Specials/Features Board . . . . . . . . . . . . . . . . . . . . . . . . . . . . . . . . . . . . . . . . . . . .29Syrup Warmer . . . . . . . . . . . . . . . . . . . . . . . . . . . . . . . . . . . . . . . . . . . . . . . . . .30
IHOP Page iii

IHOP Standard Operating Procedures
EQUIPMENT MANUAL
TABLE OF CONTENTS
Page iv March, 2002
Back-of-House EquipmentAir Curtains and Strip Curtains . . . . . . . . . . . . . . . . . . . . . . . . . . . . . . . . . . . . .31Convection and Standard Ovens . . . . . . . . . . . . . . . . . . . . . . . . . . . . . . . . . . . . .32Deep Fryer - Manual Filtering . . . . . . . . . . . . . . . . . . . . . . . . . . . . . . . . . . . . . . .34Deep Fryer - Self-filtering . . . . . . . . . . . . . . . . . . . . . . . . . . . . . . . . . . . . . . . . .36Deep Fryer Timer . . . . . . . . . . . . . . . . . . . . . . . . . . . . . . . . . . . . . . . . . . . . . . . . .38Dishwasher . . . . . . . . . . . . . . . . . . . . . . . . . . . . . . . . . . . . . . . . . . . . . . . . . . . . . .40Egg Burners/Step-up Ranges . . . . . . . . . . . . . . . . . . . . . . . . . . . . . . . . . . . . . . . .43Grills - US Range . . . . . . . . . . . . . . . . . . . . . . . . . . . . . . . . . . . . . . . . . . . . . . . .44Grills - Vulcan . . . . . . . . . . . . . . . . . . . . . . . . . . . . . . . . . . . . . . . . . . . . . . . . . . .46Heat Lamps . . . . . . . . . . . . . . . . . . . . . . . . . . . . . . . . . . . . . . . . . . . . . . . . . . . .48Heat Lamps – Service/Cooks Line . . . . . . . . . . . . . . . . . . . . . . . . . . . . . . . . . . .49HVAC – Ventilation Systems . . . . . . . . . . . . . . . . . . . . . . . . . . . . . . . . . . . . . .50Ice Machine . . . . . . . . . . . . . . . . . . . . . . . . . . . . . . . . . . . . . . . . . . . . . . . . . . . .52Microwave Oven . . . . . . . . . . . . . . . . . . . . . . . . . . . . . . . . . . . . . . . . . . . . . . . . .54Mixer . . . . . . . . . . . . . . . . . . . . . . . . . . . . . . . . . . . . . . . . . . . . . . . . . . . . . . . . . .56Refrigerators . . . . . . . . . . . . . . . . . . . . . . . . . . . . . . . . . . . . . . . . . . . . . . . . . . . .58Remote Refrigeration Systems . . . . . . . . . . . . . . . . . . . . . . . . . . . . . . . . . . . . . .62Sandwich Station . . . . . . . . . . . . . . . . . . . . . . . . . . . . . . . . . . . . . . . . . . . . . . . .63Shelving and Dunage Racks . . . . . . . . . . . . . . . . . . . . . . . . . . . . . . . . . . . . . . . .65Slicer . . . . . . . . . . . . . . . . . . . . . . . . . . . . . . . . . . . . . . . . . . . . . . . . . . . . . . . . .66Steam Table . . . . . . . . . . . . . . . . . . . . . . . . . . . . . . . . . . . . . . . . . . . . . . . . . . . .69Toaster, Pop-up . . . . . . . . . . . . . . . . . . . . . . . . . . . . . . . . . . . . . . . . . . . . . . . . . .71Toaster, Rotary Conveyer . . . . . . . . . . . . . . . . . . . . . . . . . . . . . . . . . . . . . . . . .72Waffle Baker – CoBatCo . . . . . . . . . . . . . . . . . . . . . . . . . . . . . . . . . . . . . . . . . .74Waffle Baker – FS Carbon . . . . . . . . . . . . . . . . . . . . . . . . . . . . . . . . . . . . . . . .76Waffle Baker – NEMCO . . . . . . . . . . . . . . . . . . . . . . . . . . . . . . . . . . . . . . . . . . .77

IHOP Standard Operating Procedures
EQUIPMENT MANUAL
INTRODUCTION
IHOP Page v
Introduction International House of Pancakes, Inc. has updated the Equipment Manual to provide the most current anduseful information about using and maintaining your approved IHOP equipment. Use this information tokeep your equipment, which is a significant business investment, in top condition. That will help youreduce the cost of repair or replacement and business down-time.
This book contains the following information:
• A list of currently approved IHOP equipment: The equipment items have been dividedinto two categories: Front-of-House and Back-of-House. They appear in alphabetical order in theirrespective sections.
• Troubleshooting Tips: These explain how to quickly fix a problem before calling for expensiverepairs. This is general information only and is not intended to provide detailed repair instruction.
• Maintenance: Follow the general maintenance and cleaning information to help you extend thelife of your equipment. Because much of our equipment is constructed of stainless steel, we haveincluded a special section called “Stainless Steel Equipment Care and Cleaning,” which begins on p. xiii.
• Instructions for Use: This is manufacturer's information about the proper use of yourequipment. Some pages also contain SOP, OSHA regulations, and other safety information.
• Repair Information: This section provides space to record the telephone number of your serviceagency or technician to call when troubleshooting does not correct the problem or for additionalservice information.
• Repair and Maintenance Log: Copies of this form are included behind the “Repair andMaintenance Log” tab. Use the log to track the maintenance and repair history of your equipment.Make additional copies of the form as needed.
• Cleaning and Maintenance Charts: These charts provide IHOP-suggested deep cleaning andmaintenance schedules. They list most of the equipment referenced in this manual and includeadditional space to write in others that may be unique to your IHOP. Copy these charts and postthem in your restaurant for easy reference.

IHOP Standard Operating Procedures
EQUIPMENT MANUAL
INTRODUCTION
Page vi March, 2002
How to Use this BookStep 1: First locate the equipment name and page number in the Table of Contents under either the
Front-of-House or Back-of-House section. The equipment items are listed in alphabeticalorder under each section.
Step 2: Read the information about the product, which is organized as shown in the example below:
Equipment name
Manufacturer’s name
Manufacturer’s model number
Space for recording the service agency telephone number or other serviceinformation
Troubleshooting information appears first for easy reference. It containsmanufacturer's tips on identifying and correcting minor problems.
The maintenance information offers general cleaning and care instructions.
This section contains manufacturer's instructions on operating the equipment foroptimum performance. Additional information may appear on some equipment pagescovering SOP, OSHA, or safety information.
Manufacturer
Gemini
Model
Gem 12
Repair Information
AutomaticCoffee Brewer
Troubleshooting TipsIf coffee tastes strong:1. Check if water temperature is too high.2. Check if holding time is over 25 minutes.If coffee tastes weak:1. See if spray head is attached.2. Make sure new coffee is being used in brewing each pot.
MaintenanceClean the unit daily as follows:1. Wipe any spills, dust, or debris from the exterior surfaces.2. Slide out brewing cone to clean spray head and dome with a
TSP solution.
Instructions for Use1. To brew coffee, turn the Power and Warmer switches on.2. Place clean Satellite on warmer deck and pre-heat for 10
minutes before brewing coffee.

IHOP Standard Operating Procedures
EQUIPMENT MANUAL
PREVENTIVE MAINTENANCE
IHOP Page vii
Preventive Maintenance Schedule (PMS)Sidework is the general routine cleaning of your restaurant equipment completed each shift. Deep cleaningand preventive maintenance are more periodic equipment care procedures. Both are essential to keep yourequipment in good working condition.
The following pages contain charts to use as guidelines for when to carry out deep cleaning or preventivemaintenance (PM) measures on your equipment.
Warranty InformationManufacturer's tips on troubleshooting equipment are found on each equipment page and can be performedby Franchisees, Managers or qualified assistants.
Before attempting any repairs, however, check your warranty.
All equipment comes with the standard manufacturer's warranty. Warranty sheets should be stored in thisbinder.
IF YOUR EQUIPMENT IS STILL UNDER WARRANTY, OR IF YOU ARE UNSURE OF HOWTO INTERPRET THE INSTRUCTIONS, DO NOT ATTEMPT TO TROUBLESHOOT OR MAKEREPAIRS ON YOUR OWN, no matter how minor, without calling the manufacturer's servicedepartment. Many warranties will be voided if you perform these repairs yourself.

IHOP Standard Operating Procedures
EQUIPMENT MANUAL
PREVENTIVE MAINTENANCE
Page viii March, 2002
Deep Cleaning and Preventive Maintenance Chart*
Legend AM = Day ShiftPM = Evening or graveyard
shift
Coffee Brewersand Carafes
Deep Fryer
Dry Storage
Glass, Plants, andPictures
Grills
Hot Chocolate
HVAC, Hoods, andFilters
Ice Cream Cabinet
Iced Tea Dispenser
Mon Tues Wed Thurs Fri Sat Sun
PM
PM
PM
PM
PM
PM
PM
AM
AM
AM
*IHOP-suggested schedule
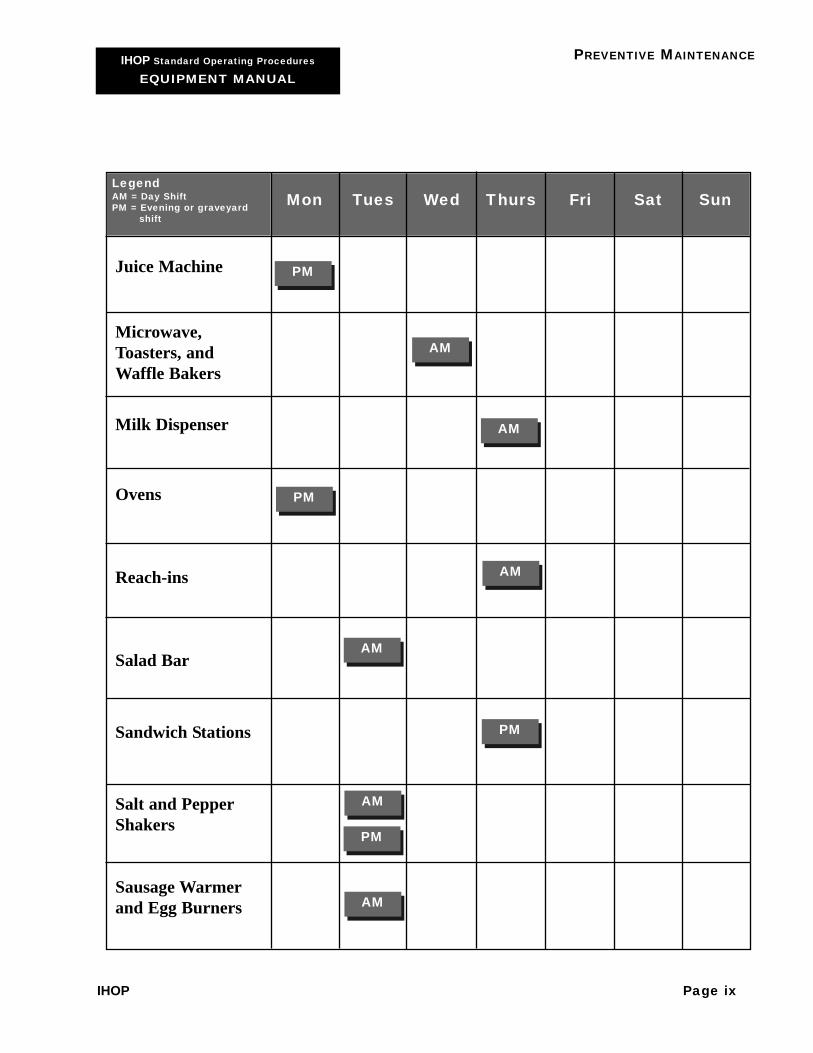
IHOP Standard Operating Procedures
EQUIPMENT MANUAL
PREVENTIVE MAINTENANCE
IHOP Page ix
Juice Machine
Microwave,Toasters, andWaffle Bakers
Milk Dispenser
Ovens
Reach-ins
Salad Bar
Sandwich Stations
Salt and PepperShakers
Sausage Warmerand Egg Burners
AM
AM
AM
PM
PM
PM
PM
AM
AM
AM
Legend AM = Day ShiftPM = Evening or graveyard
shift
Mon Tues Wed Thurs Fri SunSat

IHOP Standard Operating Procedures
EQUIPMENT MANUAL
PREVENTIVE MAINTENANCE
Page x March, 2002
AM
PM
PM
PM
PM
PM
Legend AM = Day ShiftPM = Evening or graveyard
shiftMon Tues Wed Thurs Fri Sat Sun
Soup Wells
Steam Table andHeat Lamps
Syrup Pitchersand Caddies
Walk-inRefrigerator
Walk-in Freezer

IHOP Standard Operating Procedures
EQUIPMENT MANUAL
REPAIR AND MAINTENANCE LOG
IHOP Page xi
Repair and Maintenance LogInstructions for UseIf a piece of equipment fails to perform after you have exercised your troubleshooting options, contact your servicingagency for repairs. Use this Repair and Maintenance (R&M) Log to document the history of repairs in your unit. Thelog will help you to make informed decisions about replacement and repair warranties. Copies of this form are in thisbinder under the “Repair and Maintenance Log” tab. Keep any work order slips there as well.
Equipment Date ofServiceContact
Service AgencyContact Person
CurrentProblem
ResolutionDate
Cost ofRepair
IHOP Standard Operating Procedures
EQUIPMENT MANUAL
IHOP SCOPE OF WORK FORHVAC MAINTENANCE PROGRAM
Page xii March, 2002
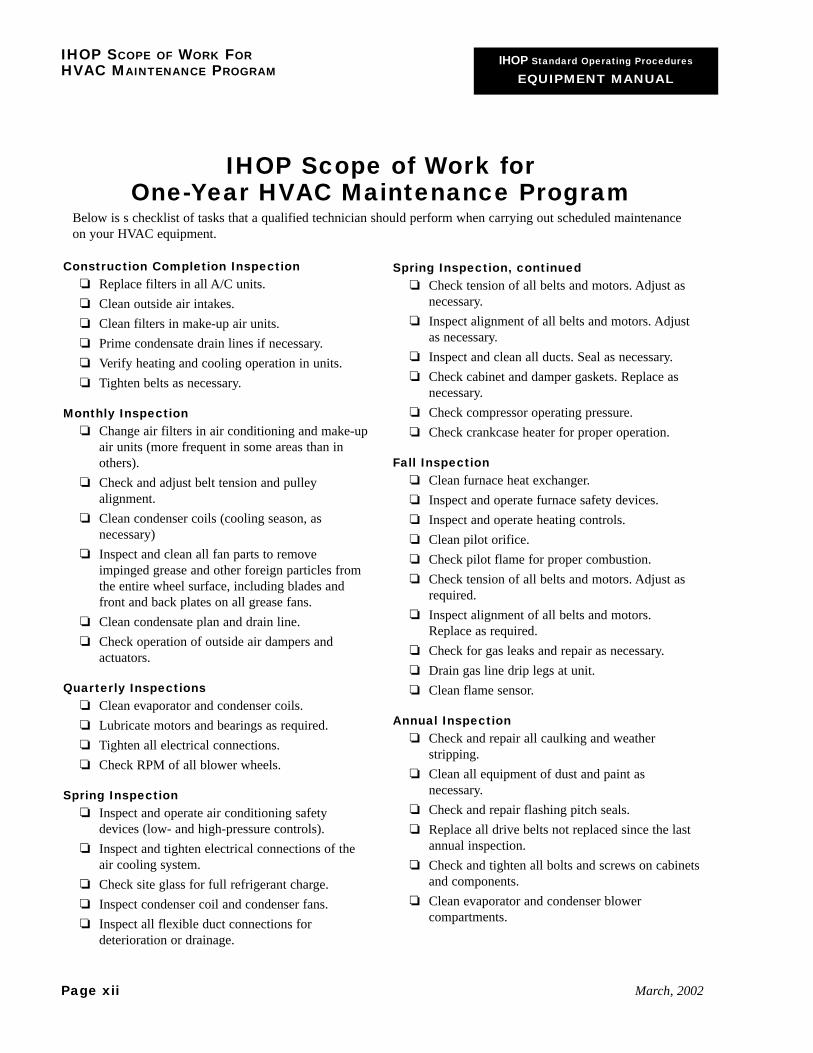
IHOP Scope of Work for One-Year HVAC Maintenance Program
Below is s checklist of tasks that a qualified technician should perform when carrying out scheduled maintenanceon your HVAC equipment.
Construction Completion InspectionReplace filters in all A/C units.Clean outside air intakes.Clean filters in make-up air units.Prime condensate drain lines if necessary.Verify heating and cooling operation in units.Tighten belts as necessary.
Monthly InspectionChange air filters in air conditioning and make-upair units (more frequent in some areas than inothers).Check and adjust belt tension and pulleyalignment.Clean condenser coils (cooling season, asnecessary)Inspect and clean all fan parts to removeimpinged grease and other foreign particles fromthe entire wheel surface, including blades andfront and back plates on all grease fans.Clean condensate plan and drain line.Check operation of outside air dampers andactuators.
Quarterly InspectionsClean evaporator and condenser coils.Lubricate motors and bearings as required.Tighten all electrical connections.Check RPM of all blower wheels.
Spring InspectionInspect and operate air conditioning safetydevices (low- and high-pressure controls).Inspect and tighten electrical connections of theair cooling system.Check site glass for full refrigerant charge.Inspect condenser coil and condenser fans.Inspect all flexible duct connections fordeterioration or drainage.
Spring Inspection, continuedCheck tension of all belts and motors. Adjust asnecessary.Inspect alignment of all belts and motors. Adjustas necessary.Inspect and clean all ducts. Seal as necessary.Check cabinet and damper gaskets. Replace asnecessary.Check compressor operating pressure.Check crankcase heater for proper operation.
Fall InspectionClean furnace heat exchanger.Inspect and operate furnace safety devices.Inspect and operate heating controls.Clean pilot orifice.Check pilot flame for proper combustion.Check tension of all belts and motors. Adjust asrequired.Inspect alignment of all belts and motors.Replace as required.Check for gas leaks and repair as necessary.Drain gas line drip legs at unit.Clean flame sensor.
Annual InspectionCheck and repair all caulking and weatherstripping.Clean all equipment of dust and paint asnecessary.Check and repair flashing pitch seals.Replace all drive belts not replaced since the lastannual inspection.Check and tighten all bolts and screws on cabinetsand components.Clean evaporator and condenser blowercompartments.

IHOP Standard Operating Procedures
EQUIPMENT MANUAL
STAINLESS STEEL EQUIPMENTCARE AND CLEANING
IHOP Page xiii
Stainless Steel Equipment Care and CleaningFollow these general guidelines when caring for all your stainless steel equipment.
General CautionsThree main elements commonly corrode stainless steel surfaces: mechanical abrasion, mineral depositsfrom water and food, and chlorides.
• Mechanical abrasions are scratches to the steel surface caused by steel pads, wire brushes, andscrapers.
• Hard water may leave deposits behind. If allowed to sit, these deposits will break down the toplayer and rust stainless steel. Other deposits from food preparation and service will similarly harmthe steel and must be removed in a timely fashion.
• Chlorides are in water, food, and table salt. They are also in potent concentrations in household andindustrial cleaners, so use cleaners without chlorides.
Cleaning TipsUse Proper ToolsWhen cleaning stainless steel products, use non-abrasive tools such as soft cloths and plastic scouringpads. These will not harm the steel's passive (top) layer. Stainless steel pads may also be used, althoughwhen doing so scrub only in the direction of the manufacturer's polishing marks.
Clean with the Polish LinesSome stainless steel comes with visible polishing lines or “grains.” When visible lines are present, alwaysscrub in the direction of the grains. When the grain cannot be seen, opt for a soft cloth or plastic scouringpad.
Use Alkaline, Alkaline-chlorinated, or Chloride-free CleanersMany traditional cleaners contain chlorides, which damage stainless steel. If you are unsure of a cleaner'schloride content, contact your cleaner supplier.
If your cleaner contains chloride, ask for alternative cleaning products. Also avoid cleaners containingquaternary salts, which cause pitting and rusting.
See examples of appropriate cleaners provided in the “Recommended Cleaners of Stainless Steel” table onthe following page.
Treat Your WaterIf possible, use soft water to reduce deposits. Filters can be installed to remove distasteful and corrosiveelements. If you are not sure of the proper water treatment, call a treatment specialist.
Keep Your Equipment CleanClean frequently to avoid buildup of hard, stubborn stains. If you boil water in your stainless steelequipment, remember that the single, most likely cause of damage is chlorides in the water. Heatingcleaners that contain chlorides has a similar effect upon the steel.

IHOP Standard Operating Procedures
EQUIPMENT MANUAL
STAINLESS STEEL
Page xiv March, 2002
Rinse, Rinse, RinseIf you use chlorinated cleaners, rinse thoroughly and wipe dry immediately. After wiping the equipmentdown, allow it to air dry, as oxygen helps maintain the stainless steel's passivity film.
NOTE: Never use hydrochloric acid (Muriatic acid) on stainless steel.Regularly polish stainless steel.
Recommended Cleaners for Stainless Steel
Job
Routine cleaning
Fingerprints and smears
Stubborn stains anddiscoloration
Grease and fatty acids,blood, burnt-on foods
Grease and oil
Restoration/passivation
Cleaning Agent
Soap, ammonia, detergent,Medallion
Arcxal 20, Lac-O-Nu, Ecoshine
Cameo, Talc, Suz, First Impression
Easy-Off, De-Grease It, Oven Aid
Any good commercial detergent
Benefit, Super Sheen
Comments
Apply with cloth or sponge.
Provides barrier film.
Rub in direction of polishlines.
Excellent removal on allfinishes.
Apply with sponge or cloth.
IHOP Standard Operating Procedures
EQUIPMENT MANUAL
FRONT-OF-HOUSE EQUIPMENT GUIDE
Automatic Coffee Brewer - Bunn
IHOP Page 1
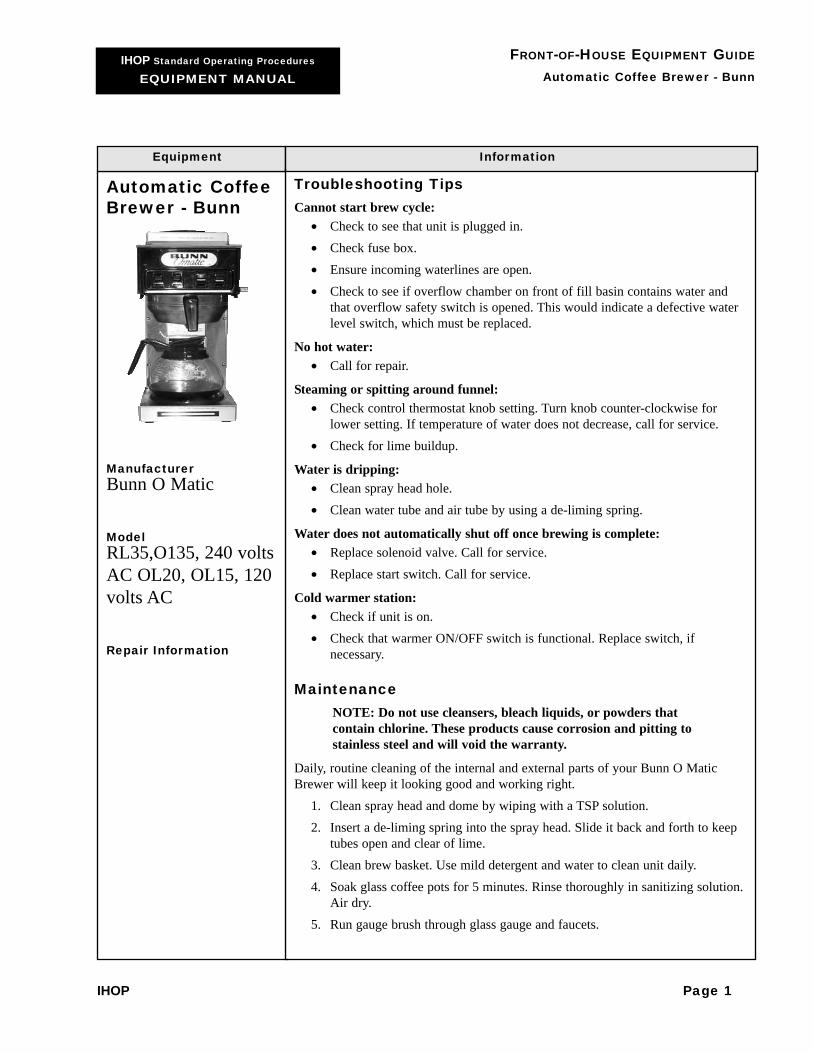
Automatic CoffeeBrewer - Bunn
ManufacturerBunn O Matic
ModelRL35,O135, 240 voltsAC OL20, OL15, 120volts AC
Repair Information
Equipment
Troubleshooting TipsCannot start brew cycle:
• Check to see that unit is plugged in. • Check fuse box.• Ensure incoming waterlines are open.• Check to see if overflow chamber on front of fill basin contains water and
that overflow safety switch is opened. This would indicate a defective waterlevel switch, which must be replaced.
No hot water:• Call for repair.
Steaming or spitting around funnel:• Check control thermostat knob setting. Turn knob counter-clockwise for
lower setting. If temperature of water does not decrease, call for service.• Check for lime buildup.
Water is dripping:• Clean spray head hole.• Clean water tube and air tube by using a de-liming spring.
Water does not automatically shut off once brewing is complete:• Replace solenoid valve. Call for service.• Replace start switch. Call for service.
Cold warmer station:• Check if unit is on. • Check that warmer ON/OFF switch is functional. Replace switch, if
necessary.
MaintenanceNOTE: Do not use cleansers, bleach liquids, or powders thatcontain chlorine. These products cause corrosion and pitting tostainless steel and will void the warranty.
Daily, routine cleaning of the internal and external parts of your Bunn O MaticBrewer will keep it looking good and working right.
1. Clean spray head and dome by wiping with a TSP solution. 2. Insert a de-liming spring into the spray head. Slide it back and forth to keep
tubes open and clear of lime.3. Clean brew basket. Use mild detergent and water to clean unit daily. 4. Soak glass coffee pots for 5 minutes. Rinse thoroughly in sanitizing solution.
Air dry.5. Run gauge brush through glass gauge and faucets.
Information

IHOP Standard Operating Procedures
EQUIPMENT MANUAL
FRONT-OF-HOUSE EQUIPMENT GUIDE
Automatic Coffee Brewer - Bunn
Page 2 March, 2002
Automatic CoffeeBrewer - Bunn,continued
6. Drain and rinse gauge and faucets using clear water several times.7. Flush satellites until water runs clear.8. Wipe with clean cloth.9. Clean warmer plate and wipe dry.
Brewing Instructions1. Place Bunn filter in the brew basket and add the proper portion of coffee.2. Level the bed of coffee and insert the brew basket into hood guides.3. Place an empty coffee pot on the center warmer.4. Turn the ON/OFF toggle switch to the ON position.5. Press the START switch.6. Promptly remove brew basket and wet grounds after brewing is complete.
Equipment Information

IHOP Standard Operating Procedures
EQUIPMENT MANUAL
FRONT-OF-HOUSE EQUIPMENT GUIDE
Automatic Coffee Brewer - Gemini Gem 12
IHOP Page 3
Automatic CoffeeBrewer - GeminiGem 12
ManufacturerCurtis
ModelGem 12
Repair Information
Troubleshooting TipsCoffee tastes too strong:
• Check if water temperature is too high.• Check if holding time is adhered to.• Check weight of the grounds in the portion pack.
Coffee tastes too weak:• Ensure that red spray head is attached.• Ensure that new coffee is being used to brew each pot.
Coffee does not remain hot after brewing:• See if hot plates are turned on and functioning.
MaintenanceNOTE: Do NOT use cleansers, bleach liquids, or powders thatcontain chlorine. These products cause corrosion and pitting tostainless steel and will void the warranty.
Daily, routine cleaning of the internal and external parts of your Gemini System willkeep it looking good and working properly.
1. Clean spray head and dome by wiping with a TSP solution. 2. Clean brew basket rails with a damp cloth or brush and TSP solution.3. Add ½ gallon of hot water to the satellite and add one package of urn
cleaning compound. Stir to dissolve.4. Let stand for 5 minutes. 5. Brush satellite liners and cover briskly.6. Run gauge brush through glass gauge and faucets. Drain and rinse several
times.7. Flush satellites until water runs clear. Wipe with clean cloth.8. Clean warmer plates and wipe dry.
NOTE: The inside of the heating tank should be de-limed at leastevery 6 months, especially in heavy lime areas. The de-limingprocess should be supervised by a manager. Wear gloves, mask, andapron. Avoid spills and contact with the skin. Work in a well-ventilated area.
Operating Instructions1. Press the ON/OFF and WARMER switches.2. Pre-heat clean satellite on warmer deck for 10 minutes before brewing coffee.3. Open one pre-ground packet of coffee. To protect flavor and freshness, open
packets only before brewing to limit the coffee’s exposure to air.
Equipment Information

IHOP Standard Operating Procedures
EQUIPMENT MANUAL
FRONT-OF-HOUSE EQUIPMENT GUIDE
Automatic Coffee Brewer - Gemini Gem 12
Page 4 March, 2002
Automatic CoffeeBrewer - GeminiGem 12,continued
Equipment
4. Place the correct portion of ground coffee into paper filter.5. Slide the brew basket into brew rails. 6. Press the brew switch to start brewing process.
CAUTIONPush brew switch only once or the coffee will overflow. Wait untilbrewing is completed before disposing of coffee grounds and filter toprevent severe burns.
7. After the brewing is completed, carefully remove the brew basket and disposeof used grounds.
8. Rinse and dry the brew basket.
Information
IHOP Standard Operating Procedures
EQUIPMENT MANUAL
FRONT-OF-HOUSE EQUIPMENT GUIDE
Automatic Coffee Brewer - Gemini 612 Digital
IHOP Page 5
Troubleshooting TipsNOTE: The red Ready-to Brew light displays Error Codes. If anerror code occurs, the unit will shut down all functions includingheating, water inlet and water delivery. Always confirm error code.
Water does not flow into heating tank:• Water supply is insufficient.• Water line is turned off.• Water filter is clogged.
Water heating tank is overflowing:• Heat probe is corroded. De-lime probe.• Terminal connections at control board or tank are non-grounded or loose.• Water inlet valve is defective.• Heating function may shut down due to water level error code.
Water in heating tank does not get hot:• Heater sensor is defective or loose.
Water not flowing from spray head:• Spray head is obstructed.• Water level is too low in heating tank.
Water in tank is overheating:• Temperature is set too high.• Heat sensor is loose.
MaintenanceRoutine cleaning of the internal and external parts of your Gemini System will keepit looking good and working right.
On-going Cleaning (Every Shift)1. Slide out the brew basket.2. Clean the rails with a damp cloth and a non-toxic cleaning solution.3. Thoroughly clean brew basket using a non-toxic cleaning solution.4. Rinse clean with hot water.5. Remove and clean the red spray head and dome using a non-toxic cleaning
solution.
Daily Cleaning of Coffee BrewerOnce a day, de-lime the brewer as follows:
1. Remove the brew basket and clean.2. Remove the spray head and clean it with a damp cloth. Be sure holes are
open and clear of mineral deposits.
Information
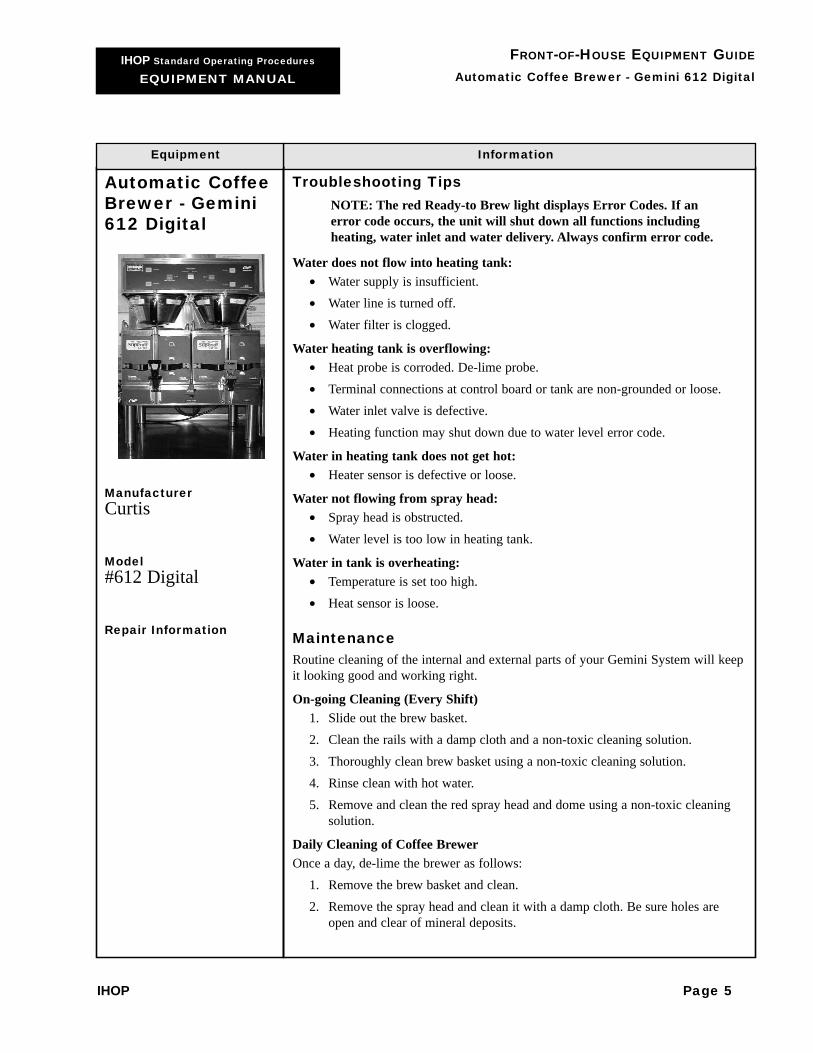
Automatic CoffeeBrewer - Gemini612 Digital
ManufacturerCurtis
Model#612 Digital
Repair Information
Equipment
IHOP Standard Operating Procedures
EQUIPMENT MANUAL
Front-of-House Equipment GuideAutomatic Coffee Brewer - Gemini 612 Digital
Page 6 March, 2002
Automatic CoffeeBrewer - Gemini612 Digital,continued
Equipment
3. Insert a de-liming spring all the way into the spray head opening until nomore than one inch of the spring is visible.
4. Slide the spring in and out 5 to 6 times. 5. Follow the same de-liming procedure for the air tube (located to the left of
the water tube). Wipe water tube area with damp towel to remove residue.6. Replace spray head and brew basket.
Daily Cleaning of Satellite Server1. Turn all switches to OFF. Wipe any spills, dust, or debris from exterior
surfaces.2. Add ½ gallon of hot water to the satellite. Empty one package of urn cleaner
into satellite and stir to dissolve.3. Let cleaning solution stand for 5 minutes. 4. Brush satellite liners and cover briskly. Run gauge brush through glass gauge
and faucets. Drain and rinse several times.5. Flush satellites and cover until water runs clear.6. Run gauge brush through the glass gauge and faucets. Drain and rinse several
times.7. Wipe exterior with a clean, damp cloth.
Brewing Instructions 1. Turn brewer on by pressing the yellow ON/OFF button and the red
WARMER switches.2. Place empty satellite on the warmer plate and pre-heat it for 10 minutes.3. Open one pre-ground packet of coffee. To protect flavor and freshness, open
packets only before brewing to limit the coffee’s exposure to air.4. Place one portion of ground coffee into a clean filter and place it in the brew
basket. 5. Slide the brew basket into the brew rails while holding the lock retainers in
the UP position.6. Lower the lock retainers to keep the brew basket from being removed during
the brewing process.7. Press the desired brew button, either SMALL for ½ gallon or LARGE for 1½
gallons. Brewing will begin immediately.
NOTE: If the recovery light is on, the brew light will blink andbrewing will begin when the correct temperature of 200°F isreached.
Information

IHOP Standard Operating Procedures
EQUIPMENT MANUAL
FRONT-OF-HOUSE EQUIPMENT GUIDE
Automatic Coffee Brewer - Gemini 612 Digital
IHOP Page 7
Automatic CoffeeBrewer - Gemini612 Digital,continued
8. Once coffee has completed brewing, carefully remove brew basket anddispose of used grounds immediately.
CAUTIONWait until brewing is completed before disposing of coffee groundsand filter to prevent severe burns.
9. Gemini systems feature a quality timer that sounds an alarm and causes thewarmer light to blink when the coffee should be replaced. To turn off thealarm, press the WARMER button. The quality timer is pre-set for 60 minutesto comply with IHOP standards.
Bypass Flow OperationThe bypass valve allows for brew temperature water to bypass the brew basket andenter the satellite. The bypass is on only for the LARGE (36-cup) brew button. TheGemini 612 unit is set to bypass 38% of the total water used in the large brew cycle.
Cleaning the Bypass Valve1. Insert the de-liming spring into the valve until two inches of the spring
remains visible.2. Saw back and forth 5 to 6 times. In hard water areas, clean it everyday.
NOTE: Reprogramming bypass flow adjustments is required everytime you make a bypass adjustment or change to a different sprayhead and should be performed by an authorized servicerepresentative.
3. Clean warmer plate and wipe dry.
NOTE: Do not use cleansers, bleach liquids, or powders that containchlorine. These products cause corrosion and pitting to stainlesssteel and will void the warranty.
NOTE: The inside of the heating tank should be de-limed at leastevery 6 months, especially in heavy lime areas. The de-limingprocess should be supervised by a manager. Wear gloves, mask, andapron. Avoid spills and contact with the skin. Work in a well-ventilated area.
Equipment Information

IHOP Standard Operating Procedures
EQUIPMENT MANUAL
FRONT-OF-HOUSE EQUIPMENT GUIDE
Baby Changing Station
Page 8 March, 2002
Baby ChangingStation
ManufacturerKoala
ModelKinder Craft DiaperChanging Table
Repair Information
TroubleshootingUnit will not close properly:
• Check spring mechanism for obstructions.
MaintenanceDaily
1. Using mild detergent, clean entire surface both inside and out. Thoroughlyrinse, sanitize, and allow to air dry.
2. Replace Koala sanitary liners as needed.
NOTE: One changing table should be installed in each rest room.
General InformationThis product has built-in, 10-gauge steel mounting supports that can withstand staticloads up to 350 pounds. Child protection straps can be ordered as replacements.Product conforms to ANSI A117.1 for handicapped accessibility and has State ofCalifornia OSHA R-0367 approval. It is made of FDA-approved, high-impactpolyethylene that resists fungal and bacterial growth. Koala sanitary liners are 3-ply, biodegradable, and are safe for septic and publicsewers.
Equipment Information

IHOP Standard Operating Procedures
EQUIPMENT MANUAL
FRONT-OF-HOUSE EQUIPMENT GUIDE
Bread and Bun Warmer
IHOP Page 9
Bread and BunWarmer
ManufacturerWells
Toastwell FoodServers
ModelWells: #MFG RWN-26
Toastwell FoodServers: #FF, STT,CFF, NMS, and GSeries
Repair Information
Troubleshooting TipsEach drawer has an individual thermostatic temperature, humidity control device,and a red light indicator when the desired temperature setting has been reached.
Unit does not heat:• Check that circuit breakers have not tripped.• Check that unit is plugged into outlet.• Check that control knobs are set at proper temperature.
Units gets too hot:• Check that control knobs are set at the proper level.• Check that nothing is obstructing the front vent that controls the humidity
level.
MaintenanceNOTE: Do not use cleansers, bleach liquids, or powders thatcontain chlorine. These products cause corrosion and pitting tostainless steel and will void the warranty.
Daily1. Remove bread products from drawers. Turn unit to the OFF position.2. Once unit has cooled, remove drawer inserts.3. Clean inserts using soapy water. Rinse and sanitize drawers.4. Dry each drawer thoroughly and replace.5. Wipe the outside surfaces with damp sanitizing towel.
Equipment Information

IHOP Standard Operating Procedures
EQUIPMENT MANUAL
FRONT-OF-HOUSE EQUIPMENT GUIDE
Central Vacuum System
Page 10 March, 2002
Central VacuumSystem
ManufacturerCustom CommercialVacuums
North AmericanCentral VacuumSystems
ModelCustom CommercialVacuums: Nutone#CV 353
Repair InformationIf you cannot troubleshoot theproblem yourself, contact yourlocal service representative.
Troubleshooting TipsNOTE: Do not use vacuum cleaner on back-of-house floors.Doing so will cause the grout in the floor tiles to deteriorate.
No power:• Check the circuit breaker at the electrical panel.• Ensure that the motor unit is plugged in.• Press the reset button (on the front of the motor unit).• Remove any debris clogging the inlet or hose.
Unit stays on after the hose is disconnected:• Lift the inlet cover and locate the small steel ball inside. If it does not move
freely, use your finger or a damp cloth and try to move the steel ball.
NOTE: Disconnect power to shut off unit and call for service if thesteel ball moves freely but the unit stays on, or if the steel ballcannot be moved.
Low suction:• Check the inlet to ensure that debris is not clogging the wall inlet or hose.• Remove any debris from the hoses, wand, and rug tool.• Empty dirt canister and clean built-in screen.• Make sure all other wall inlets are closed (if applicable).• Make sure that the lid is on the dirt canisters to prevent leakage.
MaintenanceEmpty the dirt canister before it is ¾ full by doing the following:
1. Supporting the bottom of the canister with one hand, unsnap first the leftlatch; then switch hands and unsnap the other latch.
2. Lower bottom section of the dirt canister carefully.3. Empty dirt. Place the bottom section back onto the unit and snap the latches
securely.4. Remove the lid of the top section of the dirt canister. Clean the built-in
screen with your hand or brush, if needed. Replace lid evenly to ensurethere are no vacuum leaks.
5. Never put a plastic bag in the dirt can. This will be sucked up and causeproblems.
Equipment Information

IHOP Standard Operating Procedures
EQUIPMENT MANUAL
FRONT-OF-HOUSE EQUIPMENT GUIDE
Central Vacuum System
IHOP Page 11
Central VacuumSystem,continued
Equipment Information
Instructions for Use
CAUTIONNever use the vacuum to pick up water or ice or to clean drains, asan electrical shock may result.
1. Take the rug tool, wands, hoses, interceptor canister, and hose on a cart (ifapplicable) to the dining room.
2. Set the interceptor canister or cart (if applicable) next to the wall inlet in thedining room.
3. Plug the 30 ft.-long hose into the slanted metal stem on the interceptorcanister.
NOTE: Do not place hoses or attachments where guests might trip orfall over them. Place the “Caution - Wet Floor” sign near the hose.
4. Lift the cover of the appropriate wall inlet and gently plug in the attached endof the short hose into the inlet. This will start the vacuum.
5. Gently unplug the hose when finished.
NOTE: NEVER pull on the hose to unplug the unit or let the inletcover slam shut. This will damage the unit.
6. Open the clamps of the interceptor canister and empty it into the trashcontainer.
7. Return all attachments to the storage area.
NOTE: Never leave the unit unattended when it is operating.

IHOP Standard Operating Procedures
EQUIPMENT MANUAL
FRONT-OF-HOUSE EQUIPMENT GUIDE
CO-2 Tank
Page 12 March, 2002
Equipment Information
CO-2 Tank
ManufacturerCoca-Cola Company
Model
Repair InformationCoca-Cola Company(800) 241-2653
Troubleshooting TipsSoda tastes flat or is less carbonated than it should be:
1. Check the gauge pressure on the high-pressure regulator.2. Check whether the CO-2 tank is too low or if the valve is open.
Using too much CO-2:1. Check for a leak in your CO-2 tank by first turning off the CO-2 supply. 2. Note the pressure reading on the 0 to 3000 PSI gauge. If the pressure settles
and remains constant, there are no leaks. Steadily dropping pressure indicatesa leak in the system.
Call Coca-Cola customer service center for the following:• You have a CO-2 leak.• You cannot adjust your CO-2 regulator.• You cannot read your gauges.
NOTE: A 20# CO-2 tank will service 5 boxes of syrup. A 50# CO-2tank will service 12 boxes of syrup.
Instructions for UseCO-2 is carbon dioxide under high pressure that is used to force syrup through thelines and to carbonate the water. A carbonator consisting of four basic parts − themotor, pump, switch, and mixing chamber − mixes the water and CO-2. Syrup linesare usually run under the ice storage bin in the counter and are cooled by the ice bincold plate. Each valve has a lever that activates a switch that begins the dispensingprocedure. CO-2 tanks measure 0−3000 PSI.
• Change your CO-2 tank when pressure is under 500 PSI to produce qualitysodas.
• The Low-Pressure Regulator controls the pressure of the CO-2 gas, whichmoves syrup from the syrup containers to the dispenser. The regulator ismounted near the syrup supply. The gauge setting should be set at 90 PSI.
• The High Pressure Regulator controls the amount of CO-2 gas used to makecarbonated water. The gauge setting should be set at 90 PSI.
NOTE: Chain all CO-2 tanks to a secure area.

IHOP Standard Operating Procedures
EQUIPMENT MANUAL
FRONT-OF-HOUSE EQUIPMENT GUIDE
Dipper Wells
IHOP Page 13
Equipment Information
Dipper Wells
ManufacturerKenco
Model#FW-510
Repair Information
Troubleshooting TipsCheck that the correct water temperature is being used at each dipper well. Thebutter bin well should be temperate (90º to 105ºF). The ice cream dipper wellmaintains cold water.
Dipper well does not drain:• Remove insert and clear obstruction.
Water dispenses too fast:• Turn knob to lower flow of water.• Check external water pressure and adjust.
MaintenanceNOTE: Do not turn knob too tightly, as this will strip the insidethreads and break the knob.
Daily Perform these tasks at the end of each shift or more often as needed.
1. Turn off water at knob. 2. Remove the insert pan. Clean and sanitize it in the dish machine or three-
compartment sink.3. Using a mild detergent and nylon bristle brush or cleaning cloth, clean the
inside of dipper well and the faucet. 4. Rinse thoroughly with hot water to maintain free-flowing drain.5. Replace dipper well insert and proper serving utensil. 6. Turn water back on per normal business practice.
Instructions for Use Dipper wells are required by health departments. They provide potable water and areused to hold scoops on the service line.

IHOP Standard Operating Procedures
EQUIPMENT MANUAL
FRONT-OF-HOUSE EQUIPMENT GUIDE
Glass Filler with Ice Bin
Page 14 March, 2002
Equipment Information
Glass Filler withIce Bin
ManufacturerDelfield
Model204
Repair Information
MaintenanceNOTE: Do not use cleansers, bleach liquids, or powders that containchlorine. These products cause corrosion and pitting to stainless steeland will void the warranty.
• Each shift, remove stainless steel lid and clean unit with a sanitized towel.• Each week, remove all ice from unit and clean using mild detergent. Rinse
well. Keep drains clean and free flowing.
Clean and sanitize ice bin and drip tray:1. Remove ice from bin.2. Clean cold plate using mild detergent and cool tap water using a nylon bristle
brush. DO NOT USE water hotter than 120ºF.3. Pour sanitizing solution into drip tray and bin drains. Follow with clear tap
water for final rinse.4. Allow unit to air dry and refill with ice.
NOTE: Only a trained and qualified service person should sanitizetank systems, pre-mix and post-mix. Call Coca-Cola for this service.
IHOP Standard Operating Procedures
EQUIPMENT MANUAL
FRONT-OF-HOUSE EQUIPMENT GUIDE
Hot Chocolate Machine
IHOP Page 15
Equipment Information
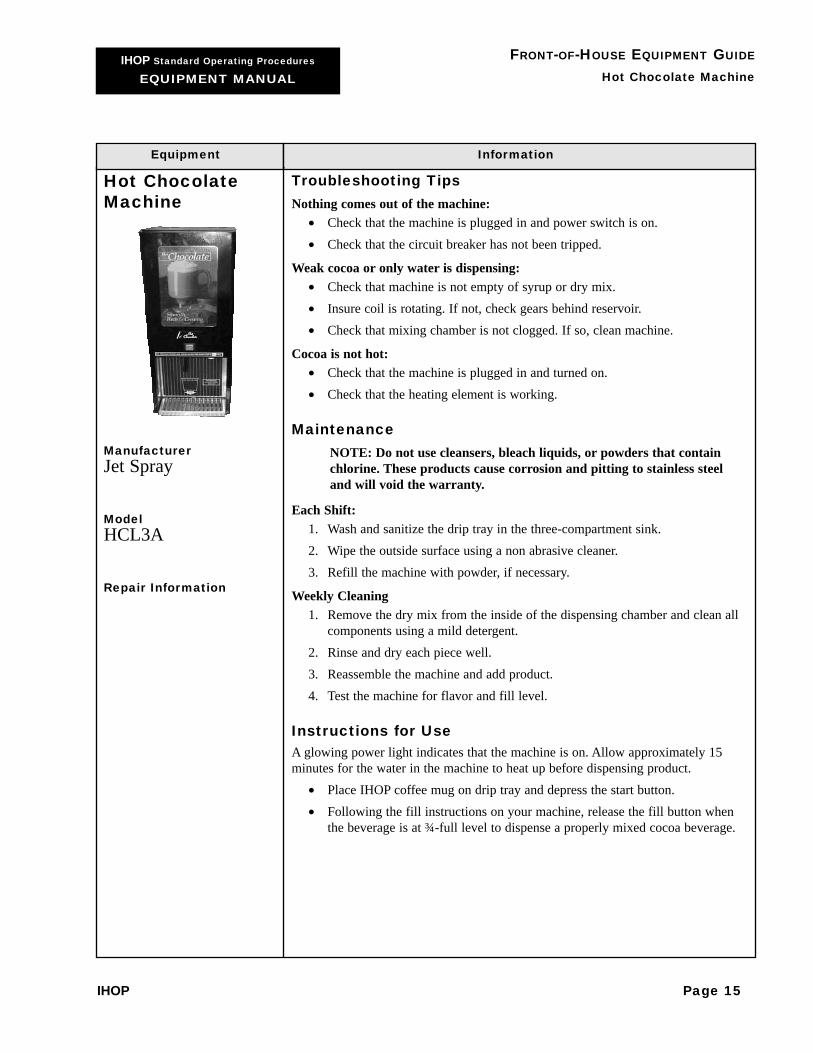
Hot ChocolateMachine
ManufacturerJet Spray
ModelHCL3A
Repair Information
Troubleshooting TipsNothing comes out of the machine:
• Check that the machine is plugged in and power switch is on. • Check that the circuit breaker has not been tripped.
Weak cocoa or only water is dispensing:• Check that machine is not empty of syrup or dry mix.• Insure coil is rotating. If not, check gears behind reservoir.• Check that mixing chamber is not clogged. If so, clean machine.
Cocoa is not hot:• Check that the machine is plugged in and turned on.• Check that the heating element is working.
MaintenanceNOTE: Do not use cleansers, bleach liquids, or powders that containchlorine. These products cause corrosion and pitting to stainless steeland will void the warranty.
Each Shift:1. Wash and sanitize the drip tray in the three-compartment sink. 2. Wipe the outside surface using a non abrasive cleaner. 3. Refill the machine with powder, if necessary.
Weekly Cleaning1. Remove the dry mix from the inside of the dispensing chamber and clean all
components using a mild detergent. 2. Rinse and dry each piece well. 3. Reassemble the machine and add product. 4. Test the machine for flavor and fill level.
Instructions for UseA glowing power light indicates that the machine is on. Allow approximately 15minutes for the water in the machine to heat up before dispensing product.
• Place IHOP coffee mug on drip tray and depress the start button. • Following the fill instructions on your machine, release the fill button when
the beverage is at ¾-full level to dispense a properly mixed cocoa beverage.

IHOP Standard Operating Procedures
EQUIPMENT MANUAL
FRONT-OF-HOUSE EQUIPMENT GUIDE
Ice Cream Cabinet
Page 16 March, 2002
Equipment Information
Ice CreamCabinet
ManufacturerDelfield
Model#225
Repair Information
Troubleshooting TipsIce cream is too soft or too hard:
Check temperature setting and adjust as necessary. Maintain cabinettemperature of 0º to 10ºF.
MaintenanceNOTE: Do not use cleansers, bleach liquids, or powders that containchlorine. These products cause corrosion and pitting to stainless steeland will void the warranty.
Daily1. Clean ice cream cabinet surface using warm soapy water. Rinse and dry
thoroughly.2. Clean gaskets and lid.3. Remove any spilled ice cream from inside cabinet.
Weekly (or more often as needed)1. Defrost ice cream cabinet completely.2. Remove ice cream containers from cabinet. Cover and place in walk-in
freezer.3. Turn the thermostat to the OFF position.4. Remove excess frost with a plastic scraper or by pouring hot water down the
sides.
NOTE: Be sure to use a plastic scraper to avoid damaging thecabinet liner finish.
5. Wash entire inside area using hot soapy water. Rinse thoroughly. Cabinet isnot equipped with a drain, so soak up any excess water. Thoroughly dry thecabinet liner with towels.
6. Turn the thermostat to the ON position.7. Once the temperature reaches 0º to 10ºF, place ice cream containers back into
the cabinet.
Instructions for UseBe sure to maintain a cabinet temperature of 0º to 10ºF.
IHOP Standard Operating Procedures
EQUIPMENT MANUAL
FRONT-OF-HOUSE EQUIPMENT GUIDE
Iced Tea Machine
IHOP Page 17
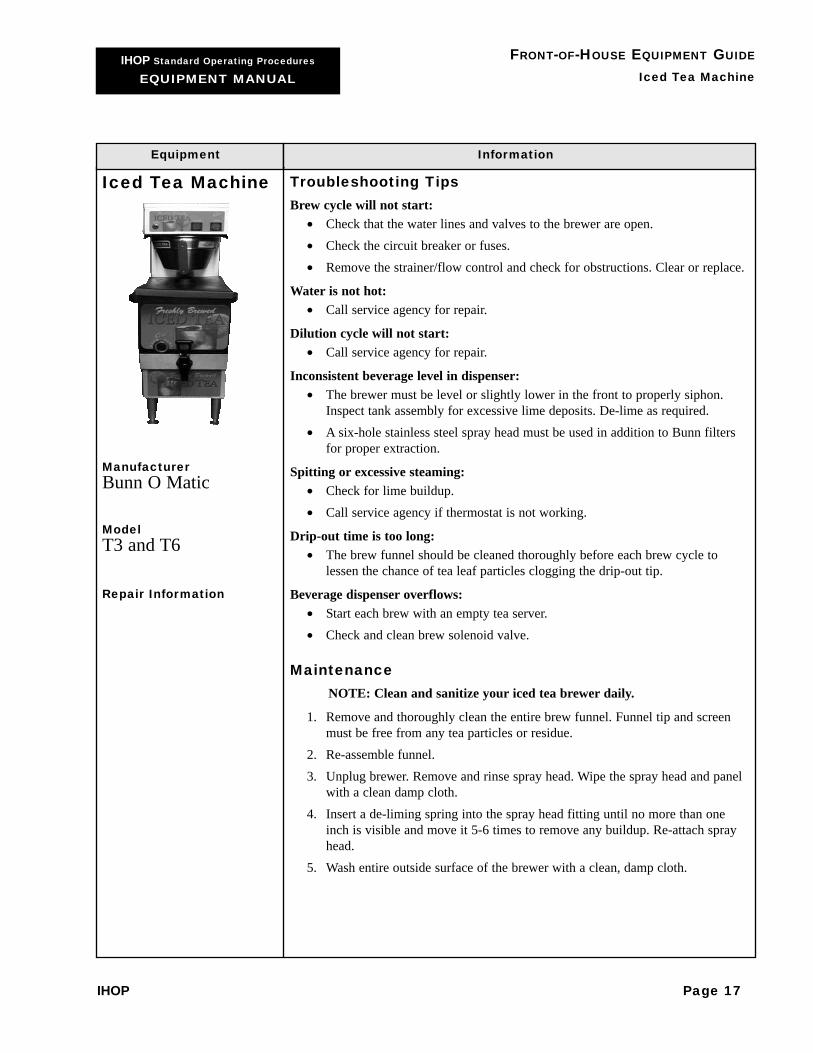
Equipment Information
Iced Tea Machine
ManufacturerBunn O Matic
ModelT3 and T6
Repair Information
Troubleshooting TipsBrew cycle will not start:
• Check that the water lines and valves to the brewer are open.• Check the circuit breaker or fuses.• Remove the strainer/flow control and check for obstructions. Clear or replace.
Water is not hot:• Call service agency for repair.
Dilution cycle will not start:• Call service agency for repair.
Inconsistent beverage level in dispenser:• The brewer must be level or slightly lower in the front to properly siphon.
Inspect tank assembly for excessive lime deposits. De-lime as required.• A six-hole stainless steel spray head must be used in addition to Bunn filters
for proper extraction.
Spitting or excessive steaming:• Check for lime buildup.• Call service agency if thermostat is not working.
Drip-out time is too long:• The brew funnel should be cleaned thoroughly before each brew cycle to
lessen the chance of tea leaf particles clogging the drip-out tip.
Beverage dispenser overflows:• Start each brew with an empty tea server.• Check and clean brew solenoid valve.
MaintenanceNOTE: Clean and sanitize your iced tea brewer daily.
1. Remove and thoroughly clean the entire brew funnel. Funnel tip and screenmust be free from any tea particles or residue.
2. Re-assemble funnel.3. Unplug brewer. Remove and rinse spray head. Wipe the spray head and panel
with a clean damp cloth.4. Insert a de-liming spring into the spray head fitting until no more than one
inch is visible and move it 5-6 times to remove any buildup. Re-attach sprayhead.
5. Wash entire outside surface of the brewer with a clean, damp cloth.
IHOP Standard Operating Procedures
EQUIPMENT MANUAL
FRONT-OF-HOUSE EQUIPMENT GUIDE
Iced Tea Machine
Page 18
Equipment Information
Iced TeaMachine,continued
Instructions for UseBegin each brew with a clean empty brew funnel and server.
1. Insert a Bunn filter into the funnel.2. Pour and level one packet of tea leaves, or place one package of bagged tea
leaves into the filter.3. Slide the funnel into the rails until it stops.4. Place the ON/OFF switch in the ON position.5. Depress the start switch.6. Wait 10 minutes before removing the brew basket and discarding the tea
leaves.7. Turn the unit to the OFF position to avoid a false start.
General Product InformationThis equipment must be installed to comply with the Basic Plumbing Code of theBuilding Officials and Code Administrators International, Inc. and the FDA.
• Use extreme caution when removing a hot funnel.• Wait 10 minutes following brew start to removing the funnel.• Check for proper flow in funnel and screen.• The brewer is energized unless unplugged. Keep away from combustibles.

IHOP Standard Operating Procedures
EQUIPMENT MANUAL
FRONT-OF-HOUSE EQUIPMENT GUIDE
Juice Dispenser - Minute Maid
IHOP Page 19
Equipment Information
Juice Dispenser -Minute Maid
ManufacturerMinute Maid
Model (IHOP custom items)Pour-overSealed
Repair InformationFor all repairinformation contactCoca-Cola/MinuteMaid at(800) 241-2653
Troubleshooting TipsWeak drink:
• Check for swollen or pinched O-rings.• Check for water leaking into concentrate.• Check for vent holes covered from package seal.
Water only, no concentrate:• Check if out of product.• Valve may not be properly installed.• Check if the concentrate is still frozen.
All concentrate, no water:• Check to see if the inlet water valve is turned OFF.
Water leaks at spout connection:• Check to see if an O-ring is missing.• Check to see if the nut is missing from the spout.
Drink will not shut off:• Check to see if the spring is missing or if the paddle is loose or broken.
Glass is not filling to proper level:• Check and reset portion control settings.
No power:• Check that the machine is on and circuit breakers have not tripped.
Concentrate low-level indicator is beeping, but concentrate is full:• If the concentrate is not seated properly, adjust container.• If the sensor tank or compartment is dirty and not making contact, clean unit.• If using Minute Pak, low-level indicators must be disabled. Contact servicing
agency.Call your service agency for other troubleshooting or repairs.
MaintenanceNOTE: Do not use cleansers, bleach liquids, or powders that containchlorine. These products cause corrosion and pitting to stainless steeland will void the warranty.
Daily1. Flush each valve of dispenser until clear water flows from the nozzle.2. Remove and wash the drip tray and cup rest in the three-compartment sink.3. Wipe down the inside and outside of the dispenser to remove any sticky
residue.

IHOP Standard Operating Procedures
EQUIPMENT MANUAL
FRONT-OF-HOUSE EQUIPMENT GUIDE
Juice Dispenser - Minute Maid
Page 20 March, 2002
Equipment Information
Juice Dispenser -Minute Maid,continued
Weekly1. Flush each valve of the dispenser until clear water flows from each nozzle.2. Turn off the water supply to the dispenser. (This step is very important on
models with dispensing gun assemblies.)3. Remove lid and wash thoroughly.4. Lift up check valve (yellow or white elbow) to remove it from the concentrate
container.5. Remove the concentrate container (Minute Pack™ or Minute Pouch™) from
the dispenser.6. If using pour-over product, remove concentrate from the container and
refrigerate. Clean and sanitize concentrate tanks.7. Run water through valves, ensuring all traces of cleaning solution have been
removed.8. Replace the check valve (white or yellow elbow) in concentrate tanks.9. Wipe the dispenser with a clean, damp cloth.10. Replace the paddles, nozzles, drip tray, and cup rest.11. Turn on water supply to the unit.12. Replace each concentrate container.13. Reconnect check valves. Re-install lid.14. Prime dispenser by holding the cup under the spout and depressing the
paddle. An initial 8 to 10 oz. of water will dispense before concentrate reachesthe spout.
Instructions for UseFollow these Portion Control Programming instructions (portion dispensers only):
1. If frozen, thaw Minute Maid juice under proper temperature of 33° to 39.9°F. 2. Turn key to ON position.3. Place 10-oz. glass under dispensing nozzle. Depress and hold the SMALL
size switch until the glass is filled to the proper level (½″ from rim). Releasethe switch. Repeat this procedure for the large 20-oz. glass size.
4. When all cup sizes have been set, press and release the POUR/CANCELswitch. The beeper or red blinking light will stop, indicating the system is indispensing mode.
Repeat this procedure for all remaining valves.

IHOP Standard Operating Procedures
EQUIPMENT MANUAL
FRONT-OF-HOUSE EQUIPMENT GUIDE
Juice Dispenser - Vitality
IHOP Page 21
Equipment Information
Juice Dispenser -Vitality
ManufacturerVitality
Model
Repair Information
Troubleshooting TipsAll mechanical maintenance and routine preventative maintenance for Vitalitydispensers is provided by a Vitality-trained service technician. Call if your dispenseris not producing quality product.
MaintenanceNOTE: Do not use cleansers, bleach liquids, or powders that containchlorine. These products cause corrosion and pitting to stainless steeland will void the warranty.
Daily1. Wipe down the exterior of the dispenser with a clean, sanitized towel.2. Remove and clean the drip tray using warm water.
Every Other Day1. Empty the contents of the concentrate tanks into separate, sanitized
containers.2. Wash the concentrate tanks, fill ¼ full with hot tap water, and place tanks
back into the dispenser well. Reconnect the dip tubes to the concentrate tanks.3. Press the DISPENSE button on the front of the system. With a large container
beneath each spigot, flush hot water through the concentrate tubing.4. Using a small brush, clean the spigot fittings and continue to flush with hot
water.5. Remove the concentrate tanks and replace any remaining hot water with
Vitality concentrate.6. Clean the concentrate well area with a warm, damp cloth. Hot water may be
needed to remove dried concentrate.7. Place full concentrate tanks into the dispenser and reconnect the dip tubes.8. Press the DISPENSE button for four (4) seconds or until juice flows from the
dispensing nozzles.
Instructions for Use1. If frozen, thaw Vitality juice under proper refrigeration 33º to 39.9ºF.2. Open carton and pour contents into dispensing tank. Do not mix old and new
concentrate. Always clean the machine before adding new product.

IHOP Standard Operating Procedures
EQUIPMENT MANUAL
FRONT-OF-HOUSE EQUIPMENT GUIDE
Lowerator
Page 22 March, 2002
Equipment Information
Lowerator
ManufacturerWyott
Model # SL 8
Repair Information
Troubleshooting TipsLowerator will not move:
1. Check that unit is not obstructed by debris.2. Check that dispensing mechanism springs are attached to the sliding bar.3. Check for rust or gummy buildup. Clean sliding bars.
MaintenanceNOTE: Do not use cleansers, bleach liquids, or powders that containchlorine. These products cause corrosion and pitting to stainless steeland will void the warranty.
DailyClean area using soapy water. Rinse and dry well.
Weekly1. Remove bowls from dispensing unit. Lift sliding bar out of hole. 2. Clean any debris from inside lowerator. Replace sliding bar in cutout. 3. Replace bowls inside lowerator. Unit should move freely up and down.

IHOP Standard Operating Procedures
EQUIPMENT MANUAL
FRONT-OF-HOUSE EQUIPMENT GUIDE
Milk Machine - Malt Mixer
IHOP Page 23
Equipment Information
Milk Machine -Malt Mixer
ManufacturerSilver King
Model # SK6MAJ#SK1
Repair Information
Troubleshooting TipsTemperature indicator not reading correctly:
• Re-calibrate the machine. Instructions are located on the inside of the door.• Check that the circuit breaker has not tripped.• Check that the temperature knob is in the ON position.
Inconsistent temperatures:• Insure the temperature knob is set at #4. This is the tested temperature
setting as suggested by the manufacturer.
Milk continues to drip from valve:• Check pinch point of the dispensing valve.
MaintenanceNOTE: Do not use cleansers, bleach liquids, or powders thatcontain chlorine. These products cause corrosion and pitting tostainless steel and will void the warranty.
1. Remove the milk from the machine to thoroughly clean the inside. Do thisby pinching the milk valve and turning the milk dispenser upside down withthe valve pointing toward the top. Refrigerate the product while cleaningthe machine.
3. Clean the outside of machine daily with warm soapy water. Rinsethoroughly.
4. Clean gaskets on inside of milk machine using a damp cloth.5. Clean pinch point and dispenser arm to remove dried milk.6. Replace milk inside machine. Insert pinch point dispenser arm.7. Test product to assure free flow of milk.
Instructions for Use1. Start with a clean machine.2. Open door and remove pinch point dispenser arm.3. Place milk inside machine.4. Replace dispenser arm. Make sure tubing is straight.5. Using a sharp knife, cut dispensing tube at an angle approximately 2″ long.6. Remove plastic cover from tube.

IHOP Standard Operating Procedures
EQUIPMENT MANUAL
FRONT-OF-HOUSE EQUIPMENT GUIDE
Salad Bar Refrigerator
Page 24 March, 2002
Equipment Information
Salad BarRefrigerator
ManufacturerTrue (G and D Buildings)
Victory (D Building)
ModelTrue:# TSSU-48-18M
Victory:#PT50IHOP or#PT64SIHOP
Repair Information
Troubleshooting TipsNOTE: Proper leveling of your salad bar refrigerator is critical toits operating success.This should be performed by a qualifiedperson.
Product is freezing:• Control setting is set too high. Reset control.• Air circulation is inadequate. Adjust par stock levels to allow fan to blow.
Product is not cold enough:• Control setting is set too low. Reset control.• Air circulation is inadequate. Re-arrange product away from fan to improve
air circulation.Noisy condensing unit:
• Check for loose parts or mounting.• Check for bent fan blade.• Check that the fan motor bearings are not worn.
Condensing unit continually cycles:• Check for refrigerant leak.• Clean control contacts or call for repair if control needs to be replaced.• Check for air restriction. Re-arrange product.
Condensing unit cycles are too short (call for service):• Voltage to unit is too low (or unbalanced if 3-phase).• Overload protector is defective.• Check for air restriction. Re-arrange product.
Unit fails to start when plugged in:• Check circuit breaker. Call for service if resetting the breaker has no effect.
MaintenanceNOTE: Do not use cleansers, bleach liquids, or powders thatcontain chlorine. These products cause corrosion and pitting tostainless steel and will void the warranty.
Daily1. Wipe spills immediately.2. Remove contents from inside reach-in. Wash interior surfaces (include
shelves) using mild detergent. Rinse and sanitize unit. Dry thoroughly. 3. Remove lid and clean entire surface.4. Remove food pans to walk-in refrigerator. Wash and dry divider bars.
Replace bars and food pans. For non-24-hour units, food should not be heldin food pans on salad table when unit is closed.

IHOP Standard Operating Procedures
EQUIPMENT MANUAL
FRONT-OF-HOUSE EQUIPMENT GUIDE
Salad Bar Refrigerator
IHOP Page 25
Equipment Information
Salad BarRefrigerator,continued
Weekly1. Remove food to the walk-in refrigerator.2. Disconnect power by switching circuit breaker off or unplugging unit from
wall.3. Open doors and allow warm air to enter cabinet.4. Remove all accessories (shelves, racks, etc.) and scrub each piece with a
detergent solution and a nylon-bristled brush.5. Rinse with clear water.6. Soak in a sanitizing solution for recommended time.7. Remove and air dry.8. Scrub all interior surfaces. Rinse and allow to air dry.9. Clean fan and guard. Dry thoroughly.10. Return accessories to inside unit.11. Restore power to unit.12. When temperature reaches safety zones of 33º to 39.9ºF, return food pans to
cabinet and close doors and lid.
Every Three MonthsDuring weekly cleaning, add the following maintenance tasks:
1. Use a vacuum cleaner with the proper brush attachments to clean thecondenser, compressor motor, and related parts.
2. In extreme cases, dust and grease may build up, and the condenser fins mayrequire blowing out with compressed air. This procedure requires a trainedservice representative.

IHOP Standard Operating Procedures
EQUIPMENT MANUAL
FRONT-OF-HOUSE EQUIPMENT GUIDE
Soda Machine
Page 26 March, 2002
Equipment Information
Soda Machine
ManufacturerCornelius
ModelPost-Mix DrinkDispenser #1522
Repair Information
Troubleshooting TipsBeverage is not dispensing:
• Ensure that the key is turned to ON.• Ensure that the unit plugged in.• Check if a fuse has blown or circuit breaker has tripped.
Unit is dispensing only plain water:• Check the CO-2 cylinder.• Check if the syrup box is empty.
Unit is dispensing only syrup:• Check to see that the carbonator is working.• Check if CO-2 pressure is set too high.• Check that the water is turned on.
Too much foam is produced when beverage is dispensed:• The first drink dispensed after a period of disuse may contain excessive foam. • Check that the drink temperature is 33º to 39.9ºF.• Check pressure on carbonator.
MaintenanceTower
1. Remove the cup rest from the drip tray.2. Wash the drip tray with warm soapy water. Rinse the drip tray, allowing water
to run down the drain hose.3. Wipe entire exterior of the tower with a damp cloth. Dry the tower with a
clean cloth.
Dispensing Valves, Post-mix1. Remove the valve cover and wash in plain water.2. Remove the nozzle and the syrup diffuser and wash the parts in plain water.
Dispensing Valves, Pre-mix1. Pour clean water over the valve to rinse sticky residue away.2. Using a small round brush, clean valve spout with water.3. Dry valve with a clean dry cloth.
Ice Bin and Drip Tray1. Remove ice from bin.2. Clean cold plate using mild detergent and cool tap water using a nylon bristle
brush. DO NOT USE water hotter than 120ºF.

IHOP Standard Operating Procedures
EQUIPMENT MANUAL
FRONT-OF-HOUSE EQUIPMENT GUIDE
Soda Machine
IHOP Page 27
Equipment Information
Soda Machine,continued
3. Pour sanitizing solution into drip tray and bin drains. Follow with clear tapwater for final rinse.
4. Allow unit to air dry and refill with ice.
NOTE: Only a trained and qualified service person should sanitizetank systems, Pre-mix and Post-mix. Call Coca-Cola for thisservice.
Maintenance Schedule
*Performed by qualified service person.
Clean exterior surfaces
Clean dispensing valves, post -mix
Clean dispensing valves, pre-mix
Clean and sanitize ice bin
Sanitize tank systems, post-mix and pre-mix
Sanitize syrup lines, B-1B systems
Sanitize bin drain and drip tray drain
x
x
x
x
x*
x*
x
Task Daily Weekly Monthly Quarterly

IHOP Standard Operating Procedures
EQUIPMENT MANUAL
FRONT-OF-HOUSE EQUIPMENT GUIDE
Soup Well Warmer
Page 28 March, 2002
Equipment Information
Soup WellWarmer
ManufacturerWells
Model#SS10ULTD
Repair Information
Troubleshooting TipsThe soup warmer is heated by a tubular element and controlled by a thermostatwith a positive OFF and a red signal light to indicate that power is on. The soupwarmer is designed to be mounted in a stainless steel counter.
Water won’t stay in warmer well:• Check that the drain handle is not obstructed and the handle turns freely.
Warmer does not heat:• Check that the circuit breakers have not tripped.• Check that the red indicator light is on (indication of burned-out thermostat).
Water gets too hot:• Check that the thermostat knob is set at proper level.
NOTE: Do not attempt to repair this unit. A qualified technicianmust perform all repair work.
MaintenanceCarry out maintenance when the unit is OFF and drained of water. Allow the unit tocool before cleaning.
NOTE: Do not use cleansers, bleach liquids, or powders thatcontain chlorine. These products cause corrosion and pitting tostainless steel and will void the warranty.
Daily1. Clean inside of warmer well and surrounding stainless steel with a mild
detergent and clean cloth.2. Rinse and dry well and surrounding stainless.
Weekly (or more often as needed)1. Using protective equipment, scrub internal warmer well using a nylon bristle
brush and cleaning solution.2. Thoroughly rinse and dry well warmer and surrounding stainless. 3. Remove lime buildup from unit only as needed.
NOTE: The de-liming process should be supervised by a manager.Wear gloves, mask, and apron. Avoid spills and contact with theskin. Work in a well-ventilated area.
Instructions for UseTo conserve energy, use hot water to set up the warmer.
• Pre-heat warmers before placing food in them.• Food products must be brought to an internal temperature of 165ºF and
heated for 15 seconds before placing in the pre-heated warmer.• Always keep the warmer wells covered during the pre-heat and food-holding
times.
IHOP Standard Operating Procedures
EQUIPMENT MANUAL
FRONT-OF-HOUSE EQUIPMENT GUIDE
Specials/Features Board
IHOP Page 29
Equipment Information
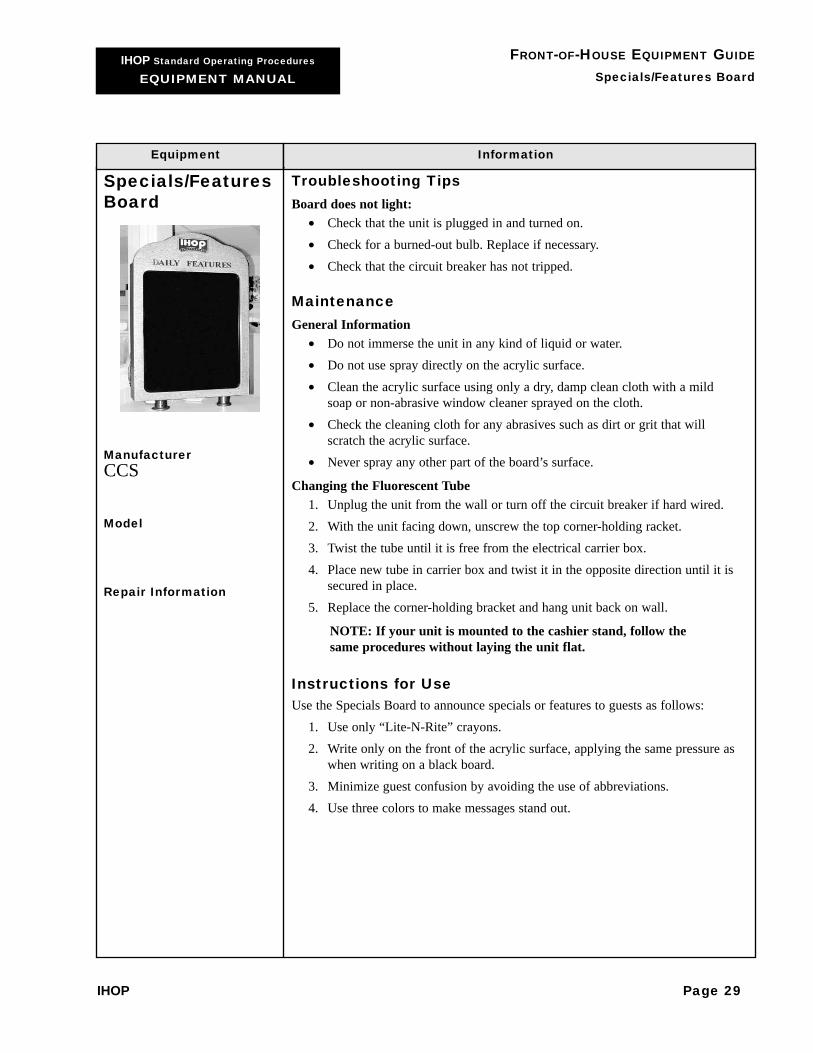
Specials/FeaturesBoard
ManufacturerCCS
Model
Repair Information
Troubleshooting TipsBoard does not light:
• Check that the unit is plugged in and turned on.• Check for a burned-out bulb. Replace if necessary.• Check that the circuit breaker has not tripped.
MaintenanceGeneral Information
• Do not immerse the unit in any kind of liquid or water.• Do not use spray directly on the acrylic surface. • Clean the acrylic surface using only a dry, damp clean cloth with a mild
soap or non-abrasive window cleaner sprayed on the cloth.• Check the cleaning cloth for any abrasives such as dirt or grit that will
scratch the acrylic surface.• Never spray any other part of the board’s surface.
Changing the Fluorescent Tube1. Unplug the unit from the wall or turn off the circuit breaker if hard wired.2. With the unit facing down, unscrew the top corner-holding racket.3. Twist the tube until it is free from the electrical carrier box.4. Place new tube in carrier box and twist it in the opposite direction until it is
secured in place. 5. Replace the corner-holding bracket and hang unit back on wall.
NOTE: If your unit is mounted to the cashier stand, follow thesame procedures without laying the unit flat.
Instructions for UseUse the Specials Board to announce specials or features to guests as follows:
1. Use only “Lite-N-Rite” crayons.2. Write only on the front of the acrylic surface, applying the same pressure as
when writing on a black board.3. Minimize guest confusion by avoiding the use of abbreviations.4. Use three colors to make messages stand out.
IHOP Standard Operating Procedures
EQUIPMENT MANUAL
FRONT-OF-HOUSE EQUIPMENT GUIDE
Syrup Warmer
Page 30 March, 2002
Equipment Information
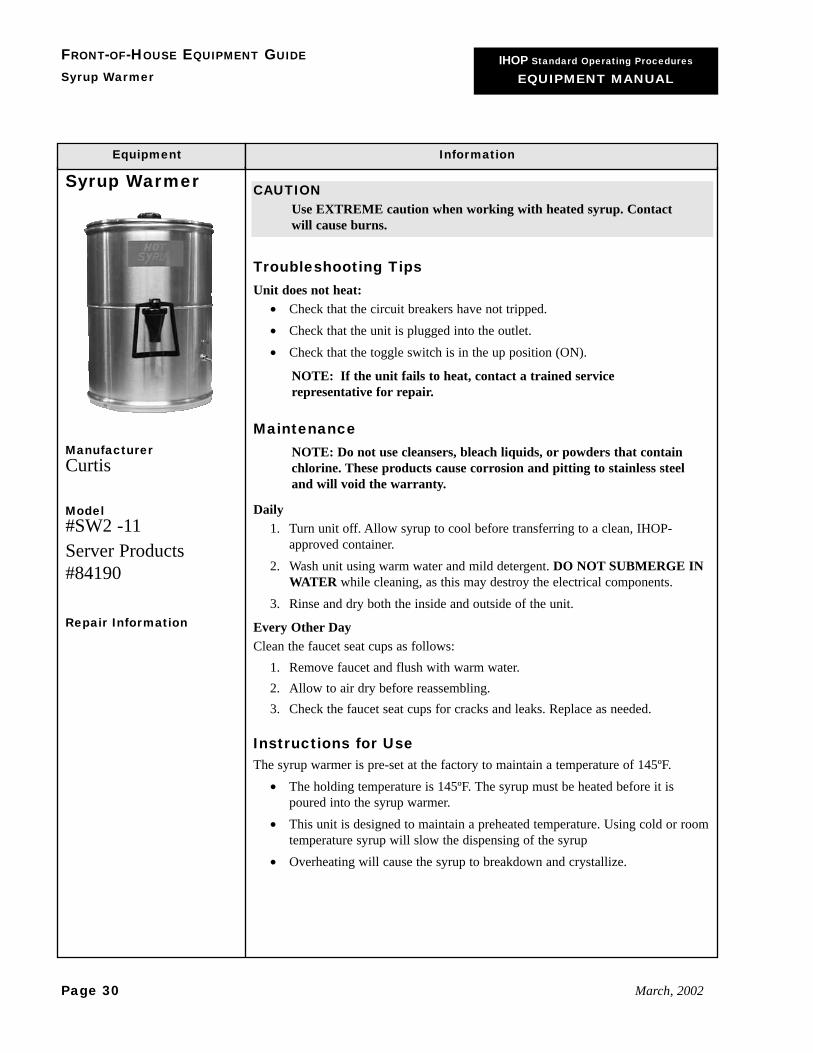
Syrup Warmer
ManufacturerCurtis
Model#SW2 -11Server Products#84190
Repair Information
CAUTIONUse EXTREME caution when working with heated syrup. Contactwill cause burns.
Troubleshooting TipsUnit does not heat:
• Check that the circuit breakers have not tripped.• Check that the unit is plugged into the outlet.• Check that the toggle switch is in the up position (ON).
NOTE: If the unit fails to heat, contact a trained servicerepresentative for repair.
MaintenanceNOTE: Do not use cleansers, bleach liquids, or powders that containchlorine. These products cause corrosion and pitting to stainless steeland will void the warranty.
Daily1. Turn unit off. Allow syrup to cool before transferring to a clean, IHOP-
approved container. 2. Wash unit using warm water and mild detergent. DO NOT SUBMERGE IN
WATER while cleaning, as this may destroy the electrical components. 3. Rinse and dry both the inside and outside of the unit.
Every Other DayClean the faucet seat cups as follows:
1. Remove faucet and flush with warm water. 2. Allow to air dry before reassembling. 3. Check the faucet seat cups for cracks and leaks. Replace as needed.
Instructions for UseThe syrup warmer is pre-set at the factory to maintain a temperature of 145ºF.
• The holding temperature is 145ºF. The syrup must be heated before it ispoured into the syrup warmer.
• This unit is designed to maintain a preheated temperature. Using cold or roomtemperature syrup will slow the dispensing of the syrup
• Overheating will cause the syrup to breakdown and crystallize.

IHOP Standard Operating Procedures
EQUIPMENT MANUAL
BACK-OF-HOUSE EQUIPMENT GUIDE
Air Curtains and Strip Curtains
IHOP Page 31
Equipment Information
Air Curtains andStrip Curtains
ManufacturerCool Curtain
ModelClear Vu DoorsStrip Curtains
Repair Information
Troubleshooting TipsCurtains will not close:
• Check for ice formation on bearings that restrict movement.• Check for objects that may be blocking closure.
Ice builds up on the inside of the cooler/freezer door:• Cooler/freezer door is left open too long.
Maintenance• The materials used to produce the Clear Vu and Strip curtains are pliable
plastic to withstand temperatures of below -20°F for the walk-in freezer.• Clean curtains using mild detergent and water, then dry. • Periodically check bearings on curtain brackets for wear and tear.
Instructions for Use• Clear Vu curtains are factory-installed to aid in maintaining cooler and freezer
temperatures when doors are being opened and closed. • Temperatures defined in the refrigeration section of this manual can be
maintained for 45 minutes to one hour if cool curtains or strip curtains aremaintained properly.
• Clear Vu curtains should be replaced by an authorized service agency.Replacement strip curtains may be ordered and replaced at the unit level.
NOTE: Do not prop curtains open for any reason. Strip curtainsshould hang straight and not be hung over the door frame orshelving units.
NOTE: Cool Curtains are cut to size at the factory.

IHOP Standard Operating Procedures
EQUIPMENT MANUAL
BACK-OF-HOUSE EQUIPMENT GUIDE
Convection and Standard Ovens
Page 32 March, 2002
Equipment Information
Convection andStandard Ovens
ManufacturerVulcan
Model#GH56C-SEFBAA(with 6-burner top)#GH60TC-SEFBKK(51″ griddle withconvection oven)
Repair Information
Troubleshooting TipsOven will not operate:
• Check that the unit is plugged in. • Check that the circuit breaker is not tripped.• Check that the pilot light is lit. • Check that the thermostat has not malfunctioned.
Poor ignition:• The gas input may be insufficient. Call for service.• The air-to-gas adjustment may be poor. Call for service.
Oven cooks too fast or overheats:• Oven needs calibration.• Thermostat may be faulty.
NOTE: An authorized service technician should perform calibrationof oven.
MaintenanceDaily
• Always start with a cold oven. • Clean stainless interiors and exteriors with a non-abrasive type cleanser. • Clean under and around burner grates using a soapy solution. • Dry to avoid rust.
Weekly• Remove oven racks and rack slides and soak using a commercial de-greaser. • Thoroughly rinse and dry racks and slides.• Clean stainless steel door liners and oven front using mild soap and water.• Remove “heat tint” using a non-abrasive cleanser.• Always apply these cleansers when the oven is cold and rub in the direction
of the metal’s grain.• Maintain gaskets in good condition.
General Operation – Convection Oven Convection ovens constantly circulate air over the product. This strips the thin layerof moisture and cool air from the top of the product and allows heat to penetratemore quickly, reducing cooking times.
NOTE: Motors in convection ovens are permanently lubricated andrequire no additional maintenance. A qualified service technicianshould perform all repairs. Do not attempt to disconnect gas lines.

IHOP Standard Operating Procedures
EQUIPMENT MANUAL
BACK-OF-HOUSE EQUIPMENT GUIDE
Convection and Standard Ovens
IHOP Page 33
Equipment Information
Convection andStandard Ovens,continued
Lighting the Pilot – Convection Oven with Open Top, Griddle Top, and Hot TopBurner PilotsBefore lighting oven, be sure that the range top sections have been lit.
1. Connect the range to the main electrical supply line. 2. Open oven door panel and locate square pilot lighter cutout.3. Turn red gas valve (located behind the control panel) ON, purging the gas line
of air. 4. Turn the gas valve and power switch OFF. Close oven door.5. While depressing the red ignition button, use a taper to ignite the pilot. 6. Hold down the ignition button for 30 seconds or until the pilot remains lit. 7. Turn gas valve back ON.8. If pilot fails to light, turn main gas valve OFF. Wait 5 minutes and repeat
steps 2 and 3. After pilot is lit, push the power switch ON and turn thetemperature dial to the desired setting.
Nightly Shutdown Turn the power switch to OFF and the temperature dial to 0ºF. The pilot will remainlit.
Lighting the Pilot – Standard Oven Before lighting the oven, be sure that the range top sections have been lit.
1. Open the oven door and locate the square pilot lighter cutout.2. While depressing the red ignition button located on the side control panel
above the thermostat knob, use a taper to light the oven pilot. Continue tohold ignition button in for one minute.
NOTE: If the pilot fails to light, turn the main gas valve OFF andwait 5 minutes before repeating steps 1 and 2.
Nightly ShutdownTurn the burner valve off.
Lighting the Pilot – Oven Cook Top Burners and Griddle Tops (for combinationoven/range/griddles)
1. Turn main gas supply on.2. Turn all top burner valve knobs on to purge gas line of air.3. Turn all top burner valve knobs off.4. Wait 30 seconds.5. Using a taper, light the pilot(s).6. If the pilot fails to light, wait 5 minutes and repeat steps 1-5. Turn one top
burner valve on to ensure all gas lines are purged of air. Turn the burner offwhen the gas begins to flow.
Nightly ShutdownTurn the burner valve off. The pilot will remain lit.

IHOP Standard Operating Procedures
EQUIPMENT MANUAL
Back-of-House Equipment GuideDeep Fryer - Manual Filtering
Page 34 March, 2002
Equipment Information
Deep Fryer -Manual Filtering
ManufacturerDean
Model#SM20/SM20G#UFFSM2250IHOPG#UFFSM2250IHOP60
Repair Information
CAUTIONDeep-fryer oil (canola or soy-based) will catch fire at hightemperatures. Be aware that the Smoke Point (when oil beginssmoking) ranges between 450º - 460ºF, depending upon the quality ofthe oil. The Flash Point (when oil flares momentarily and then goesout) is 625ºF. The Fire Point (when oil will burn continuously) is675ºF.
Troubleshooting TipsCheck for possible causes of the following conditions:
Shortening takes on black appearance too quickly, is off flavor, or emits odor:• Inferior shortening• Overheating of shortening• Faulty thermostat• Hot spots in fryer• Improper filtering
Shortening smokes excessively:• Inadequate filtering• Inadequate cleaning of equipment
Foods do not cook properly (not brown in expected time):• Over-filling fryer baskets• Frying temperature too low• Faulty thermometer• Improper use of fryer timer
Foods are greasy (excessive oil absorption):• Temperature set too low• Over-filling fryer baskets• Heating fried foods in fryer• Slow temperature recovery
MaintenanceDaily Filtering for Manual Filtering Systems
1. Turn off fryer.2. Lift up heating element. WARNING: Do not operate in air.3. Lift crumb cradle out of the kettle. WARNING: Handles are HOT.
IHOP Standard Operating Procedures
EQUIPMENT MANUAL
BACK-OF-HOUSE EQUIPMENT GUIDE
Deep Fryer - Manual Filtering
IHOP Page 35
Equipment Information
Deep Fryer -Manual Filtering,continued
4. Strain the oil through an oil filter. WARNING: Secure filter in holder anddrain in an approved container.
5. Completely wash and sanitize fryer kettle, baskets, and crumb cradle. 6. Dry and assemble fryer.7. Replace strained oil and top off to appropriate level with fresh oil.
Thorough Cleaning (Once Each Week Minimum)1. Drain oil.2 Fill the fryer kettle with water and add a boil-out chemical (8 oz. TSP to one
kettle of water) or mild dish soap.3. Set control to 200ºF.4. Place crumb cradle and fry baskets into water to be cleaned at the same time.5. When water reaches 200ºF, scrub the fry baskets with a stiff-bristle brush.6. Remove the crumb cradle and baskets from fryer and thoroughly rinse and
dry.7. Raise the heating element to make it accessible but not out of the water. Scrub
the element and lower it back into the cleaning solution.8. Turn off the fryer. Drain the solution and discard.
CAUTION Contents are HOT. Use protective equipment when working.
9, Fill kettle with clean water and 8 oz. of distilled vinegar.10. Set control to 200º F.11. When the water reaches temperature, scrub all parts with neutralizing cleaning
solution.12 Turn fryer off. Drain and discard solution.13. Dry completely. Top off with fresh shortening to fill line.
SOP InformationNOTE: The correct oil rotation is potatoes, meat, and sausage.
• The useful life of shortening can be extended by rotation. Fresh shorteningshould be placed in the fryer reserved for cooking of potato products.
• IHOP products are deep-fried at a temperature of 350ºF, except for linksausages, which are deep-fried at 300ºF.
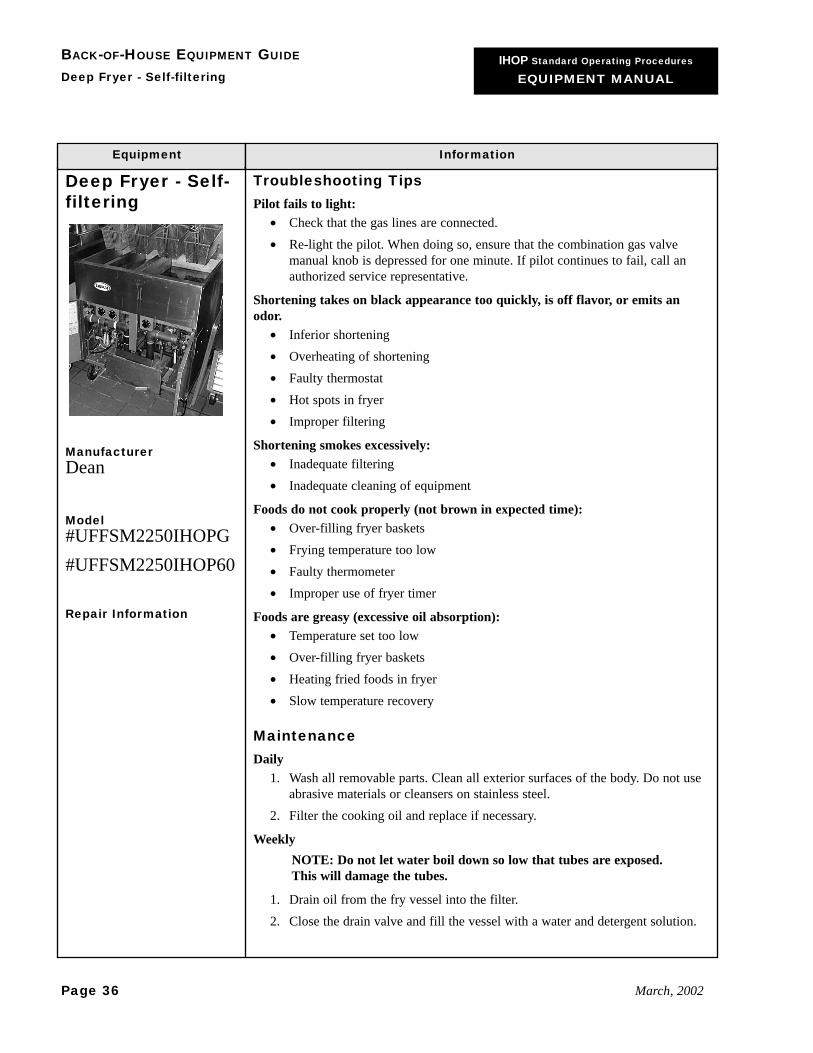
IHOP Standard Operating Procedures
EQUIPMENT MANUAL
BACK-OF-HOUSE EQUIPMENT GUIDE
Deep Fryer - Self-filtering
Page 36 March, 2002
Equipment Information
Deep Fryer - Self-filtering
ManufacturerDean
Model#UFFSM2250IHOPG#UFFSM2250IHOP60
Repair Information
Troubleshooting TipsPilot fails to light:
• Check that the gas lines are connected.• Re-light the pilot. When doing so, ensure that the combination gas valve
manual knob is depressed for one minute. If pilot continues to fail, call anauthorized service representative.
Shortening takes on black appearance too quickly, is off flavor, or emits anodor.
• Inferior shortening• Overheating of shortening• Faulty thermostat• Hot spots in fryer• Improper filtering
Shortening smokes excessively:• Inadequate filtering• Inadequate cleaning of equipment
Foods do not cook properly (not brown in expected time):• Over-filling fryer baskets• Frying temperature too low• Faulty thermometer• Improper use of fryer timer
Foods are greasy (excessive oil absorption):• Temperature set too low• Over-filling fryer baskets• Heating fried foods in fryer• Slow temperature recovery
MaintenanceDaily
1. Wash all removable parts. Clean all exterior surfaces of the body. Do not useabrasive materials or cleansers on stainless steel.
2. Filter the cooking oil and replace if necessary.
WeeklyNOTE: Do not let water boil down so low that tubes are exposed.This will damage the tubes.
1. Drain oil from the fry vessel into the filter.2. Close the drain valve and fill the vessel with a water and detergent solution.

IHOP Standard Operating Procedures
EQUIPMENT MANUAL
BACK-OF-HOUSE EQUIPMENT GUIDE
Deep Fryer - Self-filtering
IHOP Page 37
Equipment Information
Deep Fryer - Self-filtering,continued
3. Set operating thermostat to 220ºF.4. Bring solution to a rolling boil. Turn heat down and let the mixture stand until
deposits and or carbon spots can be removed with a Teflon brush.5. Scrub tank walls, bottom, and heating tubes. 6. Drain vessel and rinse in clear water.
NOTE: DO NOT drain water into filter. Water will damage the filterpump.
7. Refill with clear water and set operation thermostats to 220ºF. 8. Boil for 5 minutes. Turn fryer off, drain water, rinse and completely dry
before filling with shortening.
Filtering Procedures
CAUTIONThe oil temperature of the fryer to be filtered should beapproximately 350ºF. Position the drain handle PROPERLY prior tooperating the filter unit. Failure to do this can result in burn orinjury to the user.
1. Turn the gas valve to pilot and press down. At the same time, press the Piezoigniter until pilot ignites.
2. Continue to press the pilot knob on the valve for 60 seconds after the pilotignites.
3. Turn the gas valve to ON.4. Clear debris from oil using skimmer.5. Remove filter pan from cabinet and lift out crumb basket.6. Remove screen by turning the lock-down bolt counter-clockwise.7. Disassemble the filter screen by pulling on attached loops. Remove frame
sections from filter material.8. Remove inner stiffener. Thoroughly clean all screen material with very hot
water and detergent.9. Reassemble pan and return to fryer. Ensure male-female connection is solid.10. Turn fryer off.11. Pull red handle to drain oil into filter pan. Pull yellow handle that turns on the
filter pan.12. Oil flows from the filter pan through the fry vessel and back to pan. Remove
screen and use L-shaped brush to clean vessel.
NOTE: DO NOT pull on probes.
13. Press in the red handle to close drain valve. Oil will fill fry vessel. Allowbubbles to form for 15-30 seconds, ensuring oil lines are clear.
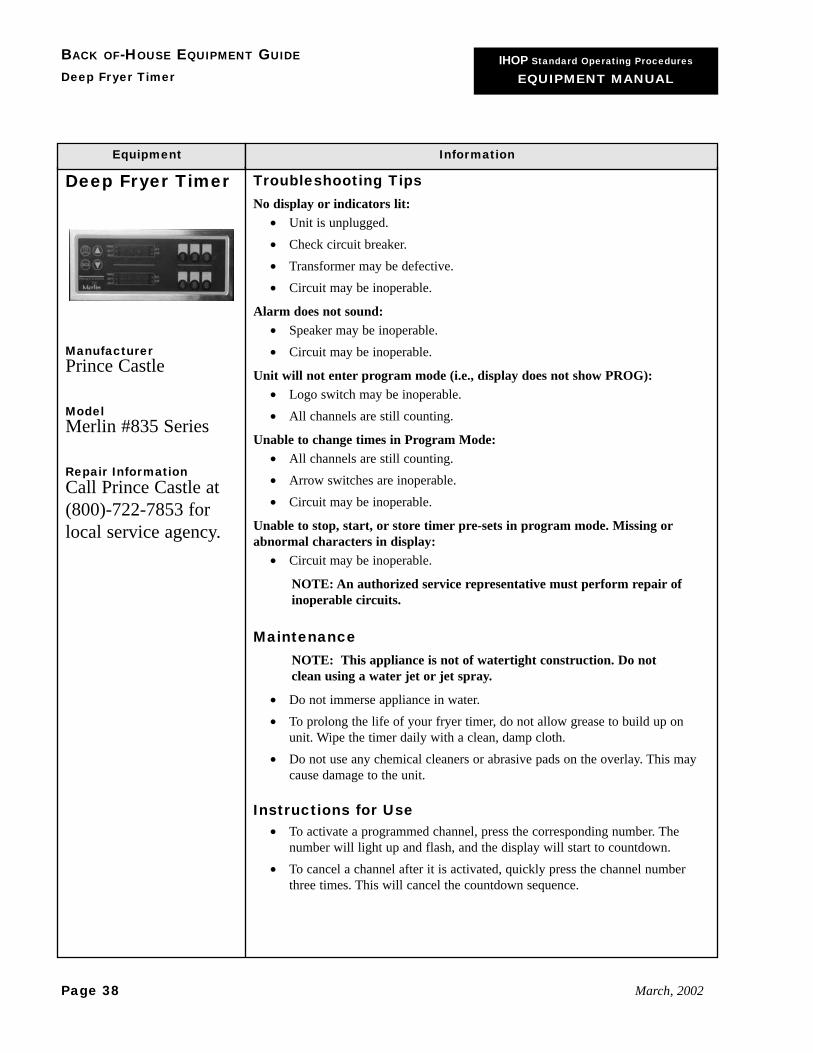
IHOP Standard Operating Procedures
EQUIPMENT MANUAL
BACK OF-HOUSE EQUIPMENT GUIDE
Deep Fryer Timer
Page 38 March, 2002
Equipment Information
Deep Fryer Timer
ManufacturerPrince Castle
ModelMerlin #835 Series
Repair InformationCall Prince Castle at(800)-722-7853 forlocal service agency.
Troubleshooting TipsNo display or indicators lit:
• Unit is unplugged.• Check circuit breaker.• Transformer may be defective.• Circuit may be inoperable.
Alarm does not sound:• Speaker may be inoperable.• Circuit may be inoperable.
Unit will not enter program mode (i.e., display does not show PROG):• Logo switch may be inoperable.• All channels are still counting.
Unable to change times in Program Mode:• All channels are still counting.• Arrow switches are inoperable.• Circuit may be inoperable.
Unable to stop, start, or store timer pre-sets in program mode. Missing orabnormal characters in display:
• Circuit may be inoperable.
NOTE: An authorized service representative must perform repair ofinoperable circuits.
MaintenanceNOTE: This appliance is not of watertight construction. Do notclean using a water jet or jet spray.
• Do not immerse appliance in water.• To prolong the life of your fryer timer, do not allow grease to build up on
unit. Wipe the timer daily with a clean, damp cloth.• Do not use any chemical cleaners or abrasive pads on the overlay. This may
cause damage to the unit.
Instructions for Use• To activate a programmed channel, press the corresponding number. The
number will light up and flash, and the display will start to countdown.• To cancel a channel after it is activated, quickly press the channel number
three times. This will cancel the countdown sequence.

IHOP Standard Operating Procedures
EQUIPMENT MANUAL
BACK-OF-HOUSE EQUIPMENT GUIDE
Deep Fryer Timer
IHOP Page 39
Equipment Information
Deep Fryer Timer,continued
Programming the Fryer TimerFollow this procedure to set all program buttons to coincide with the IHOPFryer Timer Chart.
1. Locate the “magic button,” which is a raised area under the word MERLIN atthe bottom left of the timer.
2. Depress and hold the “magic button” for 5 seconds. A SHOW PROGRAMmessage will appear in the window.
3. Press program button #1. The timer setting will light up.4. Set button #1 according to the fry timer chart by pressing the up and down
arrow keys.5. Press the program button #1 again to change the setting from TIMER to
DUTY.
The following steps (6-9) need to be followed to remove the DUTY function.This will set it to “:00”:
6. With the duty button lit, set the DUTY time to “:00” by pressing theUP/DOWN arrow keys.
7. Press the program button #1 again to change from DUTY to HOLD. 8. Set the HOLD button to “:00” using the UP/DOWN arrow keys.9. Press program button #1 twice to complete the program. 10. With the DUTY button lit, set the DUTY time to “:00” by pressing the
UP/DOWN arrow keys.
Setting Volume Control:1. Depress the MAGIC BUTTON for approximately 5 seconds, until the SHOW
PROGRAM message appears in the window.2. Press the DATA button located above the MAGIC BUTTON.3. Using the UP/DOWN arrow keys, increase or decrease the volume where
1=Low Volume and 4=High Volume.4. Press the MAGIC BUTTON once to set the volume level selected.

IHOP Standard Operating Procedures
EQUIPMENT MANUAL
BACK-OF-HOUSE EQUIPMENT GUIDE
Dishwasher
Page 40 March, 2002
Equipment Information
Dishwasher
ManufacturerEcolab
ModelES40
Repair InformationIHOP installs Ecolab serviceunless otherwise requested.
Troubleshooting TipsDishes are not clean:
• Clean out drain obstructions.• Replace worn “O” rings.• Water pressure may be low due to pump obstructions. Disconnect electrical
supply and drain lines.• Check for obstruction at the pump intake.• Detergent is not dispensing or is dispensing incorrect amount. Call for service.• Excessive mineral deposits throughout machine. De-lime as necessary.
Silverware, glassware, and dishes are spotted:• Dish racks are not loaded properly.• Rinse water temperature is not set properly (min. 120ºF).• Water is excessively hard.
Inadequate rinse:• Clean line strainer. Remove strainer cap, clean, and replace.
No wash tank heat:• The machine is equipped with a low water safety device that shuts off the heat
if the water level gets too low. Check that the water level is at the fill line.• Stem valve is not open completely.• Check that the circuit breaker is not tripped.
Sanitizer is not being dispensed:• If the sanitizer bottle is empty, replace it. • Check for a leak or crack in the sanitizing tube.
MaintenanceThe outside surface of the dish machine should be cleaned each shift using a non-abrasive cleanser.
NOTE: The inside maintenance procedures for our machine areoutlined below and should be performed a minimum of every shiftand more often as necessary during peak business periods.
1. Turn the power off.2. Remove the strainer bucket and the slanted strainer. Empty contents into
garbage. Wash and rinse the slanted strainer and strainer bucket.3. Rinse the overflow cover and remove the overflow tube.4. Open the drain and thoroughly cleanse and flush the interior of the
dishwasher.
IHOP Standard Operating Procedures
EQUIPMENT MANUAL
BACK-OF-HOUSE EQUIPMENT GUIDE
Dishwasher
IHOP Page 41
Equipment Information
Dishwasher,continued
5. Wash and rinse the overflow tube inside and out.6. Check the rinse nozzles to make sure they are free of lime deposits and solids.7. Check that wash arms and rinse arms rotate freely. 8. Check all liquid levels − Wash, Rinse, and Sanitize. Replace as needed.
De-liming ProceduresNOTE: The de-liming process should be supervised by a manager.Wear gloves, mask, and apron. Avoid spills and contact with the skin.Work in a well-ventilated area.
1. Inspect the rinse arms for lime deposits. Remove buildup by inserting a de-liming wire into each opening.
2. Remove plugs from both the upper and lower rinse arms.3. Remove the standpipe assembly from the bleach container and place it as
close to the floor as possible, placing a catch pan underneath.4. Turn the power switch on and fill the machine.5. Cycle the machine 6 times to empty the bleach-dispensing system. Make a
visual check to assure the system is empty.6. Turn the water supply off. Cycle the machine four times.7. Remove the rinse tank cover.8. Make a visual check to assure the rinse-holding tank is empty.
NOTE: If more than ¼″″ of water remains in the tank, cycle themachine two more times.
9. Pour two caps of de-liming solution into the rinse-holding tank.10. Cycle the machine once.11. Let solution stand 10 minutes.12. Turn the water supply off.13. Cycle the machine three times or until the rinse-holding tank is drained.14. Wipe the inside of the rinse-holding tank to remove loose mineral deposits
using a clean, damp towel.15. Turn the water supply on.16. Cycle the machine three times.17. Turn pumps off.18. Replace the rinse arm plugs.19. Cycle the machine once.20. Replace the standpipe assembly.21. Drain the machine.
IHOP Standard Operating Procedures
EQUIPMENT MANUAL
BACK-OF-HOUSE EQUIPMENT GUIDE
Dishwasher
Page 42 March, 2002
Equipment Information
Dishwasher,continued
Instructions For UseThe low temperature dishwasher is designed as an energy-saving piece ofequipment. It operates with a water temperature of 120ºF minimum and sanitizesdishes chemically instead of using hot water. The machine also has an electroniccontrol system that regulates the time cycle, water temperature, and timed fill of thetank.The door switch activates the machine cycle when the doors are closed. If the doorsare opened during a cycle, the machine will stop and a new cycle will begin whenthe door is closed again. ALWAYS allow the machine to complete one cycle beforeopening the doors.If the doors are opened during a timed fill cycle, the machine will not return to thatcycle. Pushing the timed fill switch will restart a complete cycle.
• Scrape all food particles from china. Empty all glasses and cups.• Properly load each rack until full. Running ½-full racks wastes chemicals and
energy.• Use the pre-rinse spray arms to spray racked dishes before placing into dish
machine.• Run the appropriate number of racks for your machine.• Allow dishes and smallwares to air dry before removing from dish rack to
storage areas.
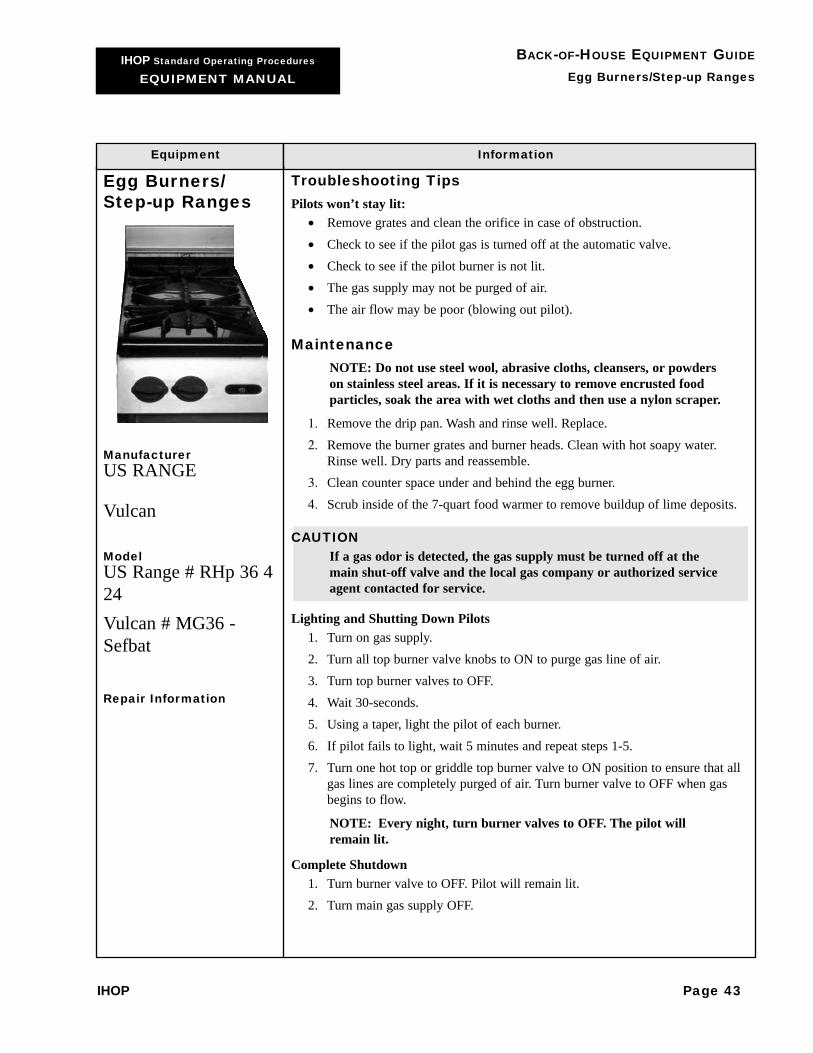
IHOP Standard Operating Procedures
EQUIPMENT MANUAL
BACK-OF-HOUSE EQUIPMENT GUIDE
Egg Burners/Step-up Ranges
IHOP Page 43
Equipment Information
Egg Burners/Step-up Ranges
ManufacturerUS RANGE
Vulcan
ModelUS Range # RHp 36 424Vulcan # MG36 -Sefbat
Repair Information
Troubleshooting TipsPilots won’t stay lit:
• Remove grates and clean the orifice in case of obstruction. • Check to see if the pilot gas is turned off at the automatic valve.• Check to see if the pilot burner is not lit.• The gas supply may not be purged of air.• The air flow may be poor (blowing out pilot).
MaintenanceNOTE: Do not use steel wool, abrasive cloths, cleansers, or powderson stainless steel areas. If it is necessary to remove encrusted foodparticles, soak the area with wet cloths and then use a nylon scraper.
1. Remove the drip pan. Wash and rinse well. Replace.2. Remove the burner grates and burner heads. Clean with hot soapy water.
Rinse well. Dry parts and reassemble.3. Clean counter space under and behind the egg burner.4. Scrub inside of the 7-quart food warmer to remove buildup of lime deposits.
CAUTIONIf a gas odor is detected, the gas supply must be turned off at themain shut-off valve and the local gas company or authorized serviceagent contacted for service.
Lighting and Shutting Down Pilots1. Turn on gas supply. 2. Turn all top burner valve knobs to ON to purge gas line of air.3. Turn top burner valves to OFF.4. Wait 30-seconds.5. Using a taper, light the pilot of each burner.6. If pilot fails to light, wait 5 minutes and repeat steps 1-5.7. Turn one hot top or griddle top burner valve to ON position to ensure that all
gas lines are completely purged of air. Turn burner valve to OFF when gasbegins to flow.
NOTE: Every night, turn burner valves to OFF. The pilot willremain lit.
Complete Shutdown1. Turn burner valve to OFF. Pilot will remain lit.2. Turn main gas supply OFF.
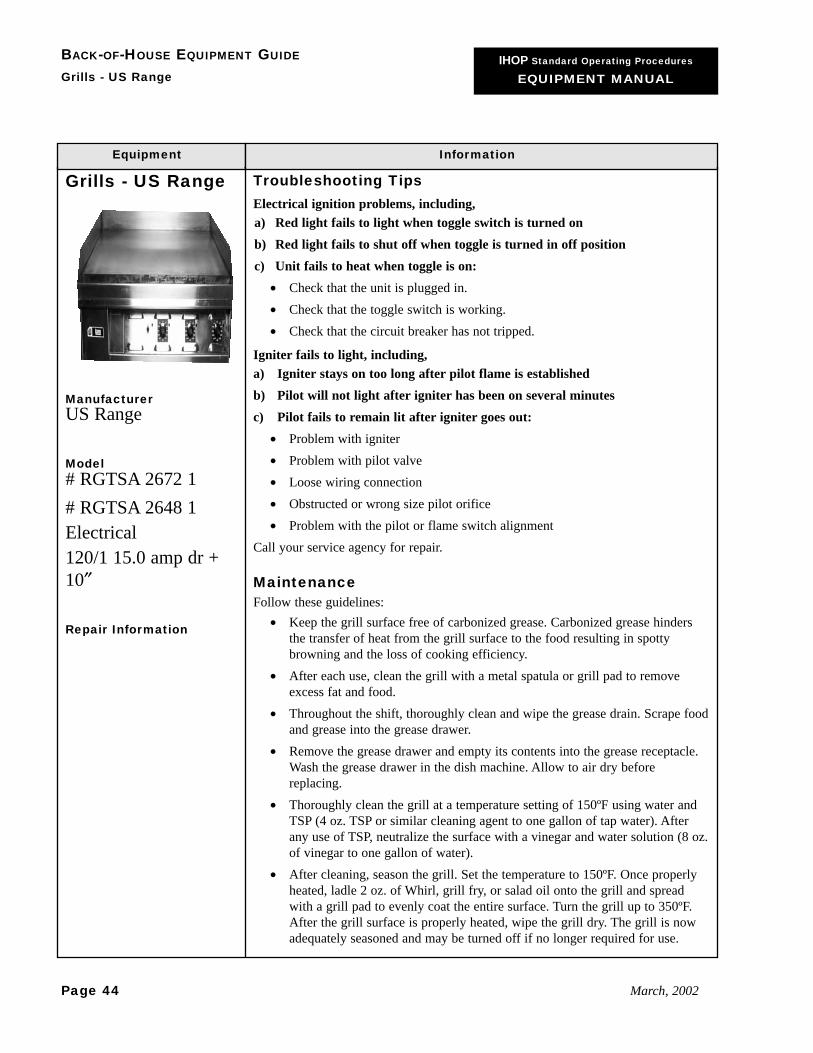
IHOP Standard Operating Procedures
EQUIPMENT MANUAL
BACK-OF-HOUSE EQUIPMENT GUIDE
Grills - US Range
Page 44 March, 2002
Equipment Information
Grills - US Range
ManufacturerUS Range
Model# RGTSA 2672 1# RGTSA 2648 1 Electrical120/1 15.0 amp dr +10″
Repair Information
Troubleshooting TipsElectrical ignition problems, including,a) Red light fails to light when toggle switch is turned onb) Red light fails to shut off when toggle is turned in off positionc) Unit fails to heat when toggle is on:
• Check that the unit is plugged in.• Check that the toggle switch is working.• Check that the circuit breaker has not tripped.
Igniter fails to light, including, a) Igniter stays on too long after pilot flame is establishedb) Pilot will not light after igniter has been on several minutesc) Pilot fails to remain lit after igniter goes out:
• Problem with igniter• Problem with pilot valve• Loose wiring connection• Obstructed or wrong size pilot orifice• Problem with the pilot or flame switch alignment
Call your service agency for repair.
MaintenanceFollow these guidelines:
• Keep the grill surface free of carbonized grease. Carbonized grease hindersthe transfer of heat from the grill surface to the food resulting in spottybrowning and the loss of cooking efficiency.
• After each use, clean the grill with a metal spatula or grill pad to removeexcess fat and food.
• Throughout the shift, thoroughly clean and wipe the grease drain. Scrape foodand grease into the grease drawer.
• Remove the grease drawer and empty its contents into the grease receptacle.Wash the grease drawer in the dish machine. Allow to air dry beforereplacing.
• Thoroughly clean the grill at a temperature setting of 150ºF using water andTSP (4 oz. TSP or similar cleaning agent to one gallon of tap water). Afterany use of TSP, neutralize the surface with a vinegar and water solution (8 oz.of vinegar to one gallon of water).
• After cleaning, season the grill. Set the temperature to 150ºF. Once properlyheated, ladle 2 oz. of Whirl, grill fry, or salad oil onto the grill and spreadwith a grill pad to evenly coat the entire surface. Turn the grill up to 350ºF.After the grill surface is properly heated, wipe the grill dry. The grill is nowadequately seasoned and may be turned off if no longer required for use.
IHOP Standard Operating Procedures
EQUIPMENT MANUAL
BACK-OF-HOUSE EQUIPMENT GUIDE
Grills - US Range
IHOP Page 45
Equipment Information
Grills - US Range,continued
Energy Conservation InformationGrills must not be turned on at the circuit breaker. Individual thermostatic controlson the grill should be turned on one at a time with a few seconds lag between eachone to avoid a power surge.
Instructions for Use• Warm grills to 285ºF. • After 15 minutes, turn the temperature to 350ºF.• After the desired temperature is reached, the indicator lights will turn off.• The thermostats maintain selected temperatures automatically and are
combined with OFF switches on each dial. • The signal light illuminates after the thermostat is turned on and remains lit
while the grill is heating.
SpecificationsStainless steel front and sides with one-inch thick Blanchard grind grill plate andfront access to controls for service. Thermostat bypass switch mounted on front.Includes a vertical knob guard for each thermostat and gas regulator.IHOP grills are calibrated to 350ºF ± 15ºF.

IHOP Standard Operating Procedures
EQUIPMENT MANUAL
BACK-OF-HOUSE EQUIPMENT GUIDE
Grills - Vulcan
Page 46 March, 2002
Equipment Information
Grills - Vulcan
ManufacturerVulcan
Model900 Series#948AGas griddles, including electricignition option and solid statecontrol option.
Repair Information
Troubleshooting TipsStandard controls:
• In the event a gas odor is detected, shut down the units at the main shutoffvalve and contact the local gas company or gas supplier for service.
• For your safety, do not use or store gasoline or other flammable vapors orliquids in the vicinity of this or any other appliance.
• Do not obstruct the airflow into and around this appliance. This airflow isnecessary for proper combustion of gasses and for ventilation.
• Keep flue duct free of obstacles.
If unit does not heat when thermostat is turned on, or the pilot burner will notlight or stay lit:
1. Check that the unit is plugged in.2. Check that the circuit breaker has not tripped.3. Check for an obstruction in the pilots orifice.4. Check that a backdraft of air is not blowing the pilot out.5. Check that the pilot gas is not turned off at the automatic shut-off.
NOTE: If the above tips do not correct the problem, call yourservice agency for repair.
Instructions for Use - Standard GriddlesLighting Pilots for Standard GriddlesIf the pilot light goes out, an automatic shut-off valve turns off the gas supply to thegriddle burners. Re-light as follows:
1. Turn the thermostat to OFF and wait 5 minutes to allow gas to escape fromthe burner.
2. Turn on the main shut-off valve.3. Depress and hold the red button “A” on the automatic shut-off valve while
lighting the pilot burner.4. After the gas at the pilot has been burning for about 45 seconds, release the
red button. If the pilot does not remain lit, repeat the operation, allowing moretime before releasing the reset button.
NOTE: All units are equipped with fixed orifices and a factorypreset pressure regulator. No adjustments are necessary.
Operating InstructionsTurn the thermostats to the desired setting to operate the unit as follows:
• Pre-heat griddles to 285ºF, allowing 15-20 minutes before turning thermostatsetting to 350ºF. Each thermostat will control gas flow to burners to bringtheir grill area to the set temperature.
IHOP Standard Operating Procedures
EQUIPMENT MANUAL
BACK-OF-HOUSE EQUIPMENT GUIDE
Grills - Vulcan
IHOP Page 47
Equipment Information
Grills - Vulcan,continued
Instructions for Use - Electronic Ignition GriddlesLighting Pilots
1. Turn all burner valves to OFF. Wait 5 minutes for all gas to escape fromburner compartments.
2, Turn on the gas supply to the unit.3, Turn on the electric supply to the unit by turning the toggle switch to ON.
The red light will light.4. When the grill is no longer required, turn the toggle switch to OFF. The pilot
igniter red light and thermostat will be turned off.5. To turn off the unit completely for an extended time, shut off the electricity
and gas supply to the unit.
Operating Instructions1. Turn the toggle switch to the ON position. The red light will light, and the
igniter will spark (not visible) to ignite the pilot.2. When the pilot is lit, the igniter will turn off.3. The unit is now ready for service. Pre-heat the grill to 285ºF. Wait 15
minutes at the preheat temperature and then set the thermostats to 350ºF.
Maintenance for Standard Gas GrillsAfter Each Use
• Clean the griddle with a flexible spatula or griddle scraper.
During the Day1. Flush the hot griddle with water and scrape to reduce the amount of
carbonized grease buildup.2. Follow with a light coating of oil to prevent sticking.
Once a Day• Thoroughly clean backslash, sides, and front. Ensure that the integral part of
the backsplash is not vigorously banged with a spatula.• Empty the grease trough of grease and food into the grease drawer. Empty
the grease drawer into the grease barrel and wash and sanitize in the dishmachine.
• Clean the griddle surface with water and de-greasing cleaner. Rub with thegrain of the metal while the griddle is still warm (150ºF). Flush grill surfaceto remove all traces of de-greaser.
• Clean stainless steel and chrome surfaces with a damp cloth and polish witha clean, soft cloth.
• Season the griddle after each cleaning. While grill is set at 285ºF, ladle 2 oz.of Whirl, grill fry, or salad oil onto grill surface and spread evenly. Turn grillto 350ºF. Once temperature is reached, wipe off excess grease. The grill isnow properly seasoned and ready for use.

IHOP Standard Operating Procedures
EQUIPMENT MANUAL
BACK-OF-HOUSE EQUIPMENT GUIDE
Heat Lamps
Page 48 March, 2002
Equipment Information
Heat Lamps
ManufacturerHatco
Model#GR FFBPortable Dump Station
Repair Information
Photo Not Available
Troubleshooting TipsUnit does not heat:
• Check circuit breaker.• Check that the unit is plugged in.
MaintenanceThe portable food warmer has a Glo-Ray infrared heating element from above with athermo-controlled heated base.
• Unplug unit while cleaning and at any time unit is not in use.• DO NOT immerse unit in water.• DO NOT use abrasives on infrared elements.• Wipe outside surfaces with clean damp cloth. Use a mild detergent if unit
becomes heavily soiled. Rinse using clean water on a soft cloth.• Dry unit thoroughly.
Instructions for Use• This appliance is to be used to hold fried foods for short time periods. • Do not over-prepare product and hold, as this will significantly lower the
quality of the product.

IHOP Standard Operating Procedures
EQUIPMENT MANUAL
BACK-OF-HOUSE EQUIPMENT GUIDE
Heat Lamps - Service/Cooks Line
IHOP Page 49
Equipment Information
Heat Lamps –Service/CooksLine
ManufacturerHatco
Model#GRAIWHL-108Infra Black
Repair Information
Troubleshooting TipsUnit will not start:
• No power• Defective switch• Open wiring• Defective element
Excessive heat:• Voltage too high• Improper mounting
Maintenance• Use only non-abrasive cleaners. Abrasive cleaners could scratch the finish of
the food warmer, marring its appearance and making it susceptible to soilaccumulation.
• Wipe daily with a damp cloth and mild detergent.• DO NOT spray water or cleaning chemicals directly on Glo-Ray element.
Instructions for Use• To conserve energy, turn on heat lamps in intervals. Use only the number of
lamps needed to meet business demands.• Turn on portable heat lamps at 10-minutes intervals. • Do not add decorative soffit to hide a pass-through mounted Glo-Ray. This
may block the heat and cause fire or flare-up.

IHOP Standard Operating Procedures
EQUIPMENT MANUAL
BACK-OF-HOUSE EQUIPMENT GUIDE
HVAC - Ventilation Systems
Page 50 March, 2002
Equipment Information
HVAC –VentilationSystems
ManufacturerMarshal Air
ECS
Model
Repair InformationContact local HVAC service.
Troubleshooting TipsVentilation systems is not pulling smoke and exhaust from the restaurantequipment:
• Check that the exhaust fan is turned on. • Check that exhaust fan wheel rotation is correct. • Check that the fan belt is not broken or loose. • Check that the fan switch is on for the make-up air.• Check that the circuit breaker is not tripped. • Check that filters and or spacers are in place.• Check that equipment alignment under hood is correctly positioned. • Check that make-up air filter is clean.• Check that the HVAC register in ceiling is not blowing towards hood. If so,
re-adjust air deflector.
Filters are out of square and/or surface becomes black:• Check that fryers under hood are properly positioned. • Improper cleaning chemicals may have caused damage. • Carbon may have built up. Follow weekly cleaning schedule set up in your
unit.
Excessive amount of grease in hood area:• Make sure that grease trough or grease collection cups are in place. • Make sure that filters and/or spacers are installed properly.
Gas fired equipment is not working:• Check that gas power is turned on.• Check if Ansul gas safety valve is tripped. Call local Ansul distributor to
inspect.• Check if equipment is broken or defective. Call authorized service
representative.
MaintenanceSet up a regular preventative maintenance program for your unit. Refer to the HVACMaintenance Program information gon p. xii. Also follow the cleaning guidelinesbelow.
NOTE: The monthly, quarterly, and bi-annual procedures for allrooftop maintenance and belt replacements should be carried out bya reputable service agency.
Daily1. Wipe surface using a clean cloth and mild detergent.2. Rinse and dry to prevent spotting.

IHOP Standard Operating Procedures
EQUIPMENT MANUAL
BACK-OF-HOUSE EQUIPMENT GUIDE
HVAC - Ventilation Systems
IHOP Page 51
Equipment Information
HVAC- VentilationSystems,continued
3. Empty and clean grease cups. Replace.4. Wipe out grease trough(s).5. Replace any burned-out light bulbs.
Weekly1. Perform all daily maintenance.2. Wipe grease and dirt buildup off the light protectors.3. Check for noise or vibration. Report any to your service agency.
Monthly1. Perform all daily and weekly maintenance procedures. 2. In addition, arrange for a reputable service agency to conduct intake filter
replacements, lubrication, and belt replacements as needed.
Quarterly Servicing1. Have the exhaust fans and fan wheels inspected and cleaned to prevent
excessive vibration caused by grease accumulation.2. Inspect exhaust ducts for grease buildup. Clean as necessary.
Bi-Annually Servicing• Have a local authorized Ansul distributor perform the bi-annual inspection of
the hood and fire system.
Maintenance of Filters and SpacersThe function of filters is to remove grease from the exhaust air. Grease will drainfrom the filters into the grease trough and then into the grease collection cup. Forfilters to perform properly, the following procedures must be followed:
• Keep filters in good condition.• Ensure that filters fit snugly into hood opening.• Remove grease from the filters and hood area behind them. • Ensure that filters are sealed in place by the spacers. This prevents air from
passing through the system without being filtered.
Instructions for UseNOTE: An approved fire suppression system must be installed to thefire suppression system manufacturer’s specifications. Regularmaintenance of the exhaust system and fire suppression system is theresponsibility of each IHOP unit.
• Turn on exhaust fans whenever cooking equipment or dish machine is inoperation.

IHOP Standard Operating Procedures
EQUIPMENT MANUAL
BACK-OF-HOUSE EQUIPMENT GUIDE
Ice Machine
Page 52 March, 2002
Equipment Information
Ice Machine
ManufacturerCornelius
Scotsman
ModelCornelius: MachineModel #IRC 1448Cornelius: Ice Bin Scotsman: Machine#CME-1656-RS32Scotsman: Ice Bin #BH-900S
Repair Information
Troubleshooting TipsCuber not operating:
• Check that the unit is turned on. • Check that circuit breaker has not tripped.
Cuber not working, and indicator light is on:• Check contactor leads. Replace if defective.• Compressor overload may be on OPEN. Permit overload to cool, then reset or
replace.
Cuber is not working, indicator light is off, or no power to the switchboard:• Unit is off due to full bin. Remove ice from curtain. Eliminate curtain
restriction.• Adjust switch range. Reduce clearance from ice shoot to proximity switch.
Cubes are coming out in one solid piece rather than in separate cubes:NOTE: For optimum ice production and maximum cube separation,the ice connecting the individual cubes should be a minimum of 1/8″″thick at the center area of the ice waffle.
• Clean condenser and fan blades to improve water flow over evaporator.• If unit is operated with the panels off, the heat at the top of the evaporator will
cause thinner ice at the top than when the panels are in place.• Thinner ice can be achieved by turning the “pot” adjustment screw clockwise
one full turn.• Thicker ice can be achieved by turning the “pot” adjustment screw
counterclockwise one full turn.
MaintenanceNOTE: ONLY LIME-A-WAY or CALGON NICKLE SAFE isapproved for deep cleaning ice machine.
The de-liming process should be supervised by a manager. Weargloves, mask, and apron. Avoid spills and contact with the skin.Work in a well-ventilated area.
Ice machine cleaners are acidic-based chemicals. Before beginning any cleaning ofthe cuber, remove all ice from the storage bin.
1. Set the switch to CLEAN and allow any ice on the evaporator to melt.2. Remove the water curtain and pour ½ oz. of machine cleaner down the rear
key-slot openings. The cleaner will drain into the water pan.3. Return the water curtain to the operating position.4. Add 3 oz. (for a single evaporator) or 5 oz. (for a double evaporator) of either
Lime-A-Way or Calgon Nickle Safe ice-machine cleaner directly into thewater pan.
IHOP Standard Operating Procedures
EQUIPMENT MANUAL
BACK-OF-HOUSE EQUIPMENT GUIDE
Ice Machine
IHOP Page 53
Equipment Information
Ice Machine,continued
5. Set switch to CLEAN and circulate for a maximum of 15 minutes.6. Depress the HOLD and DUMP switch to allow the cleaner to drain away.7. Fill the water pan with clean fresh water and circulate for 3 minutes.8. Depress the HOLD and DUMP switch and allow water to drain away.
REPEAT this procedure THREE times.9. After the third rinse cycle, return cuber to normal operating mode.
NOTE: Ice machines should only be cleaned as needed. If your icemachine requires cleaning more than twice yearly, consult yourdistributor or dealer about proper water treatment.
Instructions for UseAn external water filter is installed on your ice machine. This helps to removeparticles from your water as it passes through the filter to produce optimum icecubes and keep your ice machine working properly and able to produce ice of up to1,675 pounds per day as needed.

IHOP Standard Operating Procedures
EQUIPMENT MANUAL
BACK-OF-HOUSE EQUIPMENT GUIDE
Microwave Oven
Page 54 March, 2002
Equipment Information
Microwave Oven
ManufacturerPanasonic
Model# NE 8051–800 watt1 yr. parts and labor,3 yr. Magnatron tube
# NE 1051–1000 watt
#NE-1251–1200 watt1 yr. parts and labor,3 yr. Magnatron tube
#NE 1257–1200 watt1 yr. parts and labor, 3 yr. Magnatron tube
# NE 1258–1200 watt3 yr. parts, labor, andMagnatron tube
Repair Information
CAUTION• Never use metal of any kind in the microwave, including aluminum foil.
Glass, ceramic, china, paper, and most plastic dishes can be used in themicrowave. Pouches or packages of paper or plastic may be used butshould always be punctured to allow steam to escape.
•• Temperatures and cooking times vary depending on the wattage of eachunit.
•• Never operate an empty microwave oven. Without food in the cavity toabsorb power, the microwave energy will be reflected back into themagnetron causing damage.
•• Use caution when removing items from the microwave or uncoveringheated items due to a buildup of steam.
Troubleshooting TipsNOTE: Do not operate the oven if there is damage to the door (bent),hinges, latches, door seals, or ceiling surfaces.
Read failure codes on panel front:Code F01- Overcooked food:
1. Press STOP/RESET pad to stop beep.2. Wait for oven to cool down, then reset.3. If a flame is present, do not open door.
Code F33-34 – Defective sensor circuit:• Unplug the oven and wait more than 10 seconds before re-connecting.
Code F44 – Defective pad or control circuit• Pad was pressed for more than 30 seconds.
NOTE: If normal operation does not resume, call service agent andgive failure code.
MaintenanceNOTE: Do not place any objects between the oven front face and thedoor or allow soil or solvents to build up.
1. Unplug the microwave before cleaning.2. Remove the air intake splash guard/light diffuser for cleaning by removing the
center plugs from the two plastic rivets at the top inside of the microwave.3. Wash the entire inside surfaces of the unit using a mild detergent. Rinse and
sanitize. Air dry.4. Replace air intake guard.5. Wipe outside of unit with damp sanitized cloth.

IHOP Standard Operating Procedures
EQUIPMENT MANUAL
BACK-OF-HOUSE EQUIPMENT GUIDE
Microwave Oven
IHOP Page 55
Equipment Information
Microwave Oven,continued
Instructions for Use1. Place microwave safe dish in center of microwave.2. Close door securely.3. Set a desired heating time. Follow SOP microwave chart.
General Use Guidelines• It is better to under-heat rather than overheat. Always start with the minimum
heat times.• You may open the microwave door while the unit is operating to stir or rotate
food.• When setting a dial timer for less than 30 seconds, turn timer past the 30-
second mark and then set to the desired time.• Touch pad units are pre-programmed at the factory and match the IHOP
microwave chart in your restaurant.

IHOP Standard Operating Procedures
EQUIPMENT MANUAL
BACK-OF-HOUSE EQUIPMENT GUIDE
Mixer
Page 56 March, 2002
Equipment Information
Mixer
ManufacturerHOBART
ModelModel #H-600 Heavy-duty 60 qt. mixer with atwo-horsepower motor, a timerand a #12 attachment hub asstandard equipment.
Repair Information
CAUTIONKeep hands, clothing, and utensils out of bowl when mixer is inoperation.
Troubleshooting TipsMixer will not start:
• Gearshift lever between gears is not fully engaged.• Circuit protector is in the open position. Check fuse or disconnect switch.• Mixer or attachment is overloaded.• Mixing bowl is not fully engaged.• Wire cage assembly is not in the front-center position.
Agitator touches the bowl:• Bowl clamps are not closed.• Improper agitator clearance. Review how to adjust agitator in the maintenance
section.• Bowl clamps improperly adjusted.
Planetary seal squeaks:• Seal requires occasional lubrication. Call for service.
Instructions for UseNOTE: The bowl guard must be in position or the mixer will notoperate. Two clamps lock the bowl into position.
• The START button is used to start the mixer.• The STOP button is used to stop the mixer.• The timer is used in conjunction with the start button for timed mixing
operations and will stop the mixer when a preset time has elapsed.• For non-timed mixing, set the timer on HOLD and use the STOP button to
stop the mixer.Using the Dial Timer to Set Mixing Time:
1. Turn the knob to set the mixing time. The M/C indicator will be lit.2. Use the START and STOP buttons to control the mixing operation.3. Press the START button to begin mixing. The timer will countdown from the
set time to 00:00.
NOTE: If the STOP button is pressed, both the mixing timer and thecountdown will be interrupted. After pressing STOP, press START toresume both mixing and timer countdown.
IHOP Standard Operating Procedures
EQUIPMENT MANUAL
BACK-OF-HOUSE EQUIPMENT GUIDE
Mixer
IHOP Page 57
Equipment Information
Mixer, continued Changing Speeds• The gearshift lever is used to change speeds. • Always stop the mixer before changing speeds. • To change speeds, push the STOP button, move the gearshift lever to the
desired speed, and restart the mixer by pushing the start button.
Using the Hand-Wheel Bowl Lift• Each mixer is equipped with a hand-wheel bowl-lift device to raise and lower
the mixing bowl. • Turn the hand-wheel clockwise to raise the bowl and counterclockwise to
lower the bowl.
Mixer AttachmentsTwo mixer attachments used to prepare IHOP recipes are the Paddle and the Whip.Additional attachments are optional. Follow the guidelines for use as indicated withthe attachment.
Mixer SpeedsFour speeds are available for use. Follow SOP for the appropriate speed level whenmixing batters, butters, and other IHOP recipes.
NOTE: If you do not stop the mixer before you change speeds, it willautomatically shut itself off.
Maintenance NOTE: Unplug the mixer before beginning cleaning procedures.
The mixer should be thoroughly cleaned after each use as follows:
NOTE: DO NOT use a hose to clean the mixer.
1. Using a clean damp cloth and mild detergent, clean the entire surface of themixer base. The apron can be removed by loosening the thumbscrew. Behindthe apron is an access cover, which can be removed for cleaning.
2. Clean the drip cup-splash guard. Remove the three screws that secure it andwipe clean.
3. Remove the bowl guard by holding the guard with both hands and pushingdown on the black release knob. Lower and remove the wire bowl guard.Wash the guard in the pot-and-pan sink, rinse, sanitize, and allow to air dry.
4. Clean the mixing bowl and attachments using mild soap and water.Thoroughly rinse and sanitize bowl and attachments. Turn bowl upside downwhen not in use to prevent food from falling into it.
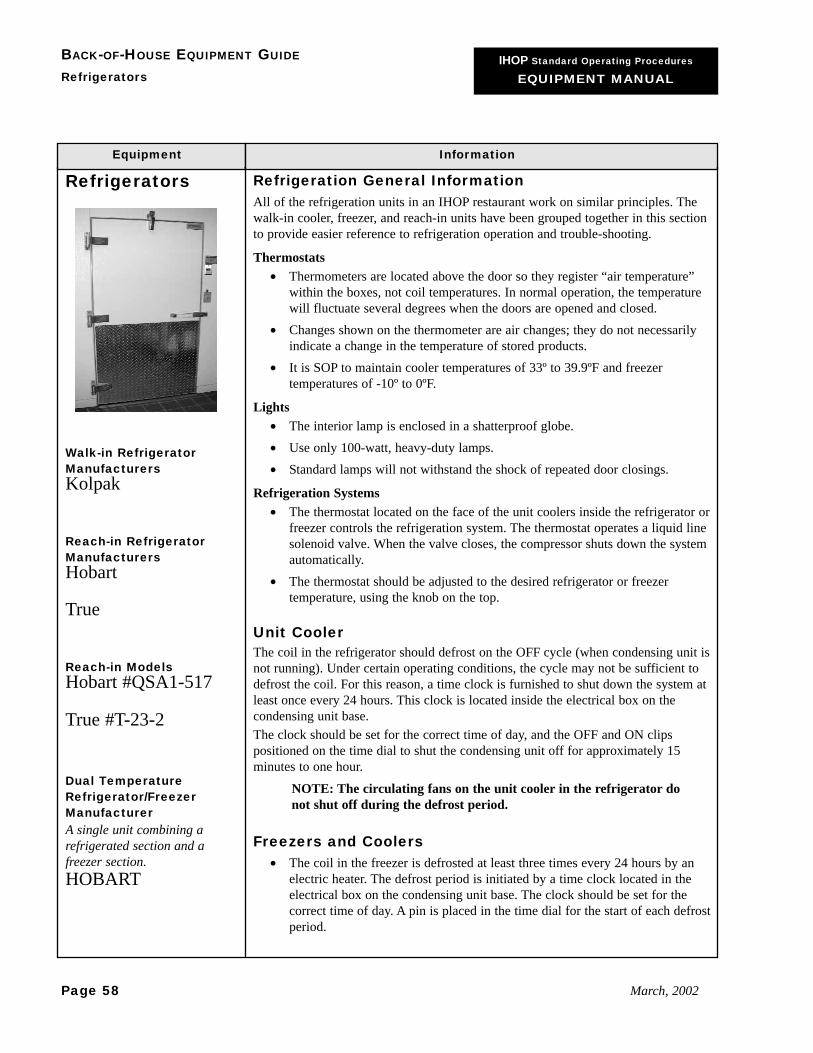
IHOP Standard Operating Procedures
EQUIPMENT MANUAL
BACK-OF-HOUSE EQUIPMENT GUIDE
Refrigerators
Page 58 March, 2002
Equipment Information
Refrigerators
Walk-in RefrigeratorManufacturersKolpak
Reach-in RefrigeratorManufacturersHobart
True
Reach-in Models Hobart #QSA1-517
True #T-23-2
Dual TemperatureRefrigerator/FreezerManufacturerA single unit combining arefrigerated section and afreezer section.HOBART
Refrigeration General InformationAll of the refrigeration units in an IHOP restaurant work on similar principles. Thewalk-in cooler, freezer, and reach-in units have been grouped together in this sectionto provide easier reference to refrigeration operation and trouble-shooting.
Thermostats• Thermometers are located above the door so they register “air temperature”
within the boxes, not coil temperatures. In normal operation, the temperaturewill fluctuate several degrees when the doors are opened and closed.
• Changes shown on the thermometer are air changes; they do not necessarilyindicate a change in the temperature of stored products.
• It is SOP to maintain cooler temperatures of 33º to 39.9ºF and freezertemperatures of -10º to 0ºF.
Lights• The interior lamp is enclosed in a shatterproof globe. • Use only 100-watt, heavy-duty lamps. • Standard lamps will not withstand the shock of repeated door closings.
Refrigeration Systems• The thermostat located on the face of the unit coolers inside the refrigerator or
freezer controls the refrigeration system. The thermostat operates a liquid linesolenoid valve. When the valve closes, the compressor shuts down the systemautomatically.
• The thermostat should be adjusted to the desired refrigerator or freezertemperature, using the knob on the top.
Unit CoolerThe coil in the refrigerator should defrost on the OFF cycle (when condensing unit isnot running). Under certain operating conditions, the cycle may not be sufficient todefrost the coil. For this reason, a time clock is furnished to shut down the system atleast once every 24 hours. This clock is located inside the electrical box on thecondensing unit base. The clock should be set for the correct time of day, and the OFF and ON clipspositioned on the time dial to shut the condensing unit off for approximately 15minutes to one hour.
NOTE: The circulating fans on the unit cooler in the refrigerator donot shut off during the defrost period.
Freezers and Coolers• The coil in the freezer is defrosted at least three times every 24 hours by an
electric heater. The defrost period is initiated by a time clock located in theelectrical box on the condensing unit base. The clock should be set for thecorrect time of day. A pin is placed in the time dial for the start of each defrostperiod.

IHOP Standard Operating Procedures
EQUIPMENT MANUAL
BACK-OF-HOUSE EQUIPMENT GUIDE
Refrigerators
IHOP Page 59
Equipment Information
Refrigerators,continued
Model #QSA1/QSAF1
Reach-in FreezerManufacturerHobart
True
ModelHobart #QSAF1
True #T-23-2
Under-Counter FreezerManufacturerTRUE
Model#TWT-27F
• We recommend three defrost cycles. Set these times to meet your businessneeds. It is recommended that defrost times be set during non-peak timeswhen units will not get much traffic.
• If a fourth defrost is required, the cycles should be spaced six hours apart. Thedefrost period is terminated by a time clock or thermostat. The thermostatsenses the temperature of the coil and starts the condensing unit when the coilreaches a pre-determined temperature.
• The fans on the unit cooler is the freezer. DO NOT operate during the defrostcycle. The defrost termination control also prevents them from restarting untilthe coil temperature has been lowered before freezing.
Pressure SwitchesPressure switches are located at the condensing units. The switch senses the suctionline pressure and since pressure and temperature are directly related, the lower thepressure, the lower the temperature.
Condensing Drain Trap
CAUTIONTurn off the power to the condensing unit before working on it.
• The ¾″ condensate drain line from the evaporative coil in the freezer andcooler should have a trap assembly installed before entering the floor drain.The water trap assembly stops air from being pumped into the box by theevaporative fans, which otherwise would result in ice buildup on the freezerevaporative coil.
• Flush it with warm water at least once a month to clean the condensate drainrunning to the building floor drain from the unit cooler inside the refrigeratoror freezer. Flush freezers during the defrost cycle.
• Clean the air-cooled condenser on the condensing unit once a month using astiff brush or vacuum cleaner to remove dirt and dust buildup.
• Check for frayed or worn belts. Report needed repairs to an authorized servicerepresentative.
• Keep motor room and areas clean and clear of all items not needed to serviceequipment.
• Keep condensers clear of any items that can obstruct air flow.
Door Frame Heaters (Freezers Only)• Commonly called heat strips, a heat cable extends around the perimeter of the
door opening under the aluminum extrusion that holds the gasket. The heatstrip crosses the bottom of the door opening under the lip of the metal sillplate. The heat strip will prevent the formation of condensation and frostaround the opening except during periods of high humidity.

IHOP Standard Operating Procedures
EQUIPMENT MANUAL
BACK-OF-HOUSE EQUIPMENT GUIDE
Refrigerators
Page 60 March, 2002
Equipment Information
Refrigerators,continued
Troubleshooting Tips for Walk-insCompressor does not run:
• Check circuit breaker.• Check that the reset button is not tripped. If it is, you MUST WAIT for the
motor to cool before pushing the reset button.
Unit short cycles:• Check for a freon leak. If you detect one (look for a buildup of ice on coils),
contact an authorized service representative.
Unit operates long or continuously:• Check the unit for a freon leak.• Check that the coil is not iced up or plugged.• Check that the doors are not being left open.• Check that the air curtains are properly installed and in place.
Noisy unit:• Compressor oil may be insufficient.• Mounting may be loose.• Motor compressor may be worn.
Frosted or sweating suction line:• Box is too cold. Adjust temperature or replace control.• Low ambient air temperature. • Check that the evaporation fan is plugged in.• Check that the circuit breaker is not tripped.• Clean evaporator coil.
Maintenance for Walk-in RefrigeratorsNOTE: DO NOT use jet spray or pressure hose inside the unit or on any part of
the Back-of-House floors. • Clean entire surfaces, both inside and out, using a non-abrasive cleanser and
soft bristled brush.• Deck brush the inside flooring weekly. Mop up excess water and rinse with a
damp mop.• Each week thoroughly wash and dry walls, ceilings, coils, and racks.• Wipe up spills as they occur.

IHOP Standard Operating Procedures
EQUIPMENT MANUAL
BACK-OF-HOUSE EQUIPMENT GUIDE
Refrigerators
IHOP Page 61
Equipment Information
Refrigerators,continued
Maintenance for Reach-in Refrigerators• The interior of the cabinet should be cleaned daily with soap and water. Do
not use abrasive cleansers or scouring pads.• Odors may be eliminated with baking soda and water solution once cleaned.• The fans on the condensing unit must be cleaned often with a stiff brush or
vacuum cleaner to remove dust buildup.• The hinges on the door should be oiled as needed with a good-grade machine
oil.• Door latches should operate freely, and door locks (if applicable) should be
operable.• Clean exterior of unit with normal shift sidework using a mild soap and water.
Rinse unit and dry.• Keep top of unit free of grease and dirt.• A thermometer should be installed and visible as required by the Department
of Health.

IHOP Standard Operating Procedures
EQUIPMENT MANUAL
BACK-OF-HOUSE EQUIPMENT GUIDE
Remote Refrigeration Systems
Page 62 March, 2002
Equipment Information
RemoteRefrigerationSystems
ManufacturerCOLDZONE
Model#MPL2CZ
Repair Information
Troubleshooting TipsContact an authorized service representative for any repairs.
MaintenanceA regular preventative maintenance program will keep your remote refrigeration ingood working condition. Follow the maintenance guidelines below:
• Preventive maintenance should include removal of buildup on condensingcoils and fans.
• Replace belts and filters as necessary. • Keep condensate drain lines free of buildup.
Instructions for UseRemote refrigeration is located on a pad on the roof of the building. The systemconsists of Copeland semi-hermetic air-cooled condensing units with (2) ½-hpcondenser fan motors and 24″ fans.
Photo Not Available
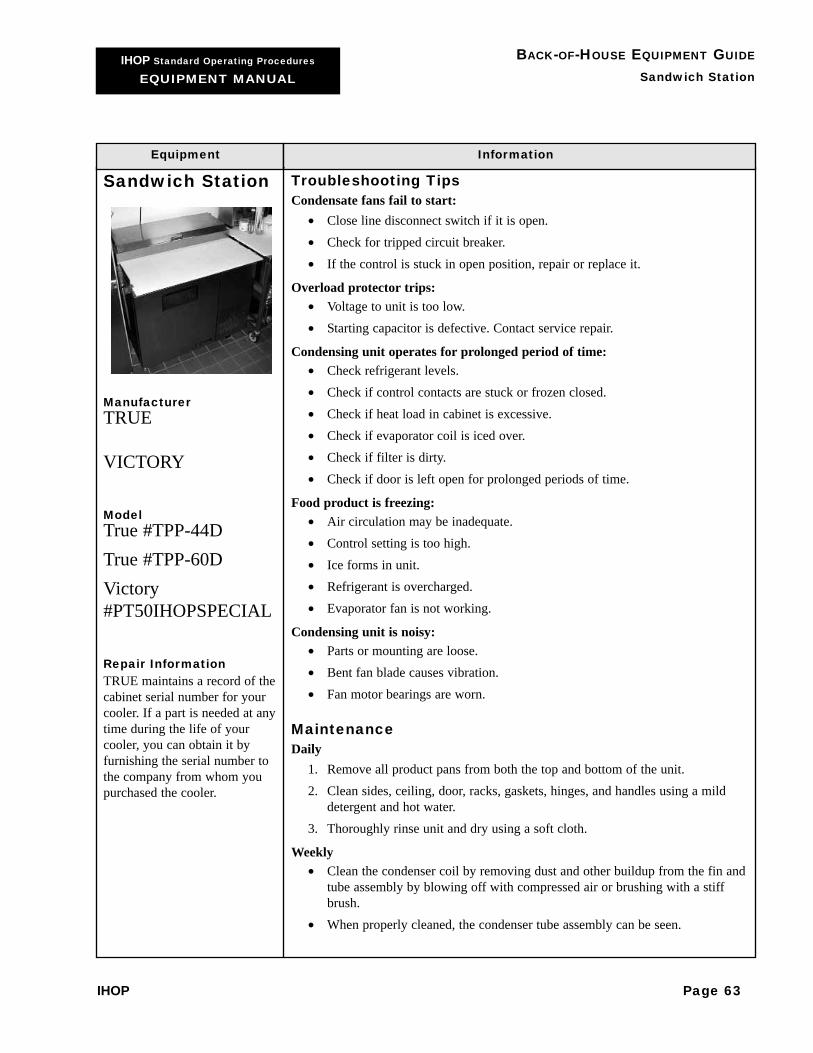
IHOP Standard Operating Procedures
EQUIPMENT MANUAL
BACK-OF-HOUSE EQUIPMENT GUIDE
Sandwich Station
IHOP Page 63
Equipment Information
Sandwich Station
ManufacturerTRUE
VICTORY
ModelTrue #TPP-44DTrue #TPP-60DVictory#PT50IHOPSPECIAL
Repair InformationTRUE maintains a record of thecabinet serial number for yourcooler. If a part is needed at anytime during the life of yourcooler, you can obtain it byfurnishing the serial number tothe company from whom youpurchased the cooler.
Troubleshooting TipsCondensate fans fail to start:
• Close line disconnect switch if it is open.• Check for tripped circuit breaker.• If the control is stuck in open position, repair or replace it.
Overload protector trips:• Voltage to unit is too low.• Starting capacitor is defective. Contact service repair.
Condensing unit operates for prolonged period of time:• Check refrigerant levels.• Check if control contacts are stuck or frozen closed.• Check if heat load in cabinet is excessive.• Check if evaporator coil is iced over.• Check if filter is dirty.• Check if door is left open for prolonged periods of time.
Food product is freezing:• Air circulation may be inadequate.• Control setting is too high.• Ice forms in unit.• Refrigerant is overcharged.• Evaporator fan is not working.
Condensing unit is noisy:• Parts or mounting are loose.• Bent fan blade causes vibration.• Fan motor bearings are worn.
MaintenanceDaily
1. Remove all product pans from both the top and bottom of the unit.2. Clean sides, ceiling, door, racks, gaskets, hinges, and handles using a mild
detergent and hot water. 3. Thoroughly rinse unit and dry using a soft cloth.
Weekly• Clean the condenser coil by removing dust and other buildup from the fin and
tube assembly by blowing off with compressed air or brushing with a stiffbrush.
• When properly cleaned, the condenser tube assembly can be seen.

IHOP Standard Operating Procedures
EQUIPMENT MANUAL
BACK-OF-HOUSE EQUIPMENT GUIDE
Sandwich Station
Page 64 March, 2002
Equipment Information
Sandwich Station,continued
Instructions for UseIngredient pans should be stored in the normal rail position during normal operation.Removal of pans for extended times when the unit is on will cause excessivecondensation and the condensate pan to overflow.
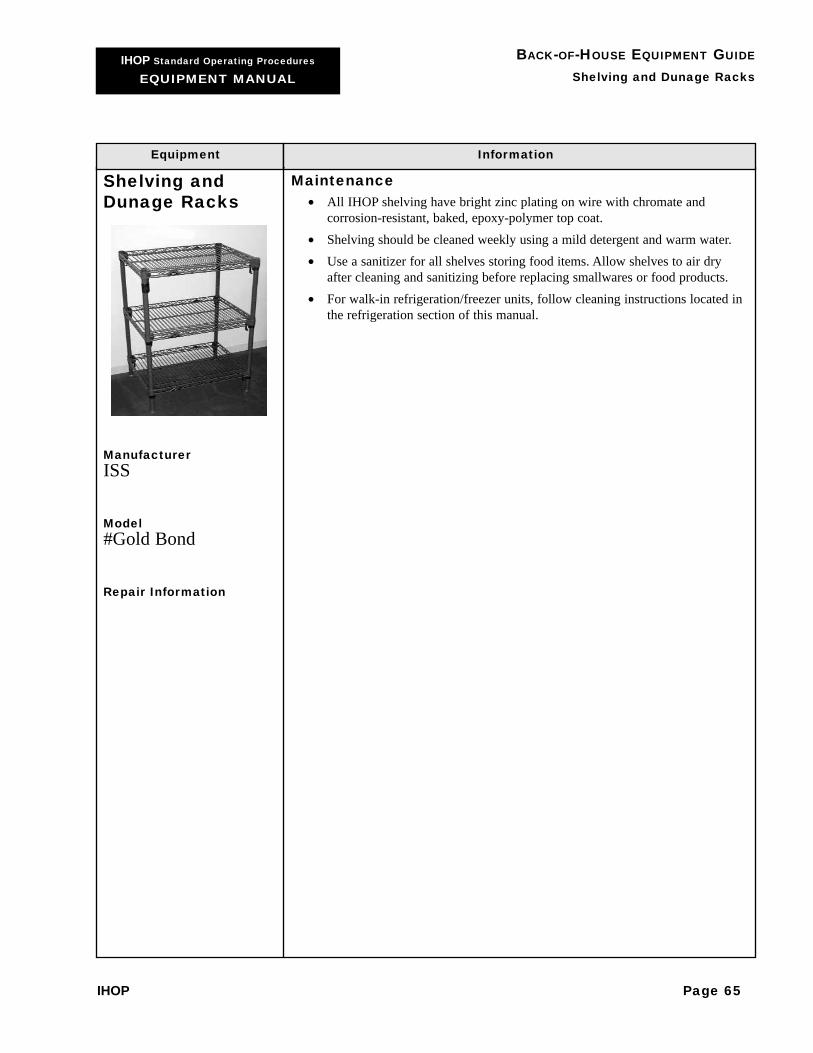
IHOP Standard Operating Procedures
EQUIPMENT MANUAL
BACK-OF-HOUSE EQUIPMENT GUIDE
Shelving and Dunage Racks
IHOP Page 65
Equipment Information
Shelving andDunage Racks
ManufacturerISS
Model#Gold Bond
Repair Information
Maintenance• All IHOP shelving have bright zinc plating on wire with chromate and
corrosion-resistant, baked, epoxy-polymer top coat.• Shelving should be cleaned weekly using a mild detergent and warm water. • Use a sanitizer for all shelves storing food items. Allow shelves to air dry
after cleaning and sanitizing before replacing smallwares or food products.• For walk-in refrigeration/freezer units, follow cleaning instructions located in
the refrigeration section of this manual.
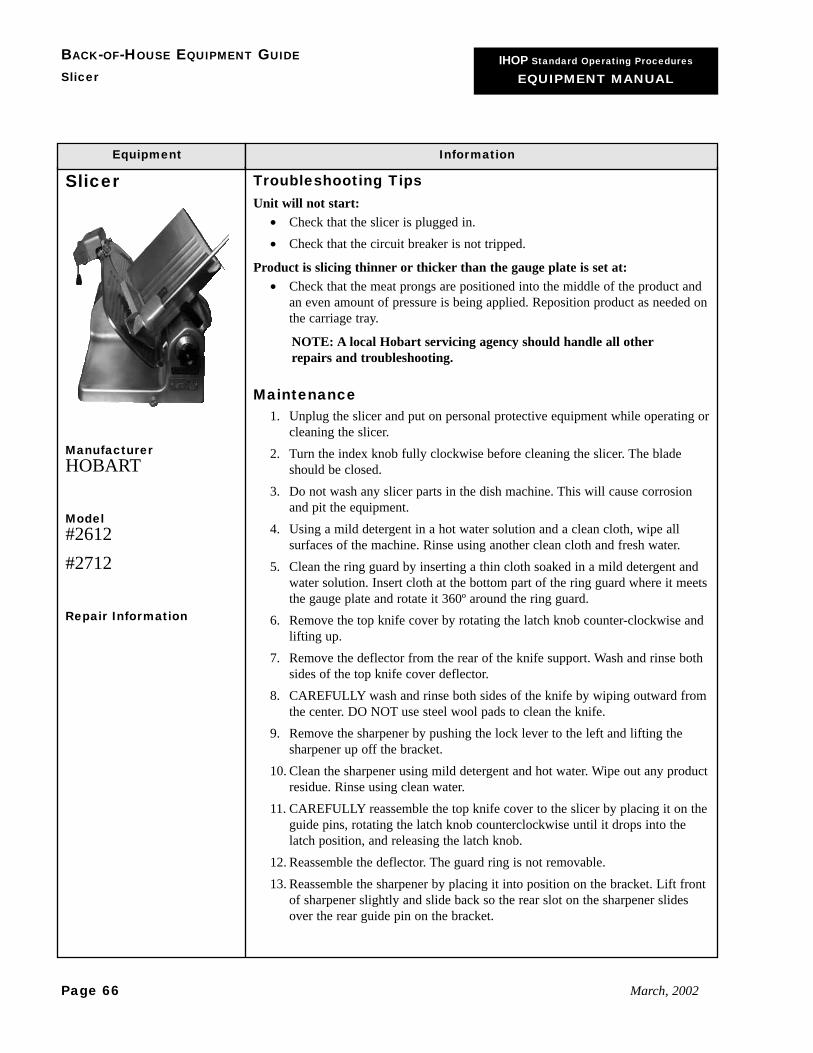
IHOP Standard Operating Procedures
EQUIPMENT MANUAL
BACK-OF-HOUSE EQUIPMENT GUIDE
Slicer
Page 66 March, 2002
Equipment Information
Slicer
ManufacturerHOBART
Model#2612#2712
Repair Information
Troubleshooting TipsUnit will not start:
• Check that the slicer is plugged in.• Check that the circuit breaker is not tripped.
Product is slicing thinner or thicker than the gauge plate is set at:• Check that the meat prongs are positioned into the middle of the product and
an even amount of pressure is being applied. Reposition product as needed onthe carriage tray.
NOTE: A local Hobart servicing agency should handle all otherrepairs and troubleshooting.
Maintenance1. Unplug the slicer and put on personal protective equipment while operating or
cleaning the slicer.2. Turn the index knob fully clockwise before cleaning the slicer. The blade
should be closed.3. Do not wash any slicer parts in the dish machine. This will cause corrosion
and pit the equipment.4. Using a mild detergent in a hot water solution and a clean cloth, wipe all
surfaces of the machine. Rinse using another clean cloth and fresh water.5. Clean the ring guard by inserting a thin cloth soaked in a mild detergent and
water solution. Insert cloth at the bottom part of the ring guard where it meetsthe gauge plate and rotate it 360º around the ring guard.
6. Remove the top knife cover by rotating the latch knob counter-clockwise andlifting up.
7. Remove the deflector from the rear of the knife support. Wash and rinse bothsides of the top knife cover deflector.
8. CAREFULLY wash and rinse both sides of the knife by wiping outward fromthe center. DO NOT use steel wool pads to clean the knife.
9. Remove the sharpener by pushing the lock lever to the left and lifting thesharpener up off the bracket.
10. Clean the sharpener using mild detergent and hot water. Wipe out any productresidue. Rinse using clean water.
11. CAREFULLY reassemble the top knife cover to the slicer by placing it on theguide pins, rotating the latch knob counterclockwise until it drops into thelatch position, and releasing the latch knob.
12. Reassemble the deflector. The guard ring is not removable.13. Reassemble the sharpener by placing it into position on the bracket. Lift front
of sharpener slightly and slide back so the rear slot on the sharpener slidesover the rear guide pin on the bracket.

IHOP Standard Operating Procedures
EQUIPMENT MANUAL
BACK-OF-HOUSE EQUIPMENT GUIDE
Slicer
IHOP Page 67
Equipment Information
Slicer, continued 14. Press down to engage the sharpener over the front guide pin on the bracket. 15. Slide the lock lever to the right to ensure the sharpener is tightly engaged.
Instructions for UseGeneral Guidelines
• OSHA regulations do not permit the operation of a slicer by a person underthe age of 18.
• Use caution when operating the slicer. All focus must be placed on the task athand.
• ABSOLUTELY no talking or visiting is permitted while the slicer is inoperation or being cleaned.
• Unplug the slicer and wear personal protective equipment while operating orcleaning the slicer.
Knife Sharpening
CAUTIONAlways wear protective gloves when working with the slicer blade.
1. Unplug the machine.2. Turn the index knob fully clockwise.3. Remove the top knife cover by rotating the latch knob.4. Thoroughly wash the area around the knife, the exposed knife surfaces, and
the knife-edge. Grease should not be transferred to the grinding stone.5. Plug in the slicer and turn to the ON position.6. Lift sharpener handle to a horizontal position.7. Pull the sharpener handle toward you, applying pressure until the handle has
gone as far as it will go.8. Sharpen slicer blade for 5 seconds. Release sharpener handle. If necessary,
repeat sharpening for another 5 seconds.9. Turn the slicer off. Unplug the machine.10. Wipe slicer with a clean damp cloth to remove any grinding particles.11. Replace top knife cover.
Slicing1. For manual slicing, use the carriage tray handle to push the carriage back and
forth.2. For automatic slicing, turn the adjusting screw until the front edge of the
actuating block is at the setting that matches the index knob.3. Turn the plunger knob to engage the meat grip with the feed screw. Product
should be snug against the gauge plate.

IHOP Standard Operating Procedures
EQUIPMENT MANUAL
BACK-OF-HOUSE EQUIPMENT GUIDE
Slicer
Page 68 March, 2002
Equipment Information
Slicer, continued 4. Pull the carriage to the end of its travel and engage the driving unit by liftingthe actuating lever to its locked position.
5. Make sure the speed selector knob is set. Pull the switch knob and gentlypush the carriage to begin automatic slicing.
6. To disengage automatic slicing, push the locking clip when the carriage isnearing the operator end of its travel.
7. Always leave the driving unit in low speed (knob pushed in) when the sliceris not operating automatically.
Lubrication1. Unplug the slicer.2. The carriage rod reservoir should be filled monthly with several drops of
Lubriplate FMO – 200- AW oil. Do not use vegetable oil.3. Additional supplies of Lubriplate FMO – 200- AW are available through your
local Hobart dealer.

IHOP Standard Operating Procedures
EQUIPMENT MANUAL
BACK-OF-HOUSE EQUIPMENT GUIDE
Steam Table
IHOP Page 69
Equipment Information
Steam Table
ManufacturerWells
Model#SS-206TDCustom fabrication
Repair Information
Troubleshooting TipsUnit does not heat:
• Check the circuit breaker.• Check that unit is plugged in.
Maintenance• Remove water daily and clean inside of well using a mild detergent and nylon
brush.• Wipe spills as they occur.• Maintain outside of unit with damp cloth or stainless steel cleaner. Do not use
abrasive cleansers or steel wool.
Instructions for Use1. Close drain valve.2. Add water to inside of well.3. Turn unit on to medium high to pre-heat. Cover well to prevent heat loss and
speed the pre-heat process.4. All products must be heated to the proper internal temperature as defined by
current SOP.5. Steam table should hold food products at a temperature of 150º to 165ºF.
Keep product stirred and covered during the holding time.

IHOP Standard Operating Procedures
EQUIPMENT MANUAL
BACK-OF-HOUSE EQUIPMENT GUIDE
Sausage Warmer
Page 70 March, 2002
Equipment Information
Sausage Warmer
ManufacturerWells
Model#SS-8-ULT
Repair Information
Troubleshooting TipsSausage warmer does not keep product warm:
• Check that the unit is plugged in and turned on.• Check temperature knob setting is at proper temperature.
MaintenanceDaily
• Wipe up spills as they happen. • Scour inside of well to remove lime deposit.
Weekly• Remove any standing water.• Using protective equipment, scour inside of well using stainless steel cleaner.• Thoroughly rinse unit and dry.
Instructions for UseWarmer is to have a stainless steel body with wet or dry operation, heated by atubular element, and with a thermostatic control. A red signal light on thethermostatic control indicates power is on.
For Wet Operation1. Turn unit on. Add about 2″ of water and cover to keep heat from escaping.
Once unit is properly heated, insert pan to act as double boiler. 2. Keep all prepared sausage covered to maintain proper temperature as defined
by SOP.
For Dry Operation1. Insert sausage pan into pre-heated insert.2. Keep all prepared sausages covered to maintain proper temperature as defined
by SOP.

IHOP Standard Operating Procedures
EQUIPMENT MANUAL
BACK-OF-HOUSE EQUIPMENT GUIDE
Toaster - Pop-up
IHOP Page 71
Equipment Information
Toaster, Pop-up
ManufacturerWells
Model# T-4C
Repair Information
Troubleshooting TipsToast is too light or dark:
• Check that the thermostat timing mechanism is working.• Adjust setting by turning knob clockwise for darker and counter clockwise for
lighter.• If a slice of bread becomes lodged in the toaster, UNPLUG the toaster before
removing the bread.
CAUTIONNEVER use metal instruments to remove lodged bread.
MaintenanceNOTE: The conveyor belt and drive motor do not requirelubrication.
1. Unplug the toaster before cleaning.2. Clean the exterior of the toaster daily with a clean damp cloth. Avoid getting
cleaning agents or water in the toaster openings.3. Pull out crumb tray as far as it will go. Brush tray to remove all crumbs
before putting back into position.4. Contact your local service agency for service or repairs.
Instructions for UseOn the 4-slice toaster, adjust the section independently with the other section turnedoff.

IHOP Standard Operating Procedures
EQUIPMENT MANUAL
BACK-OF-HOUSE EQUIPMENT GUIDE
Toaster - Rotary Conveyer
Page 72 March, 2002
Equipment Information
Toaster, RotaryConveyer
ManufacturerHollman
ModelT710H & (TW)T714 (H&TW)TX714 B710(H)
Repair Information
Troubleshooting TipsUnit will not heat, and drive motor will not run:
• Check circuit breaker.• Ensure toaster is plugged in.• Ensure all controls are set in the ON position.
Unit will not heat, and drive motor is running properly:• Check that both the top and bottom heat controls is turned to HI.• Push heat limit switch on front of control box. If this reactivates the heater
tubes, see heat limit switch below.
Drive motor will not run, unit heats properly:• Disconnect unit from power source.• Remove right-side panel (from operator’s position). • Loosen screws holding drive motor in place and slide motor toward the rear
of conveyor belt to check for mechanical binding. If conveyor moves freely,call for service. Drive motor or speed control may need replacement.
MaintenanceDaily
1. Turn the top and bottom heat controls to the OFF position.2. For lightly soiled conveyor belts, turn the conveyor speed control to the
fastest setting (100) and wipe with a damp cloth.3. For heavily soiled conveyors, turn the conveyor speed control to the fastest
setting (100) and wipe with an abrasive pad.4. Turn the conveyor speed control to OFF.5. After the unit cools, remove the interior crumb tray and clean. Slide the
crumb tray back into position.6. Wipe the exterior surface of the unit.
NOTE: Do not operate the unit without the crumb tray in place.Overheating may occur in the control box and may activate the heatlimit switch.
The Hollman conveyor toaster is equipped with an automatically activated heat limitswitch that interrupts the heater tube connections if the ambient temperature in thecontrol box exceeds 190ºF. This heat limit switch can be reset manually by pushingthe red button on the front of the control box.
IHOP Standard Operating Procedures
EQUIPMENT MANUAL
BACK-OF-HOUSE EQUIPMENT GUIDE
Toaster - Rotary Conveyer
IHOP Page 73
Equipment Information
Toaster, RotaryConveyer,continued
Instructions for Use1. On all models, lower the heat source shield all the way down. Leave enough
clearance for bread slices to pass under the shield into the cooking cavity.2. Turn the top and bottom heat controls to HI.3. Turn the conveyor speed to 50.4. Allow approximately 10 minutes for toaster to warm up.5. Test color of toast. If toast is too light, turn conveyor speed counter-clockwise
to a slower speed.6. It the toast is too dark, turn the conveyor speed control clockwise to a faster
speed.

IHOP Standard Operating Procedures
EQUIPMENT MANUAL
BACK-OF-HOUSE EQUIPMENT GUIDE
Waffle Baker - CoBatCo
Page 74 March, 2002
Equipment Information
Waffle Baker-CoBatCo
ManufacturerCoBatCo
Model#BWI-40SS/WI20Single baker
#WI-20, BWI-40SSTwin baker
Repair Information
Troubleshooting TipsWaffles stick:
• Baker is not properly seasoned. DO NOT USE OIL-BASED SPRAYRELEASE. To season, use a water-based Teflon spray conditioner once a day, at initialstart-up of baker. If sticking occurs, use a product called Par Way, availablethrough your broadline distributor.
• Batter is inferior (i.e., old or made incorrectly).• Baker is not properly cleaned.
Soggy waffles, or light or mottled coloring on waffle:• Too much release spray is used.• Temperature is set too low.• Cook times are improper.
Waffles are too light or dark, but baked per SOP:• Check baker time and temperature setting. • Check that temperature for CoBatCo baker is set for 385ºF (SOP).
MaintenanceThe removable waffle grids are made of coated cast aluminum, making themvirtually scratch-proof. You can scour them using a soft brush.
Daily1. Unplug baker.2. With grids closed, rotate the handle to the down position.3. Using a small slotted screwdriver, remove the button in the center of the pan.4. Using a 3/16″ Allen wrench, loosen the bolt until the grids click and
separation is visible. Remove both grids for cleaning.5. Clean grids in hot soapy water using a soft brush or cloth.6. Rinse, sanitize, and air dry. Do NOT place damp grids back on waffle baker.7. Season grids after each cleaning using a non-stick spray WITHOUT oil,
which will contribute to a quicker carbon buildup. 8. Clean the outside surface of the waffle baker using a mild soap and water
solution. Rinse and dry the unit.
NOTE: Chemical cleaning is not recommended for the followingreasons:
• Exposure to water from excessive rinsing, immersion, etc. will damage thebaker.
• Chemical cleaning strips the seasoned effect baked into the grids afterrepeated use.

IHOP Standard Operating Procedures
EQUIPMENT MANUAL
BACK-OF-HOUSE EQUIPMENT GUIDE
Waffle Baker - CoBatCo
IHOP Page 75
Equipment Information
Waffle Baker-CoBatCo,continued
• Abrasive chemicals and cleaners will damage the outside surface of thebaker.
Instructions for Use• Leave grids open when not in use.• Season grids using a non-stick vegetable oil spray. Cover the timing
mechanism before spraying to keep the timer clean and functional, which willensure consistent baking.
Operating the Baker1. Turn the waffle baker to ON.2. Allow to heat for 15 minutes.3. Set the timer bell to the correct SOP time.4. When the timer bell rings, remove waffle from baker.
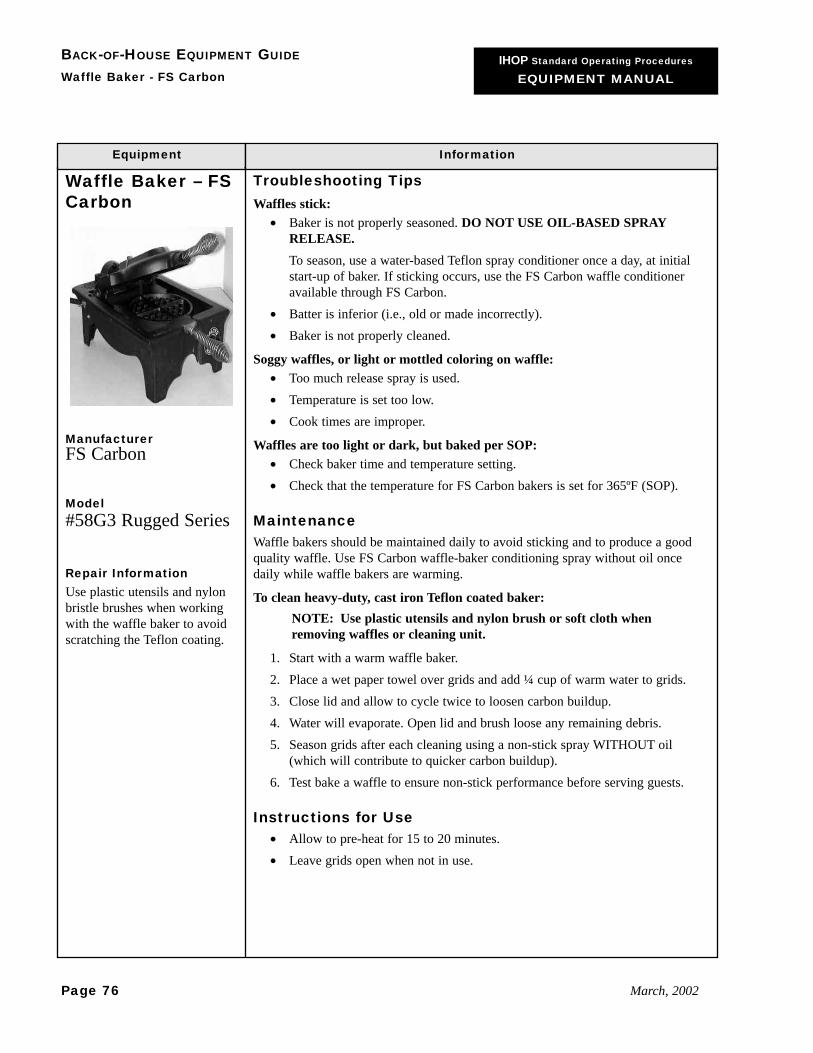
IHOP Standard Operating Procedures
EQUIPMENT MANUAL
BACK-OF-HOUSE EQUIPMENT GUIDE
Waffle Baker - FS Carbon
Page 76 March, 2002
Equipment Information
Waffle Baker – FSCarbon
ManufacturerFS Carbon
Model#58G3 Rugged Series
Repair InformationUse plastic utensils and nylonbristle brushes when workingwith the waffle baker to avoidscratching the Teflon coating.
Troubleshooting TipsWaffles stick:
• Baker is not properly seasoned. DO NOT USE OIL-BASED SPRAYRELEASE. To season, use a water-based Teflon spray conditioner once a day, at initialstart-up of baker. If sticking occurs, use the FS Carbon waffle conditioneravailable through FS Carbon.
• Batter is inferior (i.e., old or made incorrectly).• Baker is not properly cleaned.
Soggy waffles, or light or mottled coloring on waffle:• Too much release spray is used.• Temperature is set too low.• Cook times are improper.
Waffles are too light or dark, but baked per SOP:• Check baker time and temperature setting. • Check that the temperature for FS Carbon bakers is set for 365ºF (SOP).
MaintenanceWaffle bakers should be maintained daily to avoid sticking and to produce a goodquality waffle. Use FS Carbon waffle-baker conditioning spray without oil oncedaily while waffle bakers are warming.
To clean heavy-duty, cast iron Teflon coated baker:NOTE: Use plastic utensils and nylon brush or soft cloth whenremoving waffles or cleaning unit.
1. Start with a warm waffle baker.2. Place a wet paper towel over grids and add ¼ cup of warm water to grids.3. Close lid and allow to cycle twice to loosen carbon buildup.4. Water will evaporate. Open lid and brush loose any remaining debris.5. Season grids after each cleaning using a non-stick spray WITHOUT oil
(which will contribute to quicker carbon buildup). 6. Test bake a waffle to ensure non-stick performance before serving guests.
Instructions for Use• Allow to pre-heat for 15 to 20 minutes.• Leave grids open when not in use.
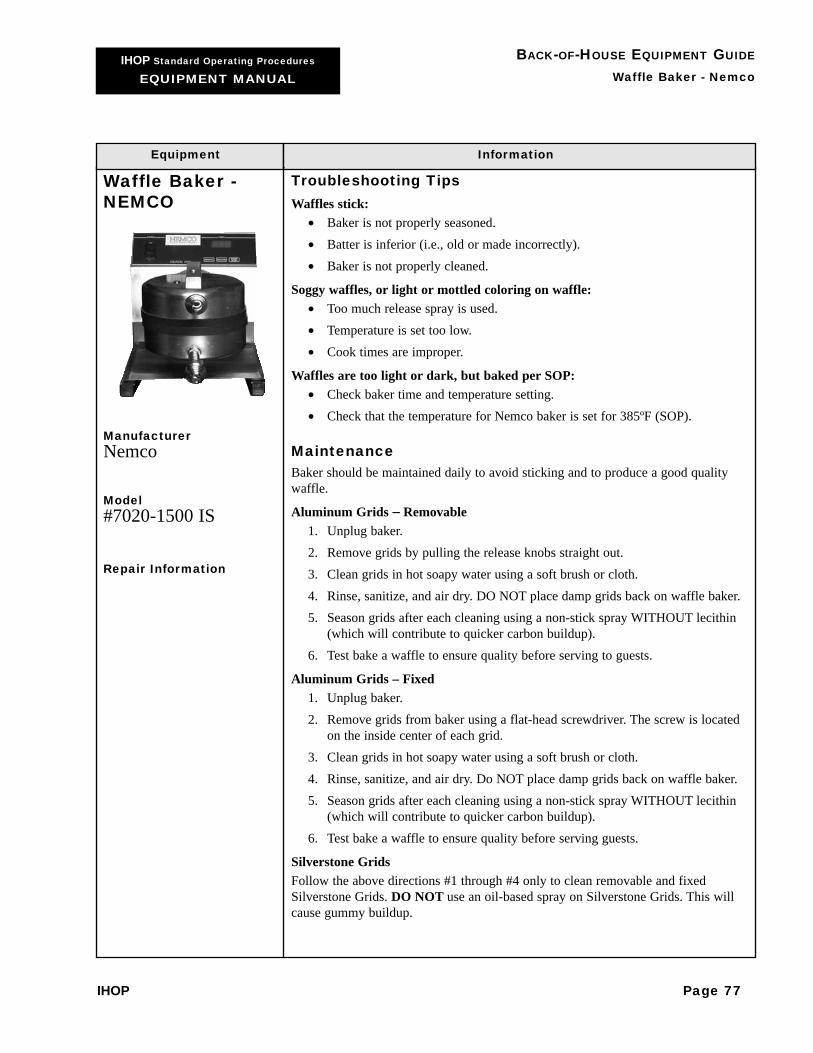
IHOP Standard Operating Procedures
EQUIPMENT MANUAL
BACK-OF-HOUSE EQUIPMENT GUIDE
Waffle Baker - Nemco
IHOP Page 77
Equipment Information
Waffle Baker -NEMCO
ManufacturerNemco
Model#7020-1500 IS
Repair Information
Troubleshooting TipsWaffles stick:
• Baker is not properly seasoned.• Batter is inferior (i.e., old or made incorrectly).• Baker is not properly cleaned.
Soggy waffles, or light or mottled coloring on waffle:• Too much release spray is used.• Temperature is set too low.• Cook times are improper.
Waffles are too light or dark, but baked per SOP:• Check baker time and temperature setting. • Check that the temperature for Nemco baker is set for 385ºF (SOP).
Maintenance Baker should be maintained daily to avoid sticking and to produce a good qualitywaffle.
Aluminum Grids −− Removable1. Unplug baker.2. Remove grids by pulling the release knobs straight out.3. Clean grids in hot soapy water using a soft brush or cloth.4. Rinse, sanitize, and air dry. DO NOT place damp grids back on waffle baker.5. Season grids after each cleaning using a non-stick spray WITHOUT lecithin
(which will contribute to quicker carbon buildup). 6. Test bake a waffle to ensure quality before serving to guests.
Aluminum Grids – Fixed1. Unplug baker.2. Remove grids from baker using a flat-head screwdriver. The screw is located
on the inside center of each grid.3. Clean grids in hot soapy water using a soft brush or cloth.4. Rinse, sanitize, and air dry. Do NOT place damp grids back on waffle baker.5. Season grids after each cleaning using a non-stick spray WITHOUT lecithin
(which will contribute to quicker carbon buildup).6. Test bake a waffle to ensure quality before serving guests.
Silverstone GridsFollow the above directions #1 through #4 only to clean removable and fixedSilverstone Grids. DO NOT use an oil-based spray on Silverstone Grids. This willcause gummy buildup.
IHOP Standard Operating Procedures
EQUIPMENT MANUAL
BACK-OF-HOUSE EQUIPMENT GUIDE
Waffle Baker - Nemco
Page 78 March, 2002
Equipment Information
Waffle Baker -NEMCO,continued
Instructions for UseNOTE: Keep lids closed when not in use to prevent heat loss.
1. Turn unit ON. Allow waffle baker to heat until the LO indicator goes off. Acooking time of 3 minutes will be displayed once the proper temperature hasbeen reached.
2. Open the grids and ladle or pour the proper amount of batter on the lowergrid.
3. Close the grids, rotate 180º for proper batter distribution, and press theSTART/STOP button to begin the baking cycle.
4. When timer reaches 0, the alarm will sound for 10 seconds. Open grids andremove the waffle.