ePro Training Exercises
58
Updated September 2015 Page 1 Important Please keep these important facts in mind: Group your orders so that on one single ePro requisition you have: Only one vendor/supplier you are buying from District Catalog Items on one requisition, Special Request items on a separate requisition, and individual Web (Direct Connect) suppliers each on their own separate requisition. DO NOT MIX VENDORS ON ONE REQUISITION. DO NOT CHANGE the “Ship To” field on your requisitions. Leave the Ship To field at its default of 5983A. Orders must go through the Supply Center before arriving at your site. If you change the “Ship To” field from 5983A to a different Department or Cost Center Code, your requisition may be denied. On all Special Request orders for goods (physical items you can touch… not services), in the “Item Description” field, ALWAYS type this information in this order: Noun (for what the item is), Make, and Model. No part numbers. Put part numbers in the Additional Information field at the bottom. Leave all “Due Date” fields blank unless you are ordering a service, in which case only enter the date that the service is to be completed by. Always type your name, your phone number, and the name of your site at the beginning of all “Additional Information” fields for all Special Request orders. Then type any other important details concerning the order. Whenever you have an ePro order delivered directly to your site, bypassing the Supply Center, you must send an independent email message to the Supply Center alerting them of this. If you don’t then it will mess up the district’s records on your order. This includes orders for software subscriptions. In the email message, include the requisition ID number, the P.O. number, and write that the order is being delivered directly to your site. Send the email to: [email protected] Follow up on your orders. Watch for their arrival; don’t assume anything! If you don’t receive your items within 30 days after your requisition’s purchase order has been created, contact the eProcurement SME (Subject Matter Expert) in the Strategic Sourcing Department. (Check your Manage Requisitions page to see when a purchase order (P.O.) has been created for any given requisition).
Transcript of ePro Training Exercises

Updated September 2015 Page 1
Important
Please keep these important facts in mind:
Group your orders so that on one single ePro requisition you have: Only one vendor/supplier you are buying from District Catalog Items on one requisition, Special Request items on a
separate requisition, and individual Web (Direct Connect) suppliers each on their own separate requisition. DO NOT MIX VENDORS ON ONE REQUISITION.
DO NOT CHANGE the “Ship To” field on your requisitions. Leave the Ship To field at its default of 5983A. Orders must go through the Supply Center before arriving at your site. If you change the “Ship To” field from 5983A to a different Department or Cost Center Code, your requisition may be denied.
On all Special Request orders for goods (physical items you can touch… not services), in the “Item Description” field, ALWAYS type this information in this order: Noun (for what the item is), Make, and Model. No part numbers. Put part numbers in the Additional Information field at the bottom.
Leave all “Due Date” fields blank unless you are ordering a service, in which case only enter the date that the service is to be completed by.
Always type your name, your phone number, and the name of your site at the beginning of all “Additional Information” fields for all Special Request orders. Then type any other important details concerning the order.
Whenever you have an ePro order delivered directly to your site, bypassing the Supply Center, you must send an independent email message to the Supply Center alerting them of this. If you don’t then it will mess up the district’s records on your order. This includes orders for software subscriptions. In the email message, include the requisition ID number, the P.O. number, and write that the order is being delivered directly to your site. Send the email to: [email protected]
Follow up on your orders. Watch for their arrival; don’t assume anything! If you don’t receive your items within 30 days after your requisition’s purchase order has been created, contact the eProcurement SME (Subject Matter Expert) in the Strategic Sourcing Department. (Check your Manage Requisitions page to see when a purchase order (P.O.) has been created for any given requisition).

Page 2 Updated September 2015

Updated September 2015 Page 3
Table of Contents
Basic Orders ......................................................................................................................................... 1
Catalog Keyword Search Method – Example .................................................................................. 1
Express Item Entry Method – Example............................................................................................ 4
To Enter Budget Once for Multiple Items – Example ...................................................................... 8
To Build an ePro Favorites List of Catalog Items – Example .......................................................... 10
To Order from Preset Template – Example ................................................................................... 13
Web (Direct Connect) Orders ............................................................................................................ 16
To Order Office Supplies – Example .............................................................................................. 16
Compare Office Depot Prices with Independent Stationers Prices – Example ............................. 19
Track Your Office Depot Orders – Example ................................................................................... 20
Return Your Office Depot Order – Example .................................................................................. 21
To Order Custodial Supplies – Example ......................................................................................... 23
Special Request Orders ...................................................................................................................... 26
Choose Category for Special Request Items - Example ................................................................. 26
Requisitions Settings Shortcut - Example ...................................................................................... 28
To Order Goods (physical items) – Example ................................................................................. 30
To Order an Asset Item – Example ................................................................................................ 35
To Order a Service (hire outside contractor) ................................................................................. 39
Manage Your Requisitions ................................................................................................................. 43
Track Your Orders .......................................................................................................................... 43
Edit a Denied Requisition .............................................................................................................. 44
Cancel & Release Funds from a Denied Requisition ...................................................................... 45
Advanced Features ............................................................................................................................ 46
Create a Custom Template ............................................................................................................ 46
Place a Lot Order for Books (must be 41+ titles) ........................................................................... 48
Attach a Document Electronically to an Order .............................................................................. 50
Change Delivery Address for Single Items ..................................................................................... 51
Change Account Chartfield for Single Item ................................................................................... 52
Reports .............................................................................................................................................. 53
“Remaining Amounts” Budget Report ........................................................................................... 53
eProcurement Report .................................................................................................................... 54

Page 4 Updated September 2015

Updated September 2015 Page 1
Basic Orders
How to submit an order when you need District Catalog items (a.k.a. stock / inventory items).
EXERCISE 1
Click: Main Menu > eProcurement > Requisition
What to Do What it Looks Like
1) Type %tardy% into the Search field. Click Search to find the item.
2) NOTE how items come packaged. Type 5 into the Qty box, to order 5 packages of tardy slips. (They come 400 to a package).
3) Click the Add button once.
4) This is all we’re ordering, so click Checkout (upper-right area of screen).
5) Type an appropriate name into Requisition Name box.
NOTE: Steps 6 through 10 show you one of two ways to enter the budget string. The other way (called “Mass Change” and used for multiple items) is shown in a later exercise in this booklet.
Catalog Keyword Search Method – Example
Page 2 Updated September 2015
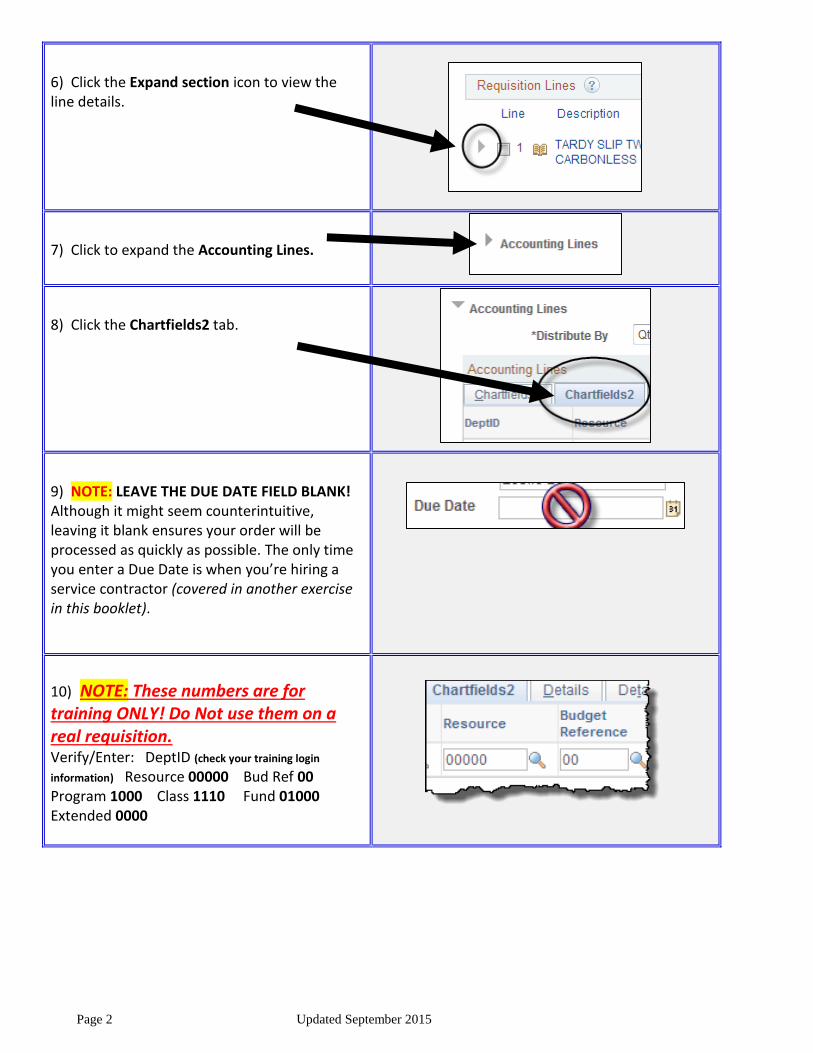
6) Click the Expand section icon to view the line details.
7) Click to expand the Accounting Lines.
8) Click the Chartfields2 tab.
9) NOTE: LEAVE THE DUE DATE FIELD BLANK! Although it might seem counterintuitive, leaving it blank ensures your order will be processed as quickly as possible. The only time you enter a Due Date is when you’re hiring a service contractor (covered in another exercise in this booklet).
10) NOTE: These numbers are for training ONLY! Do Not use them on a real requisition. Verify/Enter: DeptID (check your training login
information) Resource 00000 Bud Ref 00 Program 1000 Class 1110 Fund 01000 Extended 0000
Updated September 2015 Page 3
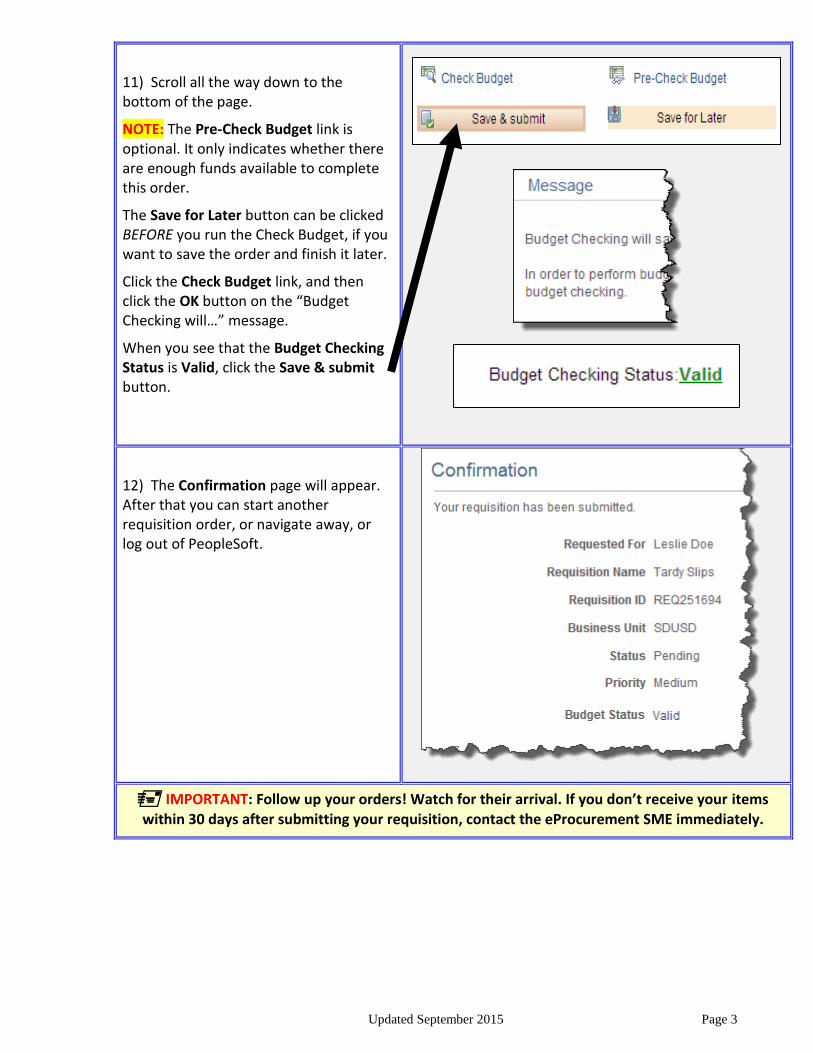
11) Scroll all the way down to the bottom of the page.
NOTE: The Pre-Check Budget link is optional. It only indicates whether there are enough funds available to complete this order.
The Save for Later button can be clicked BEFORE you run the Check Budget, if you want to save the order and finish it later.
Click the Check Budget link, and then click the OK button on the “Budget Checking will…” message.
When you see that the Budget Checking Status is Valid, click the Save & submit button.
12) The Confirmation page will appear. After that you can start another requisition order, or navigate away, or log out of PeopleSoft.
IMPORTANT: Follow up your orders! Watch for their arrival. If you don’t receive your items
within 30 days after submitting your requisition, contact the eProcurement SME immediately.

Page 4 Updated September 2015
EXERCISE 2
Click: Main Menu > eProcurement > Requisition
What to Do What it Looks Like
1) On the right-hand side of the screen, click Express Item Entry.
2) Leave all the fields blank, and click the Search icon for the Item ID field.
(If you know the Item ID number of the item you want, see the Alternative Steps, below Step 5 on the next page).
3) Change the Description from “begins with” to “contains”. (You will get a more complete search).
4) In the Description field, type a single descriptive word for the item you’re looking for. Then, click the Look Up button.
Express Item Entry Method – Example

Updated September 2015 Page 5
5) A list of possible items will display, each containing the word you had typed in the Description field. Click on the item you want. (NOTE: If you don’t see the item you want, try running a new search using a different keyword).
Alternative Steps – Item ID Number
If you know the Item ID number for the item you want, enter it into the Item ID field to find that specific item.
SHORTCUT: Enter only the actual numbers without any zeroes. Then click just to the left side of the numbers you entered. Press and hold down the zero key until it stops creating zeroes in front of your number. That way, you don’t have to count the zeroes in the Item ID number.
Once you have the correct Item ID number entered (with all its zeroes), click away into any other field. The screen should automatically display the item, and be ready for you to enter the Quantity you want of it.
6) Enter the Quantity you want of that item. Then, click the Add to Cart button.
7) Since that’s all you’re ordering, click Checkout (upper-right area of screen).

Page 6 Updated September 2015
8) Type an appropriate name into Requisition Name box.
9) Click the Expand section icon to open up the line details.
10) Click to expand the Accounting Lines.
11) Click the Chartfields2 tab.
12) NOTE: LEAVE THE DUE DATE FIELD BLANK! Although it might seem counterintuitive, leaving it blank ensures your order will be processed as quickly as possible.
13) NOTE: These numbers are for training ONLY! Do Not use them on a real requisition. Verify/Enter: DeptID (check your training login
information) Resource 00000 Bud Ref 00 Program 1000 Class 1110 Fund 01000 Extended 0000

Updated September 2015 Page 7
14) Scroll all the way down to the bottom of the page.
Note: The Pre-Check Budget link is optional. All that does is indicate whether or not there are enough funds available to complete this order.
The Save for Later button can be clicked BEFORE you run the Check Budget, if you want to save the order and finish it later.
Click the Check Budget link, and then click the OK button on the “Budget Checking will…” message.
When you see that the Budget Checking Status is Valid, click the Save & submit button.
15) The Confirmation page will appear. After that you can start another requisition order, or navigate away, or log out of PeopleSoft.
IMPORTANT: Follow up your orders! Watch for their arrival. If you don’t receive your items within 30 days after submitting your requisition, contact the eProcurement SME immediately.

Page 8 Updated September 2015
EXERCISE 3
Click: Main Menu > eProcurement > Requisition
What to Do What it Looks Like
1) Use any methods you’ve already practiced to find different items. Add the items to your requisition. Order two or more items. (Please make sure they are District Catalog items, like the ones you ordered in the previous exercises).
2) Click Checkout (upper-right area of screen).
3) Enter an appropriate name in the Requisition Name box.
4) Click a checkmark into the Select All/Deselect All checkbox located underneath all the line items.
5) Click the Mass Change link, located on the right-hand side.
6) NOTE: Leave the Due Date field blank. Although it might seem counterintuitive, leaving it blank ensures your order will be processed as quickly as possible.
7) NOTE: These numbers are for training ONLY! Do Not use them on a real requisition. Scroll the Chartfields in the Accounting Lines section over to the right. Verify/Enter: DeptID (check your training login
To Enter Budget Once for Multiple Items – Example

Updated September 2015 Page 9
information) Resource 00000 Bud Ref 00 Program 1000 Class 1110 Fund 01000 Extended 0000 (Notice that the Account field is blank. That’s okay; the code number will appear later). Then click the OK button.
8) Make sure that All Distribution Lines is the chosen option. Click into its option button if necessary. Then, click the OK button.
9) Scroll all the way down to the bottom of the page.
Note: The Pre-Check Budget link is optional. All that does is indicate whether or not there are enough funds available to complete this order.
The Save for Later button can be clicked BEFORE you run the Check Budget, if you want to save the order and finish it later.
Click the Check Budget link, and then click the OK button on the “Budget Checking will…” message.
When you see that the Budget Checking Status is Valid, click the Save & submit button.
10) The Confirmation page will appear. After that you can start another requisition order, or navigate away, or log out of PeopleSoft.

Page 10 Updated September 2015
EXERCISE 4
Important Note: This feature might not work, depending on which browser version you use at the time. Oracle is planning to fix this glitch.
Click: Main Menu > eProcurement > Requisition
What to Do What it Looks Like
1) Locate a District Catalog item you order on a regular basis, and add a quantity of it to a fresh ePro requisition. Go to the Checkout page.
Click to place a checkmark in the checkbox to the left of the line item you just added.
2) Look just beneath the Supplier column of the line item, and locate the Add to favorites link. Click that link.
3) A Confirmation window opens up. If you don’t want to see this message every time you create a new Favorite item, click the checkbox to “Do not show this message again”.
Click OK.
4) To test out your new Favorite item, start a fresh, new, blank ePro requisition. Go to the requisition home page. (See illustration on next page of this exercise).
To Build an ePro Favorites List of Catalog Items – Example

Updated September 2015 Page 11
5) Look to the lower right side of the page. Your new favorite item should be listed as a link underneath the Favorites link.
Click the new Favorite item link.
6) The Favorites list will display. If all you see is the phrase “Ungrouped Items”, click on the Expand icon to open and view your Favorites.
7) The Favorite Item opens up, and you can order it from here.

Page 12 Updated September 2015
8) Once you have a growing list of Favorite Items, you have the option of grouping them, to make it easier to find them.
To place a Favorite Item in a Group, first click a checkmark to select the Favorite Item.
9) Beneath the Quantity field, click the Add to Favorites Group(s) link.
10) You have to create your first Favorites Group before adding a Favorite Item to it.
In the Group Name field, type a title for your new Group.
In the Description field, type a name for the Favorite Item you are placing in the new Group.
Then, click OK.
11) Your new Group is displayed, and it also shows the name of the Favorite Item in that Group. To order that item, click to Expand the Group.

Updated September 2015 Page 13
EXERCISE 5
Click: Main Menu > eProcurement > Requisition
What to Do What it Looks Like
1) Click the Templates link.
2) The Templates page opens. To learn more about how to use Templates, you can click the Templates Help icon.
3) Scroll down through the list of Templates until you find the one you want. To view the Template’s details (see what items it contains), click the Template’s Expand icon.
4) To the right-hand side of the Template’s name, you can order all the items on that Template by typing a number (usually a 1) for the Quantity. Then, click the Add button.
To Order from Preset SDUSD Template – Example

Page 14 Updated September 2015
5) Scroll up to the top of the screen and click Checkout.
6) Type an appropriate name into Requisition Name box.
7) Click a checkmark into the Select All/Deselect All checkbox located underneath all the line items.
8) Click the Mass Change link, located on the right-hand side.
9) NOTE: Leave the Due Date field blank. Although it might seem counterintuitive, leaving it blank ensures your order will be processed as quickly as possible.
10) NOTE: These numbers are for training ONLY! Do Not use them on a real requisition! Scroll the Chartfields in the Accounting Lines section over to the right. Verify/Enter: DeptID (check your training login information) Resource 00000 Bud Ref 00 Program 1000 Class 1110 Fund 01000 Extended 0000 (Notice that the Account field is blank. That’s okay; the code number will appear later). Then click the OK button.
11) Make sure that All Distribution Lines is the chosen option. Click into its option button if necessary. Then, click the OK button.

Updated September 2015 Page 15
12) Scroll all the way down to the bottom of the page.
Note: The Pre-Check Budget link is optional. It only indicates whether there are enough funds available to complete this order.
The Save for Later button can be clicked BEFORE you run the Check Budget, if you want to save the order and finish it later.
Click the Check Budget link, and then click the OK button on the “Budget Checking will…” message.
When you see that the Budget Checking Status is Valid, click the Save & submit button.
13) The Confirmation page will appear. After that you can start another requisition order, or navigate away, or log out of PeopleSoft.
Important: Follow up your orders! Watch for their arrival. If you don’t receive your items
within 30 days after submitting your requisition, contact the eProcurement SME immediately.

Page 16 Updated September 2015
Web (Direct Connect) Orders
Submit a Web (Direct Connect) Order when you need goods that are not included within our own SDUSD Catalogs. Examples are certain kinds of office or custodial supplies, for instance.
Important Note: Direct Connect Web orders must be kept on separate requisitions. Do not combine any other items with Direct Connect items on the same requisition. Create a new, separate requisition for each vendor/supplier from whom you order.
EXERCISE 6
Click: Main Menu > eProcurement > Requisition
What to Do What it Looks Like
1) Click the Web link.
2) Click the link for the supplier you want.
3) Note: Each supplier’s ordering website is different. Locate the item(s) you want, indicate how many of each you want by adding them to your “shopping cart”, and then return to the ePro requisition (usually by clicking a “Checkout” button or link, which returns you to the eProcurement Checkout screen). For Independent Stationers, you must click to view the shopping cart, and then you can click the Checkout button to get back to the ePro requisition.
Important Note: DO NOT add any other items to this requisition. Order only those items you
want from the one Web supplier, and then submit the requisition. If you attempt to add other items from other suppliers, or District Catalog or Special Request items, it will mess up your requisition and not work.
4) Type a name (whatever you like) into Requisition Name box.
To Order Office Supplies – Example

Updated September 2015 Page 17
5) Click a checkmark into the Select All/Deselect All checkbox located underneath all the line items.
6) Click the Mass Change link, located on the right-hand side.
7) NOTE: Leave the Due Date field blank. Although it might seem counterintuitive, leaving it blank ensures your order will be processed as quickly as possible.
8) NOTE: These numbers are for training ONLY! Do Not use them on a real requisition! Scroll the Chartfields in the Accounting Lines section over to the right. Verify/Enter: DeptID (check your training login
information) Resource 00000 Bud Ref 00 Program 1000 Class 1110 Fund 01000 Extended 0000 (Notice that the Account field is blank. That’s okay; the code number will appear later). Then click the OK button.
9) Make sure that All Distribution Lines is the chosen option. Click into its option button if necessary. Then, click the OK button.
10) Scroll all the way down to the bottom of the page.
Note: The Pre-Check Budget link is optional. It only indicates whether there are enough funds available to complete this order.

Page 18 Updated September 2015
The Save for Later button can be clicked BEFORE you run the Check Budget, if you want to save the order and finish it later.
Click the Check Budget link, and then click the OK button on the “Budget Checking will…” message.
When you see that the Budget Checking Status is Valid, click the Save & submit button.
11) The Confirmation page will appear. After that you can start another requisition order, or navigate away, or log out of PeopleSoft.
IMPORTANT: Follow up your orders! Watch for their arrival. If you don’t receive your items within 30 days after submitting your requisition, contact the eProcurement SME immediately.
Office Supplies

Updated September 2015 Page 19
EXERCISE 7
Please Note: You can usually get the same exact product cheaper from Independent Stationers, than
buying it from Office Depot. This exercise shows how to compare pricing easily and quickly on the Independent Stationers website.
Click: Main Menu > eProcurement > Requisition
What to Do What it Looks Like
1) Click the Web link.
2) Click the Independent Stationers link.
NOTE: You must first have the Office Depot product item ID number in hand.
3) In the Independent Stationers’ Keyword Search field, type the Office Depot ID number for the product you want. Then, click the orange Search button.
4) Independent Stationers will cross reference Office Depot’s product with their own. The website will then display their findings. If they cannot match the exact same product, they will show you an equivalent product. NOTE: You WON’T see the Office Depot web page appear on the Independent Stationers’ screen. You will only see the Independent Stationers’ pricing. In the example shown here, (August 2015), Independent Stationers sells the exact same Avery address labels for $62.97 that Office Depot sells for $74.99. That’s a savings of $12.02.
Compare Office Depot Prices with
Independent Stationers Prices – Example
Office Depot’s Item ID number

Page 20 Updated September 2015
EXERCISE 8
You can track your Office Depot orders on the Office Depot website, through eProcurement.
Click: Main Menu > eProcurement > Requisition
What to Do What it Looks Like
1) Click the Web link.
2) Click the Office Depot link.
3) Click the My Account link, and then click “My Account” in the drop-down menu.
4) You cannot find your order by using the ePro requisition ID number. You can find and track your order by choosing from the Search By menu:
Ship to ID (this is your Dept. ID Location number: xxxxA)
P.O. Number (the PeopleSoft Purchase Order number, found on the Manage Requisitions page)
You can also filter your search by Status: “Shipped”, “Delivered”, etc.
Track Your Office Depot Orders – Example
Updated September 2015 Page 21
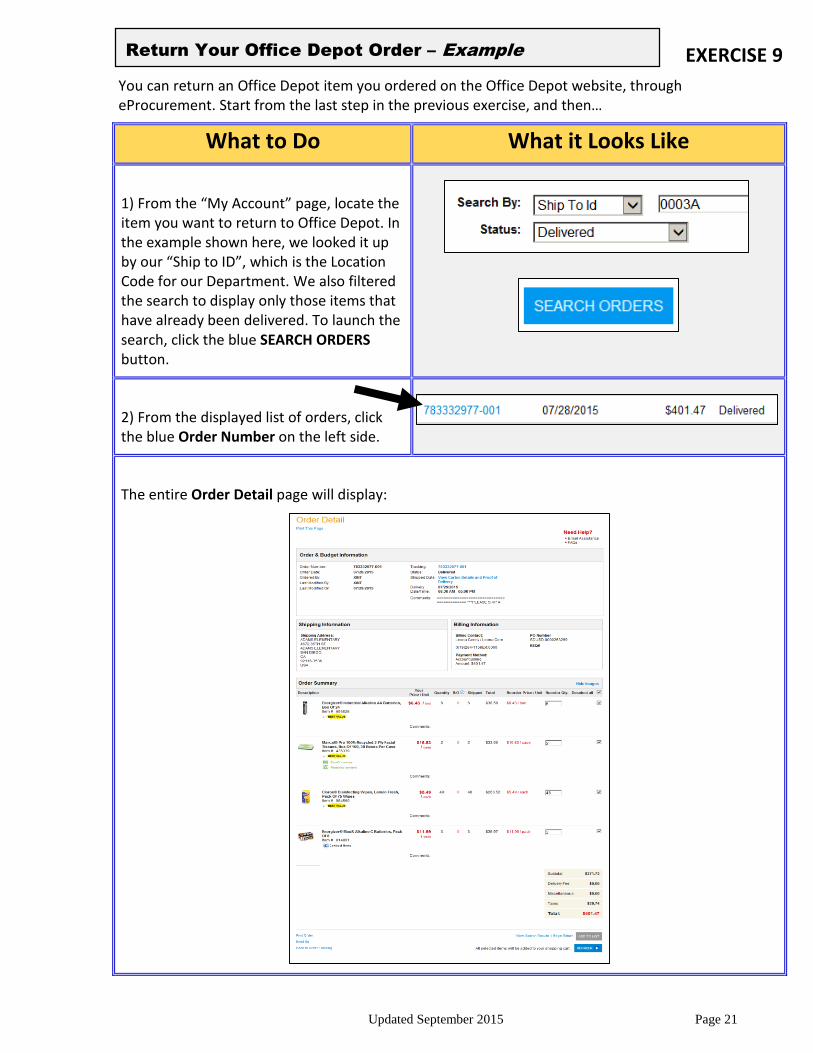
EXERCISE 9
You can return an Office Depot item you ordered on the Office Depot website, through eProcurement. Start from the last step in the previous exercise, and then…
What to Do What it Looks Like
1) From the “My Account” page, locate the item you want to return to Office Depot. In the example shown here, we looked it up by our “Ship to ID”, which is the Location Code for our Department. We also filtered the search to display only those items that have already been delivered. To launch the search, click the blue SEARCH ORDERS button.
2) From the displayed list of orders, click the blue Order Number on the left side.
The entire Order Detail page will display:
Return Your Office Depot Order – Example

Page 22 Updated September 2015
3) In the bottom right corner, click the blue Begin Return link.
NOTE: If the “Begin Return” link is not there, you need to contact Office Depot and ask them about it.
Their Customer Service number for SDUSD staff is 866-725-1752
4) Verify your site’s address, and click the blue Continue button in the lower right corner. If you need assistance, in the upper right corner there is a small box labeled Need Help? with ways to get help.
5) The next page shows you step by step what to do to return a part of or all of the order. You will complete the required fields (what you’re returning, how much of it, why it’s being returned, whether you want to exchange it or get credit back, etc.). Then it will be your responsibility to pack up the item and send it back.

Updated September 2015 Page 23
EXERCISE 10
Click: Main Menu > eProcurement > Requisition
What to Do What it Looks Like
1) Click the Web link.
2) Click the Waxie link.
NOTE: You might have to also click to accept the “Show All Content” message at the very bottom of your screen, and then click the Waxie link a second time, to get in.
3) Navigate the Waxie website to choose several items that might be typical for your school or office. These might be paper towels, soap, toilet paper, cleaning supplies, etc. After adding the items to your electronic shopping cart, click the Return the Shopping Cart button.
4) Type a name (whatever you like) into Requisition Name box.
5) Click a checkmark into the Select All/Deselect All checkbox located underneath all the line items.
6) Click the Mass Change link, located onthe right-hand side.
To Order Custodial Supplies – Example

Page 24 Updated September 2015
7) NOTE: Leave the Due Date field blank. Although it might seem counterintuitive, leaving it blank ensures your order will be processed as quickly as possible.
8) NOTE: These numbers are for training ONLY! Do Not use them on a real requisition! Scroll the Chartfields in the Accounting Lines section over to the right. Verify/Enter: DeptID (check your training login information) Resource 00000 Bud Ref 00 Program 1000 Class 1110 Fund 01000 Extended 0000 (Notice that the Account field is blank. That’s okay; the code number will appear later). Then click the OK button.
9) Make sure that All Distribution Lines is the chosen option. Click into its option button if necessary. Then, click the OK button.
10) Scroll all the way down to the bottom of the page.
Note: The Pre-Check Budget link is optional. All that does is indicate whether or not there are enough funds available to complete this order.
The Save for Later button can be clicked BEFORE you run the Check Budget, if you want to save the order and finish it later.
Click the Check Budget link, and then click the OK button on the “Budget Checking will…” message.
When you see that the Budget Checking Status is Valid, click the Save & submit button.

Updated September 2015 Page 25
11) The Confirmation page will appear. After that you can start another requisition order, or navigate away, or log out of PeopleSoft.
IMPORTANT: Follow up your orders! Watch for their arrival. If you don’t receive your items within 30 days after submitting your requisition, contact the eProcurement SME immediately.
BSS Supplies
Page 26 Updated September 2015
Special Request Orders
Submit a Special Request Order when you need goods or services that are not found within our own District Catalogs. Some examples are: unusual or uncommon items; when you need to hire an outside contractor; purchase a subscription or service agreement; pay for something in advance such as admission tickets for students; or make a hotel reservation for a field trip.
Important Note: Always check the “eProcurement Quick Reference Guide” (a separate publication provided by the Strategic Sourcing Department) for correct procedures when placing Special Request orders.
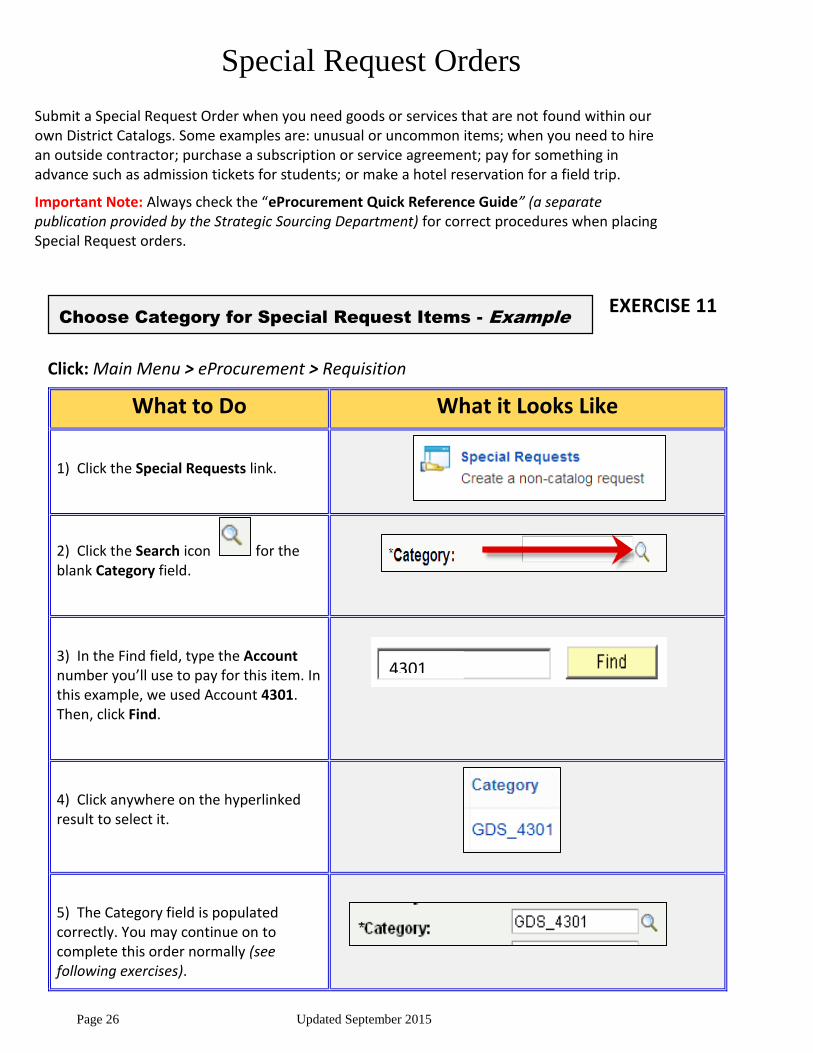
EXERCISE 11
Click: Main Menu > eProcurement > Requisition
What to Do What it Looks Like
1) Click the Special Requests link.
2) Click the Search icon for the blank Category field.
3) In the Find field, type the Account number you’ll use to pay for this item. In this example, we used Account 4301. Then, click Find.
4) Click anywhere on the hyperlinked result to select it.
5) The Category field is populated correctly. You may continue on to complete this order normally (see following exercises).
Choose Category for Special Request Items - Example
4301

Updated September 2015 Page 27
VARIATION - You can locate categories in another less-specific way. Follow Steps 1 – 4 above.
Then try this variation:
1) Type either GDS (for goods), SVC (for services), or A (for assets) into the Find field. Then click the Find button.
2) All the Categories are displayed in a list. Click the Category you want.

Page 28 Updated September 2015
EXERCISE 12
Important Note: This feature only works when you order multiple Special Request items from the same supplier/vendor.
Click: Main Menu > eProcurement > Requisition
What to Do What it Looks Like
1) BEFORE YOU DO ANYTHING ELSE… Click the Requisition Settings link in the upper right area of the page.
2) On the Requisition Settings page, fill in whichever fields (text boxes) you want to have show up automatically on each Special Request item you plan to have on this order. These are called “defaults”:
A) Enter the Supplier’s ID number. This Supplier will then automatically be used for each subsequent Special Request item on this requisition only.
B) If all items ordered from this supplier will use the same budget string and Category, enter the Category here for automatic populating.
C) The same goes for the Unit of Measure, if it will be the same for all items on this order.
D) If you plan to use the same budget to pay for all these items, you can enter it here and it will automatically populate when you start each new Special Request item.
Requisitions Settings Shortcut - Example

Updated September 2015 Page 29
E) When done entering the defaults, click OK to save it.
3) Click the Special Requests link.
4) All the defaults you entered on the Requisition Settings page will now show up on all Special Request items you create on this requisition. Each time you start a new Special Request item here, the defaults you created will already be filled in.
Try it out… create a couple of Special Request items in a row.

Page 30 Updated September 2015
EXERCISE 13
Click: Main Menu > eProcurement > Requisition
What to Do What it Looks Like
1) Click the Special Request link.
2) In the Item Description field type details about the item you want (name, item #, any details): Widgets ID#123ABC Assorted Colors
3) In the Price field, type 50.00 (You can include a decimal point, but no dollar sign).
4) Type 3 into Quantity field.
5) In the Unit of Measure field, type EA (for Each; how they come packaged). If you aren’t sure what to type here, click the Search icon to the right of the field to view a list.
6) NOTE: Leave the Due Date field blank. Although it might seem counterintuitive, leaving it blank ensures your order will be processed as quickly as possible.
To Order Goods (physical items) – Example

Updated September 2015 Page 31
7) Enter the correct Category into the Category field. (Review the steps from Exercise 8).
8) In the Supplier ID field, type the numeric ID for the vendor you wish to use. If you don’t know the supplier’s ID number, click the Search icon to the right of the empty field.
9) Let’s say you want to buy the widgets from Scholastic, Inc. In the Name field type Scholastic and click the Find button.
10) When you see a choice for Scholastic, Inc., click on the Supplier ID number for one of them. You should be certain you’re choosing the correct vendor, especially when there is more than one listing; choose the one that accepts P.O.’s from our school district.
11) In the Additional Information field, type your name, phone #, the site where you work, and then type a justification for the purchase, such as: BSS needs replacement Widgets to repair the thingy.

Page 32 Updated September 2015
12) Click the Add to Cart button. (Note: If this is an item you order on a regular basis, click a checkmark in the Request New Item box. This requests that the item be added to the lists of Catalog (stock) items, to make it easier to order).
13) Click Checkout (upper-right area of screen).
14) Type an appropriate name into Requisition Name box.
15) Click the Expand section icon to open up the line details.
16) Click to expand the Accounting Lines.
17) Click the Chartfields2 tab.
18) NOTE: LEAVE THE DUE DATE FIELD BLANK! Although it might seem counterintuitive, leaving it

Updated September 2015 Page 33
blank ensures your order will be processed as quickly as possible.
19) NOTE: These numbers are for training ONLY! Do Not use them on a real requisition! Verify/Enter: DeptID (check your
training login information) Resource 00000 Bud Ref 00 Program 1000 Class 1110 Fund 01000 Extended 0000
20) Scroll all the way down to the bottom of the page.
Note: The Pre-Check Budget link is optional. All that does is indicate whether or not there are enough funds available to complete this order.
The Save for Later button can be clicked BEFORE you run the Check Budget, if you want to save the order and finish it later.
Click the Check Budget link, and then click the OK button on the “Budget Checking will…” message.
When you see that the Budget Checking Status is Valid, click the Save & submit button.

Page 34 Updated September 2015
21) The Confirmation page will appear. After that you can start another requisition order, or navigate away, or log out of PeopleSoft.
IMPORTANT: Follow up your orders! Watch for their arrival. If you don’t receive your items within 30 days after submitting your requisition, contact the
eProcurement SME immediately.
Widgets for BSS

Updated September 2015 Page 35
EXERCISE 14
Click: Main Menu > eProcurement > Requisition
What to Do What it Looks Like
1) Click the Special Request link.
2) Type the Item Description in all caps like this example: PRINTER HP LASERJET PRO 4000
3) In the Price field, type 449.99
4) In the Quantity field, type 1
5) In the Unit of Measure box type EA
6) NOTE: Leave the Due Date field blank. Although it might seem counterintuitive, leaving it blank ensures your order will be processed as quickly as possible.
7) Click the Search icon for the blank Category field.
8) In the Category field, type an A (for Asset) and click Find.
To Order an Asset Item – Example

Page 36 Updated September 2015
9) Locate the appropriate category in the list that appears, and click it. (G=Greater Than $4,640.00, and L=Less Than $4,640.00)
10) Since we often use Arey Jones as our computer equipment supplier, click the Search
icon for Supplier ID . In the Name field type Arey and click the Find button. When you see a choice for Arey Jones, click on its Supplier ID number.
Notice that the Supplier area now shows the one you chose.
11) In the Additional Information box type your name, phone #, the site where you work, and then type a justification for this purchase, such as this example: Need new printer for main office since the old one burned up.
12) Click Add to Cart
13) If you see a message pop up asking you to change the Category, you can click OK to ignore it, as long as you know what you’re ordering really is an Asset item.
The following must be true for an item to be an Asset:
The item is a good. The item is not consumable. The item is cheaper to repair than to replace.

Updated September 2015 Page 37
The item costs $500 or more per unit (there are exceptions to this).
14) Click Checkout (upper-right area).
15) Type an appropriate name into Requisition Name field.
16) Click the Expand section icon to open up the line details.
17) Click to expand the Accounting Lines.
18) Click the Chartfields2 tab.
19) NOTE: LEAVE THE DUE DATE FIELD BLANK! Although it might seem counterintuitive, leaving it blank ensures your order will be processed as quickly as possible.

Page 38 Updated September 2015
20) NOTE: These numbers are for training ONLY! Do Not use them on a real requisition! Verify/Enter: DeptID
(check your training login information) Resource 00000 Bud Ref 00 Program 1000 Class 1110 Fund 01000 Extended 0000
21) Scroll all the way down to the bottom of the page.
Note: The Pre-Check Budget link is optional. All that does is indicate whether or not there are enough funds available to complete this order.
The Save for Later button can be clicked BEFORE you run the Check Budget, if you want to save the order and finish it later.
Click the Check Budget link, and then click the OK button on the “Budget Checking will…” message.
When you see that the Budget Checking Status is Valid, click the Save & submit button.
22) The Confirmation page will appear. After that you can start another requisition order, or navigate away, or log out of PeopleSoft.
Important: Follow up your orders! Watch for their arrival. If you don’t receive your items within 30 days after submitting your requisition, contact the eProcurement SME immediately.
Printer

Updated September 2015 Page 39
EXERCISE 15
PLEASE NOTE that in addition to doing an ePro requisition, you probably also need to submit an
ICA form (Independent Contractor Agreement). Be sure to verify this with the Contract Services department at this phone number, before you hire an outside contractor: (858) 522-5808.
Click: Main Menu > eProcurement > Requisition
What to Do What it Looks Like
1) Click the Special Request link.
2) In the Item Description box type: Services - tree trimming
3) In the Price field, type the fixed cost fee. For this example, type 400.00
4) In the Quantity field, type 1 (always type 1 for service quantity).
5) In the Unit of Measure field, type EA (for Each).
6) In the Due Date box type the date the service is supposed to be completed by.
To Order a Service (hire outside contractor)
3/23/2016

Page 40 Updated September 2015
7) Click the Search icon for the blank Category box.
8) Enter the correct Category into the Category field. (Review the steps from Exercise 8).
9) If you’re going to hire an already established district supplier, then follow the steps from the last exercise to choose the supplier. If you’re going to hire a new supplier that’s not yet listed with the district, click the link for Suggest New Vendor. For this exercise, make up an imaginary supplier and type in details (name, address, phone, etc.). Then click OK.
10) Type your name, phone #, the site where you work, and then type details about the service, such as: Need overgrown trees trimmed on campus. Supplier will trim all plants, and haul away all debris. Start 10/20 and end 10/24.
11) Click the Add to Cart button.
12) Click Checkout (upper-right area of screen).

Updated September 2015 Page 41
13) Type an appropriate name into Requisition Name field.
14) Click the Expand section arrow icon to open up the line details.
15) Click the Chartfields2 tab.
16) NOTE: These numbers are for training ONLY! Do Not use them on a real requisition! Verify/Enter:
DeptID (check your training login information) Resource 00000 Bud Ref 00 Program 1000 Class 1110 Fund 01000 Extended 0000
17) Scroll all the way down to the bottom of the page.
Note: The Pre-Check Budget link is optional. All that does is indicate whether or not there are enough funds available to complete this order.
The Save for Later button can be clicked BEFORE you run the Check Budget, if you want to save the order and finish it later.
Click the Check Budget link, and then click the OK button on the “Budget Checking will…” message.
When you see that the Budget Checking Status is Valid, click the Save & submit button.

Page 42 Updated September 2015
18) The Confirmation page will appear. After that you can start another requisition order, or navigate away, or log out of PeopleSoft.
IMPORTANT: Follow up your orders! Watch for their arrival. If you don’t receive your items within 30 days after submitting your requisition, contact the eProcurement SME immediately.
Tree Trimming

Updated September 2015 Page 43
Manage Your Requisitions
EXERCISE 16
Click: Main Menu > eProcurement > Manage Requisitions
What to Do What it Looks Like
1) On the Manage Requisitions screen, scroll if necessary to locate the requisition you want to track. (If it does not appear, you probably need to adjust your Date From field to an earlier date, and then click the yellow Search button. This will display older requisitions).
Once you locate the requisition in your list, click its tiny triangular Expand Section icon on the left.
2) The Request Lifespan timeline is displayed. This shows you what has already happened to your requisition, and what will happen next. If an icon is lit up, then your order has reached that step. If an icon is grayed out, then it hasn’t gotten that far yet.
When you are finished viewing the Request Lifespan timeline, click the Expand Section icon again to put it away.
Track Your Orders

Page 44 Updated September 2015
EXERCISE 17
PLEASE NOTE that only by monitoring your Manage Requisitions page will you know when a
requisition is denied. Follow the steps in the example below if you want to edit and resubmit a denied requisition.
Click: Main Menu > eProcurement > Manage Requisitions
What to Do What it Looks Like
1) On the Manage Requisitions page locate the denied requisition. On the far right side of the screen, on the Select Action drop-down menu, choose Approvals and click Go.
2) Scroll down the page and locate the approver’s typed note telling you what to do. The note is located below the red Denied box, in a section labeled Comments.
3) Click the yellow Edit Requisition button (you may have to scroll the page back up to see the button).
The requisition will open and allow you to make any changes to it. Complete the task(s) you read about in the approver’s note from Step 2… make the necessary changes, run a fresh Budget
Check, and upon valid success, Save & Submit the requisition.
IMPORTANT: Follow up your orders! Watch for their arrival. If you don’t receive your items within 30 days after submitting your requisition, contact the eProcurement SME immediately.
Edit a Denied Requisition

Updated September 2015 Page 45
EXERCISE 18
IMPORTANT NOTE: When an Approver denies a requisition it does not automatically return
the encumbered funds back into the budget from whence they came. You (the Requester) must manually release the funds by canceling the requisition, and budget-checking again.
Click: Main Menu > eProcurement > Manage Requisitions
What to Do What it Looks Like
1) On the Manage Requisitions page locate the denied requisition On the far right side of the screen, on the Select Action drop-down menu, choose Cancel and click Go.
2) On the next screen you see, click the yellow Cancel Requisition button.
3) You will be returned to the Manage Requisitions page, where you will notice that the new Status for that requisition now reads Canceled, and its Budget status reads Not Chk’d.
4) IMPORTANT! You must also run the Budget-Check process after canceling the requisition. Only then will your funds be successfully unencumbered, and returned to the budget.
When you see that the Budget Status has changed from Not Chk’d to Valid, you’ll know your funds have been returned.
Cancel & Release Funds from a Denied Requisition

Page 46 Updated September 2015
Advanced Features
EXERCISE 19
PLEASE NOTE: When you create a custom template, by default you are the only one who has access to use it. You can choose to share your template with other employees. You can also edit/change your template at any time, or delete it.
Click: Main Menu > eProcurement > Requisition
What to Do What it Looks Like
Custom templates are typically built with items you plan to order on a regular basis. Create a requisition with any items on it you want, with the exception of Web Direct Connect items (Web
Direct Connect items can be placed on a custom template, but it must be done as a separate template, and can’t be combined with items that are not from Web Direct Connect suppliers).
1) After adding all the items you want to have on the template to your requisition, navigate to the Checkout screen.
2) Be sure to enter a name into the Requisition Name field. This will be the title for your new custom template.
3) On the left, beneath the list of items, click to place a checkmark for:
Select All/Deselect All
4) Beneath the list of items, in about the center of the screen, click the Add to Template link.
Create a Custom Template

Updated September 2015 Page 47
5) Type a name for your new template. Enter the same name in both fields (Name and Description). Then, click OK.
At that point, you can continue to process the requisition if you want to place the order now; or you can navigate elsewhere, and use the new template later.
6) Start a fresh blank requisition. Verify your template is available to you now, by clicking the Templates link.
7) Once there, scroll to the very bottom of the templates list. Your new custom template should be there, ready to be used. Also at the bottom of the screen is the Manage Personal Templates link, which is used to edit, share, and delete your custom templates.

Page 48 Updated September 2015
EXERCISE 20
Click: Main Menu > eProcurement > Requisition
What to Do What it Looks Like
IMPORTANT NOTE: You may place a Lot Order only when you are ordering 41 or more individual titles (books). If you’re ordering fewer than 41 books, you must create a separate line item for each book.
1) Click the Special Request link.
2) Complete the Special Item fields with the necessary information. The Description must have the word LOT in front: “LOT order for books”. Price should be the cost not to exceed (NTE). Quantity is 1, since this is a single lot order. Be sure to use the correct Category for the right budget. Unit of Measure is LOT. Leave the Due Date blank, and then choose a supplier.
3) Be sure to enter important information in the Additional Information textbox. This must include your name, phone number, and site. Also say that you will attach list of books electronically to this requisition, or will fax the list (with the ePro ID number on it!) to Strategic Sourcing.
4) Be sure you have a list of 41 or more book titles you want to order, ready to be scanned into your computer as a file, so that you can attach it electronically to the requisition (how to attach a file
Place a Lot Order for Books (must be 41+ titles)

Updated September 2015 Page 49
is in the next exercise). The list must include: Book titles, Publishers, ISBNs, and prices.
5) (This Step is covered in the next exercise). Attach the list electronically to the requisition, if you have a scanner available. If you don’t have a scanner, then fax the list to Strategic Sourcing and be SURE that the ePro requisition ID number is on the fax!
6) Click Checkout. (If you see a message telling you to change to an Asset Category, check with the Strategic Sourcing Department to find out whether you should do that or not). You would complete the requisition normally by entering the budget Chartfield string, running a successful budget-check, and submitting the order. NOTE: For this exercise, do not submit this practice requisition yet…you will complete it in the next exercise. Leave this requisition on your screen.

Page 50 Updated September 2015
EXERCISE 21
What to Do What it Looks Like
1) Make sure the requisition from your last exercise is still on your screen (the one for a Lot order for books). You should be on the Checkout page.
2) On the far right-side of the lot order line item, click the Edit icon. (It looks like a cartoon text bubble).
3) Click the Add Attachments button.
4) Use the Browse button to locate the document file you want to attach (upload) to this requisition. When you find the file, double-click its name to place it into the Browse text field shown here.
Then, click the Upload button.
5) Observe that the file is now attached. Click the OK button.
6) You are returned to the Checkout screen. You may now finish budget-checking (if you have not done so yet) the requisition, and then submit it for processing.
Attach a Document Electronically to an Order

Updated September 2015 Page 51
EXERCISE 22
PLEASE NOTE: You can change the delivery address for single line items, however, the Strategic Sourcing department has the ability to change it back to your own address at their discretion. You should include a Line Comment explaining why you want the item delivered elsewhere.
Click: Main Menu > eProcurement > Requisition
What to Do What it Looks Like
1) In this exercise you’ll order an item you want to have delivered to a different district site other than your own. You can do this with any items, including Special Requests and Web Direct Connect. Create a new requisition with an easy-to-find Catalog line item such as tardy slips or absence report forms. Navigate to the Checkout screen. Click the Expand Section and Account Information little arrow icons for the line item, to access the Chartfield (budget) area.
2) In the Location Chartfield, delete the default location code and type in the new one for the physical address where you want that item delivered. If you don’t know the code for the delivery site, you can click the Search icon (the magnifying glass) next to the field and view the list of codes and their site names.
Important Note: DO NOT change the Ship To code! Leave it at the default of 5983A!
3) Enter an explanation into the Requisition Comments textbox for this item, as to why you want it delivered to an address other than your own. This is so that the Strategic Sourcing Department will understand your intention, and won’t assume you made a mistake.
You can now complete and submit the requisition normally.
Change Delivery Address for Single Items

Page 52 Updated September 2015
EXERCISE 23
PLEASE NOTE: You can only do this on Special Request or Web Direct Connect items. This does not work on District Catalog items.
Click: Main Menu > eProcurement > Requisition
What to Do What it Looks Like
Create a new requisition (or use a previously created one) that has a line item that is either a Special Request item, or a Direct Connect vendor item. Navigate to its Checkout screen.
1) Click a checkmark into the Select this row checkbox on the left side of the line item description.
2) Click the Mass Change icon, located below and to the right.
3) Next to the blank Category field, click the Search icon (it looks like a magnifying glass).
4) Type the Account code number for the budget you want to change to, to pay for this item. This will change only the Account Chartfield…not any other of the Chartfields.
Then click the Find button.
5) Click the Category link that appears.
6) Click the OK button in the lower left corner.
7) Click OK to accept the Distribution Change Options.
8) Complete the requisition normally. The Account code for that one line item has been changed.
Change Account Chartfield for Single Item

Updated September 2015 Page 53
Reports
EXERCISE 24
Click: Main Menu > Reporting Tools > Query > Query Viewer
What to Do What it Looks Like
1) In the begins with field, type: SD_BD_REM (include the underscore lines) and then click Search or press the Enter key on your keyboard.
2) Click Search.
3) Of the two Queries that appear to choose from, you want the “EXP” one, for Expenses. That one displays more details about individual budgets and accounts.
4) Click the Excel link for the query titled: SD_BD_REMAIN_BUDGET_AMT_EXP
5) Enter the appropriate code numbers into the fields and then click the View Results button. Your code numbers will be different than the ones shown in this illustration.
If you want to see results from all possible codes, type a percentage sign.
It might take several moments for the report to display. It will display in an Excel spreadsheet, in a separate window.
“Remaining Amounts” Budget Report
2016

Page 54 Updated September 2015
EXERCISE 25
Click: Main Menu > Reporting Tools > Query > Query Viewer
What to Do What it Looks Like
1) In the begins with field, type: SD_SITES_EPRO_REQS (include the underscore lines) and then click Search or press the Enter key on your keyboard.
2) Of the two queries to pick from, you want the first one, on the top… the one that does not have “USERID” on the end of its name.
3) Click the link to run the report query to display the results in an Excel spreadsheet.
4) Enter the appropriate data into the fields and then click the View Results button. Enter your own Department’s cost center (Dept. ID) number, and then the dates for a time frame in which you want to examine all eProcurement requisitions.
In this example, we entered the dates so that the report will display all ePro requisitions created between 2/23/2016 and 3/23/2016.
5) You must click either Open or Save when the Excel spreadsheet begins to appear (check the bottom of your screen for a message bar asking what you want to do). The report includes the following details:
Employee ID of the person who submitted the order
Items ordered (descriptions, quantities, prices, total costs, etc.)
Budget strings used for the purchases
Order status
eProcurement Report
02/23/2016
03/23/2016