EPOCHE 2013 LLP ERASMUS IP Excellence in Photogrammetry for Open Cultural Landscape & Heritage...
34
EPOCHE 2013 LLP ERASMUS IP Excellence in Photogrammetry for Open Cultural Landscape & Heritage Education http://la.teikav.edu.gr/epoche/ Thassos 2013
-
Upload
violet-page -
Category
Documents
-
view
214 -
download
0
Transcript of EPOCHE 2013 LLP ERASMUS IP Excellence in Photogrammetry for Open Cultural Landscape & Heritage...

EPOCHE 2013 LLP ERASMUS IP
Excellence in Photogrammetry
for Open Cultural Landscape & Heritage Education
http://la.teikav.edu.gr/epoche/
Thassos 2013

Project Thesis of group E’ Group Members:
Frantisek RADINGER Slovak University of Technology Bratislava, SK
Tibor HALMAY University of West Hungarian Geoinformatic Szekesfehervar, HU
Ronela Ioana PODEAN GRECU University of Timisoara, RO
Mihaela RUJAN University “1st Decembrie 1918” of Alba-Iulia, RO
Angeliki GEROCHRISTOU TEI Kavalas, GR Maria ROKKOU TEI Kavalas, GR


• Agisoft PhotoScan Standard edition• Agisoft PhotoScan Standard automatically builds professional
quality textured 3D models from still images. The program provides robust photo alignment, no coded targets or special shooting conditions being needed
• Photo alignment• Point cloud generation (sparse / dense)
• Polygonal model generation• Texture mapping
http://agisoft.ru/products/photoscan/standard

PhotoModeler Software The PhotoModeler Software extracts 3D Measurements
and Models from photographs taken with an ordinary camera. A very cost-effective way of doing accurate 3D scanning, measurement and surveying
http://www.photomodeler.com/index.html

• VeCAD• VeCAD is a 3D vector graphics library. It serves as a
foundation for your own customized drawing applications (CAD/GIS). The library is furnished in two discreet formats; as a run-time Windows 32 bit DLL; and, as an OCX. Both are included. The package also includes a powerful CAD editor in executable form, based entirely on the VeCAD engine. Use this application to visualize your own project's possibilities!
http://vecad.software.informer.com/

• Calib Specify the calibration algorithm. Valid algorithms are 3 and 4. Default
value is 3. Specify the touch point acceptance variance (range 0 - 2000). Enabling
this will force bound checking on touch points. Limit the number of samples for each touch point. Default value is 15. Offset for crosshair position, which you can use to tweak calibration.
Applicable only with 4-point calibration. Use small touch targets. Default is large.
http://calib.qub.ac.uk/

• Nikon D3000 10 MP CCD sensor (D5000: 12.3 MP CMOS) 11 AF points (with 3D tracking) 3 frames per second continuous shooting (buffer: 6
raw, unlimited JPEG) Extensive in-camera retouching including raw
development and straightening
Total stationConsists by an electronic distance meter (EDM) reads slope distances from the instrument to a particular point

B1. Camera CalibrationB2. Planning (Photo Campaign) & Taking
Photography (shooting)B3. Orientation of the ImagesB4. Rich Geometry Objects (e.g.
Monuments)B5. Identification of Common Points, Lines,
Curves and other Geometric Elements

• Taking photos of the calibration figure• Dots paper ( 9 photos )• Chess paper ( 8 photos )• Upload the pictures in the program (in Calib
and in PhotoModeler)• Processing, calculation• Processing informations good for the project
(PhotoModeler, PhotoScan, VeCad)

We have to take shoots of calibration paper, we need at least 6 photos of calibration paper
Start PhotoModeler Scanner software and choose camera calibration project
then we import photos of calibration paper to our project then we press “Execute calibration” in Automatic Camera Calibration
dialog Software automatically select points on the calibration paper and
calculate the calibration parameters
After we can see a calibration report with calculate parameters At last we add a camera to the library and save calibration project as
NIKON D3000.pmr

Entering the area and walk around for measuring things (building, monument, pillar, stone )
Field work ( taking photos, measuring with total station) Measuring check distances (in the measuring things ) Upload measurements and pictures in our computer and check the
ground’s products

•We have to find object with rich geometry and texture
•Then we have to choose camera stations
•Taking shoots from these camera stations•If we have prepared all photos of monument, we can start PhotoModeler Scanner software.•We choose the Point-based project•Import all photos of monument and assign with calibrated camera NIKON D3000.•We have to orient at least 4 photos, but we used 5 photos.•For orientation we use Mark Points Mode and create point on first 2 photos.
1/3

• Than we use Referencing mode to connect the points. •After reference we can start the Process.•When an error was good, we can start creating points, lines and curves.
•Then we can create a surfaces. For surfaces we used the Path mode.
•When we have created all surfaces, we have to set a materials for this surfaces and build textures.
2/3
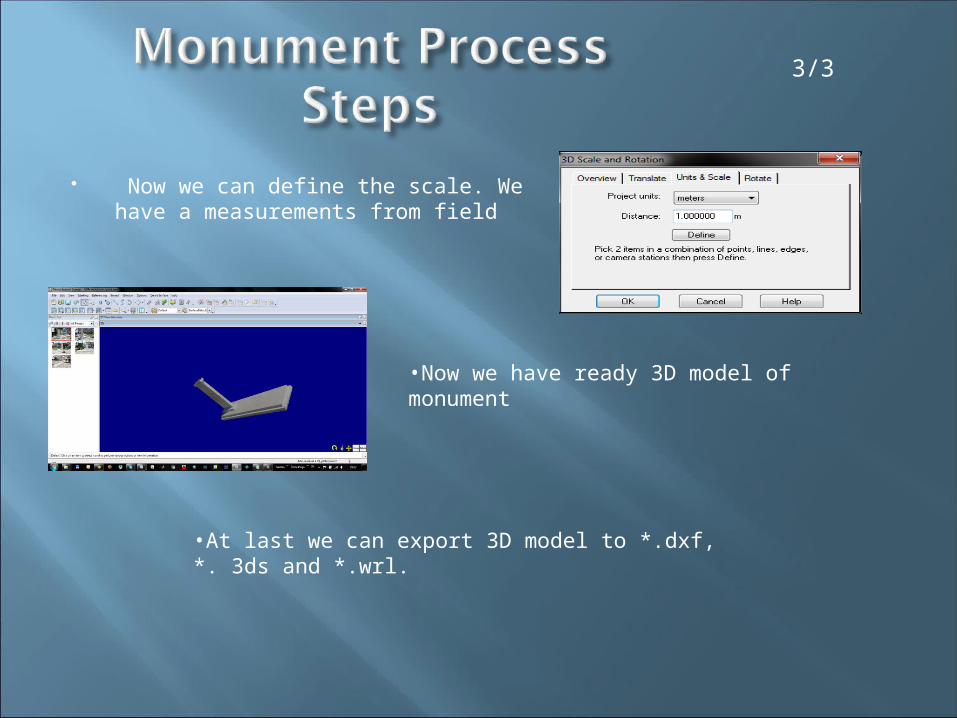
Now we can define the scale. We have a measurements from field
•Now we have ready 3D model of monument
•At last we can export 3D model to *.dxf, *. 3ds and *.wrl.
3/3

We have to find object with rich geometry and texture
Than we have to choose camera stations
Taking shoots from these camera stations If we have prepared all photos of monument, we can start PhotoModeler Scanner software. We choose the Point-based project
1/5

• Import all photos of pillar and assign with calibrated camera NIKON D3000.
• We have to orient at least 4 photos, but we used 5 photos.
• For orientation we use Mark Points Mode and create point on first 2 photos.
• Than we use Referencing mode to connect the points.
• After reference we can start the Process. • When an error was good, we can start
creating points, lines, curves and cylinder.
• For create cylinder we have to use Mark
Cylinders Mode.
2/5

• Than we create a curve on the bottom of pillar and we can rotate it around the axis of pillar (cylinder). For rotation we used Revolution Mode.
• Than we can create a surfaces. For surfaces we used the
• When we have created all surfaces, we have to set a material for these surfaces and build textures. For cylinder we have to create a photo set of oriented photos. Than we make a new material from these photos and use this material for build texture on the cylinder.
• Now we can define the scale. We have measurements from field.
• Now we have ready 3D model of monument• At last we can export 3D model to *.dxf, *. 3ds
and *.wrl.
3/5

When we have created all surfaces, we have to set a material for these surfaces and build textures. For cylinder we have to create a photo set of oriented photos. Than we make a new material from these photos and use this material for build texture on the cylinder
•Now we can define the scale. We have measurements from field.
4/5

Now we have ready 3D model of monument
•At last we can export 3D model to *.dxf, *. 3ds and *.wrl.
5/5

Import photos of the object – we can use drag&drop method. We used 27 pictures.
Crop the area on each photo
•Than we start the 1st process – Align photos
•When process finish successfully, we have a point clouds
1/4

Then we can start the 2nd process – Build Geometry
•When process finish successfully, we have a meshed point clouds
2/4

3/4
•At last we can start 3rd process – Build textures
•We can also set the reference distanece to define the scale

3/4
•Now we have a 3D model with real scale and texture
•At last we can export 3D model to *.dxf, *. 3ds and *.wrl.

First we take some measurements of some control points with a total station and take photos of the building that we are going to use, for rectifying the images.
then calibrate the images that we selected for the rectification. Then we insert control points in VeCAD Then we match the points in the image Then we rectify the image and we match the points from the first image with
the control points in the second image. Then we name the rectified image and specify the pixel size in the
coordinates.
Egyptian building’s Process steps


This work was supported by the Erasmus IP project financed by the European Union. The authors thank the Technological Institution of Kavala for their support and the guidance and generous support in providing hardware and software licenses for training. We also wish to specifically thank the professional staff of The Technological Institute of Kavala during our stay, Mr. Athanasios STYLIADIS, Mr. Lazaros SECHIDIS, Dr. Tamás Jancsó, Mr. Vasilis TSIOKAS, Mr. Sorin HERBAN, Dr. Laszlo GERGELY Dr. Beatrice VILCEANU, Dr. Alexandra POPA for their valuable participation, contributions, instructions and help – our work would not have been feasible without their gracious assistance. The authors also acknowledgement the dedicated efforts of the Greek team members who have made our visit here very agreeable.

Among the benefits of 3D models with PhotoModeler Scanner, we mention the followings:
• opportunity of real image acquisition with very realistic 3D models, that are applied in a large variety of fields;
• less time for field work, more time for data processing;• minimizes the probability of unscanned zones due to shadowing effect of
roughness elements and overhanging zones due to proximity to the target and the possibility of scanning from different angles and overlapping the scanning results;
• providing high precision and complex data;• using 3D technology, 3D models can be created; • can be combined with other well established high precision surveying
techniques

Podean-Grecu Ronela-Ioana(RO): [email protected] :was born in 1991,in Lugoj city,Coșteiu,Romania Country and she is a student at „Politehnica” University of Timișoara, Faculty of Constructions, Section Geodesy, Specialty Cadastre,since 2010.Interested in travelling, reading, 3D modeling
Rujan Mihaela (RO) , [email protected]: was born in 1991, in Targu-Mures City, Mures, Romania and she is a student at “1 December 1918” University of Alba-Iulia, Faculty of Science, Specialty Land Measurement and Cadastre, since 2010. Interested in: learning new things, motocross, travelling.
Frantisek Radinger (SK): [email protected]. He was born in 1989, in Lucenec, Slovakia. He is a student at Slovak University od Technology in Bratislava, Faculty of Civil Engineering, since 2008. His interest are photography, basketball, speleology.
EPOCHE 2013 LLP Erasmus IP, Thassos 2013 – The Group E’ Members

Rokkou Maria (GR) : [email protected]:she was born in 1992,in Athens,Greece.She is a student at technological institute of Kavala, department of Drama.Faculti of landscape architecture since 2010.She is interest at dancing ,drawing,horse riding,crafts,photography ,travelling.
Angeliki GEROCHRISTOU(GR) [email protected] was born in 1991, Athens, Greece. She studies Landscape Architecture at Technological Institute of Drama, department of Kavala. Interested in knowing new cultures and make a lot of friends. Hobbies: playing violin, reading literature, drawing and travelling
Tibor HALMAY(HY) was born In Hungary in 14th of octoberin 1983. He is studying at University of West Hungary Facultion of Geoinformatics. Live in Székesfehérvár.Interested in climbing mountains, running and traveling. It is his last year in his school, and later he wants to go to another college in Hungary learning Economic..


![thassos snow white NSR web preview[3]](https://static.fdocuments.in/doc/165x107/62e07d44b29ceb6a1842d78d/thassos-snow-white-nsr-web-preview3.jpg)