EpiData Help file
98
EpiData Help file Version 3.1 Data entry and data documentation http://www.epidata.dk Jens M. Lauritsen & Michael Bruus The EpiData Association, Odense Denmark Version of : November 26th 2004
Transcript of EpiData Help file

EpiData Help file
Version 3.1
Data entry and data documentation
http://www.epidata.dk
Jens M. Lauritsen & Michael Bruus The EpiData Association, Odense Denmark
Version of : November 26th 2004

.
2
About EpiData v3.1 Program design by: Jens M. Lauritsen & Michael Bruus. EpiData is released as freeware by the non-profit organisation “The EpiData Association” Odense, Denmark (In danish: EpiData foreningen). Previous releases by County of Funen, Denmark and Brixton Health, UK. Programming by: Michael Bruus, Denmark. Translation: EpiData has been translated to several languages. See http://www.epidata.dk for a list of names, web servers and institutions of those who made the translations. Suggested citation: Lauritsen JM & Bruus M. EpiData (version 3.1). A comprehensive tool for validated entry and documentation of data. The EpiData Association, Odense Denmark, 2004. Previous versions: We wish to emphasise that Mark Myatt contributed with great inspiration, specifications and ideas to version 1 and 2 of EpiData – initiation of the EpiData effort would not have been possible without Marks contribution. See also history document on www.epidata.dk First version of EpiData released as Lauritsen JM, Bruus M., Myatt MA, EpiData, version 1.0-1.5. A tool for validated entry and documentation of data. County of Funen Denmark and Brixton Health UK. 2001. EpiData is free. EpiData is distributed as freeware. You are welcome to give a copy to a colleague. All documentation documents are released with permission to copy, distribute, and / or modify the documents under the terms of the GNU (http://www.gnu.org/copyleft/fdl.html) Free Documentation License Version 1.1 or any later version published by the Free Software Foundation with no invariant sections, no back-cover texts. Front pages must be kept as is when documents are translated with the addition of name and organisation of translator. If anyone finds that EpiData is sold or restricted in use by some regulations please notify us immediately at [email protected] It is strictly prohibited to charge anything for the use or delivery of EpiData. Exceptions for this can be supplementary materials in printing made at the cost of printing or for postage of disks or CD’s. But the program as such cannot be sold. This includes translations. No-one can charge any fee for delivery of a translated version. If you are in doubt do not hesitate to contact us. Give reference for the download site or postal adress of those asking for payments for delivery of EpiData. Procedures in EpiData cannot be patented. Visit www.epidata.dk for information on updates, known bugs and further documentation. Some useful internet pages on Biostatistics, Epidemiology, Public Health, Epi Info etc.: Data types and analysis: http://www.sjsu.edu/faculty/gerstman/Epi Info Tools for tabulated data: http://www.openepi.com Epi Info home page: http://www.cdc.gov/epo/epi/Epi Info.htm
Statistical routines: http://www.oac.ucla.edu/training/stata/ Epidemiology Sources: http://www.epibiostat.ucsf.edu/epidem/epidem.html Epidemiology lectures: http://www.pitt.edu/~super1/ EpiDemiology – further: http://www.medepi.net/epitools/ Including analysis in R S Bennett, Mark Myatt, D Jolley and A Radalowicz. Data Management for Surveys and Trials - A Practical Primer using EpiData. Available from: http://www.epidata.dk/documentation.php
Freeware for calculations and diagrams: See http://www.epidata.dk/documentation.php Disclaimer The EpiData software program was developed and tested to ensure fail-safe entering and documentation of
data. We made every possible effort in producing a fail-safe program, but cannot in any circumstance be held responsible for errors, loss of data, work time or other losses incurred by or in relation to the program.

.
3
About EpiData v3.1 .......................................................................................................................................... 2
EpiData is free. ............................................................................................................................................. 2 New features ................................................................................................................................................ 7
Introduction ...................................................................................................................................................... 8 Overview – short tour of EpiData. .................................................................................................................... 9
1. Define Data............................................................................................................................................... 9 2. Make datafile. ........................................................................................................................................... 9 3. Add/Revise Checks - at Entry of Data ...................................................................................................... 9 4. Enter Data ................................................................................................................................................ 9 5. Document Data....................................................................................................................................... 10 6. Export for analysis and securing data. ................................................................................................... 11
How to analyse data after entry...................................................................................................................... 11 History of EpiData:...................................................................................................................................... 12 The EpiData Association ............................................................................................................................ 12 Thanks for the support and testing............................................................................................................. 12 Contributions and funding........................................................................................................................... 13
Credit card payments. ......................................................................................................................... 13 Bank transfer. ...................................................................................................................................... 13 Financial review................................................................................................................................... 13
Support ....................................................................................................................................................... 14 EpiData mail news...................................................................................................................................... 14
Features in EpiData ....................................................................................................................................... 15 EpiData future Development plan: ...................................................................................................... 15
Compatibility with Epi Info .............................................................................................................................. 16 Editor .............................................................................................................................................................. 17
Auto indention............................................................................................................................................. 17 Aligning entry fields..................................................................................................................................... 17 The Field Pick List ...................................................................................................................................... 17 Code Writer ................................................................................................................................................ 18 Preview Data Form..................................................................................................................................... 18
Field names.................................................................................................................................................... 19 First word as field name ............................................................................................................................. 20 Automatic field names ................................................................................................................................ 20 Variable labels ............................................................................................................................................ 21
Create data file............................................................................................................................................... 22 Revise Data File ............................................................................................................................................. 23 Rename fields ................................................................................................................................................ 24 Check file ....................................................................................................................................................... 24
Add / Revise Checks .................................................................................................................................. 25 Range / Legal ............................................................................................................................................. 26 Ignoremissing ............................................................................................................................................. 26 Jumps ......................................................................................................................................................... 27 Must Enter .................................................................................................................................................. 27 Repeat ........................................................................................................................................................ 27 Value labels ................................................................................................................................................ 28 Edit all checks for current field ................................................................................................................... 29 Copying checks .......................................................................................................................................... 30 Clear Checks .............................................................................................................................................. 30 Check file structure..................................................................................................................................... 30 Example of a check file .............................................................................................................................. 31 User defined check functions ..................................................................................................................... 33
List of check commands ................................................................................................................................ 33 AFTER ENTRY ................................................................................................................................... 33 AFTER FILE........................................................................................................................................ 33 AFTER RECORD................................................................................................................................ 34 AUTOJUMP......................................................................................................................................... 34 AUTOSAVE......................................................................................................................................... 34

.
4
AUTOSEARCH ................................................................................................................................... 35 BACKUP.............................................................................................................................................. 35 BEEP................................................................................................................................................... 36 BEFORE ENTRY ................................................................................................................................ 36 BEFORE FILE ..................................................................................................................................... 36 BEFORE RECORD............................................................................................................................. 37 CLEAR ................................................................................................................................................ 37 CLEAR COMMENT LEGAL ................................................................................................................ 37 COLOR................................................................................................................................................ 37 COMMENTS (*).................................................................................................................................. 37 COMMENT LEGAL ............................................................................................................................. 38 CONFIRM............................................................................................................................................ 40 CONFIRMFIELD ................................................................................................................................. 40 COPYTOCLIPBOARD ........................................................................................................................ 40 DEFINE ............................................................................................................................................... 40 EXECUTE ........................................................................................................................................... 41 EXIT .................................................................................................................................................... 42 GOTO.................................................................................................................................................. 42 HELP ................................................................................................................................................... 42 HIDE, UNHIDE.................................................................................................................................... 43 INCLUDE............................................................................................................................................. 43 IF..THEN ............................................................................................................................................. 44 JUMPS ................................................................................................................................................ 44 KEY ..................................................................................................................................................... 45 LABEL ................................................................................................................................................. 46 LABELBLOCK ..................................................................................................................................... 46 LET...................................................................................................................................................... 47 MISSINGVALUE ................................................................................................................................. 47 MUSTENTER...................................................................................................................................... 48 NOENTER........................................................................................................................................... 48 QUIT.................................................................................................................................................... 48 RANGE................................................................................................................................................ 48 RELATE .............................................................................................................................................. 49 REPEAT .............................................................................................................................................. 49 SHOWLASTRECORD ........................................................................................................................ 49 TOPOFSCREEN................................................................................................................................. 49 TYPE ................................................................................................................................................... 50 TYPE COMMENT ............................................................................................................................... 50 TYPE STATUSBAR ............................................................................................................................ 51 UNHIDE............................................................................................................................................... 51 WRITENOTE ...................................................................................................................................... 52
Operators and functions ............................................................................................................................. 53 Operators ................................................................................................................................................ 53
Arithmetic operators ............................................................................................................................ 53 Logical operators................................................................................................................................. 53 Relational operators ............................................................................................................................ 53
Arithmetic functions ................................................................................................................................ 54 ABS(X): FLOAT ............................................................................................................................... 54 ARCTAN(X: FLOAT): FLOAT.......................................................................................................... 54 COS(X: FLOAT): FLOAT................................................................................................................. 54 EXP(X: FLOAT): FLOAT ................................................................................................................. 54 FLOAT(X): FLOAT........................................................................................................................... 54 FRAC(X: FLOAT): FLOAT............................................................................................................... 54 INT(X: FLOAT): FLOAT................................................................................................................... 54 INTEGER(X): INTEGER.................................................................................................................. 54 LN(X: FLOAT): FLOAT.................................................................................................................... 54 LOG10(X: FLOAT): FLOAT............................................................................................................. 54 PI: FLOAT........................................................................................................................................ 54

.
5
POWER(BASE, EXPONENT: FLOAT): FLOAT.............................................................................. 54 ROUND(X: FLOAT): INTEGER....................................................................................................... 54 SIN(X: FLOAT): FLOAT................................................................................................................... 54 SQR(X: FLOAT): FLOAT................................................................................................................. 55 SQRT(X: FLOAT): FLOAT .............................................................................................................. 55 STRING(X): STRING....................................................................................................................... 55 TRUNC(X: FLOAT):INTEGER ........................................................................................................ 55
String functions ....................................................................................................................................... 56 UPPER(S: STRING): STRING ........................................................................................................ 56 LOWER(S: STRING): STRING ....................................................................................................... 56 COPY(S: STRING; INDEX, COUNT: INTEGER): STRING ............................................................ 56 POS(SUBSTR: STRING; S: STRING): INTEGER .......................................................................... 56 LENGTH(S: STRING): INTEGER.................................................................................................... 56 STRING(X): STRING....................................................................................................................... 56 SOUNDEX(S: STRING): STRING................................................................................................... 56
Date and time functions .......................................................................................................................... 57 DATE(D:INTEGER,M:INTEGER,Y:INTEGER): DATE.................................................................... 57 DAY(D: DATE): INTEGER............................................................................................................... 57 DAYOFWEEK(D: DATE):INTEGER................................................................................................ 57 MONTH(D: DATE): INTEGER......................................................................................................... 57 NOW: DATE .................................................................................................................................... 57 NUM2TIME(D: DATE): FLOAT........................................................................................................ 57 TIME2NUM(F: FLOAT): DATE........................................................................................................ 57 TODAY: DATE................................................................................................................................. 57 WEEKNUM(D: DATE):INTEGER .................................................................................................... 57 YEAR(D: DATE): INTEGER ............................................................................................................ 57
About dates ......................................................................................................................................... 57 How to calculate age on a given specific date ? ................................................................................. 59 About time ........................................................................................................................................... 59
Other functions........................................................................................................................................ 60 ISBLANK(FIELD NAME): BOOLEAN .............................................................................................. 60 RECORDCOUNT: INTEGER .......................................................................................................... 60 RECORDNUMBER: INTEGER ....................................................................................................... 60
Enter Data ...................................................................................................................................................... 61 Navigation between fields........................................................................................................................... 61 Navigation between records..................................................................................................... 61 Navigation between related files................................................................................................................. 62 Finding records........................................................................................................................................... 62 Finding fields and relatefields ..................................................................................................................... 62 Filter............................................................................................................................................................ 63
Append / Merge Data files.............................................................................................................................. 64 Append ....................................................................................................................................................... 64 Merge Data files ......................................................................................................................................... 64
Document data file ......................................................................................................................................... 66 Data entry notes ......................................................................................................................................... 66 Data file label .............................................................................................................................................. 66 List data ...................................................................................................................................................... 67 Codebook – basic tabulation ...................................................................................................................... 67 Logical Consistency Check ........................................................................................................................ 68 Double entry and validation ........................................................................................................................ 69
Validate duplicate data files................................................................................................................. 69 Double entry ........................................................................................................................................ 69
Count records by field................................................................................................................................. 70 Export data..................................................................................................................................................... 72
Backup of data............................................................................................................................................ 72 Export to text file......................................................................................................................................... 72 Export to dBase III format........................................................................................................................... 73 Export to Excel ........................................................................................................................................... 73

.
6
Export to SPSS........................................................................................................................................... 74 Export to SAS ............................................................................................................................................. 74 Export to Stata............................................................................................................................................ 74
Select lettecase for fieldnames............................................................................................. 75 Export to new EpiData data file .................................................................................................................. 75
Import data ..................................................................................................................................................... 76 Import text files ........................................................................................................................................... 76 Import dBase files....................................................................................................................................... 76 Import Stata files......................................................................................................................................... 77
Other tools and functions ............................................................................................................................... 78 Make QES file from data file....................................................................................................................... 78 Recode data file.......................................................................................................................................... 78 Converting a two digit year to a four digit year............................................................................................ 78 Pack data file .............................................................................................................................................. 79 Compress data file...................................................................................................................................... 79 Print data entry form ................................................................................................................................... 79
Options........................................................................................................................................................... 80 Editor options ...................................................................................................................................... 80 Show data form options....................................................................................................................... 80 Create data file options ....................................................................................................................... 80 Documentation options........................................................................................................................ 80 Advanced options................................................................................................................................ 80 Sounds ................................................................................................................................................ 81 File associations.................................................................................................................................. 81
The .INI file ................................................................................................................................................. 81 Toolbars...................................................................................................................................................... 81 Short-cut keys / mouse............................................................................................................................... 82 Program parameters .................................................................................................................................. 84 Internationalisation...................................................................................................................................... 85
Field types in EpiData .................................................................................................................................... 85 ID Number .................................................................................................................................................. 86 Numeric fields............................................................................................................................................. 86 Text fields and encrypted fields .................................................................................................................. 86 Upper-case text fields................................................................................................................................. 86 Boolean fields (yes/no fields)...................................................................................................................... 87 Date fields................................................................................................................................................... 87 Today’s date fields...................................................................................................................................... 87 Soundex fields ............................................................................................................................................ 87 Tabulator code............................................................................................................................................ 89
Appendices .................................................................................................................................................... 90 Contributions and further acknowledgement.............................................................................................. 90 Acknowledgements .................................................................................................................................... 90 EpiData house example. – extended explanation ...................................................................................... 91 Datafile structure ........................................................................................................................................ 94 EpiData International Versions ................................................................................................................... 97 Principles of translation and local adaptation. ............................................................................................ 97 Who can translate EpiData texts. ............................................................................................................... 98

New features in v3.1 Double entry of data and feedback if different from first time. Implementation of user defined extensions to the check file language New check commands and functions implemented as: SHOWLASTRECORD LOG10 BACKUP creating zip-files or encrypted zip-files See http://www.epidata.dk/revision.htm for an updated list of changes

.
8
Introduction EpiData is a program for DataEntry and documentation of data. Use EpiData when you have collected data on paper and you want to do statistical analyses or tabulation of data. Basic frequency tables and lists of data can be made, but other than that EpiData is focused on dataentry and documentation of data. During dataentry calculation of summary scales or restrictions to values can be defined. You can choose an item from a list and save the corresponding numerical code (1 = No 2= Yes), the text lists are exported as "value labels" for statistical programs. Dates are easily entered, e.g. 2301 will be formatted as 23/01/2001 if entered in year 2001 in a "dd/mm/yyyy" field. EpiData is suitable for simple datasets where you have one source of data (e.g. one questionnaire or one laboratory registration form) as well as datasets with many or branching dataforms. The principle is rooted in the simplicity of the dos program Epi Info version 6, which has many users around the world. EpiData implements the Epi Info version 6 file structure and principles in a windows setting with focus on documentation. The idea is that you write simple text lines and the program converts this to a dataentry form. Once the dataentry form is ready it is easy to define which data can be entered in the different data fields. EpiData will not interfere with your computer setup. It is an essential principle of EpiData not to interfere with the setup of your computer. EpiData consists of one program file and help files. (In technical terms: EpiData comes as a few files and does not depend on, install or replace any DLL files in your system directory. Options are saved in an ini file). A standard "setup.exe" file helps you get the program into your computer. But you can copy the exe file alone to any other place on your computer and it will still work. Limitations No limit on number of observations in theory. In practice it should be less than about 2-300.000. (tested with 250.000). Search with index in 80.000 records < 1 sec on Pentium I 200Mhz). All fields (variables) must fit within 999 lines of text. EpiData cannot handle several users working in the same file. It is a single user system. But there is no problem in placing datafiles on a shared network drive. As long as each operator works with the data at a time when no other operator uses the data. The length of explaining texts for numerical or string codes is 80, the length of the codes as such is 30 characters.

.
9
Overview – short tour of EpiData.
How to work with EpiData The EpiData screen has a “standard” windows layout with one menu line and two toolbars. The "Work Process toolbar" guides you from "1. Define data" to “6. Export data” for analysis. 1. Define Data Define data by writing three types of information for each variable:
A.. Name of input field (variable, e.g. v1 or exposure). B.. Text describing the variable. (e.g. sex or "day of birth")
C.. An input definition, e.g. ## for two digit numerical. Other field types are boolean (yes-no) or Soundex. Variable names can take two forms: a. v1sex (8 first characters in sentence) b. v1 (first word of sentence). 2. Make datafile. After writing the defintion you can preview your dataform or create a datafile. 3. Add/Revise Checks - at Entry of Data A strong part of EpiData is the possibility to specify rules and calculations during dataentry. • Restrict dataentry to certain values and give text descriptions to the numerical codes entered. • Specify sequence of dataentry E.g. fill out certain questions for males only, (jumps) • Apply calculations during dataentry. E.g. age at visit based on date of visit and date of birth.
Summation of scales and index. • Help messages and
extended definitions, e.g. if .. then ...endif. (For an example get first.chk from Http:///www.epidata.dk - examples page).
4. Enter Data Open the file and enter, add or search data. Colors for fields and background can be configured. Here white background and yellow field. The blue explanatory text to the right of the input fields is added by EpiData after entry of data based on labels in check file. Body mass index and age are calculated automatically. Files saved:
A. Dataform definition file. E.g. first.qes
B. Actual datafile containing the data. E.g. first.rec. C. A file with the defined checks. E.g. first.chk
My first DataEntry Formid (automatic id number) <idnum >V1 sex #V2 Height (meter) #.##v3 Weight (kilo) ###.#bmi Body Mass Index ##.##v4 Date of birth <dd/mm/yyyy>age Age today ###s1 Country of Residence _____________s2 City (Current address) <a >t1 Todays Date <Today-dmy>

.
10
D. Supplementary files, e.g. first.not with notes taken during dataentry or first.log with documentation.
5. Document Data After creating the datafile you can document file structure. An example (part of first.rec) is:
DATAFILE: C:\data\first.recFilelabel: My first test datafile is an example
Filesize: 612 bytesLast revision: 28. Jan 2001 12:14Number of fields: 7Number of records: 0Checks applied: Yes (Last revision 28. Jan 2001 12:02)
Fields in datafile:
No. Name Variable label Fieldtype Width Checks Value labels---------------------------------------------------------------------------------------1 id ID-number 6
2 v1 sex Integer 1 sex1: Male2: Female9: Unknown
3 v2 Height (meter) Fixed number 4:2 Legal: 0.0-2.30,9
6 v4 Date of birth Date (dmy) 10
(other fields omitted)
And after dataentry lists values for some or all records:
Observation 1
id 1 v1 Male v2 1.92v4 12/12/1945 s1 denmark s2 Copenhagent1 28/10/2000
A "codebook" can include raw frequency tables. (example not based on first.rec file)
v2 ------------------------------------------------------------------------- Sextype: Integer
value labels: sexrange/legal: 1-2,2
missing: 0/25range: [1,2]
unique values: 2
tabulation: Freq. Pct. Value Label11 44.0 1 Male14 56.0 2 Female
v3 ------------------------------------------------------------------------ Temptype: Floating point
range/legal: 36.00-40.00
missing: 0/25range: [36.00,37.50]
unique values: 12
mean: 36,84std. dev: 0,37

.
11
6. Export for analysis and securing data. The backup routine will copy all files associated with a given datafile to a selected user defined backup directory/folder. You can also export the data to a number of data formats for analysis. How to analyse data after entry EpiData Data Entry is made for entry / checking / management / documentation of data only. It is not a data analysis system – although basic crude tables can be made (codebook). Follow the development of an analysis programme on www.epidata.dk. A testversion of Analysis has been available since October 2004. The programme is nearing release and many basic functions are available. See Http://www.epidata.dk/testing.php (and later also download pages). The format of data files produced by EpiData is the same as Epi Info v6.xx, as well as the principles of the analysis programme. Exceptions to Epi Info file compatibility are described on page 16 You can use Epi Info for Dos to analyse EpiData data files directly or export data to a comma separated text file, a dBase III file, an Excel file, a Stata data file (www.stata.com) or a command file which can be read by SPSS or SAS. You can also convert your data using StatTransfer (www.circlesys.com), DBMS/Copy or Epi Info’s Export module (www.cdc.gov). Several add-on programs are available for analysis of data in Epi Info format (e.g. survival analysis or regression analysis). Visit www.brixtonhealth.com for more information.

.
12
History of EpiData: The initiative to make EpiData was taken by Jens M.Lauritsen. MD. Ph.d. from Denmark. Initially as part of the “Initiative for Accident Prevention” at Funen County - but why develop a new data entry programme ? Epi Info version 6 has all that we need in terms of control of data entry and simplicity. But with development of windows like programs most users find it hard to cope with the "dos" mode of working in Epi Info developed during 1990-1995. Commercially available programs are not focused on documentation, simplicity of use and validation of double entered data. On the Epi Info discussion list there were some discussions on strategies around 1997-1998, when the Epi Info team at CDC in USA decided to make an updated Epi Info version 2000. The updated Epi Info applies a different strategy in using a completely new way of working and the Access database format instead of simple text files (ascii). Since Mark Myatt had similar viewpoints on development strategies he was contacted by Jens M.Lauritsen towards the end of 1999 and agreed to join the EpiData development team which at that point also included a skilled pascal programmer Michael Bruus, who is doing the actual programming. The ambition of EpiData is to create a simple to use independent application, which will not interfere with or require any special database system drivers (dll based routines) shared with or interfering with other applications. The ambition is also to finance development by contributions from institutions, individuals and other contributors such that the program can be delivered as freeware. Previous versions: We wish to emphasise that Mark Myatt contributed with great inspiration, specifications and ideas to version 1 and 2 of EpiData – initiation of the EpiData effort would not have been possible without Marks contribution. See also history document on www.epidata.dk First version of EpiData released as Lauritsen JM, Bruus M., Myatt MA, EpiData, version 1.0-1.5. A tool for validated entry and documentation of data. County of Funen Denmark and Brixton Health UK. 2001. The EpiData Association EpiData is released for public use by the EpiData association, which has the purpose of enhancing dataquality and tools for public health and other field work by dissemination of the Epidata program. The purpose is also to gain external funding such that all costs for EpiData are paid for. Thereby allowing for continued dissemination of EpiData as freeware. The EpiData association has no personnel employed. Persons involved are having jobs elsewhere and are doing the work in freetime or on paid leave for larger tasks or part of the development. It is expected that more groups will be formed as part of the continued EpiData development, each responsible for one part. Contact [email protected] for further information. Thanks for the support and testing During the period from end of 1999 to january 2001 it was not known whether EpiData was just my cracy idea or a sustainable idea. Since then it has gained wide acceptance, not the least shown by the many Epi Info centers around the world having engaged in translation of menu’s and documents. Also the many persons having spent hours on testing and commenting are worth mentioning. Without this support the development of EpiData would not have continued. JM.Lauritsen Dated : see front page.

.
13
Contributions and funding Contributions and donations EpiData has been made on a very small budget and is supplied as free-ware to the international community. EpiData is from version 2.0 and above released by the non-profit organisation “The EpiData Association” Odense, Denmark (In danish: EpiData foreningen). The association receives NO baseline budget from anyone. If you like EpiData please consider giving a donation for further development. If you need a proof of payment please mail us at [email protected] Further funding is needed to facilitate the development after version 1.5 (e.g. refining of programming, enhancing speed, maintenance of website, to pay for absence from paid work to do EpiData or other developmental and promotional efforts for EpiData). CREDIT CARD PAYMENTS. A credit card payment should be possible directly on the website www.epidata.dk from mid or end december 2001. (Awaits official approval). BANK TRANSFER. You can also send a contribution to this bank account by direct bank-to-bank transfer (not cheque): Bank Name: Laan & Spar Bank Bank Address: Hoejbro Plads 9-11, Postboks 2117, DK1014 København K, Denmark Account number: 0400 401 0550861 Account holder: EpiData SWIFT code: LOSADKK Due to transaction costs the contribution should be at least $25 / £20 / Euro25 or equivalent. Any less and it all goes to the banks! From some banks the transaction cost is around $18 / £14 / Euro18 others as low as $3 / £2 / Euro3. Ask your bank to transfer contributions directly to the bank mentioned above not through a different danish bank first. Ask for transfer in $/ £/ Euro (€) this should minimise transaction costs. The transaction costs are the same for small and large contributions. A mechanism of combined transaction is therefore worked upon. FINANCIAL REVIEW The Danish Society of Public Health (Research and general public health association for public health interested professionals in Denmark) monitors use of the contributions and has full insight into the spending of donations.

.
14
Support The current document works as the technical manual for EpiData. Use this document for printing of a manual. See also: a. Steve Bennett, Mark Myatt, Damien Jolley, and Andrzej Radalowicz. Data Management for
Surveys and Trials - A Practical Primer using EpiData. Available from: http://www.myatt.demon.co.uk
b. EpiTour guide provided as windows help file and pdf file. Other manuals and examples exist. See www.epidata.dk for updated lists of materials. Unfortunately we do not have the resources to provide personal support in general. But we always try to help people out of a situation. In particular if data are threatened to be lost or malfunctioning. In general EpiData questions can be sent to the Epi Info discussion list (subscribe from www.cdc.gov/epo/epi/Epi Info.htm). Remember that the list is for all Epi Info users so include the key word EpiData in the title of your message. If you find errors or bugs when using the program or have suggestions for improvements you may contact us at: [email protected] A list of known bugs is maintained at www.EpiData.dk as well as at the discussion forum at the same adress.. Bug reports should include the following information: Description of problem. Was it consistent? Did it appear with different data files / structures or only with a particular one? Could you make the error appear on a different PC? Which operating system were you using? How much free disk space? Which version of EpiData? Which e-mail address to contact you if we have suggestions. Basic principles of formation of data-entry forms, entering data, building of check rules etc. follows what can be read in the Epi Info v6.xx manual (see http://www.cdc.gov/Epi Info/ei6.htm ). EpiData mail news To receive major news on EpiData development sign on at www.epidata.dk/php/maillist.php or use the link on the help menu which will take you to the same link if you have a direct internet connection. Users who signed on will receive information on major updates and changes arising from major bug reports. We might also ask users to participate in decisions on what to include in upcoming versions or to test future versions of EpiData. Your e-mail address will not be used for other purposes nor will it be given to anyone else.

.
15
Features in EpiData A complete version and development list is maintained at the http://www.epidata.dk site. Version 3.1 of EpiData includes the following features: An editor where multiple questionnaire definition (.QES) files may be created or modified including find / replace, copy to / from clipboard, and undo functions. A easy-to-use field alignment function A test-data form function allowing questionnaires to be previewed without creating a data file Creation of data files based on .QES files Automatic naming of variables based on the text before the variable Basic entry validation Check rules Beep /sounds emitted on error Create new data records and view / modify existing records Export of data files to comma separated text files, dBase III, Excel, Stata, SPSS and SAS files Import of data from text files, dBase III/IV and Stata files Data file compatibility with Epi Info v6.xx A work process toolbar to help structure the creation of data and check files Create a questionnaire (.QES) file from data (.REC) file Backup of data file Print Data Form Data file labels, variable labels and value labels Revise structure of data file with revised .QES file Case-wise data listing and enhanced data documentation functions Indexing of data files for fast searching Double-entry and validation Facilities to implement hierarchical coding schemes. Functions to handle different languages in menus, dialogs, etc. Relational data entry Merge / append data files Batch consistency check of data files Batch recoding of data files Implementation of user defined extensions to the check file language EPIDATA FUTURE DEVELOPMENT PLAN: Depending on the number of bugs reported in EpiData 3.1 a bug fix release might come out in first quarter of 2005, but other than that we are in a phase of preparing for the next possible extension of EpiData. The development could include: a. Analysis module compatible with EpiData b. Implementation of user configurable menu and user specified extensions and external programs. c. Implementation of a module for transaction logging during dataentry. A request by data authorities
in some countries. d. A version for the Linux platform e. Listing and reporting of data based on menu files and additions. But the above will not take place unless further funding is secured. The basic principle is to get funding and donations for development and release such that EpiData can be given away at no cost.

.
16
Compatibility with Epi Info EpiData is, in its ideas and principles of operation, based upon the MSDOS program EpiInfo v6.xx created for the WHO by the CDC. visit www.cdc.gov/epiinfo.htm for more information. In the development of EpiData it has been a basic principle that data files created in EpiData should be compatible with Epi Info and vice versa. However, some differences do exist because some field types are available in EpiData that are not available in Epi Info and vice-versa. EpiData and Epi Info v6 are sufficiently similar that many EpiInfo v6.xx projects will work in EpiData with little or no modification. This is particularly true if only basic checks (i.e. ranges, legal values, repeats, must enter, skip patterns) are used in the EpiInfo v6.xx project. Differences between EpiData and Epi Info data files
Using Epi Info data files in EpiData EpiData does not support the following field types:
• Phonenumber fields • Phone extension number fields • Colour codes for background and single entry fields (ignored by EpiData)
Using EpiData data files in EpiInfo
EpiInfo does not support the following EpiData field types: • European style today’s date <Today-dmy> • Reversed dates <yyyy/mm/dd> and <Today-ymd> • Soundex fields • Tabulator (@) codes • Colour codes for background, entry fields, etc. are not saved by EpiData
For a full list of field types supported by EpiData, see Field types description. CHECK language
• IF … THEN structures that specify more than one condition (i.e. IF … THEN structures that use Boolean operators such as AND / OR) must use round brackets to enclose each conditional expression (e.g. IF (a=2) AND (b>3) THEN ...). EpiData uses a slightly different syntax in some calculations and expression.
• The EpiData check language has now been extended to include many functions not allowed in the Epi Info v6 check file language.
• The HELP command uses a slightly different syntax. • Colour codes and screen coordinates in some commands (e.g. TYPE, HELP) are ignored by
EpiData. • Date constants must be ten digit European dates in EpiData, e.g. ”10/02/2001” • Codefield and codes are NOT supported by EpiData. But the same feature can be
implemented by use of COMMENT LEGAL and TYPE COMMMENT, see the bacterialist example on the EpiData homepage.
• QUIT, COPYTOCLIPBOARD, SHOWLASTRECORD and user-defined check-commands are not supported by Epi Info.
Screen co-ordinates in some commands (e.g. TYPE, HELP) are ignored by EpiData. EpiData uses a slightly different syntax in some calculations and expression.

.
17
Editor The primary purpose of the EpiData editor is to create questionnaires (.QES files). But also to handle output from documentation procedures. The user-interface should be familiar as it uses standard Windows functions. Some functions, however, are not found in other programs: The Field Pick List, The Code Writer, Preview Data form Auto Indention, Align Entry fields. these are explained below. See also how EpiData uses text in .QES files to create field names and variable labels Auto indention When the editor in EpiData is used to create indented text the option Auto Indent may be useful. If the option is selected then new lines will automatically be indented with the same number of blank characters as the previous line. This is especially useful when using the editor to create check files Aligning entry fields The Align Fields function can be used in the editor when a questionnaire (.QES) file is being written. Place the cursor in a line in the editor which contains an entry field that has the desired position on the line. Select Align Fields from the Edit menu. The result of Align Fields is dependent on the setting of field naming (see File / Options / Create data file). If First word is field name is the current setting then these lines v1 A small text ####v2 Other text <A > v3 ###.#v3 Text ###
will be changed to
v1 A small text ####v2 Other text <A > v3 ###.#v3 Text ###
provided the cursor was placed in the v1-line before Align Entry fields was called. If field naming is set to Automatic field naming then the result will be:
v1 A small text ####v2 Other text <A > v3 ###.#
v3 Text ### The Field Pick List The field pick list shows, on tabbed pages, the field types available in EpiData. When the pick list is open, you can select a field type to be inserted at the current position of the cursor in the current editor window. A field type is selected by choosing the page containing the desired field type, then setting the properties of the field and clicking on [Insert] (or pressing the [Enter] key). The pick-list can be opened:
by pressing [Ctrl] + [Q] by a click on the Field Pick List button found in the editor toolbar by selecting Field Pick List in the Edit menu Pressing [Ctrl] + [Q] when pick list is shown changes focus from the editor window to the pick list window.
Remove the pick-list by:
Clicking the close control on the pick list window Pressing [Ctrl] + [F4] when the pick list has the focus

.
18
Code Writer The Code Writer is a helper function making it easier to type the codes used to define the field type and length in questionnaire (.QES) files. If Code Writer is enabled certain keystrokes will be interpreted as the beginning of a field definition and Code Writer will complete the code or will ask for information on the length of the field before writing the code in the questionnaire (.QES) file. For example, if you type the character #, Code Writer will interpret this as the beginning of a numeric field and will prompt you for the length of the numeric field. When you have entered the length, the numeric field will be inserted in the current editor window in the current cursor position. The following character combinations are recognised by Code Writer:
# Numeric field. User is prompted for length of field. Type 5 to get an integer field of five digits in length (#####). Type 5.2 or 5,2 to get a floating point field with five digits before the decimal place and two digits after the decimal place (#####.##).
_ Text field. User is prompted for length of field.
<E Encrypted field. User is prompted for length of field.
<A Upper-case text field. User is prompted for length of field. Latter case of the "A" is not important.
<d European style date <dd/mm/yyyy> will be inserted. <m American style date <mm/dd/yyyy> will be inserted. <y Boolean field <Y>will be inserted <i Automatic ID-number will be inserted.
User is prompted for length of field. Default length (and smallest possible length) is five characters.
<s Soundex field. User is prompted for length of field.
Toggle Code Writer on and off: by pressing [Ctrl] + [W] by a click on the Code Writer button found in the editor toolbar by selecting Code Writer in the Edit menu Pressing [Ctrl] + [Q] to open the Field Pick List will turn off the Code Writer. Opening the Code Writer will turn off the Field Pick List. Preview Data Form The Preview Data Form function shows the layout of the questionnaire as it is shown during data entry but without creating a data (.REC) file. The fields shown in Preview Data Form behave in the same way and have the same names and lengths as during data entry, giving a realistic impression of how the questionnaire works. Check functions are not applied when Preview Data Form is used because no data file is created. It is not necessary to close a Preview Data Form window before a new Preview Data Form can be run. The preview of the data form is not updated automatically when you make changes to the questionnaire (.QES) file. You should run Preview Data Form again to preview the effect of changes made in the questionnaire (.QES) file.

.
19
When a questionnaire definition is show in an editor window, Preview Data Form can be run by: pressing [Ctrl] + [T] clicking the Preview Data Form button in the editor toolbar choosing Preview Data Form in the Data File menu choosing Preview Data Form in the editor pop-up menu choosing Preview Data Form in the drop-down menu to the Make Data File button on the work process toolbar. Field names Names of the entry fields in a data form are created automatically from the contents of the .QES file. Two different ways of naming field can be used in EpiData: 1) First word in the question (i.e. the text to the left of the field) is used as the field name 2) Automatic field naming according to the rules used by Epi Info The method used depends upon the options defined in File / Options / Create Data file. Note also that the case for variables is defined here. This is particularly useful when exporting to e.g. Stata, in which fieldnames are case sensitive.
Depending on settings in options, you can get variable names v1, v2 ....v8 or v1age v2sex ... v8Dur in this example: If you select "first word" as shown in the options (file menu) you get v1, v2.....v8 in the example above. Further examples given below.
id <idnum> V1 Age ## V2 Sex # V3 Temp ##.## V3a Temp ##.## V4 WBC ## V5 AB # V6 Cult # V7 Serv # V8 Dur ##

.
20
First word as field name If the option First word in question is field name is selected from File / Options / Create data file, then the names of the entry fields are created by using the first word in the text to the left of the entry field. If the length of the first word is more than 10 characters then the first 10 characters of the first word will be used as the field name. Examples: The line v1 Enter age of patient ### in a .QES file will give the 3-digit integer field the field name "v1" if the option First word in question is field name is selected. The line Enter age of patient ### will give the entry field the name "Enter". In this case it would perhaps be better to use the automatic field naming option. If a field name is already in use then the next occurrence of the name will include a number. For example, the lines v1 Enter age of patient ### v1 Height of patient ### will create two 3-digit integer fields. The name of the first field will be "v1". The name of the second field will be "v2" despite the fact that the first word in line 2 is "v1". This is because field names must be unique. In this last case it would be nice to have the data form reflect the actual field name instead of repeating the word "v1". This can be done by selecting the option Update question to actual field name. An easy way of testing the way the field names are generated is to use Preview Data form in the Data file menu or by pressing [Ctrl] + [T]. The letter case of field names is dependent upon the option chosen in File / Options / Create data file. Automatic field names If Automatic field names is selected in the Create data file options (File / Options / Create data file), EpiData automatically generates field names based on the field's question (i.e. the text to the left of the field). The field name is a maximum of 10 characters starting with a letter. Letters used in the name are A-Z. International letters are skipped (a note for Danish users: the Danish letters æ, ø and å are automatically changed into ae, oe and aa). The field name is generated from the beginning of the field’s question.

.
21
The following rules are used when generating the field names:
1. Text enclosed in braces (curly brackets) is used in preference to normal text. If the question is “{my} first {field}” then the field name will be MYFIELD. Braces offer a powerful method of defining meaningful field names.
2. Common words are skipped (i.e. words like “what”, “the”, “of”, “and” etc.). “What did you do?” generates the field name YOUDO.
3. Fields without a question get the same name as the previous field plus a number. If the previous field is named MYFIELD then the next field (if it has no question) is named MYFIELD1. If the previous field is named V31 then the next field is named V32. If no previous field exists then the default name FIELD1 is used.
4. If the first character of the generated field name is a number then the letter N is inserted at the first character. “3 little mice” generates the field name N3LITTLEMI.
5. Letter case of the field name is based on the settings used in File / Options / Show data form.
Examples:
Question Generated field name Applied rule(s) State your {nation}ality NATION Rule 1 Al{l} you l{i}ke is i{ce}cream LICE Rule 1 What is your name ISYOURNAME Rule 2 3. question: N3QUESTION Rule 4
Variable labels A variable label is a description of the data that a field contains. In EpiData the variable label is generated automatically by using the text to the left of the field in the .QES file. If the option First word in question is field name is set then the variable label will be the text to the left of the field excluding the first word, which is used as the field name. Example: The line v1 Age of patient ### will create the field name "v1" and the variable label "Age of patient" if the option First word in question is field name is set. If the option Automatic field naming is set then the field name will be "v1ageofp" and the variable label will be "v1 Age of patient".
.
22
Create data file Create a data (.REC) file by: selecting New File from the Data menu in the main screen, or by clicking the Make Data File button in the work process toolbar, or by selecting Make Data File in the Data File menu in the editor It is not necessary to open a questionnaire (.QES) file in the editor before creating a data (.REC) file. If no questionnaire (.QES) file is open in the editor then a select files dialog will be shown. Settings in Create data file options specify how the fields of the data file are named, see Field names. The data (.REC) file will, by default, have the same name as the questionnaire (.QES) file by default, but with the extension .REC instead of .QES. Using the same name for .QES and .REC files is recommended but is not required. An optional short description of the data file can be entered (maximum of 50 characters). The short description is called the data file label. The data file label will be shown as part of the data file's documentation and it is saved as part of the data file created when exporting to Stata. You may find that some Epi Info file format data analysis tools will not read a file with a data file label. You are advised to experiment with data file labels to check if they cause problems with your Epi Info tools. If in doubt, do not specify a data file label. Before a data file is created it may be previewed if the .QES file is open in the editor by selecting Preview Data Form from the Data File menu or by pressing [Ctrl] + [T]. WARNING: An existing data file will be deleted and the data will be lost if a new data file is created with the same name. To modify a data file without losing data, e.g. to add a field or change the field type of a field, please use Revise Data File.

.
23
Revise Data File A data file containing data can be revised without losing data. Data already entered will be copied to the new format for fields with the same name. You can add fields, change definition of fields or delete fields. Use the function Revise File found in the Tools menu from the main screen (close all files first). Do this to revise a data file: Open the questionnaire (.QES) file defining the data file to revise. If the questionnaire (.QES) file is not available then create a new questionnaire (.QES) file using QES File from REC File. Edit the questionnaire (.QES) file (e.g. add new fields, remove fields, change field types). Save the questionnaire (.QES) file and close it.
Now two options are available: � Simply open the REC file for date entry, and EpiData will recognise that an updated QES file
exists and ask if you wish to revise the file. � Or select Revise File in the Tools menu. Select the revised questionnaire (.QES) file and the
data (.REC) file you wish to revise. WARNING: If you remove fields or change the names of the fields (e.g. by changing the text to the left of the fields) you will lose data. Please check the new, revised data file carefully. If something goes wrong, the original data file can be restored. The original data file is saved with the name FILENAME.OLD.REC in the same directory as the new data file. EpiData supports two ways of generating the names of the fields in a .QES file, see Field names. Which method is used is specified using Options from the File menu. Changing naming systems will change the field names and may lead to loss of data. Revise data file will check the naming system used when the original data file was created and if it differs from the setting in Options a warning will be given suggesting that the same naming system used for the original data file is used. The field types of the original data file can be changed by giving the field a new type in the revised questionnaire ( .QES) file.
All field types can be changed to text fields or upper-case text fields. Numeric fields can be changed to numeric fields with the same number of decimals or more. A
warning will be given if data are about to be lost because of a change to fewer decimals.
Field type in original data file
Can be changed to
Integer Floating point, text, upper-case text, encrypted field Floating point Floating point, text, upper-case text, encrypted field IDNUM Integer, floating point, text, upper-case text,
encrypted field Text Upper-case text, encrypted field Upper-case text Text, encrypted field Soundex Text, upper-case text, encrypted field All date types Text, upper-case text, encrypted field

.
24
Rename fields Rename Fields changes the names assigned automatically to the fields in a data. Rename Fields is found on the Tools menu. Select the data file to rename fields in. A list of the current field names is shown in the first column of a table along with their field labels in the second column. To rename a field, place the cursor in the third column in the row of the field to be renamed and type the new field name. Field names can be up to 10 characters long. They must begin with a letter and can only contain the letters a-z and numbers 0-9. Only the fields that are to be renamed need to have text in the third column of the list. Click Save and close to save the changes to the data. Press Cancel to leave the function without changing the data file. If Save and close is clicked then a copy of the original data file is saved as filename.old.rec. If the data file has a check file attached then the field blocks names are changed according to the entered changes in field names but references to the fields (e.g. GOTO field name or COMMENT LEGAL USE field name) are not changed. This has to be done manually. Check file The simplest way of using EpiData is: create a questionnaire (.QES) file to describe the layout of the questionnaire, create a data (.REC) file from the questionnaire (.QES file), and enter data in the data (.REC) file. This will work perfectly well. Rather than checking the data after all data has been entered, it may be useful to check the validity of the data during the data entry process. Using a check file makes this possible. A check file describes ways of checking the validity of the entered data for one, several, or all of the entry fields. The check file can also contain commands to control the flow of data entry (e.g. automatic jumps from one entry field to another field based on the data entered). A check file must have the same name as the data file but with the extension .CHK instead of .REC. Examples of operations that can take place during the data entry process if programmed in a check file: Limiting entry of numbers or dates to a specific range or to a number of specified values Forcing an entry to be made in a field Copying the data from the previous record to a new record Making conditional jumps to other fields based on the data in one field Calculate values of fields based on the values in other fields Complex calculations and conditional operations (IF..THEN operations) Help messages to the person entering data A check file is usually created after creating a data file. The check file may be created in two ways: 1) By using Add / Revise found on the Checks menu, or by clicking the third button on the work process toolbar. This method can be used to specify or change checks for the fields, but blocks outside the field blocks (e.g. BEFORE FILE, etc.) can only be specified or changed using the editor. 2) By using the editor to manually write all check commands. Remember to save the check file with the same name as the data file, but with the extension .CHK instead of .REC. It is possible to use both methods, using Add/Revise Checks to add basic checks and the editor to add more complex checks or file level (rather than field level) checks. If a check file exists when Enter Data is selected then the commands in the check file will be loaded automatically at the same time as the selected data file.

.
25
The most basic check commands can easily be programmed using the Checks / Add / Revise function. This includes range checking, specification of legal values, making a field required, making conditional jumps between fields, making a field the value of the previous record, and using value labels. If you only want to use these commands then continue to Add / Revise Checks. If you want to use other commands (BEFORE ENTRY, AFTER ENTRY, HIDE, UNHIDE, GOTO, HELP, IF..THEN) then please read The structure of the check file and continue to An example of a check file. For a reference of all check commands see List of check commands. Related topics: Add/Revise Checks The structure of the check file An example of a check file List of check commands Add / Revise Checks This function adds or revises checks (validation rules) to an existing data file. When a data file is selected, a data form is built and the check functions window is shown. The [F6] key toggles the focus between the data form and the check functions window. If the focus is in the data form then pressing [Ctrl] + [RightArrow] key will change the focus to the check functions window. If the focus is in the check functions window then pressing [Ctrl] + [LeftArrow] key will change the focus to the data form. Select the entry field to add validation rules by: selecting it in the data form (use a mouse click or [TAB] and [Enter] to reach the field) using the field name pick list at the top of the check functions window pressing [Ctrl] + [UpArrow] or [Ctrl] + [DownArrow] key when focus is in the check functions window See also list of short-cut keys. The field name pick list shows the names of the fields in the data file in the same order as they appear on the data form. If the check functions window has the focus you can use the [Arrow] keys, the [TAB] key or the [Enter] key to reach one of the five basic checks, which are Range/legal Jumps Must Enter RepeatValue Labels If the data form has the focus the following key-combinations will give the focus to one of the validation rules: Press [Ctrl] + [L] to change the current field's range and/or legal values Press [Ctrl] + [J] to change Jumps Press [Ctrl] + [E] to toggle the current field's Must Enter status Press [Ctrl] + [R] to toggle the current field's Repeat status Press [Ctrl] + [A] to change the current field's value labels Note the special use of [Ctrl] + [C], [Ctrl] + [V] and [Ctrl] + [X] when focus is in the data form. See Copying Checks.

.
26
Save ([Alt] + [S]) Click the save button to save all checks without exiting the Add / Revise Checks function. Edit ([Alt] + [D] or [F9]) Click Edit to edit all checks of the field, see Edit all checks for current field. Exit ([Alt] + [X]) Click Exit to exit the Add / Revise Checks function. If changes has been made the user will be asked if the new checks are to be saved. Press [Enter] or use the [Arrow] keys when changes have been made to a check to ensure that the changes are saved. Pressing [Enter] confirms a change. Range / Legal If focus is in a field on the data form then [Ctrl] + [L] will make the cursor jump to the Range/Legal definition line. A range is defined by typing the minimum value and the maximum value separated by a hyphen. Typing 2-5 defines that only the numbers 2,3,4 or 5 can be entered in the current field. If only a maximum value is wanted then use -INF (minus infinity) as the minimum value. If only a minimum value is wanted then use INF (infinity) as the maximum value. Typing -INF-5 defines all numbers less than or equal to 5 as legal entries in the current field. Typing 0-INF defines all positive numbers as legal values. Legal values are defined by typing all the accepted values separated by spaces or commas. Typing 4,6,8,10 defines that only the numbers 4,6,8 or 10 can be entered in the current field. If both a range and legal values are defined then the range must be entered before the legal values. Typing 2-6, 8 defines the numbers 2,3,4,5,6 and 8 as legal values. The definition 8, 2-6 will result in an error. If you want to use a comma instead of a dot as the decimal separator please enclose the definition in double quotes. Ignoremissing The default behaviour of EpiData to let a calculation return a missing value if one of the variables included in the calculation is a missing value. Use IgnoreMissing in a BEFORE FILE, BEFORE ENTER or anywhere else in the checkfile to change this behaviour. If IgnoreMissing is found in the checkfile then calculations including missing values will return a valid result, because missing numeric values will be treated as the value 0 (zero). Only if all variables in the calculation is are missing values the result will be a missing value. Example: A datafile has four fields: V1, V2, V3 and V4, which all are integer fields. V1 contains the number 2, V2 is missing (empty) and V3 contains the number 5. V4 has these checkcommands: V4 BEFORE ENTRY V4=V1+V2+V3 END The default result of this calculation will be a missing value (V4 remains empty) because V2 is a missing value. If the checkcommands are: V4 BEFORE ENTRY IGNOREMISSING V4=V1+V2+V3 END

.
27
then the result assigned to V4 will be 2+0+5=7. Jumps Jumps define which entry field receives the focus for particular values entered into the current field. If, for example, the current field contains a sex (1 = male, 2 = female), then the jumps can define that the value of 1 gives the focus to the field V23 and the value of 2 gives focus to another field, e.g. V40. Type [Ctrl] + [J] to move the focus from a field in the data form to the jumps definition line. Jumps are entered by specifying the value, entering a greater-than-sign (>) and specifying the name of the field to jump to. For example, 1>V23, 2>V40 defines that an entered value of 1 makes the entry continue in the field named V23 and an entered value of 2 makes the entry continue in the field named V40. Note that Jumps are separated by commas. If spaces or commas are used in a definition, enclose the whole definition in double quotes (e.g. “2.5>V30”, “3,5>V35”). Instead of specifying a field name as the target for a Jump, two special targets may also be used: END and WRITE. END means “jump to the last field in the data form”, WRITE means write the current record to the disk. For example, the Jumps definition “1>V30”,”2>END”,”3>WRITE” specifies the following behaviour: If the number 1 is entered then data entry continues in the field named V30; if the number 2 is entered then data entry continues in the last field in the data form; if the number 3 is entered then the current record is saved. A general jump command can be entered as “AUTOJUMP V30”. This means that the next field that receives the focus will be the field named V30 regardless of the data entered in the field containing this jump condition. If AUTOJUMP is used this must be the only entry in the jumps edit box. AUTOJUMP is useful for entering data from forms which do not follow the normal left-to-right, top-to-bottom completion order (e.g. forms arranged in columns). To make definition of jumps faster, the following short-cut can be used: When the value of a jump and the following ">" has been written, click with the mouse on the field that the jump should go to. The name of the clicked field will be inserted after the ">". The same point-and-click can be used after writing AUTOJUMP (remember to type a space before attempting to click on the destination field). Must Enter This rule defines if data must be entered into the current field. Pressing [Ctrl] + [E] when a field in the data form has the focus during Add / Revise Checks will toggle the field’s Must Enter status. Repeat If Yes is entered in this rule then the data entered in the previous record will be repeated in the next new record. Repeated data can be changed during data entry. This function can save a lot of typing if your forms contain data that changes only rarely in a particular batch of forms (e.g. reporting forms in a surveillance system). Pressing [Ctrl] + [R] when a field in the data form has the focus will toggle the field’s Repeat status.

.
28
Value labels Value labels are a set of values combined with text items that explain the meaning of each value. For example: A field is created to enter information on the sex of the informant. It is decided that a value of 1 in the field means that the informant is male and that a value of 2 means the informant is female. If a value label is defined then a ‘translation table’ can be shown during data entry if the user presses [F9] (or the [+] key on the numeric keypad). The value labels in this example would be: 1 Male2 Female To define a new label Click the button to the right of the value label drop-down list marked with ‘+’. This opens a small edit window with this text: LABEL Label_fieldEND The text Label_field is based on the name of the field. You can change this if you want to. The text to be entered for the example above is: LABEL Label_Sex
1 ”Male gender”2 Female
END The spaces before the values are optional, but they make the list easier to read. Notice the need for quotes when spaces are included, e.g. 1 ”Buena Vista Social Club” or 3 ”Mongolian Horse” Click Accept and Close or press [Alt] + [A] to close the edit window. The name of the new label will now be shown in the Value Label drop-down list. To edit an existing label Make sure that the name of the label to be edited is shown in the Value Label drop-down list. Click the [+] button. The edit window is now shown with all labels defined for the selected Value Label. Edit the labels and click Accept and Close to exit or press the [Esc] key (or click Cancel) to abandon the changes. Assign an existing label to a field Click on the down arrow in the Value Label drop-down list and select the relevant label. Several fields can share the same value label, which only needs to be defined once. Clear the value label for the field Click on the down-arrow in the Value Label drop-down list and select [none]. Using predefined labels With the installation of EpiData a value label library was saved in the EpiData program directory. The library has the filename EpiData.Lbl. The library is meant to be a help when the same value labels are used often in different projects. When the down-arrow in the Value Label drop-down list is clicked, the names of value label sets contained in the library file are shown in normal font. Bold names signify value label sets that are part of the check file being edited.

.
29
If a value label set from the library file is being edited, the revised value label set is saved only in the current check file. The value labels in the library file cannot be edited using an editor. If a value label set in the current check file has the same name as a value label set in the value label library file, then the label set in the current check file is used and the value label set in the library file is ignored. If a EpiData.lbl file exists in the same directory as the data file selected for Add/Revise Checks then this library is used instead of the library found in the same directory as the program file (EpiData.exe). NOTE: No warning is given if the EpiData.lbl file has syntax errors. If errors are found then the labels in the file are ignored. What is really happening? When a value label set is assigned to a field using Add / Revise the label definition is placed in the LABELBLOCK of the check file and the command COMMENT LEGAL USE [labelname] is placed in the field's field block in the check file. See List of check commands for an explanation of these commands. Edit all checks for current field The Add / Revise Checks window has a button labelled Edit. Pressing this button (or pressing [Alt] + [D] or [F9]) will open an edit window where the field block for the current field can be edited directly in the same way as writing the whole check file with an editor, see Check file structure. If the current field has no check commands attached when the Edit button is clicked then the edit window will only show the name of the field (to signify the beginning of the field block) and the word END (to signify the end of the field block). If the current field has check commands attached these will be shown in the edit window where they may be edited and new commands can be added. Press [Esc] or click Cancel to abandon changes. Click Accept and close or press [Alt] + [A] to accept the changes. Refer to Check file structure and List of check commands if you want to edit a field's check commands directly. Check file blocks outside the field blocks cannot be edited using Add / Revise Checks, but only by editing the check (.CHK) file in the editor. Errors in the check commands When Accept and close is selected, the check commands are evaluated. If no errors are found, the edit window closes. If errors are found, the edit window is split into two. The top of the window shows the check commands and the button of the window shows the errors found and the line number where the errors where found. Double-click on the line showing the error to make the cursor jump to the check command that contains the error. Select Accept and Close once the errors have been corrected. Please note that expressions and calculations are not evaluated when Accept and Close is selected.
.
30
Copying checks The most common checks applied to one field can easily be copied or moved to another field: Select the field with the checks to be copied. Press [Ctrl] + [C] to copy the field’s checks or press [Ctrl] + [X] to cut all checks. Select another field and press [Ctrl] + [V] to paste the checks into the new field. The copy / cut / paste functions copy basic functions such as RANGE, LEGAL, JUMPS, MUSTENTER, REPEAT and value labels, plus others which are written outside before/after entry blocks. Clear Checks This function delete all checks defined for a particular data file. Deleted checks cannot be undeleted. Use this function with extreme caution. Check file structure Commands in a check file are stored in blocks. EpiData supports two basic blocks: label blocks and field blocks. The label block is described in the List of check commands. All commands related to a specific field are stored in a field block. If a field block begins with the name of the field and ends with the command END, the latter case of commands is ignored and "end" is interpreted in the same way as "END". Some commands are themselves blocks (e.g. LEGAL..END, JUMPS..END) while other commands only use one line (e.g. RANGE, GOTO). All blocks are ended with the command END. An example: VAR1
RANGE 1 5MUSTENTERJUMPS
1 VAR42 VAR53 VAR10
ENDBEFORE ENTRY
VAR1 = F1 + 100ENDAFTER ENTRY
IF (VAR1=2) AND (F2=1) THENHELP "VAR1 cannot equal 2 if F2 equals 1. Check your entries"GOTO VAR1
ENDIFEND
END The first line marks the beginning of a field block (i.e. a set of commands) for the field named VAR1. The last line has the command END which marks the end of the field block. Line 2 and 3 contains single line commands. Line 2 specifies that only numbers from 1 to 5 may be entered in this field. Line 3 specifies that data must be entered in this field. Line 4 marks the beginning of a JUMPS command. JUMPS commands are blocks in themselves and must be terminated with an END (in line 8). In this example an entry of 1 will make the cursor jump to the field called VAR4, an entry of the number 2 will make the cursor jump to the field called VAR5, and an entry of the number 3 will make the cursor jump to the field called VAR10. In this example, the lines in the field block are indented. And the lines in the JUMPS block are indented more. This indention is not necessary but it makes it easier to read the check file and to keep track of

.
31
where blocks begin and end. The editor in EpiData has an automatic indention function (in the Edit menu) that makes it easy to indent the lines when editing check files. Two important block commands are shown in this example: BEFORE ENTRY..END and AFTER ENTRY..END. All commands in the BEFORE ENTRY..END block are executed as the field receives the focus but before the user is allowed to enter anything. This can be used to fill out the field with a default value that may be changed by the user. All commands in the AFTER ENTRY..END block are executed when the user moves the cursor to another field. If the field has commands in the field block without an AFTER or BEFORE ENTRY block, these commands will be handled as if they were part of an AFTER ENTRY..END block. It is not necessary to include a field block for all the fields in the data file. Continue to Example of a check file or to see the List of check commands. Example of a check file A set of example files are installed in the directory where EpiData is installed. Look at these for inspiration or troubleshooting. Other examples are found on the EpiData internet site www.EpiData.dk One of the example files installed on your computer with EpiData is commented here. The example consists of three files: SAMPLE.QES, SAMPLE.REC and SAMPLE.CHK which resemble a questionnaire made in connection to a study of children's growth. The sample files may seem illogical in certain places, so please remember that it is not a real study but only a fictional example to demonstrate how commands used in check files. From the main window in EpiData select Open and then the file SAMPLE.QES and press OK. Select Open again and change the file type to EpiData check file (*.CHK). Select the file SAMPLE.CHK and press OK. Now the questionnaire (.QES) file and the check (.CHK) file of the example study are both open for examination. If you want to see both files at the same time select Tile in the Windows menu. Note that the status bar shows the current line number. It is recommended that a fixed-width font (e.g. Courier New) is used in the editor when working with check files. This makes it easier to use indentation and the makes the file clearer to read. The first line in the check file begins with a *. This makes it a comment line which is ignored when the check file is interpreted. The first block in the check file (beginning in line 3 and ending in line 22) is a LABELBLOCK. In this block two sets of value labels are defined, one called "nationality" and the other "years". Value labels are used to show the user the meaning of code numbers (e.g. the number 3 is used to indicate a British citizen). Both sets of value labels are themselves blocks. The label nationality begins in line 4 and ends in line 14. For a thorough explanation of value labels see Comment Legal. The first field block begins in line 24 and ends in line 26. It concerns the field "V1" which the .QES file shows is this field used for information on the height of the informant. Only one command is found in this field block and that is RANGE 130 230. This command limits the legal entries in the field ”V1” to numbers between (and including) 130 and 230. This ensures that errors cannot be made on entry, resulting in a record stating that the informant was 3 cm in height for example. The next field block (lines 28-30) concerns the field B1 where the informant's nationality is entered. As you can see in the .QES file the field is a one-digit integer field. Value labels are used to remind the user the meaning of the code. The command in line 29: COMMENT LEGAL USE nationality states that the field uses the value label set called "nationality" which was defined in the label block in the beginning of the check file. When the user enters this field they can press [F9] (or the [+] key on the numeric keypad) to see a list of the legal values and their meaning. The COMMENT LEGAL command can be used in three different ways which are explained in Comment legal.

.
32
The field block of the field D1 begins in line 32 and ends in line 46. The entry in the field is the date of birth of the informant. The field block holds an AFTER ENTRY command from line 33 to line 45. The commands in the AFTER ENTRY block are executed after the user has entered the date of birth and the commands in the block serves two purposes: 1) to check if the date of birth seems reasonable and 2) to calculate the informant's age and to put the age in field D2. The check on the date is made with two nested IF..THEN blocks. The first IF (line 34) is: IF (Year(d1)<1900) OR (d1>Today) THEN
which means IF the year of the date entered in field D1 is less than 1900 OR if the date if field D1 is bigger than today's date (i.e. the date lies in the future) THEN do something If either of these two conditions are true then the command between the THEN (in line 34) and the word ELSE (in line 37) are executed. In this case the user will see a message box on the screen asking them to check the entered date of birth. After that the cursor will return to field D1 instead of continuing to the next field. If both conditions in the IF sentence (line 34) are false then the commands between the ELSE (line 37) and ENDIF (line 44) are executed. If no ELSE command was present (as it is in this example) then the next command being executed would be the one following the command ENDIF. In this check file the commands in the ELSE..ENDIF block (line 37-44) contains a new IF..THEN-END block. This show that IF..THEN..ELSE..ENDIF blocks can be nested. Be careful to pair the ELSEs and ENDIFs correctly. In this example the innermost ENDIF (line 43) belongs to the innermost IF (line 38), while the outer most ENDIF (line 44) belongs to the outermost IF (line 34). The new IF..THEN..ELSE..ENDIF block begins with line 38: IF (ROUND(INT((TODAY-D1)/365.25))<15) THEN which means IF today's date minus the date entered in field D1 is less than 15 years THEN you must do something. If this is true then lines 39 and 40 are executed giving the user a warning that the entered birthday means the informant is less than 15 years old and therefore not a parent. If the condition in line 38 is false then the command in the ELSE block (line 42) is executed. This line calculates the age of the person based on the date entered in field D1 and assigns the result to the field D2. Line 43 ends the inner most IF..THEN block Line 44 ends the outer most IF..THEN block Line 45 ends the AFTER ENTRY block Line 46 ends the field block for the field D1 This rather complicated example shows how several conditions can be checked with different actions as a result. Nesting IF..THEN blocks is not limited to two blocks, there can be any number of nested IF..THEN blocks. WARNING: many nested IF..THEN blocks can make it difficult to keep track of all the ELSEs and ENDIFs. Use indentation in the check file to make reading the check file easier. The field block for field D2 begins in line 48. Only one check command is given, NOENTER, which means the user cannot enter data in this field. The field V1A asks if the informant has any children. If no, then the fields V1B to V2 are irrelevant and the data entry process should continue in the field V6. This action is done in the field block for the field V1A (lines 52-76). Lines 53-55 (JUMPS) states that focus must move to the field V6 if the letter N (for no) is entered. Line 56 (MUSTENTER) states that data must be entered in this field. Line 57 to line 75 contain an AFTER ENTRY..END block. This contains an IF..THEN..ELSE..ENDIF block. If V1A is false or no, then the commands in lines 59-68 are executed. These lines clear the contents of the fields V1B, V1C, V1D, V1E and V2 and hides the fields, making it impossible to enter data in these fields since they are irrelevant if the informant has no children.

.
33
If V1A is true or yes, then commands in lines 70-73 are executed. The commands in these lines UNHIDEs the same four fields, making it possible for the user to enter data. The field block for field V1C (height of 1st child - see lines 90-104 in the check file) shows an example of how to use BEFORE ENTRY. The BEFORE ENTRY..END block (lines 91-97) is executed as the user enters this field, but before data can be entered. In this case the BEFORE ENTRY command is used to enter a default value for the field V1C. The default value is half of the informant's height if the informant's height was entered; otherwise the default value is 50 cm. The commands in the AFTER ENTRY block in field V1C show a conditional GOTO. If only one child (i.e. V1B=1) then the average of the children's height (V2) is equal to the height of that one child (V2=V1C) and the next field that requires an input is V6 (GOTO V6). The same technique is used in the fields V1D and V1E (except that these two field have no BEFORE ENTRY block). The last thing that should be pointed out in the example check file is the benefits gained by using a label block. The fields V12 and V13 both require a code number to indicate a range of years. Instead of specifying the same value labels for both field, a single line in both fields does the job. If value labels need to be changed later then they must only be changed in one place, that is in the label block. Look through the rest of the check file and try to enter data in the data file to see how the check file affects the flow of data entry. A full reference of all check commands can be found in List of check commands. User defined check functions From EpiData Data Entry version 3.1 it is possible to extend the check language with user defined check functions. The feature is for programming experts only since it involves programming a DLL-file that specifies the new funktions. Before a user defined check functions is used in a check file, the command LOAD dll-filename must be used. Examples including source code on how to make a DLL-file with new check functions can be found at http://www.epidata.dk. List of check commands * See COMMENTS AFTER ENTRY Specifies a block of commands that are executed after data has been entered in the field and / or the user moves to another field. AFTER ENTRY is a block command and must be terminated with END. If commands are specified in a field block without putting them in an AFTER ENTRY block then these commands are interpreted as AFTER ENTRY commands. Example: AFTER ENTRY
<command><command>...
END AFTER FILE Specifies a block of commands that are executed when a data file is closed. See also BEFORE FILE. Example:

.
34
AFTER FILE
HELP "Remember to make a backup of the data file!" TYPE=WARNINGEND AFTER RECORD Specifies a block of commands that are executed just before a new or modified record is saved. Use AFTER RECORD to check if data are entered correctly. If a GOTO command is executed in the AFTER RECORD block then the current record is not saved. The example below is from a data file which asks the person entering data to enter an ID-number as the first field (ID1) in the record and the same ID-number as the last field (ID2) as a control. If the two ID-numbers are not the same or if either are missing then a warning is given, the field ID1 gets the focus and the record is not saved. Example: AFTER RECORD
IF (ID1<>ID2) THENHELP "ID1=@ID1 and ID2=@ID2\n\nPlease check the data" TYPE=WARNINGGOTO ID1EXIT
ENDIFIF (ID1 = .) OR (ID2 = .) THEN
HELP "ID-number must be entered in ID1 and ID2" TYPE=ERRORIF ID1 = . THEN
GOTO ID1ELSE
GOTO ID2ENDIF
ENDIFEND AUTOJUMP Unconditional jump to another field. The jump is made as the user leaves the field. See also JUMPS. Instead of specifying a field name the words END or WRITE can be used. AUTOJUMP END makes the cursor jump to the last field in the record. AUTOJUMP WRITE causes the Write record to disk? dialog box to appear. After clicking Yes the next or a new record is loaded. AUTOJUMP SKIPNEXTFIELD will move the focus from the current field to the second-next field. Example: AUTOJUMP [name of field to jump to]AUTOJUMP ENDAUTOJUMP WRITEAUTOJUMP SKIPNEXTFIELD AUTOSAVE When a modified record is left then the user is asked Save record to disk? giving the option not to save the modified record. This function can be suppressed by adding the command AUTOSAVE to the check file. The command can also be given as a program parameter. Be careful when using AUTOSAVE. Existing records in the data file may be overwritten without any warning. Example:
BEFORE FILEAUTOSAVE
END
.
35
AUTOSEARCH Autosearch is a look-up function that checks the remaining data file for records with certain data. Look-up can be defined to be on one field or a combination of several fields. Example: In a file with several fields ID and v10 are two sequential fields. V10 contains ”AUTOSEARCH IDNUM v10”. After entering data in V10 EpiData searches the existing records to find a record with the same values in ID and v10. If a match is found, a messagebox will appear asking whether you want to continue data entry in the existing record or create a new record. If no match is found, data entry can continue without interuption. AUTOSEARCH LIST codenum v10 as a field block command will make a list of matching records appear in stead of only a messagebox. In the list of matching records the arrowkeys or the mouse can be used to point out in which record data entry should continue. Autosearch is helpful in preventing creation of duplicate records. Examples: AUTOSEARCH v10 AUTOSEARCH LIST codenum v10 v20 BACKUP The backup command will copy the REC files (and other EpiData related files) including files in subdirectories to the specified location when the REC files is closed. It will automatically overwrite any existing files in the location. Any CHK, QES, NOT file with the same name as the REC file will also be copied. BACKUP must be placed in an after file block. If your backup path includes spaces make sure you have quotes before and after. BACKUP only starts if there has been a change to data. If you are making a system with RELATE, then all the open REC files plus associated files will be copied. BACKUP can - instead of just making a copy a the files - save the backup-files in either a compressed file (zip-file) or an encrypted zip-file. The resulting zip-file or zky-file (an encrypted zip-file) can automatically have the current date included in the filename in the form "12nov04" if the option DATE is used. The syntax of the backup command is: BACKUP distination-directory orBACKUP distination-directory [ZIP zip-file-name [DATE]] orBACKUP distination-directory [ENCRYPT name-of-encrypted-zip-file password [DATE]]
Examples:
Copy data file(s), check-files etc. to a backup directory:
AFTER FILEBACKUP F:\backup\dataentryprojects
END
Save data file(s) etc. in a new compressed zip-file, include current date in filename:
AFTER FILEBACKUP F:\backup\distinationdirectory ZIP myzipfile.zip [DATE]
END
Save data file(s) etc. in a new encrypted data file, do not include current date in filename: AFTER FILE
BACKUP F:\dist_dir ENCRYPT myencryptfile secretwordEND
.
36
BEEP This will give a sound when the command is invoked. The BEEP has three subtypes giving different sounds. A little experimentation is needed since setup of sounds varies between computers. For the standard setup of sounds in windows the standard beep is used for beeping without qualifier. For CONFIRMATION the exclamation sign (!) and for WARNING the (?) is indicated in the sound setup system. BEEP can be used in combination with IF ... THEN ....ENDIF blocks. Example: BEEPBEEP CONFIRMATIONBEEP WARNING To use warning sounds without the BEEP command, see options advanced tab page. BEFORE ENTRY Specifies a block of commands that are executed when the field receives the focus, but before data can be entered. BEFORE ENTRY is a block command and must be terminated with END. If commands are specified in a field block without putting them in either an AFTER ENTRY block or a BEFORE ENTRY block then these commands are interpreted as AFTER ENTRY commands. Example: BEFORE ENTRY
<command><command>...
END BEFORE FILE Specifies a block of commands that are executed when a data file is opened for data entry but before any data can be entered. See also AFTER FILE. BEFORE FILE is a good place to define temporary variables used in the data file. Example: BEFORE FILE
HELP "Welcome to my data file"DEFINE varAge ###DEFINE varRefDate <dd/mm/yyyy>
END

.
37
BEFORE RECORD Specifies a block of commands that are executed when a record is entered, but before any data can be entered. See also AFTER RECORD. Example: BEFORE RECORD
varAge = 33END CLEAR Clears the contents of the specified field. If no field name is specified after CLEAR then the field containing the command is cleared. Examples: CLEARCLEAR field5 CLEAR COMMENT LEGAL Clears the comment legal definition of the field, which field block it is defined in. Usefull in connection with conditional comment legals, i.e. a comment legal definition in a if-then structure. COLOR The checkcommand COLOR is used to change the backgroundcolor of the data entry form, the color of the text ("questions") in the form or the color of the data entry fields. To make EpiData able to read Epi Info check files, EpiData can handle the colorcodes used in Epi Info 6. But EpiData also understands text indicating the colors. Select the menu item Tools | Color table to see the colors available in EpiData. Using colorwords: COLOR DATA textcolor [backgroundcolor [highlightcolor] ] COLOR QUESTION textcolor [backgroundcolor of question] COLOR BACKGROUND form_backgroundcolor Using Epi Info colorcodes: COLOR DATA code COLOR QUESTION code COLOR BACKGROUND code Examples: COLOR DATA BLUE WHITE LIME Gives data entry fields with white background, blue
letters and a lime background when the field has focus
COLOR DATA BLACK YELLOW Data entry fields with yellow background and black letters. Highlight color is defined in Options
COLOR DATA 31 Data entry fields with blue background and white letters (see tools | color table | Number codes)
COLOR BACKGROUND WHITE COLOR QUESTION BLACK COLOR DATA BLACK YELLOW AQUA
Will give black text on white background. Data fields will be yellow with black text and current field will be light blue (aqua)
COMMENTS (*) Comment lines must begin with the character *. The whole line beginning with this character is ignored when the check file is interpreted.

.
38
COMMENT LEGAL Works in the same way as LEGAL in the sense that the command specifies what entries are allowed in a field, but COMMENT LEGAL also gives the user the option to see a list of the legal values and their meanings by pressing [F9] or the [+] key on the numeric keypad during the data entry process. COMMENT LEGAL has four different forms: 1) A block command COMMENT LEGAL
DenmarkSomaliaOtherEND
2) A reference to a COMMENT LEGAL block in another field
COMMENT LEGAL USE field name
3) A reference to a set of value labels defined in a LABELBLOCK
COMMENT LEGAL USE labelname
4) A reference to data file that contains the values and labels
COMMENT LEGAL filename[.rec]
Please notice the word USE must be added when referencing comment legals defined in another field or in a label block. When referencing a data file the file extension (.REC) is not required. The referenced data file (a look-up table) must have two fields that are defined as KEY or KEY UNIQUE fields. The field with KEY 1 (or KEY UNIQUE 1) is the value field; the field with KEY 2 is the label field. COMMENT LEGAL can also be used in IF..THEN structures (e.g. for hierarchical coding). This can be useful if the set of value labels (comment legals) used in a field should be dependent on the value of another field. See example below or see the sample files HIERARTEST.REC and HIERARTEST.CHK. See also the TYPE COMMENT command below. If the word SHOW is added to a COMMENT LEGAL then the list of possible values are shown during data entry if the field is empty. Important note: Be cautious when defining comment legal terms. The field which receives the values of the comment legal must be appropriate. E.g. if you define -mus ”Mouse was the animal”- and try to enter into a <A > field the check file will be rejected, since only MUS not mus is allowed in such a field. Examples: COMMENT LEGAL
1 ”Male gender”2 Female
END
COMMENT LEGAL1 One* 2 Two (The * comments out the line)3 Three
END
COMMENT LEGAL USE [field name] SHOW
COMMENT LEGAL USE [labelname] Examples of comment legal in IF..THEN structures V1 {User selects a country}
COMMENT LEGAL1 USA2 CANADA
ENDEND

.
39
V2 {User selects a state}IF V1=1 THEN
COMMENT LEGAL1 Alabama2 ”New York”3 Nevada4 Oklahoma
.....END
ENDIFIF V1=2 THEN
COMMENT LEGAL1 ”Nova Scotia”2 Quebec
....END
ENDIFEND Example of COMMENT LEGAL data file name: NAMELOOKUP.REC is a data file with two fields: ID (integer) and NAME (text field). ID is in the check file defined as KEY UNIQUE 1, NAME is defined as KEY 2. PATIENTDATA.REC is a data file made from this .QES file: ID Enter ID-code of patient #####HEIGHT Patient's height in kg ###WEIGHT Patient's weight in kg ### The check file of PERSONDATA.REC (PERSONDATA.CHK) contains: ID
COMMENT LEGAL NameLookupTYPE COMMENT
END When data are entered in PATIENTDATA.REC then only patients whose ID is found in NAMELOOKUP.REC are accepted as legal entries. When the ID field loses the focus the patient's name will be typed next to the ID field. Important note: You must enter at least a few names in the lookup file before it can be used in the ”comment legal” . Otherwise an error occurs. The reason for this is that the index tables of the lookup file must be ready before the ”comment legal” can refer to the lookup file. On the www.epidata.dk site examples page an extended example of this is found based on a list of approx. 250 bacteria names and number codes.

.
40
CONFIRM When a field is filled, the cursor automatically moves to the next field. This function can be suppressed by using the command CONFIRM in the check file. If CONFIRM is set then the next field will be selected when the [Enter] key is pressed. See also CONFIRMFIELD. Example: BEFORE FILE
CONFIRMEND CONFIRMFIELD Same function as CONFIRM, but where CONFIRM handles all fields in the data file, CONFIRMFIELD only deals with one field. This command may only be used in a field block. Example:
V1CONFIRMFIELDMUSTENTER
END COPYTOCLIPBOARD The command COPYTOCLIPBOARD can be used in BEFORE/AFTER ENTRY blocks to copy a string and/or the contents of one or more data fields to the standard Windows clipboard. Data copied to the clipboard can be pasted into any other Windows application. COPYTOCLIPBOARD takes text inclosed in double quotes as parameter. Use @ in front of a field name or of the name of a DEFINEd variable to copy the contents of the field or variable to the clipboard. Examples: V10
AFTER ENTRYV20 = String(V5) + "-" + String(V10)COPYTOCLIPBOARD "Codenumber=@V20"
ENDEND
COPYTOCLIPBOARD "Field V1 equals @V1 and V2 equals @V2" DEFINE Allows new, temporary variables to be defined. These variables may be used to hold temporary values in calculations and to carry values from one record to another. The DEFINE command can hold the optional words CUMULATIVE or GLOBAL. Cumulative variables are not reset when a new record is entered. If CUMULATIVE is omitted then the variable is set to missing between records. GLOBAL variables are never reset and may therefore be used to transfer data between related data files (see RELATE). The names of the DEFINEd variables may be up to 16 characters in length. Temporary variables are not saved in the data file. In relational data file systems the same DEFINE can be used in several check files. Duplicate DEFINEs are ignored.

.
41
Examples: DEFINE MyTempVar #### (defines a 4-digit integer called MyTempVar)DEFINE varSurname <A > CUMULATIVEDEFINE tempDate <dd/mm/yyyy>DEFINE varCity GLOBAL EXECUTE Execute can be used in the checkfile to run external programs. It can be specified if EpiData must halt untill the called program has been closed. Syntax: EXECUTE programname [parameters] WAIT | NOWAIT [HIDE] WAIT tells EpiData to halt untill the called program has been closed. NOWAIT will open the specified program, but EpiData continue execution (e.g. runs the rest of the commands in the after entry block). HIDE is optional. If specified then the called program will be run without showing on the screen. WARNING: Use only this option if the called program closes itself without user interaction. The programname can be the name of an EXE-file (i.e. an application) or a document, a picturefile, etc. If either program name or parameters include spaces then they must be inclosed in double quotes. Examples: EXECUTE c:\windows\notepad.exe WAIT Opens notepad. EpiData is halted
untill notepad is closed. EXECUTE "c:\my documents\ICD10 list.doc" NOWAIT Opens the document "ICD10
list.doc" with the default program for .doc files (usually Word).
EXECUTE pkzip.exe "t.zip d:\data\*.*" NOWAITHIDE
Runs pkzip and passes the parameters "t.zip d:\data\*.*" to pkzip. Pkzip is run in the background without opening a window on the screen.
PICTNUMDEFINE tmpName _________________AFTER ENTRY
LET tmpName="d:\pics\picture"+pictnum+".jpg"EXECUTE @tmpName WAIT
ENDEND
The field PICTNUM is a integer field. If user enters the number 3 then a .jpg picture file called "d:\pics\picture3.jpg" will be opened by the default program for .jpg files. EpiData halts until pictureviewer (or –editor) is closed. @tmpName means that @tmpName should be replaced by the contents of the variable tmpName.
This block will first backup the data to the specified folder (c:\temp\), Then it will ask whether to create a zip file with the name of todays date. (Pkzip must be in the so-called search path).
after filedefine tmpz _____________________________BACKUP c:\temp\help “Create zip file ? 1:yes 2:no ” keys=”12” type=CONFIRMATIONif resultvalue = 1 then
let tmpz = string(day(today))if month(today) < 10 thentmpz = tmpz + "0" + string(month(today)) + string(year(today)) + ".zip"
elsetmpz = tmpz + string(month(today))+ string(year(today))+ ".zip c:\temp\*.*"
endifendifexecute pkzip.exe "@tempzip -r -u" wait hide

.
42
END EXIT Stops the execution of a block of commands and leaves the block (e.g. an AFTER ENTRY block). EXIT can be used to avoid a long list of IF..THEN-ELSE. In the example a number of checks are made of a date field (<dd/mm/yyyy>). After every check EXIT makes sure that the AFTER ENTRY block is left before any more commands are executed. Example: d1
AFTER ENTRYIF D1 = . THEN
HELP "A date must be entered" TYPE=ERRORGOTO D1EXIT
ENDIFIF D1 > TODAY THEN
HELP "A future date is not valid" TYPE=WARNINGGOTO D1EXIT
ENDIFIF D1 < TODAY-365 THEN
HELP "@D1 is more than one year ago. Please re-enter" TYPE=ERRORGOTO D1EXIT
ENDIF* The following commands are only executed* if all above checks indicates a valid dateD2 = D1+14V4 = Year(D1)
ENDEND GOTO Changes the focus (i.e. moves the cursor) to the specified field. If no field name is specified after GOTO then the jump is made to the field containing the command. Examples: GOTOGOTO field10GOTO WRITEREC (writerec can be abbreviated to write)
GOTO WRITEREC is a special form of the GOTO command which stops further data entry and causes EpiData to display the Save record to disk? dialog box. HELP Shows a message box on the screen with the specified text. The user must click the OK button before data entry can continue. Four different types of message boxes exist: information boxes, warnings, confirmation boxes and error boxes. If no message box type is specified then an information box is displayed. The type of message box used can be indicated by the first letter instead of writing the full name of the type (e.g. ”C” for confirmation box). Insert "\n" to break a line and continue on the next line. Current values of fields or DEFINEd variables may be shown in the help message by using @field name. If an @-character is to be displayed (e.g. as part of an e-mail address) then use two @s. A special use of the HELP command prompts the user to press one of a series of keys to continue. The syntax is HELP "Do you want to continue (y/n)?" KEYS="YN". This example will show a box on the screen with the message. The box is removed and data entry is resumed when the user presses

.
43
the [Y] key or the [N] key. The result of the operation is saved in the predefined variable RESULTLETTER and RESULTVALUE. To continue the example: If the user presses [N] then RESULTLETTER will be set to the string "N" and RESULTVALUE will be set to the number 2 because the key pressed is second in the series of KEYS. Examples: HELP "This is the information text"HELP "This is a \n two-line warning box" TYPE=WARNINGHELP "This is also a warning box" TYPE=WHELP "Please confirm" TYPE=CONFIRMATIONHELP "You made an error!" TYPE=ERRORHELP "The field V1 is equal to @V1"HELP "EpiData's e-mail address is Info@@EpiData.dk"
Example using KEYS:
V1AFTER ENTRY
HELP "Select option:\n A. Enter personal information\n B. Enteroccupational information\n C. Enter health history" KEYS="123"TYPE=CONFIRMATION
IF RESULTLETTER="A" THEN* The user pressed the key "A"GOTO V100
ELSE IF RESULTVALUE=2 THEN* The user pressed the key "B"GOTO V200
ENDIFIF RESULTVALUE=3 THEN
GOTO V300ENDIF
ENDEND HIDE, UNHIDE Hides or unhides a field. When a field is hidden it changes colour on the screen and the user cannot enter data in the field. If no field name is specified after the word HIDE or UNHIDE then the field containing the command is hidden or unhidden. Examples: HIDEHIDE field5UNHIDEUNHIDE field5 INCLUDE Includes a file in the checkfile at the point, where the INCLUDE command is found. The include command cannot be used in files that them-selves are included. Check-files containing INCLUDE cannot be edited using the Add/Revise Checks funktion, only by using the editor. Examples: LABELBLOCK
LABEL numbersinclude test6.inc4 four5 five6 six
ENDEND The file test6.inc could in this example contain this:
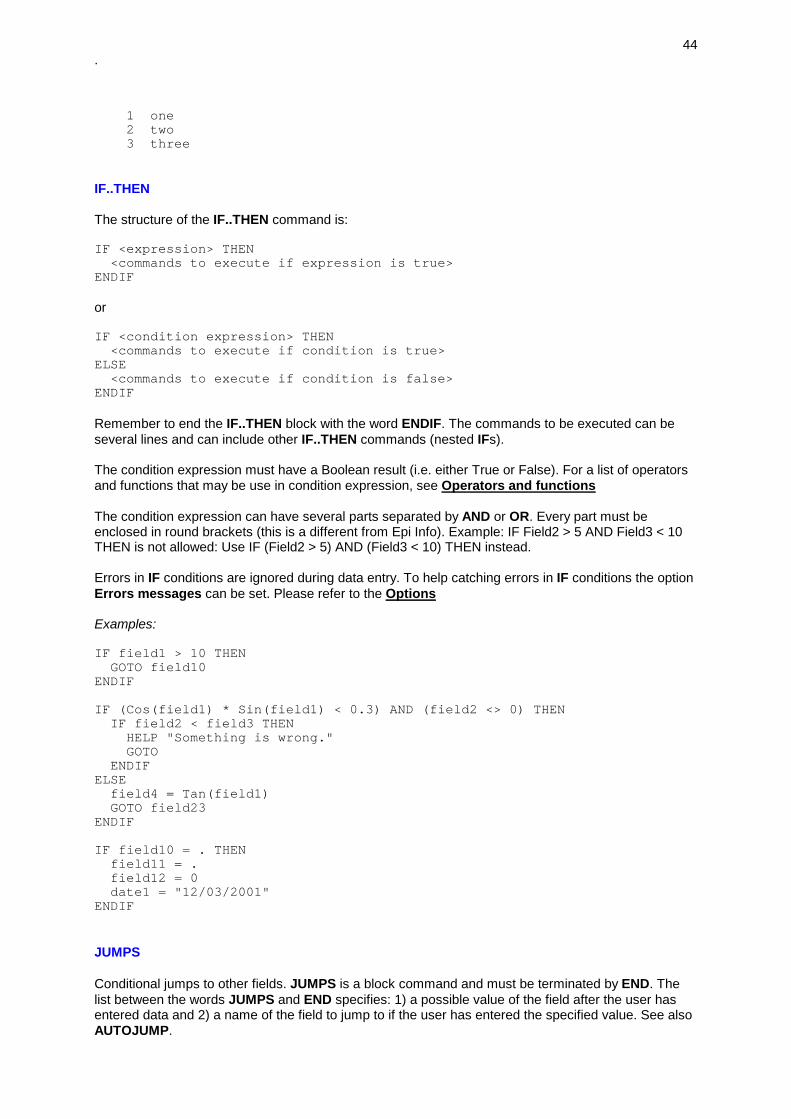
.
44
1 one2 two3 three
IF..THEN The structure of the IF..THEN command is: IF <expression> THEN
<commands to execute if expression is true>ENDIF or IF <condition expression> THEN
<commands to execute if condition is true>ELSE
<commands to execute if condition is false>ENDIF Remember to end the IF..THEN block with the word ENDIF. The commands to be executed can be several lines and can include other IF..THEN commands (nested IFs). The condition expression must have a Boolean result (i.e. either True or False). For a list of operators and functions that may be use in condition expression, see Operators and functions The condition expression can have several parts separated by AND or OR. Every part must be enclosed in round brackets (this is a different from Epi Info). Example: IF Field2 > 5 AND Field3 < 10 THEN is not allowed: Use IF (Field2 > 5) AND (Field3 < 10) THEN instead. Errors in IF conditions are ignored during data entry. To help catching errors in IF conditions the option Errors messages can be set. Please refer to the Options Examples: IF field1 > 10 THEN
GOTO field10ENDIF
IF (Cos(field1) * Sin(field1) < 0.3) AND (field2 <> 0) THENIF field2 < field3 THEN
HELP "Something is wrong."GOTO
ENDIFELSE
field4 = Tan(field1)GOTO field23
ENDIF
IF field10 = . THENfield11 = .field12 = 0date1 = "12/03/2001"
ENDIF JUMPS Conditional jumps to other fields. JUMPS is a block command and must be terminated by END. The list between the words JUMPS and END specifies: 1) a possible value of the field after the user has entered data and 2) a name of the field to jump to if the user has entered the specified value. See also AUTOJUMP.

.
45
Instead of specifying a field name the words END or WRITE can be used. END makes the cursor jump to the last field in the record. WRITE causes the Write record to disk? dialog box to appear. SKIPNEXTFIELD can also be used instead of a field name. This will move focus from the current field to the second next field. Often when JUMPS is used the fields between the field jumped from and the field jumped to should be cleared or set to a special ”missing” value. To ensure these fields are not filled with junk data the command JUMPS RESET can be used. JUMPS RESET clears all fields between the field with the JUMP definition and the target field. If a character is added after RESET then the irrelevant fields are filled with this character (except date fields): JUMPS RESET 9 will fill all irrelevant fields with 9s. RESET cannot be used with AUTOJUMP and is ignored if a jump to WRITE is made. Examples: JUMPS
1 V52 V103 END4 WRITE
END
JUMPS RESET1 V52 SKIPNEXTFIELD
END
JUMPS RESET 91 V52 V30
END Here a jump to v5 would fill fields from current field to V5 with 9’s, e.g. a ### field would then contain 999 and a character field of length 5 _____ would contain “99999”. KEY This syntax is: KEY {UNIQUE} {keynumber} This command creates an index for the field in which it appears. The index is another file that speeds up the search for records containing a particular value in the field. If the word UNIQUE appears after KEY, the index is a special one for unique identifiers. JONES cannot appear twice, and NAME would therefore not be a proper choice for a KEY UNIQUE field. Such fields contain unique identification numbers that are assigned to only one record each. KEY (without UNIQUE) can be assigned to any field and allows data values to occur in more than one record, and may be used with fields like NAME, COUNTY, or AGE. KEYs have four purposes: 1. Searching for records in ENTER using KEY fields is many times faster than normal searches if the file is longer than a few hundred records. 2. To specify a sort order in the LIST DATA function 3. To make sure that (e.g.) an ID-number is entered only once (only KEY UNIQUE) 4. To allow files to be RELATEd (i.e. joined) to each other during data entry. The KEY number is an optional number that identifies the sequence of the keys in the index file. If no KEY number is given then the order of the keys are decided by the order of the fields with KEY commands. If a KEY field is longer than 30 characters, then only the first 30 characters are used in the key. A maximum of 10 KEY fields can be defined.

.
46
Index files are created automatically when a data file is opened for entry. If the number of records or number of KEY fields of the data file does not match the index file then the index is rebuilt. Use the function Rebuild Indexes in the Tools menu if you want to force EpiData to rebuild the indexes. Examples: IDNUMBER
KEY UNIQUE 1END
NAMEKEY
END LABEL See LABELBLOCK LABELBLOCK A label block contains definitions of sets of value labels. The block must end with the command END and it cannot be part of a field block. Each set of value labels must begin with the command LABEL followed by the name of the label set and it must end with the command END. The value label sets defined in the optional label block may be used by COMMENT LEGAL USE [labelname] commands. The example shows how to define two sets of value labels. One is called "yesno", the other "sex". Example: LABELBLOCK
LABEL yesno1 Yes2 No
ENDLABEL sex
1 Male2 Female9 ”Unknown sex”
ENDEND LEGAL Specifies legal values for a field (i.e. values that are allowed to be entered in the field). LEGAL is a block command and must be terminated by END. Instead of defining the same legals for several fields you can define legal values in one field and then refer this definition to other fields. This is done using the command LEGAL USE field name. The example shows how define only even numbers smaller than 10 as legal entries in the field V1. The same legal-definition is applied to the field V2 by LEGAL USE. Examples: V1
LEGAL2468
ENDEND
V2LEGAL USE V1
END

.
47
LET Assigns a value or the result of a calculation to a field or a DEFINEd variable. For a list of operators and functions that can be use in calculations and other expressions, see Operators and functions Errors in LET expressions will be ignored during data entry. To help finding errors the option Error messages can be set. Please refer to the Options Note that the result of a let statement with several fields will not return a value if any of the fields have the value missing. The logic of this behaviour is that if any one field has the value “missing”, then the combination of missing and other values is not defined. The word LET is optional. The following examples are interpreted in the same way. Examples: LET field5 = (field2/field3)+INT(field4)field5 = (field2/field3)+INT(field4)
Other examples:
LET date1 = "14/09/2000" (assigns a date to a date field)LET v1 = . (sets the field v1 to missing value)LET b1 = ((15/2)>4) (sets a Boolean field to "Y")LET b2 = "Y" (sets a Boolean field to "Y")LET b3 = False (sets a Boolean field to "N")LET v3 = integer(copy(s2,1,2)) (extracts the first two characters in a
string field and assigns result to aninteger field)
LET Text1 = "Q"+String(Number) (assigns Q14 to the string field Text1if Number is equal to 14)
NOTE: When you use LET statements in a BEFORE FILE or BEFORE RECORD the status of a record as being edited does NOT change, whereas in a BEFORE ENTRY of first field does change this. But placing in an AFTER ENTRY block in first field does NOT change this state unless the cursor was moved out of the first field. Before a user defined check functions is used in a check file, the command LOAD dll-filename must be used. LOAD Load a DLL file containing user defined functions. Examples including source code on how to make a DLL-file with new check functions can be found at http://www.epidata.dk MISSINGVALUE MISSINGVALUE has three syntaxes: MISSINGVALUE x [y [z]] which can be used in fieldblocks, and MISSINGVALUE ALL x [y [z]] which can be used in BEFORE FILE blocks, and MISSINGVALUE field1-field5, field6 …. x [y [z]] which can be used in BEFORE FILE blocks The command MISSINGVALUE can be used to assign 1, 2 or 3 different values that have a special meaning, e.g. 9=value not specified (in questionnaire), 8=field is irrelevant. MISSINGVALUE ALL sets 1, 2 or 3 different missing values for all numeric fields in the datafile at once. MISSINGVALUE field1…. can be used in the BEFORE FILE block to specify missing value for several fields. MISSINGVALUE x y z can be used in a fieldblock and will only apply to the field that the field block concerns. If both MISSINGVALUE ALL and MISSINGVALUE in the field block is used, then the assignment in the field block takes precedence.

.
48
During dataentry a minus-character (-) can be entered in fields that have MISSINGVALUE defined. When leaving the field the “–“ will be changed to the first of the 1, 2 or 3 defined MISSINGVALUEs. A MISSINGVALUE extends the range, legal or comment legal definitions of a field. If MISSINGVALUE 9 is part of a field block then the value 9 is allowed to be entered in addition to e.g. RANGE 1-5 MISSING VALUEs will be exported to Stata 8 in the native Stata form: .a, .b and .c. Likewise will import of a Stata 8 datafile to EpiData result in a MISSINGVALUE definition if the values .a, .b or .c are found in the datafile. Examples: (in before file block): MISSINGVALUE ALL 9 8 assigns primary missing value 9 and secondary 8 to all numeric fields MISSINGVALUE V1-V4, V10, V20 9 8 7 assings missing values to all fields between (and including) the fields V1 and V4 and also to the fields V10 and V20 (in the field block): MISSINGVALUE 9 8 7 assigns three different missing values to the field that the fieldblock concerns. MUSTENTER Ensures that the field cannot be left blank. MUSTENTER can stall the data entry process if data are missing. It is a good idea to specify a missing value code for MUSTENTER fields and to use the MUSTENTER command sparingly. Example: MUSTENTER NOENTER Protects the field in the sense that user cannot enter data in a field that has NOENTER in the field block. NOENTER may be used if the field is to contain calculated data (such as compound identifier numbers) only. Example: NOENTER QUIT The QUIT command in a check file stops data entry and closes the data entry form. RANGE Specifies a range of legal values for the field. The words -INFINITY and INFINITY can be used if either the lower limit or the upper limit of the range is irrelevant. Examples: RANGE -5 5 (allows numbers between and including -5 and 5) RANGE -INFINITY 99 (allows all numbers smaller than 100) RANGE 100 INFINITY (allows all numbers greater than or equal to 100) RANGE 1/3/2001 31/3/2001 (allows dates in March 2001 – note the lack of quotes) Be careful when you specify RANGE. If you use COMMENT LEGAL or LEGAL in the same field you can produce conflicting rules. E.g. if range specifies 1-5 and LEGAL indicates 7 and 8. Then you can newer enter data into that field.

.
49
RELATE RELATE is a command used for linking two different data files relationally during data entry. When the RELATE command is encountered in the main (parent) file, data entry continues in the related (child) file. The syntax of RELATE is: RELATE identifier_field filename [1] The identifier field is the name of field that exists in both the main (parent) data file and the related (child) data file. The identifier field does not have to be the same field as the field that calls RELATE. The identifier field must be KEY UNIQUE in the main (parent) data file and KEY in the related (child) data file. If only one record in the related data file is allowed for every record in the mail data file, the number "1" should follow the command. Otherwise any number of records may be entered into the related file for each record in the main data file with the same value in the identifier field. In this case the user returns to the main data file by pressing [F10], [Ctrl] + [R] or by clicking the close control of the related data entry form. If a related file has a BEFORE FILE block, the commands in this block will be executed every time the related data file is accessed. When a data file is opened and its check file contains one or more RELATE commands then all related data files are opened. The data files can be seen as tabs in the bottom of the screen. RELATEd files can be browsed at any time, but they will remain in read only state until called by the main data file's RELATE command. All data files are closed when the main data file is closed. Clicking the close control of a related data entry form will not close the form but will bring it's parent data files form into focus. An example of the use of relate is shown in the files HOUSE.REC, PERSON.REC and VISITS.REC found in the samples directory in the EpiData program directory. Use Enter Data and select the data file HOUSE.REC to try the example. On the samples page of www.epidata.dk several comprehensive examples are available showing the flexibility of the relate principle. NOTE: If you place RELATE in the last field of a data entry form then upon return from a “child” record, EpiDta will place the input at the upper level to a new record. To avoid this place a dummy field as the last field. If the key unique status is violated relate will not be performed. The user will be guided to either move to the record with the value duplicated or to edit the value. REPEAT The field on the next new record is filled out with the value entered in the same field in the previous record. Example: REPEAT SHOWLASTRECORD If SHOWLASTRECORD is present in the check file, then EpiData will open a data file showing the last record in the file instead of a new, blank record. Example: BEFORE FILE
SHOWLASTRECORDEND TOPOFSCREEN TopOfScreen in a fieldblock will result in the field being moved to the top of the data entry form when the user enters the field. This command can be used to mimick a change of page. Add a number to the
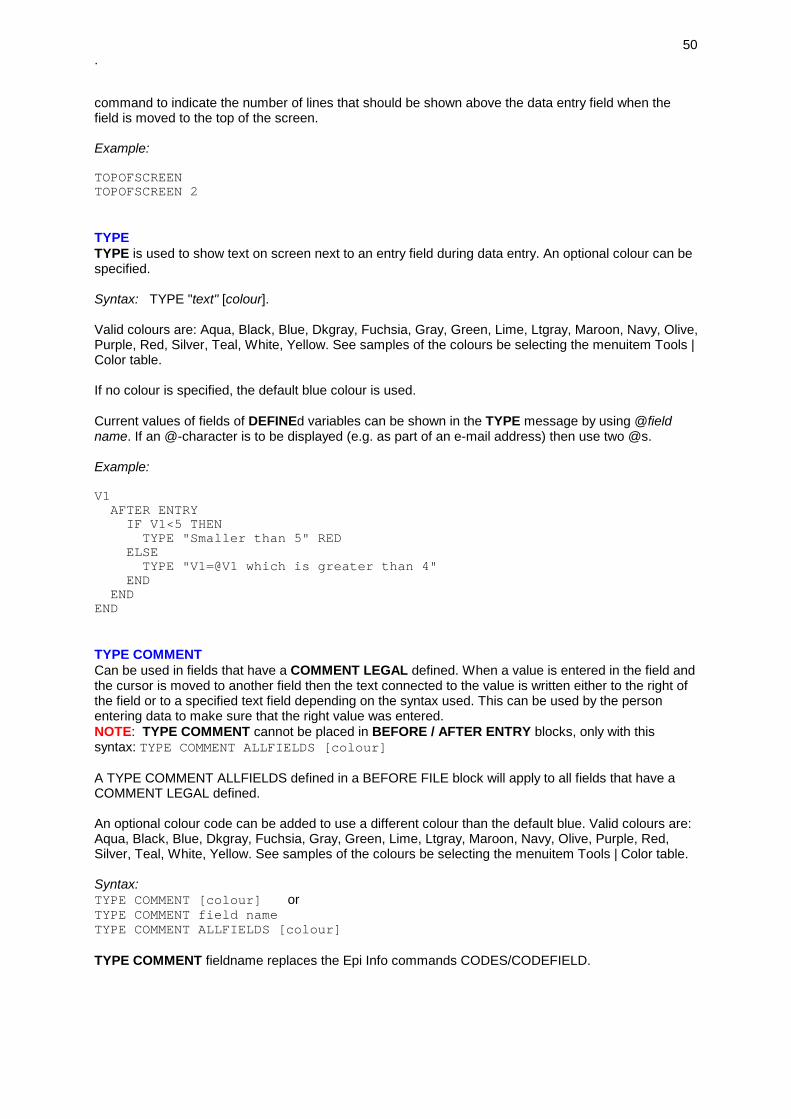
.
50
command to indicate the number of lines that should be shown above the data entry field when the field is moved to the top of the screen. Example: TOPOFSCREENTOPOFSCREEN 2 TYPE TYPE is used to show text on screen next to an entry field during data entry. An optional colour can be specified. Syntax: TYPE "text" [colour]. Valid colours are: Aqua, Black, Blue, Dkgray, Fuchsia, Gray, Green, Lime, Ltgray, Maroon, Navy, Olive, Purple, Red, Silver, Teal, White, Yellow. See samples of the colours be selecting the menuitem Tools | Color table. If no colour is specified, the default blue colour is used. Current values of fields of DEFINEd variables can be shown in the TYPE message by using @field name. If an @-character is to be displayed (e.g. as part of an e-mail address) then use two @s. Example: V1
AFTER ENTRYIF V1<5 THEN
TYPE "Smaller than 5" REDELSE
TYPE "V1=@V1 which is greater than 4"END
ENDEND TYPE COMMENT Can be used in fields that have a COMMENT LEGAL defined. When a value is entered in the field and the cursor is moved to another field then the text connected to the value is written either to the right of the field or to a specified text field depending on the syntax used. This can be used by the person entering data to make sure that the right value was entered. NOTE: TYPE COMMENT cannot be placed in BEFORE / AFTER ENTRY blocks, only with this syntax: TYPE COMMENT ALLFIELDS [colour] A TYPE COMMENT ALLFIELDS defined in a BEFORE FILE block will apply to all fields that have a COMMENT LEGAL defined. An optional colour code can be added to use a different colour than the default blue. Valid colours are: Aqua, Black, Blue, Dkgray, Fuchsia, Gray, Green, Lime, Ltgray, Maroon, Navy, Olive, Purple, Red, Silver, Teal, White, Yellow. See samples of the colours be selecting the menuitem Tools | Color table. Syntax: TYPE COMMENT [colour] or TYPE COMMENT field nameTYPE COMMENT ALLFIELDS [colour] TYPE COMMENT fieldname replaces the Epi Info commands CODES/CODEFIELD.

.
51
Example: A field has these commands in the check file: V1
COMMENT LEGAL1 Dog2 Cat3 Lion4 Rat
ENDTYPE COMMENT YELLOW
END If the value 2 is entered in the field then the text "Cat" is written to the right of the field when the cursor leaves the field. If TYPE COMMENT S1 was used then the text "Cat" would be written in the entry field S1, provided S1 is a text field. TYPE COMMENT is recommended for use with hierarchical coding schemes (see COMMENT LEGAL). TYPE STATUSBAR In questionnaires with many fields it can be useful to keep track of what record is being edited by having (e.g.) the ID number of the questionnaire on screen no matter what part of the questionnaire is currently being displayed. By using TYPE STATUSBAR in one (and only one) field the current value of the field will be shown on the status bar. An optional pice of explanatory text can be added to the command (e.g. to show the name of the field whose value is shown in the status bar). An optional colour code can be added to use a different colour than the default blue. Valid colours are: Aqua, Black, Blue, Dkgray, Fuchsia, Gray, Green, Lime, Ltgray, Maroon, Navy, Olive, Purple, Red, Silver, Teal, White, Yellow. See samples of the colours be selecting the menuitem Tools | Color table. Examples: IDCODE
TYPE STATUSBAR "IDCODE = "END IDCODE
TYPE STATUSBAR "" LIMEEND If you invoke dataentry notes during dataentry, then the text currenty written on the statusbar will be included. This is a good way of getting e.g. an id number into the notes. UNHIDE See HIDE

.
52
WRITENOTE Adds a comment to the data entry notes file The current content of an entry field can be written by prefixing the field name with @. Add the option SHOW to show the data entry notes file during data entry. Examples: V10
AFTER ENTRYIF V10 > 100 THEN
WRITENOTE "Please check if the value @V10 in field V10 is reallytrue"
ENDIFIF V10 > 110 THEN
WRITENOTE "Unusual value of field V10 is entered. Please specifyreasons for this value:" SHOW
ENDIFEND
END

.
53
Operators and functions This list shows the operators and functions available for Boolean expressions used in IF commands and calculations and expressions in LET commands. Operators (arithmetic, logical and relational) Functions: When you read the functions make notice of the three parts describing each function. The name. The input to the function (e.g. a real or floating point number) and what type of data is returned from the function (e.g. an integer). If you think a function is not working. Then check if the output has the correct type (string, integer, floating real etc). Arithmetic functions String functions Date functions Operators ARITHMETIC OPERATORS Operator Operation Type of Data Result type ^ exponent integer floating point floating point floating point + addition integer integer floating point floating point string string - subtraction integer integer floating point floating point * multiplication integer integer floating point floating point / division integer floating point floating point floating point div integer division integer integer mod remainder integer integer LOGICAL OPERATORS Operator Operation Type of Expression Result type not negation Boolean Boolean and logical AND Boolean Boolean or logical OR Boolean Boolean xor logical XOR Boolean Boolean RELATIONAL OPERATORS Operator Operation Comparing values Result type = equal compatible Boolean <> not equal compatible Boolean < less than compatible Boolean > greater than compatible Boolean <= less than or equal to compatible Boolean >= greater than or
equal to compatible Boolean
The relational operators may also be used on text strings. Boolean result type is the same as the answer is True or False that is, True: Yes or No.

.
54
Arithmetic functions Functions are used to get change a number or string to something else. Float is used to describe a decimal number in contrast to an integer which does not have any decimals. If you have problems in getting a value into a field check that the field has the appropriate type. Sometimes you must convert a float value to an integer or vise versa. ABS(X): FLOAT Returns the absolute value of the argument. x is an integer-type or float-type expression. ABS(4)=4, ABS(-4)=4 ARCTAN(X: FLOAT): FLOAT Calculates the arctangent of x. Calculate other trigonometric functions using Sin, Cos, and ArcTan in the following expressions: Tan(x) = Sin(x) / Cos(x)ArcSin(x) = ArcTan (x/sqrt (1-sqr (x)))ArcCos(x) = ArcTan (sqrt (1-sqr (x)) /x) COS(X: FLOAT): FLOAT Returns the cosine of the angle x, in radians. EXP(X: FLOAT): FLOAT Returns the value of e raised to the power of x, where e is the base of the natural logarithms. FLOAT(X): FLOAT Converts x to a float. If FIELD1 equals "Q34.3" then Float(pos(FIELD1,2,4)) returns the float 34.3. FRAC(X: FLOAT): FLOAT Returns the fractional part of the argument x where x is a float-type expression. The result is the fractional part of x; that is: Frac(x) = x - Int(x). INT(X: FLOAT): FLOAT x is a float-type expression. The result is the integer part of x; that is, x rounded toward zero. Note that the result is a float (decimal number) even if it contains only the integer part of x. INTEGER(X): INTEGER Integer converts a string to an integer number. Obviously only if the string contains a number. If FIELD1 equals '”b410” then Integer(pos(FIELD1,3,2)) equals the integer 41. If FIELD1 equals ”410” then Integer(FIELD1) equals 410 LN(X: FLOAT): FLOAT Returns the natural logarithm of the float-type expression x. LOG10(X: FLOAT): FLOAT Returns the base 10 logarithm of the float-type expression x. PI: FLOAT Use Pi in mathematical calculations that require pi, the ratio of a circle's circumference to its diameter, approximated as 3.1415926535897932385. POWER(BASE, EXPONENT: FLOAT): FLOAT Raises Base to any power. For fractional exponents Base must be greater than 0. ROUND(X: FLOAT): INTEGER Rounds a float-type value to an integer-type value. x is a float-type expression. Round(x: Float) returns an integer value of x rounded to the nearest whole number. If x is exactly halfway between two whole numbers, the result is the number with the greatest absolute magnitude (i.e. away from zero). v2 = round(2.5) will make v2 have the value 3. SIN(X: FLOAT): FLOAT Returns the sine of the argument. x is a float-type expression. Sin(x: Float) returns the sine of the angle x in radians.

.
55
SQR(X: FLOAT): FLOAT Returns the square of the argument. x is a floating-point expression. The result, of the same type as x, is the square of x, or x*x. SQRT(X: FLOAT): FLOAT x is a floating-point expression. The result is the square root of x. STRING(X): STRING Converts x to a string. If FIELD1 is an integer field with the value 41 then ”sb”+String(FIELD1) equals ”sb41” See function INTEGER for conversion of string to numerical value. TRUNC(X: FLOAT):INTEGER Truncates a float value to an integer value. x is a float expression. Trunc(x: Float) returns an integer value that is the value of x rounded toward zero. v2 = trunc(2.5) will make v2 have the value 2, see also Round() above.

.
56
String functions UPPER(S: STRING): STRING Returns a string containing the same text as S, but with all characters converted to upper case. The conversion affects all characters included in the ANSI character set. LOWER(S: STRING): STRING Returns a string with the same text as the string passed in S, but with all letters converted to lowercase. The conversion affects all characters included in the ANSI character set. COPY(S: STRING; INDEX, COUNT: INTEGER): STRING Returns a substring of a string. S is a string-type expression. Index and Count are integer-type expressions. Copy(S: string; Index, Count: Integer) returns a string containing Count characters starting at position Index in the string S. If Index is larger than the length of S, Copy(S: string; Index, Count: Integer) returns an empty string. If Count specifies more characters than are available, the only the characters from Index to the end of S are returned. e.g. SHORT = copy(”My short sentence”,4,5) means that SHORT has the value ”short” POS(SUBSTR: STRING; S: STRING): INTEGER Searches for a substring, Substr, in a string, S. Substr and S are string expressions. Pos(Substr: string; S: string) searches for Substr within S and returns an integer value that is the index of the first character of Substr within S. Pos(Substr: string; S: string) ignores case-insensitive matches. If Substr is not found, Pos(Substr: string; S: string) returns zero. e.g. position = pos(”short”, ”My short sentence”) means that position gets the value 4. LENGTH(S: STRING): INTEGER Returns the number of characters actually used in the string S. e.g. length(”This string”) is 11. STRING(X): STRING Converts x to a string. If FIELD1 is an integer field with the value 41 then ”sb”+String(FIELD1) equals ”sb41” See function integer for conversion from a string to a number. SOUNDEX(S: STRING): STRING The result of the function is the Soundex code of the string S. For an explanation of Soundex, see Soundex Fields.
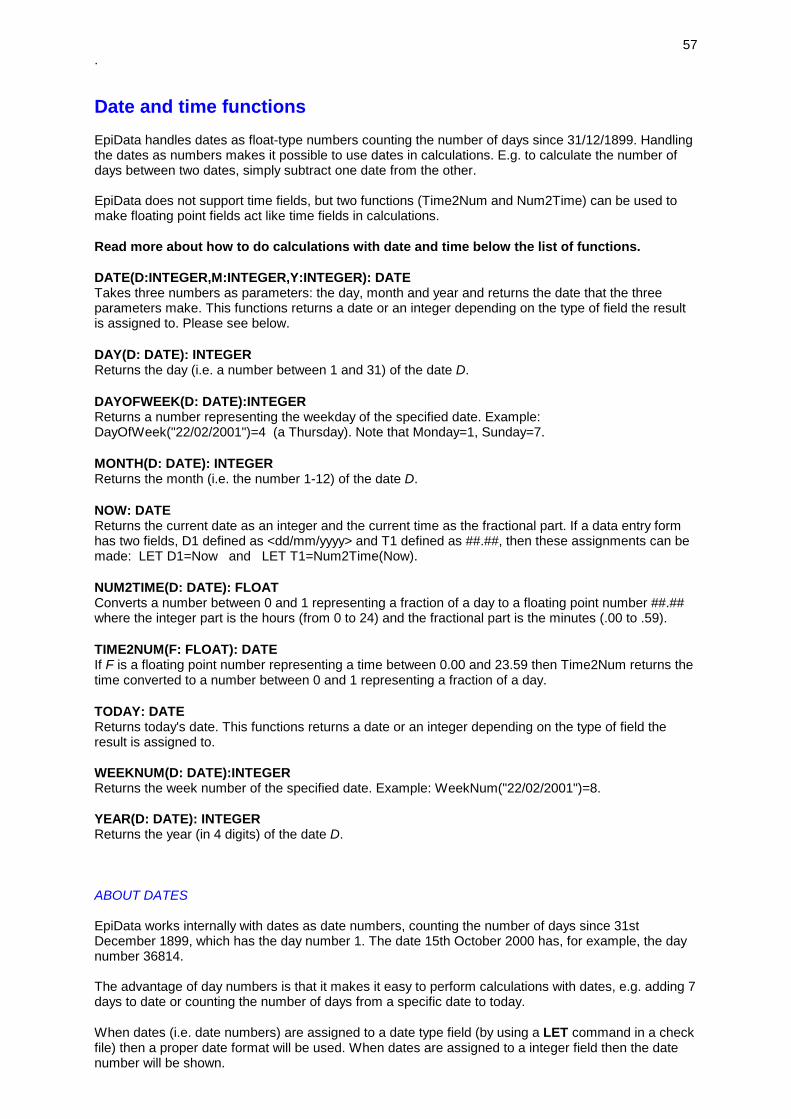
.
57
Date and time functions EpiData handles dates as float-type numbers counting the number of days since 31/12/1899. Handling the dates as numbers makes it possible to use dates in calculations. E.g. to calculate the number of days between two dates, simply subtract one date from the other. EpiData does not support time fields, but two functions (Time2Num and Num2Time) can be used to make floating point fields act like time fields in calculations. Read more about how to do calculations with date and time below the list of functions. DATE(D:INTEGER,M:INTEGER,Y:INTEGER): DATE Takes three numbers as parameters: the day, month and year and returns the date that the three parameters make. This functions returns a date or an integer depending on the type of field the result is assigned to. Please see below. DAY(D: DATE): INTEGER Returns the day (i.e. a number between 1 and 31) of the date D. DAYOFWEEK(D: DATE):INTEGER Returns a number representing the weekday of the specified date. Example: DayOfWeek("22/02/2001")=4 (a Thursday). Note that Monday=1, Sunday=7. MONTH(D: DATE): INTEGER Returns the month (i.e. the number 1-12) of the date D. NOW: DATE Returns the current date as an integer and the current time as the fractional part. If a data entry form has two fields, D1 defined as <dd/mm/yyyy> and T1 defined as ##.##, then these assignments can be made: LET D1=Now and LET T1=Num2Time(Now). NUM2TIME(D: DATE): FLOAT Converts a number between 0 and 1 representing a fraction of a day to a floating point number ##.## where the integer part is the hours (from 0 to 24) and the fractional part is the minutes (.00 to .59). TIME2NUM(F: FLOAT): DATE If F is a floating point number representing a time between 0.00 and 23.59 then Time2Num returns the time converted to a number between 0 and 1 representing a fraction of a day. TODAY: DATE Returns today's date. This functions returns a date or an integer depending on the type of field the result is assigned to. WEEKNUM(D: DATE):INTEGER Returns the week number of the specified date. Example: WeekNum("22/02/2001")=8. YEAR(D: DATE): INTEGER Returns the year (in 4 digits) of the date D. ABOUT DATES EpiData works internally with dates as date numbers, counting the number of days since 31st December 1899, which has the day number 1. The date 15th October 2000 has, for example, the day number 36814. The advantage of day numbers is that it makes it easy to perform calculations with dates, e.g. adding 7 days to date or counting the number of days from a specific date to today. When dates (i.e. date numbers) are assigned to a date type field (by using a LET command in a check file) then a proper date format will be used. When dates are assigned to a integer field then the date number will be shown.
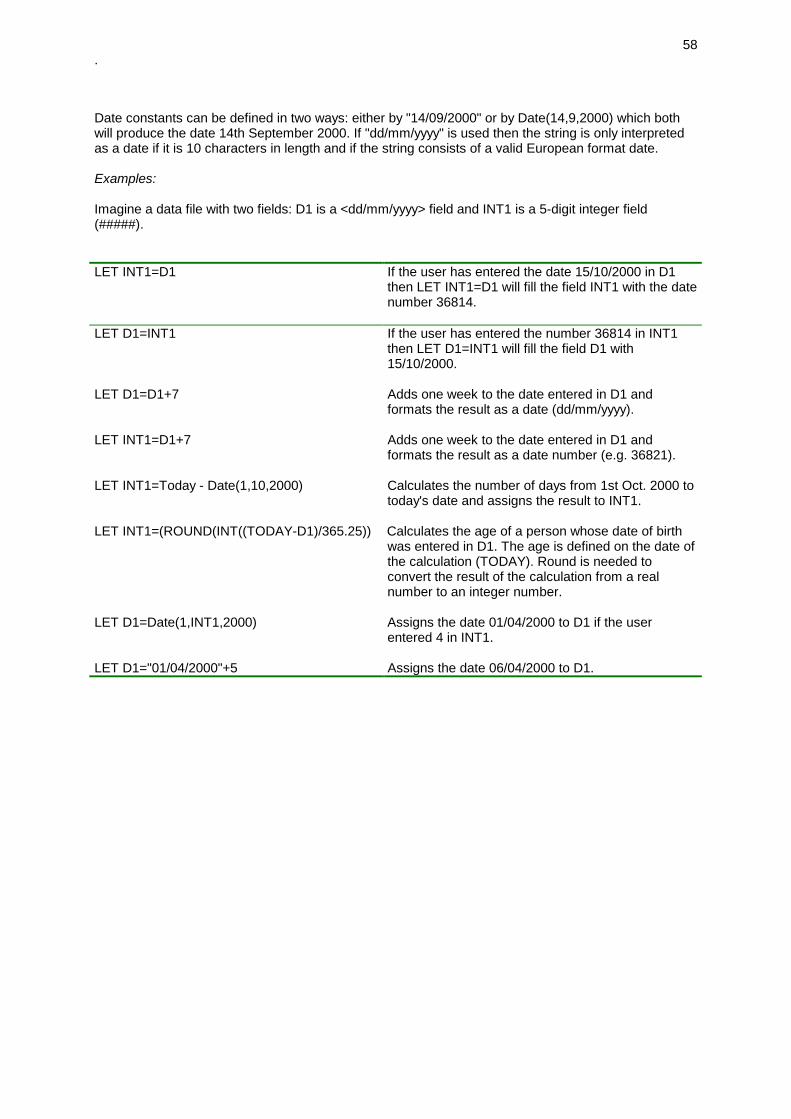
.
58
Date constants can be defined in two ways: either by "14/09/2000" or by Date(14,9,2000) which both will produce the date 14th September 2000. If "dd/mm/yyyy" is used then the string is only interpreted as a date if it is 10 characters in length and if the string consists of a valid European format date. Examples: Imagine a data file with two fields: D1 is a <dd/mm/yyyy> field and INT1 is a 5-digit integer field (#####). LET INT1=D1
If the user has entered the date 15/10/2000 in D1 then LET INT1=D1 will fill the field INT1 with the date number 36814.
LET D1=INT1 If the user has entered the number 36814 in INT1 then LET D1=INT1 will fill the field D1 with 15/10/2000.
LET D1=D1+7 Adds one week to the date entered in D1 and formats the result as a date (dd/mm/yyyy).
LET INT1=D1+7 Adds one week to the date entered in D1 and formats the result as a date number (e.g. 36821).
LET INT1=Today - Date(1,10,2000) Calculates the number of days from 1st Oct. 2000 to today's date and assigns the result to INT1.
LET INT1=(ROUND(INT((TODAY-D1)/365.25)) Calculates the age of a person whose date of birth was entered in D1. The age is defined on the date of the calculation (TODAY). Round is needed to convert the result of the calculation from a real number to an integer number.
LET D1=Date(1,INT1,2000) Assigns the date 01/04/2000 to D1 if the user entered 4 in INT1.
LET D1="01/04/2000"+5 Assigns the date 06/04/2000 to D1.

.
59
HOW TO CALCULATE AGE ON A GIVEN SPECIFIC DATE ? One wishes to calculate the AGE as the difference between a given data, e.g. June 6th 2001 and date of birth which was entered in the field DOB. How to do that ? Just specify this formulae: let age = round(int(("01/06/1001"-DOB)/365.25)) This might seem a little complicated, but by taking it apart it is easier to understand: 1. Take the difference in days btw. june 1st and DOB: "01/06/2001" - DOB 2. Convert that difference into an integer: int( "01/06/2001" - DOB ) 2. Convert the result to number of years: round( int( "01/06/2001" - DOB ) /365.25)
round is needed since epidata cannot store a real into an integer and AGE was a ”### field” For persons used to US specification of dates this is confusing since ”01/06/2001” indicates 6th of january. We can only say “sorry” if you find that odd. EpiData is made in Europe and here dates are written in the notation dd/mm/yyyy, not the US way mm/dd/yyyy. ABOUT TIME EpiData does not support time fields, but two functions (Time2Num and Num2Time) may be used to make floating point fields act like time fields. Time2Num converts a floating point number ##.##, which must be bigger than or equal to 0.00 and smaller than 24.00, to a number between 0 and 1 representing a fraction of a day. 12.00 noon is converted to 0.5, 18.00 is converted to the value 0.75. Please notice that a 24-hour clock is used. This method makes it possible to add and subtract times. Dates and time values can be added since the integer part of a date/time number represents the date and the fractional part represents the time. The date functions that take a date as a parameter are not affected by the date having a fractional part (it is ignored). The Num2Time function, which converts a time value between 0 and 1 to a floating point number between 0.00 and 23.59 is not affected if the parameter is larger than 1. Only the fractional part is used for the conversion. Example (see the example files DateTime.rec, -.qes and -.chk in the Sample directory in the EpiData program directory):: Make a datafile from this QES-file: Procedure {start dat}e <dd/mm/yyyy>Procedure {start tim}e ##.## (enter hh.mm as 24-hour clock)
Procedure {end date} <dd/mm/yyyy>Procedure {end time} ##.## (enter hh.mm as 24-hour clock)
Total time used in procedure was{Days}: ###{Hours}/{Min}utes: ##.##
{Sec}onds {used} to fill out this record: ####
The curly brackets show the field names in the datafile. Make a CHK-file like this:
BEFORE FILEDEFINE varEntryBegun ########.#####DEFINE varStartTime ########.#####DEFINE varEndTime ########.#####
END
BEFORE RECORDvarEntryBegun=NowENDDATE=varEntryBegunENDTIME=NUM2TIME(varEntryBegun)
END
STARTTIMRANGE 0 23.59
END

.
60
ENDTIMRANGE 0 23.59AFTER ENTRY
varStartTime=STARTDAT+TIME2NUM(STARTTIM)varEndTime=ENDDATE+TIME2NUM(ENDTIME)DAYS=INT(varEndTime-varStartTime)HOURSMIN=NUM2TIME(varEndTime-varStartTime)
ENDEND
DAYSNOENTER
END
HOURSMINNOENTER
END
SECUSEDBEFORE ENTRY
IF SECUSED = . THENSECUSED=(Now-varEntryBegun)*86400* 86400 seconds equals 24 hours
ENDIFEND
END
Other functions ISBLANK(FIELD NAME): BOOLEAN Returns True if the field, whose name is given as parameter, is blank, i.e. no data is entered. IsBlank(field name) returns False if the field contains data. Instead of using IsBlank(field name), a period (dot) can be used to represent a missing value. These two examples give the same result: IF IsBlank(v1) THEN ...IF v1 = . THEN ... RECORDCOUNT: INTEGER Returns the current number of saved records. If the current record is a new record that record is NOT included. RECORDNUMBER: INTEGER Returns the record number of the current record. If the current record is a new record the value -1 is returned.

.
61
Enter Data Choose this function and select an existing data file to begin entry of data or to edit existing data. If validation rules (checks) are found in connection to the data file these will be applied. When all data in a record are entered the user will be asked if the record is to be saved. To close the data file select File / Close Form or click the close control of the data form window. Navigation between fields, Navigation between records, navigation between related files, Finding records and finding fields is explained further here. Navigation between fields Warning: Be careful if you use the mouse during entry of data. Controls defined in the check file are NOT applied when moving from one field to another by clicking the mouse. See explanation in the section on keyboard short-cuts. Select the next field by: pressing [Enter] pressing [Tab] pressing [Down-arrow] key clicking on the destination field with the mouse If the full width of a entry field is used then the next field is automatically selected unless CONFIRM is used as a program parameter or check command. Select the previous field by: pressing [Shift] + [Tab] pressing [Up-arrow] key Select the first field in the data form by pressing [Ctrl] + [Home]. Select the last field by pressing [Ctrl] + [End]. Navigation between records Navigation buttons are shown in the bottom of the data form window. All the functions of these buttons are displayed on the Goto menu.
The navigation panel shown above shows that the current record is record number 2 out of a total of 2 records. DEL signifies that the current record is marked for deletion. The buttons are:
Goto the first record Goto the previous record ([Ctrl] + [PgUp] or [F7] may be used instead) Goto the next record ([Ctrl] + [PgDn] or [F8] may be used instead) Goto the last record Enter new record ([Ctrl] + [N] may be used instead) Delete a record or undelete a deleted record ([Shift] + [Delete] may be used instead)
NOTE: records are only marked as deleted when [Shift] + [Delete] is used. The record still exists in the data file and can later be undeleted. Use the Pack File function found in the Tools menu to permanently remove all records marked as deleted.

.
62
Navigation between related files When a system of relational datafiles (i.e. datafiles with relate commands) is opened the "relatetree" is shown in the left side of the dataentry form. The relatetree shows in a treelike structure which datafiles are related to each-other. The relatetree is usefull for getting a overview of the relationsships between the datafiles and it helps navigation between the datafiles by indicating the datafile currently on screen (marked by ) and the datafile currently active, i.e. open for input (marked by ). Click on the name of a relatefile to view the file's contents. Please notice that the choosen datafile will be shown in read-only mode, no data can be changed. You can only change relatelevel by passing through the field that contains the relevant RELATE command. To get help finding the relevant field use Find field or Find relate field (see below). Right-click on a datafile in the relatetree to get extended information on the relations. The relatetree window can be closed by clicking the X-icon in it's upper right corner, by pressing F11 or by selecting the menuitem Window | Hide relate tree. To show the relatetree again, press F11 or select the menuitem Window | Show relate tree. The relatetree can be moved to the left side of the data entry form by dragging in the relatetree window's top bar. If the relatetree window is dropped outside the far left or far right side of the EpiData window then the relatetree will change to an ordinary window which can be placed anywhere on the screen. Finding records If the number of the record is known then the record can be shown by using Goto Record in the Goto menu or by pressing [Ctrl] + [G]. If the number is unknown then use Find Record on the Goto menu or press [Ctrl] + [F]. A search window will be opened. The search will be performed on the current field by default (i.e. the field which had the focus when Find Record was selected), but any other field can be searched on ¤¤. This includes fields that cannot receive the focus (e.g. IDNUM-fields). A search can be performed on up to ten different fields with different parameter: equals (specify no parameter or specify =), not equal to (<>), greather than (>), less than (<), begins with (xxxx*), ends with (*xxxx) or contains (*abcd*). Options are case sensitivity, whole words / parts of words and to ignore deleted records. Press [F3] or select Find Again to repeat the search with the same search parameters. A search can be aborted by pressing [Esc] or by clicking Cancel in the progress window shown during the search. Searching in KEY fields is much faster than searching in other fields, but only if all fields that are searched are KEY fields. If you know that you will need to locate records using particular variables then you should consider making these variables KEY fields. Press the Reset button in the search option window to clear all search parameters. This will reduce the search to the current field. Finding fields and relatefields To find a specific data entry field press F4 or select the menuitem Goto | Find field which brings up a list of the fields of the current datafile. Enter part of the field name untill the name is highlighted, then press enter or click on the fieldname to jump to the field. Press Shift-F4 or select Goto | Find relate field if a list containing only fields with a RELATE command is to be shown. Pressing F4 twice has the same effect.

.
63
Filter During data entry it can be useful to limit which records are shown. This may be done by using the filter function found in the filter menu during data entry. Set a filter By placing the cursor in the field that is to be used as filter. The field must be a KEY or KEY UNIQUE field to act as a filter. Select Filter and Define Filter. Enter the filter value. Now only records where the selected field has the entered filter value are shown. If you go to the next record, the next record that has the same filter value is shown. Find returns individual records whereas Filter returns a subset of records. Deactivate a filter By selecting Filter and Deactivate Filter. During a RELATE a filter function using the value of the RELATE field is automatically activated.

.
64
Append / Merge Data files Is used to combine two data files into a third (new) data file. Append is used for combining two data files with exactly or nearly the same structure. Files are joined end-to-end. Merge is used for combining two data files with different structure that share 1-3 common fields ("ID-fields" or key-fields). An example could be one data file that is entered on basis of paper-questionnaires and another data file that is imported from another database with (e.g.) clinical data for the same persons. Both data files will contain a code or ID-number identifying the individual person. Files are joined side-to-side. Append Select the function Append / Merge from the Data menu. Enter the name of the two data files that are to be appended. Click OK. A summary of the two selected data files is shown. Enter the name of the new data file that will contain the result of the append operation. The two selected data files will not be changed during the operation. Append can be performed in two different ways: The result data file will have the same structure (same fields) as Data file A. Only data in Data file B contained in fields that exist in Data file A will be appended. Data in fields that do not exist in Data file A will be ignored. The result data file will have a structure that is a combination of all the fields of Data file A and all the fields of Data file B. NOTE: Data file A is considered the ‘master’ data file. If a field exists with the same name in Data file A and Data file B then the same field in the result data file will have the same field type as the field in Data file A. NOTE: If either Data file A or Data file B has a check file Append/Merge will combine the check files into one check file for the combined file. It is up to the user to control and confirm proper action of the various check commands in the combined file. Pay particular attention to labels jumps, goto statements and if ... then .... endif structures. After running append a summary of the result data file is shown. The summary is also added to the data entry notes file of the result data file. Merge Data files Select the function Append / Merge from the Data menu. Enter the name of the two data files that are to be merged. Click OK. A summary of the two selected data files is shown. Enter the name of the new data file that will contain the result of the merge operation. The two selected data files will not be changed during the operation. Merge requires one or more key fields to be present in both files in order to make it possible to match a record from Data file A to a record in Data file B. Up to three key fields can be selected. The key fields do not have to be marked as KEY or KEY UNIQUE fields in the check file, but they must exist in both data files. When the Merge page is selected, a list of common fields from Data file A and Data file B is shown. If no common fields exist, then merge cannot be run. Select from 1 to 3 fields in the list of common fields. The combined key fields must be unique in both data files. Two types of merge can be done: Merge only records where the key (combined key fields) matches in both Data file A and Data file B.

.
65
Merge all records of both data files. This option may result in many fields with missing values since some records from Data file B may have no matching record in Data file A. In order to do a merge one or more common fields must exist NOTE: If either Data file A or Data file B has a check file Append/Merge will combine the check files into one check file for the combined file. It is up to the user to control and confirm proper action of the various check commands in the combined file. Pay particular attention to labels, jumps, goto statements and if ... then .... endif structures. After running merge a summary of the result data file is shown. The summary is also added to the data entry notes file of the result data file.

.
66
Document data file This function provides information on a selected data file and its entry fields. Data file information includes: Data file name File size Date of last revision Number of fields Number of records Are checks applied? For each entry field in the file the following information is given: Name of entry field The variable label of the field Field type Width of field List of applied checks The information is shown in an editor window where it can be edited, saved or printed. Data entry notes During data entry in EpiData of a questionnaire it is often useful to make notes (e.g. if a difficult to read word is written on a questionnaire). The Data Entry Notes function can be used for making short notes either during data entry or when no data file is open. During data entry the notes can be accessed by pressing [F8]. If no note file exists for the current data file, a new file will be created. Current time and date are automatically inserted in the notes. Data Entry Notes can also be accessed from the Document menu. Data Entry Notes will be included if the function Backup Data file is selected. The data entry notes file is also used to store information of append, merge and import operations making it possible to document the changes made to a data file. During data entry, notes may also be added to the notes file using the WRITENOTE check command. Data file label When a data file is created a data file label can be entered as a short text (50 characters). The data file label is saved as part of the data file (.REC file). The data file label is shown as part of Document data file and is exported when data files are exported to Stata, Sas or SPSS The data file label can be changed by using Tools / Edit File Label.

.
67
List data List data can be used as part of the documentation of entered data by using this function to produce a print of all or part of the data in entered records. Select the function Document / List Data. An Open File dialog appears where the name of the data file to list can be entered. A new dialog box appears where the options of List Data can be set. The options are: Select records List all records or only a range of records (e.g. from record 100 to record 199) Skip deleted records Use a record filter. Enter a Boolean expression, e.g. ID>1000 or (V10 <> . ) AND (V100=20). Only records where the Boolean expression evaluates to TRUE are shown. Select fields Check or uncheck the fields of the data file to select which fields are shown in the list. Click All to select all fields. Click None to uncheck all fields. Options Dimensions of list. The line width of the list of data can be changed to insure a nice printed output. The number of columns in the list can be changed. If either the line width or the number of columns are changed, a new calculation of the width of the data columns are shown. Data wider than the data column's width are truncated (indicated by ‘—‘ in the output). Use index as sort order. If this option is set then the data is listed by an order decided by the KEY-field(s) defined in the check file. Only when a key is defined in the check file can you use that key for listing. Write value labels instead of data. If a field has value labels defined (by using COMMENT LEGAL in the check file) the labels instead of the values will be shown in the list if this option is checked. The list is shown in EpiData's editor. Codebook – basic tabulation The Codebook gives key information plus basic descriptive statistics on the data found in the data file including the number of records, number of deleted records, variable labels, field types, selected check commands and number of missing values (= blank fields). Summary statistics are also displayed depending on the field type. Codebook is a simple form of frequencies for all or selected variables. The Codebook function is found in the Document menu. Select the file to make a codebook for. Select the fields to make a codebook for (default is all fields). It is also possible to make a codebook on a selected range of records, which will effect the calculated means, ranges, etc. The options page allows you to select the level of default about checks in the check file to be shown in the Codebook. The resulting Codebook is shown in the editor.

.
68
Logical Consistency Check Consistency Check is a function used for checking the consistency of all data in a data file in one run without browsing the data file manually. It provides ’batch’ checking as opposed to the interactive (i.e. as data is entered) checking that is also offered by check commands. A number of consistency checks may be defined in the check file or another text file. The function will show a list of all records in the data file that fail one of the specified consistency checks. To make a logical consistency check a CONSISTENCYBLOCK must be entered either in the check file attached to the data file or in another text file. The CONSISTENCYBLOCK is a block command ending with the word END. Any number of consistency checks can be defined in the block. Run Consistency Checks from the Document menu. Enter the name of the data file to check and the name of file that contains the CONSISTENCYBLOCK (can be the check file or any other file). Different data files may share the same CONSISTENCYBLOCK file. Click OK, wait for the checks to finish, and examine the resulting report. The syntax of a check is CHECK "Text explaining the purpose of the check" logical / Boolean expression The logical / Boolean expression is an example of good data. An example: CONSISTENCYBLOCK
REPORT ID1CHECK "V1 is missing or unusually big" ((V1<>.) AND (V1<112))CHECK "ID-numbers are not identical" ID1=ID2CHECK "Mother too young" (AGE<15) AND (HASCHILD="N")CHECK "Ranges" CHECKRANGECHECK "Legal" CHECKLEGALCHECK "MustEnter" CHECKMUSTENTERCHECK "Range and legal" CHECKRANGELEGAL
END The command REPORT informs the function of how to report a record that fails a check. If no REPORT command is found in the CONSISTENCYBLOCK then the record number of the failing record is reported. In this example the value of the field ID1 will be reported for all failing records. The first check has the caption "V1 is missing or unusually big" and it will report records where V1 is either missing or bigger than 112. The caption is irrelevant for the function in itself. It is used for your own information and for easier reading of the resulting list of failing records. The syntax of the logical expression is the same as IF expression and the same operators and functions can be used. The expression must express what is expected in a "good" record since the resulting report shows the records that fail the test (i.e. where any of the logical expressions evaluate to FALSE). Three different predefined checks may also be used: CHECKRANGE checks if the values of all the fields are within the RANGE defined in the check file. A field's value will only result in a failing record if the value is not missing and if a RANGE for the field is defined in the check file. CHECKLEGAL checks if the values of all the fields are legal according to the LEGAL and COMMENT LEGAL definitions in the check file. Fields with missing values are ignored. CHECKRANGELEGAL checks if the values of all the fields are legal according to the LEGAL, COMMENT LEGAL and RANGE definitions in the check file. Fields with missing values are ignored. CHECKMUSTENTER reports records that have fields with missing values that have MUSTENTER defined in the check file.

.
69
Double entry and validation To ensure a high quality of data, often it is a good strategy to have two different persons enter the same data. In EpiData this can be done in two different ways: either by entering the same data in two separate data files, which later can be compared or by entering in double entry mode where the new data immediately are compared with the original data. VALIDATE DUPLICATE DATA FILES Two different persons enter the same data in two separate data files. When all data has been entered the two data files may be compared using the function Validate Duplicate Files found in the Document menu in the main screen (when all files are closed or when only editor files are shown). To prepare double entry the function Copy Structure found in the Tools menu may be used to copy the structure (not the data) of a data file to a new data file. Copy Structure has the option to leave out text fields since these are seldom entered twice. Select Validate Files when all data has been entered into both files. Select the names of the two files. After that a dialog is shown with the options of the validation process. Select key fields In order to compare two data files one or more KEY fields should be selected. The KEY fields selected are used to match records in the two files. The list of selectable key fields show only the fields that are common to both data files. Fields that are marked with KEY in the check file have a key-symbol . The key symbol is shown only as information. It is not necessary that the KEY fields selected for validation are KEY fields in the check file. If no KEY fields are selected then the two data files are compared on a record-by-record basis (i.e. record 1 in data file 1 is compared to record 1 in data file 2, and so on). Data in the two files must therefore be entered in the same order if no key fields are selected. Options: Ignore deleted records Records marked as deleted are skipped during the validation process Ignore text fields Fields of the type Text and Uppercase text are ignored during the validation process Ignore letter case in text fields If set then "Smith" is considered equal to "sMiTh" Report differences in field types If set then the validation report will include information about fields in the two data files have the same field name but have different field types. Ignore missing records in data file 2 Set this option to avoid messages that records found in data file 1 are not found in data file 2. This is useful if double entry is only made on a sample of the original data file. Select the original (full) data file as data file 1 and the extract as data file 2, and set the option Ignore missing records in data file 2. Click OK to run the validation. The two data files are compared and a validation report is shown. DOUBLE ENTRY Double entry is a procedure where one person has entered data in a data file and another person enteres the same data in EpiData's double entry mode where the new data immediately are compared with the original data. During the second round of data entry the user will receive messages if the new data differ from the orginal data. Double entry is done in two steps. First double entry is prepared, second the data are reentered.

.
70
Prepare for double entry verification In the Tools menu select Prepare Double Entry Verification. Select the data file with the original data. Select a name for the data file, where the second round of data are to be saved. Options can be changed now: choose if textfields are to be ignore during double entry (only data in numeric fields will be compared with original data). Choose if records are to be compare by recordnumber or by a keyfield. If the option "Match records by field" is unchecked, then records are compared by recordnumber. If the option is checked, the user will be asked to point out which data field should act as the keyfield. The keyfield must contain unique data, i.e. a ID-number. Click OK and read the message stating that double entry varification is now prepared. Re-enter data Select Enter Data and choose the double entry data file that was created when double entry verification was prepared (this file will be default is Enter Data is selected directly following prepare for double entry). The user will see a warning stating that EpiData is in double entry verification mode. Begin entering the data. If the data entered differ from the original data file a warning is shown, given the chose of accepting the new value, the original value or editing the input. As during normal data entry, the double entry verification can be interupted by closing the data file and resumed at a later time. Count records by field Count Records is used to document how many times a specific value of a specified field occurs in a data file. Several data files can be checked in one run of this function. An example of use of this function: A study of patients uses several data files. One data file contains the ID-number and name of all patients included in the study. Another data file could contain basic data concerning the patients (e.g. age, height, weight, etc) including their ID-number. A third data file could contain data regarding the patient's consultations. If all data are entered correctly then the first data file will have the same number of records as the number of patients included in the project. A specific ID-number will occur in one - and only one - record. The second data file ("basic data") should have one record per patient meaning that all the ID-numbers found in the first data file should occur in one (and only one) record. The third data file depends on the study. In this example all patients should have at least one consultation but they can have more than one. This means that a specific ID-number must exist in at least one record, but can exist in more than one record. The function Count Records makes it easy to check these conditions. Run the function specifying all three data files and specify that the field ID (which is found in all three data files) should be the field to evaluate. The result of the operation is a list containing all the different values found in all three data files. Next to each value is the count of records where the field ID has this specific value. How to operate the Count Records dialog box The first line in dialog is where the names of the data files to be evaluated are entered. Several file names can be entered at once separated by space. If a file name contains the character space then imbed the file name in double quotes ("my own data file.rec"). It is not necessary to specify the file extension (.REC). Click on Add to list to put the entered files on the list of data files to evaluate. To remove a file from list, highlight the file or files and click on Remove from list.

.
71
When new files are added or removed from the list, the list of fields to evaluate is updated. The list of fields shows all fields that are common to the selected data files. If no fields are shown in the fields list then no fields are common to all the files and the function cannot be used. Highlight one field in the list of fields making it the field to evaluate. Click OK to run the function. Example of output of Count Records by Field: Two datafiles, FileA.rec and FileB.rec was entered on the list of files. The field ID was highlighted making it the field to evaluate. The output of Count Records by Field is: File 1 = d:\datafiles\FileA.recFile 2 = d:\datafiles\FileB.rec
15 different values for ID found
FilesID 1 2---------------------1 1 12 1 13 1 14 1 15 1 16 1 17 1 .8 1 .9 1 .10 1 .11 . 112 . 213 . 114 . 115 . 1--------------------- The list shows that 15 different values for ID was found in the two datafiles. The values 1-6 was found in one record in both of the datafiles. Values 7-10 was only found in FileA.rec and each of them in only one record. The values 11-15 exists only in datafile 2 (FileB.rec). 11, 13, 14 and 15 is found in only one record, but the value 12 exists in two different records.
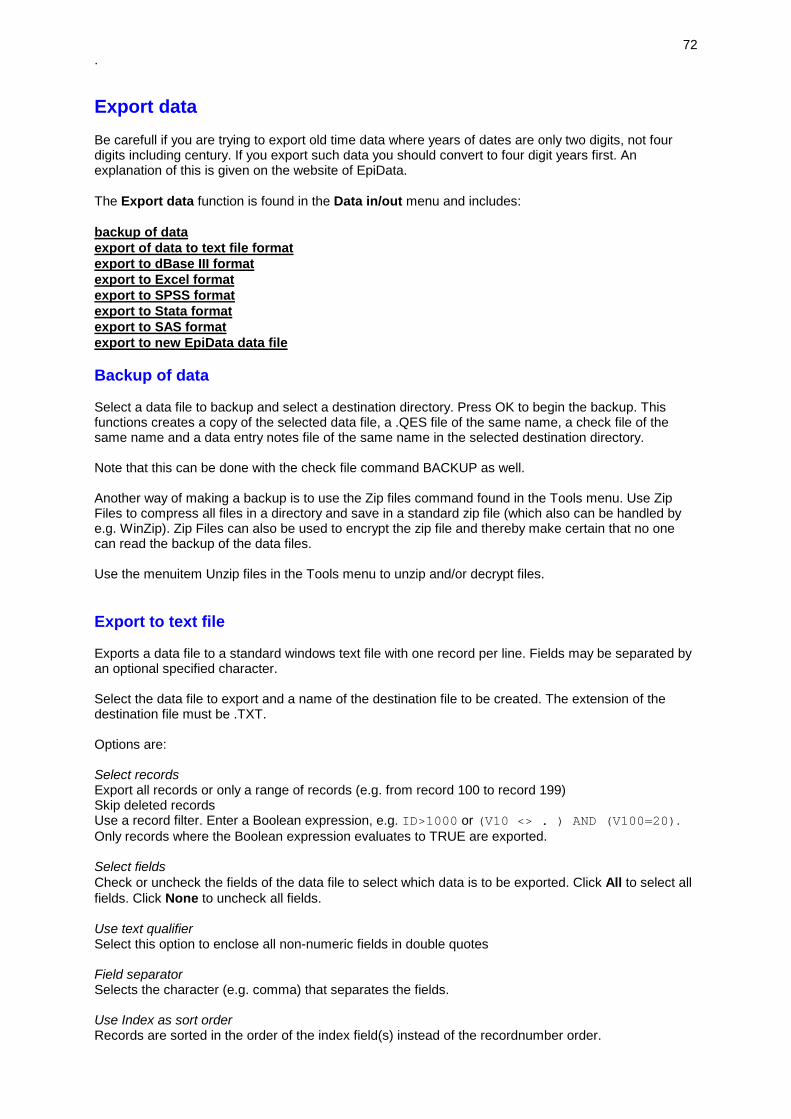
.
72
Export data Be carefull if you are trying to export old time data where years of dates are only two digits, not four digits including century. If you export such data you should convert to four digit years first. An explanation of this is given on the website of EpiData. The Export data function is found in the Data in/out menu and includes: backup of data export of data to text file format export to dBase III format export to Excel format export to SPSS format export to Stata format export to SAS format export to new EpiData data file Backup of data Select a data file to backup and select a destination directory. Press OK to begin the backup. This functions creates a copy of the selected data file, a .QES file of the same name, a check file of the same name and a data entry notes file of the same name in the selected destination directory. Note that this can be done with the check file command BACKUP as well. Another way of making a backup is to use the Zip files command found in the Tools menu. Use Zip Files to compress all files in a directory and save in a standard zip file (which also can be handled by e.g. WinZip). Zip Files can also be used to encrypt the zip file and thereby make certain that no one can read the backup of the data files. Use the menuitem Unzip files in the Tools menu to unzip and/or decrypt files. Export to text file Exports a data file to a standard windows text file with one record per line. Fields may be separated by an optional specified character. Select the data file to export and a name of the destination file to be created. The extension of the destination file must be .TXT. Options are: Select records Export all records or only a range of records (e.g. from record 100 to record 199) Skip deleted records Use a record filter. Enter a Boolean expression, e.g. ID>1000 or (V10 <> . ) AND (V100=20). Only records where the Boolean expression evaluates to TRUE are exported. Select fields Check or uncheck the fields of the data file to select which data is to be exported. Click All to select all fields. Click None to uncheck all fields. Use text qualifier Select this option to enclose all non-numeric fields in double quotes Field separator Selects the character (e.g. comma) that separates the fields. Use Index as sort order Records are sorted in the order of the index field(s) instead of the recordnumber order.
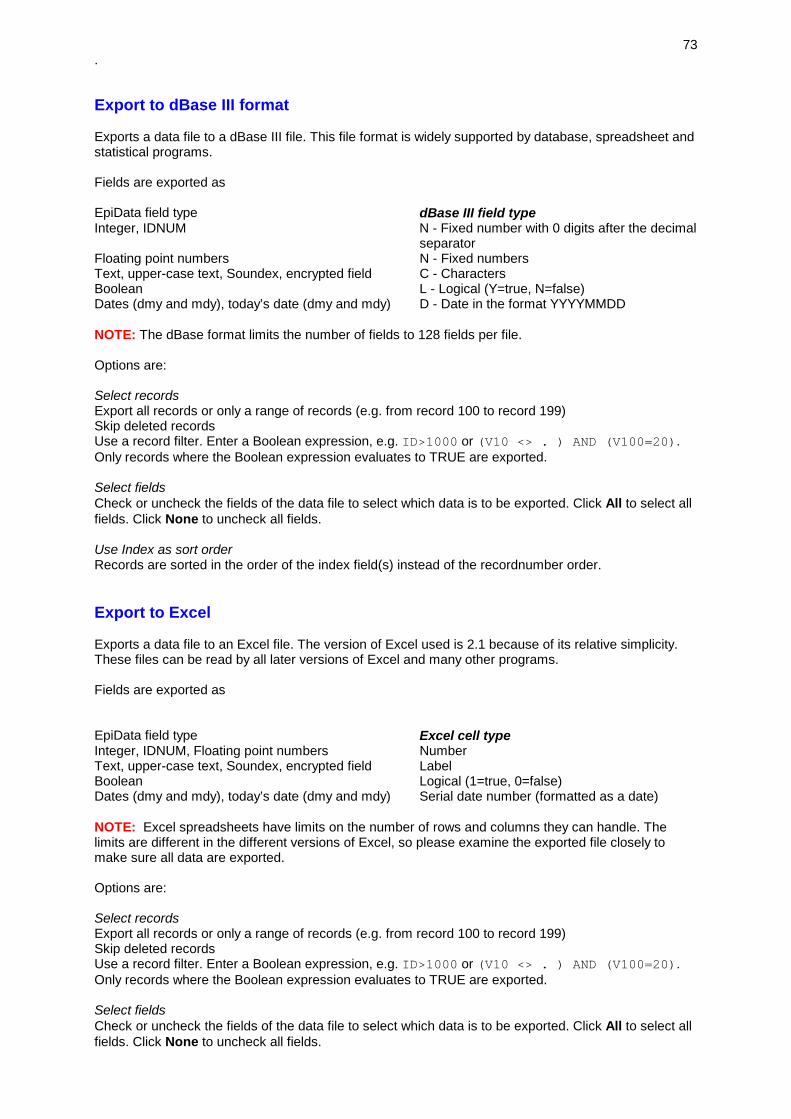
.
73
Export to dBase III format Exports a data file to a dBase III file. This file format is widely supported by database, spreadsheet and statistical programs. Fields are exported as EpiData field type dBase III field type Integer, IDNUM N - Fixed number with 0 digits after the decimal
separator Floating point numbers N - Fixed numbers Text, upper-case text, Soundex, encrypted field C - Characters Boolean L - Logical (Y=true, N=false) Dates (dmy and mdy), today’s date (dmy and mdy) D - Date in the format YYYYMMDD NOTE: The dBase format limits the number of fields to 128 fields per file. Options are: Select records Export all records or only a range of records (e.g. from record 100 to record 199) Skip deleted records Use a record filter. Enter a Boolean expression, e.g. ID>1000 or (V10 <> . ) AND (V100=20). Only records where the Boolean expression evaluates to TRUE are exported. Select fields Check or uncheck the fields of the data file to select which data is to be exported. Click All to select all fields. Click None to uncheck all fields. Use Index as sort order Records are sorted in the order of the index field(s) instead of the recordnumber order. Export to Excel Exports a data file to an Excel file. The version of Excel used is 2.1 because of its relative simplicity. These files can be read by all later versions of Excel and many other programs. Fields are exported as EpiData field type Excel cell type Integer, IDNUM, Floating point numbers Number Text, upper-case text, Soundex, encrypted field Label Boolean Logical (1=true, 0=false) Dates (dmy and mdy), today’s date (dmy and mdy) Serial date number (formatted as a date) NOTE: Excel spreadsheets have limits on the number of rows and columns they can handle. The limits are different in the different versions of Excel, so please examine the exported file closely to make sure all data are exported. Options are: Select records Export all records or only a range of records (e.g. from record 100 to record 199) Skip deleted records Use a record filter. Enter a Boolean expression, e.g. ID>1000 or (V10 <> . ) AND (V100=20). Only records where the Boolean expression evaluates to TRUE are exported. Select fields Check or uncheck the fields of the data file to select which data is to be exported. Click All to select all fields. Click None to uncheck all fields.

.
74
Use Index as sort order Records are sorted in the order of the index field(s) instead of the recordnumber order. Export to SPSS Exports a data file to an SPSS command file (*.SPS) and a raw data file (*.TXT). Run the command file in SPSS to load the data into SPSS and use the SPSS command SAVE to create a genuine SPSS data file. Comment legals found in the exported data file are used in the command file as value label definitions. Options are: Select records Export all records or only a range of records (e.g. from record 100 to record 199) Skip deleted records Use a record filter. Enter a Boolean expression, e.g. ID>1000 or (V10 <> . ) AND (V100=20). Only records where the Boolean expression evaluates to TRUE are exported. Select fields Check or uncheck the fields of the data file to select which data is to be exported. Click All to select all fields. Click None to uncheck all fields. Use Index as sort order Records are sorted in the order of the index field(s) instead of the recordnumber order. Note that the term “RECORDS=” in the generated SPSS .sps file has a different meaning than in EpiData. In EpiData records is the number of observations, whereas in SPSS it is the number of lines needed to write all the fields for one person. Export to SAS Exports a data file to a SAS command file (*.SAS) and a raw data file (*.TXT). Submit the command file in SAS to load the data into SAS. Comment legals found in the exported data file are used in the command file as value label definitions. Options are: Select records Export all records or only a range of records (e.g. from record 100 to record 199) Skip deleted records Use a record filter. Enter a Boolean expression, e.g. ID>1000 or (V10 <> . ) AND (V100=20). Only records where the Boolean expression evaluates to TRUE are exported. Select fields Check or uncheck the fields of the data file to select which data is to be exported. Click All to select all fields. Click None to uncheck all fields. Use Index as sort order Records are sorted in the order of the index field(s) instead of the recordnumber order. Export to Stata Exports a data file to a Stata file version 4, version 5 (same format as version 4), version 6, 7 or version 8. Note that the case setting in options for creation of data files is used when exporting. If you want small letter variable names in Stata set the option to small. The data file format for Stata includes information on data file label, variable labels and value labels. Note that Stata version 4/5 only allows short labels (the value labels may be up to 8 characters). If labels are too long to fit the Stata data file structure they will be truncated.

.
75
EpiData field type Stata variable type Integer - Length<3 Byte - Length<5 Integer - Length<10 Long integer - Length>=10 Double real Floating point numbers Double real Boolean Byte (0=false, 1=true) Dates (dmy and mdy), today’s date (dmy and mdy) Serial date number (formatted as a date using %d) Text, upper-case text, encrypted field String Soundex String (length=5) Options are: Select records Export all records or only a range of records (e.g. from record 100 to record 199) Skip deleted records Use record filter. Enter a Boolean expression, e.g. ID>1000 or (V10 <> . ) AND (V100=20). Only records where the Boolean expression evaluates to TRUE are exported. Select fields Check or uncheck the fields of the data file to select which data is to be exported. Click All to select all fields. Click None to uncheck all fields. Select Stata version Selects which Stata version the *.DTA file is written for. Select lettecase for fieldnames Fieldnames (or variablenames) are casesensitive in Stata. Use this option to set the letter case of variables in the exported Stata file. Use Index as sort order Records are sorted in the order of the index field(s) instead of the recordnumber order. Export to new EpiData data file Exports a data file to a new EpiData data file. The advantage of this function is that it is easy to make an extract of a data file by exporting fewer records than the original data file or by exporting fewer fields. Options are: Select records Export all records or only a range of records (e.g. from record 100 to record 199) Skip deleted records Use a record filter. Enter a Boolean expression, e.g. ID>1000 or (V10 <> . ) AND (V100=20). Only records where the Boolean expression evaluates to TRUE are exported. Select fields Check or uncheck the fields of the data file to select which data is to be exported. Click All to select all fields. Click None to uncheck all fields. Use Index as sort order Records are sorted in the order of the index field(s) instead of the recordnumber order. You can use this if you want to analyse data in Epi Info v6 and the number of fields in your REC file is too large.

.
76
Import data The import function is found in the Data menu and includes: Import of text filesImport of dBase filesImport of Stata files Import text files EpiData can import data stored in text files in different formats: delimited (with comma, semicolon, TAB, etc.) or fixed, with text qualifiers and different date formats. To import data from a text file you must first create a .QES file that acts as a template for the import. The .QES file is also used to give the variables in the text file field names. The fields are named from the .QES file. If the text file contains field names in the first line the option Ignore first line in text file must be checked. The .QES file also defines to which field types the variables in the text file are assigned. If the .QES file contains fewer fields than the text file has variables, then the surplus variables in the text file are ignored. If the .QES file contains more fields than the text file, then the surplus fields are set to missing. If the text file contains dates then make sure to set the date format options correctly. Options are: Delimited format. The variables in the text file is separated by a comma, a semicolon, a TAB character, etc. Remember to set the Delimiter option correctly. Enclosure of text/variables. Defines if all variables, no variables, or only text variables in the text file are enclosed in double quotes (”). Fixed format. The data in the text file are stored without a delimiter between the variables. If this option is used then make sure that the width of the entry fields defined in the .QES file is exactly the same as the width of the variables in the text file. If the option to create delimited text files exists in the program that generates the text file then it is recommended that you use the delimited text file format. Ignore first line in text file. Often text files include, for ease of use, the variable names in the first line. If such a line exists it must be ignored during import to EpiData. Variable names are defined in the .QES file. Date format. Specifies the order of day, month and year in dates. Date separator character. Use this option to specify which character separates the day, month and year in dates. Clear this option if no separator character is used in the text file. Dates has prefixed zero. Set this option if dates in the text file is in this format (e.g.): 04052001 (May 4th, 2001). Clear this option if the format is (e.g.): 4052001 (also May 4th, 2001) Years have 4 digits. Specifies if years in the dates of the text file are 4 digits (2001) or 2 digits (01). If years have only 2 digits then the century will be set to 20 if the year is less than 50 and to 19 if the year is greater than or equal to 50. Import dBase files Imports files in dBase III or dBase IV format to EpiData data files. dBase files has variable names that can be 11 characters in length. Field names longer than 10 characters will be truncated since EpiData operates with 10 character field names. The variable types of the dBase file will be imported as: dBase variable type EpiData field type C - Text Text field (normal case)

.
77
D - Date Date field in either European style (dd/mm/yyyy) or American style (mm/dd/yyyy) depending on what option is set
N/F - Numeric Variables with zero decimals and a width smaller than five digits will be imported as integer fields. Other numeric variables will be imported as floating point fields.
L – Logical Boolean field Only these variable types can be imported by EpiData. Options for import are: - import dates as <dd/mm/yyyy>, <mm/dd/yyyy> or <yyyy/mm/dd> Import Stata files EpiData can import Stata files versions 4, 5, 6, 7 and 8. A maximum of 800 variables can be imported. Field names in Stata version 7 and 8 can be 32 characters in width. These field names will be truncated to EpiData’s standard 10 character field names. Variable labels in Stata version 6, 7 and 8 can be 80 characters in width. These will be truncated to 50 characters. The variable types of the Stata files will be imported as: Stata variable type EpiData field type Byte Integer field (3 digits)
Integer Floating point field (5 digits)
Long Floating point field (11 digits)
Double, float Floating point field. If format code is %fx.y
then x defines the width of the field and y defines the number of decimals. If format code is not %f then the field length is set to 18 with 4 decimals.
String Text field (normal case) If the format of a numeric variable is %d then the variable is imported as a date field. Standard is <dd/mm/yyyy> but <mm/dd/yyyy> will be used if the format specifies that the month is shown before the day. If the Stata file contains value labels then these will be imported to a check file as COMMENT LEGAL. If missing values in the form .a, .b or .c are found during import of a Stata 8 data file, the check file will get a MISSING VALUE definition.

.
78
Other tools and functions Make QES file from data file If the .QES file that was used to create a data file is no longer available, it can be created by using QES File from REC File found in the Tools menu. Enter the name of the data file and a name of the new .QES file. Click OK. QES File from REC File will ensure that field names stay the same as in the data file if the new .QES file is used to make a new data file. If the data file was created with the option Automatic field naming (as Epi Info) then curly brackets will be inserted if necessary. If the data file was created with the option First word in question is field name then the field name will be inserted as the first word. Recode data file Recode data file is a tool that can be used to change the values of multiple fields in all records in a data file in one batch run. The recode commands are part of a RECODEBLOCK..END block which can be defined in the check file or in any other text file. The commands that can be used in the RECODEBLOCK are: LET (with or without an explicit LET), IF..ELSE..THEN..ENDIF, CLEAR and EXIT. To run a set recoding commands select Recode Data from the Tools menu. Enter the name of the data file to recode and the name of the file containing the RECODEBLOCK. Recoding will be done for all records. A message will be given showing the number of records that will be changed. The operation can be cancelled at this point leaving the data file unchanged. If the operation is not cancelled then a backup of the original data file will be saved under the filename FILENAME.OLD.REC and the file FILENAME.REC will contain the recoded records. In the example below the function RecordNumber is used. This function returns the current record number and can be used as a counter. In the example the field ID will get the value 3001 in record 1, 3002 in record 2, etc. A summary of the recode operation will be added to the data entry notes files of the data file. Use Document / Data Entry Notes and enter the name of the data file to view the data entry notes file. Example of a RECODEBLOCK: RECODEBLOCK
ID=RecordNumber+3000IF V2 = . THEN
CLEAR V3EXIT
ENDIFV3=V3+1
END
Converting a two digit year to a four digit year. This is simple since EpiData will read all dates as implicit four digit year. Numbers from 50 to 99 read as 19xx and numbers from 00 to 49 as 20xx: RECODEBLOCK
* to convert a 2 digit year to a four digit year:fouryear = twoyear
END

.
79
Pack data file During data entry a record can be marked for deletion using [Shift] + [Delete]. The record is not removed from the data file but only marked for deletion. To permanently delete all records marked for deletion use the function Pack File found in the Tools menu. Before the marked records are deleted permanently a warning is given showing how many records are about to be deleted. If OK is pressed the records are deleted permanently. A backup of the original data file is saved under the filename FILENAME.OLD.REC. If Cancel is pressed then the data file remains unchanged. Compress data file Compress File changes the width of all fields in a data file so that the width is exactly the width of the widest value. If an integer field is defined as ########## (10 digits) but the highest number in the data file in this field is only 9999 then the field is redefined as ####. The advantages of Compress Data file is that the data file can be reduced in size. Wasted space in all fields is removed. When the function is run a Backup of the original data file (before compression) is saved under the file name FILENAME.OLD.REC. Print data entry form When a data entry form is shown it can be printed looking the same as it does on the screen, including the current values of the fields. This may also be done when a data entry form is shown using the Preview Data Form function. Select Print Data form in the File menu when a data entry form is shown on screen.

.
80
Options When all windows are closed or when an editor window is active, EpiData program options can be set by selecting File / Options. The options are placed on several tab-sheets. You can select another tab-sheet by using the mouse or [Ctrl] + [TAB]. All settings are saved in the EpiData.ini file when EpiData is closed so selected options will be the same the next time EpiData is started. Note that several different .INI files can be made on the same computer, see The .INI file. EDITOR OPTIONS Change of font and background colour in editor windows. Note that all open editor windows are updated with the new font and colour when Options are closed by using OK. Change the number of spaces that are inserted when the [TAB] key is pressed. EpiData cannot work with tab characters so tabs are automatically replaced with the number of space characters defined in the Editor Options page when a file is opened or when text is pasted from another program. SHOW DATA FORM OPTIONS Defines how a data file is shown in a data form. You can change the font and background colour of the data forms. You may also specify a different colour for the background of the entry fields and choose to have a highlight in the active entry field. Other options are how the entry fields look (3D-look, flat with border or flat without border), line height in the data form and the number of pixels that the tabulator character (@) inserts. CREATE DATA FILE OPTIONS Defines how field names are made when Create Data file is run. Define field names to be upper-case, lower-case or "as is in the QES file". The naming style can also be selected. For details, please refer to the section Field names. DOCUMENTATION OPTIONS Defines how editor windows look when showing documentation (e.g. Document data file, List Data, Codebook). ADVANCED OPTIONS ID-number: Defines the first number used in new files that contain an IDNUM field. Error messages: If this option is set then messages due to errors in the handling of IF and LET expressions in check files will be shown during data entry. This function can help in finding the reason why an expression or condition does not work during the designing of a data entry system. If this option is not set then errors in IF and LET expressions are ignored during data entry. Language selects the language to use in menus, buttons, error messages etc. in EpiData. Please refer to the language section. Restore default options: Restores all options to default values (except language).

.
81
SOUNDS It can be useful to make EpiData beep when an error occurs. This is indicated as part of the advanced options setting. By tick marking ”Warnings” a standard beep will occur when an error or warning happens provided the PC can give sounds. Some experimentation is needed. See further explanation in CHECK file language description of the command BEEP. FILE ASSOCIATIONS Use this function to associate one or more of the EpiData file types with EpiData making it possible to start EpiData with a double click on e.g. a data file (.REC file) in Explorer. The associated file types are given an icon which makes it easier to identify the files as belonging to EpiData in Explorer. Set the check mark next to the file types that are to be associated with EpiData and click the button Associate file types. To remove the association for one or more of the file types, set the check marks of the relevant file types and click the button Remove association. The .INI file All settings of EpiData are saved in the file EPIDATA.INI which is located in the same directory as the program file EPIDATA.EXE. It is not recommended that the .INI file is edited manually. However, it can be useful if shipping a translated version of EpiData to add a file with the name EPIDATA.INI which contains one line, for example:
Language=Francais This line will make sure that EpiData starts with the specified language the first time EpiData is run without the user having to go to Options to change the current language. DO NOT include other lines in the shipped .INI file. The .INI file contains information on recently used files, window sizes, etc. All this information is unique to one computer and may create strange results if moved directly to another computer. EpiData may be run with the program parameter /INI=inifilename. This parameter specifies that the program settings are to be loaded from another .INI file than EPIDATA.INI and are to be saved to the same file. This makes it possible to have several users on the same computer all saving their own settings (window sizes, colours, etc.). Toolbars EpiData has two toolbars on the top of the program window - the work-process toolbar and the editor toolbar. All functions shown in the toolbars can be reached by using the menus (File, Edit, etc.) and one or both of the toolbars can be hidden. Hide or show a toolbar by right-clicking with the mouse on the toolbar and select or deselect the relevant toolbar. This can also be done by using Window / Toolbars. On the same menu is found the function Hide Toolbars During Data entry. If this function is checked, then both toolbars will be hidden during data entry and when adding or revising checks. This function is checked by default.
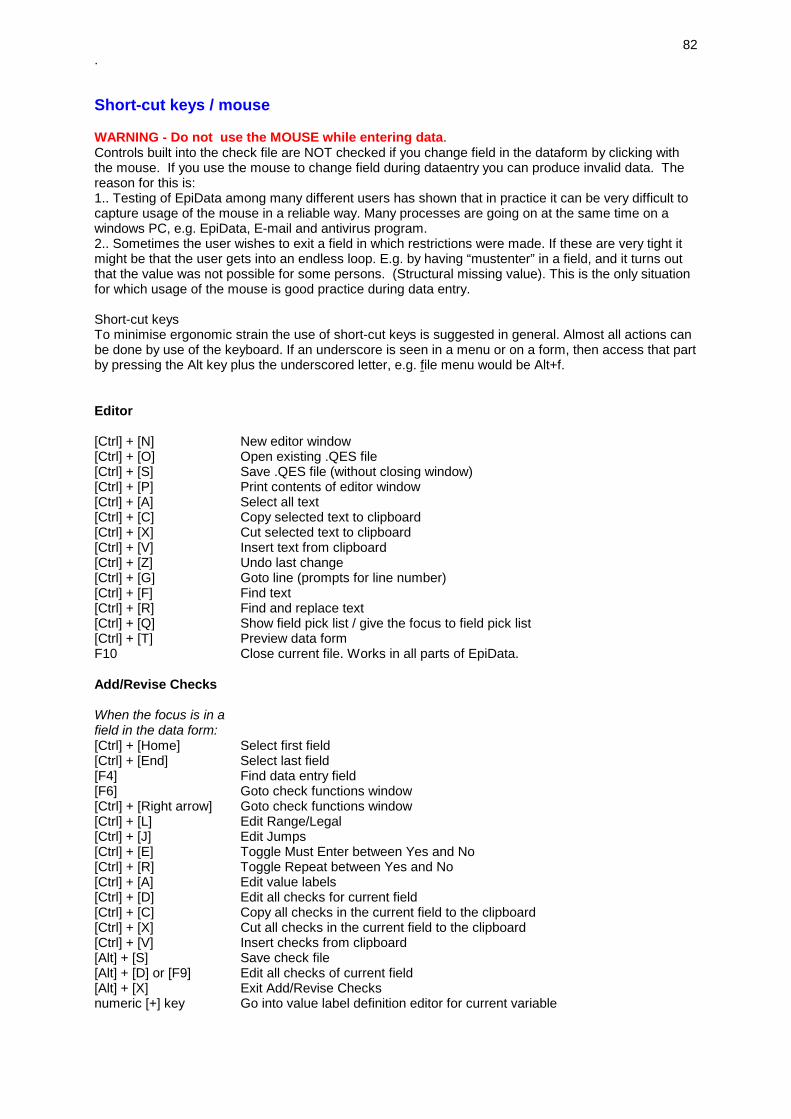
.
82
Short-cut keys / mouse WARNING - Do not use the MOUSE while entering data. Controls built into the check file are NOT checked if you change field in the dataform by clicking with the mouse. If you use the mouse to change field during dataentry you can produce invalid data. The reason for this is: 1.. Testing of EpiData among many different users has shown that in practice it can be very difficult to capture usage of the mouse in a reliable way. Many processes are going on at the same time on a windows PC, e.g. EpiData, E-mail and antivirus program. 2.. Sometimes the user wishes to exit a field in which restrictions were made. If these are very tight it might be that the user gets into an endless loop. E.g. by having “mustenter” in a field, and it turns out that the value was not possible for some persons. (Structural missing value). This is the only situation for which usage of the mouse is good practice during data entry. Short-cut keys To minimise ergonomic strain the use of short-cut keys is suggested in general. Almost all actions can be done by use of the keyboard. If an underscore is seen in a menu or on a form, then access that part by pressing the Alt key plus the underscored letter, e.g. file menu would be Alt+f. Editor [Ctrl] + [N] New editor window [Ctrl] + [O] Open existing .QES file [Ctrl] + [S] Save .QES file (without closing window) [Ctrl] + [P] Print contents of editor window [Ctrl] + [A] Select all text [Ctrl] + [C] Copy selected text to clipboard [Ctrl] + [X] Cut selected text to clipboard [Ctrl] + [V] Insert text from clipboard [Ctrl] + [Z] Undo last change [Ctrl] + [G] Goto line (prompts for line number) [Ctrl] + [F] Find text [Ctrl] + [R] Find and replace text [Ctrl] + [Q] Show field pick list / give the focus to field pick list [Ctrl] + [T] Preview data form F10 Close current file. Works in all parts of EpiData. Add/Revise Checks When the focus is in a field in the data form:
[Ctrl] + [Home] Select first field [Ctrl] + [End] Select last field [F4] Find data entry field [F6] Goto check functions window [Ctrl] + [Right arrow] Goto check functions window [Ctrl] + [L] Edit Range/Legal [Ctrl] + [J] Edit Jumps [Ctrl] + [E] Toggle Must Enter between Yes and No [Ctrl] + [R] Toggle Repeat between Yes and No [Ctrl] + [A] Edit value labels [Ctrl] + [D] Edit all checks for current field [Ctrl] + [C] Copy all checks in the current field to the clipboard [Ctrl] + [X] Cut all checks in the current field to the clipboard [Ctrl] + [V] Insert checks from clipboard [Alt] + [S] Save check file [Alt] + [D] or [F9] Edit all checks of current field [Alt] + [X] Exit Add/Revise Checks numeric [+] key Go into value label definition editor for current variable

.
83
When the focus is in the check-edit window:
[F6] Goto data form window [Ctrl] + [Left arrow] Goto data form window [Enter] Goto next check [Up arrow] Goto previous check [Down arrow] Goto next check [Ctrl] + [Up arrow] Make previous field the current field [Ctrl] + [Down arrow] Make next field the current field [Alt] + [S] Save check file [Alt] + [D] Edit all checks of current field [Alt] + [x] Exit Add/Revise Checks Enter data [Ctrl] + [N] New record [Shift] + [Delete] Mark record as deleted / Undelete record (toggle) [Ctrl] + [PgUp] or [F7] Show previous record [Ctrl] + [PgDn] or [F8] Show next record [Ctrl] + [P] Print Data form [Ctrl] + [Alt] + [Home] Show first record [Ctrl] + [Alt] + [End] Show last record [Ctrl] + [Home] Goto first field in current record [Ctrl] + [End] Goto last field in current record [Ctrl] + [G] Goto to a specified record number [Ctrl] + [F] Find record based on contents of the current field [F3] Search again using the same search conditions as specified using [Ctrl] + [F] [F4] Find data entry field [Shift]+[F4] or [F4]-[F4] Find relate field [Ctrl] + [Left arrow] Scrolls the data form to left margin [F9] or numeric [+] key Opens list of legal values (if available) [F5] Opens data entry notes (see check file description of Type Statusbar) [F10] (or [Ctrl] + [R]) Only during RELATE: moves back one level to the data file that called RELATE [F10] Closes datafile.

.
84
Program parameters EpiData can be run using one or more of the following parameters. The parameters can be specified in a .BAT file or by using a Windows shortcut. filename.QES Opens the specified QES file at start-up of program
filename.REC Opens the specified data file at start-up of program
/NOTOOLBARS Hides both tool-bars
/AUTOSAVE Suppresses the Save record to disk? message and causes modified records to
be saved without asking. /AUTO has the same effect and is kept for compatibility with Epi Info v6.xx. AUTOSAVE is also a check file command.
/CONFIRM Suppresses the function that changes focus to next entry field when a entry field is filled. CONFIRM is also a check file command.
/INI=inifilename Uses the program settings found in the specified .INI file instead of using the default EpiData.INI. See also The .INI file.
If more than one file name is used as parameter then only the last file will be opened. An example: A batch-file (.BAT file) named CHILDPRJ.BAT is created containing this command line: EPIDATA.EXE CHILDPRJ.REC /NOTOOLBARS When the batch file is run then EpiData will execute opening the data file CHILDPRJ.REC and hiding both toolbars.

.
85
Internationalisation EpiData uses English as it's ’native language’, but other languages may be supplied making it possible to make local versions of EpiData with menus, buttons, error messages, etc. in the local language. The language used by EpiData is changed by selecting Options / Advanced from the File menu from the main screen. Languages other than English require a language file to be present in the same directory as EPIDATA.EXE. The language files are named LANGUAGE.LANG.TXT. For example, the Spanish language file will be ESPANOL.LANG.TXT. Language files will be made available from www.EpiData.dk as they become available. If a language file does not currently exist for your language and you are considering undertaking the translation yourself, then please contact [email protected] for further information. When the Options / Advanced page is shown, the language dropdown box shows the names of all XXX.LANG.TXT files present in the EpiData program directory. Adding a new language is therefore done by downloading a language file from www.EpiData.dk and saving it in the same directory as EPIDATA.EXE. EpiData has three different information and help files. The standard (English) files are: EPIDATA.HLP (the help file) EPITOUR.HLP (Epitour) README.RTF (information shown when EpiData is run the first time) These files can also exist in local language versions. In the LANGUAGE.LANG.TXT file a language code is specified, e.g. FR for France. This language code is used to find local versions of the three help files by adding "_XX" to the standard filename, where XX is the language code. For example, the French files would be named: EPIDATA_FR.HLP EPITOUR_FR.HLP README_FR.RTF If no local version of the three files are found then the standard (English) files are used. Field types in EpiData Field type
Example
ID number
<IDNUM>
Numeric
### ###.##
Text
___ _________ <E >
Upper-case text
<A>, <A >
Boolean
<Y>
Date <dd/mm/yyyy> <mm/dd/yyyy> <yyyy/mm/dd>
Today's date <today-dmy> <today-mdy> <today-ymd>
Soundex
<S> <S >
Tabulator code @

.
86
ID Number <IDNUM> <IDNUM > IDNUM is an automatic ID number field that is incremented by one for every new record entered. The ID number cannot be changed during data entry since it is generated automatically. The default first value of the ID number in a new data file is 1, but this can be changed in File / Options / Advanced. Numeric fields ### ###.### ######## ##.#### Numeric fields accept entry of numbers, the minus sign and decimal points. Periods (.) as well as commas (,) are accepted as decimal points in both the .QES file and during data entry. Only one decimal point is accepted in a field. This means that commas cannot be used as thousand separators. The number of characters (including a decimal point) define the length of the field. Maximum field length is 14 characters. Text fields and encrypted fields _ ______ _________ The number of underscore characters defines the length of the field. Text fields accept all characters. The maximum field length is 80 characters. <E > Encrypted fields are a special kind of text fields. The contents of encrypted fields are shown in readable form on the screen, but saved on disk with encryption. The algorithm used is “strong encryption” called Rijndael AES, see http://www.esat.kuleuven.ac.be/~rijmen/rijndael/ and http://csrc.nist.gov/CryptoToolkit/aes/rijndael/. There is no way to brake the encryption or guess the password based on contents of the file, so do not forget the password or the information in that field is lost. Use encrypted fields to store data in a protected mode, e.g. personal information. When a datafile is created and the qes-file contains one or more encrypted fields EpiData will prompt for a password which is saved in the datafile. A datafile containing encrypted fields can only be opened if the proper password is entered. In the checkfile, a encrypted field can be treated as a text field, e.g. LET encrypt1="Howdy". Upper-case text fields

.
87
<A> <A > Upper-case text fields accept all characters, but entries are converted to upper case. The length of the field is defined by the number of characters between the ‘less-than’ (<) and the ‘greater-than’ (>) symbols, including the upper case ‘A’. In the examples given above, the first field is 1 character in length. The second field is 5 characters in length. Boolean fields (yes/no fields) <Y> Boolean fields accept only Y, N, 1, 0 and space as legal entries. An entry of "1" is converted to "Y". An entry of "0" is converted to "N". Boolean fields have a length of one. This means that a field code of <Y > in the .QES file will create an error. Date fields <dd/mm/yyyy> <mm/dd/yyyy> <yyyy/mm/dd> There are three types of date fields: European style dates (day/month/year), American style dates (month/day/year) and "reversed dates" (year/month/day). Date fields are always 10 characters in length. During data entry, legal characters are numbers and forward slash (/). Dates can be entered without using the slash character if all numbers are written in full. The date 4th of May 1999 can be entered as 04051999 if the field is of the European type date. When the focus is changed to the next field, the date field will be formatted to the standard format (04/05/1999). It is not necessary to type all 10 digits. If the entry is 040599 in a European date field, the field will be formatted to 04/05/1999. 2-digit years are interpreted as the belonging to the century 1900 for years between 50 and 99 and the century 2000 for years between 00 and 49. If the entry is 0405 in a European date field, then the current year is added to the field. After entry, all types of date fields will be checked to make sure a legal date was entered. EpiData only supports dates with 4 digit years. Today’s date fields <today-dmy> <today-mdy> <today-ymd> Today's date fields will be filled automatically with the current date (i.e. the computer's system date). This type of field cannot be edited and cannot receive the focus. If a previously saved record containing a today's date field is edited and if the modified record is saved then today's date field will be updated to the current date. This feature makes it possible to use a today's date field as a last changed date marker. NOTE: The today's date fields using European date format (dmy) and reversed format (ymd) are introduced in EpiData. These field-types are not compatible with EpiInfo. Soundex fields

.
88
<S > <S > Soundex fields accept all characters, but only the letters in the last word of the entry will be used to create the Soundex code. Soundex is a coding of words that can be used to anonymise e.g. the surnames of informants participating in a survey. A Soundex code is always in the format A-999, i.e. one upper-case letter, a hyphen and 3 numbers. The Soundex code is generated using the following rules: 1. The first letter of the word is always retained. The rest of the surname is compressed to a three digit code based on the following coding scheme:
A E I O U Y H W Not coded B F P V Coded as 1 C G J K Q S X Z Coded as 2 D T Coded as 3 L Coded as 4 M N Coded as 5 R Coded as 6
2. Consonants after the initial letter are coded in the order they occur: HOLMES = H-452 ADOMOMI = A-355 3. The code always uses the initial letter plus three digits. Further consonants in long words are ignored: VONDERLEHR = V-536 4. Zeros are used to pad out shorter names: BALL = B-400 SHAW = S-000 5. Double consonants are treated as one: BALL = B-400 6. As are adjacent consonants from the same code group: JACKSON = J-250 7. A consonant immediately following an initial letter from the same code group is ignored: SCANLON = S-545 8. Apostrophes and hyphens are ignored: KING-SMITH = KINGSMITH = K-525 9. Consonants from the same code group separated by W or H are treated as one: BOOTH-DAVIS = B-312

.
89
Tabulator code @ When a data entry form is created the fields in the .QES file will be put onto the form in a position determined be the question text in front of the field. This can cause an uneven alignment of the fields. If a justification of the fields are required, the tabulator code can be used in the .QES file. Please note that this code does not exist in Epi Info, where it will be treated as any other character. The tabulator codes do not affect the fields or the data file (.REC file) in any other way than changing the position of the fields in the form. Insert the @ symbol immediately before a field to align it with the next tab stop. An example: v1@#### v20@#### These .QES file lines will create two 4-digit integer fields. The "questions" ("v1" and "v2") will be put on the left margin of the form. The left edge of the two fields will be put on the position from the left margin. Tab stops are measured in screen-pixels. The default is one tab stop for every 40 screen pixels, but this value can be changed in File / Options / Show data form.

.
90
Appendices Contributions and further acknowledgement A complete list of donors is maintained at http://www.epidata.dk/funding.htm. Please acknowledge the institutions and funding bodies supporting the development. By aug. 2002 the following were among donors: WHO-TDR office Geneva, London School of Hygiene & Tropical Medicine, UK , Health Canada, IUTLD-Paris, Valid International, UK, International Centre for Eye Health, UK , County of Funen, Denmark, Mark Myatt, Brixton Health, UK, Danish Data Archives/ERAS, Denmark, University of Southern Denmark, Faculty of Health – Odense., University of Aarhus, Denmark Faculty of Health Sciences Acknowledgements The ideas and principles used in EpiData are based on: Dean AG, Dean JA, Coulombier D, Brendel KA, Smith DC, Burton AH, Dicker RC, Sullivan K, Fagan RF, Arner TG, Epi Info, Version 6: A Word-Processing, Database, and Statistics Program for Public Health on IBM-compatible Microcomputers, Centers for Disease Control and Prevention, Atlanta, Georgia, U.S.A., 1995. Centres for Disease Control (CDC) kindly provided the source code for Epi Info to us. Parts of EpiData are based on this source code. Neither the World Health Organisation (WHO) or CDC has any responsibilities for the development and support of EpiData. Functions that allow EpiData to export data in Microsoft Excel format is based upon a freeware Delphi Unit written by Eddy Sterckx. Parsing and interpretation of calculations, IF … THEN conditions and expressions are based on a freeware Delphi Unit written by Martin Lafferty. This unit has been modified to for use with EpiData.
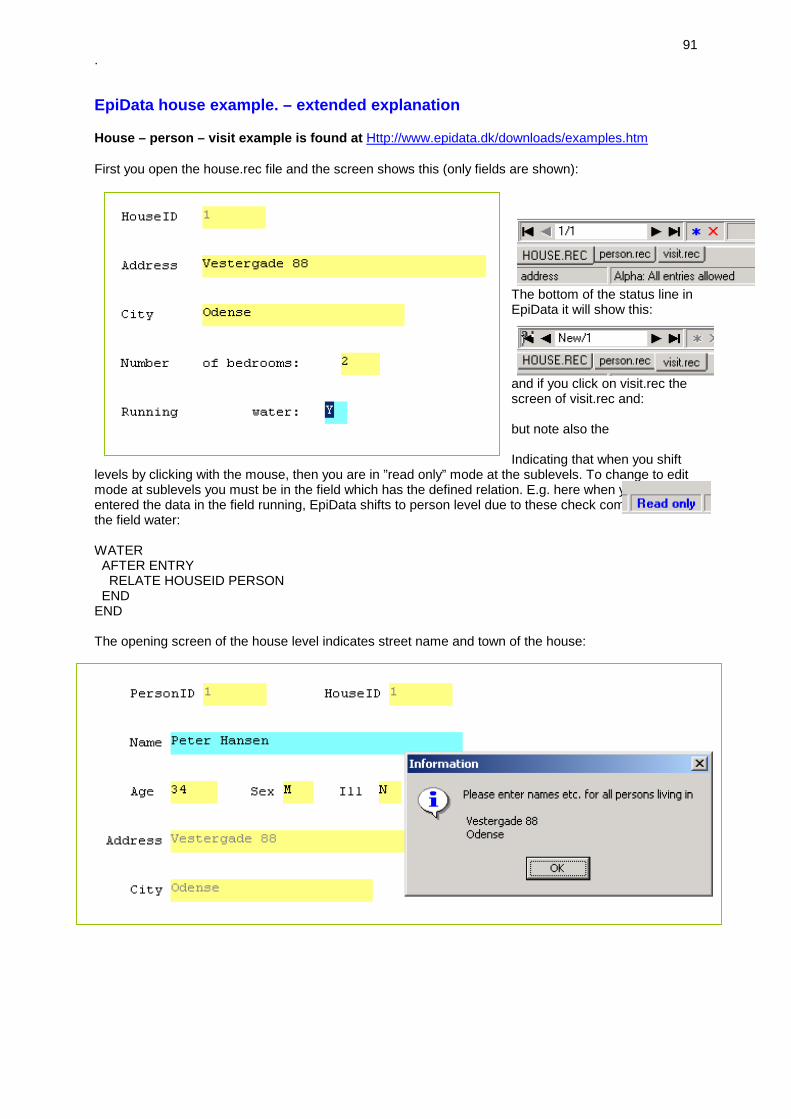
.
91
EpiData house example. – extended explanation House – person – visit example is found at Http://www.epidata.dk/downloads/examples.htm First you open the house.rec file and the screen shows this (only fields are shown):
The bottom of the status line in EpiData it will show this:
and if you click on visit.rec the screen of visit.rec and: but note also the Indicating that when you shift
levels by clicking with the mouse, then you are in ”read only” mode at the sublevels. To change to edit mode at sublevels you must be in the field which has the defined relation. E.g. here when you have entered the data in the field running, EpiData shifts to person level due to these check commands in the field water: WATER AFTER ENTRY RELATE HOUSEID PERSON END END The opening screen of the house level indicates street name and town of the house:

.
92
The highlighted tab is now person.rec and note the filter message of houseid= 1.
Now you can change data for the person ”Peter Hansen” or you could create a new person, by pressing Ctrl+N . Note that address and city is only shown in the yellow fields – it is not edited due to commands in the checkfile.
To add visits for this person enter something in field ILL which will take you to visits:
Note two things here: An information box shows the name of the person and the name, age, sex and value of person variable Ill is shown in blue. The welcome box was made like this: BEFORE FILE * Message "Now please enter all known visits for \n \n @varNAME" Help "Now please enter all known visits for \n \n @varNAME" DEFINE varINIT _ define info _________________________________________________ END

.
93
The actual values from previous record entered like this: Before record let info = varNAME + " Age: " + varAGE + " Sex: " + varSEX + " Ill: " + varILL end Where the varName varAge etc are temporay variables defined in person.chk, check contents for syntax. Now we need the commands to have the info variable shown: VISIT BEFORE ENTRY type "@info" END END By the ”type @info ” you get the blue text shown in previous figure. Once you have entered a visit the EpiData will ask if you wish to save the record:
And after you say yes and empty record will be shown. If you are done with ”Peter Hansens” records press Ctrl+R or F10 etc and you are taken to the previous level. In summary: A given relate is ONLY performed when you are in the field for which the relate is defined. If you click on other levels a ”read only” status will result. This is the same behaviour as Epi Info v6. In future versions of EpiData we might change this dependent on users comments to the discussion forum and or e-mail to [email protected] .

.
94
Datafile structure EpiData EpiData datafiles have the fileextension .REC. The datafile structure is the same as Epi Info version 6, except for a few changes described below. EpiData will read native Epi Info datafiles if they do not contain the field type phonenumber or local extension phonenumber. Epi Info will read native EpiData datafiles if the do not contain the field type soundex or EuroToday. EpiData does not add a End-Of-File marker to the datafile, but will know how to handle the EOF marked added by Epi Info. The datafile consists of a header describing the fields (variables) contained in the datafile plus the data. The header consists of one line describing the number of fields (variables) in the datafile plus a code signifying the background colour of the entry form and one line for every field (variable). Please note that a field with the length 0 (null) is a label (e.g. a heading) and should be ignored if converting the EpiData datafile to other programs. In order across each line of the header are the following data items describing each field. The text was taken from the Epi Info v6 manual text. Color codes and character displayed are not used in EpiData. All lines start from line 1 in the EpiData Dataform. Upon creation of the dataform line descriptions are converted into pixels based on the settings of line height and fonts in options. 1. The character to be displayed in the entry field. Number signs are used for text lines even
though they are not displayed. 2. The field name, up to 10 without punctuation or spaces. The name must begin with an
alpha character, but may contain digits. 3. The column in which the text preceding the entry field begins. If the line is only text, it is
displayed in this column. The first column on the left of the screen is column 1. 4. The line from the top of the screen where the text and/or field is displayed. The top line of
the questionnaire is line 1. 5. The color of the text. The color numbers are illustrated on the Epi Menu Setup screen. 6. The column where the data-entry field begins. 7. The line where the data-entry field begins. 8. A code number for the field type. Note that code numbers for numeric fields also give the
number of digits. 9. The number of characters in the field, or field width. This is 0 if the field contains only
text without one of the designated Epi Info field types. 10. The color of the entry field itself. 11. The text that will be displayed on the screen at the location specified in the third and
fourth items above. This may be up to 80 characters wide. As in Epi Info datafiles the 6th number in the field-description line which is the eight column above is the field type code. The codes are interpreted as follows: Value Field type Field length Comments 0 Integer 1-14 chars. Integer number fields. Contains only numbers 0-9 or
spaces. The field can be up to 14 characters in length, but EpiData saves integer fields with a length of 5 or more to Double Real Fieldtype with the field type code 100 (see Double Real field type)
1 Alpha 1-80 chars. Text fields. Can contain all ANSI characters. 2 Date 5, 8 or 10 chars. US style data fields, i.e. dates in the form mm/dd,

.
95
mm/dd/yy or mm/dd/yyyy. What form is used is read from the length of the field. Datafiles created with EpiData will always use 4-digit years, i.e. a length of 10, but to ensure compatibility with Epi Info short datetypes are allowed.
3 UpperAlpha 1-80 chars. Upper-case text fields. Can contain all uppercase ANSI characters.
4 - - Not used in EpiData. The number is reserved to ensure compatibility with Epi Info. However, as far as I know the number is unused in Epi Info, too. The source code of Epi Info labels field type code 4 as “CheckBox”.
5 Boolean 1 character Boolean field or yes/no field. Can contain space (ANSI #32), the letter “Y” or the letter “N”.
6 Double Real 1-14 chars. Double Real number field. If the field type code is 6 or 100 then the number of decimals is null. A double real number field with one or more digits after the decimal separator will have the code 100+the number of decimals. Decimal separator will always be a dot (“.”) even if EpiData allows users to enter real numbers using a comma a decimal separator. An example: A field entered in EpiData as ###.## will signify a double real number field with the length of 6 and the field type code will be 100+2=102.
7 - - Not supported by EpiData. Used for phone-number fields in Epi Info.
8 - - Not supported by EpiData. Was ment to be used for time fields in Epi Info.
9 - - Not supported by EpiData. Used for local extension phonenumber in Epi Info.
10 Today 5,8 or 10 Today’s day field in US date style. Data cannot be entered in this field by the user but will contain the current date of the time the record containing the field was saved. Use same format as Date fields (see field code 2)
11 EuroDate 5,8 or 10 European style date field, i.e. dd/mm, dd/mm/yy or dd/mm/yyyy. Which date type is used is read from the length of the field. EpiData only creates date fields with 4-digit years (i.e. a field length of 10), but shorted date types are kept for compatibility with Epi Info.
12 IDNUM 5-14 chars. Automatic ID-number field. Field will be filled out by EpiData with an incrementing integer number. Contains only numbers 0-9.
13 - - Not supported by EpiData. Field type code is reserved by Epi Info.
14 - - Not supported by EpiData. Field type code is reserved by Epi Info.
15 - - Not supported by EpiData. Field type code is reserved by EpiData.
16 EuroToday 5,8 or 10 European style today’s date field. Data cannot be entered in this field by the user but will contain the current date of the time the record containing the field was saved. Use same format as EuroDate fields (see field code 11). Field type is not supported by Epi Info.
17 Soundex 5-80 characters Soundex code field in the format A-000 where A can be any uppercase letter and 000 can be any three numbers. When converting EpiData datafiles to other programs this field type can be converted to a text field with a length of 5. Field type is not supported by Epi Info.

.
96
A few more remarks: • A missing value is saved as a number of spaces (ANSI #32) corresponding to the length of the
field. • Epi Info creates field names using only upper-case letters. When datafiles are created in EpiData
the user can optionally create lower-case, upper-case or mixed-case field names. The lettercase of fieldnames created in EpiData should therefore be kept if possible when converting to other datafile-formats.
• The length of the header of an Epi Info v6 file should not exceed 500. However it is not consistent across the Epi Info v6 modules whether the header length can indicate a position up to 999. Since 4 places are left for indication of which line in the qes file that ”line” in the rec file refers to: EpiData allows up to 999 lines in the QES file.
Datafile label and variable-labels The datafile label is stored in the first line of the datafile following the identifier “Filelabel: “ (see example of datafile attached to this document). The datafile will also contain a flag showing if variable-labels are used because this will influence the way EpiData will interpretate the “questions” save in connection with every field (variable). If the variable-label flag is set then the first word in a field’s question will be interpreted as a copy of the fieldname and the rest of the question will be interpreted as the variable-label. The variable-label flag is set if the string “VLAB” (lettercase not important) is found in line one of the datafile before the identifier “Filelabel: “ or if the string “VLAB” is found in line one of the datafile without the identifier “Filelabel: “ being present in line one. Example of datafile created by EpiData. The file consists of 22 fields (variables), none of which are labels-only, and 3 records. The 2nd record is marked "Deleted" (it is terminated by a question-mark). The datafile uses variable-labels. The question for the first field is, according to the datafile, "Int1 The first integer". But because of the VLAB flag, the fieldname "Int1" is removed and the variable-label is therefore "The first integer". The datafile has the label “This is the filelabel”. 22 1 VLAB Filelabel: This is the filelabel#INT1..........1...1..30...7...1...0...1.112.Int1.The first integer#INT4..........1...2..30...7...2...0...4.112.Int4.A 4-digit integer#INT6..........1...3..30...7...3.100...6.112.Int6.A 6-digit integer#INT9..........1...4..30...7...4.100...9.112.Int9.A 9-digit integer#INT13.........1...5..30...7...5.100..13.112.Int13.A 13-digit integer#FIX11.........1...7..30..10...7.101...3.112.Fix1:1...#FIX53.........1...8..30..10...8.103...6.112.Fix5:3...#FIX104........1...9..30..10...9.104..10.112.Fix10:4.._TXT1..........1..11..30...7..11...1...1.112.Txt1.._TXT4..........1..12..30...7..12...1...4.112.Txt4.._TXT9..........1..13..30...7..13...1...9.112.Txt9.._TXT14.........1..14..30...7..14...1..14.112.Txt14._UPP1..........1..16..30...7..16...3...1.112.Upp1.._UPP4..........1..17..30...7..17...3...4.112.Upp4.._UPP9..........1..18..30...7..18...3...9.112.Upp9.._UPP14.........1..19..30...7..19...3..14.112.Upp14._BOOL..........1..21..30...7..21...5...1.112.Bool.._SOUNDEX2......1..22..30..11..22..17..20.112.Soundex20._EUDATE........1..24..30..10..24..11..10.112.EU.date.._USDATE........1..25..30..10..25...2..10.112.US.date.._EUTODAY.......1..26..30..10..26..16..10.112.EU.today._USTODAY.......1..27..30..10..27..10..10.112.US.today.1111111111111111111111111111111111.111.11111111.1111aaaaaaaaaaaaaaaaaaaaaaaaaa!aaAAAAAAAAAAAAAAAAAAAAAAAAAAAAYF-623 01/05/200005/01/200025/05/2!00005/25/2000!2222222222222222222222222222222222.222.22222222.2222bbbbbbbbbbbbbbbbbbbbbbbbbb!bbBBBBBBBBBBBBBBBBBBBBBBBBBBBBYA-535 02/05/200005/02/200025/05/2!00005/25/2000?

.
97
EpiData International Versions Principles of translation and local adaptation. With the development of EpiData we encourage users in other countries and areas using other languages to translate documentation and other supplementary parts of EpiData. We cannot do the translation but will assist by supplying certain modules for use in the translation process. We hope for an open minded "culture" surrounding EpiData, but a few restrictions must apply to ensure similarity and guard against misunderstandings. Therefore we have decided on the following principles: 1. Epidata.exe as such is NOT changed. Only one version exists. That version can be distributed
from as many local servers around the world as needed. For those putting EpiData on an internet server or other media we would like an e-mail telling: a. Once a year the number of downloaded copies if possible. And if possible from which
countries these were downloaded. b. The internet address of the server c. The e-mail adress of the person to notify when we update EpiData
2. Menu titles, documentation and help files can be changed to other languages. The local version can consist of the following (from a...f) a. Menu titles file (e.g. French.Lang.Txt or Dutch.Lang.Txt) b. Readme.rtf (e.g. ReadMe_Fr.rtf) c. EpdIntro file translated to pdf file d. Help file translated to pdf file e. EpiData Help file as windows help file (including epidata.cnt - e.g. EpiData_fr.hlp) f. Translated examples files, see "samples" folder in the supplied zip file. g. EpiTour guide translated to pdf file h. EpiTour help file as windows help file (including epitour.cnt) (e.g. EpiTour_fr.hlp)
3. Levels of translation can be: Only introduction documentation and menu's : a + b + c. Full package will be: a-d packed as a supplementary zip file for extraction. Complete package will be: (a+b+c+e +f + epidata.exe) as a setup.exe file for installation
4. Once translated the language packs will be available from (http://www.epidata.dk) including all translated files. A facility is included in EpiData (from version 1.5) to choose which language to use: See Option - Advanced - Language.
5. We encourage users to write introduction papers or notes on how to use EpiData as part of courses or otherwise. Those who write such material has the copyright for those parts.
6. We will try to arrange a coordination seminar in Europe for the translation. Provided we can find someone to host the meeting and funding is available.

.
98
Who can translate EpiData texts. We have asked on the internet lists for persons and institutions willing to do the work. As soon as someone wishes to do the job they can start. If national institutions exist for Epi Info distribution in that country we will contact them and ask if they are willing to coordinate the task. Those wishing to develop national versions should aggree to the following principles: 1. The Epidata logo, the epidata homepage (http://www.epidata.dk) and any local homepage should
be mentioned on the front page of all material relating to EpiData. 2. The "about" box when running EpiData will include a one line statement describing who made the
local version. E.g. French version could be: Version d'EpiData en français (Http://www.epiconcept.fr) de ... M xxxxx.
3. The About box and the acknowledgement part of the help file will be formulated by the EpiData team and will include information on those who developed the international versions.
4. The local versions must be given to users as freeware and made available from an internet site at no cost. For distribution via other media than internet only cost of materials, printing and postage can be charged. For distribution of printed material costs of printing can be included.
5. Direct translation of material developed as part of EpiData should have unchanged frontpage format, see examples of the Epitour document attached. Authors remain as the original Lauritsen JM, Bruus M, Myatt M. with "Translated by ....... and ....... etc" added. These translations must be provided as free pdf files on the internet site. The EpiData office can transform the documents to PDF format if needed.
6. If someone writes independent documents or notes (not translation of the EpiData supplied documents) on usage of EpiData we suggest putting the logo on the frontpage and reference to the relevant www pages and the suggested reference for epidata in the foreword or prepage of that material.
7. A copy of the local version or the relevant link to a local server must be given to [email protected]. The information will be made available from http://www.epidata.dk
8. If no local site is available the international versions can be distributed from http://www.epidata.dk 9. The responsibility of correctness of formulation and suggestions of the local language versions
remains with the authors of the local versions. How to get started with translation: Check out on the http://www.epidata.dk if a translation has already been made. If so contact the site or person responsible for that language and offer your assistance in further translation. If a translation has not been made send an e-mail to [email protected] and tell who you are and to which language you wish to translate EpiData into. Further instructions and material will be sent to you.