Eowave Ribbon
15
Eowave Ribbon lofi ribbon synth/ USB/CV/Gate controller
Transcript of Eowave Ribbon

Eowave Ribbon lofi ribbon synth/ USB/CV/Gate controller

Cautions Care of the Ribbon Before using the Ribbon, make sure you have read the following instructions carefully, as well
as the instructions for use.
Refer servicing to qualified service personal
Do not try to repair the Ribbon. Please contact Eowave for technical support.
Avoid all sharp object contact on the Ribbon.
Do not use the Ribbon or store it under extreme temperature conditions or expose it to direct sunlight, damp or dusty areas, areas prone to strong vibrations.
Before you plug in the Ribbon, always check the voltage.
Protect the Ribbon against violent shocks.
Before using the Ribbon in a foreign country, check if the voltage is compatible.
When the Ribbon is not used, disconnect the unit from its power supply.
Never place heavy objects on the Ribbon.
Never touch the Ribbon with wet hands when it is plugged in.
Before moving the Ribbon, make sure the unit is disconnected from other devices.
Before cleaning the Ribbon, make sure the unit is switched off and not plugged in.
During lightning, unplug the Ribbon.
The Ribbon is not a light saber. It is not made for fighting.
Make sure your body is well isolated from the ground.
The Ribbon surface is fragile. Only use your finger to play on it. Avoid playing with sharp objects, wood sticks, pens, chop sticks…
Clean the Ribbon with a dry cloth. Never use any detergent or Acetone on it or on the plexi enclosure.
Clean the tactile pad with a dry cloth. Never use any detergent or Acetone on it or any sharp objects.

Preliminary
What is Ribbon? Unpacking Thank you for buying a Ribbon! With Ribbon, we tried to create a new type of instrument designed for today’s musician.
At the same time synth, USB and CV/Gate controller, it can be used in many different ways, as a sole instrument, to control virtual instruments and iOS or to control modular systems and CV/gate devices.
With its plexi enclosure, Eowave Ribbon is a modern visual instrument perfect for live applications.
If you have any questions, feel free to contact Eowave at [email protected]
Make sure that you have everything! Ribbon is delivered in a tube. You may keep this tube to store your Ribbon when it’s not used or when you travel. Ribbon is delivered with - 1 mini USB cable - 4 plastic pods
Join Eowave users list!
If you want to share your videos and pictures with us, send them or their links to [email protected] or post them on Eowave Facebook

Use Ribbon as a MiniSynth
Basic connections to your sound system Basic connections to your computer In the example below, the Ribbon is used as an instrument connected to your computer. The Ribbon is USB powered. Connect the Ribbon to your computer with the USB cable delivered with the Ribbon.
The Ribbon has a real sound generation section with an internal lofi digital oscillator. It can be used as a mini synth by plugging it to a sound system or thru your computer.
In the example below, the Ribbon is used as an instrument. It can be powered with a 5V DC USB power supply or via usb. Plug an audio cable from the audio out of the Ribbon to the audio in of your loud speaker. Plug a mini USB to your computer or to a 5V DC power supply to the power. Note that plugging more than 5V power supply can destroy the unit. Cables and power supply can be found on www.eowave.com/shop .
Once plugged, the Ribbon is automatically recognized as a MIDI interface by your computer. It will appear under the name « eowave ribbon ».

How to play
The Ribbon
The Ribbon is sensitive to the position and to the pressure. Gently press the Ribbon. The sound that you hear is generated by the oscilllator from the Ribbon. The volume is controlled by the pressure applied onto the Ribbon.Note that in the controller mode, it is possible to change the pressure destination with the editor.
About the serigraphy You can use the Ribbon serigraphy to play. As Ribbon’s tolerance slightly differs from one another, it is not possible to print an accurate serigraphy with notes. However, we chose to add this serigraphy as a visual chromatic scale of the Ribbon. The serigraphy indicates the 4 octaves and the middle point.
The tactile pad on the right or on the left? Ribbon can be played with the tactile pad on the right or on the left. It is possible to invert the linearity of the Ribbon with the editor. Can I change the Ribbon’s scale? Yes, depending on how it is used (stand-alone or controller), the Ribbon has different scales settings in the editor.
The tactile pad The tactile pad controls a frequency modulation effect. When pressing the tactile pad, the FM modulation amount increases. The pad is pressure sensitive. It means that the more you press onto it, the more the FM modulation increases.
The tactile pad and resistive technology The tactile pad uses a resistive technology that uses the natural resistance of your body. Note that if you play with bare feet, the result may differ than when your body is isolated from the ground. Note that a bad isolation from the ground may be the cause of erratic sending of information or uncontrolled values.
Note that in the controller mode, it is possible to change the pad destination with the editor.
Tactile pad Octave 1 Octave 2 Octave 3 Octave 4
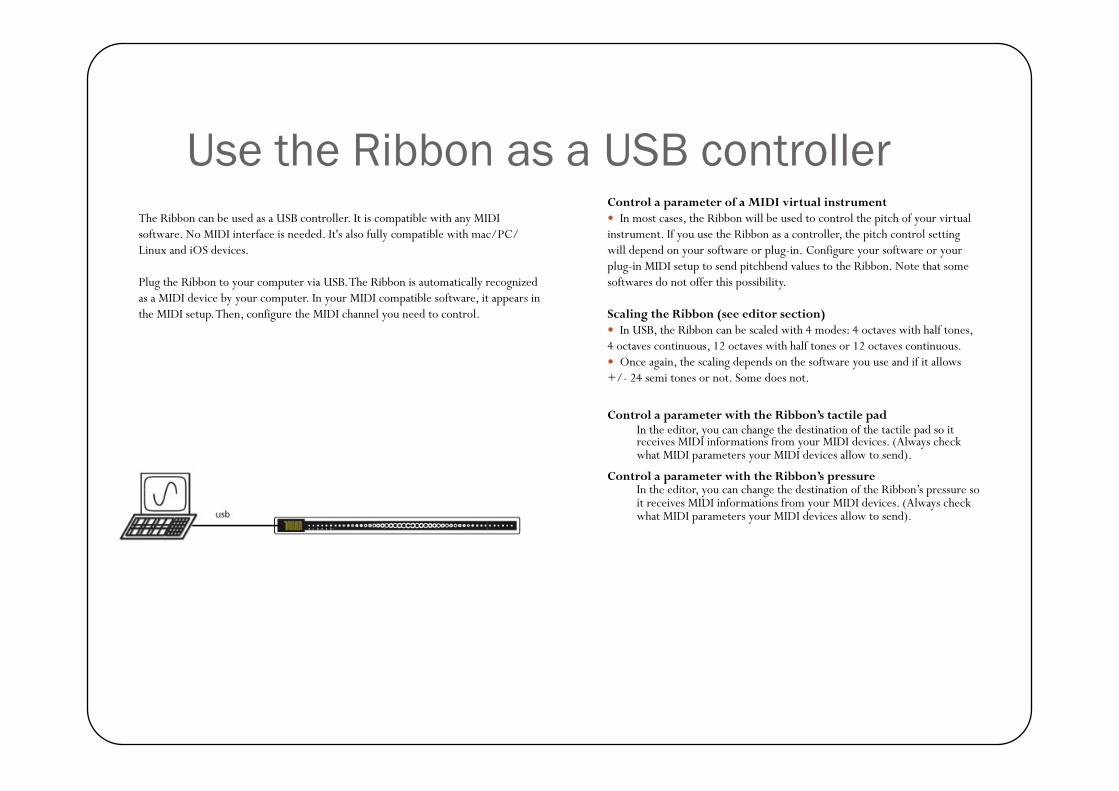
Use the Ribbon as a USB controller The Ribbon can be used as a USB controller. It is compatible with any MIDI software. No MIDI interface is needed. It's also fully compatible with mac/PC/Linux and iOS devices. Plug the Ribbon to your computer via USB. The Ribbon is automatically recognized as a MIDI device by your computer. In your MIDI compatible software, it appears in the MIDI setup. Then, configure the MIDI channel you need to control.
Control a parameter of a MIDI virtual instrument In most cases, the Ribbon will be used to control the pitch of your virtual instrument. If you use the Ribbon as a controller, the pitch control setting will depend on your software or plug-in. Configure your software or your plug-in MIDI setup to send pitchbend values to the Ribbon. Note that some softwares do not offer this possibility.
Scaling the Ribbon (see editor section) In USB, the Ribbon can be scaled with 4 modes: 4 octaves with half tones, 4 octaves continuous, 12 octaves with half tones or 12 octaves continuous. Once again, the scaling depends on the software you use and if it allows +/- 24 semi tones or not. Some does not.
Control a parameter with the Ribbon’s tactile pad In the editor, you can change the destination of the tactile pad so it receives MIDI informations from your MIDI devices. (Always check what MIDI parameters your MIDI devices allow to send).
Control a parameter with the Ribbon’s pressure In the editor, you can change the destination of the Ribbon’s pressure so it receives MIDI informations from your MIDI devices. (Always check what MIDI parameters your MIDI devices allow to send).

Use the Ribbon as a CV/Gate controller The Ribbon has an audio out that can be turned into a CV/gate controller with an audio cable. Like this, the Ribbon can control a modular synthesizer directly. It's V/oct. Range is from 0 to 5V would be about 5 octaves. It is possible to set less octaves with an attenuator module.
Plug your analogue synth CV In pitch and trigger to a Y jack with 1 mini stereo on one side and 2 mini monos on the other side.
CV1 is the position of the Ribbon. CV2 can be controlled by the pressure of the Ribbon or by the tactile pad.

Use the Ribbon with your iOS You can plug the Ribbon directly to your iPhone to control iPhone sounds. It will be automatically recognized. Plug the Ribbon to your IPhone with a USB cable. You can control any iOS MIDI app with the Ribbon.

Settings Install the editor
Before installing the editor, you need to download Max5 runtime from www.cycling74.com. It’s free.
Download the editor from www.eowave.com/members
Open the editor. It is mac and pc compatible.

Using the Editor: MIDI and presets Select the Ribbon MIDI port The Ribbon uses the MIDI protocol to transfer data. This means that it is compatible with almost every MIDI softwares. You do not need any MIDI drivers.
What is MIDI? MIDI stands for Musical Instrument Digital Interface, and is a worldwide standard for exchanging a variety of performance- related information between electronic musical instruments and computers. About the MIDI implementation chart The owner’s manual of each MIDI device includes a “MIDI implementation chart.” This chart lets you check the types of MIDI message that can be transmitted or received. To control a MIDI device with the Ribbon, check the MIDI implementation chart of your MIDI device with to see which types of MIDI message is able to transmit and receive from the Ribbon. Note that some MIDI softwares do not give access to all MIDI parameters. With the Ribbon, you can receive the MIDI messages that are in the pad destination list and the pressure destination list in the editor. In the MIDI port menu, choose the Ribbon MIDI port.
Create presets With the editor, you can store up to 16 settings presets. Once you’ve made your settings, you can save them by clicking on the preset number of your choice. You can recall this preset by clicking on load presets. The presets can be called via Program Change messages (1 to 16).
1. Select the MIDI port 2. Load memory load the last configuration to your editor’s memory.
3. Modify the parameters in the editor 4. Save to one of the 16 parameters
Note that preset 1 is always on when the unit is powered

Presets parameters in synth mode To select the synth mode, select Oscillator in the Audio Out menu.
The oscillator of the Ribbon is lofi digital 8 bit oscillator. Aliasing and artefacts are part of the sound in the highier ranges.
Scale the Ribbon In the stand-alone mode using the synth, you can set the range of the Ribbon with either 4 octaves or 12 octaves (full scale) with half tones mode or not. In the half tones modes, the first note played on the Ribbon will be the closest half tone to the pressed position.
In the scale menu, choose between: Full scale continuous (12 octaves) Full scale halftone (12 octaves) 4 octaves continuous starting at the base note 4 octaves halftone starting at the base note
Oscillator waveform The oscillator waveform can be chosen from saw, square, triangle, sine and noise. In the Waveform menu, choose a waveform.
Pad destination This defines the effect type that the tactile pad will produce. AM (amplitude modulation) FM (frequency modulation)
Ribbon direction The Ribbon direction can be inversed with its maximu value on the LED side or with its minimum value on the LED side. This feature allows to hold the Ribbon with the tactile pad on the right or on the left. It’s also very useful for left handed players.
Base note Base note defines the base note. Click on the arrow and scroll to choose your base note.

Settings paramaters in the USB controller mode
Scale the Ribbon Limitations due to some virtual instruments Note that virtual instruments are not all programmed to allow a continuous control of the pitch on a wide range. Some are limited to +/-2 halftones, most of them to +/-12 halftones,some others allow +/-24 halftones. Check on your virtual instrument manual to see what range it allows. According to the range your virtual instrument allows, the Ribbon will have a 4th, 2 or 4 octaves range. This is not possible to get 4 octaves with a virtual instrument that allows only +/-2 halftones or +/-12 halftones.
In USB, the Ribbon can be scaled with 4 modes:
Full scale continuous (12 octaves) Sends the base note and the absolute pitchbend position
Full scale halftone (12 octaves) Doesn’t send pitchbend. Each times the Ribbon is pressed, it sends a note from 0 to 127.
4 octaves continuous Sends the nearest halftone in a 4 octaves range (starting at base note). If you keep the finger pressed and move it, it will send a relative pitchbend with 0 being the first position of your finger. To keep the same pitch after a glide or if you press the Ribbon a second time after a release, set the pitchbend range of your plug-in to +/- 24 half tones.
4 octaves halftone Doesn’t send pitchbend. Each times the Ribbon is pressed, it sends 4 octaves starting at the base note.
Velocity In the four modes, the Ribbon sends a velocity of 127. The velocity is controlled continuously by the volume controller #7 on the pressure.
Ribbon direction The Ribbon direction can be inversed with its maximu value on the LED side or with its minimum value on the LED side. This feature allows to hold the Ribbon with the tactile pad on the right or on the left. It’s also very useful for left handed players.
Base note Base note defines the base note. Click on the arrow and scroll to choose your base note.
MIDI Channel Set the MIDI channel
CC pressure destination Choose the MIDI control change destination value for the pressure of the Ribbon. The table is the standart MIDI implementation table.
CC pad destination Choose the MIDI control change destination value for the pressure of the pad.
The USB controller mode is always active. Once connected, USB sends MIDI information.

Setting parameters in the CV-Gate controller mode To select the CV Gate controller mode, select CV out in the Audio Out menu. This mode allows to control CV Gate analogue synthesizers.
Scale the Ribbon In this mode, the Ribbon sends from 0 to 5V. Range is from 0 to 5V would be about 5 octaves. It is possible to set less octaves with an attenuator module.
Waveform When selecting CV is gate, the pressure is disactivated. A Gate will be send each time the Ribbon is pressed.
Pad destination CV2 can be controlled by the pressure of the Ribbon or by the tactile pad
Ribbon direction The Ribbon direction can be inversed with its maximu value on the LED side or with its minimum value on the LED side. This feature allows to hold the Ribbon with the tactile pad on the right or on the left. It’s also very useful for left handed players.

Expander mode Connect your Ribbon to your computer. Connect the audio out in the audio in of your sound system. To control the internal synthesizer with MIDI, use the following CC:
Pad : CC1 Pressure : CC7 Position: CC Pitchbend

Specifications
50 cm position and pressure sensitive ribbon 8 bit digital oscillator Tactile resistive pad Usb Audio out Dimensions : 63 x 4 x 1,5 cm Weight : 480 g (680 g with packaging)
CE norm & FCC INFORMATION 1. Important notice: do not modify this unit! This product, when installed as indicated in the instructions contained in this manual, is compatible with the CE norm & FCC requirements. 2. Important! When connecting this product to accessories and/or another product, use only high quality shielded cables. Cables supplied with this product must be used. Follow all installation instructions. Failure to follow instructions could void your FCC authorisation to use this product in the USA. Note: this product has been tested and found to comply with the requirements listed in FCC Regulations, Part 15 for Class B digital devices & in The European Standard EN 50081-1 on Electromagnetic Compatibility - Generic emission standard on residential, commercial and light industry. Compliance with these requirements provides a reasonable level of assurance that the use of this product in a residential environment will not result in harmful interference with other electronic devices.
Eowave www.eowave.com [email protected]
+33/(0)661 702 050