EORGIA EPARTMENT OF DUCATION OFFICE OF … · georgia department of education office of the state...
72
GEORGIA DEPARTMENT OF EDUCATION OFFICE OF THE STATE SUPERINTENDENT OF SCHOOLS TWIN TOWERS EAST ATLANTA, GA 30034-5001 TELEPHONE: (800) 869 - 1011 FAX: (404) 651-5006 http://www.gadoe.org/ Georgia Department of Education Richard Woods, State School Superintendent July 27, 2018 • 11:33 AM • Page 1 of 72 All Rights Reserved. MEMORANDUM TO: PCGenesis System Administrators FROM: Steven Roache, Senior Information Systems Manager SUBJECT: Release 18.02.00 – 2018 Fiscal Year-End Updates, VerraDyne Print Manager and Miscellaneous Changes / Installation Instructions This document contains the PCGenesis software release overview and installation instructions for Release 18.02.00. PCGenesis supporting documentation is provided at: http://www.gadoe.org/Technology-Services/PCGenesis/Pages/default.aspx June, 2018 Payroll Completion Instructions Install this release after completing the June 2018 payroll(s). Install this release before executing F4 – Calculate Payroll and Update YTD for the July 2018 payroll. Please import the FY 2019 CPI Salary Schedule into PCGenesis. The 2019 CPI Salary Schedule is available on the PCGenesis documentation web page. The Fiscal Year End Checklist is available on the PCGenesis documentation web page. Please follow the instructions for completing the fiscal year end closing in the order provided. For users of the new Enhanced Substitute Pay and Employee Leave System, to begin a new leave plan year, 1) Run the Plan Year Rollover Processing (F3, F4, F2, F11) for ALL Leave Types first, and 2) Run the Advance Leave (F3, F4, F2, F10) second. The Create Original Leave of Absence File (F4, F9, F6) step can be run at any time since the leave data is pulled from the Leave History File. For users of the Legacy Leave System, to begin a new leave plan year, 1) Create the Original Leave of Absence File (F4, F9, F6) first in order to capture FY 2018 leave totals for CPI reporting, and 2) Run the Automatic Leave Update (F3, F5, F3) second in order to clear the FY 2018 Fiscal Year leave totals.
Transcript of EORGIA EPARTMENT OF DUCATION OFFICE OF … · georgia department of education office of the state...

GEORGIA DEPARTMENT OF EDUCATION
OFFICE OF THE STATE SUPERINTENDENT OF SCHOOLS
TWIN TOWERS EAST
ATLANTA, GA 30034-5001
TELEPHONE: (800) 869 - 1011 FAX: (404) 651-5006
http://www.gadoe.org/
Georgia Department of Education
Richard Woods, State School Superintendent
July 27, 2018 • 11:33 AM • Page 1 of 72
All Rights Reserved.
MEMORANDUM
TO: PCGenesis System Administrators
FROM: Steven Roache, Senior Information Systems Manager
SUBJECT: Release 18.02.00 – 2018 Fiscal Year-End Updates, VerraDyne Print Manager
and Miscellaneous Changes / Installation Instructions
This document contains the PCGenesis software release overview and installation instructions
for Release 18.02.00.
PCGenesis supporting documentation is provided at:
http://www.gadoe.org/Technology-Services/PCGenesis/Pages/default.aspx
June, 2018 Payroll Completion Instructions
Install this release after completing the June 2018 payroll(s). Install this release before
executing F4 – Calculate Payroll and Update YTD for the July 2018 payroll.
Please import the FY 2019 CPI Salary Schedule into PCGenesis. The 2019 CPI Salary
Schedule is available on the PCGenesis documentation web page.
The Fiscal Year End Checklist is available on the PCGenesis documentation web page.
Please follow the instructions for completing the fiscal year end closing in the order provided.
For users of the new Enhanced Substitute Pay and Employee Leave System, to begin a new
leave plan year, 1) Run the Plan Year Rollover Processing (F3, F4, F2, F11) for ALL Leave
Types first, and 2) Run the Advance Leave (F3, F4, F2, F10) second. The Create Original
Leave of Absence File (F4, F9, F6) step can be run at any time since the leave data is pulled
from the Leave History File.
For users of the Legacy Leave System, to begin a new leave plan year, 1) Create the Original
Leave of Absence File (F4, F9, F6) first in order to capture FY 2018 leave totals for CPI
reporting, and 2) Run the Automatic Leave Update (F3, F5, F3) second in order to clear the
FY 2018 Fiscal Year leave totals.

Georgia Department of Education
Richard Woods, State School Superintendent
July 27, 2018 • 11:33 AM • Page 2 of 72
All Rights Reserved.
A PCGenesis E-mail User List Is Available
The Georgia Department of Education has created an e-mail user list for PCGenesis. PCGenesis users
can join the list by sending a blank e-mail to:
After joining the PCGenesis user list, users can take advantage of discussion forums by sending e-mails
to:
An e-mail sent to [email protected] will broadcast the e-mail to all PCGenesis users enrolled
in the group. Those PCGenesis districts and RESAs that join the user list will be able to share ideas,
discuss problems, and have many more resources available for gaining insight into PCGenesis
operations. Join today!

Georgia Department of Education
Richard Woods, State School Superintendent
July 27, 2018 • 11:33 AM • Page 3 of 72
All Rights Reserved.
Table of Contents
SECTION A: OVERVIEW OF RELEASE .................................................................................................................................... 5
A1. PCGENESIS VERRADYNE PRINT QUEUE UPGRADE ........................................................................................................................ 5
A1.1. VerraDyne Print Queue Overview ............................................................................................................................. 5
A1.2. VerraDyne Print Directories ...................................................................................................................................... 8
A1.3. Sorting Entries in the VerraDyne Print Queue .......................................................................................................... 9
A1.4. Display Print Queue Reports in PDF Format ........................................................................................................... 10
A1.5. Spool PCGenesis Report .......................................................................................................................................... 12
A1.6. Display Detail Info ................................................................................................................................................... 13
A1.7. E-mail PCGenesis Reports ....................................................................................................................................... 14
A1.8. Archive PCGenesis Reports ..................................................................................................................................... 16
A1.9. Automatically Set Payroll Reports, Vendor Check Reports and Monthly Financial Reports to ‘Requeue’ ............. 21
A1.10. New Printer Icons for Server/Workstation Desktop ............................................................................................. 22
A1.11. Full Backup of K:\ for PCGenesis ........................................................................................................................... 22
A1.12. Update for the Microsoft® Word Print Queue (QWORD) ..................................................................................... 23
A1.13. Print Queue Components Added to Current Release Number Screen ................................................................. 25
A2. PAYROLL SYSTEM ................................................................................................................................................................. 26
A2.1. New Teachers Retirement System (TRS) Rates for FY 2019 .................................................................................... 26
A1.2. New Employees’ Retirement System (ERS) Rates for FY 2019 ................................................................................ 26
A3. FINANCIAL ACCOUNTING AND REPORTING (FAR) SYSTEM ........................................................................................................... 27
A3.1. Expand Purchase Order Account Lines to 20 .......................................................................................................... 27
A3.2. Expand Claim Account Lines to 20 .......................................................................................................................... 28
A3.3. Allow Purchase Order to Print Up to 20 Account Lines .......................................................................................... 28
A3.4. PCG Server Name and Server Version Added to System Control Information ....................................................... 29
A5. CERTIFIED/CLASSIFIED PERSONNEL INFORMATION (CPI) SYSTEM .................................................................................................. 30
A5.1. Upload the 2019 CPI State Salary Schedule ............................................................................................................ 30
SECTION B: INSTALLATION INSTRUCTIONS FOR RELEASE 18.02.00 SOFTWARE ................................................................. 31
B1. VERIFY SPECIAL RELEASE 18.S.12 OR 18.S.16 INSTALLED ........................................................................................................... 31
B2. PERFORM A PCGENESIS FULL BACKUP ..................................................................................................................................... 33
B3. INSTALL PCGENESIS RELEASE 18.02.00 ................................................................................................................................... 34
B4. VERIFY RELEASE 18.02.00 WAS SUCCESSFULLY INSTALLED .......................................................................................................... 41
SECTION C: INSTALLATION INSTRUCTIONS FOR VERRADYNE PRINT MANAGER SOFTWARE.............................................. 42
C1. INSTALL VERRADYNE PRINT MANAGER SOFTWARE 03.02.00 ...................................................................................................... 42
C2. VERIFY VQUEUE SERVICE IS RUNNING ...................................................................................................................................... 46
C3. REMOVE PCGSPOOL FROM “ALL USERS STARTUP” .................................................................................................................. 48
C4. ADD REQUIRED PCG SHORTCUTS TO SERVER/WORKSTATION DESKTOP ......................................................................................... 48
C5. PROVIDE PCGENESIS FINANCIAL DIRECTOR WITH ADMINISTRATIVE ACCESS TO THE PRINT MANAGER ................................................... 49
C6. CHECK PRINTER DEFINITION ................................................................................................................................................... 55
C7. SETUP E-MAIL SERVER INFORMATION FOR PRINT MANAGER ........................................................................................................ 59
C8. VERIFY PRINT MANAGER ACCESS FROM WORKSTATIONS ............................................................................................................. 62
C9. CLEAN UP K:\SECOND\#XXXPRT ......................................................................................................................................... 71

Georgia Department of Education
Richard Woods, State School Superintendent
July 27, 2018 • 11:33 AM • Page 4 of 72
All Rights Reserved.
SECTION D: AFTER PCGENESIS RELEASE 18.02.00 HAS BEEN INSTALLED ............................................................................ 72
D1. PERFORM A PCGENESIS FULL BACKUP AFTER RELEASE 18.02.00 IS INSTALLED ............................................................................... 72

Release 18.02.00 – 2018 Fiscal Year-End Updates, VerraDyne Print Manager and Miscellaneous Changes / Installation
Instructions
Georgia Department of Education
Richard Woods, State School Superintendent
July 27, 2018 • 11:33 AM • Page 5 of 72
All Rights Reserved.
Section A: Overview of Release
A1. PCGenesis VerraDyne Print Queue Upgrade
A1.1. VerraDyne Print Queue Overview
The GaDOE is happy to announce a major upgrade of the PCGenesis Print. The DOE has purchased the
VerraDyne Print Manager for a cost of $25,000 to replace the existing PCGenesis print queue software.
The new VerraDyne Print Manager has much in common with the existing PCGenesis print queue
because the same company created both systems.
Features of the VerraDyne Print Manager
The VerraDyne Print Manager is designed to provide users with an easy to use print/e-mail manager for
use in the windows environment. Just like our existing PCGenesis print queue, it is designed to utilize
the Windows print queues and printer functions. Just like our existing PCGenesis print queue, it allows
the user to interact with other applications in the foreground, while a print job is running in the
background under Windows Local Services. Once a print file has been released it is passed to the
Windows print queue, and is ready for printing.
Unlike our existing PCGenesis print queue, the VerraDyne Print Manager stores its data in SQL Server
tables to which it connects using windows authentication. The VerraDyne Print Manager uses the
FREE version of Microsoft SQL Server.
Some of the features of the new VerraDyne Print Manager system include:
• The ability to view and e-mail the documents in PDF format
• The ability to e-mail reports to a specific user, or group of users
• The ability to print reports to a specific printer
• The ability to re-queue reports after printing or emailing
• The ability to archive reports to specific archive directories, based on individual users or file type
• The ability to view or requeue the archived files
• Full audit tracking of reports viewed and deleted by users
• The ability to search archived reports using specific parameters
Release 18.02.00 – 2018 Fiscal Year-End Updates, VerraDyne Print Manager and Miscellaneous Changes / Installation
Instructions
Georgia Department of Education
Richard Woods, State School Superintendent
July 27, 2018 • 11:33 AM • Page 6 of 72
All Rights Reserved.
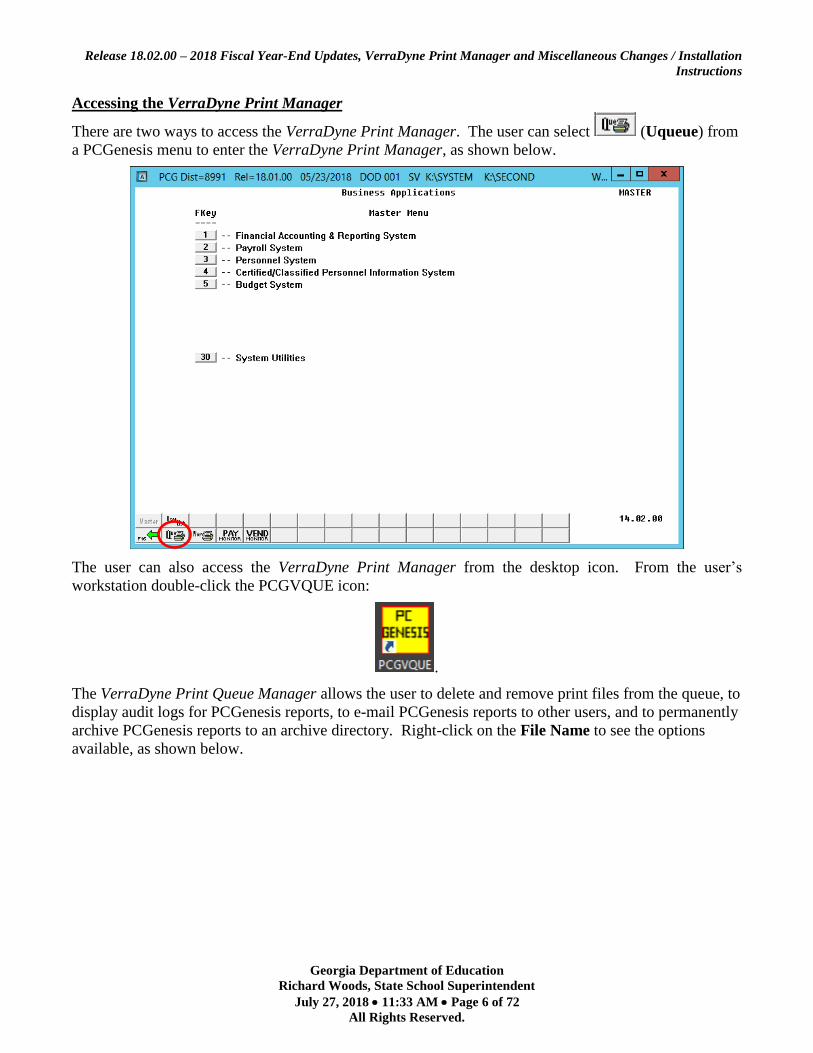
Accessing the VerraDyne Print Manager
There are two ways to access the VerraDyne Print Manager. The user can select (Uqueue) from
a PCGenesis menu to enter the VerraDyne Print Manager, as shown below.
The user can also access the VerraDyne Print Manager from the desktop icon. From the user’s
workstation double-click the PCGVQUE icon:
.
The VerraDyne Print Queue Manager allows the user to delete and remove print files from the queue, to
display audit logs for PCGenesis reports, to e-mail PCGenesis reports to other users, and to permanently
archive PCGenesis reports to an archive directory. Right-click on the File Name to see the options
available, as shown below.

Release 18.02.00 – 2018 Fiscal Year-End Updates, VerraDyne Print Manager and Miscellaneous Changes / Installation
Instructions
Georgia Department of Education
Richard Woods, State School Superintendent
July 27, 2018 • 11:33 AM • Page 7 of 72
All Rights Reserved.
Right-click on the File Name allows the user to: • Delete (delete file and remove from queue) • Remove (remove file from queue) • Detail Info (audit log information) • E-mail (e-mail PCG report to another user) • Archive

Release 18.02.00 – 2018 Fiscal Year-End Updates, VerraDyne Print Manager and Miscellaneous Changes / Installation
Instructions
Georgia Department of Education
Richard Woods, State School Superintendent
July 27, 2018 • 11:33 AM • Page 8 of 72
All Rights Reserved.
A1.2. VerraDyne Print Directories
The VerraDyne Print Queue manages PCGenesis report files differently than in the past. Before, all
PCGenesis reports were stored in the K:\SECOND\#nnnPRT directories. Now, the VerraDyne Print
Queue monitors two sets of print directories: The Spool Directory and the Print Directory.
The Spool Directory is where PCGenesis creates the reports:
• K:\SECOND\#DODPRT
The Print Directory is the directory where the Print Manager stores the reports in the print queue:
• For example, the Print Directory may be K:\UCTPRINT\#DODPRT
• The VerraDyne Print Queue will MOVE the PCG reports from the Spool Directory located
in K:\SECOND to the Print Directory located in K:\UCTPRINT
• If there is an existing print file with the same name as a new print file, the VerraDyne Print
Queue will rename the file and append a date/time stamp
IMPORTANT NOTE: Before, users would sometimes store personal spreadsheets, etc in their print
spool directory in K:\SECOND\#xxxPRT. (xxx is the three character PCGenesis user ID.) This causes
problems with the VerraDyne Print Spooler. Therefore, advise all PCGenesis users to not save any
miscellaneous files to the K:\SECOND\#xxxPRT directories. The print spool directories are used by
the system to temporarily contain PCGenesis reports created by the system and should be used for no
other purpose.
Print Directory: • Notice the print files will reside in UCTPRINT
• Notice the file name may be changed and the date/time stamp may be appended to the name
Release 18.02.00 – 2018 Fiscal Year-End Updates, VerraDyne Print Manager and Miscellaneous Changes / Installation
Instructions
Georgia Department of Education
Richard Woods, State School Superintendent
July 27, 2018 • 11:33 AM • Page 9 of 72
All Rights Reserved.
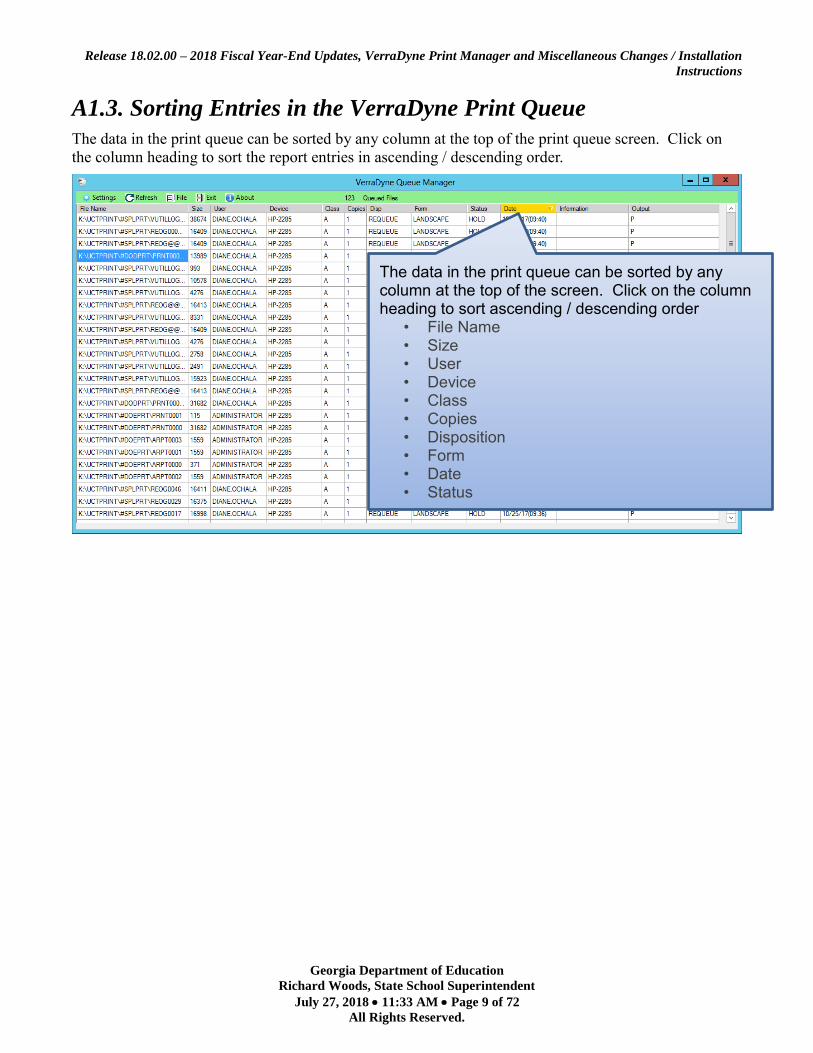
A1.3. Sorting Entries in the VerraDyne Print Queue
The data in the print queue can be sorted by any column at the top of the print queue screen. Click on
the column heading to sort the report entries in ascending / descending order.
The data in the print queue can be sorted by any column at the top of the screen. Click on the column heading to sort ascending / descending order
• File Name
• Size
• User • Device
• Class
• Copies
• Disposition
• Form
• Date
• Status
Release 18.02.00 – 2018 Fiscal Year-End Updates, VerraDyne Print Manager and Miscellaneous Changes / Installation
Instructions
Georgia Department of Education
Richard Woods, State School Superintendent
July 27, 2018 • 11:33 AM • Page 10 of 72
All Rights Reserved.
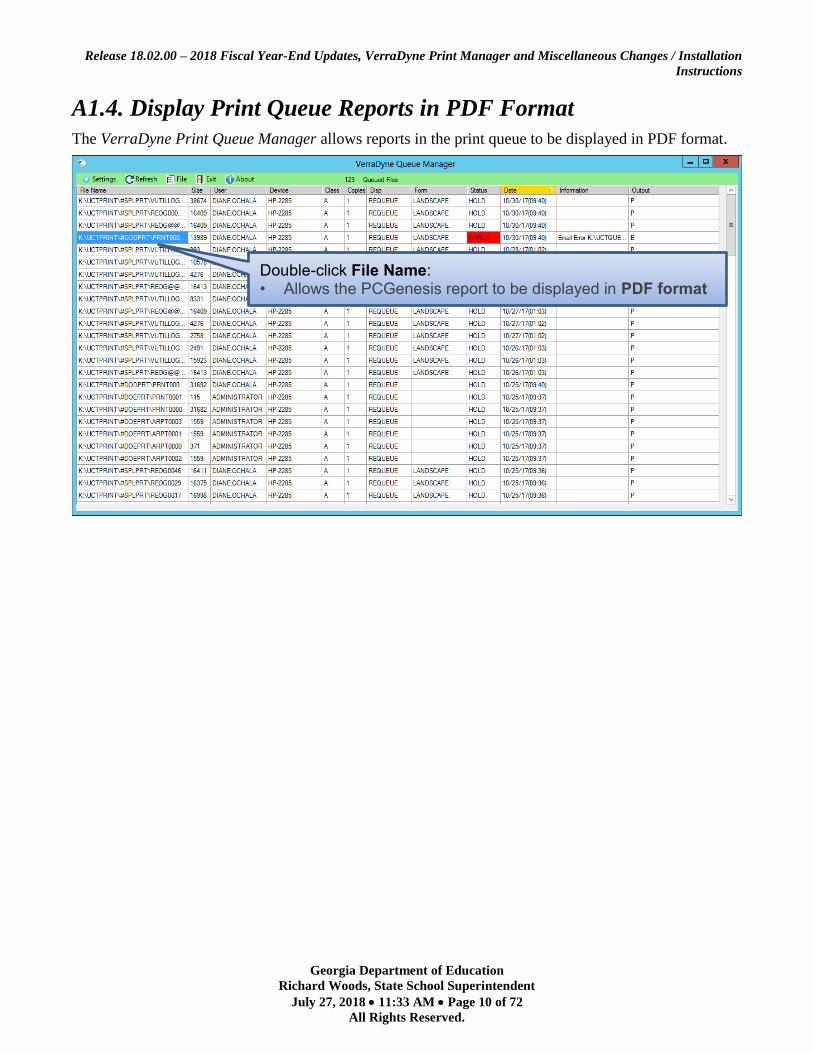
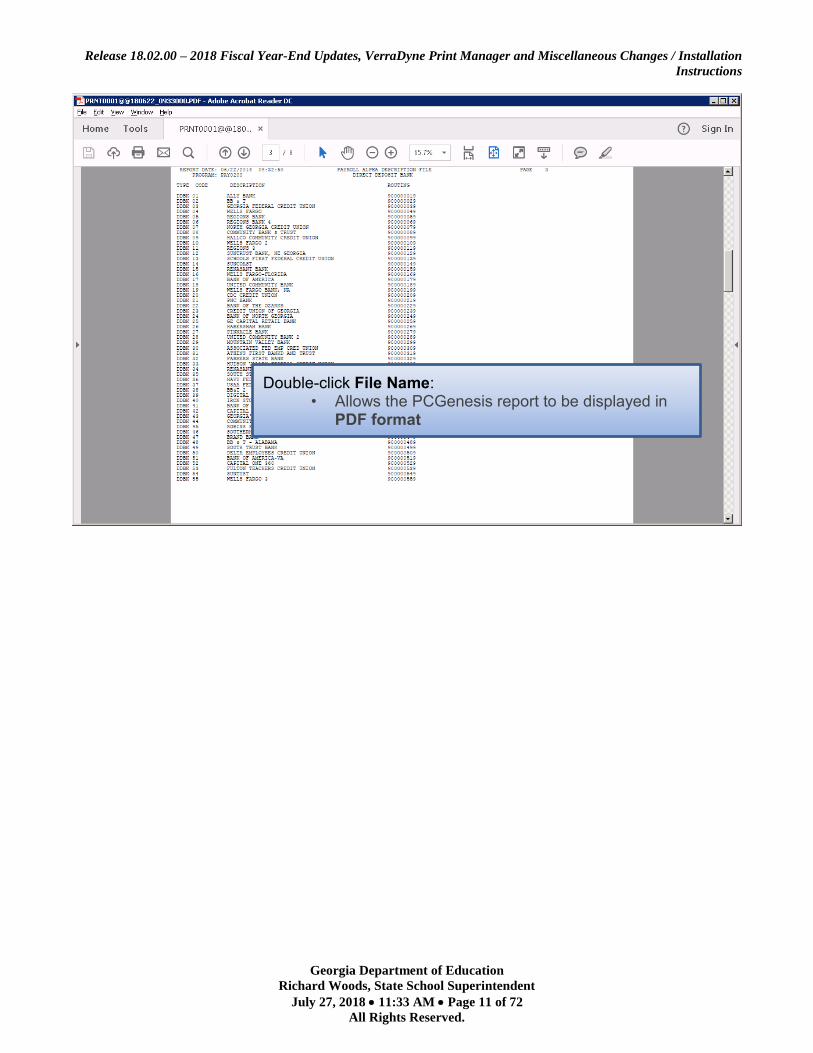
A1.4. Display Print Queue Reports in PDF Format
The VerraDyne Print Queue Manager allows reports in the print queue to be displayed in PDF format.
Double-click File Name: • Allows the PCGenesis report to be displayed in PDF format
Release 18.02.00 – 2018 Fiscal Year-End Updates, VerraDyne Print Manager and Miscellaneous Changes / Installation
Instructions
Georgia Department of Education
Richard Woods, State School Superintendent
July 27, 2018 • 11:33 AM • Page 11 of 72
All Rights Reserved.
Double-click File Name: • Allows the PCGenesis report to be displayed in
PDF format
Release 18.02.00 – 2018 Fiscal Year-End Updates, VerraDyne Print Manager and Miscellaneous Changes / Installation
Instructions
Georgia Department of Education
Richard Woods, State School Superintendent
July 27, 2018 • 11:33 AM • Page 12 of 72
All Rights Reserved.
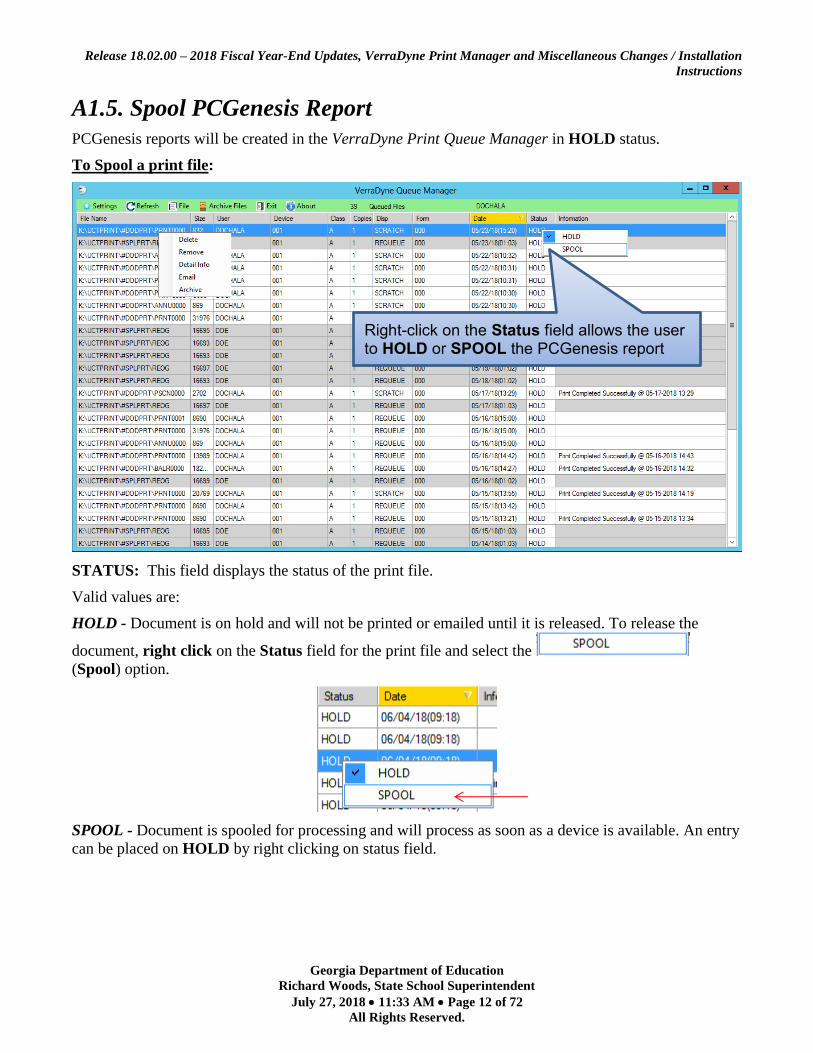
A1.5. Spool PCGenesis Report
PCGenesis reports will be created in the VerraDyne Print Queue Manager in HOLD status.
To Spool a print file:
STATUS: This field displays the status of the print file.
Valid values are:
HOLD - Document is on hold and will not be printed or emailed until it is released. To release the
document, right click on the Status field for the print file and select the
(Spool) option.
SPOOL - Document is spooled for processing and will process as soon as a device is available. An entry
can be placed on HOLD by right clicking on status field.
Right-click on the Status field allows the user to HOLD or SPOOL the PCGenesis report

Release 18.02.00 – 2018 Fiscal Year-End Updates, VerraDyne Print Manager and Miscellaneous Changes / Installation
Instructions
Georgia Department of Education
Richard Woods, State School Superintendent
July 27, 2018 • 11:33 AM • Page 13 of 72
All Rights Reserved.
A1.6. Display Detail Info
The VerraDyne Print Queue Manager keeps a detail log for every entry in the print queue.
Right-click on the File Name allows the user to display:
• Detail Info (audit log information)
Detail Info: • Displays screen itemizing each action related to
the print file
• For example, who has released the file for printing

Release 18.02.00 – 2018 Fiscal Year-End Updates, VerraDyne Print Manager and Miscellaneous Changes / Installation
Instructions
Georgia Department of Education
Richard Woods, State School Superintendent
July 27, 2018 • 11:33 AM • Page 14 of 72
All Rights Reserved.
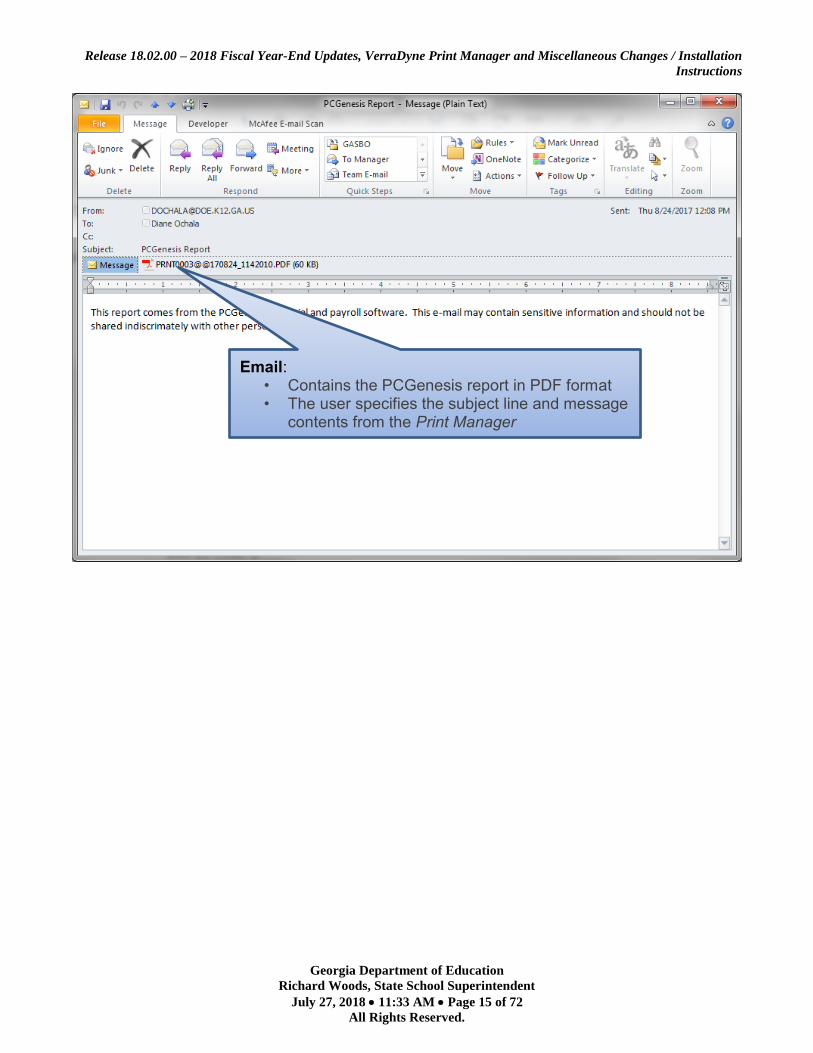
A1.7. E-mail PCGenesis Reports
The VerraDyne Print Queue Manager allows reports in the print queue to be e-mailed in PDF format.
Right-click on the File Name allows the user to: • E-mail (e-mail PCG report to another user)
Email Dialog: • Allows the PCGenesis report to be e-mailed to
other individuals
Release 18.02.00 – 2018 Fiscal Year-End Updates, VerraDyne Print Manager and Miscellaneous Changes / Installation
Instructions
Georgia Department of Education
Richard Woods, State School Superintendent
July 27, 2018 • 11:33 AM • Page 15 of 72
All Rights Reserved.
Email: • Contains the PCGenesis report in PDF format • The user specifies the subject line and message
contents from the Print Manager
Release 18.02.00 – 2018 Fiscal Year-End Updates, VerraDyne Print Manager and Miscellaneous Changes / Installation
Instructions
Georgia Department of Education
Richard Woods, State School Superintendent
July 27, 2018 • 11:33 AM • Page 16 of 72
All Rights Reserved.
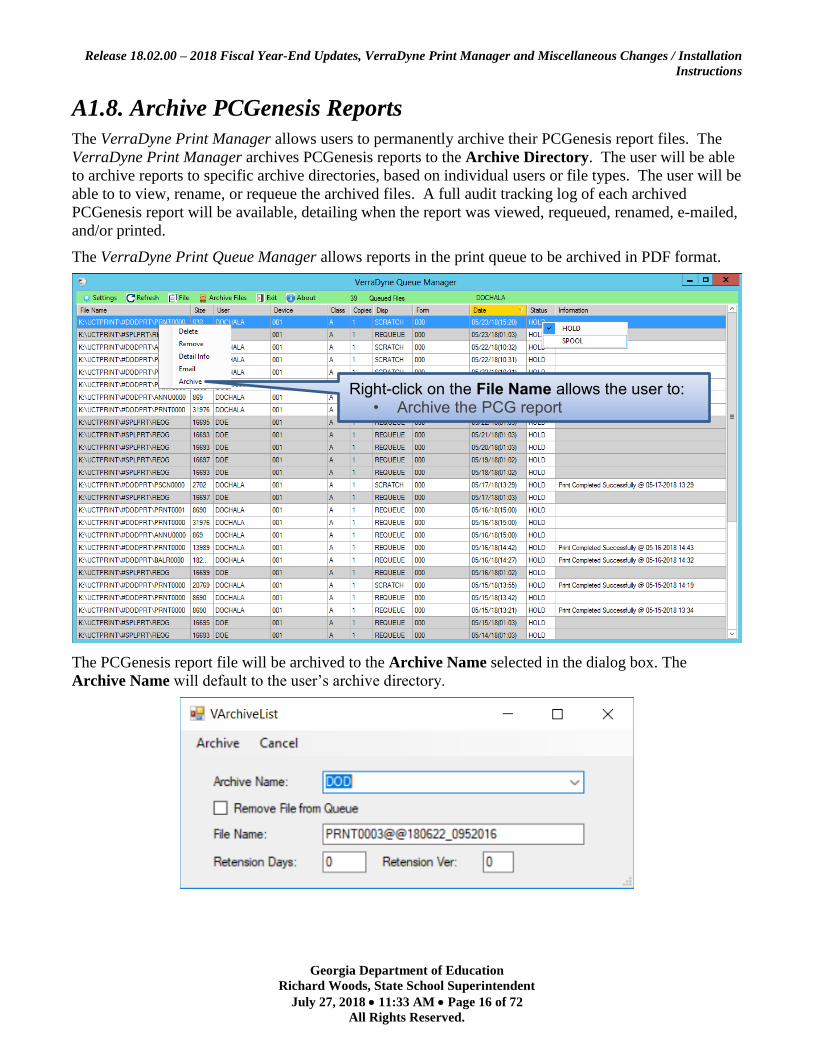
A1.8. Archive PCGenesis Reports
The VerraDyne Print Manager allows users to permanently archive their PCGenesis report files. The
VerraDyne Print Manager archives PCGenesis reports to the Archive Directory. The user will be able
to archive reports to specific archive directories, based on individual users or file types. The user will be
able to to view, rename, or requeue the archived files. A full audit tracking log of each archived
PCGenesis report will be available, detailing when the report was viewed, requeued, renamed, e-mailed,
and/or printed.
The VerraDyne Print Queue Manager allows reports in the print queue to be archived in PDF format.
The PCGenesis report file will be archived to the Archive Name selected in the dialog box. The
Archive Name will default to the user’s archive directory.
Right-click on the File Name allows the user to: • Archive the PCG report
Release 18.02.00 – 2018 Fiscal Year-End Updates, VerraDyne Print Manager and Miscellaneous Changes / Installation
Instructions
Georgia Department of Education
Richard Woods, State School Superintendent
July 27, 2018 • 11:33 AM • Page 17 of 72
All Rights Reserved.
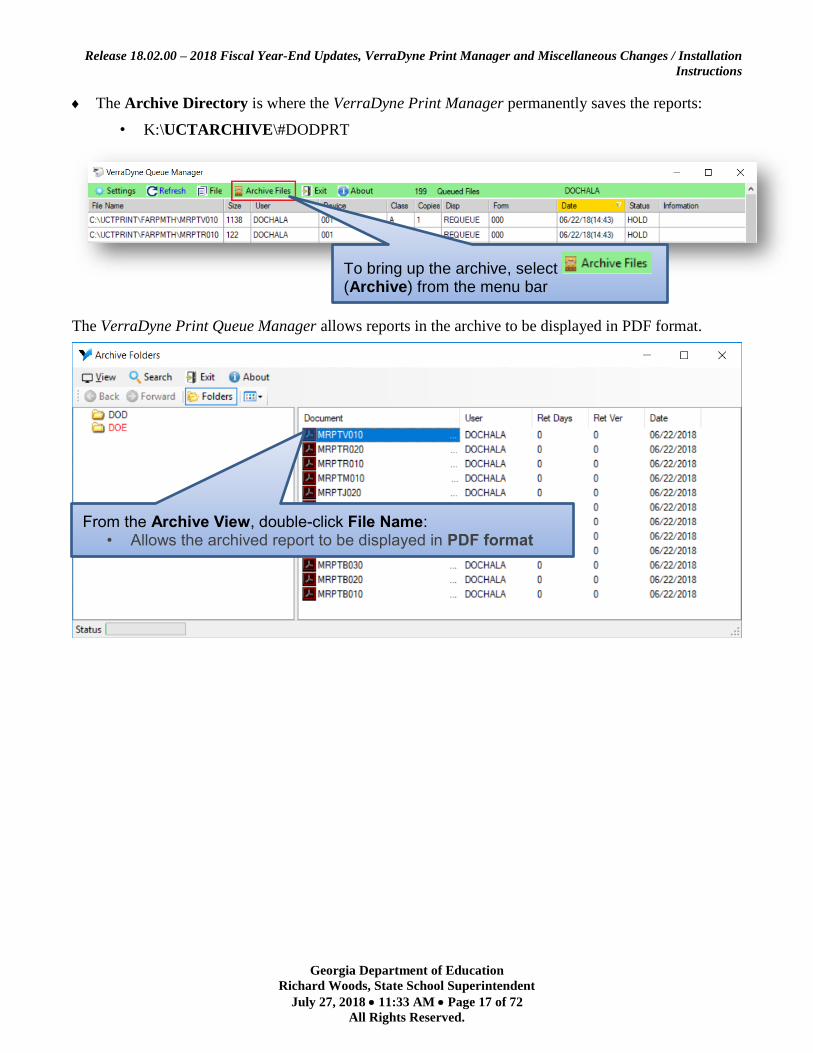
The Archive Directory is where the VerraDyne Print Manager permanently saves the reports:
• K:\UCTARCHIVE\#DODPRT
The VerraDyne Print Queue Manager allows reports in the archive to be displayed in PDF format.
From the Archive View, double-click File Name: • Allows the archived report to be displayed in PDF format
To bring up the archive, select (Archive) from the menu bar

Release 18.02.00 – 2018 Fiscal Year-End Updates, VerraDyne Print Manager and Miscellaneous Changes / Installation
Instructions
Georgia Department of Education
Richard Woods, State School Superintendent
July 27, 2018 • 11:33 AM • Page 18 of 72
All Rights Reserved.
Double-click File Name: • Allows the PCGenesis report to be displayed in PDF
format
Right-click on the File Name allows the user to: • Add to Queue as Spool • Add to Queue as Hold • Delete File • Detail Info (audit log information) • E-mail • Rename/Modify

Release 18.02.00 – 2018 Fiscal Year-End Updates, VerraDyne Print Manager and Miscellaneous Changes / Installation
Instructions
Georgia Department of Education
Richard Woods, State School Superintendent
July 27, 2018 • 11:33 AM • Page 19 of 72
All Rights Reserved.
The VerraDyne Print Queue Manager allows reports in the archive to be renamed to a title that is more
meaningful to the user.

Release 18.02.00 – 2018 Fiscal Year-End Updates, VerraDyne Print Manager and Miscellaneous Changes / Installation
Instructions
Georgia Department of Education
Richard Woods, State School Superintendent
July 27, 2018 • 11:33 AM • Page 20 of 72
All Rights Reserved.
The VerraDyne Print Queue Manager keeps track of a detail log for every entry in the archive.
Detail Info: • Displays screen itemizing each action related to the
archived file
• For example, who has viewed the file

Release 18.02.00 – 2018 Fiscal Year-End Updates, VerraDyne Print Manager and Miscellaneous Changes / Installation
Instructions
Georgia Department of Education
Richard Woods, State School Superintendent
July 27, 2018 • 11:33 AM • Page 21 of 72
All Rights Reserved.
A1.9. Automatically Set Payroll Reports, Vendor Check Reports
and Monthly Financial Reports to ‘Requeue’
Successful printing of payroll, vendor check reports, and financial monthly reports is imperative to
PCGenesis. The old process created these reports with a disposition of ‘SCRATCH’ and
automatically deleted these reports from the print queue after printing. With the old system, if there was
a network hiccup and the reports were spooled but never printed for some reason, the reports couldn’t be
recovered.
An enhancement has been made to payroll reports, vendor check reports, and financial monthly reports
so that these reports are not automatically deleted from the print queue after being spooled to the printer.
Since it is very important to print these reports successfully, now these reports will be created in the
VerraDyne Print Queue with the disposition ‘REQUEUE’, allowing the reports to be spooled and
respooled numerous times, if necessary. All other PCGenesis reports will continue to be created with a
disposition of 'SCRATCH'.
It is possible for the user to change the disposition of any PCGenesis report to be what the user desires
by right-clicking on the disposition field for a report and selecting either SCRATCH, KEEP, or
REQUEUE.
To change the Disposition of a print file:
The disposition of a print file can be changed by right clicking on the disposition (Disp) field for the
print file and selecting the desired option.
Disposition, valid values are:
SCRATCH - After printing or emailing, the document entry will be removed from the print queue and
the file on the disk will be scratched.
KEEP - After printing or emailing, the document entry will be removed from the print queue. The
document on the disk will not be scratched.
REQUEUE - After printing or emailing, the document entry will remain in the print queue in HOLD
status and the file on the disk will be not be scratched. The entry status will be set back to HOLD after
printing or emailing.
NOTE: Even though the selected reports will be sent to the VerraDyne Print Manager with a
disposition of ‘REQUEUE’, the reports will only remain in the print queue for 30 days before being
permanently deleted. The VerraDyne Print Manager constantly cleans up old files and will delete files
from the print queue after 30 days regardless of the disposition of the file.

Release 18.02.00 – 2018 Fiscal Year-End Updates, VerraDyne Print Manager and Miscellaneous Changes / Installation
Instructions
Georgia Department of Education
Richard Woods, State School Superintendent
July 27, 2018 • 11:33 AM • Page 22 of 72
All Rights Reserved.
A1.10. New Printer Icons for Server/Workstation Desktop
Release 18.02.00 adds two new shortcuts in the K:\PCGIcon directory that can be copied to the server
desktop and workstation desktop. The PCGVADMIN icon brings up the VerraDyne Print Manager
administration module. The PCGVQUE icon brings up the Verra Dyne Print Queue. Both shortcuts
will require the user to logon using their PCGenesis logon credentials.
Add required PCG shortcuts to server desktop:
PCGenensis print spooler administration: K:\PCGIcon\
PCGenensis print queue: K:\PCGIcon\
Add required PCG shortcuts to workstation desktop:
PCGenensis print queue: K:\PCGIcon\
A1.11. Full Backup of K:\ for PCGenesis
Because the VerraDyne Print Manager utilizes SQL Server Express for the print queue database, school
districts must stop the VerraDyne Queue Service and theSQL Express service prior to running a full
backup of the K:\ PCGenesis disk drive or else the backup will not run to completion. If the VerraDyne
Queue Service and the SQL Express service are not stopped before running the backup of the K: drive,
the backup will abort because files will be open in SQL Server Express. To solve this problem, the
following commands need to be entered in the command prompt for Windows or added to the backup
bat file to stop the services:
NET STOP VQueueService
NET STOP MSSQL$SQLEXPRESSPCG
After the backup has completed, the following commands can be entered in the command prompt for
Windows or added to the backup bat file to restart the services:
NET START MSSQL$SQLEXPRESSPCG
NET START VQueueService
Release 18.02.00 – 2018 Fiscal Year-End Updates, VerraDyne Print Manager and Miscellaneous Changes / Installation
Instructions
Georgia Department of Education
Richard Woods, State School Superintendent
July 27, 2018 • 11:33 AM • Page 23 of 72
All Rights Reserved.
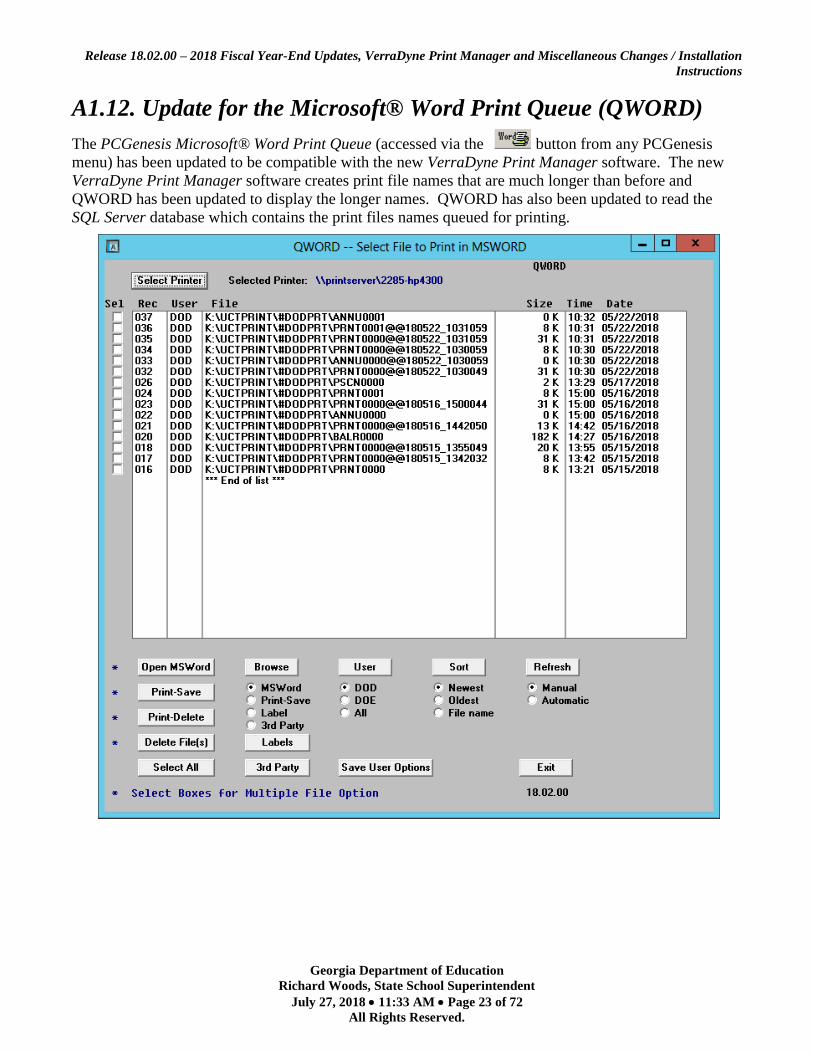
A1.12. Update for the Microsoft® Word Print Queue (QWORD)
The PCGenesis Microsoft® Word Print Queue (accessed via the button from any PCGenesis
menu) has been updated to be compatible with the new VerraDyne Print Manager software. The new
VerraDyne Print Manager software creates print file names that are much longer than before and
QWORD has been updated to display the longer names. QWORD has also been updated to read the
SQL Server database which contains the print files names queued for printing.

Release 18.02.00 – 2018 Fiscal Year-End Updates, VerraDyne Print Manager and Miscellaneous Changes / Installation
Instructions
Georgia Department of Education
Richard Woods, State School Superintendent
July 27, 2018 • 11:33 AM • Page 24 of 72
All Rights Reserved.
The updated PCGenesis Microsoft® Word Print Queue allows multiple print files to be processed from
the print queue at the same time. Four buttons work in conjunction with the Sel (Select) check box. The
Open MSWORD button ( ), the Print-Save button ( ), the Print-Delete button (
), and the Delete Files(s) button ( ) will allow multiple files to be processed at
the same time. A new Select All button ( ) will allow all print files to be selected or
deselected at once.
To select a print file or files for deletion or printing, the check box to the left of the print file(s) must
be selected. When selected, the check box displays a check ( ) to identify the print file’s selection for
up to 29 print files. The multiple file selection feature is not available when there are more than 29 print
files.
Other recent new features include:
• The Select All button ( ) allows all print files to be selected or deselected at once.
• The Open MSWORD button (* ) allows the user to view the document(s) in
Microsoft® Word. (The asterisk indicates this function works with the multiple-select feature.)
• The Print-Save button (* ) allows the user to print the document(s) and then save the
document(s) in the queue. (The asterisk indicates this function works with the multiple-select
feature.)
• The Print-Delete button (* ) allows the user to print the document(s) and then delete
from the queue. (The asterisk indicates this function works with the multiple-select feature.)
• The Delete File(s) button (* ) allows the user to delete the document(s) from the
queue. (The asterisk indicates this function works with the multiple-select feature.)
• The 3rd Party button ( ) allows the user to print the document for use by a 3rd party
without any PCL (printer control language) codes.
• The Labels button ( ) allows the user to print mailing labels using the QWord process
on AVERY 5162 label stock.
The PCGenesis Microsoft® Word Print Queue is a powerful feature which allows users to quickly
display and view PCGenesis reports in a readable format in Microsoft® Word. For users who have not
implemented the PCGenesis Word Print Queue, Microsoft® Word macros must be installed on each
user’s individual computer. In order to access the instructions necessary for installing the Microsoft®
Word macros, users may access the following link or call the PCGenesis Help Desk for instructions:
http://www.gadoe.org/Technology-Services/PCGenesis/Documents/A1_QWordMacro2010.pdf
Release 18.02.00 – 2018 Fiscal Year-End Updates, VerraDyne Print Manager and Miscellaneous Changes / Installation
Instructions
Georgia Department of Education
Richard Woods, State School Superintendent
July 27, 2018 • 11:33 AM • Page 25 of 72
All Rights Reserved.
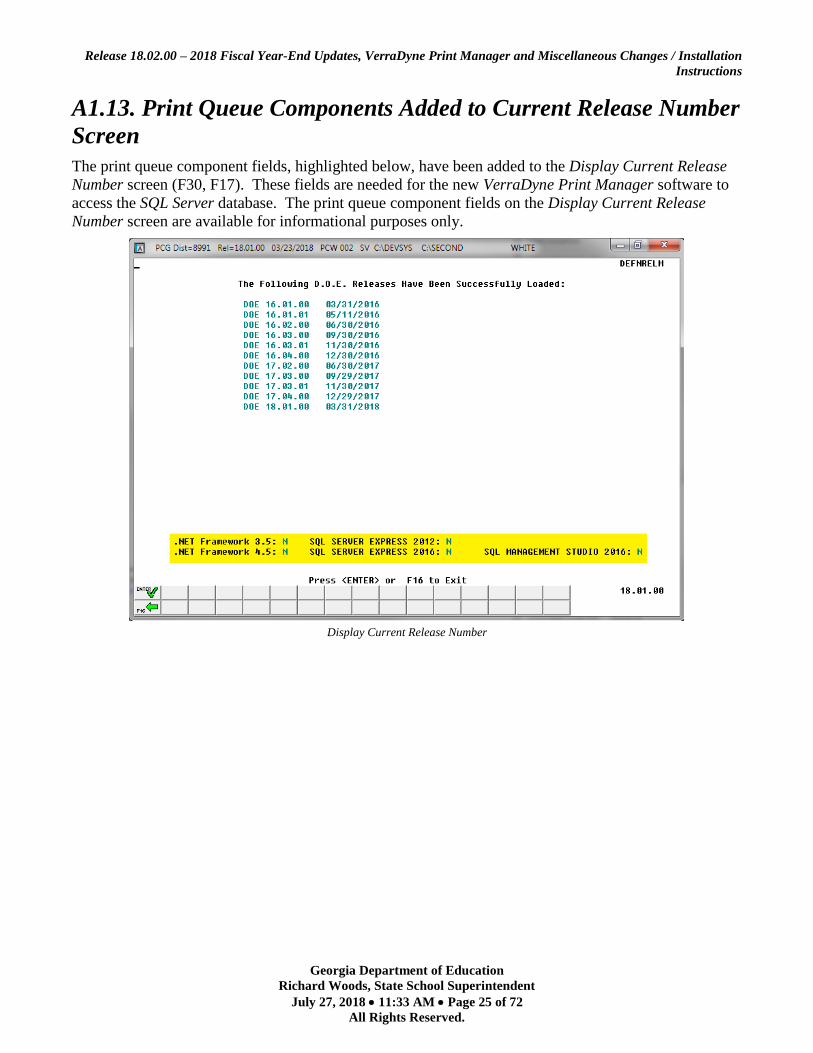
A1.13. Print Queue Components Added to Current Release Number
Screen
The print queue component fields, highlighted below, have been added to the Display Current Release
Number screen (F30, F17). These fields are needed for the new VerraDyne Print Manager software to
access the SQL Server database. The print queue component fields on the Display Current Release
Number screen are available for informational purposes only.
Display Current Release Number

Release 18.02.00 – 2018 Fiscal Year-End Updates, VerraDyne Print Manager and Miscellaneous Changes / Installation
Instructions
Georgia Department of Education
Richard Woods, State School Superintendent
July 27, 2018 • 11:33 AM • Page 26 of 72
All Rights Reserved.
A2. Payroll System
A2.1. New Teachers Retirement System (TRS) Rates for FY 2019
The TRS Board of Trustees has adopted the following changes to the employer and employee
contribution rates effective July 1, 2018.
Fiscal Year 2019
TRS
Employer Rate: 20.90%
Employee Rate: 6.00%
This release automatically updates the TRS rates into PCGenesis.
A1.2. New Employees’ Retirement System (ERS) Rates for FY 2019
The ERS Board of Trustees has adopted the following changes to the employer and employee
contribution rates effective July 1, 2018.
Fiscal Year 2019
Old ERS Employer contribution: Pickup:
Total Employer Rate:
20.03% 05.00 % 25.03%
Employee Rate: 1.5%
Fiscal Year 2019
New ERS
Employer Rate: 24.78%
Employee Rate: 1.5%
This release automatically updates the ERS rates into PCGenesis.

Release 18.02.00 – 2018 Fiscal Year-End Updates, VerraDyne Print Manager and Miscellaneous Changes / Installation
Instructions
Georgia Department of Education
Richard Woods, State School Superintendent
July 27, 2018 • 11:33 AM • Page 27 of 72
All Rights Reserved.
A3. Financial Accounting and Reporting (FAR) System
A3.1. Expand Purchase Order Account Lines to 20
The number of General Ledger accounts on vendor purchase orders has been increased from 10 accounts
to 20 accounts. This enhancement will facilitate entering vendor purchase orders by allowing more
general ledger data to be entered per purchase order.

Release 18.02.00 – 2018 Fiscal Year-End Updates, VerraDyne Print Manager and Miscellaneous Changes / Installation
Instructions
Georgia Department of Education
Richard Woods, State School Superintendent
July 27, 2018 • 11:33 AM • Page 28 of 72
All Rights Reserved.
A3.2. Expand Claim Account Lines to 20
The number of General Ledger accounts on vendor claims has been increased from 10 accounts to 20
accounts. This enhancement will facilitate entering vendor claims by allowing more general ledger data
to be entered per claim.
A3.3. Allow Purchase Order to Print Up to 20 Account Lines
The number of General Ledger accounts on a vendor purchase order has been increased from 10
accounts to 20 accounts. Because up to 20 account lines may now be entered per purchase order, there
is a slight change in the way purchase orders are printed.
Today, PCGenesis always prints the general ledger account lines on the last page of the purchase
order. Now, to include all 20 account lines, some accounts may be printed on the next-to-last page of
the purchase order. The way the purchase order prints depends on the number of inventory lines and the
number of account lines as detailed below:
• If there are 10 account lines or less, all accounts will be printed on the last page of the purchase
order.
• If there are 10 account lines or more, the accounts will print on the next-to-last page and the last
page of the purchase order.
• If there are more than 20 accounts lines, but less than 27 inventory lines, then the remaining
accounts lines will be printed on the second page of the purchase order even though no inventory
lines are left to be printed on the second page.
Release 18.02.00 – 2018 Fiscal Year-End Updates, VerraDyne Print Manager and Miscellaneous Changes / Installation
Instructions
Georgia Department of Education
Richard Woods, State School Superintendent
July 27, 2018 • 11:33 AM • Page 29 of 72
All Rights Reserved.
NOTE: For school districts using Softdocs software to print purchase orders, the changes detailed
above require modifications to the Softdocs interface. Contact Softdocs before installing release
18.02.00 to coordinate software updates. Softdocs is aware of the changes to the PCGenesis purchase
order print process and will be ready with the required changes to their software.
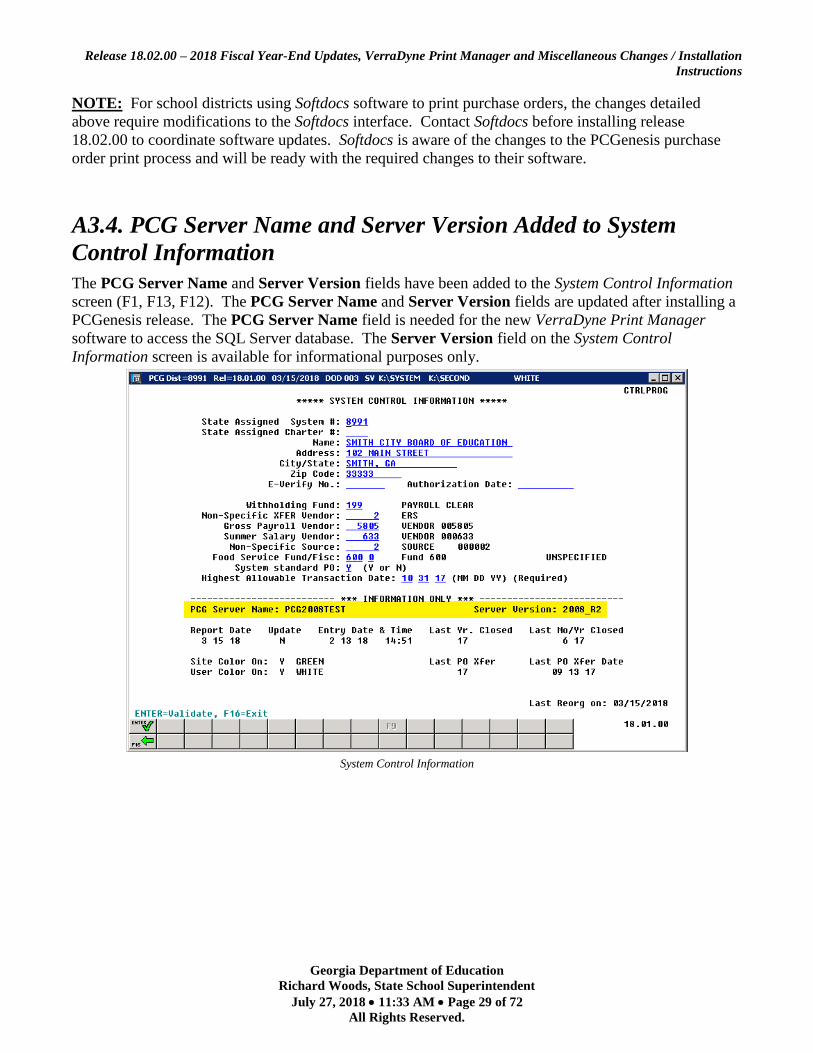
A3.4. PCG Server Name and Server Version Added to System
Control Information
The PCG Server Name and Server Version fields have been added to the System Control Information
screen (F1, F13, F12). The PCG Server Name and Server Version fields are updated after installing a
PCGenesis release. The PCG Server Name field is needed for the new VerraDyne Print Manager
software to access the SQL Server database. The Server Version field on the System Control
Information screen is available for informational purposes only.
System Control Information

Release 18.02.00 – 2018 Fiscal Year-End Updates, VerraDyne Print Manager and Miscellaneous Changes / Installation
Instructions
Georgia Department of Education
Richard Woods, State School Superintendent
July 27, 2018 • 11:33 AM • Page 30 of 72
All Rights Reserved.
A5. Certified/Classified Personnel Information (CPI) System
A5.1. Upload the 2019 CPI State Salary Schedule
The PCGenesis documentation website provides the PCGenesis CPI Salary Schedule.csv File – 2019.
Supporting documentation at that location provides the corresponding instructions to import the
information into PCGenesis.

Release 18.02.00 – 2018 Fiscal Year-End Updates, VerraDyne Print Manager and Miscellaneous Changes / Installation
Instructions
Georgia Department of Education
Richard Woods, State School Superintendent
July 27, 2018 • 11:33 AM • Page 31 of 72
All Rights Reserved.
Section B: Installation Instructions for Release
18.02.00 Software
B1. Verify Special Release 18.S.12 or 18.S.16 Installed NOTE: Before Release 18.02.00 can be installed, the special Release 18.S.12 or Release 18.S.16 must
be installed.
Step Action
1 Log into PCGenesis.
2 From the Business Applications Master Menu, select (F30 - System Utilities).
3 From the System Utilities Menu, select (F17 - Display Current Release Number).
The following screen displays for Windows Server 2008 or 2008 R2:

Release 18.02.00 – 2018 Fiscal Year-End Updates, VerraDyne Print Manager and Miscellaneous Changes / Installation
Instructions
Georgia Department of Education
Richard Woods, State School Superintendent
July 27, 2018 • 11:33 AM • Page 32 of 72
All Rights Reserved.
The following screen displays for Windows Server 2012, 2012 R2, or 2016:
Step Action
4 For Windows Server 2008 or 2008 R2 PCGenesis servers, verify Release 18.S.12 has been
installed.
Verify the necessary components are installed. Check that a ‘Y’ is displayed next to each of
the following components.
.NET Framework 3.5: Y
.NET Framework 4.5: Y
SQL SERVER EXPRESS 2012: Y
If the above components do not display a ‘Y’, contact the Technology Management
Customer Support Center for assistance.
5 For Windows Server 2012, 2012 R2, or 2016 PCGenesis servers, verify Release 18.S.16 has
been installed.
Verify the necessary components are installed. Check that a ‘Y’ is displayed next to each of
the following components.
.NET Framework 4.5: Y
SQL SERVER EXPRESS 2016: Y
SQL MANAGEMENT STUDIO 2016: Y
If the above components do not display a ‘Y’, contact the Technology Management
Customer Support Center for assistance.
Release 18.02.00 – 2018 Fiscal Year-End Updates, VerraDyne Print Manager and Miscellaneous Changes / Installation
Instructions
Georgia Department of Education
Richard Woods, State School Superintendent
July 27, 2018 • 11:33 AM • Page 33 of 72
All Rights Reserved.
Step Action
6 Select Enter.
7 Log off the PCGenesis server.
8 Verify users remain logged out of PCGenesis.
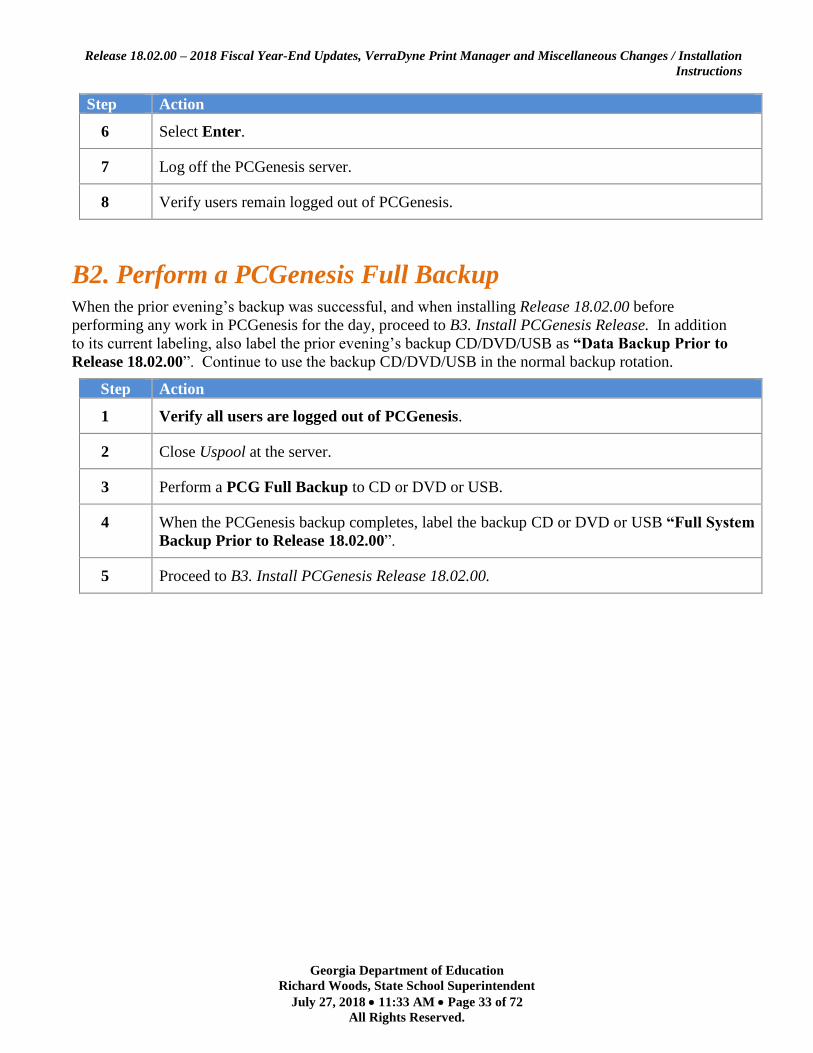
B2. Perform a PCGenesis Full Backup When the prior evening’s backup was successful, and when installing Release 18.02.00 before
performing any work in PCGenesis for the day, proceed to B3. Install PCGenesis Release. In addition
to its current labeling, also label the prior evening’s backup CD/DVD/USB as “Data Backup Prior to
Release 18.02.00”. Continue to use the backup CD/DVD/USB in the normal backup rotation.
Step Action
1 Verify all users are logged out of PCGenesis.
2 Close Uspool at the server.
3 Perform a PCG Full Backup to CD or DVD or USB.
4 When the PCGenesis backup completes, label the backup CD or DVD or USB “Full System
Backup Prior to Release 18.02.00”.
5 Proceed to B3. Install PCGenesis Release 18.02.00.
Release 18.02.00 – 2018 Fiscal Year-End Updates, VerraDyne Print Manager and Miscellaneous Changes / Installation
Instructions
Georgia Department of Education
Richard Woods, State School Superintendent
July 27, 2018 • 11:33 AM • Page 34 of 72
All Rights Reserved.
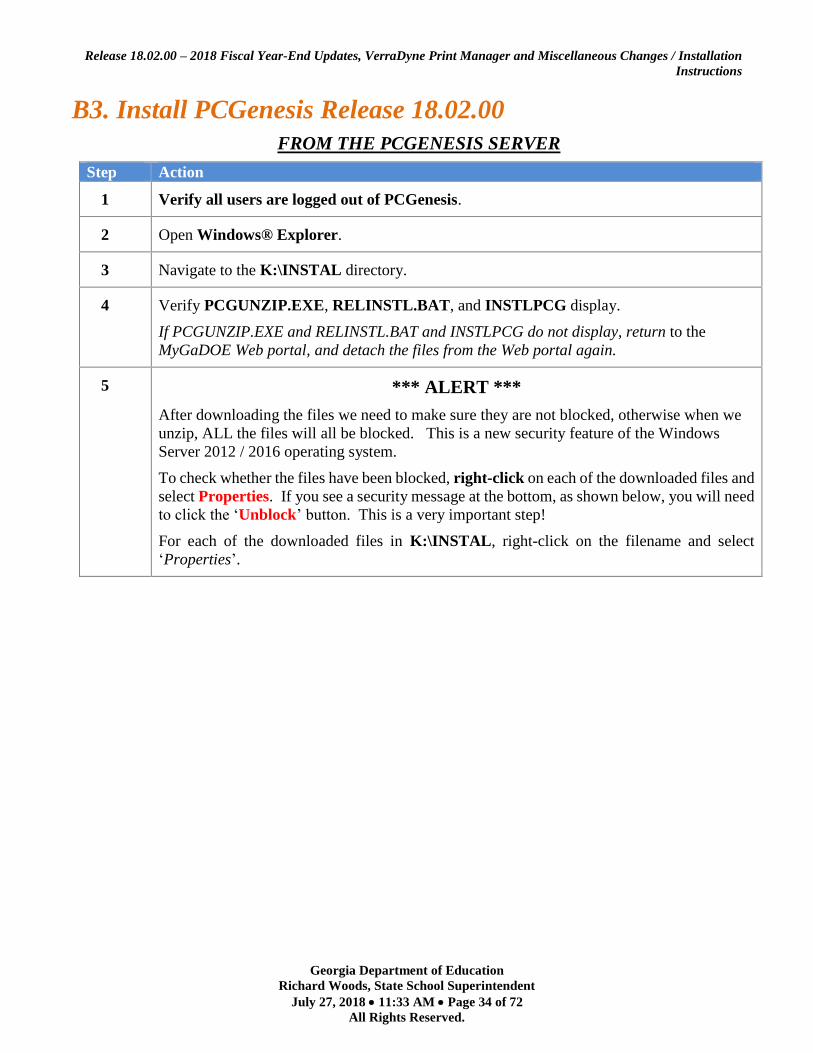
B3. Install PCGenesis Release 18.02.00
FROM THE PCGENESIS SERVER
Step Action
1 Verify all users are logged out of PCGenesis.
2 Open Windows® Explorer.
3 Navigate to the K:\INSTAL directory.
4 Verify PCGUNZIP.EXE, RELINSTL.BAT, and INSTLPCG display.
If PCGUNZIP.EXE and RELINSTL.BAT and INSTLPCG do not display, return to the
MyGaDOE Web portal, and detach the files from the Web portal again.
5 *** ALERT ***
After downloading the files we need to make sure they are not blocked, otherwise when we
unzip, ALL the files will all be blocked. This is a new security feature of the Windows
Server 2012 / 2016 operating system.
To check whether the files have been blocked, right-click on each of the downloaded files and
select Properties. If you see a security message at the bottom, as shown below, you will need
to click the ‘Unblock’ button. This is a very important step!
For each of the downloaded files in K:\INSTAL, right-click on the filename and select
‘Properties’.

Release 18.02.00 – 2018 Fiscal Year-End Updates, VerraDyne Print Manager and Miscellaneous Changes / Installation
Instructions
Georgia Department of Education
Richard Woods, State School Superintendent
July 27, 2018 • 11:33 AM • Page 35 of 72
All Rights Reserved.
After right-clicking on each file, select the ‘Properties’ option:
Depending on the version of the Windows operating system, the following screen displays:

Release 18.02.00 – 2018 Fiscal Year-End Updates, VerraDyne Print Manager and Miscellaneous Changes / Installation
Instructions
Georgia Department of Education
Richard Woods, State School Superintendent
July 27, 2018 • 11:33 AM • Page 36 of 72
All Rights Reserved.
Step Action
6 Check the bottom of the ‘Properties’ dialog box to see if the following security warning is
displayed:
“This file came from another computer and might be blocked to help protect this computer.”
If the option is presented, select (Unblock) or check the box to the left of
Unblock.
Do this for each of the files in the K:\INSTAL directory.
7 Right-click RELINSTL.BAT and select Run as administrator to perform the installation.
A status screen will display showing the release steps as they are completed.
A screen will display showing the progress of the installation:

Release 18.02.00 – 2018 Fiscal Year-End Updates, VerraDyne Print Manager and Miscellaneous Changes / Installation
Instructions
Georgia Department of Education
Richard Woods, State School Superintendent
July 27, 2018 • 11:33 AM • Page 37 of 72
All Rights Reserved.
For PCGenesis Release 18.02.00 successful installations, the following message displays:
Step Action
8 Select Enter to close the window.
9 If the installation was successful: Proceed to B4. Verify Release 18.02.00 Was Successfully
Installed.
If the installtion was unsuccessful: Proceed to Step 10.

Release 18.02.00 – 2018 Fiscal Year-End Updates, VerraDyne Print Manager and Miscellaneous Changes / Installation
Instructions
Georgia Department of Education
Richard Woods, State School Superintendent
July 27, 2018 • 11:33 AM • Page 38 of 72
All Rights Reserved.
A problem message displays if an error occurred:
Step Action
10 Select F16 to close the window.
11 Return to the MyGaDOE Web portal, and detach the files again.
12 Contact the Technology Management Customer Support Center for additional assistance if
needed. A description of the error will display with instructions to call the Help Desk.

Release 18.02.00 – 2018 Fiscal Year-End Updates, VerraDyne Print Manager and Miscellaneous Changes / Installation
Instructions
Georgia Department of Education
Richard Woods, State School Superintendent
July 27, 2018 • 11:33 AM • Page 39 of 72
All Rights Reserved.
A warning message will display if the release installation is repeated:
A warning message will display if the release installation is repeated, but in this case, the installation is
considered successful. In this instance, select any key to continue:

Release 18.02.00 – 2018 Fiscal Year-End Updates, VerraDyne Print Manager and Miscellaneous Changes / Installation
Instructions
Georgia Department of Education
Richard Woods, State School Superintendent
July 27, 2018 • 11:33 AM • Page 40 of 72
All Rights Reserved.
Step Action
13 Proceed to B4. Verify Release 18.02.00 Was Successfully Installed.
Release 18.02.00 – 2018 Fiscal Year-End Updates, VerraDyne Print Manager and Miscellaneous Changes / Installation
Instructions
Georgia Department of Education
Richard Woods, State School Superintendent
July 27, 2018 • 11:33 AM • Page 41 of 72
All Rights Reserved.
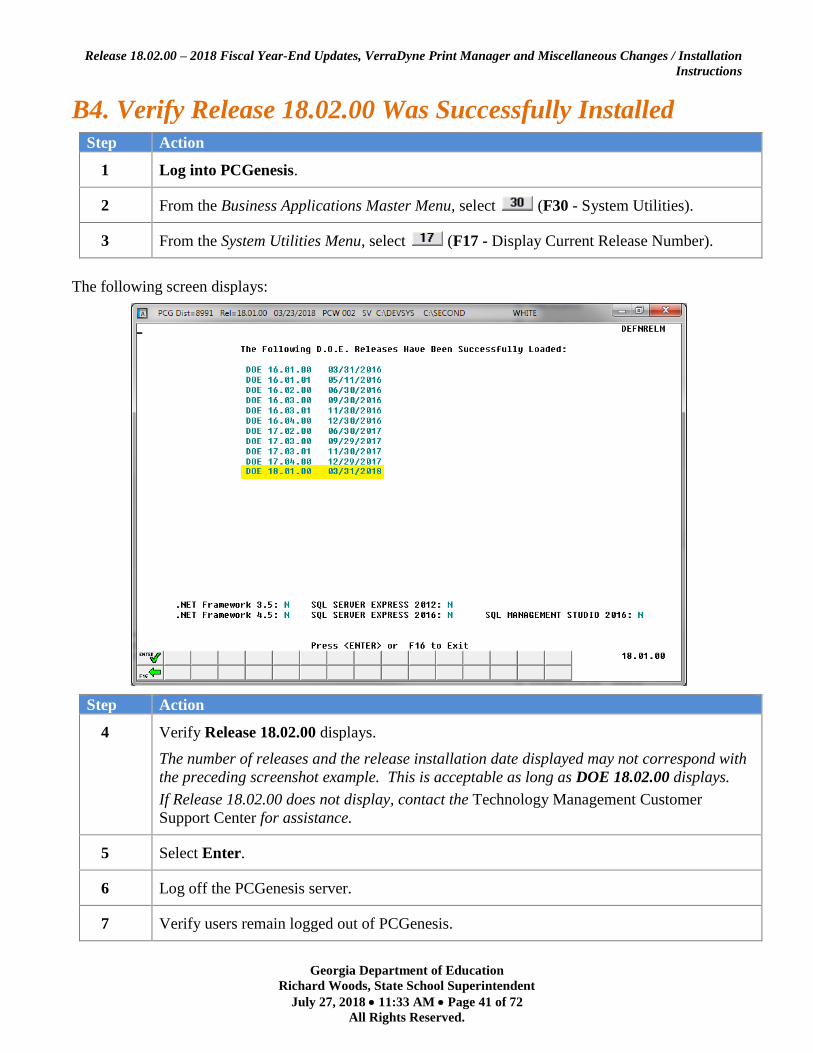
B4. Verify Release 18.02.00 Was Successfully Installed Step Action
1 Log into PCGenesis.
2 From the Business Applications Master Menu, select (F30 - System Utilities).
3 From the System Utilities Menu, select (F17 - Display Current Release Number).
The following screen displays:
Step Action
4 Verify Release 18.02.00 displays.
The number of releases and the release installation date displayed may not correspond with
the preceding screenshot example. This is acceptable as long as DOE 18.02.00 displays.
If Release 18.02.00 does not display, contact the Technology Management Customer
Support Center for assistance.
5 Select Enter.
6 Log off the PCGenesis server.
7 Verify users remain logged out of PCGenesis.

Release 18.02.00 – 2018 Fiscal Year-End Updates, VerraDyne Print Manager and Miscellaneous Changes / Installation
Instructions
Georgia Department of Education
Richard Woods, State School Superintendent
July 27, 2018 • 11:33 AM • Page 42 of 72
All Rights Reserved.
Section C: Installation Instructions for VerraDyne
Print Manager Software
C1. Install VerraDyne Print Manager Software 03.02.00
FROM THE PCGENESIS SERVER
Step Action
1 Verify all users are logged out of PCGenesis.
2 Open Windows® Explorer.
3 Navigate to the K:\VQUEUE03 directory.
4 Locate the file QueueSetup.bat in the K:\VQUEUE03 directory.
5 Right-click QueueSetup.bat and select Run as administrator to perform the installation.
The following screen displays:

Release 18.02.00 – 2018 Fiscal Year-End Updates, VerraDyne Print Manager and Miscellaneous Changes / Installation
Instructions
Georgia Department of Education
Richard Woods, State School Superintendent
July 27, 2018 • 11:33 AM • Page 43 of 72
All Rights Reserved.
Step Action
6 Enter the Company Name as Ga DOE.
7 Accept the terms of the license agreement:
Select the (radio button) to the left of ‘Accept’.
8 Select (Continue) to continue the installation.
The following screen displays:
Step Action
9 Verify the Company as Ga DOE.
10 Verify the Server Name.
The server name should default to the name of the PCGenesis server followed by
\SQLEXPRESSpcg.
For example, PCGenesis_Server_Name\SQLEXPRESSpcg

Release 18.02.00 – 2018 Fiscal Year-End Updates, VerraDyne Print Manager and Miscellaneous Changes / Installation
Instructions
Georgia Department of Education
Richard Woods, State School Superintendent
July 27, 2018 • 11:33 AM • Page 44 of 72
All Rights Reserved.
Step Action
11 Verify the PrintQueue Directory.
The PrintQueue Directory should default to K:\VQUEUE.
12 Verify the Service UserId and the Service Password.
Both the Service UserId and the Service Password should be blank.
13 Select (Install) to continue the installation.
The following screen displays:
Step Action
14 Verify that “Installation Completed” and “Please Restart your computer” are displayed in the
window.
If “Installation Completed” is not displayed, contact the Technology Management Customer
Support Center for additional assistance. Obtain a screenshot of the above screen to send to
the help desk to facilitate troubleshooting issues.
15 Select (Exit) to exit the installation procedure.

Release 18.02.00 – 2018 Fiscal Year-End Updates, VerraDyne Print Manager and Miscellaneous Changes / Installation
Instructions
Georgia Department of Education
Richard Woods, State School Superintendent
July 27, 2018 • 11:33 AM • Page 45 of 72
All Rights Reserved.
The following screen displays:
Step Action
16 A black Command Prompt screen will display. The final message on the screen will be
“Press any key to continue”.
Enter to complete the installation.
17 Now, REBOOT the PCGenesis server.
18 Proceed to C2. Verify VQueue Service is Running.

Release 18.02.00 – 2018 Fiscal Year-End Updates, VerraDyne Print Manager and Miscellaneous Changes / Installation
Instructions
Georgia Department of Education
Richard Woods, State School Superintendent
July 27, 2018 • 11:33 AM • Page 46 of 72
All Rights Reserved.
C2. Verify VQueue Service is Running Step Action
1 Bring up the Control Panel of your PCGeensis server.
Select (Settings). Then select (Control Panel).
The following screen displays:
Step Action
2 Locate the “Search Control Panel” input box in the upper right-hand corner of the screen.
Enter Local Services in the input box.
3 Click (View local services).

Release 18.02.00 – 2018 Fiscal Year-End Updates, VerraDyne Print Manager and Miscellaneous Changes / Installation
Instructions
Georgia Department of Education
Richard Woods, State School Superintendent
July 27, 2018 • 11:33 AM • Page 47 of 72
All Rights Reserved.
The following screen displays:
Step Action
4 Locate the VQueueService. Verify the status of the VQueueService is Running.
5 If the VQueueService is not displayed or is not running, reboot the PCGenesis Server. Then,
repeat these steps starting at Step 1.
If after rebooting the PCGenesis Server, the VQueueService still does not display
“Running”, contact the Technology Management Customer Support Center for additional
assistance.

Release 18.02.00 – 2018 Fiscal Year-End Updates, VerraDyne Print Manager and Miscellaneous Changes / Installation
Instructions
Georgia Department of Education
Richard Woods, State School Superintendent
July 27, 2018 • 11:33 AM • Page 48 of 72
All Rights Reserved.
C3. Remove PCGSPOOL From “All Users Startup” Step Action
1 Remove K:\PCGICON\PCGSPOOL shortcut from “All Users Startup”.
2 Remove the PCGenensis print spooler job scheduler (UQUCTL) from scheduled tasks, if
present.
3 After completing the steps above, the old USPOOL program should no longer run
automatically.
C4. Add Required PCG Shortcuts to Server/Workstation
Desktop Step Action
1 Add required PCG shortcuts to server desktop:
PCGenensis print spooler administration: K:\PCGIcon\
PCGenensis print queue: K:\PCGIcon\
2 Add required PCG shortcuts to workstation desktop:
PCGenensis print queue: K:\PCGIcon\

Release 18.02.00 – 2018 Fiscal Year-End Updates, VerraDyne Print Manager and Miscellaneous Changes / Installation
Instructions
Georgia Department of Education
Richard Woods, State School Superintendent
July 27, 2018 • 11:33 AM • Page 49 of 72
All Rights Reserved.
C5. Provide PCGenesis Financial Director with
Administrative Access to the Print Manager Step Action
1
From the server double-click the PCGVADMIN icon: .
The following screen displays:
Step Action
2 Enter the Windows User ID of the technology specialist who installed the software.
If the Windows User ID of the technology specialist who installed the software is the same
as a PCGenesis User ID, enter the PCGenesis password that matches the user Id, otherwise
do not enter a Password.
3 Select (OK).

Release 18.02.00 – 2018 Fiscal Year-End Updates, VerraDyne Print Manager and Miscellaneous Changes / Installation
Instructions
Georgia Department of Education
Richard Woods, State School Superintendent
July 27, 2018 • 11:33 AM • Page 50 of 72
All Rights Reserved.
The following screen displays:
Step Action
4 Select (Setup).
5 Select (Users) from the drop-down box.

Release 18.02.00 – 2018 Fiscal Year-End Updates, VerraDyne Print Manager and Miscellaneous Changes / Installation
Instructions
Georgia Department of Education
Richard Woods, State School Superintendent
July 27, 2018 • 11:33 AM • Page 51 of 72
All Rights Reserved.
The following window displays:
The list of User Ids displayed in the drop-down box will be system specific.
Step Action
6 Select the drop-down icon ( ) to display the list of PCGenesis users.
7 Find the user id of the PCGenesis Financial Director or the PCGenesis user id that should have
full access to all files in the print queue and archive.
8 After selecting the correct user id, Enter to proceed to the next screen.

Release 18.02.00 – 2018 Fiscal Year-End Updates, VerraDyne Print Manager and Miscellaneous Changes / Installation
Instructions
Georgia Department of Education
Richard Woods, State School Superintendent
July 27, 2018 • 11:33 AM • Page 52 of 72
All Rights Reserved.
The following window displays:
Step Action
9 In the Defaults section of the screen, change the Access field to ADMIN.
Select the drop-down icon ( ) for the Access field.
Select a value of ADMIN .
10 In the Archive Access section of the screen, check ( ) the box for the Full Access field.

Release 18.02.00 – 2018 Fiscal Year-End Updates, VerraDyne Print Manager and Miscellaneous Changes / Installation
Instructions
Georgia Department of Education
Richard Woods, State School Superintendent
July 27, 2018 • 11:33 AM • Page 53 of 72
All Rights Reserved.
The following window displays:
Step Action
11 Select (Save) to update the record.

Release 18.02.00 – 2018 Fiscal Year-End Updates, VerraDyne Print Manager and Miscellaneous Changes / Installation
Instructions
Georgia Department of Education
Richard Woods, State School Superintendent
July 27, 2018 • 11:33 AM • Page 54 of 72
All Rights Reserved.
The following window displays:
Step Action
12 If any other PCGenesis user should have administrative access to all files in the print queue
and archive, repeat Steps 6 – 12 as necessary.
13 Select (Exit) to exit the User Setup module.

Release 18.02.00 – 2018 Fiscal Year-End Updates, VerraDyne Print Manager and Miscellaneous Changes / Installation
Instructions
Georgia Department of Education
Richard Woods, State School Superintendent
July 27, 2018 • 11:33 AM • Page 55 of 72
All Rights Reserved.
C6. Check Printer Definition The following screen displays:
Step Action
1 Select (Setup).
2 Select (Printers) from the drop-down box.

Release 18.02.00 – 2018 Fiscal Year-End Updates, VerraDyne Print Manager and Miscellaneous Changes / Installation
Instructions
Georgia Department of Education
Richard Woods, State School Superintendent
July 27, 2018 • 11:33 AM • Page 56 of 72
All Rights Reserved.
The following window displays:
The list of Printer Ids displayed in the drop-down box will be system specific.
Step Action
3 Select the drop-down icon ( ) to display the list of PCGenesis printer ids. Highlight and
select printer id 001.
4 After selecting the correct printer id, Enter to proceed to the next screen.
Release 18.02.00 – 2018 Fiscal Year-End Updates, VerraDyne Print Manager and Miscellaneous Changes / Installation
Instructions
Georgia Department of Education
Richard Woods, State School Superintendent
July 27, 2018 • 11:33 AM • Page 57 of 72
All Rights Reserved.
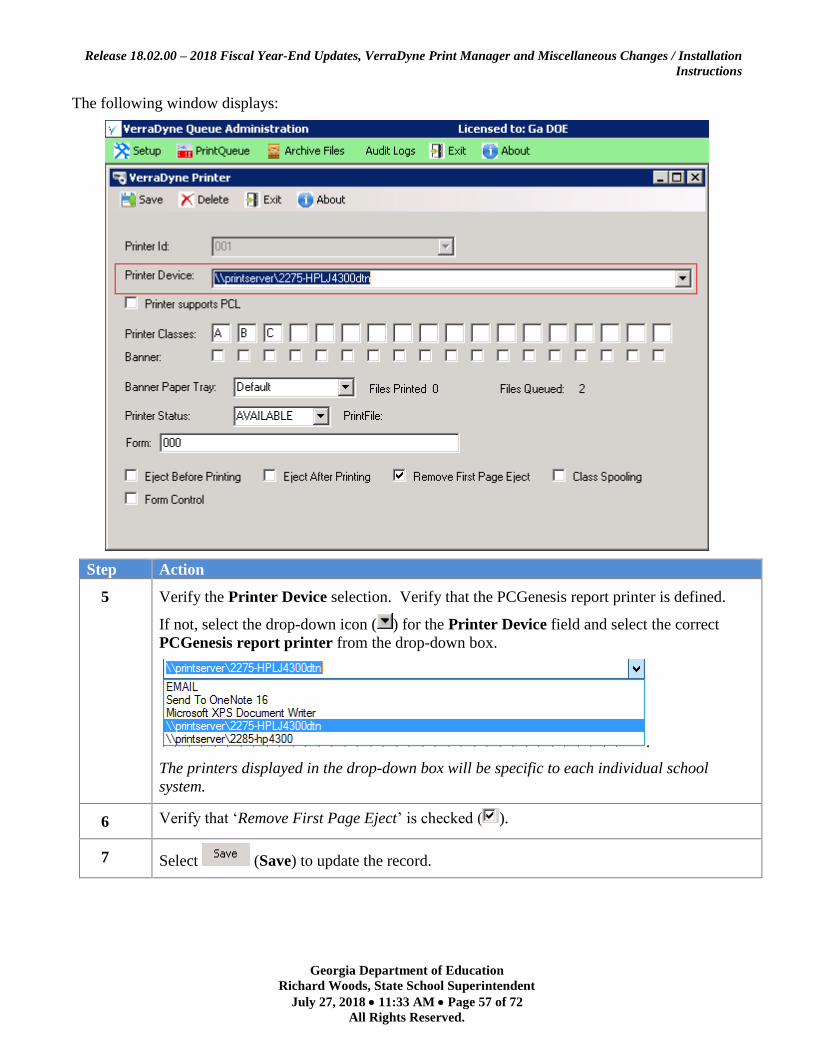
The following window displays:
Step Action
5 Verify the Printer Device selection. Verify that the PCGenesis report printer is defined.
If not, select the drop-down icon ( ) for the Printer Device field and select the correct
PCGenesis report printer from the drop-down box.
.
The printers displayed in the drop-down box will be specific to each individual school
system.
6 Verify that ‘Remove First Page Eject’ is checked ( ).
7 Select (Save) to update the record.
Release 18.02.00 – 2018 Fiscal Year-End Updates, VerraDyne Print Manager and Miscellaneous Changes / Installation
Instructions
Georgia Department of Education
Richard Woods, State School Superintendent
July 27, 2018 • 11:33 AM • Page 58 of 72
All Rights Reserved.
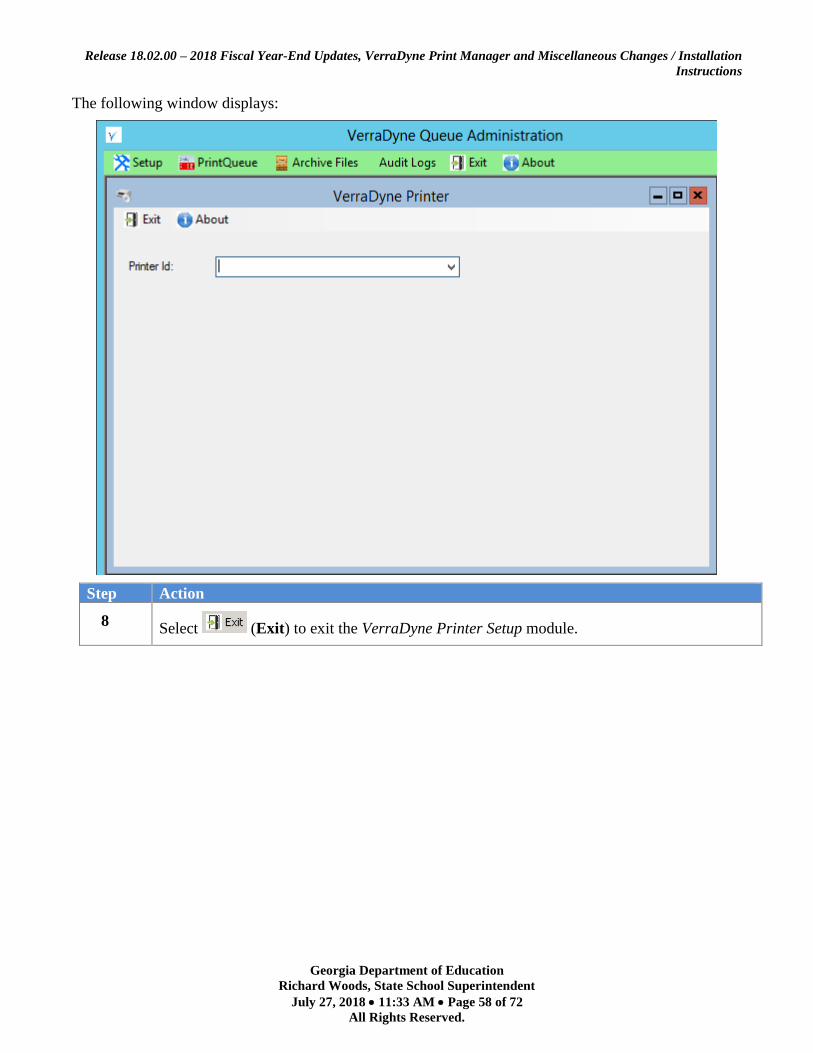
The following window displays:
Step Action
8 Select (Exit) to exit the VerraDyne Printer Setup module.
Release 18.02.00 – 2018 Fiscal Year-End Updates, VerraDyne Print Manager and Miscellaneous Changes / Installation
Instructions
Georgia Department of Education
Richard Woods, State School Superintendent
July 27, 2018 • 11:33 AM • Page 59 of 72
All Rights Reserved.
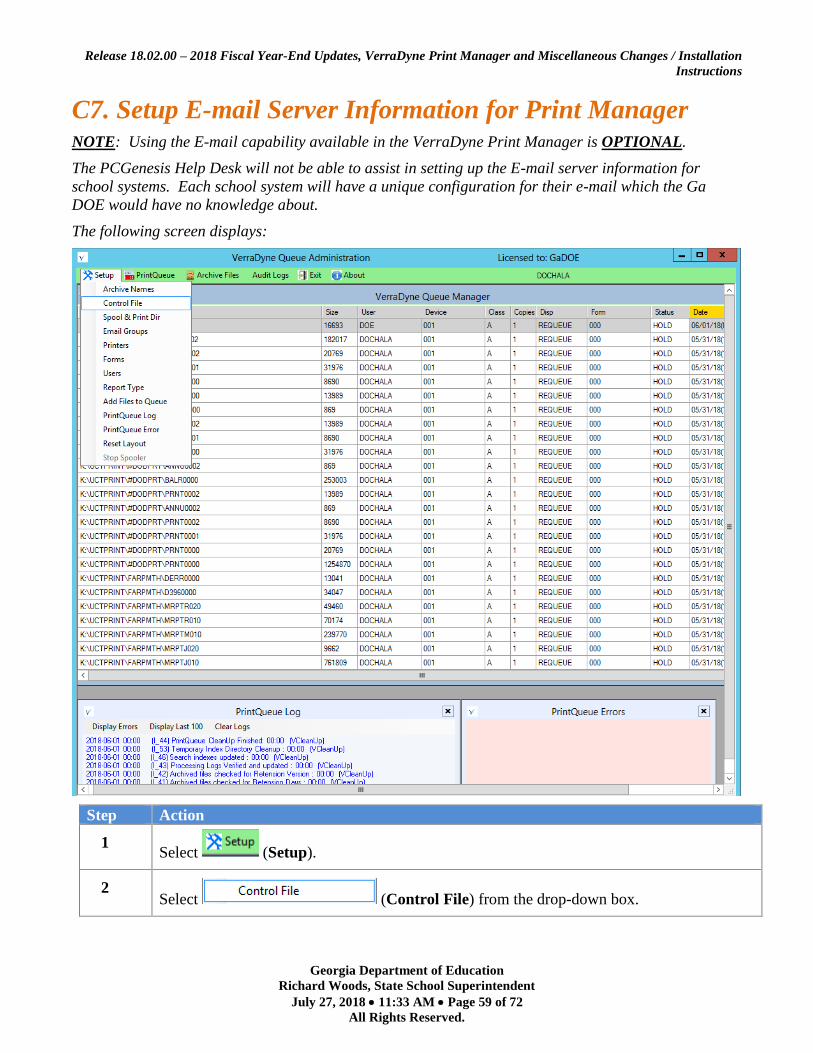
C7. Setup E-mail Server Information for Print Manager NOTE: Using the E-mail capability available in the VerraDyne Print Manager is OPTIONAL.
The PCGenesis Help Desk will not be able to assist in setting up the E-mail server information for
school systems. Each school system will have a unique configuration for their e-mail which the Ga
DOE would have no knowledge about.
The following screen displays:
Step Action
1 Select (Setup).
2 Select (Control File) from the drop-down box.

Release 18.02.00 – 2018 Fiscal Year-End Updates, VerraDyne Print Manager and Miscellaneous Changes / Installation
Instructions
Georgia Department of Education
Richard Woods, State School Superintendent
July 27, 2018 • 11:33 AM • Page 60 of 72
All Rights Reserved.
The following window displays:
Step Action
3 In the Email Settings section of the screen, enter the outgoing SMTP mail server in the Smtp
Host Name field.

Release 18.02.00 – 2018 Fiscal Year-End Updates, VerraDyne Print Manager and Miscellaneous Changes / Installation
Instructions
Georgia Department of Education
Richard Woods, State School Superintendent
July 27, 2018 • 11:33 AM • Page 61 of 72
All Rights Reserved.
Step Action
4 Use Default Credentials:
If checked ( ), when sending email, the system will not use the User Name and Password
field on the screen for SMTP authentication. Instead, the system will authenticate using the
default credentials of the currently logged on user.
If not checked, when sending email, the system will use the User Name field and Password
field entered on the screen for SMTP authentication.
Some SMTP servers require that the client be authenticated before the server sends e-mail
on its behalf. Check ( ) this box when this SmtpClient object should, if requested by the
server, authenticate using the default credentials of the currently logged on user. For client
applications, this is the desired behavior in most scenarios.
5 Use SSL:
When sending emails, the print manager will use Secure Sockets Layer. Your SMTP Server
must support SSL.
6 PORT:
Port used by Smtp Server. If the port is left as spaces, the system will default to port 80.
7 UserName and Password:
This is the username and password for SMTP authentications. If Use Default Credentials is
checked, you do not need to enter the username and password.
8 Email From:
Enter the default email address. This email address will be used when emailing documents.
9 Subject:
Enter the subject line for all outgoing emails.
10 Body:
Enter the message body of the email for all outgoing emails.
11 Email Errors:
If this box is checked, the system will email all the errors to a specified email address. On
this release of the product this function is not activated, and is for future use.
12 Make the necessary entries on the screen. To test the E-mail server setup, select
(Test Smtp) to generate a test e-mail. Verify that a test e-mail was sent and received.
13 Once the E-mail server setup has been tested and verified, select (Save) to update
the record.

Release 18.02.00 – 2018 Fiscal Year-End Updates, VerraDyne Print Manager and Miscellaneous Changes / Installation
Instructions
Georgia Department of Education
Richard Woods, State School Superintendent
July 27, 2018 • 11:33 AM • Page 62 of 72
All Rights Reserved.
C8. Verify Print Manager Access from Workstations Step Action
1 Log into PCGenesis from a user workstation.
NOTE: Adobe Reader must be installed on each individual workstation for PCGenesis
reports to display correctly from the VerraDyne Print Manager. If Adobe Reader hasn’t
been installed on the workstation, install the software from the internet before continuing.
2 Generate a PCGenesis report.
Note: It is preferable to generate a short report so that paper is not wasted.
3 After creating a PCGenesis report, return to a menu.
The following screen displays:
Step Action
4 Select (Uqueue) to enter the VerraDyne Print Manager.

Release 18.02.00 – 2018 Fiscal Year-End Updates, VerraDyne Print Manager and Miscellaneous Changes / Installation
Instructions
Georgia Department of Education
Richard Woods, State School Superintendent
July 27, 2018 • 11:33 AM • Page 63 of 72
All Rights Reserved.
The following screen displays:
The items in the print queue will be system specific.
Step Action
5 To Refresh the Print Queue:
To refresh the print queue, click on the (Refresh) field and select the
(Refresh queue) option.
Refresh Queue: When selected, print queue will be redisplayed and refreshed.

Release 18.02.00 – 2018 Fiscal Year-End Updates, VerraDyne Print Manager and Miscellaneous Changes / Installation
Instructions
Georgia Department of Education
Richard Woods, State School Superintendent
July 27, 2018 • 11:33 AM • Page 64 of 72
All Rights Reserved.
Step Action
6 Sorting Columns:
You can sort columns in the VerraDyne Print Manager by clicking on the column heading.
When a sort is selected, the VerraDyne Print Manager will display the column heading in an
orange color. For example, in the screen shown above, the print files are shown in order by
date (Creation Date).
The Sort option is saved by user id when (Exit) is selected on the menu bar.
If you wish to reset the column sort, click (Settings) on menu bar, and select the
(Clear Sort) option, as shown below.
Release 18.02.00 – 2018 Fiscal Year-End Updates, VerraDyne Print Manager and Miscellaneous Changes / Installation
Instructions
Georgia Department of Education
Richard Woods, State School Superintendent
July 27, 2018 • 11:33 AM • Page 65 of 72
All Rights Reserved.
The following screen displays:
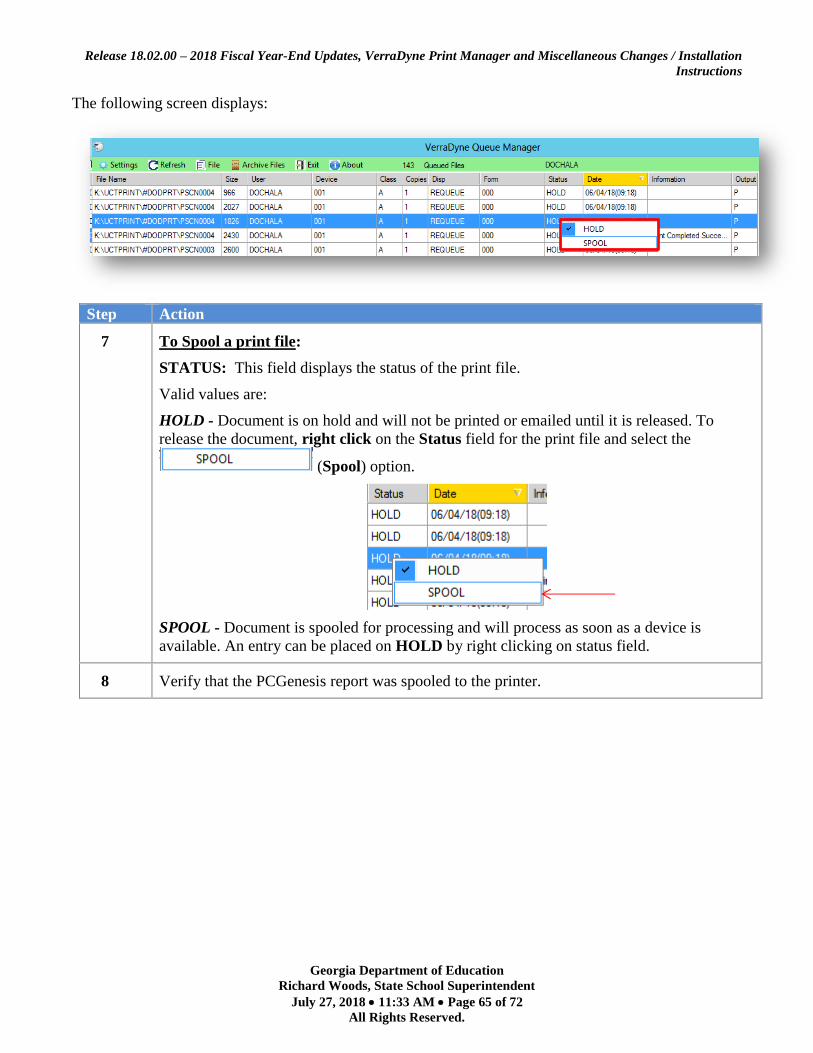
Step Action
7 To Spool a print file:
STATUS: This field displays the status of the print file.
Valid values are:
HOLD - Document is on hold and will not be printed or emailed until it is released. To
release the document, right click on the Status field for the print file and select the
(Spool) option.
SPOOL - Document is spooled for processing and will process as soon as a device is
available. An entry can be placed on HOLD by right clicking on status field.
8 Verify that the PCGenesis report was spooled to the printer.

Release 18.02.00 – 2018 Fiscal Year-End Updates, VerraDyne Print Manager and Miscellaneous Changes / Installation
Instructions
Georgia Department of Education
Richard Woods, State School Superintendent
July 27, 2018 • 11:33 AM • Page 66 of 72
All Rights Reserved.
The following screen displays:
Step Action
9 To change the Disposition of a print file:
The disposition of a print file can be changed by right clicking on the disposition (Disp)
field for the print file and selecting the desired option.
Disposition, valid values are:
SCRATCH - After printing or emailing, the document entry will be removed from the print
queue and the file on the disk will be scratched.
KEEP - After printing or emailing, the document entry will be removed from the print
queue. The document on the disk will not be scratched.
REQUEUE - After printing or emailing, the document entry will remain in the print queue
in HOLD status and the file on the disk will be not be scratched. The entry status will be set
back to HOLD after printing or emailing.
The following screen displays:

Release 18.02.00 – 2018 Fiscal Year-End Updates, VerraDyne Print Manager and Miscellaneous Changes / Installation
Instructions
Georgia Department of Education
Richard Woods, State School Superintendent
July 27, 2018 • 11:33 AM • Page 67 of 72
All Rights Reserved.
Step Action
10 File options:
The file options can be selected by right clicking on the file name (File Name) field for the
print file and selecting the desired option.
Valid options are:
DELETE - You can delete a print file from the queue by right clicking on the filename and
selecting Delete. If you select Delete, the entry will be removed from the queue and the file
is deleted from the disk.
REMOVE - You can remove a print file from the queue by right clicking on the filename
and selecting Remove. If you select Remove, the entry will be removed from the queue, and
the file is not deleted from the disk.
DETAIL INFO - You can view a detail log of the print file by right clicking on the
filename and selecting Detail Info. By selecting the Detail Info option, you can view the
detailed log regarding the selected file.
EMAIL - You can email a print file from the queue by right clicking on the filename and
selecting Email. You can email the document(s) directly from queue or Archive Folders by
selecting the Email option. The sender’s email address is automatically defaulted to the
user’s email address defined in User maintenance. The print file will be emailed in PDF
format. You can enter the email address of recipient or select from the list of groups
previously defined. If no subject or message is entered, the program will default to standard
subject and message defined in the control file. If the Requeue option is checked, the
program will requeue the document after emailing. If Email Password is checked, the
program will send a separate email with the password to all recipients.
ARCHIVE - You can archive a print file from the queue by right clicking on the filename
and selecting Archive. You can modify the filename for the archive, retention days and
retention version. Also, you can select to remove the file from print queue after archiving.
If multiple files are selected for archiving, program will display Multiple Files Selected. To
select multiple files to archive from the print queue, select the files you wish to archive,
right click, and select Archive. The maximum number of files which can be selected for
archiving is 100.
11 Displaying the Print File:
You can display the PCGenesis reports in the print queue by double clicking on the
filename. The VerraDyne Print Manager will display the file in pdf format as shown below.

Release 18.02.00 – 2018 Fiscal Year-End Updates, VerraDyne Print Manager and Miscellaneous Changes / Installation
Instructions
Georgia Department of Education
Richard Woods, State School Superintendent
July 27, 2018 • 11:33 AM • Page 68 of 72
All Rights Reserved.
The following screen displays:
PCGenesis Report Displayed in PDF Format
Step Action
12 Exit the PCGenesis application.
13 Verify the PCGVQUE shortcut on the desktop:
Access the VerraDyne Print Manager from the desktop icon.
From the user’s workstation double-click the PCGVQUE icon: .
Release 18.02.00 – 2018 Fiscal Year-End Updates, VerraDyne Print Manager and Miscellaneous Changes / Installation
Instructions
Georgia Department of Education
Richard Woods, State School Superintendent
July 27, 2018 • 11:33 AM • Page 69 of 72
All Rights Reserved.
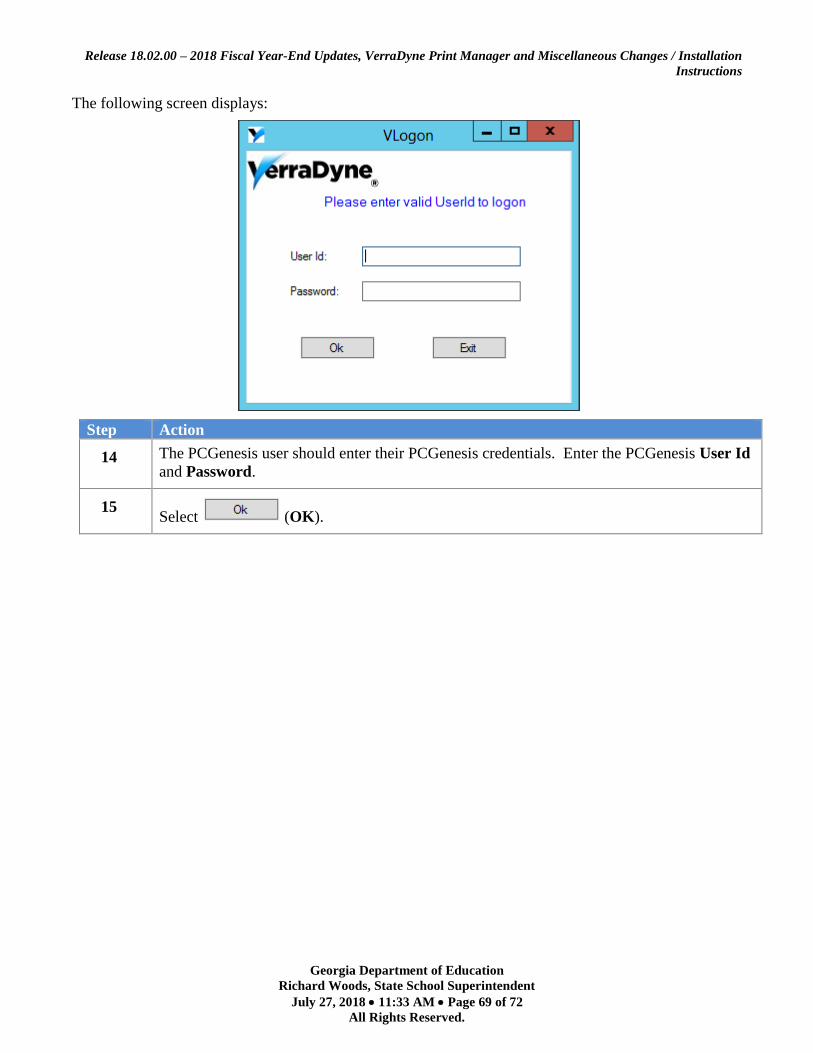
The following screen displays:
Step Action
14 The PCGenesis user should enter their PCGenesis credentials. Enter the PCGenesis User Id
and Password.
15 Select (OK).

Release 18.02.00 – 2018 Fiscal Year-End Updates, VerraDyne Print Manager and Miscellaneous Changes / Installation
Instructions
Georgia Department of Education
Richard Woods, State School Superintendent
July 27, 2018 • 11:33 AM • Page 70 of 72
All Rights Reserved.
The following screen displays:
The items in the print queue will be system specific.
Step Action
16 Repeat Steps 5 – 10 to ensure access to the VerraDyne Print Manager from the desktop icon.
Release 18.02.00 – 2018 Fiscal Year-End Updates, VerraDyne Print Manager and Miscellaneous Changes / Installation
Instructions
Georgia Department of Education
Richard Woods, State School Superintendent
July 27, 2018 • 11:33 AM • Page 71 of 72
All Rights Reserved.
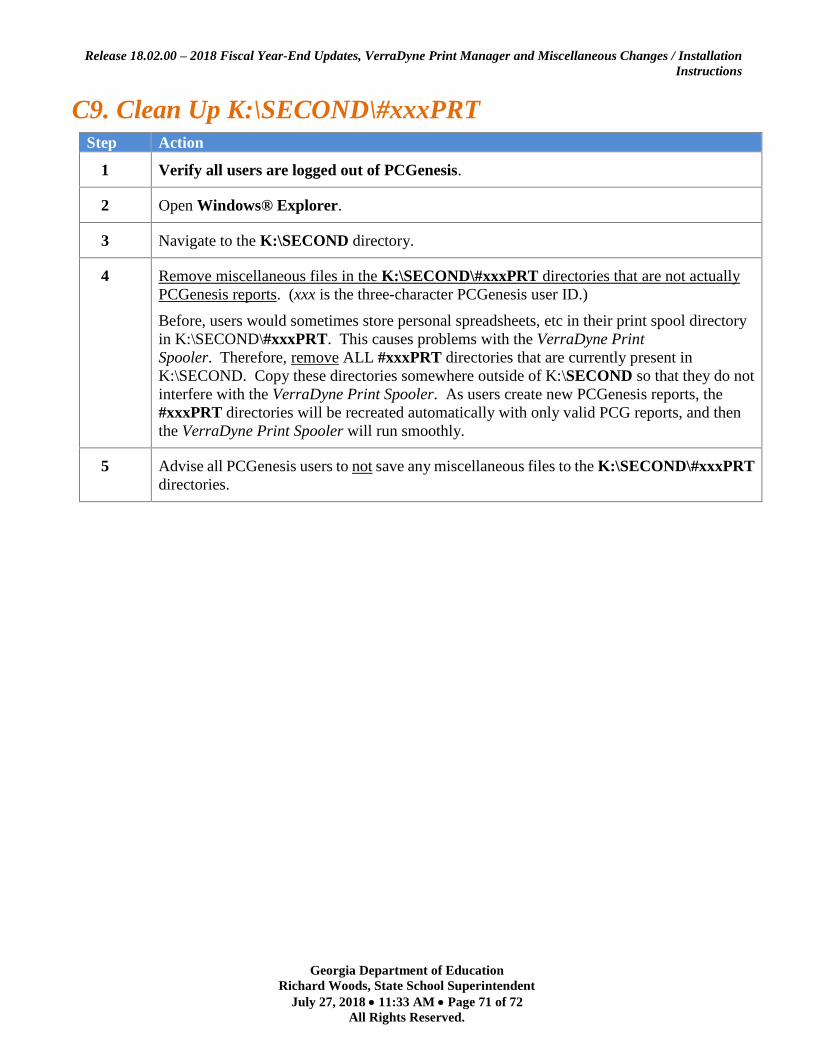
C9. Clean Up K:\SECOND\#xxxPRT Step Action
1 Verify all users are logged out of PCGenesis.
2 Open Windows® Explorer.
3 Navigate to the K:\SECOND directory.
4 Remove miscellaneous files in the K:\SECOND\#xxxPRT directories that are not actually
PCGenesis reports. (xxx is the three-character PCGenesis user ID.)
Before, users would sometimes store personal spreadsheets, etc in their print spool directory
in K:\SECOND\#xxxPRT. This causes problems with the VerraDyne Print
Spooler. Therefore, remove ALL #xxxPRT directories that are currently present in
K:\SECOND. Copy these directories somewhere outside of K:\SECOND so that they do not
interfere with the VerraDyne Print Spooler. As users create new PCGenesis reports, the
#xxxPRT directories will be recreated automatically with only valid PCG reports, and then
the VerraDyne Print Spooler will run smoothly.
5 Advise all PCGenesis users to not save any miscellaneous files to the K:\SECOND\#xxxPRT
directories.

Release 18.02.00 – 2018 Fiscal Year-End Updates, VerraDyne Print Manager and Miscellaneous Changes / Installation
Instructions
Georgia Department of Education
Richard Woods, State School Superintendent
July 27, 2018 • 11:33 AM • Page 72 of 72
All Rights Reserved.
Section D: After PCGenesis Release 18.02.00 Has
Been Installed
D1. Perform a PCGenesis Full Backup After Release
18.02.00 is Installed
Step Action
1 Verify all users are logged out of PCGenesis.
2 Close Uspool at the server.
3 Perform a PCG Full Backup to CD or DVD or USB.
4 When the PCGenesis backup completes, label the backup CD or DVD or USB “Full System
Backup After Release 18.02.00”.