eoh361-4-5-6jrs-instruction-bulletin-08-25-14-2338.pdf · PDF fileNeutral bus and auxiliary...
56
EOH364/5/6JK/RK/S/SS NEMA 12, 3R, 4X / 200 A, 400 A, 600 A Instruction Bulletin / Boletín de instrucciones / Directives d‘utilisation / 34EOH364-5-6JRS / A, 1SCC340032M1401
Transcript of eoh361-4-5-6jrs-instruction-bulletin-08-25-14-2338.pdf · PDF fileNeutral bus and auxiliary...

EOH364/5/6JK/RK/S/SSNEMA 12, 3R, 4X / 200 A, 400 A, 600 A
Instruction Bulletin / Boletín de instrucciones / Directives d‘utilisation / 34EOH364-5-6JRS / A, 1SCC340032M1401

Retain for future use. / Conservar para uso futuro. / À conserver pour usage ultérieur.
EOH364/5/6JK/RK/S/SSNEMA 12, 3R, 4X / 200 A, 400 A, 600 A
EOH Series
Heavy Duty Fusible Safety Switches
EOH Serie
Interruptores fusibles de seguridad de servicio pesado
EOH Série
Interrupteurs de sécurité avec fusible pour service intensif3
2
1
200 A, 400 A, 600 A:
NEMA 12: EOH364JK, EOH365JK, EOH366JK
NEMA 3R: EOH364RK, EOH365RK, EOH366RK
NEMA 4X: EOH364S, EOH364SS, EOH365S, EOH365SS,
EOH366S, EOH366SS
Instruction Bulletin / Boletín de instrucciones / Directives d‘utilisation, 1SCC340032M1401 / A | EOH364/5/6JK/RK/S/SS 3
French version is available at later date.French version is available at later date.

1

1
EOH SeriesEnclosed Heavy Duty Fusible Safety Switches
General safety instructions 1/2
Receiving, handling and storage 1/3
Applications 1/4
Product overview 1/5
EOH364JK/_RK/_S/_SS, EOH365JK/_RK/_S/_SS,
EOH366JK/_RK/_S/_SS 1/5
Ratings 1/6
Heavy duty fusible safety switches 1/6
Cabling 1/7
Heavy duty fusible safety switches 1/7
Neutral bus and auxiliary contacts 1/8
Installation 1/9
Opening the enclosure 1/9
Knockouts 1/10
Mounting 1/11
Wiring 1/12
Neutral assembly (optional) 1/13
Auxiliary contact (optional) 1/14
Fuses 1/15
Operation 1/16
Operating 1/16
Operating mechanism 1/17
Padlocking handle and door latches 1/19
Dimension drawings 1/20
EOH364JK/_RK/_S/_SS, EOH365JK/_RK/_S/_SS,
EOH366JK/_RK/_S/_SS / NEMA 12, 3R, 4X / 200 A, 400 A, 600 A 1/20
Cable outlets / knockouts for NEMA 12 and 3R types 1/21
Accessories (optional) 1/22
Ordering information 1/22
Maintenance 1/24
Replacement parts, ordering information 1/24
Installation and maintenance log 1/25
Instruction Bulletin EOH364/5/6JK/RK/S/SS, 1SCC340032M1401 / A | EOH Series 1/1
1
1/2 General safety instructions | Instruction Bulletin EOH364/5/6JK/RK/S/SS, 1SCC340032M1401 / A
General safety instructions
HAZARD OF ELECTRIC SHOCK, EXPLOSION, OR ARC FLASH – Apply appropriate personal protective equipment (PPE) and
follow safe electrical work practices. See NFPA 70E or CSA Z462.
– This equipment must only be installed and serviced by qualified electrical personnel.
– Before performing visual inspections, tests, or maintenance on the equipment, disconnect all sources of electric power. Assume that all circuits are live unless they are completely deenergized, tested, grounded, and tagged. Pay particular attention to the design of the power system. Consider all sources of power, including the possibility of backfeeding.
– Never operate energized switch with door open. – Turn off switch before removing or installing fuses or making
load side connections. – Always use a properly rated voltage sensing device at all line
and load fuse clips to confirm switch is off. – Turn off power supplying switch before doing any other work
on or inside switch. – Do not use renewable link fuses in fused switches.
Failure to follow these instructions will result in death or serious injury.
Read these safety instructions carefully before using this product!
DANGER

1
Instruction Bulletin EOH364/5/6JK/RK/S/SS, 1SCC340032M1401 / A | Receiving, handling and storage 1/3
Receiving, handling and storage
Receiving and handlingUpon receipt, carefully inspect the switch for damage that may have occurred during transit. If damage is evident, or there is visible indication of rough handling, immediately file a damage claim with the transportation company, and notify your local ABB sales office.
Do not remove the shipping package until ready to install the switch.
WARNING
HAZARD OF EQUIPMENT OVERTURNINGWhen moving with a fork lift, do not remove the shipping package until the device is in its final location.
Failure to follow this instruction will result in personal injury or equipment damage.
StorageIf the unit will not be placed into service immediately, store the switch on its original package in a clean, dry location. To prevent condensation, maintain a uniform temperature. Store the unit in a heated building, allowing adequate air circulation and protection from dirt and moisture. Storing the unit outdoors could cause harmful condensation inside the switch enclosure.
1
1/4 Applications | Instruction Bulletin EOH364/5/6JK/RK/S/SS, 1SCC340032M1401 / A
Applications
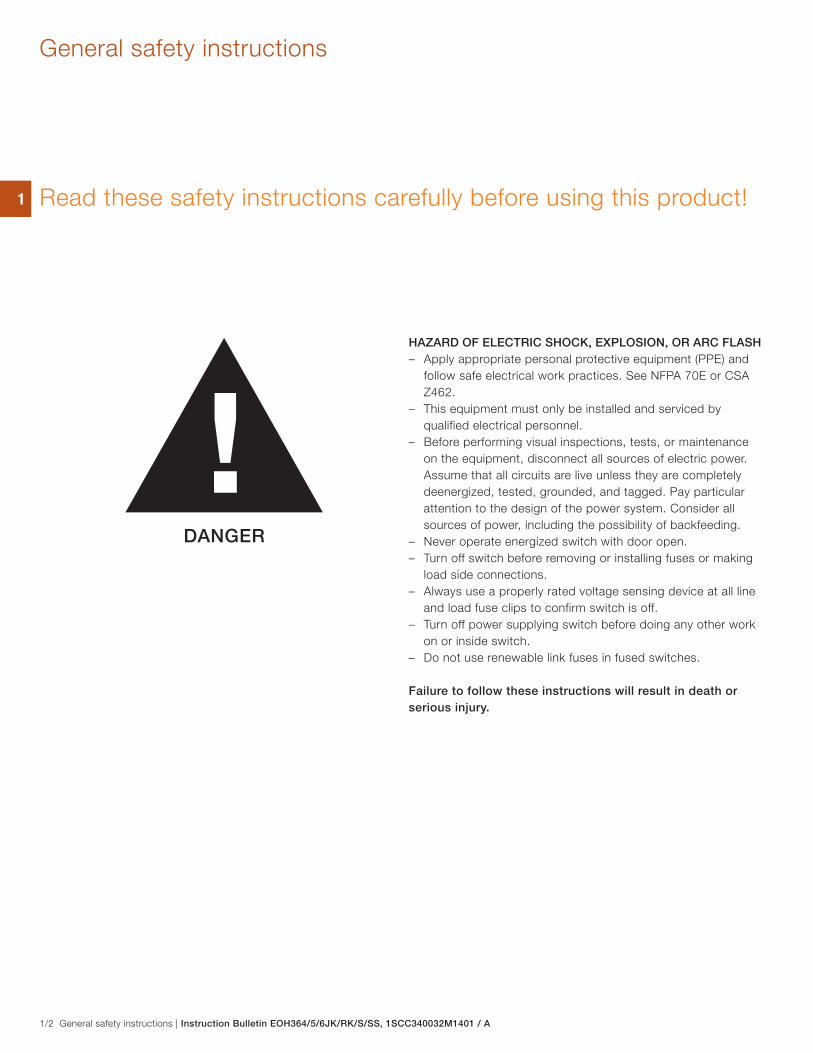
Heavy duty fusible safety switches offer the ability to manually open and close a circuit. Products can be used as disconnecting means or on the load side of a branch circuit protective device and are suitable for use as motor disconnects.
General purpose current ratings: 200 A, 400 A and 600 AStandards: UL98, UL50, UL4248-1, NEMA KS1, CSA
Catalog numbers: TYPE 12: EOH364JK, EOH365JK, EOH366JKTYPE 3R: EOH364RK, EOH365RK, EOH366RKEnclosure material specification: Electrically galvanized steel, polyester powder coating. Thickness: door and enclosure 0.059 in /1.5 mm (EOH364K/5K) and 0.079 in /2 mm (EOH366K). Handle: glass reinforced polyamide (PA f1), polycarbonate (PC f1).Enclosure color: ANSI 61 (light gray).
The EOH series fusible safety switches are side-operated, 3 pole, 600V, available in UL environmental ratings TYPE 12 and TYPE 3R housed in steel sheet enclosures and TYPE 4X housed in stainless steel sheet enclosures.
The EOH364JK/_RK/_S/_SS, EOH365JK/_RK/_S/_SS, EOH366JK/_RK/_S/_SS heavy duty fusible safety switches up to 600 VAC, 3-ph with the ground bus (included) and the neutral link N (optional)
Catalog numbers: TYPE 4X: EOH364S, EOH365S, EOH366SEnclosure material specification: Stainless steel sheet, Grade 304: AISI304. Thickness: door and enclosure 0.059 in /1.5 mm (EOH364K/5K) and 0.079 in /2 mm (EOH366K). Handle: glass reinforced polyamide (PA f1), polycarbonate (PC f1).
Catalog numbers: TYPE 4X: EOH364SS, EOH365SS, EOH366SSEnclosure material specification: Stainless steel sheet, Grade 316: AISI316. Thickness: door and enclosure 0.059 in /1.5 mm (EOH364K/5K) and 0.079 in /2 mm (EOH366K). Handle: glass reinforced polyamide (PA f1), polycarbonate (PC f1).
Controller
Disconnecting means
Short circuit protective device
Overload protection
Motor disconnection
Auxiliary contacts (optional) inside the mechanism
Fuses (to be ordered separately)
Ground bus
Neutral link (optional)

3
316
2
15
146
4
10
811
13
9
7
1
1
12
5
5
1
Instruction Bulletin EOH364/5/6JK/RK/S/SS, 1SCC340032M1401 / A | Product overview 1/5
Product overviewEOH364JK/_RK/_S/_SS, EOH365JK/_RK/_S/_SS, EOH366JK/_RK/_S/_SS
1. Door latches, provision for padlocking2. Handle3. Knockouts in catalog numbers EOH364JK/_RK, EOH365JK/_RK and EOH366JK/_RK (TYPE12 and 3R), blank in catalog numbers EOH364S/_SS, EOH365S/_SS and EOH366S/_SS (TYPE 4X)4. Keyslot mounting hole5. Mounting holes6. 3-pole switch, double breaking contacts with viewing windows7. Line side (switch terminals) terminal lugs8. Fuse base
9. Load side (fuse base terminals) terminal lugs10. Ground bus (2 lugs)11. Operating mechanism, inside place for auxiliary contacts (optional)12. Door interlock mechanism13. Locking hook for door interlock mechanism14. Door interlock bypass shaft (Only qualified personnel should perform this procedure)15. Hole for padlocking the handle (3 padlocks)16. Place for neutral assembly (optional)

1
1/6 Ratings | Instruction Bulletin EOH364/5/6JK/RK/S/SS, 1SCC340032M1401 / A
Heavy duty fusible safety switch EOHU364_ EOHU365_ EOHU366_
AMPS A 200 400 600
General purpose current rating A 200 400 600
Max. horse power rating Three phase 240 V HP 60 125 200
480 V HP 125 250 400
600 V HP 150 350 500
Standard horse power rating Three phase 240 V HP 25 50 75
480 V HP 50 100 150
600 V HP 60 125 200
Max. motor FLA current Three phase 240 V A 164 312 480
480 V A 156 302 477
600 V A 144 336 472
Short circuit rating Class R, J or T fuses 480 V kA 200 200 200
Class R fuses 600 V kA 200 100 200
Class J or T fuses 600 V kA 200 200 200
Maximum fuse size A 200 400 600
Standard fuse clips R, H, K R, H, K R, H, K
Fuse conversion kits (fuse clips), optional J, T J, T J
Ground bus
Ground bus catalog number OZXG1 OZXG2 OZXG2
Temperature rating °F 167 167 167
°C 75 75 75
Auxiliary contacts, optional
Suitable auxiliary contacts Function 1NO OA1G10 OA1G10 OA1G10
1NC OA3G01 OA3G01 OA3G01
Nema ratings, AC AC600 AC600 AC600
AC rated voltage VAC 600 600 600
AC rated thermal current A 10 10 10
AC maximum volt-ampere making VA 7200 7200 7200
AC maximum volt-amperage breaking VA 720 720 720
Nema ratings, DC R300 R300 R300
DC rated voltage VDC 300 300 300
DC rated thermal current A 1 1 1
DC maximum make-break VA 28 28 28
RatingsHeavy duty fusible safety switches

1
Instruction Bulletin EOH364/5/6JK/RK/S/SS, 1SCC340032M1401 / A | Cabling 1/7
CablingHeavy duty fusible safety switches
Cabling / Fusible safety switchesCable entry/exit locations: Top entry-bottom exit. Cable entry/exit through top/bottom endwalls maximize the cable bending area. All cable entry/exit must be in accordance with the National Electrical Code and all other local codes.
See the chapter Wiring. In 200 A switches use Hex key / wrench size 3/8 and in 400 A / 600 A switches use Hex key / wrench size 1/2.
WARNING
To avoid hazard of electric shock, turn off and lock out all power sources before installing or performing maintenance on this equipment.
Heavy duty fusible safety switch EOH364_ EOH365_ EOH366_
AMPS A 200 400 600
Line side (switch terminals) terminal lugs
Terminal lug OZXA-400 OZXA-800E OZXA-800
Torque: wire tightening for Cu and Al cables lbs.in 375 500 500
Nm 41.8 55.7 55.7
Lug mounting torque lbs.in 228 480 480
Nm 25.4 53.5 53.5
Wire range kcmil #2 - 600 (2) #2 - 600 (2) #2 - 600
mm2 35 - 300 2 × 35 - 300 2 × 35 - 300
Load side (fuse base terminals) terminal lugs
Terminal lug OZXA-400 OZXA-800 OZXA-800
Torque: wire tightening for Cu and Al cables lbs.in 375 500 500
Nm 41.8 55.7 55.7
Lug mounting torque lbs.in 228 480 480
Nm 25.4 53.5 53.5
Wire range kcmil #2 - 600 #3 - 900 or 2 × 350 (2) #2 - 600
mm2 35 - 300 25 - 400 or 2 × 185 2 × 35 - 300
Ground bus (2 lugs)
Screwdriver, tool Slot 5/16” Hex 5/16” Hex
Ground bus catalog number OZXG1 OZXG2 OZXG2
Torque: wire tightening for Cu and Al cables lbs.in 50 275 275
Nm 5.6 31.1 31.1
Maximum stud mounting torque lbs.in 72 72 72
Nm 8.1 8.1 8.1
Wire range AWG, kcmil #14 - 2 #6 - 250 kcmil #6 - 250 kcmil
mm2 2.5 - 35 10 - 120 10 - 120

1
1/8 Cabling | Instruction Bulletin EOH364/5/6JK/RK/S/SS, 1SCC340032M1401 / A
CablingNeutral bus and auxiliary contacts
Cabling / Neutral bus (optional)In 200 A switches use Hex key / wrench size 3/8 and in 400A and 600 A switches use 1/2 Hex key / wrench. See chapter Installation / Neutral assembly (optional).
Heavy duty fusible safety switch EOH364_ EOH365_ EOH366_
AMPS A 200 400 600
Suitable neutral bus, catalog number EOHXSN4 EOHXSN56 EOHXSN56
Neutral bus / terminal lugs
Terminal lug OZXA-400 OZXA-800 OZXA-800
Torque: wire tightening for Cu and Al cables lbs.in 375 500 500
Nm 41.8 55.7 55.7
Lug mounting torque lbs.in 228 480 480
Nm 25.4 53.5 53.5
Wire range kcmil #2 - 600 (2) #2 - 600 (2) #2 - 600
mm2 35 - 300 2 × 35 - 300 2 × 35 - 300
Cabling / Auxiliary contacts (optional)Use Pozi-drive #2 or flat blade screwdriver. See chapter Installation / Auxiliary contacts (optional).
Auxiliary contacts, catalog numbers OA1G10 (1NO), OA3G01 (1NC)
NEMA A600, R300
Wire size 1 - 2 × #18 - 14 AWG
1 - 2 × 0.75 - 2.5 mm2
Torque 7 lbs.in
0.78 Nm

3
2A
0740
0-1
1
1
Instruction Bulletin EOH364/5/6JK/RK/S/SS, 1SCC340032M1401 / A | Installation 1/9
Opening of the enclosureOperate switch to the OFF-position and open the door latches according to the picture. Open the enclosure.
InstallationOpening the enclosure
CAUTION
HAZARD OF INJURY OR EQUIPMENT DAMAGEDo not in any circumstances bend or twist the locking hook fixed on the door. Wrong position of the door hook causes the malfunction of the locking mechanism that may result in personal injury or equipment damage.
Failure to follow these instructions can result in injury or equipment damage.
DANGER
HAZARD OF ELECTRIC SHOCK, EXPLOSION, OR ARC FLASHSee general safety instructions on page 1/2 before proceeding.
Failure to follow these instructions will result in death or serious injury.

A07
400-
2
1 2
1
1/10 Installation | Instruction Bulletin EOH364/5/6JK/RK/S/SS, 1SCC340032M1401 / A
InstallationKnockouts
Cable entry/exit, the knockouts for conduit hubsThe concentric knockouts for conduit hubs are provided in the top and bottom of the enclosure EOH364JK/_RK, EOH365JK/_RK and EOH366JK/_RK (TYPE 12 and 3R). Choose the size and amount needed. Install the conduit hubs. In catalog numbers EOH364S/_SS, EOH365S/_SS and EOH366S/_SS (TYPE 4X) the top and bottom of the enclosure are blank for own holes. Check all parts for possible metal shavings. Remove any shavings.
Catalog Cable entry/exit knockouts, top and bottom
number [ø inch] [ø mm]
EOH364JK/RK 3×(ø2.5+ø2.03+ø1.4+ø1.125+
ø0.89+ø0.64)+ø0.25+ø0.8
3×(ø62.5+ø50.8+ø35.2+ø28.2+
ø22.4+ø16.0)+ø6.4+ø20.0
EOH365JK/RK 3×(ø3.68+ø3.06+ø2.5+ø2.03+
ø1.77)+2×(ø0.76+ø0.5)
3×(ø92.0+ø76.5+ø62.5+ø50.8+
ø44.4)+2×(ø19.1+ø12.7)
EOH366JK/RK 4×(ø3.68+ø3.06+ø2.5+ø2.03+
ø1.77)+2×(ø0.76+ø0.5)
4×(ø92.0+ø76.5+ø62.5+ø50.8+
ø44.4)+2×(ø19.1+ø12.7)
CAUTION
The enclosure has to maintain the NEMA classification when installing cable entry/exit. It is not allowed to do any other extra holes except cable entry/exit to the enclosure. No responsibility is assumed by ABB for any consequences arising out of the installing of cable entry/exit or if any other extra holes done to the enclosure.
CAUTION
HAZARD OF INJURY OR EQUIPMENT DAMAGEDo not in any circumstances bend or twist the locking hook fixed on the door. Wrong position of the door hook causes the malfunction of the locking mechanism that may result in personal injury or equipment damage.
Failure to follow these instructions can result in injury or equipment damage.
OR

200 A: 6×400 A, 600 A: 10× A
0740
0-3
12
1
Instruction Bulletin EOH364/5/6JK/RK/S/SS, 1SCC340032M1401 / A | Installation 1/11
Mounting the safety switch on the wall or other supporting structureMount the safety switch using 3/16” screws (for 200 A: 3 pcs, for 400 A /600 A: 5 pcs) and 5/16” screws (for 200 A: 3 pcs, for 400 A /600 A: 5 pcs). Note: Use the keyslot mounting hole to hang the enclosure while securing the other mounting screws. Verify that the load-carrying capacity of mounting wall or supporting structure is sufficient in relation to the weight, size and way of fixing of safety switch and in accordance with local requirements.
Anchorage: – wall-mounted – mount cabinet on flat surface to avoid distortion – use shims if necessary
InstallationMounting
CAUTION
HAZARD OF INJURY OR EQUIPMENT DAMAGEDo not in any circumstances bend or twist the locking hook fixed on the door. Wrong position of the door hook causes the malfunction of the locking mechanism that may result in personal injury or equipment damage.
Failure to follow these instructions can result in injury or equipment damage.

A07
400-
4
G
3 2
L
1
1
1/12 Installation | Instruction Bulletin EOH364/5/6JK/RK/S/SS, 1SCC340032M1401 / A
Installation Wiring
WiringConnect the power wires to the switch and the fuse base terminals and connect the ground wire to the ground terminal block inside the enclosure. Reference the National Electric Code and all local codes for appropriate wire size and grounding requirements. See chapter Cabling. All cables must have 167 °F / 75 °C minimum rating.
Switch terminals are not intended to support the weight of the cables, so installer must provide adequate cable support. To avoid placing a strain on the line and load terminals, bend the cable carefully. Undue strain may cause terminal distortion and adversely affect the performance of the switch.
DANGER
HAZARD OF ELECTRIC SHOCK, EXPLOSION, OR ARC FLASHSee general safety instructions on page 1/2 before proceeding.
Failure to follow these instructions will result in death or serious injury.
Safety switch size [A] Line / load side terminal lugs Ground bus
Wire range [kcmil ; mm2]
200 #2 - 600 ; 35 - 300 #14 - 2 ; 2.5 - 35
400 (2) #2 - 600 ; 2×35 - 300 /
#3 - 900 ; 25 - 400 or
2 × 350 ; 2 × 185 mm2
#6 - 250 ; 10 - 120
600 (2) #2 - 600 ; 2 × 35 - 300 #6 - 250 ; 10 - 120
Wire strip length L [in ; mm2]
200 1.10 - 1.18 ; 28 - 30 0.39 - 0.47 ; 10 - 11.9
400 1.34 - 1.42 ; 34 - 36 0.91 - 0.99 ; 23 - 25
600 1.34 - 1.42 ; 34 - 36 0.91 - 0.99 ; 23 - 25
Wire tightening torque
[lbs.in] [Nm] [lbs.in] [Nm]
200 375 41.8 50 5.6
400 500 55.7 275 31.1
600 500 55.7 275 31.1

A07
400-
12
1
Instruction Bulletin EOH364/5/6JK/RK/S/SS, 1SCC340032M1401 / A | Installation 1/13
Neutral assemblies (EOHXSN4 and EOHXSN56), optionalInstall the neutral link to the bottom plate of the safety switch to the existing threaded holes according to the picture. See chapter Cabling.
Wire range:EOHXSN4: #2 - 600 kcmil / 35 -300 mm2
EOHXSN56: (2) #2 - 600 kcmil / 2 × 35 - 300 mm2
Safety switch size[A]
Suitable neutral busCatalog number
Torque: wire tightening
Copper Aluminum
[lbs.in] [Nm] [lbs.in] [Nm]
200 EOHXSN4 375 41.8 375 41.8
400 EOHXSN56 500 55.7 500 55.7
600 EOHXSN56 500 55.7 500 55.7
DANGER
HAZARD OF ELECTRIC SHOCK, EXPLOSION, OR ARC FLASHSee general safety instructions on page 1/2 before proceeding.
Failure to follow these instructions will result in death or serious injury.
InstallationNeutral assembly (optional)

2
3
1
4
A07
400-
12
1
1/14 Installation | Instruction Bulletin EOH364/5/6JK/RK/S/SS, 1SCC340032M1401 / A
InstallationAuxiliary contact (optional)
Auxiliary contacts OA1G10 and OA3G01 (optional)Install the auxiliary contacts to the safety switch mechanism according to the pictures. In the picture 3 the mounting example is for 200A and 400 A safety switches. In 600 A safety switches, please, leave the mechanism cover off, when the maximum amount of auxiliary contacts (3 or 4 pcs) is used. See chapter Cabling.Wire size: 1 - 2 × 18 - 14 AWG, 1 - 2 × 0.75 - 25 mm2
Torque: 7 lbs.in, 0.78 Nm
DANGER
HAZARD OF ELECTRIC SHOCK, EXPLOSION, OR ARC FLASHSee general safety instructions on page 1/2 before proceeding.
Failure to follow these instructions will result in death or serious injury.
200 A, 400 A 600 A
Main contacts
NO-contact in place A
NO-contact in place B
NC-contact in place B
NC-contact in place A
30 60 90
OFFO
ONI
Place APlace Amax
2max
2 Place B
Main contact
Test contact (NO)
Test indication contact (NO)
Test contact (NC)
Test indication contact (NC)
0 Test01 0
2 Place B
Test contact
Test indication contact
max 2
max 2
max 2
max 2
Test conta
max2
max2
indicaconta
max 2
max 2
A07
400-
8
A07
365
A
B
1
Instruction Bulletin EOH364/5/6JK/RK/S/SS, 1SCC340032M1401 / A | Installation 1/15
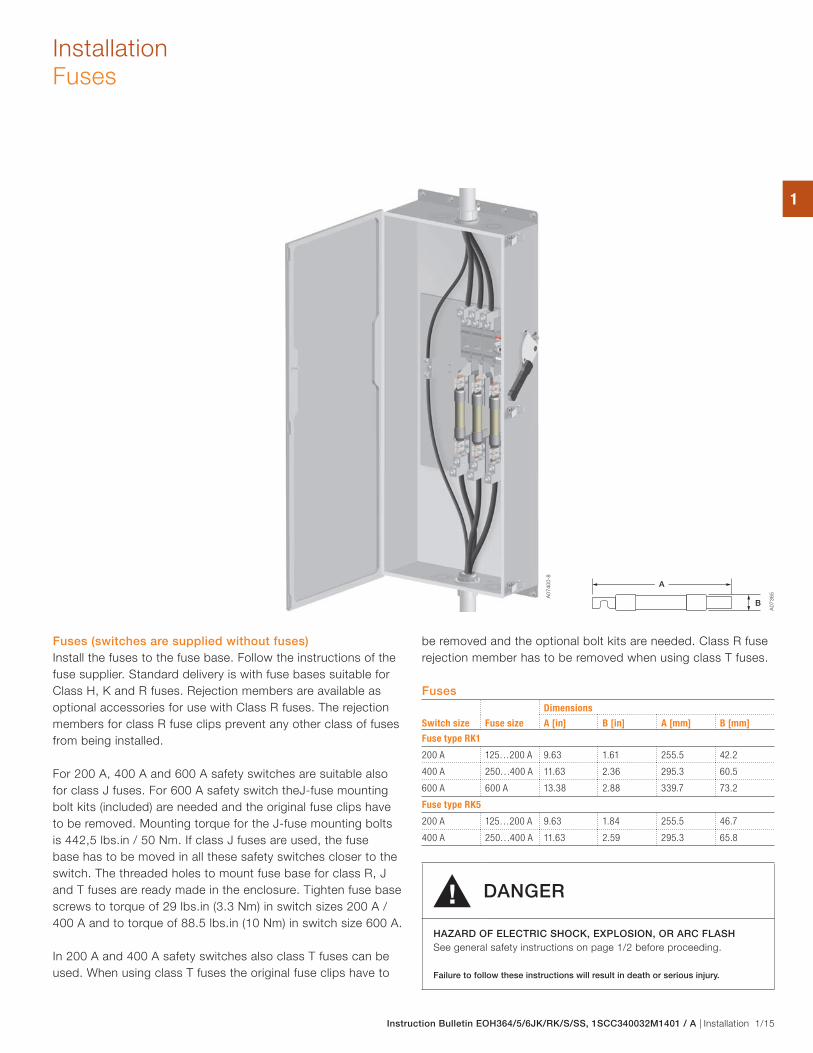
InstallationFuses
Fuses (switches are supplied without fuses)Install the fuses to the fuse base. Follow the instructions of the fuse supplier. Standard delivery is with fuse bases suitable for Class H, K and R fuses. Rejection members are available as optional accessories for use with Class R fuses. The rejection members for class R fuse clips prevent any other class of fuses from being installed.
For 200 A, 400 A and 600 A safety switches are suitable also for class J fuses. For 600 A safety switch theJ-fuse mounting bolt kits (included) are needed and the original fuse clips have to be removed. Mounting torque for the J-fuse mounting bolts is 442,5 lbs.in / 50 Nm. If class J fuses are used, the fuse base has to be moved in all these safety switches closer to the switch. The threaded holes to mount fuse base for class R, J and T fuses are ready made in the enclosure. Tighten fuse base screws to torque of 29 lbs.in (3.3 Nm) in switch sizes 200 A / 400 A and to torque of 88.5 lbs.in (10 Nm) in switch size 600 A.
In 200 A and 400 A safety switches also class T fuses can be used. When using class T fuses the original fuse clips have to
DANGER
HAZARD OF ELECTRIC SHOCK, EXPLOSION, OR ARC FLASHSee general safety instructions on page 1/2 before proceeding.
Failure to follow these instructions will result in death or serious injury.
be removed and the optional bolt kits are needed. Class R fuse rejection member has to be removed when using class T fuses.
FusesDimensions
Switch size Fuse size A [in] B [in] A [mm] B [mm]
Fuse type RK1
200 A 125…200 A 9.63 1.61 255.5 42.2
400 A 250…400 A 11.63 2.36 295.3 60.5
600 A 600 A 13.38 2.88 339.7 73.2
Fuse type RK5
200 A 125…200 A 9.63 1.84 255.5 46.7
400 A 250…400 A 11.63 2.59 295.3 65.8

A07
400-
8
3
2
1
1
1/16 Operation | Instruction Bulletin EOH364/5/6JK/RK/S/SS, 1SCC340032M1401 / A
OperationOperating
Closing the enclosure and operation to the ON-positionClose the enclosure door and the latches according to the picture. Operate switch to the ON-position.
NOTE: The door must be closed and fastened securely with the door latches before the switch is operated.
CAUTION
HAZARD OF INJURY OR EQUIPMENT DAMAGEDo not force the handle to the ON (I) position with the door open. When the door is open, the mechanism interlock prevents the switch blades from closing and the handle from fully rotating.
Failure to follow these instructions can result in injury or equipment damage.
CAUTION
HAZARD OF INJURY OR EQUIPMENT DAMAGEDo not in any circumstances bend or twist the locking hook fixed on the door. Wrong position of the door hook causes the malfunction of the locking mechanism that may result in personal injury or equipment damage.
Failure to follow these instructions can result in injury or equipment damage.

A07
400-
9
A07
400-
13
ON
1
Instruction Bulletin EOH364/5/6JK/RK/S/SS, 1SCC340032M1401 / A | Operation 1/17
Door interlock mechanismA door interlock prevents opening the enclosure door if the switch is in ON-position. It also works in conjunction with the mechanism interlock, which prevents the operation to ON-position if the enclosure door is open.
The door interlock:A. Prevents the enclosure door from opening when the switch is in the ON (I) position unless the interlock bypass screw is rotated clockwise defeating the door interlock, see next page.B. Permits opening the enclosure door with the switch in the OFF (O) position without turning the interlock bypass screw.C. The door will close completely but will not latch with the switch in the OFF (O) position.D. The door will close completely and will be held closed by the door interlock when the switch is in the ON (I) position.E. With the door closed completely, the mechanism interlock will engage the door interlock when the switch is thrown from the OFF (O) to the ON (I) position.
OperationOperating mechanism
DANGER
HAZARD OF ELECTRIC SHOCK, EXPLOSION, OR ARC FLASHSee general safety instructions on page 1//2 before proceeding.
Failure to follow these instructions will result in death or serious injury.

A07
400-
9
3
21
1
1/18 Operation | Instruction Bulletin EOH364/5/6JK/RK/S/SS, 1SCC340032M1401 / A
Defeating the door interlock mechanismThe door of the safety switch cannot be opened when the switch is in the ON-position. This can be defeated to allow authorized personnel access for inspection.
OperationOperating mechanism
DANGER
HAZARD OF ELECTRIC SHOCK, EXPLOSION, OR ARC FLASHBypassing the door interlock will expose the operator to live parts and is not recommended. Only qualifi ed personnel should perform this procedure.
Failure to follow these instructions will result in
death or serious injury.
CAUTION
HAZARD OF INJURY OR EQUIPMENT DAMAGEDo not in any circumstances bend or twist the locking hook fixed on the door. Wrong position of the door hook causes the malfunction of the locking mechanism that may result in personal injury or equipment damage.
Failure to follow these instructions can result in
injury or equipment damage.
DANGER
HAZARD OF ELECTRIC SHOCK, EXPLOSION, OR ARC FLASHSee general safety instructions on page 1/2 before proceeding.
Failure to follow these instructions will result in
death or serious injury.
Note: Only qualifi ed personnel should perform this procedure.

A07
400-
10
Ø 0.20 - 0.39 in / 5 - 10 mm Ø 0.20 - 0.24 in / 5 - 6 mm
1
Instruction Bulletin EOH364/5/6JK/RK/S/SS, 1SCC340032M1401 / A | Operation 1/19
OperationPadlocking handle and door latches
Padlocking handleOperating handle can be padlocked in the OFF-position with up to three padlocks.
Padlocking door latchesDoor latches can be padlocked by one padlock each to prevent unauthorized access to inside of enclosure.

EOH364/5/6JK/RK EOH364/5/6S/SS
M07
038
M07
039
1
1/20 Dimension drawings | Instruction Bulletin EOH364/5/6JK/RK/S/SS, 1SCC340032M1401 / A
Dimension drawingsEOH364JK/_RK/_S/_SS, EOH365JK/_RK/_S/_SS, EOH366JK/_RK/_S/_SS / NEMA 12, 3R, 4X / 200 A, 400 A, 600 A
Size
H W W1 D E
Catalog number [in] [mm] [in] [mm] [in] [mm] [in] [mm] [in] [mm]
EOH364JK, _RK 39.80 1011 17,28 439 18.54 471 7.36 187 9.25 235
EOH365JK, _RK 58.66 1490 22.99 584 24.53 623 8.50 216 10.39 264
EOH366JK, _RK 66.93 1700 22.99 584 24.53 623 8.50 216 11.61 295
Fixing dimensions Fixing hole
A B F O P G N K L M
Catalog number [in] [mm] [in] [mm] [in] [mm] [in] [mm] [in] [mm] [in] [mm] [in] [mm] [in] [mm] [in] [mm] [in] [mm]
EOH364JK, _RK 39.02 991 14.65 372 7.32 186 - - - - 1.18 30 083 21 0.35 9 0.35 9 0.75 19
EOH365JK, _RK 57.48 1460 20.16 512 10.08 256 5.20 132 4.82 122.5 1.00 25.5 1.14 29 0.55 14 0.55 14 0.98 25
EOH366JK, _RK 65.75 1670 20.16 512 10.08 256 5.20 132 4.82 122.5 1.00 25.5 1.14 29 0.55 14 0.55 14 0.98 25

1
Instruction Bulletin EOH364/5/6JK/RK/S/SS, 1SCC340032M1401 / A | Dimension drawings 1/21
For catalog numbers EOH364JK, _RK
For catalog numbers EOH365JK, _RK
For catalog numbers EOH366JK, _RK
Dimension drawingsCable outlets / knockouts for NEMA 12 and 3R types
S00
261A
A07
368
OA_
H_-TB
A07
375
EOHXSN4
A07
376
EOHXSN56
1
1/22 Accessories (optional) | Instruction Bulletin EOH364/5/6JK/RK/S/SS, 1SCC340032M1401 / A
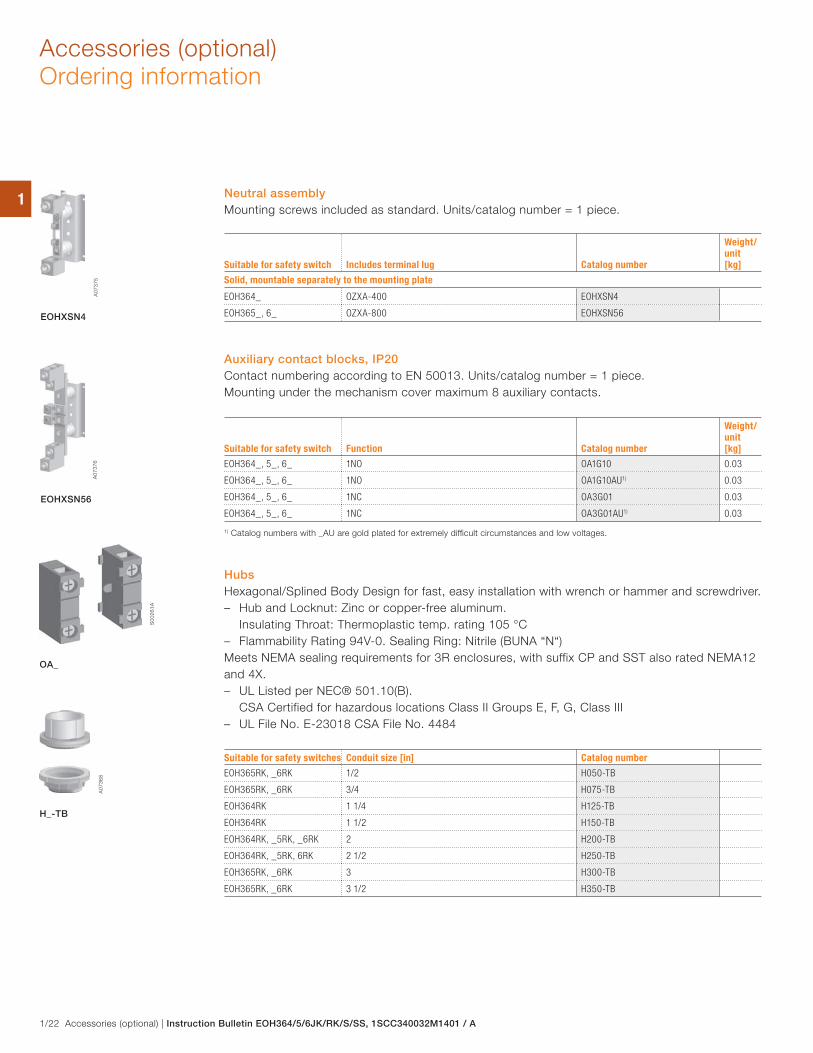
Accessories (optional)Ordering information
Neutral assemblyMounting screws included as standard. Units/catalog number = 1 piece.
Suitable for safety switch Includes terminal lug Catalog number
Weight/unit[kg]
Solid, mountable separately to the mounting plate
EOH364_ OZXA-400 EOHXSN4
EOH365_, 6_ OZXA-800 EOHXSN56
Auxiliary contact blocks, IP20Contact numbering according to EN 50013. Units/catalog number = 1 piece. Mounting under the mechanism cover maximum 8 auxiliary contacts.
Suitable for safety switch Function Catalog number
Weight/unit[kg]
EOH364_, 5_, 6_ 1NO OA1G10 0.03
EOH364_, 5_, 6_ 1NO OA1G10AU1) 0.03
EOH364_, 5_, 6_ 1NC OA3G01 0.03
EOH364_, 5_, 6_ 1NC OA3G01AU1) 0.03
1) Catalog numbers with _AU are gold plated for extremely diffi cult circumstances and low voltages.
HubsHexagonal/Splined Body Design for fast, easy installation with wrench or hammer and screwdriver. – Hub and Locknut: Zinc or copper-free aluminum.
Insulating Throat: Thermoplastic temp. rating 105 °C – Flammability Rating 94V-0. Sealing Ring: Nitrile (BUNA “N“)
Meets NEMA sealing requirements for 3R enclosures, with suffix CP and SST also rated NEMA12 and 4X. – UL Listed per NEC® 501.10(B).
CSA Certified for hazardous locations Class II Groups E, F, G, Class III – UL File No. E-23018 CSA File No. 4484
Suitable for safety switches Conduit size [in] Catalog number
EOH365RK, _6RK 1/2 H050-TB
EOH365RK, _6RK 3/4 H075-TB
EOH364RK 1 1/4 H125-TB
EOH364RK 1 1/2 H150-TB
EOH364RK, _5RK, _6RK 2 H200-TB
EOH364RK, _5RK, 6RK 2 1/2 H250-TB
EOH365RK, _6RK 3 H300-TB
EOH365RK, _6RK 3 1/2 H350-TB

EOHRM34R/5R/6R
EOHFBK4/5
S07
300
A07
400
1
Instruction Bulletin EOH364/5/6JK/RK/S/SS, 1SCC340032M1401 / A | Accessories (optional) 1/23
Accessories (optional)Ordering information
Rejection membersThe rejection members for class R -fuse clips prevent any other class of fuses from being installed. Units / catalog number = 3 pieces.
Suitable for fusible safety switches Suitable for fuse / size Catalog number
EOH364_ RK 200A EOHRM34R
EOH365_ RK 400A EOHRM5R
EOH366_ RK 600A EOHRM6R
Fuse mounting bolt kits for T fusesIncludes mounting bolts, washers and connection bars. Units / catalog number = 6 pieces.
Suitable for fusible safety switches Suitable for fuse / size Screw size Catalog number
EOH364_ T -fuse / 200 A UNC 5/16 - 18 x 5/8“ EOHFBK4
EOH365_ T -fuse / 400 A UNC 3/8 - 16 x 5/8“ EOHFBK5

EOHFDS_/SS_
A07
392
OT400/600U30EOHR
S07
304
OZXA-800_
A07
372-
3
EOHFBR5/6 EOHH2
EOHFD_
A07
370
EOHLM2
A07
380
A07
373
A07
383
EOHFBK6
S07
298
A07
428
OZXA-400_
1
1/24 Maintenance | Instruction Bulletin EOH364/5/6JK/RK/S/SS, 1SCC340032M1401 / A
MaintenanceReplacement parts, ordering information
Switch-disconnects
Suitable for safety switch
General purposecurrent rating [A]
Max. horse power rating [HP] Three phase
Catalog number240 V 480 V 600 V
Includes terminal lugs. Units/catalog number = 1 piece.
EOH364_ 200 60 125 150 OT200U30EOHR
EOH365_ 400 150 250 350 OT400U30EOHR
EOH366_ 600 200 500 500 OT600U30EOHR
Fuse basesSuitable for safety switch Fuse type Catalog number
Mounting screws, terminal lugs and fuse clips included as standard. Units/catalog number = 1 piece.
EOH364_ Class R EOHFBR4
EOH365_ Class R EOHFBR5
EOH366_ Class R EOHFBR6
Other replacement partsSuitable for safety switch Suitable for fuse / size Screw size Catalog number
Handle kit
Handle, shaft, handle shield and mounting screws included as standard. Units/catalog number = 1 piece.
EOH364_, 5_, 6_ EOHH2
Door interlock mechanism
Mounting screws included as standard. Units/catalog number = 1 piece.
EOH364_, 5_, 6_ EOHLM2
Line side lug assembly
Mounting screws included as standard. Units/catalog number = 3 pieces.
EOH364_ OZXA-400/3
EOH365_, 6_ OZXA-800/3
Load side lug assembly
Mounting screws included as standard. Units/catalog number = 3 pieces.
EOH364_ OZXA-400/3
EOH365_ OZXA-800E/3
EOH366_ OZXA-800/3
Fuse mounting bolt kits for J fuses
EOH366_ J -fuse / 600 A UNC 7/16 - 14 × 7/8“ EOHFBK6
Door assembly
Includes a door, ABB logo stripe, labels and hinges with screws as standard. Units/catalog number = 1 piece.
EOH364JK EOHFDJ4
EOH365JK EOHFDJ5
EOH366JK EOHFDJ6
EOH364RK EOHFDR4
EOH365RK EOHFDR5
EOH366RK EOHFDR6
EOH364S EOHFDS4
EOH365S EOHFDS5
EOH366S EOHFDS6
EOH364SS EOHFDSS4
EOH365SS EOHFDSS5
EOH366SS EOHFDSS6

1
Instruction Bulletin EOH364/5/6JK/RK/S/SS, 1SCC340032M1401 / A | Maintenance 1/25
MaintenanceInstallation and maintenance log
Installation and maintenance log All service performed on this device should be recorded in the Installation and Maintenance Log.
Date of installation of the safety switch:
Description of service performed Reason for servicing Special observations of device Date of serviceName of person performing service
MaintenanceThe switch is properly lubricated at the factory. No lubrication is required. However, careful cleaning is required after wire connections and mounting of additional accessories, fuses and replacement parts. The cleaning and checking of wire connections are recommended to be performed once a year.
DANGER
HAZARD OF ELECTRIC SHOCK, EXPLOSION, OR ARC FLASHSee general safety instructions on page 1//2 before proceeding.
Failure to follow these instructions will result in death or serious injury.

2

2
Series EOHInterruptores fusibles de seguridad de servicio pesado
Instrucciones de seguridad 2/2
Recibo, manejo y almacenamiento 2/3
Aplicaciones 2/4
Visión general del producto 2/5
EOH364JK/_RK/_S/_SS, EOH365JK/_RK/_S/_SS,
EOH366JK/_RK/_S/_SS 2/5
Datos nominales 2/6
Interruptores fusibles de seguridad de servicio pesado 2/6
Cableado 2/7
Interruptores fusibles de seguridad de servicio pesado 2/7
Barra del neutro 2/8
Instalación 2/9
Apertura del gabinete 2/9
Aberturas tipo knockout 2/10
Montaje 2/11
Conexión de cableado 2/12
Ensamble de la terminal de neutro (opcional) 2/13
Contactos auxiliaries (opcional) 2/14
Fusibles 2/15
Operación 2/16
Operación del interruptor 2/16
Mecanismo de operación 2/17
Enclavamiento de la palanca y cerradura 2/19
Dimensiones generales 2/20
EOH364JK/_RK/_S/_SS, EOH365JK/_RK/_S/_SS,
EOH366JK/_RK/_S/_SS / NEMA 12, 3R, 4X / 200 A, 400 A, 600 A 2/20
Salidas de cable / abertura tipo knockout NEMA 12 y 3R 2/21
Accesorios (opcional) 2/22
Información de pedido 2/22
Mantenimiento 2/24
Piezas de repuesto, información de pedido 2/24
Registro de Instalación y Mantenimiento 2/25
Boletín de instrucciones EOH364/5/6JK/RK/S/SS, 1SCC340032M1401 / A | Series EOH 2/1
2
2/2 Instrucciones de seguridad | Boletín de instrucciones EOH364/5/6JK/RK/S/SS, 1SCC340032M1401 / A
PELIGRO
Instrucciones de seguridad
PELIGRO DE DESCARGA ELÉCTRICA, EXPLOSIÓN O DESTELLO POR ARQUEO – Utilice equipo de protección personal (EPP) apropiado y
siga las prácticas de seguridad eléctrica establecidas por su compañía. Consulte la norma 70E de NFPA o CSA Z462.
– Solamente el personal eléctrico especializado deberá instalar y prestar servicio de mantenimiento a este equipo.
– Desenergice el equipo antes de realizar inspecciones, pruebas o dar mantenimiento. Siempre asuma que todos los circuitos están energizados a menos de que hayan sido desenergizados, probados, aterrizados y marcados. Tome en cuenta todas las fuentes de energía, e incluso la posibilidad de retroalimentación.
– Nunca haga funcionar el interruptor energizado con la puerta abierta.
– Desconecte el interruptor antes de retirar o instalar los fusibles o realizar las conexiones del lado de carga.
– Siempre utilice un dispositivo detector de tensión nominal adecuado en todos los clips para fusibles en los lados de línea y carga para confirmar la desenergización del interruptor.
– Desenergice el interruptor antes de realizar cualquier otro trabajo dentro o fuera de él.
– No use fusibles renovables en los interruptores fusibles.
El incumplimiento de estas instrucciones podrá causar la muerte o lesiones serias.
Lea con detenimiento estas instrucciones antes de utilizar este producto

2
Boletín de instrucciones EOH364/5/6JK/RK/S/SS, 1SCC340032M1401 / A | Recibo, manejo y almacenamiento 2/3
Recibo, manejo y almacenamiento
Recibo y manejoAl recibir el interruptor, realice cuidadosamente una inspección visual para ver si encuentra daños que pudiesen haber ocurrido durante el transporte. Si los daños son evidentes, o existe indicación visible de manejo inapropiado, de inmediato presente una reclamación ante la compañía de transporte y notifique a la oficina local de ventas de ABB.
No retire estas cintas sino hasta que esté listo para instalarlo.
ADVERTENCIA
PELIGRO DE QUE SE VOLTEE EL EQUIPOAl mover el equipo con un montacargas, no retire las cintas de transporte ni la cinta de acero sino hasta que el equipo esté en su ubicación final.
El incumplimiento de esta instrucción puede causar lesiones personales o daño al equipo.
AlmacenamientoSi la unidad no va a ser puesta en servicio de inmediato, almacénela con la plataforma para manejo de mercancías original, en un lugar limpio y seco. Para evitar condensación, mantenga la temperatura uniforme. Almacene la unidad en un edificio con calefacción y circulación de aire adecuada, y protéjala de la suciedad y humedad. Si se almacena en el exterior podría formarse condensación peligrosa dentro del gabinete del interruptor.
2
2/4 Aplicaciones | Boletín de instrucciones EOH364/5/6JK/RK/S/SS, 1SCC340032M1401 / A
Aplicaciones
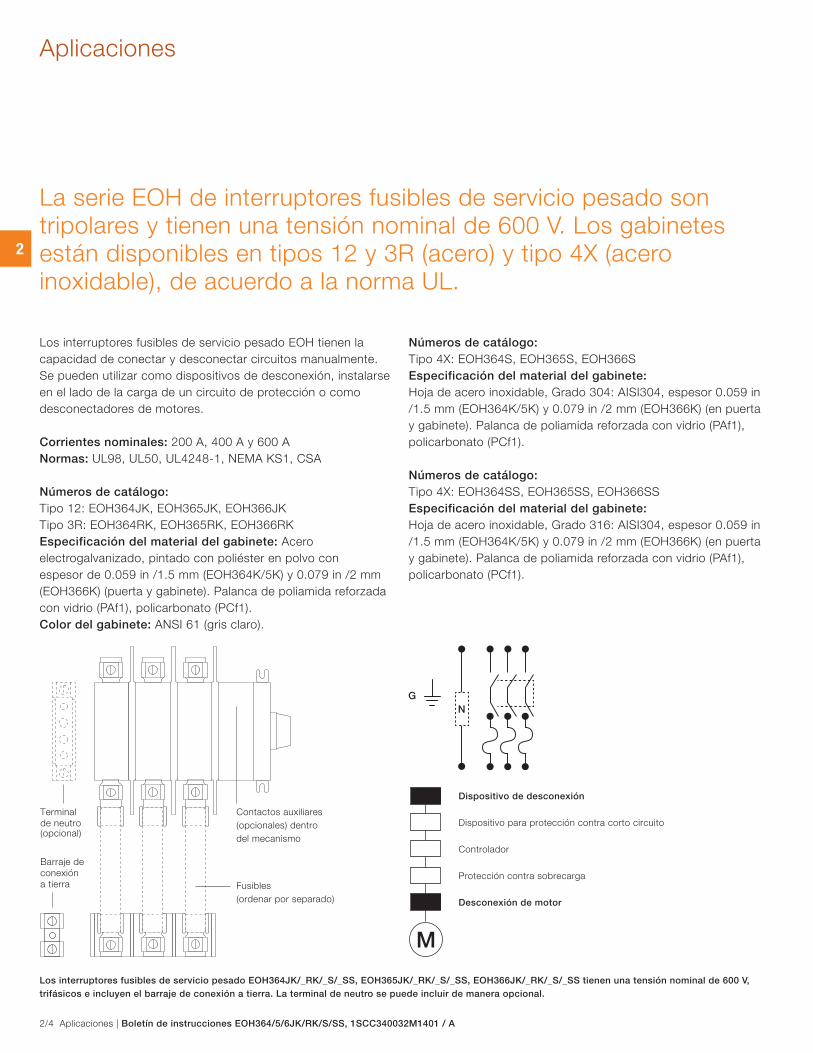
Los interruptores fusibles de servicio pesado EOH tienen la capacidad de conectar y desconectar circuitos manualmente. Se pueden utilizar como dispositivos de desconexión, instalarse en el lado de la carga de un circuito de protección o como desconectadores de motores.
Corrientes nominales: 200 A, 400 A y 600 ANormas: UL98, UL50, UL4248-1, NEMA KS1, CSA
Números de catálogo: Tipo 12: EOH364JK, EOH365JK, EOH366JKTipo 3R: EOH364RK, EOH365RK, EOH366RKEspecificación del material del gabinete: Acero electrogalvanizado, pintado con poliéster en polvo con espesor de 0.059 in /1.5 mm (EOH364K/5K) y 0.079 in /2 mm (EOH366K) (puerta y gabinete). Palanca de poliamida reforzada con vidrio (PAf1), policarbonato (PCf1).Color del gabinete: ANSI 61 (gris claro).
La serie EOH de interruptores fusibles de servicio pesado son tripolares y tienen una tensión nominal de 600 V. Los gabinetes están disponibles en tipos 12 y 3R (acero) y tipo 4X (acero inoxidable), de acuerdo a la norma UL.
Los interruptores fusibles de servicio pesado EOH364JK/_RK/_S/_SS, EOH365JK/_RK/_S/_SS, EOH366JK/_RK/_S/_SS tienen una tensión nominal de 600 V, trifásicos e incluyen el barraje de conexión a tierra. La terminal de neutro se puede incluir de manera opcional.
Números de catálogo: Tipo 4X: EOH364S, EOH365S, EOH366SEspecificación del material del gabinete: Hoja de acero inoxidable, Grado 304: AISI304, espesor 0.059 in /1.5 mm (EOH364K/5K) y 0.079 in /2 mm (EOH366K) (en puerta y gabinete). Palanca de poliamida reforzada con vidrio (PAf1), policarbonato (PCf1).
Números de catálogo: Tipo 4X: EOH364SS, EOH365SS, EOH366SSEspecificación del material del gabinete: Hoja de acero inoxidable, Grado 316: AISI304, espesor 0.059 in /1.5 mm (EOH364K/5K) y 0.079 in /2 mm (EOH366K) (en puerta y gabinete). Palanca de poliamida reforzada con vidrio (PAf1), policarbonato (PCf1).
Controlador
Dispositivo de desconexión
Dispositivo para protección contra corto circuito
Protección contra sobrecarga
Desconexión de motor
Contactos auxiliares(opcionales) dentrodel mecanismo
Fusibles (ordenar por separado)
Barraje de conexión a tierra
Terminal de neutro(opcional)

3
316
2
15
146
4
10
811
13
9
7
1
1
12
5
5
2
Boletín de instrucciones EOH364/5/6JK/RK/S/SS, 1SCC340032M1401 / A | Visión general del producto 2/5
Visión general del productoEOH364JK/_RK/_S/_SS, EOH365JK/_RK/_S/_SS, EOH366JK/_RK/_S/_SS
1. Cerradura de la puerta 2. Palanca3. Abertura para cable tipo knockout en números de catálogo EOH364JK/_RK, EOH365JK/_RK y EOH366JK/_RK (tipos 12 y 3R), sin pre-agujeros (superficie lisa) en números de catálogo EOH364S/_SS, EOH365S/_SS y EOH366S/_SS (Tipo 4X))4. Agujero bocallave para montaje de interruptor5. Agujeros para montaje del interruptor6. Interruptor tripolar, contacto de doble cuchilla7. Zapatas para terminales de entrada (interruptor)8. Portafusible
9. Zapatas para terminales de salida (portafusibles)10. Barraje de conexión a tierra (2 zapatas)11. Mecanismo de operación, espacio interior para montaje de contactos auxiliaries (opcional)12. Mecanismo para bloqueo de puerta13. Gancho para bloquear el mecanismo de bloqueo de puerta14. Tornillo desactivador del mecanismo de bloqueo de puerta (Atención: solamente el personal autorizado debe de llevar acabo este procedimiento)15. Agujero para enclavamiento16. Espacio para terminal de neutro (opcional

2
2/6 Datos nominales | Boletín de instrucciones EOH364/5/6JK/RK/S/SS, 1SCC340032M1401 / A
Datos nominalesInterruptores fusibles de seguridad de servicio pesado
Tipo de interruptor fusible de seguridad EOHU364_ EOHU365_ EOHU366_
AMPS A 200 400 600
Corriente nominal A 200 400 600
Potencia maxima (HP) Trifásica 240 V HP 60 125 200
480 V HP 125 250 400
600 V HP 150 350 500
Potencia estándar (HP) Trifásica 240 V HP 25 50 75
480 V HP 50 100 150
600 V HP 60 125 200
Máxima corriente FLA del motor Trifásica 240 V A 164 312 480
480 V A 156 302 477
600 V A 144 336 472
Especifi cación de corto circuito Fusibles clase R, J o T 480 V kA 200 200 200
Fusibles clase R 600 V kA 200 100 200
Fusibles clase J o T 600 V kA 200 200 200
Máximo tamaño de fusible A 200 400 600
Clips estándar para fusibles R, H, K R, H, K R, H, K
Kits de conversion (clip para fusible), opcional J, T J, T J
Terminales a tierra
Tipo de barraje de conexión a tierra OZXG1 OZXG2 OZXG2
Especifi cación de temperatura °F 167 167 167
°C 75 75 75
Contactos auxiliares, opcional
Contactos auxiliares apropiados Función Function 1NO OA1G10 OA1G10 OA1G10
1NC OA3G01 OA3G01 OA3G01
Datos nominales NEMA, CC AC600 AC600 AC600
Tensión nominal, VCC VCC 600 600 600
Corriente térmica nominal, A A 10 10 10
Máxima potencia nominal de cierre, VA CC VA 7200 7200 7200
Máxima potencia nominal de corte, VA CC VA 720 720 720
Datos nominales NEMA, CD R300 R300 R300
Tensión nominal, VCD VCD 300 300 300
Corriente térmica nominal, A A 1 1 1
Máxima potencia nominal de cierre-corte, VA VA 28 28 28

2
Boletín de instrucciones EOH364/5/6JK/RK/S/SS, 1SCC340032M1401 / A | Cableado 2/7
CableadoInterruptores fusibles de seguridad de servicio pesado
ADVERTENCIA
Para evitar daños por descarga eléctrica, desenergice y desconecte el interruptor antes de llevar a cabo la instalación o mantenimiento.
Cableado / Interruptores fusibles de seguridad de servicio pesadoUbicación de cables de entrada/salida: Entrada en la parte superior y salida en la parte inferior, lo cual maximiza el área de cableado. Las entradas y salidas de cables deben de seguir la norma NEC (National Electrical Code) y todas las normas o códigos locales.
Vea la figura en el capítulo Instalación - Conexión de cableado. Utilice una llave Allen 3/8 (200 A) y 1/2 (400 A y 600 A).
Tipo de interruptor fusible de seguridad EOH364_ EOH365_ EOH366_
AMPS A 200 400 600
Zapata de entrada (terminal del interruptor)
Zapata OZXA-400 OZXA-800E OZXA-800
Par de apriete de cable, Cu y Al (Calibre) lbs.in 375 500 500
Nm 41.8 55.7 55.7
Par de apriete para montaje de zapata lbs.in 228 480 480
Nm 25.4 53.5 53.5
Rango de calibres kcmil #2 - 600 (2) #2 - 600 (2) #2 - 600
mm2 35 - 300 2 × 35 - 300 2 × 35 - 300
Zapatas de salida (terminal del portafusible)
Zapata OZXA-400 OZXA-800 OZXA-800
Par de apriete de cable, Cu y Al (Calibre) lbs.in 375 500 500
Nm 41.8 55.7 55.7
Par de apriete para montaje de zapata lbs.in 228 480 480
Nm 25.4 53.5 53.5
Rango de calibres kcmil #2 - 600 #3 - 900 or 2 × 350 (2) #2 - 600
mm2 35 - 300 25 - 400 or 2 × 185 2 × 35 - 300
Barraje de conexión a tierra (2 zapatas)
Desatornillador Punta plana 5/16” Hex 5/16” Hex
Tipo de Barraje de conexión a tierra OZXG1 OZXG2 OZXG2
Par de apriete de cable, Cu y Al (Calibre) lbs.in 50 275 275
Nm 5.6 31.1 31.1
Máximo par de apriete del perno lbs.in 72 72 72
Nm 8.1 8.1 8.1
Rango de calibres AWG, kcmil #14 - 2 #6 - 250 kcmil #6 - 250 kcmil
mm2 2.5 - 35 10 - 120 10 - 120

2
2/8 Cableado | Boletín de instrucciones EOH364/5/6JK/RK/S/SS, 1SCC340032M1401 / A
Cabledo/Barra del neutroPara interruptores de 200 A, utilice una llave hexagonal 3/8. Para interruptores de 400 y 600 A, utilice una llave hexagonal 1/2. Vea la figura en el capítulo Instalación - Ensamble de la terminal de neutro (opcional).
Interruptor fusible de seguridad - Número de catálogo EOH364_ EOH365_ EOH366_
AMPS A 200 400 600
Tipo de barra del neutro EOHXSN4 EOHXSN56 EOHXSN56
Barra del neutro/zapatas
Zapata OZXA-400 OZXA-800 OZXA-800
Par de apriete de cable, Cu y Al (Calibre) lbs.in 375 500 500
Nm 41.8 55.7 55.7
Par de apriete para montaje de zapata lbs.in 228 480 480
Nm 25.4 53.5 53.5
Rango de calibres kcmil #2 - 600 (2) #2 - 600 (2) #2 - 600
mm2 35 - 300 2 × 35 - 300 2 × 35 - 300
CableadoBarra del neutro
Cableado/contactos auxiliaries (opcional)Utilice un destornillador tipo Pozidrive #2 o de punta plana. Vea la figura en el capítulo Instalación - Contactos auxiliares (opcional).
Contactos auxiliaries, tipos OA1G10 (1NO), OA3G01 (1NC)
NEMA A600, R300
Calibre 1 - 2 × #18 - 14 AWG
1 - 2 × 0.75 - 2.5 mm2
Par de apriete 7 lbs.in
0.78 Nm

3
2A
0740
0-1
1
2
Boletín de instrucciones EOH364/5/6JK/RK/S/SS, 1SCC340032M1401 / A | Instalación 2/9
Apertura del gabinete Desenergice el interruptor (posición OFF) y abra la cerradura de la puerta de acuerdo a la imagen. Abra el gabinete.
InstalaciónApertura del gabinete
PRECAUCIÓN
PELIGRO DE LESIONES O DAÑO AL EQUIPONo doble o tuerza el gancho para bloquear el mecanismo, bajo ninguna circunstancia. El gancho en posición incorrecta puede causar lesiones serias o daños al equipo.
El incumplimiento de estas instrucciones podrá causar la muerte o daños en el equipo
PELIGRO
PELIGRO DE DESCARGA ELÉCTRICA, EXPLOSIÓN O DESTELLO POR ARQUEOLea detenidamente las instrucciones en la página 2/2 antes de continuar.
El incumplimiento de estas instrucciones puede causar muerte o lesiones serias.

A07
400-
2
1 2
2
2/10 Instalación | Boletín de instrucciones EOH364/5/6JK/RK/S/SS, 1SCC340032M1401 / A
InstalaciónAberturas tipo knockout
Entrada/salida de cables, aberturas tipo knockout para conectores de tubos conduitLas aberturas concéntricas tipo knockout para los para los conectores de tubos conduit están localizadas en las superficies superior e inferior de los gabinetes EOH364JK/_RK, EOH365JK/_RK y EOH366JK/_RK (Tipos 12 y 3R). Los gabinetes EOH364S/_SS, EOH365S/_SS y EOH366S/_SS (Tipo 4X) no cuentan con pre-agujeros. La superficie es lisa, con el fin de que el instalador haga los agujeros necesarios. Asegúrese de que las piezas estén libres de viruta u otros residuos de metal.
Entrada/salida de cable, knockouts/ superior e inferior
Tipo [ø in] [ø mm]
EOH364JK/RK 3×(ø2.5+ø2.03+ø1.4+ø1.125+
ø0.89+ø0.64)+ø0.25+ø0.8
3×(ø62.5+ø50.8+ø35.2+ø28.2+
ø22.4+ø16.0)+ø6.4+ø20.0
EOH365JK/RK 3×(ø3.68+ø3.06+ø2.5+ø2.03+
ø1.77)+2×(ø0.76+ø0.5)
3×(ø92.0+ø76.5+ø62.5+ø50.8+
ø44.4)+2×(ø19.1+ø12.7)
EOH366JK/RK 4×(ø3.68+ø3.06+ø2.5+ø2.03+
ø1.77)+2×(ø0.76+ø0.5)
4×(ø92.0+ø76.5+ø62.5+ø50.8+
ø44.4)+2×(ø19.1+ø12.7)
PRECAUCIÓN
La clasificación NEMA del gabinete debe de permanecer aún despuésde instalar los cables y conectores. No está permitido hacer otrosagujeros que no sean la entrada o salida de cable del gabinete. ABB nose responsabiliza por consecuencias de la instalación de los cables yconectores o si se hacen agujeros adicionales al gabinete
PRECAUCIÓN
PELIGRO DE LESIONES O DAÑO AL EQUIPONo doble o tuerza el gancho para bloquear el mecanismo, bajo ningunacircunstancia. El gancho en posición incorrecta puede causar lesionesserias o daños al equipo.
El incumplimiento de estas instrucciones podrá causar la muerte o
daños en el equipo.
O
200 A: 6×400 A, 600 A: 10× A
0740
0-3
12
2
Boletín de instrucciones EOH364/5/6JK/RK/S/SS, 1SCC340032M1401 / A | Instalación 2/11
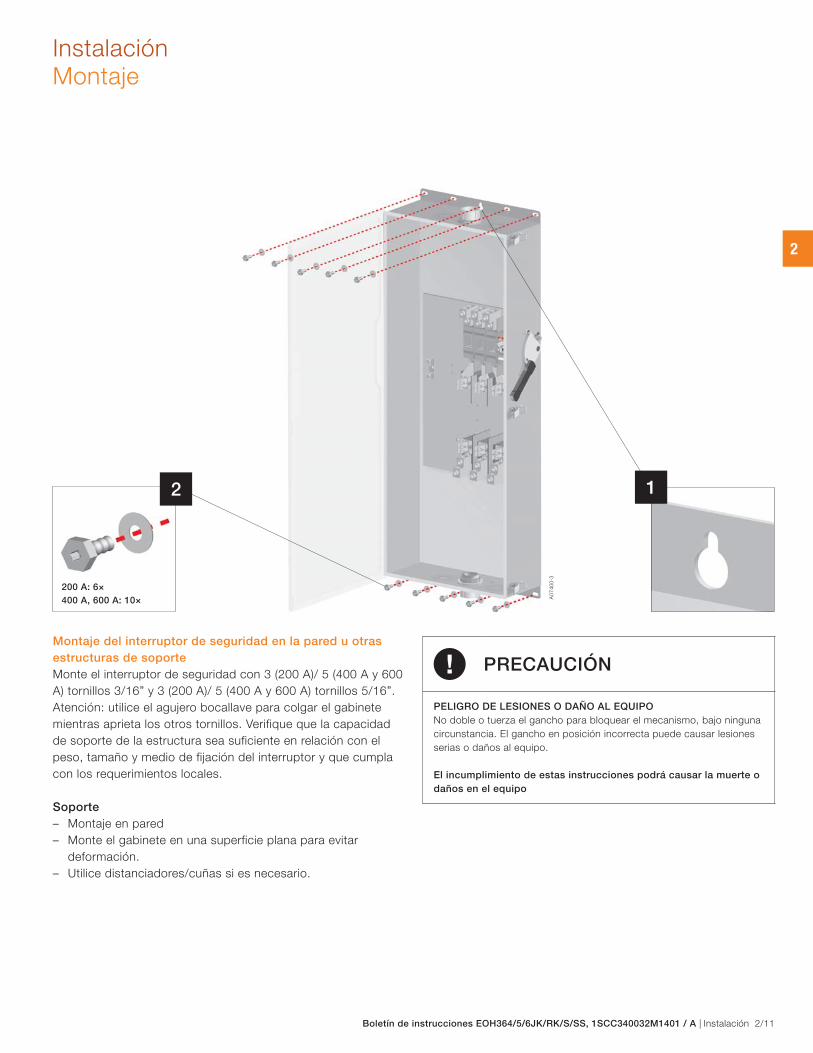
Montaje del interruptor de seguridad en la pared u otras estructuras de soporteMonte el interruptor de seguridad con 3 (200 A)/ 5 (400 A y 600 A) tornillos 3/16” y 3 (200 A)/ 5 (400 A y 600 A) tornillos 5/16”. Atención: utilice el agujero bocallave para colgar el gabinete mientras aprieta los otros tornillos. Verifique que la capacidad de soporte de la estructura sea suficiente en relación con el peso, tamaño y medio de fijación del interruptor y que cumpla con los requerimientos locales.
Soporte – Montaje en pared – Monte el gabinete en una superficie plana para evitar
deformación. – Utilice distanciadores/cuñas si es necesario.
InstalaciónMontaje
PRECAUCIÓN
PELIGRO DE LESIONES O DAÑO AL EQUIPONo doble o tuerza el gancho para bloquear el mecanismo, bajo ningunacircunstancia. El gancho en posición incorrecta puede causar lesionesserias o daños al equipo.
El incumplimiento de estas instrucciones podrá causar la muerte o daños en el equipo

A07
400-
4
G
3 2
L
1
2
2/12 Instalación | Boletín de instrucciones EOH364/5/6JK/RK/S/SS, 1SCC340032M1401 / A
InstalaciónConexión de cableado
PELIGRO
PELIGRO DE DESCARGA ELÉCTRICA, EXPLOSIÓN O DESTELLO POR ARQUEOLea detenidamente las instrucciones en la página 2/2 antes de continuar.
El incumplimiento de estas instrucciones puede causar muerte o lesiones serias.
Conexión de cableadoConecte los cables a las terminales del interruptor y de losportafusibles. Conecte el cable a tierra al bloque de conexiónlocalizado dentro del gabinete. Siga los requerimientos sobretamaño de cable y conexión a tierra establecidos en la normaNEC (National Electric Code) y en todas las normas o códigoslocales. Vea el capítulo Cableado. La temperatura nominal de todos los cables tiene que ser de 167 °F / 75 °C.
Las terminales del interruptor no están diseñadas para soportar el peso de los cables, por lo que el instalador debe de proveer
Tamaño de interruptor
Zapatas de entrada/ en lado de la carga Terminales de conexión a tierra
Rango de calibres [kcmil ; mm2]
200 #2 - 600 ; 35 - 300 #14 - 2 ; 2.5 - 35
400 (2) #2 - 600 ; 2×35 - 300 /
#3 - 900 ; 25 - 400 or
2 × 350 ; 2 × 185 mm2
#6 - 250 ; 10 - 120
600 (2) #2 - 600 ; 2 × 35 - 300 #6 - 250 ; 10 - 120
Longitud L [in ; mm2]
200 1.10 - 1.18 ; 28 - 30 0.39 - 0.47 ; 10 - 11.9
400 1.34 - 1.42 ; 34 - 36 0.91 - 0.99 ; 23 - 25
600 1.34 - 1.42 ; 34 - 36 0.91 - 0.99 ; 23 - 25
Par de apriete
[lbs.in] [Nm] [lbs.in] [Nm]
200 375 41.8 50 5.6
400 500 55.7 275 31.1
600 500 55.7 275 31.1
el soporte adecuado. Doble el cable cuidadosamente para evitar deformación en las terminales. Deformación en las terminales tiene un impacto negativo en el funcionamiento del interruptor.

A07
400-
12
2
Boletín de instrucciones EOH364/5/6JK/RK/S/SS, 1SCC340032M1401 / A | Instalación 2/13
PELIGRO
PELIGRO DE DESCARGA ELÉCTRICA, EXPLOSIÓN O DESTELLO POR ARQUEOLea detenidamente las instrucciones en la página 2/2 antes de continuar.
El incumplimiento de estas instrucciones puede causar muerte o lesiones serias.
InstalaciónEnsamble de la terminal de neutro (opcional)
Ensamble de la terminal de neutro EOHXSN4 yEOHXSN56 (opcional)Instale la terminal de neutro de acuerdo a los agujeros roscadosexistentes en la placa de montaje. Vea el capítulo Cableado.
Rango de calibres:EOHXSN4: #2 - 600 kcmil / 35 -300 mm2
EOHXSN56: (2) #2 - 600 kcmil / 2×35 - 300 mm2
Tamaño de interruptor [A]
Barra de neutro apropiada, número de catálogo
Par de apriete (cable)
Cobre Aluminio
[lbs.in] [Nm] [lbs.in] [Nm]
200 EOHXSN4 375 41.8 375 41.8
400 EOHXSN56 500 55.7 500 55.7
600 EOHXSN56 500 55.7 500 55.7

2
3
1
4
A07
400-
12
2
2/14 Instalación | Boletín de instrucciones EOH364/5/6JK/RK/S/SS, 1SCC340032M1401 / A
InstalaciónContactos auxiliaries (opcional)
PELIGRO
PELIGRO DE DESCARGA ELÉCTRICA, EXPLOSIÓN O DESTELLO POR ARQUEOLea detenidamente las instrucciones en la página 2/2 antes de continuar.
El incumplimiento de estas instrucciones puede causar muerte o lesiones serias.
Contactos auxiliaries OA1G10 y OA3G01 (opcional)Instale los contactos auxiliaries dentro del mecanismo delinterruptor de acuerdo a la imagen. Vea el capítulo Cableado.La imagen 3 muestra un ejemplo de como montar contactos auxiliares en interruptores de 200 A y 400 A. En el caso de los interruptores de 600 A y la cantidad máxima de contactos sea montada, no vuelva a montar la cubierta del mecanismo.Calibre de cable: 1 - 2 × 18 - 14 AWG, 1 - 2 × 0.75 - 25 mm2
Par de apriete: 7 lbs.in, 0.78 Nm
200 A, 400 A 600 A
Contactos principales
Contacto NA - en la posición A
Contacto NA - en la posición B
Contacto NC - en la posición B
Contacto NC - en la posición A
30 60 90
OFFO
ONI
máx.2
máx.2 Posición B
Contacto principal
Contacto de test (NA)
Contacto de indicación de test (NA)
Contacto de test (NC)
Contacto de indicación de test (NC)
0 Test01 0
2 Posición B
Contacto de test
Contacto de indicación de test
máx. 2
máx. 2
max 2
max 2
Contade tes
máx. 2
máx. 2
Contade indde tes
max2
max 2
Posición A

A07
400-
8
A07
365
A
B
2
Boletín de instrucciones EOH364/5/6JK/RK/S/SS, 1SCC340032M1401 / A | Instalación 2/15
InstalaciónFusibles
PELIGRO
PELIGRO DE DESCARGA ELÉCTRICA, EXPLOSIÓN O DESTELLO POR ARQUEOLea detenidamente las instrucciones en la página 2/2 antes de continuar.
El incumplimiento de estas instrucciones puede causar muerte o lesiones serias.
FusiblesTamaño de interruptor
Tamaño de fusible
Dimensiones
A [in] B [in] A [mm] B [mm]
Fusible tipo RK1
200 A 125…200 A 9.63 1.61 255.5 42.2
400 A 250…400 A 11.63 2.36 295.3 60.5
600 A 600 A 13.38 2.88 339.7 73.2
Fusible tipo RK5
200 A 125…200 A 9.63 1.84 255.5 46.7
400 A 250…400 A 11.63 2.59 295.3 65.8
Fusibles (ordenar por separado)Instale los fusibles en el portafusible. Siga las instrucccionesdel fabricante de fusibles. La entrega incluye portafusibles para clase H, K y R como estándar. Si se utilizan fusibles de tipo R, es necesario instalar barreras de rechazo, las cuáles se ordenan por separado. Las barreras de rechazo previenen que fusibles de otra clase sean instalados.
En el caso de los interruptores de seguridad de 200 A, 400 A y 600 A, los fusibles de clase J también son apropiados. Para los interruptores de 600 A, es necesario utilizar el kit de tornillos para montaje de fusible tipo J (incluido) y los clips para fusible tienen que ser removidos. El par de apriete para los tornillos de los fusibles de clase J es 442.5 lb.in/50 Nm. El gabinete incluye agujeros roscados para montar portafusibles para clases R, J y T. Si se instalan fusibles de clase J, el portafusible se tiene que montar en una posición más cercana al interruptor. Fusibles de clase T pueden ser utilizados en interruptores de 200 A y 400 A. En éste caso, es necesario utilizar el kit de tornillos para montaje de fusible y los clips para fusible tienen que ser removidos. Las barreras de rechazo tienen que ser removidas para poder montar fusibles de clase J.

A07
400-
8
3
2
12
2/16 Operación | Boletín de instrucciones EOH364/5/6JK/RK/S/SS, 1SCC340032M1401 / A
OperaciónOperación del interruptor
Cerradura del gabinete y operación hacia la posición ONCierre la puerta del gabinete y las cerraduras de acuerdo a la imagen. Opere el interruptor hacia la posición ON.
ATENCIÓN: La puerta debe de cerrarse firmemente con la cerradura antes de operar el interruptor
PRECAUCIÓN
PELIGRO DE LESIONES O DAÑO AL EQUIPONo fuerce la palanca en la posición de cerrado (ON) con la puerta abierta. Cuando está abierta la puerta, el bloqueo del mecanismo evita que se cierren las cuchillas del interruptor y que gire totalmente la palanca.
El incumplimiento de estas instrucciones podrá causar lesiones o daño al equipo
PRECAUCIÓN
PELIGRO DE LESIONES O DAÑO AL EQUIPONo doble o tuerza el gancho para bloquear el mecanismo, bajo ningunacircunstancia. El gancho en posición incorrecta puede causar lesionesserias o daños al equipo.
El incumplimiento de estas instrucciones podrá causar lesiones o daño al equipo

A07
400-
9
A07
400-
13
ON2
Boletín de instrucciones EOH364/5/6JK/RK/S/SS, 1SCC340032M1401 / A | Operación 2/17
Mecanismo de bloqueo de puerta El bloqueo de seguridad de la puerta previene la abertura de la puerta del gabinete cuando el interruptor está en la posición ON. En conjunto con el bloqueo del mecanismo, evita que el interruptor sea operado hacia la posición ON cuando la puerta del gabinete está abierta.
El bloqueo de seguridad de la puerta:A. Evita la apertura de la puerta del gabinete cuando el interruptor está en la posición ON (I), a menos de que se haga girar el tornillo desactivador en sentido de las manecillas del reloj para desactivar el bloqueo de puerta. Vea la página siguiente.B. Permite la abertura de la puerta del gabinete cuando el interruptor está en la posición OFF (O) sin hacer girar el tornillo desactivador.C. Hace que la puerta cierre completamente pero no se enlace con el interruptor en la posición OFF.D. Hace que la puerta cierre completamente y se mantenga cerrada cuando el interruptor esté en la posición ON (I)E. Será embragado mediante el bloqueo del mecanismo cuando el interruptor sea operado de la posición OFF (O) a ON (I), mientras la puerta del gabinete esté completamente cerrada.
OperaciónMecanismo de operación
PELIGRO
PELIGRO DE DESCARGA ELÉCTRICA, EXPLOSIÓN O DESTELLO POR ARQUEOLea detenidamente las instrucciones en la página 2/2 antes de continuar.
El incumplimiento de estas instrucciones puede causar muerte o lesiones serias

A07
400-
9
3
21
2
2/18 Operación | Boletín de instrucciones EOH364/5/6JK/RK/S/SS, 1SCC340032M1401 / A
Vencimiento del mecanismo de bloqueoLa puerta del gabinete no puede ser abierta cuando el interruptor esté en la posición ON. Éste puede ser vencido por el personal autorizado para inspección
OperaciónMecanismo de operación
PELIGRO
PELIGRO DE DESCARGA ELÉCTRICA, EXPLOSIÓN O DESTELLO POR ARQUEOAl evitar el mecanismo de bloqueo de puerta se expone al operador a partes energizadas y no es recomendable. Solamente el personal especializado puede llevar a cabo esta acción.
El incumplimiento de estas instrucciones podrá causar lesiones o daño al equipo
PRECAUCIÓN
PELIGRO DE LESIONES O DAÑO AL EQUIPONo doble o tuerza el gancho para bloquear el mecanismo, bajo ninguna circunstancia. El gancho en posición incorrecta puede causar lesiones serias o daños al equipo.
El incumplimiento de estas instrucciones podrá causar lesiones o daño al equipo
PELIGRO
PELIGRO DE DESCARGA ELÉCTRICA, EXPLOSIÓN O DESTELLO POR ARQUEOLea detenidamente las instrucciones en la página 2/2 antes de continuar.
El incumplimiento de estas instrucciones podrá causar lesiones o daño al equipo
Atención: Solamente el personal especializado puede llevar a cabo esta acción.

A07
400-
10
Ø 0.20 - 0.39 in / 5 - 10 mm Ø 0.20 - 0.24 in / 5 - 6 mm
2
Boletín de instrucciones EOH364/5/6JK/RK/S/SS, 1SCC340032M1401 / A | Operación 2/19
OperaciónEnclavamiento de la palanca y cerradura
Enclavamiento de la palancaLa palanca es candadeable en la posición OFF. Se pueden utilizar hasta tres candados.
Enclavamiento de la cerraduraLa cerradura se puede enclavar usando un candado para prevenir acceso no autorizado al interior del gabinete.

EOH364/5/6JK/RK EOH364/5/6S/SS
M07
038
M07
039
2
2/20 Dimensiones generales | Boletín de instrucciones EOH364/5/6JK/RK/S/SS, 1SCC340032M1401 / A
Dimensiones generalesEOH364JK/_RK/_S/_SS, EOH365JK/_RK/_S/_SS, EOH366JK/_RK/_S/_SS / NEMA 12, 3R, 4X / 200 A, 400 A, 600 A
Número de
catálogo
Tamaño
H W W1 D E
[in] [mm] [in] [mm] [in] [mm] [in] [mm] [in] [mm]
EOH364JK, _RK 39.80 1011 17,28 439 18.54 471 7.36 187 9.25 235
EOH365JK, _RK 58.66 1490 22.99 584 24.53 623 8.50 216 10.39 264
EOH366JK, _RK 66.93 1700 22.99 584 24.53 623 8.50 216 11.61 295
Número de
catálogo
Dimensiones para montaje Agujero para montaje
A B F O P G N K L M
[in] [mm] [in] [mm] [in] [mm] [in] [mm] [in] [mm] [in] [mm] [in] [mm] [in] [mm] [in] [mm] [in] [mm]
EOH364JK, _RK 39.02 991 14.65 372 7.32 186 - - - - 1.18 30 083 21 0.35 9 0.35 9 0.75 19
EOH365JK, _RK 57.48 1460 20.16 512 10.08 256 5.20 132 4.82 122.5 1.00 25.5 1.14 29 0.55 14 0.55 14 0.98 25
EOH366JK, _RK 65.75 1670 20.16 512 10.08 256 5.20 132 4.82 122.5 1.00 25.5 1.14 29 0.55 14 0.55 14 0.98 25

2
Boletín de instrucciones EOH364/5/6JK/RK/S/SS, 1SCC340032M1401 / A | Dimensiones generales 2/21
Para números de catálogo EOH364JK, _RK
Para números de catálogo EOH365JK, _RK
Para números de catálogo EOH366JK, _RK
Dimensiones generalesSalidas de cable / abertura tipo knockout NEMA 12 y 3R

S00
261A
A07
368
OA_
H_-TB
A07
375
EOHXSN4
A07
376
EOHXSN56
2
2/22 Accesorios (opcional) | Boletín de instrucciones EOH364/5/6JK/RK/S/SS, 1SCC340032M1401 / A
A
A
–––––A
Accesorios (opcional)Información de pedido
Terminal de neutroTornillos incluidos de manera estándar. Unidades/No. de catálogo = 1 pieza.
Adecuado para interruptores Incluye Zapata tipo No. de catálogo
Peso/unidad[kg]
Sólido, para fi jar en placa de montaje
EOH364_ OZXA-400 EOHXSN4
EOH365_, 6_ OZXA-800 EOHXSN56
Contactos auxiliares, IP20Numeración de contactos de acuerdo a EN 50013. Unidades/No. de catálogo = 1 pieza.Un máximo de 8 piezas se puede instalar en dentro de la cubierta del mecanismo.
Adecuado para interruptores Función No. de catálogo
Peso/unidad[kg]
EOH364_, 5_, 6_ 1NO OA1G10 0.03
EOH364_, 5_, 6_ 1NO OA1G10AU1) 0.03
EOH364_, 5_, 6_ 1NC OA3G01 0.03
EOH364_, 5_, 6_ 1NC OA3G01AU1) 0.03
1) Los tipos _AU están recubiertos en oro. Pueden ser utilizados para circunstancias difíciles o para tensiones muy bajas.
ConectoresHexagonal, diseño con guías para instalación fácil y rápida con una llave o desatornillador y martillo. – Conector y tuerca: Zinc o aluminio libre de cobre.
Aislante: Termoplástico, temperatura nominal 105 C – Grado de inflamabilidad - 94V-0. Anillo de estanqueidad: Nitrile (BUNA “N“)
Cumple con los requerimientos de sellado de 3R, con CP y SST sufijo NEMA12 y 4X conestrellas. – Listado UL de acuerdo a la norma NEC® 501.10(B).
Certificación CSA para ubicaciones peligrosas clase II, Grupos E, F, G Clase III. – Archivo UL No. E-23018, Archivo CSA No. 4484
Adecuado para interruptores Tamaño de conduit [in] No. de catálogo
EOH365RK, _6RK 1/2 H050-TB
EOH365RK, _6RK 3/4 H075-TB
EOH364RK 1 1/4 H125-TB
EOH364RK 1 1/2 H150-TB
EOH364RK, _5RK, _6RK 2 H200-TB
EOH364RK, _5RK, 6RK 2 1/2 H250-TB
EOH365RK, _6RK 3 H300-TB
EOH365RK, _6RK 3 1/2 H350-TB

EOHRM34R/5R/6R
EOHFBK4/5
S07
300
A07
400
2
Boletín de instrucciones EOH364/5/6JK/RK/S/SS, 1SCC340032M1401 / A | Accesorios (opcional) 2/23
Terminal de neutroMounting screws include as standard. Unidades/No. de catálogo = 1 pieza.Adecuado para interruptores Incluye Zapata tipo No. de catálogo Peso/unidad[kg]Sólido, para fi jar en placa de montajeEOH361K, _2K, _3K OZXA-100 EOHXSN13Contactos auxiliares, IP20Numeración de contactos de acuerdo a EN 50013. Unidades/No. de catálogo = 1 pieza.Mounting under the mechanism cover maximum 4 auxiliary contacts.Adecuado para interruptores Función No. de catálogo Peso/unidad[kg]EOH361K, _2K, _3K 1NO OA1G10 0.03EOH361K, _2K, _3K 1NO OA1G10AU1) 0.03EOH361K, _2K, _3K 1NC OA3G01 0.03EOH361K, _2K, _3K 1NC OA3G01AU1) 0.031) Los tipos _AU están recubiertos en oro. Pueden ser utilizados para circunstancias difíciles o para tensiones muy bajas.ConectoresHexagonal, diseño con guías para instalación fácil y rápida con una llave o desatornillador y martillo. – Conector y tuerca: Zinc o aluminio libre de cobre. Aislante: Termoplástico, temperatura nominal 105 C – Grado de inflamabilidad - 94V-0. Sealing Ring: Nitrile (BUNA “N“) – Cumple con los requerimientos de sellado de NEMA 1 – Listado UL por NEC® 501.10(B).Certificación CSA para ubicaciones peligrosas clase II, Grupos E, F, G Clase III. – Archivo UL No. E-23018, Archivo CSA No. 4484Adecuado para interruptores Conduit size [in] No. de catálogo Peso/unidad[kg]EOH361K, 2K, 3K 1/2 HB50-HBEOH361K, 2K, 3K 3/4 HB75-HBEOH362K, 3K 1 1/4 HB125-HBEOH363K 1 1/2 HB150-HB
Rejection membersPara fusibles tipo R, previene que fusibles de otra clase sean instalados.Unidades/No. de catálogo = 3 piezasPara interruptor de seguridad fusible Para fusible / tamaño No. de catálogo Peso/unidad[kg]EOH361K RK 30A EOHRM1REOH362K RK 60A EOHRM2REOH363K RK100A EOHRM34RClip para fusibleUnidades/No. de catálogo = 6 piezasPara interruptor de seguridad fusible Para fusible / tamaño No. de catálogo Peso/unidad[kg]EOH362K T 60 A EOHFC2TKit de tornillos para montaje de fusibles tipo TIncluye los tornillos, barras de conexión y tuercas. Unidades/No. de catálogo = 6 piezasPara interruptor de seguridad fusible Para fusible / tamaño Screw size No. de catálogo Peso/unidad[kg]EOH363K T -fuse / 100 A UNC 1/4-20x1/2 EOHFBK3
Accesorios (opcional)Información de pedido
Barreras de rechazoPara fusibles tipo R, previene que fusibles de otra clase sean instalados.Unidades/No. de catálogo = 3 piezas
Para interruptorde seguridad fusible Para fusible / tamaño No. de catálogo
EOH364_ RK 200A EOHRM34R
EOH365_ RK 400A EOHRM5R
EOH366_ RK 600A EOHRM6R
Kit de tornillos para montaje de fusibles tipo TIncluye los tornillos, barras de conexión, tuercas y barras de conexión. Unidades/No. de catálogo = 6 piezas.
Para interruptor de seguridad fusible Para fusible / tamaño Tamaño de tornillo No. de catálogo
EOH364_ T -fusible / 200 A UNC 5/16 - 18 × 5/8“ EOHFBK4
EOH365_ T -fusible / 400 A UNC 3/8 - 16 × 5/8“ EOHFBK5

EOHFDS_/SS_
A07
392
OT400/600U30EOHR
S07
304
OZXA-800_
A07
372-
3
EOHFBR5/6 EOHH2
EOHFD_
A07
370
EOHLM2
A07
380
A07
373
A07
383
EOHFBK6
S07
298
A07
428
OZXA-400_
2
2/24 Mantenimiento | Boletín de instrucciones EOH364/5/6JK/RK/S/SS, 1SCC340032M1401 / A
Interruptores
Adecuado para interruptores
Corriente nominal [A]
Potencia maxima [HP]Trifásica
No. de catálogo240 V 480 V 600 V
Incluye zapata. Unidades/No. de catálogo = 1 pieza
EOH364_ 200 60 125 150 OT200U30EOHR
EOH365_ 400 150 250 350 OT400U30EOHR
EOH366_ 600 200 500 500 OT600U30EOHR
PortafusibleAdecuado para interruptores Clase de fusible No. de catálogo
Tornillos, zapata y clips para fusible incluidos como estándar. Unidades/No. de catálogo = 1 pieza
EOH364_ Clase R EOHFBR4
EOH365_ Clase R EOHFBR5
EOH366_ Clase R EOHFBR6
Otras partes de repuestoAdecuado para interruptores Para fusible / tamaño Tamaño de tornillo No. de catálogo
Kit de palanca
Palanca, varilla, protector de palanca y tornillos incluidos como estándar. Unidades/No. de catálogo = 1 pieza
EOH364_, 5_, 6_ EOHH2
Mecanismo de bloqueo de puerta
Tornillos incluidos como estándar. Unidades/No. de catálogo = 1 pieza
EOH364_, 5_, 6_ EOHLM2
Zapatas para lado de línea
Tornillos incluidos como estándar. Unidades/No. de catálogo = 3 piezas
EOH364_ OZXA-400/3
EOH365_, 6_ OZXA-800/3
Zapatas para lado de carga
Tornillos incluidos como estándar. Unidades/No. de catálogo = 3 piezas
EOH364_ OZXA-400/3
EOH365_ OZXA-800E/3
EOH366_ OZXA-800/3
Kit de tornillos para montaje de fusibles tipo J
EOH366_ J -fusible / 600 A UNC 7/16 - 14 × 7/8“ EOHFBK6
Ensamble de puerta
Incluye calcomania con logotipo ABB, etiquetas, bisagras y tornillos como estándar. Unidades/No. de catálogo=1 pieza.
EOH364JK EOHFDJ4
EOH365JK EOHFDJ5
EOH366JK EOHFDJ6
EOH364RK EOHFDR4
EOH365RK EOHFDR5
EOH366RK EOHFDR6
EOH364S EOHFDS4
EOH365S EOHFDS5
EOH366S EOHFDS6
EOH364SS EOHFDSS4
EOH365SS EOHFDSS5
EOH366SS EOHFDSS6
MantenimientoPiezas de repuesto, información de pedido

2
Boletín de instrucciones EOH364/5/6JK/RK/S/SS, 1SCC340032M1401 / A | Mantenimiento 2/25
MantenimientoRegistro de Instalación y Mantenimiento
Registro de Instalación y MantenimientoCualquier servicio de mantenimiento que se preste a este dispositivo debe de ser anotado en el registro de Instalación y Mantenimiento.
Fecha de instalación del interruptor de seguridad:
Descripción del servicio de mantenimiento prestado Razón de mantenimiento Observaciones especiales
Fecha de mantenimiento
Responsable del mantenimiento
MantenimientoEl interruptor es lubricado apropiadamente en la fábrica, por lo cual no se necesita lubricación adicional. Sin embargo, es necesario limpiarlo cuidadosamente después de la instalación de los cables, accesorios, fusibles y piezas de repuesto. Se recomienda limpiar e inspeccionar el cableado una vez al año.
PELIGRO
PELIGRO DE DESCARGA ELÉCTRICA, EXPLOSIÓN O DESTELLO POR ARQUEOLea detenidamente las instrucciones en la página 2/2 antes de continuar.
El incumplimiento de estas instrucciones puede causar muerte o lesiones serias

1SC
C34
0032
M14
01
Contact us / Contacto / Contactez nous
Electrical equipment should be installed, operated, serviced, and maintained only by qualified personnel. No responsibility is assumed by ABB for any consequences arising out of the use of this material.
Todo el equipo eléctrico debe de ser instalado, operado y mantenido solamente por personal calificado. ABB no asume ninguna responsabilidad por consecuencias causadas por el uso de éste material.
Tout les équipements électriques doivent être installés, exploités et entretenus par du personnel qualifié seulement. Aucune responsabilité n’est assumée par ABB pour les conséquences découlant de l’utilisation de ce matériel.
ABB Inc. / USALow Voltage Control Products16250 W Glendale DriveNew Berlin, WI 53151Phone: 888-385-1221 Fax: 800-726-1441
USA Technical Support & Customer Service:888-385-1221, Option 47:30AM to 5:30PM, CST, Monday - FridayE-Mail: [email protected]
www.abb.us/lowvoltage
ABB Inc. / CANADA2117, 32nd AvenueLachine, QC H8T 3J1
www.abb.com/ca