ENTity & ENTitySD NasoView LED Illuminated Flexible ... Illuminated Flexible Nasopharyngoscope ....
21
ENTity & ENTitySD NasoView LED Illuminated Flexible Nasopharyngoscope Operator’s Manual Manufactured by: Optim LLC 64 Technology Park Road Sturbridge, MA 01566-1253 USA USA Tel: 1.800.225.7486 Tel: +1.508.347.5100 Fax: +1.508.347.2380 www.optim-llc.com [email protected] 1
Transcript of ENTity & ENTitySD NasoView LED Illuminated Flexible ... Illuminated Flexible Nasopharyngoscope ....

ENTity & ENTitySD NasoView
LED Illuminated Flexible Nasopharyngoscope
Operator’s Manual
Manufactured by:
Optim LLC
64 Technology Park Road Sturbridge, MA 01566-1253 USA
USA Tel: 1.800.225.7486 Tel: +1.508.347.5100 Fax: +1.508.347.2380
www.optim-llc.com [email protected]
1

Table of Contents Page 1. Introduction ................................................................................................................................ 4 Indications ................................................................................................................................ 4 Precautions .............................................................................................................................. 4 2. Endoscope Description ............................................................................................................. 5 Endoscope Control Body Diagram and Descriptions ............................................................... 5 Insertion Tube Diagram and Descriptions................................................................................ 6 Specifications ........................................................................................................................... 7 Accessories Listing .................................................................................................................. 7 3. Endoscope Function and Operation ........................................................................................ 8 Endoscope Preparation............................................................................................................ 8 Endoscope Operation .............................................................................................................. 8 Battery and Charger ................................................................................................................. 9 Use of the Endoscope with Video ......................................................................................... 11 4. Care & Maintenance ................................................................................................................. 12 I - Methods of Endoscope Reprocessing ............................................................................... 12 II – Endoscope Reprocessing Protocol .................................................................................. 13 1. Pre-Cleaning ............................................................................................................ 13 2. Leak Testing............................................................................................................. 13 3. Enzymatic Cleaning and Rinsing ............................................................................. 14 4. High-Level Disinfection ............................................................................................ 14 III - Endoscope Storage ......................................................................................................... 14 Note: Preventative Maintenance ............................................................................................ 14 5. Troubleshooting ....................................................................................................................... 15 6. Emissions and Immunity Information .................................................................................... 16 Guidance and Manufacturer’s Declaration - Emissions ......................................................... 16 Guidance and Manufacturer’s Declaration – Immunity .......................................................... 16 Guidance and Manufacturer’s Declaration – Emissions Equipment and Systems That Are NOT Life-supporting ........................................................................ 17 Recommended Separation Distances between Portable and Mobile RF Communication Equipment and the ENTity/SD NasoView Endoscope – Equipment and Systems That Are NOT Life-Supporting ..................................................... 17 7. Repair Service .......................................................................................................................... 18 8. Warranty .................................................................................................................................... 19 9. Symbol Descriptions ............................................................................................................... 20 10. Approvals ................................................................................................................................ 20 11. Vendor Information ................................................................................................................ 21
2

WARNING: The device is not supplied sterile. Clean and disinfect the device prior to use, employing the procedure listed in this manual. WARNING: The equipment is not suitable for use in the presence of flammable mixtures.
WARNING: In order to avoid potential safety hazards, the user of the device should consult the manuals of all medical electrical equipment used in conjunction with this device.
The instrument is a TYPE BF Applied Part. The equipment is rated IPX7. WARNING: the following methods of sterilization and disinfection will result in damage to the endoscope and should not be used: Ethylene Oxide, autoclave, ultrasonic, chlorides, formaldehyde, and hydrogen peroxide.
The device is covered under US Patent’s. For a complete listing visit our website at www.optim-llc.com/patents.
3

1. Introduction Indications The Optim ENTity & ENTitySD NasoView Nasopharyngoscopes are intended to be used for oral or nasal introduction for the examination of the upper airway from the nasal passage to the vocal cords. Please be sure to handle the fiber optic instrument with care at all times. The fiber optics are comprised of thin glass fibers that can be damaged by physical trauma, extreme temperatures, or fluid invasion into the endoscope.
IMPORTANT: The instrument is intended for use by persons thoroughly trained in the techniques of nasopharyngoscopy. This manual describes the proper procedures for preparing and using the endoscope. This manual also contains pertinent information on the proper care and handling of the endoscope
during use, reprocessing, and storage. Please read this entire manual carefully before using the endoscope. For any questions concerning the material contained in this manual or the operation or safety of the equipment, please contact our customer service department.
Precautions
• Damage may occur to the endoscope if used improperly. Read this Owner’s Manual thoroughly before attempting to use the endoscope.
• Check all items upon receipt to assure damage has not occurred during shipment. • Verify compatibility of all components and accessories used with the endoscope by contacting Optim
LLC at 1.800.225.7486 or 1.508.347.5100. • Avoid excessive bending or twisting of the endoscope Insertion Tube. While designed to bend, too
much force can damage the fiber bundles and internal components. • Do not use excessive force when wiping the endoscope Insertion Tube. Hold the endoscope by the
Control Body and gently wipe back and forth along the Insertion Tube with a soft material (such as 4x4 gauze).
• Avoid storing or using the endoscope in areas of heavy traffic where the endoscope may sustain physical damage.
• The endoscope should not be stored in the Carrying Case, but in a well-ventilated environment. Avoid extreme temperatures, direct sunlight, and high humidity.
• Avoid immersing the endoscope for periods of time greater than recommended by the disinfectant manufacturer. Prolonged immersion may damage the outer coverings of the endoscope and could result in fluid invasion into the endoscope.
• Do not attempt to disassemble the endoscope in any way. There are no user-serviceable parts and disassembly will void all warranties.
4

2. Endoscope Description
Figure 1. ENTity/SD NasoView Endoscope Control Body (Handle) Control Body: Eyepiece: The eyepiece allows the user to visualize the image directly or to connect a standard video camera, still photography system, or teaching attachment to the endoscope. The eyepiece is compatible with most C-mount adapters and video camera systems. Call Optim LLC at +1.508.347.5100 or 800.225.7486 for information on video adapters, cameras, processors and monitors. Focus Ring: The focus ring adjusts the image to the user’s eyesight. Adjust the focus by rotating the Focus Ring (also known as the Diopter Adjustment Ring) clockwise or counterclockwise until the fiber pattern is in clear focus. Diopter Markings: If using a video camera, still photography system, or teaching attachment, the white dot on the Control Body must be aligned with the white dot on the Focus Ring (Diopter Adjustment Ring). The colored lines provide reference markers for various users of the same endoscope. Articulation Lever: The articulation lever controls the angular deflection of the Distal Tip. Light Switch Lever: The light switch lever controls the on / off and intensity of light output. Moving the lever towards the wider end of the intensity indicator increases the light intensity; moving the lever towards the narrower end of the intensity indicator decreases the light intensity. Identification Label: The laser marked label includes the identity of the endoscope by model, serial number, manufacturer, manufacturer telephone number and web address. It also includes the IPX7 rating and Type BF Part symbols.
5

Battery Cap: The battery cap seals the battery and electronics within the control body. Vent: Equalizes the air pressure inside the endoscope during storage and shipping when the Vent Cap is installed. It is also the connection to the Leak Tester (used to check that the endoscope is fully sealed and can be immersed in liquid or used for patient procedures). Vent Cap: Cap ON: The Vent Cap must be PLACED ON for aeration and shipping. The Vent Cap holds the Vent open and prevents damage caused by changes in pressure and temperature.
Cap OFF: The Vent Cap must be REMOVED for patient use, leak-testing, and disinfection. Removing the cap allows the Vent to close, preventing fluid invasion. Insertion Tube: Depth Markers: Depth marks are located at 10cm and 20cm from the Distal Tip of the Insertion Tube. Bending Section: The bending section deflects up and down when the Articulation Lever is rotated. Distal Tip: The termination of the Image fiber bundle (at the Objective Lens) and the Illumination fiber bundles (Light Guides).
Figure 2. ENTity/SD NasoView Control Body and Insertion Tube
6

Specifications & Accessories
ENTity Model Parameter Specification
Insertion Tube Diameter 3.6mm Insertion Tube Working Length 30cm Insertion Tube Markings 10cm & 20cm Field of View 70º Depth of Field 5-50mm Articulation 135º Up/Down Minimum Bend Radius 25mm Eyepiece Pointer 12 o’clock position Eyepiece Diopter Correction Range +4 to -8 Diopter Battery Life at Full LED Power 30-40 minutes Battery Charge Time 2 hours Battery Type Lithium Ion NP-700
3.6V, 700mAHr minimum Safe Operating Temperature Range 15 - 43 ºC Safe Storage and Transport Temperature Range -25 – 50 ºC Safe Operating, Storage, and Transport Relative Humidity Range
0 – 95% RH
ENTitySD Model
Parameter Specification Insertion Tube Diameter 2.7mm (nominal) Insertion Tube Working Length 30cm Insertion Tube Markings 10cm & 20cm Field of View 85º Depth of Field 5-50mm Articulation 110º Up/Down Minimum Bend Radius 20mm Eyepiece Pointer 12 o’clock position Eyepiece Diopter Correction Range +4 to -8 Diopter Battery Life at Full LED Power 30 minutes (nominal) Battery Charge Time 2 hours Battery Type Lithium Ion NP-700
3.6V, 680mAHr minimum Safe Operating Temperature Range 18 - 26 ºC Safe Storage and Transport Temperature Range -25 – 50 ºC Safe Operating, Storage, and Transport Relative Humidity Range
0 – 95% RH
Eyepiece Magnification 30X or 45X available
Scope & Accessories Listing Part Number ENTity NasoView Nasopharyngoscope F006189 ENTitySD NasoView Nasopharyngoscope (30X) F014766 ENTitySD NasoView Nasopharyngoscope (45X) F014901 Leak Tester F004918 Carrying Case Carrying Case Rechargeable Battery P006176PXF Battery Charger Cradle F006107PF Battery Charger AC/DC Adapter (US Plug) F0069201F Battery Charger AC/DC Adapter (European Plug) F0069202F Battery Charger AC/DC Adapter (UK Plug) F014386F Operator’s Manual N006104D Vent Cap F006284 Greased O-ring Kit (Qty 3) F014148
7

3. Endoscope Function and Operation Endoscope Preparation
• Before use, the endoscope should be reprocessed. Please refer to the Care & Maintenance
Section of this manual for proper reprocessing protocol. • Before each procedure, visually inspect the Insertion Tube for holes, cuts or abrasions. Run one’s
fingertips down the length of the Insertion Tube, feeling for the above defects. Do not squeeze the outer coverings tightly.
• Check the Distal Tip deflection by rotating the Articulation Lever clockwise and counterclockwise. Do not apply excessive force rotating the Articulation Lever. The endoscope articulates 135° Up and Down.
• Clean the Eyepiece and lens on the Distal Tip with an alcohol prep pad. Do not use abrasive cleaners on the lens surfaces.
Endoscope Operation
• Hold the endoscope so that the control body fits comfortably in one hand, allowing easy manipulation
of the articulation lever with the thumb. Use the other hand to manipulate the Insertion Tube of the endoscope.
CAUTION: Avoid excessive bending or twisting of the endoscope insertion shaft. While designed to bend, excessive pressure can damage the fibers and internal components. Do not manually bend the distal tip; always use the articulation lever to articulate the tip up or down.
Figure 3. Suggested Method for Holding the ENTity NasoView Endoscope During Use
• While viewing through the Eyepiece, rotate the Focus Ring clockwise or counterclockwise until the
fiber pattern is in clear focus. • When using a video camera, still photography system, or teaching attachment with the endoscope, be
sure the white dot on the Control Body is aligned with the white dot on the Focus Ring. • Turn on the light by rotating the lever on the side of the Control Body near the Articulation Lever.
Adjust the brightness to the desired level by the rotating lever. • Introduce the endoscope into the patient and operate the Articulation Lever as necessary to guide the
Distal Tip & Insertion Tube for advancement and observation. • At the completion of the exam, remove the endoscope under direct visualization and with the
Articulation Lever in the neutral position.
8
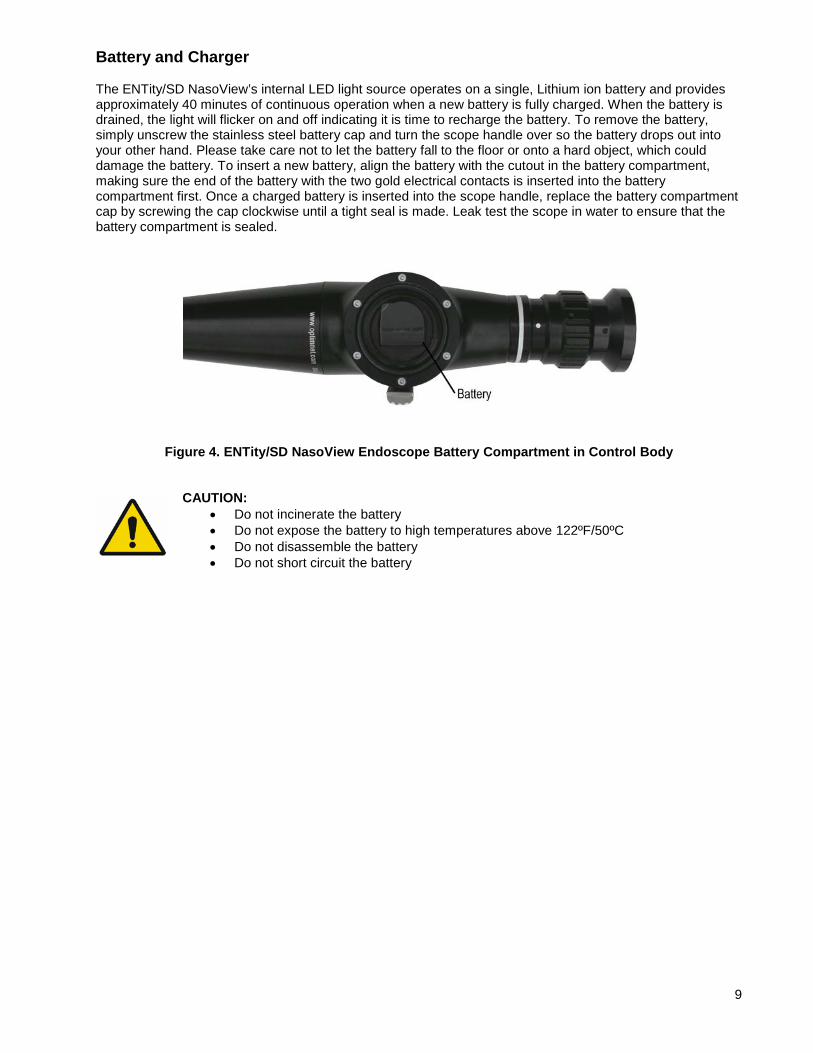
Battery and Charger The ENTity/SD NasoView’s internal LED light source operates on a single, Lithium ion battery and provides approximately 40 minutes of continuous operation when a new battery is fully charged. When the battery is drained, the light will flicker on and off indicating it is time to recharge the battery. To remove the battery, simply unscrew the stainless steel battery cap and turn the scope handle over so the battery drops out into your other hand. Please take care not to let the battery fall to the floor or onto a hard object, which could damage the battery. To insert a new battery, align the battery with the cutout in the battery compartment, making sure the end of the battery with the two gold electrical contacts is inserted into the battery compartment first. Once a charged battery is inserted into the scope handle, replace the battery compartment cap by screwing the cap clockwise until a tight seal is made. Leak test the scope in water to ensure that the battery compartment is sealed.
Figure 4. ENTity/SD NasoView Endoscope Battery Compartment in Control Body
CAUTION: • Do not incinerate the battery • Do not expose the battery to high temperatures above 122ºF/50ºC • Do not disassemble the battery • Do not short circuit the battery
9

Figure 5. Battery Charger and End Views of Battery To charge a battery:
• First plug the AC adapter into a wall outlet. • Connect the AC power adapter to the DC IN jack located at the back of the charger. The “STATUS”
indicator will be solid RED when the charger is ready and the “CHARGE” indicator will be flashing GREEN when the charger is waiting for a battery to charge.
• Slide the battery into the charger, making sure the end of the battery with the two gold electrical contacts is inserted into the charger first. The “CHARGE” indicator will turn RED when the battery is charging.
• The “CHARGE” indicator will alternately flash RED and GREEN when the battery has been charged to over 90%.
• When the battery is fully charged, the “CHARGE” indicator will turn solid green. • After the battery has been fully charged, slide the battery out of the charger and unplug the AC
adapter for the charger.
CAUTION: • Do not expose the charger to fire, water or moisture • To avoid electrical shock, do not disassemble the charger • No user-serviceable parts inside the charger • Follow local regulations for disposal of electrical components or batteries
WARNING: The battery charger is not a medical device and should not be used in a room where a patient may be present.
WARNING: The battery should be removed if the equipment is not likely to be used for some time. When the end-user wishes to discard this product, it must be sent to separate collection facilities for recovery and recycling.
10

Use of the Endoscope with Video The endoscope may be used with video camera or still photography systems. The endoscope’s “B” style eyepiece will accommodate most video adapters for connection to a camera system and video chain. When using a video camera, be sure to align the white dot on the Control Body of the scope with the white dot on the Focus Ring. This setting will optimize the focusing capabilities of your camera system. Call Optim LLC at +1.508.347.5100 to order video adapters, cameras, monitors and accessories for Optim’s Nasopharyngoscopes.
Figure 6. Alignment of White Focus Ring Marks
Align dots
11
4. Care and Maintenance I – Method of Endoscope Reprocessing
WARNING: Failure to comply with the following may result in damage to the endoscope and will void the product warranty.
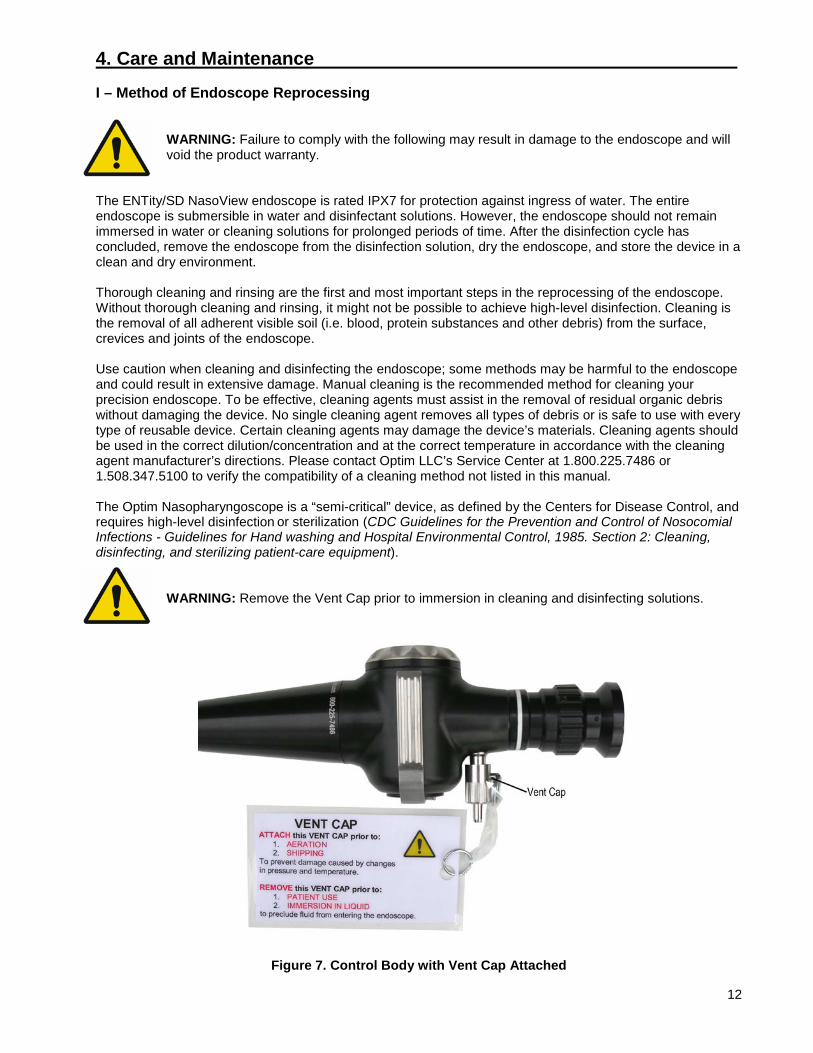
The ENTity/SD NasoView endoscope is rated IPX7 for protection against ingress of water. The entire endoscope is submersible in water and disinfectant solutions. However, the endoscope should not remain immersed in water or cleaning solutions for prolonged periods of time. After the disinfection cycle has concluded, remove the endoscope from the disinfection solution, dry the endoscope, and store the device in a clean and dry environment. Thorough cleaning and rinsing are the first and most important steps in the reprocessing of the endoscope. Without thorough cleaning and rinsing, it might not be possible to achieve high-level disinfection. Cleaning is the removal of all adherent visible soil (i.e. blood, protein substances and other debris) from the surface, crevices and joints of the endoscope. Use caution when cleaning and disinfecting the endoscope; some methods may be harmful to the endoscope and could result in extensive damage. Manual cleaning is the recommended method for cleaning your precision endoscope. To be effective, cleaning agents must assist in the removal of residual organic debris without damaging the device. No single cleaning agent removes all types of debris or is safe to use with every type of reusable device. Certain cleaning agents may damage the device’s materials. Cleaning agents should be used in the correct dilution/concentration and at the correct temperature in accordance with the cleaning agent manufacturer’s directions. Please contact Optim LLC’s Service Center at 1.800.225.7486 or 1.508.347.5100 to verify the compatibility of a cleaning method not listed in this manual. The Optim Nasopharyngoscope is a “semi-critical” device, as defined by the Centers for Disease Control, and requires high-level disinfection or sterilization (CDC Guidelines for the Prevention and Control of Nosocomial Infections - Guidelines for Hand washing and Hospital Environmental Control, 1985. Section 2: Cleaning, disinfecting, and sterilizing patient-care equipment).
WARNING: Remove the Vent Cap prior to immersion in cleaning and disinfecting solutions.
Figure 7. Control Body with Vent Cap Attached
12

II- Endoscope Reprocessing Protocol:
1. Pre-Cleaning 2. Leak-Testing 3. Enzymatic Cleaning and Rinsing 4. High-Level Disinfection with Cidex OPA (0.55% ortho-Phthalaldehyde Solution)
Pre-Cleaning: Optim recommends the endoscope be pre-cleaned immediately after every patient procedure. This will prevent patient material from adhering to the endoscope. Dried material is difficult to remove and can render the disinfection or sterilization process ineffective. Gently wipe all debris from the Insertion Tube and Distal Tip using a soft, lint-free cloth and water to which you have added a low sudsing detergent, diluted in accordance with the detergent manufacturer’s instructions. Leak Testing: After every procedure, in preparation for high-level disinfection or sterilization, the endoscope should first be tested to ensure that it is watertight. This is accomplished using the Leak Tester. Gloves should be worn when performing the Leak Test procedure, as the endoscope has not yet been reprocessed.
• Remove Vent Cap. Connect the Leak Tester to the Vent by aligning the pin in the Leak Tester connector with the groove on the Vent, pushing down, and rotating the Leak Tester connector clockwise 1/4 turn.
• Pump the hand bulb of the Leak Tester until the needle is within the 140-180mmHg or the green gauge area. Do not exceed 180mmHg. Observe the needle for 10 seconds. If the needle drops, the Leak Tester connection to the endoscope may be loose. Repeat procedure to verify.
• If the needle drops again, the endoscope may have a damaged seal and should not be immersed in any liquid. DO NOT CONTINUE TO USE THE ENDOSCOPE. Please contact Optim LLC’s Service Center at 1.800.225.7486 or 1.508.347.5100 to arrange for evaluation and/or repair.
• If the needle stays in place, immerse the entire endoscope in water. Observe the endoscope for 30 seconds. Articulate the Distal Bending Section up and down during this period; holes in the soft covering of the Distal Bending Section may not be evident in a relaxed position.
• A STEADY STREAM OF AIR BUBBLES INDICATES A LEAK IN THE ENDOSCOPE. Remove the scope immediately from the water, while the scope is still pressurized. Air escaping the endoscope at the leak site will have prevented fluid invasion.
• If a leak is detected, the endoscope should not be immersed in solution or used for patient procedures after the leak test. DO NOT CONTINUE USE OF THE ENDOSCOPE. Reprocess the endoscope by washing all its external surfaces with an enzymatic cleaning solution. Do not immerse the endoscope in the enzymatic cleaning solution. Do not conduct high-level disinfection or sterilization of the endoscope. Please contact Optim LLC’s Service Center at 1.800.225.7486 or 1.508.347.5100 to arrange for evaluation and/or repair.
CAUTION: Do not mistake the release of trapped air from the crevices on the endoscope’s outer surface with a leak. Trapped air can be released by tapping the endoscope gently after immersing the endoscope in water.
• Absence of a steady stream of air bubbles confirms that the endoscope is watertight. Remove the
endoscope from the water and disconnect the Leak Tester from the endoscope. It is now safe to immerse the endoscope in solution.
13

Enzymatic Cleaning and Rinsing
1. Fill a basin with a freshly made solution of water and a low sudsing detergent, diluted in accordance with the detergent manufacturer’s instructions.
2. Immerse the endoscope. Wash all debris from the exterior of the endoscope by gently brushing and wiping the instrument while submerged in the detergent solution.
3. Rinse the endoscope in clean water. 4. Wipe dry the exterior of the endoscope with a soft, clean cloth.
High-Level Disinfection with Cidex OPA (0.55% ortho-Phthalaldehyde Solution):
1. Verify that the Vent Cap is removed. 2. Prepare the disinfectant solution in accordance with the solution manufacturer’s label. 3. Completely immerse the endoscope in the disinfectant solution for the recommended time and
temperature as indicated on the label of the disinfectant. 4. Thoroughly rinse the exterior of the endoscope with large amounts of clean water.
NOTE: “It is suggested that all rinsing after disinfection should be done with water that has been filtered by passage through a 0.2 micron filter or otherwise treated by a method documented to improve the microbiological quality of water.” ASTM F 1518
5. A final rinse using 70% isopropyl alcohol solution can be used to speed the drying process and reduce the numbers of any organisms present as a result of rinsing with potable water.
6. Dry the exterior of the endoscope with a soft, clean towel. 7. Ensure the Eyepiece and Distal Tip lenses are free from solution residue.
III - Endoscope Storage
• The endoscope should be stored in a dry, well-ventilated environment. Avoid extreme temperatures, direct sunlight, and high humidity.
• Avoid storing the endoscope in areas of heavy traffic where the endoscope may sustain physical damage.
• Do not store the endoscope in the carrying case. The carrying case is not sufficiently ventilated for storage of the endoscope. The carrying case is intended only for transport of the endoscope.
• The endoscope should be completely clean and dry before storing. • When storing the endoscope, be sure to keep the Insertion Tube straight.
Note: Preventative Maintenance:
Over time the O-ring on your endoscope battery compartment may become dry. To prevent the O-ring from cracking and falling off we recommend replacing the O-ring with the provided greased O-ring every 6 months or 300 disinfectant cycles.
Figure 8. Battery compartment open for replacing O-ring
14
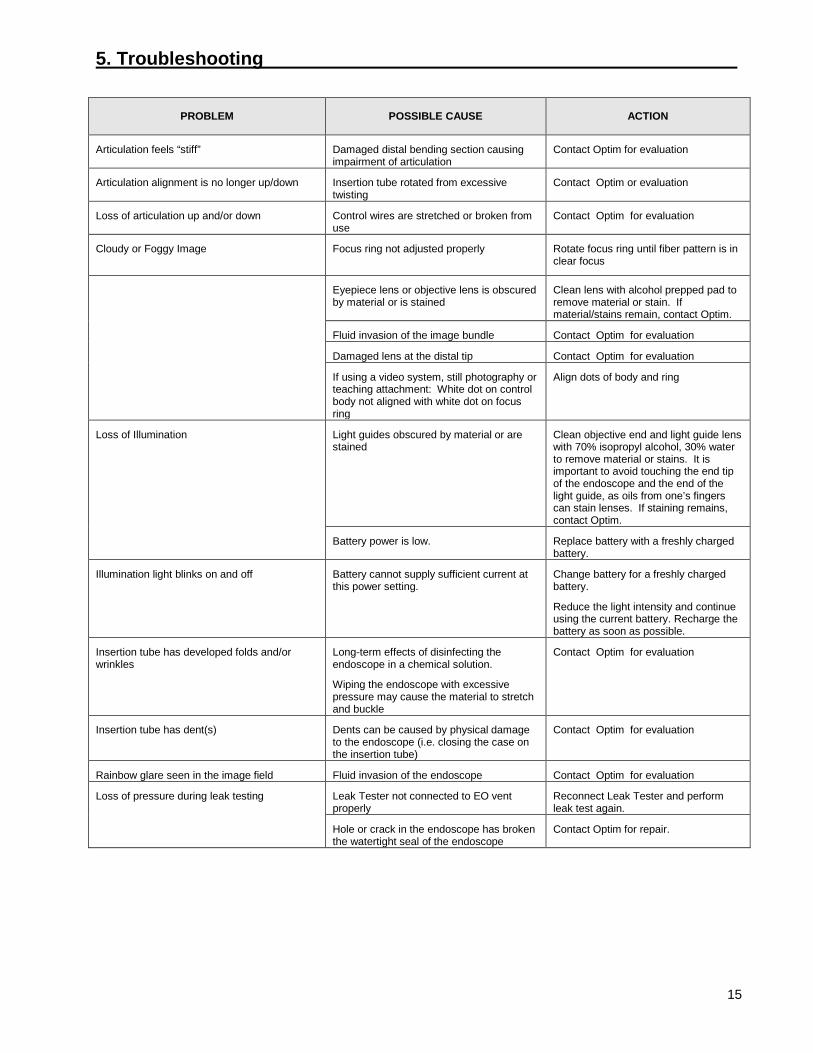
5. Troubleshooting
PROBLEM
POSSIBLE CAUSE
ACTION
Articulation feels “stiff” Damaged distal bending section causing impairment of articulation
Contact Optim for evaluation
Articulation alignment is no longer up/down Insertion tube rotated from excessive twisting
Contact Optim or evaluation
Loss of articulation up and/or down Control wires are stretched or broken from use
Contact Optim for evaluation
Cloudy or Foggy Image Focus ring not adjusted properly
Rotate focus ring until fiber pattern is in clear focus
Eyepiece lens or objective lens is obscured by material or is stained
Clean lens with alcohol prepped pad to remove material or stain. If material/stains remain, contact Optim.
Fluid invasion of the image bundle Contact Optim for evaluation
Damaged lens at the distal tip Contact Optim for evaluation
If using a video system, still photography or teaching attachment: White dot on control body not aligned with white dot on focus ring
Align dots of body and ring
Loss of Illumination Light guides obscured by material or are stained
Clean objective end and light guide lens with 70% isopropyl alcohol, 30% water to remove material or stains. It is important to avoid touching the end tip of the endoscope and the end of the light guide, as oils from one’s fingers can stain lenses. If staining remains, contact Optim.
Battery power is low. Replace battery with a freshly charged battery.
Illumination light blinks on and off Battery cannot supply sufficient current at this power setting.
Change battery for a freshly charged battery.
Reduce the light intensity and continue using the current battery. Recharge the battery as soon as possible.
Insertion tube has developed folds and/or wrinkles
Long-term effects of disinfecting the endoscope in a chemical solution.
Wiping the endoscope with excessive pressure may cause the material to stretch and buckle
Contact Optim for evaluation
Insertion tube has dent(s) Dents can be caused by physical damage to the endoscope (i.e. closing the case on the insertion tube)
Contact Optim for evaluation
Rainbow glare seen in the image field Fluid invasion of the endoscope Contact Optim for evaluation
Loss of pressure during leak testing Leak Tester not connected to EO vent properly
Reconnect Leak Tester and perform leak test again.
Hole or crack in the endoscope has broken the watertight seal of the endoscope
Contact Optim for repair.
15
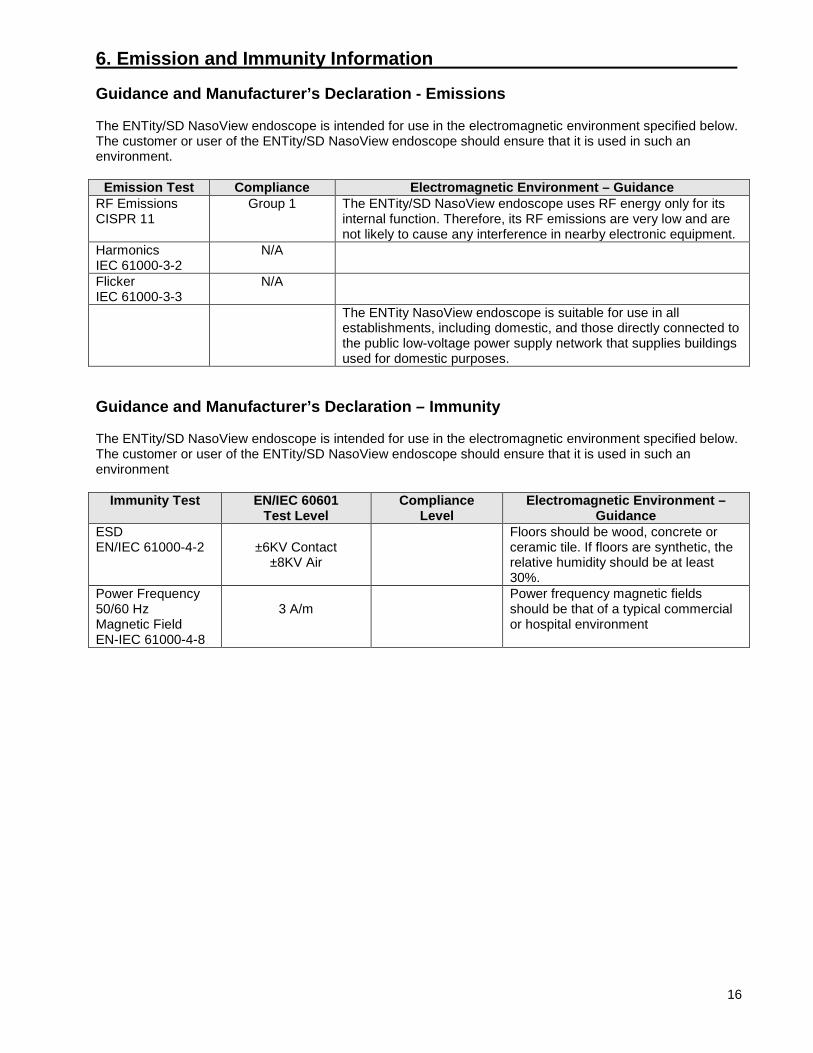
6. Emission and Immunity Information Guidance and Manufacturer’s Declaration - Emissions The ENTity/SD NasoView endoscope is intended for use in the electromagnetic environment specified below. The customer or user of the ENTity/SD NasoView endoscope should ensure that it is used in such an environment.
Emission Test Compliance Electromagnetic Environment – Guidance RF Emissions CISPR 11
Group 1 The ENTity/SD NasoView endoscope uses RF energy only for its internal function. Therefore, its RF emissions are very low and are not likely to cause any interference in nearby electronic equipment.
Harmonics IEC 61000-3-2
N/A
Flicker IEC 61000-3-3
N/A
The ENTity NasoView endoscope is suitable for use in all establishments, including domestic, and those directly connected to the public low-voltage power supply network that supplies buildings used for domestic purposes.
Guidance and Manufacturer’s Declaration – Immunity The ENTity/SD NasoView endoscope is intended for use in the electromagnetic environment specified below. The customer or user of the ENTity/SD NasoView endoscope should ensure that it is used in such an environment
Immunity Test EN/IEC 60601 Test Level
Compliance Level
Electromagnetic Environment – Guidance
ESD EN/IEC 61000-4-2
±6KV Contact
±8KV Air
Floors should be wood, concrete or ceramic tile. If floors are synthetic, the relative humidity should be at least 30%.
Power Frequency 50/60 Hz Magnetic Field EN-IEC 61000-4-8
3 A/m
Power frequency magnetic fields should be that of a typical commercial or hospital environment
16

Guidance and Manufacturer’s Declaration – Emissions Equipment and Systems That Are NOT Life-supporting The ENTity/SD NasoView endoscope is intended for use in the electromagnetic environment specified below. The customer or user of the ENTity/SD NasoView endoscope should ensure that it is used in such an environment.
Immunity EN/IEC 60601 Test Level
Compliance Level
Electromagnetic Environment-Guidance
Radiated RF EN/IEC 61000-4-3
3 V/m 80 MHz to 2.5 GHz
(E3) V/m Portable and mobile communications equipment should be separated from the endoscope by no less than the distances calculated/listed below: D=(3.5/E3)(Sqrt P) 80 to 800 MHz D=(7/E3)(Sqrt P) 800 MHz to 2.5 GHz Where P is the max power in watts and D is the recommended separation distance in meters. Field strengths from fixed transmitters, as determined by an electromagnetic site survey, should be less than the compliance levels (E3). Interference may occur in the vicinity of equipment containing a transmitter.
Recommended Separation Distances Between Portable and Mobile RF Communication Equipment and the ENTity NasoView Endoscope – Equipment and Systems That Are NOT Life-Supporting Recommended Separation Distances for the ENTity/SD NasoView Endoscope: The ENTity/SD NasoView Endoscope is intended for use in the electromagnetic environment in which radiated disturbances are controlled. The customer or user of the ENTity/SD NasoView Endoscope can help prevent electromagnetic interference by maintaining a minimum distance between portable and mobile RF Communications Equipment and the ENTity/SD NasoView Endoscope as recommended below, according to the maximum output power of the communication equipment.
Max Output Power (watts)
Separation (m) 150KHz to 80MHz
D=(3.5/E3)(Sqrt P)
Separation (m) 80 to 800 MHz
D=(3.5/E3)(Sqrt P)
Separation (m) 800MHz to 2.5GHz
D=(7/E3)(Sqrt P)
0.01 0.12 0.12 0.23 0.1 0.37 0.37 0.74 1 1.2 1.2 2.3 10 3.7 3.7 7.4 100 11.7 11.7 23.3
17
7. Repair Service Customer Service The Optim ENTity/SD NasoView Nasopharyngoscope is serviced at Optim LLC’s manufacturing facilities in Sturbridge, MA, USA. Use the following procedure to expedite returned goods for evaluation, repair or replacement.
1. Telephone Optim LLC at 1.800.225.7486 or 1.508.347.5100 or complete the online RMA request form on our website www.optim-llc.com/rma-request.
2. Provide a detailed description of the problem. 3. If the scope needs to be sent to Optim, a Returned Material Authorization number will be issued. 4. The endoscope should then be returned to the address below for repair or replacement. 5. Include a copy of the RMA inside package. 6. Have RMA visible on package.
Returning Goods to Optim LLC Ship the endoscope with the Vent cap attached to the Vent, in the carrying case and within a corrugated box to prevent damage during shipment.
Ship to: Optim LLC
64 Technology Park Road Sturbridge, MA 01566-1253 USA Attention: Customer Service / RMA#______________
ATTENTION: If the endoscope has been used in a clinical setting, the endoscope must be reprocessed according to procedures outlined in the Care & Maintenance section of this manual before shipment to Optim LLC.
Upon evaluation, the customer will be contacted and advised of the findings and estimated repair cost. Repairs will not begin until authorization or a purchase order is issued indicating the approval of charges.
18

8. Warranty The Optim LLC ENTity and ENTity SD Flexible LED Nasopharyngoscopes are warranted to be free from defects in materials and workmanship for a period of one (1) year from the date of purchase. All non-warranty repairs will be warranted to be free from defects in materials and workmanship for a period of ninety (90) days from the date of the invoice. Accidental damage and damage resulting from misuse, abuse, excessive sterilization, disinfection and sterilization methods not approved by Optim LLC, as well as fluid invasion and normal wear and tear, will be subject to prevailing repair charges. Disassembly, alteration, or repair performed by any person not authorized by Optim LLC will result in immediate loss of warranty. THE ABOVE WARRANTIES ARE IN LIEU OF ALL OTHER WARRANTIES EITHER EXPRESS OR IMPLIED, INCLUDING ANY WARRANTY OF MERCHANTABILITY OR FITNESS FOR A PARTICULAR PURPOSE. Suitability for use of the medical device for any surgical procedure shall be determined by the user. Optim LLC shall not be liable for incidental or consequential damages of any kind. All shipping charges to and from Optim's facility is the responsibility of the customer.
19

9. Symbol Descriptions Attention: Read Operating Manual for Warnings, Cautions, and Instructions for Use. The symbol indicates that this device provides a certain level of protection against electric shock. This instrument is rated a TYPE BF Applied Part. This equipment is rated IPX7 and is protected against the effect of immersion between 15cm and 1m. This symbol indicates the product’s Serial Number. Light intensity symbol. Moving the light intensity lever towards the wider end of this symbol increases the light intensity. Moving towards the narrower end decreases the light. Light intensity lever. In the European Union, this symbol indicates that when the end-user wishes to discard this product, it must be sent to separate collection facilities for recovery and recycling. By separating this product from other household-type waste, the volume of waste sent to incinerators or land-fills will be reduced and natural resources will thus be conserved.
10. Approvals UL 60601-1 (2003) Part 1 CAN/CSA C22.2 #601.1 (1990) Part 1 IEC 60601-2-18 (1996) Part 2 §2.18 IEC 60601-1-2 (2001) + A1 (2004) + CISPR 11 (2004) Group 1, Class B CENELEC EN 60601-1 Part 1 + A1(93) + A2(95)
The CE mark on this product indicates that it has been tested to and conforms with the provisions noted within the Medical Device Directive 93/42/EEC + 2007/47/EC (21.09.2007).
Authorized Representative: Scanlan Group B.V. Postbus 75664 1118 ZS Schiphol Triport The Netherlands Telephone +31(0)20 653 0553
ISO 9001:2008 ISO 13485:2003 ISO14971:2007 FDA CGMP 820 CDN MDR CMDCAS MDD 93/42/EEC Annex VII
S/N
20

11. Vendor Information Manufactured and Serviced by: Optim LLC USA TEL: 1.800.225.7486 64 Technology Park Road TEL: +1.508.347.5100 Sturbridge, MA 01566-1253 USA FAX: +1.508.347.2380 Website: www.optim-llc.com Sales & Service Email: [email protected] Part No. N006104D Rev J DCN No.09014 November, 2014
21