Enterprise Edge 2.0 Voice Messaging Set Up and Operation Guide
170
www.nortelnetworks.com © 2000 Nortel Networks P0911620 Issue 02 Enterprise Edge 2.0 Voice Messaging Set Up and Operation Guide
Transcript of Enterprise Edge 2.0 Voice Messaging Set Up and Operation Guide

Enterprise Edge 2.0 Voice Messaging
Set Up and Operation Guidewww.nortelnetworks.com
© 2000 Nortel NetworksP0911620 Issue 02


are
re
are
line
Contents
Chapter 1 Introduction 13About Enterprise Edge Voice Messaging 13Basic Enterprise Edge Voice Messaging 13
Voice Messaging 13Automated Attendant 13Custom Call Routing (CCR) 13
Enterprise Edge Integrated Solution optional software 14Enterprise Edge Message Networking 14Enterprise Edge Unified Messaging 14Enterprise Edge Call Center 15
How this guide is organized 16Symbols and conventions 16What appears on the display 16Prerequisites 16The Enterprise Edge Voice Messaging document set 17
Chapter 2 Using Enterprise Edge Voice Applications Manager 21Overview 21Enterprise Edge Voice Applications Manager installation overview 21
PC prerequisites 21Installing the Enterprise Edge Voice Applications Manager client softw
22Starting the Enterprise Edge Voice Applications Manager client softwa
from a PC 23Removing the Enterprise Edge Voice Applications Manager client softw
24
Chapter 3 Setting up Enterprise Edge Voice Messaging 25Overview 25Who can use Enterprise Edge Voice Messaging 25Using Enterprise Edge Voice Messaging with an Enterprise Edge two
display telephone 25Ending a session 26Accessing your Personal Mailbox while away from the office 26Interrupting a voice prompt 26Recording greetings and prompts 27
Recording a greeting or prompt from your telephone handset 27Recording a greeting or prompt from your PC 28Locating a previously recorded greeting or prompt 28
P0911620 Issue 02 Enterprise Edge 2.0 Voice Messaging Set Up and Operation Guide

4 Contents
39
ise
Chapter 4 Setting up an Automated Attendant 31Overview 31Greeting Tables 32
Company Greetings 34Recording a Company Greeting 35
To record a Company Greeting: 35Setting up a Greeting Table 35
Assigning greetings and CCR Trees to Greeting Tables 36Setting the Business Hours 36Assigning the language preference 37Assigning the Greeting Table Attendant 37Automated Attendant Menu 38Recording a Custom Menu prompt 38
Changing the Enterprise Edge Voice Messaging language availabilityProgramming which lines are answered by Enterprise Edge Voice
Messaging 39Assigning a Greeting Table and the number of rings before Enterpr
Edge Voice Messaging answers 40Enabling Touchtone Gate 41Setting up the fax answering extension 42Enabling and disabling Enterprise Edge Voice Messaging 42
Chapter 5 Automated Attendant Status settings 45Overview 45Setting the Operator Status 45Changing the Operator password 45Changing the Operator default extension 46Setting the Business Status 46Making changes from a remote telephone 47Changing the Business Status from a remote telephone 48Changing a Company Greeting from a remote telephone 48Setting the Answer Lines status 49Setting the Return to Automated Attendant Status 50
Chapter 6 Overview of Mailboxes 53Types of mailboxes 53
System Administrator Mailbox 53General Delivery Mailbox 54User Mailboxes 54Guest Mailboxes 54Information Mailboxes 54
Tools and materials 54Terms and definitions 55
Enterprise Edge 2.0 Voice Messaging Set Up and Operation Guide P0911620 Issue 02
Contents 5
65
Class of Service 56Default values 57
Mailbox Overrides 58Company Directory 59Alternate extensions 59Express Messaging Line 60Call Screening 60Message Waiting Notification 60Outdial route 61
Chapter 7 Special Mailboxes: General Delivery and System Administrator 63Overview 63
System Administrator Mailbox 64General Delivery Mailbox 64Classes of Service for Special Mailboxes 65
Setting up the System Administrator and General Delivery MailboxesOpening the mailboxes 65Initializing the mailboxes 65Recording the mailbox in the Company Directory 66Recording the mailbox greeting 68Selecting a Mailbox Greeting 69
Listening and responding to messages left in Special Mailboxes 70Copying a message to another Mailbox 72Replying to a message 73
Chapter 8 Creating Mailboxes 77Overview 77
Tools and materials 77User Mailboxes 77
Adding a User Mailbox 78Adding multiple mailboxes 79Guest Mailboxes 80
When to use Guest Mailboxes 80Adding Guest Mailboxes 82
Information Mailboxes 83When to use Information Mailboxes 83Adding Information Mailboxes 84
Chapter 9 Changing and Deleting Mailboxes 85Overview 85Changing mailbox options 85Deleting a mailbox 86
P0911620 Issue 02 Enterprise Edge 2.0 Voice Messaging Set Up and Operation Guide

6 Contents
pt
Chapter 10 Mailbox Administration Tasks 87Overview 87
Administering Special Mailboxes 87Administering Personal Mailboxes 87
About mailbox passwords 88Incorrect password lock-out 88Password expiry 88
Enabling external initialization 89Configuring the Company Directory 89Setting up Outcalling Channels 90
Designating the number of channels for Off-premise Message Notification and Outbound Transfer 90
Enabling and disabling the General Delivery Mailbox 90Setting up the Operator’s Mailbox 91Broadcast and Group messages 91
Sending Broadcast Messages 91Sending Group Messages 92Preparing a Group List 93Adding a Group List 94Changing a Group List 94Changing the Group List leading digit 95Deleting a Group List 96Sending a Group Message 96
Caller ID (CLID) 97
Chapter 11 Mailbox feature codes 99Overview 99Programming a memory button 100
Chapter 12 Overview of Custom Call Routing 103Planning and designing a CCR Tree 106About the CCR Tree structure 106
Next Action 108
Chapter 13 Building, saving, and assigning a CCR Tree 109Overview 109
Tools and materials 109Beginning a new CCR Tree and recording the Home node voice prom
109Beginning to build a new Tree 110
Adding a sub-node to a Menu node 111Adding an Information Mailbox 113Adding a Mailbox node 114
Enterprise Edge 2.0 Voice Messaging Set Up and Operation Guide P0911620 Issue 02

Contents 7
rt
port
port
Adding a Transfer 115Adding a Transfer to an internal extension 115Adding a Transfer to an external number 115
Saving a CCR Tree 117Assigning a CCR Tree 117Testing a CCR Tree 117
Chapter 14 Changing or deleting a CCR Tree 119Overview 119
Tools and materials 119Precautions 119
Saving a CCR Tree to a file 119Disabling a CCR Tree 120Changing the Home node menu 120Changing a Sub-node 121Moving a node 121Deleting a menu 121Deleting a Tree 122
Chapter 15 Enterprise Edge Voice Messaging Reports 125Overview 125Directory Report 126Numeric Mailbox Report 126System Group List Report 126Mailbox Activity Report 127Caller ID (CLID) Report 127Dialing Translation Report 127Alarm Report 127Custom Call Routing Report 127Enterprise Edge Voice Messaging Call Handling and Port Usage Repo
128Enterprise Edge Voice Messaging Call Handling and Port Usage Re
Part 1 128Enterprise Edge Voice Messaging Call Handling and Port Usage Re
Part 2 128System Configuration Report 128
System Configuration Report, Part 2 128System Configuration Report, Part 3 129System Configuration Report, Part 4 129Fax On Demand Usage Report 129
P0911620 Issue 02 Enterprise Edge 2.0 Voice Messaging Set Up and Operation Guide

8 Contents
very
ing
132ise
35
red”
Chapter 16 Enterprise Edge Voice Messaging Troubleshooting 131Overview 131System trouble 131
Automated Attendant does not answer calls 131Call display information is lost 131The Automated Attendant transfers some callers to the General Deli
Mailbox 132Greetings are played at the wrong time of day 132Greetings are played on the wrong line 132A telephone cannot be forwarded to Enterprise Edge Voice Messag
132Feature 981 produces a Log prompt on the Enterprise Edge displayMailbox owner is unable to reply to an external caller, use Off-prem
Message Notification or Outbound Transfer 133Operating trouble 134
Personalized Greetings do not play 134Mailboxes are not accepting messages 134Messages are being lost in a mailbox 134A mailbox owner lost the mailbox password 134A mailbox owner cannot access their mailbox 134A mailbox is not in the Company Directory 135Calls are answered by the wrong mailbox 135A mailbox cannot be added to Enterprise Edge Voice Messaging 1You cannot enter a name for a mailbox 135Incomplete messages are received in a mailbox or “Message delive
plays while recording a message, or a Enterprise Edge Voice Messaging session ends unexpectedly 135
You cannot create a Group List 135Custom Call Routing (CCR) trouble 136
The Tree cannot be deleted 136The Tree cannot be enabled 136The Mailbox is full 136Deleting a mailbox 136
Appendix A: Dialing Translation 139Overview 139
How the Dialing Translation Table works 139Phone number translation 139Network Access 141Dialing Translation Parameters 141
Setting the Dialing Translation Parameters 142Building a Dialing Translation Table 143Reviewing entries in the Dialing Translation Table 143Changing an entry in the Dialing Translation Table 144Deleting a Dialing Translation Table entry 144
Enterprise Edge 2.0 Voice Messaging Set Up and Operation Guide P0911620 Issue 02

Contents 9
ed
Appendix B: Enterprise Edge Configuration Tips 145Overview 145Delayed answering by the Enterprise Edge Voice Messaging Automat
Attendant 145Ringing lines and answer buttons 145Ringing Answer Button 146Using Call Forward All Calls (CFAC) and Call Forward No Answer
(CFNA) 146Sample Enterprise Edge Voice Messaging setups 146
Setting Up for a small company 147Setting Up for a medium sized company 148
Feature Compatibility 151
Appendix C: Resetting Enterprise Edge Voice Messaging 155Overview 155Resetting Enterprise Edge Voice Messaging 155
Glossary 157
Index 165
P0911620 Issue 02 Enterprise Edge 2.0 Voice Messaging Set Up and Operation Guide

10 Contents
Enterprise Edge 2.0 Voice Messaging Set Up and Operation Guide P0911620 Issue 02

Section I - Getting started• Introduction
P0911620 Issue 02 Enterprise Edge 2.0 Voice Messaging Set Up and Operation Guide

P0911620 Issue 02 Enterprise Edge 2.0 Voice Messaging Set Up and Operation Guide

e
ns
and
tion
ilbox
ting. a
nu to well d
Introduction
About Enterprise Edge Voice MessagingEnterprise Edge Voice Messaging works with your Enterprise Edge telephonsystem and Enterprise Edge Voice Applications Manager, the Administrationsoftware, to give you easy access to administering Enterprise Edge.
For more information on installing and using Enterprise Edge Voice ApplicatioManager see Appendix B: Enterprise Edge Configuration Tips on page 145.
Enterprise Edge Voice Messaging is available in two different packages: basicoptional.
Basic Enterprise Edge Voice MessagingThe following is a brief description of the basic Enterprise Edge Integrated Solusoftware.
Voice MessagingAccurately records callers’ messages and stores them in a mailbox for easy retrieval. Each Enterprise Edge telephone in your system can have its own maand personal greeting.
Automated AttendantAnswers your business calls promptly, 24 hours a day, with a Company GreeA voice prompt offers callers a menu of options to direct their call by selectingdigit on the dialpad.
Custom Call Routing (CCR)Enhances the Automated Attendant menu with a customized CCR Home Meoffer callers a wider range of call routing options and access to sub-menus asas information messages. CCR allows you to determine the menu options anrecord the voice prompts that guide callers along call paths.
1
P0911620 Issue 02 Enterprise Edge 2.0 Voice Messaging Set Up and Operation Guide

14 Introduction
s of your
g or e
r to
, uide
ge
l the
Enterprise Edge Integrated Solution optional softwareEnterprise Edge Integrated Solution optional software includes all the featureEnterprise Edge Voice Messaging and the following components that enhanceoffice communications.
Enterprise Edge Message NetworkingEnterprise Edge Message Networking links Enterprise Edge Voice Messaginother voice mail systems at different locations. Message Networking allows thexchange of Voice Messages between users at different sites connected on anetwork via Transmission Control Protocol/Internet Protocol (TCP/IP).
Audio Messaging Interchange Specification (AMIS) Networking and Digital Networking
Includes General Networking parameters, Audio Messaging Interchange Specification (AMIS)-specific parameters and AMIS Site Administration. Refethe Enterprise Edge 2.0 Voice Messaging AMIS Set Up and Operation Guide for information about AMIS Networking. For information about digital networkingrefer to the Enterprise Edge 2.0 Message Networking Set Up and Operation G.
Enterprise Edge Unified MessagingEnterprise Edge Unified Messaging consists of three features:
• Enterprise Edge Unified Messaging
• Enterprise Edge Personal Mailbox Manager
• Enterprise Edge Operator Manager
Enterprise Edge Unified Messaging
Enterprise Edge Unified Messaging lets you create and receive Enterprise EdVoice Messaging messages on your personal computer (PC).
Enterprise Edge Personal Mailbox Manager
Enterprise Edge Personal Mailbox Manager lets you administer from a PC almailbox features and functions that are available through ƒ·°⁄. Enterprise Edge Personal Mailbox Manager gives you the ability to:
• Initialize your personal mailbox
• Record your primary, personal and alternate greetings
• Select your primary, personal and alternate greetings
• Change your spoken name that appears in the Company Directory
• Change your Target Attendant
• Set up and maintain Off-premise Message Notification
• Set up and maintain Outbound Transfer
Enterprise Edge 2.0 Voice Messaging Set Up and Operation Guide P0911620 Issue 02

Introduction 15
ator ess
from ilable
ture
and r to h call ys r of
ption
Enterprise Edge Personal Mailbox Manager also gives the System Administraccess to Information Mailboxes, the System Administrator Mailbox, the BusinOpen status tab and the record Company Greetings tab.
Enterprise Edge Operator Manager
Enterprise Edge Operator Manager lets the System Administrator administer a PC the Enterprise Edge Voice Messaging features and functions that are avathrough ƒ·°¤. Enterprise Edge Operator Manager gives you theability to:
• Change the Operator password
• Change the Business Status to open or closed
• Enable and disable the system attendant (Operator)
• Change the extension of the system attendant (Operator)
• Enable and disable the Enterprise Edge Voice Messaging Call Answer fea(Automated Attendant and call answering)
Enterprise Edge Call CenterThe Enterprise Edge Call Center system handles incoming calls as efficientlyeconomically as possible. Incoming calls are distributed to available agents oEnterprise Edge Call Center greetings in your call center. To ensure that eacis handled successfully, the Enterprise Edge Call Center system answers, plagreetings and routes each incoming call to the first available agent in the ordethe call’s arrival.
Enterprise Edge Call Center is an Enterprise Edge Voice Messaging system othat is enabled with a Security Keycode.
P0911620 Issue 02 Enterprise Edge 2.0 Voice Messaging Set Up and Operation Guide

16 Introduction
ge ctions tting
ion is
cs stem.
ppear
g
nsion
with
How this guide is organizedThis guide leads a System Administrator through setting up the Enterprise EdVoice Messaging system and serves as an ongoing reference aid. The instruin this guide are presented in easy-to-follow steps that cover all aspects of seup and administering your Enterprise Edge Voice Messaging system.
This section tells you what to expect as you read the guide, and how informatpresented.
The Appendices at the back of this guide include detailed information on topirelevant to setting up and operating the Enterprise Edge Voice Messaging sy
Symbols and conventionsThe following conventions and symbols are used to describe the words that aon the telephone display and dialpad.
What appears on the displayThe telephone displays in this guide use the Enterprise Edge Voice Messagindefault settings and sample names.
For example:
This display shows an example of the Enterprise Edge Voice Messaging extenumber.
PrerequisitesBefore you set up Enterprise Edge Voice Messaging, ensure you are familiarhow Enterprise Edge Voice Applications Manager works.
Convention/Symbol Example Purpose
Display font, mixed case Pswd: Display prompts. Used on one- and two-line display telephones. You must performan action in response to the prompt.
Display font, word in capital letters and underlined
MBOX Display button option. Appears on two-line display telephones only. Press the button directly below the option on the display to proceed.
Dialpad buttons £ Represents the buttons you press on the dialpad to select a particular option.
Set 2100 OK
Enterprise Edge 2.0 Voice Messaging Set Up and Operation Guide P0911620 Issue 02

Introduction 17
The Enterprise Edge Voice Messaging document set
Document Audience Description
Enterprise Edge 2.0 Voice Messaging Quick Reference Guide
All users Describes how to use the most common Enterprise Edge Voice Messaging commands and features.
Enterprise Edge 2.0 Voice Messaging Reference Guide
All users A more detailed, procedural description of the Enterprise Edge Voice Messaging commands and features available to end users.
Enterprise Edge 2.0 Voice Messaging Set Up and Operation Guide
System Administrator
Instructions for setting up, programming, and operating the Enterprise Edge Voice Messaging system.
Enterprise Edge 2.0 Voice Messaging Programming Record
System Administrator
Planning sheets to support the Enterprise Edge Voice Messaging System Administrator programming tasks.
Enterprise Edge 2.0 Voice Messaging AMIS Set Up and Operation Guide
System Administrator
Instructions for setting up and programming the optional AMIS software.
Enterprise Edge 2.0 Voice Messaging AMIS User Guide
All users Information about programming and using the optional AMIS software.
Enterprise Edge 2.0 Voice Messaging FAX Set Up and Operation Guide
System Administrator
Instructions for setting up and programming the optional FAX software.
Enterprise Edge 2.0 Voice Messaging FAX User Guide
All users Information about programming and using the optional FAX software.
P0911620 Issue 02 Enterprise Edge 2.0 Voice Messaging Set Up and Operation Guide

18 Introduction
Enterprise Edge 2.0 Voice Messaging Set Up and Operation Guide P0911620 Issue 02

Section II - Preparing Enterprise EdgeVoice Messaging for use
• Using Enterprise Edge Voice Applications Manager• Setting up Enterprise Edge Voice Messaging
P0911620 Issue 02 Enterprise Edge 2.0 Voice Messaging Set Up and Operation Guide

P0911620 Issue 02 Enterprise Edge 2.0 Voice Messaging Set Up and Operation Guide

tions
at is /IP)
dge
se
ocal
rver is
dge
ot t
Using Enterprise Edge Voice Applications Manager
OverviewEnterprise Edge Voice Applications Manager is a Windows® based application thatlets the System Administrator set up and administer Enterprise Edge Voice Messaging features.
Enterprise Edge Voice Applications Manager can be accessed by clicking theEnterprise Edge Voice Messaging icon on the Enterprise Edge Voice ApplicaManager window.
You can also install Enterprise Edge Voice Applications Manager on any PC thconnected to the same Transmission Control Protocol/Internet Protocol (TCPbased local area network as the Enterprise Edge server.
Note: To record voice prompts or greetings using Enterprise Edge Voice Applications Manager from a PC, the PC must have voice recording capabilities, including a sound card, microphone and speakers.
Enterprise Edge Voice Applications Manager installation overviewTo use this guide, you must be familiar with Enterprise Edge and Enterprise EVoice Messaging terminology as well as the Windows® operating system.
PC prerequisitesYour PC must meet the following requirements before you install the EnterpriEdge Voice Applications Manager client software:
• Your PC must be running Windows® 95, Windows® 98 or Windows® NT.
• If Enterprise Edge Voice Applications Manager is to be connected over a larea network, your PC must be equipped with the required hardware and configured to access the same local area network the Enterprise Edge seon.
• Your PC requires at least 2 MB of free disk space to install the Enterprise EVoice Applications Manager client software.
• You must have installed DCOM95 for Windows 95 on your PC. If you do nhave DCOM95 installed, you can download it from the Microsoft website ahttp://www.microsoft.com
2
P0911620 Issue 02 Enterprise Edge 2.0 Voice Messaging Set Up and Operation Guide

22 Using Enterprise Edge Voice Applications Manager
ct
Installing the Enterprise Edge Voice Applications Manager client software
To install the Enterprise Edge Voice Applications Manager software:
1. Exit any Windows-based programs that are running.
2. On the taskbar, click the Start button, point to Find and then click Computer.The Find: Computer dialog box appears.
3. In the Named list box, type the name of the Enterprise Edge server or selethe Enterprise Edge server from the list. If you do not know the name, askyour System Administrator.
4. Click the Find Now button.The Enterprise Edge server icon appears in the list below.
5. Double-click the Enterprise Edge server icon.The Enterprise Edge server window opens.
6. Double-click the NortelDT folder.
7. Double-click the Enterprise Edge Voice Applications Manager folder.
8. Double-click the Setup.exe file.
9. Follow the instructions on the display to complete the installation.
Enterprise Edge 2.0 Voice Messaging Set Up and Operation Guide P0911620 Issue 02

Using Enterprise Edge Voice Applications Manager 23
a
rd
Starting the Enterprise Edge Voice Applications Manager client software from a PC
To start the Enterprise Edge Voice Applications Manager client software fromPC:
1. Click Start, point to Programs, point to Enterprise Edge Voice Applications Manager and then click Enterprise Edge Voice Applications Manager.The Administration Password dialog box appears.
2. In the Server Name or IP Address box, type your Enterprise Edge server Name or IP Address.
3. In the Administration Password box, type your System Administrator Mailbox number and password combination and click the OK button.For information on the System Administrator Mailbox number and passwocombination refer to System Administrator and General Mailbox mailbox number and password combinations on page 65.
The Enterprise Edge Voice Applications Manager menu appears.
P0911620 Issue 02 Enterprise Edge 2.0 Voice Messaging Set Up and Operation Guide

24 Using Enterprise Edge Voice Applications Manager
rom
e
ved
Removing the Enterprise Edge Voice Applications Manager client software
To remove the Enterprise Edge Voice Applications Manager client software fyour PC:
1. Click Start, point to Settings and then click Control Panel.The Control Panel window appears.
2. Double-click Add/Remove Programs.
3. From the list, select Enterprise Edge Voice Applications Manager and click the Add/Remove button.A message appears that asks you to confirm the deletion.
4. Click the Yes button.The Uninstall program removes the items associated with Enterprise EdgVoice Applications Manager. This procedure takes several seconds.
The Enterprise Edge Voice Applications Manager client software is now remofrom your PC.
Enterprise Edge 2.0 Voice Messaging Set Up and Operation Guide P0911620 Issue 02

ailbox can m.
r is
ne, a ture
tion Voice
nces,
t ialpad.
Setting up Enterprise Edge Voice Messaging
OverviewThis chapter includes information about:
• Who can use Enterprise Edge Voice Messaging
• Using Enterprise Edge Voice Messaging with an Enterprise Edge two linedisplay telephone
• Ending a session
• Accessing your Personal Mailbox while away from the office
• Interrupting a voice prompt
• Recording prompts and greetings
Who can use Enterprise Edge Voice MessagingEnterprise Edge Voice Messaging can be used by any outside caller and by mowners in your company. Inside your office, Enterprise Edge Voice Messagingbe used from any touch tone phone connected to your Enterprise Edge systeMailbox owners who are away from the office can use Enterprise Edge VoiceMessaging can from any touch tone phone.
Incoming calls from a rotary dial telephone are transferred to your company Receptionist or designated Operator. If the Operator is not available, the calledirected to the General Delivery Mailbox.
When using Enterprise Edge Voice Messaging from a Enterprise Edge telephomailbox owner must first enter a feature code. For more information about feacodes, refer to Mailbox feature codes on page 99.
Using Enterprise Edge Voice Messaging with an Enterprise Edge two line display telephone
The display on Enterprise Edge two line display telephones provides informaabout commands and options available when you are using Enterprise Edge Messaging.
The display can show up to three display button options at once. In some instayou must wait for the voice prompt to play the other available options. When options are played by the voice prompt and the corresponding button does noappear on the display, you must select the option using the numbers on the d
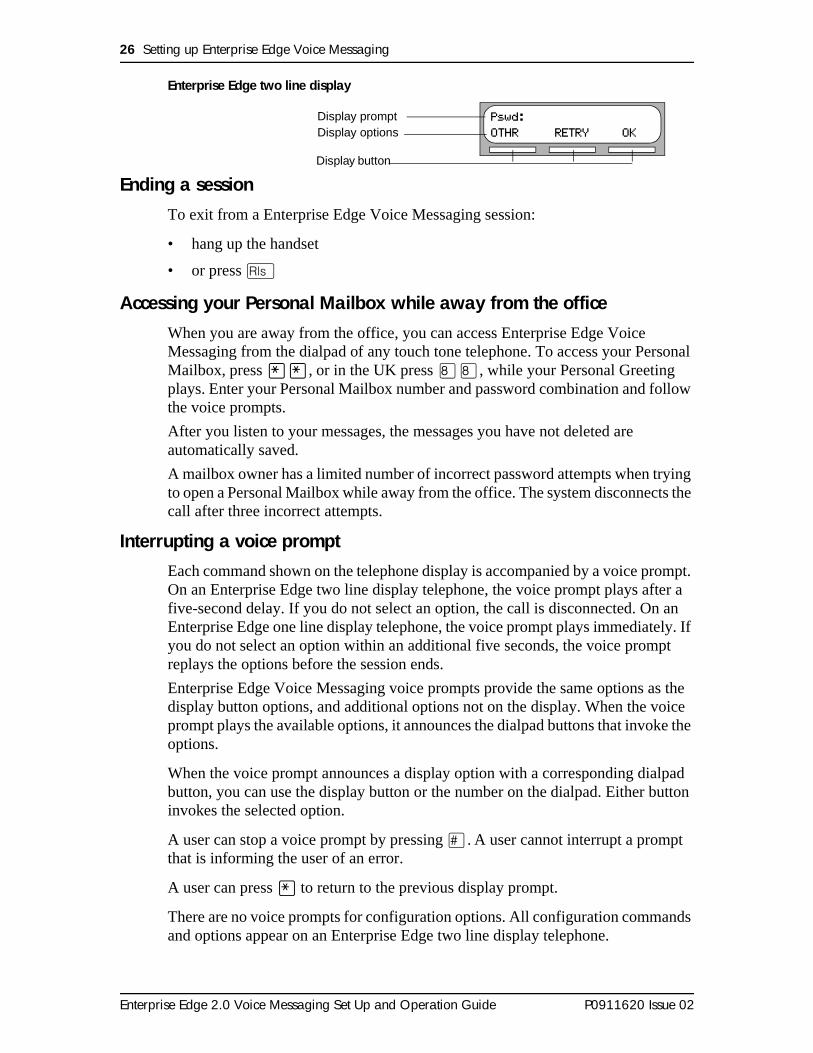
The Enterprise Edge two line display display is shown in the figure Enterprise Edge two line display on page 26.
3
P0911620 Issue 02 Enterprise Edge 2.0 Voice Messaging Set Up and Operation Guide
26 Setting up Enterprise Edge Voice Messaging
sonal
llow
ying s the
ompt. er a an ly. If t
s the ice e the
lpad utton
nds
Enterprise Edge two line display
Ending a sessionTo exit from a Enterprise Edge Voice Messaging session:
• hang up the handset
• or press ®
Accessing your Personal Mailbox while away from the officeWhen you are away from the office, you can access Enterprise Edge Voice Messaging from the dialpad of any touch tone telephone. To access your PerMailbox, press ••, or in the UK press °°, while your Personal Greeting plays. Enter your Personal Mailbox number and password combination and fothe voice prompts.
After you listen to your messages, the messages you have not deleted are automatically saved.
A mailbox owner has a limited number of incorrect password attempts when trto open a Personal Mailbox while away from the office. The system disconnectcall after three incorrect attempts.
Interrupting a voice promptEach command shown on the telephone display is accompanied by a voice prOn an Enterprise Edge two line display telephone, the voice prompt plays aftfive-second delay. If you do not select an option, the call is disconnected. OnEnterprise Edge one line display telephone, the voice prompt plays immediateyou do not select an option within an additional five seconds, the voice prompreplays the options before the session ends.
Enterprise Edge Voice Messaging voice prompts provide the same options adisplay button options, and additional options not on the display. When the voprompt plays the available options, it announces the dialpad buttons that invokoptions.
When the voice prompt announces a display option with a corresponding diabutton, you can use the display button or the number on the dialpad. Either binvokes the selected option.
A user can stop a voice prompt by pressing £. A user cannot interrupt a prompt that is informing the user of an error.
A user can press • to return to the previous display prompt.
There are no voice prompts for configuration options. All configuration commaand options appear on an Enterprise Edge two line display telephone.
Pswd:OTHR RETRY OK
Display promptDisplay options
Display button
Enterprise Edge 2.0 Voice Messaging Set Up and Operation Guide P0911620 Issue 02

Setting up Enterprise Edge Voice Messaging 27
and rded
eakers
n your
ne
Recording greetings and promptsTo record greetings and prompts, click the Voice button and record greetingsprompts from your PC or Enterprise Edge telephone, or locate previously recogreetings and prompts.
The PC you use to record prompts and greetings must have a sound card, spand a microphone.
The telephone you use to record prompts and greetings must be a telephone oEnterprise Edge system.
You can use your PC or Enterprise Edge telephone to record:
• Automated Attendant prompts and greetings.See Recording a Company Greeting on page 35 and Recording a Custom Menu prompt on page 38.
• Mailbox prompts and greetings.See Adding a Group List on page 94.
• CCR prompts and greetings.See Beginning to build a new Tree on page 110Adding a Menu sub-node on page 112 andAdding an Information Mailbox on page 113.
Recording a greeting or prompt from your telephone handset
1. Click the Voice button.The dialog box you can record greetings and prompts from appears.
2. In the Set is box, type the extension number of the Enterprise Edge telephoyou are using to record the greeting or prompt.
3. Click the Record button.The telephone rings.
4. Pick up the handset. After the tone, record your greeting or prompt.
5. After you finish recording the greeting or prompt, click the Stop button.
6. To listen to the greeting or prompt, click the Play button.
7. Click the Close button and replace the telephone handset.A message appears that asks you to confirm that you want to save the recording.
8. Click the Yes button to save the changes.You return to the dialog box.
9. Record another greeting or prompt or click the Close button.
P0911620 Issue 02 Enterprise Edge 2.0 Voice Messaging Set Up and Operation Guide

28 Setting up Enterprise Edge Voice Messaging
ager card,
Recording a greeting or prompt from your PCTo record a greeting or prompt using Enterprise Edge Voice Applications Manfrom a PC, the PC must have voice recording capabilities, including a sound microphone and speakers.
1. Click the Voice button.The dialog box you can record greetings and prompts from appears.
2. At the PC Microphone and Speakers option, click the Record button.The Sound Recorder dialog box appears.
3. Click the Record button to record the greeting or prompt.
4. After you finish recording the greeting or prompt, click the Stop button.
5. Click the Close button to close the Sound Recorder.A message appears that asks you to confirm that you want to save the recorded file.
6. Click the Yes button on the next two dialog boxes to save the recording.
7. Click the Close button to return to the dialog box.
8. Click the OK button to close the dialog box.
Locating a previously recorded greeting or prompt
1. Click the Voice button.The dialog box you can locate the greeting or prompt from appears.
2. Click the Advanced button.The dialog box expands to show the Upload Voice and Download Voice options.
3. If you know the location of the greeting or prompt, in the Load from File box type the location of the file and click the Load from File buttonorif you do not know the location of the greeting or prompt, at the Upload Voice option, click the Browse button and follow steps 4 through 8.The Open dialog box appears.
4. From the Look in list, select the location of the file.
5. In the File name box, type the file name.
6. From the Files of type list, select the file type.
7. Click the Open button.
8. Click the Close button and then click the OK button to accept the greeting orprompt.
Enterprise Edge 2.0 Voice Messaging Set Up and Operation Guide P0911620 Issue 02

Section III - Automated Attendant• Setting up an Automated Attendant
• Automated Attendant Status settings
P0911620 Issue 02 Enterprise Edge 2.0 Voice Messaging Set Up and Operation Guide

P0911620 Issue 02 Enterprise Edge 2.0 Voice Messaging Set Up and Operation Guide

the
also the
fferent
tions e this
you dant
Setting up an Automated Attendant
OverviewThe Automated Attendant provides a convenient means of answering your company’s incoming telephone lines with a prerecorded greeting selected fromGreeting Table, according to the time of day.
You can record and assign different greetings to the Greeting Tables. You canspecify which greeting plays for particular lines. For example, you can programsystem so that callers hear one greeting when they call the sales line, and a digreeting when they call the customer support line.
After the greeting, the Automated Attendant Menu offers callers a range of opthat they can select using the dialpad of their telephone. You can also customizmenu to provide a different selection of options for callers.
If you want to offer a greater range of options and services for incoming calls,can assign a Custom Call Routing (CCR) menu instead of the Automated AttenMenu.
Automated Attendant answering overview
4
Incoming call
Voice Attendant
answersanswersReceptionist
Company Greetingplays
Custom Call Routing
Home Menu options play
Voice Attendant Menu options play
P0911620 Issue 02 Enterprise Edge 2.0 Voice Messaging Set Up and Operation Guide
32 Setting up an Automated Attendant
ing
ers
ffice.
ng the ID)
t
be etings
This chapter contains information and procedures on:
• recording your company Greetings
• setting up a Greeting Table
• assigning greetings to the table
• creating a custom menu
• adding an Alternate Language for your greetings
• assigning the Greeting Table Attendant
• assigning a Custom Call Routing menu
• programming the business hours for the Automated Attendant
• programming which lines are answered by Enterprise Edge Voice Messag
• setting the number of rings before Enterprise Edge Voice Messaging answ
You can revise the Automated Attendant settings to reflect changes in your oThis section also contains information on:
• viewing and changing which lines are answered by Enterprise Edge VoiceMessaging
• enabling or disabling the Touchtone Gate option
• enabling or disabling the Enterprise Edge Voice Messaging option
Other options available are explained elsewhere in this guide, such as changiCompany Directory status for a mailbox and adding or changing a Caller ID (CLDialing Table.
Greeting TablesThe Greeting Tables store the recordings played by the Automated Attendanto incoming callers. Enterprise Edge Voice Messaging provides four GreetingTables numbered 1 to 4.
You can record a total of 40 Company Greetings, but only four greetings canassigned a Greeting Table at any one time. You can assign the same four greto each table, or you can assign unique greetings to each table.
Enterprise Edge 2.0 Voice Messaging Set Up and Operation Guide P0911620 Issue 02

Setting up an Automated Attendant 33
les.
s, and
he
n one two
ust rnate
the
ess
The following shows an example of how Greetings can be assigned to the tab
We recommend using greetings 1 through 16 as your daily business greetinggreetings 17 through 40 as special greetings.
Each Greeting Table is divided into four sections, based on the time of day. Tfollowing shows the default times assigned to the sections.
Greeting Tables using the Alternate Language
If you use a Primary and an Alternate Language, we recommend that you assigGreeting Table to the Alternate Language. For example, if your company hasincoming lines and you want to assign a line to the Alternate Language, you massign the line to a Greeting Table that has all the greetings recorded in the AlteLanguage. This means you can record greetings 5, 6, 7 and 8 in the AlternateLanguage and assign the greetings to Greeting Table 2 for line 2.
Greeting Type Table 1 Table 2 Table 3 Table 4
Morning Greeting 1 Greeting 5 Greeting 9 Greeting 13
Afternoon Greeting 2 Greeting 6 Greeting 10 Greeting 14
Evening Greeting 3 Greeting 7 Greeting 11 Greeting 15
Non-business Greeting 4 Greeting 8 Greeting 12 Greeting 16
Greeting type Default start times
Morning 12:00 am
Afternoon 12:00 pm
Evening 6:00 pm
Non-business 6:00 pm
If default hours are used, the Non-business Greeting is not heard by caller.
The Non-business Greeting can be turned on and off using the BusinStatus feature.
P0911620 Issue 02 Enterprise Edge 2.0 Voice Messaging Set Up and Operation Guide

34 Setting up an Automated Attendant
o be gs to mber
ans nd 4.
to 4 t you
ption your g is in
e the tem
mber
Company GreetingsBefore you record your company Greetings, determine the type of greetings tused on the different incoming telephone lines and what you want the greetinsay. You must prepare at least four greetings. As you record your greetings, nuthem from 1 to 4.
The four greetings reflect the Morning, Afternoon, Evening and Non-businesshours. For example:
1) Morning Greeting: “Good morning. You have reached Touchstone Marketing.”
2) Afternoon Greeting: “Good afternoon. You have reached Touchstone Marketing.”
3) Evening Greeting: “Good evening. You have reached Touchstone Marketing.”
4) Non-business Greeting: “You have reached Touchstone Marketing. Our business hours are Monday to Friday from 8:00 a.m. to 5:00 p.m. Please stay on the line and leave a message. Thank you for calling.”
Greetings 1 through 4 are assigned by default to all Greeting Tables. This methat Greeting 1 is played as the Morning Greeting for Greeting Tables 1, 2, 3 a
If you use only one Greeting Table, the numbered greetings you record from 1play automatically. You do not have to assign Greetings 1 to 4 to the Table, bumust select the language preference.
If you use a Primary and Alternate Language, it is a good idea to record the o· instruction in the Alternate Language. For example, if you use English as Primary Language and French as your Alternate Language, your main greetinEnglish and the option · instruction is in French. For example:
“Good morning. This is Touchstone Marketing. To use our voice messagingservice in French, press ·.”
Since the default Automated Attendant Menu prompt does not announce an Alternate Language Option, your Greeting must instruct a caller to press · to use the Alternate Language.
Company Greetings can be 1 to 10 minutes in duration. If you need to changgreeting duration, you must change the Class of Service assigned to the SysAdministrator Mailbox. For information on how to change the setting, refer to Changing mailbox options on page 85.
After you determine what your Greetings are, practice recording them. Remeto speak slowly and clearly, at a pace that is easy to understand.
Enterprise Edge 2.0 Voice Messaging Set Up and Operation Guide P0911620 Issue 02

Setting up an Automated Attendant 35
d
Recording a Company Greeting
To record a Company Greeting:
1. Click the Auto Attendant menu and then click Company Greetings.The Company Greetings dialog box appears.
2. Click the number of the greeting you want to record.
3. Follow the steps in Recording a greeting or prompt from your telephone handset on page 27 to record a greeting from your telephone handsetorfollow the steps in Recording a greeting or prompt from your PC on page 28 to record a greeting from your PCor follow the steps in Locating a previously recorded greeting or prompt on page 28 to select a previously recorded greeting.
Setting up a Greeting TableTo set up a Greeting Table, complete the following procedures to:
• assign a greeting and a CCR Tree to a Greeting Table
Note: You must build a Custom Call Routing (CCR) Tree before you can assign it.
• set your company’s Business Hours
• assign a language preference
• assign a Greeting Table Attendant
• record Custom Menu prompts, if you want to replace the default AutomateAttendant Menu.
P0911620 Issue 02 Enterprise Edge 2.0 Voice Messaging Set Up and Operation Guide

36 Setting up an Automated Attendant
ree ting
eting ign a u
to
eting
Assigning greetings and CCR Trees to Greeting TablesFor each Greeting Table you can assign what greeting plays and what CCR Tcalls route to depending on the time of day. Assigning a CCR Tree to a GreeTable is optional. You must build a CCR Tree before you can assign it.
If you do not assign a CCR Tree to a Greeting Table, the caller hears the greyou assign and then hears the Automated Attendant menu prompt. If you assgreeting and a CCR Tree to a Greeting Table, the caller hears the greeting yoassign and is routed to a CCR Tree.
To assign greetings and CCR Trees to a Greeting Table:
1. Click the Auto Attendant menu, point to Greeting Table and click the number of the Greeting Table you want to configure.The Greeting Table Setup dialog box appears with the Routing tab open.
2. At the Greeting option, in the Morning , Afternoon, Evening and Non-business boxes, type the greeting numbers you want to use.
3. At the CCR Tree option, select from each list box the CCR Tree you want calls to route to for each time of day. If you do not want calls to route to a CCR Tree, select None from the list box.
4. Click the OK button.
Setting the Business HoursSetting the Business Hours determines when greetings and CCR Trees applyGreeting Tables. Business Hours are divided into the categories of Morning, Afternoon, Evening and Non-business for each day of the week for each GreTable.
To set the Business Hours:
1. Click the Auto Attendant menu, point to Greeting Table and then click the Greeting Table you want to configure.The Greeting Table Setup dialog box is displayed.
2. Click the Hours tab.
3. From the list box, select the day of the week you want to configure.
4. Use the arrows to select a start time in the Morning , Afternoon, Evening and Non-business boxes.
5. Click the OK button.
Enterprise Edge 2.0 Voice Messaging Set Up and Operation Guide P0911620 Issue 02

Setting up an Automated Attendant 37
rt time 59
ature. play ss s
he ou can which e sign
the s no
To set up the days when your business is not open, set the Non-business stato 12:00 a.m. Then set the Morning, Afternoon and Evening start times to 11:p.m. so that the Non-business greeting plays throughout the day.
You can turn the Non-business greeting on or off using the Business Status feIf you set the Business Status to off, the Non-business greeting continues to until you set the Business Status to on. For information on setting the BusineStatus, see Setting the Business Status on page 46 and Changing the Business Statufrom a remote telephone on page 48.
Assigning the language preferenceWhen all your greetings are assigned to the Greeting Table, you can assign tlanguage preference. You can change the language preference at any time. Yset the language preference for each Greeting Table. This setting determines language the Automated Attendant uses when answering incoming calls. If thEnterprise Edge Voice Messaging Bilingual option is set to No, you do not asa language preference.
To assign an language preference:
1. Click the Auto Attendant menu, point to Greeting Table and then click the Greeting Table you want to configure.The Greeting Table Setup dialog box appears.
2. Click the Answering tab.
3. At the Language Preference option, select Primary to use the Primary Language or select Alternate to use the Alternate Language.
4. Click the OK button.
Assigning the Greeting Table AttendantAssigning the Greeting Table Attendant overrides the designated Operator. IfAttendant does not answer, the call goes to the destination mailbox. If there imailbox, the call goes to the General Delivery Mailbox.
To assign the Greeting Table Attendant:
1. Click the Auto Attendant menu, point to Greeting Table and then click the Greeting Table you want to configure.The Greeting Table Setup dialog box appears.
2. Click the Answering tab.
3. In the Attendant Extension box, type the extension of the Greeting Table Attendant.
4. Click the OK button.
P0911620 Issue 02 Enterprise Edge 2.0 Voice Messaging Set Up and Operation Guide

38 Setting up an Automated Attendant
a
tom your pt.
t of ectory for a
Automated Attendant MenuThe Automated Attendant Menu plays after the company Greeting, and whenmailbox owner accesses the Automated Attendant.
The default Automated Attendant Menu informs the caller: “Using the dialpad, please enter the extension you wish to call. To use the directory, press £. To leave a message, press•. To reach an Operator, press ‚.”
Recording a Custom Menu promptIf the Automated Attendant Menu prompt is set to No, you must record a CusMenu prompt to replace the prerecorded one. You can record a prompt from PC or your telephone handset, or you can select a previously recorded prom
When you record a Custom Menu prompt you can provide the caller with a lisoptions such as choosing the Alternate Language, accessing the Company Diror reaching an Operator. Each Greeting Table has two Custom Menu promptsPrimary and Alternate prompt.
Remember to speak slowly and clearly, at a pace that is easy to understand.
To record a Custom Menu prompt:
1. Click the Auto Attendant menu, click Greeting Table and click the Greeting Table you want to record a prompt for.The Greeting Table Setup dialog box appears.
2. Click the Answering tab.
3. At the Custom Auto Attendant Menu Prompts option, select the Enable check box.
4. Follow the steps in Recording a greeting or prompt from your telephone handset on page 27 to record a greeting from your telephone handsetorfollow the steps in Recording a greeting or prompt from your PC on page 28 to record a greeting from your PCorfollow the steps in Locating a previously recorded greeting or prompt on page 28 to select a previously recorded greeting.
Enterprise Edge 2.0 Voice Messaging Set Up and Operation Guide P0911620 Issue 02

Setting up an Automated Attendant 39
aging
s no e
e
ct
t
y
, or an
fter a the
s to ing t tion.
Changing the Enterprise Edge Voice Messaging language availabilityThe Automated Attendant language is set when Enterprise Edge Voice Messis installed.
If you set the Enterprise Edge Voice Messaging bilingual option to No, there iAlternate Language capability, and all the Classes of Service are assigned thPrimary Language selected. This means that a caller who presses · when using the Automated Attendant is told that the command is not recognized.
To change the Enterprise Edge Voice Messaging language availability and thPrimary and Alternate Languages:
1. Click the Options menu and then click System Parameters.The System Parameters dialog box appears.
2. At the Bilingual option, select Yes to enable the Alternate Language or seleNo to disable Alternate Language capability.
3. From the Primary Language list box, select the Primary Language you wanto use.
4. From the Secondary Language list box, select the Secondary Language youwant to use. The Secondary Language cannot be the same as the PrimarLanguage.
5. Click the OK button.
Programming which lines are answered by Enterprise Edge Voice Messaging
Enterprise Edge Voice Messaging is able to answer all of your incoming linesjust the lines you specify. Before Enterprise Edge Voice Messaging answers incoming line, you must assign the line and set the Answer status to Yes. Themaximum number of lines is 500.
You can assign Enterprise Edge Voice Messaging to answer incoming calls aspecified number of rings. The number of rings ranges from 0 (zero) to 12. If number of rings is left at zero, Enterprise Edge Voice Messaging answers immediately.
For lines equipped with Caller ID (CLID), you must assign the number of ringtwo or more. CLID is not provided until just prior to the second ring, so assignthe number of rings to zero or one prevents CLID from being relayed. WithouCLID, Personalized Greetings and other features related to CLID do not func
P0911620 Issue 02 Enterprise Edge 2.0 Voice Messaging Set Up and Operation Guide

40 Setting up an Automated Attendant
ge
Assigning a Greeting Table and the number of rings before Enterprise Edge Voice Messaging answers
1. Click the Auto Attendant menu, and then click Lines.The Line Administration dialog box appears.
2. Click the line number you want to configure.
3. Click the Change button.
4. At the Answer option, select AA .
5. In the Table Number box, type the Greeting Table number you want to assign to the line selected.
6. In the Number of Rings box, type the number of rings before Enterprise EdVoice Messaging answers.
7. Click the OK button.Repeat steps 3 through 7 for each line you want to configure.
8. Click the Close button.
Enterprise Edge 2.0 Voice Messaging Set Up and Operation Guide P0911620 Issue 02

Setting up an Automated Attendant 41
e dard
s the ate,
on
ted
. If
sing
tor.”
Enabling Touchtone GateThe Touchtone Gate option allows you to speed up routing incoming calls.
When you enable Touchtone Gate, you can choose to have the standard voicprompt play or you can record your own custom prompt. If you choose the stanprompt, the following voice prompt plays after your company greeting: “If you are calling from a touch tone phone, please press ⁄ now. If you are a rotary caller, please hold and you will be transferred.”
Note: If you want to use a custom voice prompt, you must record it before enabling Touchtone Gate. It is recommended that you use Greeting 40 acustom Touchtone Gate voice prompt. When you enable Touchtone GGreeting 40 is the default custom voice prompt. For more information recording Greetings, refer to Recording a Company Greeting on page 35.
If the caller presses ⁄ on the telephone dialpad, the call proceeds to the AutomaAttendant or CCR Tree. If no tone is received, the call is sent back to the Receptionist or designated Operator specified by the Greeting Table. If the attendant is not available, the call is directed to the General Delivery Mailboxthis is not available, the call is disconnected.
The Touchtone Gate voice prompt is not presented to internal callers or while uFeature 981 or Feature 986.
If you disable Touchtone Gate re-record the Company Greeting to include “If you are calling from a touch tone phone, please dial the extension or press £ for the company directory. If not, please hold and you will be transferred to the opera
To enable or disable Touchtone Gate:
1. Click the Auto Attendant menu and then click General AA Parameters.The General Auto Attendant Parameters dialog box appears.
2. At the Touchtone Gate option:select None to disable Touchtone Gateorselect Standard to enable the default promptorselect Custom and enter the number of the customized prompt.
3. Click the OK button.
P0911620 Issue 02 Enterprise Edge 2.0 Voice Messaging Set Up and Operation Guide

42 Setting up an Automated Attendant
send dant st be fault.
e lers to the oice
t can
oice shown
ternal
Setting up the fax answering extensionThis feature allows a caller to use the autosend feature on their fax machine tofaxes to the Enterprise Edge Voice Messaging system. The Automated Attenrecognizes the fax tone and automatically sends the fax messages to the faxanswering extension fax machine for printing. The fax answering extension mua valid Enterprise Edge extension. The fax answering extension is empty by de
Note: The fax answering extension fax machine must be connected to an Enterprise Edge ATA 2 or an Analog Station Module.
To assign a fax answering extension:
1. Click the Fax menu.The Fax Parameters dialog box appears.
2. In the System Fax Extension box, type the fax answering extension.
3. Click the OK button.
Enabling and disabling Enterprise Edge Voice MessagingYou can enable or disable Enterprise Edge Voice Messaging at any time. Thdefault status is enabled. If Enterprise Edge Voice Messaging is enabled, calwho try to reach an extension that is busy or does not answer are transferredextension’s mailbox. Callers can access all mailboxes when Enterprise Edge VMessaging is enabled.
If Enterprise Edge Voice Messaging is disabled, callers hear the Automated Attendant Menu prompt. Callers cannot leave messages in any mailboxes buaccess Information Mailboxes, or press ‚ to reach the Operator.
If the Enterprise Edge Voice Messaging Option is disabled, Enterprise Edge VMessaging users can still leave a message in a mailbox using Feature 980, asin the figure Overview of Sending Messages using Feature 980 on page 43, or the record message option in Feature 981. The mailbox owner can also transfer incalls to another mailbox using Feature 986.
Enterprise Edge 2.0 Voice Messaging Set Up and Operation Guide P0911620 Issue 02

Setting up an Automated Attendant 43
Overview of Sending Messages using Feature 980
To enable or disable Enterprise Edge Voice Messaging:
1. Click the Options menu and then click System Parameters.The System Parameters dialog box appears.
2. At the Voice Mail option, select Enable or Disable.
3. Click the OK button.
Feature 980
Entermailboxnumber
Use Directory
Owner’s nameconfirmation
Record message
Sendmessage
Delivery Options (3)
Certified Urgent
Private Timed
Other
P0911620 Issue 02 Enterprise Edge 2.0 Voice Messaging Set Up and Operation Guide

44 Setting up an Automated Attendant
Enterprise Edge 2.0 Voice Messaging Set Up and Operation Guide P0911620 Issue 02
s, set
Status
d the er
erator
Automated Attendant Status settings
OverviewThis chapter describes how to:
• set the Operator Status to Yes or No
• change the Operator password
• set the Business Status
• assign Enterprise Edge Voice Messaging Line answering
• change the Automated Attendant Status
Setting the Operator StatusWhen your company Receptionist or Operator is available to respond to callerthe Operator Status to Yes. When your company Receptionist or designated Operator goes for a break, lunch, or leaves in the afternoon, set the Operator to No.
If the Operator Status is set to No, a caller who requests an Operator is informeOperator is not available, and is transferred to the Menu options to dial anothextension or leave a message.
To set the Operator Status:
1. Click the Options menu and then click Operator Settings.The Operator Settings dialog box appears.
2. At the Attendant Available option, select Yes if the Operator is available or select No if the Operator is not available.
3. Click the OK button.
Changing the Operator passwordThe Operator password can be reset to the default at any time. The default Oppassword is fl‡‹‡¤°fl‡ (Operator).
To change the Operator password:
1. Click the Options menu and then click Operator Settings.The Operator Settings dialog box appears.
2. Select the Reset Operator Password check box.
3. Click the OK button in the next two dialog boxes to accept your changes.
5
P0911620 Issue 02 Enterprise Edge 2.0 Voice Messaging Set Up and Operation Guide
46 Automated Attendant Status settings
ist or r’s two
the
eneral
erator
rator
he
e s, the e
ss day til the
Status day, tus to
Changing the Operator default extensionWhenever anyone selects the option of speaking to your company ReceptionOperator, Enterprise Edge Voice Messaging transfers the call to the Operatoextension. For example, if Enterprise Edge Voice Messaging is operating on adigit Enterprise Edge extension length, this extension is 21. You can change Receptionist or designated Operator extension.
If the Operator’s extension changes, you must change the extension of the GDelivery Mailbox to the new extension of the Operator.
Callers can request to speak to your company Receptionist or designated Opwhen the Automated Attendant voice prompt announces the option and the Operator Status is set to Yes.
To change the Operator default extension:
1. Click the Options menu and then click Operator Settings.The Operator Settings dialog box appears.
2. In the Attendant box, type the Operator’s extension number.
3. Click the OK button.
Anyone requesting an Operator is transferred to the new extension. If the Opedoes not answer, the call is transferred to the General Delivery Mailbox.
Setting the Business StatusThe Business Status setting overrides the scheduled times programmed for tMorning, Afternoon, and Evening in the Greeting Tables.
If the Business Status is set to Yes, greetings are played according to the timscheduled in the Greeting Tables. For example, if Business Status is set to YeMorning, Afternoon and Evening Greetings play automatically according to thstart times programmed in the Greeting Tables.
When the Receptionist sets the Business Status to No at the end of the busineor prior to the weekend, the Non-business hours Greeting continues to play unBusiness Status is set to Yes.
Have the company Receptionist or designated Operator change the Businessto Yes in the morning when your company opens. At the end of the businesshave the company Receptionist or designated Operator set the Business StaNo.
Enterprise Edge 2.0 Voice Messaging Set Up and Operation Guide P0911620 Issue 02

Automated Attendant Status settings 47
ss
e one. ox.
on.
the
To set the Business Status:
1. Click the Options menu and then click Operator Settings.The Operator Settings dialog box appears.
2. At the Business Open option, select Yes to return to the Greeting Table settings or select No to override the Greeting Table and play the Non-businegreeting.
3. Click the OK button.
Making changes from a remote telephoneYou can access Enterprise Edge Voice Messaging to change a greeting or thBusiness Status by using the dialpad of any internal or external touch tone phRemote administration must be done through the System Administrator MailbThe System Administrator Mailbox must be initialized before remote administration can be accessed.
To access the System Administrator Mailbox:
1. While the greeting plays, press ••, or in the UK press °°.
2. Enter the System Administrator Mailbox number and password combinati
3. Press £.
4. Press ·· to access the Remote Administration Menu.
From the Remote Administration Menu, you can change a greeting, or assignBusiness Status to open or closed.
P0911620 Issue 02 Enterprise Edge 2.0 Voice Messaging Set Up and Operation Guide

48 Automated Attendant Status settings
ce is
the
the
Changing the Business Status from a remote telephoneIf the Business Status is No (office is closed) and you wish to set it to Yes (offiopen), start from the Remote Administration Menu:
The following voice prompts play:
“To open or close the business, press ⁄.”“To change a Company Greeting, press ¤.”“To exit, press •.”
1. Press ⁄.
The following voice prompts play:
“The business is closed.”“To open it, press ⁄.”“To exit, press •.”
2. Press ⁄.
The following voice prompts play:
“The business is open.”“To close it, press ⁄.”“To exit, press •.”
3. Press •.
The Business Status is now set to open.
If the Business Status is set to open and you wish to set it to closed, start fromRemote Administration Menu and follow the voice prompts.
Changing a Company Greeting from a remote telephoneTo change a greeting that has been assigned to a Greeting Table, start from Remote Administration Menu.
The following voice prompts play:
“To open or close the business, press ⁄.”“To change a Company Greeting, press ¤.”“To exit, press •.”
1. Press ¤.
2. Enter the number of the greeting (from 1 to 40) you wish to change.
Enterprise Edge 2.0 Voice Messaging Set Up and Operation Guide P0911620 Issue 02

Automated Attendant Status settings 49
.
es e
e er or swer ng
3. Press £ to accept the greeting number.To listen to the greeting, press ¤. If you want to access a different greeting number, press • and enter the new number.
4. Press ⁄ to record your new greeting.
5. After the tone, record your greeting.
6. Press £ to end your recording.Press ⁄ to replay your recording.To erase and re-record your greeting, press ¤.
7. Press £ to accept your recording.
After the recording is accepted you return to the Remote Administration Menu
Setting the Answer Lines statusEnterprise Edge Voice Messaging can answer all your Central Office (CO) linincluded in line configuration. When Answer Lines is enabled, Enterprise EdgVoice Messaging answers all incoming calls and presents each caller with thCompany Greeting and Automated Attendant Menu. You can designate whethnot Enterprise Edge Voice Messaging answers your company lines. When AnLines is disabled, Enterprise Edge Voice Messaging does not answer incomicalls. All incoming calls must be answered and routed by your company Receptionist.
For more information about line configuration, refer to Programming which lines are answered by Enterprise Edge Voice Messaging on page 39.
To assign Answer Lines:
1. Click the Options menu and then click Operator Settings.The Operator Settings dialog box appears.
2. At the Answer Lines option, select Yes to have your lines answered by Enterprise Edge Voice Messaging or select No to have the call answered by the company Receptionist.
3. Click the OK button.
P0911620 Issue 02 Enterprise Edge 2.0 Voice Messaging Set Up and Operation Guide

50 Automated Attendant Status settings
fter a es a ated ore
t g the
Setting the Return to Automated Attendant StatusThe Automated Attendant Menu plays after the Company Greeting and also acaller leaves a message in a mailbox. The Automated Attendant Menu providcaller with a list of options, such as entering a mailbox number, accessing theCompany Directory or reaching the Operator. You can turn the default AutomAttendant Menu off at any time and record a customized menu prompt. For minformation about recording customized menu prompts, refer to Company Greetings on page 34.
When the Return to Automated Attendant prompt is set to No, the caller is noprovided with any more options after leaving a message. Instead, after hearinvoice prompt “Message delivered”, the caller hears “Exiting the system, good-bye”, and the session ends.
To change the Automated Attendant status:
1. Click the Auto Attendant menu and then click General AA Parameters.The General Auto Attendant Parameters dialog box appears.
2. To enable the Automated Attendant menu, select the Return to AA check box. To disable the Automated Attendant menu, clear the Return to AA check box.
3. Click the OK button.
Enterprise Edge 2.0 Voice Messaging Set Up and Operation Guide P0911620 Issue 02

Section IV - Mailboxes• Overview of Mailboxes
• Special Mailboxes: General Delivery and System Administrator• Creating Mailboxes
• Changing and Deleting Mailboxes
• Mailbox Administration Tasks• Mailbox feature codes
P0911620 Issue 02 Enterprise Edge 2.0 Voice Messaging Set Up and Operation Guide

P0911620 Issue 02 Enterprise Edge 2.0 Voice Messaging Set Up and Operation Guide

dge d
the
rise ple, if
6 . You erver.
ery
ise the e.
t are
bility rmed
Overview of Mailboxes
A mailbox is a storage place for fax and voice messages on the Enterprise EVoice Messaging system. This section contains information about creating anmanaging the different types of mailboxes. For information about fax, refer toEnterprise Edge 2.0 Voice Messaging FAX Set Up and Operation Guide and the Enterprise Edge 2.0 Voice Messaging FAX User Guide.
Mailboxes are installed by enabling a Mailbox Software Keycode on the EnterpEdge server. The Mailbox Software Keycode limits the number of Subscribermailboxes that can be added to Enterprise Edge Voice Messaging. For examyou enable a 16 Mailbox Software Keycode, you can have a maximum of 16 Subscriber mailboxes on the Enterprise Edge server. If you need more than 1Subscriber mailboxes, you must purchase another Mailbox Software Keycodecan have a maximum of Subscriber 1,000 mailboxes on the Enterprise Edge s
Types of mailboxesMailboxes are added in any combination of the following:
• Special Mailboxes, which include System Administrator and General DelivMailboxes
• Personal Mailboxes, which include User and Guest Mailboxes
• Information Mailboxes
System Administrator MailboxThe System Administrator Mailbox is created automatically when the EnterprEdge Voice Messaging system is installed for the first time. In order to use it,mailbox must be initialized by changing the password and recording the nam
Until a mailbox is installed, it cannot receive voice messages and any calls thadirected to it are rerouted to the General Delivery Mailbox.
Only a person using the System Administrator mailbox and password has the ato create, change, or delete the mailboxes. Administrative tasks are also perfousing the System Administrator Mailbox.
For more information, refer to the following chapters:
• Special Mailboxes: General Delivery and System Administrator on page 63
• Creating Mailboxes on page 77
• Changing and Deleting Mailboxes on page 85
• Mailbox feature codes on page 99
6
P0911620 Issue 02 Enterprise Edge 2.0 Voice Messaging Set Up and Operation Guide

54 Overview of Mailboxes
dge
l
y the n veral
stem
x
e It ers r to
General Delivery MailboxThe General Delivery Mailbox is created automatically when the Enterprise EVoice Messaging system is initialized for the first time. This is the company mailbox and, like the System Administrator Mailbox, you initialize the GeneraDelivery Mailbox by changing the password and recording the name.
For more information, refer to Special Mailboxes: General Delivery and SystemAdministrator on page 63.
User MailboxesThe User Mailbox is the first of three types of mailboxes that can be created bSystem Administrator. It must be initialized by the mailbox owner before it careceive messages. The Create Mailbox Utility is useful if you need to create seUser Mailboxes with the same values. For more information, refer to Creating Mailboxes on page 77.
Guest MailboxesThe Guest Mailbox is the second type of mailbox that can be created by the SyAdministrator. This type of mailbox is assigned to users who do not have an operating extension, but require a mailbox. It must be initialized by the mailboowner before it can receive messages. For more information, refer to Guest Mailboxes on page 80.
Information MailboxesThe Information Mailbox is the third type of mailbox that can be created by thSystem Administrator. This mailbox plays an information message to callers.must be initialized before it can play an information messages to callers. Callcannot leave messages in an Information Mailbox. For more information, refeInformation Mailboxes on page 83.
Tools and materialsBefore you begin adding mailboxes, complete the Mailboxes section of the Enterprise Edge 2.0 Voice Messaging Programming Record. This enables you to enter the values and become familiar with the task without having to stop andreview each feature, especially when you are adding the first few mailboxes.
Enterprise Edge 2.0 Voice Messaging Set Up and Operation Guide P0911620 Issue 02

Overview of Mailboxes 55
dge er ature
ed,
hen gning
e
ot and
d by
.
uses
ner
reset
t or
nswer
Terms and definitionsThe following terms are introduced in this section:
Term Definition
Alternate sets If a caller dials a set that has one or more alternate extensions, Enterprise EVoice Messaging rings at all of the sets simultaneously. The first set to answaccepts the call. The other sets cannot access the line or use the Interrupt Fe(Feature 987) to access the answered line.
Alternate extensions are available only on User mailboxes.
Call Screening If you change a mailbox owner’s Personal Mailbox transfer option to Screenthe Call Screening feature lets the mailbox owner listen to a recording of the caller’s name before accepting the call.
Class of Service A Class of Service defines the values for the special features of a Mailbox. Wyou set up a mailbox, you can assign several special features at once by assia Class of Service that provides an appropriate level of service for the user.
A mailbox cannot be added without a Class of Service.
Company Directory The Company Directory is an internal voice list that contains the names of mailbox owners with initialized mailboxes who are designated to appear in thdirectory.
Guest Mailbox A Guest Mailbox is a type of Personal Mailbox assigned to people who do nhave a permanent extension, but require a mailbox. These mailboxes receivestore messages the same way that User Mailboxes do.
Information Mailbox An Information Mailbox plays an information message to callers. The Information Mailbox does not have an extension associated with it. Callers cannot leave messages in an Information Mailbox.
Mailbox A User Mailbox.
Message Waiting Notification
If a mailbox owner has a message, Message Waiting Notification displays Message for you on the display of the mailbox owner’s telephone.
Operator An Operator is the person whose extension rings when the caller is promptethe Automated Attendant to “Press 0 for an operator”.
If the Operator is not available, calls transfer to the General Delivery Mailbox
In the Class of Service, the Operator is also known as the Target Attendant.
Outdial route The outdial route determines which line, line pool or route code the system for Off-premise Message Notification, Outbound Transfer or when a mailbox owner replies to a message left by an external caller.
Personal Mailboxes Personal Mailboxes (shown on telephone display as subscriber)
- include both User Mailboxes and Guest Mailboxes
- are assigned by the System Administrator and maintained by the mailbox ow
- can be listed in the Company Directory under the mailbox owner’s name
- are protected by a password that can be changed by the mailbox owner, or to 0000 by the System Administrator if the password is forgotten.
Subscriber When creating new mailboxes, the choices are Subscriber (which is a GuesUser mailbox) or Information.
User Mailboxes User Mailboxes store the messages for mailbox owners who are unable to atheir telephones.
User Mailboxes can be assigned to anyone who has an Enterprise Edge extension.
P0911620 Issue 02 Enterprise Edge 2.0 Voice Messaging Set Up and Operation Guide

56 Overview of Mailboxes
ter a can nter s the
to in a
elp.
is 180
ox, be e
from
n
ger.
. The
e to
s 20.
es
Class of ServiceClass of Service (COS) reduces the amount of programming needed to regismailbox. Instead of entering separate values for several special features, youselect a COS that contains the appropriate values for the new mailbox. You ethe COS during the mailbox registration and the system automatically programassociated values.
The following features have preset values. You can change individual valuesmeet the needs of your company. For more information on editing the valuesClass of Service, refer to Enterprise Edge Voice Applications Manager online H
The features that are set by the Class of Service number are:
Features Explanation
Mailbox message time The total message time available to a mailbox. The maximum message timeminutes. An Enterprise Edge Voice Messaging mailbox is equipped with the Never Full Mailbox feature, which allows a caller to leave a message in a mailbeven if the mailbox is “full”. The message is stored in the mailbox, but cannot played, copied or saved until a saved message is deleted to create space in thmailbox for the message.
Message length The maximum length of an incoming message. The message length rangesone to 60 minutes.
Message retention period
The number of days messages are saved in a mailbox. The message retentioperiod ranges from one to 365 days. 0 = indefinitely.
Greeting length The length of a recorded mailbox greeting. A mailbox greeting length can bebetween 1 and 60 minutes.
Off-premise Message Notification
Directs messages to another Enterprise Edge set, any phone number, or a paFor important information on preventing callers from making unauthorized external calls, refer to User Mailboxes on page 77. Dialing restrictions that apply to outdial lines apply to Off-premise Message Notification.
Retry intervals The time between attempts to notify the recipient of a new or urgent messageretry interval ranges from one to 120 minutes.
Number of attempts How many attempts Enterprise Edge Voice Messaging makes to notify the recipient of a new or urgent message. The number of attempts ranges from on20.
Outbound Transfer Transfers a caller who reaches a mailbox and presses ‡ to an external phone number or an Enterprise Edge set.
Incorrect password attempts
The maximum number of incorrect password attempts before a mailbox user ilocked out of the mailbox. The incorrect password attempts range from one to
Password Expiry The maximum time a mailbox password is active. The password expiry rangfrom one to 365 days. 0 = never expire.
Networking If Audio Messaging Interchange Specification (AMIS) or Digital Networking isinstalled, voice messaging can be directed to different mailboxes located at various sites on a communication network.
Enterprise Edge 2.0 Voice Messaging Set Up and Operation Guide P0911620 Issue 02

Overview of Mailboxes 57
ches a
n their
law
Default valuesThe following tables shows the default values for the Enterprise Edge Voice Messaging Classes of Service.
* If optional Message Networking is enabled. 0 = indefinite; never expire, P = Primary Language, A = Alternate Language
Target Attendant The Target Attendant is assigned to answer a telephone when the caller reamailbox and presses ‚ to speak with the Operator.
Call Record Call Record lets users record an active telephone call and put the message imailbox. Call Record is activated by pressing ƒ·°·.
Call Record is not enabled in any Class of Service because it is prohibited by in some areas. If Call Record is legal in your area, use Enterprise Edge VoiceApplications Manager to customize a Class of Service to enable Call Record.
Class of Service 1 2 3 4 5 6 7 8
Prompt language P A P A P A P A
Mailbox message time (in minutes) 15 15 15 15 5 5 20 20
Message length (in minutes) 3 3 7 7 3 3 2 2
Message retention period (in days) 30 30 0 0 7 7 15 15
Greeting length (in minutes) 1 1 1 1 1 1 10 10
Off-premise Message Notification Y Y Y Y N N Y Y
Retry intervals (in minutes) 5 5 10 10 n/a n/a 30 30
Number of attempts 3 3 5 5 n/a n/a 9 9
Outbound Transfer Y Y Y Y N N Y Y
Incorrect password attempts 9 9 9 9 6 6 4 4
Password expiry (in days) 90 90 90 90 60 60 30 30
Message Networking* Y Y Y Y N N Y Y
Target Attendant Y Y Y Y N N Y Y
Call Record N N N N N N N N
Features Explanation
P0911620 Issue 02 Enterprise Edge 2.0 Voice Messaging Set Up and Operation Guide

58 Overview of Mailboxes
d s on aging oice
lbox,
If Premium Voice Messaging is enabled.
0 = indefinite; never expire P = Primary Language, A = Alternate Language* If optional Message Networking is enabled. 0 = indefinite; never expire, P = Primary Language, A = Alternate Language
The Class of Service determines how the available message time is distributeamong the mailboxes. The amount of time available to be distributed dependthe amount of message storage available on the Enterprise Edge Voice Messsystem. You can change the Class of Service values using Enterprise Edge VApplications Manager.
Mailbox OverridesMailbox Overrides let you change these mailbox settings:
• Company Directory
• Alternate extensions
• Call Screening
• Message Waiting Notification
• Outdial route
Mailbox Overrides are not included in a Class of Service. When you add a maiyou can change these settings without changing the Class of Service.
Class of Service 9 10 11 12 13 14 15 16
Prompt language P A P A P A P A
Mailbox message time (in minutes) 10 10 30 30 120 120 120 120
Message length (in minutes) 3 3 7 7 10 10 2 2
Message retention period (in days) 365 365 60 60 90 90 45 45
Greeting length (in minutes) 1 1 2 2 3 3 5 5
Off-premise Message Notification Y Y N N Y Y Y Y
Retry intervals (in minutes) 5 5 n/a n/a 15 15 30 30
Number of attempts 3 3 n/a n/a 7 7 9 9
Outbound Transfer Y Y N N Y Y Y Y
Incorrect password attempts 9 9 9 9 6 6 4 4
Password expiry (in days) 90 90 90 90 60 60 30 30
Message Networking* Y Y N N Y Y Y Y
Target Attendant Y Y N N Y Y Y Y
Call Record N N N N N N N N
Enterprise Edge 2.0 Voice Messaging Set Up and Operation Guide P0911620 Issue 02

Overview of Mailboxes 59
ilbox
he time. y last , both y
ry
ry. r
ller d), the
re
main ssage
splay rs at he
ternate
rnate
Company DirectoryThe Company Directory is an internal voice list that contains the names of maowners with initialized mailboxes who are assigned to the directory.
When you register a mailbox you determine whether the mailbox appears in tCompany Directory. The Company Directory override can be changed at any Company Directory options determine whether callers can search for names bname, first name, or first and last names. For example, if a caller enters Jamesmailbox owner names Jesse James and James Bond come up if the CompanDirectory options are set for both first and last names.
The Company Directory option default is Yes. If you set the Company Directooption is set to No, a mailbox owner’s name is not included in the Company Directory and a mailbox owner cannot be selected from the Company DirectoEven if a mailbox is not included in the Company Directory, the mailbox ownemust record their name when they initialize their mailbox.
For more information about the Company Directory, refer to Setting Up for a medium sized company on page 148.
Alternate extensionsUp to two Alternate extensions can be assigned to each User Mailbox. If a cadials the main extension (the extension that has Alternate extensions assignecall rings at the main extension only. The exception to this is when Alternate extensions are assigned an Answer extension for the main extension. For moinformation about Answer Extension Numbers, refer to the Enterprise Edge 2.0 Installation and Maintenance Guide included with Enterprise Edge.
When a caller leaves a message, a message waiting indicator appears at theextension and at the Alternate extension(s). Mailbox owners can access the mefrom the Alternate extension(s) with Feature 981, the same way they access messages from their main extension telephone.
If an Alternate extension is assigned to a telephone that has Caller ID and if DiCaller is enabled, Caller ID information is displayed and an audible tone occuall telephones when the call proceeds to Enterprise Edge Voice Messaging. Tmessage can be intercepted using Feature 987, the Interrupt feature, at the Alextension as long as the caller is still leaving a message.
Only extensions that do not have a mailbox assigned can be used as an Alteextension.
There are no default Alternate extensions programmed for User Mailboxes.
P0911620 Issue 02 Enterprise Edge 2.0 Voice Messaging Set Up and Operation Guide

60 Overview of Mailboxes
g Line ion
Line ds.
ive the as the
hone e line
aging
ceive
pt a e ne, r take
ialing oes or
or ing is
ilbox
ot
Express Messaging LineWhen you create a Subscriber Mailbox, you can assign an Express Messaginto it. When you create the Subscriber Mailbox, instead of assigning an extensnumber to it, assign an Express Messaging Line. If you assign an Express Messaging Line, fax and voice calls are left in the Subscriber Mailbox withoutringing at the set. When Message for you appears on the telephone display, theuser can open their mailbox and access their voice and fax messages.
If the user has FAX enabled, they can tell people that the Express Messagingnumber is their fax number and they can have it printed on their business car
The line used you use for Express Messaging must be between 1 and 500. Gcorresponding seven digit phone number associated with the line you assign Express Messaging Line to the user. For example, if line 20 is the Express Messaging Line and the corresponding phone number is 555-2424, give this pnumber to the user. After you assign a line to a mailbox, you cannot assign thto another function until you remove it from the mailbox.
The prime set for the Express Messaging Line must be set to the Voice MessDN. For more information see "Line Access" in the Enterprise Edge 2.0 Programming Operations Guide.
The Express Messaging default is none. Users must have FAX enabled to refax messages on the Express Messaging Line.
Call ScreeningCall Screening lets mailbox owners determine who is calling before they accecall. Call Screening is useful if there is no Caller ID available. Enterprise EdgVoice Messaging records the caller’s name, calls the mailbox owner’s telephoannounces the name of the caller and offers options such as accept the call oa message.
Call Screening applies to external calls dialed by callers using the extension dfacilities of the Auto Attendant or Custom Call Routing (CCR). Call Screening dnot apply to internal calls, or external calls routed using a CCR Transfer nodeplaced to the mailbox owner’s dedicated line. If a caller is calling from a line fwhich the mailbox owner has recorded a Personalized Greeting, Call Screenbypassed and the call is transfers without delay.
If Call Screening is enabled, Enterprise Edge Voice Messaging still calls a maowner’s telephone that is call forwarded.
The default for Call Screening is No, which means that mailbox owners canndetermine who is calling before they answer the call.
Message Waiting NotificationMessage Waiting Notification provides the user with a visual indication on thetelephone display that one or more new messages are waiting to be heard.
Enterprise Edge 2.0 Voice Messaging Set Up and Operation Guide P0911620 Issue 02

Overview of Mailboxes 61
ged
n to you
ave
ses , and
ode re to
for
trict
he aging rom hen e e.
e set ional
he dge
The default value for Message Waiting Notification is Yes. This means that Enterprise Edge Voice Messaging leaves a Message for you notification on a Enterprise Edge telephone display. If the Message Waiting Notification is chanto No, Enterprise Edge Voice Messaging does not leave a Message for you notification.
When you add Guest Mailboxes, you must set the Message Waiting NotificatioNo. These mailboxes do not have an operating Enterprise Edge extension. Ifadd a Guest Mailbox to a single-line telephone, you must set the Message Notification to No at the Enterprise Edge ATA 2. Single-line telephones do not ha display.
Outdial routeThe Outdial route determines which line, line pool or route code the system uwhen a mailbox owner wishes to reply to a message left by an external callerwhen Off-premise Message Notification and Outbound Transfer are used.
The default for Outdial route is None. Until you assign a line, line pool or route cas the Outdial route for a mailbox, the mailbox owner can use the Reply Featureply to calls from internal extensions only, Off-premise Message Notificationinternal extensions only and Outbound Transfer for internal extensions only.
For more information on line pools and route codes, refer to the Enterprise Edge 2.0 Programming Operations Guide.
Dialing restrictions
Dialing restrictions can be applied to an Enterprise Edge telephone and the extensions connected to Enterprise Edge Voice Messaging. If you wish to resoutdialing of certain phone numbers, you must do one of the following:
• Through Enterprise Edge programming, assign the dialing restrictions to tEnterprise Edge extension numbers to which Enterprise Edge Voice Messis connected. This restricts all outdialing calls including external transfers fCCR trees, Off-premise Message Notification and Outbound Transfers. Wassigning an Outdial route, all dialing is done by the set to which EnterprisEdge Voice Messaging is connected, not by the Enterprise Edge telephonRefer to your Enterprise Edge System documentation for additional information.
• Through Enterprise Edge programming, assign the dialing restrictions to thof the user. Refer to your Enterprise Edge System documentation for additinformation.
• Through Enterprise Edge programming, assign the dialing restrictions to tEnterprise Edge line(s) being used for outdialing. Refer to your Enterprise ESystem documentation for additional information.
• Through Mailbox Admin, ensure Outdial is set to NONE. This restricts outdialing calls from the mailbox.
P0911620 Issue 02 Enterprise Edge 2.0 Voice Messaging Set Up and Operation Guide

62 Overview of Mailboxes
Enterprise Edge 2.0 Voice Messaging Set Up and Operation Guide P0911620 Issue 02

d
box
ords,
Special Mailboxes: General Delivery and System Administrator
OverviewSpecial Mailboxes are the administration tools of the System Administrator aninclude:
• System Administrator Mailbox
• General Delivery Mailbox
Overview of Programming using Feature 981: Open Mailbox
The first time a mailbox owner opens their mailbox, they must initialize the mailby entering a password and recording a name in the Company Directory.
The Special Mailboxes are protected by a password that you establish. The password for each mailbox is determined when you initialize the mailbox withEnterprise Edge Voice Messaging. For more information about mailbox passwrefer to About mailbox passwords on page 88.
7
ƒ·°⁄
PasswordorLog on
Owner’s nameconfirmation
flPlay saved messages
‹Record messages
°MailboxAdmin
¤PersonalGreetings
›Password
⁄Changedirectoryname
Record Select
flMessageNotification
·SendBroadcastMessage(System Administrator only)
fiAssign Target Attendant
··RemoteAdmin(System Administratoronly)
°Outbound TransferAdmin
Call Forward
¤Play newmessages
‡Print Destination
P0911620 Issue 02 Enterprise Edge 2.0 Voice Messaging Set Up and Operation Guide

64 Special Mailboxes: General Delivery and System Administrator
ou
tor
or
igit m n
here
nated
tor is ry
ccess
ated
the
System Administrator MailboxThe System Administrator Mailbox is reserved for the System Administrator. Ycan use it to send Broadcast Messages to all User Mailboxes.
Only you, as System Administrator, are able to access the System Administramailbox. Remember to check for messages sent to this mailbox.
You must initialize the System Administrator Mailbox before you can use it. Finstructions on how to initialize the System Administrator Mailbox see Initializing the mailboxes on page 65.
The mailbox numbers used in this guide for the Special Mailboxes are the Enterprise Edge Voice Messaging default mailbox numbers based on a two dextension length. The mailbox number length is determined in the initial systesetup. Mailbox numbers can be between two and seven digits. For informatioabout the System Administrator mailbox number see Special Mailbox numbers on page 65.
General Delivery MailboxThe General Delivery Mailbox is your company mailbox. Messages can be leftfor:
• employees who do not have their own mailbox
• no specific person
To ensure confidentiality, make sure that only you, the Receptionist, or a desigOperator has the password for this mailbox.
The General Delivery Mailbox stores messages from callers when the Operanot available or from callers using a rotary dial telephone. The General DeliveMailbox has a default greeting, but you can replace this greeting with one yourecord. For more information, refer to Recording the mailbox greeting on page 68 in this section.
Messages left in the General Delivery Mailbox must be forwarded to the appropriate person. Only you, the Receptionist or a designated Operator can athe messages in the General Delivery Mailbox.
We recommend assigning the General Delivery Mailbox number to the designOperator. For more information, refer to Setting up the Operator’s Mailbox on page 91. For information on the General Delivery Mailbox number refer to Special Mailbox numbers on page 65.
You can disable the General Delivery Mailbox if your company does not requireservice of this mailbox. For more information, refer to Enabling and disabling the General Delivery Mailbox on page 90.
Enterprise Edge 2.0 Voice Messaging Set Up and Operation Guide P0911620 Issue 02

Special Mailboxes: General Delivery and System Administrator 65
ber x The table
o e
n two
e
ial nd oth
e are
Special Mailbox numbers
Mailbox number lengths can be from two to seven digits. When the mailbox numlength is two digits the System Administrator Mailbox is 12. When the mailbonumber length is seven digits, the System Administrator Mailbox is 1000002.System Administrator password and mailbox combinations are shown in the System Administrator and General Mailbox mailbox number and password combinations.
Note: If the extension length is 2 and the leading digit for Group Lists (used tsend a message to a group of mailboxes) is 1, the default values for thSpecial Mailboxes are 20 and 22. The extension length can be betweeand seven digits.
Classes of Service for Special MailboxesThe General Delivery Mailbox has a default Class of Service of 1. The SystemAdministrator Mailbox has a default Class of Service of 7. You can change thClass of Service at any time. For more information, refer to Changing mailbox options on page 85.
Setting up the System Administrator and General Delivery Mailboxes
Opening the mailboxesTo open a Special Mailbox, you must enter the mailbox number and the SpecMailbox password. The default System Administrator Mailbox number is 12 athe default General Delivery Mailbox number is 10. The default password for bmailboxes is 0000.
Initializing the mailboxesBefore any Enterprise Edge Voice Messaging mailbox can be used, it must binitialized. The steps for initializing Special Mailboxes and Personal Mailboxesthe same. Initializing a mailbox involves:
• changing the default password
• recording the mailbox name in the Company Directory
System Administrator and General Mailbox mailbox number and password combinations
Mailbox number length
System Administrator General Delivery
2 120000 100000
3 1020000 1000000
4 10020000 10000000
5 100020000 100000000
6 1000020000 1000000000
7 10000020000 10000000000
P0911620 Issue 02 Enterprise Edge 2.0 Voice Messaging Set Up and Operation Guide

66 Special Mailboxes: General Delivery and System Administrator
ut it
n the ro. livery
re a in the
Record a mailbox greeting as soon as possible after initialization.
The General Delivery Mailbox can receive messages before it is initialized, bmust be initialized before you can retrieve any messages from it.
Before you initialize a mailbox, decide what password you want to use to opemailbox. Passwords must be four to eight digits long and cannot start with zeWrite the passwords down and keep them in a safe place. Give the General DeMailbox password to your Receptionist or designated Operator.
Recording the mailbox in the Company DirectoryThe Company Directory stores a list of mailbox owners in your company. Befomailbox can receive messages, the mailbox owner’s name must be recordedCompany Directory. Whether a mailbox appears in the Company Directory isdetermined by the Company Directory override that you establish.
Enterprise Edge 2.0 Voice Messaging Set Up and Operation Guide P0911620 Issue 02

Special Mailboxes: General Delivery and System Administrator 67
To initialize the mailboxes:
After you record the Company Directory name, you return to the mailbox’s administration display prompt. You can now record the mailbox greeting.
You must repeat steps 1 through 6 to initialize each mailbox.
1. Press ƒ·°⁄.
2. Enter the System Administrator Mailbox number and password, then press OK.
If the set you are using has a mailbox, the Pswd: prompt appears. Press OTHR to display the Log: prompt.
3. Enter the new password and press OK.
4. Enter the new password again and press OK.
5. At the tone, record your name and press OK.
When you record a mailbox name in the Company Directory, include the directory number.
6. To accept the recording, press OK.
If the recording is not acceptable, press RETRY.
Press ® to end this programming session.
Log:QUIT RETRY OK
Must change pswd
Pswd:RETRY OK
Again:RETRY OK
Must record name
Record name:RETRY OK
Accept name?RETRY PLAY OK
P0911620 Issue 02 Enterprise Edge 2.0 Voice Messaging Set Up and Operation Guide
68 Special Mailboxes: General Delivery and System Administrator
lbox can
of age.
Recording the mailbox greetingYou must record a greeting for each mailbox. In your greeting state which maihas been reached and tell callers how to leave a message. For example, yourecord your General Delivery Mailbox Greeting to say:
“Hello. You have reached Warrington’s General Delivery Mailbox. At the soundthe tone, please leave the name of the person you are calling and your messYour message will be returned as soon as possible.”
Before you record the Special Mailbox Greetings, prepare a greeting for eachmailbox. Include the Special Mailbox name in your greeting.
To record a Special Mailbox Greeting:
1. Press ƒ·°⁄.
2. Enter your password, then press OK.
If the set you are using has a mailbox, the Pswd: prompt appears. Press OTHR to display the Log: prompt.
3. Press ADMIN.
4. Press GREET.
5. Press REC.
6. Press PRIME to record your Primary Greetingorpress ALT to record your Alternate Greeting.
For information on recording Personalized Greetings, refer to the Enterprise Edge 2.0 Voice Messaging Reference Guide.
7. Press YES.
8. At the tone, record your greeting and press OK.
Log:QUIT RETRY OK
0 new 0 savedPLAY REC ADMIN
Mailbox adminGREET PSWD QUIT
Greeting optionsREC CHOOSE CFWD
Greeting:PRIME ALT PERS
Record new?YES NO QUIT
Record greeting:RETRY OK
Enterprise Edge 2.0 Voice Messaging Set Up and Operation Guide P0911620 Issue 02

Special Mailboxes: General Delivery and System Administrator 69
eting
do e an
e
After the Primary and Alternate Greetings are recorded, you must select a greto play. If you do not select a greeting to play, the Primary Greeting plays automatically.
Selecting a Mailbox GreetingFor a Primary or Alternate Greeting to play, you must select a greeting. If younot choose a greeting, the Primary Greeting plays automatically. If you choosAlternate Greeting, remember to change back to the Primary Greeting at the appropriate time.
If you select a greeting that is not yet recorded, you are transferred back to thGreeting option display to record the greeting.
To choose a Primary or Alternate Greeting:
9. Press OK to accept the greeting.
If you are not satisfied with this greeting, pressRETRY and rerecord the greeting. Pressing • returns the display to the previous prompt.
10. For each Special Mailbox Greeting, follow steps 1 through 9orpress ® to end this programming session.
1. Press ƒ·°⁄.
2. Enter the System Administrator Mailbox number and password and then press OK.
If the set you are using has a mailbox, the Pswd: prompt appears. Press OTHR to display the Log: prompt.
3. Press ADMIN.
4. Press GREET.
5. Press CHOOSE.
6. Select the greeting you want to play.
Press ® to end this programming session.
Accept greeting?RETRY PLAY OK
Log:QUIT RETRY OK
0 new 0 savedPLAY REC ADMIN
Mailbox adminGREET PSWD QUIT
Greeting optionsREC CHOOSE CFWD
Use greeting:PRIME ALT QUIT
P0911620 Issue 02 Enterprise Edge 2.0 Voice Messaging Set Up and Operation Guide

70 Special Mailboxes: General Delivery and System Administrator
ssage
you el.
t the
vides
tified has
ent ges
tside
Listening and responding to messages left in Special MailboxesMessages left in the Special Mailboxes must be listened to daily. To save mestorage space, delete a message from the mailbox after you listen to it.
Controling volume
Press • to adjust the volume of a message. The volume increases each timepress•. After four consecutive presses, the volume returns to the lowest levThis option is not shown on the display.
Volume control does not apply to system prompts. The system prompts play apreset volume.
Delivery Options
When leaving a message in a mailbox, Enterprise Edge Voice Messaging proyou with Delivery Options: Certified, Urgent, Private, and Normal.
• Certified (CERT)This notifies you that your message has been received and read. The CerDelivery Option can be applied only from an internal telephone if the callera mailbox recognized by the system.
• Urgent (URGENT)This marks the message urgent and is preceded by the voice announcem“This message is urgent”. Messages marked Urgent play before other messaleft in the mailbox.
• Private (PRIV)This prevents a message from being forwarded to another mailbox.
• Timed (TIME)This allows a mailbox owner to delay delivery of a message until after a specified date and time. The Timed Message option is not available to oucallers.
• NormalIf a delivery option is not chosen, the message is sent normally.
If only PRIV or TIME apply, that option replaces OTHR on the first display.
Enterprise Edge 2.0 Voice Messaging Set Up and Operation Guide P0911620 Issue 02

Special Mailboxes: General Delivery and System Administrator 71
s
To open and listen to messages left in a Special Mailbox:
After a message plays you can:
• Press fl or £ or NEXT to listen to the next message.
• Press · or REPLY to reply to the message sender.
• Press ° or ERASE to erase the message.
• Press ⁄ to replay the message.
• Press › to listen to the previous message.
• Press fi to forward a copy of the message.
• Press ‡ to listen to the message date and time.
• Press ‡‡ to save the message.
After you listen to the messages, press ® to end the session.
1. Press ƒ·°⁄.
2. Press OTHR.
If the extension you are using has a mailbox, the Pswd: prompt appears. Press OTHR to display the Log: prompt.
3. Enter the System Administrator Mailbox number and password, then press OK.
4. Press PLAY. The first message in the mailbox is played.
To listen to the date and time the message wasent, press ‡ while the message is playing or after it has played.
5. If the message is left by someone in your company who does not have an extension or mailbox, the option display line shows: COPY ERASE NEXT.
Pswd:OTHR RETRY OK
Log:QUIT RETRY OK
1 new 0 savedPLAY REC ADMIN
End of messageCOPY ERASE NEXT
P0911620 Issue 02 Enterprise Edge 2.0 Voice Messaging Set Up and Operation Guide

72 Special Mailboxes: General Delivery and System Administrator
r a ot
w the
x and
Copying a message to another MailboxYou can use the COPY feature to copy a message left in the Special Mailboxes (oPersonal Mailbox) to any mailbox owner with an initialized mailbox. You canncopy a message if the original message is:
• designated as Private by the sender
• a Broadcast Message, which deletes automatically after it plays
When the display shows the REPLY feature, press fi to continue to the next display.If a message is left by an internal caller who has a mailbox initialized with Enterprise Edge Voice Messaging, the display shows the REPLY feature. The display also shows REPLY if a message is left by an external caller and your company subscribes to Call services. Otherwise, the display line options shoCOPY feature.
To send a copy of a message to a mailbox owner, you must open the mailbolisten to the message.
1. Press ƒ·°⁄.
2. Enter the System Administrator Mailbox number and password, then press OK.
3. Press PLAY.
4. Press COPY.
If the display does not show the COPY option, press fi to continue to the next display.
5. Press YES.
Press NO to copy the message without an introduction. The display changes to show: Mbox:.
6. At the tone, record the message introduction. The introduction to a message must be more than three seconds long.Press OK to end the recording.
7. To accept the recording, press SEND.
To listen to your introduction before you send the message, press PLAY.
To record the introduction again, press RETRY.
Pswd:OTHR RETRY OK
1 new 0 savedPLAY REC ADMIN
End of messageCOPY ERASE NEXT
Record intro?YES NO
Record intro:RETRY OK
Accept intro?RETRY PLAY SEND
Enterprise Edge 2.0 Voice Messaging Set Up and Operation Guide P0911620 Issue 02

Special Mailboxes: General Delivery and System Administrator 73
ernal u can
ernal
e
Replying to a messageWhen a message is left in a Special Mailbox or any Personal Mailbox by an intmailbox owner, you can use the Reply feature to respond to the message. Yoreply by calling the message sender or by sending them a message.
If your company subscribes to CLID, the Reply feature can also be used for extcalls, provided a Dialing Translation Table is created.
8. Enter the mailbox number that is to receive thmessageorpress DIR to select the mailbox number using the Company Directory.
9. To deliver your introduction and message normally, press SEND orto select sending options, press OPTS.
10. To mark a message Certified, press CERT, then press SEND. To mark a message Urgent, press URGENT, then press SEND.
To mark a message Private, press OTHR, then press PRIV, then SEND.
To send a Timed Message, press OTHR, then TIME, then follow the time and date prompts.
If only one of PRIV or TIME apply, that button replaces the OTHR button at the Delivery Options prompt.
To cancel Delivery Options, or return to the options menu, press •.
11. This display appears briefly to acknowledge the message has been sent.
12. Press QUIT to end this sessionorpress YES to forward a copy of this message toanother mailbox.
Press ® to end this programming session.
Mbox:DIR QUIT
Name:OPTS CC SEND
Delivery optionsCERT URGENT OTHR
Delivery optionsPRIV TIME
Msg delivered
Another copy?YES QUIT
P0911620 Issue 02 Enterprise Edge 2.0 Voice Messaging Set Up and Operation Guide

74 Special Mailboxes: General Delivery and System Administrator
oute .
e
Replying to an internal message sender
To reply to an internal message by calling the sender, you must first open themailbox and listen to the message:
Calling an external message sender
Before you can reply to an external caller, your mailbox must have an Outdial rassigned and your system must be equipped with Call Display. To reply to anexternal message, you must first open the mailbox and listen to the message
1. Press ƒ·°⁄.
2. Enter your password, then press OK.
3. Press PLAY.
4. Press REPLY.
5. Press CALL. You are transferred to the messagsender’s extension.Press MSG to reply with a recorded message.
1. Press ƒ·°⁄.
2. Enter your password, then press OK.
3. Press PLAY.
4. Press REPLY.
Pswd:OTHR RETRY OK
1 new 0 savedPLAY REC ADMIN
End of messageREPLY ERASE NEXT
Reply to msgMSG CALL QUIT
Pswd:OTHR RETRY OK
1 new 0 savedPLAY REC ADMIN
End of messageREPLY ERASE NEXT
Enterprise Edge 2.0 Voice Messaging Set Up and Operation Guide P0911620 Issue 02

Special Mailboxes: General Delivery and System Administrator 75
n
if
e
5. Press DIAL.When this display appears, you have the optioof adding or removing digits from the number to be outdialed. This display does not appear a Dialing Translation Table is established andenabled, or if the Caller ID number does not require translation. In these cases you see Please hold while the number dials directly.
Note: Press TRIM to remove digits from the beginning of the phone number. This automatically removes the area code from an incoming longdistance call.To return the call, add more digits to the beginning of the phone number by entering threquired digits. For example, if you want to add 403 before the number, enter 403 and thenumber becomes 403-123-4567.
1234567 403DIAL TRIM QUIT
P0911620 Issue 02 Enterprise Edge 2.0 Voice Messaging Set Up and Operation Guide

76 Special Mailboxes: General Delivery and System Administrator
Enterprise Edge 2.0 Voice Messaging Set Up and Operation Guide P0911620 Issue 02

oxes.
rise le, if
6 You
they
e that
alues
Creating Mailboxes
OverviewThis chapter contains information on how to create the different types of mailb
Tools and materialsBefore you begin to create mailboxes, complete the Mailboxes section of theEnterprise Edge 2.0 Voice Messaging Programming Record.
User MailboxesMailboxes are installed by enabling a Mailbox Software Keycode on the EnterpEdge server. The Mailbox Software Keycode limits the number of Subscribermailboxes that you can add to Enterprise Edge Voice Messaging. For exampyou enable a 16 Mailbox Security Keycode, you can have a maximum of 16 Subscriber mailboxes on the Enterprise Edge server. If you need more than 1Subscriber mailboxes, you must purchase another Mailbox Security Keycode.can have a maximum of 1,000 mailboxes on the Enterprise Edge server.
You can add new mailboxes to Enterprise Edge Voice Messaging whenever are required. You cannot add more mailboxes than the number of mailboxes installed on the Enterprise Edge server. Before you add a new mailbox, ensuryou have all the necessary mailbox information. Complete Mailboxes in the Enterprise Edge Voice Messaging Programming Record, outlining the:
• mailbox number
• extension
• Class of Service
• mailbox owner’s name (last name and first name or initial)
• mailbox type
• Company Directory, Message Waiting, and Outdial Overrides
• Alternate extensions (for User Mailboxes only)
• Express Messaging Line number
When adding Information Mailboxes, assign a Class of Service that has the maximum message length. To accommodate an average Information Mailboxmessage, assign a Class of Service of either 7 or 8. These Class of Service vhave a message length of 10 minutes.
8
P0911620 Issue 02 Enterprise Edge 2.0 Voice Messaging Set Up and Operation Guide

78 Creating Mailboxes
y
x
ar
rs to
t
s
Adding a User MailboxTo add a single mailbox:
1. Click the Mailbox menu and then click Add.The Add Mailbox dialog box is displayed.
2. In the Mailbox box, type the mailbox number.
3. At the Mailbox Type option, select Subscriber.
4. Click the OK button.The Mailbox Properties dialog box appears, with the General tab open.
5. In the Extension box, type the extension.
6. In the Last Name and the First Name boxes, type the mailbox owner’s last and first names.
7. From the COS list, select a Class of Service.
8. Select the Directory check box if you want the mailbox owner’s name to plain the Company Directory.
9. Click the Options tab.
10. In the Alternate Extension 1 box, type the Alternate extension (if required).If you do not require an alternate extension leave this box empty.
11. In the Alternate Extension 2 box, type the second Alternate extension (if required). If you do not require a second alternate extension leave this boempty.
12. If you want to assign an Express Messaging Line to the mailbox, in the Express Messaging Line box type the line number.
13. Click the Msg Waiting check box if you want message notification to appeon the mailbox owner’s telephone display.
14. Select the Call Screening check box to assign screened transfers to the mailbox owner. Clear the Call Screening check box to assign blind transfethe mailbox owner.
15. Click the Outdial tab.
16. Click Line and type the specific outgoing line you want to assign to the mailbox for outdialing or click Pool and type the Line Pool number you wanto assign to the mailbox for outdialing or click Route to assign a route code for outdialing. Click None if you do not want to assign outdialing capabilitieto the mailbox.
17. Click the OK button.
Enterprise Edge 2.0 Voice Messaging Set Up and Operation Guide P0911620 Issue 02

Creating Mailboxes 79
Edge your of igned tion
rs ually. es.
g, if
ual
Adding multiple mailboxesYou can save time by creating multiple mailboxes when you set up Enterprise Voice Messaging for the first time or add a large number of telephone users tosystem. Adding many mailboxes creates Subscriber mailboxes for the range extensions that you define. You must use extensions that are not already assto mailboxes. Before you create multiple mailboxes, use telephony administrato define the new extensions and assign user names to the extensions.
To make the most effective use of adding multiple mailboxes, identify the usewho need a non-standard Subscriber mailbox. Create these mailboxes individAfter you finish, add multiple mailboxes for the remaining Subscriber mailbox
The mailboxes have the following characteristics:
• the Mailbox number is the same as the extension
• Class of Service the same for all mailboxes
• Call screening default is blind (off)
• the mailbox name is taken from the Enterprise Edge extension programminit is complete
• Message Waiting notification is enabled
• the Outdial route is the same for all mailboxes
The mailboxes created are uninitialized and ready for initialization by the individmailbox owners.
A Subscriber mailbox is not created if:
• a mailbox of the same number already exists
• the extension is used by another mailbox
• the extension is identified as a Enterprise Edge Voice Messaging voice extension
To add multiple mailboxes:
1. Click the Mailbox menu and then click Add many.The Add Many Mailboxes dialog box appears.
2. In the From Extension box, type the extension you want to start creating mailboxes from.
3. In the To Extension box, type the extension you want to stop creating mailboxes at.
4. In the COS list box, select a Class of Service.
P0911620 Issue 02 Enterprise Edge 2.0 Voice Messaging Set Up and Operation Guide

80 Creating Mailboxes
t
rs to
dge es just
same r e
e all
e
by
low a ny
5. At the Outdial option, click Line and type the specific outgoing line you wanto assign for outdialing orclick Pool and type the Line Pool number you want to assign for outdialingorclick Route to assign a route code for outdialingorclick None if you do not want to assign outdialing capabilities.
6. At the Options option, select the Directory check box if you want the mailbox owner’s name to play in the Company Directory.
7. Select the Msg Waiting check box if you want Message Notification to appear on the mailbox owner’s telephone display.
8. Select the Call Screening check box to assign screened transfers to the mailbox owner. Clear the Call Screening check box to assign blind transfethe mailbox owner.
9. Click the OK button.
Guest MailboxesAssign Guest Mailboxes to users who do not have an operating Enterprise Eextension, but require a mailbox. These mailboxes receive and store messagas the User Mailboxes do.
When you create Guest Mailboxes, use mailbox numbers that begin with the digit. This identifies the mailbox type. Use a digit that is different than the UseMailbox numbers. For example, if the User Mailbox numbers start with two, thGuest Mailboxes can start with four.
When to use Guest MailboxesGuest Mailboxes can provide a temporary employee or a with Enterprise EdgVoice Messaging services, or give clients access to internal messaging and crouting. Guest Mailboxes with Outbound Transfer enabled are ideal for telecommuters. Guest Mailboxes can also be used to allow customers to maktelephone orders.
Depending on your business, you can use Guest Mailboxes for:
• personal catalog shopping orders
• listing classes or seminars and providing callers with the ability to registertelephone
• providing frequent customers access to Enterprise Edge Voice Messagingservices
The following example suggests how you can set up a Guest Mailbox for an announcement and order-taking capability. When you provide services that alcustomer to call into a mailbox, you record the mailbox number in the CompaGreeting. This allows a caller to transfer directly to the mailbox.
Enterprise Edge 2.0 Voice Messaging Set Up and Operation Guide P0911620 Issue 02
Creating Mailboxes 81
mine rking ting
ade e and e
e is
ng to
dio,
ion
g est -of-y
Guest the
Example 1 - Announcing courses and seminars (telephone registration)
To use a Guest Mailbox to provide telephone registration, you must first detera mailbox number. The Guest mailbox number you assign does not have a woEnterprise Edge extension. Next, you must determine what the Mailbox Greesays. For example:
“This month we are pleased to provide the following courses: Jazz Dancing MEasy, Intermediate Jazz Dancing, Warming Up for that Big Performance, andBeginners’ Ballet. If you are interested in any of these courses, leave your namphone number after the tone. One of our instructors will contact you with morinformation.”
You can even include the time and date the classes are offered. This examplapplicable to Guest Mailboxes that are used for taking orders.
After you determine what the announcement says, record a Company Greetiinform callers this mailbox is available. For example:
“Good Morning. This is On Your Toes Dance School. To reach the dance stupress ›fl. To register for our fall classes, press ¤°. To reach our receptionist, press ‚.”
Note: The number 46 in this example is an operating Enterprise Edge extensand the number 28 is the Guest Mailbox.
The leading digit of Guest Mailbox numbers must be different from the leadindigit of the extensions. If you must use the same leading digit, ensure the GuMailbox numbers are “out-of-range” extensions. To test if an extension is outrange, dial it from another extension. If the number is out-of-range, the displashows Invalid number. If the number is not out-of-range, the display shows Not in service.
You must assign a Class of Service. When you assign a Class of Service for aMailbox that is used as an order mailbox, choose a Class of Service that hasmaximum mailbox greeting recording and message time available. Refer to Class of Service on page 56.
P0911620 Issue 02 Enterprise Edge 2.0 Voice Messaging Set Up and Operation Guide

82 Creating Mailboxes
y
the
Adding Guest MailboxesTo add a Guest Mailbox:
1. Click the Mailbox menu and then click Add.The Add Mailbox dialog box appears.
2. In the Mailbox box, type the mailbox number.
3. At the Mailbox Type option, select Subscriber.
4. Click the OK button.The Mailbox Properties dialog box appears with the General tab open.
5. Leave the Extension box blank.
6. In the Last Name box, type the mailbox owner’s last name.The last name can be a maximum of 15 characters.
7. In the First Name box, type the mailbox owner’s first name.The first name can be a maximum of 15 characters.
8. From the COS list, select a Class of Service.
9. Select the Directory check box if you want the mailbox owner’s name to plain the Company Directory.
10. Click the Options tab.
11. Leave the Alternate Extension 1 box blank.
12. Leave the Alternate Extension 2 box blank.
13. If you want to assign an Express Messaging Line to the Guest Mailbox, inExpress Messaging Line box type the line number.
14. Ensure the Msg Waiting check box is clear.
15. Ensure the Call Screening check box is clear. Guest mailboxes must have blind transfers.
16. Click the Outdial tab.
17. Select None. To avoid toll charges, you do not want to assign outdialing capabilities to a Guest mailbox.
18. Click the OK button.
Enterprise Edge 2.0 Voice Messaging Set Up and Operation Guide P0911620 Issue 02

Creating Mailboxes 83
or n
s the
ers.
an nd
has om
ies. ro to
,
Information MailboxesInformation Mailboxes play information messages to callers. Information Mailboxes do not take messages and do not have operating extensions.
Information Mailboxes are initialized by you, and are maintained either by youan Enterprise Edge Voice Messaging mailbox owner. You can add InformatioMailboxes whenever one is needed.
When to use Information MailboxesInformation Mailboxes can be used to:
• announce sales
• provide product lists
• announce special events
A caller disconnects automatically after listening to an Information Mailbox. Information Mailbox Greetings can be recorded by you or by the user who haInformation Mailbox. For more information about recording Information Greetings, refer to the Enterprise Edge 2.0 Voice Messaging Reference Guide.
You must make sure the Information Mailboxes are accessible to outside callYou can make callers aware of your company’s Information Mailboxes if you:
• Advertise the Automated Attendant main number and record a Company Greeting that informs the caller of the Information Mailbox services. You calso provide a list of your company’s Information Mailboxes in brochures atelephone directory advertising.
• Record Information Mailboxes in the Company Greeting if your company a small number of Information Mailboxes, such as three or four. Use CustCall Routing (CCR) if you have a large number of mailboxes.
• Assign the Operator as the Transfer node for all Information Mailbox inquirRecord a statement in the Company Greeting that tells a caller to press zereach company information. For example:
“Good Afternoon. This is On Your Toes Dance Studio. To reach our studiopress ›fl. To listen to one of our special announcements, press ‚ to reach the Operator.”
• When a caller presses zero, the Operator provides a list of the InformationMailboxes and transfers the caller accordingly.
P0911620 Issue 02 Enterprise Edge 2.0 Voice Messaging Set Up and Operation Guide

84 Creating Mailboxes
vice.
he
y
Adding Information MailboxesBefore you can add an Information Mailbox, you must determine a Class of SerThe Class of Service must have a message length that is long enough for anInformation Greeting. Refer to Class of Service on page 56.
When you add Information Mailboxes, use mailbox numbers that begin with tsame digit. This helps you identify the mailbox type.
To add an Information Mailbox:
1. Click the Mailbox menu and then click Add.The Add Mailbox dialog box appears.
2. In the Mailbox box, type the mailbox number.
3. At the Mailbox Type option, select Information .
4. Click the OK button.The Mailbox Properties dialog box appears with the General tab open.
5. In the Last Name box, type the mailbox owner’s last name.The combined characters for the last name and the first name can be a maximum of 15 characters.
6. In the First Name box, type the mailbox owner’s first name.The combined characters for the last name and the first name can be a maximum of 15 characters.
7. From the COS list, select a Class of Service.
8. Select the Directory check box if you want the mailbox owner’s name to plain the Company Directory.
9. Click the OK button.
Enterprise Edge 2.0 Voice Messaging Set Up and Operation Guide P0911620 Issue 02

ilbox.
t a ner ner t
Changing and Deleting Mailboxes
OverviewThis chapter discusses how to change mailbox options and how to delete a ma
Changing mailbox optionsAfter a mailbox is initialized with Enterprise Edge Voice Messaging, you can change several options and overrides. You can:
• reset a mailbox password
• change a mailbox extension
• change a mailbox Class of Service
• change a mailbox owner’s name
• change the Company Directory Override
• change Message Waiting Notification status
• change the Mailbox Outdial route
• change the Alternate extensions
• change the Call Screening feature status
Resetting a mailbox password
Resetting a mailbox password changes it to the default password 0000. Resepassword only if the mailbox owner forgets the password or if the mailbox owis “locked-out”. After a mailbox password is reset, you must tell the mailbox owto change the default password. A mailbox cannot be opened until the defaulpassword is changed.
To reset a mailbox password:
1. Click the Mailbox menu and then click Change/Delete.The Mailbox List dialog box appears.
2. Click the name of the mailbox you want to modify.
3. Click the Change button.The Mailbox Properties dialog box appears.
4. Select the Reset Password to default check box.
5. Click the OK button.
6. Click the Close button.
9
P0911620 Issue 02 Enterprise Edge 2.0 Voice Messaging Set Up and Operation Guide

86 Changing and Deleting Mailboxes
ss
ir re and
ove age
Changing mailbox options
To change any of the mailbox options:
1. Click the Mailbox menu and then click Change/Delete.The Mailbox List dialog box appears.
2. Click the name of the mailbox you want to modify.
3. Click the Change button.The Mailbox Properties dialog box appears with the General tab open.
4. Modify the extension number, first or last name of the mailbox owner, Claof Service or Company Directory availability.
5. Click the Options tab to modify the Alternate extension numbers, MessageWaiting notification or Call Screening settings.
6. Click the Outdial tab to modify the Outdialing route information.
7. After you modifying the mailbox, click the OK button.
8. Click the Close button.
Deleting a mailboxBefore you delete a mailbox, ensure the mailbox owner has listened to all themessages. When you delete a mailbox, all messages stored in that mailbox adeleted and the mailbox is deleted automatically from the Company Directoryall Group Lists.
If you are deleting a mailbox associated with a CCR Tree, make sure you remthe mailbox from the CCR Tree first. If you do not delete the mailbox, the messMbox in CCR appears on your display.
To delete a mailbox:
1. Click the Mailbox menu and then click Change/Delete.The Mailbox List dialog box appears.
2. Click the name of the mailbox you want to delete.
3. Click the Delete button.A message appears that asks you to confirm the deletion.
4. Click the OK button.
5. Click the Close button.
Enterprise Edge 2.0 Voice Messaging Set Up and Operation Guide P0911620 Issue 02

ach in the
You
d to
you lbox,
very
s of
es.
the
Mailbox Administration Tasks
OverviewThis chapter describes the steps for administering Enterprise Edge Voice Messaging mailboxes, including:
• Special Mailboxes (System Administrator Mailbox and General Delivery Mailbox)
• Personal Mailboxes (User and Guest)
• Information Mailboxes
Administering Special MailboxesSpecial Mailbox administration involves listening to messages, attending to emessage, and then deleting the message. Attend every day to messages leftSpecial Mailboxes.
There are two Special Mailboxes: System Administrator and General Delivery.can use the following features for both types.
When a message is left in the System Administrator Mailbox, you can responthe message in your role as System Administrator.
When a message is left in the General Delivery Mailbox for a mailbox owner, can send the message from the General Delivery Mailbox to the owner’s maiif they have one.
Administering Personal MailboxesA Personal Mailbox is administered mainly by the mailbox owner and requires little administration from you.
The Personal Mailbox administration tasks that you perform include changingmailbox options such as:
• resetting a password to 0000 if a mailbox owner forgets their password
• mailbox extension
• Class of Service
• mailbox owner’s name
• mailbox overrides, including Alternate extensions (User Mailboxes only), Fax line number (User mailboxes only on systems with FAX enabled) and statuthe Call Screening feature.
System Administrator tasks also include adding or deleting Personal MailboxFor information about adding mailboxes, refer to User Mailboxes on page 77, and Adding multiple mailboxes on page 79.
For more information about Personal Mailbox Options and administration seeEnterprise Edge 2.0 Voice Messaging Reference Guide.
10
P0911620 Issue 02 Enterprise Edge 2.0 Voice Messaging Set Up and Operation Guide

88 Mailbox Administration Tasks
a prise the
ew
ord to
ect f If the lbox
s its he not nged. nt is
About mailbox passwordsEach mailbox certified with Enterprise Edge Voice Messaging is protected bypassword established by the mailbox owner. When you add a mailbox to EnterEdge Voice Messaging, the password 0000 is assigned automatically. This isdefault password.
To use a mailbox, a mailbox owner must change the default password. The npassword must be four to eight digits in length and cannot start with zero.
If a mailbox owner cannot remember their password, you can reset the passwthe default password 0000. Refer to Changing mailbox options on page 85.
Incorrect password lock-outIn its Class of Service each mailbox is assigned a maximum number of incorrpassword attempts. Enterprise Edge Voice Messaging records the number oincorrect attempts since the last time the mailbox was accessed successfully.number is of attempts is exceeded, the mailbox owner is “locked-out”. The maicannot be opened again until the password is reset. Refer to Changing mailbox options on page 85.
Password expiryIn its Class of Service each mailbox is assigned the maximum number of daypassword remains active. When the maximum number of days is exceeded tmailbox password expires. The mailbox owner can open the mailbox but canaccess messages or perform other mailbox functions until the password is chaUnless the telephone has a two line display, the following voice announcemeplayed when the mailbox is opened after the password expires:
“Your current password has expired. You must change your password.Please enter your new password, then press £.”
After the new password is entered the mailbox returns to normal operation.
Caution: Change your System Administrator password frequently to minimize the risk of unauthorized activity.
Caution: Set the Class of Service password expiry to a low value so that mailbox owners must change their password often. Mailboxes with a Class of Service value that has a high or indefinite password expiry interval setting have an increased likelihood of unauthorized use of the Enterprise Edge Voice Messaging system.
Enterprise Edge 2.0 Voice Messaging Set Up and Operation Guide P0911620 Issue 02

Mailbox Administration Tasks 89
mper
they ailbox ture
t ny fer
Enabling external initializationYou can assign Mailbox initialization to be performed only from an internal Enterprise Edge telephone. This added security feature makes it difficult to tawith or gain access to the mailboxes fraudulently.
If a user attempts to access an uninitialized mailbox from an external number,are denied access. After the mailbox is initialized, the user can access the mfrom any touch tone phone. The default setting for the External Initialization feais off.
To enable External Initialization:
1. On the Options menu click System Parameters.The System Parameters dialog box appears.
2. At the External Initialization option, select Enable.
3. Click the OK button.
Configuring the Company DirectoryYou can determine whether callers can search the Company Directory by firsname, last name or both first and last name. You can also disable the CompaDirectory if necessary. For more information about the Company Directory, reto Company Directory on page 59.
To configure the Company Directory:
1. On the Options menu click System Parameters.The Systems Parameters dialog box appears.
2. At the Directory Search by option, select First Name, Last Name or Both.
3. Click the OK button.
P0911620 Issue 02 Enterprise Edge 2.0 Voice Messaging Set Up and Operation Guide

90 Mailbox Administration Tasks
rk, ust
.
n
lling.
ol or
neral ant
Setting up Outcalling Channels
Designating the number of channels for Off-premise Message Notification and Outbound Transfer
For Off-premise Message Notification, fax printing and AMIS networking to wovoice channels must be available to Enterprise Edge Voice Messaging. You massign channels to Enterprise Edge Voice Messaging to place outgoing calls
Set Outcalling channels to no more than half of the total channels available oEnterprise Edge Voice Messaging.
Do not assign all station channels on your system as voice channels for OutcaEnsure you reserve enough channels to accommodate incoming calls.
Note: Enable Outbound Transfer only for users who require this feature. Outbound Transfer increases the likelihood of unauthorized use of theEnterprise Edge Voice Messaging system, especially when the line, poroute code assigned allows long distance dialing.
To designate the number of channels for Outcalling:
1. On the Options menu click System Parameters.The System Parameters dialog box appears.
2. In the Number of Outcalling Channels box, type the number of outcalling channels.
3. Click the OK button.
Enabling and disabling the General Delivery MailboxThe default status for the General Delivery Mailbox is enabled. The General Delivery Mailbox can be disabled or enabled as required by your company.
To assign the General Delivery Mailbox:
1. On the Options menu click System Parameters.The System Parameters dialog box appears.
2. At the General Delivery Mailbox option, select Yes for enabled or No for disabled.
3. Click the OK button.
Callers who reach the General Delivery Mailbox can leave a message if the GeDelivery Mailbox is enabled. If it is disabled, callers hear the Automated AttendVoice Prompt. At any time, callers can press ‚ to reach the Operator.
Enterprise Edge 2.0 Voice Messaging Set Up and Operation Guide P0911620 Issue 02

Mailbox Administration Tasks 91
the ur ion on o a
eed to
, and st
d a
ice play. , and
Setting up the Operator’s MailboxIf the Operator is not available, any calls that request the Operator transfer toGeneral Delivery Mailbox. Assign the General Delivery Mailbox number to yocompany’s designated Operator. The extension can be any operating extensyour Enterprise Edge Voice Messaging System that is not already assigned tmailbox.
To change the mailbox number:
1. On the Options menu click Operator Settings.The Operator Settings dialog box appears.
2. In the Attendant box, type the Operator’s mailbox extension.
3. Click the OK button.
Broadcast and Group messagesApart from the day-to-day messages you send, there can be times when you nsend a Broadcast Message to all mailbox owners, or a Group Message to a designated group of mailboxes.
This section describes how to:
• send a Broadcast Message
• create or delete a Group List
• change the members of a Group List
• view the members of a Group List
• send a Group Message
Sending Broadcast MessagesA Broadcast Message sends the same message is delivered to each mailboxeliminates recording and sending the same message several times. BroadcaMessages can be sent to announce meetings, special company events, and reminders.
Only you, as System Administrator, can send Broadcast Messages. You senBroadcast Message by entering ƒ·°⁄, logging on and pressing ·.
Broadcast Messages play on all mailboxes initialized with Enterprise Edge VoMessaging. A mailbox owner does not have to select a Broadcast Message toThe message plays automatically when mailbox owners open their mailboxeserases automatically after it plays.
A Broadcast Message plays only once for each mailbox owner.
Broadcast Messages are not sent to Information or Special Mailboxes.
P0911620 Issue 02 Enterprise Edge 2.0 Voice Messaging Set Up and Operation Guide

92 Mailbox Administration Tasks
r
oice
ssages
roup mple, , and
the
Sending a Broadcast Message
To send a Broadcast Message, you must first open your System AdministratoMailbox:
Your message is delivered to all mailboxes initialized with Enterprise Edge VMessaging.
Sending Group MessagesGroup Messages can be sent by any user, but the Group List to which the meare sent must be defined or changed by the System Administrator.
Before you can send a Group Message, you must first define a Group List. A GList contains all the mailbox numbers that receive a group message. For exayou can group all mailboxes from the accounting department into a Group Listall the mailboxes from the shipping department into another Group List.
A Group List can include only mailbox numbers. A Group List cannot include number of another Group List.
The Group List feature is enabled during installation.
1. Press ƒ·°⁄.
2. Press OTHR.
Note: If the set you are using does not have amailbox, the Log: prompt appears.
3. Enter the System Administrator Mailbox number and password, then press OK.
4. Press ·.
5. At the tone, record your message and press OK.
6. To listen to your message before sending it, pressPLAY.
Press OK to accept your recording. The displaychanges to show Msg delivered.
To record your message again, press RETRY.
Press ® to end this programming session.
Pswd:OTHR RETRY OK
Log:OTHR RETRY OK
0 new 0 savedPLAY REC ADMIN
Record message:RETRY PAUSE OK
Accept rec?RETRY PLAY OK
Enterprise Edge 2.0 Voice Messaging Set Up and Operation Guide P0911620 Issue 02

Mailbox Administration Tasks 93
ber ange
he ust
n you
list,
, the List g.
n on
e for
Preparing a Group ListPreparing a Group List is similar to setting up a new mailbox. You assign a numand a name to a Group List. The leading digit for Group Lists is 9. You can chthe Group List leading digit at any time, if necessary. The next two digits are assigned automatically by Enterprise Edge Voice Messaging when you add tGroup List. The Group List numbers are assigned in sequential order. You massign the Group List name. For information about Fax Group Lists, refer to Enterprise Edge 2.0 Voice Messaging FAX Set Up and Operation Guide.
Enterprise Edge Voice Messaging allows 99 Group Lists. Each Group List cacontain a maximum of 1,000 mailboxes. Before you begin to add Group Lists,must prepare a group mailbox member list. Ensure that this list contains:
• leading digit – (see Group List Numbers on page 93)
• Group List name – maximum 16 characters long
• mailbox numbers – to be included in the group
A mailbox must be initialized before it can be added to a Group List.
After you establish a Group List, you can change the mailboxes included in therecord a new list name, view the Group List, or delete the Group List.
Group List Numbers
The number 9 is assigned as the default Group List leading digit. For exampledefault Group List numbers are 901 to 999. If the leading digit is 5, the Groupnumbers are 501 to 599. The Group List numbers are always three digits lon
You can change the Group List leading digit if necessary. For more informatiochanging the Group List leading digit, refer to Changing the Group List leading digit on page 95.
The Group List number acts like a mailbox number when you leave a messagthe mailboxes in the Group List. The table Sample Group List shows two sample Group Lists.
Sample Group List
Group List no. Name Mailbox no.
901 Sales 224
223
233
902 Shipping 227
221
P0911620 Issue 02 Enterprise Edge 2.0 Voice Messaging Set Up and Operation Guide

94 Mailbox Administration Tasks
ne
p
up
roup roup , you roup
nd
Adding a Group ListTo add a Group List:
1. Click the Group Lists menu.The Group Lists dialog box appears.
2. Click the Add button.The Group List dialog box appears.
3. In the Group List Name box, type the new Group List name.
4. Follow the steps in Recording a greeting or prompt from your telephone handset on page 27 to record a spoken Group List name from your telephohandsetorfollow the steps in Recording a greeting or prompt from your PC on page 28 to record a spoken Group List name from your PCorfollow the steps in Locating a previously recorded greeting or prompt on page 28 to select a previously recorded Group List name.
5. From the Available list, click a mailbox that you want to include in the GrouList.
6. Click the Add button to copy the mailbox into the Current Members list.Repeat steps 5 and 6 for each mailbox that you want to include in the GroList.
7. After you add all the members to the Group List, click the OK button and then click the Close button.
Changing a Group ListA Group List Name and mailbox numbers can be added to or deleted from a GList at any time. Mailboxes must be initialized before they can be added to a GList. You cannot change a Group List number. To change a Group List numbermust delete the Group List and add new member mailbox numbers as a new GList. For more information, refer to Adding a Group List on page 94.
To change a Group List:
1. Click the Group Lists menu.The Group Lists dialog box appears.
2. If you want to change the Group List name, click the name of the group, athen click the Change button.
3. Enter the new Group List name.
Enterprise Edge 2.0 Voice Messaging Set Up and Operation Guide P0911620 Issue 02

Mailbox Administration Tasks 95
ne
, if 9 ists.
599.
cts
t
4. Follow the steps in Recording a greeting or prompt from your telephone handset on page 27 to record a spoken Group List name from your telephohandsetorfollow the steps in Recording a greeting or prompt from your PC on page 28 to record a spoken Group List name from your PCorfollow the steps in Locating a previously recorded greeting or prompt on page 28 to select a previously recorded Group List name.
5. Select a mailbox from the Current Members Available list that you want to remove from the Group List.
6. Click the Remove button to remove it from the Current Members list.
7. Select a mailbox from the Available list that you want to include in the GroupList.
8. Click the Add button to copy the mailbox into the Current Members list.
9. After you make the necessary changes to the Group List, click the OK button.
Changing the Group List leading digitYou can find it necessary to change the Group List leading digit. For exampleis assigned as the Group List leading digit, 901 to 999 is your range of Group LIf you change the leading digit to 5, the Group List numbers change to 501 toThe Group List numbers are always three digits long.
Note: You cannot change the Group List leading digit to a number that confliwith mailbox numbers. For example, if your company has mailboxes ranging from 500 to 720, you cannot choose 5, 6 or 7 as the Group Lisleading digit.
To change the Group List leading digit:
1. On the Options menu click System Parameters.The System Parameters dialog box appears.
2. In the Group List Leading Digit box, type the new leading digit.
3. Click the OK button.
P0911620 Issue 02 Enterprise Edge 2.0 Voice Messaging Set Up and Operation Guide

96 Mailbox Administration Tasks
List next es
of roup
, before sage roup
e
Deleting a Group ListYou can delete a Group List at any time. If you delete a Group List, the Groupnumber is re-assigned automatically by Enterprise Edge Voice Messaging thetime you add a Group List. Deleting a Group List does not delete any mailboxfrom the Enterprise Edge Voice Messaging system.
To delete a Group List:
1. Click the Group Lists menu.The Group Lists dialog box appears.
2. Click the Group List you want to delete.
3. Click the Delete button.
4. Click the OK button to confirm the deletion.
5. Click the Close button.
Sending a Group MessageYou can sent a Group Message whenever you want to notify a specific groupmailboxes of a pending event or company notice that pertains to the group. A GList message must be selected to play, just as a regular message is selecteda mailbox owner can listen to it. Unlike a Broadcast Message, a Group List mesdoes not play automatically. When a mailbox owner sends a message to the GList, the mailbox owner’s own mailbox does not receive the message.
To send a Group Message from your Enterprise Edge telephone:
1. Press ƒ·°‚.
2. Enter the Mailbox number.
3. Enter the Group List number and press OK.
4. At the sound of the tone, record your messagand press OK to end your recording.
5. Press RETRY to record your message againorpress PLAY to replay your messageorpress SEND to accept and send your message.
Press ® to end this programming session.
Mbox:DIR QUIT
Grp List:RETRY OK
Record message:RETRY PAUSE OK
Message options:RETRY PLAY SEND
Leave message:NEW MBOX
Enterprise Edge 2.0 Voice Messaging Set Up and Operation Guide P0911620 Issue 02

Mailbox Administration Tasks 97
ion s
lls.
aller not
Caller ID (CLID)If your company subscribes to Caller ID, also known as Calling Line Identificator CLID, the caller’s number or name and number appears on the telephone’display if the telephone has a one or two-line display.
Caller ID is one of the options needed to use the Reply feature for external ca
You must assign the number of rings to two or more on lines equipped with CID for pre-recorded Personalized Greetings to play. Caller ID information doesappear until just prior to the second ring.
P0911620 Issue 02 Enterprise Edge 2.0 Voice Messaging Set Up and Operation Guide

P0911620 Issue 02 Enterprise Edge 2.0 Voice Messaging Set Up and Operation Guide

ions. . The
codes
tor
r
n
r If
at
ge
Mailbox feature codes
OverviewCallers use feature codes to perform Enterprise Edge Voice Messaging functThere are nine feature codes that work with Enterprise Edge Voice Messagingtable Description of feature codes explains the purpose of each Enterprise EdgeVoice Messaging feature code.
Feature codes are assigned during installation. You can program the feature onto memory buttons. For information, refer to Programming a memory button on page 100.
Description of feature codes
Feature code name Feature code buttons Description
Leave Message ƒ·°‚ Leaves a message in a mailbox. No password is required.
Open Mailbox ƒ·°⁄ Opens your Personal mailbox. Your personal password is required.
Operator Status ƒ·°¤ Used by the System Administrator, receptionist, or Operator to set the Operator Status. When an operais not available, set the Operator Status to No. This alerts the Automated Attendant that the Receptionistor designated Operator is not available. Operator Status also establishes whether a business is open oclosed, and designates the Operator’s extension. Operator Status is protected by a password.
Call Forward to Enterprise Edge Voice Messaging
ƒ·°› Forwards incoming calls to Enterprise Edge Voice Messaging.
Enterprise Edge Voice Messaging extension
ƒ·°fi Determines the Enterprise Edge Voice Messaging extension. This number is used to access EnterpriseEdge Voice Messaging from a one line display telephone attached to an Enterprise Edge ATA 2 or aAnalog Station Module.
Transfer ƒ·°fl Transfers calls to a mailbox.
Interrupt ƒ·°‡ Interrupts Enterprise Edge Voice Messaging when acaller is listening to your personal mailbox greeting oleaving a message so you can speak with the caller.a caller is interrupted, the first part of the message remains in the mailbox. You can delete this messageyour convenience. If Off-premise Message Notification is on, the message causes Enterprise EdVoice Messaging to call the Off-premise Notification number immediately.
Call Record ƒ·°· Records a telephone call from your Enterprise Edge telephone. The message is left in your mailbox.
11
P0911620 Issue 02 Enterprise Edge 2.0 Voice Messaging Set Up and Operation Guide

100 Mailbox feature codes
used
vided
Programming a memory buttonTo simplify setup and administration tasks, we recommend that you programmemory buttons for the feature codes you use most often. The most frequentlyEnterprise Edge Voice Messaging feature codes are:
• Open Mailbox - Feature 981
• Forward to Enterprise Edge Voice Messaging - Feature 984
• Transfer - Feature 986
• Interrupt - Feature 987
To program a memory button:
Label the buttons with the feature code description using the paper labels prowith your Enterprise Edge telephone.
Note: We recommend that you program a memory button with the EnterpriseEdge Voice Messaging extension.
1. Press ƒ•‹.
2. Press a programmable button.
3. Press ƒ and enter the feature code number.
4. Repeat steps 1 through 3 for each Enterprise Edge Voice Messaging feature code you wantto program.
Press a buttonQUIT
Programmed
Enterprise Edge 2.0 Voice Messaging Set Up and Operation Guide P0911620 Issue 02

Section V - Custom Call Routing (CCR)• Overview of Custom Call Routing
• Building, saving, and assigning a CCR Tree
• Changing or deleting a CCR Tree
P0911620 Issue 02 Enterprise Edge 2.0 Voice Messaging Set Up and Operation Guide

P0911620 Issue 02 Enterprise Edge 2.0 Voice Messaging Set Up and Operation Guide

that ing,
. ider
n
he
Overview of Custom Call Routing
This chapter contains general information about Custom Call Routing (CCR) prepares you, the System Administrator, for the subsequent chapters on buildchanging and deleting a CCR Tree. This chapter contains:
• an overview of how CCR works
• terms and definitions
• examples
• planning and designing a CCR Tree
How CCR works
After you assign a CCR Tree, callers hear the CCR Home voice prompt immediately after the Company Greeting instead of the Automated AttendantCustom Call Routing (CCR) offers callers a more sophisticated menu and a wrange of options than the Automated Attendant menus.
A caller navigates through CCR using their telephone dialpad. By selecting aoption from the prompts that you create, callers can:
• play an information message
• leave a message in a mailbox
• transfer to an extension or an external number
• access another menu
Note: Set up mailboxes and Greeting Tables before designing and building tCCR Tree.
12
P0911620 Issue 02 Enterprise Edge 2.0 Voice Messaging Set Up and Operation Guide

104 Overview of Custom Call Routing
me
me
ingle other
e
Custom Call Routing overview
When you build a CCR Tree, you start by programming the options in the Honode. If the Home node is a menu, up to eight options can be included.
You record a voice prompt or import a voice file that informs callers of the Honode menu options.
When a caller makes a selection from the Home node menu (by pressing a sbutton) the caller can access an information message, mailbox, transfer, or anmenu below the Home node menu.
If the Home node is an Information node, the caller disconnects after the Information Message plays.
As System Administrator, you can program up to eight CCR Trees. After youprogram a CCR Tree, you must assign the Tree to a Greeting Table. For morinformation, refer to Greeting Tables on page 32.
Automated Attendant
answersanswersattendant
Company Greetingplays
Custom Call Routing
Home node option(s) play
Automated Attendant Menu options play
Incoming call
Enterprise Edge 2.0 Voice Messaging Set Up and Operation Guide P0911620 Issue 02

Overview of Custom Call Routing 105
after tree e
is
se
o
in
ext
s.
es h a nd ub-
ree
first 0
Terms and definitionsThe following terms are introduced in this section.
Term Definition
Assigned Key Key or button that the caller is prompted to press to access a node.
Home node Node associated with the first CCR Tree recording the caller hears they hear the company greeting. The Home node appears below theicon. A Home node can be either a Menu node or an Information nodin the CCR Tree.
Icon Indicates the type of node including Menu, Transfer, Mailbox, and Information. There are also icons for a warning or an error if the nodeincomplete or in error.
Information Mailbox Provides a caller with information about goods or services availablefrom your company. An Information Mailbox lets an end-user department keep the information current by logging on and changingthe Information Mailbox greeting.
Information node Does not have a mailbox allocation and is changed only in EnterpriEdge Voice Applications Manager. To callers, an Information node isthe same as an Information Mailbox.
Mailbox node Lets a caller access a mailbox. Callers who select a Mailbox node transfer to a mailbox to leave a message or listen to an Information Mailbox. An Information Mailbox node plays a prompt to the caller. Note that a Mailbox node refers to a Mailbox but does not set up themailbox. Set up mailboxes before you design and build a CCR Tree.
Menu A voice prompt you record that provides a caller with a menu of up teight options.
Menu node A voice prompt you record that provides a caller with a list of up to eight options. Use a Menu node to create another level of tree depththe tree.
Next Action Determines where the call is directed after the caller listens to an Information message or uses a mailbox. The three possibilities for NAction are:- Previous: returns the caller to the previous menu- Home: returns the caller to the Home node- Disconnect: disconnects the call
You can assign Next Actions only to Information nodes and Mailboxe
Node There are several types of nodes. There are Root nodes, Menu nodand leaf nodes. A Root node is the beginning of a CCR Tree to whicHome node is added. Menu nodes can support other Menu nodes aleaf nodes. Leaf nodes cannot support Menu nodes. A total of eight snodes can be added to a Menu node. A sub-node belongs to a Menunode and can include Menu nodes or leaf nodes.
Root node The beginning of a CCR Tree, represented by a tree icon. A new Tconsists only of the Root node until you create a Home node.
Transfer node Is assigned a one-digit number that callers press to transfer to an extension or external number.
Tree A collection of nodes organized in a tree structure.
Tree depth As nodes are added to a CCR Tree, the Tree depth increases. Thelevel of Tree depth is the Home node. The maximum Tree depth is 1nodes.
P0911620 Issue 02 Enterprise Edge 2.0 Voice Messaging Set Up and Operation Guide

106 Overview of Custom Call Routing
es
g
ice
f the Root
node r an
Planning and designing a CCR TreePlanning and designing a CCR Tree involves:
• determining frequently requested departments
• determining frequently called extensions
• making a list of goods and services to be promoted in Information messag
• selecting mailboxes to be assigned to Mailbox nodes
• determining Next Actions
• designing the CCR Tree template in the Enterprise Edge 2.0 Voice MessaginProgramming Record. Photocopy this record and use the photocopy as an outline as you proceed through this section.
• recording the prompts and messages
By default, a caller can press · to hear prompts in the Alternate Language, or ‚ to reach an Operator. Record the options as part of the Home node menu voprompt so that the caller is aware of these options.
About the CCR Tree structureAfter the Company Greeting, a caller hears the Home voice prompt at the top oCCR Tree. You create the Home node by adding a node to the Root node. Thenode appears as a tree icon in the CCR x - Editor window.
When the Home node is an Menu node
You can set up a CCR Tree so that callers who select an option from the Homemenu can access another menu, leave a message, transfer to an extension oexternal number, or listen to an Information Mailbox message.
Enterprise Edge 2.0 Voice Messaging Set Up and Operation Guide P0911620 Issue 02

Overview of Custom Call Routing 107
:
-t
t the
st y ll the
o a in a
, from rs
with age
node
ines. to
When the Home node is an Information node
You can set up the Home node to play an Information message. For example
“Come celebrate with us! It’s time for the Ideal Office Machines annual get-toknow-our-customers picnic. The annual picnic is on the first Sunday in Augusfrom 1:00 to 5:00 p.m. in Central Park. See you there.”
If the Home node is an Information node, the caller disconnects automatically aend of the message. The other Next Action types do not apply.
Recording an Alternate Language Home node menu voice prompt
If you record an Alternate Language Home node menu voice prompt, you muinform callers of the Alternate Language option. When you record the PrimarLanguage Home node menu prompt, speak in the Alternate Language and tecaller to press · if they wish to hear the message in the Alternate Language. Mention that they can press ‚ to transfer to the attendant. For example:
“To hear this message in (the Alternate Language), press ·. To place an order, press ⁄. To add your name to our mailing list, press ¤. To reach our sales department, press ‹. To speak with our Customer Service Representative, press ›. To speak with our attendant, press ‚.”
Menu sub-node
A menu sub-node includes a voice prompt you record to provide a caller withanother list of options. A menu sub-node is created by adding a Menu node tMenu node. A menu sub-node is assigned a single-digit number that appearsmenu. A total of eight sub-nodes can be added to a Menu node. For examplethe Home node menu, the caller presses ‹ to reach the Sales department and heathe sub-node options:
“To place an order, press ⁄. To add your name to our mailing list, press ¤. To speak with our Customer Service Representative, press ‹. To speak with our attendant, press ‚.”
Information node
An Information node accompanies a message you record to provide a caller information about goods or services available from your company. This messcan provide callers with information about sales, specials, company events, business hours, price lists, shipping times or even the weather. An Informationis assigned a single-digit number that is announced in a menu (unless the Information node is the Home node). When callers press this number, the Information message plays automatically. For example:
“We are pleased to announce the arrival of the new FaxEasy line of FAX machFaxEasy produces top quality FAX images at an affordable price, and is easyoperate.”
P0911620 Issue 02 Enterprise Edge 2.0 Voice Messaging Set Up and Operation Guide

108 Overview of Custom Call Routing
. The a
one, mber
. A en a or
an Next
Leave Message
The Leave Message option lets a caller access a mailbox to leave a messageLeave Message option is assigned a single-digit number that is announced inmenu. When callers press this number, the caller transfers automatically to amailbox to leave a message. An example of a Mailbox Greeting is:
“You have reached the Ideal Office Machines Order Desk mailbox. After the tplease leave your name, address, phone number, and the item name and nuyou want to order. Thank you.”
Transfer
A Transfer option lets a caller transfer to an extension or an external numberTransfer option is assigned a single-digit number that appears in a menu. Whcaller presses this number, the caller transfers automatically to an extension external number.
Next ActionNext Action determines the destination the caller is sent to after they listen toInformation message or leave a message in a mailbox. The three options for Action are:
• Previous: returns the caller to the previous menu
• Home: returns the caller to the Home node
• Disconnect: disconnects the call
Enterprise Edge 2.0 Voice Messaging Set Up and Operation Guide P0911620 Issue 02
R Tree.
e rd
reate is a
and
ntinue
Building, saving, and assigning a CCR Tree
OverviewThis chapter contains the instructions needed to create, save and assign a CC
The specific topics in this chapter include:
• Beginning to build a new Tree
• Recording the Home node voice prompt
• Adding a Menu sub-node
• Adding an Information node
• Adding a Mailbox node
• Adding an internal Transfer node
• Adding an external Transfer node
• Saving a CCR Tree
• Assigning a CCR Tree
• Testing a CCR Tree
Tools and materialsTo have a clear record of the CCR Tree you intend to create, first complete thappropriate section of the Enterprise Edge Voice Messaging Programming Reco and have it handy during the programming.
Beginning a new CCR Tree and recording the Home node voice promptAfter you design your CCR Tree, the first step is to create a new Tree, then ca Home node (either a Menu node or an Information node). If the Home nodeMenu node, you can record the Home node voice prompt and then add:
• a Menu sub-node
• an Information node
• a Mailbox node
• a Transfer node
If the Home node is an Information node, you can record a voice prompt.
After you complete these steps, you must save the Tree. You must completesave the CCR Tree before you can assign it.
When you start to build a CCR Tree, you can save the Tree at any time and coworking on it later. For more information about saving a Tree, refer to Saving a CCR Tree on page 117.
13
P0911620 Issue 02 Enterprise Edge 2.0 Voice Messaging Set Up and Operation Guide

110 Building, saving, and assigning a CCR Tree
g ree.
The enu
you than
ears
set
Beginning to build a new TreeBeginning to build a new Tree is as simple as clicking the CCR menu, clickinNew, and creating a Home node. From this node you can build a new CCR T
To begin to build a new Tree and record the Home node voice prompt:
1. Click the CCR menu and then click New.The Tree - CCR Editor window, or Tree view, appears.
The newly created Tree shows only the Root node which is labeled Tree. Root node is highlighted. To continue to build the Tree, you must add a Mnode or an Information node.
2. Click the Node menu and point to Add.A list appears with the following available options: Menu and Information. Note: After you select Information, you cannot add Sub-nodes later. After select Menu, you can set up the CCR Tree so the caller can access moreone option.
3. Click Menu or Information .
4. Double-click the new Home node.The Properties - Menu Node or the Properties - Info Node dialog box appwith the updated Tree view behind it.
5. In the Caption box, type a caption name, such as List of options, if the Home node is a menu.
6. To record the Home node voice prompt or select a previously recorded prompt, follow the steps in Recording a greeting or prompt from your telephone handset on page 27 to record a prompt from your telephone handorfollow the steps in Recording a greeting or prompt from your PC on page 28 to record a prompt from your PCorfollow the steps in Locating a previously recorded greeting or prompt on page 28 to select a previously recorded prompt.
For information about saving a Tree, refer to Saving a CCR Tree on page 117.
Enterprise Edge 2.0 Voice Messaging Set Up and Operation Guide P0911620 Issue 02

Building, saving, and assigning a CCR Tree 111
tions ome o your
ub-
ns in up to
. If -node
me
,
Adding a sub-node to a Menu nodeAfter you create a CCR Tree, the first step in building the Tree is to assign opto the Home node menu. If there are more choices than fit conveniently in the Hnode menu, you can create one or more sub-node menus. Add a Menu node tHome node menu.
Remember that if the Home node is an Information node, you cannot add a snode and the call disconnects automatically after the message plays.
After you determine how many options you want to offer in a menu, you mustdetermine where the option directs the caller.
After you assign a Menu sub-node, you must next assign another set of optiothe next level of tree depth. Options for each menu can be another Menu, anInformation Mailbox, a Transfer, or a Leave Message option. You can assign eight options to each menu.
The Menu sub-node gives callers single-digit access to another list of optionsyour Tree is designed to progress to a second level, you must add a Menu subon the first level to inform the caller of further options. For example, if your Honode menu says:
“To place an order, press ⁄. To add your name to our mailing list, press ¤. To reach our sales department, press ‹. To speak with our attendant, press ‚.”
The caller can to press ⁄ and hear more options, such as:
“To hear our weekly specials, press ⁄. To speak with a clerk at the Order Deskpress ¤.”
P0911620 Issue 02 Enterprise Edge 2.0 Voice Messaging Set Up and Operation Guide

112 Building, saving, and assigning a CCR Tree
ved.
er of
ree
Adding a Menu sub-node
To add a new Menu sub-node:
1. Click the CCR menu, point to Open and then click the Tree that you want toadd a sub-node to.The Tree x - CCR Editor window appears.
Note: x is a variable that represents the Tree number after the Tree is sa
2. Click the Menu node that you want to add a sub-node to.
3. Click the Node menu, point to Add, and then click Menu.An error message appears if the menu you select has the maximum numbsub-nodes.
4. Double-click the new node.The Properties - Menu Node window appears.
5. In the Caption box, type a caption name.
6. To record the Primary and Alternate prompts, follow the steps in Recording a greeting or prompt from your telephone handset on page 27 to record a prompt from your telephoneorfollow the steps in Recording a greeting or prompt from your PC on page 28or to record a prompt from your PCorfollow the steps in Locating a previously recorded greeting or prompt on page 28 to select a previously recorded prompt.
7. In the Assigned Key list box, the lowest available Assigned Key number forthe Tree is shown. You can change the number to re-order the menu if required.
8. Click the OK button.The node is created.
You can continue to build the Tree and add more options, finish building the Tand save it, or save the Tree now and add to it later.
Enterprise Edge 2.0 Voice Messaging Set Up and Operation Guide P0911620 Issue 02

Building, saving, and assigning a CCR Tree 113
t her.
r in
he
y.
he
Adding an Information Mailbox You can use the Information Mailbox to provide callers with information abousales, specials, company events, business hours, price lists or even the weat
To add an Information Mailbox:
1. Click the CCR menu, point to Open and click the Tree that you want to add an Information Mailbox to.The Tree x - CCR Editor window appears.
2. Click the node that you want to add an Information node to.
3. Click the Node menu, point to Add, and then click Information .
4. Double-click the new node.The Properties - Info Node dialog box appears. The messages that appeathe bottom of the Properties - Info Node dialog box contain tips and information.
5. In the Caption box, type a name for the Information Mailbox, such as Store Hours and Directions.
6. To record the Primary and Alternate prompts, follow the steps in Recording a greeting or prompt from your telephone handset on page 27 to record a prompt from your telephoneorfollow the steps in Recording a greeting or prompt from your PC on page 28or to record a prompt from your PCorfollow the steps in Locating a previously recorded greeting or prompt on page 28 to select a previously recorded prompt.
7. At the Next Action option, select either Home, Disconnect or Previous.
• Previous: returns to the Previous menu
• Home: returns the call to the Home node voice prompt
• Disconnect: disconnects the call
An exception to this occurs if an Information Mailbox is the Home node. Tcall disconnects after the Information message plays.
8. The Assigned Key list box displays the default number for the Assigned KeClick the OK button to add the Information Mailbox. The node is created. You can continue to build this Tree and add more options, finish building tTree and save it, or save the Tree now and add to it later.
P0911620 Issue 02 Enterprise Edge 2.0 Voice Messaging Set Up and Operation Guide

114 Building, saving, and assigning a CCR Tree
a . You .
be
pear
o.
y.
ding
Adding a Mailbox nodeAdding a mailbox node provides a caller with a mailbox where they can leavemessage or listen to an Information Message, depending on the mailbox typecreate a mailbox by giving it a Path number and assigning a mailbox number
Before you assign a mailbox to receive callers’ messages, the mailbox must initialized.
To add the mailbox in which callers can leave messages:
1. Click the CCR menu, point to Open, and then click the Tree you want to adda mailbox node to.The Tree x - CCR Editor window appears.
2. Click the node that you want to add a mailbox node to.
3. Click the Node menu, point to Add, and then click Mailbox .
Double-click the new node.The Properties - Mailbox Node dialog box appears. The messages that apin the bottom of the Properties - Mailbox Node dialog box contain tips and information.
4. In the Mailbox box, type the mailbox number you want to direct the caller tIf you do not know the mailbox number, click the Directory button. The Select Mailbox dialog box appears.
5. Click the mailbox number you want and click the Select button.The Properties - Mailbox Node dialog box appears.
6. At the Next Action option, select either Home, Disconnect or Previous.
• Previous: returns to the Previous menu
• Home: returns the call to the Home node voice prompt
• Disconnect: disconnects the call
The Assigned Key list box displays the default number for the Assigned Ke
7. Click the OK button to add the new Mailbox node.
You can continue to build this Tree and add more options, or you can finish builthis Tree and save it. For more information about saving a Tree, refer to Saving a CCR Tree on page 117.
Enterprise Edge 2.0 Voice Messaging Set Up and Operation Guide P0911620 Issue 02

Building, saving, and assigning a CCR Tree 115
ppear
ller
y.
to it
l Tree lines
can nsfer.
ge .
nes
Adding a TransferA Transfer directs a caller to an internal extension or an external number.
Adding a Transfer to an internal extensionTo add a Transfer to an internal extension:
1. Click the CCR menu, point to Open, and then click the Tree you want to adda Transfer to.The Tree x - CCR Editor window appears.
2. Click the Menu node that you want to add a transfer node to.
3. Click the Node menu, point to Add, and then click Transfer.
4. Double-click the new node.The Properties - Transfer Node dialog box appears. The messages that ain the bottom of the Properties - Mailbox Node dialog box contain tips andinformation.
5. In the Caption box, type the name of the where you are transferring the cato, for example New Car Sales.
6. At the Select option, select either Line, Pool, Intercom or Route Code.
7. In the Dial box, type the extension number.
8. The Assigned Key list box displays the default number for the Assigned KeThe node is created. You can continue to build this Tree and add more options, finish building the Tree and save it, or save the Tree now and addlater.
9. Click the OK button to add the new Transfer node.
Adding a Transfer to an external numberWhen Enterprise Edge Voice Messaging transfers a call using a CCR externatransfer, two lines are used. An incoming line connects the caller to the CCR and an outgoing line transfers the caller to the external telephone number. Bothare used while the user connects to the external telephone number.
To optimize using Enterprise Edge Voice Messaging lines, the incoming line be used to make the external transfer. This type of transfer is called a Link tra
Note: A Link transfer can be performed only if the Enterprise Edge Voice Messaging lines are equipped with Link transfer capability. If a Link transfer is programmed for an external transfer and your Enterprise EdVoice Messaging lines do not support this feature, the call disconnectsEnsure you have Link transfer capabilities on your Central Office (CO) libefore programming this feature.
P0911620 Issue 02 Enterprise Edge 2.0 Voice Messaging Set Up and Operation Guide

116 Building, saving, and assigning a CCR Tree
ial er
r to
ear in
ller
r
y. he
To perform a Link transfer for a CCR external transfer you must add the speccharacter £ before the telephone number. For example, the telephone numblooks like:
£fififi⁄¤‹›
where:
fififi⁄¤‹› is the telephone number dialed
For more information about this feature, refer to the Enterprise Edge 2.0 Installation and Maintenance Guide.
For important information on preventing unauthorized calls using outdial, refeOutdial route on page 61.
To add a Transfer to an external number:
1. Click the CCR menu, point to Open, and then click the Tree you want to addan external Transfer to.The Tree x - CCR Editor window appears.
2. Click the node to which you want to add a transfer node.
3. Click the Node menu, point to Add, and then click Transfer.
4. Double-click the new node.The Properties - Transfer Node window appears. The messages that appthe bottom of the Properties - Mailbox Node dialog box contain tips and information.
5. In the Caption box, type a description of where you are transferring the cato, for example Sales Manager Cellular.
6. At the Select option, select either Line, Pool, Intercom or Route Code.
7. In the Dial box, type # and the external number. If your company uses line,pool or route access codes, the code must precede the phone number. Foexample, if you press 9 to access an outside line, then 9 must be the first number in the phone number.
8. The Assigned Key list box displays the default number for the Assigned KeYou can continue to build this Tree and add more options, finish building tTree and save it, or save the Tree now and add to it later.
9. Click the OK button to add the new Transfer node.
Enterprise Edge 2.0 Voice Messaging Set Up and Operation Guide P0911620 Issue 02

Building, saving, and assigning a CCR Tree 117
r you e Tree
Tree
eting fer to oice
must ation
CR sure
Saving a CCR TreeAfter you build a CCR Tree record the menus and messages, or any time aftestart building it, you can save the Tree as Tree 1 through 8. You cannot save thif it has errors.You must save the Tree before you can assign it.
To save an open CCR Tree:
1. In the Tree x - CCR Editor window, click the File menu, and then click Save.The Save As dialog box appears.
2. Select the location for the stored CCR Tree in the Save In box.
3. In the File name box, type the number for the Tree.
4. Click the Save button.
After you build and save a CCR Tree, you can assign it. Before you assign a to a Greeting Table, test it to make sure it is working correctly. For more information about testing, refer to Testing a CCR Tree on page 117.
Assigning a CCR TreeBefore incoming callers can access a CCR Tree, you must assign lines to GreTable 1, 2, 3 or 4. For information about assigning lines to Greeting Tables, reAssigning a Greeting Table and the number of rings before Enterprise Edge VMessaging answers on page 40.
After you assign lines, you can assign the Tree to a Greeting Table.
To assign a Tree, you must:
• assign the Tree to Greeting Table 1, 2, 3 or 4.
• make the Tree number a destination in the Caller ID Table. Your company subscribe to Caller ID services before you can use this feature. For informabout Caller ID Tables, refer to Setting up an Automated Attendant on page 31.
Testing a CCR TreeAfter you a build, save and assign a CCR Tree to a Greeting Table, test the CTree. To verify the Tree, call the company number and test each node. Makethat:
• the Home node routes the call as designed
• each transfer routes the caller to the intended destination
• each prompt provides the correct information
• messages are courteous and easy to understand
P0911620 Issue 02 Enterprise Edge 2.0 Voice Messaging Set Up and Operation Guide

118 Building, saving, and assigning a CCR Tree
Enterprise Edge 2.0 Voice Messaging Set Up and Operation Guide P0911620 Issue 02
your it.
s to g
Changing or deleting a CCR Tree
OverviewAfter you create and assign a CCR Tree, you can modify it to reflect changes incompany or you can save an existing CCR file to another file and customize
This chapter describes how to:
• save a CCR Tree file to another file
• disable a CCR Tree
• change a Home node or Sub-node
• move a node
• delete a Menu on a CCR Tree
• delete a CCR Tree
Tools and materialsTo have a clear record of the options you intend to change, first make changethe appropriate section of the Enterprise Edge 2.0 Voice Messaging ProgramminRecord and keep it handy during the programming changes.
PrecautionsBefore you make changes to a CCR Tree, you must disable the Tree.
Saving a CCR Tree to a fileTo save a CCR Tree to a file:
1. Open the Tree you want to save.
2. On the Tree x - CCR Editor window, click the File menu, point to Save As, and then click the Tree you want to save the Tree file to, or click File.The Save As dialog box appears.
3. In the File name box, type the name of the file.
4. Click the Save button.
Note: To re-open the file, click the CCR menu, point to Open and click File. The Open dialog box appears. Select the file, which has a .CCR extension and then click the Open button.
14
P0911620 Issue 02 Enterprise Edge 2.0 Voice Messaging Set Up and Operation Guide

120 Changing or deleting a CCR Tree
is not bles
g
you
how
hen a Home
w
Disabling a CCR TreeBefore you make any changes to an active CCR Tree you must ensure servicedisrupted by removing any references to the CCR Tree from the Greeting Taand the Caller ID Tables.
To remove references to a CCR Tree from a Greeting Table:
1. Click the Auto Attendant menu, point to Greeting Table and click the number of the Greeting Table that references the CCR Tree. If you don’t know which Greeting Table references the CCR Tree check each GreetinTable.The Greeting Table Setup dialog box appears with the Routing tab open.
2. From the CCR Tree list box, select a different CCR Tree or select None.
3. Click the OK button.Repeat steps 1 through 3 for each Greeting Table that has the CCR Treewant to disable assigned to it.
To remove references to a CCR from a Caller ID Table:
1. On the Auto Attendant menu click CLID Table Admin .The Calling Line Identification dialog box appears.
2. Find any entries that refer to the CCR Tree.These entries are identified by the word "Table" in the Type column and sthe Tree number in the Value column.
3. Click the Change button or the Delete button to change or delete these tableentries.
Changing the Home node menuIf you add a menu to the Root node (which appears as the image of a tree) wHome node already exists, a new Home node menu is created with the former node as the first assigned sub-node.
Note: Changes cannot be undone unless you close the CCR x - Editor windowithout saving changes.
Enterprise Edge 2.0 Voice Messaging Set Up and Operation Guide P0911620 Issue 02

Changing or deleting a CCR Tree 121
e
t to
Menu with
u.
Changing a Sub-node To change a sub-node:
1. Click the CCR menu, point to Open, and then click the Tree that contains thsub-node you want to change.
2. Click the sub-node you want to change.If you click the Home node, the Assigned Key is not displayed.
3. Click the Node menu, and then click Properties.The Properties - Menu Node dialog box appears.
4. Depending on the type of node you click, Primary Prompt and Alternate Prompt appear. You can change your prompt.
5. From the Assigned Key list box, choose the new Assigned Key number thayou want to change the sub-node to. If you choose a key that is assignedanother node, the nodes exchange assignments.
6. Click the OK button.
Moving a nodeA node can be moved from one menu to another by dragging it onto the target node. The node is removed from the menu and inserted into the target Menuits original assigned key or the first unassigned key.
Deleting a menuTo delete a menu:
1. Move the menu’s sub-nodes (if any) to a location in a higher level menu.
2. Click the Menu node you want to delete.
3. Click the Node menu.
4. Click Delete.A message appears asking you to confirm your request to delete the men
5. Click the OK button.
P0911620 Issue 02 Enterprise Edge 2.0 Voice Messaging Set Up and Operation Guide

122 Changing or deleting a CCR Tree
on
ee.
Deleting a TreeBefore you delete a CCR Tree, make sure the Tree is disabled. For informatiabout disabling a Tree, refer to Disabling a CCR Tree on page 120.
To delete a Tree after it is disabled:
1. Click the CCR menu, point to Delete, and then click the number of the Tree you want to delete.A message appears that asks you to confirm your request to delete the Tr
2. Click the OK button.The Tree is deleted.
Enterprise Edge 2.0 Voice Messaging Set Up and Operation Guide P0911620 Issue 02

Section VI - Maintenance andTroubleshooting
• Enterprise Edge Voice Messaging Reports• Enterprise Edge Voice Messaging Troubleshooting
P0911620 Issue 02 Enterprise Edge 2.0 Voice Messaging Set Up and Operation Guide

P0911620 Issue 02 Enterprise Edge 2.0 Voice Messaging Set Up and Operation Guide

s how
ing,
ers in
server.
for
of
reas
ort
on ng
Enterprise Edge Voice Messaging Reports
OverviewThis chapter describes Enterprise Edge Voice Messaging Reports and explainto generate and print reports.
Use the following reports to view Enterprise Edge Voice Messaging programmstatus and the available message time.
Report Contains
Directory Report A list of the mailbox owners in the Company Directory.
Numeric Mailbox Report A list of mailbox owners in order of mailbox numbers.
System Group List Report A list of Group Lists by number and name, including the names of the usthe list and their mailbox numbers.
Message Usage Report A list of the current storage available in minutes on the Enterprise Edge
Mailbox Activity Report A list of daily and average mailbox statistics. You can generate this reporteither an individual mailbox or all mailboxes.
Caller ID (CLID) Report A list of the daily CLID activity for the Enterprise Edge Voice Messaging System.
Dialing Translation Report
A list of the current settings of the Dialing Translation parameters and a listall the entries in the Dialing Translation Table.
Alarm Report A list of the alarm messages collected in the Alarm log.
Custom Call Routing (CCR) Report
A list of the menus on the CCR Tree, assignments to the menus and any athat need administering.
The Tree report must be accessed through the CCR Administration menu.
Enterprise Edge Voice Messaging Call Handling and Port Usage Report
A two-part report that summarizes inbound and outbound call activity and pusage for the previous seven days.
Enterprise Edge Voice Messaging System Configuration Report
A four-part report that indicates how the system is configured. The informatiincludes System options, lines, Greeting Tables, installed Enterprise EdgeVoice Messaging Options, General Networking parameters, AMIS networkiparameters and site table.
Fax On Demand usage report
A list of Fax On Demand requests for the previous seven days. Includes
the date, time, item requested, delivery fax number, and Caller ID of the
caller.
15
P0911620 Issue 02 Enterprise Edge 2.0 Voice Messaging Set Up and Operation Guide

126 Enterprise Edge Voice Messaging Reports
ory
a ion
only)
e
ct
ist me n.
Directory ReportThis report shows information for mailbox owners listed in the Company Directand includes:
• the mailbox owner’s name, mailbox number
• the type of mailbox, extension,
• if the mailbox owner has their name in the Company Directory
• if the mailbox owner has a recorded mailbox greeting.
Note: The Subscriber list appears in alphabetical order.
Numeric Mailbox ReportThis report shows all mailboxes in numeric order, including mailbox type and“snapshot” of the mailbox at the time the report is run. The following informatis reported:
• the mailbox number
• mailbox type
• mailbox name
• primary extension assigned (or Guest)
• Class of Service number
• total number messages in the mailbox
• total volume of messages rounded to nearest minute
• number of new messages (User mailboxes only)
• volume of new messages rounded to the nearest minute (User mailboxes
• Outdial parameter assigned (User and Fax On Demand mailboxes only)
• space for Information Messages to display additional information about thmailbox
• if the owner had their mailbox locked for exceeding the number of incorrepassword attempts
System Group List ReportThis report shows the Group List number, the type of Group List, the Group Lname, the mailbox numbers included in the Group List, the mailbox owner naand the type of mailbox. If FAX is installed, Fax Group Lists are also be show
Enterprise Edge 2.0 Voice Messaging Set Up and Operation Guide P0911620 Issue 02

Enterprise Edge Voice Messaging Reports 127
f n two
e even
e
h for f this
rint
em.
Input
that dds
igned hows er of the tation
Mailbox Activity ReportThis report shows the mailbox number, mailbox owner’s name, the last date oaccess, and information about the messages left in a mailbox. This report is iparts and covers mailbox usage over a period of seven days.
The starting point of this report is the last full day of activity. For example, if thfull day of activity is Tuesday, the report begins on Tuesday and goes back sdays to the previous Wednesday.
In part two of the Mailbox Activity Report, each line total indicates a cumulativaverage of the mailbox activity.
You can print this report for individual mailboxes or all mailboxes certified witEnterprise Edge Voice Messaging. When you print the Mailbox Activity Reportall the mailboxes, ensure the printer has enough paper. Because of the size oreport, print at night or during a slow time. To get the full benefit of this report, pit on the same day each week and reset the statistics after each printing.
Caller ID (CLID) ReportA list of the daily CLID activity for the Enterprise Edge Voice Messaging Syst
Dialing Translation ReportThis report lists the current settings of the Dialing Translation Parameters the and Output entries in the Dialing Translation Table.
Note: A “ * ” character after a value signifies any digits in the phone number remain to be dialed. Enterprise Edge Voice Messaging automatically athe “* ” character after every Input and Output value.
Alarm ReportThis report shows the alarm messages in the Alarm log.
Custom Call Routing ReportThis report shows the Tree number, the Greeting Table(s) the CCR Tree is assto, the date the Tree was last modified, and the Tree status. The report also sthe Path, type, description, destination, a seven day rolling count of the numbcalls received by the Tree and the number of times each path is visited. PrintCustom Call Routing Report on the same day each week to get a true represenof CCR activity.
Ensure you generate this report before you modify a CCR Tree.
P0911620 Issue 02 Enterprise Edge 2.0 Voice Messaging Set Up and Operation Guide

128 Enterprise Edge Voice Messaging Reports
sage f call
art 1
e
calls
ll all is
re is
d or s
Enterprise Edge Voice Messaging Call Handling and Port Usage ReportThis two-part report summarizes inbound and outbound call activity and port uon a seven day rolling basis. Use this report to identify volume and sources otraffic, and to determine if additional system ports are needed.
Enterprise Edge Voice Messaging Call Handling and Port Usage Report Part 1The Enterprise Edge Voice Messaging Call Handling and Port Usage Report Pincludes the following information:
• Allocation: Minimum and maximum number of ports allocated to EnterprisEdge Voice Messaging
• Port Status: Number of ports the customer has paid to use
• Percentage of Time All Enterprise Edge Voice Messaging Ports Busy: An asterisk ( * ) indicates periods in which at least one port is disabled
Enterprise Edge Voice Messaging Call Handling and Port Usage Report Part 2This report shows the number of calls, total duration and average duration ofin minutes for the following categories:
• Incoming Calls: Internal, External and Total Incoming
• Outgoing Calls: Message Notification, AMIS Delivery, and Total Outgoing. Aoutgoing calls are attributed to a single category. For example, the entire cconsidered as Message Notification even if the call party logs on.
• All Calls: Number of calls, Total duration, and Average duration.
System Configuration ReportThis multi-section report indicates how the system is currently configured. Thea section for each of the following aspects of the system:
• System options
• Lines
• Greeting tables
• Fax parameters
• General networking parameters
• AMIS networking parameters
• site table
System Configuration Report, Part 2In the Greetings column, the list does not show greetings that are not recordenot used in any Greeting Table. The Line Answering column of Part 2 containentries only for the lines for which the Answer parameter is Yes.
Enterprise Edge 2.0 Voice Messaging Set Up and Operation Guide P0911620 Issue 02

Enterprise Edge Voice Messaging Reports 129
basis, f the
System Configuration Report, Part 3The following categories in Part 3 appear only if the General Networking Parameters and AMIS Networking Parameters are installed.
System Configuration Report, Part 4The Site Table appears if AMIS is installed. Local site information is availablewithin the Site Table data structure, and does not appear in this report.
Fax On Demand Usage ReportThis report lists all Fax On Demand requests on a seven complete day rolling and shows the date, time, item requested, delivery fax number and Caller ID ocaller.
P0911620 Issue 02 Enterprise Edge 2.0 Voice Messaging Set Up and Operation Guide

130 Enterprise Edge Voice Messaging Reports
Enterprise Edge 2.0 Voice Messaging Set Up and Operation Guide P0911620 Issue 02

into
wner
is set to
rate.
ng
Enterprise Edge Voice Messaging Troubleshooting
OverviewThis chapter on Enterprise Edge Voice Messaging troubleshooting is dividedthe following sections:
• system trouble
• operating trouble
• Custom Call Routing (CCR) trouble
System troubleSystem trouble is defined as problems that occur to more than one mailbox oand to both internal and external callers.
Automated Attendant does not answer calls
1. Verify that you have assigned the lines to the Greeting Table, and the linedesignated as Yes. This means that Enterprise Edge Voice Messaging is answer the line.
2. Possibly all the Enterprise Edge Voice Messaging channels are busy. Trycalling back. Your call is answered when a channel is available.
3. Verify that greetings 1 to 4 are recorded. These greetings default to the Greeting Tables and must be recorded for the Automated Attendant to opeRefer to Setting up an Automated Attendant on page 31.
4. If the Enterprise Edge Voice Messaging channels are frequently busy, it indicates there is too much activity. Contact your advice line or sales representative.
Call display information is lostThe Automated Attendant must be set to answer after two or more rings for Enterprise Edge Voice Messaging to record call log information for an incomicall. For information about setting the number of rings, refer to Enabling Touchtone Gate on page 41.
16
P0911620 Issue 02 Enterprise Edge 2.0 Voice Messaging Set Up and Operation Guide
132 Enterprise Edge Voice Messaging Troubleshooting
or rs to y
must print
s to
t
he
Edge ne is
not ox, sword.
The Automated Attendant transfers some callers to the General Delivery MailboxEnterprise Edge Voice Messaging requires a touch tone phone signal and a minimum voice level. Enterprise Edge Voice Messaging waits for a caller to respond. If a response is not received, the caller transfers to the Receptionistdesignated Operator. If they are not available, the caller automatically transfethe General Delivery Mailbox. The caller also transfers to the General DeliverMailbox if an extension does not have a mailbox.
For Enterprise Edge Voice Messaging to transfer calls correctly, each mailboxhave a unique extension. To verify that all mailboxes have a unique extension,the Directory Report (Report 1).
Greetings are played at the wrong time of dayThere are three possible causes for this problem:
1. The Business Open Status is set to No. Change the Business Open StatuYes. Refer to Setting the Operator Status on page 45.
2. The wrong greeting numbers are assigned to the Greeting Table.
3. The business hours are set incorrectly.
Greetings are played on the wrong lineTo verify the line information is correct, refer to the Enterprise Edge 2.0 Voice Messaging Programming Record. If you find the information is incorrect, you musreassign lines to the Greeting Table. Refer to Programming which lines are answered by Enterprise Edge Voice Messaging on page 39.
A telephone cannot be forwarded to Enterprise Edge Voice MessagingIf you forward your incoming calls to Enterprise Edge Voice Messaging and tdisplay shows: Forward denied, possibly you are forwarding to the wrong extension. Use feature code 985 to display the correct extension for EnterpriseVoice Messaging and compare this number to the extension that your telephoforwarded to.
Feature 981 produces a Log prompt on the Enterprise Edge displayIf a Log prompt appears on the display, it can signify that the telephone doeshave an assigned mailbox. If the extension does not have an assigned mailbEnterprise Edge Voice Messaging requests both a mailbox number and a pas
Enterprise Edge 2.0 Voice Messaging Set Up and Operation Guide P0911620 Issue 02

Enterprise Edge Voice Messaging Troubleshooting 133
ernal
able
ode re to
for
trict
he m hen
e
he
he n,
Mailbox owner is unable to reply to an external caller, use Off-premise Message Notification or Outbound Transfer
An Outdial route must be assigned before a Mailbox Owner can reply to an extcaller using the Reply feature or use Off-premise Message Notification or Outbound Transfer. Before a Mailbox Owner can reply to a message from anexternal caller, an Outdial route must be assigned and a Dialing Translation Tmust be created.
The default for Outdial route is None. Until you assign a line, line pool or route cas the Outdial route for a mailbox, the mailbox owner can use the Reply Featureply to calls from internal extensions only, Off-premise Message Notificationinternal extensions only and Outbound Transfer for internal extensions only.
You can apply dialing restrictions to an Enterprise Edge telephone and the extensions connected to Enterprise Edge Voice Messaging. If you wish to resoutdialing of certain phone numbers, you must do one of the following:
1. Through Enterprise Edge programming, assign the dialing restrictions to tEnterprise Edge extensions to which Enterprise Edge Voice Messaging isconnected. This restricts all outdialing calls including external transfers froCCR trees, Off-premise Message Notification and Outbound Transfers. Wassigning an Outdial route, all dialing is done by the extension to which Enterprise Edge Voice Messaging is connected, not by the Enterprise Edgtelephone. For additional information, refer to the Enterprise Edge 2.0 Programming Operations Guide.
2. Through Enterprise Edge programming, assign the dialing restrictions to textension of the user. For additional information, refer to the Enterprise Edge 2.0 Programming Operations Guide.
3. Through Enterprise Edge programming, assign the dialing restrictions to tEnterprise Edge line(s) being used for outdialing. For additional informatiorefer to the Enterprise Edge 2.0 Programming Operations Guide.
P0911620 Issue 02 Enterprise Edge 2.0 Voice Messaging Set Up and Operation Guide

134 Enterprise Edge Voice Messaging Troubleshooting
y or ese
ed
t less d.
ailbox
e to the et a
s as a orrect ber of
trator
Operating troubleThe following conditions list some problems that can occur when operating Enterprise Edge Voice Messaging.
Personalized Greetings do not playPersonalized Greetings do not play when a telephone is on Call Forward BusCall Forward All Calls to the Enterprise Edge Voice Messaging extension. In thcases, Personalized Greetings depend on Caller ID information that is receivbefore the second ring.
Personalized Greetings also do not play if the Auto Attendant is set to answer athan 2 rings. The Primary or Alternate Personal Mailbox Greeting plays insteaAssign the number of rings to two or more.
Mailboxes are not accepting messagesA mailbox does not accept messages if the mailbox is not initialized.
Note: A mailbox cannot receive messages until it is initialized by the mailbox owner. Instruct owners to initialize their mailboxes.
Messages are being lost in a mailboxIf messages are being removed, check the message retention period in the mClass of Service. To check the Class of Service, refer to Changing mailbox options on page 85.
A mailbox owner lost the mailbox passwordA forgotten password cannot be recovered. The password associated with thmailbox must be reset to the default password 0000. After a password is resetdefault, the mailbox owner must change it in order to use the mailbox. To respassword, refer to Changing mailbox options on page 85.
A mailbox owner cannot access their mailbox Each mailbox is assigned a maximum number of incorrect password attemptClass of Service. Enterprise Edge Voice Messaging records the number of incattempts since the last time the mailbox was successfully accessed. If the numattempts is exceeded, the mailbox owner is “locked-out” and hears “This mailbox has been locked to prevent unauthorized access. Please contact your adminisfor assistance.” The mailbox cannot be opened again until the System Administrator resets the password. To reset a password, refer to Changing mailbox options on page 85.
Enterprise Edge 2.0 Voice Messaging Set Up and Operation Guide P0911620 Issue 02

Enterprise Edge Voice Messaging Troubleshooting 135
es ry
ing. re up
ust name,
rs if one
erprise tion.
ering
e Edge age
ng
Edge List , you
A mailbox is not in the Company DirectoryCheck to ensure the mailbox is initialized. If the mailbox is not initialized it donot appear in the Company Directory. Check to ensure the Company DirectoOverride for the mailbox is set to Yes. Refer to Changing mailbox options on page 85.
Calls are answered by the wrong mailboxCheck to ensure that the correct extension is assigned to the mailbox.
A mailbox cannot be added to Enterprise Edge Voice MessagingEnsure the mailbox is not already certified with Enterprise Edge Voice MessagMailbox numbers must be unique. Enterprise Edge Voice Messaging can stoto 1,000 mailboxes. This number includes the Special Mailboxes. Refer to theEnterprise Edge 2.0 Voice Messaging Programming Record.
You cannot enter a name for a mailboxNames must be entered as last name, then first name and initial. All names mhave a comma (,) between the first and last name. The maximum length of the including the comma, is 16 characters. Refer to Changing mailbox options on page 85.
Incomplete messages are received in a mailbox or “Message delivered” plays while recording a message, or a Enterprise Edge Voice Messaging session ends unexpectedly
Any of these situations can be due to a problem called Talk Off. Talk Off occuEnterprise Edge Voice Messaging interprets certain voice patterns as Dual TMulti Frequency (DTMF) tones. DTMF tones are produced when buttons are pressed on a touch tone phone. When you press a button on the dialpad, EntEdge Voice Messaging receives a DTMF tone and performs the correct operaFor example, after you enter your mailbox password, you can press £. The DTMF tone sent to Enterprise Edge Voice Messaging indicates you are finished entyour password.
Some voice patterns are the same as DTMF tones. This can cause EnterprisVoice Messaging to function incorrectly. For example, if in the middle of a messyou say something that sounds the same as the DTMF tone created by pressi£, the recording session ends. Correcting Talk Off requires adjustments to yourEnterprise Edge Voice Messaging system.
You cannot create a Group ListThe maximum number of Group Lists that can be created is 99. The EnterpriseVoice Messaging Group List must be enabled during installation. If the Groupfeature is not enabled, you cannot create a Group List. To enable this featuremust reset Enterprise Edge Voice Messaging.
P0911620 Issue 02 Enterprise Edge 2.0 Voice Messaging Set Up and Operation Guide

136 Enterprise Edge Voice Messaging Troubleshooting
R.
re it
before
r ored, s in the
lbox,
Custom Call Routing (CCR) troubleThe following conditions describe problems that can occur while operating CCEnsure that you check the CCR Tree Report regularly.
Note: For information about Reports, refer to Enterprise Edge Voice MessagingReports on page 125.
The Tree cannot be deletedThe Tree cannot be deleted while it is in use. The Tree must be disabled befocan be deleted.
Note: For more information about deleting the Tree, refer to Deleting a Tree on page 122.
The Tree cannot be enabledThe Tree must be saved before it can be enabled, and it must be completed it is saved. To complete the Tree, ensure:
• The Tree contains the Home Menu node with an action node below it.
• If the Tree contains a Mailbox node, the mailbox is initialized.
The Mailbox is fullThe mailbox is equipped with a Never Full Mailbox feature, which lets a calleleave a message in the mailbox, even if the mailbox is “full”. The message is stbut cannot be accessed until the mailbox owner deletes some of the messagemailbox.
If more message time is required, the Class of Service of the mailbox can bechanged.
Deleting a mailboxDo not delete a mailbox used in a CCR Tree. If you delete a Mailbox node maithe messages automatically go to the General Delivery Mailbox.
For more information about the General Delivery Mailbox, refer to General Delivery Mailbox on page 54.
Enterprise Edge 2.0 Voice Messaging Set Up and Operation Guide P0911620 Issue 02

Section VII - Appendices• Appendix A: Dialing Translation
• Appendix B: Enterprise Edge Configuration Tips• Appendix C: Resetting Enterprise Edge Voice Messaging
P0911620 Issue 02 Enterprise Edge 2.0 Voice Messaging Set Up and Operation Guide

P0911620 Issue 02 Enterprise Edge 2.0 Voice Messaging Set Up and Operation Guide
a e
te a d m. The rior to
prise lly.
D ing in r oice n be
an “1”,
dial. dge
e
e is
t can er is r 403-t can the
Appendix A: Dialing Translation
OverviewDialing translation is a process by which the number of an incoming call frompublic network translates through a translation table into a number that can brecognized and dialed on the local network, using the Reply feature.
For Dialing Translation to occur, you, as the System Administrator, must creaDialing Translation Table that recognizes the digits of an external number antranslates them into a number that can be dialed by the Enterprise Edge systeEnterprise Edge system also consults the restrictions and schedules tables pdialing the number.
The Dialing Translation Tables are necessary only for the Reply feature. EnterEdge Voice Messaging does not require the tables in order to function norma
How the Dialing Translation Table worksA phone number is derived from information attached to an incoming Caller Imessage. The number is then searched for by Enterprise Edge Voice Messagthe Dialing Translation Table. If the leading digit or digits of the phone numbematch a Dialing Translation Table Input value (the number Enterprise Edge VMessaging searches for in the Dialing Translation Table), the Output value issubstituted for the Input value. This change results in a phone number that cadialed on the local network. Changing the number usually involves removing area code or inserting an access code, based on the dialing rules of the localnetwork. For example, if a local number is prefixed with the long distance codeit is removed by the Dialing Translation Table.
The Dialing Translation process is immediate so calls do not take any longer toSome phone numbers do not need to be changed before dialing. Enterprise EVoice Messaging functions without a Dialing Translation Table except that thReply feature cannot be used.
Phone number translationThe Dialing Translation Table must define each possible case where a changneeded to allow the number to be on the local network.
The Dialing Translation Table changes Network extensions into numbers thabe dialed on the local network. The Network extension form of a phone numbthe usual form in which the number appears. For example, the phone numbe555-5050, in its Network extension form, must be translated into a number thabe dialed on the local telephone network. The Dialing Translation Table followsrules required to make the call.
P0911620 Issue 02 Enterprise Edge 2.0 Voice Messaging Set Up and Operation Guide

140 Appendix A: Dialing Translation
they mn ading
lue dge tput
wn
ers.
ts.
nce
ng
The following three tables are examples of Dialing Translation Tables and howfunction. Every Dialing Translation Table entry consists of an Input value coluand an Output value column. The values in the Input column represent the ledigits of the Network extensions which, if matched, are replaced by the corresponding value in the Output column. The “*” character shown after a vasignifies any digits in the phone number that remain to be dialed. Enterprise EVoice Messaging automatically adds the “*” character after every Input and Ouvalue.
A phone number either matches or does not match a specific Input value.
A sample Dialing Translation Table from a site in metropolitan Toronto is shobelow.
Sample Dialing Translation Table
A sample Dialing Translation Table from a site in Mountainview, California.
Sample Dialing Translation Table
INPUT OUTPUT Explanation
011* 011* The Table does not attempt to translate international phone numb
416* * The Table removes the 416 area code and dials all calls as 7 digi
905206*
90527*
etc.
(135 more entries)
905206*
90527*
etc.
(135 more entries)
These telephone exchanges can be dialed as local (no long distacharges) 10 digit calls from the 416 area.
905* 1905* All other 905 numbers not listed in the Input column above are lodistance numbers and must be dialed as 11 digit long distance numbers.
* 1* Any numbers that start with digits other than 011, 416 and 905 arelong distance, and have 1 added as a prefix.
INPUT OUTPUT Explanation
The Dialing Translation Table is empty. The local network in Mountainview supports 10 digit national dialing with recognized long distance charging.
In situations like the Mountainview example, there is no need to build a Dialing Translation Table.
Enterprise Edge 2.0 Voice Messaging Set Up and Operation Guide P0911620 Issue 02

Appendix A: Dialing Translation 141
rder
cal rk BX, ms
eters
riber g
to 1.
code is r has is area
A sample Dialing Translation Table from a site with area code 206 near the bowith area code 360.
Sample Dialing Translation Table
Network AccessThe Dialing Table Translation results in a number that can be dialed on the lonetwork. The final step is to prefix any digits required to reach the local netwofrom your Enterprise Edge system. For systems that are behind a PBX or PAtypically in North America · must be prefixed to the phone number. For systeattached to Central Office (CO) lines no digits need to be prefixed.
Dialing Translation ParametersThe Dialing Translation process is controled by four parameters. These paramare:
• Long distance access code (Lg dst ac)
This prefix, if specified, is removed from any numbers entered by the subscif it is not needed to make the call. This simplifies the creation of the DialinTranslation Table. For North America, set the long distance access code The default for this parameter is none. The field for this parameter is a maximum of 1 digit.
• Area code (Area cd)
If the phone number entered appears to be missing an area code, an area prefixed to the number. The area code is considered missing if the numbefewer than 10 digits. The default for this parameter is none. The field for thparameter is a maximum of 6 digits. If this parameter is set to none, then nocode is prefixed to the phone number.
INPUT OUTPUT Explanation
011* 011* The Table does not attempt to translate international phone numbers.
20644*
206626*
etc.
(40 more entries)
44*
626*
etc.
(40 more entries)
Due to the site location, some calls can be dialed as local 7 digit numbers.
206* 1206* All other 206 numbers require 11 digit long distance dialing.
360224*
360227*
360472*
360224*
360227*
360472*
These 360 numbers can be dialed as 10 digit local numbers...
360* 1360* ... but all other 360 numbers are 11 digits long distance numbers.
* 1* All numbers starting with other than 011, 206 and 360 are long distance and have 1 added as a prefix.
P0911620 Issue 02 Enterprise Edge 2.0 Voice Messaging Set Up and Operation Guide

142 Appendix A: Dialing Translation
all rise de to s a
for to en fault
the
eters
ct
• Access code (Access cd)
In North America, the access code is usually 9. This number is prefixed tonumbers after Translation to access the local telephone network. If EnterpEdge Voice Messaging is attached directly to CO lines, set the Access Conone. The default for this parameter is none. The field for this parameter imaximum of 2 digits.
• Reply translation (Reply trans)
If set to N (no), the user must manually trim the CLID message informationthe number to be dialed on the local network. For more information, refer Replying to a message on page 73. If the reply translation is set to Y (yes), ththe Reply feature uses the Dialing Translation Table to dial the call. The defor this parameter is N.
To make it easier for subscribers, set the Reply Translation to Y if a Dialing Translation Table is created. If a Dialing Translation Table is not created, setReply Translation to N.
Setting the Dialing Translation ParametersSetting the Dialing Translation Parameters makes it easier to build a Dialing Translation Table. It is not a prerequisite to set the Dialing Translation Paramto operate Enterprise Edge Voice Messaging.
To set the Dialing Translation Parameters:
1. On the Options menu click Dialing Translation Table.The Dialing Translation Table dialog box appears.
2. Click the Parameters button.The Dialing Translation Parameters dialog box appears.
3. Type the Long Distance Access Code, Area Code, Access Code and seleeither Yes or No for Reply Translate.
4. Click the OK button.
5. Click the Close button.
Enterprise Edge 2.0 Voice Messaging Set Up and Operation Guide P0911620 Issue 02

Appendix A: Dialing Translation 143
utput e ry mber
ime.
Building a Dialing Translation Table To create a Dialing Translation Table, you must enter an Input value and an Ovalue for each entry. The Input value is the number that Enterprise Edge VoicMessaging looks up in the Dialing Translation Table. If the corresponding entmatches, the Output value is substituted for the Input value. The resulting nuis ready to dial on the local network. Refer to the Sample Dialing Translation Table on page 140.
To build a Dialing Translation Table:
1. Click the Options menu and then click Dialing Translation Table.The Dialing Translation Table dialog box appears.
2. Click the Add button.The Dialing Translation dialog box appears.
3. In the Input Value box, type the input value.
4. In the Output Value box, type the output value.Repeat steps 2 through 4 for each Dialing Translation Table entry.
5. Click the Close button.
Reviewing entries in the Dialing Translation TableYou can review or check the entries in your Dialing Translation Table at any t
To review your Dialing Translation Table entries:
1. On the Options menu click Dialing Translation Table.The Dialing Translation Table dialog box, containing the entries, appears.
2. After you review the Dialing Translation Table entries, click the Close button.
P0911620 Issue 02 Enterprise Edge 2.0 Voice Messaging Set Up and Operation Guide

144 Appendix A: Dialing Translation
alue
reate
lation
he e
Changing an entry in the Dialing Translation TableAfter a Dialing Translation Table has been built, you can change the Output vof an entry at any time.
You cannot change the Input value of an entry. You must delete the entry and ca new entry with new Input and Output values. Refer to Deleting a Dialing Translation Table entry on page 144.
To change an entry in the Dialing Translation Table:
1. Click the Options menu and then click Dialing Translation Table.The Dialing Translation Table dialog box appears.
2. Click the Dialing Translation entry you want to change.
3. Click the Change button.
4. In the Output Value box, type the new output value.
5. Click the OK button.Repeat steps 2 through 5 to change any other entries in the Dialing TransTable.
6. Click the Close button.
Deleting a Dialing Translation Table entryYou can delete an entry in the Dialing Translation Table at any time. To find tentry you want to delete, refer to Reviewing entries in the Dialing Translation Tabl on page 143.
To delete an entry in the Dialing Translation Table:
1. Click the Options menu and then click Dialing Translation Table.The Dialing Translation Table dialog box appears.
2. Click the Dialing Translation entry you want to delete.
3. Click the Delete button.
4. Click the OK button to confirm the deletion.Repeat steps 2 through 4 for every entry you wish to delete.
5. Click the Close button.
Enterprise Edge 2.0 Voice Messaging Set Up and Operation Guide P0911620 Issue 02

that
call ngs.
ay the
the
ng ward ng he
ance
tely ist’s s on
For f or
are
Appendix B: Enterprise Edge Configuration Tips
OverviewThis appendix describes some Enterprise Edge configuration enhancementsmaximize the efficiency of Enterprise Edge Voice Messaging.
Delayed answering by the Enterprise Edge Voice Messaging Automated Attendant
The Enterprise Edge Voice Messaging Automated Attendant can answer anyon specified Central Office (CO) telephone lines after a specified number of riEnterprise Edge Voice Messaging answers incoming calls if:
1. The Installer programs Enterprise Edge Voice Messaging to be the primetelephone for one or more designated CO lines. The Enterprise Edge DelRing Transfer (DRT) feature transfers unanswered calls on these lines to Automated Attendant after the specified number of rings.
Note: The Enterprise Edge DRT feature applies only to incoming calls onassigned line. It does not affect any extension calls between telephones.
Ringing lines and answer buttonsIf two or more telephones have a ringing line appearance of the same incomitelephone line, and one of these telephones is programmed with the Call ForAll Calls (CFAC) or Call Forward No Answer (CFNA) features, then all incomicalls on the incoming telephone line are directed to the Personal Mailbox of tprogrammed telephone.
For example, if a marketing receptionist’s telephone has a ringing line appearof the marketing director’s telephone, and the receptionist’s telephone is call forwarded to Enterprise Edge Voice Messaging, then all incoming call immediatransfer to the receptionist’s Personal Mailbox. This is also true if the receptiontelephone is CFNA to Enterprise Edge Voice Messaging and if the number ofspecified rings on the receptionist’s telephone is fewer than the specified ringthe marketing director’s telephone.
Note: CFAC and CFNA do not affect calls on a telephone’s non-ringing lines. example, if a receptionist’s telephone has a non-ringing appearance oanother telephone’s CO line, and the receptionist’s telephone is CFACCFNA to Enterprise Edge Voice Messaging, incoming calls on this linenot affected.
P0911620 Issue 02 Enterprise Edge 2.0 Voice Messaging Set Up and Operation Guide

146 Appendix B: Enterprise Edge Configuration Tips
, and ing
ging, d to
an FAC
ds on how
Ringing Answer ButtonIf one or more telephones have a Ringing Answer Button for another telephoneone of these is CFAC or CFNA to Enterprise Edge Voice Messaging, all incomcalls are directed into the Personal Mailbox of the call forwarded telephone.
If two or more of these telephones are CFAC to Enterprise Edge Voice Messaall calls are directed to the Personal Mailbox of the telephone that is connectethe lowest numbered station port on the Enterprise Edge system.
Using Call Forward All Calls (CFAC) and Call Forward No Answer (CFNA)
If a mailbox owner does not want to take any calls for a period of time, they cforward their telephone to their Personal Mailbox using the Enterprise Edge Cfeature. When forwarded, all calls to the mailbox owner’s extension transfer directly into their Personal Mailbox.
To call forward to a mailbox, press ƒ·°›.
To cancel call forward:
Press ƒ£›
or
press CANCEL
or
press ∞.
No other telephone on the Enterprise Edge system can have a ringing line appearance of the mailbox owner’s lines or a ringing answer button of the forwarded telephone.
Sample Enterprise Edge Voice Messaging setupsThere are several ways to set up Enterprise Edge Voice Messaging in your company. How you choose to set up Enterprise Edge Voice Messaging depenthe type of Enterprise Edge Business Communication System you have, andmany CO lines you use.
This sample Enterprise Edge Voice Messaging setup describes four differentsample configurations and concludes with some useful application tips.
Enterprise Edge 2.0 Voice Messaging Set Up and Operation Guide P0911620 Issue 02

Appendix B: Enterprise Edge Configuration Tips 147
stem.
e the on.
sy
s their
io’s within the
dio mber ear
, and
e
r four
Setting Up for a small companyThe On Your Toes Dance Studio has a Compact Business Communication syThe Installer programmed both Enterprise Edge and Enterprise Edge Voice Messaging. The Installer programmed Enterprise Edge Voice Messaging to bEnterprise Edge Call Forward No Answer (CFNA) telephone for each extensiThis means that any call not answered by a mailbox owner transfers to their mailbox.
Each mailbox owner has buttons programmed for the Enterprise Edge Voice Messaging Leave Message and Open Mailbox feature codes. This allows eaaccess to these frequently used features.
All of the employees have been assigned a mailbox number that is the same aEnterprise Edge extension. All of the mailbox owners have initialized their mailbox, and recorded and selected a Personal Greeting.
For the purpose of this example, Enterprise Edge and Enterprise Edge VoiceMessaging work together in call handling.
The central receptionist
The On Your Toes Dance Studio’s receptionist handles all calls from the studpublished phone number. When the receptionist cannot answer the telephone four rings, the Automated Attendant answers the call. The receptionist is alsoEnterprise Edge designated Operator. Whenever a caller presses ‚ to speak with the operator, the call transfers back to the receptionist.
Here is how On Your Toes Dance Studio’s communication system works.
The On Your Toes Dance Studio’s public phone number is 555-2468. The stusubscribes to custom calling services from its telephone company and this nuforwards to any available (non-busy) line in a group of six lines. All six lines appon the receptionist telephone.
Enterprise Edge Voice Messaging is the Prime Set for each of the six lines. Enterprise Edge’s Delayed Ring Transfer (DRT) feature is used to forward unanswered lines to the Automated Attendant. The DRT to Prime is set to Yesthe DRT Delay is set to four.
Note: Delayed Ring Transfer is a Enterprise Edge system-wide call handlingfeature. All lines on the Enterprise Edge programmed DRT to Prime arforwarded after four rings. In the Enterprise Edge Configuration, this isdone by setting the Prime Set of the line to the Enterprise Edge Voice Messaging extension.
Enterprise Edge Voice Messaging uses Greeting Table 1 to answer calls afterings. Depending on the time of day, different recorded greetings play for theMorning, Afternoon, and Evening. When the Business Status is No, the Non-business Hours Greeting plays.
Note: Lines must be assigned to a Greeting Table before the Greeting Tablegreetings are used.
P0911620 Issue 02 Enterprise Edge 2.0 Voice Messaging Set Up and Operation Guide

148 Appendix B: Enterprise Edge Configuration Tips
e
s
ce
tings
ging st or
s:
lease eturn
prise rprise rprise eans
sy
Greetings have been recorded by the System Administrator and say:
Greeting No. 1 “Good morning. You have reached On Your Toes Dance Studio. The studio is closed at this time. Pleasstay on the line to leave a message.” (The Enterprise Edge Voice Messaging voice promptplay after the greeting. You can make Company Greetings up to five minutes long.)
Greeting No. 2 “Good afternoon. You have reached On Your Toes Dance Studio.”
Greeting No. 3 “Good evening. You have reached On Your Toes DanStudio.”
Greeting No. 4 “You have reached On Your Toes Dance Studio. Thestudio is closed at this time. Please stay on the line toleave a message.”
Greeting Table 1 automatically answers calls using greetings 1 through 4. Gree1 through 4 play until the System Administrator assigns different numbered greetings.
When Greeting Table 1 was configured, English was chosen as the Primary Language.
The Costume Room
The Costume Room has one telephone with a Enterprise Edge Voice Messamailbox. Calls are directed to the Costume Room Attendant by the receptionithe Automated Attendant. When the Attendant is not available, the caller is forwarded to the Costume Room mailbox. The mailbox primary message say
“You have reached the Costume Room. No one is available to take your call. Pleave your name and number and a brief message after the tone and we will ryour call as soon as possible.”
Setting Up for a medium sized companyThe Bridge Stone Company is an engineering firm that has a Compact EnterEdge Business Communication system. The Installer programmed both EnteEdge and Enterprise Edge Voice Messaging. The Installer programmed EnteEdge Voice Messaging to be the CFNA telephone for each extension. This mthat any call not answered by a mailbox owner transfers to their mailbox.
Each mailbox owner has buttons programmed for the Enterprise Edge Voice Messaging Leave Message and Open Mailbox feature codes. This allows eaaccess to these frequently used features.
Enterprise Edge 2.0 Voice Messaging Set Up and Operation Guide P0911620 Issue 02

Appendix B: Enterprise Edge Configuration Tips 149
prise ed
lers
Voice
r. d
or re is
. All ur et of
is set
r four
e
All employees are assigned a mailbox number that is the same as their EnterEdge extension. All mailbox owners have initialized their mailbox, and recordand selected a Personal Greeting.
When the receptionist is not available, Custom Call Routing lets incoming calroute their call along a call path.
For the purpose of this example, Enterprise Edge, CCR and Enterprise Edge Messaging work together in call handling.
The central receptionist
Bridge Stone’s receptionist handles all calls from the published phone numbeWhen the receptionist is unable to answer the telephone within four rings, theAutomated Attendant answers the call. The receptionist is also the designateOperator. Whenever a caller presses ‚ to speak with the operator, the caller transfers to the receptionist.
Here is how Bridge Stone’s communication system works.
Bridge Stone’s public phone number is 123-1234. All lines appear on the receptionist’s telephone. Enterprise Edge Voice Messaging is the Prime Set feach of the six lines. The Enterprise Edge Delayed Ring Transfer (DRT) featuused to forward unanswered lines to the Automated Attendant.
Delayed Ring Transfer is an Enterprise Edge system-wide call handling featurelines on the Enterprise Edge programmed with DRT to Prime forward after forings. In the Enterprise Edge Configuration, this is done by setting the Prime Sthe line to the Enterprise Edge Voice Messaging extension. The DRT to Primeto YES, and the DRT Delay is set to four.
Enterprise Edge Voice Messaging uses Greeting Table 1 to answer calls afterings. Depending on the time of day, different recorded greetings play for theMorning, Afternoon, and Evening. When the Business Status is No, the Non-business Hours Greeting plays.
Greetings have been recorded by the System Administrator and say:
Greeting No. 1 “Good morning. You have reached Bridge Stone Engineering.” (The CCR Home Menu plays after the greeting. You can make Company Greetings up to fivminutes long.)
Greeting No. 2 “Good afternoon. You have reached Bridge Stone Engineering.”
Greeting No. 3 “Good evening. You have reached Bridge Stone Engineering.”
Greeting No. 4 “You have reached Bridge Stone Engineering. Our office is closed at this time. Please stay on the line toleave a message.”
P0911620 Issue 02 Enterprise Edge 2.0 Voice Messaging Set Up and Operation Guide

150 Appendix B: Enterprise Edge Configuration Tips
tings
y
Table
his the e. For
wo Edge omer
.
’s set. in the tionist ture
ise
re to ing’s
hone
Greeting Table 1 automatically answers calls using greetings 1 through 4. Gree1 through 4 play until the System Administrator assigns different numbered greetings.
When the Greeting Table was configured, English was chosen as the PrimarLanguage.
Note: Lines used must be assigned to the Greeting Table before the Greeting greetings are used.
Following the Company Greeting the CCR Home Menu voice prompt plays. Tmenu provides a list of single digit options to a caller. A caller, after listening toHome Menu, selects an option by pressing a number on any touch tone phonexample:
“To speak to our customer service representative, press ⁄. To reach our sales department, press ¤. To reach our shipping and receiving department, press ‹. To speak with our receptionist, press ‚.”
The Customer Service and Sales department
This department has two secretaries, two customer service representatives, tsales agents, a sales manager, and a customer service manager. EnterpriseVoice Messaging is set up to answer all calls with callers selecting either custservice or sales from the CCR Home Menu voice prompt.
Incoming calls for customer service transfer directly to the customer service receptionist. Incoming calls for sales transfer directly to the sales receptionist
The managers
Bridge Stone managers have a personal CO line that appears on their privatetelephone and their receptionist’s telephone. The receptionists answer the managers’ calls, and then transfer the calls to each manager’s telephone.
If a manager is unavailable to take a call, the call rings back at the receptionistThe receptionist handles the call by asking the caller to leave a voice messagemanager’s Personal Mailbox. If the caller wants to leave a message, the receptransfers the caller using the Enterprise Edge Voice Messaging Transfer Fea(Feature 986).
When Enterprise Edge Voice Messaging is set up in this manner, the EnterprEdge CFNA for the manager’s set is not used. The receptionist answers the manager’s calls and uses Enterprise Edge Voice Messaging’s Transfer Featutransfer the caller to the manager’s telephone. Enterprise Edge Voice MessagTransfer Callback Feature returns the call to the receptionist’s telephone if a manager is not available to take a call.
Note: The receptionist’s telephone has a ringing line appearance. This telepcannot be forwarded to another telephone.
Enterprise Edge 2.0 Voice Messaging Set Up and Operation Guide P0911620 Issue 02

Appendix B: Enterprise Edge Configuration Tips 151
e. This line is
can
th rder,
ing et, g
.
ram
ion to be
nsion r.
ion
Shipping and Receiving
The employees in this department share the same Enterprise Edge telephondepartment uses one telephone line that is assigned to the loading dock. Thisassigned to Path 3 of the CCR Home Menu.
The shipping and receiving department mailbox greeting informs callers theyleave a message or press ‚ to speak with the receptionist.
Feature CompatibilityThis part of the appendix describes how Enterprise Edge features interact wiEnterprise Edge Voice Messaging. The section is organized in alphabetical oaccording to the Enterprise Edge feature.
Enterprise Edge ATA 2
An analog single-line set can be connected to Enterprise Edge Voice Messagusing the Enterprise Edge ATA 2 or an Analog Station Module. This type of sworking with DTMF tones, allows access to Enterprise Edge Voice Messaginoptions through the dialpad only. There is no Message Waiting Notification availability.
Rotary dials cannot be used internally with Enterprise Edge Voice Messaging
Answer buttons
For information about Answer Buttons, refer to Ringing Answer Button on page 146.
Autodial (internal)
All mailbox owners on the Enterprise Edge Voice Messaging system can progthe Enterprise Edge Voice Messaging extension. The Enterprise Edge Voice Messaging extension is determined using feature code 985.
The System Administrator can use autodial for Busy Lamp Field (BLF) indicatfor all voice channels. This allows Enterprise Edge Voice Messaging channelsmonitored during busy periods.
Automatic Set Relocation
Must be set to No when changing the Enterprise Edge Voice Messaging exteand connections between the Enterprise Edge and the Enterprise Edge serve
Call Forward All Calls (CFAC)
Any ringing line or answer button appearance on a set forwards to the extensspecified by the call forwarded extension.
If CFAC is used a caller immediately transfer to the mailbox of the CFAC extension.
P0911620 Issue 02 Enterprise Edge 2.0 Voice Messaging Set Up and Operation Guide

152 Appendix B: Enterprise Edge Configuration Tips
the
g g, her
ber
aging. Camp rprise
dge e sion,
ition,
nsion ging.
es
ise oice
Call Forward No Answer (CFNA)
Any ringing line appearance on a set is CFNA to the extension specified afterprogrammed number of rings.
CFNA is not applicable in an Automated Attendant application. If Delayed RinTransfer (DRT) is being used for Enterprise Edge Voice Messaging answerinensure that the number of rings for CFNA on any of the sets is equal to or higthan the number of rings for DRT.
CFNA takes precedence over DRT and Transfer Callback if it has a lower numof rings.
Camp On
The Camp On Feature cannot be used to access Enterprise Edge Voice MessIf a user calls the extension and there is no answer, the user cannot invoke theOn Feature. Instead, advise the user to wait a few moments and try the EnteEdge Voice Messaging extension again.
Changing extensions
Using Enterprise Edge configuration programming to change the Enterprise EVoice Messaging extension is not automatically supported by Enterprise EdgVoice Messaging. If you change the Enterprise Edge Voice Messaging extenreboot Enterprise Edge Voice Messaging.
Delayed Ring Transfer (DRT)
To use Enterprise Edge Voice Messaging as a secondary line answering posset DRT:
1. Assign the Enterprise Edge Voice Messaging extension as the prime extefor the specified lines that are to be DRT to Enterprise Edge Voice Messa
2. Set the Enterprise Edge DRT to Yes.
3. Set DRT Delay from one to six rings.
4. Assign a Greeting Table to each line that is to be DRT to Enterprise EdgeVoice Messaging.
5. Set the Enterprise Edge Voice Messaging Answer option to No for the linthat are to be DRT to Enterprise Edge Voice Messaging.
If DRT is used for Enterprise Edge Voice Messaging Answering, and EnterprEdge telephones with a ringing line appearance forward to Enterprise Edge VMessaging, a caller immediately transfers to the mailbox of the CFAC set.
Enterprise Edge 2.0 Voice Messaging Set Up and Operation Guide P0911620 Issue 02

Appendix B: Enterprise Edge Configuration Tips 153
gs up
ntom’ ce
ature
uring oice
ller to ne
m aging e
ging lbox.
r a
hen be ferred
Disconnect Supervision
If the Enterprise Edge server has Line Disconnect Supervision and a caller hanafter reaching the Automated Attendant, Enterprise Edge Voice Messaging immediately senses this and breaks the connection. This results in fewer ‘phamessages in the General Delivery Mailbox and prevents Enterprise Edge VoiMessaging ports from being occupied.
Do Not Disturb (DND)
Stops all tones and ringing to a set. When a call transfers to a set with DND activated, the call appears as a flashing indicator on an available line. The Automated Attendant transfers the caller to the mailbox associated with that telephone.
Feature timeout
Enterprise Edge Voice Messaging has a timeout of up to two minutes. This feis independent of the Enterprise Edge timeout.
Hold
A mailbox owner cannot put a session on hold. If the hold button is pressed da Enterprise Edge Voice Messaging programming session, Enterprise Edge VMessaging disconnects, except when Automatic Hold is used to transfer a caa mailbox or an extension. Enterprise Edge Voice Messaging ignores Held LiReminder tones.
Intercom Numbers
An inside user can access Enterprise Edge Voice Messaging using an intercobutton and entering the extension. Access to the Enterprise Edge Voice Messfeature codes and “Message for you” indication requires an intercom button on thset.
An intercom button is required to notify an extension of an incoming transfer.
Language choice
The Enterprise Edge Voice Messaging language capability is independent ofEnterprise Edge’s language selection for a set. Enterprise Edge Voice Messalanguage availability is determined by the Class of Service assigned to a mai
Note: The Enterprise Edge Voice Messaging language option is enabled aftemailbox owner starts a session.
Lines
If a line programmed for the Automated Attendant appears on a set, it rings wEnterprise Edge Voice Messaging transfers the call. If a line programmed to answered by the Automated Attendant does not appear on a set, a call is transto an intercom line appearing on the intercom button.
P0911620 Issue 02 Enterprise Edge 2.0 Voice Messaging Set Up and Operation Guide

154 Appendix B: Enterprise Edge Configuration Tips
ll the
e
rime er nt.
as the ted
prise line e
rprise to an
med ific e
NA e med
Message Send/Reply/Waiting
Any message notification left by an internal caller can be replied to using the Enterprise Edge Voice Messaging message reply options. After listening to amessage, a user can forward a copy of the message to another mailbox or camessage sender.
Note: Replying to a message from an Enterprise Edge one line display phonrequires the user to press · after listening to the message.
Night Service
When Night Service is activated and the Enterprise Edge Voice Messaging pextension is specified as the Night Ring extension for an incoming line, a callimmediately hears the Enterprise Edge Voice Messaging Automated Attenda
Prime Set (multiple)
When configuring lines, Enterprise Edge Voice Messaging can be designated prime extension. Enterprise Edge Voice Messaging answers with the AutomaAttendant.
Private line
When private lines are assigned to a set programmed to ring, CFNA to EnterEdge Voice Messaging is answered by the set’s Personal Mailbox. If a privateis the only appearance on that set, Enterprise Edge transfers calls through thintercom button.
Note: If the private line is not programmed to ring, CFNA is not activated.
Release button
Ends an Enterprise Edge Voice Messaging session or telephone call.
Ringing line preference
Ringing lines programmed to Enterprise Edge extensions are recognized by Enterprise Edge Voice Messaging. Features such as CFNA and CFAC to EnteEdge Voice Messaging are not recognized by non-ringing lines programmed Enterprise Edge extension. Refer to the Call Forward No Answer (CFNA) on page 152, Call Forward All Calls (CFAC) on page 151 and Answer buttons on page 151.
Selective Call Forward
Refer to Do Not Disturb (DND) on page 153.
Service Modes
The Service Modes feature allows the Enterprise Edge System to be programto forward all incoming calls to Enterprise Edge Voice Messaging during spectime periods, such as lunch time or nonbusiness hours. Enterprise Edge VoicMessaging answers with the Automated Attendant.
Transfer Callback
Calls through the Automated Attendant that transfer to a extension without CFare routed by Transfer Callback to Enterprise Edge Voice Messaging after thdesignated number of rings. The CFNA/Transfer Callback feature is programso that the fewest rings take precedence.
Enterprise Edge 2.0 Voice Messaging Set Up and Operation Guide P0911620 Issue 02

you
gs,
copy ted
Appendix C: Resetting Enterprise Edge Voice Messaging
OverviewThis appendix describes how to reset Enterprise Edge Voice Messaging.
As System Administrator, you must reset Enterprise Edge Voice Messaging ifchange the extension number length.
Resetting Enterprise Edge Voice MessagingResetting Enterprise Edge Voice Messaging erases all the Company GreetinGreeting Table and mailbox information.
Before you reset Enterprise Edge Voice Messaging, make sure that you have aof the current Enterprise Edge Voice Messaging setup. Refer to your compleEnterprise Edge Voice Messaging Programming Record.
After you reset Enterprise Edge Voice Messaging you must:
• record Company Greetings. See Recording a Company Greeting on page 35.
• enter Greeting Table information. See Greeting Tables on page 32.
• add mailboxes. See Creating Mailboxes on page 77.
• initialize the Special Mailboxes. See Special Mailboxes: General Delivery andSystem Administrator on page 63.
CAUTIONIf you reset Enterprise Edge Voice Messaging all previous programming and any messages in the mailboxes are lost.
P0911620 Issue 02 Enterprise Edge 2.0 Voice Messaging Set Up and Operation Guide
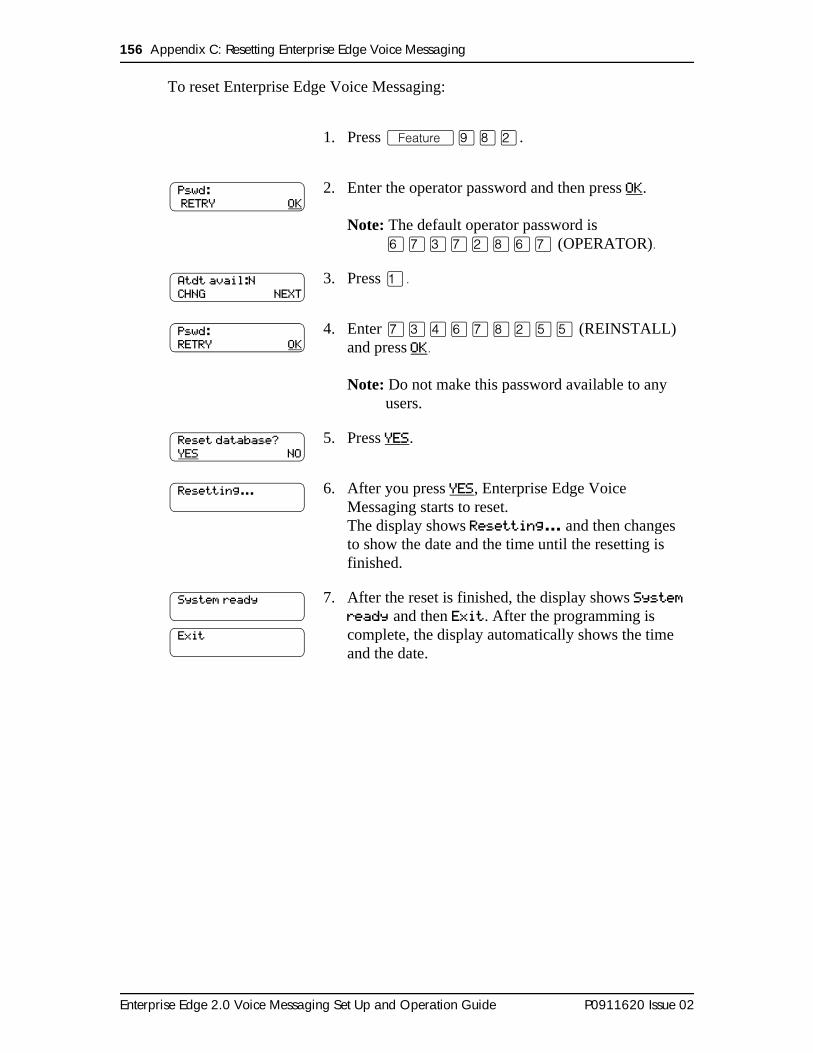
156 Appendix C: Resetting Enterprise Edge Voice Messaging
To reset Enterprise Edge Voice Messaging:
1. Press ƒ·°¤.
2. Enter the operator password and then press OK.
Note: The default operator password isfl‡‹‡¤°fl‡ (OPERATOR).
3. Press ⁄.
4. Enter ‡‹›fl‡°¤fifi (REINSTALL) and press OK.
Note: Do not make this password available to any users.
5. Press YES.
6. After you press YES, Enterprise Edge Voice Messaging starts to reset.The display shows Resetting... and then changes to show the date and the time until the resetting is finished.
7. After the reset is finished, the display shows System ready and then Exit. After the programming is complete, the display automatically shows the time and the date.
Pswd: RETRY OK
Atdt avail:NCHNG NEXT
Pswd:RETRY OK
Reset database?YES NO
Resetting...
System ready
Exit
Enterprise Edge 2.0 Voice Messaging Set Up and Operation Guide P0911620 Issue 02

tting
rnate ously. or use
ional
nnot
cates calls.
ing rms
.
ge lbox tens
Glossary
AA
See Automated Attendant.
Administration
The tasks involved in maintaining the Enterprise Edge Voice Messaging Mailboxes, Greetings and set up configuration. Administration also involves seup and maintaining the CCR Trees.
Alternate extensions
When a caller dials an extension that is programmed to have one or more alteextensions, Enterprise Edge Voice Messaging rings at all of the sets simultaneThe first set to answer accepts the call. The other sets cannot access the linethe Interrupt Feature (Feature 987) to access the answered line.
Alternate extensions are available only on User mailboxes.
Alternate Greeting
A greeting that is recorded for a Personal Mailbox and played only on exceptoccasions, such as absence.
Alternate Language
A secondary language used for greetings and prompts. To use an Alternate Language, you must enable the Bilingual Option. The Alternate Language cabe the same as the Primary Language.
Attendant sign ON/OFF
A task performed by a company Receptionist or designated Operator that indito Enterprise Edge Voice Messaging when an Operator is available to answer
Automated Attendant
The Enterprise Edge Voice Messaging answering service that answers incomcalls with a Company Greeting, plays a menu of options to a caller, and perfocall routing functions in response to a caller’s selections.
Blind Call
An incoming call where the caller transfers directly to the extension requested
Broadcast Message
A message that can be sent by the System Administrator. This type of messaplays in all initialized Personal Mailboxes and plays immediately when the maiis opened by the owner. It is deleted automatically after the mailbox owner listo the message.
P0911620 Issue 02 Enterprise Edge 2.0 Voice Messaging Set Up and Operation Guide

158 Glossary
re
hen tures the
rs
oice by
prise
create.
they s are:
ssage
Business Status
A setting that overrides the schedule of the Greeting Table and plays the Non-business greeting until turned off.
CCR
Custom Call Routing.
Channel configuration
The number of channels on the Enterprise Edge Voice Messaging unit that adesignated for outcalling.
Class of Service
A Class of Service defines the values for the special features of a Mailbox. Wregistering a mailbox, the System Administrator programs several special feaat once by choosing the number from the Class of Service table that provideslevel of service most appropriate for the user.
A mailbox cannot be added without a Class of Service.
Company Directory
The Company Directory is an internal voice list of the names of mailbox ownewith initialized mailboxes who are designated to appear in the directory.
Configuration
The tasks involved in setting up the different parameters of Enterprise Edge VMessaging. For example, configuring the Central Office (CO) lines answeredEnterprise Edge Voice Messaging.
Configuring Enterprise Edge Voice Messaging lines
The tasks involved in determining which external lines are answered by EnterEdge Voice Messaging and which Greeting Table is assigned.
Custom Call Routing Tree
Call Paths that let users select options to direct their calls along the paths you
Default
The preset parameters for Enterprise Edge Voice Messaging.
Destination
On a CCR Tree, the Destination determines where the caller is directed afterlisten to information or leaving a message in a mailbox. The Destination Type
• PREV: returns the caller to the Previous menu
• HOME: returns the caller to the Home Menu
• DISC: disconnects the call
Destinations can be assigned only to the Information Message and Leave Meoptions.
Enterprise Edge 2.0 Voice Messaging Set Up and Operation Guide P0911620 Issue 02

Glossary 159
ows
lay. saging
two lay or
ch as .
and
a
Voice igits.
atures
not
Display
A one-line or two-line display screen on an Enterprise Edge telephone that shEnterprise Edge Voice Messaging commands and options.
Display buttons
The three buttons that appear below an Enterprise Edge two line display dispWhen pressed, these buttons select the specified Enterprise Edge Voice Mesoption.
Display Options
The choices available to a mailbox owner that appear on an Enterprise Edgeline display. Options appearing on the display can be selected using the dispdialpad buttons.
Enterprise Edge ATA 2
An Enterprise Edge product that allows the connection of an analog device, sua single-line telephone or a facsimile machine, to an Enterprise Edge system
Enterprise Edge Voice Messaging Programming Record
A booklet where you record Enterprise Edge Voice Messaging configuration CCR Tree programming information.
Envelope information
A date and time stamp that appears on all messages left in a mailbox. When message is left by another mailbox owner, envelope information includes themessage sender’s name.
Extensions
A two to seven-digit number that is used to reach a designated telephone.
Extension length
The number of digits in a Enterprise Edge extension and an Enterprise Edge Messaging mailbox number. The extension length ranges from two to seven d
Feature code
A unique three-digit code used to access Enterprise Edge Voice Messaging Feand options.
General Delivery Mailbox
One of the two Special Mailboxes that hold messages for individuals who areassigned a Personal Mailbox.
P0911620 Issue 02 Enterprise Edge 2.0 Voice Messaging Set Up and Operation Guide

160 Glossary
any
nal lected ices
ing.
y all the
have store
a
s ished.
tions ion, or
ystem.
es
Greetings
There are three types of Enterprise Edge Voice Messaging Greetings: CompGreetings, Personal Mailbox Greetings and Information Mailbox Greetings. Company Greetings are played by the Automated Attendant to callers. PersoMailbox Greetings are played to callers who want to leave a message in a semailbox. Information Mailbox Greetings are played to describe goods or servavailable to callers.
Greeting Tables
A table for storing recorded Company Greetings, start times assigned to the greetings, and the lines that are answered by Enterprise Edge Voice MessagThere are four Greeting Tables.
Group Lists
A collection of mailbox numbers that are assigned a special Group number bEnterprise Edge Voice Messaging. When a message is sent to a Group List, mailboxes in the list receive the message.
Guest Mailbox
A Guest Mailbox is a type of Personal Mailbox assigned to people who do not a permanent extension, but require a mailbox. These mailboxes receive and messages the same way that User Mailboxes do.
Home Menu
The Home Menu is the first CCR menu callers encounter after they hear the Company Greeting. The Home Menu provides a list of single-digit options to caller. A caller, after listening to the Home Voice Menu, selects the option by pressing a number on any touchtone telephone.
A Home Menu can be programmed to offer eight options. By default, Ø is reserved for reaching the Operator, and · offers the menu in the Alternate Language.
The Home Menu can also be a recorded Information Message that announceinformation to a caller and disconnects the call when the announcement is fin
Home Menu Voice Prompt
A voice prompt that provides a list of number options. When pressed, these oproute a caller to: a sub-menu, an Information Message, a Leave Message opta transfer to an extension.
ICS
Integrated Communication System, an Enterprise Edge business telephone s
Information Mailbox
A mailbox that provides a caller with a message describing goods or servicesavailable from your company. The Information Mailbox does not take messagand does not have an extension associated with it.
Enterprise Edge 2.0 Voice Messaging Set Up and Operation Guide P0911620 Issue 02

Glossary 161
caller
can
x nal
ber
ng
ailbox
es
m.
ion,
th
Information Message
On a CCR Tree, an Information Message is a message you record to provide awith information about goods or services available from your company. Information mailboxes must be created before the Information Message optionbe added to the CCR Tree.
Initialize
Preparing a mailbox to receive messages, which includes changing a mailbodefault password, recording a Company Directory name, and recording PersoMailbox Greetings.
Initializing Enterprise Edge Voice Messaging
Preparing the Enterprise Edge Voice Messaging settings used in mailbox numlength and language preference.
Leave Message
The feature code used to leave messages in Enterprise Edge Voice Messagimailboxes.
Leave Message option
The Leave Message option on a CCR Tree provides callers with access to a mso they can leave messages. A caller who selects this option is automaticallytransferred to a mailbox to leave a message.
Level
The Home Menu is on Level 0. As sub-menus are added, the caller progressthrough the levels of the CCR Tree. Ten levels can be created (from 0 to 9).
Mailbox
A storage place for messages on the Enterprise Edge Voice Messaging syste
Mailboxes
Part of the Enterprise Edge 2.0 Voice Messaging Programming Record that contains mailbox information which includes mailbox number, assigned extensmailbox owner’s name, and Directory Overrides.
Mailbox number length
The number of digits allowed in a mailbox number. The mailbox number lengranges from two to seven digits.
Mailbox Overrides
Mailbox Overrides are optional parameters in addition to the Class of Servicevalues. The Mailbox Overrides are: Include in Company Directory, Alternate Extensions, Express Messaging Line, Call Screening, Message Waiting Notification, and Outdial route.
P0911620 Issue 02 Enterprise Edge 2.0 Voice Messaging Set Up and Operation Guide

162 Glossary
ight enu,
th a
essage
ailbox,
ull en if elete
ager. .
d by
valid
oice
Menu
A menu is a voice prompt you record that provides a caller with a list of up to eoptions. There is one default pre-recorded menu, the Automated Attendant Mthat plays after the Company Greeting. You can replace this default menu wicustom menu, or you can assign the CCR Home Menu to play instead of an Automated Attendant menu.
Message Delivery Options
Message sending options that are stamped onto a message. There are five MDelivery Options: Normal, Certified, Urgent, Private and Timed. A Message Delivery Option can be assigned to a message after a user has selected a mor after recording a message.
Message Waiting Notification
Message Waiting Notification provides a mailbox owner with a message notification Message for you on the display of their telephone. This EnterpriseEdge Voice Messaging Feature is a Mailbox Override.
Never Full Mailboxes
Your Enterprise Edge Voice Messaging mailbox is equipped with the Never FMailbox Feature, which allows a caller to leave a message in your mailbox, evthe mailbox is “full”. The message is stored, but cannot be accessed until you dat least one saved message.
Off-premise Message Notification
Allows you to direct your messages to any phone number, extension or to a pThis Enterprise Edge Voice Messaging Feature is part of the Class of Service
Operator
The Operator is the person whose extension rings when the caller is promptethe Automated Attendant to “Press Ø for an operator”. If the Operator is not available, callers who request the Operator transfer to the General Delivery Mailbox.
In Class of Service, the Operator is also known as a Targeted Attendant.
Operator default extension
The Receptionist or Enterprise Edge Voice Messaging designated Operator’sdefault extension. This default is preset to none, and must be changed to anyextension on the system.
Operator Status
The Enterprise Edge Voice Messaging setting that tells the system whether aReceptionist or designated Operator is available.
Option
An Enterprise Edge Voice Messaging choice that is given to a user through vor display prompts.
Enterprise Edge 2.0 Voice Messaging Set Up and Operation Guide P0911620 Issue 02

Glossary 163
used
on a
the
r reset
a
can
e
Outdial route
The Outdial route determines which line or line pool the system uses when amailbox owner replies to a message left by an external caller.
Password
A four- to eight-digit number that is entered using the dialpad. A password is to open mailboxes or perform configuration tasks.
Path
A Path is the course an incoming call takes to or through one or more menusCCR Tree to reach a desired destination.
Path number
An identification number assigned to a Path on each CCR Tree. The numberrepresents the sequence of digits that callers enter to route themselves alongPath.
Personal Mailboxes
Personal Mailboxes (appear on the telephone display as Subscriber when programming)
• are assigned to users by the System Administrator
• include both User Mailboxes and Guest Mailboxes
• are maintained by the mailbox owner
• can be listed in the Company Directory under the mailbox owner’s name
• are protected by a password that can be changed by the mailbox owner, oto 0000 by the System Administrator
Primary Greeting
The main greeting played in a Personal Mailbox to callers who want to leave message.
Programmable memory buttons
Buttons on the Enterprise Edge one line and two line display telephones thatstore feature codes and numbers.
Registering Mailboxes
Registering a mailbox adds a mailbox number to the Enterprise Edge Voice Messaging system using the Configuration feature code.
Reports
The Reports used to view Enterprise Edge Voice Messaging programming, thamount of available message storage time, and CCR programming and administration.
P0911620 Issue 02 Enterprise Edge 2.0 Voice Messaging Set Up and Operation Guide

164 Glossary
nt
r. The
enus
rise
ding
a
ion or pears speak
ise along
Resetting passwords
A System Administrator task that changes a mailbox password from its curresetting back to the Enterprise Edge Voice Messaging default setting of 0000.
Resetting Enterprise Edge Voice Messaging
Returning Enterprise Edge Voice Messaging to its default settings.
Special Mailboxes
The two mailboxes used by the System Administrator and designated Operatotwo Special Mailboxes are System Administrator and General Delivery.
Sub-menu
A sub-menu is any menu presented to the caller after the Home Menu. Sub-mcan lead to other sub-menus. Nine sub-menus can be added to a CCR Tree.
Subscriber
When creating new mailboxes, the choices are Subscriber (a Guest or User mailbox) or Information.
System Administrator
The person responsible for configuring, updating, and maintaining the EnterpEdge Voice Messaging system.
System Administrator Mailbox
One of the two Special Mailboxes. Used by the System Administrator for senBroadcast Messages. This is the System Administrator’s Personal Mailbox.
Target Attendant
The Target Attendant is assigned to answer a telephone when a caller opensmailbox to leave a message and presses ‚ to reach the Operator.
Touch Tone Phone
A push button telephone that emits DTMF tones.
Transfer
On a CCR Tree, a Transfer prompt provides a caller with access to an extensan external number. A Transfer prompt is assigned a one-digit number that apin a menu. When this number is pressed, the caller automatically transfers to with an individual.
User Mailboxes
User Mailboxes store messages for mailbox owners. A User Mailbox can be assigned to anyone in the system who has an Enterprise Edge telephone.
Voice prompts
The prerecorded voice instructions that play when callers access the EnterprEdge Voice Messaging features and options. Voice prompts also guide callersthe call Path of a CCR Tree.
Enterprise Edge 2.0 Voice Messaging Set Up and Operation Guide P0911620 Issue 02

Index
AAdding lines 40Alarm Report 127Alternate extensions 55, 59Alternate Greeting 69Alternate Language 33, 34Answer Button 146Assigned Key 105Autodial
Enterprise Edge Voice Messaging Feature Compatibility 151
Automated AttendantBusiness Status 46changing the status 50greetings 32recording 38
BBeginning a new CCR tree 109Broadcast Message 91
sending 91Business Hours
setting 36Business Status
Remote Administration 48setting 46
CCall Display Information
troubleshooting 131Call Forward
All Calls 146No Answer 146
Call Screening 55Call Screening feature
mailbox 60Caller ID (CLID) 74, 97Camp On
Enterprise Edge Voice Messaging Feature Compatibility 152
Canceling Off-premise Message Notification 97CCR Tree 109
adding a Menu node 111adding an Information Message 113assigning to a Greeting Table 36building 109changing 120deleting 122designing 106disabling 120
P0911620 Issue 02 Enterprise Edge 2
erasing a Path 121Home Menu Voice Prompt 109Home node 105Menu node 120, 121node 105overview 106planning 106saving 117testing 117
Certified, Delivery option 70Change extension
Enterprise Edge Voice Messaging Feature Compatibility 152
Class of Service 55, 56AMIS networking 56greeting length 56incorrect password 56language prompts 56mailbox 56message length 56message retention 56message time 56number of attempts 56Off-premise Message Notification 56Outbound Transfer 56retry interval 56summary 57, 58Target Attendant 56
Company Directory 55, 66configuring the search 89disabling 89recording mailbox 66troubleshooting 135
Company Directory options 59Configuring the lines 39Conventions, guide 16
angled brackets 16button options 16buttons 16command line 16
Custom Call Routing (CCR) 13adding a Menu node 111adding an Information Message 113changing CCR 120deleting a Tree 122Destination Types 104disabling 120erasing a Path 121Home Menu 104
.0 Voice Messaging Set Up and Operation Guide

166 Index
Information Message 104, 107Leave Message 104, 108level 104menu 104Menu node 120, 121overview 103Path 104saving a Tree 117testing a Tree 117transfer 105Tree 109Tree overview 106troubleshooting 131, 136
Custom Call Routing (CCR) Transfer 108Custom Call Routing Report 127Customized Automated Attendant Prompt 38DDefault extension
Operator DN 46Delayed Ring Transfer (DRT)
Enterprise Edge Voice Messaging Feature Compatibility 152
Deleting a Group List 96Deleting a mailbox 86Delivery options 70Destination Types
Custom Call Routing (CCR) 105Dialing Translation 139
access code 142area code 141long distance access code 141Network Access 141overview 139parameters 141reply translation 142sample table 140setting 142Table 139
Dialing Translation Table 133building 143changing entries 144deleting entries 144reviewing entries 143sample 140
Directory NumberDirectory Number feature code 100
Directory options 59Directory Report 126Disabling 90
CCR Tree 120External Initialization 89
Disconnect SupervisionEnterprise Edge Voice Messaging Feature
Compatibility 153
Display 16log prompt 132one line 25two line 25
Do Not Disturb (DND)Enterprise Edge Voice Messaging Feature
Compatibility 153EEnabling
External Initialization 89General Delivery Mailbox 90
Enterprise Edge ATA 2Enterprise Edge Voice Messaging Feature
Compatibility 151Enterprise Edge Integrated Solution software
configurationtips 145
Enterprise Edge Integrated Solution software Feature Compatibility
Enterprise Edge ATA 2 151Enterprise Edge Voice Messaging
Directory Number feature code 100Enterprise Edge Integrated Solution software
Feature compatibility 145Glossary 157language availability 39line display 25passwords 88Reports 125set up 146user eligibility 25
Enterprise Edge Voice Messaging Call Handling Report 125, 128
Enterprise Edge Voice Messaging Feature Compatibility
Autodial 151Camp On 152change extension 152Delayed Ring Transfer (DRT) 152Disconnect Supervision 153Do Not Disturb (DND) 153hold 153intercom numbers 153language choice 153messages 154Night Service 154Prime Set 154private line 154ringing line preference 154Service Modes 154Set Relocation 151timeout 153Transfer Callback 154
Enterprise Edge 2.0 Voice Messaging Set Up and Operation Guide P0911620 Issue 02

Index 167
Enterprise Edge Voice Messaging Reportsoverview 125
Enterprise Edge Voice Messaging System Configuration
resetting 155Enterprise Edge Voice Messaging System
Configuration Report 125, 128Erasing a CCR Path 121Error Messages
troubleshooting 131Expiry
password 88Express Messaging Line
about 60defaults 60
External Initialization 89FFax answering 42Fax On Demand
Reports 125Feature codes
Directory Number 100frequently used 100Operator Status 100
Feature compatibility 145Forwarding calls
troubleshooting 132GGeneral Delivery
Mailbox 54General Delivery Mailbox 90, 132
assigning 90Glossary 157Greeting Table
adding lines 40Alternate Language 34assigning 37assigning a CCR Tree 36assigning a greeting 35, 36Attendant 37overview 32Primary Language 34recording Company Greetings 34setting up 35using the Alternate Language 33
Greetingsassigning to a Greeting Table 35, 36Mailboxes 69troubleshooting 132
Group Listadding a 94delete 96Group Message 96
preparing 93troubleshooting 135
Group Messages 92Group List 93
GuestMailbox 54
Guest Mailbox 80, 82adding 82Express Messaging Line 60uses 80using 80
Guide, organization 16HHold
Enterprise Edge Voice Messaging Feature Compatibility 153
Home MenuCustom Call Routing (CCR) 107
How CCR works 103IInformation
Mailbox 54, 83Information Mailbox 105
adding 84setting up 83uses for 83
Information Messageadding 113Custom Call Routing (CCR) 107
Information node 105Initializing
Mailboxes 65Intercom numbers
Enterprise Edge Voice Messaging Feature Compatibility 153
Interrupting a Voice Prompt 26LLanguage
changing availability 39Language choice
Enterprise Edge Voice Messaging Feature Compatibility 153
Language preferenceassigning 37
Leave MessageCustom Call Routing (CCR) 108
Lines 39adding 40configuring 39
Log prompttroubleshooting 132
P0911620 Issue 02 Enterprise Edge 2.0 Voice Messaging Set Up and Operation Guide

168 Index
MMailbox
“locked-out” 88, 134adding 77adding multiple mailboxes 79Broadcast 91Call Screening feature 60cannot be added 135Class of Service 56delete 86General Delivery 54, 90greetings 69Guest 54, 80Information 54, 83initializing 65Message length 56Message Waiting Notification 60node 105options 85outdial route 61, 77Overrides 58
include in Company Directory 58Message Waiting Notification 58outdial route 58
password 85password expiry 56Personal 87remote access 26security 89setting up operator mailbox 91Special 87terms and definitions 55tools and materials 54troubleshooting 134User 54
Mailbox Activity Report 127Mailbox Overrides
outdial route 77Maximum
Tree depth 105Memory button
programming 100Memory buttons 99Menu
Custom Call Routing (CCR) 105node 105target 121
Menu nodeadding 111changing 120, 121
Message 70Broadcast 91Group 92
sending to group 96troubleshooting 135
Message length 56Message retention period 56Message time 56Message Waiting Notification 55, 60
mailbox 60Messages
calling sender 74delivery options 70Enterprise Edge Voice Messaging Feature
Compatibility 154external reply 74internal reply 74listening 70replying 73Special Mailbox 70
NNext Action 105Night Service
Enterprise Edge Voice Messaging Feature Compatibility 154
NodeInformation 105Mailbox 105Menu 105Root 105Transfer 105
Node, adding 111Nodes, CCR
adding a Menu node 111adding an Information Message 113Menu 120, 121
Numeric Subscriber Report 126OOff-premise Message Notification 56, 133
channels for outcalling 90Outcalling Channels 90
One line displayusing 25
Operatingtroubleshooting 131
Operator Mailbox 91Operator password
change 45Operator Status 45
default extension 46Operator Status feature code 100setting 45
Options, mailbox 85Organization, guide 16
Enterprise Edge 2.0 Voice Messaging Set Up and Operation Guide P0911620 Issue 02

Index 169
Outbound Transfer 56, 133channels for outcalling 90Outcalling Channels 90
Outcalling 90Outcalling Channels
setting up 90Outdial route 55, 77
mailbox 61Overrides
Mailbox 58PParameters
access code 142area code 141long distance access code 141reply translation 142setting 142
Password 85“locked-out” 88, 134expiry 88incorrect lock-out 88Mailbox 56, 88Operator 45reset 85Special Mailbox 65troubleshooting 134
Personal Mailbox 77, 87changing options 85delete 86reset password 85
Personal Mailboxes 55adding 77
Port UsageReports 125
Port Usage Report 128Prerequisites 16Primary Greeting 69Prime Set
Enterprise Edge Voice Messaging Feature Compatibility 154
Private lineEnterprise Edge Voice Messaging Feature
Compatibility 154Private, delivery option 70Programming
memory buttons 100RRecording
Company Greetings 34Customized Menu prompt 38greetings and prompts from a telephone 27greetings and prompts from your PC 28mailbox in Company Directory 66
Remote access 26Remote Administration
Business Status setting 48Reply Feature
troubleshooting 133Replying
messages 73Reports 125
Alarm 125, 127Caller ID (CLID) 125Custom Call Routing (CCR) 125, 127Dialing Translation 125Directory 125, 126Enterprise Edge Voice Messaging Call
Handling 125, 128Enterprise Edge Voice Messaging System
Configuration 125, 128Fax On Demand 125Mailbox Activity 127Mailboxes 125Message Usage 125Numeric Subscriber Mailbox 126overview 125Port Usage 125, 128System Group List 125, 126
ResettingEnterprise Edge Voice Messaging System
Configuration 155Ringing Answer Button 146Ringing line
Enterprise Edge Voice Messaging Feature Compatibility 154
Rootnode 105
Routing rotary callers 41SSaving a CCR Tree 117Security
Mailbox 89Sending a Group Message 96Service Modes
Enterprise Edge Voice Messaging Feature Compatibility 154
Set RelocationEnterprise Edge Voice Messaging Feature
Compatibility 151Setting up the fax answering extension 42Special Mailbox 87
initializing 65messages 70password 65recording a greeting 68selecting greeting 69
P0911620 Issue 02 Enterprise Edge 2.0 Voice Messaging Set Up and Operation Guide

170 Index
Sub-menuCustom Call Routing (CCR) 107
Symbols 16System
troubleshooting 131System Administrator password 88System Group List Report 126TTarget Attendant 56target menu 121
node 121target menu node 121Terms and definitions
mailbox 55Testing a CCR Tree 117Timeout
Enterprise Edge Voice Messaging Feature Compatibility 153
Tools and materialsmailbox 54
Touchtone Gate 41Transfer
Custom Call Routing (CCR) 105, 108node 105
Transfer CallbackEnterprise Edge Voice Messaging Feature
Compatibility 154Tree definition
Custom Call Routing (CCR) 105Tree depth 105Troubleshooting 132
accessing a line or line Pool 134Call Display Information 131Company Directory 135Custom Call Routing (CCR) 131, 136Error Messages 131Forward denied 132General Delivery Mailbox 132greetings 132Group List 135log prompt 132mailbox not accepting messages 134message lost in a mailbox 134messages 135operating trouble 131, 134password lost 134Reply Feature 133system trouble 131
Two line displayusing 25
UUrgent, Delivery option 70User
Mailbox 54VVoice messaging 13Voice Prompts
interrupting 26Volume control 70
Enterprise Edge 2.0 Voice Messaging Set Up and Operation Guide P0911620 Issue 02