Enhancing your Workflow with Digital Forensics...
49
Enhancing your Workflow with Digital Forensics Tools: The BitCurator Environment Christopher (Cal) Lee and Kam Woods Thursday, March 14, 2013 12:00pm-1:00pm Digital Discussions (Carolina Digital Library and Archives) University of North Carolina at Chapel Hill
-
Upload
hoangthuan -
Category
Documents
-
view
233 -
download
2
Transcript of Enhancing your Workflow with Digital Forensics...
Enhancing your Workflow with Digital Forensics Tools: The BitCurator Environment Christopher (Cal) Lee and Kam Woods
Thursday, March 14, 2013 12:00pm-1:00pm
Digital Discussions (Carolina Digital Library and Archives)
University of North Carolina at Chapel Hill

What This Talk Covers What This Talk Covers
• Motivation for using digital forensics tools in collecting institutions • Workflows based on incorporation of digital forensics tools • Introduction to the BitCurator project • Learn how to run the BitCurator environment in a virtual machine
(using VirtualBox) • Export file system metadata from a disk image (using fiwalk) • Locate and identify personally identifying information within digital
materials (using Bulk Extractor) • Automate repetitive tasks (using Nautilus scripts) • Recognize and understand the main data elements that are
generated by many open source forensics tools (using DFXML) • Generate summary reports of DFXML metadata that can be used to
characterize the contents of disks (using BitCurator reporting tools)

Many librarians and archivists know how to process this stuff:
Source: The Processing Table: Reflections on a manuscripts internship at the Lilly Library.
https://processingtable.wordpress.com/tag/archival-processing/

How about processing this stuff?
Source: “Digital Forensics and creation of a narrative.” Da
Blog: ULCC Digital Archives Blog.
http://dablog.ulcc.ac.uk/2011/07/04/forensics/
Source: Simson Garfinkel

Hint: You might need some of this stuff:

Luckily, there are a lot of people with expertise in using such tools in places like this:
El Paso County Sheriff’s Office (Colorado) http://shr.elpasoco.com/Law+Enforcement+Bureau/Investigations+Division/Computer+Crime+Lab.htm

Here’s what it looks like in libraries and archives:

Stanford University Libraries and Academic Information Resources (SULAIR)

British Library, London

Two Sources of Workflow Examples
Martin J. Gengenbach, “’The Way We Do it Here’: Mapping
Digital Forensics Workflows in Collecting Institutions,” A
Master’s Paper for the M.S. in L.S degree. August 2012.
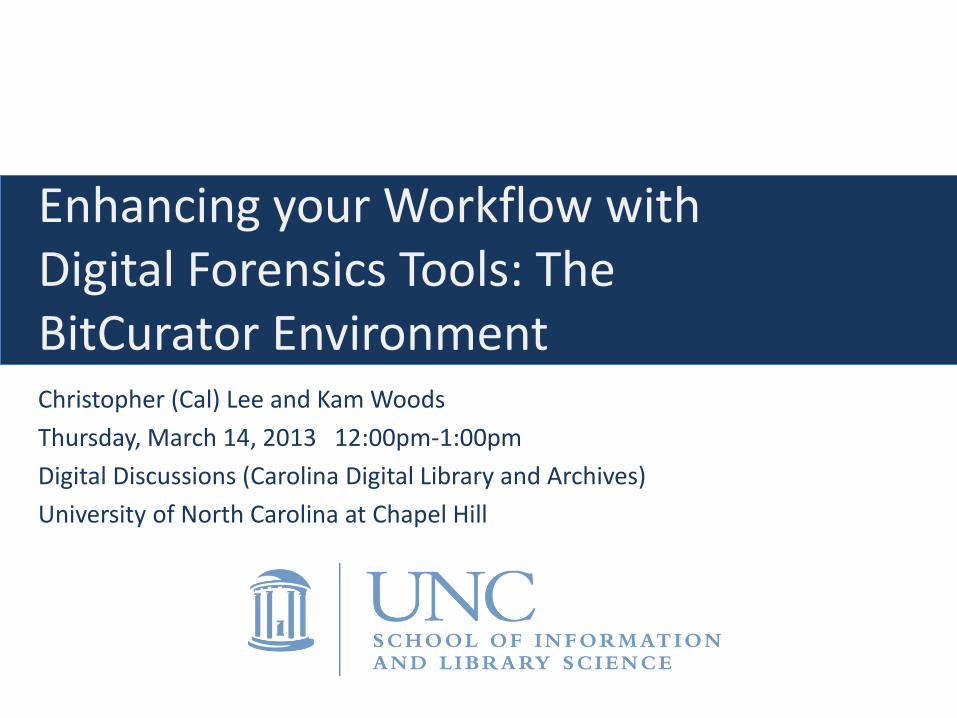
AIMS Work Group, “AIMS Born-Digital Collections: An Inter-
Institutional Model for Stewardship,” January 2012.
http://www2.lib.virginia.edu/aims/whitepaper/AIMS_final.pdf

Martin J. Gengenbach, “’The Way We Do it Here’: Mapping Digital Forensics Workflows in Collecting Institutions,” A Master’s
Paper for the M.S. in L.S degree. August, 2012.
AIMS Work Group, “AIMS Born-Digital Collections: An Inter-Institutional Model for Stewardship,” January 2012.

The BitCurator Project The BitCurator Project
“The BitCurator Project is an effort to build, test, and analyze systems and software for incorporating digital forensics methods into the workflows of a variety of collecting institutions.” BitCurator uses open source and public domain software drawn from the digital forensics community, along with internally developed GPLv3 licensed software to assist in analyzing born-digital materials. Intended to to work alongside or augment existing preservation and archiving environments. Two ways to use the software: as part of a pre-configured virtual machine, or as independent software modules and scripts.

• Funded by Andrew W. Mellon Foundation - October 1, 2011 – September 30, 2013
• Partners: SILS and Maryland Institute for Technology in the Humanities (MITH)
• Core Team:
– Cal Lee, PI
– Matt Kirschenbaum, Co-PI
– Kam Woods, Technical Led
– Alex Chassonoff, Project Manager (UNC), Sunitha Misra, GA (UNC), Porter Olsen, GA (MITH)
Professional Experts Panel Development Advisory Group
• Bradley Daigle, University of Virginia Library • Erika Farr, Emory University • Jeremy Leighton John, British Library • Leslie Johnston, Library of Congress • Naomi Nelson, Duke University • Erin O'Meara, Gates Archive • Michael Olson, Stanford University Libraries • Gabriela Redwine, Harry Ransom Center, University of
Texas • Susan Thomas, Bodleian Library, University of Oxford
• Barbara Guttman, National Institute of Standards and Technology
• Jerome McDonough, University of Illinois • Mark Matienzo, Yale University • David Pearson, National Library of Australia • Doug Reside, New York Public Library • Seth Shaw, University Archives, Duke
University • William Underwood, Georgia Tech • Courtney Mumma, Artefactual Systems

BitCurator Goals BitCurator Goals
• Develop a system for collecting professionals that incorporates the functionality of many digital forensics tools
• Address two fundamental needs:
– incorporation into the workflow of archives/library ingest and collection management environments
– provision of public access to the data
16
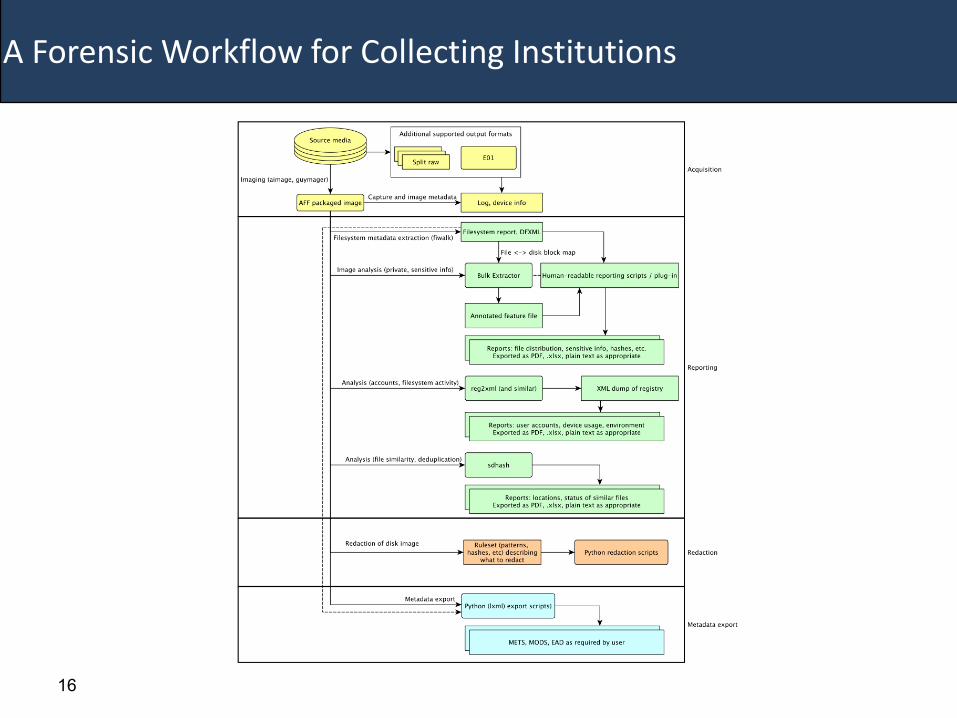
A Forensic Workflow for Collecting Institutions

17
Imaging Workflow
17
18
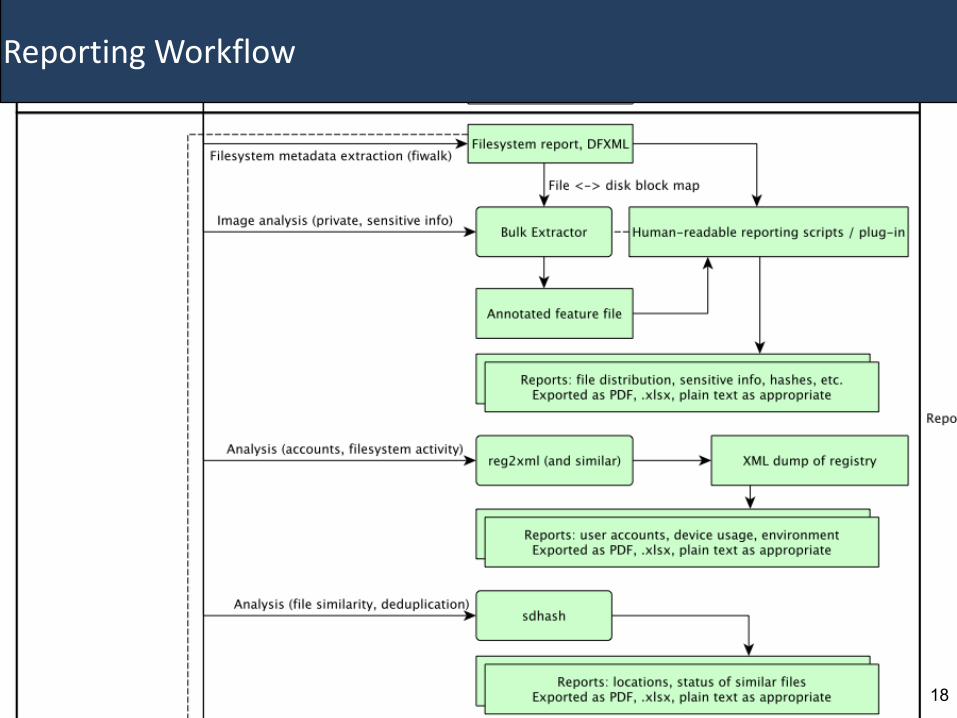
Reporting Workflow
18

19
A Forensic Workflow for Collecting Institutions
• Christopher A. Lee and Kam Woods. 2012. Automated Redaction of Private and Personal Data in Collections: Toward Responsible Stewardship of Digital Heritage. The Memory of the World in the Digital age: Digitization and Preservation, 2012. Vancouver, BC

Many types of media to image and analyze… Many types of media to image and analyze…

Things You’ll Need to Get Started Things You’ll Need to Get Started
• A machine running a 64-bit version of Windows 7 (or newer), Mac OS 10.8 (or newer), or a 64-bit Linux variant (we’ve tested on Ubuntu 12.04 and 12.10)
• 4GB of RAM
• 10GB of hard disk space (minimum)
• The BitCurator VM or Live CD: http://wiki.bitcurator.net
• The current build of VirtualBox: https://www.virtualbox.org/wiki/Downloads
• The current VirtualBox Extension Pack (to be installed on the host system)

Unpacking the BitCurator Virtual Machine Unpacking the BitCurator Virtual Machine
• The BitCurator Virtual Machine is packaged as a tar archive and compressed with gzip. The file will look something like: “BitCurator-0.2.0.tar.gz”
• On a Mac or Linux machine, you can simply double-click on the file to unpack the contents. On a Windows 7 machine, you’ll need a 3rd party utility such as 7zip: http://www.7-zip.org/download.html

The BitCurator Virtual Machine Files The BitCurator Virtual Machine Files
• Once you’ve unpacked the archive, you’ll have two files (versions may differ from those shown here): – BitCurator-0.2.0.vbox (the VirtualBox configuration
file)
– BitCurator-0.2.0.vdi (the VirtualBox disk image)
• Copy these files to a location of your choosing (a “BitCurator-0.2.0” directory in the “VirtualBox VMs” directory in your home location is a good place), and start up VirtualBox.

The Oracle VM VirtualBox Manager The Oracle VM VirtualBox Manager
Select the menu item “Machine -> Add…”, and navigate to the .vbox file that you extracted. The Virtual Machine should appear in the list within the manager, as shown above.

The Oracle VM VirtualBox Manager The Oracle VM VirtualBox Manager
Click on the Settings icon in the manager, and select the system tab. You may wish to increase the RAM and number of processors dedicated to the VM depending on the hardware that you’re running on.

The Oracle VM VirtualBox Manager The Oracle VM VirtualBox Manager
Click on the Ports icon in the Settings window, and select the USB tab. Note that there is a device filter in use that captures every USB device that is attached to the system while the VM is running.

Starting the BitCurator Environment Starting the BitCurator Environment
Clicking on the green “Start” arrow in the Manager screen will start the BitCurator environment. You’ll see a startup screen, and then the BitCurator environment will boot and automatically log in.

Adding a Folder to Hold the Image and Reports Adding a Folder to Hold the Image and Reports
Right-click anywhere on the desktop, and select “Create New Folder”. A folder named “Untitled Folder” will appear on the Desktop. Click on the name and rename it to “SampleData”. We’ll use this location to store the data for the rest of the exercise.

Getting Ready to Image a Media Carrier Getting Ready to Image a Media Carrier
BitCurator can be used to image a wide variety of digital media. For this example* we’ll use an external USB CD-ROM drive and a commercially produced CD. Now that the VM is started up, the device will be automatically captured when plugged in. *We will probably not have time to image a disk during the workshop, but the process from this point on will be largely the same whether we’re working with data from a CD, a floppy, a hard disk, or any other media.

Imaging the Disk Imaging the Disk
With the CD-ROM drive plugged in, double-click on “Imaging Tools” on the Desktop, and then double-click on Guymager. The CD-ROM is selected in the picture above.

Imaging the Disk Imaging the Disk
Right-click on the selected image, and click on “Acquire image” in the menu. You’ll see a new dialog window appear, which will prompt you to enter some acquisition metadata.

Entering Imaging Metadata Entering Imaging Metadata
For this exercise, we’ll capture the disk image in the Expert Witness Format (the second option at the top). The remaining metadata can be entered as desired or left blank. Don’t forget to select the directory we made on the desktop under “Image directory”, and name the image. Then click “OK”.
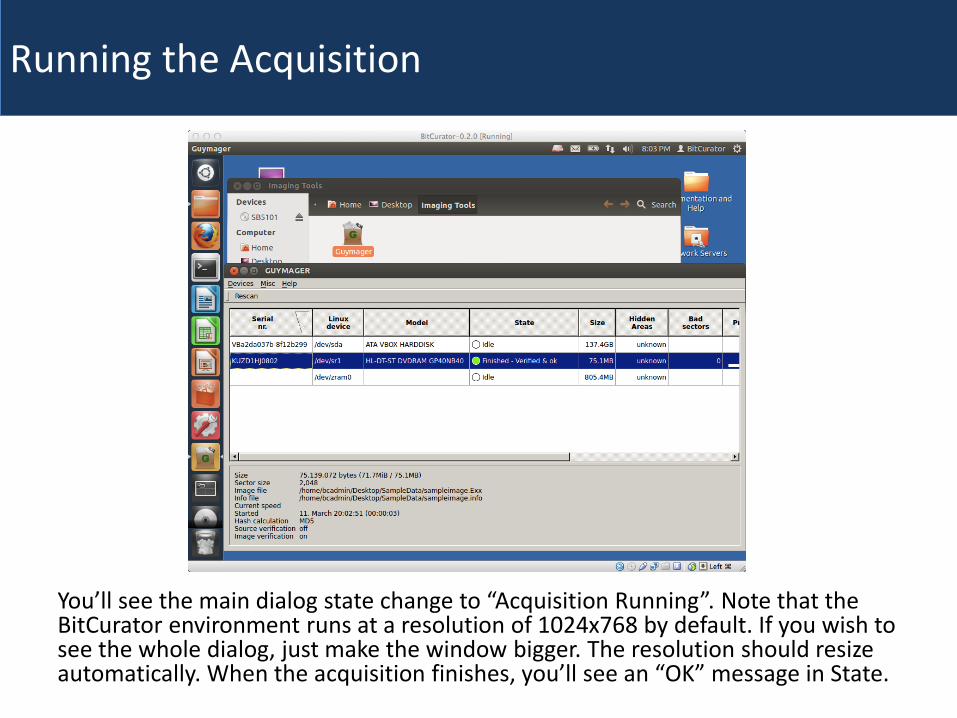
Running the Acquisition Running the Acquisition
You’ll see the main dialog state change to “Acquisition Running”. Note that the BitCurator environment runs at a resolution of 1024x768 by default. If you wish to see the whole dialog, just make the window bigger. The resolution should resize automatically. When the acquisition finishes, you’ll see an “OK” message in State.

Examining the Image Examining the Image
You can now exit Guymager, open up the SampleData directory we made on the desktop, and see the two files that have been produced: the .E01 image file, and a .info file specific to Guymager.

Producing a DFXML report of the File System Contents Producing a DFXML report of the File System Contents
Double-click on the “Forensics Tools” folder, and then double click on the “Fiwalk Command Line” launcher. You’ll see a terminal pop up and execute the help dialog for fiwalk.

Producing a DFXML report of the File System Contents Producing a DFXML report of the File System Contents
Today, we won’t be using most of the options that you see when you start this program (although you’re welcome to try them out!) The fiwalk program really only needs to know three things: 1. Whether you want to run “file” to identify the file formats in the file system (the ‘- f’ option) 2. The name of the DFXML file that will be produced (‘-X’, followed by the file path) 3. The name of the image to process. The command to run is shown below (the ‘~/’ at the beginning of each path just tells the program to start looking for these folders in the user’s home directory)

Producing a DFXML report of the File System Contents Producing a DFXML report of the File System Contents
The resulting DFXML file can be found in the Sample Data directory we created earlier on the desktop. You can examine the contents by double-clicking on it.

Generating Feature Reports with Bulk Extractor Generating Feature Reports with Bulk Extractor
From the desktop, double-click on “Forensics Tools”, and then double-click on the “Bulk Extractor Viewer” icon. This will launch the GUI front-end to Bulk Extractor, a tool that allows you to identify various “features” contained within the bitstream extracted from the source media.

Generating Feature Reports with Bulk Extractor Generating Feature Reports with Bulk Extractor
Click on the “Tools” menu in the top of the window, and select “Run Bulk Extractor”. This will bring up a dialog that allows you to select which scanners to run, and where to generate the report directory.

Generating Feature Reports with Bulk Extractor Generating Feature Reports with Bulk Extractor
Using the “…” icons to the right of the “Image File” and “Output Feature Directory” text boxes, select the image file we previously produced and tell Bulk Extractor to output the report in a new directory “beoutput”, within the SampleData directory we made previously on the desktop.

Generating Feature Reports with Bulk Extractor Generating Feature Reports with Bulk Extractor
Click on “Start Bulk Extractor” at the bottom of the dialog, and you will see a new dialog appear, indicating the progress made so far. This may take a while for large images. Be patient!

Viewing the Bulk Extractor Report Viewing the Bulk Extractor Report
Once the process has completed, the report directory will be available in the relevant location (in our case, the directory “beoutput” within SampleData). The features identified can also be viewed in the main Bulk Extractor Viewer window, by clicking on the report name in the “Reports” subwindow.

Examining Features Examining Features
Individual features may be examined, for example by selecting the histogram file associated with a particular feature type (in the example above, emails), clicking on a particular instance of a feature in the “Referenced Feature” window, and examining that feature in the Image map on the right.

Matching Features to Files Matching Features to Files
Bulk Extractor extracts these features from a disk image by scanning the raw bitstream – not by parsing the file system.
In order to determine which files these features appear within (or if they appear on an area of the disk not associated with the file system), we need to run an additional tool.
Return to the desktop, double-click on “Forensics Tools”, and double click on “Match BE Features to File Names Command Line”. You’ll see a new terminal pop up.

Matching Features to Files Matching Features to Files
The “Identify Filenames” program needs to know about four things:
1. Which feature reports to work from (here we’ve used the “all” flag to tell it to use all of them)
2. Where the image file is (“—image file [FILE LOCATION]”)
3. Where the fiwalk output is (“—xmlfile [FILE LOCATION]”)
4. Where the bulk extractor output is (just the location)
5. Where we want to generated the output. In this case, we’re telling it to make a new directory called “beannotated” in our SampleData directory on the desktop.

Generating Human-Readable Reports Generating Human-Readable Reports
Now that we have a disk image, an XML representation of the file system contents, a directory of feature files, and a set of reports that match features to filenames, we can run the BitCurator reporting tool.
Double-click on “Reporting and Metadata Tools” on the desktop, open “BitCurator Reporting Tools”, and double-click on the “BitCurator Report Generator” launcher

Running the Report Generator Running the Report Generator
The “Generate Report” program needs to know about four things: 1. Whether to generate the reports as PDFs (currently the only option), specified by –pdf-report 2. Where the fiwalk output is (“—fiwalk_xmlfile [FILE LOCATION]”) 4. Where the annotated bulk extractor report directory (the one we generated in the last step) is (“—annotated_dir [DIRECTORY LOCATION]”) 5. Where we want to generated the output. In this case, we’re telling it to make a new directory called “bcsamplereports” in our SampleData directory on the desktop. Finally, we’ll get a couple of prompts for configuration. We’ll use the defaults for now (typing “Y” and enter for the first prompt, and simply hitting enter for the second)
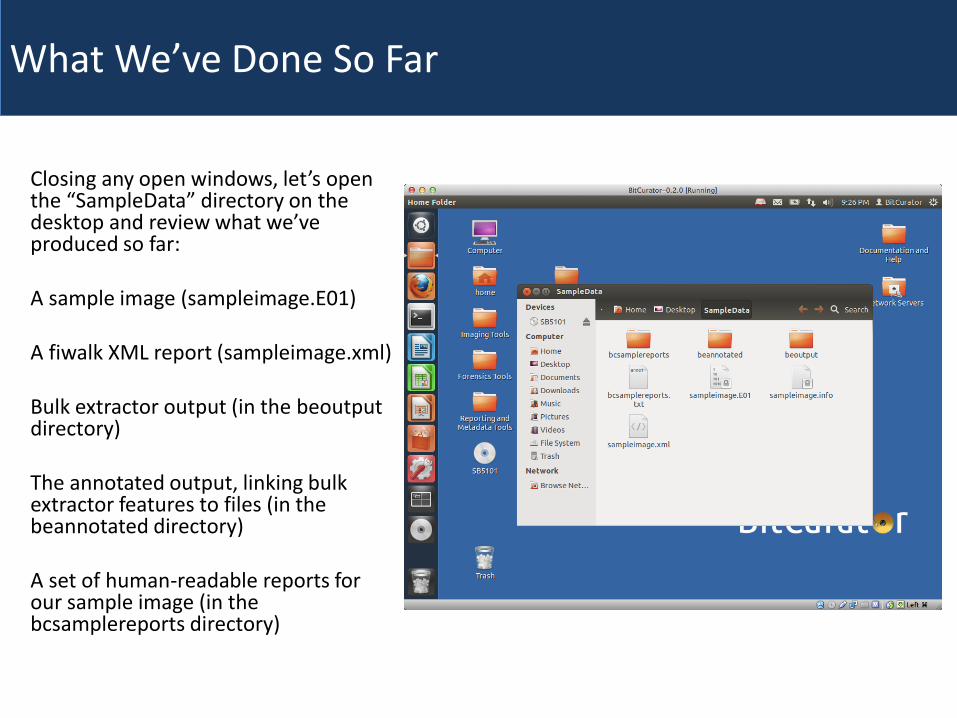
What We’ve Done So Far What We’ve Done So Far
Closing any open windows, let’s open the “SampleData” directory on the desktop and review what we’ve produced so far: A sample image (sampleimage.E01) A fiwalk XML report (sampleimage.xml) Bulk extractor output (in the beoutput directory) The annotated output, linking bulk extractor features to files (in the beannotated directory) A set of human-readable reports for our sample image (in the bcsamplereports directory)

Find BitCurator Online Find BitCurator Online
Get the software Documentation and technical specifications Google Group http://wiki.bitcurator.net/
People Project overview News http://www.bitcurator.net/