Engineering is Elementary Professional Development Guide ... · Professional Development Guide: A...
132
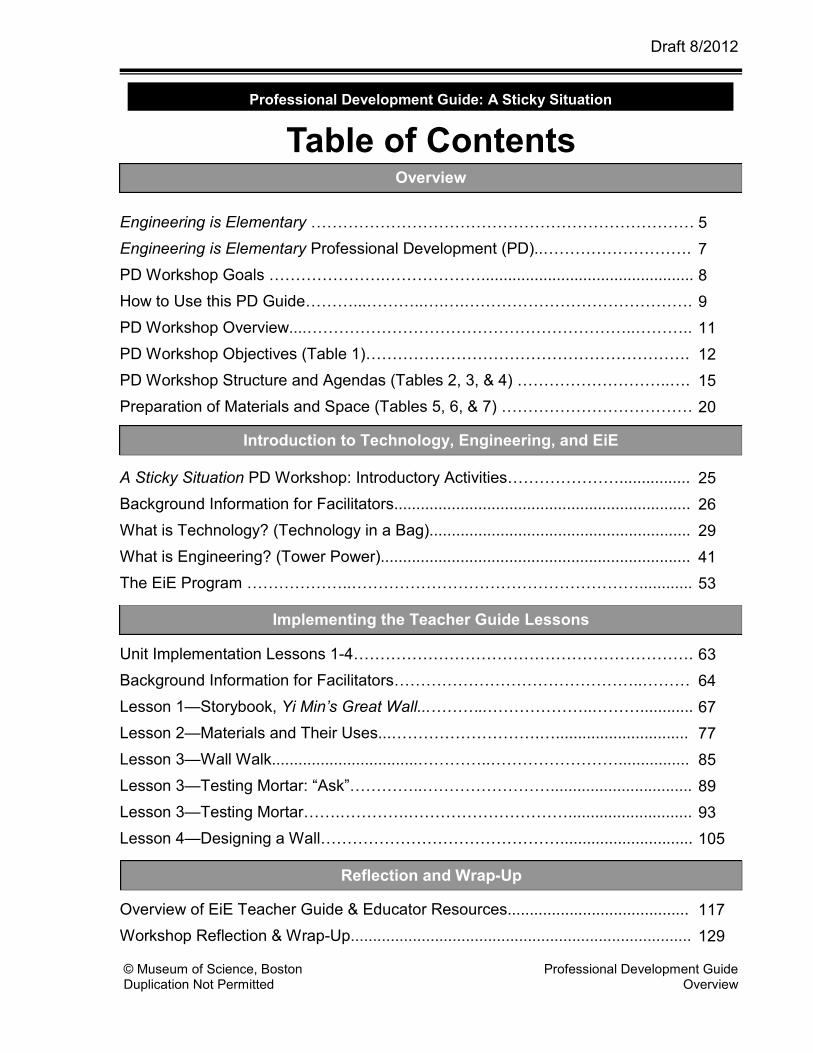
Engineering is Elementary ® Professional Development Guide: A Sticky Situation: Designing Walls Written by the Engineering is Elementary Team Edited by Rebecca Pedersen Illustrations by Jeannette Martin Graphics by Braden Chang, Stephanie Cline, and the EiE Team Draft 8/2012
-
Upload
trinhduong -
Category
Documents
-
view
218 -
download
4
Transcript of Engineering is Elementary Professional Development Guide ... · Professional Development Guide: A...

Engineering is Elementary®
Professional Development Guide:
A Sticky Situation:
Designing Walls
Written by the Engineering is Elementary Team
Edited by Rebecca Pedersen
Illustrations by Jeannette Martin
Graphics by Braden Chang, Stephanie Cline, and the EiE Team
Draft 8/2012

This work is to be used solely as a guide for facilitating educator workshops about the Engineering is Elementary program. It may not be downloaded, reproduced, or distributed for any other purpose without the express permission of the Museum of Science, Boston. For permission to copy portions of this material for other purposes, please write to:
Engineering is Elementary Museum of Science, 1 Science Park Boston, MA 02114
Major support for the Professional Development Guides has been provided by the Cisco Foundation and the S. D. Bechtel, Jr. Foundation.
This material is based upon work supported by the National Science Foundation under Grant No. 0454526. Any opinions, findings, and conclusions or recommendations expressed in this material are those of the author(s) and do not necessarily reflect the views of the National Science Foundation.
Draft 8/2012
Written by the Engineering is Elementary Team: Christine M. Cunningham Kristin Sargianis Sharlene Yang Martha Davis Carolyn DeCristofano Erin Fitzgerald Shannon McManus Michelle DiIeso Valerie Costa Elizabeth Fox Kate Sokol Emily Young Owen Berliner Jonathan Hertel Melissa Higgins Cathy Lachapelle Katy Laguzza Elizabeth Mantey Michelle Mizner Chantez Neymoss Jeff Odell Preeya Phadnis Stephen Sullivan
© Museum of Science, Boston Duplication Not Permitted
Professional Development Guide Overview
Draft 8/2012
Engineering is Elementary ………………………………………………………………
Engineering is Elementary Professional Development (PD)..……………………….
PD Workshop Goals ………………….………………................................................
How to Use this PD Guide………...………..….….…………………………………….
PD Workshop Overview....……………………………………………………..………..
PD Workshop Objectives (Table 1)…………………………………………………….
PD Workshop Structure and Agendas (Tables 2, 3, & 4) ………………………..….
Preparation of Materials and Space (Tables 5, 6, & 7) ………………………………
A Sticky Situation PD Workshop: Introductory Activities…………………................
Background Information for Facilitators...................................................................
What is Technology? (Technology in a Bag)...........................................................
What is Engineering? (Tower Power)......................................................................
The EiE Program ………………..………………………………………………............
Unit Implementation Lessons 1-4……………………………………………………….
Background Information for Facilitators………………………………………..………
Lesson 1—Storybook, Yi Min’s Great Wall...………..………………..………............
Lesson 2—Materials and Their Uses...……………………….…..............................
Lesson 3—Wall Walk.................................…………..……………………................
Lesson 3—Testing Mortar: “Ask”…………..……………………................................
Lesson 3—Testing Mortar…….………….…………………………............................
Lesson 4—Designing a Wall………………………………………..............................
Overview of EiE Teacher Guide & Educator Resources.........................................
Workshop Reflection & Wrap-Up.............................................................................
Professional Development Guide: A Sticky Situation
Table of Contents
5
7
8
9
11
12
15
20
25
26
29
41
53
63
64
67
77
85
89
93
105
117
129
Introduction to Technology, Engineering, and EiE
Implementing the Teacher Guide Lessons
Overview
Reflection and Wrap-Up


© Museum of Science, Boston Duplication Not Permitted
Ove
rvie
w
5 Professional Development Guide Overview
Draft 8/2012
Engineering is Elementary®
Most humans spend over 95% of their time interacting with technology. Pencils, chairs, water filters, toothbrushes, cell phones, and buildings are all technologies—solutions designed by engineers to fulfill human needs or wants. To understand the world we live in, it is vital that we foster engineering and technological literacy among all people, even young children! Fortunately, children are born engineers—they are fascinated with building, with taking things apart, and with how things work. The Engineering is Elementary curriculum harnesses children’s natural curiosity to promote their learning of engineering and technology concepts and skills.
The Engineering is Elementary (EiE) curriculum integrates engineering with elementary science topics. Connections with literacy, social studies, and mathematics can also be made. The EiE project has four primary goals:
Goal 1: Increase children’s technological literacy.
Goal 2: Increase elementary educators’ abilities to teach engineering and
technology to their students.
Goal 3: Increase the number of schools in the U.S. that include
engineering at the elementary level.
Goal 4: Conduct research and assessment to further the first three goals and contribute knowledge about engineering teaching and learning at the
elementary level.


© Museum of Science, Boston Duplication Not Permitted
Ove
rvie
w
7 Professional Development Guide Overview
Draft 8/2012
Professional Development Guide: A Sticky Situation
Engineering is Elementary
Professional Development
Welcome to the Professional Development (PD) Guide for the Engineering is Elementary (EiE) unit, A Sticky Situation: Designing Walls.
Just as the EiE curricular materials strive to create excellent elementary-level engineering resources that educators can use and adapt to their needs, the EiE series of PD Guides aims to support those who teach and facilitate PD programs for other educators and implement workshops that introduce the EiE materials in effective ways. This PD guide is intended for:
teacher educators who have attended a Teacher Educator Institute (TEI) run by EiE staff and are preparing to introduce the A Sticky Situation unit to other educators.
EiE PD resources, such as this PD Guide, are an important supplement to EiE Teacher Guides because teaching EiE materials to educators is different than teaching the materials to students. EiE hopes that by using these resources, teacher educators will be able to help participants understand the EiE program and its instructional approaches, ideas, and resources so that they can, in turn, effectively implement these materials with their own students. PD workshops, therefore, not only address the content and organization of each EiE unit’s activities, but also aim to engage participants in an experience that will allow them to reflect on their teaching practice and add to their pedagogical expertise.
Along with the EiE professional development experience, this PD Guide provides facilitation approaches and practices that have worked well for EiE PD staff. However, as much as we may aim to incorporate solid PD practices, EiE does not aim to be your sole resource when working with other educators. In preparing these EiE-specific resources for you, EiE assumes that you:
are already experienced in providing professional development and preparation programs for educators.
will use your local expertise to adapt EiE PD workshops to your unique context.
Therefore, we do not prescribe one specific program of professional development practice.
8 © Museum of Science, Boston Duplication Not Permitted
Ove
rvie
w
Draft 8/2012
Engineering is Elementary PD A Sticky Situation
PD Workshop Goals
Regardless of the specific unit and available time, all EiE PD workshops are focused on the same core goals and all EiE PD activities are designed to support educators who will use the EiE curriculum materials with their students. To do this, every EiE PD workshop aims to develop teachers’:
confidence in teaching engineering.
knowledge of the structure and types of learning activities within one or more EiE units.
awareness of engineering as a field and of the Engineering Design Process (EDP), including how to apply the EDP to solve problems using technology.
knowledge of technology as any object, system, or process designed by humans to solve a problem or fulfill a desire.
In addition to understanding the engineering content in a specific EiE unit, our workshops also have specific pedagogical goals:
To put participants in active roles so they can experience a learner-centered experience. There is ample opportunity provided for exploring their questions and solving problems.
To provide participants with opportunities to experience the power of science inquiry and reflect on implementing it in their classrooms.
To allow participants to create their own conceptual understandings of engineering and the EiE unit by tapping into their prior knowledge of technology, engineering, and science.
This focus on the learner stems both from learning theory and from the efficacy of the EiE curriculum materials as measured by our research and assessment. We propose this hands-on, personal approach both to affect the teaching of engineering and to provide another method of reinforcing the related science content already being taught in the classroom. By modeling and demonstrating the power of hands-on science and engineering learning, the EiE program strives to influence educators to adopt more constructivist methods of teaching.

© Museum of Science, Boston Duplication Not Permitted
Ove
rvie
w
9 Professional Development Guide Overview
Draft 8/2012
How to Use this PD Guide
The Role of the PD Guide
This guide is written using the experiences of PD providers within the EiE program. It shares important ideas, goals, tips, and strategies for translating the unit into an effective educator workshop and has been field-tested to ensure that it is useful to other PD facilitators. However, it is meant to be used in conjunction with the corresponding Teacher Guide and does not contain the essential details and information that will be needed to implement the unit in the classroom. Therefore, it is important to note that:
PD Guides are companions to their corresponding units’ Teacher Guides, not replacements. As you plan for a workshop, you will need to use the PD Guide and its corresponding Teacher Guide in tandem.
How this PD Guide and EiE PD Workshops are Organized
The PD Guide is organized to map directly to the running of a PD workshop. The guide is separated into four tabbed sections; each tabbed section is indicated along the outer margin of each page.
The Overview section is designed to help teacher educators envision and plan effective PD workshops. It provides details about the preparation necessary to conduct a PD workshop for a specific unit. This section includes tables that may be extremely helpful as they outline:
the purpose and important points of each workshop component (Table 1, pp. 12-14).
the time it will take to complete each part of the workshop (Tables 2-4, pp. 16-18).
the preparation required to prepare and set up workshop materials, space, and handouts (Tables 5-7, pp. 20-24).
The Introduction to Technology, Engineering, and EiE section starts the workshop with two hands-on activities that generate and clarify the meanings of technology and engineering and how they are related to each other. It also is a chance to introduce the participants to the EiE program.
The Implementing the Teacher Guide Lessons section delves deeper into each of the four content lessons of the featured unit.
The Workshop Reflection and Wrap-Up section provides participants with an overview of the resources found within the EiE Teacher Guides as well as an introduction to EiE’s online educator resources.
Additional resources to help you facilitate your EiE PD workshop, such as corresponding PowerPoint presentations, classroom videos, and “How-To” videos can be found through the EiE Educator Resources website:
http://www.mos.org/EiE/EducatorResources


11 Professional Development Guide Overview
© Museum of Science, Boston Duplication Not Permitted
Draft 8/2012
Ove
rvie
w
PD
Work
sho
p General Overview of A Sticky Situation: Designing Walls
The unit's storybook focuses on keeping a rabbit pest out of a young girl's classroom garden in China. Students are introduced to the idea that different materials have different properties and that these properties help engineers determine whether or not a material will work well in the design of a particular technology. In the corresponding lessons, students are introduced to materials engineering through an activity that allows them to explore and reflect on the way materials can be manipulated in different ways to solve multiple problems and how a single problem can be solved by multiple materials. Students then work in teams to use their knowledge of the properties of earth materials to design a mortar that will allow them to build a strong and durable wall.
This unit helps students connect their knowledge of earth materials to a practical understanding of the importance of considering material properties in engineering design. Science concepts about earth materials such as soil, clay, and sand, as well as different aspects of materials engineering are explored.
Connections to Elementary Science Curricula:
FOSS: Pebbles, Sand, and Silt
STC: Soils
GEMS: Stories in Stone
Science Companion: Solids, Liquids, and Gases; Dirt, Sand, and Water; Construction
Social Studies Content:
Ancient Civilizations: Great Wall of China
Mathematics Content:
Problem Solving, Data Analysis
Professional Development Guide: A Sticky Situation
A Sticky Situation:
Designing Walls
PD Workshop Overview

12 © Museum of Science, Boston Duplication Not Permitted
Draft 8/2012
Ove
rvie
w
PD
Work
sho
p
Engineering is Elementary PD A Sticky Situation
PD Guide Section
Purpose Guiding Questions and Common Responses
What is
Technology?
Technology in
a Bag
Participants will:
reflect upon personal
knowledge of technology and engineering as well as students’ prior knowledge and misconceptions of technology.
examine and discuss
different technologies (objects, systems, and processes) and use their experiences to construct a working definition of technology.
connect the development
of technologies to the field of engineering.
What is technology?
Technology is any human-made thing that solves a problem or fulfills a desire. It can be an object, system, or process.
What do your students think technology is?
Students may focus only on electronic devices.
In designing a new technology or modifying an existing one, what are some important factors that engineers consider? Engineers use knowledge of material properties and science to design solutions towards a specific function or goal.
What is
Engineering?
Tower Power
Participants will:
engage in a common
engineering experience.
realize that they naturally
solve problems using a process similar to the EDP.
develop the five-step
EDP that forms the backbone of the EiE units.
Who are engineers and what is engineering and the Engineering Design Process? Engineers are people who use math and science knowledge, creativity, and the EDP to solve problems through the creation of new or improved technologies. The EiE project describes the EDP as a problem-solving process with five steps: “Ask,” “Imagine,” “Plan,” “Create,” and “Improve.”
Introduction to the EiE
Program
Participants will:
learn about the
background and goals of the EiE project.
What is EiE?
EiE is a grant-funded project that fosters engineering and technological literacy among children by creating a research-based, standards-based, and classroom-tested curriculum that integrates engineering and technology topics with commonly taught elementary science topics.
Table 1: Objectives of A Sticky Situation PD Workshop
To help you plan and easily reference the main teaching points for your Professional Development workshop, Table 1 breaks down a standard workshop into its component sections and highlights the PD goals of every section in terms of the purpose, guiding questions, and common responses.

13 Professional Development Guide Overview
© Museum of Science, Boston Duplication Not Permitted
Draft 8/2012
Ove
rvie
w
PD
Work
sho
p
PD Guide Section
Purpose Guiding Questions and Common Responses
Lesson 1
Yi Min’s Great
Wall
Participants will:
be introduced to the
unit storybook, which will set the context for, and introduce content integral to, the rest of the unit.
How does this EiE unit connect to ELA and social studies? Every EiE unit starts with a storybook set in a unique geographic location; within each storybook, EiE features cultural connections appropriate to the geographic setting. This unit is set in China.
What is the related science content?
This unit reinforces content about earth materials and their properties.
What role do materials engineers fill?
Materials engineers use their knowledge of science, mathematics, and materials to solve problems related to materials and create new materials with new properties.
What is the design challenge in this unit?
The design challenge in this unit is to design a wall using earth materials.
Lesson 2
Materials and
Their Uses
Participants will:
experience the
Materials and Their Uses activity.
reflect on the ways one
material can be used to solve many different problems, as well as how one problem can be solved though the use of many different materials.
How can one material solve many different problems?
Depending on how the material is manipulated, it can do many things. For example, a piece of cloth can be sewn into a bag or a shirt; it can also be shredded into a mop and used to clean a floor.
How do materials engineers choose the best material
to use in the design of a technology? Even though there are often multiple materials to choose from, the best material is usually dependent upon the criteria and constraints of the problem at hand. For example, a shopping bag can be made out of paper or plastic, but if one of the design criteria is that the bag needs to be waterproof, then plastic is the best material choice.
Lesson 3
Testing Mortar
Participants will:
observe different types
of walls in their environment and describe the materials from which they are made.
connect different wall
materials and their properties to the functions of walls.
engage in participant-
guided inquiry and discover that the Engineering Design Process begins with asking questions.
connect Lesson 3 with
the EDP as a whole.
How does Lesson 3 fit into the Engineering Design Process? For success with the design challenge, we should first ask such important questions as: What materials are available? What are their properties? What are desirable properties of a wall? Lesson 3 focuses on answering these questions and gathering data that can be applied towards creating a successful mortar and wall.
What are the desired properties of a mortar for this design challenge? This design challenge requires a mortar that is both adhesive (sticky) and durable (will not crack or crumble) as the mortar will be used to create a strong and sturdy wall.
Table 1: Objectives of A Sticky Situation PD Workshop

14 © Museum of Science, Boston Duplication Not Permitted
Draft 8/2012
Ove
rvie
w
PD
Work
sho
p
Engineering is Elementary PD A Sticky Situation
PD Guide Section
Purpose Guiding Questions and Common Responses
Lesson 3
Testing Mortar
(continued)
Participants will:
examine the available
materials for designing walls and relevant handouts, and test different materials to see how well they work as a mortar.
discuss development of
testing methodology and ways to scaffold this topic with students.
What are some things to consider when setting up an experiment? Standardizing methodology, controlling variables, a standardized data collection system, a way to quantify data, etc.
Lesson 4
Designing a
Wall
Participants will:
use the data collected
and analyzed from Lesson 3 to make connections about material properties and the success of their wall designs.
use the Engineering
Design Process to design a strong and durable wall.
become familiar with the
EDP handouts that students will use at each step of the design process.
What materials did you use in your wall mortar and
why? Based on Lesson 3 data, clay is good because it is adhesive and will stick the rocks together; but it is not good because it cracks. Sand and soil were not adhesive and crumbled easily. A mixture of different earth materials, each with some of the desirable properties seems to be the best solution.
What happened when you tested your wall? If you
needed to improve your wall mortar, what did you do and why? We needed to add more [clay, sand, or soil] so that the mortar was [more adhesive, cracked less]..
What are some other factors that may have contributed to the success of your wall? The size of the rocks that we used varied from group to group. Also, the way that the rocks were arranged to build the wall may have been a factor; perhaps we needed to stack our rocks in an interlocking structure to maximize strength. The amount of mortar we used and the way it was applied to the rocks could have affected the success of our wall.
How did you use your knowledge of science and the
EDP to create a technology? I used my knowledge of earth materials and the steps of the EDP to design a wall.
Overview of the EiE Teacher Guide & Educator
Resources
Participants will:
learn how the EiE
Teacher Guides are structured and the location of resources within the guides, such as planning charts, lesson plans, handouts, and assessments.
be introduced to the
resources available through the EiE Educator Resources website.
How is the EiE Teacher Guide organized so that educators can easily find relevant resources? Every EiE unit, regardless of the engineering focus, has a common and consistent structure of four lessons as well as a preparatory lesson, background resources for the teacher, black line masters for handouts, and student assessments.
Table 1: Objectives of A Sticky Situation PD Workshop

15 Professional Development Guide Overview
© Museum of Science, Boston Duplication Not Permitted
Draft 8/2012
Ove
rvie
w
PD
Work
sho
p
Planning Your EiE PD Workshop
Even though the structure of EiE PD workshops depend on a number of factors (the context, timeframe, facilitator, and the participants themselves), they are all based on a common framework and style. The common features of EiE PD workshops include:
a structure of sections that flow in a predictable order, and
an interactive environment where participants engage in activities, reflection, and discussion.
This PD Guide is set up with a six-hour workshop as a default, shown in Table 2 (p. 16). The EiE project recommends this format to allow for sufficient teacher engagement with the hands-on activities as well as time for reflective discussion. Because there are often time constraints, this guide also includes tables of possible PD agendas for shorter workshops:
Table 3 (p. 17) outlines a shorter, four to five-hour workshop.
Table 4 (p. 18) presents an abbreviated, three-hour workshop. (We strongly advise against workshops shorter than three hours.)
Again, you must reference the corresponding Teacher Guide for additional details about the unit. Please note that if you are using an earlier version of the Teacher Guide with this PD Guide, the referenced pages may not be exact.
A Note About Timing
You will notice that the “Time” column in each of the subsequent tables does not add up to the total workshop time (6 hours, 4-5 hours, or 3 hours) listed. This is purposefully done to allow for breaks and lunch, as well as to provide extra time to address participants’ questions or concerns during the workshop. In some instances, participants might struggle with a particular lesson and need to spend more time working or discussing certain concepts. Plan your workshop accordingly.
NOTE: Even though we have provided a possible 3-hour workshop agenda in Table 4 as a resource for you, we strongly discourage facilitating a workshop in less than four hours. Based on our experience facilitating EiE PD, we have found that in order to allow learners time for adequate reflection on the EiE content and pedagogy, a minimum of 4-5 hours is needed. Engineering is a new discipline for most elementary educators and therefore the introductory activities (Technology in a Bag and Tower Power) are crucial for laying the foundation for their understanding of the EiE content, and should never be skipped (except if participants have previously attended an EiE workshop that included these activities). However, we know that time for PD is often short and constrained by school/district resources—this is why we have included the 3-hour agenda, but again, we do not endorse this practice.

16 © Museum of Science, Boston Duplication Not Permitted
Draft 8/2012
Ove
rvie
w
PD
Work
sho
p
Engineering is Elementary PD A Sticky Situation
Table 2: Full 6 Hour PD Workshop Agenda
PD Guide Section Part or Description Time Pages in PD Guide
Pages in Teacher Guide
Introductory Activities What is Technology? (Technology in a Bag)
45 min. 29-40 29-38
What is Engineering? (Tower Power)
60 min. 41-52 N/A
Introduction to EiE Overview of the EiE program 10 min. 53-61 N/A
Lesson 1 Yi Min’s Great Wall
Storybook slides and notes 10-15 min.
67-76 39-51
Lesson 2 Materials and Their Uses
Analyze the use of different materials in different contexts
30 min. 77-84 55-63
Lesson 3 Testing Mortar
Wall Walk 10 min. 85-88
Ask open-ended questions about design challenge
10 min. 89-92 N/A
Testing different earth materials as mortars
40 min. 93-104 67-90
Lesson 4 Designing a Wall
Design a wall and discuss improvement ideas
40 min. 105-116 91-122
Overview of EiE Teacher Guides & Educator Resources
Overview of EiE Teacher Guide sections and resources; Overview of EiE Educator Resources Website
15 min. 117-128 N/A
Wrap-up & Reflection Ask reflection question(s) and have participants respond
5 min. 129-132 N/A

17 Professional Development Guide Overview
© Museum of Science, Boston Duplication Not Permitted
Draft 8/2012
Ove
rvie
w
PD
Work
sho
p
PD Guide Section Part or Description1 Time
2
Pages in PD Guide
Pages in Teacher Guide
Introductory Activities What is Technology? (Technology in a Bag)
45 min. 29-40 29-38
What is Engineering? (Tower Power)
60 min. 41-52 N/A
Lesson 1 Yi Min’s Great Wall
Storybook slides and notes 10-15 min.
67-76 39-51
Lesson 2 Materials and Their Uses
Overview of the Materials and Their Uses activity—analyze one material as a whole workshop
15 min.
77-84 55-63
Lesson 3 Testing Mortar
Wall Walk 10 min. 85-88
Ask open-ended questions about design challenge
10 min. 89-92 N/A
Testing different earth materials as mortars—omit Activity 2
30 min.
93-104 67-90
Lesson 4 Designing a Wall
Design a wall and discuss improvement ideas
40 min.
105-116 91-122
Overview of EiE Teacher Guides & Educator Resources
Overview of EiE Teacher Guide sections and resources; Overview of EiE Educator Resources Website
15 min. 117-128 N/A
Wrap-up & Reflection Ask reflection question(s) and have participants respond
5 min. 129-132 N/A
1The Introduction to EiE has been omitted.
2 = part shortened
Table 3: 4-5 Hour Workshop Agenda

18 © Museum of Science, Boston Duplication Not Permitted
Draft 8/2012
Ove
rvie
w
PD
Work
sho
p
Engineering is Elementary PD A Sticky Situation
PD Guide Section Part or Description1
Time
2
Pages in PD Guide
Pages in Teacher Guide
Introductory Activities What is Technology? (Technology in a Bag)
45 min.
29-40 29-38
What is Engineering? (Tower Power)
60 min.
41-52 N/A
Lesson 1 Yi Min’s Great Wall
Storybook slides and notes 10 min.
67-76 39-51
Lesson 2 Materials and Their Uses
Give a brief overview of the goals and premise of the activity
5 min.
77-84 55-63
Lesson 3 Testing Materials
Ask open-ended questions about design challenge
10 min. 89-92 N/A
Exploring earth materials as mortars—omit Activity 2
30min.
93-104 67-90
Lesson 4 Designing a Wall
Participants complete “Ask,” “Imagine,” and “Plan” steps of the EDP in their groups, but do not create their own walls. Participants test and analyze pre-made walls.
30 min.
105-116 91-122
Overview of EiE Teacher Guides & Educator Resources
Briefly show participants the resources in the EiE Teacher Guide.
5 min.
117-128 N/A
Wrap-up & Reflection Ask reflection question(s) and have participants respond
5 min. 129-132 N/A
***EiE does not recommend workshops shorter than four hours.
1The Introduction to EiE and the Wall Walk have been omitted.
2 = part shortened
Table 4: 3 Hour PD Workshop Agenda***

19 Professional Development Guide Overview
© Museum of Science, Boston Duplication Not Permitted
Draft 8/2012
Ove
rvie
w
PD
Work
sho
p
Facilitator Notes:

20 © Museum of Science, Boston Duplication Not Permitted
Draft 8/2012
Ove
rvie
w
PD
Work
sho
p
Engineering is Elementary PD A Sticky Situation
Table 5: General Workshop Materials
The list below contains the materials that you will need for all EiE PD workshops. Note that many of the materials listed under “General Supplies” (e.g., scissors, cellophane tape) will be re-used during the unit-specific sections of your workshop.
Section Items (For 25 Participants)
Notes (For 25 Participants)
General Supplies 15 rolls of cellophane tape
For use in most lessons. 15 pairs of scissors
15 rulers
25 pens/pencils
25 dry erase markers (thin) Use with reusable handout sheets.
5 dry erase markers (thick) For writing on a white board.
5 chart paper markers For writing on chart paper.
1 chart paper pad For creating charts, tables, and for writing Guiding Questions.
1 LCD projector For projecting PowerPoints.
1 screen, or other surface onto which you can project PowerPoints.
For projecting PowerPoints.
1 extension cord (optional) These items may not be necessary for every EiE workshop, but EiE has found that they are often useful to have on hand, just in case they are needed.
1 roll of masking tape (optional)
1 roll of duct tape (optional)
“What is Technology?” (Tech in a Bag)
1 plastic spoon
Gather or purchase.
1 pad of sticky notes, any size Gather or purchase.
1 copy of {PD-1} Canning Procedure Copy onto card stock and cut out.
5 additional technologies See list on p. 28 of this PD Guide for details.
8 brown paper lunch bags Gather or purchase.
“What is Engineering?” (Tower Power)
1 stuffed animal, approx. 6” tall, 2-4 oz. Gather or purchase.
8 packs of 100 index cards, 3” x 5” Gather or purchase.

21 Professional Development Guide Overview
© Museum of Science, Boston Duplication Not Permitted
Draft 8/2012
Ove
rvie
w
PD
Work
sho
p
Tab
le 6
: A
Sti
ck
y S
itu
ati
on
: M
ate
rials
Pre
para
tio
n
The
lis
t be
low
de
tails
th
e m
ate
ria
ls y
ou
will
ne
ed
fo
r fa
cili
tatin
g L
esso
ns 1
-4 o
f th
e A
Sticky S
itu
atio
n:
De
sig
nin
g W
alls
u
nit.
Note
th
at yo
u w
ill n
eed
to p
repa
re m
an
y o
f th
ese
ite
ms p
rio
r to
be
gin
nin
g y
ou
r w
ork
sh
op
(p
refe
rab
ly t
he d
ay/n
igh
t b
efo
re).
A fu
ll m
ate
ria
ls lis
t fo
r ea
ch
le
sso
n c
an
als
o b
e f
ou
nd in
its
co
rre
sp
ond
ing s
ection
of
the
PD
Gu
ide.
Se
cti
on
It
em
s
(Fo
r 2
5 P
art
icip
an
ts)
Dir
ec
tio
ns
(Fo
r 2
5 P
art
icip
an
ts)
Se
t-U
p
(Da
y o
f W
ork
sh
op
)
Lesso
n 1
Sto
rybo
ok P
ow
erP
oin
t, L
CD
pro
jecto
r,
and s
cre
en o
r oth
er
surf
ace o
n w
hic
h t
o
pro
ject th
e P
ow
erP
oin
t
Do
wn
loa
d P
ow
erP
oin
t fr
om
EiE
Educato
r R
esourc
es w
ebsite
(ww
w.m
os.o
rg/E
iE/E
ducato
rResourc
es)
Cut a
nd p
aste
into
Facili
tation P
ow
erP
oin
t or
ha
ve s
tory
bo
ok P
ow
erP
oin
t re
ad
ily
ava
ilab
le o
n c
om
pute
r.
Lesso
n 2
F
or
com
ple
te lis
t of
Lesson 2
mate
ria
ls,
ple
ase s
ee p
. 7
8 o
f th
is P
D G
uid
e.
meta
l spoon,
bla
nket, b
rick, sm
all
back
of
str
aw
, she
et of
pa
per,
co
tton T
-shirt
Gath
er
the m
ate
rials
that
part
icip
ants
will
exam
ine d
urin
g th
e a
ctivity.
S
et m
ate
ria
ls a
sid
e in th
e w
ork
shop
space f
or
use in L
esson 2
.
Lesso
n 3
For
com
ple
te lis
t of
Lesson 3
mate
ria
ls,
ple
ase s
ee p
. 8
6 o
f th
is P
D G
uid
e.
3 m
ort
ar
sandw
iches f
or
ea
ch g
roup o
f part
icip
an
ts (
one c
lay,
one s
and, o
ne
soil)
Pre
pare
on
e o
r tw
o d
ays p
rio
r to
w
ork
sh
op
. S
ee d
irections o
n p
p. 8
0-8
1
of
the T
eacher
Guid
e f
or
de
tails
. S
et
asid
e t
o t
horo
ugh
ly d
ry.
Pla
ce
on
e o
f each t
yp
e o
f m
ort
ar
sand
wic
h o
n a
paper
pla
te o
r fo
am
tra
y
for
each g
roup
of
part
icip
an
ts. S
et
asid
e
in a
pla
ce w
here
the
y w
ill n
ot be
dis
turb
ed.
5 s
am
ple
s o
f dry
soil
5 s
am
ple
s o
f dry
cla
y p
ow
der
5 s
am
ple
s o
f dry
sand
Cre
ate
fiv
e s
am
ple
bags o
f each d
ry
eart
h m
ate
ria
l. L
abe
l e
ach b
ag.
Se
e p
. 76
of
the T
eacher
Guid
e f
or
de
tails
.
Set
asid
e f
or
use in
Lesson
3.
8 s
am
ple
s o
f w
et
eart
h m
ate
rials
P
repare
sam
ple
s just prior
to b
egin
nin
g
Lesson 3
(or
in r
eseala
ble
pla
stic
conta
iners
if
yo
u m
ust pre
pare
them
prior
to th
e w
ork
shop).
Se
e p
. 76
of
the
Teacher
Guid
e a
nd
on
line H
ow
-to v
ideo
fo
r directions.
Set
asid
e f
or
use in
Lesson
3.

22 © Museum of Science, Boston Duplication Not Permitted
Draft 8/2012
Ove
rvie
w
PD
Work
sho
p
Engineering is Elementary PD A Sticky Situation
Tab
le 6
: A
Sti
ck
y S
itu
ati
on
: M
ate
rials
Pre
para
tio
n (
co
nti
nu
ed
)
The
lis
t be
low
de
tails
th
e m
ate
ria
ls y
ou
will
ne
ed
fo
r fa
cili
tatin
g L
esso
ns 1
-4 o
f th
e A
Sticky S
itu
atio
n:
De
sig
nin
g W
alls
u
nit.
Note
th
at yo
u w
ill n
eed
to p
repa
re m
an
y o
f th
ese
ite
ms p
rio
r to
be
gin
nin
g y
ou
r w
ork
sh
op
(p
refe
rab
ly t
he d
ay/n
igh
t b
efo
re).
A fu
ll m
ate
ria
ls lis
t fo
r ea
ch
le
sso
n c
an
als
o b
e f
ou
nd in
its
co
rre
sp
ond
ing s
ection
of
the
PD
Gu
ide.
Se
cti
on
It
em
s
(Fo
r 2
5 P
art
icip
an
ts)
Dir
ec
tio
ns
(Fo
r 2
5 P
art
icip
an
ts)
Se
t-U
p
(Da
y o
f W
ork
sh
op
)
Lesso
n 3
(c
on
tin
ued
)
For
com
ple
te lis
t of
Lesson 3
mate
ria
ls,
ple
ase s
ee p
. 8
6 o
f th
is P
D G
uid
e.
6 tile
s
1 p
aper
pla
te o
r fo
am
tra
y
1 s
et of
the w
et
eart
h m
ate
rial sam
ple
s
1 p
lastic s
po
on
Gath
er
and s
et
asid
e f
or
de
monstr
ating
ho
w t
o c
reate
the m
ort
ar
sand
wic
hes.
Set
asid
e f
or
use in
Lesson
3.
paper
tow
els
or
rags f
or
cle
an
-up
G
ath
er.
S
et
asid
e in
case o
f spill
s.
Lesso
n 4
For
com
ple
te lis
t of
Lesson 4
mate
ria
ls,
ple
ase s
ee p
. 1
06
of
this
PD
Guid
e.
3 m
odel w
alls
(each w
ith a
diffe
rent
mort
ar
mix
ture
) P
rep
are
tw
o d
ays p
rio
r to
th
e
wo
rksh
op
. F
ollo
w th
e d
ire
ctions o
n p
p.
108
-109 o
f th
e T
eacher
Guid
e a
nd b
e
sure
to b
uild
each w
all
on
to its
ow
n
stu
rdy p
aper
or
card
bo
ard
pla
te.
Set
asid
e t
o d
ry, p
erh
aps a
imin
g a
fan a
t th
e
walls
to e
xp
ed
ite d
ryin
g.
La
bel each
stu
rdy p
aper
or
card
bo
ard
pla
te w
ith its
m
ort
ar
mix
ture
.
Set
asid
e in
a s
afe
pla
ce f
or
use in
Lesson 4
. M
ake s
ure
th
ey a
re o
ut
of
part
icip
an
ts’ vie
w u
ntil it is t
ime to u
se
them
.
dem
olit
ion b
all
assem
bly
P
repare
accord
ing t
o th
e d
irections o
n p
. 97 o
f th
e T
eacher
Guid
e, o
n D
em
olit
ion
Ball
Assem
bly
{4
-10},
and in the
on
line
Ho
w-T
o v
ideo.
Set
asid
e in
th
e w
ork
shop s
pace, b
ut
hid
e f
rom
part
icip
ants
’ vie
w u
ntil it is tim
e
to u
nve
il it.
8 c
ups o
f w
et cla
y
Pre
pare
in a
larg
e r
esea
lab
le p
lastic
conta
iner
accord
ing
to t
he p
rocedure
in
Ste
p 4
on p
. 10
6 o
f th
e T
ea
cher
Guid
e.
You m
ight
wear
a d
ust m
ask w
hen
inte
ractin
g w
ith t
he d
ry c
lay p
ow
der.
The w
et
cla
y s
ho
uld
be
pre
pare
d p
rior
to
the b
eg
inn
ing
of
the w
ork
shop.
Set th
e
reseala
ble
pla
stic c
on
tain
er
(with lid
on)
asid
e f
or
use in L
esson 4
.

23 Professional Development Guide Overview
© Museum of Science, Boston Duplication Not Permitted
Draft 8/2012
Ove
rvie
w
PD
Work
sho
p
Tab
le 6
: A
Sti
ck
y S
itu
ati
on
: M
ate
rials
Pre
para
tio
n (
co
nti
nu
ed
)
Se
cti
on
It
em
s
(Fo
r 2
5 P
art
icip
an
ts)
Dir
ec
tio
ns
(Fo
r 2
5 P
art
icip
an
ts)
Se
t-U
p
(Da
y o
f W
ork
sh
op
)
Lesso
n 4
(c
on
tin
ued
)
For
com
ple
te lis
t of
Lesson 4
mate
ria
ls,
ple
ase s
ee p
. 1
06
of
this
PD
Guid
e.
ne
wspa
per/
table
clo
ths
N/A
U
se to c
over
part
icip
ants
’ w
ork
table
s.
30 r
ocks a
nd 1
stu
rdy p
ape
r or
card
board
pla
te f
or
each
gro
up o
f part
icip
an
ts
Count
rocks into
pile
s o
f 30
and s
et asid
e
for
each g
roup
of
part
icip
an
ts.
Set
asid
e f
or
dis
trib
ution in
Lesson 4
.
“Mate
rials
Sto
re”
P
lace
soil,
san
d,
wet cla
y, cra
ft s
ticks,
bo
wls
, sp
oons,
and
wate
r so tha
t part
icip
an
ts c
an g
ath
er
wha
t th
ey n
eed
fo
r th
eir m
ort
ar
mix
ture
desig
ns.
Pre
pare
on a
table
or
se
para
te a
rea o
f th
e w
ork
shop s
pace. K
eep w
et cla
y in
seale
d p
lastic c
on
tain
er
to p
reve
nt
it f
rom
dry
ing o
ut.
paper
tow
els
or
rags f
or
cle
an
-up
G
ath
er.
S
et
asid
e in
case o
f spill
s.
ED
P P
ackets
P
repare
on
e p
acket per
part
icip
ant
with
hand
outs
{4
-1},
{4
-3},
{4
-5},
{4-6
}, {
4-7
},
and {
4-9
}.
Set
asid
e f
or
dis
trib
ution in L
esson 4
.
The
lis
t be
low
de
tails
th
e m
ate
ria
ls y
ou
will
ne
ed
fo
r fa
cili
tatin
g L
esso
ns 1
-4 o
f th
e A
Sticky S
itu
atio
n:
De
sig
nin
g W
alls
u
nit.
Note
th
at yo
u w
ill n
eed
to p
repa
re m
an
y o
f th
ese
ite
ms p
rio
r to
be
gin
nin
g y
ou
r w
ork
sh
op
(p
refe
rab
ly t
he d
ay/n
igh
t b
efo
re).
A fu
ll m
ate
ria
ls lis
t fo
r ea
ch
le
sso
n c
an
als
o b
e f
ou
nd in
its
co
rre
sp
ond
ing s
ection
of
the
PD
Gu
ide.

24 © Museum of Science, Boston Duplication Not Permitted
Draft 8/2012
Engineering is Elementary PD A Sticky Situation
Table 7: Preparation of Workshop Handouts
For Lessons 1-3, EiE recommends placing individual handouts in plastic sleeves and having participants write on them using dry-erase markers. This makes the handouts reusable from workshop to workshop and also minimizes waste. Because a PD workshop is often the first time participants are engaging in the EDP, EiE recommends creating packets of the Lesson 4 handouts (NOT in plastic sleeves) that participants can write on and take home with them to promote reflection. Be sure to prepare the handouts prior to the day of the workshop.
Duplication Masters Copies
(For 25 Participants)
{2-1} Materials Engineering: Keeping Warm 10 copies
{2-3} Materials Engineering: Carrying Eggs {2-5} Materials Engineering: Sitting {2-7} Materials Engineering: Cleaning the Floor
1 copy of either {2-3}, {2-5}, or {2-7} for each group of participants
{3-1} Wall Walk 10 copies
{3-2} Properties of Dry Earth Materials (optional) {3-3} Properties of Wet Earth Materials (optional)
10 of each, printed as a double-sided copy
{3-5} Testing Mortar: Soil, Sand, and Clay 10 copies
{3-6} Earthquake Test 10 copies
{3-7} Testing Results 10 copies
Use Duplication Masters {4-1}, {4-3}, {4-5}, {4-6}, {4-7}, and {4-9} 25 of each handout, stapled together as a packet (NOT in plastic sleeves)

25 Professional Development Guide Introduction
Professional Development Guide: A Sticky Situation
A Sticky Situation PD Workshop:
Introductory Activities
© Museum of Science, Boston Duplication Not Permitted
Draft 7/2012
Intro
du
ctio
n
Te
ch
an
d E
ngin
ee
ring
This section includes:
an introduction to technology and engineering at the elementary level
What is Technology? (Technology in a Bag)
What is Engineering? (Tower Power)
Overview of the EiE Program
What is Technology?
Preparation: 5 minutes Workshop: 45 minutes
What is Engineering?
Preparation: 5 minutes Workshop: 60 minutes
The EiE Program
Preparation: 5 minutes Workshop: 20 minutes
Overview of EiE Teacher Guide
Preparation: 5 minutes Workshop: 15 minutes

26 Engineering is Elementary PD A Sticky Situation
© Museum of Science, Boston Duplication Not Permitted
Draft 7/2012
Intr
od
uc
tio
n
Te
ch
an
d E
ngin
ee
rin
g
Background Information for Facilitators
Launching Your Workshop: Why Is this Section Important?
How you launch a PD workshop will convey what participants can expect of their experience. It is important to set the tone, help participants feel comfortable, and signal the importance of participants’ engagement in experiences and in each other’s learning. Because time is often short, it is important to begin every workshop with teacher-friendly activities that both help participants get comfortable and address introductory content. EiE has developed two introductory activities that help build participants’ comfort, form a strong learning community, and lay a foundation for understanding EiE’s pedagogical philosophy.
An EiE workshop typically begins with two introductory activities: “What Is Technology?” (Technology in a Bag) and “What Is Engineering?” (Tower Power). The first uses familiar, everyday objects and helps participants broaden their definition of the term “technology,” as well as make the connection between technologies and the engineers who design them. The second activity, a follow-up brief design challenge, uses simple materials to help learners see themselves as engineers and relate their own problem-solving methods to EiE’s five-step Engineering Design Process.
Through these experiences and the ensuing discussions, participants will have a chance to explore the unifying, core content involved in all EiE materials—the nature of technology and engineering, the Engineering Design Process, how they relate, and the importance of setting a relevant context for design challenges. In addition, we hope participants will get a taste of student-centered teaching and learning and experience the value of open-ended questioning as a way to allow students to form their own understandings.

© Museum of Science, Boston Duplication Not Permitted
27 Professional Development Guide Introduction
Draft 7/2012
Intro
du
ctio
n
Te
ch
an
d E
ngin
ee
ring
What Do You Need to Know about Technology and Engineering?
Technology, engineering, and science are intimately connected, yet children and adults are often at a loss when asked to explain what they mean or how they relate to one another. For instance, when asked to name examples of technology, many children and adults will focus only on electronic devices. Technology is much more than that; it includes every object, system, or process designed or modified by people to solve a problem or fulfill a desire. Simple objects such as forks and string are technologies; so, too, are processes such as canning fruits or vegetables and dry cleaning clothing. Systems, which are technologies made up of a group of parts that work together to meet a goal, can be as complicated as a series of machines that work together to process potatoes into chips at a factory or more simple, like a juice box that is made up of a container and straw.
Thinking about how technologies develop and the engineer’s role in their design is an intuitive way to understand the link between engineering, science, and technology. For example, a technology’s object or physical properties (e.g., shape, size, color), its material properties (e.g., hardness, durability), and the way these properties relate to its function can show how the engineer used what he/she knows about science (e.g., chemistry and physics) to make design choices. These properties also dictate the shape the technology may take, how its parts may fit together, and how it may work.
The people behind these developments, modifications, designs, and tweaks have all engaged in engineering—solving problems by developing or improving technologies. EiE defines engineers as people who use their creativity and understanding of materials, tools, mathematics, and science to design and improve technologies. Engineering is something people—engineers—do; its products are technologies. As a creative process, engineering can look different from person to person, team to team, and project to project. However, despite all of these possible differences, it is still useful to think about engineering as a series of steps or phases that engineers can use to work through problems and design solutions. In EiE, a five-step Engineering Design Process (EDP) model helps organize children’s engineering efforts.


29 Professional Development Guide Introduction
© Museum of Science, Boston Duplication Not Permitted
Draft 7/2012
Intro
du
ctio
n
Te
ch
an
d E
ngin
ee
ring
Participants will:
reflect upon personal knowledge of technology and engineering as well as students’ prior knowledge and misconceptions of technology.
examine and discuss different technologies (objects, systems, and processes) and use their experiences to construct a working definition of technology.
connect the development of technologies to the field of engineering.
What is Technology? Technology in a Bag
Overview
Many children and adults believe that technology only refers to objects powered by electricity or newly developed, “modern,” things. In this activity, participants are first asked the questions, “What comes to mind when you hear the word ‘technology’?” and “What might your students think of?” Each group of participants then receives a “mystery bag,” which contains a technology. When the bag is opened, participants might be surprised to find an everyday object, such as a spoon, sticky notes, or a paper clip—items that they might not typically describe as technology.
As groups examine and discuss their technologies, they consider the problems that the technologies solve, the materials from which they are made, and how they might be repurposed for other uses. Participants then consider the role that materials play in the design of a technology for a particular function. Finally, the relationship between engineers and technology is considered (engineers design and improve technologies) as participants use their knowledge of science, mathematics, and materials to think about how they would redesign a spoon to solve a different problem.
A version of this lesson is included in every EiE Teacher Guide. It is intended as a preparatory lesson before students begin any EiE unit (although without the discussion around technologies as systems or processes). Allowing participants a chance to experience this lesson firsthand gives them the opportunity to reflect on their own prior knowledge of technology and engineering, develop a deeper understanding of the way these fields are related, and to reveal any possible misconceptions that their students (and they) might have.
Preparation: 5 minutes Workshop: 45 minutes

30 Engineering is Elementary PD A Sticky Situation
© Museum of Science, Boston Duplication Not Permitted
Draft 7/2012
Intr
od
uc
tio
n
Te
ch
an
d E
ngin
ee
rin
g
Materials
For the Workshop:
chart paper and markers
“What is Technology?” PowerPoint presentation (downloaded from EiE Educator Resources website)
For Each Group (Assume Groups of Two to Four Participants):
one technology (See Preparation below for examples.)
opaque bag or container (e.g., brown paper bag)
Preparation
1. Collect simple, everyday technologies—enough to have one for each participant group:
You MUST include:
plastic spoon
pad of sticky notes
{PD-1} Canning Procedure
Enough other technologies for the remaining groups, you might use:
glue stick
juice box (empty) with straw
toothbrush
sponge
paper clip
plastic container
eraser
nail clippers
pen
slippers
2. Place each technology in an opaque “mystery bag” (a brown paper lunch bag works well). The opaque bag is used so that participants will not see the objects until they are ready to examine them.
Part 1: What is Technology?

31 Professional Development Guide Introduction
© Museum of Science, Boston Duplication Not Permitted
Draft 7/2012
Intro
du
ctio
n
Te
ch
an
d E
ngin
ee
ring
Activity
1. Tell participants that you are going to begin the workshop with two activities that will serve as an introduction to the concepts of technology and engineering, which are foundational to all EiE units and activities.
2. Ask participants:
What comes to mind when you hear the
word “technology”?
How might your students respond to this question? Common responses (to both questions): Computers, cell phone, video games, cars, anything electronic, anything mechanical, anything that plugs in, etc.
Record participants’ responses on the board or a piece of chart paper (see example at right) and explain that they will return to it later.
3. Explain to participants that you are going to divide them into small groups and then each group will receive a “mystery bag” that contains a technology for them to discuss.
4. When groups examine their technologies, they should discuss the following questions:
What is the technology?
What does your technology do? What problem does it solve?
How else could you use it?
What material(s) is it made of?
What other materials could it be made of?
Post these questions for participants’ reference.
5. Divide participants into groups of two to four and give one “mystery bag” to each group. Be sure to distribute the plastic spoon (object), the pad of sticky notes (system), and the canning procedure card (process).
Part 1: What is Technology?
EiE recommends creating this on chart paper or the board for reference later in the lesson:
•
•
•
•
•

32 Engineering is Elementary PD A Sticky Situation
© Museum of Science, Boston Duplication Not Permitted
Draft 7/2012
Intr
od
uc
tio
n
Te
ch
an
d E
ngin
ee
rin
g
6. Give groups 5-10 minutes to discuss their technologies. As they are working, circulate the room and check in with each group to see how their discussions are going.
7. Once groups are finished discussing their technologies, gather the attention of the workshop to have groups share their ideas.
8. Begin with the group that had the plastic spoon. Ask them to share their thoughts about the questions you posted on the board or chart paper (see previous page).
9. Then, expand a bit up on the role of materials and their properties in the design and function of the plastic spoon by asking all participants:
Why do you think the spoon was made out of plastic? What are the benefits? Common responses: Plastic spoons are disposable; they are also lightweight so they are easy to carry.
What are some other materials that spoons are made of? Common responses: Wood, metal, glass, silicone, gourds, shells, etc.
Why would you make a spoon out of wood or metal? Common responses: Metal and wooden spoons are sturdier and last longer than plastic spoons. Wood is not a good conductor of heat, so you can use it to stir hot liquids.
In what circumstances would you choose a plastic spoon over a metal spoon? A metal spoon over a plastic spoon? Common responses: We would use a plastic spoon when traveling/going on a picnic/eating on the go because it is lightweight, easy to carry, and disposable. We would use a metal spoon when we are cooking because it is sturdier than a plastic spoon and it won’t melt in hot liquids. It is also more durable so we can use it many, many times. It saves us money and also reduces waste.
Part 1: What is Technology?
PD Tip
EiE purposefully suggests that you begin this debrief with the object (the plastic spoon), and then move on to the system and the process (in that order), such that the concepts become more complex and build upon one another. There should be time after discussing all three of these technologies to allow other groups to share as well.
PD Tip
If the group working on the canning procedure are focusing their discussion on the canning jars rather than the procedure, redirect their discussion with the following questions:
What is literally in front of you? A card/piece of paper with instructions on it.
What problem does the card/piece of paper solve in this scenario? Common responses: It allows us to communicate information; write things down; keep records; etc.
What problem does the canning procedure solve? Common responses: It allows you to have fruit or vegetables even when they are out of season; it prevents the produce from spoiling; if you have extra produce, you are able to can it instead of throwing it out; etc.

33 Professional Development Guide Introduction
© Museum of Science, Boston Duplication Not Permitted
Draft 7/2012
Intro
du
ctio
n
Te
ch
an
d E
ngin
ee
ring
10. Point out to participants that materials and their properties (such as durability and conductivity) are important design elements to consider when creating a technology to solve a particular problem.
11. Next, have the group with the pad of sticky notes share their responses to the posted questions.
12. After listening to the group’s responses, have participants consider the difference between the object (the plastic spoon) and the pad of sticky notes. Ask:
What are the different components of the pad of sticky notes? Common responses: The paper and the glue/adhesive on the back.
What problem does the paper solve? Common response: It allows us to communicate words, pictures, and ideas.
What problem does the adhesive solve? Common response: It sticks two things together.
What problem does the sticky note solve? Common responses: It lets you write something down on the paper, stick it to a surface, then remove the paper (without damaging the surface) and stick the note somewhere else.
What would happen if I took away one of these components? Would the technology still function as intended? Common response: No, it wouldn’t work properly anymore.
What do we call a technology that is made of multiple parts that must all work together in order for the technology to function? Common response: A system.
Point out to participants that they have just identified that technologies can be objects or systems.
PD Tip
Participants may need extra support when thinking about technologies as systems or processes. For your reference, the EiE definitions for these terms are:
System: A group of parts that work together to meet a goal.
Process: A series of actions or steps leading to a result or goal.
Part 1: What is Technology?

34 Engineering is Elementary PD A Sticky Situation
© Museum of Science, Boston Duplication Not Permitted
Draft 7/2012
Intr
od
uc
tio
n
Ba
ckgro
un
d
13. Next, have the group with the canning procedure card share their thoughts on the posted questions. Participants may have had difficulty separating the object (the card that the procedure is printed on or the canning implements themselves) from the process (the series of steps listed in the procedure), which is the technology EiE is hoping participants will focus on. To help participants tease apart these differences, ask:
It sounds like you have identified the card [or the canning implements] as a technology, but what about the canning procedure itself? What problem does the canning procedure solve? Common responses: The canning procedure solves the problem of not having produce over the winter; it makes sure the food does not spoil in the jar; it prevents people from getting sick; it reduces waste; etc.
Does it need to be printed on a card as a tangible object? How else could it be shared? Common responses: It can be in a book, shared online via email or a website; it can be totally orally; etc.
Would you consider the canning procedure a technology? Why? Common response: Yes, because it solves a problem.
14. If participants are still struggling with the idea that a process can solve a problem, you might ask:
If, 150 years ago, you had a crop of summer berries, what problem might this
canning procedure help you solve?
What could happen if you don't seal the
canning jars as prescribed?
What if the jars are not hot enough?
15. Point out to participants that even though technologies are often tangible objects, they can also be processes that solve a problem, like the canning process.
Part 1: What is Technology?
PD Tip
To help participants understand the concept that a technology can be a process, it sometimes helps to focus them on the idea that a process can solve a problem (e.g., the process of canning fruit solves the problem of the fruit spoiling). In addition, a person had to design the steps (and sequence) of the process, which must be performed accurately in order to achieve the process’ goal (and solve the problem).

© Museum of Science, Boston Duplication Not Permitted
35 Professional Development Guide Introduction
Draft 7/2012
Intro
du
ctio
n
Ba
ckgro
un
d
16. If time allows, have other groups present their technologies, responding to the questions that you originally posted on chart paper. If you are short on time, you might ask all participants:
Does anyone else have a technology that
is an example of a system? What is it?
Can you think of any other technologies
that are systems?
Can you think of any other technologies
that are processes?
[Ask each group] What problem does your
technology solve?
Reflection
1. Explain to participants that they are now going to use their experiences in this activity to construct a definition of technology. (You are aiming for participants to construct a definition that matches EiE’s, which is that technology is anything human-made that solves a problem of fulfills a desire. It can be an object, a system, or a process.)
2. Begin by returning to the original list of ideas about the term “technology” that participants generated at the beginning of this lesson (see example at right). Ask:
Now that you’ve examined these different technologies, would you still consider the items on your original list as technologies? Common response: Yes, electronic devices are examples of technology.
Is there anything you would add? Common responses: Plastic spoon, sticky notes, canning procedure, etc.
What do they have in common with the technologies in your bags? Common responses: They solve problems or make life easier; they are all human-made.
Are the technologies we examined natural or human-made? Common response: Human-made.
Part 1: What is Technology?
What comes to mind when you
hear the word “technology”?
Computers
Cell phones
Video games
Anything that uses electricity
Anything mechanical
Cars
Anything that plugs in.
On Chart Paper:
PD Tip
If participants have trouble thinking of other process technologies, you might mention:
dry cleaning clothing
hydraulic fracturing/fracking (in mining)
an automated car wash
an appendectomy (surgery to remove the appendix)
an assembly line to create a product, like a car

36 Engineering is Elementary PD A Sticky Situation
© Museum of Science, Boston Duplication Not Permitted
Draft 7/2012
Intr
od
uc
tio
n
Te
ch
an
d E
ngin
ee
rin
g
Are technologies only objects? What else can they be? Common response: They can also be systems or processes.
As participants respond to the questions above, record their ideas on the board or a piece of chart paper (see example at left) and have them refine their ideas to come up with a working definition of the term “technology.” It is likely that participants will come up with a definition very similar to EiE’s definition.
3. Post EiE’s definition of technology on the board or a piece of chart paper (see example at left) and point out that the definition that participants came up with is very close to EiE’s definition, which is the definition that students will use in the classroom.
4. As a quick assessment, you might ask participants:
Is there anything in this room that is NOT a technology? How do you know? Common responses: Air, sunlight, water, plants, us (humans), anything natural; these things are not human-made.
5. Prepare to segue into the “What Is Engineering?” (Tower Power) activity by returning to the plastic spoon. Ask participants:
What was one of the alternative functions for the plastic spoon that we mentioned earlier? Common responses: You could use it as a shovel, a catapult, a drumstick to bang on a pot, a prop to dangle from your nose, etc.
Would the plastic spoon, as it is, be an effective technology to use when digging a hole to plant a tree [or another function participants mentioned that involves digging]? Why not? Common responses: No! It would take forever to dig the hole; the spoon could break; we could hurt our backs from bending over; etc.
Part 1: What is Technology?
EiE recommends creating this on chart paper or the board for reference in future lessons:

37 Professional Development Guide Introduction
© Museum of Science, Boston Duplication Not Permitted
Draft 7/2012
Intro
du
ctio
n
Te
ch
an
d E
ngin
ee
ring
PD Tip
When thinking about technology as anything human-made, participants often wonder whether natural objects that animals use as tools (e.g., a gorilla uses a twig to gather ants out of a log) are other examples of technology. At EiE, we tell participants that this is a gray area, and a very real question that anthropologists explore in their work. If this question arises in your workshop, have participants discuss the idea and, if it comes up with students in the classroom, encourage them to do the same. However the EiE definition, which is based on the International Technology and Engineering Education Association (ITEEA) standards, defines technology as something that is human-made to solve a problem or fulfill a desire.
Part 1: What is Technology?
If you were to think about redesigning this spoon so that it functioned better as a digging tool, what would you change? Why would you make that change? Common responses: Make the handle longer for more leverage; make the “scoop” part out of metal for more strength; make the scoop end larger and broader to move more dirt; make the handle more lightweight and slightly curved so it would be comfortable to carry and to use; etc.
6. As noted above, every time a participant suggests a change to the spoon, ask them to explain why they would make that change. Justification of design ideas is an engineering practice that we model in PD workshops and hope that participants will, in turn, use with their students.
7. Briefly summarize participants’ responses using appropriate science and engineering terminology (e.g. simple machines, ergonomics, material properties). For example, based on their responses, you might say:
From your answers, I hear you using your knowledge of simple machines (leverage), material properties (metal for increased strength), ergonomics, and your experience shoveling (lightweight shovel and curved handle) to redesign the plastic spoon to solve a different problem.
8. Finally, ask:
Who do you think does this kind of work? Who uses their knowledge of science, material properties, and sometimes ergonomics to design technologies? Common response: Engineers.
9. Explain to participants that in the next activity, they will have an opportunity to further explore the relationship between technology and engineering.
PD Tip
Participants might ponder whether a natural object used by a person to solve a problem is a technology (e.g., a rock used to grind grain). This can lead to a rich discussion about the point at which a natural object becomes a technology. Again, this is somewhat of a gray area and can be debated. While these objects are not human-made, per se, they are being utilized and manipulated by humans to solve a problem, which fits the EiE definition of technology.


Tower Power EiE: What is Technology? © Museum of Science, Boston Duplication Permitted
PD-1
CANNING PROCEDURE FOR JAMS,
JELLIES AND PRESERVES
Step 1. Wash jelly glasses or jars in warm
soapy water. Rinse with hot water. Keep hot
until ready to use. Wash jar lids according to
manufacturer's directions.
Step 2. Prepare jam or jelly according to
directions in recipe.
Step 3. Pour hot jelly mixture into hot glasses
to within 1/2 inch of top.
Step 4. Pour preserves and soft jams into
canning jars filling to top. Wipe top and
threads of jar with clean damp cloth. Place
lids atop, sealing compound next to jar rim
and seal immediately. Screw the metal
bands down tightly.
Step 5. Let jams and jellies cool on rack or
thick cloth overnight. Cover jelly glasses with
metal or paper lids. Store jar in cool, dry, dark
place.
Canning Procedure
Directions: Copy the canning procedure card below onto card stock (or print, cut out, and tape onto an index card or piece of card stock).


41 Professional Development Guide Introduction
© Museum of Science, Boston Duplication Not Permitted
Draft 7/2012
Intro
du
ctio
n
Te
ch
an
d E
ngin
ee
ring
Participants will:
engage in a common engineering design challenge.
realize that they naturally solve problems using a process similar to the Engineering Design Process (EDP).
develop the five-step EDP that forms the backbone of the EiE units.
Overview
In the previous activity (“Technology in a Bag”), participants learned that engineers design and improve technologies. They now focus on the question of how, exactly, do engineers do this? What does it mean “to engineer”? The “Tower Power” activity presented here is a natural follow-up to the “Technology in a Bag” activity—it allows participants to take on the role of engineers as they design a technology to solve a problem. Through their experiences, they construct their own understanding of the Engineering Design Process (EDP) and use it to generate the five-step EDP as defined by EiE.
The “Tower Power” activity begins by introducing participants to their engineering problem through context—a small, but very expensive, statue needs to be raised higher so that it can be seen by visitors at the entrance to a museum exhibit. After asking questions to find out more about the constraints and criteria of their design challenge, participants work in small groups to try to successfully design a technology (a tower) to solve the problem. After groups have created their different designs, the whole workshop observes as each design is tested. The facilitator asks each group questions about their design that allow participants to reflect on their prior knowledge, the trade-offs that were considered, and how they would improve their designs based on testing results.
The facilitator then guides participants to articulate what actions their team took to solve the challenge and relates their experiences to the Engineering Design Process, as defined by EiE. By immersing participants in an engineering experience right away, participants co-construct their knowledge of the EDP through experience and reflection. This activity serves as a focal point that participants can refer back to as they become more familiar with the formal process of engineering as defined by the EiE curriculum.
What is Engineering? Tower Power
Preparation: 5 minutes Workshop: 60 minutes

42 Engineering is Elementary PD A Sticky Situation
© Museum of Science, Boston Duplication Not Permitted
Draft 7/2012
Intr
od
uc
tio
n
Te
ch
an
d E
ngin
ee
rin
g
Materials
For the Workshop:
chart paper
markers
small stuffed animal, approx. 6” tall, 2-4 oz., that is able to stably sit or rest on its own
“What Is Engineering?” PowerPoint presentation (downloaded from EiE Educator Resources website)
For Each Group (Assume Groups of Two to Four Participants):
1 pack of 100 index cards (3” x 5” (7.6 x 12.7 cm)
1 foot (30.5 cm) of cellophane tape
For Each Participant:
scissors
ruler
Preparation
1. Measure and cut one foot of cellophane tape for each group of participants.
Optional Materials/Variations
Replace index cards with half-sheets of 8.5” x 11” paper or 5” x 8” index cards.
Do not provide any tape.
Provide more tape, but fewer cards.
What is Engineering?

© Museum of Science, Boston Duplication Not Permitted
43 Professional Development Guide Introduction
Draft 7/2012
Intro
du
ctio
n
Te
ch
an
d E
ngin
ee
ring
What is Engineering?
Activity
1. Continue with the segue from the “What Is Technology?” activity (see p. 35, Step 8) by explaining to participants:
Now that we have learned that engineers are the people who design and improve technologies to solve problems, we are going to focus on the process that engineers use in their work. You are going to work as engineering teams to solve an engineering problem.
2. Set the context for the design challenge with a short story. One example used by EiE is shown below, but feel free to come up with your own story for your workshop; it’s most fun to come up with a scenario that is locally relevant:
The Museum of Science is about to open a new exhibit about [species of stuffed animal, e.g., dog, rabbit, etc.] and they have commissioned an artist to create a very expensive statue that will be displayed at the entrance of the exhibit.
3. Show participants the “statue” (the stuffed animal) and place it on the floor. Ask:
What is the problem? Common responses: The statue is too small and the visitors won’t be able to see it; they might step on it; etc.
Record their thoughts under the heading “What is the problem?” (see example to the right).
4. Tell participants that it is their job, as engineers, to solve this problem by creating a structure to raise the height of the statue. Ask:
In order to solve this problem, what do you want to know? What questions do you
have before you start?
EiE recommends creating this on chart paper or the board for reference in future lessons:

44 Engineering is Elementary PD A Sticky Situation
© Museum of Science, Boston Duplication Not Permitted
Draft 7/2012
Intr
od
uc
tio
n
Te
ch
an
d E
ngin
ee
rin
g
5. Record participants’ questions (see example at left). It is important for participants to ask questions about the design challenge criteria and constraints, including:
What materials can we use?
How much time do we have?
How tall does our structure need to be?
How will we know if our structure is successful? How will we test?
On what surface will we build our structures?
How much space do we have to build?
Participants might not use the exact wording listed above, but it is key for them to ask questions that are at least similar. Other common questions include:
Can we change the statue?
What is our budget?
Do we have to make our structure aesthetically pleasing?
Do we need to put label copy/description on our structure?
Do our structures need to be moveable or will they stay in one place?
6. Separately address each of the questions raised by participants. Make sure to include and add, if necessary:
Each group will receive 100 index cards and 12 inches (30.5 cm) of cellophane tape that they can use to create their structures.
Each group will also receive scissors and rulers, but these are provided as tools and may NOT be included in their structures.
Groups will have 18 minutes to design their structures.
Structures must be at least two feet (61.0 cm) tall.
PD Tip
When asking questions in Step 5, participants sometimes focus only on the aesthetics of their structure designs (e.g., attracting visitors, lighting for the statue, color, label copy, etc.). To help steer the conversation back to engineering questions that are related to design criteria and constraints, remind participants that as engineers, their job is to design a structure that is tall enough for visitors to see and stable enough that the statue can rest on top of it. The museum’s exhibit designers will worry about all of these other details.
What is Engineering?
EiE recommends creating this on chart paper or the board for reference later in the lesson:

45 Professional Development Guide Introduction
© Museum of Science, Boston Duplication Not Permitted
Draft 7/2012
Intro
du
ctio
n
Te
ch
an
d E
ngin
ee
ring
The stuffed animal should be able to rest on top of the structure.
Teams should build their structures on their tables/desks.
The base of the structure can be as large as groups would like, as long as it fits on the table/desk.
The structures will not need to be moved, but groups may NOT tape their structures to the table/desk.
Groups cannot suspend the stuffed animal from the ceiling.
Groups won’t be able to use the actual statue to test their designs until the 18 minutes are up (remember, it’s very expensive!), but they are free to hold the statue to get an idea of its mass.
Groups don’t need to worry about the aesthetics of their design, decorating it, or including label copy on it. The museum’s exhibit design team will do that. As engineers, they should only focus on the structure.
7. Address how groups will know if their designs are successful, by asking:
In addition to height, what other criteria are important to consider if you are building a structure to support the stuffed animal? Common responses: Our structures should be strong enough to support the stuffed animal.
How could you test your structures to see if they successfully meet these criteria? Common response: We could place the stuffed animal on top of our structure and see if the structure is strong enough to support the stuffed animal without collapsing.
What variable will we need to control for our test? Common responses: How long the stuffed animal is on top of the structure.
PD Tip
For this activity, it is best if there at least three and up to six different tower designs to test and compare. To get this number of groups, split participants into group sizes ranging from two to four participants.
PD Tip
You might point out to participants that, through their questions, they are identifying the criteria and constraints of their design challenge. Work as a group to define those terms: EiE uses constraints to describe the limitations on a design, such as resources (e.g., time, materials, and human-power). EiE considers criteria to be specific qualities of a successfully designed solution. For example, strength, durability, reliability, and speed can all be criteria for a design.
What is Engineering?

46 Engineering is Elementary PD A Sticky Situation
© Museum of Science, Boston Duplication Not Permitted
Draft 7/2012
Intr
od
uc
tio
n
Te
ch
an
d E
ngin
ee
rin
g
How long should we leave the stuffed animal on the structure to determine whether it is successful? Common responses: Responses will vary but usually are between five and 15 seconds.
The purpose of this line of questioning is to give participants some experience with experimental design and to help them understand that engineers also test their designs in very controlled ways. They may suggest that the same person (the facilitator) place the stuffed animal on top of each structure, but in EiE’s experience, it is much better for participants to place the stuffed animal themselves, as they know where their designs are weaker/stronger/more balanced/etc.
8. Divide participants into groups of two to four.
9. Distribute index cards, lengths of cellophane tape, rulers, and scissors to each group (or have participants collect their materials).
10. Start the timer.
11. As participants are working, visit each group with the stuffed animal and allow them to hold and get a sense of its mass. You might ask groups questions about what they are doing, such as:
Tell me about your structure design. How
did your group come up with it?
Why do you think it will be successful?
What prior knowledge did you use?
As you are circulating, keep track of the time and every five minutes or so let participants know how much time they have left.
12. Once the 18 minutes are up, ask all participants to put down their materials and stand in a large circle so that they can see all of the different structures that were created. Ask:
What do you notice about all of the
structures?
PD Tip
To promote large-group thinking and to reduce competition, tell participants to consider themselves a large group of engineers who want to generate as many solutions as possible and who will work in smaller teams. Teams should feel free to compare ideas, borrow, and use inspiration. The goal is to learn as much about engineering and what makes the best tower possible.
What is Engineering?

47 Professional Development Guide Introduction
© Museum of Science, Boston Duplication Not Permitted
Draft 7/2012
Intro
du
ctio
n
Te
ch
an
d E
ngin
ee
ring
How are they similar? Common responses: They are all made of the same materials; they all incorporate layers of index cards; certain shapes might be repeated in multiple designs; etc.
How are they different? Common responses: They used different techniques, such as folding, rolling, cutting, notching, etc.; they are made up of different shapes (triangles, circles, square, etc.); some are larger at the base and smaller on top; some are the same size at all levels; etc.
13. Go around the room and have each group test their tower structure by first measuring to see if it is at least two feet (61.0 cm) tall, and then placing the stuffed animal on top and seeing if it can stay in place for the decided upon amount of time. Before they test, ask each group some of the following questions:
Tell us about your design. What are some of the design features your team decided
to use?
Why did you choose those features?
How did your group decide what design to
use?
14. If it fits in with your discussion, you might point out that some of participants’ assumptions and statements may evoke questions that could be answered using inquiry-based science. For example, the common belief that triangles are the strongest structural shape may inspire questions about the orientation of the triangles and what “strong” means. Other groups might have mentioned different forces that were acting on their structures.
15. After each group tests, regardless of whether or not their design failed, ask every group:
If you had more time, how would you improve your design? What would you
change?
PD Tip
If any participants’ tower designs were unsuccessful, remind them and the whole group that learning from failure is valuable and that the Engineering Design Process incorporates this experience in the “Improve” step. To reinforce this, ask the group with the unsuccessful design, “Now that you have designed your first tower and tested it, how would you improve it?”
What is Engineering?

48 Engineering is Elementary PD A Sticky Situation
© Museum of Science, Boston Duplication Not Permitted
Draft 7/2012
Intr
od
uc
tio
n
Ba
ckgro
un
d
16. If a group’s design does fail, ask:
What did you notice about the way your
structure failed? Did it buckle or crumple?
Did all of it collapse or just part of it?
Did it fall to one particular side?
How might this information help you think about how you could improve your
design?
17. After all the teams have tested, independent of success or failure, ask:
Now that you’ve had a chance to test your own design and to observe others’ designs, how would you improve your
tower if given the opportunity?
Reflection
1. Have participants return to their seats and explain that they are now going to spend some time reflecting on the process that groups’ used in order to design their solutions.
2. Ask participants:
What are some “action words” that describe what your group did as you designed your structures? Common responses: brainstorm; test; improve; cut; fold; analyze; troubleshoot; plan; prototype; etc.
List participants’ responses on the board or chart paper (see example at left).
3. The goal for Step 2 is to have participants share action words that represent each of the five steps of the EiE EDP (ask, imagine, plan, create, and improve). To prompt participants to give words for certain steps, you might use the following questions:
What is Engineering?
EiE recommends creating this on chart paper or the board for reference later in the lesson:

© Museum of Science, Boston Duplication Not Permitted
49 Professional Development Guide Introduction
Draft 7/2012
Intro
du
ctio
n
Ba
ckgro
un
d
What did you do at the very, very beginning of this activity, right when I first showed you the stuffed animal, before you broke into your groups? Common responses: Clarified the problem; asked questions.
How did your group narrow down your ideas to the one structure design to build? Common responses: We came up with a plan; we combined idea from multiple group members; we planned how we would delegate the tasks; etc.
4. Once there are words that align with all five steps of the EiE EDP on the list, explain to participants that they are now going to look at the list of action words that they created and think about the order in which they performed them. The action words listed will vary from workshop to workshop, but, for example, if two of the words are “fold” and “brainstorm,” you might ask:
Which did you do first—fold or brainstorm? Common response: Brainstorm
5. On a separate section of the board, or on a new piece of chart paper, begin to re-write the action words in the order that participants suggest, placing arrows between each step. Tell participants that they can also group words together, if they would like (e.g., cut, fold, tape, and build could be combined into “build” or “create”). You might need to suggest this grouping yourself, if participants do not.
6. Also point out that there are some actions that occurred throughout the design process, such as discuss, collaborate, communicate, etc.
7. You will likely notice that as participants order the action words, they will naturally be categorized into the five steps of the EiE EDP.
8. Guide participants to notice that the process they used to design their structures wasn’t linear—they repeated certain actions in a cyclical manner. Ask:
What is Engineering?
EiE recommends creating this on chart paper or the board:

50 Engineering is Elementary PD A Sticky Situation
© Museum of Science, Boston Duplication Not Permitted
Draft 7/2012
Intr
od
uc
tio
n
Ba
ckgro
un
d
Did you only test your structure once, at the very end or did you test it along the way as your were designing? Common response: We tested it multiple times along the way.
How did you test it, since you weren’t allowed to put the stuffed animal on top? Common responses: We put another object of comparable weight on top (e.g. scissors, a cell phone); we used our hand to push down on the structure to see if it was strong and stable.
What did you do after these tests? Did you change your structure at all? Common responses: We noticed what parts of our structure were not strong or were not working well and we changed them, then we tested it again.
Add this information to the ordered list of words that you wrote on the board or chart paper by using arrows to represent the cyclical nature of the design process.
8. After participants have finished creating their version of the EDP, based on their experience, point out that this kind of problem solving came very naturally to them (as it does to students) and is actually very similar to the Engineering Design Process that EiE uses, which you are going to show them now.
9. Begin to build a drawing of the EiE EDP using the PPT, or by drawing on the board/chart paper (see example to the left).
10. Point out the “Goal” in the center of the diagram. Ask:
What was the goal of your engineering design challenge? Common responses: To design a structure that would be able to support the statue and stand at least two feet off of the ground.
Record responses in the center of the diagram .
What is Engineering?

© Museum of Science, Boston Duplication Not Permitted
51 Professional Development Guide Introduction
Draft 7/2012
Intro
du
ctio
n
Ba
ckgro
un
d
11. Tell participants that even though they have already established that the EDP is cyclical, many engineers begin working towards their goal by asking questions, just as participants did.
12. Write “Ask” in one of the EDP circles that you drew (see example at right), or use the animated PowerPoint slide to facilitate Steps 12-15. Ask:
What were some of the questions that you asked before you began working on your design challenge? Common responses: What are the materials? How much time do we have? (Constraints) How high does the structure have to be? (Criteria)
As participants respond, ask them which of their questions were about constraints and criteria. (See the PD Tip on p. 43 for definitions of constraints and criteria.)
13. You might also point out that some questions related to science content knowledge that helped them with their challenge (e.g., in their working groups, participants might have asked which shapes are the strongest).
14. Then, write “Imagine” in the EDP circle to the right of the “Ask” step. Ask participants:
Which action words from our list fit into the “Imagine” step? Common responses: Brainstorm; Discuss
15. Repeat Step 14 for each of the remaining EDP steps: “Plan,” “Create,” and “Improve.” Note that your EDP diagram should look like the example to the right when done.
16. Once your diagram is finished, explain that EiE’s representation of the EDP is a general summary of the cyclical nature of the design and improvement of technologies. The process may begin with the “Improve” step if engineers are working to redesign an existing technology. Often, engineers move between a few steps many times or follow the steps out of order as they work to design solutions to problems.
What is Engineering?

52 Engineering is Elementary PD A Sticky Situation
© Museum of Science, Boston Duplication Not Permitted
Draft 7/2012
Intr
od
uc
tio
n
Te
ch
an
d E
ngin
ee
rin
g
17. Summarize this activity by explaining to participants that this five-step Engineering Design Process is the backbone of all 20 EiE units. In an EiE unit, students are introduced to the EDP and their design challenge through a story (just like participants were). Then, students work through the EDP themselves in Lessons 3 and 4 of every EiE unit as they design and improve a technology.
18. Wrap up these two introductory activities (“What Is Technology?” and “What Is Engineering?”) by explaining to participants how these activities can be used with students in the classroom:
The “What Is Technology?” activity is included in every EiE Teacher Guide as a “Preparatory Lesson.” EiE suggests doing this lesson before beginning any EiE unit. However, EiE doesn’t recommend including systems and processes in this activity with students.
The “What Is Engineering?” activity can also be used to introduce elementary students to the EDP, however EiE recommends allowing students to use two feet of cellophane tape, giving them about 30 minutes to design and construct their structures, and using a height criterion of 12” (30.5 cm) instead of two feet (61.0 cm). For lesson plans for facilitating this activity with students, please visit EiE Educator Resources.
What is Engineering?

53 Professional Development Guide Introduction
© Museum of Science, Boston Duplication Not Permitted
Draft 8/2012
Intro
du
ctio
n
EiE
and
Tea
ch
er G
uid
e
The EiE Program
53
Participants will:
learn about the background and goals of the Engineering is Elementary project.
Overview
Participants who are new to engineering education are often unsure of how they will be able to integrate EiE units into their curriculum in a coherent and cohesive way. Typically, they like to know more about the background of the EiE project—in particular, how the project started, its goals, and an overview of all of the resources available.
This part of the PD Guide includes a slide presentation, which can be downloaded from our Educator Resources webpage, that responds to these concerns. To give participants a context for why engineering education is important at the elementary school level, the presentation begins with illustrations by third grade students depicting common misconceptions about “what engineers do.” In addition, the facilitator provides information on how the different EiE units integrate with science content already being taught in the classroom by:
outlining the goals of the EiE program.
giving an overview of the 20 EiE units and their common structures and themes.
briefly summarizing the Teacher Guide structure, as well as its included resources.
introducing Engineering Adventures, and out-of-school-time (OST) design curriculum created by the EiE project.
Preparation: 5 minutes Workshop: 10 minutes

54 Engineering is Elementary PD A Sticky Situation
© Museum of Science, Boston Duplication Not Permitted
Draft 8/2012
Intr
od
uc
tio
n
EiE
and
Tea
ch
er
Gu
ide
Overview of the EiE Program
Materials
For the Workshop:
“Overview of the EiE Program” facilitation PowerPoint (downloadable from EiE Educator Resources)
NOTE: The slides provided might include more detail than you need for your workshop—choose the slides that you think are most important/relevant for your audience and workshop timing.
LCD projector and screen
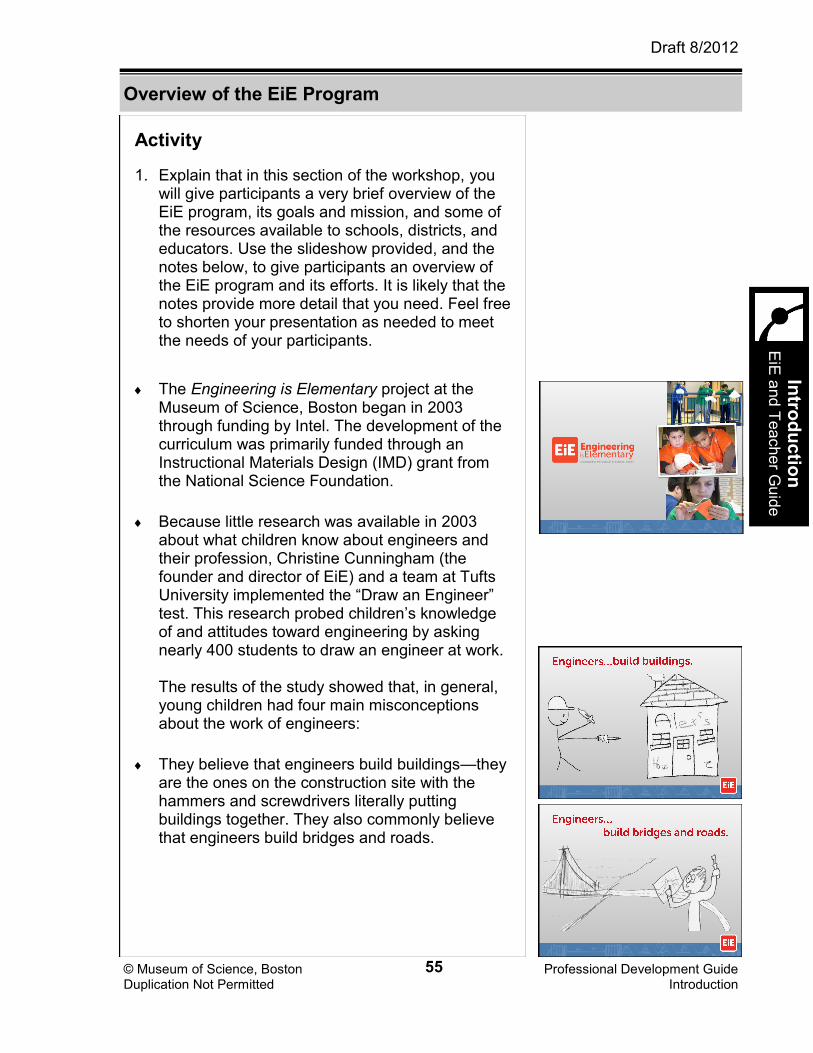
© Museum of Science, Boston Duplication Not Permitted
55 Professional Development Guide Introduction
Draft 8/2012
Intro
du
ctio
n
EiE
and
Tea
ch
er G
uid
e
Overview of the EiE Program
Activity
1. Explain that in this section of the workshop, you will give participants a very brief overview of the EiE program, its goals and mission, and some of the resources available to schools, districts, and educators. Use the slideshow provided, and the notes below, to give participants an overview of the EiE program and its efforts. It is likely that the notes provide more detail that you need. Feel free to shorten your presentation as needed to meet the needs of your participants.
The Engineering is Elementary project at the Museum of Science, Boston began in 2003 through funding by Intel. The development of the curriculum was primarily funded through an Instructional Materials Design (IMD) grant from the National Science Foundation.
Because little research was available in 2003 about what children know about engineers and their profession, Christine Cunningham (the founder and director of EiE) and a team at Tufts University implemented the “Draw an Engineer” test. This research probed children’s knowledge of and attitudes toward engineering by asking nearly 400 students to draw an engineer at work. The results of the study showed that, in general, young children had four main misconceptions about the work of engineers:
They believe that engineers build buildings—they are the ones on the construction site with the hammers and screwdrivers literally putting buildings together. They also commonly believe that engineers build bridges and roads.

Te
ach
er
Gu
ide S
truc-
ture
56 Engineering is Elementary PD A Sticky Situation
© Museum of Science, Boston Duplication Not Permitted
Draft 8/2012
Intr
od
uc
tio
n
EiE
and
Tea
ch
er
Gu
ide
Overview of the EiE Program
Perhaps due to the fact that the word “engine” is in the word “engineer,” they believe that engineers work as mechanics that fix cars and other machines.
They believe that engineers are technicians that use and fix computers and repair electronics.
And, finally, they believe (correctly, in terms of vocabulary) that engineers drive trains.
We culled the following points from this study:
Students did not understand that engineers are designers that use skills and knowledge related to math and science.
They did not see engineers as being particularly creative.
They primarily saw engineers as technicians and mechanics—a view that is not only incorrect, but incredibly narrow.
The fields they described are all male-dominated—and in fact, almost all of the pictures they illustrated were of men.
They also did not describe engineers as doing anything related to biology, chemistry, or environmental studies.
Furthermore, when the same students were asked to give examples of technology, many alluded only to electronics such as cell phones, TVs, and computers and did not include more commonplace, problem-solving items like cups, pencils, and notebooks.
It became clear from this initial research that there is a very strong need for increased technological literacy and knowledge of related engineering careers among children. It is particularly important to expose students early to engineering fields while they are still receptive to different types of careers. In addition, we need to equip children with the problem-solving and critical thinking skills necessary to excel in a

© Museum of Science, Boston Duplication Not Permitted
57 Professional Development Guide Introduction
Draft 8/2012
Intro
du
ctio
n
EiE
and
Tea
ch
er G
uid
e
Overview of the EiE Program
constantly changing world. EiE strives to clear up students’ misconceptions related to engineering, encourage students to consider engineering careers, develop problem-solving skills, and grow to be technologically literate members of society. (You can find the data from EiE’s research on students’ and teachers’ conceptions of technology and engineering, as well as effects of the curriculum on science learning on the EiE website, www.mos.org/EiE.)
In order to address these needs, the Engineering is Elementary (EiE) project works to fulfill four main goals (read or summarize goals in slide).
EiE has developed 20 different engineering units that integrate with the 20 science content topics that are most commonly taught in elementary schools. Units consist of Teacher Guides, storybooks, and materials kits. It is important to note that the EiE units do NOT teach science—instead, they reinforce and review science content and allow students to apply their science knowledge to solve an engineering problem. To find the EiE unit that is the best fit for your students, find a science topic that you teach on the table, and then look at the related EiE unit.
In addition to integrating with science, EiE integrates with other subject areas—including literacy and social studies. Each EiE unit is introduced through a storybook that features a child from a different country around the world (including the United States) who has an engineering problem to solve—which happens to be the same problem that students will solve in the classroom. By purposely writing stories that take place all over the world with main characters who are diverse in their gender, ethnicity, and ability, EiE storybooks emphasize that everyone can engineer. Through these books, EiE hopes to engage all students.

Te
ach
er
Gu
ide S
truc-
ture
58 Engineering is Elementary PD A Sticky Situation
© Museum of Science, Boston Duplication Not Permitted
Draft 8/2012
Intr
od
uc
tio
n
EiE
and
Tea
ch
er
Gu
ide
Overview of the EiE Program
by presenting stories and characters to which children can relate. Teachers often use reading minutes in their classrooms as a way to incorporate EiE without adding additional subjects to their day.
All EiE units, regardless of their topic, follow a very similar structure, making it easier to teach a second unit after you have already taught one:
The Preparatory Lesson introduces children to the broad definition of the term “technology.”
Lesson 1 introduces the field of engineering, the Engineering Design Process, and the design challenge through the aforementioned storybook.
Lesson 2 presents a broader view of the unit’s field of engineering through a brief, hands-on activity.
Lessons 3 and 4 together comprise the unit’s design challenge. In Lesson 3 students conduct science experiments and collect and analyze data that, in turn, will help them with their engineering design challenge.
In Lesson 4, students use the Engineering Design Process to solve a problem by designing and improving a technology.
Provide some additional detail on the four lessons in each EiE unit, using A Sticky Situation: Designing Water Filters as an example:
In Lesson 1, the storybook is used to set the context for the engineering design challenge. The main character has an engineering problem that he/she needs to solve with the help of an adult engineering mentor. The story introduces important vocabulary, the field of engineering, and reviews important science concepts. It also introduces students to their design challenge. In this book, Salila learns about environmental engineering and she designs a water filter to clean contaminated water to save her pet turtle.

© Museum of Science, Boston Duplication Not Permitted
59 Professional Development Guide Introduction
Draft 8/2012
Intro
du
ctio
n
EiE
and
Tea
ch
er G
uid
e
Overview of the EiE Program
In Lesson 2, students learn more about environmental engineering by identifying and evaluating sources of contamination the way that environmental engineers would.
In Lessons 3 and 4 students work through the five steps of the Engineering Design Process as they design water filters to clean contaminated water.
Lesson 3, which begins the “Ask” step of the EDP, activates students’ science knowledge and skills as they examine the available materials for their water filter designs, identify their properties, and conduct a controlled experiment to determine how well each material works to clean different types of contaminated water. They analyze their data and draw conclusions.
In Lesson 4, students work in teams and go through the “Imagine,” “Plan,” “Create,” and “Improve” steps of the EDP to design their water filters. They use their data from Lesson 3 to help them choose materials and after testing their first water filter designs, they use their findings to go back and improve their designs.
Point out that every EiE unit has gone through a multi-year development process, including:
significant teacher input and feedback about content, integration across subject areas, and ease of use.
revising units based on teacher feedback and classroom observations.
classroom observations of teachers piloting units in development.
national field testing in five different states.
incorporating research data about students’ prior knowledge, and their understanding of engineering and technology.
•
•
•
•

Te
ach
er
Gu
ide S
truc-
ture
60 Engineering is Elementary PD A Sticky Situation
© Museum of Science, Boston Duplication Not Permitted
Draft 8/2012
Intr
od
uc
tio
n
EiE
and
Tea
ch
er
Gu
ide
Overview of the EiE Program
In addition to helping students learn engineering and technology content and skills, EiE units also focus on building 21st Century Skills with students, such as critical thinking, collaboration/teamwork, communication, and creativity.
EiE units also focus on the engineering practices set forth in “A Framework for K-12 Science Education” (NRC, 2011), including problem solving, analysis and data-driven decision making, and variables and optimization.
In addition to the resources provided in each EiE Teacher Guide, the EiE program has developed a number of online resources—located on the EiE Educator Resources website (www.mos.org/EiE/EducatorResources).
These resources include:
Content Connections: A searchable database of lesson plans written by classroom teachers and EiE staff members that connect EiE lessons to other subject areas, such as mathematics, language arts, social studies, science, and fine arts.
Multimedia Resources: Video resources include How-To videos, which demonstrate how to prepare and set up materials for EiE lessons, as well as classroom videos, which show EiE lessons being taught in real classrooms across the U.S.
Supporting Documents: These resources include presentations, overviews, and other documents to support EiE use.
Student Assessments: A collection of assessment for use with students to determine what they know about technology and engineering before beginning EiE, and to assess what students have learned from EiE lessons.
Mathematics
Science
Language Arts
Fine Arts
Social Studies

© Museum of Science, Boston Duplication Not Permitted
61 Professional Development Guide Introduction
Draft 8/2012
Intro
du
ctio
n
EiE
and
Tea
ch
er G
uid
e
Overview of the EiE Program
For additional information, or to contact the EiE team, use EiE’s website and email address:
www.eie.org (website)
[email protected] (email)
www.nctl.org (National Center for Technological Literacy)
In addition to developing curriculum for use in-school, the EiE team has developed Engineering Adventures (EA)—a fun, engaging, hands-on, design curriculum for use in out-of-school-time settings, such as after-school and camp programs.
EA challenges children to solve design challenges using creativity, teamwork, science, and engineering. EA is arranged as a series of thematic units, each focusing on a field of engineering.
As EA units become available to the public (after extensive field testing and revision), they will be available for download from the Engineering Adventures website (engineeringadventures.org).
For more information on EA, visit the website, or email the EA team at [email protected].


63 Professional Development Guide Implementation
© Museum of Science, Boston Duplication Not Permitted
Draft 7/2012
Professional Development Guide: A Sticky Situation
Unit Implementation
Lessons 1-4
Imp
lem
en
tatio
n
Lesson 1 Story Overview Preparation: 5 minutes
Workshop: 10-15 minutes
Lesson 2 Preparation: 5 minutes Workshop: 30 minutes
Lesson 3
Preparation: 5-10 minutes Workshop: 75 minutes
Lesson 4
Preparation: 5-10 minutes Workshop: 40 minutes
This section includes:
Lesson 1—Storybook, Yi Min’s Great Wall
Lesson 2—Materials and Their Uses
Lesson 3—Testing Mortar: “Ask”
Lesson 3—Testing Mortar
Lesson 4—Designing a Wall

64 Engineering is Elementary PD A Sticky SItuation
© Museum of Science, Boston Duplication Not Permitted
Draft 7/2012
Imp
lem
en
tati
on
Ba
ckgro
un
d
Background Information for Facilitators
Implementing an EiE Unit: Why Is this Section Important?
Many participants have told us that full engagement in the unit’s lessons—the same lessons in which students will engage—is the single most important aspect of a workshop. This experience is at the heart of not only an EiE PD workshop, but the philosophy of the EiE program as a whole. Experiencing content in a supported way is most important to learning; therefore, each part of every lesson is aimed at supporting that engagement. By modeling the lessons for workshop participants, these experiences are layered; educators not only learn about engineering, but they also experience the pedagogical approach embedded in EiE.
EiE curricular materials are designed to be implemented in the classroom over 8-10 hours, paced in shorter segments that are suited to young children. Because of time constraints and the different needs of adult learners, unit workshops are typically six hours or less and more intense. Because of this, EiE PD specialists typically alter the lessons’ activities in two main ways:
editing down the level of scaffolding.
adding in short activities that support educators’ deeper understanding of necessary science content.
Time permitting, EiE workshops address each of the four main lessons because exposure to all of the lessons helps teachers experience and observe:
the unique role each lesson plays in the overall unit and the way in which the lessons connect to one another.
the thought processes and skills that are required for each lesson so they can locate places in the lessons where their students might struggle and brainstorm possible accommodations.
important classroom management and teaching strategies that will help young students handle more complicated skills like optimizing variables, understanding and representing data, and evaluating designs based on criteria and constraints.

© Museum of Science, Boston Duplication Not Permitted
Draft 7/2012
65 Professional Development Guide Implementation
Imp
lem
en
tatio
n
Ba
ckgro
un
d
Implementation Background: What Do You Need to Know?
Every EiE unit begins with a storybook in Lesson 1. In addition to introducing the unit’s engineering design challenge, it also introduces a rich, scientific vocabulary, reinforces science content, and introduces the Engineering Design Process (EDP)—all in an accessible context. Enhancing vocabulary provides students with tools that can help them tackle this unit and their science lessons, and provides a foundation for science content in later grades. All EiE storybooks have commonalities: a child character from around the world who faces a challenge that can be solved using the Engineering Design Process; an adult engineering mentor; and information about the engineering field and tie-in science content.
Lesson 2 focuses on the unit’s highlighted field of engineering. In the case of A Sticky Situation, students learn more about materials engineers—engineers who are concerned with creating new materials with new properties or figuring out how to optimize the properties of existing materials. An activity highlights two important messages about materials and their use in solving problems—one material can be used to solve multiple problems and conversely, one problem can be solved by multiple materials. Materials engineers determine the best material by considering the specific criteria and constraints of the problem they are working to solve.
A typical Lesson 3 launches the EDP by asking questions related to the central design challenge and then focusing on answering one of the questions through a structured, controlled experiment. In this unit, the students’ challenge is to design a strong and durable wall from rocks and a mortar made from earth materials. Lesson 3 focuses on answering the question: Which earth materials make a good mortar that is sticky and durable? Having the opportunity to explore and test materials in the context of the challenge is a powerful way for students to make a connection between material properties and the functionality of a technology. However, the emphasis for educators should be different. Because of the experimental nature of this lesson, it is also a good place to foster and model discussion about trickier topics that may arise in the classroom, such as standardizing experimental procedures and material versus object properties. Facilitating this discussion in your PD workshop is a great model for how this might occur in the classroom.
In the classroom, Lesson 4 begins by wrapping up the “Ask” step with a review of what was learned from Lesson 3, as well as the asking and answering of questions related to the design challenge criteria and constraints. It then leads students to complete the design challenge by structuring student engagement through the subsequent steps of the EDP—”Imagine,” “Plan,” “Create,” and “Improve.” For students, each step of the EDP is scaffolded with a specific handout. In a PD workshop, there are stricter time constraints; in addition, adult participants have different learning goals and needs. Therefore, the pacing of Lesson 4 is much more intense. The goal in this part of the workshop is to give participants a taste of the lesson flow by leading them through each step of the EDP. You can facilitate this by giving each person a hard copy of the EDP packet (Lesson 4 handouts). As participants work through each step, it is a good idea to highlight relevant Teacher Tips and give them a chance to experience the Plan and Create steps so that they have a chance to reflect on the process and think about how it will work in their classrooms.


67 Professional Development Guide Implementation
© Museum of Science, Boston Duplication Not Permitted
Imp
lem
en
tatio
n
Le
sson
1
Draft 7/2012
Participants will:
be introduced to the unit storybook, which will set the context for, and introduce content integral to, the rest of the unit.
Lesson 1 Storybook, Yi Min’s Great Wall
Overview
The slide show presented in this part of the workshop is a summary of the storybook that we use to introduce the engineering unit to students (downloadable from Education Resources website). In Yi Min’s Great Wall, a girl from China is frustrated when a bunny pest eats all of the vegetables in her class’ garden. How can she keep the bunny out? Yi Min’s grandfather, a materials engineer, prompts her to think about different earth materials that she can use to build a wall to surround the garden. Yi Min eventually understands that different earth materials have different properties. This information, in combination with the EDP, helps her create a wall that is durable, strong, and bunny-proof.
In addition to being an engaging way to introduce and set the context for the design challenge, the story is also important in a number of different ways. It:
places the relevant science content in context by connecting to the engineering design challenge. Unit-specific content in this story focuses on earth materials and their properties.
uses science and engineering vocabulary in a way that helps students make sense of new words and ideas.
describes the Engineering Design Process by clearly outlining and describing what Yi Min does in each of the steps. Yi Min’s route to a solution also includes some ideas that don’t work, modeling real life for students.
introduces a specific field of engineering that will be detailed further in Lesson 2.
It is important to emphasize the above points and to highlight the EiE handouts that help reinforce these concepts.
Preparation: 5 minutes Workshop: 10-15 minutes

68 Engineering is Elementary PD A Sticky Situation
© Museum of Science, Boston Duplication Not Permitted
Imp
lem
en
tati
on
Le
sson
1
Lesson 1: Storybook
Draft 7/2012
Materials
For the Workshop:
Yi Min’s Great Wall storybook PowerPoint
(downloadable from EiE Educator Resources)
Lesson 1 of the A Sticky Situation facilitation PowerPoint
(downloadable from EiE Educator Resources)
LCD projector and screen
chart paper
marker
For Each Pair of Participants:
pad of sticky notes
Preparation
1. Write the words “Teacher Hat Parking Lot” on the top of a sheet of chart paper and post it where everyone can see it.

69 Professional Development Guide Implementation
© Museum of Science, Boston Duplication Not Permitted
Draft 7/2012
Imp
lem
en
tatio
n
Le
sson
1
Lesson 1: Storybook
Activity
1. Explain that in this section of the workshop, participants will have the chance to experience Lessons 1 through 4 of the A Sticky Situation unit.
2. Tell participants that as they move through the lessons in this unit, they will be asked to wear two hats: the student hat and the teacher hat.
Participants should wear their student hat as they engage in each of the activities. While wearing this hat, they should approach activities as a learner, the same way that students will in the classroom.
While going through the activities, participants may have questions about the lesson from a teacher’s perspective. When participants have concerns or comments about these issues (classroom management, differentiated instruction, student misunderstandings, etc.) tell them to write their ideas on a sticky note, and place it in the “Teacher Hat Parking Lot.”
At the end of each lesson, the group will pause and spend a few minutes discussing the activity from a teacher’s perspective, reviewing any comments tor questions in the “Parking Lot”.
3. Remind participants that every EiE unit begins with a storybook. In addition to being an engaging way to introduce and set the context for the design challenge, the storybook is important in a number of different ways.
On Chart Paper:
Teacher Hat Parking Lot

70 Engineering is Elementary PD A Sticky Situation
© Museum of Science, Boston Duplication Not Permitted
Imp
lem
en
tati
on
Le
sson
1
Lesson 1: Storybook
Draft 7/2012
It describes a field of engineering, in this case materials engineering.
It reviews relevant science content, in this case earth materials.
It introduces the Engineering Design Process by outlining the steps Yi Min goes through to solve her problem.
6. Use the slides to tell an abridged version of the unit storybook, Yi Min’s Great Wall as follows:
...who lives in China.
Yi Min is a girl...
Yi Min is spying through the bamboo thicket behind her school. She and her classmates have been growing a vegetable garden, but even though they have been caring for their plants by watering and weeding them, they have a big problem…

71 Professional Development Guide Implementation
© Museum of Science, Boston Duplication Not Permitted
Draft 7/2012
Imp
lem
en
tatio
n
Le
sson
1
Lesson 1: Storybook
…a bunny problem. Yi Min imagines her bunny as a bandit with a black mask over its eyes. She thinks that if she waits for the bunny to return, she can jump out of her hiding place and scare it away forever. The garden would be saved and she’d be a hero! Unfortunately, it turns out that bunny spying is pretty boring. “The problem with being an undercover bunny detective,” she thinks, “is that sitting still like a statue is no fun!” Eventually, Yi Min gives up on waiting for the bunny and goes home.
The next day, Yi Min goes on a school trip with her class to the Great Wall of China and the students think about the reasons people build walls.
The Great Wall was built to protect China’s people from invaders, but walls can have other purposes – like to keep people dry, warm, and safe from wild animals. Yi Min giggles as she imagines a friendly bear tapping on her bedroom window, hungry for snacks.
The next day at school, Yi Min and her class-mates go outside to check on their garden and find that all of their cabbage has been nibbled on!

72 Engineering is Elementary PD A Sticky Situation
© Museum of Science, Boston Duplication Not Permitted
Imp
lem
en
tati
on
Le
sson
1
Lesson 1: Storybook
Draft 7/2012
The class is very upset with the bunny, but their teacher reminds them that the bunny doesn’t mean them any harm; it’s just looking for food. Then Yi Min remembers their trip to the Great Wall and comes up with the idea of building their own wall to keep out the bunny! She and her friend, Chen, decided to work on this project after dinner.
Luckily, Yi Min knows someone that can help them. Her grandfather is a retired engineer and helped design real structures like bridges and buildings.
When Yi Min gets home, she asks her grandfather if he ever built structures like the Great Wall. He explains that he was a materials engineer so he used to develop new materials, which are technologies, with new properties that were used to build things. For instance, he developed a new mortar that was then used to build a bridge across the Yangtze River. Yi Min tells him about her bunny problem. “I thought I might build a wall to keep the bunny out,” she explains, “but I don’t know where to start.”
Yi Min’s grandfather tells her that whenever he has a problem that needs solving, he uses the Engineering Design Process and suggests that she use it too. “You’ve already started the process by asking questions,” he explains. You’ll need to imagine lots of solutions, make a plan, create it, and then improve it to make it better.” Yi Min begins asking questions about wall materials and notices that different walls are made of different materials like brick, glass, stone, or metal. The walls of her blanket fort are made out of cloth. The key, she realizes, is to match the material to the job you need it to do.
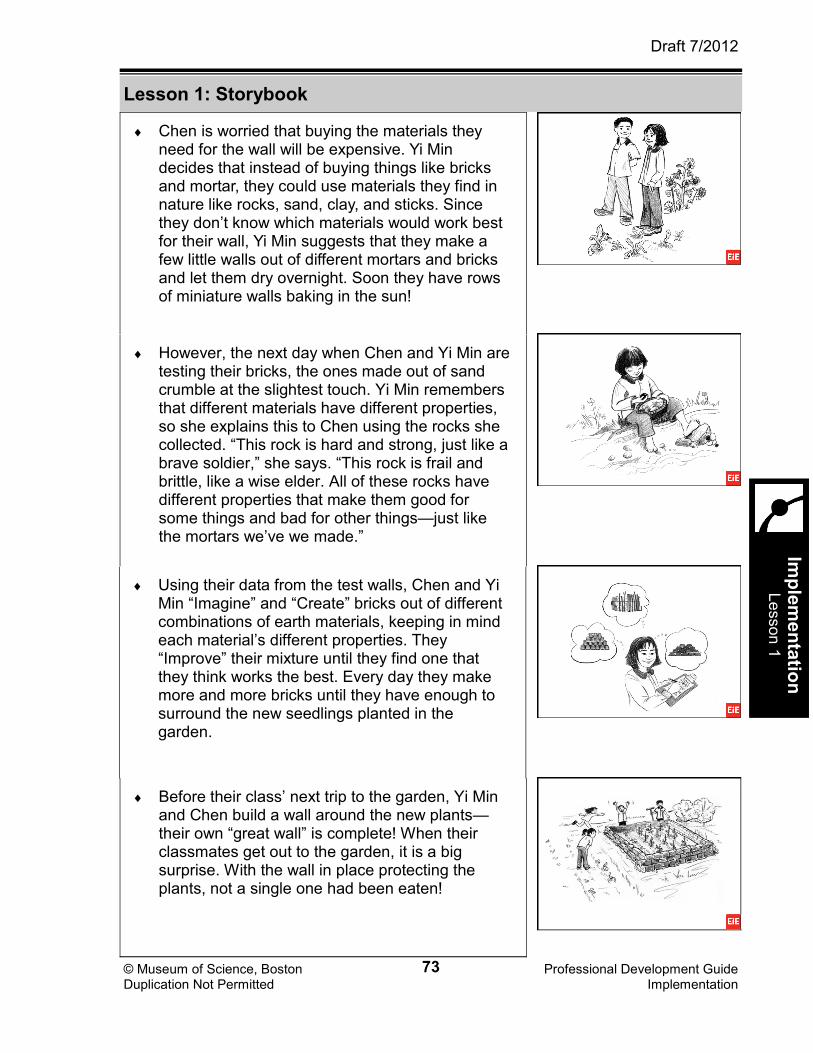
73 Professional Development Guide Implementation
© Museum of Science, Boston Duplication Not Permitted
Draft 7/2012
Imp
lem
en
tatio
n
Le
sson
1
Lesson 1: Storybook
Chen is worried that buying the materials they need for the wall will be expensive. Yi Min decides that instead of buying things like bricks and mortar, they could use materials they find in nature like rocks, sand, clay, and sticks. Since they don’t know which materials would work best for their wall, Yi Min suggests that they make a few little walls out of different mortars and bricks and let them dry overnight. Soon they have rows of miniature walls baking in the sun!
However, the next day when Chen and Yi Min are testing their bricks, the ones made out of sand crumble at the slightest touch. Yi Min remembers that different materials have different properties, so she explains this to Chen using the rocks she collected. “This rock is hard and strong, just like a brave soldier,” she says. “This rock is frail and brittle, like a wise elder. All of these rocks have different properties that make them good for some things and bad for other things—just like the mortars we’ve we made.”
Before their class’ next trip to the garden, Yi Min and Chen build a wall around the new plants—their own “great wall” is complete! When their classmates get out to the garden, it is a big surprise. With the wall in place protecting the plants, not a single one had been eaten!
Using their data from the test walls, Chen and Yi Min “Imagine” and “Create” bricks out of different combinations of earth materials, keeping in mind each material’s different properties. They “Improve” their mixture until they find one that they think works the best. Every day they make more and more bricks until they have enough to surround the new seedlings planted in the garden.

74 Engineering is Elementary PD A Sticky Situation
© Museum of Science, Boston Duplication Not Permitted
Imp
lem
en
tati
on
Le
sson
1
Lesson 1: Storybook
Draft 7/2012
Reflection
1. Call out important points and goals of the storybook, emphasizing that since the students will undertake the same design challenge as the character in the storybook, it is important to introduce the challenge and give it context. In addition, the storybook also introduces a relevant field of engineering and the Engineering Design Process.
2. Show participants the Yi Min and the Engineering Design Process handouts—{1-6} Advanced and {1-7} Basic versions. It is important for students to complete this handout as it will be a useful reference during Lessons 3 and 4 when they start to complete each step of the EDP themselves. Also, remind participants that for handouts with “closed” answers such as these, we also provide answer keys.
Later that day, Yi Min brings her grandfather to show him the new wall. While they are looking at it, she tells him about all the hard work and mate-rials it took to build it, even though it’s small. She just can’t imagine how a wall like the Great Wall could have been built. Yi Min’s grandfather re-plies, “I can imagine it. They just needed a good engineer to lead them. Just like you, Yi Min!”

75 Professional Development Guide Implementation
© Museum of Science, Boston Duplication Not Permitted
Draft 7/2012
Imp
lem
en
tatio
n
Le
sson
1
Lesson 1: Storybook
3. Show participants the other Lesson 1 handouts—What Materials Would You Choose? {1-5}, China {1-1}, and Vocabulary List {1-8}. Explain that these handouts support students’ learning of vocabulary, geography, and the relevant science content that is featured in the storybook. They also provide a convenient jumping-off point for deeper connections to other curricular areas, such as literacy, social studies, and science.
4. Take a few minutes at the end of this lesson to address any comments that have been posted in the Teacher Hat Parking Lot. After there has been opportunity for discussion from the participants about their thoughts/questions/concerns, reveal the bullets on the “Teacher Hat: Lesson 1” slide.
5. Remind participants that you presented an abbreviated version of the storybook, and that it may take several sessions to read the entire book to students. Suggest that teachers preserve time in their science and engineering blocks by reading the storybook during ELA.
•
•


77 Professional Development Guide Implementation
© Museum of Science, Boston Duplication Not Permitted
Imp
lem
en
tatio
n
Le
sson
2
Draft 8/2012
Participants will:
experience the Materials and their Uses activity.
reflect on the ways one material can be used to solve many different problems, as well as how one problem can be solved through the use of many different materials.
Lesson 2: Materials and their Uses
Overview
A Sticky Situation Lesson 2 presents an example of how materials engineers use their knowledge of different materials and their properties to help them design technologies that meet the criteria and constraints of a specific problem. In this lesson, children (and participants) explore four different materials—cloth, straw, brick, and paper—and reflect on the way they can be used to solve four different problems—keeping warm, carrying eggs, sitting, and cleaning the floor.
Closely examining materials, thinking about their properties, and discussing the ways in which materials can be manipulated and used to meet a problem’s criteria and constraints, guides students to realize that materials engineers follow a similar process when they determine the best material to use in a particular technology. Although not all workshops will provide time for a full rendering of Lesson 2, at least an overview of this will be beneficial to participants.
Preparation: 5 minutes Workshop time: 30 minutes

78 Engineering is Elementary PD A Sticky Situation
© Museum of Science, Boston Duplication Not Permitted
Imp
lem
en
tati
on
Le
sson
2
Lesson 2: Materials and Their Uses
Draft 8/2012
Materials
For the Workshop:
Lesson 2 of the A Sticky Situation facilitation PowerPoint (downloadable from EiE Educator Resources)
LCD projector and screen
metal spoon
blanket
brick
small bag of straw
sheet of paper
cotton T-shirt
Copy for Each Group of Participants:
{2-1} Materials Engineering: Keeping Warm
one of the following handouts:
{2-3} Materials Engineering: Carrying Eggs
{2-5} Materials Engineering: Sitting
{2-7} Materials Engineering: Cleaning the Floor

© Museum of Science, Boston Duplication Not Permitted
79 Professional Development Guide Implementation
Imp
lem
en
tatio
n
Le
sson
2
Lesson 2: Materials and Their Uses
Draft 8/2012
Activity
1. Remind participants that Lesson 2 of every EiE unit is meant to give students a more in-depth look at a field of engineering. A Sticky Situation: Designing Walls focuses on the field of materials engineering. Ask participants:
Who were the materials engineers in the book? Common responses: Yi Min, Chen, Yi Min’s grandfather.
What were some types of problems that they worked on? Common responses: Creating mortar for a bridge, creating mortar and bricks for a wall.
If participants are unsure, suggest they look at the illustrations on the PowerPoint slide for clues.
2. Explain to participants that, today, they are going to practice thinking like materials the way that materials engineers do—by analyzing their properties in the context of solving a particular problem. They will focus on the following Guiding Question:
What makes a material a good or poor choice for a particular task?
Tell participants that Lessons 2-4 of every EiE unit begin with a Guiding Question that students will be able to answer by the end of the lesson.
3. Tell participants that they are going to begin by examining some everyday objects and thinking about the materials from which they are made.
4. Divide all participants into three groups and have groups sit or stand together in the workshop space.
5. Distribute one of the following objects to each group:
blanket
cotton T-shirt
metal spoon

80 Engineering is Elementary PD A Sticky Situation
© Museum of Science, Boston Duplication Not Permitted
Imp
lem
en
tati
on
Le
sson
2
Lesson 2: Materials and Their Uses
Draft 8/2012
6. Explain that groups should take about five to seven minutes to discuss the material(s) from which their object is made. In their discussion, they should keep in mind the following questions:
What material(s) is this object made of?
What are some properties of this material?
Do you think this material was a good choice for this particular object? Why or
why not?
What do you think might happen if we chose to make this object out of a different
material such as stone/paper/glass?
7. Once groups have finished their discussion, have them share their thoughts with the workshop as a whole.
8. Point out that, in the classroom, this is an excellent place to have students work on developing a deeper understanding of the difference between a property of a material and a property of an object. See p. 61 of the Teacher Guide for more information.
9. Tell participants that they are now going to examine another material that is likely very familiar to them—but this time they will examine it in the context of solving a problem—keeping warm.
10. Show participants the blanket.
11. Ask:
Is a blanket a good choice for keeping you warm? Common response: Yes.
What material is the blanket made of? Common responses: (Depends on the particular blanket you use.) Wool, cotton, cloth, polyester, down, etc.
What are some properties of this material? Common responses: Soft, fuzzy, thick, flexible, etc.
PD Tip
Adult participants will sometimes want to further distinguish between material and object properties.
Material property: A permanent characteristic of a material, such as how it looks, how it feels, and how it behaves under certain conditions. For example, a material property of aluminum foil is that it is shiny.
Object property: A characteristic specific to the object, such as shape and size, that can be changed. For example, an object property of a sheet of aluminum foil is that it may be rectangular, but it can also exist as a circle or triangle.

© Museum of Science, Boston Duplication Not Permitted
81 Professional Development Guide Implementation
Imp
lem
en
tatio
n
Le
sson
2
Lesson 2: Materials and Their Uses
Draft 8/2012
Which of those properties make this material a good choice for keeping warm? Common responses: Thick, soft, fuzzy, etc.
12. As a group, complete the first row of Materials Engineering: Keeping Warm {2-1}. Have participants follow along on their copies as well.
13. Show participants the samples of straw, brick, and paper. Ask:
How could you use [material] to help you keep warm?
Complete the remaining rows of Materials Engineering: Keeping Warm {2-1}.
14. Ask participants:
Which material do you think would be BEST to use to keep warm? Why? Common responses: It is likely that there will be disagreement about which material is the best because it is subjective and dependent on further clarification of the goal of keeping warm. For example, if the goal is to create a technology that is warm and more permanent, then using brick to build a shelter would be the best choice. However, if the goal is to create something that is comfortable and transportable, then cloth is the best choice. Point out to participants that this is why the “Ask” step of the EDP is so crucial—it is essential to know all of the criteria and constraints surrounding the problem that you are trying to solve.
Have participants turn to their neighbors and discuss the above question for a minute or two, then have volunteers share their thoughts as a whole-group discussion.
15. Explain to participants that they are now going to think about these same materials in the context of solving several different problems—carrying eggs, sitting, and cleaning the floor.
PD Tip
You might show participants a copy of Materials Engineering: Keeping Warm {2-2}, which is the Basic version of {2-1}. Explain to participants that the Basic version might be used for younger (grades 1-2) or less advanced students. It is also possible to use both versions in the same class as a method of differentiated instruction, as they cover the same content.

82 Engineering is Elementary PD A Sticky Situation
© Museum of Science, Boston Duplication Not Permitted
Imp
lem
en
tati
on
Le
sson
2
Lesson 2: Materials and Their Uses
Draft 8/2012
16. Divide participants into groups and give each group one of the following handouts:
Materials Engineering: Carrying Eggs {2-3}
Materials Engineering: Sitting {2-5}
Materials Engineering: Cleaning the Floor {2-7}
Several group will have the same handout, but each group should only receive one of the three.
17. Give groups five to ten minutes to discuss the four materials in the context of their particular problem and record their ideas on their handouts.
18. Once groups have finished their discussions, pose the question:
Which material do you think is the best choice to solve your problem? Why?
Give groups a minute or two to discuss this question.
19. Post Materials Engineering: Collecting Data {2-9}. Complete the table by asking all groups who worked on the same problem to report out their ideas as you record them on the chart.
20. Once groups have shared which materials they thought were good choices to complete the different tasks, ask:
Which material do you think is the best choice for keeping warm? Why?
Which material do you think is the best choice for carrying eggs? Why?
Which material do you think is the best choice for sitting? Why?
Which material do you think is the best choice for cleaning the floor? Why?
PD Tip
If your workshop primarily consists of lower elementary (grades 1 and 2) teachers, you might consider using the Basic, or “B,” versions of all of the Materials Engineering handouts, as these will be more appropriate for their students in the classroom.

© Museum of Science, Boston Duplication Not Permitted
83 Professional Development Guide Implementation
Imp
lem
en
tatio
n
Le
sson
2
Lesson 2: Materials and Their Uses
Draft 8/2012
21. Mark these materials on the chart with a “*.” It is very possible that participants will disagree on which material is the best choice for each task and this is to be expected with students as well. Use this as an opportunity to foster and model dialogue where participants back up their ideas with data and support their reasoning. See p. 64 of the Teacher Guide for more information.
22. Ask:
Were any of these materials selected as the best choice for solving more than one of the problems? Which ones?
Why do you think this material is a good choice to solve these multiple problems?
See page 65 of the Teacher Guide for more information.
23. Remind participants that one of the jobs of a materials engineer is to determine which material is the best choice to solve a particular problem based on the given criteria and constraints.
Reflection
1. Return to the Lesson 2 Guiding Question that you wrote on chart paper at the beginning of the lesson and have participants work to answer it:
What makes a material a good or poor choice for a particular task?
2. As a way to delve deeper into this question, ask participants:
How do you think materials engineers use this knowledge in their work? Common responses: When materials engineers are working to solve a particular problem, they need to keep the context, criteria, and constraints of the problem in mind as they choose materials. They will look for (or design new) materials that have properties that will meet their criteria and constraints.
•

84 Engineering is Elementary PD A Sticky Situation
© Museum of Science, Boston Duplication Not Permitted
Imp
lem
en
tati
on
Le
sson
2
Lesson 2: Materials and Their Uses
Draft 8/2012
3. To wrap up Lesson 2, ask participants to put on their teacher hats and share any questions or concerns they might have about implementing this lesson with students. In addition, share the bullets listed on the “Teacher Hat: Lesson 2” slide:
In the classroom, EiE suggests giving each group of students small samples of cloth, paper, brick, and straw to touch and manipulate when they are trying to think of ways to use each material to solve their particular problem. This offers a visual cue for brainstorming.
One of the challenges of facilitating this lesson with young children is helping them to identify which material properties are relevant to the problem they are trying to solve. Many students will identify the color of the material—you might ask them if the color of the material affects how well it cleans the floor.
Students sometimes have trouble coming up with ways to use the different materials to solve their problem. To support them, you might have them first brainstorm as many different objects as they can that would accomplish the task listed on their handout, without regard to materials. Then, guide students to think about how they might construct some of those objects using paper, cloth, straw, or brick.
This lesson provides an engineering connection to the story of “The Three Little Pigs.” After reading or listening to the story, students might identify properties of the materials used to make each little pig’s house, and connect those properties to how well each house fared against the big bad wolf.
•
•
•
•

85 Professional Development Guide Implementation
© Museum of Science, Boston Duplication Not Permitted
Imp
lem
en
tatio
n
Le
sson
3
Draft 8/2012
Lesson 3: Wall Walk
Participants will:
observe different types of walls in their environment and describe the materials from which they are made.
connect different wall materials and their properties to the functions of walls.
Overview
This short exercise is a great way to find out what participants already know about walls, their structures, and their functions. This helps participants begin to see a connection between the specific functions a wall must serve and the properties of the materials used to build them. In this activity, participants take a three to five minute walk around the building and grounds where your workshop is taking place and note the different types of walls that they see.
Preparation: 5 minutes Workshop time: 10 minutes

86 Engineering is Elementary PD A Sticky Situation
© Museum of Science, Boston Duplication Not Permitted
Imp
lem
en
tati
on
Le
sson
3
Draft 8/2012
Materials
For the Workshop:
Lesson 3 of the A Sticky Situation facilitation PowerPoint (downloadable from EiE Educator Resources)
LCD projector and screen
chart paper
1 roll of tape, cellophane OR 5-7 magnets (for hanging participants’ handouts on the board or wall)
For Each Group of Three Participants:
{3-1} Wall Walk
Lesson 3: Wall Walk

87 Professional Development Guide Implementation
© Museum of Science, Boston Duplication Not Permitted
Imp
lem
en
tatio
n
Le
sson
3
Draft 8/2012
Lesson 3: Wall Walk
Activity
1. To segue into Lesson 3, divide participants into pairs or small groups and give each pair a copy of Wall Walk {3-1}. Instruct groups to:
Take about three to five minutes to walk around the building and its grounds and look for different kinds of walls.
Draw four different types of walls they observe, think about their functions, and try to identify the materials from which they are made.
2. Give participants about five minutes to complete Wall Walk {3-1}.
3. After they have finished sketching, ask each group to post their copy of Wall Walk {3-1} and describe one wall by focusing on its main function and the materials from which it is made.
4. After all groups have shared one of their walls, have participants look at all of the posted copies of Wall Walk {3-1}. Ask:
How are these walls similar?
How are they different?
See p. 73 of the Teacher Guide for details.
5. Reference one of the drawings on Wall Walk {3-1} that features a wall with mortar. Ask participants:
What is mortar used for? Common responses: To stick things together, usually in a building or wall.
What materials do you think mortar is made from? Common responses: Concrete, clay, etc.
•
•
•
•
•
•

88 Engineering is Elementary PD A Sticky Situation
© Museum of Science, Boston Duplication Not Permitted
Imp
lem
en
tati
on
Le
sson
3
Draft 8/2012
What are some properties that you think a good mortar should have? Common responses: It should be sticky and strong; it should be able to join rocks and bricks; it should not crack.
Record responses to the last question on chart paper for reference later in the lesson.
6. Explain to participants that they are going to use this prior knowledge to help them solve their design challenge.
Lesson 3: Wall Walk
EiE recommends creating this on chart paper or the board for reference later in the lesson:

89 Professional Development Guide Implementation
© Museum of Science, Boston Duplication Not Permitted
Imp
lem
en
tatio
n
Le
sson
3
Draft 8/2012
Lesson 3: Testing Mortar: “Ask”
Participants will:
engage in participant-guided inquiry and discover that the Engineering Design Process begins with asking questions.
connect Lesson 3 with the Engineering Design Process as a whole.
Overview
This part is a facilitated brainstorm, where participants generate a list of questions they have about the design challenge’s constraints, criteria, and required science knowledge. It is also unique to the PD experience; there is no separate activity in the A Sticky Situation Teacher Guide. However, it has become a staple of PD programs and when teachers have integrated it into their teaching of the unit, the activity has shown promise in reinforcing student’s understanding of the “Ask” step of the EDP and how asking questions links to scientific investigations.
EiE emphasizes the importance of the “Ask” step—especially as a productive way to begin meeting a design challenge. Thus, after the facilitator provides a very short description of the design challenge (“You will design a wall out of rocks and earth materials that is durable and strong”), participants generate a list of questions about that challenge. This is the questioning action that is also taken at the beginning of Tower Power (PD Workshop Part 2). Similar questions are often generated in both activities. This is a powerful learning opportunity in and of itself: a pattern of questioning and action can help us solve a problem. Questions typically relate to criteria (e.g., how will we know if our wall is strong enough?), constraints (e.g., how many rocks are we allowed to use to build our wall?), and knowledge (e.g., what are the properties of earth materials?).
The facilitator can zoom in on the questions that most strongly relate to Lesson 3 (about materials and measuring success); and hold off on answering other questions until they are more relevant, often later in the unit. In this way, participants’ questions help them invest in the progression of activities.
Preparation: 5 minutes Workshop time: 10 minutes

90 Engineering is Elementary PD A Sticky Situation
© Museum of Science, Boston Duplication Not Permitted
Imp
lem
en
tati
on
Le
sson
3
Draft 8/2012
Materials
For the Workshop:
chart paper
markers
Lesson 3 from the A Sticky Situation facilitation PowerPoint (downloadable from EiE Educator Resources)
LCD projector and screen
Lesson 3: Ask

91 Professional Development Guide Implementation
© Museum of Science, Boston Duplication Not Permitted
Imp
lem
en
tatio
n
Le
sson
3
Draft 8/2012
Activity
1. Remind participants of Yi Min’s design challenge. Ask:
What problem did Yi Min need to solve? Common response: Yi Min (and her class) had a pesky bunny that was eating the vegetables in the class garden.
What technology did she design to help her solve it? Common response: To keep out the bunny, Yi Min and Chen designed a wall using rocks and a mortar made of earth materials.
What process did she use to help solve her problem? Common response: The Engineering Design Process.
If participants need a reminder, encourage them to look at the illustration on the slide at right.
2. Explain to participants that they will be solving a design challenge similar to Yi Min’s—they will be designing a wall, but instead of using earth materials to make bricks, they will focus on the mortar that holds the wall together.
3. Remind participants that, in EiE, we start the Engineering Design Process by asking questions. Ask:
If your goal is to design a wall and a mortar from earth materials, what else do you want to know? In order to complete this challenge, what do you want to know before you start?
List participants’ questions on a chart like the one to the right. It is important for participants to ask questions about the design challenge criteria and constraints, including:
How big does our wall need to be? How tall? How long?
Lesson 3: Ask
EiE recommends creating this on chart paper or the board for reference in future lessons:

92 Engineering is Elementary PD A Sticky Situation
© Museum of Science, Boston Duplication Not Permitted
Imp
lem
en
tati
on
Le
sson
3
Draft 8/2012
What materials can we use to build our walls?
What materials work well for a mortar?
What is the purpose of our wall? What does it need to do?
How will we know if our wall design is successful?
Participants might not use the exact wording listed above, but it is key for them to ask questions that are at least similar. Other common questions include:
What is our budget?
How much time do we have?
Can we decorate our walls?
4. Tell participants that they have come up with a great list of questions and you will eventually answer all of them, but right now they will focus on answering their questions about materials and their properties.
Lesson 3: Ask

93 Professional Development Guide Implementation
© Museum of Science, Boston Duplication Not Permitted
Imp
lem
en
tatio
n
Le
sson
3
Draft 8/2012
Lesson 3: Testing Mortar
Participants will:
examine the available materials for designing walls and relevant handouts, and test different materials to see how well they work as a mortar.
discuss development of testing methodology and ways to scaffold this topic with students.
Preparation: 30-45 minutes Workshop time: 40 minutes
Overview
While representing the start of Lesson 3 as written in the Teacher Guide, this PD workshop part flows naturally from the expanded version of the “Ask” activity. Participants most likely will have asked questions about the materials for their walls and mortar. Now, in the first activity of this lesson, they examine each available earth material in a dry and wet state, identify its properties, and predict which materials would and would not be good choices for a mortar. Like the Lesson 3 in nearly all EiE units, this familiarizes children with materials they might use in their designs, providing them an opportunity to start thinking analytically about their solutions. Of course, participants are more likely to be familiar with the materials than students, but even they benefit from this experience, as it models what is an essential learning step that might otherwise be missed. It is also an opportunity for educators to consider materials and their properties in what may be a new way.
The second activity in Lesson 3 differs slightly from the Teacher Guide. This facilitation focuses on experimental design by providing an opportunity for participants to think about how to test materials to determine how well they work as a mortar, but in a more open way than is in the Teacher Guide. Thinking through the question of how to set-up a “fair test” can prepare participants to think more flexibly about the experiment and its results in the classroom. This conversation may come in handy for teachers as they work with students who may improvise new methods or fail to follow the specific procedure as outlined in the Teacher Guide.
In the last activity of Lesson 3, participants test materials both for their adhesiveness as well as for their durability. They use the procedure described in the Teacher Guide and report their data. The procedure is simple enough, but like all scientific experiments, there are still controls that will need extra clarification and even still, the data may vary. These ambiguities can frustrate some participants who seek clear-cut answers and want to know how to get things “right.” Yet, this ambiguity is at the heart of STEM thinking and learning. Modeling how to work with ambiguity is a great lesson for participants. One helpful approach is to try to gently reflect individuals’ questions back to the group. It can be even more useful to point out afterwards that this is what you have done. Rather than become the “go-to” person for answers, you will have modeled how to serve as a facilitator and supporter of learners’ own thinking.
94 Engineering is Elementary PD A Sticky Situation
© Museum of Science, Boston Duplication Not Permitted
Imp
lem
en
tati
on
Le
sson
3
Draft 8/2012
Part 9: Testing Mortar
Materials for all Three Activities
For the Workshop:
Lesson 3 of the A Sticky Situation facilitation PowerPoint (downloadable from EiE Educator Resources)
LCD projector and screen
soil, approx. 6 1/4 cups
sand, approx. 6 1/4 cups
clay powder, approx. 6 1/4 cups
measuring cup, dry, 1/4 cup (59.1 ml)
measuring cup, dry, 1 cup (236.6. ml)
15 bags, plastic, re-sealable, approx. 6” x 5” (15.2 x 12.7 cm)
6 tiles, ceramic, 2” x 2” (5.1 cm x 5.1 cm)
11 bowls, approx. 20 oz. (591.5 ml)
1 plate, paper or foam tray, small
3 spoons, plastic
water, warm, approx. 2 cups (473.1 ml)
1 roll of tape, masking
paper towels
For Each Group of Three Participants:
1 plate, paper or foam tray
3 pre-prepared tile sandwiches (see next page for details, amounts of soil, sand , and clay powder for the mortar sandwiches are included in the total above)
hand lens
{3-2} Properties of Dry Earth Materials (optional)
{3-3} Properties of Wet Earth Materials (optional)
{3-5} Testing Mortar: Soil, Sand, and Clay
{3-6} Earthquake Test
{3-7} Testing Results
Lesson 3: Testing Mortar

© Museum of Science, Boston Duplication Not Permitted
95 Professional Development Guide Implementation
Imp
lem
en
tatio
n
Le
sson
3
Draft 8/2012
Lesson 3: Testing Mortar
Preparation
1. One to two days prior to the workshop, prepare the mortar sandwiches that participants will test. Each group of participants will need:
one mortar sandwich filled with clay
one mortar sandwich filled with sand
one mortar sandwich filled with soil
See pp. 80-81 of the Teacher Guide for more details on how to prepare the mortar sandwiches. You will need use approximately two cups of each earth material (mixed with water until uniformly wet but not runny) to create the mortar sandwiches. Set aside the mortar sandwiches for each group on paper plates or small foam trays. Be sure to let all mortar sandwiches dry for at least one day.
2. Prepare samples of dry earth materials for participants to observe. Create five sealed plastic bags of each of the following:
approx. 1/4 cup (59.1 ml) of dry clay powder
approx. 1/4 cup (59.1 ml) of dry sand
approx. 1/4 cup (59.1 ml) of soil
Minimize contact with the dry clay powder by adding it gently to the plastic bag, in order to reduce dust. Label each bag with a piece of masking tape describing its contents. You might also tape along the top of each bag so that it remains securely closed. These bags, once prepared, can be reused in future workshops. (Alternatively, if you have view boxes, you might prepare 15 of them as described above, just using smaller amounts of each material.
3. Just prior to beginning this lesson, prepare samples of wet earth materials. In three separate bowls, add spoonfuls of warm water into approximately 1 cup each of clay powder, soil, and sand (each material should be in its own separate bowl) and stir thoroughly until the mixture is uniformly wet but not runny. In the remaining eight bowls, put a small spoonful of each of the three wet earth materials so that they form three separate mounds. (Alternatively, if you need to prepare the wet earth materials prior to the start of the workshop, you can do so in re-sealable plastic containers as long as you make sure they are tightly sealed. You might need to add a little extra water and stir before spooning the wet earth materials out into the eight remaining bowls.) See p. 76 of the Teacher Guide and the online How-To video for more information.
4. Set aside six tiles and one paper plate or foam tray for making the demonstration mortar sandwiches. You can re-use one set of the three wet earth material samples to fill the mortar sandwiches.

96 Engineering is Elementary PD A Sticky Situation
© Museum of Science, Boston Duplication Not Permitted
Imp
lem
en
tati
on
Le
sson
3
Draft 8/2012
Activity 1—Properties of Earth Materials
1. Explain to participants that in this lesson they will examine the properties of earth materials and determine whether mortars made of different earth materials have the properties of a good mortar. Remind participants of the properties of a good mortar that they identified earlier, after their wall walk by referring to the list you recorded earlier (see diagram on left).
2. Tell participants that they will focus on answering the following Guiding Question:
Which earth materials make a good mortar that is sticky (adhesive) and durable?
3. Divide participants into groups and distribute a hand lens and a copy of Properties of Dry Earth Materials {3-2} to each group.
4. Distribute the bags of dry earth materials and tell participants that they should:
quickly examine the bags of earth materials with and without the hand lens.
jot down their observations on Properties of Dry Earth Materials {3-2}.
pass the bag of dry earth materials onto the next group of participants.
Tell participants NOT to open the bags of dry earth materials.
5. Collect the samples of dry earth materials.
6. Have participants share their findings from Properties of Dry Earth Materials {3-2}.
7. Next, distribute the samples of wet earth materials to each group of participants.
8. Give groups a few minutes to examine the wet earth materials and jot down their observations on Properties of Wet Earth Materials {3-3}. Participants are welcome to touch the wet earth materials to get a sense of their texture.
Lesson 3: Testing Mortar
EiE recommends creating this on chart paper or the board for reference later in the lesson:

97 Professional Development Guide Implementation
© Museum of Science, Boston Duplication Not Permitted
Imp
lem
en
tatio
n
Le
sson
3
Draft 8/2012
9. Collect the samples of wet earth materials.
10. Have participants share their findings from Properties of Wet Earth Materials {3-3}.
11. Ask:
Based on your observations, do you think that we should make our mortar out of wet or dry earth materials? Why?
What material properties do you think will be important for an effective mortar? Why?
Do you have any predictions about which earth material mortar will work the best?
Record participants’ predictions. See p. 78 of the Teacher Guide for more information.
Lesson 3: Testing Mortar
•
•
•
EiE recommends creating this on chart paper or the board for reference later in the lesson:

98 Engineering is Elementary PD A Sticky Situation
© Museum of Science, Boston Duplication Not Permitted
Imp
lem
en
tati
on
Le
sson
3
Draft 8/2012
Activity 2—Testing Procedure
1. Tell participants that they have made some good predictions about the earth materials available for their mortar. The next step is to figure out how to test their predictions. Ask:
How could we figure out which materials (soil, sand, clay) work well as a mortar? Common responses: We could turn them into mortars and see how well they work. A good mortar will be sticky/adhesive. It should also be strong/durable.
What do we need to keep in mind as we set up our experiment? Common responses: We should only test one earth material at a time; we should use the same amount of earth material mortar in our tests. We need to test all of the materials in the same way. We need to find a way to measure how sticky and how durable the mortar is. We might try testing stickiness with a test to pull things apart, etc.
Record participants’ ideas.
2. Point out that this discussion is not in the Teacher Guide, but that the aim in this part of workshop is to encourage the participants to come up with the details of an experimental procedure that would be practical in an elementary classroom. Try to use participants’ answers to generate more clarifying questions. For example, a way to respond to the suggestion that we need to measure stickiness of the earth materials, you might ask: What are some ways you could do this with young children? Some may suggest that we use the different earth materials as glue to stick two things together, let them dry, and then try to pull them apart.
Lesson 3: Testing Mortar

© Museum of Science, Boston Duplication Not Permitted
99 Professional Development Guide Implementation
Imp
lem
en
tatio
n
Le
sson
3
Draft 8/2012
4. By allowing participants to brainstorm ideas for an experimental procedure, they are primed to understand why EiE has set-up the materials testing in the way that we have and are better able to address procedural issues that may arise with their students. In fact, teachers may want to open up this discussion with their students, and then let the students design a testing method of their own, rather follow EiE’s procedure.
5. Tell participants that they can (and should) use the ideas that they have come up with for materials testing in their classroom, but we (EiE) have also provided testing procedures in the A Sticky Situation Teacher Guide that incorporate many of the ideas participants likely mentioned.
Lesson 3: Testing Mortar

100 Engineering is Elementary PD A Sticky Situation
© Museum of Science, Boston Duplication Not Permitted
Imp
lem
en
tati
on
Le
sson
3
Draft 8/2012
Activity 3—Testing Materials
1. Explain that to evaluate how well soil, sand, and clay work as mortars, they will be using mortar sandwiches to test each material’s stickiness and durability. Show participants one of the mortar sandwiches that you prepared and explain that a mortar sandwich consists of two tiles held together by a mortar made of one of the wet earth materials.
2. To evaluate the different earth materials’ stickiness and durability, explain that participants will be using two tests:
the Sticking Test (stickiness)
the Earthquake Test (durability)
3. Using one of the bowls of three wet earth materials, demonstrate for participants how to make the mortar sandwiches using six tiles and the three samples of wet earth materials. See p. 80 of the Teacher Guide for details.
4. Point out that what participants will be doing today in the workshop is different from what students will do in the classroom. In the classroom, students would first prepare a set of six mortar sandwiches (two each of soil, sand, and clay mortar) and let them dry overnight.
5. However, given that these mortar sandwiches need to dry overnight, explain to participants that they will be using pre-made mortar sandwiches to conduct the Sticking Test and the Earthquake Test.
6. Tell participants that, in the interest of time in the workshop, each group will get three mortar sandwiches (one of each earth material) and they will conduct either the Sticking Test OR the Earthquake Test. Then, groups will share data with the rest of the workshop.
7. Distribute Testing Mortar: Soil, Sand, and Clay {3-4} to each group of participants.
Lesson 3: Testing Mortar
•
–
–
–
•
•
•
•
–
–
–
•
•

101 Professional Development Guide Implementation
© Museum of Science, Boston Duplication Not Permitted
Imp
lem
en
tatio
n
Le
sson
3
Draft 8/2012
8. Explain and demonstrate (using the wet mortar sandwiches you just prepared) the two tests that participants will perform on their dry mortar sandwiches:
To test the stickiness (adhesiveness) of the mortar, they will perform the Sticking Test on one of each type of mortar sandwich. See p. 84 of the Teacher Guide and the online How-To video for directions.
To test the durability of the mortar, they will perform the Earthquake Test on the remaining three mortar sandwiches. See p. 86 of the Teacher Guide and the online How-To video for directions.
9. Ask participants:
If a mortar works well, what do you predict will happen during the Sticking Test? Common responses: When you lift the sandwich up, the bottom tile won’t fall off; it will continue to adhere to the top tile; etc.
If a mortar works well, what do you predict will happen during the Earthquake Test? Common responses: The two tiles will remain stuck together and aligned; they won’t separate or fall apart.
10. Explain that as they perform each test and make careful observations, groups should think about the following questions:
Are the tiles still stuck together?
Did the mortar crack?
Did the mortar crumble?
Did any mortar fall out from between the tiles?
11. Assign each group of participants to either the Sticking Test OR the Earthquake Test. Distribute Earthquake Test {3-6} to each group conducting the Earthquake Test.
PD Tip
You might point out to participants that Testing Mortar: Soil, Sand, and Clay {3-5} is the more basic version of {3-4} and is appropriate for younger (grades 1-2) or less advanced students. If your participants are most teachers of younger grades, you might consider using {3-5} instead of {3-4}. In your workshop.
Lesson 3: Testing Mortar
•
•
•
•

102 Engineering is Elementary PD A Sticky Situation
© Museum of Science, Boston Duplication Not Permitted
Imp
lem
en
tati
on
Le
sson
3
Draft 8/2012
12. Ask participants:
Do you have any questions or concerns about our procedure?
13. Distribute foam trays of three (dry) mortar sandwiches to groups.
14. Give participants about five minutes to complete their test and record their data on Testing Mortar: Soil, Sand, and Clay {3-5}.
15. Once groups have finished their tests, ask them to report out their findings and record them on Testing Results {3-7}.
16. Have participants return to the predictions they made during Activity 1. Ask:
How did your results compare to your predictions about which materials and material properties would make a good mortar?
Were you surprised by any of our results? Which ones?
PD Tip
See p. 85 and p. 87 of the Teacher Guide for the likely results of the Sticking and Earthquake Tests.
Lesson 3: Testing Mortar
PD Tip
After participants complete the two tests, you might show them the How-To Videos found on the EiE Educator Resources website.
EiE recommends creating this on chart paper or the board for reference in future lessons:
•
•
•
EiE recommends creating this on chart paper or the board for reference later in the lesson:

103 Professional Development Guide Implementation
© Museum of Science, Boston Duplication Not Permitted
Imp
lem
en
tatio
n
Le
sson
3
Draft 8/2012
Reflection
1. Return to the Lesson 3 Guiding Question:
Which earth materials make a good mortar that is sticky (adhesive) and durable? Common response: None—all of the earth materials had some faults. They all cracked, crumbled, or did not stick together.
Ask participants to turn to their group members and discuss it for a minute or two before sharing their responses. Remind them to look at the data on Testing Results {3-7} to help inform their responses.
2. Guide participants to think about the possibility of combining different materials to create a better final product. Ask:
What were some good properties of each mortar (soil, sand, and clay)?
What could you do to make a better mortar to stick the tiles together?
Coming to the idea of combing earth materials See p. 88 of the Teacher Guide for more information.
3. Participants (as well as students) may need guidance to come to the idea that mixing earth materials together will change the properties of the mortar. You might prompt them by asking:
How might you create a mortar that has the desirable properties of two or three of the earth materials that we tested? Common responses: By mixing different earth materials together, by combining earth materials, etc.
4. To wrap up Lesson 3, ask participants to put on their teacher hats and share any questions or concerns they might have about implementing this lesson with students. In addition, share the bullets listed on the “Teacher Hat: Lesson 3” slide:
Lesson 3: Testing Mortar
•
–
–
–
•
•
•

104 Engineering is Elementary PD A Sticky Situation
© Museum of Science, Boston Duplication Not Permitted
Imp
lem
en
tati
on
Le
sson
3
Draft 8/2012
Reiterate for participants how Lesson 3 in this workshop was different from how the lesson is written in the Teacher Guide (due to time constraints):
In the classroom, students create six mortar sandwiches themselves, working in pairs or small groups, and leave them to dry overnight.
Each student pair or group then conducts BOTH the Sticking Test and the Earthquake Test using their mortar sandwiches.
To help guide students through each test, in the classroom, EiE suggests having students conduct the Sticking Test, share their results, then conduct the Earthquake Test, share their results.
Sometimes, when conducting experiments, one groups’ results are very different from others who have conducted the same experiment, especially with young students. Ask participants what they might do if this happens in their classrooms. Possible ideas include:
Repeating the experiment again as a whole class to determine if the data were indeed outliers.
Asking the particular group(s) with outlying results to conduct their experiment again, after carefully reviewing the testing procedure. For example, some students might shake the tiles harder and faster during the Earthquake Test, or lose track of how many times to shake the plate.
Participants might consider letting older or more advanced students design their own tests for stickiness and durability, rather than following EiE’s procedure exactly.
Remind participants that it is very important that they save students’ data (from Testing Results {3-7}) for their reference in Lesson 4.
Lesson 3: Testing Mortar

105 © Museum of Science, Boston Duplication Not Permitted
Imp
lem
en
tatio
n
Le
sson
4
Professional Development Guide Implementation
Draft 8/2012
Lesson 4: Designing a Wall
Participants will:
use the data collected and analyzed from Lesson 3 to make connections about material properties and the success of their wall designs.
use the Engineering Design Process to design a strong and durable wall.
become familiar with the EDP handouts that students will use at each step of the design process.
Overview
This part of the workshop is the participants’ opportunity to see how the EDP comes together. They reflect on the “Ask” step of the EDP (formally begun in Lesson 3), have an opportunity to ask additional questions, and then move step-by-step through the rest of the design process. As a facilitator, you may find a few unique PD challenges.
Like students, participants may want to design and create their walls right away. Your role is to maintain enough structure so that they will be able to experience each step of the EDP, and understand how and why EiE units support this step-by-step approach to design. The handouts serve to support this structure, but participants may skip them. At this point, the more you can encourage them to act from two perspectives simultaneously—as teachers learning about EiE and as learners designing walls—the better.
It is important to note that the classroom version of Lesson 4 is much more structured and time-intensive than this workshop version. One way to at least mark the transitions between different steps in the EDP is to set up a rhythm of several minutes of action followed by a few moments’ reflection. You might go through the “Ask” step of the EDP as a whole workshop, then explain the “Imagine,” “Plan,” and “Create” steps to participants before giving them some time to work on those steps themselves. In addition, because of workshop time constraints (meaning that the walls participants build will not be able to dry in time for testing), this PD Guide suggests building a few different walls ahead of time that participants can test and use to think about possible improvements. Of course, if you have a workshop that runs multiple days, you can have participants build their walls on Day 1, allow them to drive overnight (with a fan blowing on them) and test them towards the end of Day 2.
Preparation: 45-60 minutes Workshop time: 40 minutes

106 Engineering is Elementary PD A Sticky Situation
© Museum of Science, Boston Duplication Not Permitted
Imp
lem
en
tati
on
Le
sson
4
Draft 8/2012
Lesson 4: Designing a Wall
Materials
For the Workshop:
Lesson 4 of the A Sticky Situation facilitation PowerPoint
(downloadable from EiE Educator Resources)
LCD projector and screen
clay flour, 9 1/4 cups (8 cups for participants, 1 1/4 cups for model walls)
sand, 8 1/2 cups (8 cups for participants, 1/2 cup for model walls)
soil, 8 1/2 cups (8 cups for participants, 1/2 cup for model walls)
water, warm, 10 cups (for mixing with clay flour and for model walls)
water, in pitcher or bowl, 5 cups (1.2L)
3 containers, resealable, approx. 170 oz. (5L)
3 bowls, approx. 20 oz. (591.5 ml)
3 spoons, plastic
3 craft sticks
3 measuring cups, dry, 1/4 cup (59.1 ml)
measuring cup, dry, 1 cup (236 ml)
1 tablespoon (14.8 ml) measure
paper towels
90 rocks, slate
3 plates, sturdy paper or cardboard
2 chairs, with backs of the same height
string, 3 feet (0.9m)
wooden dowel or broom handle, approximately 3 feet (0.9m) long and 1/2” inch (1.3 cm) in diameter
tape, masking
golf ball
newspaper or tablecloths, for covering work surfaces (optional)
{4-11} Demolition Test Angle
For Each Group of Participants:
30 rocks, slate
craft stick
spoon, plastic
plate, sturdy paper or cardboard
bowl, approx. 20 oz. (591.5 ml)
ruler

© Museum of Science, Boston Duplication Not Permitted
107 Professional Development Guide Implementation
Imp
lem
en
tatio
n
Le
sson
4
Draft 8/2012
Lesson 4: Designing a Wall
Copy For Each Participant:
An EDP Packet consisting of the following handouts, stapled together:
{4-1} The Engineering Design Process: Five Steps for Engineering Design
{4-3} Engineering Design Process: Ask!
{4-5} Engineering Design Process: Imagine!
{4-6} Engineering Design Process: Plan!
{4-7} Engineering Design Process: Create!
{4-9} Engineering Design Process: Improve!
Preparation
1. Two days before the workshop, create three model walls that participants will test and analyze. Each wall should have a different mortar mixture, as follows:
2. Build the three walls (using 30 rocks per wall) according to the directions on pages 108-109 of the Teacher Guide. Be sure to build the walls onto individual paper plates. Leave the walls in a safe place to dry. You might aim a fan at the walls to help expedite the drying process.
3. Prepare the demolition ball that will be used to test participants’ wall designs. See p. 97 of the Teacher Guide, Demolition Ball Assembly {4-10}, and the online How-To video for details.
4. Prepare the wet clay for participants to use in their mortar mixtures according to the procedure in Step 5 of p. 106 of the Teacher Guide. The clay should be wet in order to minimize contact with dry clay powder.
5. Cover tables with newspaper or tablecloths to control messes.
6. Prepare a “Materials Store” table or area where participants can acquire the soil, sand, clay, craft sticks, bowls, and water they will need to create their mortar mixture designs.
7. Count out 30 rocks for each group of participants.
Mortar Mixture #1 1/4 cup sand 1/4 cup soil 1/4 cup clay
Mortar Mixture #2 1/4 cup sand 1/2 cup clay
Mortar Mixture #3 1/4 cup soil 1/2 cup clay
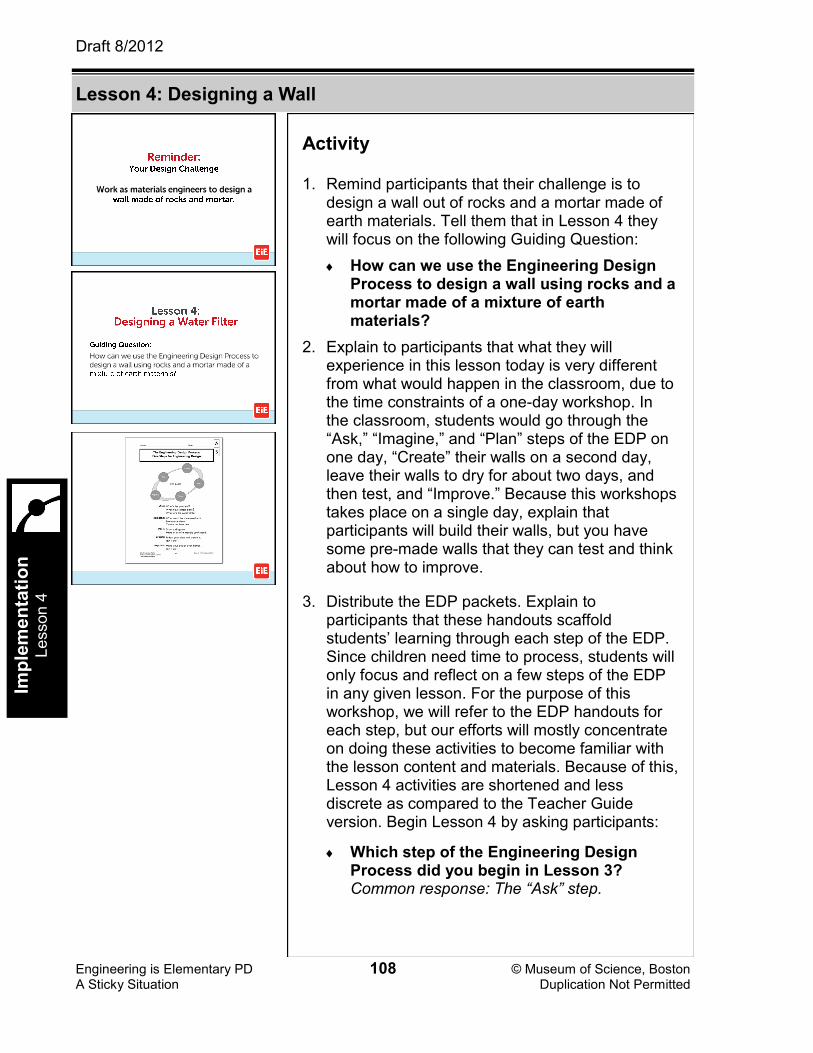
108 Engineering is Elementary PD A Sticky Situation
© Museum of Science, Boston Duplication Not Permitted
Imp
lem
en
tati
on
Le
sson
4
Draft 8/2012
Lesson 4: Designing a Wall
Activity
1. Remind participants that their challenge is to design a wall out of rocks and a mortar made of earth materials. Tell them that in Lesson 4 they will focus on the following Guiding Question:
How can we use the Engineering Design Process to design a wall using rocks and a mortar made of a mixture of earth materials?
2. Explain to participants that what they will experience in this lesson today is very different from what would happen in the classroom, due to the time constraints of a one-day workshop. In the classroom, students would go through the “Ask,” “Imagine,” and “Plan” steps of the EDP on one day, “Create” their walls on a second day, leave their walls to dry for about two days, and then test, and “Improve.” Because this workshops takes place on a single day, explain that participants will build their walls, but you have some pre-made walls that they can test and think about how to improve.
3. Distribute the EDP packets. Explain to participants that these handouts scaffold students’ learning through each step of the EDP. Since children need time to process, students will only focus and reflect on a few steps of the EDP in any given lesson. For the purpose of this workshop, we will refer to the EDP handouts for each step, but our efforts will mostly concentrate on doing these activities to become familiar with the lesson content and materials. Because of this, Lesson 4 activities are shortened and less discrete as compared to the Teacher Guide version. Begin Lesson 4 by asking participants:
Which step of the Engineering Design Process did you begin in Lesson 3? Common response: The “Ask” step.

109 Professional Development Guide Implementation
© Museum of Science, Boston Duplication Not Permitted
Imp
lem
en
tatio
n
Le
sson
4
Draft 8/2012
Lesson 4: Designing a Wall
4. Return to original list of questions about the design challenge that participants created at the beginning of Lesson 3. Review the questions that were answered in Lesson 3 by going through the list and checking off the ones that have been answered. The main questions answered in Lesson 3 are:
What materials can we use to build our walls?
What materials work well for a mortar?
5. Next, focus on the partially unanswered question “What materials can we use to build our walls?” Explain to participants that they can use the soil, sand, and clay (or any combination of the three) to create their mortars. The walls themselves will be made of rocks.
6. Hold up the slate rocks and explain that each group will get 30 rocks to build their walls.
7. Then, focus on the unanswered questions of “How big does our wall need to be? How tall? How long?” Explain that with their 30 rocks, each group’s wall will be approximately three inches high and about six inches long. This will take about three layers of rocks.
8. Remind participants of the wall walk that they went on earlier in the workshop. Ask:
What do you notice about the way the bricks are stacked in these walls?
Are the bricks set directly on top of one another or are they staggered? Common response: Staggered
Where is the mortar located? Common response: In between the bricks.
Encourage participants to keep this in mind as they imagine, plan, and create their walls.
On Chart Paper from Lesson 3:
Questions about design challenge:
How big does our wall need to
be? How tall? How long?
What materials can we use to
build our walls?
What materials work well for a
mortar?
What is the purpose of our
wall? What does it need to do?
How will we know if our wall
design is successful?

110 Engineering is Elementary PD A Sticky Situation
© Museum of Science, Boston Duplication Not Permitted
Imp
lem
en
tati
on
Le
sson
4
Draft 8/2012
Lesson 4: Designing a Wall
9. Finally, address the question of “What will we know if our design is successful?” Ask participants:
How might we test our walls to see if our mortar mixture is sticky and our wall is durable?
Record participants’ responses.
10. Allow participants to suggest various ways to test the walls. Point out that this is a useful conversation to have with students as a way of helping them to develop their abilities to design experiments. See pp. 103-104 of the Teacher Guide for details.
11. If participants have not already done so, bring up the idea that testing to failure—breaking the wall—is one way to measure wall durability. Point out that engineers often test designs in this way so that they can take note of design weaknesses and improve the design.
12. Explain that, in the classroom, participants are welcome to use students’ ideas for testing the walls, but EiE has also provided a testing procedure in A Sticky Situation that likely incorporates many of the ideas that participants mentioned.
13. Show participants the demolition ball set-up and explain how they will use it to test their walls. See pp. 111-112 of Teacher Guide (and the online How-To Video) for details. Ask:
How will the demolition ball test the stickiness of your mortar? Common responses: If the mortar is sticky, the rocks in our wall will stick together even after the demolition ball hits them.
How will the demolition ball set-up test the durability of your wall? Common responses: If our wall is durable, it will still be standing even after the demolition ball hits it several times from the largest angle.

111 Professional Development Guide Implementation
© Museum of Science, Boston Duplication Not Permitted
Imp
lem
en
tatio
n
Le
sson
4
Draft 8/2012
Lesson 4: Designing a Wall
14. Complete the “Ask” step of the EDP by showing participants EDP: Ask! {4-3} and having them turn to their copies. Point out that, in the classroom, this handout helps students what they have learned from their experiments in Lesson 3, which they likely did on a previous day.
15. Emphasize to participants that they still have the posted copy of Testing Results {3-7} for their reference.
16. Tell participants that you are now going to explain what they will need to do for the “Imagine,” “Plan,” and “Create” steps of the EDP, and then you will give groups time to complete those three steps on their own.
17. Show participants EDP: Imagine! {4-5} and explain that each participant will take five minutes to quickly sketch out two different mortar mixture designs on their own, using the knowledge they gained from Lesson 3.
18. Explain to participants that they will be able to use a total of three scoops of dry earth materials to create the mortar mixture for their walls. Each scoop is equal to 1/4 cup. Show participants the 1/4 cup measure. Groups will be allowed any three-scoop combination that they choose.
19. Tell participants that they will also be able to add up to five tablespoons of water to their mortar mixture in order to make it the consistency of cake frosting.
20. Participants will then share their mortar mixture design ideas with their group members. As a group, they will discuss the different ideas and together come up with one idea to plan out on EDP: Plan! {4-6}. Encourage participants to incorporate some ideas from all group members into their wall design.
21. Remind participants to also think about how to stack the rocks in their walls.
PD Tip
You might point out to participants that Engineering Design Process: Ask! {4-4} is the more basic version of {4-3} and is appropriate for younger (grades 1-2) or less advanced students. If your participants are most teachers of younger grades, you might consider using the Basic versions of the EDP handouts, rather than the Advanced versions indicated here.

112 Engineering is Elementary PD A Sticky Situation
© Museum of Science, Boston Duplication Not Permitted
Imp
lem
en
tati
on
Le
sson
4
Draft 8/2012
Lesson 4: Designing a Wall
22. Once groups have completed EDP: Plan! {4-6}, they will go to the “Materials Store” to gather the items they need for their walls.
23. Groups should then return to their tables and “Create” their walls according to their plans. They:
will build their wall on a paper or cardboard plate.
must use a layer of mortar to adhere their wall to the plate.
CANNOT cover the entire outside of their wall with mortar.
24. Ask:
Do you have any questions before we begin?
25. Divide participants into groups and give each group a set of 30 river rocks and a paper or cardboard plate.
26. Post the directions and give groups about 20 minutes to “Imagine,” “Plan,” “Create,” and test their first walls designs.
27. As participants are working, circulate and check in with groups. You might ask:
What step of the Engineering Design Process are you working on?
What materials do you think you will combine in your mortar mixture? Why?
How are you using what we learned in Lesson 3 to help you design your mortar mixture?
28. Once participants have built their walls, instruct them to write their names on the paper or cardboard plate. They can take their walls home at the end of the workshop, if they would like.
•
•
•
•
–
–
•

113 Professional Development Guide Implementation
© Museum of Science, Boston Duplication Not Permitted
Imp
lem
en
tatio
n
Le
sson
4
Draft 8/2012
Lesson 4: Designing a Wall
29. After all groups have had a chance to “Imagine,” “Plan,” and “Create” their first wall designs gather the attention of the workshop and discuss participants’ findings:
What were the contents of your mortar mixture? What three “scoops” did you use?
Why did you choose those earth materials?
How did you arrange the rocks in your wall? Why did you choose that arrangement?
Are there any additional materials that you can think of (other than the ones provided) that you think might improve your design?
30. Explain that since the timing of the workshop does not allow a chance for the participants’ walls to dry before testing, the group will test three pre-made walls made of the following mortar mixtures:
1 scoop of clay, 1 scoop of sand, and 1 scoop of soil
2 scoops of clay and 1 scoop of sand
2 scoops of clay and 1 scoop of soil
31. Ask participants to make some predictions:
Did any group create a wall out of a similar mortar mixture?
Which walls do you predict will work well when we test them? Why?
Are they any walls that you predict will NOT work well? Why not?
Record participants’ predictions.
32. Tell participants that they are going to test each wall using the demolition ball and record their data on EDP: Create! {4-7}. They can record the results for all three pre-made walls on the same copy of EDP: Create! {4-7}, which will make for easier comparisons.
PD Tip
If you are running a two-day workshop, teach this unit on the first day and be sure to have participants “Create” their walls by the end of day one. You can leave the walls to dry overnight in front of a fan set to high speed; they should be ready to test in the morning.
•
•
•
•
•

114 Engineering is Elementary PD A Sticky Situation
© Museum of Science, Boston Duplication Not Permitted
Imp
lem
en
tati
on
Le
sson
4
Draft 8/2012
Lesson 4: Designing a Wall
33. Ask for participant volunteers to help you test each of the three pre-made walls. The other participants will act as observers and record the data on EDP: Create! {4-7}.
34. Begin testing each of the three pre-made walls, one at a time, until each wall clearly begins to fail (this may require hitting the wall repeatedly at Level 4). See pp. 112-113 of the Teacher Guide (and the online How-To Video) for details on the testing procedure.
35. Gather the attention of the workshop and discuss what happened during testing. Use the following questions to help guide your discussion:
Which of the walls was most successful? How do you know?
Did any of the walls that we tested fail?
How did they fail? Did they crack? Crumble?
How do you think the mortar mixtures impacted the walls’ success or failure?
What was the mortar mixture of the most successful wall? How do you think that related to the wall’s successful?
Do you think the arrangement of the rocks in the walls affected their success during testing? How so?
Which aspects of each wall worked well?
Which aspects did not work well? Why not?
How would you improve these walls?
What would you change? Why?
What would you keep the same? Why?
Now that you have seen some types of walls tested, how might you improve your own wall designs based on this new data?
PD Tip
You might point out to participants that Engineering Design Process: Create! {4-8} is the more basic version of {4-7} and is appropriate for younger (grades 1-2) or less advanced students. If your participants are most teachers of younger grades, you might consider using the Basic versions of the EDP handouts, rather than the Advanced versions indicated here.

115 Professional Development Guide Implementation
© Museum of Science, Boston Duplication Not Permitted
Imp
lem
en
tatio
n
Le
sson
4
Draft 8/2012
Lesson 4: Designing a Wall
36. If time allows, have participants return to their pairs and discuss possible ways that they could “Improve” their walls and complete Engineering Design Process: Improve! {4-9}.
Reflection
1. Return to the Lesson 4 Guiding Question and have participants answer it based on their experiences:
How can we use the Engineering Design Process to design a wall using rocks and a mortar made of a mixture of earth materials?
2. Spend a few minutes discussing what might have happened if there was time for a full rendering of the “Improve” step of the EDP in the workshop. Ask participants:
What factors seemed to affect how successful the walls were? Common responses: The most successful walls had mortars made of more than one earth material—these earth materials had different particle sizes. They also had rocks that were stacked in an alternating pattern, this made the wall stronger.
How would you know if your improvements were successful? Common responses: If the demolition ball was able to hit the wall from a higher angle (or more times from 90 degrees) as compared to our first designs, then we know the wall is more successful.
3. To wrap up Lesson 4, ask participants to put on their teacher hats and share any questions or concerns they might have about implementing this lesson with students. In addition, share the bullets listed on the “Teacher Hat: Lesson 4” slide:
•
–
–
•
•

116 Engineering is Elementary PD A Sticky Situation
© Museum of Science, Boston Duplication Not Permitted
Imp
lem
en
tati
on
Le
sson
4
Draft 8/2012
Lesson 4: Designing a Wall
PD Tip
You might mention to participants that EiE also suggests that during the “Improve” step of the EDP, students might be allowed to include other materials, such as straw and twigs. See p. 117 of the Teacher Guide for details.
Reiterate and emphasize how what participants just experienced in the workshop is different from how this lesson would transpire in the classroom:
Lesson takes give, 45-minute sessions in the classroom. “Ask,” “Imagine,” and “Plan” are one session. “Create” is a second session, with a day or two of drying time for the walls. The students test and analyze their walls in the third session, “Improve” their walls in a fourth session, and test and analyze their improved walls in a fifth session.
Students, and young students in particular, often struggle with the “Imagine” and “Plan” steps of the EDP. When imagining, students often believe they can only think of one design that is worth considering. EiE recommends having students complete the “Imagine” step of the EDP individually, perhaps even for homework—and requiring that students come up with at least two designs. Encourage students to use their first design ideas as a jumping off point for their second idea. In the “Plan” step, students often struggle with trying to incorporate ideas from all group members into their designs. Discussing and modeling ways to do this can help support students in successfully completing this step.
In the “Improve” step of the EDP, it is helpful to guide students to focus on changing just one aspect of their walls at a time: either the composition of their mortar mixture or the arrangement of the rocks. This helps students to troubleshoot one aspect of their walls at a time and identify what features of their walls might be weakest.
117 Professional Development Guide Introduction
© Museum of Science, Boston Duplication Not Permitted
Draft 7/2012
Intro
du
ctio
n
EiE
and
Tea
ch
er G
uid
e
Participants will:
learn how the EiE Teacher Guides are structured and the location of resources within the guides, such as planning charts, lesson plans, handouts, and assessments.
Overview of EiE Teacher Guide
& Educator Resources
Overview
This part of the PD Guide provides a comprehensive overview of the structure and flow of the Teacher Guides. EiE has structured its curricular materials for ease of use and implementation in the following ways:
1. The Teacher Guides share a common structure and format so that participants can readily find information in predictable places within different guides.
2. Even though the specific engineering content within each Teacher Guide is unique, there is a predictable flow of activities within every EiE unit. The broad goals of Lessons 1 through 4 are the same for every unit.
When going over the Teacher Guide structure with participants, it is helpful if you can provide or ask participants to bring copies of the A Sticky Situation Teacher Guide to your workshop so that they can follow along and reference the relevant pages themselves.
Preparation: 5 minutes Workshop: 15 minutes

Te
ach
er
Gu
ide S
truc-
ture
118 Engineering is Elementary PD A Sticky Situation
© Museum of Science, Boston Duplication Not Permitted
Draft 7/2012
Intr
od
uc
tio
n
EiE
and
Tea
ch
er
Gu
ide
Overview of EiE Teacher Guide & Educator Resources
Materials
For the Workshop:
Overview of the EiE Teacher Guide & Educator Resources from the A Sticky Situation facilitation PowerPoint (downloadable from EiE Educator Resources)
LCD projector and screen
For Each Participant:
{PD-1} EiE Classroom Implementation Planning (optional)

© Museum of Science, Boston Duplication Not Permitted
119 Professional Development Guide Introduction
Draft 7/2012
Intro
du
ctio
n
EiE
and
Tea
ch
er G
uid
e
Overview of EiE Teacher Guide & Educator Resources
Activity
1. Explain that in this section of the workshop, participants will learn about the different resources found inside an EiE Teacher Guide, as well as in the Educator Resources section of the EiE website.
2. If participants have brought copies of their EiE Teacher Guide, have them take them out at this point (or if you brought some extra copies, distribute them such that every group of participants has one Teacher Guide to follow along with.
3. Use the slides to walk participants through the Teacher Guide and Educator Resources as follows:
Teacher Guide Structure The EiE Teacher Guide is organized into seven tabbed sections:
Overview
Preparatory Lesson
Lesson 1
Lesson 2
Lesson 3
Lesson 4
Assessments
Introducti
on to the
EiE
Teacher
Guides
Teacher Guide Structure
• Overview:Background Information for Teachers
• Preparatory Lesson:What are Engineering and Technology?
• Lesson 1: Engineering Story
• Lesson 2: A Broader View of an Engineering Field
• Lesson 3: Scientific Data Inform Engineering Design
• Lesson 4: Engineering Design Challenge
• Assessments

Te
ach
er
Gu
ide S
truc-
ture
120 Engineering is Elementary PD A Sticky Situation
© Museum of Science, Boston Duplication Not Permitted
Draft 7/2012
Intr
od
uc
tio
n
EiE
and
Tea
ch
er
Gu
ide
Overview of EiE Teacher Guide & Educator Resources
Unit Introduction The Unit Introduction has useful information for easy integration of the unit into the regular science curriculum. This section outlines:
which grades the unit targets: Basic for grades one and two or Advanced for grades three through five.
the science unit connections to GEMS, FOSS, Insights, Science Companion, and STC curricula.
the tie-in mathematics and social studies content.
background about the unit and additional resources.
Unit Summary Chart for Teachers The Overview section also includes a chart (pp. 10-15) that organizes information about the unit by lesson. Some of the important things that it highlights are:
the time needed to prep materials and to teach each lesson.
lesson summaries, objectives, and assessments.
tie-in science concepts in general and by specific curriculum programs.
Materials List For all units, EiE has created materials kits that are sold on the website; however, if educators choose to make their own materials kits, pp. 20-21 include a detailed list of the materials needed for the unit. Upon request, EiE will also provide vendor lists for the harder-to-find items. When possible, common and inexpensive kit materials are selected.

© Museum of Science, Boston Duplication Not Permitted
121 Professional Development Guide Introduction
Draft 7/2012
Intro
du
ctio
n
EiE
and
Tea
ch
er G
uid
e
Vocabulary Lists Pages 22-24 list the vocabulary words and definitions that students will learn in, and teachers will need to know for, the unit. NOTE: These definitions are geared towards the teacher and many, if not most, will need to be modified for students. We encourage teachers to have students generate their own definitions for essential vocabulary.
Parent Letter Page 25 is a letter to parents that informs them about the EiE unit being taught in the classroom. The letter can also be used as a donation request for unit materials. A Spanish version of this letter is also located on the Educator Resources page of the EiE website.
Preparatory Lesson Page 29 is the beginning of the Preparatory Lesson that introduces students to technology and engineering. A more advanced version of this lesson is also the first part of the EiE PD workshop format. (See the “What is Technology?” activity on p. 27 of this guide.)
Lesson 1—Storybook Lesson 1 always begins with a storybook about a child who needs to solve an engineering design challenge.
Overview of EiE Teacher Guide & Educator Resources

Te
ach
er
Gu
ide S
truc-
ture
122 Engineering is Elementary PD A Sticky Situation
© Museum of Science, Boston Duplication Not Permitted
Draft 7/2012
Intr
od
uc
tio
n
EiE
and
Tea
ch
er
Gu
ide
Lesson 1—Link to Social Studies Since the storybook also connects with social studies content, the first handout {1-1} is always a map that shows the country where the story takes place. Notice that the handouts for each lesson are always at the end of the relevant section, not at the end of the Teacher Guide.
Lesson 1—Link to Science Content To remind students of some of the relevant content in the storybook, Lesson 1 also includes handouts to review this information. In the case of A Sticky Situation, the related science is earth materials.
Lesson 1—Link to Literacy In addition to the storybook, Lesson 1 also includes handouts to better integrate literacy and help students learn vocabulary. We often encourage teachers to teach the vocabulary using their own methods such as a word wall, etc. Notice that there are often two versions of handouts: Advanced and Basic. The Advanced versions are meant for grades three through five or for younger students with more advanced reading and writing skills. The Basic versions are meant for grades one and two or as an accommodation for English Language Learner (ELL) students or students who struggle with reading or writing.
Lesson 1—The EDP Because another purpose of the storybook is to introduce the Engineering Design Process (EDP) that students will be using in Lessons 3 and 4 of the unit, there is also a handout to help students reflect on how the protagonist uses the EDP to problem-solve. Students can then refer to their completed handout later on during Lesson 4 when they need to use the EDP themselves to complete their design challenge.
Overview of EiE Teacher Guide & Educator Resources

© Museum of Science, Boston Duplication Not Permitted
123 Professional Development Guide Introduction
Draft 7/2012
Intro
du
ctio
n
EiE
and
Tea
ch
er G
uid
e
Answer Key Example Answer keys for some handouts are included in the back of every lesson section. NOTE: EiE Teacher Guides do NOT include keys for handouts with open-ended questions because they do not have just one “correct answer.”
Lesson 2—Field of Engineering Lesson 2 focuses on a broader definition of the field of engineering highlighted in the unit. EiE developed these lessons because we found that introducing a field of engineering through a storybook or a design challenge was not enough. Students need to be exposed to another angle of the field in order to prevent misconceptions.
Lesson 3—“Ask” then Collect Data In Lesson 3, students begin the Engineering Design Process by asking questions about the design challenge and then answering some of those questions by conducting experiments to gather useful and relevant data that will be applied towards their later designs.
Experimentation and Data Collection Because an important part of engineering is using knowledge about material properties, often the experimentation and data being collected in this lesson are about the materials that will be available for student use in the design challenge.
Overview of EiE Teacher Guide & Educator Resources

Te
ach
er
Gu
ide S
truc-
ture
124 Engineering is Elementary PD A Sticky Situation
© Museum of Science, Boston Duplication Not Permitted
Draft 7/2012
Intr
od
uc
tio
n
EiE
and
Tea
ch
er
Gu
ide
Lesson 4—The EDP Lesson 4 continues the Engineering Design Process by first reviewing what students have learned in Lesson 3 (the “Ask” step), asking more about the criteria and constraints, and then guiding them through the “Imagine,” “Plan,” “Create,” and “Improve” steps. Each step of the EDP has its own handout to facilitate thinking through the process.
Rubrics and Embedded Assessments Rubrics at the end of all EiE lessons help assess students’ knowledge and understanding of relevant technology, engineering, and science concepts throughout the unit.
Assessments The final section of the Teacher Guide is the Assessments section. While valuable assessment tools are embedded throughout the unit in the form of handouts, rubrics, and open-ended questions, EiE uses these additional assessments to evaluate student learning throughout the development of each of our units. They may be useful if you would like to have a way to compare your students’ knowledge of engineering and other related content before and after being exposed to the EiE curriculum.
Assessments—Technology and Engineering The first set of assessments examines students’ knowledge of technology and engineering.
Overview of EiE Teacher Guide & Educator Resources
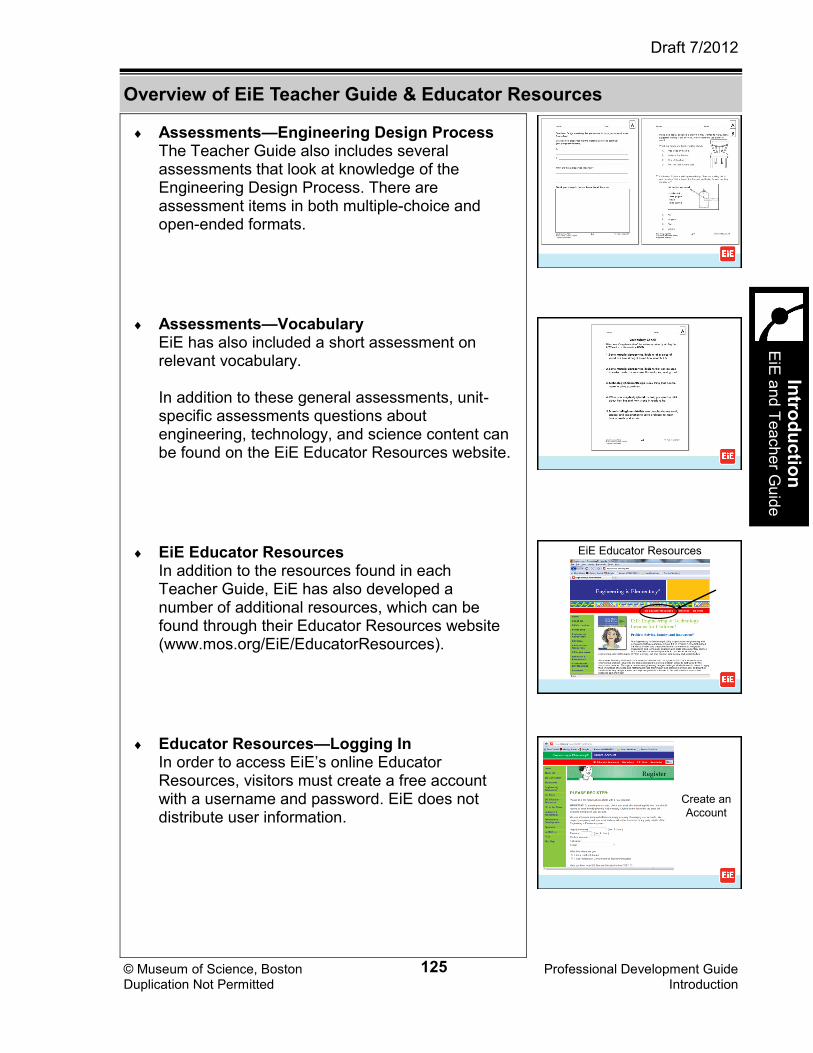
© Museum of Science, Boston Duplication Not Permitted
125 Professional Development Guide Introduction
Draft 7/2012
Intro
du
ctio
n
EiE
and
Tea
ch
er G
uid
e
Assessments—Engineering Design Process The Teacher Guide also includes several assessments that look at knowledge of the Engineering Design Process. There are assessment items in both multiple-choice and open-ended formats.
Assessments—Vocabulary EiE has also included a short assessment on relevant vocabulary. In addition to these general assessments, unit-specific assessments questions about engineering, technology, and science content can be found on the EiE Educator Resources website.
EiE Educator Resources In addition to the resources found in each Teacher Guide, EiE has also developed a number of additional resources, which can be found through their Educator Resources website (www.mos.org/EiE/EducatorResources).
Educator Resources—Logging In In order to access EiE’s online Educator Resources, visitors must create a free account with a username and password. EiE does not distribute user information.
Overview of EiE Teacher Guide & Educator Resources
EiE Educator Resources
Create an
Account

Te
ach
er
Gu
ide S
truc-
ture
126 Engineering is Elementary PD A Sticky Situation
© Museum of Science, Boston Duplication Not Permitted
Draft 7/2012
Intr
od
uc
tio
n
EiE
and
Tea
ch
er
Gu
ide
PD Tip
If Internet access is available at the workshop site (and time allows), EiE suggests logging in to the EiE Educator Resources website and showing participants how to navigate the site, as well as the resources available.
Educator Resources—Home Page Upon logging in, users can navigate into any of the four resource sections on the site: Content Connections; Multimedia Resources; Supporting Documents; Student Assessments.
Educator Resources—Available Resources Use this diagram to review the different resources available:
Content Connections
Multimedia Resources
Supporting Documents
Student Assessments
Reflection
1. As a wrap-up, ask participants if they have any questions or comments about the available resources.
2. If time allows, have participants sit in groups (if possible, with others who teach the same grade and/or will teach the same EiE unit) and discuss and plan for implementing EiE in their classrooms. You might distribute EiE Classroom Implementation Planning {PD-1} to each participants for them to use during their discussions.
3. As groups are working, circulate and check in with each group, answering any questions they might have and addressing any concerns. Participants are also welcome to email [email protected] with any additional comments or concerns.
Overview of EiE Teacher Guide & Educator Resources
Educator
Resources
Home Page
EiE Educator Resources
Mathematics
Science
Language Arts
Fine Arts
Social Studies
Mathematics
Science
Language Arts
Fine Arts
Social Studies
How-To Videos
Classroom
Videos (by unit)
Storybook
Illustration
PDF Files
Family Letter
Spanish
Translations
Research and
Evaluation
Resources
High-Resolution
EDP Image
General
Engineering,
Technology, and
EDP
Assessments
(multiple choice
& open-ended)
Unit-Specific
Assessments
(multiple choice
& open-ended)
Lesson Plans
that connect EiE
units to other
subject areas
Multimedia
Resources
Content
ConnectionsSupporting
DocumentsStudent
Assessments

Overview of EiE Teacher Guide & Educator Resources
EiE: Professional Development © Museum of Science, Boston Duplication Permitted
PD-1
EiE Classroom Implementation Planning
Directions: Flip through the Teacher Guide and the Materials Kit (if available) for the EiE unit that you plan to teach during the upcoming school year. Think about and write some responses to the questions below:
1. Look through the Duplication Masters for the EiE unit you will be teaching (they are at the end of each lesson). Do you think you will use the “A” (Advanced) or “B” (Basic) versions with your students (or both)? How did you come to that initial decision?
2. Find the Unit Summary Chart in the “Overview” section of your EiE Teacher Guide. Look at the “Time to Complete” column. How will you fit EiE lessons in with your teaching schedule? How often will you teach EiE lessons (e.g., every day, twice a week, once a week, etc.)?

3. Look at the Assessment materials included in your EiE Teacher Guide. (HINT: Find a column in the Unit Summary Chart in the overview, a rubric within each lesson, and a separate section.) Do you think these are good ways of measuring students’ engineering learning? Why or why not? What other kinds of assessments might you use instead or in addition to these?
4. Turn to the Materials and Preparation Sections for Lessons 2, 3, and 4 of your Teacher Guide (also look through your Materials Kit, if available). When will you prepare the materials for each lesson? Do you think you might want or need the help of aides/teacher assistants/parent volunteers? If so, how will you plan for the extra sets of hands? Where you will store the materials between lessons?

© Museum of Science, Boston Duplication Not Permitted
129 Professional Development Guide Reflection and Wrap-Up
Re
flec
tion
an
d
Wra
p-U
p
Draft 7/2012
Participants will:
reflect on the workshop they just experienced and the knowledge they have gained.
ask any final questions about classroom implementation or logistics.
Overview
Just as the EiE curriculum does within every lesson, it is important to bring the learning cycle to a place of reflection. This allows time for learners to make sense of their experiences so they can take their learning forward. It also helps learners create a big-picture understanding from all of the smaller parts of the workshop.
Helping participants reflect on the teaching and learning exemplified in the program is another important task. We want them to be able to implement EiE units in ways that reflect the core principles of effective pedagogy. Reflecting on how the activities were presented and examining strategies that were engaging and effective highlights the priority placed on the teaching and learning styles brought forth in EiE units.
Even identifying their continued questions, doubts, confusions, or frustrations can be important to participants’ future experiences teaching engineering—if it is facilitated in a way to enable the workshop to end on a positive note. Structured reflection and wrap-up time can help support this positive tone.
Finally, as potential users of the EiE curriculum, participants may have questions about their next steps. Many of these are fact-based: Whom do they talk to? Where and how do they get materials? Providing an opportunity to address these questions enables you to meet an important workshop goal: shoring up the participants’ ability to implement engineering education, via EiE, after they leave your workshop.
EiE understands there are many successful ways to have participants reflect on their workshop experience—in this section we present one brief option that is handy at the end of a very long (and very full) one-day workshop. You are encouraged, as facilitators, to use techniques that work best for your particular audiences.
Workshop Reflection &
Wrap-Up
Preparation: 5 minutes Workshop: 10-15 minutes

130 © Museum of Science, Boston Duplication Not Permitted
Re
fle
cti
on
an
d
Wra
p-U
p
Draft 7/2012
Engineering is Elementary PD A Sticky Situation
Materials
For the Workshop:
chart paper or white board/blackboard
marker
“Teacher Hat Parking Lot” (from Lesson 1 of this PD Guide)
For Each Participant:
index card or half sheet of scrap paper

131 Professional Development Guide Reflection and Wrap-Up
© Museum of Science, Boston Duplication Not Permitted
Re
flec
tion
an
d
Wra
p-U
p
Draft 7/2012
Activity
1. As the workshop comes to a close, it is important to spend a few minutes reflecting on participants’ experiences and addressing any last minute questions or concerns they might have.
2. Gather the attention of the workshop and post one or two of the following questions on the board or on a piece of chart paper:
How has your attitude about engineering and technology changed over the course
of this workshop?
What did you learn during this workshop
that surprised you?
What will you do differently in your classroom as a result of what you learned
at this workshop?
How has your thinking about engineering and technology changed over the course
of this workshop?
What ideas did you learn over the course of this workshop that you will take back
and share with your colleagues?
What are three things that you will take back to your classroom as a result of your
experiences at this workshop?
If you choose to use more than one question, EiE encourages you to choose one of the first two questions and one of the last four questions.
3. Distribute an index card or half sheet of scrap paper to each participant and give them about five minutes to record their responses to the question(s) that you posted.
4. Once participants have finished writing their responses, have them pair off and share their responses with their partner for a few minutes.
5. After about five minutes, gather the attention of the workshop and ask participants to share their responses.
Workshop Reflection & Wrap-Up

132 © Museum of Science, Boston Duplication Not Permitted
Re
fle
cti
on
an
d
Wra
p-U
p
Draft 7/2012
Engineering is Elementary PD A Sticky Situation
6. Finally, take a moment to conclude the workshop by addressing any remaining questions/comments on the “Teacher Hat Parking Lot” and by asking participants:
Do you have any remaining questions or concerns about implementing EiE in the
classroom?
About any of the content we covered during
today’s workshop?
Address any questions or concerns that participants share. If they ask a question that you do not feel you can answer, feel free to have them contact the EiE team directly, at [email protected].
Workshop Reflection & Wrap-Up