EnGenius ERB9250 300M Range Extender - Baltic Networks · Quick Start Guide EnGenius ERB9250 300M...
24
EnGenius ERB9250 300M Range Extender Quick Start Guide
Transcript of EnGenius ERB9250 300M Range Extender - Baltic Networks · Quick Start Guide EnGenius ERB9250 300M...

EnGenius ERB9250 300M Range Extender
Quick Start Guide

Package Contents
� One ERB9250 300M Range Extender
� One 12V/1A power adapter
� Two 2dBi 2.4GHz SMA antennas
� One Ethernet cable
� One CD-ROM with user’s manual
� This Quick Start Guide
Hardware Overview
LAN LED
WPS Button
Power LED
WLAN LED

Using the Smart Wizard to Configure Your Range Extender
Getting Started
1. We suggest you place your Range Extender next to your router for the initial setup. After
configuring the ERB92650 Range Extender with your router successfully, you can
remove the Ethernet cable and move ERB9250 to the place where strong signal (at least
3 bars) is still available and in clear line of sight with your router (as less barriers as
possible). Please see “Placing Your Range Extender in an Optimum Location,” for how to
find an optimal location for ERB9250 Range Extender to broadcast router’s signal to
extend wireless connection.
2. If you will set up the ERB9250 using manual configuration, assign a static IP address to
your PC using your PC’s Local Area Connection. The ERB9250 does not support DHCP
for automatic IP address assignments.
3. The ERB9250’s default IP address is 192.168.1.2. Confirm that your router’s IP address
is in the same subnet as the ERB9250 (first three octets should be 192.168.1. x ). If your
router’s IP address is not 192.168.1.x, your router and ERB9250 are on different subnets
and you must change the IP address of one of these devices so they are on the same
subnet. Please see “Troubleshooting” to find out how to find your router’s IP address.
To use the ERB9250 with an EnGenius ESR9752, ESR9753, or ESR9850 Router whose
default IP is 192.168.0.1, either:
– Change the router’s IP address to 192.168.1.x to match the ERB9250’s IP address
OR
– Change the ERB9250’s default IP to 192.168.0.x to match the EnGenius router’s IP
address.
4. Confirm that your Internet and the wireless network are active before powering on your
Range Extender.
5. Connect the two antennas to the antenna connectors on the rear panel of your Range
Extender.
6. Decide whether to use the Range Extender’s WPS or manual configuration:
– WPS configuration. You can use this configuration method if your router supports
WPS.
– Manual configuration – use this configuration method if your router does not support
WPS.

Using the Smart Wizard to Configure Your Range Extender
The provided Smart Wizard CD consists of a series of intuitive point-and-click pages that
guide you through the first-time setup of your Range Extender.
To use the Smart Wizard to configure your Range Extender:
1. Insert the Smart Wizard CD into your computer’s CD-ROM drive. The CD starts in a few
seconds. (If the following screen does not appear, double-click the index.html file on the
CD.)

Using the Smart Wizard to Configure Your Range Extender
2. Click Quick Setup. The following screen appears.
3. Confirm that your router is functional and is not being configured, and that you can use it
to access the Internet. Then click Next. The following screen appears.
4. Find the WPS button on your router (refer to the documentation for your router), and then
click Next. The following screen appears.
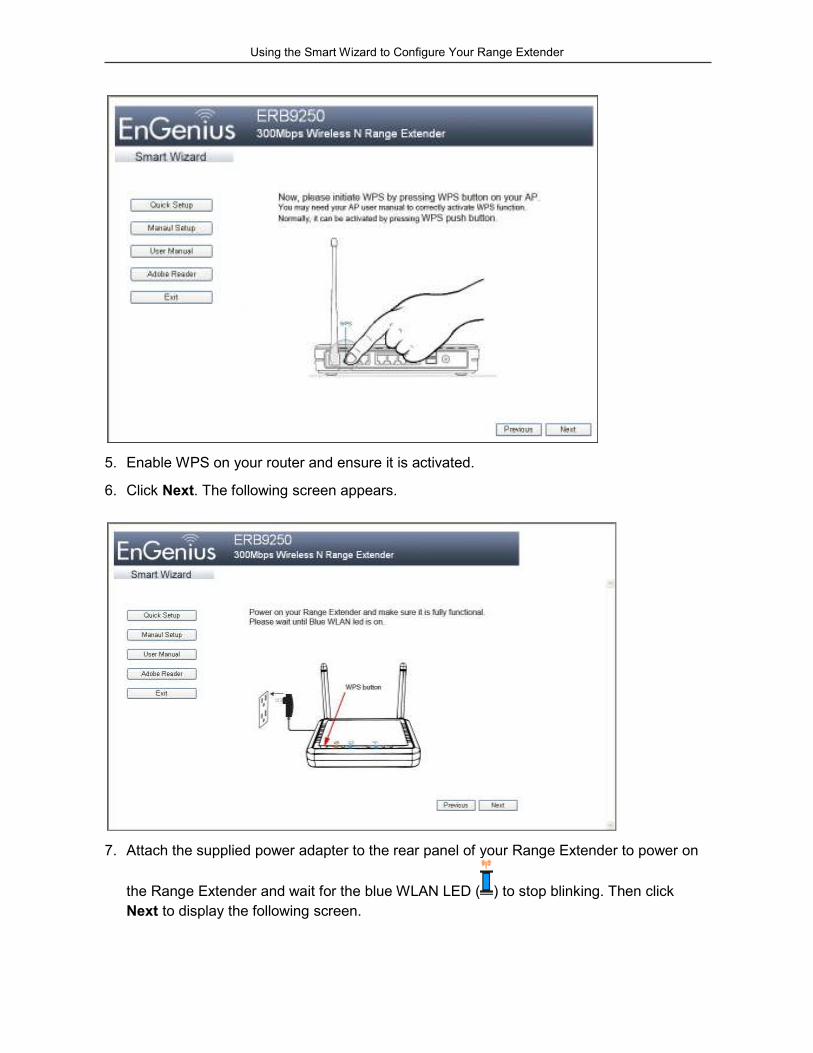
Using the Smart Wizard to Configure Your Range Extender
5. Enable WPS on your router and ensure it is activated.
6. Click Next. The following screen appears.
7. Attach the supplied power adapter to the rear panel of your Range Extender to power on
the Range Extender and wait for the blue WLAN LED ( ) to stop blinking. Then click
Next to display the following screen.

Using the Smart Wizard to Configure Your Range Extender
8. Press the WPS button on the front panel of your Range Extender once. The orange LAN
LED ( ) blinks.
9. When the orange LAN LED ( ) goes ON, it indicates that setup is complete. Click Next.
The following screen appears.
10. Click Exit to exit the Smart Wizard.
If the orange LAN LED does not stay ON, the configuration is not successful. In this case:
� Move your Range Extender closer to your router.
Using the Smart Wizard to Configure Your Range Extender
� Be sure the antennas are connected securely to the Range Extender rear panel.
� Repeat steps 2 through 11
OR
� Consider manual configuration if WPS configuration is not easy for you to set up.
This completes the Smart Wizard configuration procedure for your ERB9250 300M Range
Extender. Proceed to, “Placing Your Range Extender in an Optimum Location”

Manual Configuration
If your router does not support WPS, please configure the Range Extender manually.
1. Connect one end of the supplied Ethernet cable to the Ethernet/RJ45 connector on the
rear panel of the Range Extender. Connect the other end to an Ethernet port on your
desktop or laptop.
2. Important: Your Range Extender’s default IP address is 192.168.1.2. Configure your PC
(Local Area Connection) to use a static IP address that is on the same subnet as your
Range Extender. This means the first three octets preceding the periods in your PC’s IP
address must be the same as those in the Range Extender’s default IP address, with the
last octet being different (for example, 192.168.1.10).
The procedure you use to configure your PC’s IP address depends on the PC’s operating
system. Please follow the instructions appropriate for your PC’s operating system.

Manual Configuration
Apple Mac
1. Go to System Preferences > Network
2. For Configure, select Manually.

Manual Configuration
3. Type 192.168.1.10 in the IP address field. Click Apply and go to next section “Logging in
to the Range Extender.”

Manual Configuration
Windows 7 Operating System
1. In the Start menu search box, type: ncpa.cpl
The Network Connections List appears.
2. Right-click the Local Area Connection icon and click Properties.
3. In the Networking tab of the Local Area Connection Properties dialog box, click either
Internet Protocol Version 4 (TCP/IPv4) or Internet Protocol Version 6 (TCP/IPv6), and
then click Properties.

Manual Configuration
4. In the General tab, click Use the following IP address, type 192.168.1.10 in the IP
address field. Click OK and go to next section “Logging in to the Range Extender.”
Properties Button
Internet Protocol Version 4
(TCP/IPv4)
Manual Configuration
Windows Vista Operating System
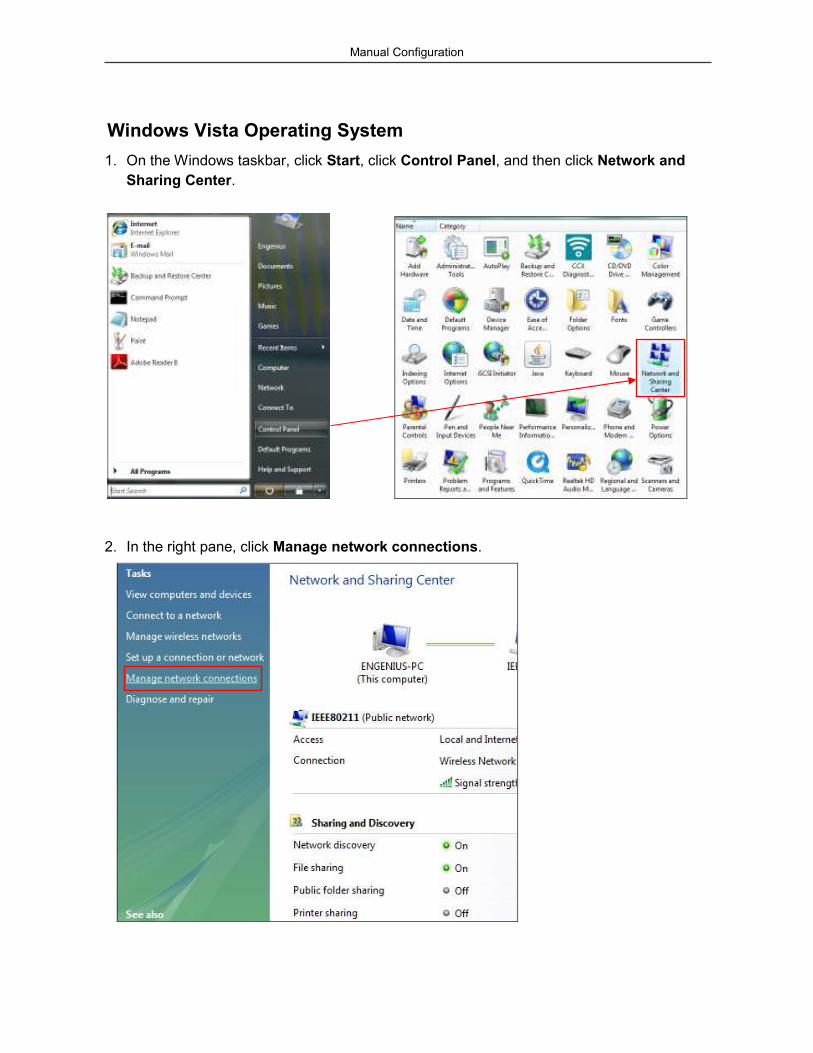
1. On the Windows taskbar, click Start, click Control Panel, and then click Network and
Sharing Center.
2. In the right pane, click Manage network connections.
Manual Configuration
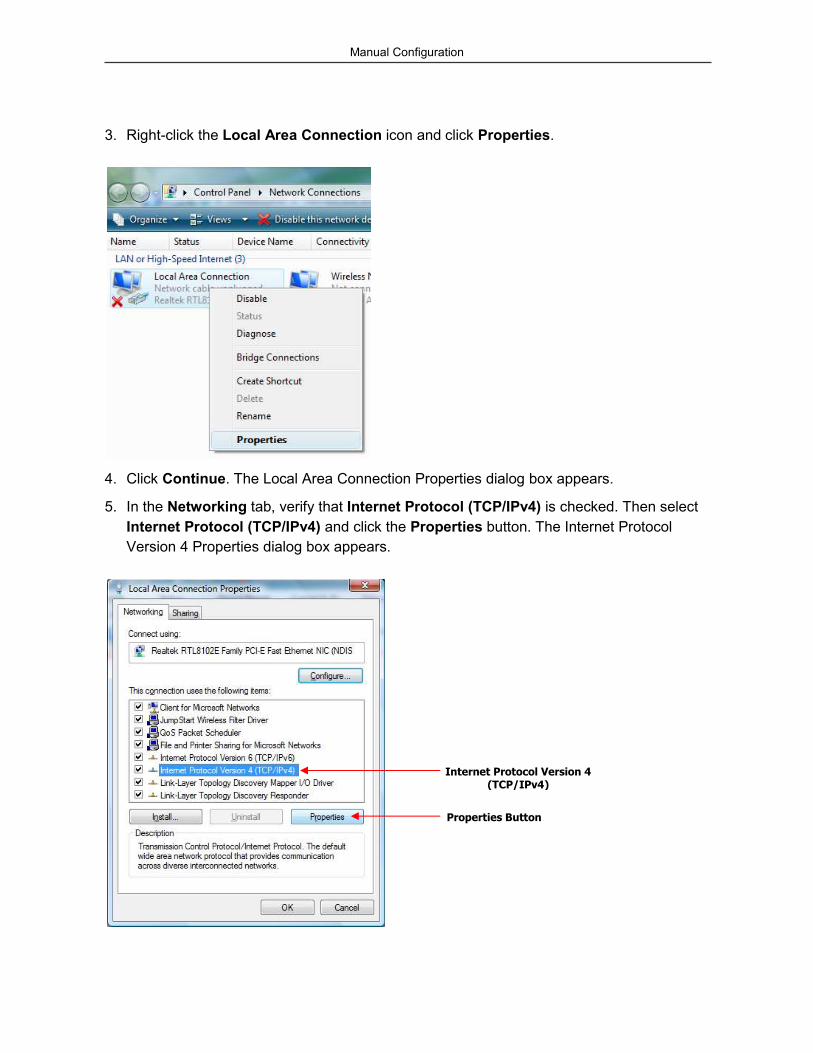
3. Right-click the Local Area Connection icon and click Properties.
4. Click Continue. The Local Area Connection Properties dialog box appears.
5. In the Networking tab, verify that Internet Protocol (TCP/IPv4) is checked. Then select
Internet Protocol (TCP/IPv4) and click the Properties button. The Internet Protocol
Version 4 Properties dialog box appears.
Properties Button
Internet Protocol Version 4
(TCP/IPv4)
Manual Configuration
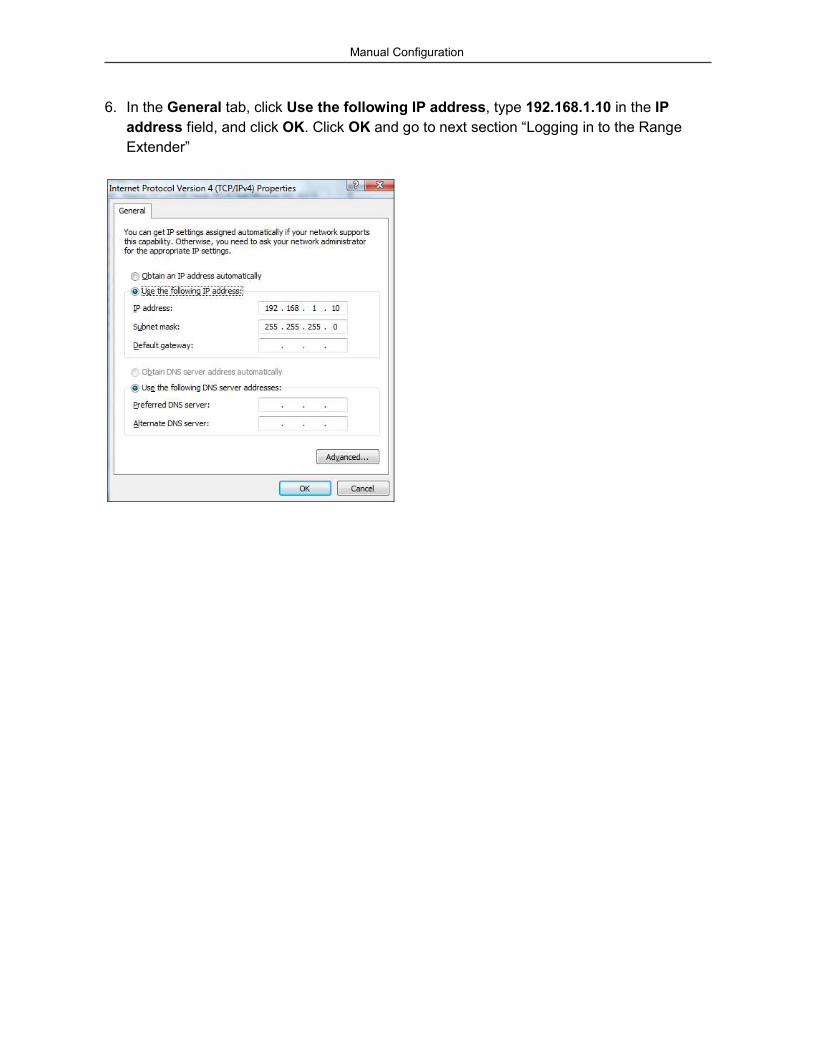
6. In the General tab, click Use the following IP address, type 192.168.1.10 in the IP
address field, and click OK. Click OK and go to next section “Logging in to the Range
Extender”

Manual Configuration
Windows XP Operating System
1. On the Windows taskbar, click Start, click Control Panel, and then click Network
Connections.
2. Right-click Local Area Connection and click Properties.
3. When the Local Area Connection Properties dialog box appears, click Internet Protocol
(TCP/IP) and click Properties. The Local Area Connection Properties dialog box appears.

Manual Configuration
4. In the General tab, click Use the following IP address, type 192.168.1.10 in the IP
address field, and click OK.
5. Click OK and go to next section “Logging in to the Range Extender”.
Properties Button
Internet Protocol Version 4 (TCP/IPv4)

Manual Configuration
Logging in to the Range Extender
After configuring your PC for the same subnet used by your Range Extender, use the
following procedure to log in to the Range Extender’s manual configuration.
1. Start your Web browser. In the address bar, and type the default IP 192.168.1.2. The
following screen appears.
2. Type admin for the user name and admin for password, and then click OK. The Web
Configuration screen appears.

Manual Configuration
3. In the left pane, under Wireless, click Basic. The following screen appears.
4. Click Site Survey to search for the available access points/routers.
5. When a Site Survey window similar to the following shows the available access
points/routers, select your access point or router and then click Connect.
Note: If no access points or routers appear in the Site Survey window, click the Refresh
button in the window to search again.
6. If your router is encrypted with passwords, choose the selection with the appropriate
security mode in the Encryption column and authentication type in the Authentication
column, and then enter the designated passwords. Click Save.

Manual Configuration
7. When a pop-up box shows the connection established between your Range Extender
and router, click Close.
8. Confirm that the router security information appears on the Range Extender status page.
This completes the manual configuration procedure for your ERB9250 300M Range
Extender. Proceed to “Placing Your Range Extender in an Optimum Location”.

Placing Your Range Extender in an Optimum Location
After configuring your Range Extender, place it in the best location that suits your needs to
ensure optimum performance.
1. Remove the Ethernet cable from the Range Extender and from your desktop or laptop.
2. Using your PC’s wireless utility software, find a location that receives a good-to-excellent
signal (usually at least 3 bars of signal strength) from your router. Avoid dead spots or
weak spots where signal strength is 2 bars or less and areas outside your router’s
coverage area.
3. Place your Range Extender in the location found in the previous step and plug it into the
closest power source to power it on. Confirm that the WLAN LED goes ON to show that
the Range Extender is broadcasting a wireless network signal.
Troubleshooting
Cannot access the Internet after successfully setup ERB9250 with your router
After you set up ERB9250 with your router successfully, moved the ERB 9250 to the center
of your home or office, and found that you could not surf Internet Web pages with your
laptop even though the signal is strong, potentially your router and ERB9250 might be on
different subnets. Check your router’s IP address. If your router’s IP is not 192.168.1.x,
change either your router’s IP address or the ERB9250’s IP address to place them on the
same subnet. Please see the following instruction on how to change your ERB9250 IP
address.
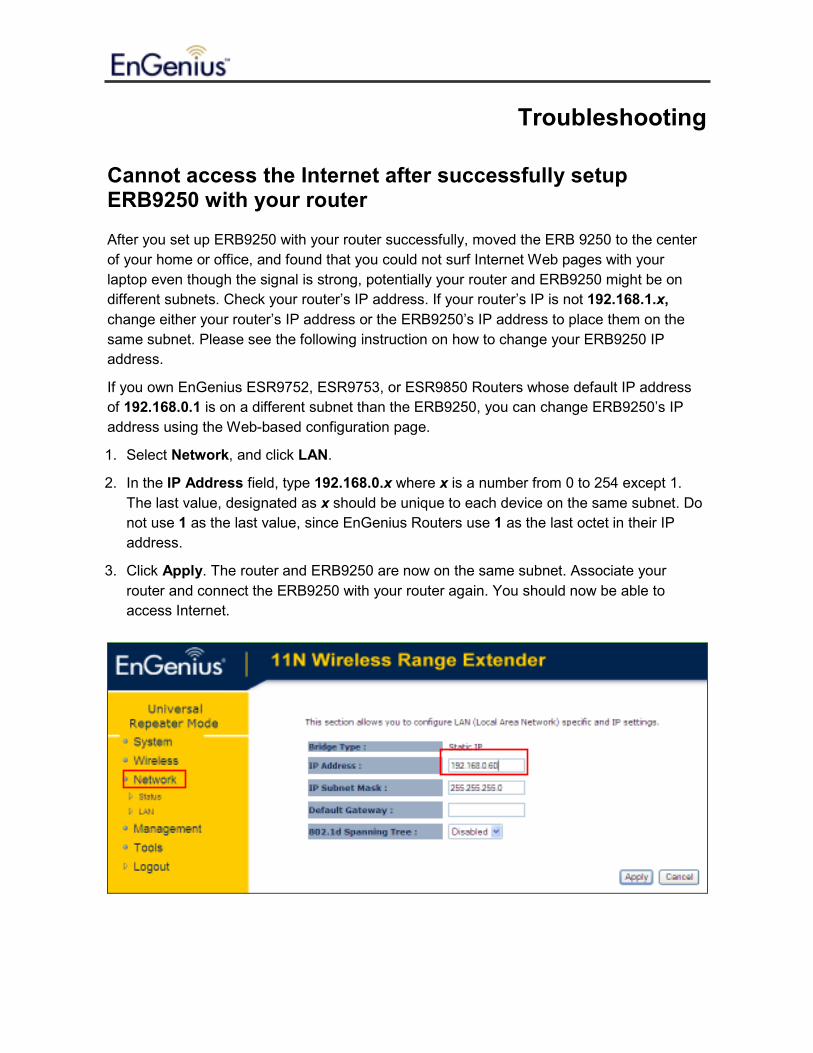
If you own EnGenius ESR9752, ESR9753, or ESR9850 Routers whose default IP address
of 192.168.0.1 is on a different subnet than the ERB9250, you can change ERB9250’s IP
address using the Web-based configuration page.
1. Select Network, and click LAN.
2. In the IP Address field, type 192.168.0.x where x is a number from 0 to 254 except 1.
The last value, designated as x should be unique to each device on the same subnet. Do
not use 1 as the last value, since EnGenius Routers use 1 as the last octet in their IP
address.
3. Click Apply. The router and ERB9250 are now on the same subnet. Associate your
router and connect the ERB9250 with your router again. You should now be able to
access Internet.
Manual Configuration
Cannot Obtain Broader Coverage
If you fail to get broader coverage, see “Placing Your Range Extender in an Optimum
Location,” for suggestion about finding a better place to place the ERB9250 to extend
wireless range.
How to find my Router’s IP address
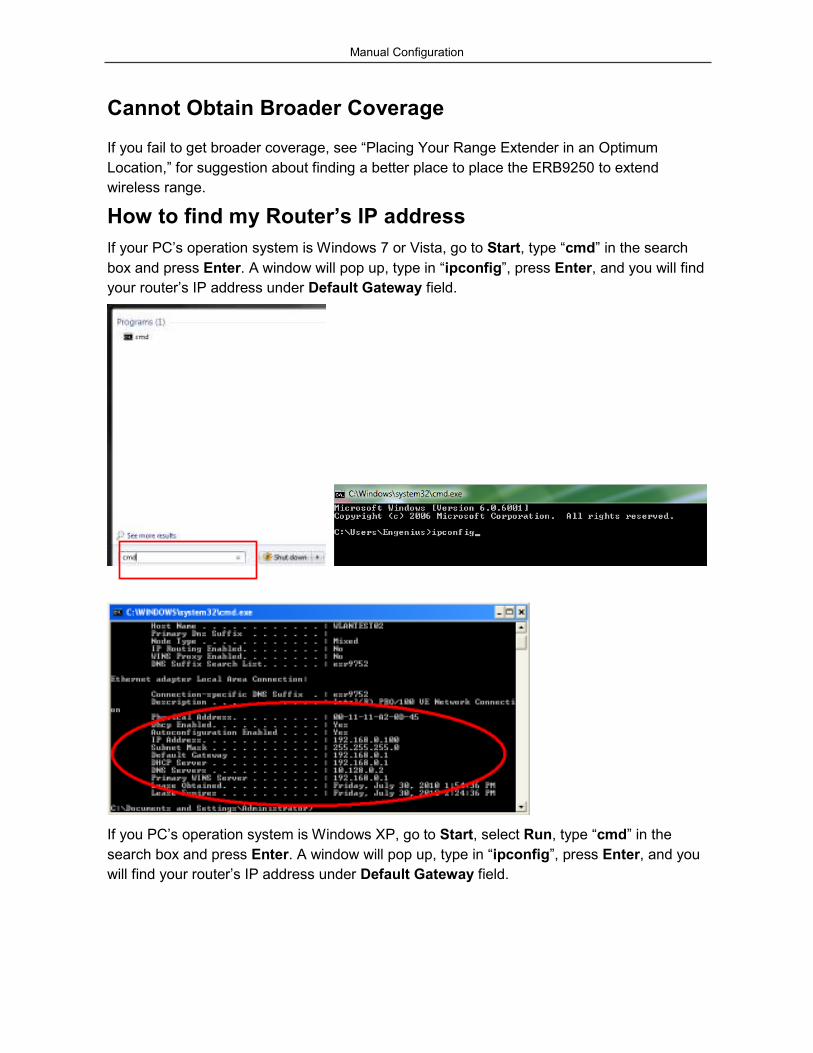
If your PC’s operation system is Windows 7 or Vista, go to Start, type “cmd” in the search
box and press Enter. A window will pop up, type in “ipconfig”, press Enter, and you will find
your router’s IP address under Default Gateway field.
If you PC’s operation system is Windows XP, go to Start, select Run, type “cmd” in the
search box and press Enter. A window will pop up, type in “ipconfig”, press Enter, and you
will find your router’s IP address under Default Gateway field.