Endodontic Clinical Simulation Manual 2014/2015 - kau year Manual 2014-15.pdf · Endodontic...
41
Conservative Dental Sciences Department Endodontic Division Endodontic Clinical Simulation (END 422) 4 th Year Dental Students Endodontic Clinical Simulation Manual 2014/2015 Head of Department: Dr. Khaled Merdad Course Director: Co Course Director: Prof. Rajab Saif Dr. Hadeel Edrees Student name: ____________________________ Computer no. : _________________ E-mail : ____
Transcript of Endodontic Clinical Simulation Manual 2014/2015 - kau year Manual 2014-15.pdf · Endodontic...

Conservative Dental Sciences Department
Endodontic Division
Endodontic Clinical Simulation (END 422)
4th
Year Dental Students
Endodontic Clinical Simulation Manual 2014/2015
Head of Department: Dr. Khaled Merdad
Course Director: Co Course Director:
Prof. Rajab Saif Dr. Hadeel Edrees
Student name: ____________________________
Computer no. : _________________
E-mail : ____
2
Welcome Note:
We welcome you to Endodontics for the fourth year. You will notice that this year marks a turning point in the
approach of teaching. What has been known as “preclinical Endodontics” for long years is being replaced by
the new emerging methodology of SIMULATION. Therefore, we are referring to Endodontic Simulation
instead of preclinical Endodontics. This approach will maximize the learning opportunities for the participants
in the course.
Practicing the treatment ergonomics will be emphasized as well as getting acquainted with the new technologic
advancement in the field like Electronic Apex Locators, Rotary semi-automated root canal preparation and
thermo-plasticized obturation. Also, this approach will decrease the need for natural teeth, as it will be replaced
by plastic artificial ones with pre-specified criteria that fit the learning objectives of the course.
This plethora is being conjugated with the dawning of application of Micro-dentistry into the teaching
methodology. This will put you –our students- on the edge of modern endodotnics.
The head of division, course director and the rest of the teaching staff welcome you to this exciting course and
we all wish you fruitful journey ending with golden skills that will set up the stage for your clinical
maneuvering skills.
Endodontic Simulation Course Description:
The simulatory part of the Endodontic Simulation course is designed to provide first hand-on
Endodontic Simulation training and experience utilizing a simulated plastic artificial teeth (Real-T Endo
Series) & extracted human teeth. The course presents demonstrations on the endodontic components of
radiographic interpretation, access preparation, root canal negotiation, tooth length determination,
preparation, and obturation of the root canal systems. After attending and practicing this Endodontic
simulation course, the student will be competent to master the technical procedures in root canal therapy on
mounted teeth.
For simplicity and more controlled procedures' evaluation time, the Endodontic Simulation course was
divided into three due dates for evaluation, specified Projects (P) as P1, P2, and P3 according to the
respective practical step.
The present course manual will guide you in performing each step of the Endodontic procedures. It
details the required activities, the practical steps, the criteria for evaluation of each step, the evaluation
system and methods (including self assessment), the course marks distribution for the continuous assessment
part, and the final practical competence exam.

3
Clinical simulation course objectives:
1. Recognition of pulp space anatomy for maxillary and mandibular anteriors, premolars, and molars teeth
and drawing of their relative access cavities.
2. Access cavities preparation for the required teeth.
3. Locating canal orifices for the assigned teeth.
4. Working length determination for the assigned teeth.
5. Cleaning and shaping of the canal system of the assigned teeth using both hand ‘’St. St.’’ files and rotary
NiTi instruments.
6. Three dimensional obturation of the cleaned and shaped canal system of the assigned teeth.
Clinical Simulation Course ‘’Minimum Procedural Experiences (MPEs)’’:
1. Drawing access cavities for maxillary and mandibular anteriors, premolars,
and molars teeth.
2. Eight artificial and natural teeth -representing a sum of 13 -14 root canals, mounted, and radio
graphed on which all the steps for endodontic treatment are made according to the course objectives.
These will be as follow:
• 3 Single rooted artificial anterior teeth and one natural anterior tooth (Real-T Endo # 8)
• 2 Premolars, one artificial (Real-T Endo # 29) and one natural
(one of them should be double rooted)
• 2 Molars (one artificial and one natural)
Directions:
Familiarize yourself with all chapters of this practical manual guide.
Familiarize yourself with the endodontic evaluation form.
Have each step on this form approved and signed by an instructor before proceeding
to the next phase of treatment.
Have your plastic & natural teeth and your mounted radiographs approved by the assigned endodontic
faculty member.
Be noted that the practical procedures’ deadline for presentation for final evaluation is extremely important
(P1 through P3 as seen in the practical schedule).

4
Steps 1-3: Teeth selection, mounting on Modu-Pro segments, and radiographing:
Important notes in teeth selection:
- Wearing personal protective equipment (e.g., gloves, mask, protective eyewear) when
handling extracted teeth is a MUST in natural teeth & to simulate clinical situation in
plastic teeth
- If natural extracted teeth used, certain precautions should be followed:
* Only freshly extracted teeth should be used in this course.
* Selected teeth should have intact, preferably non carious crowns and accessible pulp
chambers and root canals as confirmed radio-graphically.
* Selected teeth should have a mature, non-fractured root, relatively straight roots or
with mild root curvatures.
* Teeth should be cleaned from calculus and/or soft tissues attachment.
* Cleaned teeth should be placed in sodium hypochlorite solution (NaOCl) 1/10 for a
whole night. Teeth should then be removed from the NaOCl solution, washed under
tape water and kept in saline solution ready for sterilization. DO NOT ALLOW
TEETH TO DRY OUT.
Mounting Of Plastic Teeth in Modu-Pro Segments In Carrier Trays: • Each modu-pro has a socket designed to accommodate one natural or artificial plastic Tooth not More
Than 25 Mm In length
• The socket should be clean & dry before mounting the tooth
• Follow the instructions below for proper tooth placement.
Steps: 1- Using round bur, cut a horizontal notch in the coronal third of the tooth root on the buccal or lingual surfaces
this will help the tooth to lock in the fixing gel (Figure 1)
2- Place the apex putty in the bottom of the socket; at least 2 mm in depth beyond all root apices
3- Fill the entire socket around the tooth with fixing gel to cover the entire tooth’s surface to the CEJ.
4- Allow the fixing gel to set approx. 30 minutes (full strength in 24 hours) .
Figure. 1
Sterilizing of human extracted teeth and Mounting:
Before use in the lab, extracted teeth should be heat-sterilized to allow for safe handling. The following are the
steps for sterilization of amalgam-free teeth:
1. Do not heat sterilize any teeth containing amalgam?
2. Clean and thoroughly rinse any amalgam-free teeth to be sterilized.
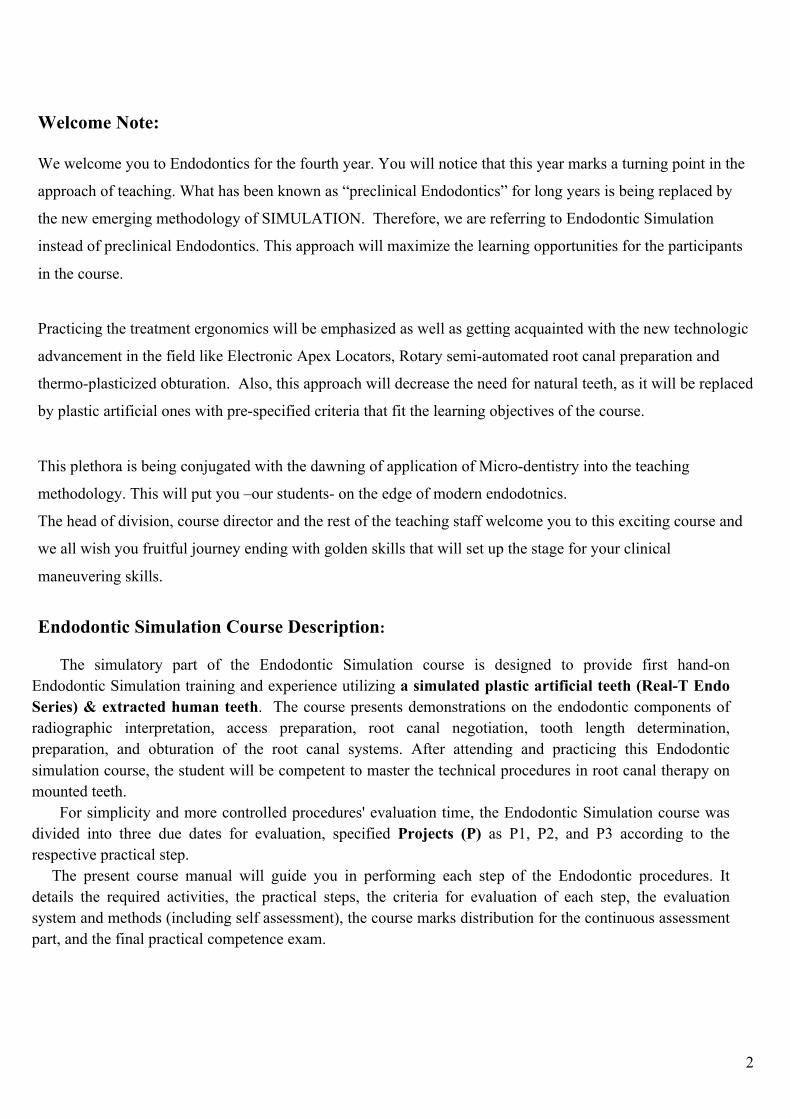
3. Place amalgam-free teeth in a heat-resistant glass container (Fig 2).
4. Fill the heat-resistant container no more than half–way with distilled water or saline, and
cover loosely (e.g., use a cork to close a flask).
5. Process through a steam sterilizer at 121ºC for 40 minutes using a fluid or liquid cycle .
5
Figure 2
6-Mount the extracted tooth in Mudo-Pro segment as previous artificial (Real-T Endo)
Keep the segments with the natural tooth in saline whenever you are not working with them.
Radio-graphing the mounted teeth:
X-ray units are present in the clinical simulation lab. Familiarize yourself with these units prior to the
first scheduled lab. Their exposure time is fixed. You must hold the timer button down throughout the
entire exposure. To minimize waiting time, know what you want on the radiograph before getting in line,
e.g. are you trying to display two roots with three instruments, check a fill, etc.
1- Place the film on horizontal flat surface
2- Place the Modu-Pro Endo
3- Segment on its side by aligning the tooth to be X-rayed faces the center of the X-ray beam
4- Shoot the radiograph, proceed or digitalized
N.B.
* Prior to the second lab session, one buccal and one proximal exposure are required for each of your
mounted teeth. After developing, films should be dried and mounted on individual filmstrips.
* When exposing your films ALWAYS be sure that the “dot” is positioned at the coronal end of the tooth.
Once dry, identify and mount the film. Mount films as you are taught in radiology (right on the left, etc).
Mount working films in the same sequence in which they were taken using four whole films mounts.
Drawing Endodontic Access Cavity Outline in
Anterior Maxillary & Mandibular Teeth:
Access cavities drawings (HW):
As a prerequisite to practical access cavities drilling in the required natural teeth (step3), the access
cavities outlines should be drawn on the respective teeth on sheets #1-3 as specified in the practical
session schedule

6
Sheet.1
Draw the access cavity outline for the above maxillary central incisors:
Note: The Left is a tooth of a young & adult, while the Right is for an old (Geriatric)
The drawn central tooth shows the exact central position of the access cavity
at the middle of the tooth
Sheet 2
MAXILLARY CENTRAL INCISOR
Supervisor Signature: Date:

7
Sheet. 2
Draw the access cavity outline for the above mandibular central incisors:
Note: The Left is a tooth of a young & adult, while the Right is for an old (Geriatric)
The drawn central tooth shows the exact central position of the access cavity at the middle of the tooth
MANDIBULAR INCISORS
Supervisor Signature: Date:

8
Sheet. 3
Draw the access cavity outline for the above maxillary and mandibular canines
MAXILLARY
CANINE
MANDIBULAR
CANINE
Supervisor Signature: Date:

9
Sheet. 4
Drawing Endodontic Access Cavity Outline in
Maxillary & Mandibular Premolars (Bicuspids)Teeth:
Draw the access cavity outline for the above maxillary and mandibular premolars
MANDIBULAR
2nd
PREMOLAR
MAXILLARY
1st PREMOLAR
Supervisor Signature: Date:

10
Sheet. 5
Drawing Endodontic Access Cavity Outline in
Maxillary & Mandibular Molar Teeth:
Locate the orifices of root canals in case of 3 root canals & Draw the access cavity
outline for the above maxillary molars
Sheet 6
MAXILLARY
1ST
MOLAR
MAXILLARY
2ND
MOLAR
Supervisor Signature: Date:
11
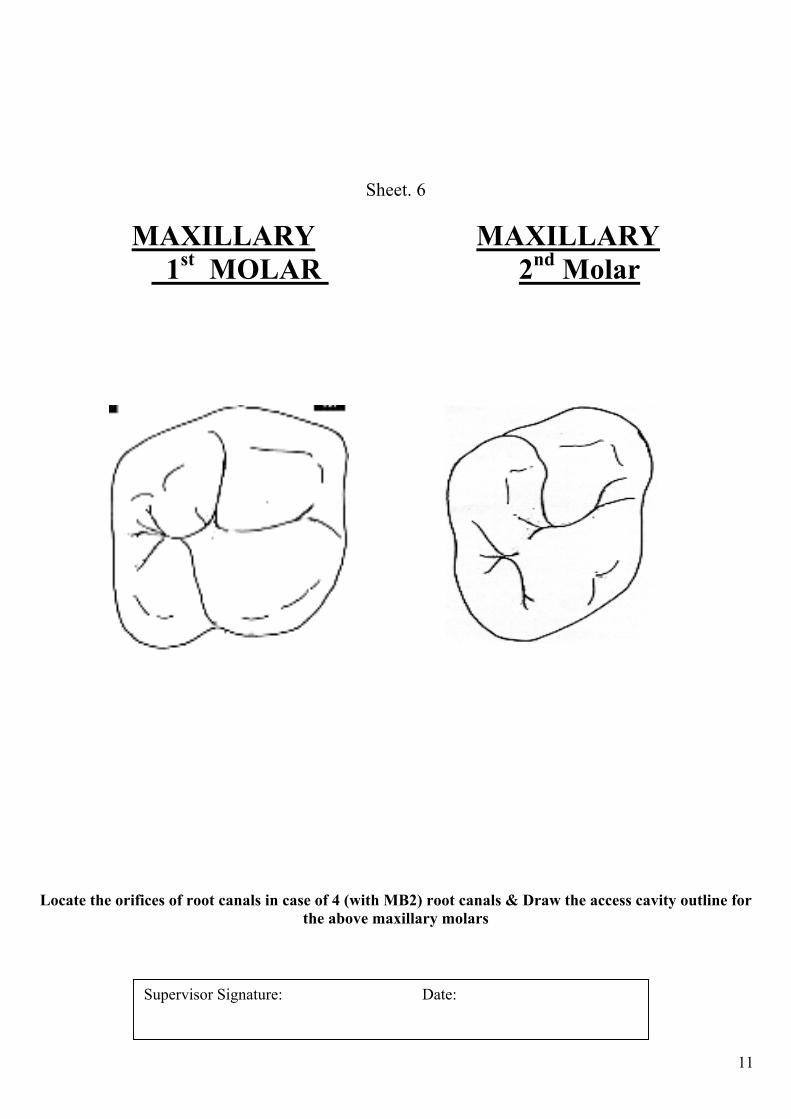
Sheet. 6
MAXILLARY MAXILLARY
1st MOLAR 2
nd Molar
Locate the orifices of root canals in case of 4 (with MB2) root canals & Draw the access cavity outline for
the above maxillary molars
Date:
Supervisor Signature: Date:

12
Sheet. 7
Locate the orifices of root canals & Draw the access cavity outline for the above mandibular molars with
3 root canals
MANDIBULAR
1st MOLAR
MANDIBULAR
2nd
MOLAR
Supervisor Signature: Date:

13
Sheet. 8
MANDIBULAR MANDIBULAR
1st MOLAR 2
nd MOLAR
te the orifices of root canals & Draw the access cavity outline for the above mandibular molars with 4
root canals
Supervisor Signature: Date:
14
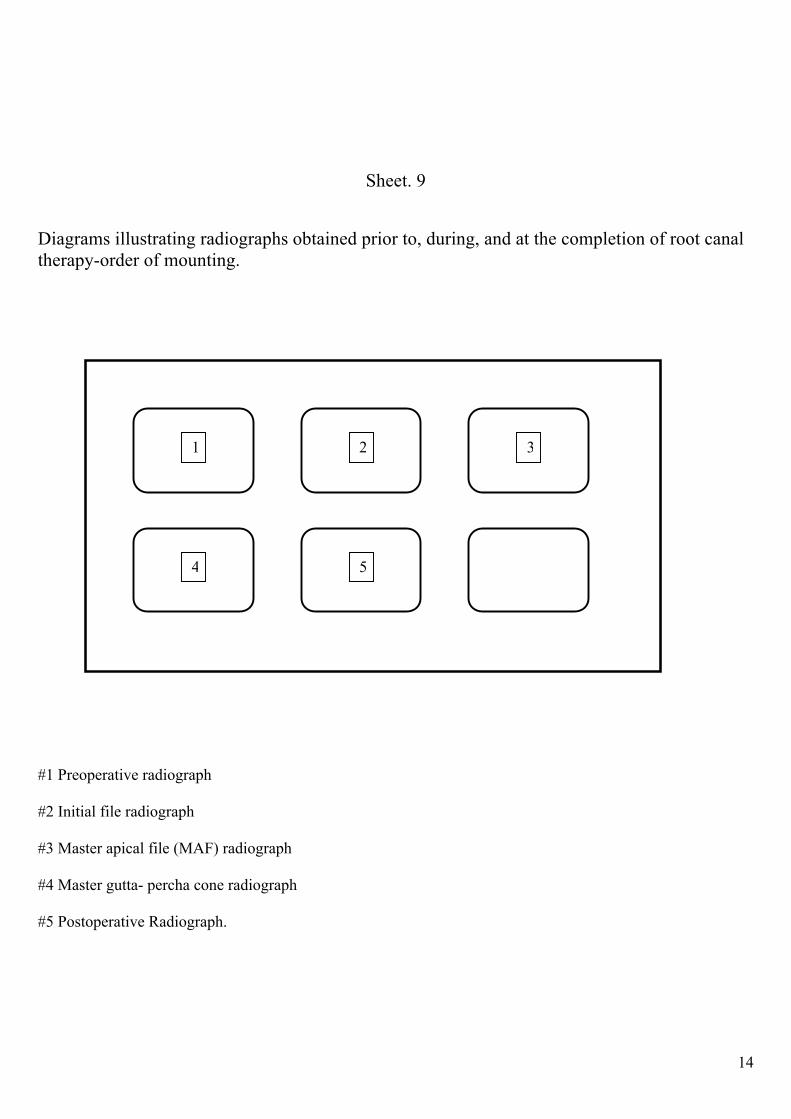
Sheet. 9
Diagrams illustrating radiographs obtained prior to, during, and at the completion of root canal
therapy-order of mounting.
#1 Preoperative radiograph
#2 Initial file radiograph
#3 Master apical file (MAF) radiograph
#4 Master gutta- percha cone radiograph
#5 Postoperative Radiograph.
1 2 3
4 5

15
Sheet. 10 ENDODONTIC INSTRUMENT:
Fig 1 Fig 2
Fig 3

16
Sheet. 11
Fig 4

17
Fig 5

18
Sheet. 12 Endodontic Clinical Simulation set up of Instruments and Materials
Bur Block:
#2, #4, #6 round carbide burs for coronal access. (Fig. 1)
Taper Diamonds and #16 safe tip carbide bur for refining access. (Fig.2)
Endodontic file Box (insert): (Fig.4)
25 mm Hand Files of the following sizes:
#10, 15, 20, 25 30, 35, 40, 45, 50, 55, 60, 70
80, 90, 100, 110, 120 ,130, 140
GG #1 #2 #3 #4
Rubber Stops
A set of NiTi instruments with 4% and 6% taper
(ProTaper Next )
Endodontic Tray: (Fig.3)
Mirror
Locked Pliers
Endodontic explorer
Spoon Excavator
#1 Glick Plugger
Endodontic Ruler
Irrigating Syringe
Obturation set up: (Fig.5)
AH 26 sealer
Glass Slab
Cement spatula
Assorted Gutta Percha points
Assorted paper points
Assorted finger spreaders
Torch

19
Steps 4-7: Access cavity preparations in mounted teeth
Prerequisites:
• Read objectives, principles, and techniques of access preparation (H.W.)
• Drawings of the access cavity outlines of different maxillary and mandibular teeth should have been
done (H.W.)
• Attend the demo made by the assigned instructor of your group.
Directions:
1. Arrange your tray instruments and burs (sheet 10-12).
2. Take a preoperative radiograph for the selected and mounted tooth.
3. Develop, dry and insert the processed x-ray in its place in separate film mounts
(See sheet 9).
4. Have your selected teeth and film mounts approved by the instructor.
5. Start to gain access and canal orifice(s) detection for the selected and mounted anterior tooth (step 4).
6. Consult with the assigned instructor whenever you need.
7. Have your completed preparation signed on your evaluation form.
8. The above directions should be repeated with each of the required teeth (steps 5 through7).
Step 8: Working length determination:
Prerequisites:
• Read working length determination ‘’biometrics in endodontics’’ (H.W.)
• Attend the demo made by the assigned instructor of your group.
Directions:
(A) Radiographic Length Determination
1. Arrange your tray instruments (sheet 8).
2. Experience to determine the exact working length for each of the required-access made teeth.
3. Always select the proper reference point on the tooth you are treating. This should be either the incisal
of an anterior tooth or a cusp tip of a posterior tooth.
4. Detect the reference points for each root canal, so that your rubber stop can rest against a fixed point.
5. Consult with the assigned instructor whenever you need.
6. Correctly place working length radiographs in the relative endodontic film mount (eg. upper teeth
apex up ….etc) then place the date on the film mount under the radiograph (see sheet 9).
7. Record each tooth’s canal(s) working lengths in its place in the evaluation charts.
8. Have this step approved and assessed by the instructor before proceeding to the next step.
9. The above directions should be repeated with each of the required teeth.

20
(B) Electronic Length Determination: (Figure.6) Using the Electronic Apex Locator with the Carrier Trays
Steps:
1. Place a drop of water on the magnet to ensure electric conductivity. Dry when finish
2. Make certain the Apex Locator Loop & the Mudo-Pro Endo apex locator ability are in contact to ensure
electrical continuity
3. Choose suitable file size in the root canal; a smaller file in a large canal may give you a erratic (false)
reading
Figure. 6

21
Step 9: Cleaning and shaping of the root canal(s) of the selected mounted teeth
Prerequisites: • Read the chapter on cleaning and shaping of the root canal system (H.W.).
• Attend the demo made by the assigned endodontic instructor of your group.
Note:
* Single rooted maxillary anterior teeth and teeth with wide straight canals to be prepared with hand St. St.
instruments by the conventional step back technique. This includes: maxillary anterior teeth, mandibular
premolars, palatal canals of maxillary molars, and single distal canals in mandibular molars.
* Multi-rooted teeth with narrow, curved canals should be prepared with combination of stainless steel & NiTi
rotary instruments. Start with St.St. & complete with Ni Ti rotary. This includes: mandibular anteriors,
maxillary premolars ‘’double canalled’’, buccal canals of maxillary molars, mesial canals of mandibular
molars.
Directions:
1. Arrange your tray instruments (sheet 10-12).
2. Clean and shape each of the required extracted teeth according to the predetermined working lengths.
3. Start first by making apical preparation.
4. Irrigate each time you are going to change to the next larger enlarging instrument.
5. Clean the files frequently during this procedure.
6. Consult with the assigned instructor whenever you need.
7. Take an x-ray for the master apical file. Develop, dry, and show to the instructor a diagnostically
accurate radiograph of the final instrument (MAF) in position in the root canal.
8. Place this film in your endodontic film mount and write in the date. TAKE THIS (MAF)
RADIOGRAPH BEFORE YOU PROCEED WITH THE NEXT STEP OF CANAL’S SHAPING
(see sheet 9).
(A) For the hand step back technique:
9. During the step back procedure; make sure your final instrument seats to the full working length
after the use of each backfilling instrument.
10. Irrigate and recapitulate each time you are going to change to the next larger enlarging instrument.
11. Dry the root canal with sterile paper points. These points must be measured at the working length
and placed into the canal this distance. This is true each time paper points are placed in a root canal.
12. Have this step approved and assessed by the instructor for each tooth before proceeding to the next
step.
(B) For rotary NiTi instrumentation: you have to use the crown down preparation technique with the
specific sequence protocol of the NiTi system used.

22
N.B.
Important points to remember during cleaning and shaping:
A- When a single root contains more than one root canal, it is important to determine if these
canals remain separate or join before reaching the apical terminus. To accomplish this:
(1) Determine the exact working length of each canal.
(2) Place a file into each canal at the same time. If both files extend to the apical
terminus, the two canals are separate (or join at the apical terminus). If one file
extends to its apical terminus but the other does not, then the two canals join.
B- When instrumenting two root canals which join into one canal in the apical third of
the root, first instrument completely the canal with straight line access to the apex (in these cases
it is Master Canal & is usually the lingual canal) and then, keeping the final instrument in this
canal in place, instrument the second canal to the point where it joins the first canal.
C- Always select the proper reference point on the tooth you are treating. This should
be either the incisal edge of an anterior tooth or a cusp tip of a posterior tooth.
Because rubber stops tend to move slightly on root canal files, the correct working
length should be continuously reconfirmed (measured) on each file during instrumentation.
D- Pay particular attention to the position of your rubber stops in relation to your
reference point. Failure to notice this change will lead to serious problems.
E- During hand instrumentation, do not proceed to the next larger size file until the
file that you are using has been worked sufficiently.
23
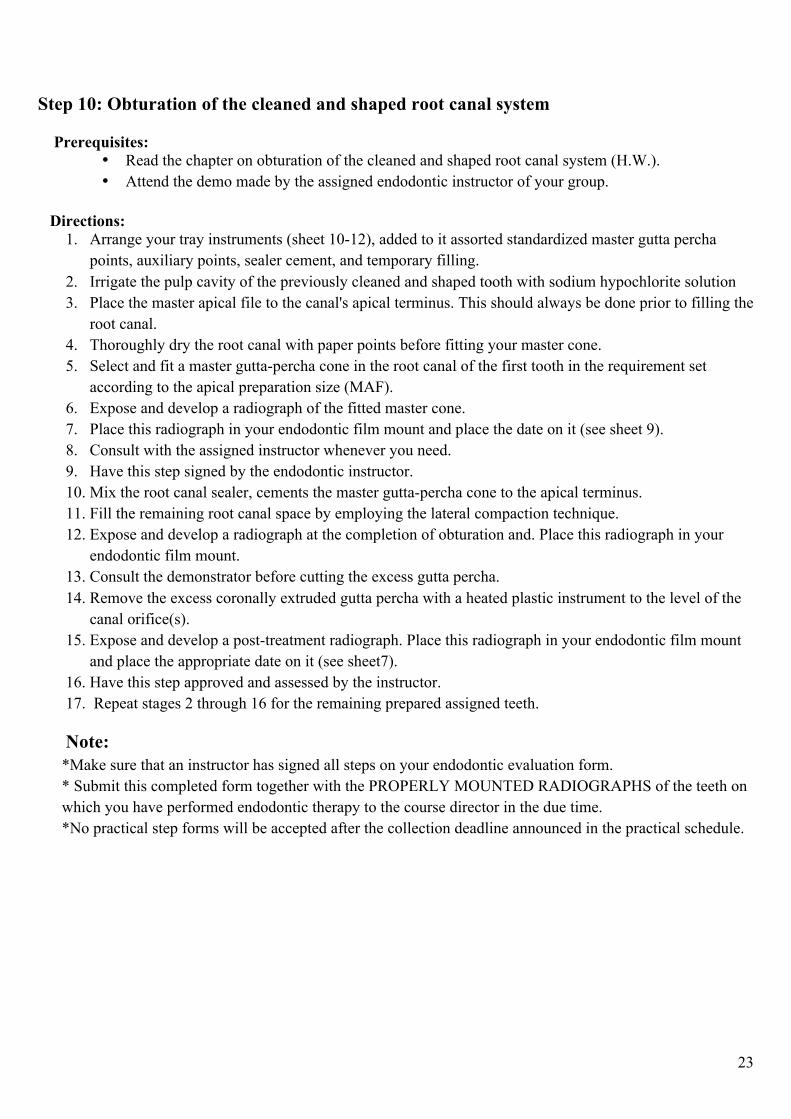
Step 10: Obturation of the cleaned and shaped root canal system
Prerequisites:
• Read the chapter on obturation of the cleaned and shaped root canal system (H.W.).
• Attend the demo made by the assigned endodontic instructor of your group.
Directions:
1. Arrange your tray instruments (sheet 10-12), added to it assorted standardized master gutta percha
points, auxiliary points, sealer cement, and temporary filling.
2. Irrigate the pulp cavity of the previously cleaned and shaped tooth with sodium hypochlorite solution
3. Place the master apical file to the canal's apical terminus. This should always be done prior to filling the
root canal.
4. Thoroughly dry the root canal with paper points before fitting your master cone.
5. Select and fit a master gutta-percha cone in the root canal of the first tooth in the requirement set
according to the apical preparation size (MAF).
6. Expose and develop a radiograph of the fitted master cone.
7. Place this radiograph in your endodontic film mount and place the date on it (see sheet 9).
8. Consult with the assigned instructor whenever you need.
9. Have this step signed by the endodontic instructor.
10. Mix the root canal sealer, cements the master gutta-percha cone to the apical terminus.
11. Fill the remaining root canal space by employing the lateral compaction technique.
12. Expose and develop a radiograph at the completion of obturation and. Place this radiograph in your
endodontic film mount.
13. Consult the demonstrator before cutting the excess gutta percha.
14. Remove the excess coronally extruded gutta percha with a heated plastic instrument to the level of the
canal orifice(s).
15. Expose and develop a post-treatment radiograph. Place this radiograph in your endodontic film mount
and place the appropriate date on it (see sheet7).
16. Have this step approved and assessed by the instructor.
17. Repeat stages 2 through 16 for the remaining prepared assigned teeth.
Note:
*Make sure that an instructor has signed all steps on your endodontic evaluation form.
* Submit this completed form together with the PROPERLY MOUNTED RADIOGRAPHS of the teeth on
which you have performed endodontic therapy to the course director in the due time.
*No practical step forms will be accepted after the collection deadline announced in the practical schedule.
24
Criteria for Evaluation: The initial practical exercises in this course (steps 1 through 3) are non-graded experiences.
I. CRITERIA FOR THE EVALUATION OF ACCESS CAVITY PREPARATION:
1. The walls of the access opening should extend laterally to, and be confluent with, the walls
of the pulp chamber. The access opening should appear to be an occlusal extension of the
pulp chamber walls.
2. All coronal decay must be removed (in human extracted teeth)
3. No overhanging dentin or pulp chamber roof should remain. As a test, an explorer should
be placed on the floor of the pulp chamber and it should be withdrawn, contacting the
lateral walls of the pulp chamber to the access opening. Any "catches" or impediments to
movement represent an incomplete access opening and those interferences must be
removed.
4. All walls must be divergent toward the access tooth surface
5. (in human extracted teeth only) No pulpal tissue remnants, including that in the pulp horns,
Can be left in the chamber.
While with incisors, incisal enamel triangle and lingual dentin shoulder should be
removed for convenience to assure a straight line access.
6. All root canal orifices must be fully exposed and accessible. An endodontic explorer
placed into each canal orifice must not rub against or bind on the walls of the pulp
chamber or access opening.
7. No bur marks or penetrations into the floor of the pulp chamber are permitted.
8. The final shape of the coronal access opening should conform to the internal anatomy of
the tooth; for example, the second canal in the distal root of the lower first molar.
9. Perforations are unacceptable.
CRITERIA FOR THE EVALUATION OF THE CLEANING AND SHAPING:
1. Canals should be prepared to the predetermined working length(s).
2. Over or under preparations are unacceptable.
3. Canal walls perforations are unacceptable.
4. Canals should be prepared to the optimum size with smooth continuously tapered pattern.
5. The selected spreader should pass easily within 1mm of the working length with space alongside for the
master gutta percha cone.
6. A seal or stop is identified by using a file smaller than the MAF at the working length.

25
CRITERIA FOR THE EVALUATION OF COMPLETED GUTTA-PERCHA ROOT CANAL
OBTURATION:
1. The filling material must extend to the working length; from the orifices of the root canal
2. to the apical foramen.
3. No voids should be present within the body of the filling, or between canal wall and filling, for the
entire length of the root canal.
4. Condensation is judged to be completed when:
a. No voids are present as viewed on a radiograph, and
b. A spreader placed into the root canal cannot be pushed into the body of the filling material more
than 2 mm or 3 mm.
5. If a dense root canal filling is not present, the filling may need to be replaced. If replacement is not
possible, another tooth may need to be treated for credit, at the discretion of the instructor.
6. No excess gutta percha should be left in the pulp chamber; this should be removed to the level of canal
orifice(s). Chambers should be cleaned free from remaining sealer material.
7. The single-film verification radiograph should be clean, dry, and unstained when filed in the endodontic
film mount provided.
Student responsibilities to the course:
By the preclinical course attending and practicing you should be able to:
1. Review pulp cavity anatomy and relate its application to endodontic treatment starting from access
preparation to canal system obturation.
2. Demonstrate competence in the use of root canal instruments both in preparation and in obturation of
the single and multirooted teeth.
3. Demonstrate how to prevent and solve procedural problems and mishaps, for example, short or long
preparation.
4. Show competency in obturating the canals of single rooted teeth using Gutta-Percha and sealer.
5. Show competency in obturating the canals of multi rooted teeth using Gutta-Percha and sealer.
6. Evaluate the obturated canal in accordance with the written criteria.

26
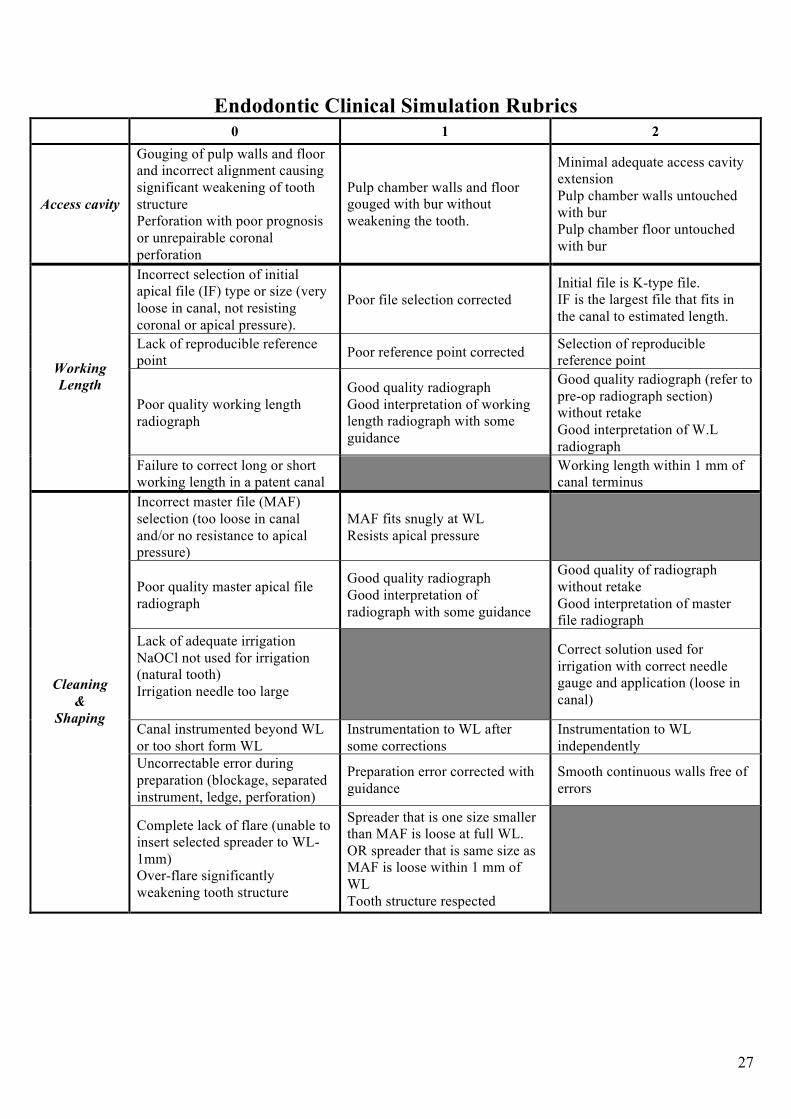
Endodontic Clinical Simulation Rubrics
0 1 2
Tooth is too close to one or 2 of
the edges of the film.
Tooth tilted to one side, not
aligned with the film.
Tooth is positioned in the middle
at equal distances from the film
edges. AND tooth is upright in
alignment with the film
Presence of cone cut.
Presence of artifacts (debris or
others).
Image taken on wrong side of the
film.
Image is free of exposure errors
Image is too dark or too light.
Yellow or brown tint across the
film.
Incomplete fixation.
Good contrast and density exists
defining the different parts of the
tooth.
Preoperative
radiograph
Image not labeled (which tooth?
What angle?)
Film not mounted appropriately.
Image is labeled according to
tooth number and exposure angle.
Unable to identify the different
parts of the image or how they
appear.
Able to identify and interpret the
anatomical appearance of
different parts of the image
(crown, pulp chamber, roots, root
canals)
Faulty access cavity location,
outline or size with weakening of
tooth structure
Access cavity outline, size and/or
location is slightly off but
acceptable
No destruction of tooth structure
(marginal ridges, incisal edge,
cusp tip)
Correct outline, size and location
of access cavity
Presence of caries or previous
restoration or unsupported tooth
structure
(natural tooth)
Removal of caries, restoration
and unsupported tooth structure
with some guidance (natural
tooth)
Complete removal of caries,
restoration and unsupported tooth
structure completed
independently
Failure to de-roof the pulp
chamber
Complete de-roofing of the pulp
chamber
Access
Cavity
Failure to detect patent main
canals
Lack of straight line access
Detection of main patent canal/s
with some difficulty
Straight line access to the root
canal/s with Good coronal flaring
with some guidance
Detection of main patent root
canal orifice/s
Detection of extra canals with or
without guidance
Straight line access to the root
canal/s with Good coronal flaring
performed independently
27
Endodontic Clinical Simulation Rubrics
0 1 2
Access cavity
Gouging of pulp walls and floor
and incorrect alignment causing
significant weakening of tooth
structure
Perforation with poor prognosis
or unrepairable coronal
perforation
Pulp chamber walls and floor
gouged with bur without
weakening the tooth.
Minimal adequate access cavity
extension
Pulp chamber walls untouched
with bur
Pulp chamber floor untouched
with bur
Incorrect selection of initial
apical file (IF) type or size (very
loose in canal, not resisting
coronal or apical pressure).
Poor file selection corrected
Initial file is K-type file.
IF is the largest file that fits in
the canal to estimated length.
Lack of reproducible reference
point Poor reference point corrected
Selection of reproducible
reference point
Poor quality working length
radiograph
Good quality radiograph
Good interpretation of working
length radiograph with some
guidance
Good quality radiograph (refer to
pre-op radiograph section)
without retake
Good interpretation of W.L
radiograph
Working
Length
Failure to correct long or short
working length in a patent canal
Working length within 1 mm of
canal terminus
Incorrect master file (MAF)
selection (too loose in canal
and/or no resistance to apical
pressure)
MAF fits snugly at WL
Resists apical pressure
Poor quality master apical file
radiograph
Good quality radiograph
Good interpretation of
radiograph with some guidance
Good quality of radiograph
without retake
Good interpretation of master
file radiograph
Lack of adequate irrigation
NaOCl not used for irrigation
(natural tooth)
Irrigation needle too large
Correct solution used for
irrigation with correct needle
gauge and application (loose in
canal)
Canal instrumented beyond WL
or too short form WL
Instrumentation to WL after
some corrections
Instrumentation to WL
independently
Uncorrectable error during
preparation (blockage, separated
instrument, ledge, perforation)
Preparation error corrected with
guidance
Smooth continuous walls free of
errors
Cleaning
&
Shaping
Complete lack of flare (unable to
insert selected spreader to WL-
1mm)
Over-flare significantly
weakening tooth structure
Spreader that is one size smaller
than MAF is loose at full WL.
OR spreader that is same size as
MAF is loose within 1 mm of
WL
Tooth structure respected

28
Endodontic Clinical Simulation Rubrics
0 1 2
Master GP cone seated more
than 1 mm short of WL.
Master CP cone extruded beyond
the apical terminus.
Master GP cone not resisting
apical or coronal displacement
Master cone seated within 1 mm
of WL.
Size fits with good resistance to
apical displacement.
Acceptable resistance to coronal
displacement.
Master cone seated within ½ mm
of WL.
Good resistance to coronal and
apical displacement
Master cone radiograph of poor
quality Good quality radiograph
Final obturation length
discrepancy of 2 mm or more
Length discrepancy corrected to
WL
Obturation length comparable to
WL
Gutta percha above cervical
line/on pulp floor
Obturation material on walls or
floor of access cavity
Correction of coronal GP level.
Access cavity completely clean.
GP seared off at cervical line
level (anterior tooth) and pulp
floor (posterior tooth)
Access cavity completely clean
Root Canal
obturation
Lack of tapered root filling
Several voids in root filling
Poor radiographic homogeneity
Root filling with adequate taper
after correction
Acceptable density and
homogeneity of obturation
(minimal voids at mid root level)
Root filling with adequate taper
achieved independently
Dense homogenous root canal
filling
29
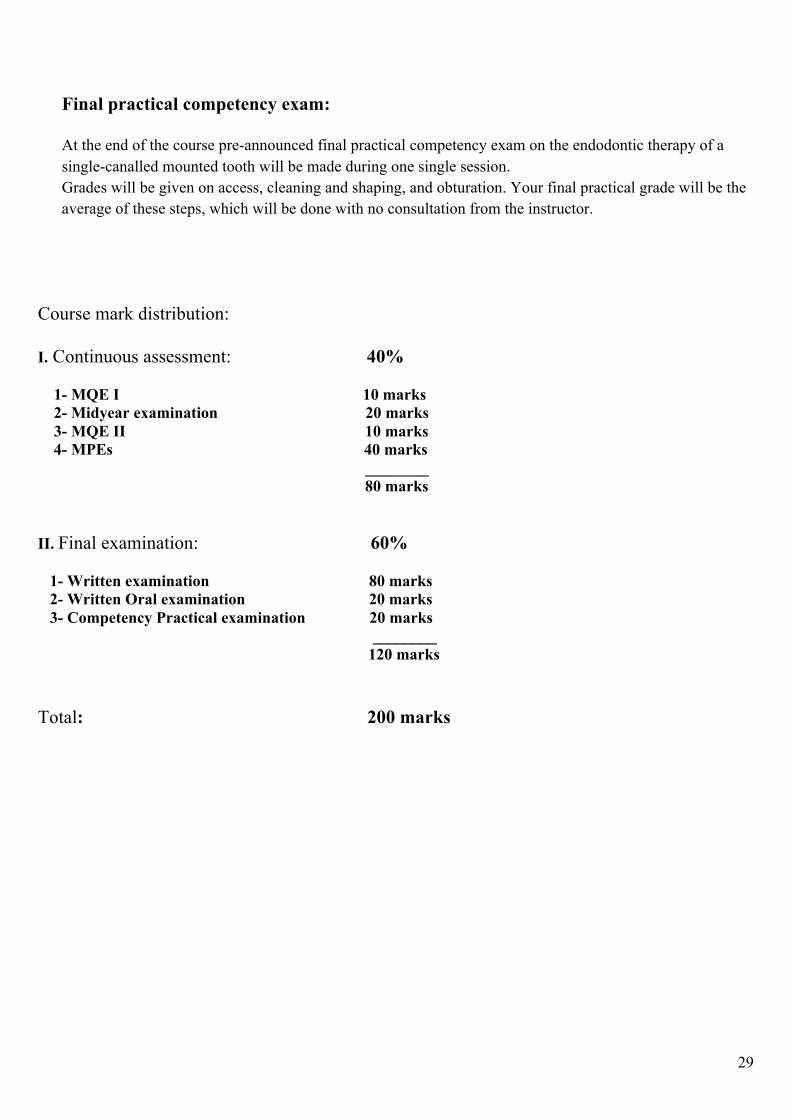
Final practical competency exam:
At the end of the course pre-announced final practical competency exam on the endodontic therapy of a
single-canalled mounted tooth will be made during one single session.
Grades will be given on access, cleaning and shaping, and obturation. Your final practical grade will be the
average of these steps, which will be done with no consultation from the instructor.
Course mark distribution:
I. Continuous assessment: 40%
1- MQE I 10 marks
2- Midyear examination 20 marks
3- MQE II 10 marks
4- MPEs 40 marks
________
80 marks
II. Final examination: 60%
1- Written examination 80 marks
2- Written Oral examination 20 marks
3- Competency Practical examination 20 marks
________
120 marks
Total: 200 marks

30
4th Year Endodontics Lecture schedule for the 1
st Semester Academic Year 2014 – 2015
Week
Date Topic:
Lecture Title Lecturer
Assessmen
t
(Quiz/
Assignmen
ts)
Reference
(Page numbers of the
main text or resource)
Practical
Sessions
And supervisors
Monday
8/9/2014
1
Wednesday
10/9/2014
•Introduction, Rational ,
indications &
contraindications Scope of
Endodontics
Prof. Khaled
Balto
MCQ Hargreaves K.M, Cohen S:
Pathways of the pulp, 10th Ed.St
Louis, 2011,Mosby
Project .1
Monday
15/9/2014
2
Wednesday
18/9/2014
•Components of the root
canal system & RC
Anatomy
.Pulp space morphology
and anatomical variation of
anterior permanent teeth
Prof. Sawsan
Abozaid
MCQ Hargreaves K.M, Cohen S:
Pathways of the pulp, 10th Ed.St
Louis, 2011,Mosby,
148-233
Project.1
Monday
22/9/2014
3
Wednesday
24/9/2014
.Endodontic Access Cavity
Preparation
Prof. Omar
Fahim
MCQ Hargreaves K.M, Cohen S:
Pathways of the pulp, 10th Ed.St
Louis, 2011,Mosby, 148-233
Project.1
Monday
13/10/2014
4
Wednesday
15/10/2014
•Pulp space morphology
and anatomical variation of
posterior permanent teeth
Prof. Sawsan
Abozaid
MCQ Hargreaves K.M, Cohen S:
Pathways of the pulp, 10th Ed. St
Louis, 2011,Mosby,
148-233
Project.1
Monday
20/10/2014
5
Wednesday
22/10/2014
.Endodontic Access Cavity
Preparation
Prof. Omar
Fahim
MCQ Hargreaves K.M, Cohen S:
Pathways of the pulp, 10th Ed.St
Louis, 2011,Mosby, 148-233
Project.1
Monday
27/10/2014
6
Wednesday
29/10/2014
•Radiographic length
Determination
(Ingle’s Method)
•Electronic length
determination
Dr.Khaled
Merdad
MCQ Hargreaves K.M, Cohen S:
Pathways of the pulp, 10th Ed.St
Louis, 2011,Mosby, 290-400
Project.1
Monday
3/11/2014
7
Wednesday
5/11/2014
•Disinfection of pulp space Prof. Lubna
Alshafie
MCQ Hargreaves K.M, Cohen S:
Pathways of the pulp, 10th Ed.St
Louis, 2011,Mosby, 290-400
Project.1
Monday
10/11/2014
8
Wednesday
12/11/2014
•Intracanal medication Prof. Lubna
Alshafie
MCQ Hargreaves K.M, Cohen S:
Pathways of the pulp, 10th Ed. St
Louis, 2011,Mosby,
290-400
Project.1
Monday
17/11/2014
9
Wednesday
19/11/2014
•Intra-canal Instruments
(Standardization)
Prof. Rajab
Saif
MCQ Hargreaves K.M, Cohen S:
Pathways of the pulp, 10th Ed.St
Louis, 2011,Mosby, 233-290
Project.1
Monday
24/11/2014
10
Wednesday
26/11/2014
•Material used for
manufacturing of Intra-
canal Inst.
•Intracanal instruments
(Traditional)
Prof. Rajab
Saif
MCQ Hargreaves K.M, Cohen S:
Pathways of the pulp, 10th Ed.St
Louis, 2011,Mosby, 233-290
Project.1
Monday
1/12/2014
11
Wednesday
3/12/2014
•Intra-canal Endod
Instruments (Hybird)
Prof. Rajab
Saif
MCQ Hargreaves K.M, Cohen S:
Pathways of the pulp, 10th Ed.St
Louis, 2011,Mosby, 233-290
Project.2
12 Monday
8/12/2014 •Intra-canal Endod Prof. Rajab MCQ Hargreaves K.M, Cohen S:
Pathways of the pulp, 10th Ed.St Project.2

31
Monday
8/12/2014
12
Wednesday
10/12/2014
Instruments (NiTi Rotary
Instruments)
Saif MCQ Louis, 2011,Mosby, 233-290 Project.2
Monday
15/12/2014
13
Wednesday
1712/2014
Microbiology Prof. Balto

32
Practical Endodontic Clinical Simulation (2014 – 2015) 1
st semester
La
b #
Stu
den
ts
Tim
e
Da
te
Practical Title Staff and Student activities during the
Lab session
M PM Monday
8/9/2014 1
F AM Wednesday
10/9/2014
Introduction to Clinical Simulation
Endodontics course description and
MPEs
Revision of the technical course description
and MPE’s
M PM Monday
15/9/2014
2
F AM Wednesday
18/9/2014
Simulation Endodontic Project1
(SEP1): 3 Artificial Ant. teeth& one
natural Ant. tooth
Orientation Clinical Simulation
Lecture for:
• Teeth selection and
mounting in Sectional
Endo Dent form (SED)
Teeth selection, radiographing and mounting
M PM Monday
22/9/2014 3
F AM Wednesday
24/9/2014
Orientation Clinical Simulation
Lecture:
Demo for Access cavity preparation Ant.
teeth
M PM Monday
13/10/2014 4
F AM Wednesday
15/10/2014
Simulation Endodontic Project1
(SEP- 1)
• Access cavity ( Ant.teeth)
Demo for WL determination for Ant. teeth
M PM Monday
20/10/2014 5
F AM Wednesday
22/10/2014
Simulation Endodontic Project
(SEP- 1)
• Ergonomics
Access cavity preparation & WL
determination for Ant. teeth
M PM Monday
27/10/2014 6
F AM Wednesday
29/10/2014
Orientation Clinical Simulation
Lecture:
• W L determination
(Radiographic method)
Demo for Cleaning and shaping of Ant.
Teeth using Step-Back Tech.
M PM Monday
3/11/2014
7
F AM Wednesday
5/11/2014
Orientation Clinical Simulation
Lecture:
• Cleaning and shaping
Cleaning and shaping of Ant. Teeth using
Step-Back Tech.
M PM Monday
10/11/2014
8
F AM Wednesday
12/11/2014
Orientation Clinical Simulation
Lecture:
• Cleaning & shaping using
rotary Ni-Ti system
Demo for Cleaning and shaping of Natural
ant. Tooth using Crown Down rotary Ni-Ti
system

33
M PM Monday
17/11/2014 9
F AM Wednesday
19/11/2014
Simulation Endodontic Project 1
(SEP- 1)
Cleaning and shaping of Natural Ant. Teeth
using Crown Down rotary Ni-Ti system
M PM Monday
24/11/2014 10
F AM Wednesday
26/11/2014
Orientation Clinical Simulation
Lecture:
• 3 Dimensional Obturation of
RCS
Demo for 3 Dimensional Obturation of root
canal system using Cold compaction Tech.
M PM Monday
1/12/2014 11
F AM Wednesday
3/12/2014
Simulation Endodontic Project 1
(SEP- 1)
3 Dimensional Obturation of root canal system
M PM Monday
8/12/2014
12
F AM Wednesday
10/12/2014
Simulation Endodontic Project 2
(SEP-2):
One artificial & one natural
premolar Teeth
Orientation Clinical Simulation
Lecture :
•Access cavity ( Premolar tooth)
•W L determination (Radiographic
method)
Demo for Access cavity preparation & WL
determination for premolar teeth
M PM Monday
15/12/2014
13
F AM Wednesday
17/12/2014
Orientation Clinical Simulation
Lecture:
• Magnification in
Endodontics
Access cavity preparation, WL determination,
cleaning and shaping and 3Dimensional
obturation of premolar
M PM Monday
22/12/2014 14
F AM Wednesday
24/12/2014
Simulation Endodontic Project 2
(SEP-2)
Access cavity preparation, WL determination,
cleaning and shaping and 3Dimensional
obturation of premolar
Required Teeth For Project 1 , 2 and 3 A minimum of teeth will be required to complete the endodontic procedures in the Endodontic Clinical
Simulation Course. You are urged to have additional teeth preselected in case you need a replacement.
The list of 8 teeth are as follow:
Project 1 (Anterior): 3 Artificial anterior teeth
1 Natural anterior tooth
Project 2 (Premolars): 1 Artificial premolar tooth
1 Natural premolar tooth
Project 3 (Molars): 1 Artificial molar tooth
1 Natural molar tooth
For competency Examination:
1 Artificial anterior tooth

34
Project 1 (P1): Simulated Endodontic Project ( SEP.1) Access cavity preparation for 3 plastic anterior
tooth, working length determination, radiographic method, cleaning and shaping by Hand
instrumentation, and obturation by cold lateral compaction. One natural tooth cleaned and shaped by NiTi
rotary system
Project 2 (P2): Simulated Endodontic Project ( SEP.2) Access cavity preparation for a an single and double
rooted Premolars, working length determination, radiographic method, cleaning and shaping, obturation by
cold lateral compaction.
Project 3 (P3): Simulated Endodontic Project ( SEP.3) Access cavity preparation for a an Maxillary and
Mandibular Molars, working length determination, radiographic method, cleaning and shaping, obturation
by cold lateral compaction.

35
Endodontics Clinical Simulation (CDS 422)
4th
year
Progress Notes Sheet
Student name: …………………………… Computer no. ….…..
Tooth ID: …………………….
Note: Staple tooth’s film mount in the empty space.
Instrumentation Technique Used:
Hand Instrumentation:
Rotary Instrumentation:
Canal ID Estimated
W.L.
Reference
point
Adjusted
W.L,
Initial file
size
Apical size
preparation
Rotary
system /
Taper%
Obturation
Technique
Canal ID Estimated
W.L.
Referenc
e point
Adjuste
d W.L
Initial file
size
Master
apical file
size
Last Step-
back file
size
Obturation
Technique

36
Endodontic Clinical Simulation – CDS 411 4
th Year
MPE Evaluation Form
Pre-operative Radiograph
Mandatory fields:
These MUST be followed at all times. Violation of any of those fields will result in immediate STOPPING of
the exercise.
Procedure evaluation: 0 = incompetent, 1 = competent
Note: • Refer to rubric for evaluation criteria
• Steps with (*) marks are critical steps. The exercise will NOT be considered an MPE if you score
zero in any of them
Student Name
Computer No. Serial
Tooth No. No. of
canals
Date
Tray organization
Yes
No
Knowledge
Yes
No
Communication skills
Yes
No
Infection control (natural tooth)
Yes
No
Self
Assessment
Instructor
Evaluation Steps and procedures
0 1 0 1
Feedback
Position of tooth on the image*
Imaging errors*
Processing of film
Labeling and mounting
Interpretation of the radiograph*
Total /5
Accepted as MPE
Yes
No
Approved by: Date:

37
Endodontic Clinical Simulation – CDS 411 4
th Year
MPE Evaluation Form
Access cavity
Mandatory fields:
These MUST be followed at all times. Violation of any of those fields will result in immediate STOPPING of
the exercise.
Procedure evaluation: 0 = incompetent, 1 = competent, 2 = outstanding
Note:
• Refer to rubric for evaluation criteria
• Minimum mark of 6/10 is needed to consider this exercise as MPE
• Steps with (*) marks are critical steps. The exercise will NOT be considered an MPE if you score
zero in any of them
Tooth No. No. of
canals
Date
Student Name
Computer No. Serial
Tray organization
Yes
No
Knowledge
Yes
No
Communication skills
Yes
No
Infection control (natural tooth)
Yes
No
Self Assessment Instructor
Evaluation Steps and procedures
0 1 2 0 1 2
Feedback
Location of access cavity
Cavity outline
Complete de-roofing of the pulp
chamber
Detection and coronal flare of root
canal(S)
Straight line access/adequate
extension (without weakening of the
tooth structure)*
Total /10
Accepted as MPE
Yes
No
Approved by: Date:

38
Endodontic Clinical Simulation – CDS 411 4
th Year
MPE Evaluation Form
Working Length Determination
Mandatory fields:
These MUST be followed at all times. Violation of any of those fields will result in immediate STOPPING of
the exercise.
Procedure evaluation: 0 = incompetent, 1 = competent, 2 = outstanding*
Note:
• Refer to rubric for evaluation criteria
• Minimum mark of 6/10 is needed to consider this exercise as MPE
• Steps with (*) marks are critical steps. The exercise will NOT be considered an MPE if you score
zero in any of them
• Code 1 =1.25, code 2= 2.5
Student Name
Computer No. Serial
Tooth No. No. of
canals
Date
Tray organization
Yes
No
Knowledge
Yes
No
Communication skills
Yes
No
Infection control (natural tooth)
Yes
No
Self Assessment Instructor
Evaluation Steps and procedures
0 1 2 0 1 2
Feedback
Correct selection of initial file(s)
Reproducible reference point per
canal
Radiograph properly taken and
interpreted
Working length within 1 mm of canal
terminus
Total: / 10
Accepted as MPE
Yes
No
Approved by: Date:

39
Endodontic Clinical Simulation – CDS 411 4
th Year
MPE Evaluation Form
Cleaning and Shaping (Part I and II)
Student Name
Computer No. Serial
Mandatory fields:
These MUST be followed at all times. Violation of any of those fields will result in immediate STOPPING of
the exercise.
Procedure evaluation: 0 = incompetent, 1 = competent, 2 = outstanding
Note:
• Refer to rubric for evaluation criteria
• Minimum mark is 6/10 to consider this step as MPE
• Steps with (*) marks are critical steps. The exercise will NOT be considered an MPE if you score
zero in any of them
Tooth No. No. of
canals
Date
Tray organization
Yes
No
Knowledge
Yes
No
Communication skills
Yes
No
Infection control (natural tooth)
Yes
No
Self Assessment Instructor
Evaluation Steps and procedures
0 1 2 0 1 2
Feedback
Correct MAF size
MAF within 1 mm of canal terminus
Good quality and interpretation of
radiograph
Irrigation used adequately
Canal walls are smooth and
continuous without fatal errors
(perforation, uncorrectable ledge or
separated instrument)*
Proper flare as confirmed by the
selected spreader
Total: /10
Accepted as MPE
Yes
No
Approved by: Date:

40
Endodontic Clinical Simulation – CDS 411
4th
Year
MPE Evaluation Form
Obturation
Mandatory fields:
These MUST be followed at all times. Violation of any of those fields will result in immediate STOPPING of
the exercise.
Procedure evaluation: 0 = incompetent, 1 = competent, 2 = outstanding
Note:
• Refer to rubric for evaluation criteria
• Minimum mark of 6/10 is needed to consider this step as MPE
• Steps with (*) marks are critical steps. The exercise will NOT be considered an MPE if you score
zero in any of them
Student Name
Computer No. Serial
Tooth No. No. of
canals
Date
Tray organization
Yes
No
Knowledge
Yes
No
Communication skills
Yes
No
Infection control (natural tooth)
Yes
No
Self Assessment Instructor
Evaluation Steps and procedures
0 1 2 0 1 2
Feedback
Master GP fits properly (size and
length)
Radiograph properly taken and
interpreted
Proper apical extension of
obturation*
Proper coronal extension of GP
Tapered, dense and homogenous
radiographic appearance of
obturation*
Total /10
Accepted as MPE
Yes
No
Approved by: Date:

41