END USER MANUAL KTC-M44CI - KENWOODEN).pdf · Multiconn Srl Pag. 2 of 25 KTC-M44CI - User Manual...
25
Transcript of END USER MANUAL KTC-M44CI - KENWOODEN).pdf · Multiconn Srl Pag. 2 of 25 KTC-M44CI - User Manual...
Multiconn Srl Pag. 2 of 25 KTC-M44CI - User Manual (ENG)
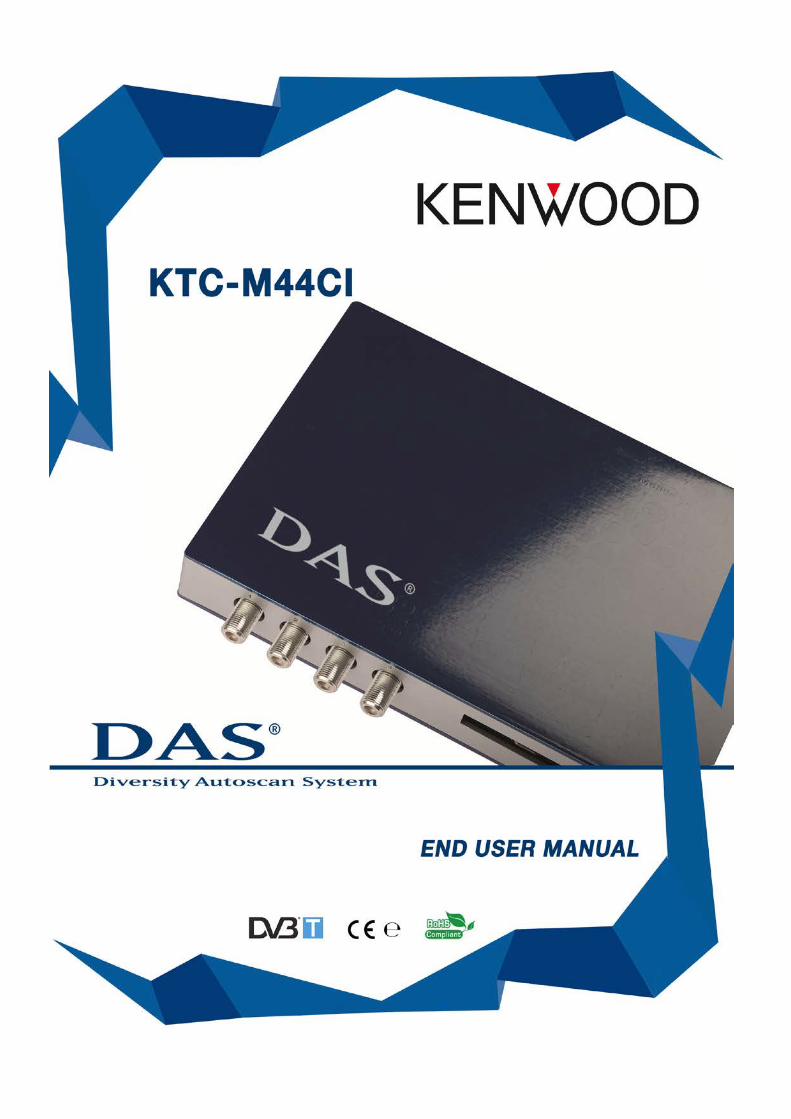
END USER MANUAL KTC-M44CI
Warnings: Important Safety Instructions and Caution
Please read all of these instructions regarding your unit and retain them for future reference • Read this manual fully and carefully before operating DAS digital receiver • Keep this manual handy as a reference for operating procedure and safety information • Pay close attention to all warnings and follow the instructions carefully • Do not allow other people to use the system until they have read and understood the operating
instructions. • Do not push objects of any kind into this product through openings as they may touch dangerous
voltage points or short- out parts that could result in a fire or electronic shock 1) Don’t use or perform any function while driving
This could cause accident, endangering both your safety and the safety of others; always observe safe driving rules and follow traffic regulations. If prolonged intervention on the unit is necessary, stop the vehicle in a safe place and make adjustments.
2) Video output For your safety, ensure that the DRIVER monitor is connected to the video OUT DRIVER. If the connection to the handbrake and the menu settings have been done properly, the Video DRIVER will only work with the handbrake on and therefore only with the vehicle still. Viewing images while driving is forbidden and dangerous! See pag.5 for handbrake setting.
3) Check for correct power supply 4) Don’t disassemble, tamper with or attempt to repair any part of the product
Any such actions will immediately void the warranty and may lead to damage, accidents or injury. 5) High temperature and humidity may compromise operations
Do not expose the unit to rain and moisture If any solid object or liquid fall into the cabinet, unplug the unit and have it checked by qualified personnel before operating it any further.
6) The unit must be installed by experienced personnel only 7) Wrong wiring may cause problems to the vehicle as well as damage, accidents and injury
Do not attempt to install or service your DVB-T receiver by yourself. Do not install the unit where it may: 1) Obstruct the driver’s attention; 2) Impair the performance of any of the vehicle’s operating systems or safety features including airbags, hazard lamp buttons etc; 3) Impair the driver’s ability to safely operate the vehicle.
8) Before wiring, disconnect the cable from the negative battery terminal 9) Don’t use bolts or nuts in the brake or steering systems to make ground connections 10) Arrange the wiring so it is not crimped or pinched by a sharp metal edge
Multiconn Srl Pag. 3 of 25 KTC-M44CI - User Manual (ENG)
WHAT IS DAS
DAS system analyzes and scans automatically the TV channels frequencies by eliminating the manual procedures normally used. DAS allows to get the best reception of the signal during a journey. Using the RDS system combined to digital signal (DVB-T), DAS changes automatically the frequency of the TV channel avoiding the waiting to receive the new signal Contents
• Installation – pag.5
• Remote Control Operations – pag.9
• Start and Antennas Installation – pag.10
• Settings Configuration Menu – pag.12
• Antennas status and check – pag.14
• TV List and Memo TV Channels List – pag.15
• Memorize TV channels – pag.16
• Change TV channels – pag.18
• Zapping – pag.18
• Upgrade via USB – pag.19
• Pay TV – pag.20
• Touch Control – pag.21
• Trouble Shooting Q & A – pag.22
Multiconn Srl Pag. 4 of 25 KTC-M44CI - User Manual (ENG)
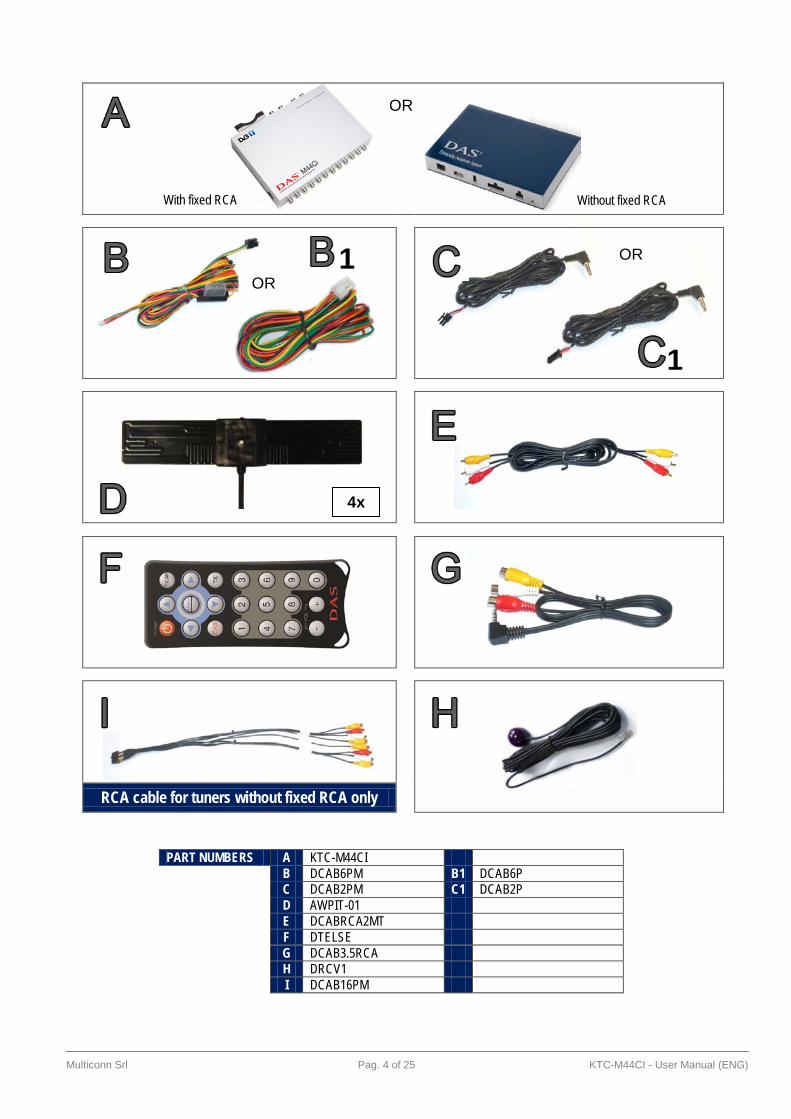
RCA cable for tuners without fixed RCA only
PART NUMBERS A KTC-M44CI B DCAB6PM B1 DCAB6P C DCAB2PM C1 DCAB2P D AWPIT-01 E DCABRCA2MT F DTELSE G DCAB3.5RCA H DRCV1 I DCAB16PM
OR
4x
With fixed RCA Without fixed RCA
OR
OR 1
1
Multiconn Srl Pag. 5 of 25 KTC-M44CI - User Manual (ENG)
Installation
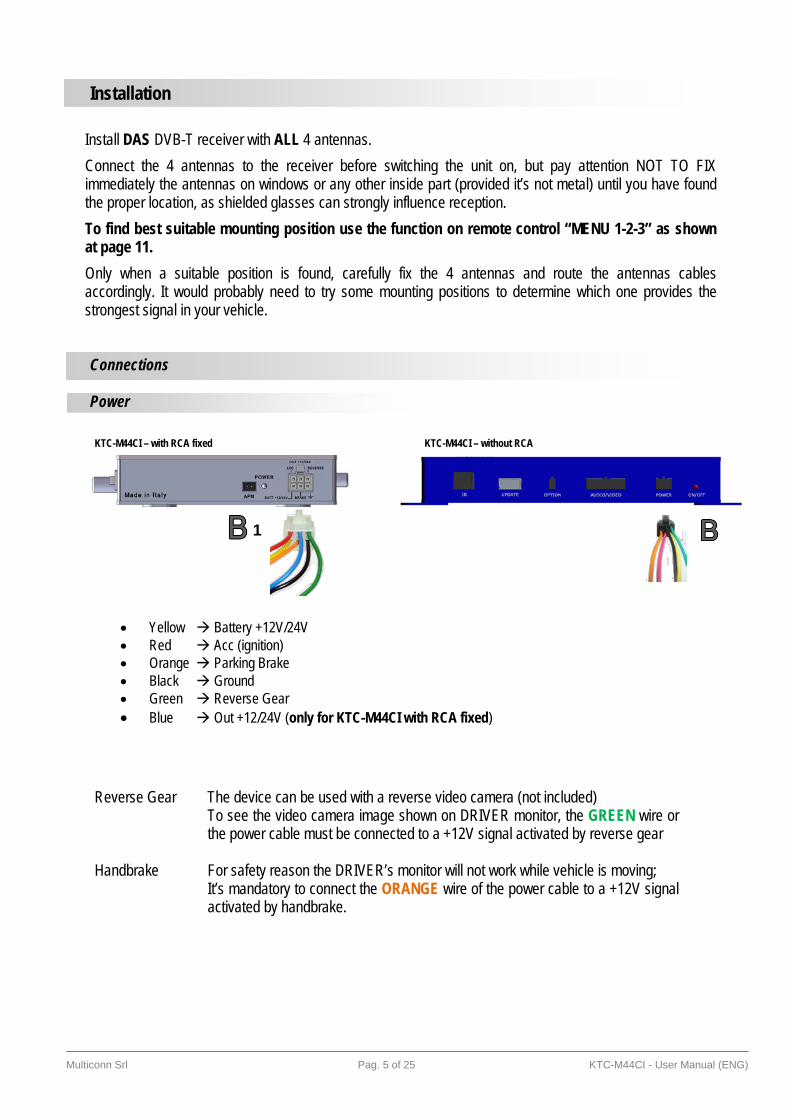
Install DAS DVB-T receiver with ALL 4 antennas. Connect the 4 antennas to the receiver before switching the unit on, but pay attention NOT TO FIX immediately the antennas on windows or any other inside part (provided it’s not metal) until you have found the proper location, as shielded glasses can strongly influence reception. To find best suitable mounting position use the function on remote control “MENU 1-2-3” as shown at page 11. Only when a suitable position is found, carefully fix the 4 antennas and route the antennas cables accordingly. It would probably need to try some mounting positions to determine which one provides the strongest signal in your vehicle. Connections Power KTC-M44CI – with RCA fixed KTC-M44CI – without RCA
Reverse Gear The device can be used with a reverse video camera (not included)
To see the video camera image shown on DRIVER monitor, the GREEN wire or the power cable must be connected to a +12V signal activated by reverse gear
Handbrake For safety reason the DRIVER’s monitor will not work while vehicle is moving;
It’s mandatory to connect the ORANGE wire of the power cable to a +12V signal activated by handbrake.
• Yellow Battery +12V/24V • Red Acc (ignition) • Orange Parking Brake • Black Ground • Green Reverse Gear • Blue Out +12/24V (only for KTC-M44CI with RCA fixed)
1
Multiconn Srl Pag. 6 of 25 KTC-M44CI - User Manual (ENG)
Panel IN-OUT
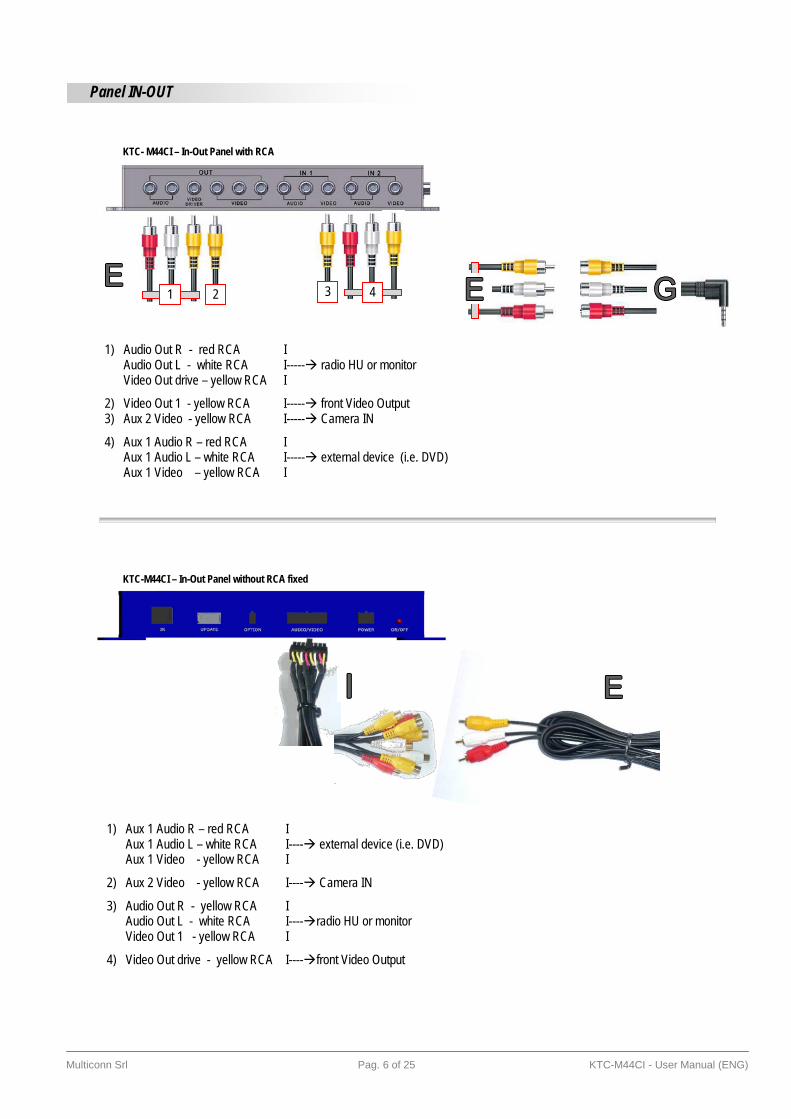
KTC- M44CI – In-Out Panel with RCA
KTC-M44CI – In-Out Panel without RCA fixed
1) Audio Out R - red RCA I Audio Out L - white RCA I----- radio HU or monitor Video Out drive – yellow RCA I
2) Video Out 1 - yellow RCA I----- front Video Output 3) Aux 2 Video - yellow RCA I----- Camera IN
4) Aux 1 Audio R – red RCA I Aux 1 Audio L – white RCA I----- external device (i.e. DVD) Aux 1 Video – yellow RCA I
1 2 3 4
1) Aux 1 Audio R – red RCA I
Aux 1 Audio L – white RCA I---- external device (i.e. DVD) Aux 1 Video - yellow RCA I
2) Aux 2 Video - yellow RCA I---- Camera IN
3) Audio Out R - yellow RCA I Audio Out L - white RCA I----radio HU or monitor Video Out 1 - yellow RCA I
4) Video Out drive - yellow RCA I----front Video Output
Multiconn Srl Pag. 7 of 25 KTC-M44CI - User Manual (ENG)
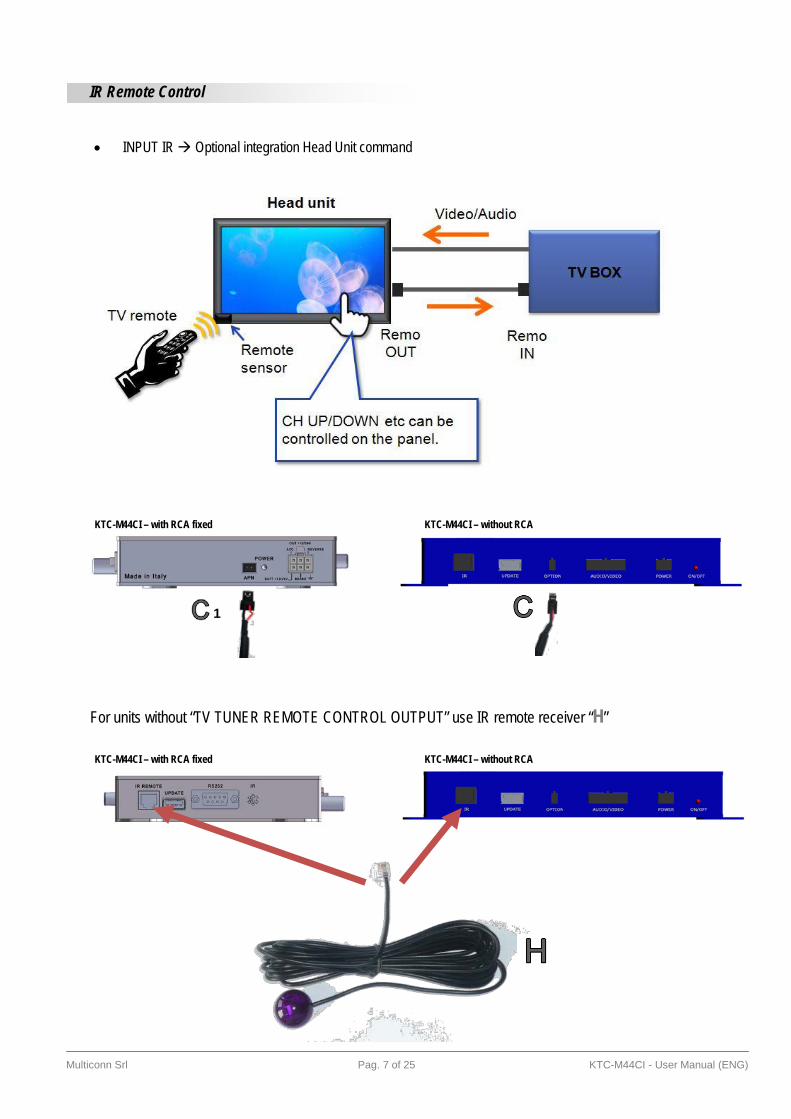
IR Remote Control • INPUT IR Optional integration Head Unit command
KTC-M44CI – with RCA fixed KTC-M44CI – without RCA
For units without “TV TUNER REMOTE CONTROL OUTPUT” use IR remote receiver “H” KTC-M44CI – with RCA fixed KTC-M44CI – without RCA
1
Multiconn Srl Pag. 8 of 25 KTC-M44CI - User Manual (ENG)
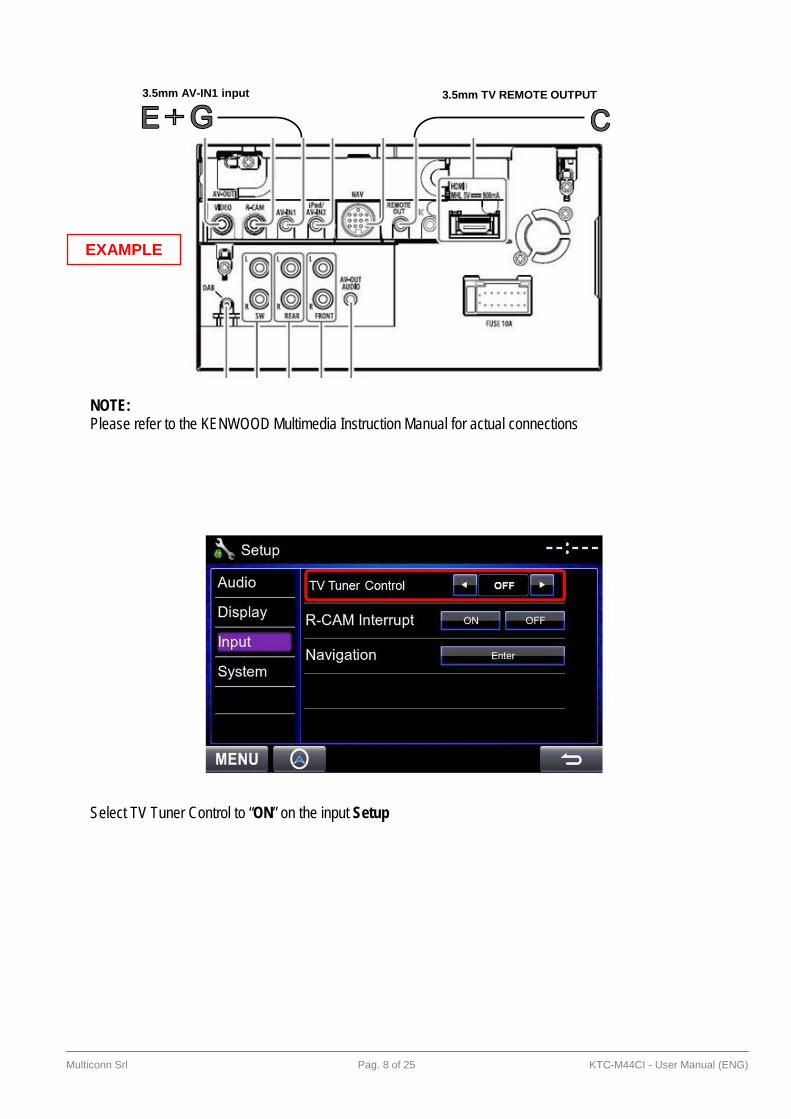
NOTE: Please refer to the KENWOOD Multimedia Instruction Manual for actual connections
Select TV Tuner Control to “ON” on the input Setup
3.5mm AV-IN1 input 3.5mm TV REMOTE OUTPUT
EXAMPLE
Multiconn Srl Pag. 9 of 25 KTC-M44CI - User Manual (ENG)
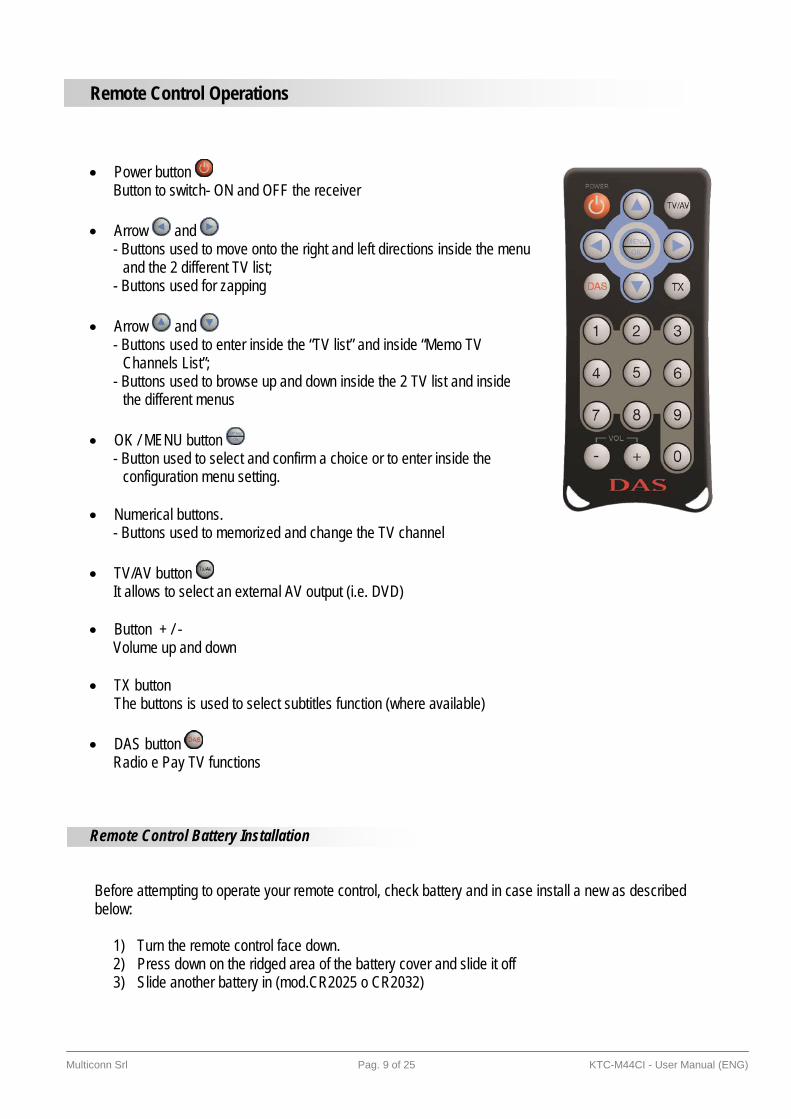
Remote Control Operations • Power button
Button to switch- ON and OFF the receiver
• Arrow and - Buttons used to move onto the right and left directions inside the menu
and the 2 different TV list; - Buttons used for zapping
• Arrow and
- Buttons used to enter inside the “TV list” and inside “Memo TV Channels List”;
- Buttons used to browse up and down inside the 2 TV list and inside the different menus
• OK / MENU button
- Button used to select and confirm a choice or to enter inside the configuration menu setting.
• Numerical buttons.
- Buttons used to memorized and change the TV channel
• TV/AV button It allows to select an external AV output (i.e. DVD)
• Button + / - Volume up and down
• TX button The buttons is used to select subtitles function (where available)
• DAS button Radio e Pay TV functions
Remote Control Battery Installation
Before attempting to operate your remote control, check battery and in case install a new as described below:
1) Turn the remote control face down. 2) Press down on the ridged area of the battery cover and slide it off 3) Slide another battery in (mod.CR2025 o CR2032)

Multiconn Srl Pag. 10 of 25 KTC-M44CI - User Manual (ENG)
Start and Antennas installation
Connect the 4 antennas to receiver but DO NOT fix them yet at windows (use first function “MENU 1-2-3” at page 11 to find right location)
DAS is a receiver with 4 antennas, 3 assigned to the reception of the TV channels and 1 assigned to the autoscan and to the update in real time of the dynamic “TV list”.
• Antenna 1 RDS autoscan and update of the “TV list” • Antennas 2-3-4 reception of the TV channels. • Antennas 1-2-3-4 with stand-by scan function: the “TV list” is updated with all 4 antennas
Multiconn Srl Pag. 11 of 25 KTC-M44CI - User Manual (ENG)
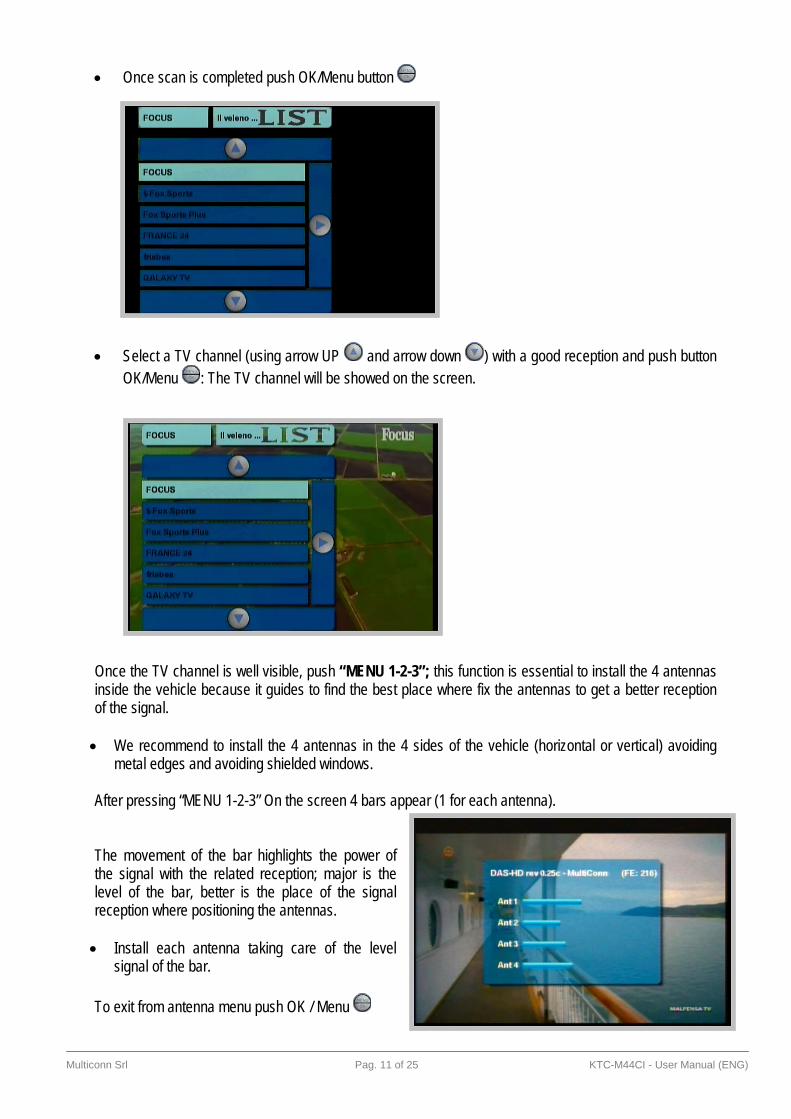
• Once scan is completed push OK/Menu button • Select a TV channel (using arrow UP and arrow down ) with a good reception and push button
OK/Menu : The TV channel will be showed on the screen. Once the TV channel is well visible, push “MENU 1-2-3”; this function is essential to install the 4 antennas inside the vehicle because it guides to find the best place where fix the antennas to get a better reception of the signal. • We recommend to install the 4 antennas in the 4 sides of the vehicle (horizontal or vertical) avoiding
metal edges and avoiding shielded windows. After pressing “MENU 1-2-3” On the screen 4 bars appear (1 for each antenna). The movement of the bar highlights the power of the signal with the related reception; major is the level of the bar, better is the place of the signal reception where positioning the antennas. • Install each antenna taking care of the level
signal of the bar. To exit from antenna menu push OK / Menu
Multiconn Srl Pag. 12 of 25 KTC-M44CI - User Manual (ENG)
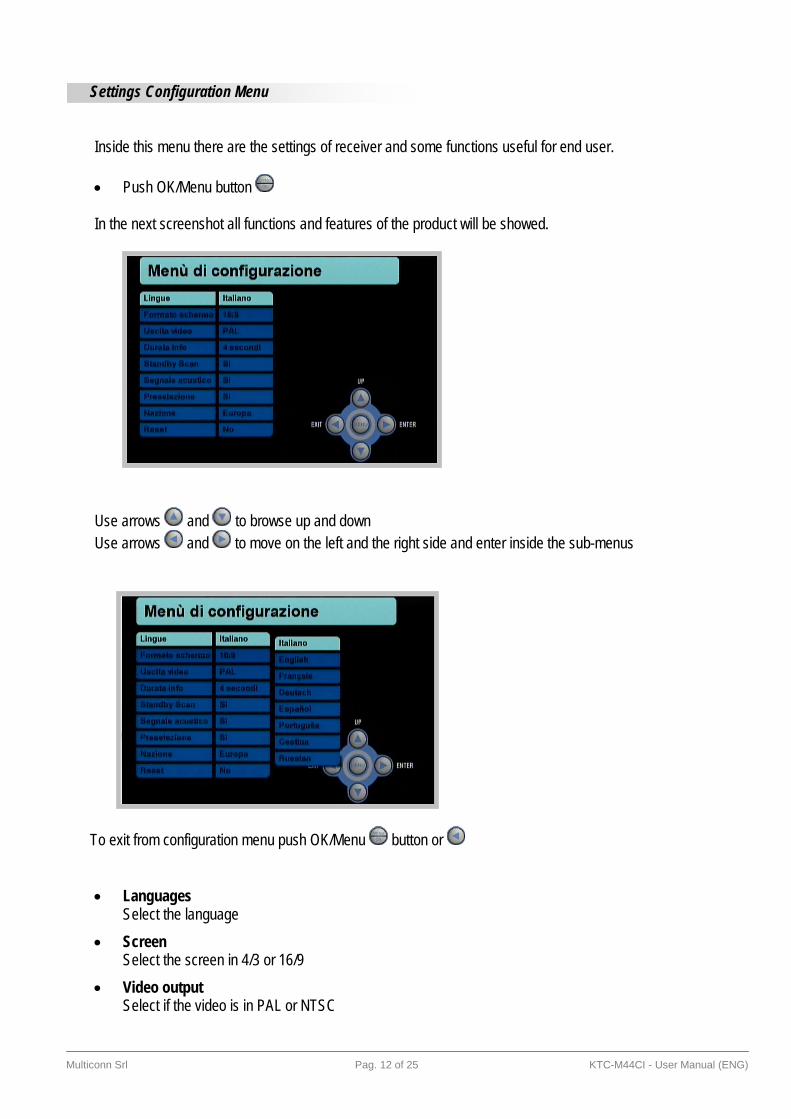
Settings Configuration Menu Inside this menu there are the settings of receiver and some functions useful for end user. • Push OK/Menu button In the next screenshot all functions and features of the product will be showed. Use arrows and to browse up and down Use arrows and to move on the left and the right side and enter inside the sub-menus
To exit from configuration menu push OK/Menu button or
• Languages
Select the language • Screen
Select the screen in 4/3 or 16/9 • Video output
Select if the video is in PAL or NTSC
Multiconn Srl Pag. 13 of 25 KTC-M44CI - User Manual (ENG)
• Info time duration Selecting the duration time it’s possible to choose the time of the screenshots or messages showed on the monitor
• Stand-by Scan This is an essential feature to update automatically the “TV list”. Selecting this option, when the vehicle is turned-off or when the receiver is in stand-by, DAS is ON and it will use the 4 antennas in autoscan version to scan the frequencies and automatically update all TV channels inside the “TV list”. In this case the “TV list” is always updated. For this function DAS unit has a consumption power is 500mA and it will take about 10 minutes. When Autoscan is completed the unit will switch OFF automatically. Select NO to disable this function.
• Memo signal To perform at its best, DAS needs to have the TV channels memorized. Each time a non-memorized channel is showed on the screen, DAS reminds the end user with a signal to memorize the TV channel. Select NO to disable this function.
• TV channel bars This feature allows to end-user to understand in real time if a TV channel is available at that time inside the TV list, provided that this channel has been previously memorized. This function works with memorized TV channels. The 2 superimposed TV channels bars (1 on the upper side of the screen, the other one on the bottom side) also display the 10 memorized TV channels while watching a TV program. End-user can choose if having these bars shown on the edge of the screen or not.
• Nation In Europe is preferable to use the standard “Europe”
• RESET This function is used to reset the system to default factory settings
Multiconn Srl Pag. 14 of 25 KTC-M44CI - User Manual (ENG)
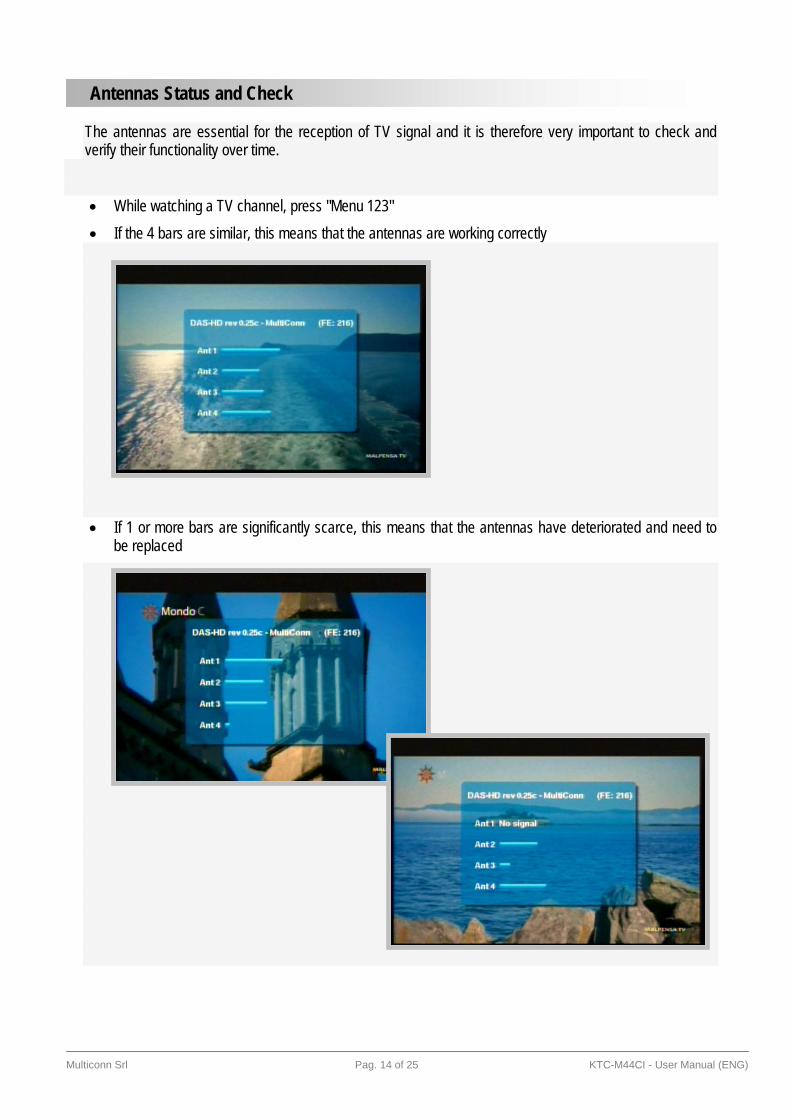
Antennas Status and Check
The antennas are essential for the reception of TV signal and it is therefore very important to check and verify their functionality over time.
• While watching a TV channel, press "Menu 123" • If the 4 bars are similar, this means that the antennas are working correctly
• If 1 or more bars are significantly scarce, this means that the antennas have deteriorated and need to
be replaced
Multiconn Srl Pag. 15 of 25 KTC-M44CI - User Manual (ENG)
TV List and Memo TV Channel List
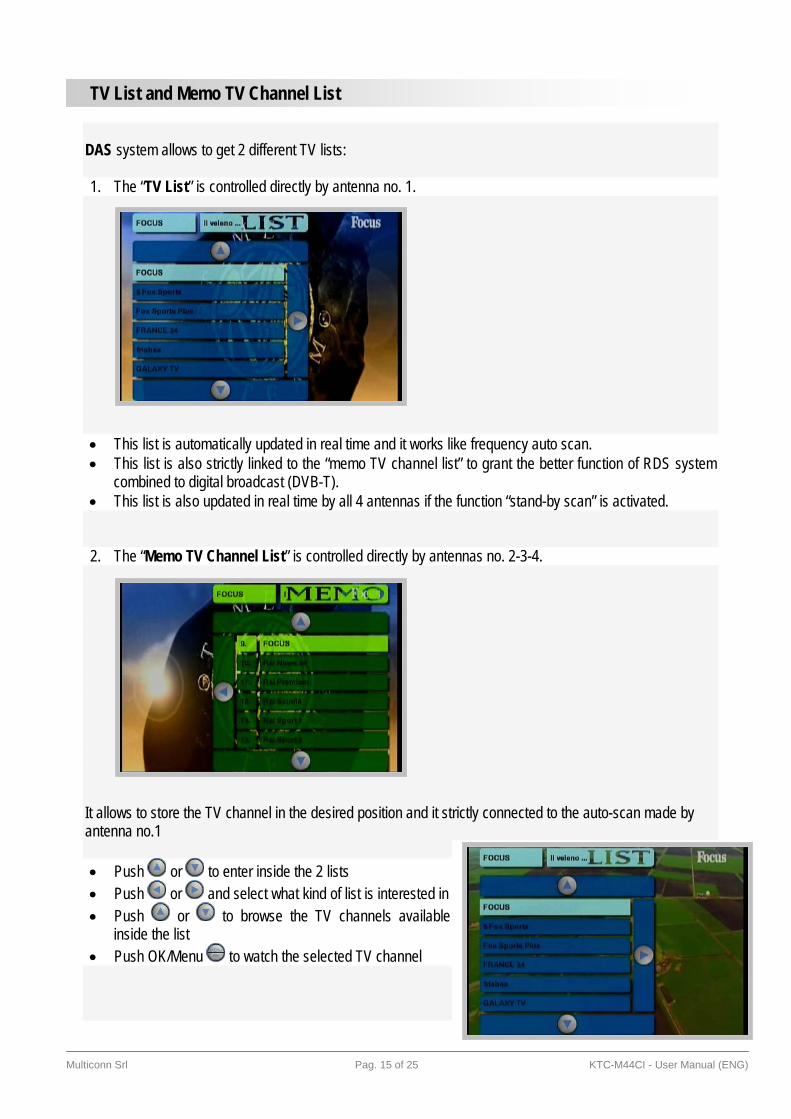
DAS system allows to get 2 different TV lists: 1. The “TV List” is controlled directly by antenna no. 1.
• This list is automatically updated in real time and it works like frequency auto scan. • This list is also strictly linked to the “memo TV channel list” to grant the better function of RDS system
combined to digital broadcast (DVB-T). • This list is also updated in real time by all 4 antennas if the function “stand-by scan” is activated.
2. The “Memo TV Channel List” is controlled directly by antennas no. 2-3-4.
It allows to store the TV channel in the desired position and it strictly connected to the auto-scan made by antenna no.1 • Push or to enter inside the 2 lists • Push or and select what kind of list is interested in • Push or to browse the TV channels available
inside the list • Push OK/Menu to watch the selected TV channel
Multiconn Srl Pag. 16 of 25 KTC-M44CI - User Manual (ENG)
Memorize TV Channel
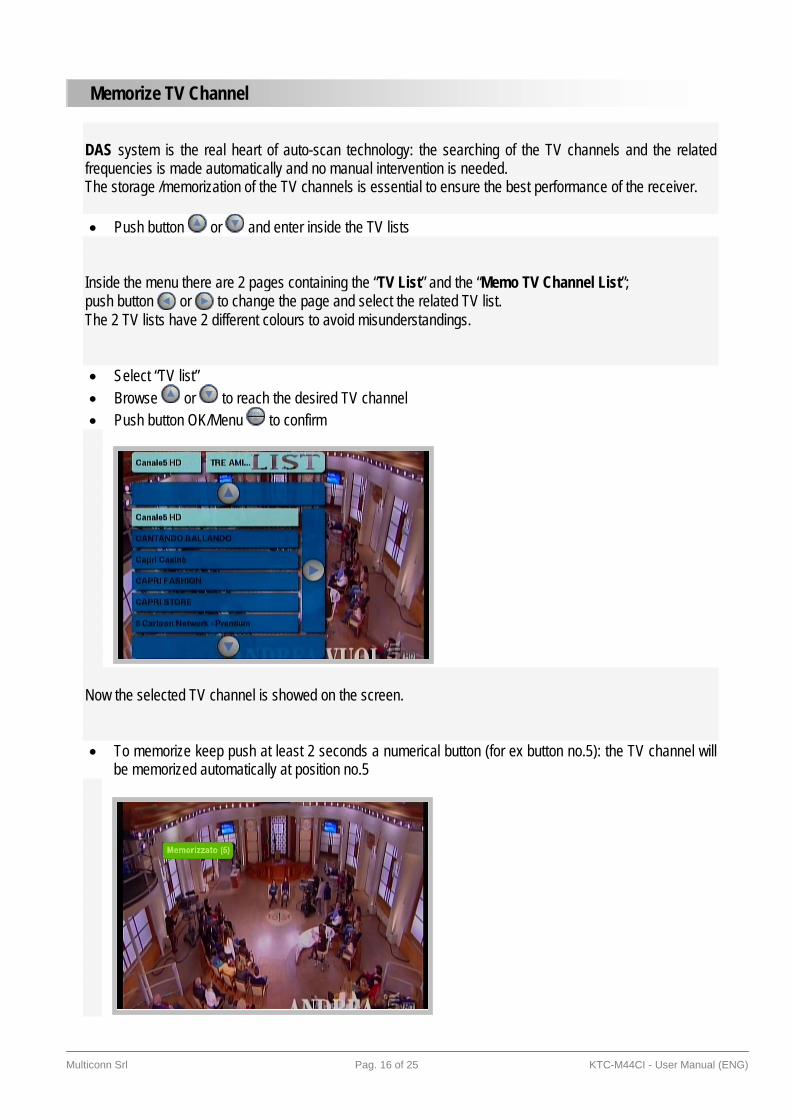
DAS system is the real heart of auto-scan technology: the searching of the TV channels and the related frequencies is made automatically and no manual intervention is needed. The storage /memorization of the TV channels is essential to ensure the best performance of the receiver. • Push button or and enter inside the TV lists
Inside the menu there are 2 pages containing the “TV List” and the “Memo TV Channel List”; push button or to change the page and select the related TV list. The 2 TV lists have 2 different colours to avoid misunderstandings. • Select “TV list” • Browse or to reach the desired TV channel • Push button OK/Menu to confirm
Now the selected TV channel is showed on the screen. • To memorize keep push at least 2 seconds a numerical button (for ex button no.5): the TV channel will
be memorized automatically at position no.5
Multiconn Srl Pag. 17 of 25 KTC-M44CI - User Manual (ENG)
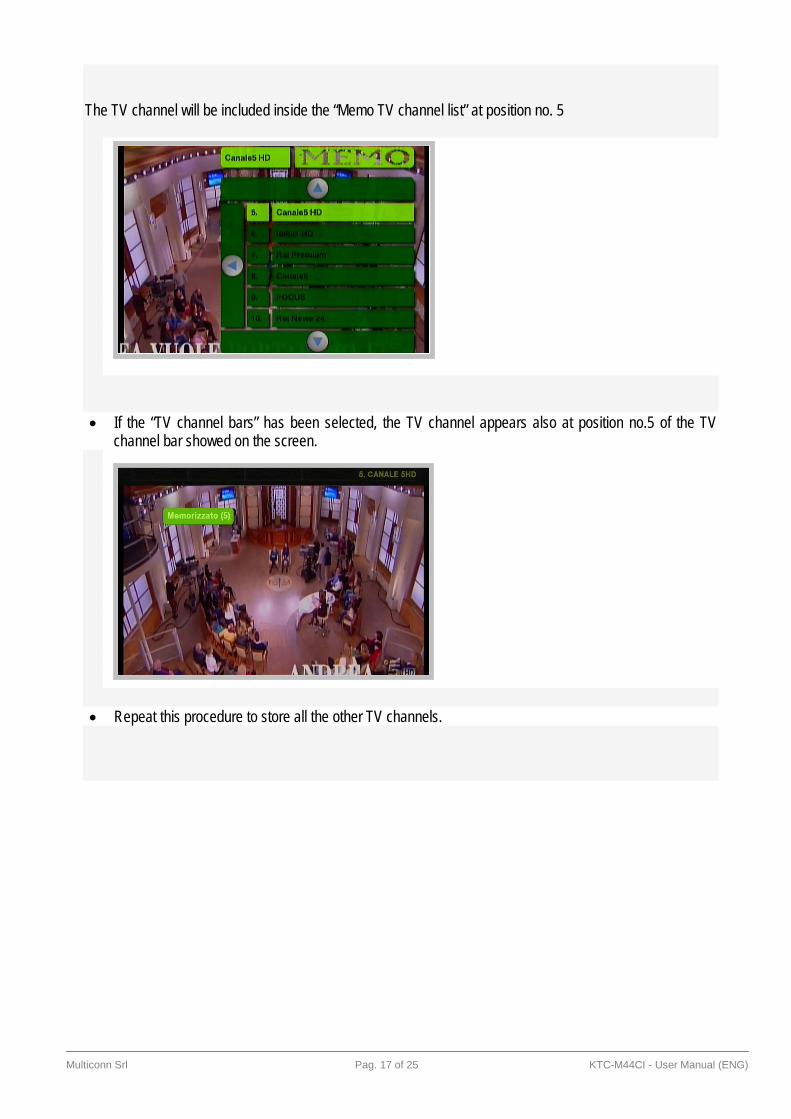
The TV channel will be included inside the “Memo TV channel list” at position no. 5 • If the “TV channel bars” has been selected, the TV channel appears also at position no.5 of the TV
channel bar showed on the screen. • Repeat this procedure to store all the other TV channels.
Multiconn Srl Pag. 18 of 25 KTC-M44CI - User Manual (ENG)
Change TV Channel
To change the channel, just digit a key number of a stored channel: for example by pressing 31, the channel stored at position 31 of the "MEMO TV channel list" is selected and displayed on screen. If you want to instead display a TV channel that is not memorized you must enter the "TV List" and select the desired TV channel. After 40 seconds of continuous viewing a flash appears on the screen. This flash warnings the user that the channel has not been stored; 4 seconds after this warning disappears from the screen After 1 minute there is a second reminder combined with an audible warning that alerts the user to save the current channel. After 4 seconds, this alert will disappear from the screen. This notice can be disabled from the configuration menu. Zapping
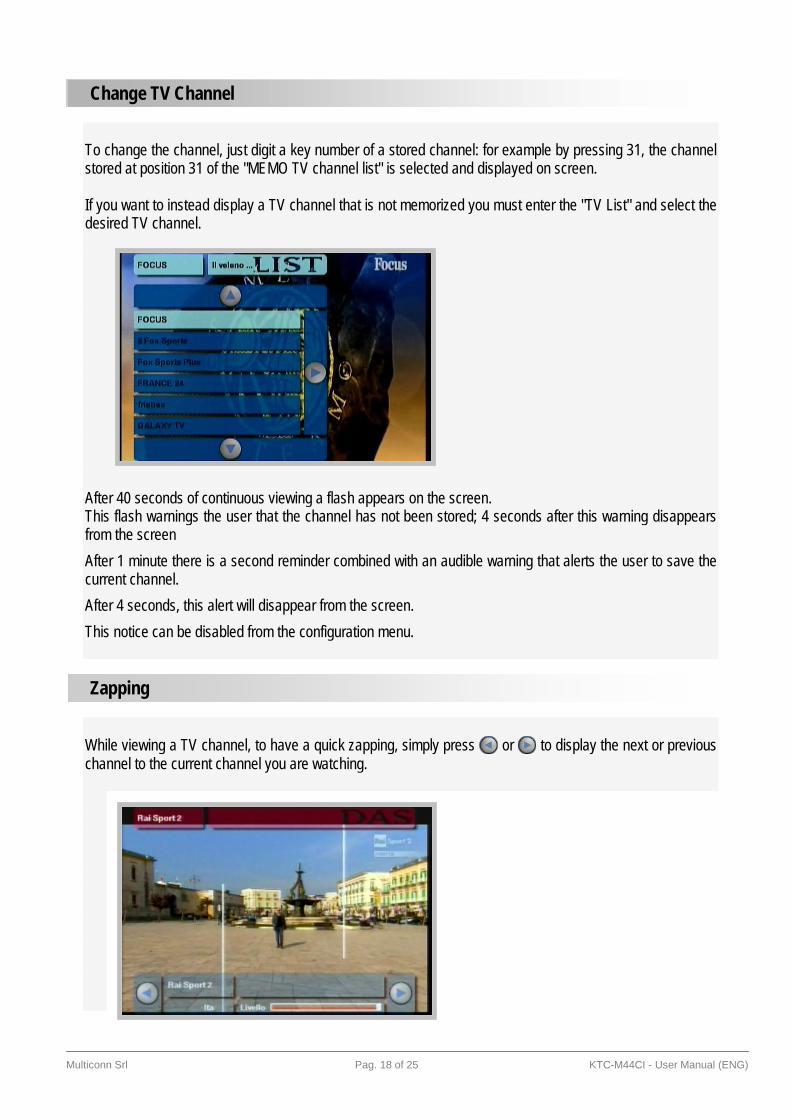
While viewing a TV channel, to have a quick zapping, simply press or to display the next or previous channel to the current channel you are watching.
Multiconn Srl Pag. 19 of 25 KTC-M44CI - User Manual (ENG)
Upgrade via USB
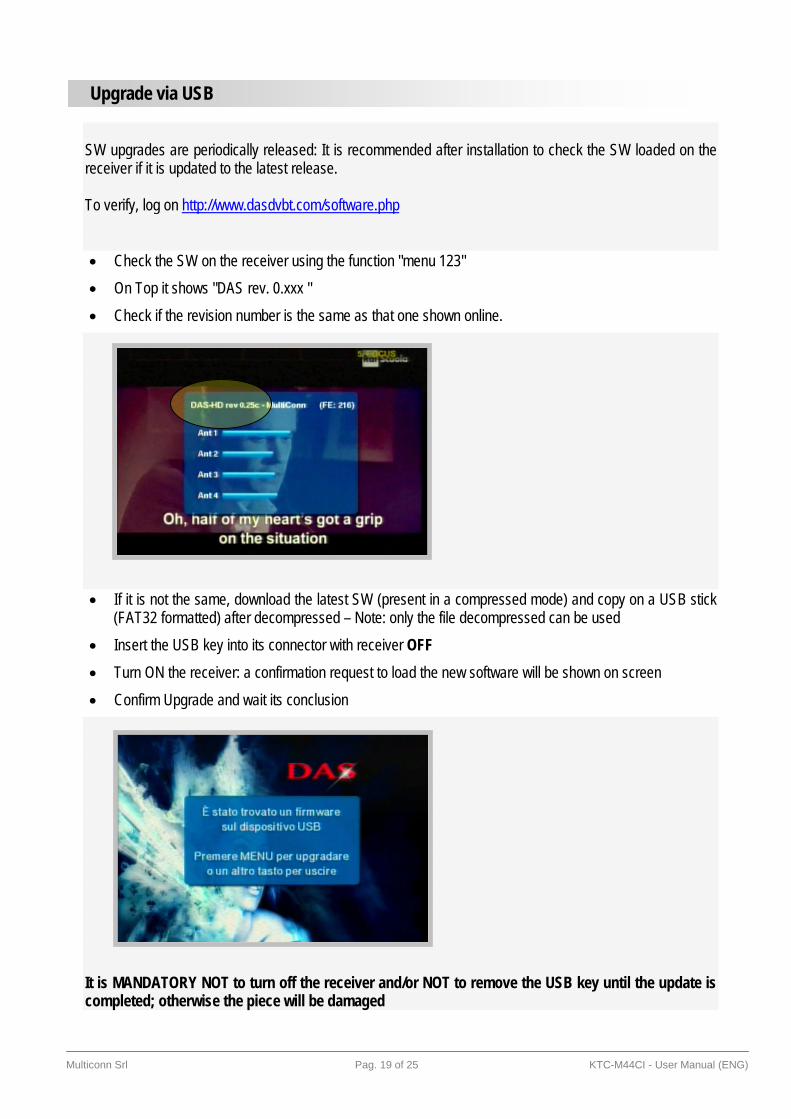
SW upgrades are periodically released: It is recommended after installation to check the SW loaded on the receiver if it is updated to the latest release. To verify, log on http://www.dasdvbt.com/software.php • Check the SW on the receiver using the function "menu 123" • On Top it shows "DAS rev. 0.xxx " • Check if the revision number is the same as that one shown online.
• If it is not the same, download the latest SW (present in a compressed mode) and copy on a USB stick
(FAT32 formatted) after decompressed – Note: only the file decompressed can be used • Insert the USB key into its connector with receiver OFF • Turn ON the receiver: a confirmation request to load the new software will be shown on screen • Confirm Upgrade and wait its conclusion
It is MANDATORY NOT to turn off the receiver and/or NOT to remove the USB key until the update is completed; otherwise the piece will be damaged
Multiconn Srl Pag. 20 of 25 KTC-M44CI - User Manual (ENG)
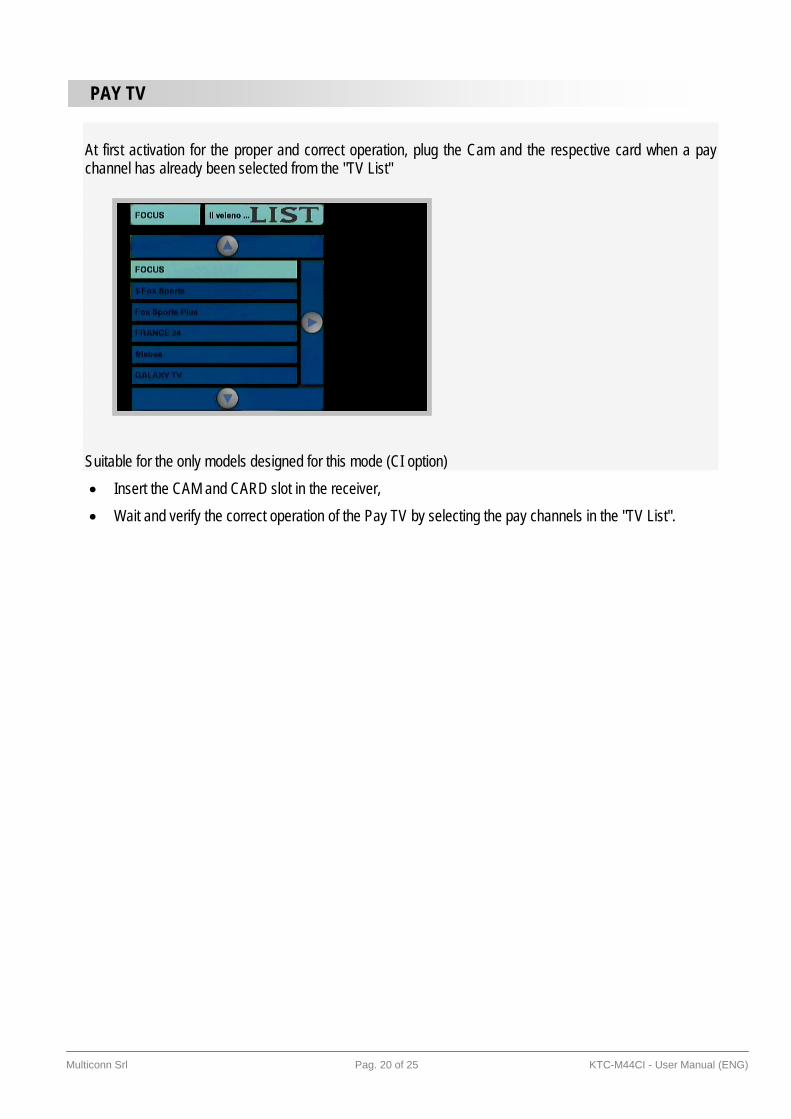
PAY TV
At first activation for the proper and correct operation, plug the Cam and the respective card when a pay channel has already been selected from the "TV List" Suitable for the only models designed for this mode (CI option) • Insert the CAM and CARD slot in the receiver, • Wait and verify the correct operation of the Pay TV by selecting the pay channels in the "TV List".
Multiconn Srl Pag. 21 of 25 KTC-M44CI - User Manual (ENG)
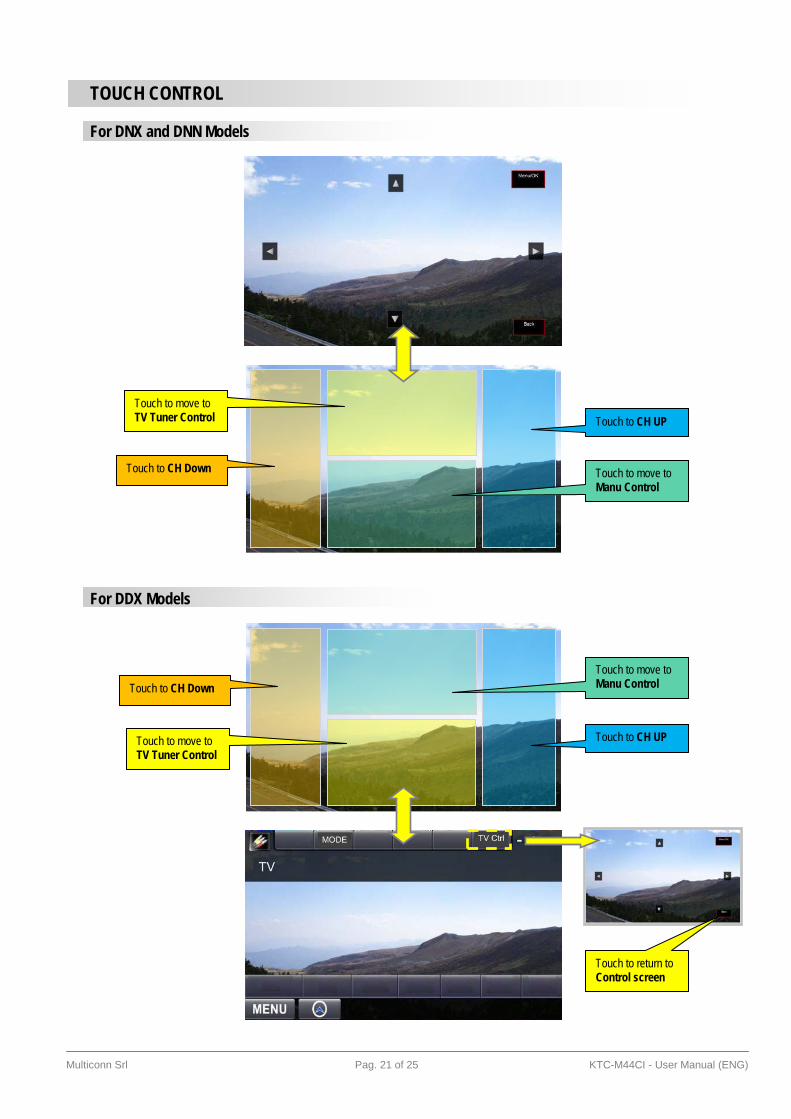
TOUCH CONTROL For DNX and DNN Models
For DDX Models
Touch to CH Down
Touch to move to TV Tuner Control Touch to CH UP
Touch to move to Manu Control
Touch to CH Down
Touch to move to TV Tuner Control
Touch to CH UP
Touch to move to Manu Control
Touch to return to Control screen
Multiconn Srl Pag. 22 of 25 KTC-M44CI - User Manual (ENG)
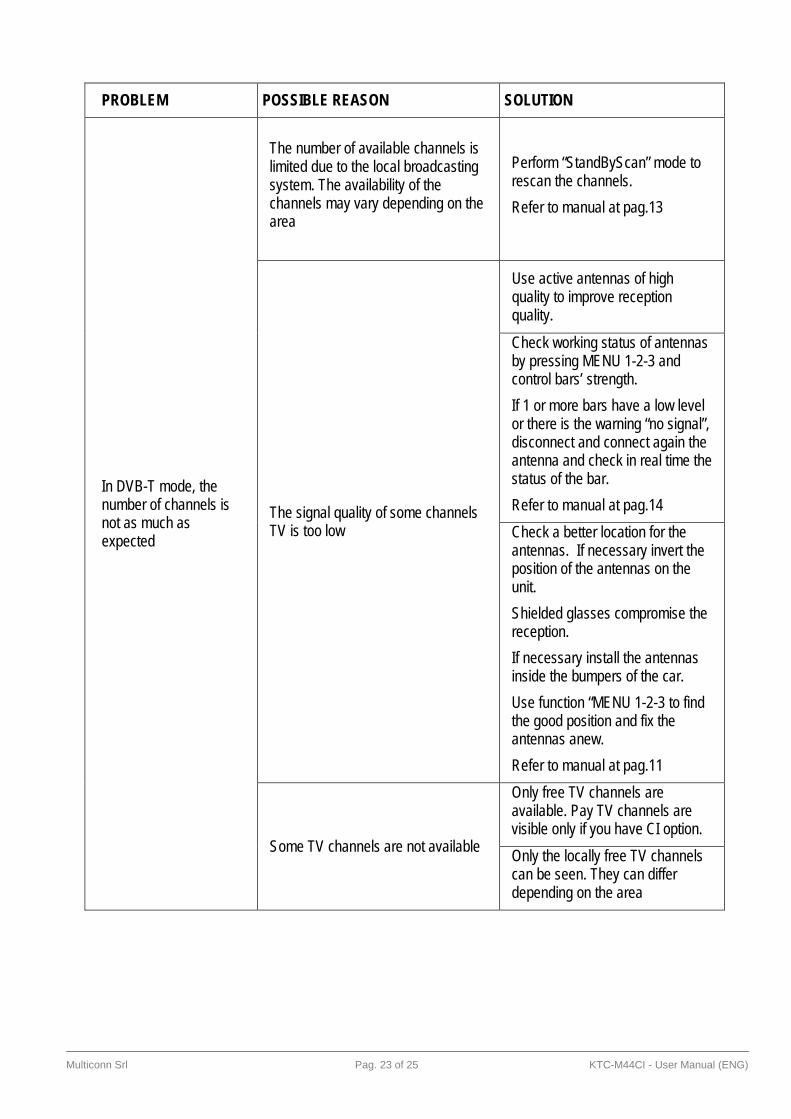
Trouble shooting Q & A Most of the troubleshooting issues can be easily solved. The common cases and their solutions are listed in the below table.
PROBLEM POSSIBLE REASON SOLUTION
No picture, no sound
The power cable is not properly inserted into the unit
Check the power wire connection. Refer to manual at pag.5
The orange or green wires are wrongly connected
Audio/video input not connected
The unit is not switched ON
The unit is in stand-by mode Check if the led is RED on the unit and press “POWER” button
The unit is in AV1 or EXT source Push the button on remote control TV/AV and check the status of the unit. Select the TV function
The Fuse crimped on yellow wire is burned out.
Change the fuse
The remote control does not work
No power
Check the remote battery
Remote battery life is over. Replace it
Remote battery is inserted wrongly
No “line-of sight” between unit and controller
Ensure there is no obstacle between the controller and the unit or light of neon lamp
The unit does not respond to remote control commands
No power Check the remote battery
Power supply cut during upgrade Unit damaged. To be returned to assistance desk
Multiconn Srl Pag. 23 of 25 KTC-M44CI - User Manual (ENG)
PROBLEM POSSIBLE REASON SOLUTION
In DVB-T mode, the number of channels is not as much as expected
The number of available channels is limited due to the local broadcasting system. The availability of the channels may vary depending on the area
Perform “StandByScan” mode to rescan the channels. Refer to manual at pag.13
The signal quality of some channels TV is too low
Use active antennas of high quality to improve reception quality. Check working status of antennas by pressing MENU 1-2-3 and control bars’ strength. If 1 or more bars have a low level or there is the warning “no signal”, disconnect and connect again the antenna and check in real time the status of the bar. Refer to manual at pag.14 Check a better location for the antennas. If necessary invert the position of the antennas on the unit. Shielded glasses compromise the reception. If necessary install the antennas inside the bumpers of the car. Use function “MENU 1-2-3 to find the good position and fix the antennas anew. Refer to manual at pag.11
Some TV channels are not available
Only free TV channels are available. Pay TV channels are visible only if you have CI option. Only the locally free TV channels can be seen. They can differ depending on the area
Multiconn Srl Pag. 24 of 25 KTC-M44CI - User Manual (ENG)
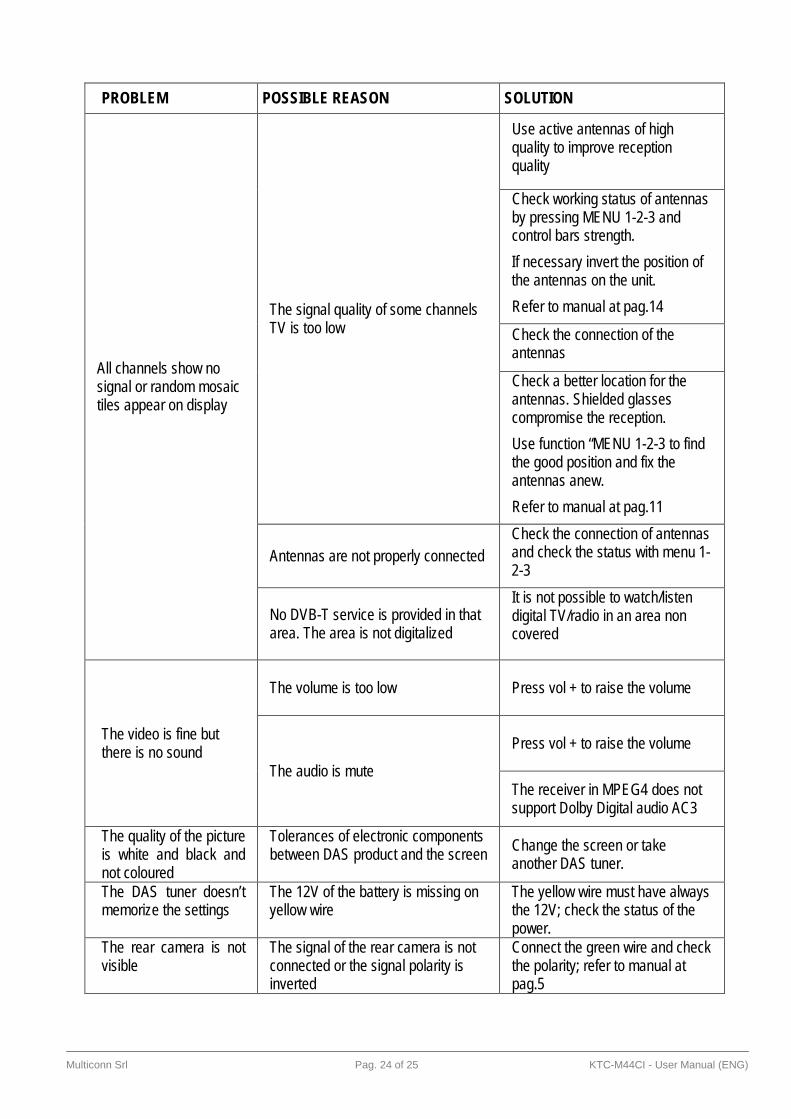
PROBLEM POSSIBLE REASON SOLUTION
All channels show no signal or random mosaic tiles appear on display
The signal quality of some channels TV is too low
Use active antennas of high quality to improve reception quality
Check working status of antennas by pressing MENU 1-2-3 and control bars strength. If necessary invert the position of the antennas on the unit. Refer to manual at pag.14
Check the connection of the antennas
Check a better location for the antennas. Shielded glasses compromise the reception. Use function “MENU 1-2-3 to find the good position and fix the antennas anew. Refer to manual at pag.11
Antennas are not properly connected Check the connection of antennas and check the status with menu 1-2-3
No DVB-T service is provided in that area. The area is not digitalized
It is not possible to watch/listen digital TV/radio in an area non covered
The video is fine but there is no sound
The volume is too low Press vol + to raise the volume
The audio is mute Press vol + to raise the volume
The receiver in MPEG4 does not support Dolby Digital audio AC3
The quality of the picture is white and black and not coloured
Tolerances of electronic components between DAS product and the screen Change the screen or take
another DAS tuner.
The DAS tuner doesn’t memorize the settings
The 12V of the battery is missing on yellow wire
The yellow wire must have always the 12V; check the status of the power.
The rear camera is not visible
The signal of the rear camera is not connected or the signal polarity is inverted
Connect the green wire and check the polarity; refer to manual at pag.5
Multiconn Srl Pag. 25 of 25 KTC-M44CI - User Manual (ENG)
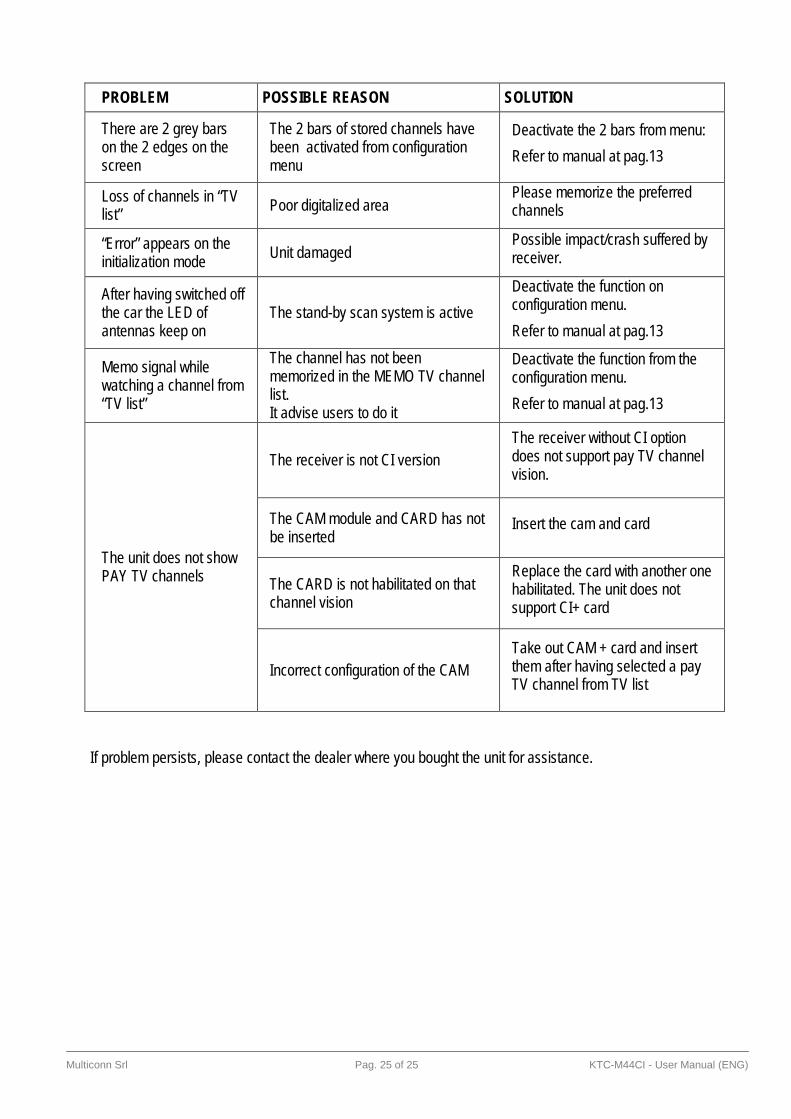
PROBLEM POSSIBLE REASON SOLUTION
There are 2 grey bars on the 2 edges on the screen
The 2 bars of stored channels have been activated from configuration menu
Deactivate the 2 bars from menu: Refer to manual at pag.13
Loss of channels in “TV list” Poor digitalized area
Please memorize the preferred channels
“Error” appears on the initialization mode Unit damaged
Possible impact/crash suffered by receiver.
After having switched off the car the LED of antennas keep on
The stand-by scan system is active Deactivate the function on configuration menu. Refer to manual at pag.13
Memo signal while watching a channel from “TV list”
The channel has not been memorized in the MEMO TV channel list. It advise users to do it
Deactivate the function from the configuration menu. Refer to manual at pag.13
The unit does not show PAY TV channels
The receiver is not CI version The receiver without CI option does not support pay TV channel vision.
The CAM module and CARD has not be inserted
Insert the cam and card
The CARD is not habilitated on that channel vision
Replace the card with another one habilitated. The unit does not support CI+ card
Incorrect configuration of the CAM Take out CAM + card and insert them after having selected a pay TV channel from TV list
If problem persists, please contact the dealer where you bought the unit for assistance.