EMR MR Manual - Medfusion MR Manual 1 ©2011 HealthPoint Medical Group and McKesson Practice Partner...
160
EMR MR Manual 1 ©2011 HealthPoint Medical Group and McKesson Practice Partner Practice Partner EMR MR Manual Document Version: EMR_v1.02 Software Version: 9.5.2 Date: 02/29/2012
-
Upload
phungkhanh -
Category
Documents
-
view
216 -
download
0
Transcript of EMR MR Manual - Medfusion MR Manual 1 ©2011 HealthPoint Medical Group and McKesson Practice Partner...

EMR MR Manual
1 ©2011 HealthPoint Medical Group and McKesson Practice Partner
Practice Partner EMR
MR Manual Document Version: EMR_v1.02
Software Version: 9.5.2
Date: 02/29/2012

EMR MR Manual
2 © 2011 HealthPoint Medical Group and Practice Partner System
About This Document
Confidentiality and Proprietary Rights
This document is the confidential property of HealthPoint Medical Group. No part of
this document may be reproduced in any form, by hotostat, microfilm, xerography, or
any other means, or incorporated into any information retrieval system, electronic or
mechanical, without the written permission of HealthPoint Medical Group. Inquiries
regarding copying and/or using the materials contained in this document outside of the
limited scope described herein should be addressed to HealthPoint Medical Group.
Copyright Notice
Copyright© 2011 HealthPoint Medical Group. All rights reserved.

EMR MR Manual
3 © 2011 HealthPoint Medical Group and Practice Partner System
Introduction ........................................................................................................................ 7
Objectives and Summaries ........................................................................................... 7
Meet the EMR Team ........................................................................................................... 8
Lesson One: Logging in/Out of Practice ........................................................................... 10
Access Standards ......................................................................................................... 11
Logging in/out of Practice Partner ............................................................................. 12
Accessing Practice Partner: ........................................................................................ 12
To Log in: .................................................................................................................... 13
Practice Partner Login: ............................................................................................... 14
To Login: ..................................................................................................................... 15
Lesson Two: Navigating Practice Partner .......................................................................... 17
Menu Bar .................................................................................................................... 19
Toolbar ........................................................................................................................ 20
Lesson Three: Dashboard ................................................................................................. 23
Dashboard ................................................................................................................... 24
Schedule ...................................................................................................................... 25
Messages ..................................................................................................................... 29
Creating a New Message ............................................................................................. 36
Quick Text ................................................................................................................... 43
To Do ........................................................................................................................... 46
Lesson Four: Patient Lookup ............................................................................................ 49
Lesson Five: Chart Overview ............................................................................................. 51
Patient Chart ............................................................................................................... 52
Lesson Six: Patient Information ....................................................................................... 56
Lesson Seven: Patient Screen ............................................................................................ 59

EMR MR Manual
4 © 2011 HealthPoint Medical Group and Practice Partner System
Patient Screen ............................................................................................................. 60
Billing tab .................................................................................................................... 64
Other Data .................................................................................................................. 65
Providers tab ............................................................................................................... 65
Dates tab ..................................................................................................................... 67
Notes tab ..................................................................................................................... 68
Configuration tab ........................................................................................................ 68
Lesson Eight: Patient Education ....................................................................................... 70
Lesson Nine: Knowledge Base .......................................................................................... 73
Lesson Ten: Chart Summary ............................................................................................. 76
Lesson Eleven: Progress Note ........................................................................................... 79
Progress notes ............................................................................................................. 80
Electronic Encounter Form (EEF) ............................................................................. 84
Lesson Twelve: Past Medical/Social and Family History ................................................ 94
Lesson Thirteen: Hospital Records, Records Request, and Correspondence. ................. 96
Hospital Records ........................................................................................................ 97
Correspondence .......................................................................................................... 97
Records Request ......................................................................................................... 98
Lesson Fourteen: Letters ................................................................................................... 99
Lesson Fifteen: Orders .................................................................................................... 103
Lesson Sixteen: Clinical Messaging ................................................................................ 106
Clinical Messaging .................................................................................................... 107
Lesson Seventeen: Flow Chart ........................................................................................ 108
Lesson Eighteen: Clinical Elements ................................................................................. 111
Lesson Nineteen: Preventive Health, Outside Records, and care Plan ........................... 114

EMR MR Manual
5 © 2011 HealthPoint Medical Group and Practice Partner System
Preventive Health ...................................................................................................... 115
Outside Records ......................................................................................................... 115
Care Plan .................................................................................................................... 116
Lesson Twenty: Problem List ........................................................................................... 117
Problem list ................................................................................................................ 118
Lesson Twenty One: Health Maintenance ....................................................................... 119
Health Maintenance ................................................................................................. 120
Lesson Twenty Two: Rx/Medications ............................................................................. 122
Rx/Medications ........................................................................................................ 123
Lesson Twenty Three: Allergies and Intolerances .......................................................... 125
Lesson Twenty Four: Vital Signs ......................................................................................127
Vital signs.................................................................................................................. 128
Lesson Twenty Five: Laboratory Data ............................................................................ 129
Laboratory data ........................................................................................................ 130
Lesson Twenty Six: Lab Table Review ............................................................................ 132
Lab Table Review ...................................................................................................... 133
Lesson Twenty Seven: Images ........................................................................................ 136
Lesson Twenty Eight: Radiology, EKG, and Pathology. ................................................. 138
Radiology .................................................................................................................. 139
EKG ........................................................................................................................... 140
Pathology ................................................................................................................... 141
Lesson Twenty Nine: Special Studies, Consults, Advance Directives, and Level II. ...... 142
Special Studies .......................................................................................................... 143
Consults .................................................................................................................... 143
Advance Directives ................................................................................................... 144
EMR MR Manual
6 © 2011 HealthPoint Medical Group and Practice Partner System
Level II ...................................................................................................................... 144
Lesson Thirty: Prenatal Flow Chart ................................................................................ 145
Lesson Thirty One: Patient Message............................................................................... 148
Lesson Thirty Two: Reports ............................................................................................ 150
Print Clinical Summary Report ................................................................................. 151
Print Chart Summary ............................................................................................... 153
Print Partial Chart .....................................................................................................155
Lesson Thirty Three: Meaningful Use ............................................................................ 158

EMR MR Manual
7 © 2011 HealthPoint Medical Group and Practice Partner System
Introduction
As a clinical software system, McKesson Practice Partner manages a variety of
information including patient demographics, clinical details, and production analysis.
For more information on Practice Partner EMR visit our website
http://emr.healthpointmedicalgroup.com
Objectives and Summaries
This manual contains objectives which provide you with overall goals that you will
achieve by the end of this training. This manual contains a summary for your review at
the end of each lesson.
Special Symbols
Throughout this manual symbols will highlight areas that require additional attention.
NOTE
Indicates guidance information that expounds upon the provided information.
TIP
Indicates supplemental help to the supplied information.
STOP Indicates important information that can include specific instructions that are required.
Indicates Meaningful Use required objective

EMR MR Manual
8 © 2011 HealthPoint Medical Group and Practice Partner System
Meet the EMR Team
EMR IS Team
Gregg Witte Clinical Application Manager [email protected]
Jennifer Wright Consultant [email protected]
Joan Barlow Consultant [email protected]
Brian Mizell Consultant [email protected]
Silvana Henley Clinical Applications Analyst [email protected]
Lynn Stevens Clinical Application Analyst [email protected]
Tom Fredrickson Clinical Application Analyst [email protected]
Nydia Berrios EMR Implementation Specialist [email protected]
Sandy Johnson EMR Implementation Specialist [email protected]
Dorian Jones EMR Quality Specialist [email protected]
EMR Steering Committee
Sherry Dorsey, Chair Tim Thompson
Dr. Lee Kirkman Chris Jenkins
Dr. John Fraker Dr. Bruce Flareau
Clinical Advisory Committee
Dr. John Fraker, Chair Silvana Henley Dr. Gilbert Pitisci
Dr. Lee Kirkman Dr. Fred Taylor Dr. Mark Borden
Sherry Dorsey Dr. Stuart Helms Dr. Satish Dholakia
Ivie Isaias Dr. Richard Hodges Dr. Tung Wynn
Howard King Dave Plattner
Dr. Michaela Mallon Dr. Nancy Silva
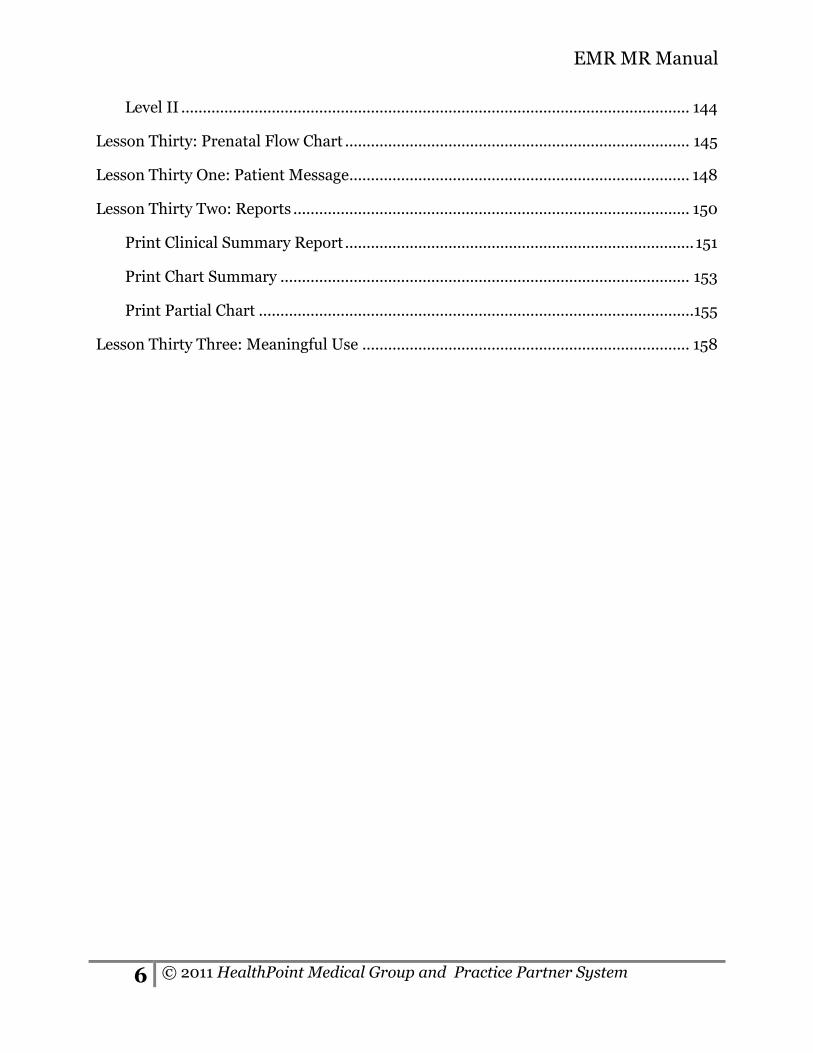
Clinical Workgroups
Adult
Pediatrics
Dr. Stuart Helms, Chair Dr. Nancy Silva, Chair Dr. John Fraker
EMR MR Manual
9 © 2011 HealthPoint Medical Group and Practice Partner System
Dr. Barrington Lynch Dr. Mercy Baker Nicole Gilman
Dr. Mary Thomas Dr. Carolyn Marasco Pat Gatto
Dr. William Werden Dr. Neil Surti
Dr. John Fraker Dr. Brent Mook-Sang
Diane Williams

EMR MR Manual
10 © 2011 HealthPoint Medical Group and Practice Partner System
Lesson One: Logging in/Out of Practice
Objectives:
By the completion of this chapter, you will be able to:
Successfully log into Practice Partner
Successfully log out of Practice Partner

EMR MR Manual
11 © 2011 HealthPoint Medical Group and Practice Partner System
Access Standards
HealthPoint Medical Group and all our members have a responsibility to safeguard the
privacy of all patients and protect the confidentiality of their health information. In the
course of employment or assignment you will come into contact with confidential
patient information. The following access standards will be followed:
Only authorized persons will be granted access. This access will be appropriate to
the job role.
Only authorized persons may enter and view data.
Passwords and system IDs will not be shared. Practice Partner keeps an audit
trail of all entries and can generate reports of a user's access and activity within
the system.
Physical security of the workstations and files will be maintained.

EMR MR Manual
12 © 2011 HealthPoint Medical Group and Practice Partner System
Logging in/out of Practice Partner
Accessing Practice Partner:
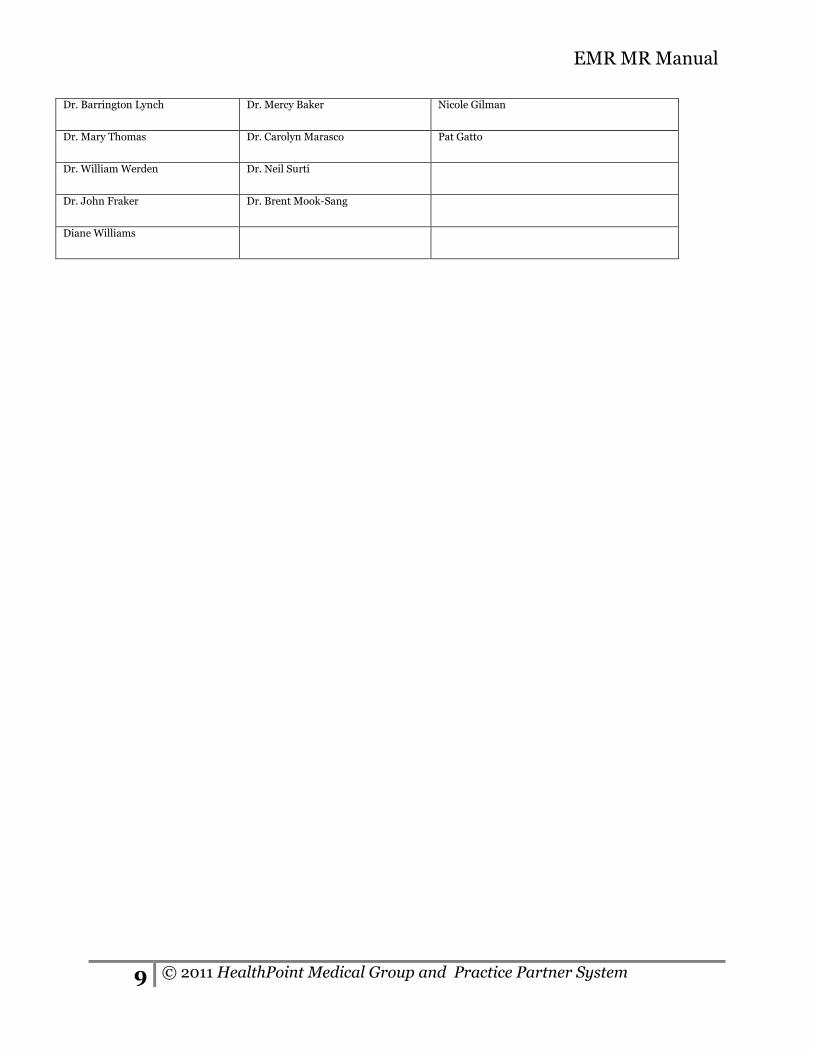
To access Practice Partner, you must first login into HealthPoint EMR Citrix Portal by
clicking on the HealthPoint EMR icon or by typing http://hpemr.baycare.org on the
internet page.
The Citrix screen will open to the HealthPoint access screen, click OK.
EMR MR Manual
13 © 2011 HealthPoint Medical Group and Practice Partner System
To Log in:
Enter your User ID and Password. This is the same user ID and password you
use to log into the computer.
Once the login process is completed, the HealthPoint EMR icon will be
available to select.
NOTE
If prompted, follow instructions to download the Citrix upgrade.
To access Practice Partner, click on the HealthPoint EMR icon. There are two icons
to choose from. To access the Production click on the HealthPoint EMR icon, to
access test click on the HealthPoint EMR Test icon.

EMR MR Manual
14 © 2011 HealthPoint Medical Group and Practice Partner System
Each icon used to access Practice Partner has its own separate database.
For example:
HealthPoint EMR - Is where the production database resides. This is where all
our live patients are stored.
HealthPoint EMR test - Is where training and testing will takes place.
Practice Partner Login:
Every Operator has an assigned user ID, password, and access level. This prevents
unauthorized access to the system, protects critical patient information, and protects
patient confidentiality.
The password must be alphanumeric 8 characters, contain at least one uppercase, and
one number.
NOTE
If you forget your password, contact the help desk to have your password reset. The
help desk telephone number is (813) 636-2034, This is also located on your
computer monitor.
Logging On:

EMR MR Manual
15 © 2011 HealthPoint Medical Group and Practice Partner System
To Login:
Enter your assigned EMR User ID and Password. The password displays as asterisks
(*) so it can’t be seen.
You may use the tab key or the mouse to advance the cursor from field to field.
NOTE
When logging in for the first time a temporary password will be given
to you. Once you log in you will be prompted to change your password. This will
occur at your initial login.
NOTE
You have 5 attempts to log into EMR, if you are not able to log in because
either the user ID or password is incorrect; you will receive a pop up stating
“The system could not log you on. Make sure your User ID is correct, then type
your password again”.
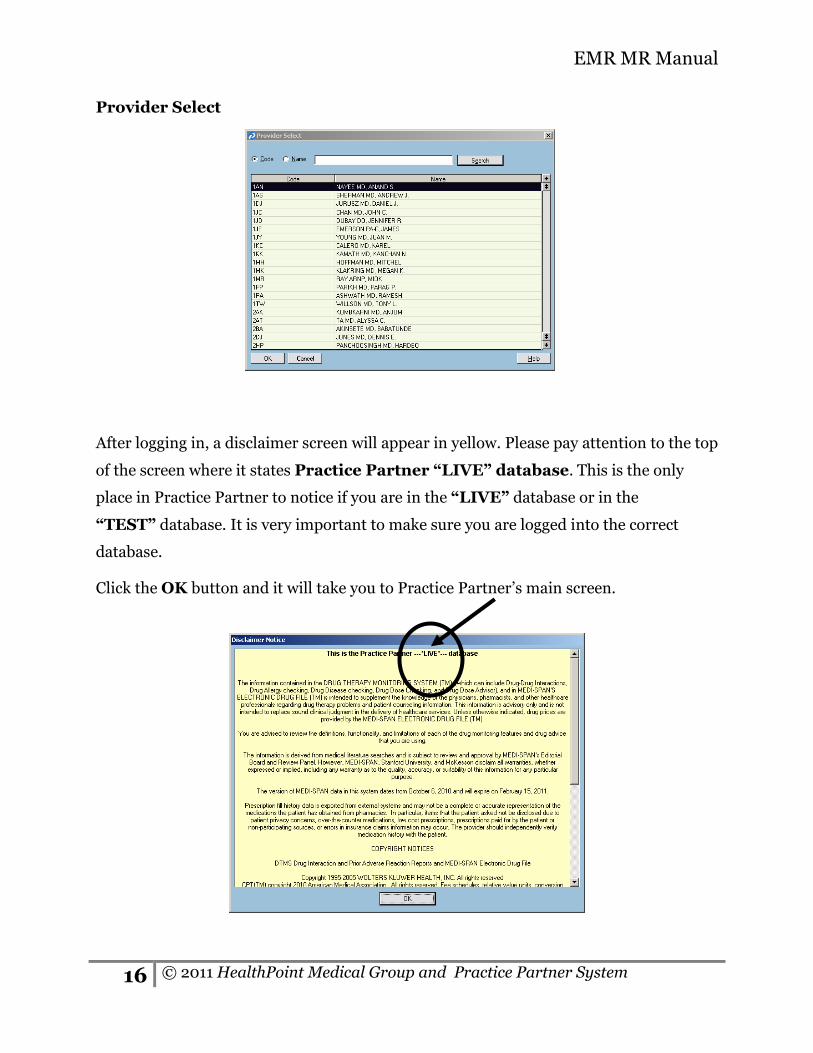
In the Provider ID field, select the appropriate provider by selecting the drop down
arrow. If you know the providers code, you can type the code in the Provider ID field.
After selecting the drop down arrow a Provider Select screen will open. To search by
name select the radio button Name, type the last name of provider and click the
Search button, highlight the name and click the OK.
In the Practice ID field, select the drop down arrow then select the appropriate
practice code.
EMR MR Manual
16 © 2011 HealthPoint Medical Group and Practice Partner System
Provider Select
After logging in, a disclaimer screen will appear in yellow. Please pay attention to the top
of the screen where it states Practice Partner “LIVE” database. This is the only
place in Practice Partner to notice if you are in the “LIVE” database or in the
“TEST” database. It is very important to make sure you are logged into the correct
database. Click the OK button and it will take you to Practice Partner’s main screen.

EMR MR Manual
17 © 2011 HealthPoint Medical Group and Practice Partner System
Lesson Two: Navigating Practice Partner
Objectives:
By the completion of this chapter, you will be able to:
Navigate within Practice Partner

EMR MR Manual
18 © 2011 HealthPoint Medical Group and Practice Partner System
As a clinical software system, Practice Partner manages a variety of information
including patient demographics, clinical details, and production analysis.
Navigating Practice Partner:
Practice Partner displays 3 different toolbars.
Title Bar - This bar displays the title Practice Partner and Patient Records.
Menu Bar - This bar provides options to various areas of the application.
Toolbar - Displays the Exit, Park, Dash, Chart, Sched, Patient, Msg, Chk In,
Review, Letter, Prov, and Help buttons.

EMR MR Manual
19 © 2011 HealthPoint Medical Group and Practice Partner System
Menu Bar
The Menu bar consists of File, View, Task, Maintenance, Reports, and Help.
These options provide access to various areas of the application.
File – Will allow the user to open a chart, open a patient which will display
patient demographics and allow the user to view the last 15 patients opened.
View – Will allow the user to change the look of their screen.
Task – Gives the user options to access various parts of the application.
Maintenance - Is used for system build. Only individuals with administrator
and security rights for HealthPoint will have access.
Reports – Are used to pull out canned reports from Practice Partner.
Help – Is a great tool to use when you need help on a particular screen.
To view the last 15
charts you access.
EMR MR Manual
20 ©2011 HealthPoint Medical Group and McKesson Practice Partner
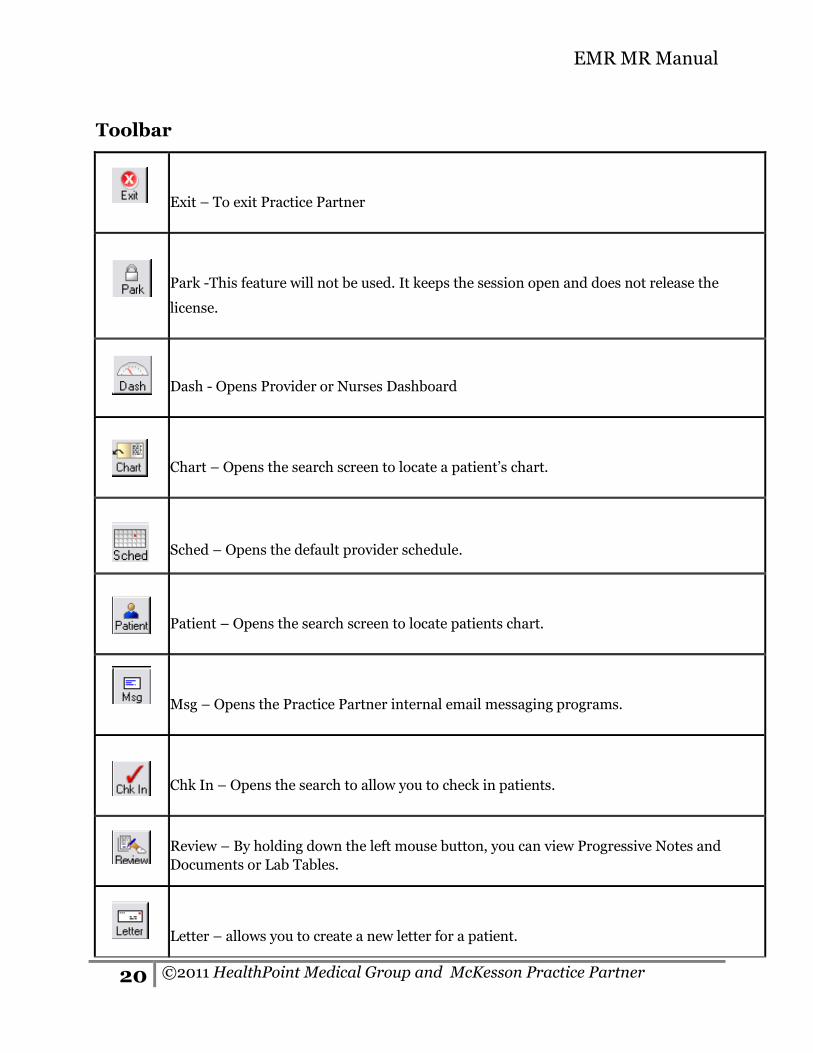
Toolbar
Exit – To exit Practice Partner
Park -This feature will not be used. It keeps the session open and does not release the
license.
Dash - Opens Provider or Nurses Dashboard
Chart – Opens the search screen to locate a patient’s chart.
Sched – Opens the default provider schedule.
Patient – Opens the search screen to locate patients chart.
Msg – Opens the Practice Partner internal email messaging programs.
Chk In – Opens the search to allow you to check in patients.
Review – By holding down the left mouse button, you can view Progressive Notes and
Documents or Lab Tables.
Letter – allows you to create a new letter for a patient.

EMR MR Manual
21 © 2011 HealthPoint Medical Group and Practice Partner System
Prov- Allows switching to a different provider.
Help – Opens the online help system.

EMR MR Manual
22 © 2011 HealthPoint Medical Group and Practice Partner System

EMR MR Manual
23 © 2011 HealthPoint Medical Group and Practice Partner System
Lesson Three: Dashboard
Objectives
By the completion of this chapter, you will be able to:
Understand the Dashboard
Create a Message
Create a To Do

EMR MR Manual
24 © 2011 HealthPoint Medical Group and Practice Partner System
Dashboard
This table has the information available in each area of the Dashboard. The table also
shows the differences between what providers and nurses see.
The Dashboard will be the first thing you see when logging into Practice Partner, this
screen is set up to view your Schedule, receive Messages , create a To Do list, review
and process orders through Operator Processing.
To open the Dashboard:
Click Dash on the Toolbar. The Dashboard opens.
To refresh information on the Dashboard:
Do one of the following to update information the Dashboard.
On the Dashboard, click Refresh , or Press F5.
Click on the
dashboard title bar
to access each
section.
EMR MR Manual
25 © 2011 HealthPoint Medical Group and Practice Partner System
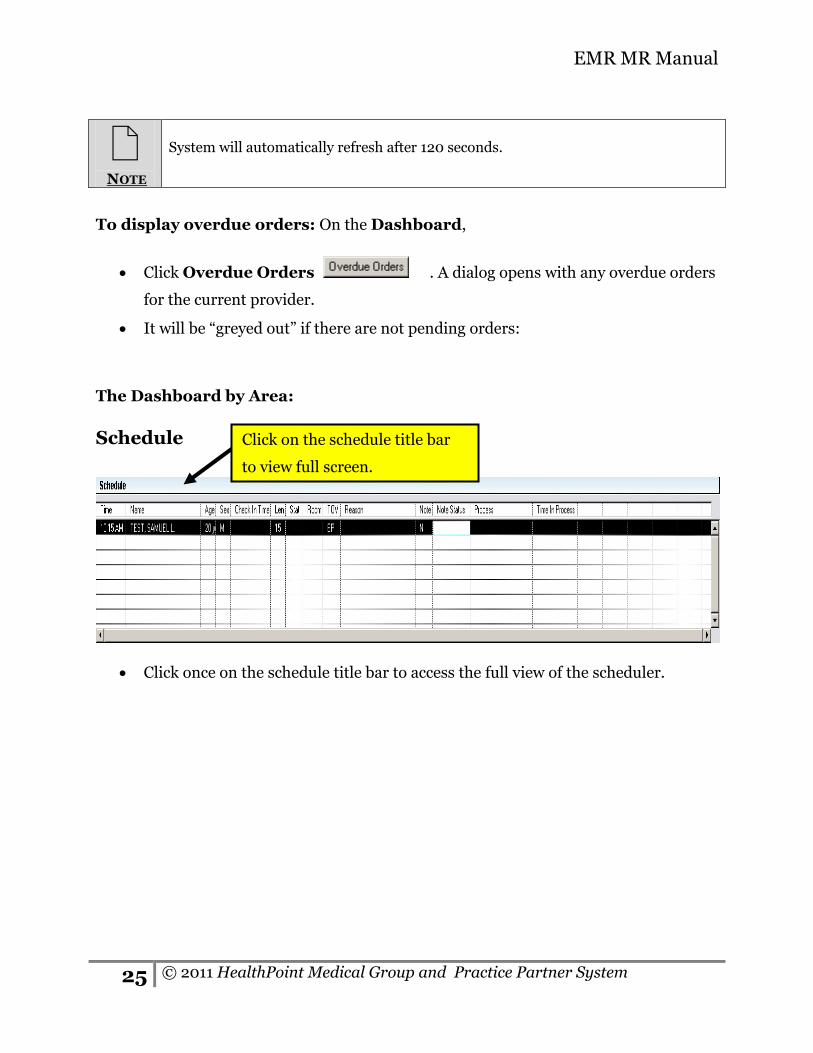
NOTE
System will automatically refresh after 120 seconds.
To display overdue orders: On the Dashboard,
Click Overdue Orders . A dialog opens with any overdue orders
for the current provider.
It will be “greyed out” if there are not pending orders:
The Dashboard by Area:
Schedule
Click once on the schedule title bar to access the full view of the scheduler.
Click on the schedule title bar
to view full screen.

EMR MR Manual
26 © 2011 HealthPoint Medical Group and Practice Partner System
After you have opened the full schedule screen you will see on the upper left hand side a
gray bar that will displays Schedule for: this will display the provider schedule you are
viewing.
The schedule will display:
Time - Appointment time
Name - Patient name
Age - Age of patient
Sex – Patient’s gender
Check in Time - Time patient was checked in
Len - Length of visit
Stat - Appointment status code, i.e. LA for late, NS for no show
TOV - Type of office visit
Note – Notes that have been assigned to the patient’s appointment
To move from one date to
another click on the arrows.

EMR MR Manual
27 © 2011 HealthPoint Medical Group and Practice Partner System
Note Status –Status of the note
o Blank (I.e., nothing displayed in field). A note has been created for the
visit or a note was created and then deleted.
o O- A note has been created and is in a “Shared Note” but has not been
permanently saved. O stands for “Open”.
o C- A note has been created and permanently saved but has not been
signed by the provider. C stands for “Closed”.
o S- A note has been saved and signed by a provider. S stands for “Signed”.
o ? – Patient records cannot definitively determine if there is a note because
the patient has multiple appointments on the same day. ? stands for
“Multiple appointments for the patient the same day”.
Process - Stages of the appointment
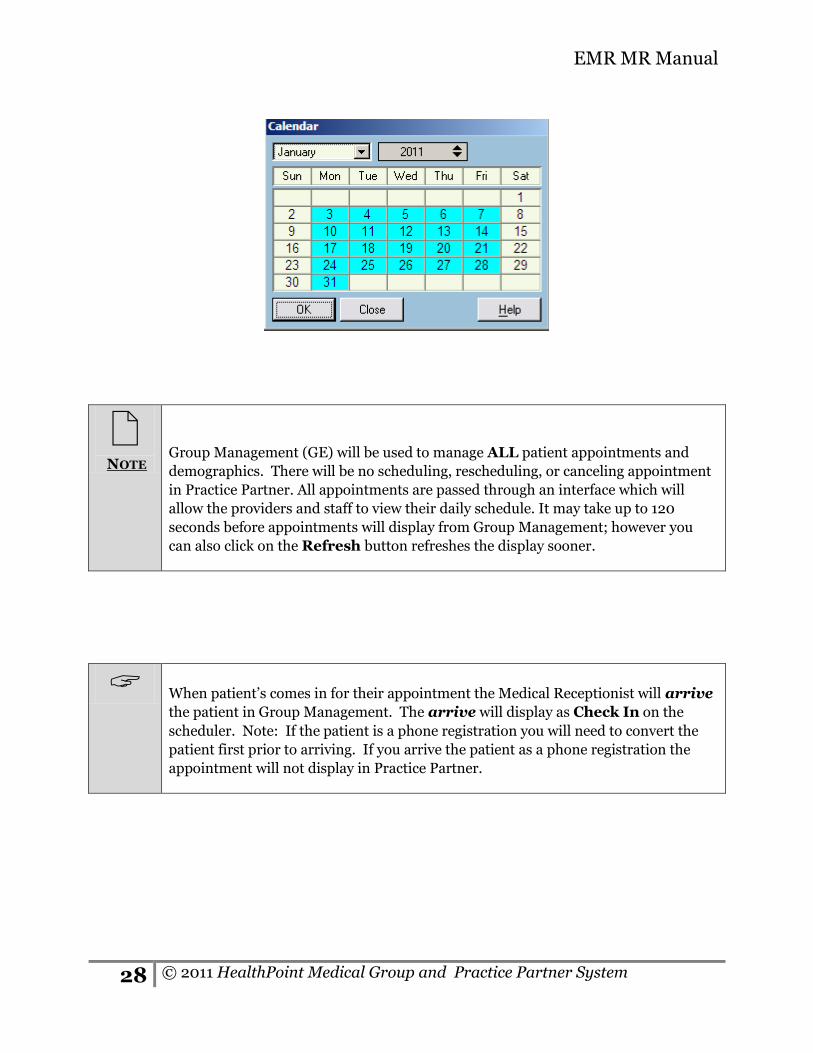
To view the entire calendar:
On the provider schedule screen, click the Calendar button to display
an entire month’s schedule for the current provider. Days for which the provider
is scheduled are highlighted.
To change the month, select a month from the drop-down list. To change the
year, click the year list box.
To view schedule detail for a day, double-click the appropriate date. The Schedule
screen appears.
EMR MR Manual
28 © 2011 HealthPoint Medical Group and Practice Partner System
NOTE
Group Management (GE) will be used to manage ALL patient appointments and
demographics. There will be no scheduling, rescheduling, or canceling appointment
in Practice Partner. All appointments are passed through an interface which will
allow the providers and staff to view their daily schedule. It may take up to 120
seconds before appointments will display from Group Management; however you
can also click on the Refresh button refreshes the display sooner.
When patient’s comes in for their appointment the Medical Receptionist will arrive
the patient in Group Management. The arrive will display as Check In on the
scheduler. Note: If the patient is a phone registration you will need to convert the
patient first prior to arriving. If you arrive the patient as a phone registration the
appointment will not display in Practice Partner.

EMR MR Manual
29 © 2011 HealthPoint Medical Group and Practice Partner System
Messages
You can view all incoming messages right from your dashboard. When viewing your
message you will be able to see the message priority, the sender, patient name if
attached, subject, and date received.
All unread messages will display in BOLD, to view the message you can either click on
the title bar called Messages, or click on the message. You can also access the messages
by clicking on the Msg button on the Toolbar.
NOTE
If the message is urgent the Msg button on the toolbar will display in RED, urgent will be a priority of 9. If there is at least one new message waiting the Msg button will display in BLUE.
It is possible to:
When writing a message, select a message template that automatically inserts
patient information and often-repeated text.
Insert QuickText, Dot codes, and Letter codes into messages.

EMR MR Manual
30 © 2011 HealthPoint Medical Group and Practice Partner System
Format the message text by changing the font style, size, or color. Text may be
bolded, italicized, underlined, or indented. Bulleted lists may be created. Text
alignment may be changed.
Check messages for spelling.
Turn on return receipt to receive notification that the recipients (the message's
To field) opened your message.
Use operator groups to send messages to a specified group of Practice Partner
operators.
Link to the chart section referenced by the message's type. For example, if the
message type is HM, click Link to open the patient's health maintenance chart
section.
Record the message as a progress note in the patient's chart.
Messaging is operator-based. Any Practice Partner operator may use the messaging
feature if they have an access level that allows it.
If you have used Microsoft® Office Outlook® or a similar e-mail program, Messages
should look familiar. The left box displays the Archived, Deleted, Inbox, Pending,
and Sent folders. The right box displays the messages in the selected folder.
In addition, you can use many common word processing shortcut keys to complete
messaging tasks, such as CTRL+P to print a message.

EMR MR Manual
31 © 2011 HealthPoint Medical Group and Practice Partner System
Messages
Messages: Have three areas: Folders, Messages, and Buttons.
The Folder Area
This displays the default messaging folders. Clicking a folder displays any messages in
that folder in the messages area. The currently-selected folder is highlighted in gray.
In the figure below, the Inbox folder has been selected. Any messages in the Inbox
display in the Message Area.

EMR MR Manual
32 © 2011 HealthPoint Medical Group and Practice Partner System
Folder Description
Archived The Message Area sorts Archived messages in the following order:
Date received
Priority
Deleted The Message Area sorts Deleted messages in the following order:
Date received
Priority
Inbox The Message Area sorts Inbox messages in the following order:
Date received
Priority
Pending The Pending folder stores messages from the current operator that are
waiting to be sent. A pending message may be edited before sending it.
The messages will release once the date to activate has arrived.
The Message Area sorts Pending messages in the following order:
Date to activate
Priority
Selected The Message Area displays selected messages after users have selected
what messages they would like to view from the Select Messages screen.
Sent The Message Area sorts Sent messages in the following order:
Date sent
Priority
EMR MR Manual
33 © 2011 HealthPoint Medical Group and Practice Partner System
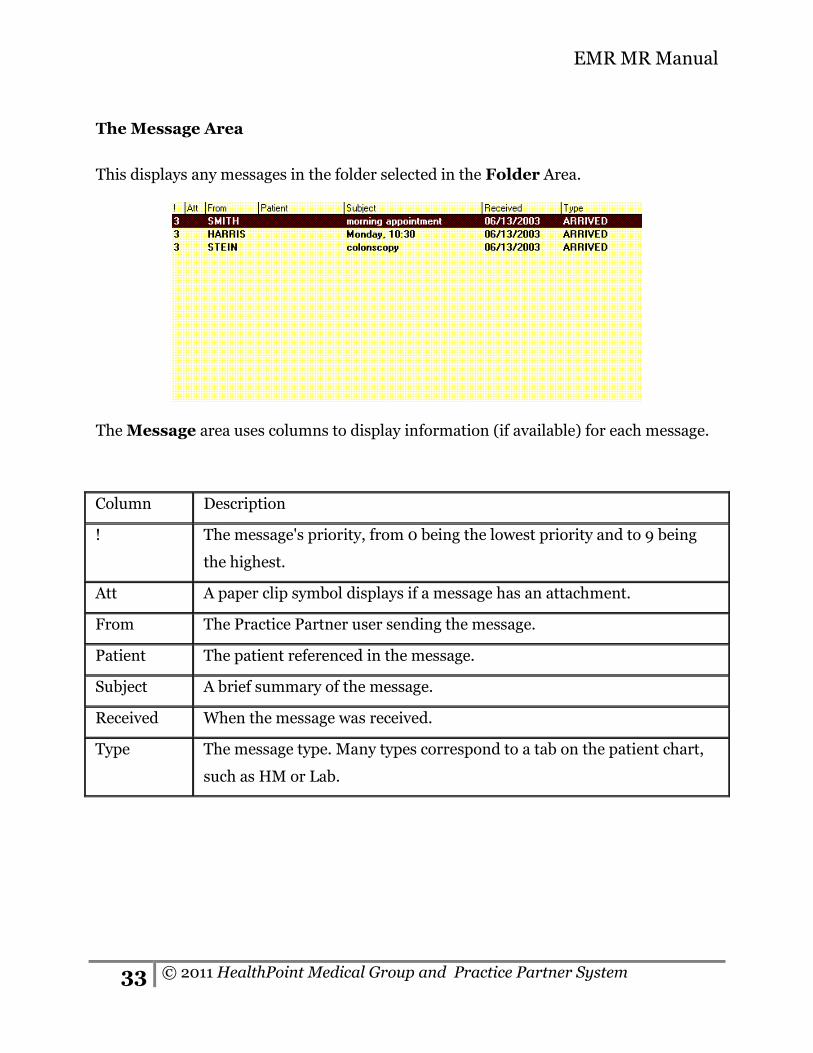
The Message Area
This displays any messages in the folder selected in the Folder Area.
The Message area uses columns to display information (if available) for each message.
Column Description
! The message's priority, from 0 being the lowest priority and to 9 being
the highest.
Att A paper clip symbol displays if a message has an attachment.
From The Practice Partner user sending the message.
Patient The patient referenced in the message.
Subject A brief summary of the message.
Received When the message was received.
Type The message type. Many types correspond to a tab on the patient chart,
such as HM or Lab.
EMR MR Manual
34 © 2011 HealthPoint Medical Group and Practice Partner System
Shortcut menu for the messaging system:
Without opening a message, right-click to use a shortcut menu to perform any of the
following actions:
Reply
Reply to all
Forward
Delete
Archive
View
Location of Messages
Method
Adjacent Messages
1. Select the first message. 2. Hold down SHIFT and click the last message in the group. 3. Right-click the selected messages. 4. Select Archive or Delete.
Non-Adjacent Messages
1. Select the first message. 2. Hold down CTRL and click each message in the group. 3. Right-click any of the selected messages. 4. Select Archive or Delete.
EMR MR Manual
35 © 2011 HealthPoint Medical Group and Practice Partner System
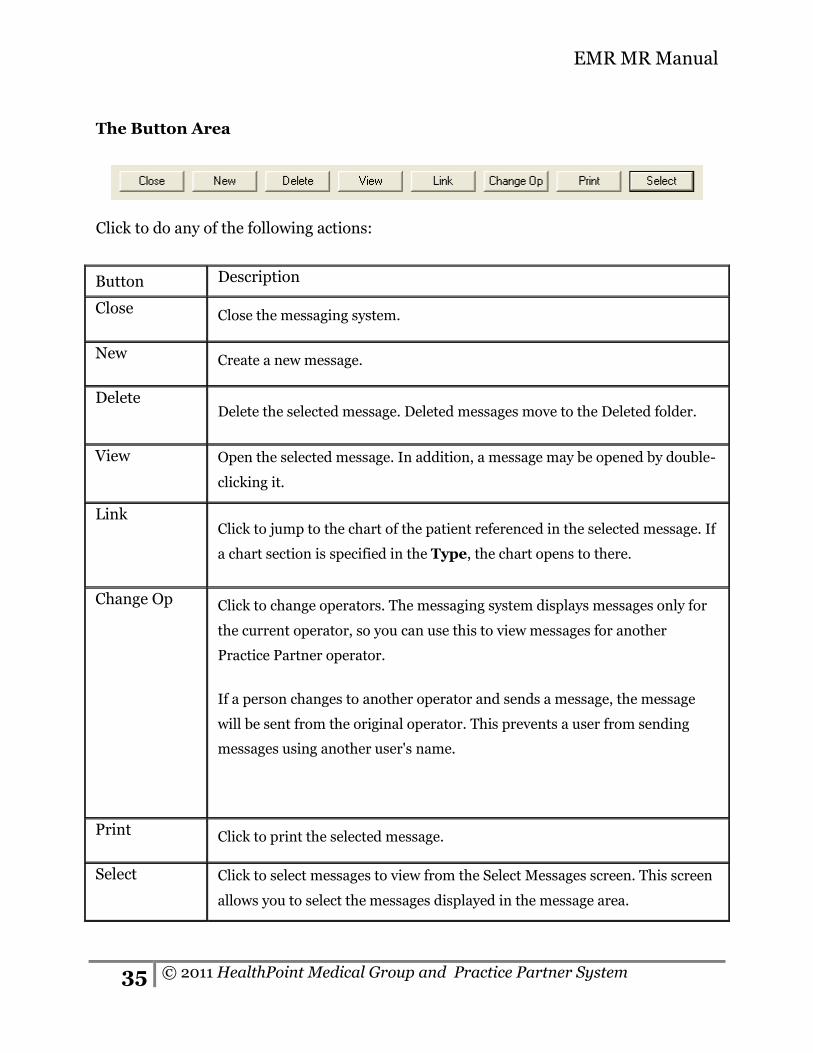
The Button Area
Click to do any of the following actions:
Button Description
Close Close the messaging system.
New Create a new message.
Delete Delete the selected message. Deleted messages move to the Deleted folder.
View Open the selected message. In addition, a message may be opened by double-
clicking it.
Link Click to jump to the chart of the patient referenced in the selected message. If
a chart section is specified in the Type, the chart opens to there.
Change Op Click to change operators. The messaging system displays messages only for
the current operator, so you can use this to view messages for another
Practice Partner operator.
If a person changes to another operator and sends a message, the message
will be sent from the original operator. This prevents a user from sending
messages using another user's name.
Print Click to print the selected message.
Select Click to select messages to view from the Select Messages screen. This screen
allows you to select the messages displayed in the message area.
EMR MR Manual
36 © 2011 HealthPoint Medical Group and Practice Partner System
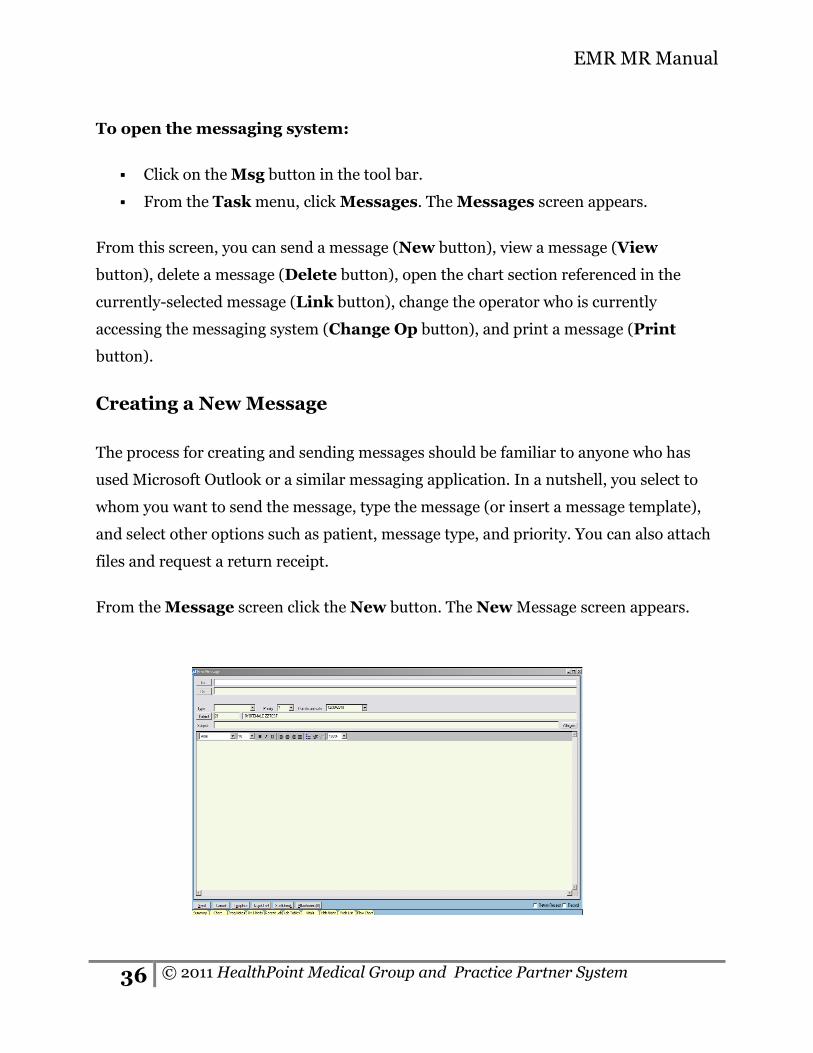
To open the messaging system:
Click on the Msg button in the tool bar.
From the Task menu, click Messages. The Messages screen appears.
From this screen, you can send a message (New button), view a message (View
button), delete a message (Delete button), open the chart section referenced in the
currently-selected message (Link button), change the operator who is currently
accessing the messaging system (Change Op button), and print a message (Print
button).
Creating a New Message
The process for creating and sending messages should be familiar to anyone who has
used Microsoft Outlook or a similar messaging application. In a nutshell, you select to
whom you want to send the message, type the message (or insert a message template),
and select other options such as patient, message type, and priority. You can also attach
files and request a return receipt.
From the Message screen click the New button. The New Message screen appears.

EMR MR Manual
37 © 2011 HealthPoint Medical Group and Practice Partner System
On the top portion of the screen it displays the following fields:
To – Who the user will be sending the message to.
Cc – The user can send a copy of the message to a separate operator.
Type – The user can select a message type by clicking on the drop down arrow.
Priority – Select a priority from the drop down arrow. This ranges from 0 being
the lowest and 9 being the highest.
Date to activate – You can select the day you would like the message to be sent.
Once you have created a message with an active date, the message will display in
Pending.
Patient – If the message relates to a patient, type the patient information in the
Lookup screen and it will attach the patient to this message.
Subject – Type a brief summary of the message.
Text Box – The user will type the message here.
HealthPoint has decided on standard naming conventions for messages: Sick call- Patient age, CC, for x days (9 year old. fever and cough, 4 days).
Refills – Refill and name of medication. (Refill: Amoxicillin)
Referral Request – Referral and type of referral. (Referral: ENT)
Lab Results – Lab Results Patient Name, date of lab results. (Lab results, John Doe,
10/23/10)
The bottom of the screen displays:
Send – Will send the message. If date to activate is later than current date then
the message will be stored under Pending.
Cancel – This will clear the message and close the New Message screen.
Template – Click this button to select templates to insert in the body of this
message.
EMR MR Manual
38 © 2011 HealthPoint Medical Group and Practice Partner System
Quick Text - Click this button to select quick texts to insert in the body of this
message.
Spell Check – Click this button to check spelling. If there are any errors with
spelling, an error box will populate to give suggestions on correct spelling.
Attachments – The user can attach text, images, or other files to the message.
You can attach up to 50 items to one message.
Return Receipt – Click this button if you want to receive notification that the
recipient has read the message.
Record – If this message pertains to a patient and you want to record this
information into the patients chart, click Record. This will record the
information in the Progress Note.
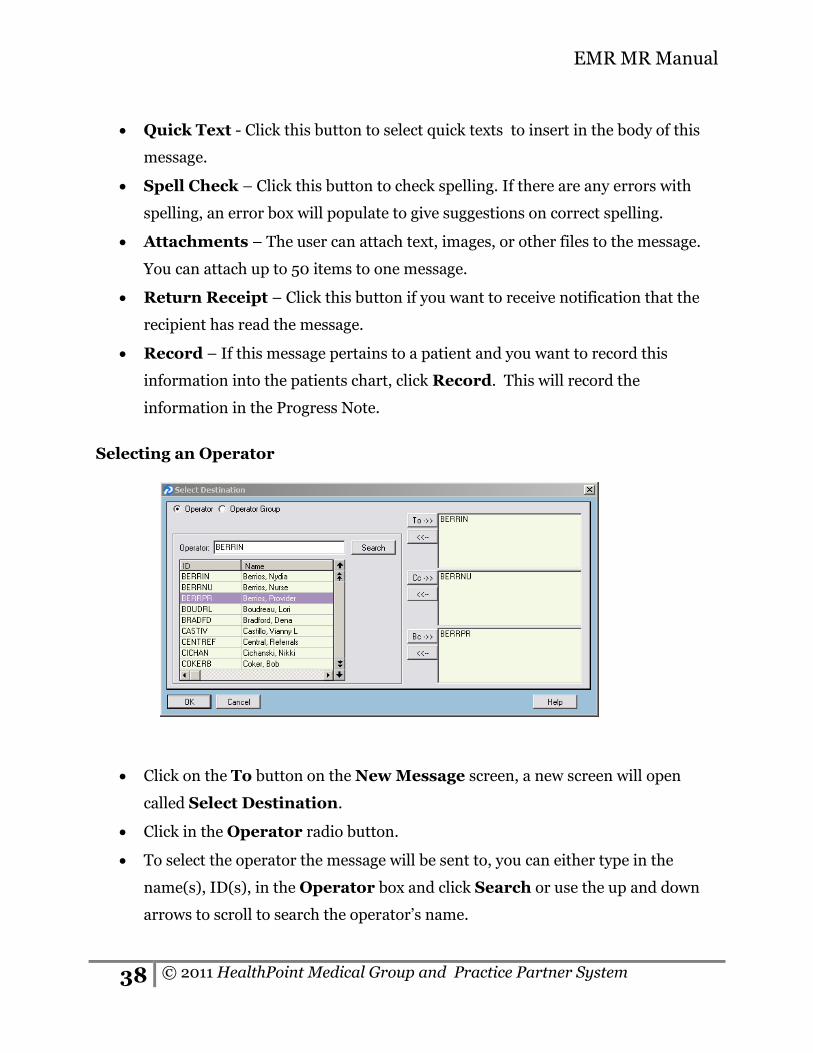
Selecting an Operator
Click on the To button on the New Message screen, a new screen will open
called Select Destination.
Click in the Operator radio button.
To select the operator the message will be sent to, you can either type in the
name(s), ID(s), in the Operator box and click Search or use the up and down
arrows to scroll to search the operator’s name.
EMR MR Manual
39 © 2011 HealthPoint Medical Group and Practice Partner System
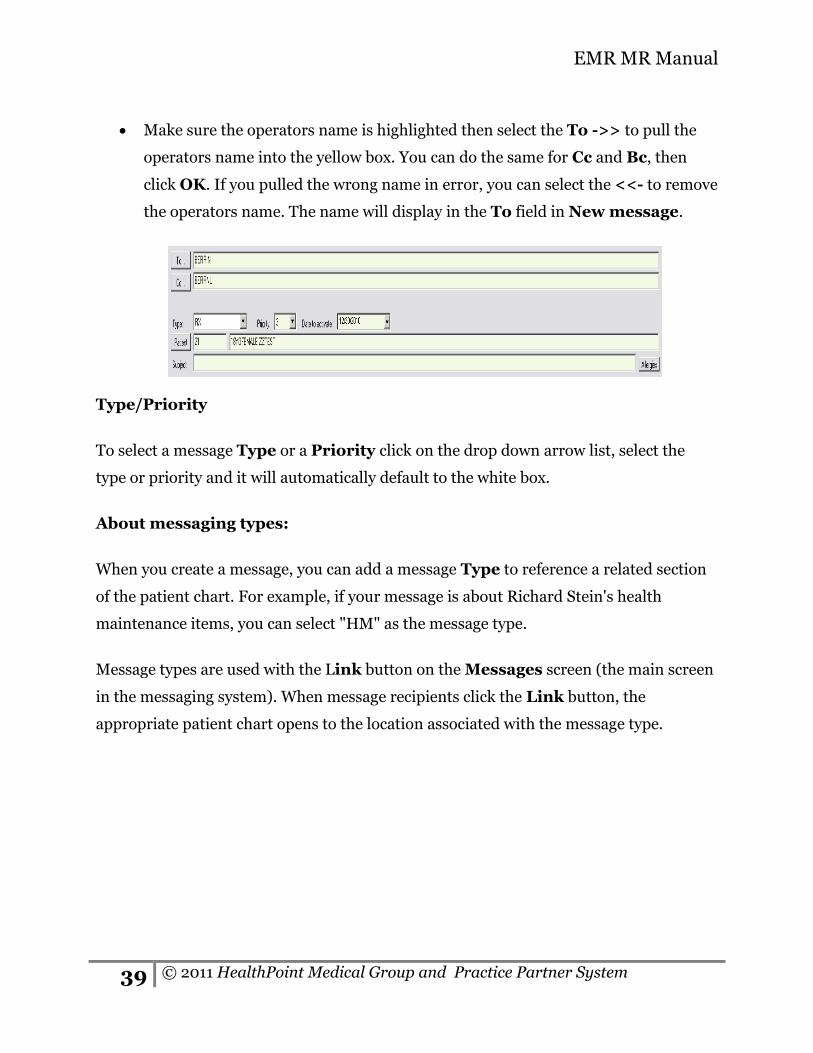
Make sure the operators name is highlighted then select the To ->> to pull the
operators name into the yellow box. You can do the same for Cc and Bc, then
click OK. If you pulled the wrong name in error, you can select the <<- to remove
the operators name. The name will display in the To field in New message.
Type/Priority
To select a message Type or a Priority click on the drop down arrow list, select the
type or priority and it will automatically default to the white box.
About messaging types:
When you create a message, you can add a message Type to reference a related section
of the patient chart. For example, if your message is about Richard Stein's health
maintenance items, you can select "HM" as the message type.
Message types are used with the Link button on the Messages screen (the main screen
in the messaging system). When message recipients click the Link button, the
appropriate patient chart opens to the location associated with the message type.

EMR MR Manual
40 © 2011 HealthPoint Medical Group and Practice Partner System
Messaging types and their chart locations:
Many of the message types are self-evident. The table below lists the message type and
its corresponding location in the patient chart.
Message type Chart location
Arrived Chart summary
Chart Patient chart
Chart summary Chart summary
Email Patient chart
Flow charts Flow charts
HM Health maintenance
In Chart summary
Lab Laboratory data
Lab micro Laboratory data - microbiology
Lab misc Laboratory data - miscellaneous
**Lab most recent Laboratory data - most recent lab data
Letters Letters
Problem list Problem list
Progress notes Progress note - most recent
Reminder Chart summary
Rx Rx/medications
Schedule Provider schedule
Tel -chart Patient chart
Tel -progress note Progress notes (most recent)
Tel -chart summary Chart summary
Vitals Vital signs
Date to activate
If you want to delay sending the message, select (or type) the activation date. When an
activation date later than the current date is selected, the message is stored in the
Pending folder until the activation date. The people to whom the message is addressed
(in the To, Cc, and Bcc fields) will not receive the message until the activation date.

EMR MR Manual
41 © 2011 HealthPoint Medical Group and Practice Partner System
Inserting a Template:
To open a template, click on the Template button at the bottom of the screen, the
Template Lookup screen will display.
The Template button holds several templates that can be entered into the body of the
message. These templates are Telephone Message, Vitals Checks, Cholesterol
Results, Lab Results, Rx Refill.
The Provider and Practice box will not be used. HealthPoint has made the decision
not to have specific templates made for providers and practices.
The user can search by Template Name if they know the name of the template or they
can highlight the template and click OK. This will insert the template right into the body
of the message.

EMR MR Manual
42 © 2011 HealthPoint Medical Group and Practice Partner System
Understanding the Template
The template is designed to help reduce free texting by allowing you to click on areas to
complete within your note. Practice Partner has the capability of utilizing templates in
Letters, Progress Notes, and Messaging.
There are a few things you should know about templates:
DEL – Means if no information is added to the right of the marker the
information will be deleted.
Asterisk – Means there's a space to add additional information.
Anything Displayed as REQ is a required field.
Once you have completed the template in the message screen, click Send to send the
message off to the operator.
REQ areas are required fields.

EMR MR Manual
43 © 2011 HealthPoint Medical Group and Practice Partner System
Quick Text
You can use Quick Text to add commonly-used words, phrases, comments, sentences,
and even paragraphs of up to 1000 characters of previously defined text. You assign
each text fragment an easy-to-remember sequence of keystrokes. Quick text can be used
in messages, letters, and progress notes.
To insert quick text, click on the Quick Text button. This will open a new screen called
Insert Quick Text. You can select through the radio button Regular Quick Text,
DOT codes, and Letter Codes.
NOTE
DOT codes are codes used to tell the patient records what type of information you are entering. Properly coded text is automatically transferred into the appropriate chart section, like the problem list, vital signs, laboratory, allergy, clinical elements, and health maintenance. All DOT codes need to be entered directly to the left of the text page. If you do not enter the DOT code on the left of the text page, you will receive errors when the note is sign.
EMR MR Manual
44 © 2011 HealthPoint Medical Group and Practice Partner System
Letter codes work similar to DOT codes. You can embed letter codes so that when
you write a letter, patient specific information appears whenever you have inserted a
letter code.
Quick Text Names allows the users to search for a particular quick text by name. You
can also use the scroll bar to move up and down the Quick Text list.
Once you have picked the quick text desired, click on the Insert button to add to the
body of the message.
NOTE
Where you cursor is placed is where the quick text will be inserted.
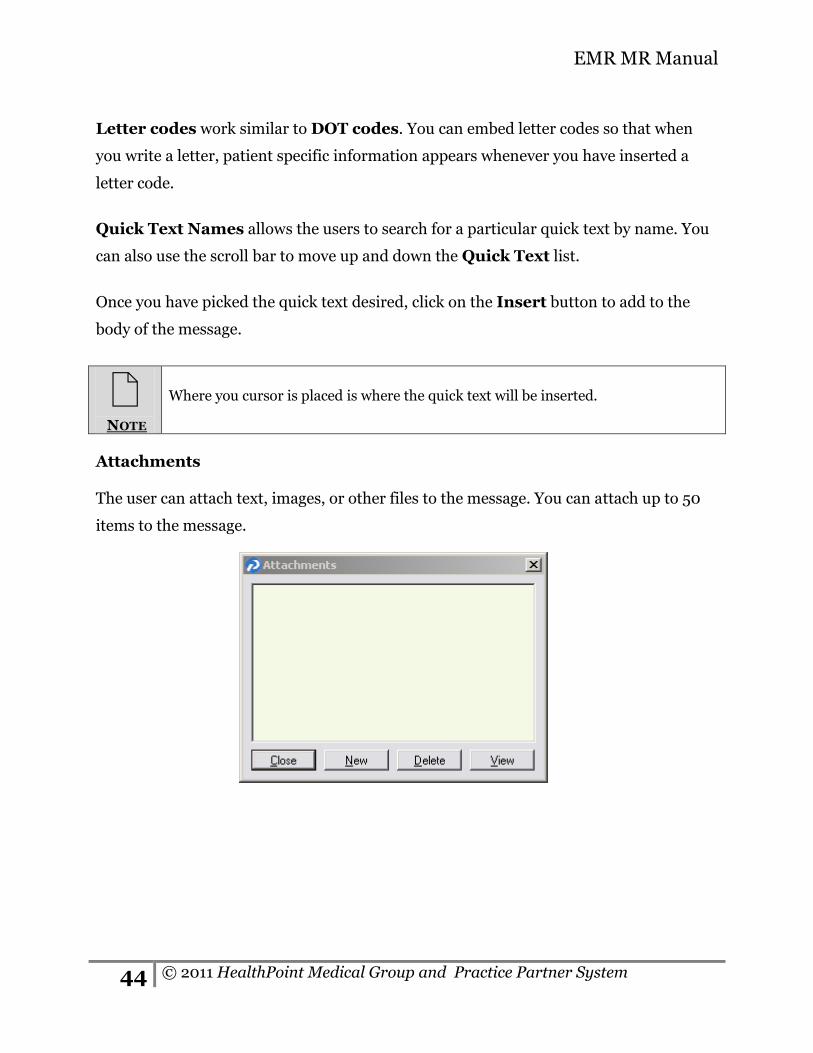
Attachments
The user can attach text, images, or other files to the message. You can attach up to 50
items to the message.

EMR MR Manual
45 © 2011 HealthPoint Medical Group and Practice Partner System
To attach a file to the message:
Click on the Attachment button on the bottom of the message screen. A new
screen called Attachments will open.
Click on the New button. A screen called Select Attachment will open. Here
you will be able to locate the file you are looking to attach.
Highlight the file you want to attach and click Open. The file will display in the
Attachments box. You can view the image by clicking View, if not click Close.
On the bottom of the message screen in the Attachments screen it will display
how many attachments are listed.
EMR MR Manual
46 © 2011 HealthPoint Medical Group and Practice Partner System
NOTE
After go-live date if a message is taken on a patient in the EMR once the message is complete
the staff needs to place this message in the Paper chart as well.
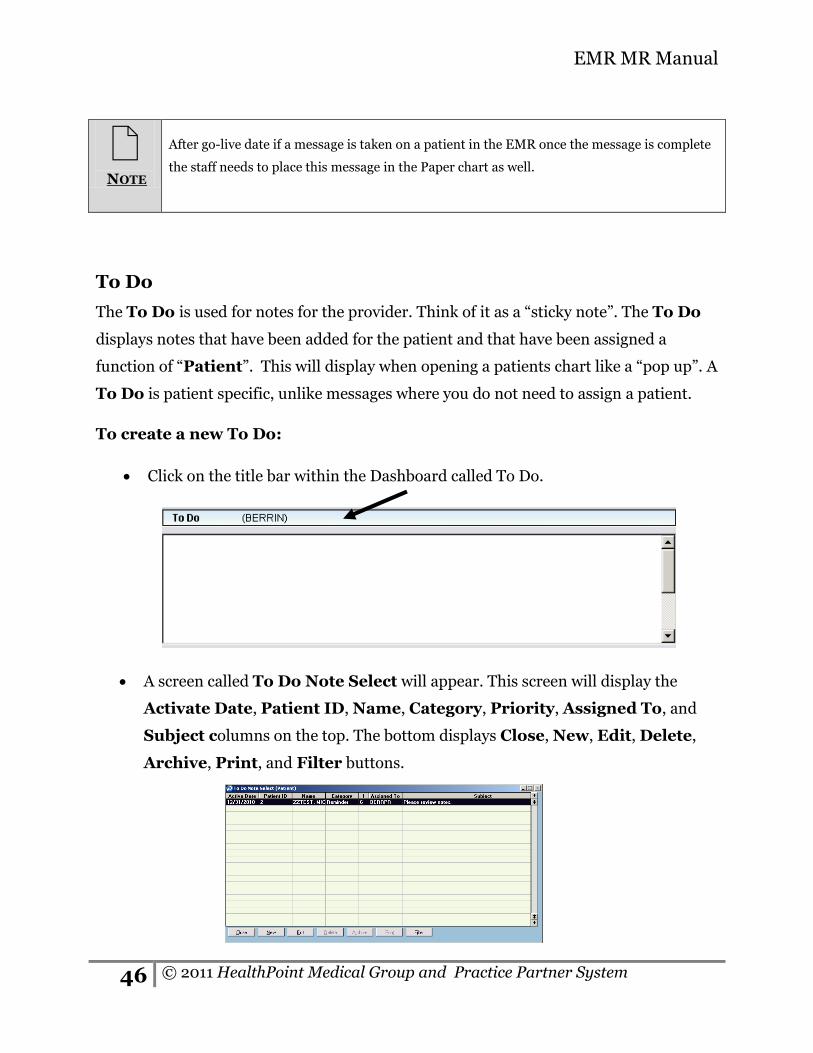
To Do
The To Do is used for notes for the provider. Think of it as a “sticky note”. The To Do
displays notes that have been added for the patient and that have been assigned a
function of “Patient”. This will display when opening a patients chart like a “pop up”. A
To Do is patient specific, unlike messages where you do not need to assign a patient.
To create a new To Do:
Click on the title bar within the Dashboard called To Do.
A screen called To Do Note Select will appear. This screen will display the
Activate Date, Patient ID, Name, Category, Priority, Assigned To, and
Subject columns on the top. The bottom displays Close, New, Edit, Delete,
Archive, Print, and Filter buttons.

EMR MR Manual
47 © 2011 HealthPoint Medical Group and Practice Partner System
Click on the New button and the patient Lookup screen will appear.
Click Close to close the To Do Note Selected screen.
To edit a “to do”, highlight the note and click the Edit button.
To delete same rule applies, highlight the note and click Delete button.
If you chose to archive the note, highlight the note and click the Archive button.
Click Yes to verify the note is to be archived.
The Filter button will open a To Do Filter screen. This area is used to set the
criteria.
You can assign an operator in the Assigned To box.
Demog Type will automatically display Patient.
Other options you have a chose to select:
o Current/Archived
o Function
o Category
o Priority
Under Date Selection, you can choose an Active Date by adding dates in the
From and To box.
When finished, click Ok and your notes will display on the To Do List.
Once you have located the patient from the Lookup screen, the Patient
Note <New> screen will appear.

EMR MR Manual
48 © 2011 HealthPoint Medical Group and Practice Partner System
Patient Note <New>
This screen has several fields that include:
• Function - Where the note should display
• Active Date - The date the note is active. The active date is the day the note
becomes "functional“.
• Expire Date - The note’s expiration date. The expiration date is the day the
note will be archived.
• Cycle - Has not been implemented through Practice Partner.
• Practice - Indicated the practice that created the note.
• To Do - If this note is a To Do check off the box.
• Completed - If the note is a To Do and has been completed, click completed.
• Priority - This is used to prioritize the “to do” note.
• Category - This is used to sort the “to do” note.
• Assigned To - This is where the operator will be assigned to the note.
• Subject - Used to type in a brief description of the “to do” note.
After you have filled out the necessary fields, type the note in the text box, and then click
OK.
EMR MR Manual
49 © 2011 HealthPoint Medical Group and Practice Partner System
Lesson Four: Patient Lookup
The purpose of this chapter is to give you an overview on how to look up a patient
record.
Objective
By the completion of this chapter, you will:
Have a complete understanding of the Lookup screen
Have the ability to look up a patient using patient name, and patient ID

EMR MR Manual
50 © 2011 HealthPoint Medical Group and Practice Partner System
Patient Lookup
Patient Lookup
In order to access a patient, you must go through the Patient Lookup Screen.
You can locate patient lookup screen by doing the following:
File/Open Chart on the Menu Bar, the Chart button on the tool bar, or the
Patient button on the toolbar.
You can locate a patient by selecting the radio button Patient Name, Patient
ID, and Phone Number.
When you have selected your search criteria, fill in the areas under Search for
or Patient Name Search Filters.
Click the Lookup button, locate your patient and click OK. This will bring you to
the Patient Chart. Repeat the step if you are not able to locate the patient.

EMR MR Manual
51 ©2011 HealthPoint Medical Group and McKesson Practice Partner
Lesson Five: Chart Overview
The purpose of the chapter is to give an overview of the patient chart.
Objectives
By the completion of this chapter, you will be able to:
Navigate around the patient chart

EMR MR Manual
52 © 2011 HealthPoint Medical Group and Practice Partner System
Patient Chart
The Patient Records is organized in much the same way as most paper-based medical
record systems. The patient chart is used to store a wide variety of patient information,
including progress notes, medications, and patient histories.
Many of the chart sections (or tabs) are note-based. That is, they contain mainly non-
numeric data.

EMR MR Manual
53 ©2011 HealthPoint Medical Group and McKesson Practice Partner
As you open the patient’s chart new buttons appear on the toolbar:
• Close – Allows you to close the chart.
• Timing - Is a way to track the patient progress during an appointment.
• Note - Allows the users to create a new progress note.
• Patient Education - Provides materials that can be used as handouts for your
patients.
• Patient Information - Is a quick snap shot of patient’s demographics
Insurance, over due Health Maintenance, and Allergies.
• Rx – Provides a short cut way to enter new medications.
• Orders – Provides a short cut to processing a new order.
You can view, add, or update the information that appears on the user-defined chart
sections in the same way you would information in any of the text-based section of the
patient chart.
NOTE
Each tab that displays a BLUE marking informs the user there is information in that tab. If it displays WHITE, no information is currently in that tab.
Accessing and closing patient charts:
You can access the patient chart in several ways: from the menu bar File/Open Chart
from, from the toolbar click Chart button, or by double clicking on the patients name
on the Scheduler.
TIP
From the menu bar go to File/Recently Reviewed, this will display up to 15 patients
whose charts were recently opened by the operator.
EMR MR Manual
54 © 2011 HealthPoint Medical Group and Practice Partner System
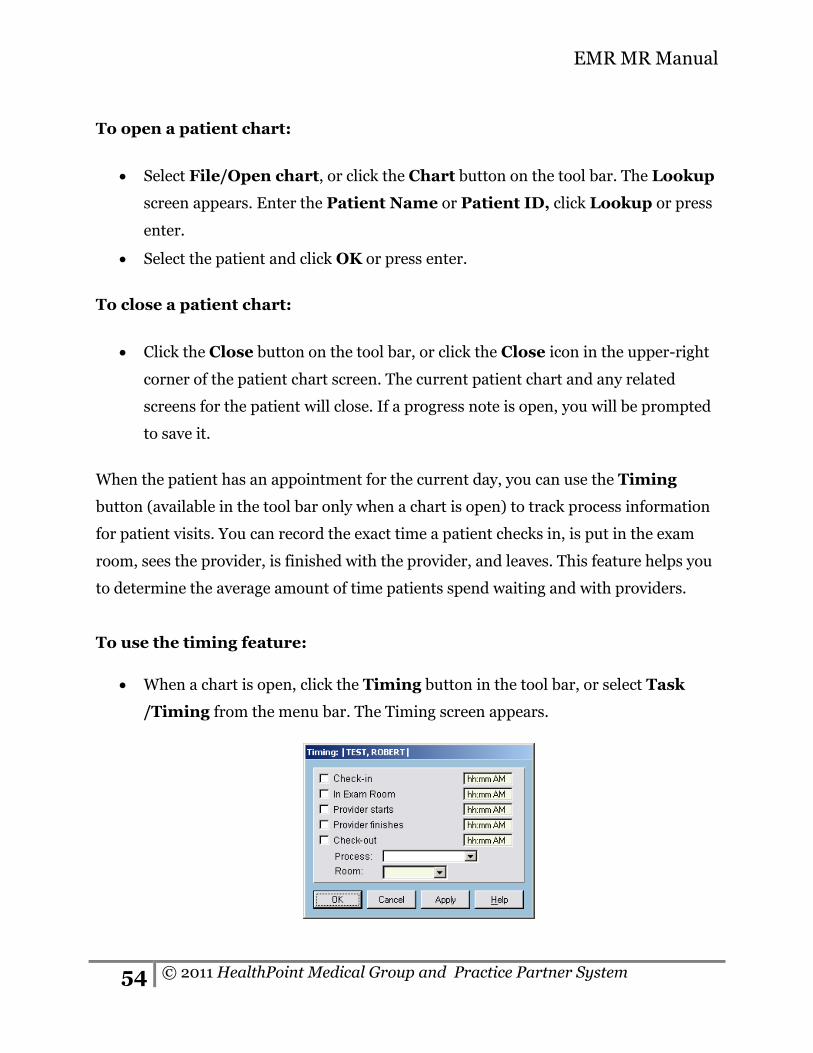
To open a patient chart:
Select File/Open chart, or click the Chart button on the tool bar. The Lookup
screen appears. Enter the Patient Name or Patient ID, click Lookup or press
enter.
Select the patient and click OK or press enter.
To close a patient chart:
Click the Close button on the tool bar, or click the Close icon in the upper-right
corner of the patient chart screen. The current patient chart and any related
screens for the patient will close. If a progress note is open, you will be prompted
to save it.
When the patient has an appointment for the current day, you can use the Timing
button (available in the tool bar only when a chart is open) to track process information
for patient visits. You can record the exact time a patient checks in, is put in the exam
room, sees the provider, is finished with the provider, and leaves. This feature helps you
to determine the average amount of time patients spend waiting and with providers.
To use the timing feature:
When a chart is open, click the Timing button in the tool bar, or select Task
/Timing from the menu bar. The Timing screen appears.
EMR MR Manual
55 ©2011 HealthPoint Medical Group and McKesson Practice Partner
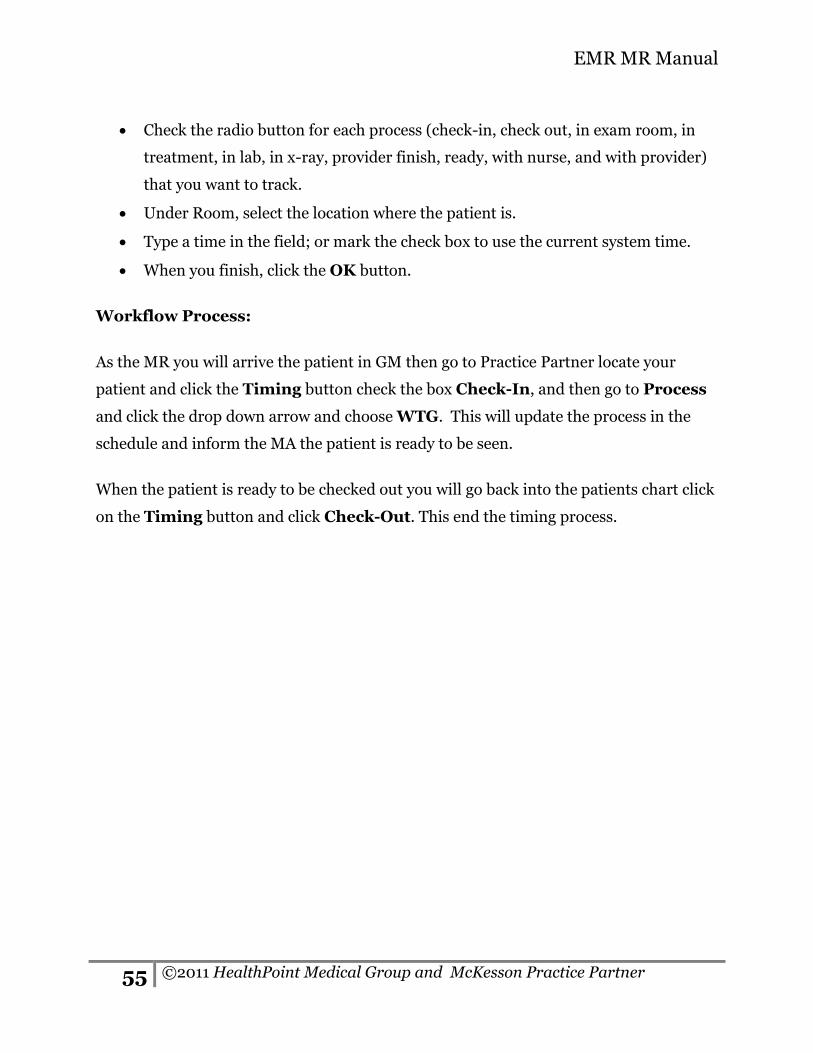
Check the radio button for each process (check-in, check out, in exam room, in
treatment, in lab, in x-ray, provider finish, ready, with nurse, and with provider)
that you want to track.
Under Room, select the location where the patient is.
Type a time in the field; or mark the check box to use the current system time.
When you finish, click the OK button.
Workflow Process:
As the MR you will arrive the patient in GM then go to Practice Partner locate your
patient and click the Timing button check the box Check-In, and then go to Process
and click the drop down arrow and choose WTG. This will update the process in the
schedule and inform the MA the patient is ready to be seen.
When the patient is ready to be checked out you will go back into the patients chart click
on the Timing button and click Check-Out. This end the timing process.

EMR MR Manual
56 © 2011 HealthPoint Medical Group and Practice Partner System
Lesson Six: Patient Information
The purpose of the chapter is to give an overview of the patient information screen.
Objectives
By the completion of this chapter, you will:
Understand what displays in the Patient Information screen.

EMR MR Manual
57 ©2011 HealthPoint Medical Group and McKesson Practice Partner
Patient Information
The Patient Information screen provides quick access to a patient’s data. The
information displayed is pulled from the Patient screen and includes, if available the,
patient’s name, ID, address, home address, telephone numbers, account type, head of
household, insurance carriers, usual provider, and referral sources. Keep in mind that
this information displays only if it has been entered via Group Management and sent
across the interface. For example, if a Usual provider is not indicated on the Patient
Information screen in Group Management, the Usual provider field on the Patient
Information screen will be blank in Practice Partner.

EMR MR Manual
58 © 2011 HealthPoint Medical Group and Practice Partner System
To access the Patient Information screen:
When a patient chart is open, select Show/Patient Info from the menu bar, or
click the Pt Info button on the toolbar. The Patient Information screen for
the current patient appears.
The screen includes several buttons that will allow you to quickly jump to additional
patient information.
You can click the:
HM button to view the patient’s overdue health maintenance.
Allergies button to view the patient’s allergies.
Co-pay button, no information will display here.
Guarantor will display guarantor information.

EMR MR Manual
59 ©2011 HealthPoint Medical Group and McKesson Practice Partner
Lesson Seven: Patient Screen
The purpose of the chapter is to give an overview of the patient screen and all tabs
associated with the Patient section.
Objectives
By the completion of this chapter, you will be able to:
Upload a photo and attachment
View insurance information
Add a provider
View all present and past appointments
View progress notes
Configure a pharmacy

EMR MR Manual
60 © 2011 HealthPoint Medical Group and Practice Partner System
Patient Screen
To access the Patient screen, click on the Patient button from the toolbar, or
File/Open Patient from the menu bar. The Patient screen is set up with several
different tabs.
The General tab will display demographics that have been sent from Group
Management. This area is NOT to be modified in Practice Partner. If any changes need
to be made to the patient’s demographics these changes MUST be made in Group
Management. The information will come through the interface within 120 seconds and
will automatically update Practice Partner.
Within the General tab, the only areas the user will need to access is Photo and
Attach button.

EMR MR Manual
61 ©2011 HealthPoint Medical Group and McKesson Practice Partner
About patient photographs:
You can add an image file (.bmp, .gif, or .jpg format) of the patient through the Photo
button. The photo displays on the Patient screen's General tab.
To add or change a patient photograph:
1. The receptionist will take the photo via a digital camera or webcam.
2. The photo will be saved, by the receptionist, to the following location as the
patient’s name:
T:\ppart\Patient Photos\%dr.’s name%\Mickey Mouse
Example : t:\ppart\Patient Photos\Wray\Mickey Mouse
3. The receptionist will attach the patient’s photo to their chart by opening their
chart.
4. Click on Patient icon located on the toolbar.
5. Click Photo. The Load Patient Photo screen will appear.

EMR MR Manual
62 © 2011 HealthPoint Medical Group and Practice Partner System
6. Click Browse.
8. Navigate to the location where you saved the photo T:\Ppart\Patient Photos.
Choose your sites folder and click Open.

EMR MR Manual
63 ©2011 HealthPoint Medical Group and McKesson Practice Partner
9. You should be able to see the list of photos available. Select the correct
picture and click OK. A Check the box labeled “Delete Original File After
Load?” after you make sure you are loading the correct photo for the patient.
10. Once you click OK, you will be able to see the photo on the patient
information screen. Click OK to close.
To delete a patient photograph:
From the General tab click the Photo button. The Patient Photo screen
appears.
Click the Delete button. A message asks you to confirm the deletion.
Click the Yes button.
EMR MR Manual
64 © 2011 HealthPoint Medical Group and Practice Partner System
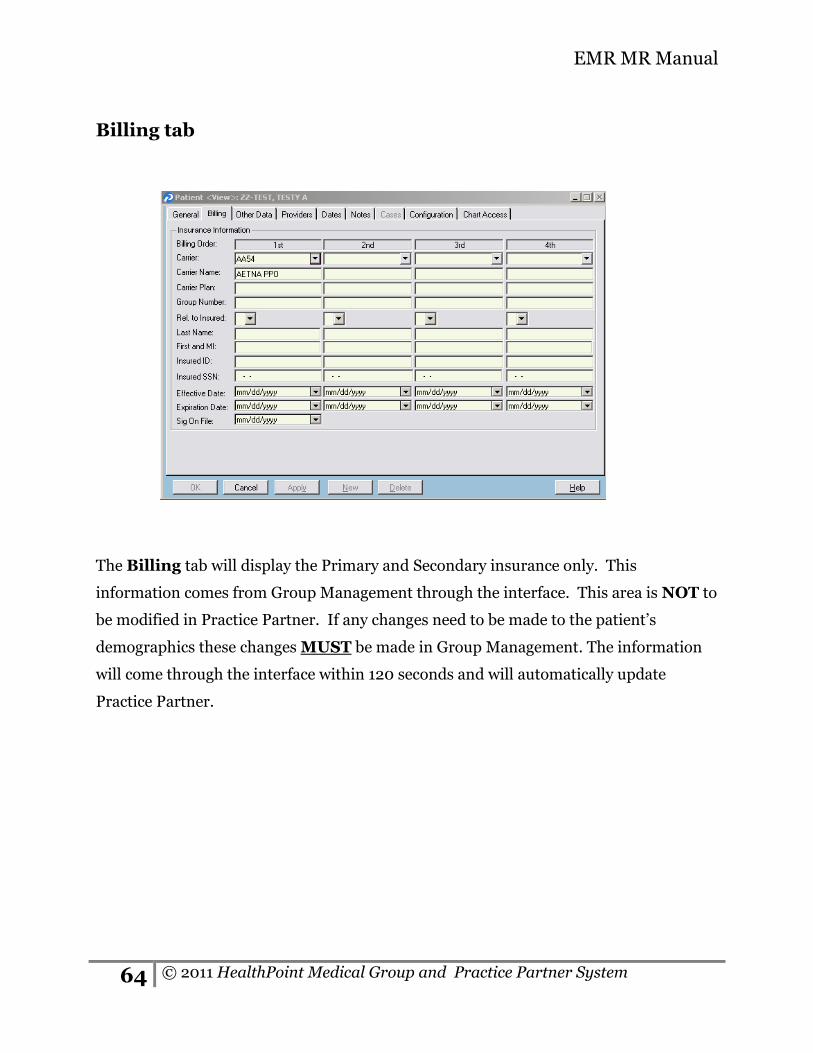
Billing tab
The Billing tab will display the Primary and Secondary insurance only. This
information comes from Group Management through the interface. This area is NOT to
be modified in Practice Partner. If any changes need to be made to the patient’s
demographics these changes MUST be made in Group Management. The information
will come through the interface within 120 seconds and will automatically update
Practice Partner.

EMR MR Manual
65 ©2011 HealthPoint Medical Group and McKesson Practice Partner
Other Data tab
This displays the language field that is brought over through the interface from GM.
Providers tab
This screen will allow the user to add the primary provider and referring sources.
To add a provider:
Click on the drop down arrow under Primary Provider. A screen will display
called Provider Select. You have to select the Name button and click OK or
use the scroll bar to move up and down the screen.
Select whether the provider is an Internal provider or External provider.
Select Date Active.

EMR MR Manual
66 © 2011 HealthPoint Medical Group and Practice Partner System
NOTE
Internal Provider section will not be used.
To add a referring source:
In the Referring Sources area, click New Src.
Under General Information select who the referring source is From by
clicking on the drop down arrow. A screen called Referring Source Select
will display, highlight the name and click OK.
To add the To Provider, click the drop down arrow and select the provider
from the Provider Select screen.
Add a Description and Auth# if necessary.
Fill in all necessary dates.
To change a referring source:
In the Referring Source area, select the referring source to be changed.
Click Edit Src. Make the changes. When finished, click OK.
To delete a referring source:
In the Referring Sources area, select the referring source to be deleted.
Click Delete Src. A message asks to confirm the deletion. Click OK.

EMR MR Manual
67 ©2011 HealthPoint Medical Group and McKesson Practice Partner
Dates tab
The Dates tab will display all previous and pending appointments. The most recent
appointment will display on top. Under Appointments it will display the Providers
code, Date of appointment, Time of the appointment, TOV – the office visit, and
Status.
You can also access any overdue Health Maintenance by clicking on the RED HM
button. The overdue Health maintenance screen will display called Overdue Health
Maintenance with a list of all the patients overdue HM.

EMR MR Manual
68 © 2011 HealthPoint Medical Group and Practice Partner System
Notes tab
The notes section will display all patient notes that have been created in the patient
record.
Configuration tab

EMR MR Manual
69 ©2011 HealthPoint Medical Group and McKesson Practice Partner
From the Configuration tab you can associate pharmacies with the patient.
From the Configuration tab, click the New button to the right of the
Patient Pharmacies section.
In the Pharmacy ID box, click the drop down arrow to select pharmacy. A
screen called Pharmacy Select will appear.
Locate the desired pharmacy; you can search by Pharmacy Name,
Pharmacy ID, or Nickname.
If this is a preferred pharmacy, click on the Preferred check box.
Enter a Note if applicable.
Click Ok when finished.
Click the drop down arrow to locate pharmacy.

EMR MR Manual
70 © 2011 HealthPoint Medical Group and Practice Partner System
Lesson Eight: Patient Education
The purpose of the chapter is to give an overview of the patient education.
Objectives
By the completion of this chapter, you will:
Understand Patient Education
Know how to search for handouts
Know how to Modify handouts
Know how to Print handouts

EMR MR Manual
71 ©2011 HealthPoint Medical Group and McKesson Practice Partner
Patient Education
The Patient Education feature of Patient Records provides education materials that
can be used as handouts for your patients. You can even create customized notes to add
to your handouts prior to printing. The Patient Education feature will automatically
select the appropriate education handout based on the age and sex of your patient, and
diagnosis.
Some of the Patient Education materials are available in English and Spanish. An
asterisk next to the index entry will indicate there is a Spanish version of the handout.
To access Patient Education:
Click on the Patient Ed button from the patients chart on the toolbar. A
screen will open called PMSI – Patient Education or you can go through
the Task/Patient Education from the menu bar.
Required Core Objective: Use certified EMR technology to identify patient-specific education resources to patient if appropriate.

EMR MR Manual
72 © 2011 HealthPoint Medical Group and Practice Partner System
The buttons on the menu bar are:
File – Will allow you to Print handouts. If you have added a progress note
for a patient and if the patient is currently selected on Patient Profile, a
notation will be added to the progress note that lists the handouts that you
print for the patients.
Task – Will allow you to search the patient education database, Index,
Notated, look at Patient Profile, and select Mode. These same actions can be
accessed by the buttons below the menu bar.
Bookmarks – Add and Edit your book marks.
Maintenance – Not being used.
You can click on the Search button, the Search screen will display. This
section will allow a search by Title, or you can scroll up and down to locate a
folders name.
Index button, is currently not available.
To notate on the actual handout, click on the Notate button. The handout
will appear in word format. Add additional notes and click Print.
E-Mail - is currently not available.
Profile - this opens the Patient Profile and the patient’s name, age and sex
display. The diagnostic coding system used and the diagnostic code, if
available, also display.
Help - is currently unavailable.

EMR MR Manual
73 ©2011 HealthPoint Medical Group and McKesson Practice Partner
Lesson Nine: Knowledge Base
The purpose of the chapter is to give an understanding of the Knowledge base.
Objectives
By the completion of this chapter, you will be able to:
Understand how to access the Knowledge Base
Understand how to search for HMG forms
EMR MR Manual
74 © 2011 HealthPoint Medical Group and Practice Partner System
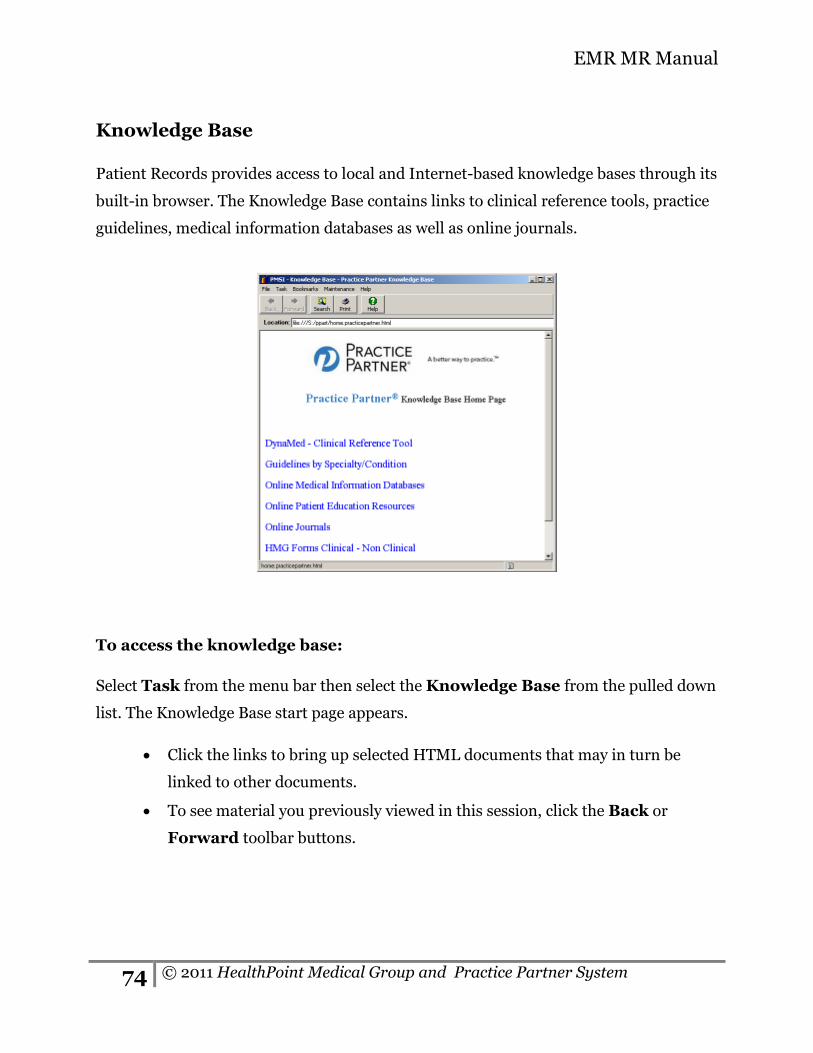
Knowledge Base
Patient Records provides access to local and Internet-based knowledge bases through its
built-in browser. The Knowledge Base contains links to clinical reference tools, practice
guidelines, medical information databases as well as online journals.
To access the knowledge base:
Select Task from the menu bar then select the Knowledge Base from the pulled down
list. The Knowledge Base start page appears.
Click the links to bring up selected HTML documents that may in turn be
linked to other documents.
To see material you previously viewed in this session, click the Back or
Forward toolbar buttons.
EMR MR Manual
75 ©2011 HealthPoint Medical Group and McKesson Practice Partner
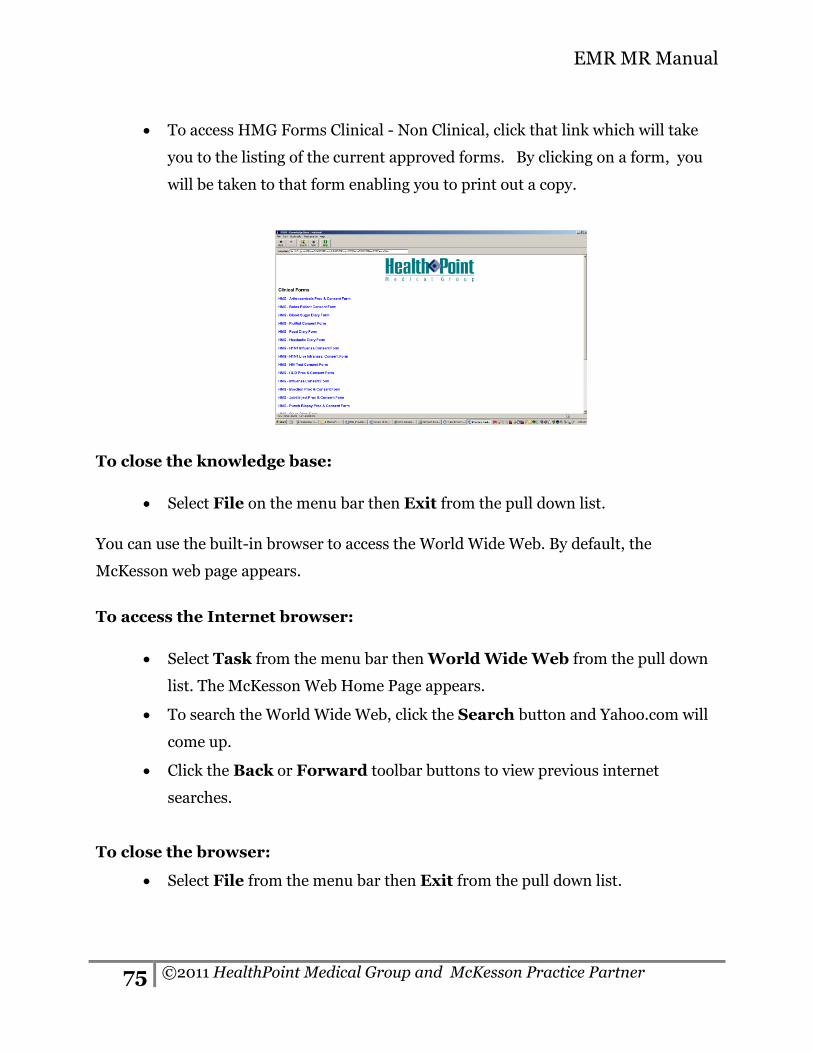
To access HMG Forms Clinical - Non Clinical, click that link which will take
you to the listing of the current approved forms. By clicking on a form, you
will be taken to that form enabling you to print out a copy.
To close the knowledge base:
Select File on the menu bar then Exit from the pull down list.
You can use the built-in browser to access the World Wide Web. By default, the
McKesson web page appears.
To access the Internet browser:
Select Task from the menu bar then World Wide Web from the pull down
list. The McKesson Web Home Page appears.
To search the World Wide Web, click the Search button and Yahoo.com will
come up.
Click the Back or Forward toolbar buttons to view previous internet
searches.
To close the browser:
Select File from the menu bar then Exit from the pull down list.

EMR MR Manual
76 © 2011 HealthPoint Medical Group and Practice Partner System
Lesson Ten: Chart Summary
The purpose of the chapter is to give an overview of the chart summary in a patient’s
chart.
Objectives
By the completion of this chapter, you will be able to:
Display the Chart Summary
Access values from the each section of the Chart Summary

EMR MR Manual
77 ©2011 HealthPoint Medical Group and McKesson Practice Partner
Chart Summary
The Chart Summary section of the patient chart displays the most recent information
about the patient in a concise, easy-to-read format. You can use the Chart Summary
screen to get a quick overview of a patient’s chart.
The chart summary is solely for viewing existing patient information. You cannot delete
or change information directly on the Chart Summary screen. If you need to change
any information displayed here, you must change it in the appropriate section of the
patient chart.

EMR MR Manual
78 © 2011 HealthPoint Medical Group and Practice Partner System
The default chart summary display shows the patient’s
• Visits
• Vitals Signs
• Allergy
• Health Maintenance needed
• Most Recent Labs
• Procedures
• Medication
• Major Problems
Other than Procedures, you can click any chart summary item to go directly to that
section of the chart. If you click on the Procedures title bar it will not display anything.
For example, you can click a Problem to go to all visits for that problem. Click Health
Maintenance to display the Health Maintenance section.
You can use the arrows to scroll through the information in each section of the chart
summary screen.
To access the chart summary:
Select Show from the menu bar the Chart Summary from the drop down
list, or click the Chart Summary tab on the patient chart. You can also click
the Summary button on the go to bar.
EMR MR Manual
79 ©2011 HealthPoint Medical Group and McKesson Practice Partner
Lesson Eleven: Progress Note
The purpose of the chapter is to give an overview of the Progress Note.
Objectives
By the completion of this chapter, you will be able to:
View the Progress Note
Process the Electronic Encounter Form for charges

EMR MR Manual
80 © 2011 HealthPoint Medical Group and Practice Partner System
Progress notes
Progress notes are records of the patient visits. You can add or update notes on any of
the progress notes screen, as well as move from one progress notes screen to another.
Accessing the progress note:
To access progress note, click on the Note button on the toolbar, or click on
the Progress Note tab from the patient record. The Progress Note screen
will appear.
When selecting the Progress Notes tab, a dialog box will appear called
Progress Note Selection.
You will have the option to select by:
o Most Recent - Displays in chronological order with the most recent note first.
o By Problem - Displays listing in alphabetical order by problem. This
option only displays unique problems. It does not represent the actual
number of progress notes in the chart.
Select category that
applies.
EMR MR Manual
81 ©2011 HealthPoint Medical Group and McKesson Practice Partner
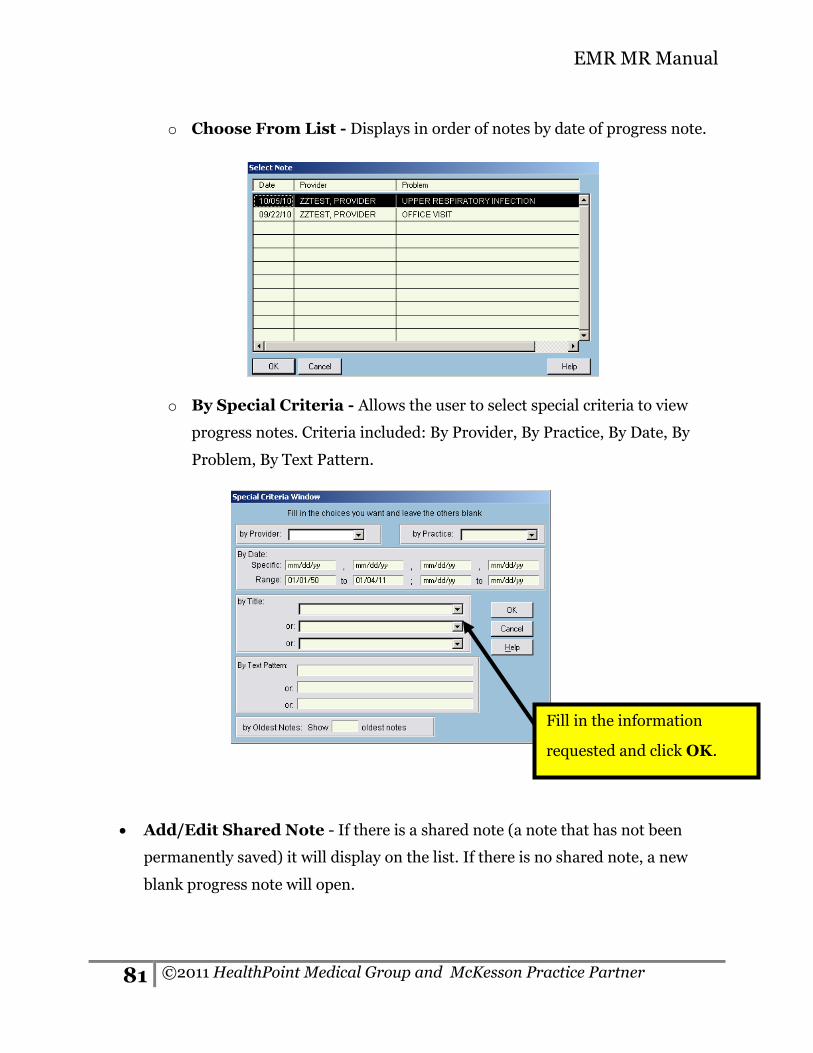
o Choose From List - Displays in order of notes by date of progress note.
o By Special Criteria - Allows the user to select special criteria to view
progress notes. Criteria included: By Provider, By Practice, By Date, By
Problem, By Text Pattern.
Add/Edit Shared Note - If there is a shared note (a note that has not been
permanently saved) it will display on the list. If there is no shared note, a new
blank progress note will open.
Fill in the information
requested and click OK.

EMR MR Manual
82 © 2011 HealthPoint Medical Group and Practice Partner System
NOTE
Practice Partner allows you to view particular parts of the progress note by clicking the Past Medical History tab, Social History tab, and Family History tab
The top blue banner area of the progress will display patient name, ID, Age, and Date of
Birth. This information comes through the interface from Group Management.
The progress note will automatically time stamp the date and time on the upper left
corner.
The right of the Progress Note screen displays:
Cancel
QT Auto which works like the TAB and F10 keys. When you click on the QT
Auto button, the cursor jumps to the next label. If the current label marker
has an embedded QuickText item name, the item name is replaced with the
associated QuickText.

EMR MR Manual
83 ©2011 HealthPoint Medical Group and McKesson Practice Partner
Fax
Image can create and display in the patient’s chart.
Spelling will check for spelling error.
Insert Tables
EM Codes will allow the user to add E & M coding labels to the note for each
service provided to the patient.

EMR MR Manual
84 © 2011 HealthPoint Medical Group and Practice Partner System
Electronic Encounter Form (EEF)
The Electronic Encounter Select screen lists all existing electronic encounters. It is also
the main screen for starting new encounter forms, entering encounter data, and
reviewing existing forms. Providers can check off the appropriate procedure codes and
diagnosis codes through the progress note or by the EEF. Then the Medical Receptionist
staff can review the completed forms and post the resulting charges to the Group
Management for processing.
To access the EEF screen go to Task/Electronic Counter Forms through the
menu bar.
A screen called Electronic Encounter Select will display. This displays all
encounters forms that are pending and completed.
Encounters on this screen display by date and time the encounter was created.
You can filter the electronic encounter forms that display on this screen by using the
fields at the top of the screen:

EMR MR Manual
85 ©2011 HealthPoint Medical Group and McKesson Practice Partner
Practice: Select a practice to display electronic encounters for that practice only,
or leave the field blank to display electronic encounters for all practices.
Provider: Select a provider to display electronic encounters for that provider
only, or leave the field blank to display electronic encounters for all providers.
Appointment From and To: Select from and to dates to display the electronic
encounter forms with an Appointment Date between the specified dates. You
can click the down arrow button to select the date from a calendar. You can also
leave the fields blank to display electronic encounter forms for all dates or you
can leave the From field blank to display all electronic encounter forms with an
Appointment Date before the To date.
Complete: To display electronic encounters marked complete, select Yes. To
display electronic encounters that are not marked complete, select No.
Status: Select an option to display either current or archived electronic
encounter forms.
Patient ID/Patient Name: Select a patient to display electronic encounters for
that patient only, or leave the field blank to display electronic encounters for all
patients. Use the Lookup button to locate the appropriate patient, then click the
Search button to filter the data in the encounter list.
NOTE
If the From date is not specified, and the selected status is "Archived", the From
date will default to the current date.
Also to view encounters for all patients again, click the Clear button to clear the
Patient ID and Patient Name fields, and then click the Search button.
To display electronic encounter forms in ascending date/time order, you must
select a practice and/or provider. If both filters are blank, electronic encounter
forms display in the order they were created.
When you change one or more filters, click the Search button. This refreshes the
list of electronic encounters, using the new filter criteria.

EMR MR Manual
86 © 2011 HealthPoint Medical Group and Practice Partner System
If a patient is currently selected in Patient Records, encounters for that patient
only display in the list.
Practice Partner automatically assigns a control number to the electronic
encounter form. This number prints on the Encounter Form Tracking report,
available in Medical Billing for Windows. You cannot edit the control number.
To open the Electronic Encounter Select screen:
Select Task/Electronic Encounter Forms from the menu bar. The
Electronic Encounter Select screen appears.
To Edit an electronic encounter form: When the provider has completed the progress notes and signs the note, any procedure
codes and diagnoses codes will display through the EEF. All charges will be generated
through Practice Partner then pushed over via interface to Group Management.
The Medical receptionist will review the EEF for each patient in Practice Partner and
process the EEF for it to be transmitted to Group Management for billing.
On the Electronic Encounter Select screen, highlight the electronic
encounter form that you want to change. Click the Edit button. Make the
appropriate changes. When you finish, click the OK button.

EMR MR Manual
87 ©2011 HealthPoint Medical Group and McKesson Practice Partner
The Electronic Encounter <Edit> screen appears.
Verify the EEF has correct provider, practice name, and template.
Click on the Template drop down arrow to choose the correct template. A
template must be chosen, if a template is not selected the Procedure and
Diagnosis tab will be empty. For example if the provider is an internal medicine
provider, then the Internal Medicine template must be selected.
The Template Name screen appears, select template and click OK.
The EEF creates a control number this number is not to be edited at any time.
NOTE
The EEF will display the last practice, provider and template you view. Verify the
information is correct before moving forward. Also note the EEF will display the
practice name you are assigned to.
Highlight the
patient name
and click the
Edit button.
EMR MR Manual
88 © 2011 HealthPoint Medical Group and Practice Partner System
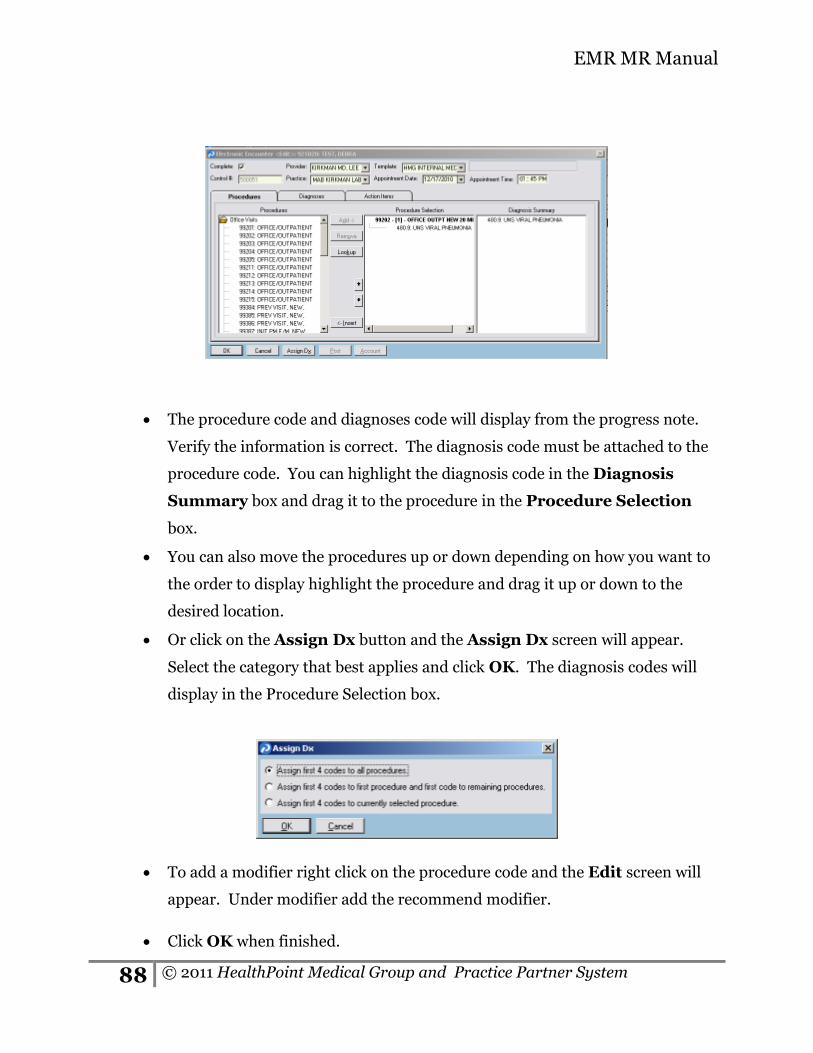
The procedure code and diagnoses code will display from the progress note.
Verify the information is correct. The diagnosis code must be attached to the
procedure code. You can highlight the diagnosis code in the Diagnosis
Summary box and drag it to the procedure in the Procedure Selection
box.
You can also move the procedures up or down depending on how you want to
the order to display highlight the procedure and drag it up or down to the
desired location.
Or click on the Assign Dx button and the Assign Dx screen will appear.
Select the category that best applies and click OK. The diagnosis codes will
display in the Procedure Selection box.
To add a modifier right click on the procedure code and the Edit screen will
appear. Under modifier add the recommend modifier.
Click OK when finished.

EMR MR Manual
89 ©2011 HealthPoint Medical Group and McKesson Practice Partner
NOTE
If the patient is a self paying patient add the modifier SD. The same modifiers that are used in IDX for discounts will be the same modifiers used in Practice Partner. VF modifiers will be used for the Medicaid patients.
When all information has been updated check the Complete box and click
OK, this will generate the charges to be pushed over to Group Management.
NOTE
Medical Receptionist will verify the EEF and check the complete box.
NOTE
When IDX is open and Practice Partner on the same patient it will duplicate charges
in IDX, print a receipt at the end of the appointment to verify charges are correct.
Also when correcting charges in Practice Partner, it will duplicate old charges and
place the new charges in. The MR must remove duplicate charges in IDX.

EMR MR Manual
90 © 2011 HealthPoint Medical Group and Practice Partner System
To add an additional procedure code on the Electronic Encounter Form:
If a procedure such as a flu shots, X-rays, or procedures that are done the same day
which require the same code to be charge out that day, you will need to add the
additional code in the electronic encounter form.
Go to Task on the Menu bar, and then down to Electronic Encounter
Forms.
Highlight the patient’s name and click on the Edit button.
Highlight the procedure code that needs to be entered in a second time and right
click.
Highlight patient’s name

EMR MR Manual
91 ©2011 HealthPoint Medical Group and McKesson Practice Partner
A new screen will appear called <Edit>. Click on the Add New button on the
bottom on the <Edit> screen.
A new screen called <New> will appear. Add the procedure code in the
Procedure Code box. Add the additional modifier in the Modifier box. For
example if a patient came in and had two flu shots A and B. You would add the
code 87804 in the Procedure Code box, and the modifier 59 in the Modifier
box.
Click OK when finished.
Highlight and right click
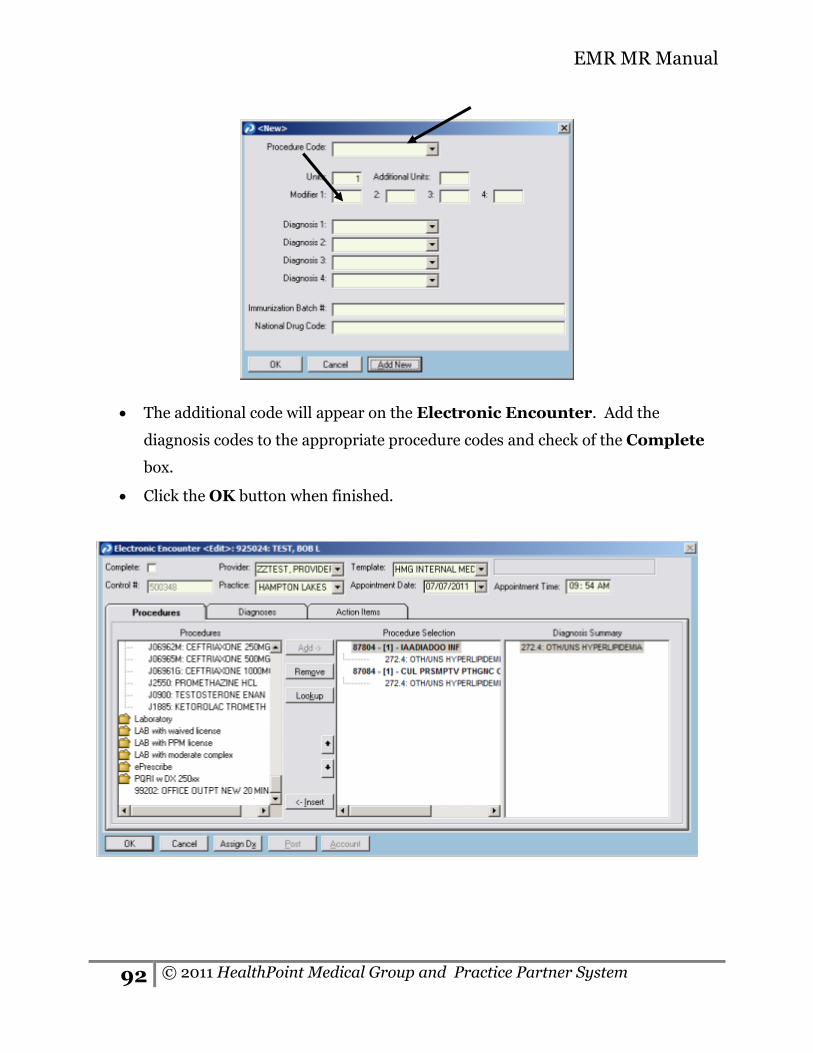
EMR MR Manual
92 © 2011 HealthPoint Medical Group and Practice Partner System
The additional code will appear on the Electronic Encounter. Add the
diagnosis codes to the appropriate procedure codes and check of the Complete
box.
Click the OK button when finished.

EMR MR Manual
93 ©2011 HealthPoint Medical Group and McKesson Practice Partner
NOTE
Procedure codes MUST have a diagnose code attached prior to marking complete.
The diagnosis code must be attached to the procedure code. You can highlight
the diagnosis code in the Diagnosis Summary box and drag it to the
procedure in the Procedure Selection box.
Or click on the Assign Dx button and the Assign Dx screen will appear.
Select the category that best applies and click OK. The diagnosis codes will
display in the Procedure Selection box.
To move a procedure code either up or down highlight the procedure code and
drag it upward or downward until you place it in the desire location.
When all information has been updated check the Complete box and click
OK, this will generate the charges to be pushed over to Group Management.

EMR MR Manual
94 © 2011 HealthPoint Medical Group and Practice Partner System
Lesson Twelve: Past Medical/Social and Family History
The purpose of the chapter is to provide an overview of the Past Medical/Social and
Family History.
Objectives
By the completion of this chapter, you will be able to:
Review the histories tab

EMR MR Manual
95 ©2011 HealthPoint Medical Group and McKesson Practice Partner
Past Medical/ Social and Family history
The patient chart provides three patient history sections:
Past Medical History – Records all the chronic illnesses, hospitalizations,
and other health information for the patient.
Social History – Records medically relevant information about the patient's
life, such as marital status, habits, work, etc.
Family History – Records medically relevant information about the patient’s
family, including major diseases and chronic conditions.
EMR MR Manual
96 © 2011 HealthPoint Medical Group and Practice Partner System
Lesson Thirteen: Hospital Records, Records Request,
and Correspondence.
The purpose of the chapter is to provide an overview of the Hospital Records, Records
Request, and Correspondence tab.
Objectives
By the completion of this chapter, you will be able to:
Review all scanned documents in the Hospital Records, Records Request, and
Correspondence tab.

EMR MR Manual
97 ©2011 HealthPoint Medical Group and McKesson Practice Partner
Hospital Records
The Hospital Records section contains all patient hospitalizations records; this
information will be scanned into the patients chart for viewing.
Click on the Hospital Records tab.
To view records, you can click on the Newer or Older button to locate the
scanned document and click Ok when finished.
Correspondence
Works the same as Hospital Records. Information such as letters will be scanned into
the patient’s chart.
Click on the Correspondence tab and select the scanned correspondence
desired.
To view records, you can click on the Newer or Older button to locate the
scanned document and click Ok when finished.
An attachment will
display in the upper right
corner. Click on
attachment to display
scanned document.

EMR MR Manual
98 © 2011 HealthPoint Medical Group and Practice Partner System
Records Request
Works the same as Hospital Records. Request will be scanned into the patient’s chart for
viewing.
Click on the Records Request tab and select the scanned correspondence
desired.
To view records, you can click on the Newer or Older button to locate the
scanned document and click Ok when finished.

EMR MR Manual
99 ©2011 HealthPoint Medical Group and McKesson Practice Partner
Lesson Fourteen: Letters
The purpose of the chapter is to provide an overview on the use of the letters.
Objectives
By the completion of this chapter, you will be able to:
Create letters from a template

EMR MR Manual
100 © 2011 HealthPoint Medical Group and Practice Partner System
About letters
The Letters section of the patient chart is designed to allow providers to write letters
about their patients. For example, you can write letters to a patient about a lab test or
physical, etc., refer a patient to another provider, send back a consultation report,
respond to an insurance company request, or just write a general letter. Letters written
in Patient Records are stored in the Correspondence tab where they can be reviewed
or edited at a later time.
Letters are a modified version of the progress notes feature, and are part of the other
text-based section of the patient chart. Many of the functions available for the notes
feature work with letters, such as entering and editing text, inserting Dot codes and
images, and using QuickText.
Letter templates can also contain conditional logic that determines which phrases
appear, and can contain page templates that specify how the letter should be printed.
You can control the margins, font, and font sizes to be used. Headers and footers can
also be included.
To create a letter:
Click on the Letter button on the toolbar.
Select the desired template and click Insert, this will display the letter in the
patients chart.

EMR MR Manual
101 ©2011 HealthPoint Medical Group and McKesson Practice Partner
The letter displays the date, time, title which is the letter template name patient
name, and address.
You can modify any part of this letter. Click Print when finished then click OK.
The note will be saved into the patients chart.
To change a letter:
In the patient chart, select Correspondence tab.
Use the Newer and Older buttons to find the letter that you want to change.
Click the Edit button. Make the appropriate changes.
When you finish, click the OK button.
If prompted, type your signature.
Click the Print button to print out the letter.
To print a letter:
Click the Print button.
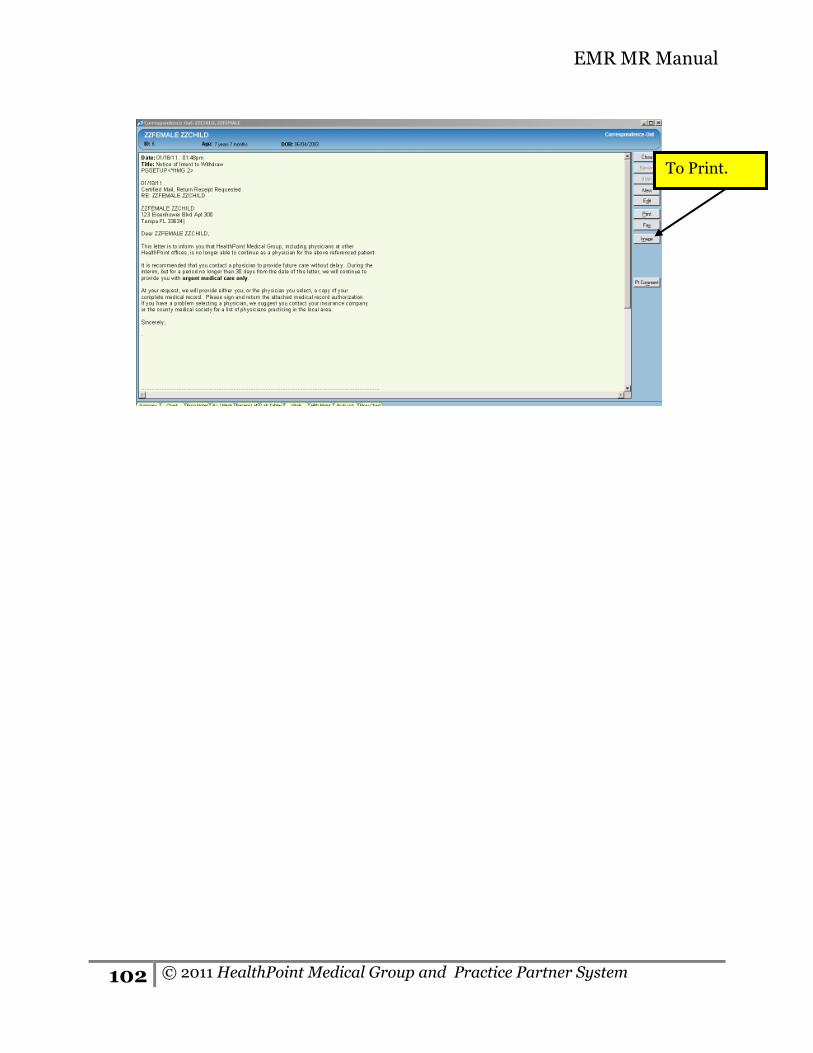
EMR MR Manual
102 © 2011 HealthPoint Medical Group and Practice Partner System
To Print.

EMR MR Manual
103 ©2011 HealthPoint Medical Group and McKesson Practice Partner
Lesson Fifteen: Orders
The purpose of the chapter is to provide an overview on using Orders.
Objectives
By the completion of this chapter, you will be able to:
Navigate the order processing screen

EMR MR Manual
104 © 2011 HealthPoint Medical Group and Practice Partner System
Orders
Orders allow you to create, process, and review laboratory, pathology, diagnostic test,
procedures and referrals. Orders can be issued from the progress note using the Orders
button, or from the Orders tab on the patient chart.
The Orders screen has three different tabs:
Pending - Will display orders that have not been processed.
In Progress - The order has been processed and pending for completion or
result to be entered.
Completed - The results or order has been received and/or completed.
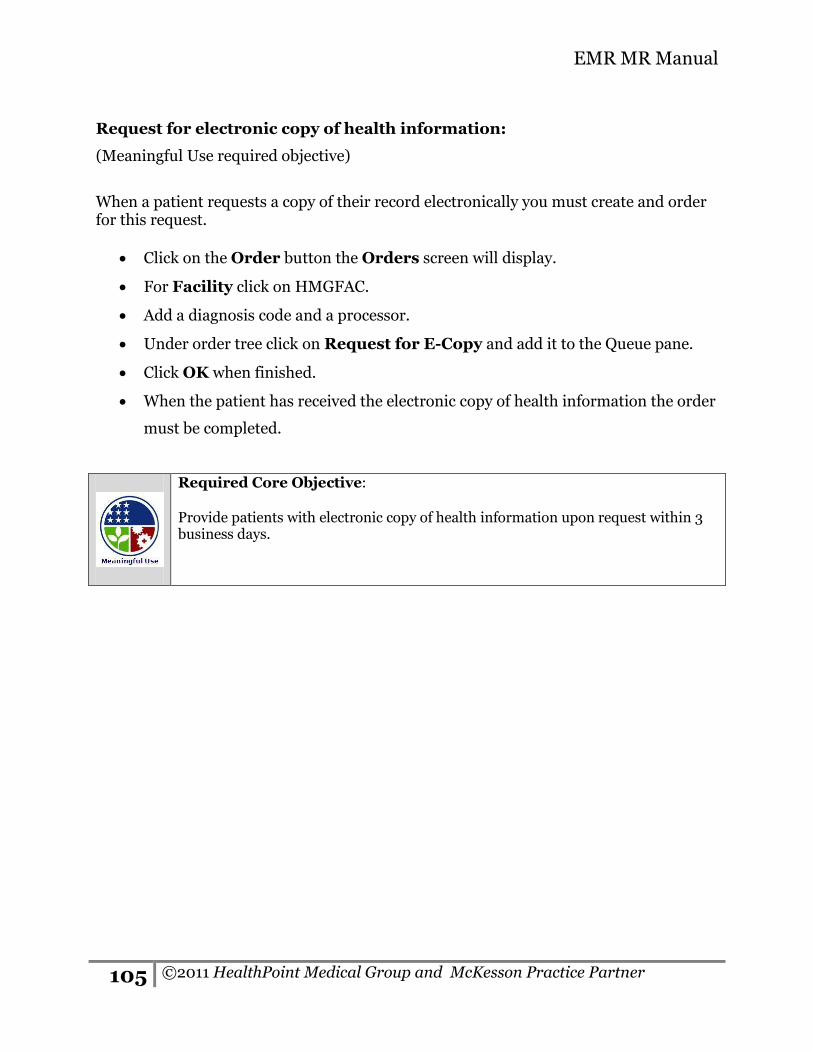
EMR MR Manual
105 ©2011 HealthPoint Medical Group and McKesson Practice Partner
Request for electronic copy of health information:
(Meaningful Use required objective)
When a patient requests a copy of their record electronically you must create and order for this request.
Click on the Order button the Orders screen will display.
For Facility click on HMGFAC.
Add a diagnosis code and a processor.
Under order tree click on Request for E-Copy and add it to the Queue pane.
Click OK when finished.
When the patient has received the electronic copy of health information the order
must be completed.
Required Core Objective: Provide patients with electronic copy of health information upon request within 3 business days.

EMR MR Manual
106 © 2011 HealthPoint Medical Group and Practice Partner System
Lesson Sixteen: Clinical Messaging
The purpose of the chapter is to provide an overview of the Clinical Messaging.
Objectives
By the completion of this chapter, you will be able to:
Understand Clinical Messaging
EMR MR Manual
107 ©2011 HealthPoint Medical Group and McKesson Practice Partner
Clinical Messaging
The Clinical Messaging tab stores the patient clinical messages that were created in
Messages from the dashboard. When the provider receives a message from the
dashboard and wants to record this message for the patient it will display as a note in
the Clinical Messaging tab.
To access the note click on the Clinical Messaging tab.
The note will display, you can view older messages by clicking on the Older
button.
When finished click Ok.

EMR MR Manual
108 © 2011 HealthPoint Medical Group and Practice Partner System
Lesson Seventeen: Flow Chart
The purpose of the chapter is to provide an overview of the Flow Chart.
Objectives
By the completion of this chapter, you will be able to:
Navigate the Flow Chart
Select different flow chart templates
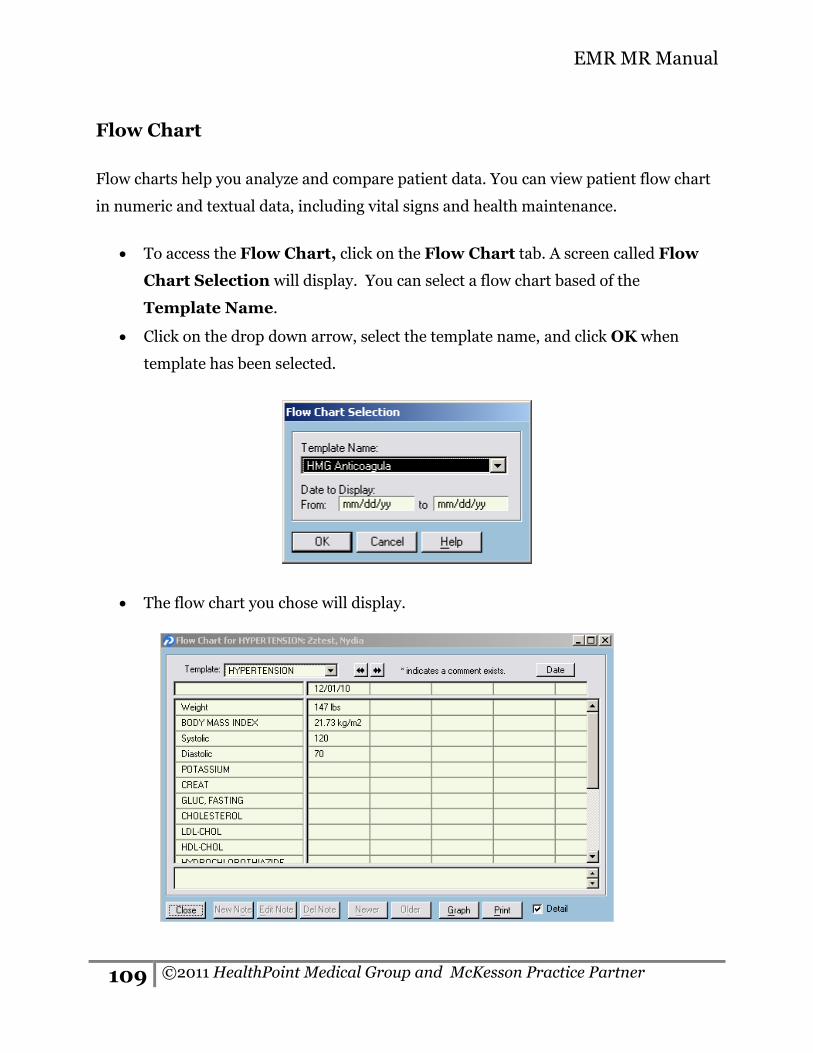
EMR MR Manual
109 ©2011 HealthPoint Medical Group and McKesson Practice Partner
Flow Chart
Flow charts help you analyze and compare patient data. You can view patient flow chart
in numeric and textual data, including vital signs and health maintenance.
To access the Flow Chart, click on the Flow Chart tab. A screen called Flow
Chart Selection will display. You can select a flow chart based of the
Template Name.
Click on the drop down arrow, select the template name, and click OK when
template has been selected.
The flow chart you chose will display.
EMR MR Manual
110 © 2011 HealthPoint Medical Group and Practice Partner System
The Flow Chart contains clinical data elements that originate from several possible
areas:
Interfaces such as the lab interface.
Chart updates containing form components that are programmed to record to
specific health maintenance.
Manual updates to the flow chart during documentation of a progress note.
The Flow Chart’s label goes vertically down the page. The values lie within the grid
and correspond to the values and the date the values were observed.

EMR MR Manual
111 ©2011 HealthPoint Medical Group and McKesson Practice Partner
Lesson Eighteen: Clinical Elements
The purpose of the chapter is to provide an overview of Clinical Elements
Objectives
By the completion of this chapter, you will be able to:
Navigate the Clinical Elements screen
Select different clinical element templates

EMR MR Manual
112 © 2011 HealthPoint Medical Group and Practice Partner System
Clinical Elements
Historically, Practice Partner users had to create custom Laboratory Names as a
workaround for recording custom discrete and non-discrete data. The Clinical
Elements feature provides a way for you to do this without using Laboratory Names,
and with greater power and versatility. For example, you can enter physiological
parameters that don't constitute vital signs, such as left ventricular ejection fraction,
standardized symptom scores, intraocular pressure, etc. A clinical element provides a
convenient and flexible way for you to enter and display this data. You can display and
enter clinical elements using flow charts, you can insert them into notes and letters
using Insert Codes, and you can record them from notes using Dot codes.
To select a template click
the drop down arrow.

EMR MR Manual
113 ©2011 HealthPoint Medical Group and McKesson Practice Partner
To access the Clinical Elements screen:
In the patient chart, click the Clinical Elements tab. The clinical elements
screen will display.
Viewing older and newer clinical elements data:
To view previous clinical elements data, click the Older button. To view more
recent data, click the Newer button.
To display clinical element details (such as clinical element name, the time the
clinical element data was entered and the data entered):
Select the Details check box located on the bottom right of the screen.

EMR MR Manual
114 © 2011 HealthPoint Medical Group and Practice Partner System
Lesson Nineteen: Preventive Health, Outside Records, and care Plan The purpose of the chapter is to provide an overview of Outside Records and Preventive
Health.
Objectives
By the completion of this chapter, you will be able to:
View scanned Outside Records
View scanned Preventive Health records
View scanned Care Plans

EMR MR Manual
115 ©2011 HealthPoint Medical Group and McKesson Practice Partner
Preventive Health
The Preventive Health tab will display scanned documents, this section works the same
as the Hospital Records tab.
To access the Preventive Health Records:
Click on the Preventive Health tab, click on the Newer or Older button to
locate the scanned document and click Ok when finished.
Outside Records
The Outside Records tab works the same as Hospital Records.
To access this section:
Click on the drop down arrow and select Outside Records.
To view records you can click on the Newer or Older button to locate the
scanned document and click Ok when finished.
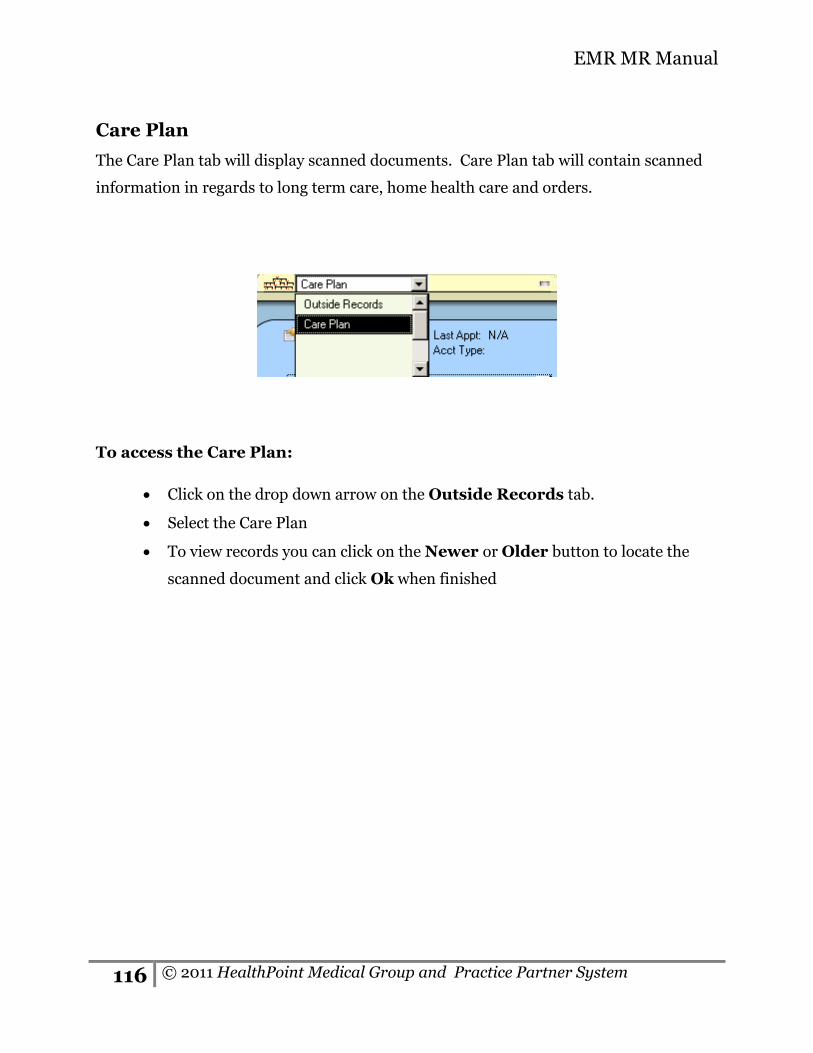
EMR MR Manual
116 © 2011 HealthPoint Medical Group and Practice Partner System
Care Plan
The Care Plan tab will display scanned documents. Care Plan tab will contain scanned
information in regards to long term care, home health care and orders.
To access the Care Plan:
Click on the drop down arrow on the Outside Records tab.
Select the Care Plan
To view records you can click on the Newer or Older button to locate the
scanned document and click Ok when finished

EMR MR Manual
117 ©2011 HealthPoint Medical Group and McKesson Practice Partner
Lesson Twenty: Problem List The purpose of the chapter is to provide an overview of Problem Lists.
Objectives
By the completion of this chapter, you will be able to:
Navigate the Problem List screen

EMR MR Manual
118 © 2011 HealthPoint Medical Group and Practice Partner System
Problem list
The Problem List section of the patient chart constitutes a longitudinal record of the
problems for which the patient has sought or received care. Problems are organized into
the following six categories, each displayed under a separate Tab:
Major Problems – The patient’s major medical problems. This is the "chronic"
problem list for the patient.
Other Problems – This category is intended as a list of problems of secondary
importance, and/or chief complaints for individual patient visits as represented,
for instance, by the "Title" section of Progress Notes.
Procedures – Significant procedures which the patient has undergone.
Diagnoses – This category represents the diagnoses from specific patient visits.
Risks - The conditions that put patients at risk for diseased states and other
adverse health events.
Hospitalizations - The problems for which the patient has been hospitalized.

EMR MR Manual
119 ©2011 HealthPoint Medical Group and McKesson Practice Partner
Lesson Twenty One: Health Maintenance The purpose of the chapter is to give an overview of Health Maintenance.
Objectives
By the completion of this chapter, you will be able to:
Navigate the Health Maintenance screen
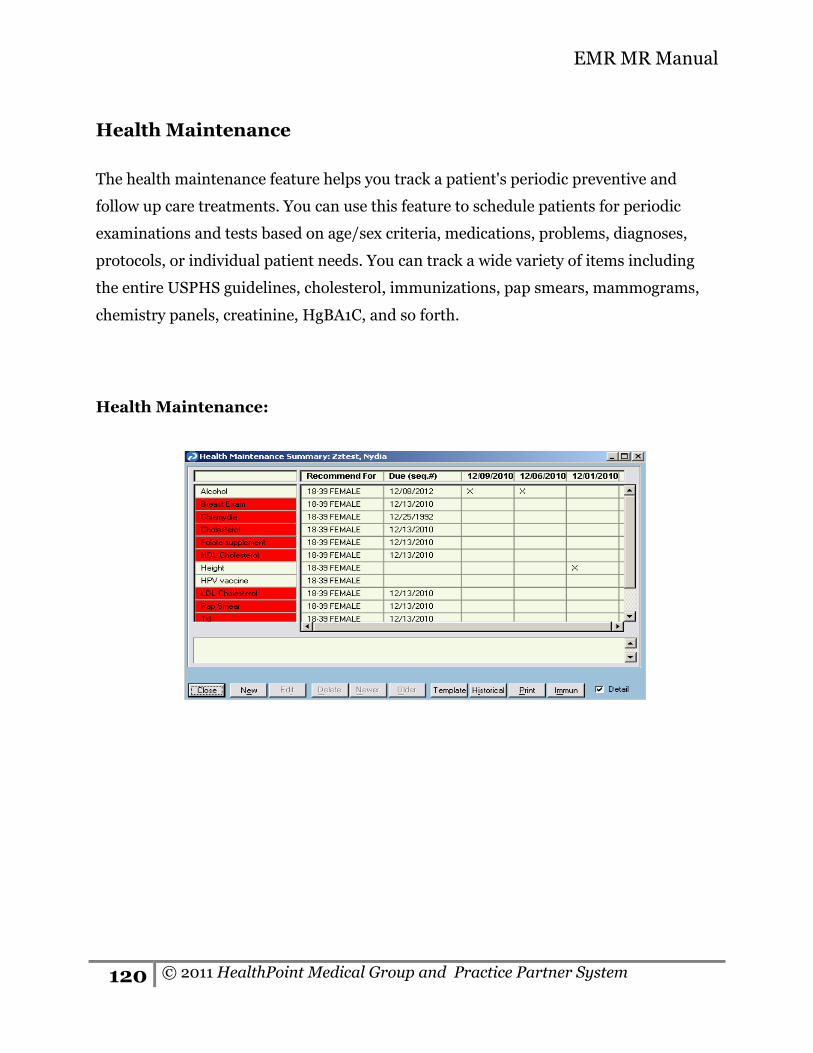
EMR MR Manual
120 © 2011 HealthPoint Medical Group and Practice Partner System
Health Maintenance
The health maintenance feature helps you track a patient's periodic preventive and
follow up care treatments. You can use this feature to schedule patients for periodic
examinations and tests based on age/sex criteria, medications, problems, diagnoses,
protocols, or individual patient needs. You can track a wide variety of items including
the entire USPHS guidelines, cholesterol, immunizations, pap smears, mammograms,
chemistry panels, creatinine, HgBA1C, and so forth.
Health Maintenance:

EMR MR Manual
121 ©2011 HealthPoint Medical Group and McKesson Practice Partner
If a patient has an overdue Health Maintenance a pop up called REMINDER – the
following are overdue for: will occur when opening the patients chart. Click Close
after reviewing the reminder.
To print health maintenance data:
On the Health Maintenance Summary screen, click the Print button. If the
Windows Print screen appears, select the printer and click the OK button.

EMR MR Manual
122 © 2011 HealthPoint Medical Group and Practice Partner System
Lesson Twenty Two: Rx/Medications The purpose of the chapter is to give an overview of Rx/Medications tab.
Objectives
By the completion of this chapter, you will be able to:
Navigate around Rx/Medications

EMR MR Manual
123 ©2011 HealthPoint Medical Group and McKesson Practice Partner
Rx/Medications
Patient Records offers a comprehensive way to record a patient's current, historical,
and ineffective medications on the Patient Chart by using Rx/Medications.
Rx/Medication screen serves many purposes. It allows the user to add, modify, and
delete Allergies and Intolerances. It also allows the users to add a New medication,
Renew a medication, Renew All medication, and Discontinue medications. You can
also view the detail on the medication by clicking on the Detail button. The Action
button will allow you to Print, Edit, Renewal History, view Drug History,
Interactions, Delete and View a prescription. Other button will allow you to put a
Flag, add Note, Print All Rx, and Print Med List.
The Tabs on Rx/Medications
Current tab - Displays the patient’s current medication, including dosage
and frequency.
Ineffective tab - Displays discontinued medications that were ineffective.
Historical tab - Displays discontinued medications that were effective.
Rx Fill History tab - Displays pharmacy prescription fill events that are
downloaded to your system from the patient’s Pharmacy Benefit Manager.
Eligibility tab - Displays pharmacy benefits eligibility data.

EMR MR Manual
124 © 2011 HealthPoint Medical Group and Practice Partner System
Under each tab there is a Status column this column allows you to view the status of
electronic prescription messages that have been sent or attempted to be sent to
pharmacies affiliated with the SureScripts or RxHub network. The list of the possible
status values includes:
Pending – this status is displayed if the prescriber has created a prescription
and clicked the Transmit button but the prescription has not yet been
transmitted to SureScripts.
Transmitted – this status is displayed if the transcription has been sent to
SureScripts but no positive verification has been sent back to the receiver.
Delivered – this status is displayed if the prescription has been sent to
SureScripts, and a confirmation message has been received from the pharmacy.
Error - this status is displayed if the prescription has been sent to SureScripts
and the verification message has been returned with an error code. An error
message will usually be sent to the operator who is set to receive messages for the
sending provider.

EMR MR Manual
125 ©2011 HealthPoint Medical Group and McKesson Practice Partner
Lesson Twenty Three: Allergies and Intolerances The purpose of the chapter is to give an overview of Allergies and Intolerances.
Objectives
By the completion of this chapter, you will be able to:
View the Allergies

EMR MR Manual
126 © 2011 HealthPoint Medical Group and Practice Partner System
Allergies and Intolerances
To add a patient's allergies and intolerances, click the Allergy button from the Rx /
Medications tab. This feature allows you to add, modify, and delete allergies and
intolerances for medications. You can enter an unlimited number of allergies and
intolerances for a patient. When an allergy or intolerance is added, it will be displayed in
the Allergies or Intolerances list at the top of the Rx/Medications screen. Scroll
down or up to see all allergies and intolerances.
Using drug interaction, Patient Records will validate the medication or allergy name
entered. First, the drug name is checked using the drug interaction database. If the entry
is not found there, then the drug name cross-reference file is checked. If the entry is not
found in either, a list displays from which to pick a medication.

EMR MR Manual
127 ©2011 HealthPoint Medical Group and McKesson Practice Partner
Lesson Twenty Four: Vital Signs The purpose of the chapter is to give an overview of Vital Signs
Objectives
By the completion of this chapter, you will be able to:
View Vitals Signs

EMR MR Manual
128 © 2011 HealthPoint Medical Group and Practice Partner System
Vital signs
The Vital Signs section of the patient chart lets you record vital signs data, and pre-
configured data including: height, weight, temperature, pulse, systolic blood pressure,
diastolic blood pressure, OFC, and one other category of vital signs data. Vital signs data
can be viewed in either tabular or graphic form.
This Vital Signs section of the patient chart also allows you to record postural Blood
Pressure and Pulse data in recumbent, sitting, and standing positions. You may enter up
to 3 sets of postural data from the Posturals screen.
EMR MR Manual
129 ©2011 HealthPoint Medical Group and McKesson Practice Partner
Lesson Twenty Five: Laboratory Data The purpose of the chapter is to give an overview of Laboratory Data.
Objectives
By the completion of this chapter, you will be able to:
Navigate the Lab Data screen

EMR MR Manual
130 © 2011 HealthPoint Medical Group and Practice Partner System
Laboratory data
The Laboratory Data section of the patient chart is used to record numeric and textual
laboratory data for the patient. To help you interpret this data, you can display selected
numeric and textual laboratory data items on a patient flow chart or on a laboratory
data table.
There are several ways to enter laboratory data. An interface exists that can handle file
formats provided by most outside labs.

EMR MR Manual
131 ©2011 HealthPoint Medical Group and McKesson Practice Partner
You can view four different types of laboratory data on the Laboratory Data
screen:
Most Recent Lab Data – Provides a convenient display of the most recent
information for each category of laboratory data in the Lab Data Tables. You
may graph the most recent laboratory data but you may not add or edit
laboratory data in this screen.
Lab Data Tables – Lets you add, view, edit, or graph numeric laboratory
data for any laboratory data category.
Microbiology – Lets you view and edit text information about microbiology
data. This will also display Allergies and AFP.
Miscellaneous – Lets you view and edit text information about
miscellaneous laboratory data. Example: Allergy Panels and AFPs
The Microbiology and Miscellaneous categories are for text information and work like
all text-based sections of the patient chart.

EMR MR Manual
132 © 2011 HealthPoint Medical Group and Practice Partner System
Lesson Twenty Six: Lab Table Review The purpose of the chapter is to give an overview of Laboratory Table review.
Objectives
By the completion of this chapter, you will be able to:
Navigate the Lab Table
View progress notes from the Lab Table Review
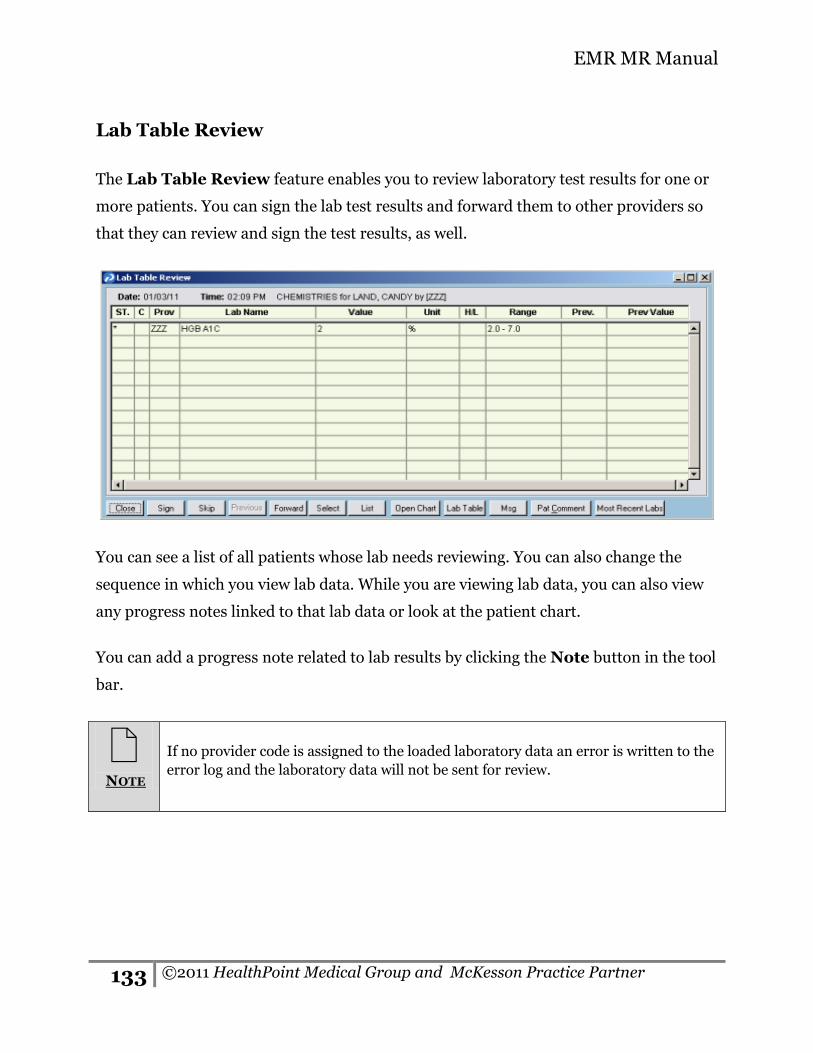
EMR MR Manual
133 ©2011 HealthPoint Medical Group and McKesson Practice Partner
Lab Table Review
The Lab Table Review feature enables you to review laboratory test results for one or
more patients. You can sign the lab test results and forward them to other providers so
that they can review and sign the test results, as well.
You can see a list of all patients whose lab needs reviewing. You can also change the
sequence in which you view lab data. While you are viewing lab data, you can also view
any progress notes linked to that lab data or look at the patient chart.
You can add a progress note related to lab results by clicking the Note button in the tool
bar.
NOTE
If no provider code is assigned to the loaded laboratory data an error is written to the
error log and the laboratory data will not be sent for review.
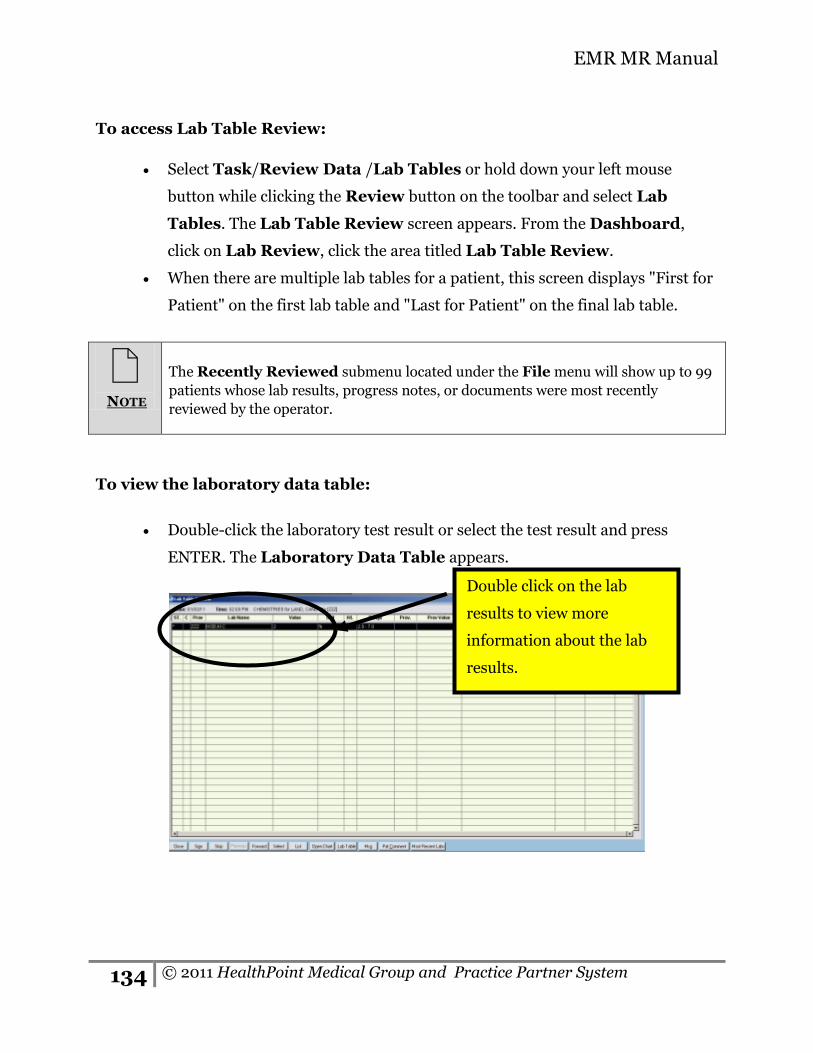
EMR MR Manual
134 © 2011 HealthPoint Medical Group and Practice Partner System
To access Lab Table Review:
Select Task/Review Data /Lab Tables or hold down your left mouse
button while clicking the Review button on the toolbar and select Lab
Tables. The Lab Table Review screen appears. From the Dashboard,
click on Lab Review, click the area titled Lab Table Review.
When there are multiple lab tables for a patient, this screen displays "First for
Patient" on the first lab table and "Last for Patient" on the final lab table.
NOTE
The Recently Reviewed submenu located under the File menu will show up to 99
patients whose lab results, progress notes, or documents were most recently
reviewed by the operator.
To view the laboratory data table:
Double-click the laboratory test result or select the test result and press
ENTER. The Laboratory Data Table appears.
Double click on the lab
results to view more
information about the lab
results.

EMR MR Manual
135 ©2011 HealthPoint Medical Group and McKesson Practice Partner
To view the list of all lab tests to review:
Click the List button. The List for Labs to Review screen appears.
From the table, select the patient whose lab tests you want to review.
Each row displays the date and time of the lab tests, as well as the patient
name and ID. Use the scroll arrows to scroll up or down the list.
NOTE
The list for Labs to Review screen displays critical tests in red. Critical tests are
defined as those with abnormal values.
Click the OK button or double-click the lab. The Lab Table Review screen
displays the lab template that you selected.

EMR MR Manual
136 © 2011 HealthPoint Medical Group and Practice Partner System
Lesson Twenty Seven: Images The purpose of the chapter is to give an overview of the Image tab.
Objectives
By the completion of this chapter, you will be able to:
Navigate the Image tab

EMR MR Manual
137 ©2011 HealthPoint Medical Group and McKesson Practice Partner
Images
The image section is used to create and modify graphic images and graphic image
templates. Images can be added from the progress note or scanned from Zoom.
From the patient’s chart click on the Image tab. To view an image, highlight
the image and click OK.

EMR MR Manual
138 © 2011 HealthPoint Medical Group and Practice Partner System
Lesson Twenty Eight: Radiology, EKG, and Pathology. The purpose of the chapter is to give an overview of the Radiology tab, EKG tab, and
Pathology tab.
Objectives
By the completion of this chapter, you will be able to:
Navigate the tabs
View scanned reports
Understand what type of reports display in each tab

EMR MR Manual
139 ©2011 HealthPoint Medical Group and McKesson Practice Partner
Radiology
The Radiology section will be used to view all scanned radiology documents like MRI,
CT scan, and Stress Test.
To view Radiology reports:
Click on the Radiology tab.
You can view Radiology documents by Problem and Choose From List.
Select the link.
You can also click on Newer or Older button to move from each Radiology
report.
NOTE
The Most Recent option will not display.

EMR MR Manual
140 © 2011 HealthPoint Medical Group and Practice Partner System
EKG
The EKG section will be used to view all scanned EKG reports.
To view EKG reports:
Click on the EKG tab.
You can view EKG reports by Most Recent, By Problem, and Choose
From List.
Select the link.
You can also click on Newer or Older button to move from each EKG
report.
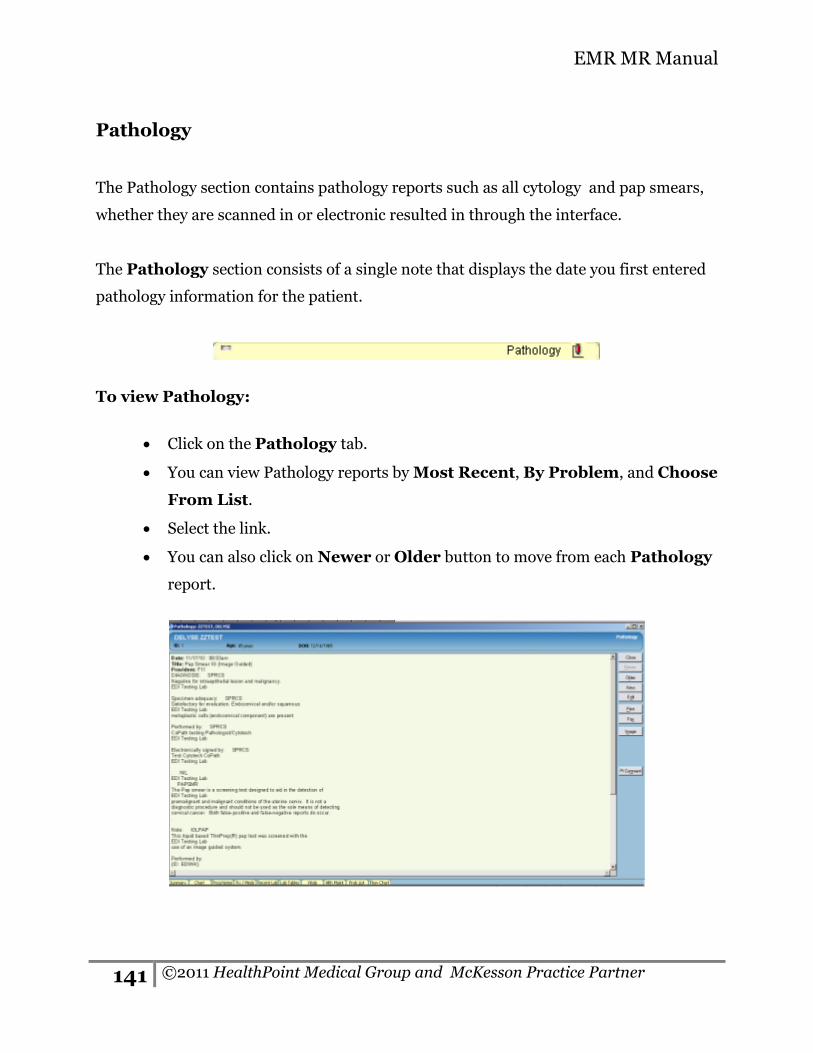
EMR MR Manual
141 ©2011 HealthPoint Medical Group and McKesson Practice Partner
Pathology
The Pathology section contains pathology reports such as all cytology and pap smears,
whether they are scanned in or electronic resulted in through the interface.
The Pathology section consists of a single note that displays the date you first entered
pathology information for the patient.
To view Pathology:
Click on the Pathology tab.
You can view Pathology reports by Most Recent, By Problem, and Choose
From List.
Select the link.
You can also click on Newer or Older button to move from each Pathology
report.

EMR MR Manual
142 © 2011 HealthPoint Medical Group and Practice Partner System
Lesson Twenty Nine: Special Studies, Consults, Advance Directives, and Level II. The purpose of the chapter is to give an overview of Special Studies, Consults, and Level
II tabs.
Objectives
By the completion of this chapter, you will be able to:
Navigate the tabs
View scanned reports
Understand what type of reports display in each tab

EMR MR Manual
143 ©2011 HealthPoint Medical Group and McKesson Practice Partner
Special Studies
The Special Studies section of the patient chart contains reports from any other type of
test or study. For Example: Sleep Studies will display here.
To view Special Studies:
Click on the Special Studies tab.
You can view Pathology reports by Most Recent, By Problem, and Choose
From List.
Select the link.
You can also click on Newer or Older button to move from each Pathology
report.
Consults
The Consults section of the patient chart contains scanned consult reports from other
providers.
To view consults:
Click on the Consult tab.
You can view scanned consults reports by Most Recent, By Problem, and
Choose From List.
Select the link.
You can also click on Newer or Older button to move from each Consult
report.

EMR MR Manual
144 © 2011 HealthPoint Medical Group and Practice Partner System
Advance Directives
The Advance Directives section of the patient chart contains scanned Advance
Directives.
To view Advance Directives:
Click on the Advance Directives tab.
You can view scanned consults reports by Most Recent.
Select the link.
You can also click on Newer or Older button to move from each Advance
Directives.
Level II
The Level II section of the patient chart contains scanned reports which included
Psychiatric and HIV reports.
To view Level II:
Click on the Level II tab.
You can view scanned consults reports by Most Recent, By Problem, and
Choose From List.
Select the link.
You can also click on Newer or Older button to move from each Level II
report.
EMR MR Manual
145 ©2011 HealthPoint Medical Group and McKesson Practice Partner
Lesson Thirty: Prenatal Flow Chart The purpose of the chapter is to understand how to navigate around the Prenatal tab.
Objectives
By the completion of this chapter, you will be able to:
Understand how to navigate the prenatal tab
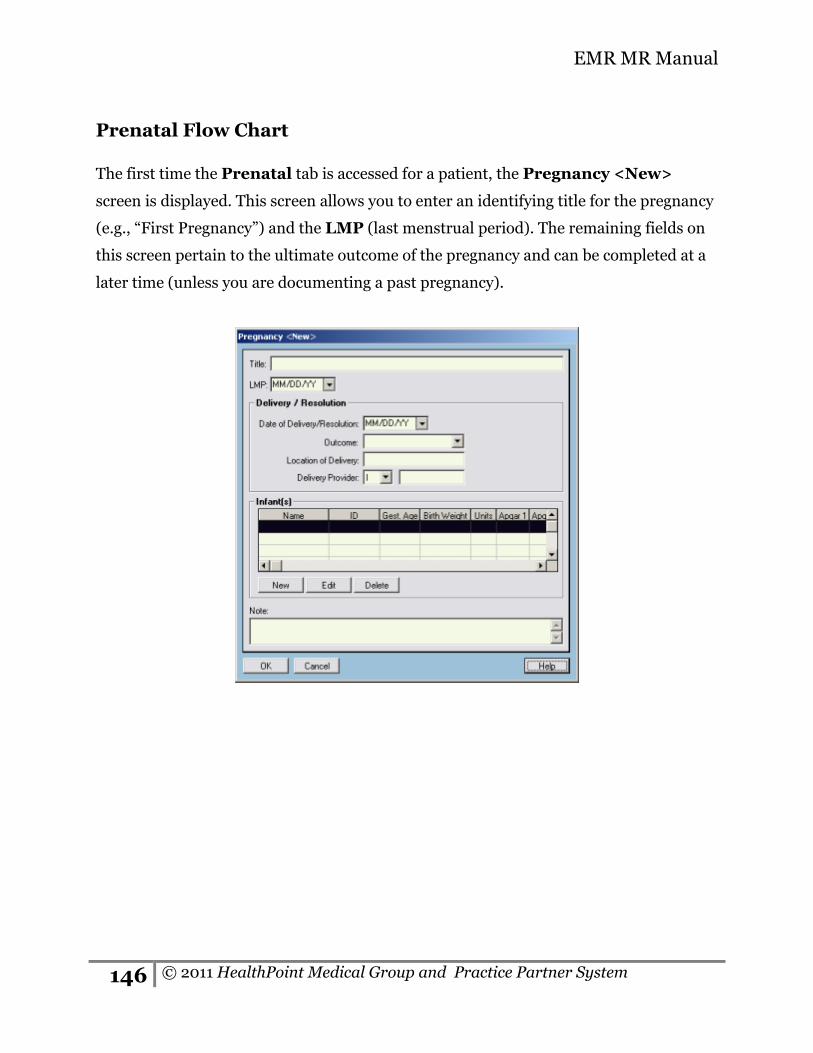
EMR MR Manual
146 © 2011 HealthPoint Medical Group and Practice Partner System
Prenatal Flow Chart
The first time the Prenatal tab is accessed for a patient, the Pregnancy <New>
screen is displayed. This screen allows you to enter an identifying title for the pregnancy
(e.g., “First Pregnancy”) and the LMP (last menstrual period). The remaining fields on
this screen pertain to the ultimate outcome of the pregnancy and can be completed at a
later time (unless you are documenting a past pregnancy).

EMR MR Manual
147 ©2011 HealthPoint Medical Group and McKesson Practice Partner
The Prenatal Visit Flow Chart screen is displayed. For the remainder of the
pregnancy, when you open the Prenatal section of the chart for the patient, the
Prenatal Visit Flow Chart screen will be displayed.
NOTE
The Prenatal Visit Flow Chart will display only data from the prenatal flow chart
template with the exact title “Prenatal Visit”. This screen will display current
Allergies, Medications and pregnancy related Problems. The columns display
information based off the prenatal visit template.

EMR MR Manual
148 © 2011 HealthPoint Medical Group and Practice Partner System
Lesson Thirty One: Patient Message The purpose of the chapter is view Patient Messages
Objectives
By the completion of this chapter, you will be able to:
Understand Patient Messages
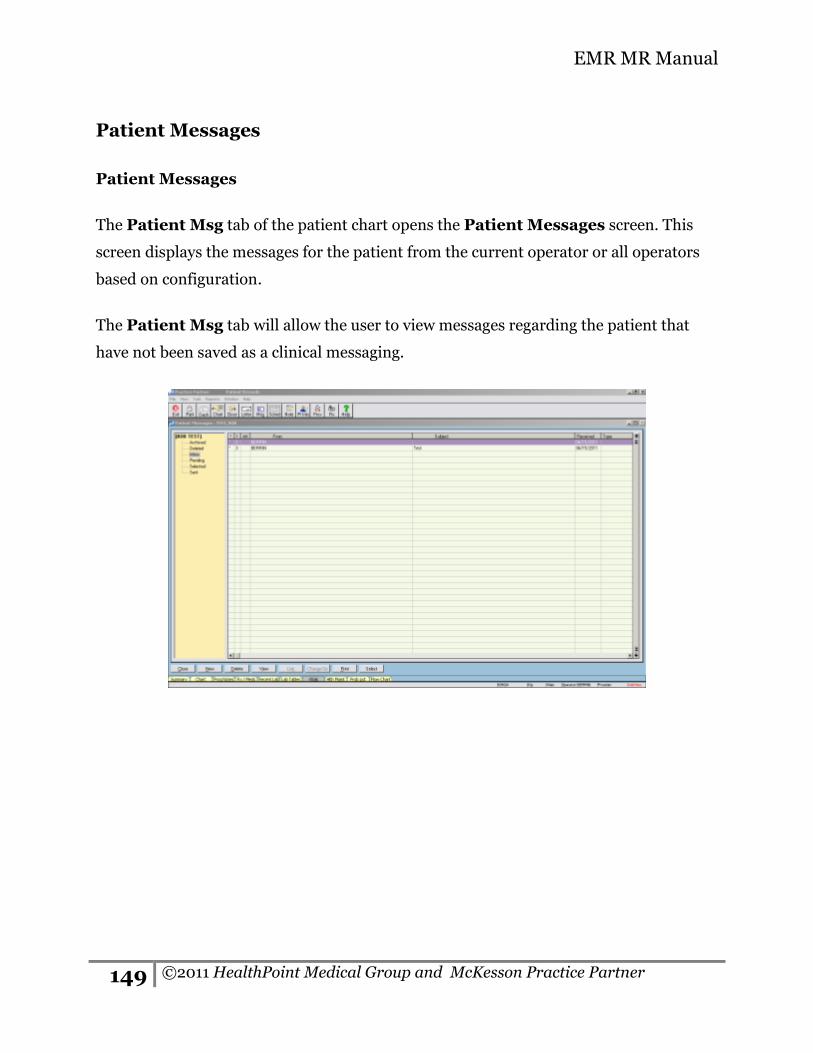
EMR MR Manual
149 ©2011 HealthPoint Medical Group and McKesson Practice Partner
Patient Messages
Patient Messages
The Patient Msg tab of the patient chart opens the Patient Messages screen. This
screen displays the messages for the patient from the current operator or all operators
based on configuration.
The Patient Msg tab will allow the user to view messages regarding the patient that
have not been saved as a clinical messaging.

EMR MR Manual
150 © 2011 HealthPoint Medical Group and Practice Partner System
Lesson Thirty Two: Reports The purpose of the chapter is to understand how to print the various reports in Practice
Partner.
Objectives
By the completion of this chapter, you will be able to:
Understand how to print various types of reports.

EMR MR Manual
151 ©2011 HealthPoint Medical Group and McKesson Practice Partner
Print Clinical Summary Report
(Meaningful Use required field)
You can use the Patient Clinical Summary report to provide clinical summaries to
your patients' for their office visits. The report includes a summary of the patient's chart
information. This report is required through Meaningful Use.
Before generating the Patient Clinical Summary report the system will see if a matching
clinical encounter has been created for the patient. If a matching clinical encounter is
found (i.e., the patient is the same, the clinical encounter date is the current date, or the
encounter is for an "Office Visit") the encounter will be marked as "Printed Clinical
Summary Provided". If no matching encounter is found, you will be given the option to
create one before printing the report. The clinical encounter will be created for the
selected patient with the type "Office Visit".
Required Core Objective: Provide clinical summaries for patients for each office visit within 3 business days.
To Print Clinical Summary Report:
From the patient’s chart go to Reports on the Menu bar
Locate the Patient Records section and then click Print Clinical Summary
Report.
A screen called Patient Clinical Summary Report will open
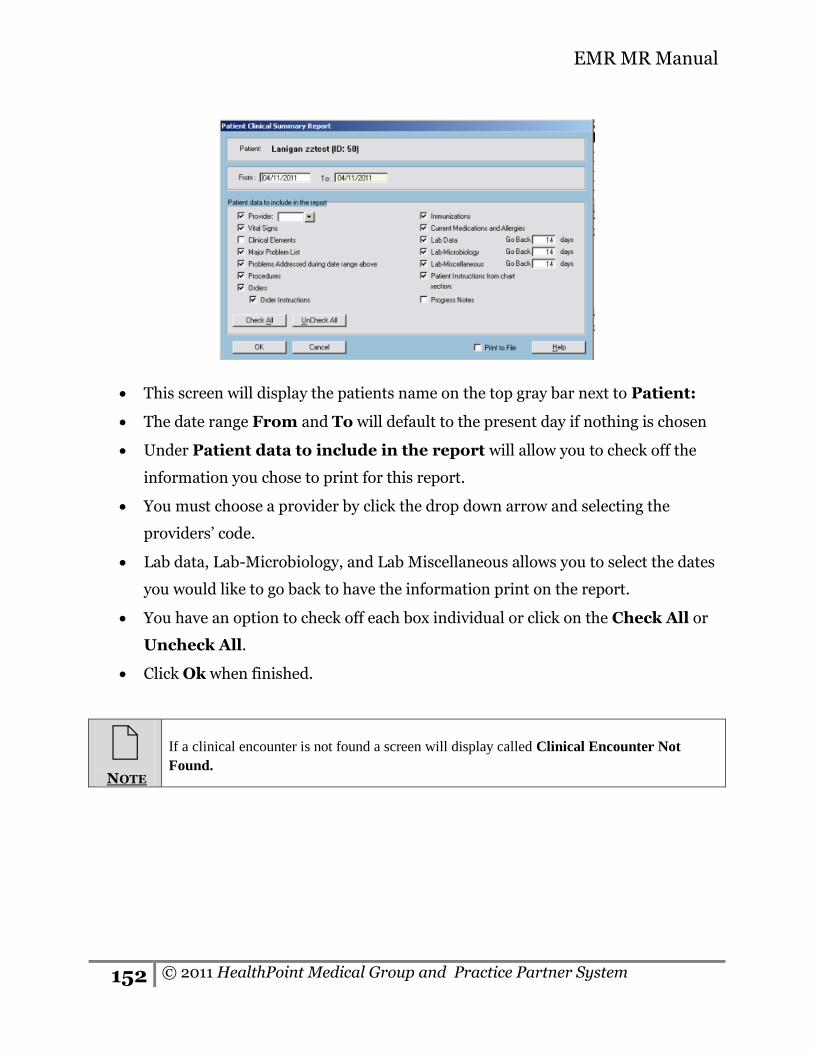
EMR MR Manual
152 © 2011 HealthPoint Medical Group and Practice Partner System
This screen will display the patients name on the top gray bar next to Patient:
The date range From and To will default to the present day if nothing is chosen
Under Patient data to include in the report will allow you to check off the
information you chose to print for this report.
You must choose a provider by click the drop down arrow and selecting the
providers’ code.
Lab data, Lab-Microbiology, and Lab Miscellaneous allows you to select the dates
you would like to go back to have the information print on the report.
You have an option to check off each box individual or click on the Check All or
Uncheck All.
Click Ok when finished.
NOTE
If a clinical encounter is not found a screen will display called Clinical Encounter Not
Found.

EMR MR Manual
153 ©2011 HealthPoint Medical Group and McKesson Practice Partner
This screen will allow you to create the clinical encounter for the patient. Click
Yes on the radio button and it will generate the clinical encounter.
Click OK and the print box will display to print the report.
Print Chart Summary
To Print Chart Summary Report:
Go to Reports on the Menu bar.
Locate the Patient Records section and then click on Print Chart Summary
Report.
The Print Chart Summary screen will appear.
Select the Single Patient radio button and click OK, or

EMR MR Manual
154 © 2011 HealthPoint Medical Group and Practice Partner System
Scheduled Patients: The Chart Selection screen appears. Enter the criteria,
including scheduled provider and scheduled dates. When you finish entering your
criteria, click the OK button.
Patients Last Seen on Specified Dates: The Chart Selection screen
appears. Enter the criteria, including scheduled provider and scheduled dates.
When you finish entering your criteria, click the OK button.
All Patients Belonging to a Usual Provider: The Chart Selection screen
appears. Enter the scheduled provider, then click the OK button.
All Patients
Patients in Patient Inquiry List: The Patient Inquiry File screen appears.
Enter (or browse to) the appropriate Patient Inquiry file, with an .inq extension.
Then click the OK button.
The Patient Lookup screen. Locate the patient you want to print the report.
NOTE
If a clinical encounter is not found a screen will display called Clinical Encounter
Not Found.
This screen will allow you to create the clinical encounter for the patient. Click
Yes on the radio button and it will generate the clinical encounter.
A screen will display asking to “Print any images associated with notes” if there is
images click Yes if there is no images click No.

EMR MR Manual
155 ©2011 HealthPoint Medical Group and McKesson Practice Partner
Click OK and the print box will display to print the report.
Print Partial Chart
To Print Partial Chart:
Go to Reports on the Menu bar.
Locate the Patient Records section and then click Print Partial Chart.
The Print Partial Chart screen will appear.
Select the Single Patient radio button and click OK or,
Scheduled Patients: The Chart Selection screen appears. Enter the criteria,
including scheduled provider and scheduled dates. When you finish entering your
criteria, click the OK button. The Select Partial Chart screen appears.
Patients Last Seen on Specified Dates: The Chart Selection screen appears.
Enter the criteria, including scheduled provider and scheduled dates. When you
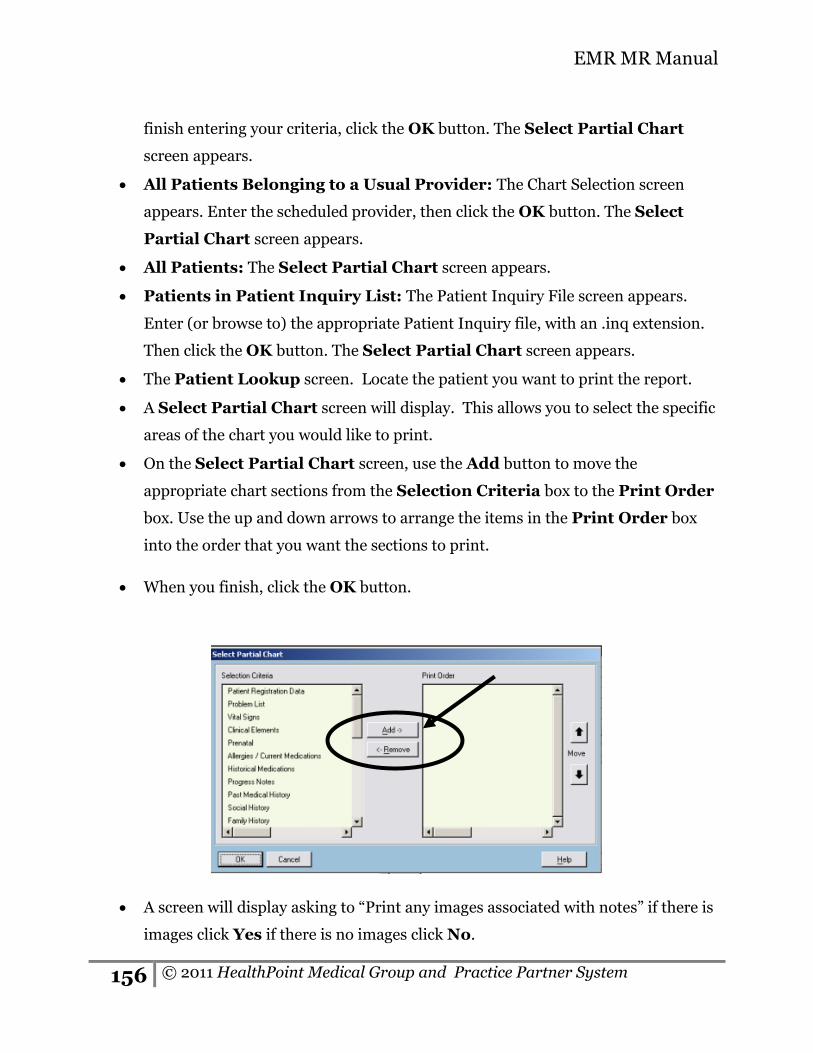
EMR MR Manual
156 © 2011 HealthPoint Medical Group and Practice Partner System
finish entering your criteria, click the OK button. The Select Partial Chart
screen appears.
All Patients Belonging to a Usual Provider: The Chart Selection screen
appears. Enter the scheduled provider, then click the OK button. The Select
Partial Chart screen appears.
All Patients: The Select Partial Chart screen appears.
Patients in Patient Inquiry List: The Patient Inquiry File screen appears.
Enter (or browse to) the appropriate Patient Inquiry file, with an .inq extension.
Then click the OK button. The Select Partial Chart screen appears.
The Patient Lookup screen. Locate the patient you want to print the report.
A Select Partial Chart screen will display. This allows you to select the specific
areas of the chart you would like to print.
On the Select Partial Chart screen, use the Add button to move the
appropriate chart sections from the Selection Criteria box to the Print Order
box. Use the up and down arrows to arrange the items in the Print Order box
into the order that you want the sections to print.
When you finish, click the OK button.
A screen will display asking to “Print any images associated with notes” if there is
images click Yes if there is no images click No.

EMR MR Manual
157 ©2011 HealthPoint Medical Group and McKesson Practice Partner
Click OK and the print box will display to print the report.

EMR MR Manual
158 © 2011 HealthPoint Medical Group and Practice Partner System
Lesson Thirty Three: Meaningful Use The purpose of the chapter is to understand the objective required for Meaningful Use
Objectives
By the completion of this chapter, you will be able to:
Understand the requirements for Meaningful Use

EMR MR Manual
159 ©2011 HealthPoint Medical Group and McKesson Practice Partner
What is "Meaningful Use"?
The American Recovery and Reinvestment Act of 2009 specify three main components
of Meaningful Use:
The use of a certified EHR in a meaningful manner, such as e-prescribing.
The use of certified EHR technology for electronic exchange of health
information to improve quality of health care.
The use of certified EHR technology to submit clinical quality and other
measures.
Simply put, "meaningful use" means providers need to show they’re using certified EHR
technology in ways that can be measured significantly in quality and in quantity.
Required core Objectives:
Core Set Objective Measure
1. Use CPOE for medication orders directly entered by any
licensed healthcare professional who can enter orders into
the medical record per state, local, professional guidelines.
>30% of patients seen with at least one
medication in their medication list has at least
one medication order entered using CPOE
2. Implement drug-drug and drug-allergy interaction
checks.
Functionality has been enabled for the entire
reporting period
3. Generate and transmit permissible prescriptions
electronically (eRx).
>40% of all permissible prescriptions are
transmitted electronically
4. Record all of the following demographics: preferred
language, gender, race, ethnicity, DOB.
>50% of patients seen have demographics
recorded as structured data
5. Maintain an up-to-date problem list of current and active
diagnoses.
>80% of patients seen have at least one entry
or indication that no problems are known

EMR MR Manual
160 © 2011 HealthPoint Medical Group and Practice Partner System
6. Maintain active medication list. >80% of patients seen have at least one entry
or indication that no meds currently prescribed
7. Maintain active allergy list. >80% of patients seen have at least one entry
or indication that no medication allergies are
known
8. Record and chart changes in vital signs:
Height/weight/BP; Calculate and display BMI for ages >2
years; Plot and display growth charts for children 2-20 years,
including BMI.
Height/weight/BP recorded for >50% of
patients seen (age 2 and over)
9. Record smoking status for patients 13 years and older. >50% of patients seen (13 years or older) have
smoking status recorded
10. Implement one clinical decision support rule relevant to
specialty/high clinical priority with ability to track
compliance.
Implement one clinical decision support rule
11. Report ambulatory quality measures to CMS or the States For 2011 provide aggregate numerator, denominator, and exclusions through attestation as discussed the final rule.
12. Provide patients with electronic copy of health
information upon request.
>50% of patients who request an electronic
copy are provided it within 3 business days
13. Provide clinical summaries for patients for each office
visit.
Clinical summary provided to patients for
>50% of all office visits within 3 business days
14. Capability to exchange key clinical information among
care providers/patient authorized entities electronically.
Performed at least one test of EMR’s capability
to electronically exchange key clinical
information
15. Protect electronic health information
created/maintained by EMR via appropriate technical
capabilities.
Conduct/review security risk analysis,
implement security updates, correct
deficiencies