Employer Help Screens - ExpertPay – Pay Child Support …€¦ · · 2017-08-01HOW TO ACCESS...
39
ExpertPay New Employer Manual 7-21-17Page 1 of 39 ExpertPay Employer Online Help Manual
Transcript of Employer Help Screens - ExpertPay – Pay Child Support …€¦ · · 2017-08-01HOW TO ACCESS...

ExpertPay New Employer Manual 7-21-17Page 1 of 39
ExpertPay Employer
Online Help Manual

ExpertPay New Employer Manual 7-21-17Page 2 of 39
TABLE OF CONTENTS
INTRODUCTION TO EMPLOYER'S ONLINE HELP ................................................................... 4
SYSTEM OVERVIEW ............................................................................................................................. 4 DEFINITIONS ........................................................................................................................................ 5
EXPLORING THE SYSTEM .............................................................................................................. 5 SCREEN FORMAT ................................................................................................................................. 5 HOW TO ACCESS EXPERTPAY FUNCTIONS ............................................................................................ 6
GETTING STARTED........................................................................................................................... 6 HOW TO GET STARTED ......................................................................................................................... 6 REGISTER ............................................................................................................................................ 7
How to Register ............................................................................................................................. 7 LOGIN .................................................................................................................................................. 11
HOW TO LOGIN .................................................................................................................................. 11 FORGET YOUR PASSWORD? ................................................................................................................ 12
CHANGE PASSWORD ...................................................................................................................... 13 HOW TO CHANGE YOUR PASSWORD ................................................................................................... 13
LOG OUT ............................................................................................................................................ 13 HOW TO LOG OUT OF EXPERTPAY ..................................................................................................... 13
USING THE SYSTEM: ...................................................................................................................... 14 PAYMENT CENTER ........................................................................................................................ 14
HOW TO ACCESS THE PAYMENT CENTER SCREEN ............................................................................... 14 STATUS DEFINITIONS ......................................................................................................................... 14
BANK ACCOUNT: ............................................................................................................................. 15 ADD NEW BANK ACCOUNT .......................................................................................................... 15
HOW TO CREATE A BANK ACCOUNT ................................................................................................... 16 EDIT BANK ACCOUNT .................................................................................................................... 17
HOW TO EDIT A BANK ACCOUNT ........................................................................................................ 17 DELETE BANK ACCOUNT ............................................................................................................. 17
HOW TO DELETE A BANK ACCOUNT ................................................................................................... 17 BANK ACCOUNT VERIFICATION: .............................................................................................. 18 PAYMENT GROUPS: ........................................................................................................................ 19 PAYMENT GROUP OVERVIEW .................................................................................................... 19 ADD A PAYMENT GROUP .............................................................................................................. 19
HOW TO MANUALLY CREATE A PAYMENT GROUP ............................................................................. 20 EDIT PAYMENT GROUP ................................................................................................................. 21
HOW TO EDIT A PAYMENT GROUP ..................................................................................................... 21 DELETE PAYMENT GROUP .......................................................................................................... 21
HOW TO DELETE A PAYMENT GROUP ................................................................................................ 21 ADD EMPLOYEE CASE TO A PAYMENT GROUP .................................................................... 22
HOW TO ADD AN EMPLOYEE CASE TO A PAYMENT GROUP ................................................................ 22 EDIT EMPLOYEE CASE IN A PAYMENT GROUP .................................................................... 23
HOW TO EDIT AN EMPLOYEE CASE ..................................................................................................... 23 DELETE EMPLOYEE CASE FROM A PAYMENT GROUP ...................................................... 23
HOW TO DELETE EMPLOYEE CASE FROM A PAYMENT GROUP ............................................................ 23 CREATING PROFILES WITH AN UPLOAD ................................................................................ 24 PROFILE UPLOAD OVERVIEW .................................................................................................... 24
HOW TO IMPORT A PAYMENT GROUP FILE: ........................................................................................ 24 FORMATTING THE PAYMENT GROUP FILES ....................................................................................... 25
REPORTS ............................................................................................................................................ 31 HOW TO GENERATE A PAYMENT TRANSACTION REPORT .................................................................... 31 HOW TO GENERATE AN EMPLOYEE TRANSACTION REPORT ................................................................ 31
MANAGE USERS ............................................................................................................................... 31 HOW TO ADD A USER ......................................................................................................................... 32 HOW TO DELETE A USER .................................................................................................................... 32 HOW TO EDIT A USER ......................................................................................................................... 32
PAYMENT CENTER: ........................................................................................................................ 33 PREPARE A PAYMENT USING A PAYMENT GROUP ............................................................. 33
HOW TO PREPARE A PAYMENT USING A PAYMENT GROUP .................................................................. 33

ExpertPay New Employer Manual 7-21-17Page 3 of 39
SETUP RECURRING (RAW) PAYMENT ..................................................................................... 35 HOW TO PREPARE A RECURRING PAYMENT ........................................................................................ 35
EDIT A RECURRING PAYMENT ................................................................................................... 36 HOW TO EDIT THE CURRENT PAYMENT IN A RECURRING SERIES ........................................................ 36 HOW TO EDIT ALL PAYMENTS IN A RECURRING SERIES ...................................................................... 37
CANCEL A RECURRING PAYMENT ............................................................................................ 38 HOW TO CANCEL THE CURRENT PAYMENT OR ALL PAYMENTS IN A RECURRING SERIES .................... 38
SUBMIT, VIEW, EDIT, OR CANCEL A PAYMENT .................................................................... 39 HOW TO SUBMIT, VIEW, EDIT, OR CANCEL A PAYMENT ...................................................................... 39
ExpertPay New Employer Manual 7-21-17Page 4 of 39
Introduction to Employer's Online Help
Welcome to the Employers’ Online Help for ExpertPay. ExpertPay provides useful functions, maintains employer data, and facilitates the federally mandated payment of child support payments withheld from employees. ExpertPay allows you (the employer) to ...
Submit child support payments that you withhold from your employees’ paychecks via the Internet.
Save and maintain employee payment information for quick transactions.
Add users to the employer's ExpertPay account - which allows other employees on your payroll/human resources team to use ExpertPay. In addition, each user's access may be limited or unlimited, depending on how the user's security level is set up.
System Overview
ExpertPay allows the employer to make payments to the state disbursement unit via the Internet. To make it easier to submit payments each pay period, ExpertPay uses a system of payroll lists, called Payment Groups. These are simply lists that you will create and name for different categories of employees. For example, if you have a weekly payroll, you may create a profile named “Weekly Payroll” on the web site and enter the payment information about each weekly employee for whom you are withholding. This profile is then used each week to create the actual payment submission. As long as the profile does not change, you simply enter the new withholding and effective dates and your payment is on its way. You can also make one time changes to a payment as required without affecting the profile. You can create as many separate Payment Groups as you need. You will probably need a weekly and a monthly profile, for example. If you have more than one facility in the state, you can create separate profiles for each facility, and if you registered more than one bank account, you can use different bank accounts for different profiles.

ExpertPay New Employer Manual 7-21-17Page 5 of 39
Definitions
Withholding Date
The date on which the money was deducted from the employees’ wages or salary. Same as payday, usually.
Effective Date
The date on which the Withholding funds will be debited from the employer account. The credit to the SDU will then be sent to the SDU 2-3 business days after the Debit Effective date. A payment must be submitted at least one business day before the Effective Date but may be changed by the employer to a date up to 30 days in the future if desired.
FIPS Code
A standard code number for identifying counties in each state. A table is provided on the web site if you need to look up the county FIPS code for an employee’s case. Many states have a State FIPS and therefore the individual counties will not be listed.
SDU
State disbursement unit - the state organization responsible for receiving and disbursing child support payments.
Primary User
The person who originally registered your company on ExpertPay. The primary user has all privileges on the site, and can create other users within the company who may have the same or fewer privileges on ExpertPay, except that only the Primary User can create other users. To change a Primary User, the employer must contact ExpertPay customer service.
PIN
Personal identification number - employees may have a PIN assigned to their case in addition to a case ID. However, in the Wage Attachment Order, if the posting information references PIN, then that is what is entered for State Identification Number
Withholding Amount
The money deducted from an employee’s wages or salary for court ordered child support.
Payment Group
A permanent list that you create to store payment information for a group of your employees who are subject to withholding orders.
Exploring the System
Screen Format
ExpertPay is best viewed when your Internet browser window is maximized so that all parts of the screen can be seen. If the window is not maximized, click on the maximize button, which is the middle of the three buttons in the upper right hand corner of the Internet browser application window. The standard ExpertPay window contains normal Internet browser features such as the menu bar, toolbar, and the location text box.
The Menu bar is located on the top of the screen. It lists all of the ExpertPay functions that can be accessed once a user is signed in

ExpertPay New Employer Manual 7-21-17Page 6 of 39
The links are listed at the bottom of the screen. These are available to ALL users that navigate to the website with or without registration. Clicking on one the links will transfer control to one of the functions listed, such as Privacy Statement, Legal Notices and Terms of Use, Online Security, Help, Fees, and Contact Us The Work Area is located in the center of the screen. This is where the processing information is entered and displayed.
How to access ExpertPay functions
Clicking on any one of the Menu bar functions will cause the appropriate function screen to be displayed.
Getting Started
In order to use ExpertPay you will need to set-up your user id, your bank account, and Payment Groups. Directions on how to complete these steps appear in the rest of the ExpertPay Help.
How to get started
1. Register to use ExpertPay, and create a user id. 2. Receive a system generated password via email upon completing the registration
process. 3. Sign-in with your user id and password. It is recommended you copy and paste your
password into the password field. 4. Change system generated password to a personal password. 5. Create a bank account. See topic under Bank Accounts. 6. Verify bank account. See topic under Bank Accounts 7. Create a Payment Group. See topic under Payment Groups. 8. Add employee case(s) to a Payment Group. See topic under Payment Groups. 9. Prepare a payment using a payment group. See topic under Payment Center. 10. Submit a payment. See topic under Payment Center.
ExpertPay New Employer Manual 7-21-17Page 7 of 39
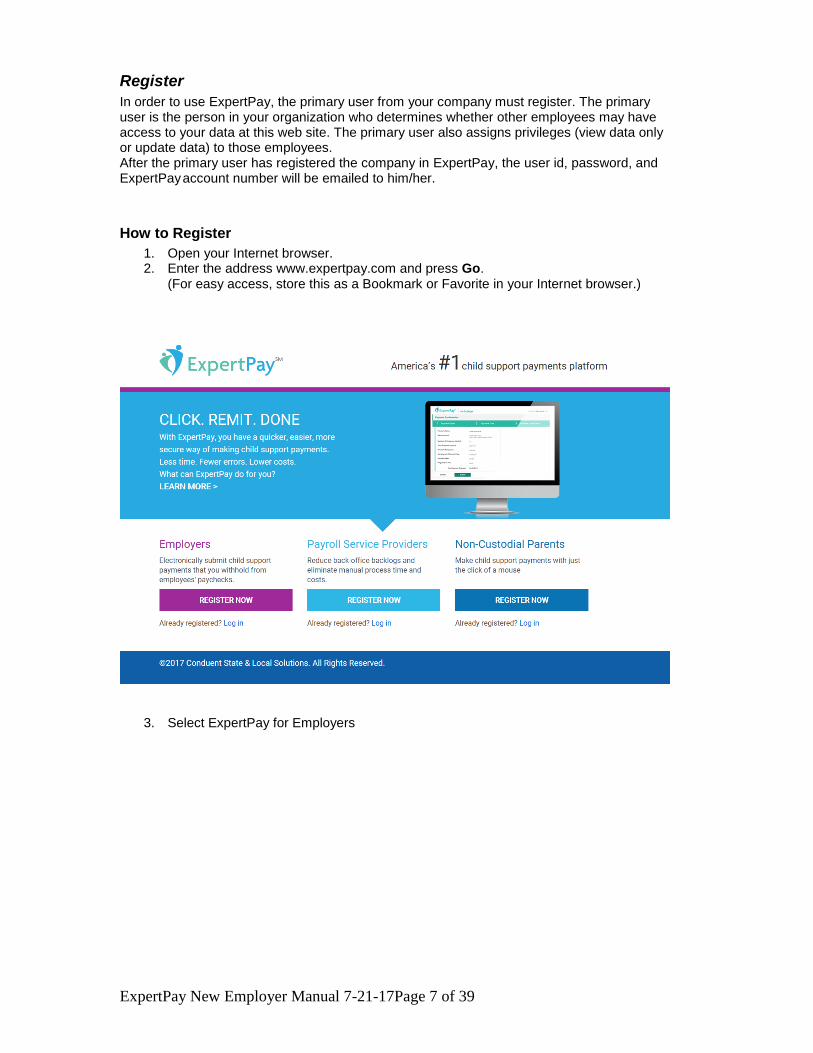
Register
In order to use ExpertPay, the primary user from your company must register. The primary user is the person in your organization who determines whether other employees may have access to your data at this web site. The primary user also assigns privileges (view data only or update data) to those employees. After the primary user has registered the company in ExpertPay, the user id, password, and ExpertPay account number will be emailed to him/her.
How to Register
1. Open your Internet browser. 2. Enter the address www.expertpay.com and press Go.
(For easy access, store this as a Bookmark or Favorite in your Internet browser.)
3. Select ExpertPay for Employers

ExpertPay New Employer Manual 7-21-17Page 8 of 39
4. Click on Register Now or New users register by clicking here.

ExpertPay New Employer Manual 7-21-17Page 9 of 39
5. Enter the following employer information. a. FEIN (nine digit federal employee ID number - no alpha characters) b. Employer name c. Address d. City e. State f. Zip code g. Click Save and Continue
6. Enter the following primary user information. a. Primary user name (first and last name) b. Phone number c. User id (at least six characters) d. Email address e. Click Save and Continue

ExpertPay New Employer Manual 7-21-17Page 10 of 39
7. Verify that the information entered is correct.
. If the information is not correct, click Back and update the information.
8. Review the Terms and Conditions.
a. Check the Box, I have read and accept the Terms of Service*
b. Click Agree and Submit, your password will be sent to you via email.

ExpertPay New Employer Manual 7-21-17Page 11 of 39
LogIn
Each time you access ExpertPay, you will need to login.
How to login
1. Open your Internet browser. 2. Enter the address www.expertpay.com and press Go.
(For easy access, store this as a Bookmark or Favorite in your Internet browser.)
3. Type in your user ID and password. (The userID is created upon registration, the password is system generated and emailed to registered email account.) It is recommended you copy and paste your password into the password field. (All passwords are of the following format: 7 letters upper and lower case and 1 numeric and 1 special character (total of 9 characters). All passwords are case sensitive.If you don't have your user ID and Password, contact ExpertPay customer service.
4. Click Login

ExpertPay New Employer Manual 7-21-17Page 12 of 39
Forget your password?
1. Click on the Forgot your password? link 2. Enter your user id. 3. Click Submit.
The system will reset your password and the new password will be emailed to your registered email account.
If you forgot your user id, click on [email protected]. This link will direct you to email the customer service group.

ExpertPay New Employer Manual 7-21-17Page 13 of 39
Change Password
You should change your password regularly to ensure that the information in ExpertPay is secure.
How to change your password
1. Click Change Password on the menu dropdown upper right hand corner. 2. Enter your new password in the New password field. 3. Enter your new password again in the Confirm New password field to confirm it. 4. Click Confirm to Change to save your new password.
Your password must be ...
Between eight and twelve alphanumeric characters.
Must include at least one upper and one lower case alpha character
Contain at least one numeric digit or special character
It must be different from the previous 6 passwords
It may not contain part of the user id or be a personal name
Exact - as they are case sensitive.
Log out
You can log out of ExpertPay at any time.
How to log out of ExpertPay
1. Click on Log Out on the drop down bar at the top right of the screen.

ExpertPay New Employer Manual 7-21-17Page 14 of 39
Using the system:
Payment Center
The Payment Center screen is the first screen that is displayed when you login to ExpertPay.
How to access the payment center screen
1. Click Payment Center on the menu bar on the top of the screen.
The Payment Center screen contains the following information. 1. Pending Payment List
Status definitions
1. Submitted indicates that the payment has been submitted from the employer's bank account to ExpertPay but has not been accessed by an ExpertPay processing program which runs at night.
2. Not Submitted indicates that a payment has been created by the employer but it has not been submitted yet. List of NOT pending status’
3. In Progress indicates that the ExpertPay processing program, that runs at night, has accessed the payment that has been submitted. This ExpertPay program changes the status of the payment from Submitted to In progress at this time.
4. Batch in Progress indicates that the ExpertPay processing program, that runs at night, is processing the payment.
5. Paid indicates that a finance person in ExpertPay administration, has approved the money to be deposited into the SDU account. This occurs sometime after the ExpertPay processing program, that runs at night, has completed.
6. Cancelled by User indicates that the employer has cancelled a payment that has been prepared. This can be done by clicking on the C button on the line of a prepared payment entry on the payment center screen.
7. Cancelled by System indicates an issue with your current bank account. Contact ExpertPay customer service.
ExpertPay New Employer Manual 7-21-17Page 15 of 39
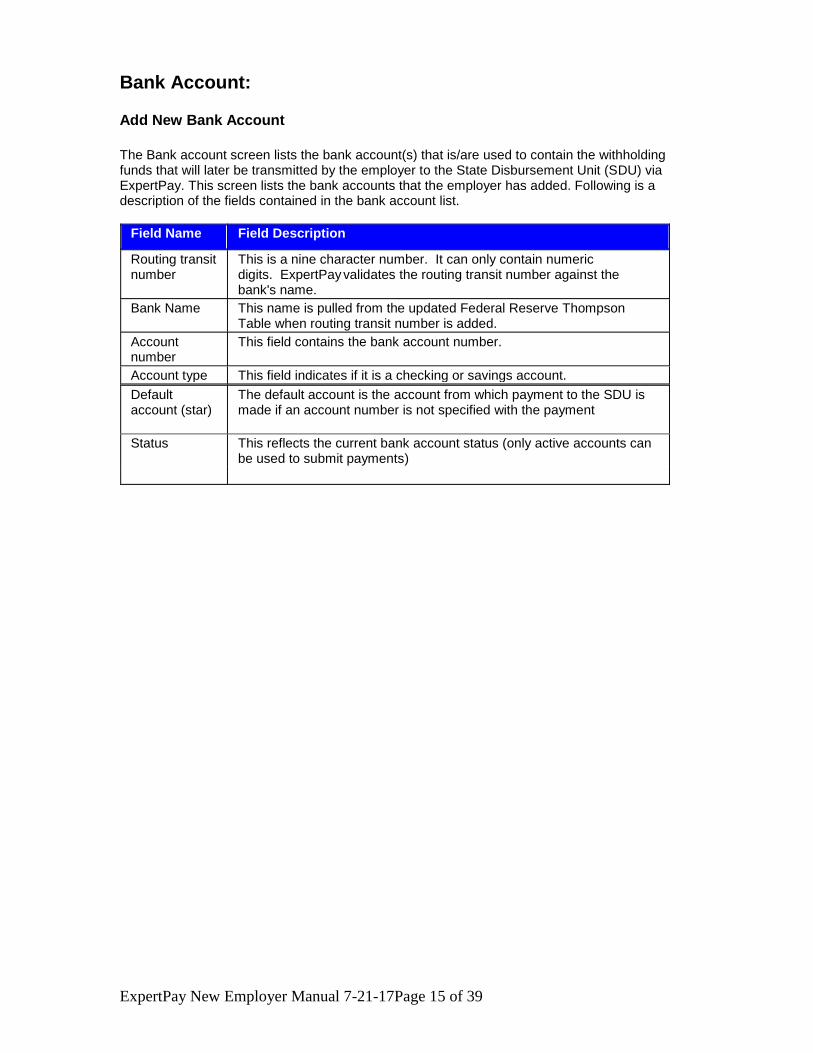
Bank Account:
Add New Bank Account
The Bank account screen lists the bank account(s) that is/are used to contain the withholding funds that will later be transmitted by the employer to the State Disbursement Unit (SDU) via ExpertPay. This screen lists the bank accounts that the employer has added. Following is a description of the fields contained in the bank account list.
Field Name Field Description
Routing transit number
This is a nine character number. It can only contain numeric digits. ExpertPay validates the routing transit number against the bank's name.
Bank Name This name is pulled from the updated Federal Reserve Thompson Table when routing transit number is added.
Account number
This field contains the bank account number.
Account type This field indicates if it is a checking or savings account.
Default account (star)
The default account is the account from which payment to the SDU is made if an account number is not specified with the payment
Status This reflects the current bank account status (only active accounts can be used to submit payments)

ExpertPay New Employer Manual 7-21-17Page 16 of 39
How to create a bank account
1. Click on Bank account on the menu bar at the top of the screen.
2. Click on the New Bank Account button that is located right above the box that
contains the list of bank accounts.
3. Complete the following information.
a. Routing transit number (must be an ABA participating institution). b. Bank account number. c. Select the type of account by clicking on the <down arrow> next to the
Account type box and then clicking on the type of account (checking, savings).
d. Click on the box next to Default account to make this the default account (if desired).
4. Click Save and Complete. 5. The Bank account information screen is displayed.
It lists all of the accounts including the account that you just added.

ExpertPay New Employer Manual 7-21-17Page 17 of 39
Edit Bank Account
There may be a time when you want to edit bank account information. As an example, you may want to make a particular account your default account.
How to edit a bank account
1. Click on Bank account on the menu bar on the top of the screen.
2. Click on pencil icon in the box of the bank account you wish to edit
3. Enter the information that needs to be changed
a. Routing transit number. b. Bank account number. c. Select the type of account by clicking on the <down arrow> next to the
Account type box and then clicking on the type of account (checking, savings).
4. Click Save Changes. *Please note: all new or edited bank accounts will need to go through the bank verification process.
Delete Bank Account
You may want to delete an account from ExpertPay at some time. Please note you will not be able to delete a bank account if there are payments and/or profiles associated with it. (You cannot delete this bank account because either Payments or verification are associated with it. Remove it after all payments processing begins.)
How to delete a bank account
1. Click on Bank account on the menu bar on the left side of the screen. 2. Click on the red x next to the bank account you wish to delete. 3. A confirm Delete pop up will be presented - Click Delete button. 4. The entry is deleted. The bank account list no longer contains an entry for that bank
account.

ExpertPay New Employer Manual 7-21-17Page 18 of 39
Bank Account Verification:
All new or edited bank accounts (where the routing transit and/or account number has
been changed) must go through Account Verification. This process sends a
transaction amount to the bank account added to the system. When user can see this
transaction in the bank account, they must sign back into the ExpertPay system to
verify the amount of that transaction.
Navigate to the bank account list by clicking Bank Accounts from the menu bar:
Your Bank account list will show the VERIFY ACCOUNT button:
Click on the Verify Account button to go the Bank Account Validation screen where
you need to enter the transaction amount sent by ExpertPay to that account upon
registration.
Click on the continue after entering the amount in the following format: .## You are given three chances to enter the correct amount before your account is deactivated. You will then be asked to contact Customer Service.

ExpertPay New Employer Manual 7-21-17Page 19 of 39
Payment Groups:
Payment Group Overview
Payment Groups are used to create and submit employee case payments on a regular basis. It is a list that you create to store payment information for a group of your employees who are subject to withholding orders. You can have as many groups as you want. Examples of possible payment group names are weekly, monthly, or salaried, eastern division, western division or whatever name you want to give the group. There are two methods to create a Payment Group with ExpertPay.
Method # 1: Create a Payment Group - by logging into the ExpertPay website, creating a group, and manually inputting the case information for each employee. This is a list that you create to store payment information for a group of your employees who are subject to withholding orders. Method #2: Create a Payment Group by uploading a file. This service can save valuable time, as your employees' electronic payment information is sent directly to the secure ExpertPay website. You do not have to type in each employee’s withholding data for each payment. Employers who make repeat payments for a large number of employees, will find that the Payment Group Upload function will help improve the overall payment process. This process requires less employer time inputting employee data for federally mandated child support withholdings.
Add a Payment Group
Payment Groups are used to create and submit employee case payments on a regular basis. It is a permanent list that you create to store payment information for a group of your employees who are subject to withholding orders. You can have as many groups as you want. Examples of possible group names could be weekly, monthly, salaried, or whatever name you want to give the group. Following is a description of the fields contained in the Payment Group list.
Field Name Field Description
Group Name This is the name of the profile that you selected.
Bank Account Bank account number.
Number of Employees
The number of employees who are attached to this profile.
Total Payment Group Amount
The total number of withholdings within the profile
X for Deletion This X must be checked when deleting a profile.

ExpertPay New Employer Manual 7-21-17Page 20 of 39
How to manually create a Payment Group
1. Click Payment Groups on the menu bar. 2. Click Add profile box.
3. Type in the name of the profile in the box next to Payment Group name. 4. Select the bank account.
a. Click on the down-arrow to the right of the box. b. Click on the desired bank account.
5. Click Add Employee.
6. Enter Employee Withholding information

ExpertPay New Employer Manual 7-21-17Page 21 of 39
Edit Payment Group
You may view and edit the details of a group by clicking on the profile name in the list of the profile you wish to edit. You may want to change the name or the bank account for this group.
How to edit a Payment Group
1. Click Payment Groups on the menu bar on the left side of the screen. 2. Click on the profile name of the group you wish to edit. 3. You may also edit employee information in the employee list by clicking on the
employee you wish to edit.
Delete Payment Group
A Payment Group may be deleted from the Payment Group list screen.
How to delete a Payment Group
1. Click Payment Groups on the menu bar on the left side of the screen.
2. Click red X to Delete.
3. Click confirm to Delete the entire group and the entire employee list

ExpertPay New Employer Manual 7-21-17Page 22 of 39
Add Employee Case to a Payment Group
Employees need to be associated with a Payment Group. This function is accomplished by adding personal employee information including name, SSN, State Identification Number and state to which the withholding will be sent.
How to add an employee case to a Payment Group
1. Click Payment Groups on the menu bar on the left of the screen. 2. Select the group you wish to Edit by clicking on the profile name. 3. Click Add employee in the Employee List box.
4. Enter / select the appropriate information for the employee:
a. First and last name b. Social security number c. State (This may or may not be the State where the employee resides – this
state agency is WHERE the withholding payment should be sent) Click the down arrow next to the state box to see the list of states and then select the appropriate state.
d. Select the FIPS code associated with the withholding e. Refer to wage attachment court order to obtain State Identification
Number/Case Number. f. Withholding amount g. Includes medical
Note: This check box indicates if the employee has medical insurance coverage.
h. Check Employment if the employee is no longer employed. 5. Click Save and Add Employee.

ExpertPay New Employer Manual 7-21-17Page 23 of 39
Edit Employee Case in a Payment Group
You may view and edit an Employee Case within a Payment Group at any time.
How to edit an employee case
1. Click Payment Groups on the menu bar. 2. Check the profile name of the group you wish to edit to select it. 3. Click on the employee name of the employee you wish to edit 4. Click Edit 5. Edit the appropriate information. 6. Click Save and Complete.
Delete Employee Case from a Payment Group
Employee case information can be deleted when appropriate. Note: Delete Employees if the record was entered in error OR you have indicated in the past that the employee is terminated and how you want to take the employee out of the profile. This would normally be done after the final payment for an employee has been submitted.
How to delete employee case from a Payment Group
1. Click on red X next to the employee you wish to delete 2. Confirm Delete button in pop up. This causes the employee case to be deleted.

ExpertPay New Employer Manual 7-21-17Page 24 of 39
Creating Profiles with an upload
Profile Upload Overview
The Profile Upload functionality in ExpertPay allows employers to electronically upload the Payment Group into ExpertPay. This function can save valuable time, as your employees' child support withholding information is uploaded directly to the secure ExpertPay website. Employers who make repeat payments for a large numbers of employees will find this function improves the overall payment process.
Prerequisites: Before you can upload a Payment Group file, you must have an ACTIVE DEFAULT bank account, and make sure the Payment Group file is in the correct format (fixed length or CSV format). If you have multiple bank accounts, you will have to ensure one of them is selected as the default account. This is the account that will be linked to your uploaded profile.
Click here for information on setting up a bank account and selecting a default account. Click here for information on file formatting.
How to import a Payment Group file:
1. Create the Payment Group file. 2. Log on to the ExpertPay site. 3. ExpertPay will display the Upload Profile on Payment Group and Payment Center
pages. 4. Click on Upload Profile. 5. ExpertPay will display the "Upload Payment Group Detail" page with upload file
process information, and controls used to upload the file. 6. Click on the "Browse" button. 7. ExpertPay will display a dialog box that allows you to browse your local machine for
the file to be uploaded. 8. Use the file browsing window to find and select the file to be uploaded, and click on
the "Open" button. 9. ExpertPay will display the path to the file being uploaded in the field next to the
"Browse" button. 10. Click on the "Upload" button. 11. ExpertPay will start the upload process. When it is completed, the system will
perform a preliminary review of the file. (Is it correctly formatted?) If the file passes the review, ExpertPay will display a "Successful upload"
message. If the file fails the review, ExpertPay will display an upload error message.
The upload controls will remain visible on the screen so you can select and upload a different file.
12. Once you have successfully uploaded a Payment Group file, you will receive an email indicating the upload was successful. The confirmation message will include the following information:
Profile name Number of detail withholding Total amount
You may now select that profile to create your payment.
ExpertPay New Employer Manual 7-21-17Page 25 of 39
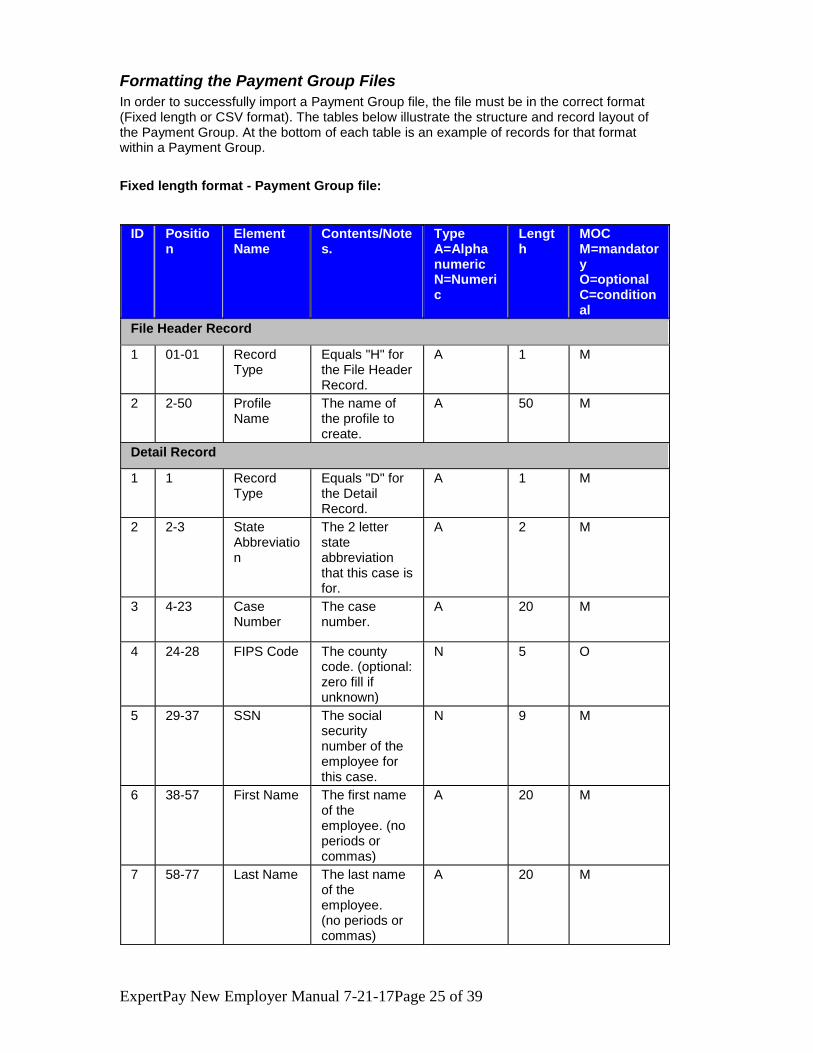
Formatting the Payment Group Files
In order to successfully import a Payment Group file, the file must be in the correct format (Fixed length or CSV format). The tables below illustrate the structure and record layout of the Payment Group. At the bottom of each table is an example of records for that format within a Payment Group.
Fixed length format - Payment Group file:
ID Position
Element Name
Contents/Notes.
Type A=Alpha numeric N=Numeric
Length
MOC M=mandatory O=optional C=conditional
File Header Record
1 01-01 Record Type
Equals "H" for the File Header Record.
A 1 M
2 2-50 Profile Name
The name of the profile to create.
A 50 M
Detail Record
1 1 Record Type
Equals "D" for the Detail Record.
A 1 M
2 2-3 State Abbreviation
The 2 letter state abbreviation that this case is for.
A 2 M
3 4-23 Case Number
The case number.
A 20 M
4 24-28 FIPS Code The county code. (optional: zero fill if unknown)
N 5 O
5 29-37 SSN The social security number of the employee for this case.
N 9 M
6 38-57 First Name The first name of the employee. (no periods or commas)
A 20 M
7 58-77 Last Name The last name of the employee. (no periods or commas)
A 20 M

ExpertPay New Employer Manual 7-21-17Page 26 of 39
8 78-87 Amount The dollar amount of the withholding. Decimal implied. Zero filled. This field can be zero but the employee must be marked as Terminiated.
N 10 M
9 88-88 Medical Indicator
Indicator for medical coverage. 0-Employee eligible for medical coverage. 1-No coverage.
N 1 M
10
89-89 Employment Indicator
Indicator for employment status. 0-Employee is no longer employed. 1-Still under employment.(If amount (field 8) is zero, the Employment Indicator (field 10) must be "0"
N 1 M
File Trailer Record
1 1-1 Record Type
Equals "T" for the File Header Record.
A 1 M
2 2-6 Total Detail Count
Total number or detail record in file. Zero filled.
N 5 M
3 7-18 Total Amount
The dollar amount for all withholding in the file. Decimal implied. Zero filled.
N 12 M
Fixed length Payment Group example: HExpert Pay
This is your record type.
This is your Profile Name.

ExpertPay New Employer Manual 7-21-17Page 27 of 39
H Expert Pay
DPA9999999999999999999955555222222222JOHN SMITHS 000000200011
This is the record type.
State Abbreviation
Case Number
FIPS Code. The county code.
The social security number of employee.
First name of employee.
Last name of employee.
Amount Medical Indicator
Employment Indicator
D PA 99999999999999999999
55555 222222222 JOHN SMITH 0000002000
1 1
T000010000000010000
This is the record type.
This is the total number or detail record in file.
Total dollar amount for all withholdings in file.
T 00001 000000010000
Below is an example of how your fixed length format file may look with 3 employees: HExpert Pay DPA9999999999999999999955555222222222JOHN SMITHS 000001000011 DPA9999999999999999999955555222222222STAN JOANS 000001000011 DPA9999999999999999999955555222222222SALLY STANTS 000001000011 T00003000000030000
------ CSV format - Payment Group file:
ID
Element Name
Contents/Notes.
Type A=Alpha numeric N=Numeric
Length
Delimiter
MOC M=mandatory O=optional C=conditional
File Header Record
1 Record Type
Equals "H" for the File Header Record.
A 1 , M
2 Profile Name
The name of the profile to create.
A 50 , M
3 Format Type
Format type of the file - constant 'CSV'
A 3 , M
Detail Record
1 Record Type
Equals "D" for the Detail Record.
A 1 , M
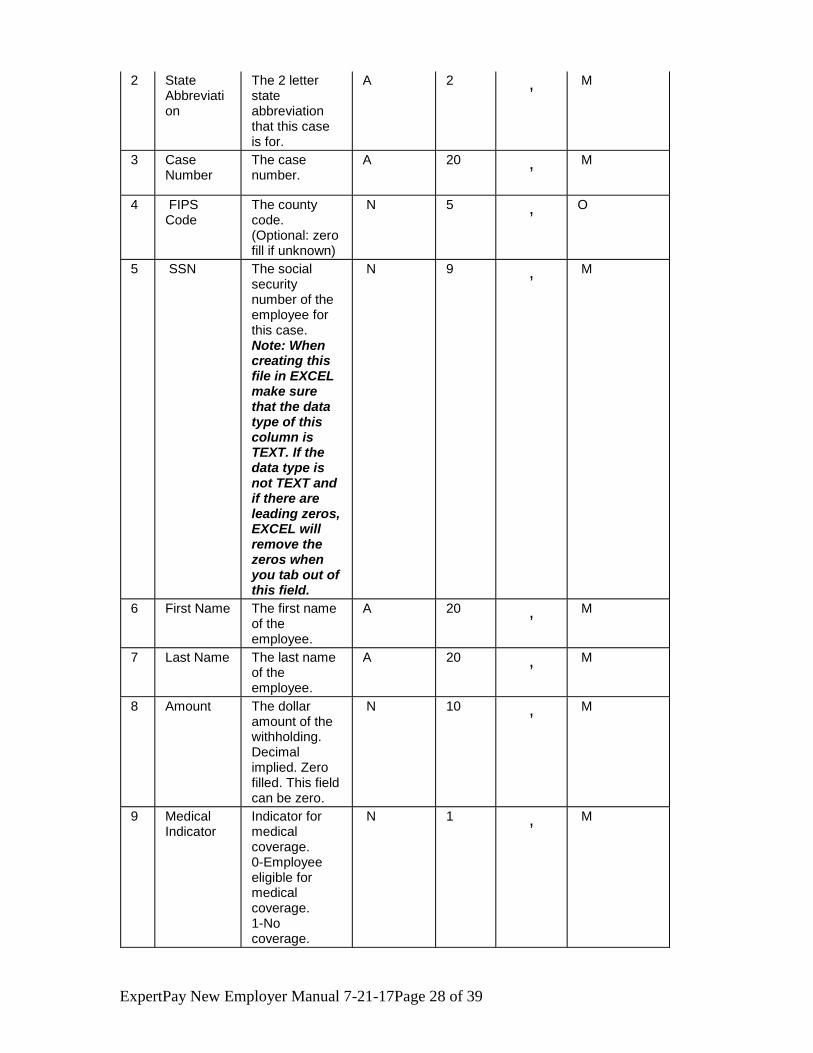
ExpertPay New Employer Manual 7-21-17Page 28 of 39
2 State Abbreviation
The 2 letter state abbreviation that this case is for.
A 2 , M
3 Case Number
The case number.
A 20 , M
4 FIPS Code
The county code. (Optional: zero fill if unknown)
N 5 , O
5 SSN The social security number of the employee for this case. Note: When creating this file in EXCEL make sure that the data type of this column is TEXT. If the data type is not TEXT and if there are leading zeros, EXCEL will remove the zeros when you tab out of this field.
N 9 , M
6 First Name The first name of the employee.
A 20 , M
7 Last Name The last name of the employee.
A 20 , M
8 Amount The dollar amount of the withholding. Decimal implied. Zero filled. This field can be zero.
N 10 , M
9 Medical Indicator
Indicator for medical coverage. 0-Employee eligible for medical coverage. 1-No coverage.
N 1 , M

ExpertPay New Employer Manual 7-21-17Page 29 of 39
10
Employment Indicator
Indicator for employment status. 0-Employee is no longer employed. 1-Still under employment.(If amount (field 8) is zero, the Employment Indicator (field 10) must be "0"
N 1 , M
File Trailer Record
1 Record Type
Equals " T " for the File Header Record.
A 1 , M
2 Total Detail Count
Total number or detail record in file.
N 5 , M
3 Total Amount
The dollar amount for all withholding in the file. Decimal implied.
N 12 , M
CSV format Payment Group example: H,Expertpay,CSV,,,,,,,
This is your record type.
This is your Profile Name.
This is
your format type
H Expert Pay
CSV
D,FL,999999999999999,55555,999999999,John,Smith,14371,0,1
This is the record type.
State Abbreviation
Case Number
FIPS Code. The county code.
The social security number of employee.
First name of employee.
Last name of employee.
Amount
Medical Indicator
Employment Indicator
D FL 999999999999999
55555 999999999
JOHN SMITH 14371 0 1
T,3,42472,,,,,,,
This is the record type.
This is the total number or detail record in file.
Total dollar amount for all withholdings in file.
T 3 42472

ExpertPay New Employer Manual 7-21-17Page 30 of 39
Below is an example of how your CSV format file may look with 3 employees when opened in a text editor: H,Expertpay,CSV,,,,,,, D,FL,99999999999999,55555,999999999,John,Smith,14371,0,1 D,FL,99999999999999,55555,999999999,Jose,AlvaradoJr,17701,0,1 D,FL,9999999999,55555,999999999,Brandon,Bauman,10400,0,1 T,3,42472,,,,,,,

ExpertPay New Employer Manual 7-21-17Page 31 of 39
Reports
Via the Payment History menu option ExpertPay allows you to make a payment search selection from either Transaction History or Employee History and generate the results as a .pdf or .csv report.
Payment Transaction Report
This report lists payments that you have made. Selection Criteria:
Date Submitted (from/to)
Effective Date (from/to)
Payment Name
Status
Employee Transaction Report
This generates a payment history by employee report. Selection Criteria:
SSN (employee SSN)
Effective Date (from/to)
How to generate a payment transaction report
1. Click on Payment History Menu on the menu bar 2. Choose/select the search criteria you need 3. Click Search 4. Export results via PDF or CSV using those buttons
How to generate an employee transaction report
1. Click on Payment History Menu from the menu bar. 2. Choose / select the SSN of the employee and the date range. 3. Click Search. 4. Export results via PDF or CSV using those buttons
Manage Users
The person who initially registers is the "Primary User". The Primary User may perform the following administrative functions.
Add other users
Assign rights or permissions to users
Delete users

ExpertPay New Employer Manual 7-21-17Page 32 of 39
How to add a user
1. Select Manage user from dropdown. 2. Click Add user. 3. Supply the required information. 4. Select Active status. 5. Select the appropriate user rights or permissions from the drop-down list. 6. Click Save button.
How to delete a user
1. Select Manage users from the menu bar. 2. Click user in the list of users 3. Click Delete when clicking on the user you wish to delete. 4. Click Delete.
How to edit a user
1. Select Manage users from the menu bar. 2. Click user in the list of users. 3. Click Edit 4. Edit the desired information. 5. Click Save.

ExpertPay New Employer Manual 7-21-17Page 33 of 39
Payment Center:
Prepare a Payment Using a Payment Group
Preparing a payment is a procedure used to indicate the amount of money that is going to be transferred from your (the employer) bank account, via ExpertPay, to a SDU (State Disbursement Unit) account.
How to prepare a payment using a payment group
1. Click on Payment center on the menu. 2. In the dropdown box choose a Payment Group,
a. Select a group. b. Click on Make a Payment
c. From the Payment Detail tab you can view/edit any employee information for
this payment or change the bank account selected d. Click Continue e. From the Payment Time Tab you may enter the effective date and the
withholding date and if you want to make this a recurring or one time payment

ExpertPay New Employer Manual 7-21-17Page 34 of 39
3. Click Continue. 4. The Payment Confirmation page allows you to review the summary information
before then clicking SUBMIT
NOTE: if you made any edits or deletions to employee information from the payment detail screen these changes will NOT be saved or reflected in the Payment Group.
Pending Payment Note The information you see in the Payment list box includes a Status column. Because you clicked on Submit payment, the status is submitted. You may click on any payment in the pending payment list to Edit, View, or Cancel this payment.

ExpertPay New Employer Manual 7-21-17Page 35 of 39
Setup Recurring (RAW) Payment
This topic addresses how to set up a recurring payment. Recurring payments will be automatically submitted by the system at a predefined date. This will cause ExpertPay to transfer money from your bank account to the SDU. You may create a recurring payment using an existing or uploaded profile. Please note any changes to this profile after submission of the recurring payment WILL NOT edit the recurring payment.
How to prepare a recurring payment
1. Click on Payment center on the menu. 2. In the dropdown box choose a Payment Group,
a. Select a profile. b. Click on Make a Payment c. From the Payment Detail tab you can view/edit any employee information for
this payment or change the bank account selected d. Click Continue e. From the Payment Time Tab you may enter the effective date and the
withholding date and if you want to make this a recurring payment. f. Select the Payment Frequency you wish for this series
1. Monthly 2. Weekly 3. Every other week 4. 1st and 15th of the month
g. Select the Starting Effective Date h. Select the Number of Payments
3. Click Continue. 4. The Payment Confirmation page allows you to review the summary information
before then clicking SUBMIT

ExpertPay New Employer Manual 7-21-17Page 36 of 39
Edit a Recurring Payment
After you have prepared and submitted a recurring payment, you may want to edit the payment entry. Submitting a profile payment causes an entry to be generated in a "Pending Payment List" that can be accessed via the "Payment Center" screen. Follow the steps below to access the "Pending Payment List" and edit a recurring payment. When editing a recurring payment there are two options, edit the current payment only or edit all occurrences in the recurring series. Each scenario is described below.
How to edit the current payment in a recurring series
1. Click on Payment center on the menu bar. 2. Locate the pending payment list towards the bottom of the screen. 3. This list contains payment entries that have been saved or submitted by you for
eventual transfer of money from your bank account to an SDU account. 4. Click on Payment Name to access the payment entry for editing OR click on the row
containing the recurring payment and select edit from the popup 5. Click on EDIT button to edit
Note: The system displays the following warning, "Do you wish to edit THIS occurrence or ALL occurrences”
6. Click on Edit this occurrence Note: The payment must be resubmitted after editing.
The system will save the changes to the current payment and automatically submit the next payment in the recurring series. The payment edited will no longer be displayed as a recurring payment on the Payment List.

ExpertPay New Employer Manual 7-21-17Page 37 of 39
How to edit all payments in a recurring series
1. . Click on Payment center on the menu bar. 2. Locate the pending payment list towards the bottom of the screen. 3. This list contains payment entries that have been saved or submitted by you for
eventual transfer of money from your bank account to an SDU account. 4. Click on Payment Name to access the payment entry for editing OR click on the row
containing the recurring payment and select edit from the popup 5. Click on EDIT button to edit
Note: The system displays the following warning, "Do you wish to edit THIS occurrence or ALL occurrences”
6. Click on Edit this occurrence Note: The payment must be resubmitted after editing.
ExpertPay New Employer Manual 7-21-17Page 38 of 39
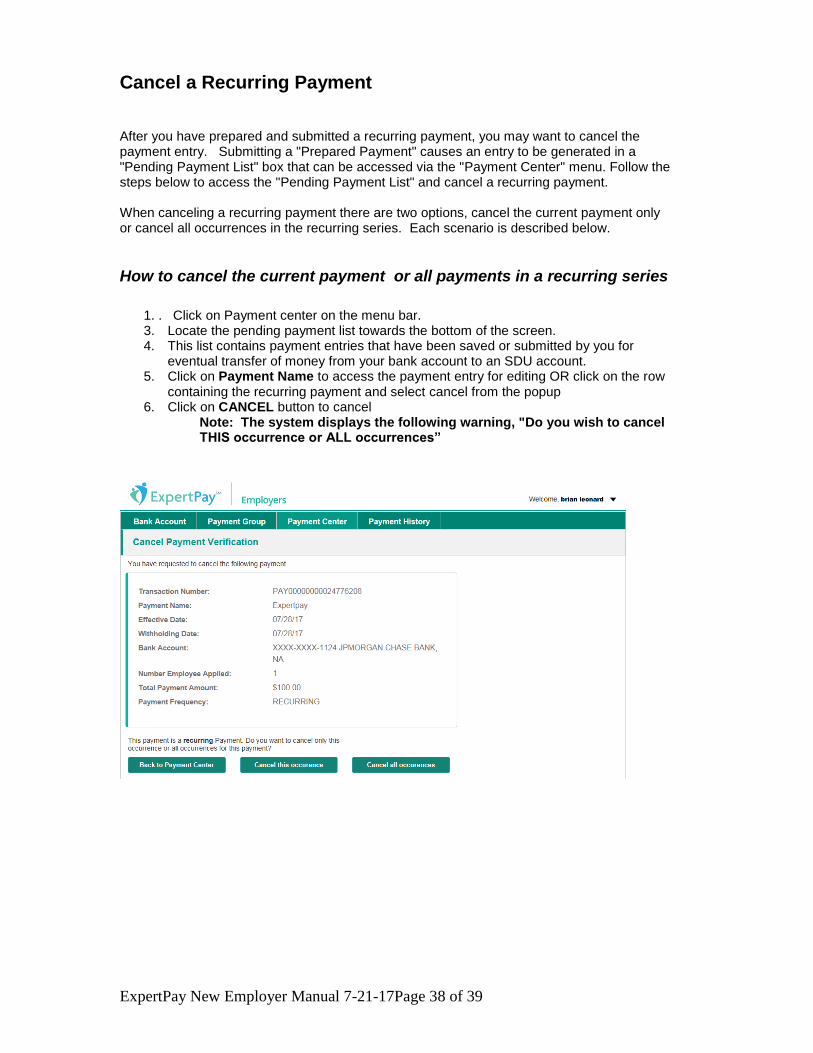
Cancel a Recurring Payment
After you have prepared and submitted a recurring payment, you may want to cancel the payment entry. Submitting a "Prepared Payment" causes an entry to be generated in a "Pending Payment List" box that can be accessed via the "Payment Center" menu. Follow the steps below to access the "Pending Payment List" and cancel a recurring payment. When canceling a recurring payment there are two options, cancel the current payment only or cancel all occurrences in the recurring series. Each scenario is described below.
How to cancel the current payment or all payments in a recurring series
1. . Click on Payment center on the menu bar. 3. Locate the pending payment list towards the bottom of the screen. 4. This list contains payment entries that have been saved or submitted by you for
eventual transfer of money from your bank account to an SDU account. 5. Click on Payment Name to access the payment entry for editing OR click on the row
containing the recurring payment and select cancel from the popup 6. Click on CANCEL button to cancel
Note: The system displays the following warning, "Do you wish to cancel THIS occurrence or ALL occurrences”

ExpertPay New Employer Manual 7-21-17Page 39 of 39
Submit, View, Edit, or Cancel a Payment
After you have prepared and saved a payment, you may want to submit, view, edit, or cancel a payment entry. Saving a "Prepared Payment" causes an entry to be generated in a "Pending Payment List" box that can be accessed via the "Payment Center" screen. Follow the steps below to access the "Pending Payment List" and submit, view, edit, or cancel a payment.
How to submit, view, edit, or cancel a payment
1. Click on Payment center on the menu bar. 2. Locate the pending payment list towards the bottom of the screen.
This box contains payment entries that have been saved by you for eventual transfer of money from your bank account to an SDU account.
3. Click on the payment you wish to submit, view, edit or cancel a. Submit to initiate the submitting of the payment. b. Edit to access the payment entry for editing. c. Cancel to initiate cancelling the payment. d. View to view the payment information.