Employee and Manager User Guide - denvergov.org€¦ · Location: Your location ... To change...
133
Employee and Manager User Guide Version 1.0, August 27, 2018
Transcript of Employee and Manager User Guide - denvergov.org€¦ · Location: Your location ... To change...
Employee and Manager User GuideVersion 1.0, August 27, 2018

This page is intentionally left blank.

https://denvergov.org/workday i
Table of ContentsIntroduction and Key
Employees
IntroductionKey
Getting StartedEmail Notifications 5
Personal Information, How Do I 8
457 Contribution 11Benefits
Adding a Child as a Dependent 13Additional Life Insurance 16HSA Contribution 18
Choose Your Home Page Apps xiviv
Beneficiary Designation 20
Add and Edit Goals 27Performance
Archive Goals 29Ongoing Check-Ins 30
Career with the CityBuild a Talent Profile 33
Additional Support xii
Build a Talent Profile Using Resume 39Apply for a Job 43
HiringRefer a Candidate 49Review an Interview Candidate 51Rate an Interview Candidate After Interview 52
Create Inbox Filters 7
https://denvergov.org/workday ii
Table of Contents
Employee Changes/CompensationBilingual Pay 77
Cell Phone Stipend 83Update Employee Cost Center 86End Additional Job 87Switch Primary Job 89Termination 91Working Out of Class 92
Performance
Archive Goals 97Add and Edit Goals 96
Copying Goals to Multiple Employees 98Print Performance Review 99Updating Goals During Job Change 100
Managers
Reviewing Candidates
Position ManagementCreate Position 57
5961Update Position's Cost Center62Close Position
Create Job Requisition: Existing Position - Employee Job Change/Rehire 69
Edit Position Restrictions: Job Profile Change
73
HiringCreate Job Requisition: Ready to Recruit 65
Fleet Technician Stipend 80
https://denvergov.org/workday iii
Contingent WorkerCreate Job Requisition: New Position 105
Contract Contingent Worker 111
Table of ContentsManagers - Continued
Create Job Requisition: Unpaid Intern 108
Appendix A: Job Requisition Reason Codes IIIAppendix B: Ready to Recruit Process Flow IVAppendix C: Job Changes/Rehire Process Flow V
Appendix

https://denvergov.org/workday ivReturn to Table of Contents
IntroductionWelcome to the Workday Employee and Manager User Guide.
This user guide will teach you how to navigate Workday and complete tasks within it. Most tasks you can do on your own so you can save time and avoid submitting SupportNow tickets. Keep in mind that processes are subject to change, so it is recommended to use the online version instead of printing. Save a bookmark to the Workday Training page for quick reference. About the User GuideThis user guide provides step-by-step processes with visual aids to help you perform all tasks in Workday. Each job aid provides a process flow of the approval process if approval is required.
This user guide is split into two sections: Employees and Managers. The Employees section includes step-by-step guidelines to tasks that every employee can perform. The Manager section includes step-by-step guidelines for the tasks that managers can perform for their employees. Recruiting processes are also included in the Manager section. Quick TipsHere are a few quick tips to help you get started:
• A brief explanation about the task is provided at the beginning of everyprocess
• Bolded words indicate they are an application or an action item to click on
• Red outlined boxes in the screenshots show you where on the page to click or fill in boxes
• Every page of the manual has a header that includes the section, title of the job aid and who can perform the task (i.e. Employee or Manager)
• Return to the Table of Contents at any time by clicking Return to Table of Contents at the bottom of each section page
Login to Workday1. Open a browser window
2. Go to https://www.myworkday.com/denver/d/home.htmld
3. Enter your City Email Address and Network Password. Click Login
https://denvergov.org/workday vReturn to Table of Contents
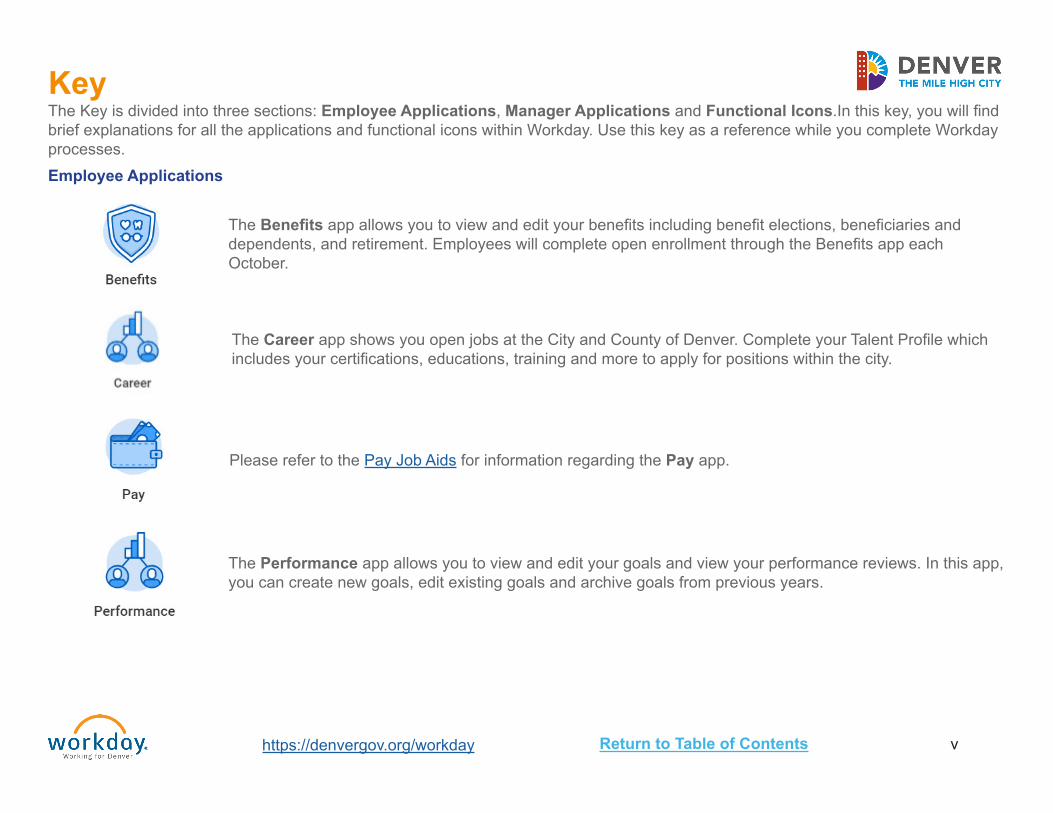
The Benefits app allows you to view and edit your benefits including benefit elections, beneficiaries and dependents, and retirement. Employees will complete open enrollment through the Benefits app each October.
Employee Applications
Please refer to the Pay Job Aids for information regarding the Pay app.
The Performance app allows you to view and edit your goals and view your performance reviews. In this app, you can create new goals, edit existing goals and archive goals from previous years.
KeyThe Key is divided into three sections: Employee Applications, Manager Applications and Functional Icons.In this key, you will find brief explanations for all the applications and functional icons within Workday. Use this key as a reference while you complete Workday processes.
The Career app shows you open jobs at the City and County of Denver. Complete your Talent Profile which includes your certifications, educations, training and more to apply for positions within the city.

https://denvergov.org/workday viReturn to Table of Contents
Manager ApplicationsThe following icons are the applications that are visible to all managers on the Workday home page. Each application has a specific function to help managers manage their teams. Please note that manager's also have the previously listed applications in Employee Applications.
The Anniversaries app notifies you about your employees' work anniversaries.
The Birthdays app notifies you about your employees' birthdays.
Please refer to the Purchases Job Aids for information regarding the Purchasing app.
The Personal Information app allows you to view and edit your personal information including your photo, emergency contacts, contact information, your name, business title and more.
Employee Applications - Continued
https://denvergov.org/workday viiReturn to Table of Contents
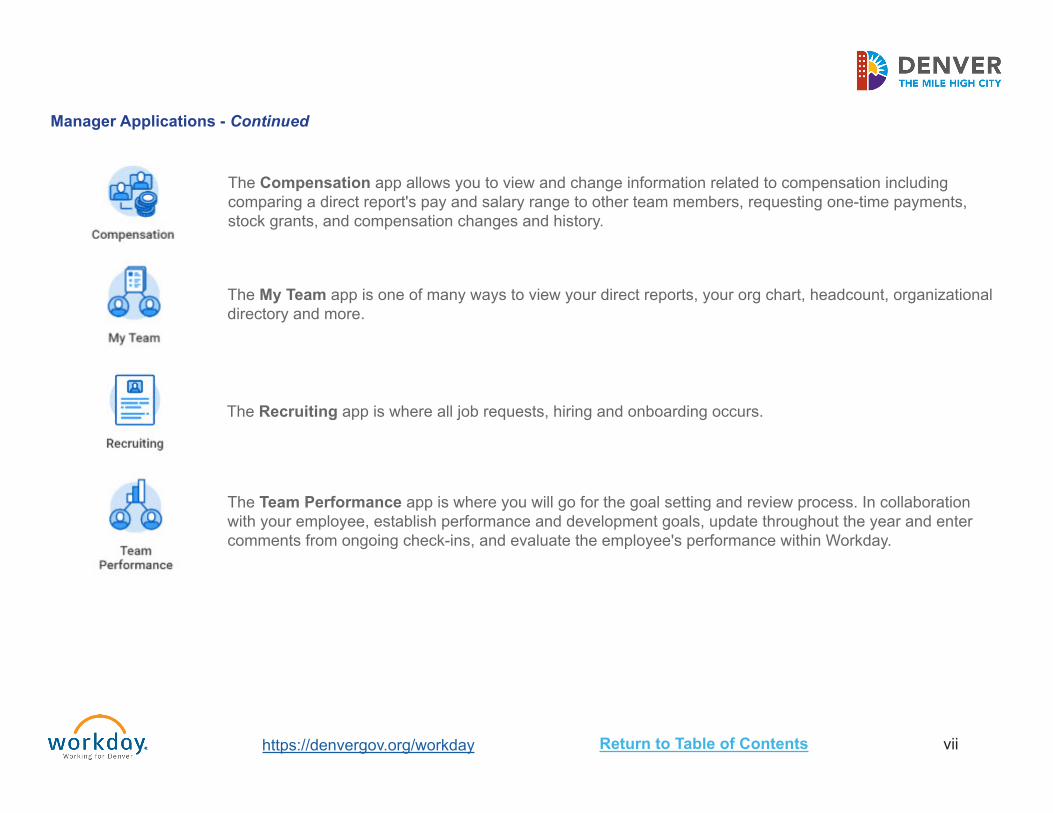
The Compensation app allows you to view and change information related to compensation including comparing a direct report's pay and salary range to other team members, requesting one-time payments, stock grants, and compensation changes and history.
The My Team app is one of many ways to view your direct reports, your org chart, headcount, organizational directory and more.
The Recruiting app is where all job requests, hiring and onboarding occurs.
The Team Performance app is where you will go for the goal setting and review process. In collaboration with your employee, establish performance and development goals, update throughout the year and enter comments from ongoing check-ins, and evaluate the employee's performance within Workday.
Manager Applications - Continued
https://denvergov.org/workday viiiReturn to Table of Contents
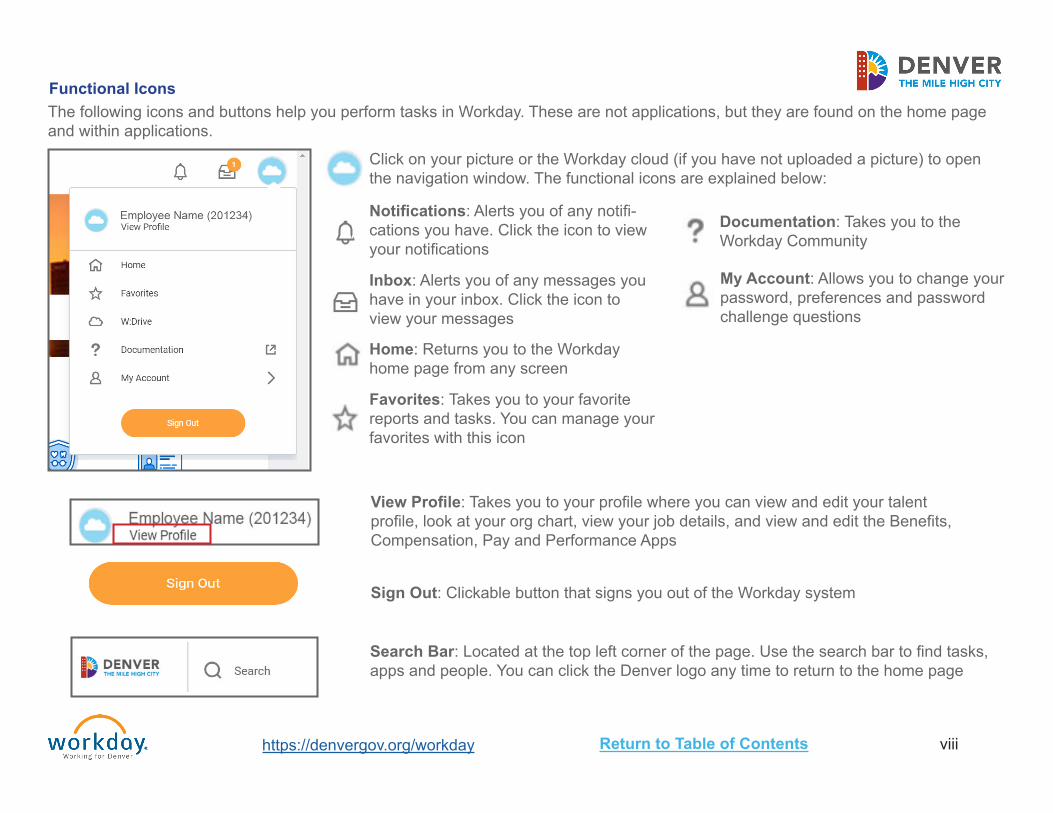
Notifications: Alerts you of any notifi-cations you have. Click the icon to view your notifications
Functional IconsThe following icons and buttons help you perform tasks in Workday. These are not applications, but they are found on the home page and within applications.
Inbox: Alerts you of any messages you have in your inbox. Click the icon to view your messages
Click on your picture or the Workday cloud (if you have not uploaded a picture) to open the navigation window. The functional icons are explained below:
Home: Returns you to the Workday home page from any screen
Favorites: Takes you to your favorite reports and tasks. You can manage your favorites with this icon
View Profile: Takes you to your profile where you can view and edit your talent profile, look at your org chart, view your job details, and view and edit the Benefits, Compensation, Pay and Performance Apps
Sign Out: Clickable button that signs you out of the Workday system
Documentation: Takes you to the Workday Community
My Account: Allows you to change your password, preferences and password challenge questions
Search Bar: Located at the top left corner of the page. Use the search bar to find tasks, apps and people. You can click the Denver logo any time to return to the home page
https://denvergov.org/workday ixReturn to Table of Contents
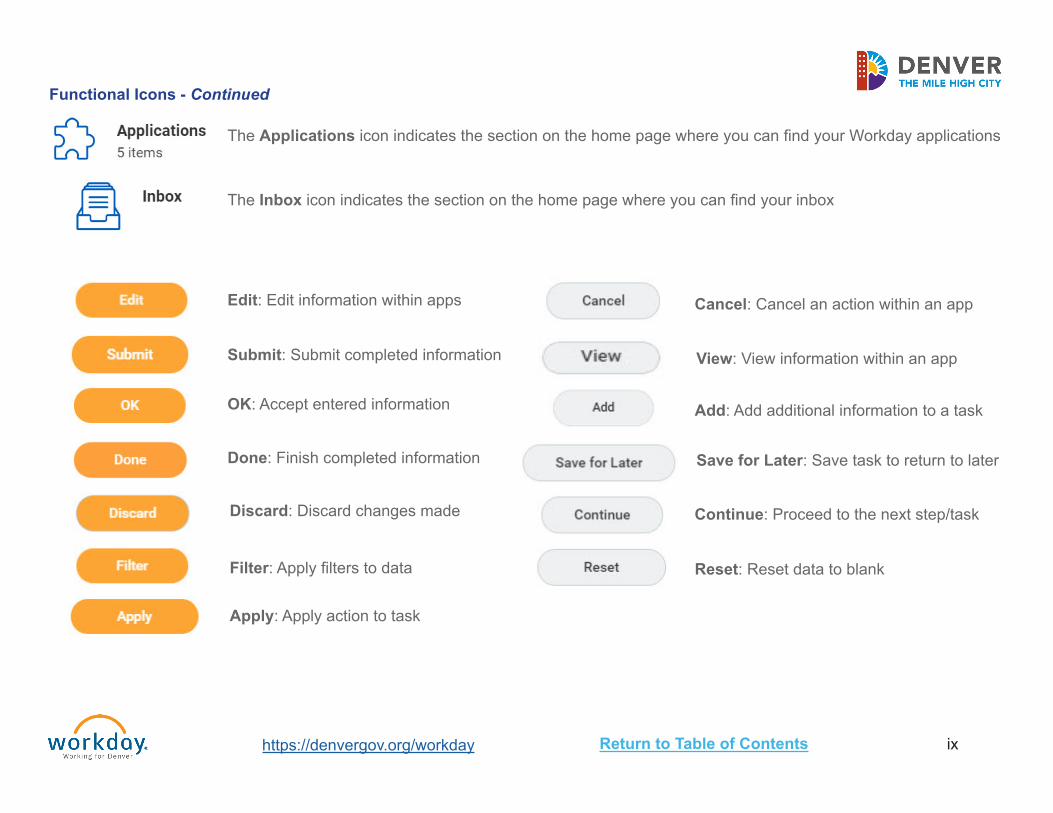
The Applications icon indicates the section on the home page where you can find your Workday applications
Functional Icons - Continued
The Inbox icon indicates the section on the home page where you can find your inbox
Edit: Edit information within apps
Submit: Submit completed information
Cancel: Cancel an action within an app
View: View information within an app
Add: Add additional information to a task
Save for Later: Save task to return to laterDone: Finish completed information
OK: Accept entered information
Discard: Discard changes made Continue: Proceed to the next step/task
Filter: Apply filters to data
Apply: Apply action to task
Reset: Reset data to blank

https://denvergov.org/workday xReturn to Table of Contents
Note: Throughout this guide, you might see note boxes like this. These note boxes provide additional information about the task or step within a task you are performing.
Expand/Collapse Chart: Changes view to graph or chart
Filter Grid Data: Apply filters to the data
Configure Applications: Make changes to displayed apps
Actions: Quick view of apps and personal information
More: Indicates that there are more items listed. Click to expand
Pencil icon: Allows you to edit sections of information
Export to Excel: Exports the data to an excel document
Full Screen Mode: Changes the view to full screen
List Detail View: Changes the view to a detailed list
Grid View: Changes the view to columns and rows
View/Edit Grid Preferences: Edit preferences for viewing grid
Print: Print information within app
Save: Save changes to information in app
Undo: Undo previous text or action
Remove: Remove information from app
Menu: Dropdown menu with pre-generated items
Add: Add information or row to section in app
Remove: Remove information or row from section in app
Move Up: Move to the next row upMove Down: Move to the next row downMove to Top: Move to the top row of gridMove to Bottom: Move to the top bottom row of grid
Normal Mode: Exit from full screen mode
Functional Icons - Continued

https://denvergov.org/workday xiReturn to Table of Contents
Additional apps can be added to your home page. Not all apps are customizable. Some apps are required by the city to appear in a specific order and they cannot be modified using this process.
1. From the Home page, click the configure applications icon in the welcome bar. The C onfigure Apps page will display
2. Under Optional Apps, click the add row icon to add a new app
3. Click the menu icon to select from the list of existing apps
4. Click the remove row icon to remove an app from the dashboard
5. Click the move r ow up icon or move row down icon to reorder the apps on the page. To move an app to the
first position, use the move row to top or move row to bottom icons
6. Click OK
7. Click Done
Choose Your Home Page Apps
https://denvergov.org/workday xiiReturn to Table of Contents
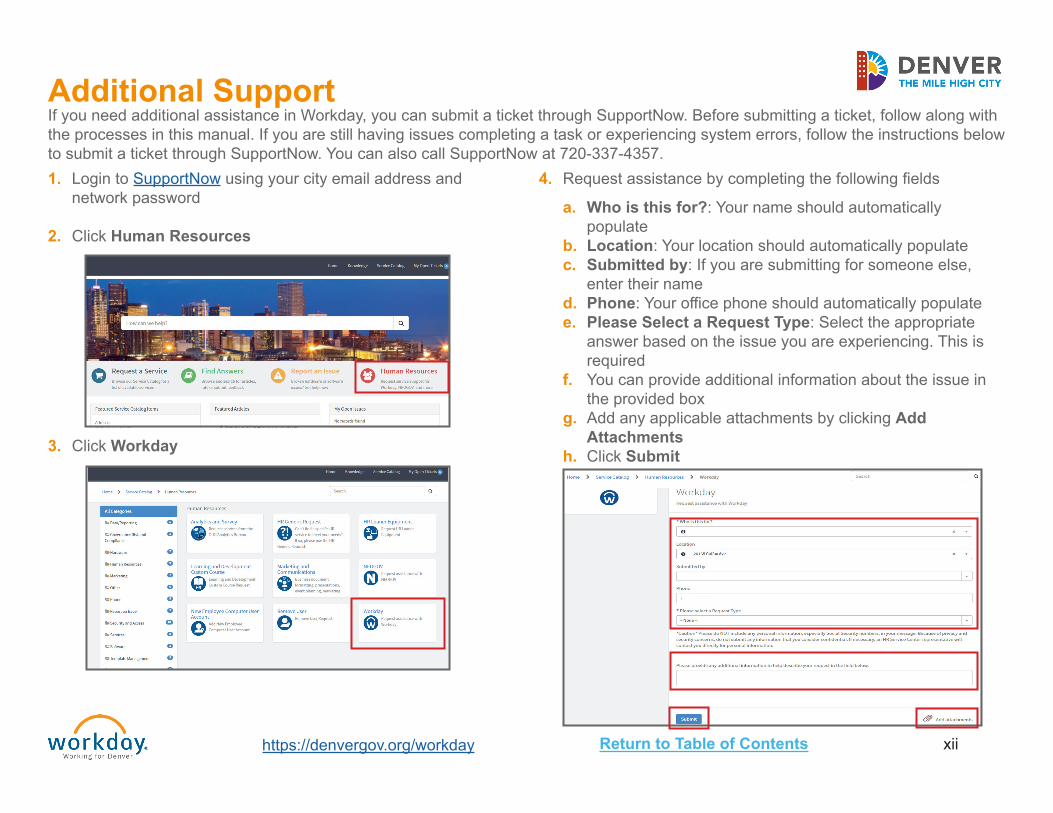
Additional SupportIf you need additional assistance in Workday, you can submit a ticket through SupportNow. Before submitting a ticket, follow along with the processes in this manual. If you are still having issues completing a task or experiencing system errors, follow the instructions below to submit a ticket through SupportNow. You can also call SupportNow at 720-337-4357.1. Login to SupportNow using your city email address and
network password
2. Click Human Resources
3. Click Workday
4. Request assistance by completing the following fields
a. Who is this for?: Your name should automatically populate
b. Location: Your location should automatically populatec. Submitted by: If you are submitting for someone else,
enter their named. Phone: Your office phone should automatically populatee. Please Select a Request Type: Select the appropriate
answer based on the issue you are experiencing. This is required
f. You can provide additional information about the issue in the provided box
g. Add any applicable attachments by clicking Add Attachments
h. Click Submit
Employees

This page is intentionally left blank.

Getting Started

This page is intentionally left blank.
Employees
https://denvergov.org/workday 8/27/2018 5Return to Table of ContentsReturn to Table of Contents
Getting Started Email Notifications
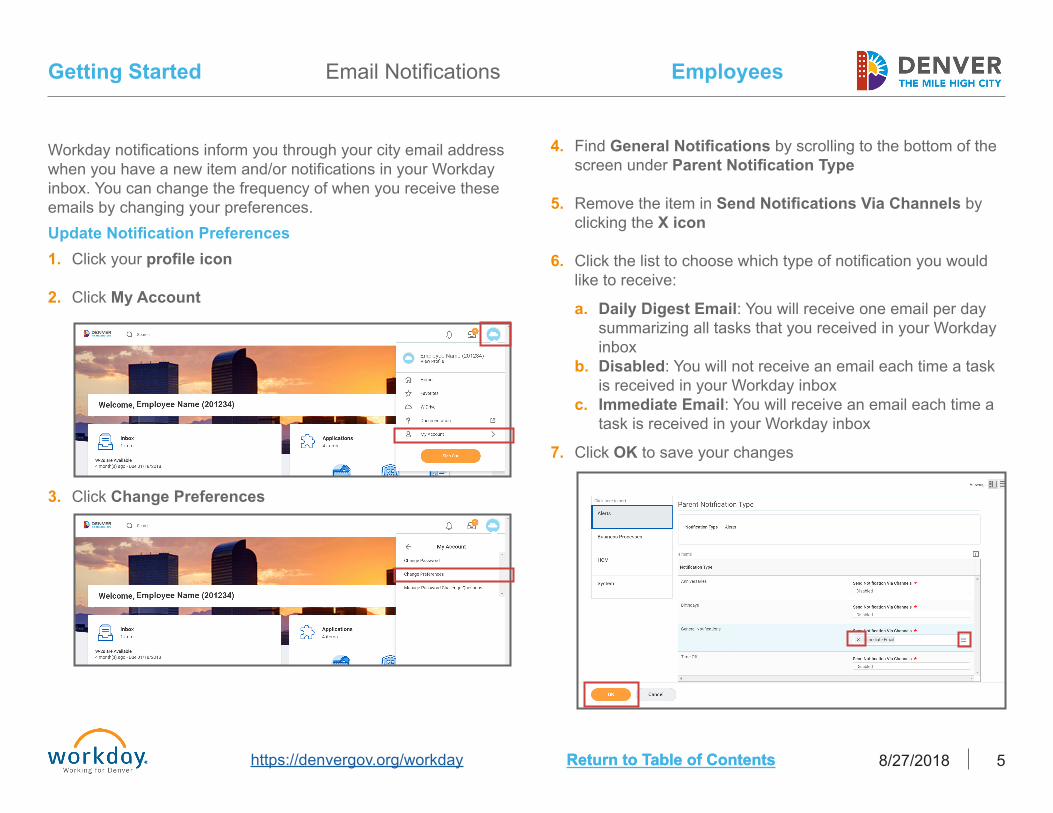
Workday notifications inform you through your city email address when you have a new item and/or notifications in your Workday inbox. You can change the frequency of when you receive these emails by changing your preferences.Update Notification Preferences1. Click your profile icon
2. Click My Account
4. Find General Notifications by scrolling to the bottom of the screen under Parent Notification Type
5. Remove the item in Send Notifications Via Channels by clicking the X icon
6. Click the list to choose which type of notification you would like to receive:
a. Daily Digest Email: You will receive one email per day summarizing all tasks that you received in your Workday inbox
b. Disabled: You will not receive an email each time a task is received in your Workday inbox
c. Immediate Email: You will receive an email each time a task is received in your Workday inbox
7. Click OK to save your changes
3. Click Change Preferences
Employees
https://denvergov.org/workday 8/27/2018 6Return to Table of ContentsReturn to Table of Contents
Getting Started Email Notifications
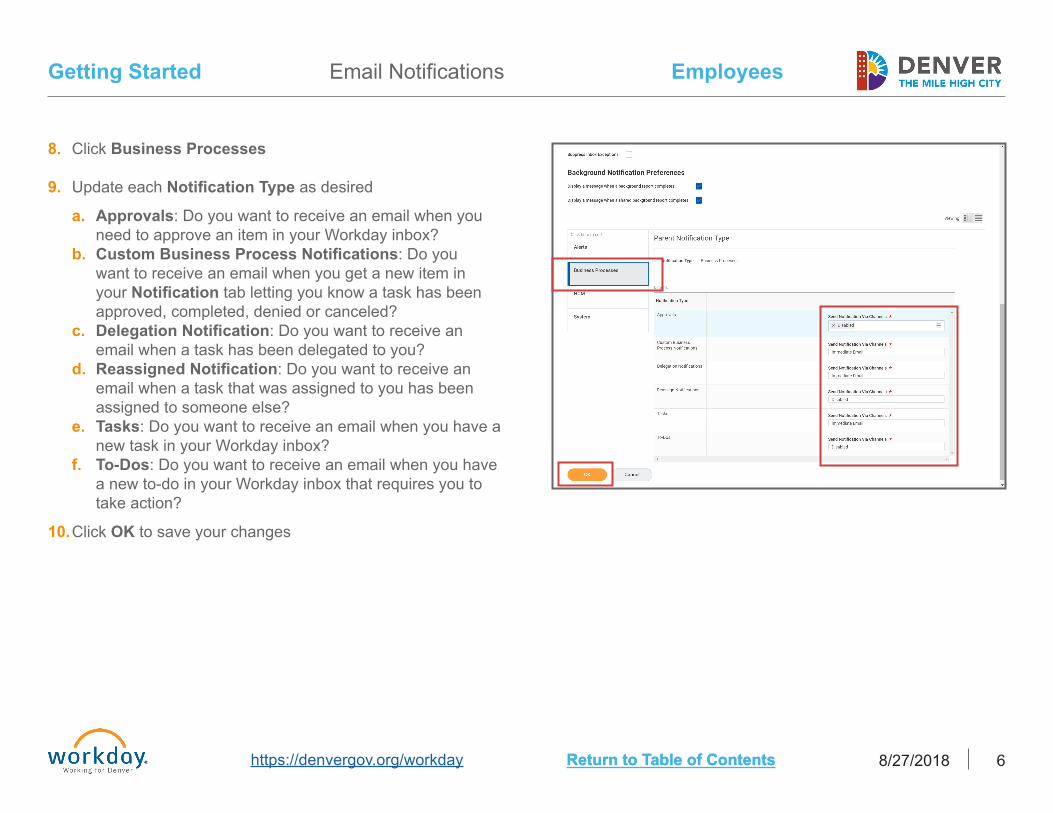
8. Click Business Processes
9. Update each Notification Type as desired
a. Approvals: Do you want to receive an email when you need to approve an item in your Workday inbox?
b. Custom Business Process Notifications: Do you want to receive an email when you get a new item in your Notification tab letting you know a task has been approved, completed, denied or canceled?
c. Delegation Notification: Do you want to receive an email when a task has been delegated to you?
d. Reassigned Notification: Do you want to receive an email when a task that was assigned to you has been assigned to someone else?
e. Tasks: Do you want to receive an email when you have a new task in your Workday inbox?
f. To-Dos: Do you want to receive an email when you have a new to-do in your Workday inbox that requires you to take action?
10. Click OK to save your changes
Employees
https://denvergov.org/workday 8/27/2018 7Return to Table of ContentsReturn to Table of Contents
Getting Started Create Inbox Filters
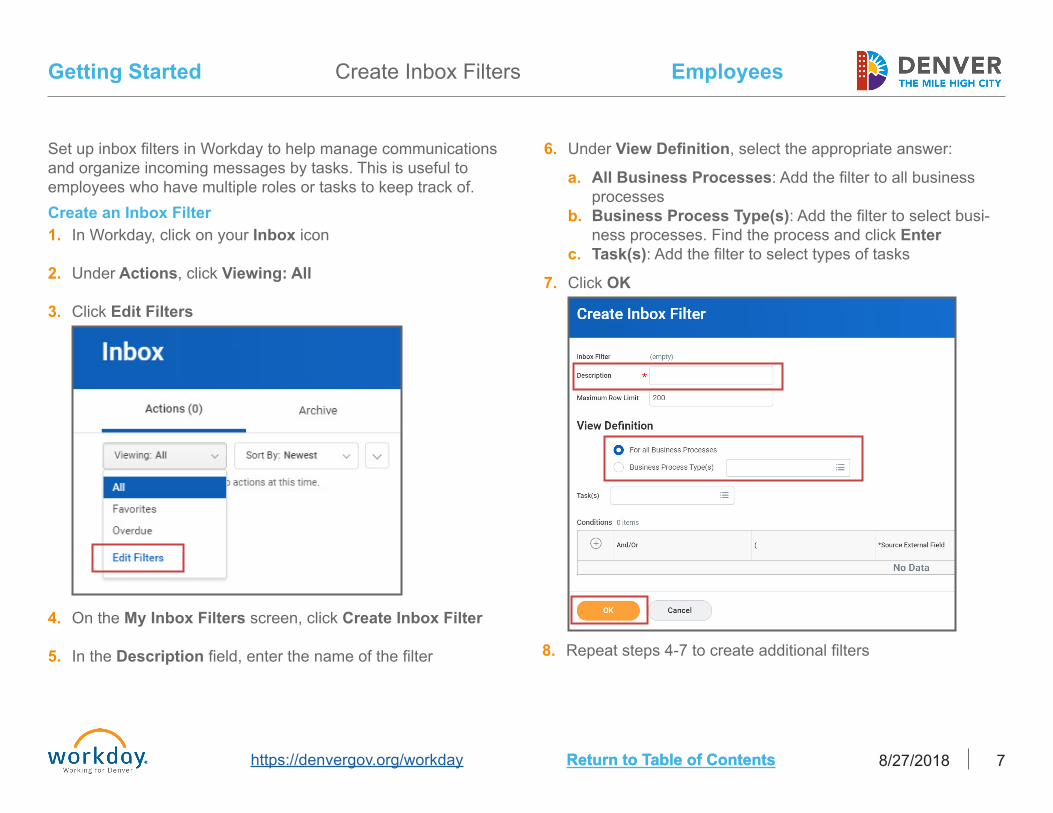
Set up inbox filters in Workday to help manage communications and organize incoming messages by tasks. This is useful to employees who have multiple roles or tasks to keep track of. Create an Inbox Filter1. In Workday, click on your Inbox icon
2. Under Actions, click Viewing: All
3. Click Edit Filters
6. Under View Definition, select the appropriate answer:
a. All Business Processes: Add the filter to all business processes
b. Business Process Type(s): Add the filter to select busi-ness processes. Find the process and click Enter
c. Task(s): Add the filter to select types of tasks
7. Click OK
8. Repeat steps 4-7 to create additional filters
4. On the My Inbox Filters screen, click Create Inbox Filter
5. In the Description field, enter the name of the filter

Employees
https://denvergov.org/workday 8/27/2018 8Return to Table of ContentsReturn to Table of Contents
Getting Started Personal Information, How Do I
Find the Personal Information app on the home page of Workday.
How Do I...change my preferred name?
...add or edit my work and home phone numbers?
a. From the home page, click the Personal Information app b. Under Change, select Preferred Namec. Complete the required fields ndicated by the red asteriskd. Click Submit
a. From the home page, click the Personal Information app b. Under Change, select Contact Informationc. Click Editd. Scroll to the appropriate section(s) and edit or add a
phone number. Do not enter dashes, dots etc.e. Expand the Details section and select the visibility of your
entryf. Click Submit
...add or edit emergency contacts?a. From the home page, click on the Personal Information
app b. Under Change, click Emergency Contactsc. Edit an existing contact or scroll to the bottom of the page
to Add an Alternated. Click Submit
...add or update my photo?a. From the home page, click the Personal Information app b. Under Change, click Photoc. Attach the new, appropriate photo. See appropriate photo
examplesd. Click Submit
...add or edit my business title?a. From the home page, click the Personal Information app b. Under Change, select Business Title (you may need to
click More)c. Complete the required fields indicated by the red asteriskd. Click Submit. This will also change your Outlook email tag
...add my veteran status?a. From the home page, type veteran in the Search bar b. Click Change My Veteran Status Identificationc. Under Select a Veteran Status, select the appropriate
answerd. Click Submit.
Approval ProcessThe approval process applies to the preferred name, photo and business title tasks.
Employee Submits
Manager

Benefits

This page is intentionally left blank.

Employees
https://denvergov.org/workday 8/27/2018 11Return to Table of ContentsReturn to Table of Contents
Benefits 457 Contribution
The Deferred Compensation Plan 457(b) is a voluntary retirement savings program offered by the City and County of Denver to all employees through TIAA Financial Services. The plan is designed to supplement the city's pension plan and provide additional financial and retirement planning options. You may elect payroll deductions on pre-tax and/or after-tax (Roth) basis. The city does not match deferred compensation contributions. You may enroll, increase or decrease your contributions at any time.
Process1. From the home page, click on the Benefits app
2. Under Change, click Retirement Savings
3. Click Edit
4. Enter the effective date of your 457 contribution change
5. Click OK
Note: The change to your 457 contribution will become effective the first of the month following the effective date you enter.
Approval ProcessThere is no approval required for this process.
Employees
https://denvergov.org/workday 8/27/2018 12Return to Table of ContentsReturn to Table of Contents
Benefits
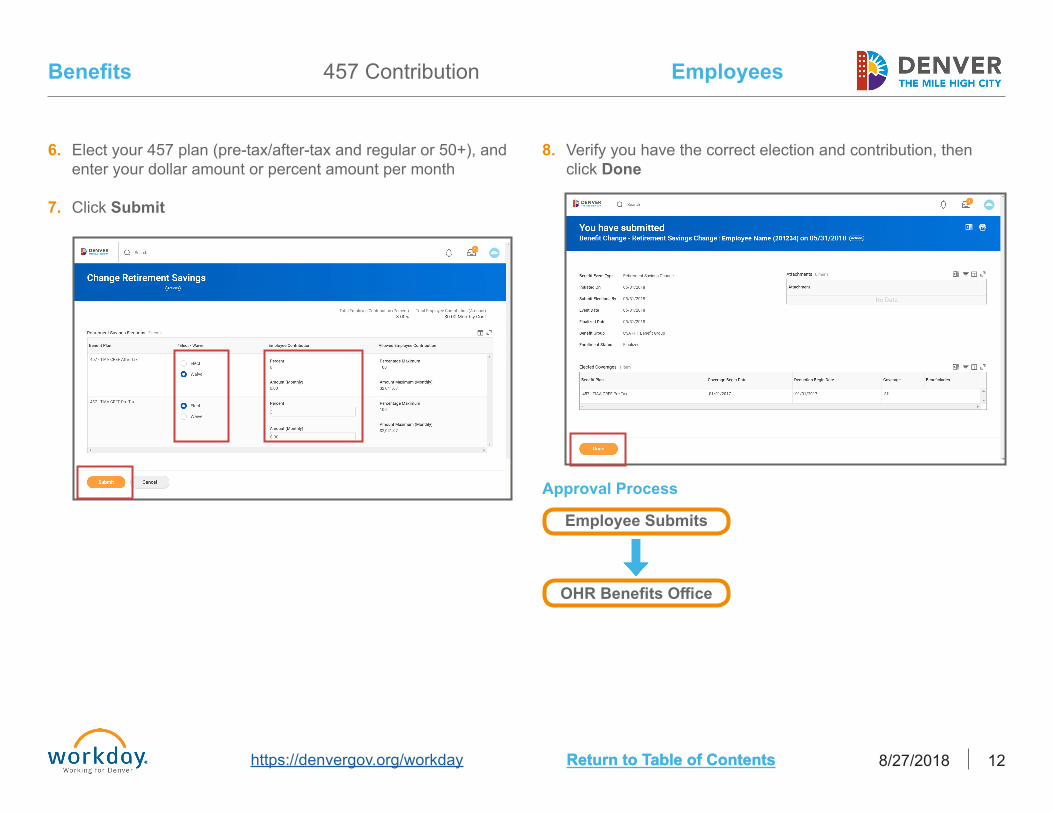
6. Elect your 457 plan (pre-tax/after-tax and regular or 50+), and enter your dollar amount or percent amount per month
7. Click Submit
8. Verify you have the correct election and contribution, then click Done
457 Contribution
Approval Process
Employee Submits
OHR Benefits Office
Employees
https://denvergov.org/workday 8/27/2018 13Return to Table of ContentsReturn to Table of Contents
Benefits Adding a Child as a Dependent
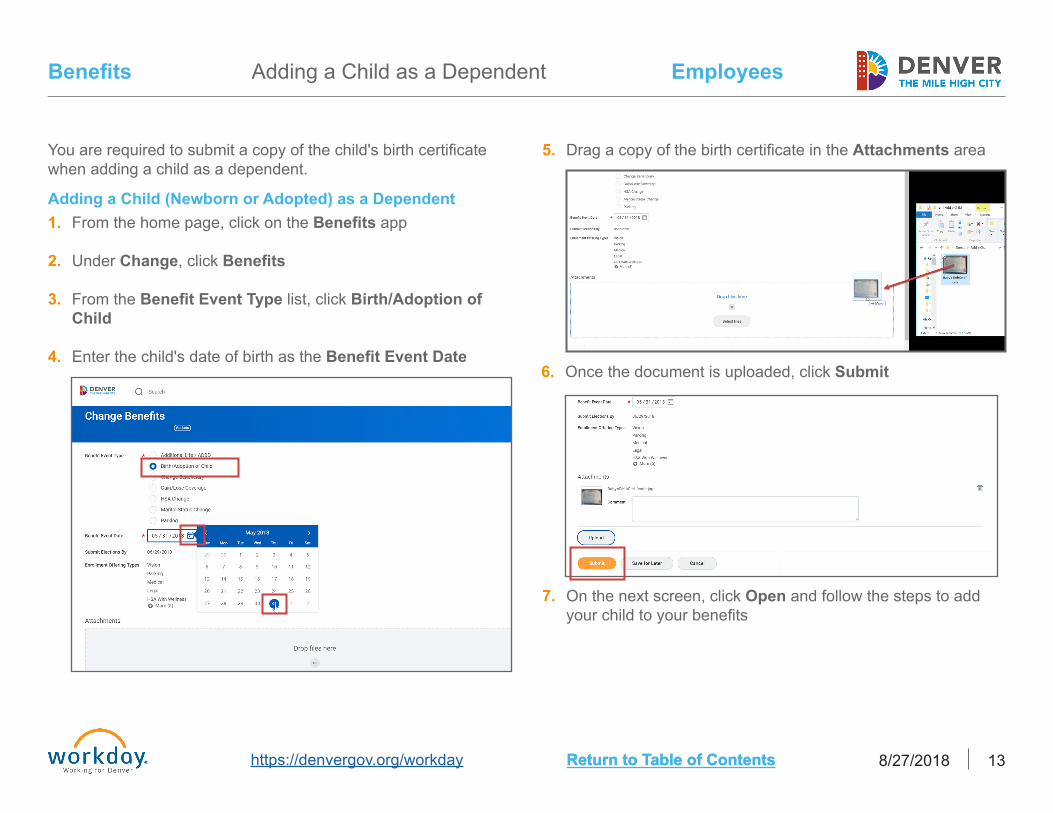
You are required to submit a copy of the child's birth certificate when adding a child as a dependent.
Adding a Child (Newborn or Adopted) as a Dependent1. From the home page, click on the Benefits app
2. Under Change, click Benefits
3. From the Benefit Event Type list, click Birth/Adoption of Child
4. Enter the child's date of birth as the Benefit Event Date
5. Drag a copy of the birth certificate in the Attachments area
6. Once the document is uploaded, click Submit
7. On the next screen, click Open and follow the steps to add your child to your benefits
Employees
https://denvergov.org/workday 8/27/2018 14Return to Table of ContentsReturn to Table of Contents
Benefits
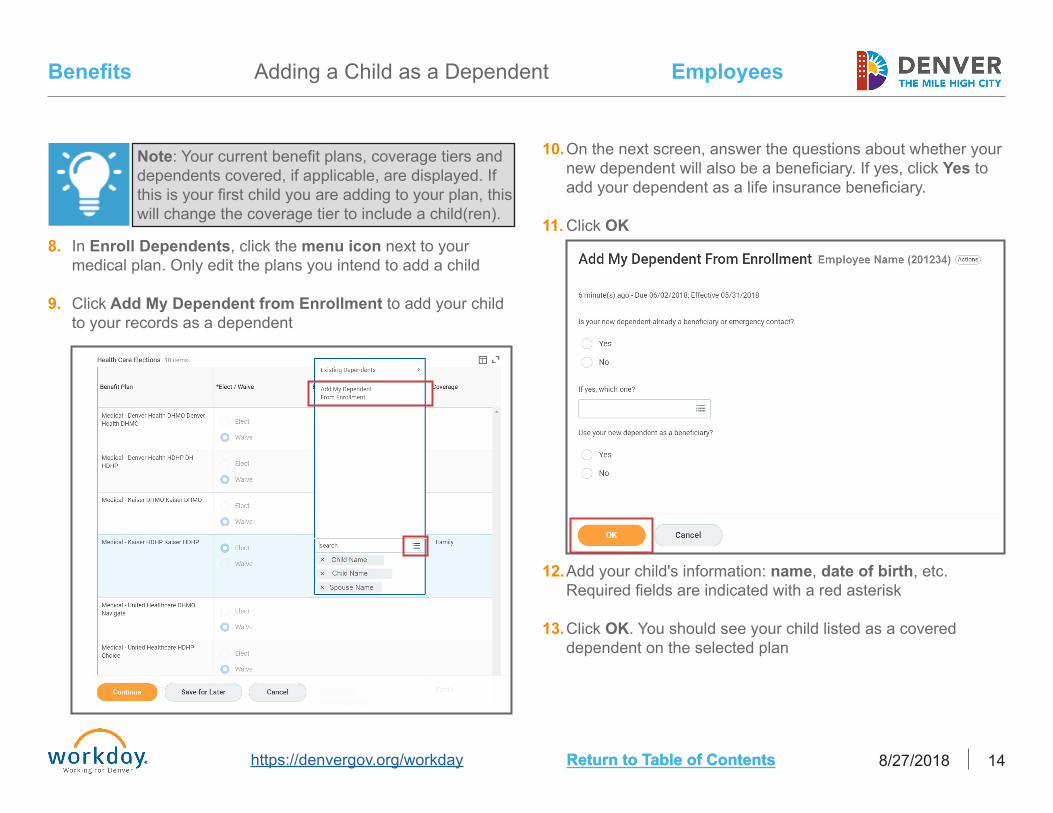
8. In Enroll Dependents, click the menu icon next to your medical plan. Only edit the plans you intend to add a child
9. Click Add My Dependent from Enrollment to add your child to your records as a dependent
10. On the next screen, answer the questions about whether your new dependent will also be a beneficiary. If yes, click Yes to add your dependent as a life insurance beneficiary.
11. Click OK
12. Add your child's information: name, date of birth, etc. Required fields are indicated with a red asterisk
13. Click OK. You should see your child listed as a covered dependent on the selected plan
Note: Your current benefit plans, coverage tiers and dependents covered, if applicable, are displayed. If this is your first child you are adding to your plan, this will change the coverage tier to include a child(ren).
Adding a Child as a Dependent

Employees
https://denvergov.org/workday 8/27/2018 15Return to Table of ContentsReturn to Table of Contents
Benefits
14. To add your child to other benefit plans, click the menu icon in Enroll Dependents and click Existing Dependent
15. Check the box next to your child's name to add them to other plans
16. When you have finished adding your child to your medical, dental and/or vision plans, click Continue
17. Enter your child's Social Security Number (SSN). If you do not have their SSN at this time, you must follow up with the Benefits Office when it is obtained
18. You will be asked to make changes to your other plan elections like HSA contributions, flexible spending accounts and life insurance, if applicable. Click Continue to proceed through these options and make changes if necessary
19. The dependent changes you have made are listed. Agree to your changes by clicking I Agree
20. Click Submit
21. Click Print to get a printed copy and/or click Done to finish the process
Approval Process
Employee Submits
OHR Benefits Office
Adding a Child as a Dependent
Employees
https://denvergov.org/workday 8/27/2018 16Return to Table of ContentsReturn to Table of Contents
Benefits Additional Life Insurance
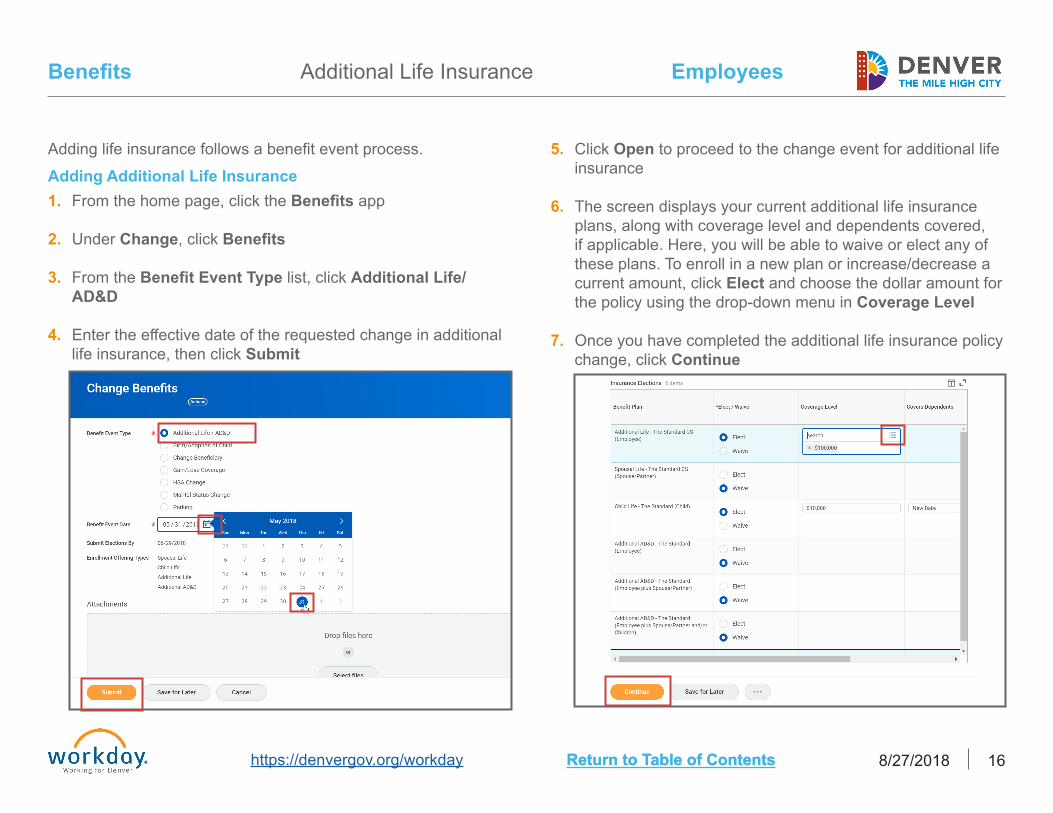
Adding life insurance follows a benefit event process.
1. From the home page, click the Benefits app
2. Under Change, click Benefits
3. From the Benefit Event Type list, click Additional Life/AD&D
4. Enter the effective date of the requested change in additional life insurance, then click Submit
5. Click Open to proceed to the change event for additional life insurance
6. The screen displays your current additional life insurance plans, along with coverage level and dependents covered, if applicable. Here, you will be able to waive or elect any of these plans. To enroll in a new plan or increase/decrease a current amount, click Elect and choose the dollar amount for the policy using the drop-down menu in Coverage Level
7. Once you have completed the additional life insurance policy change, click Continue
Adding Additional Life Insurance
Employees
https://denvergov.org/workday 8/27/2018 17Return to Table of ContentsReturn to Table of Contents
Benefits Additional Life Insurance
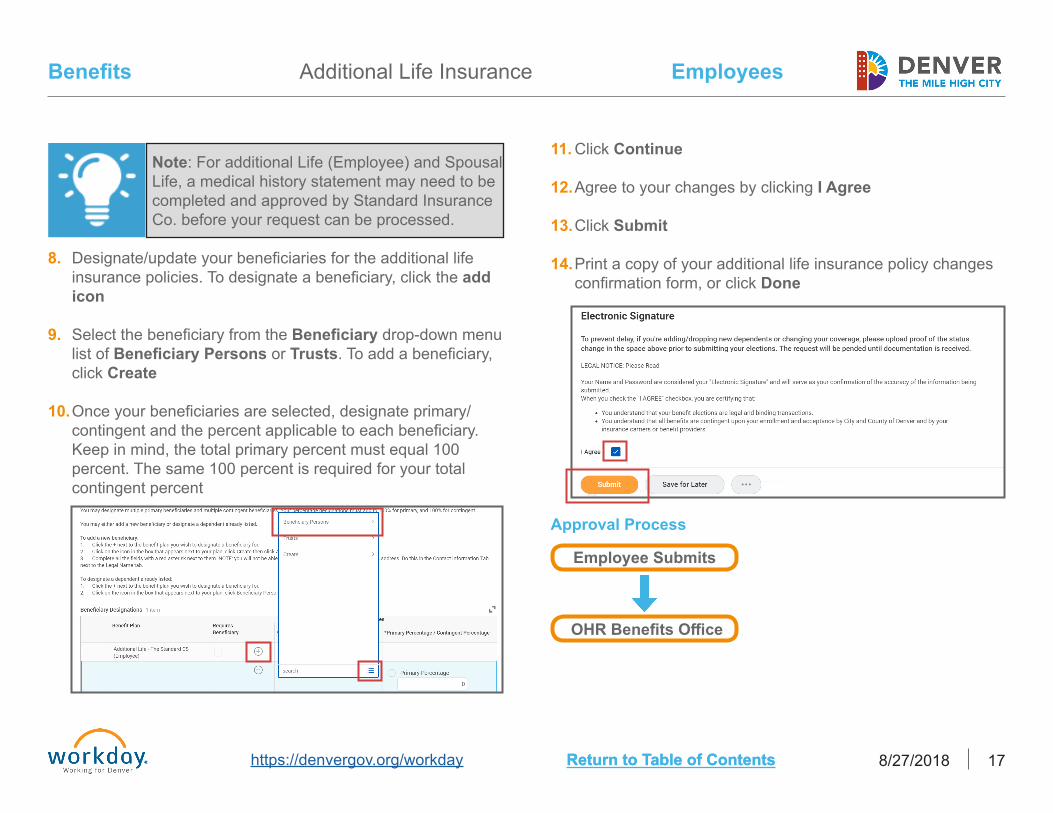
Note: For additional Life (Employee) and Spousal Life, a medical history statement may need to be completed and approved by Standard Insurance Co. before your request can be processed.
8. Designate/update your beneficiaries for the additional life insurance policies. To designate a beneficiary, click the add icon
9. Select the beneficiary from the Beneficiary drop-down menu list of Beneficiary Persons or Trusts. To add a beneficiary, click Create
10. Once your beneficiaries are selected, designate primary/contingent and the percent applicable to each beneficiary. Keep in mind, the total primary percent must equal 100 percent. The same 100 percent is required for your total contingent percent
11. Click Continue
12. Agree to your changes by clicking I Agree
13. Click Submit
14. Print a copy of your additional life insurance policy changes confirmation form, or click Done
Approval Process
Employee Submits
OHR Benefits Office
Employees
https://denvergov.org/workday 8/27/2018 18Return to Table of ContentsReturn to Table of Contents
Benefits HSA Contributions
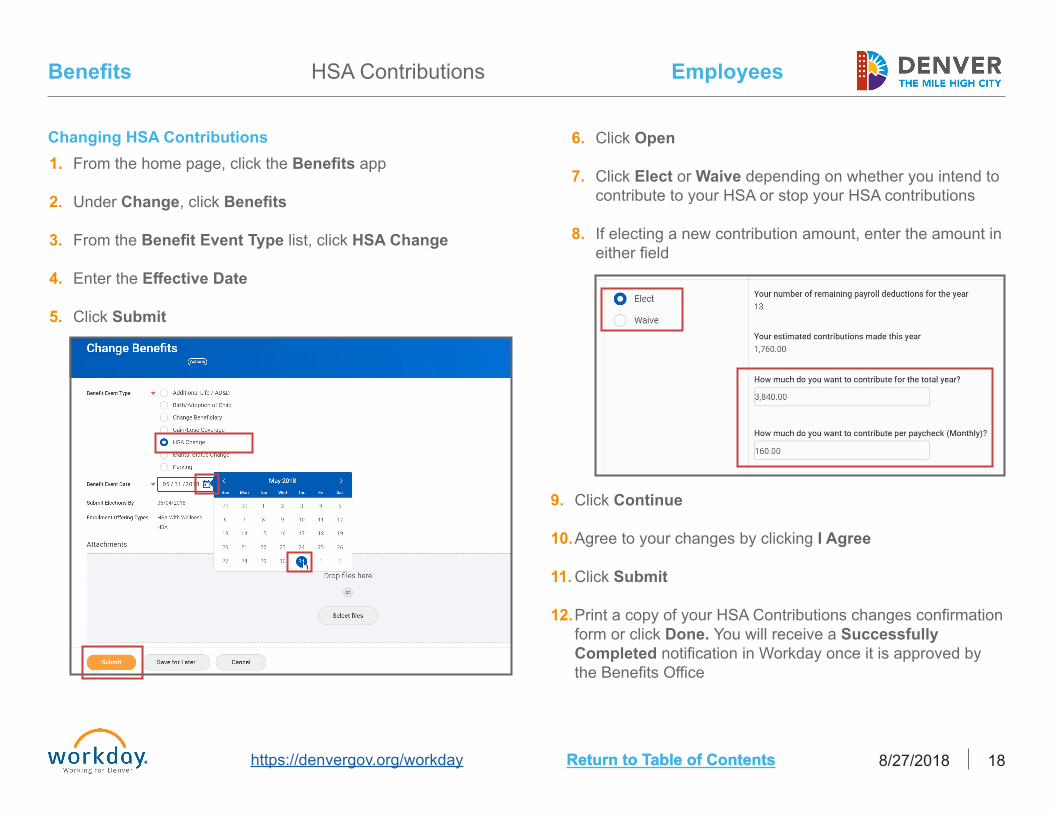
9. Click Continue
10. Agree to your changes by clicking I Agree
11. Click Submit
12. Print a copy of your HSA Contributions changes confirmation form or click Done. You will receive a Successfully Completed notification in Workday once it is approved by the Benefits Office
Changing HSA Contributions1. From the home page, click the Benefits app
2. Under Change, click Benefits
3. From the Benefit Event Type list, click HSA Change
4. Enter the Effective Date
5. Click Submit
6. Click Open
7. Click Elect or Waive depending on whether you intend to contribute to your HSA or stop your HSA contributions
8. If electing a new contribution amount, enter the amount in either field
Employees
https://denvergov.org/workday 8/27/2018 19Return to Table of ContentsReturn to Table of Contents
Benefits
Approval Process
Employee Submits
OHR Benefits Office
HSA Contributions
Employees
https://denvergov.org/workday 8/27/2018 20Return to Table of ContentsReturn to Table of Contents
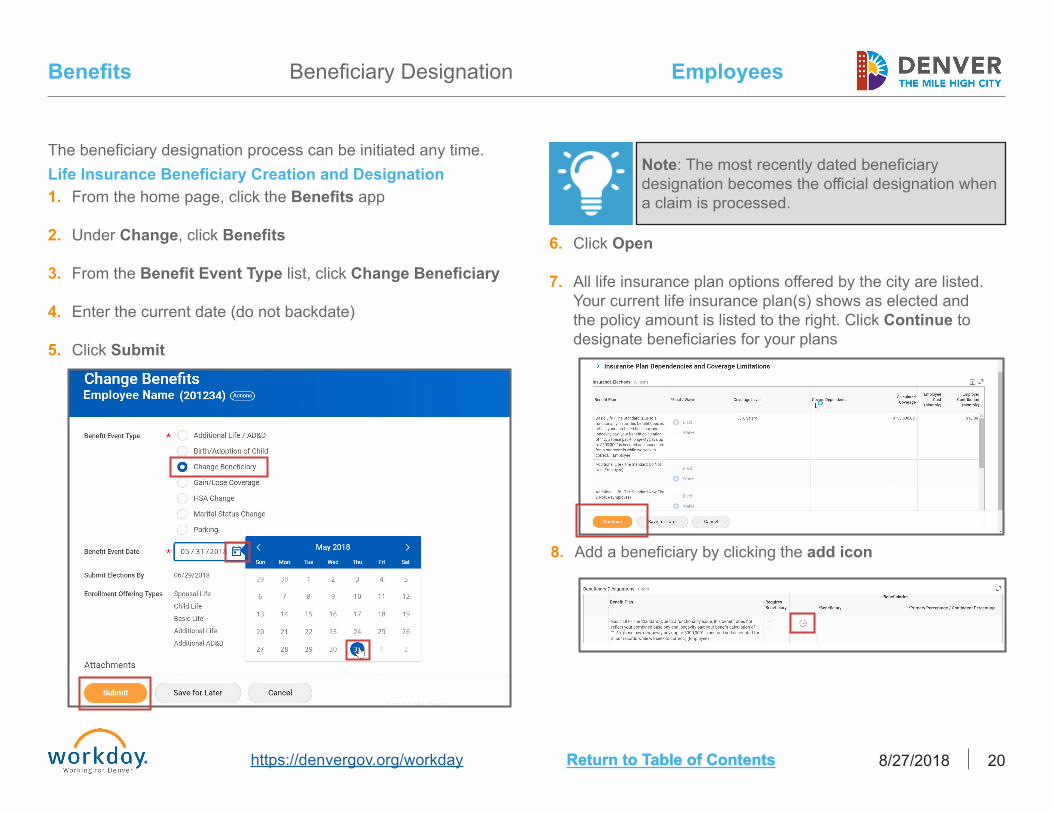
Benefits Beneficiary Designation
The beneficiary designation process can be initiated any time.Life Insurance Beneficiary Creation and Designation1. From the home page, click the Benefits app
2. Under Change, click Benefits
3. From the Benefit Event Type list, click Change Beneficiary
4. Enter the current date (do not backdate)
5. Click Submit
Note: The most recently dated beneficiary designation becomes the official designation when a claim is processed.
6. Click Open
7. All life insurance plan options offered by the city are listed. Your current life insurance plan(s) shows as elected and the policy amount is listed to the right. Click Continue to designate beneficiaries for your plans
8. Add a beneficiary by clicking the add icon
Employees
https://denvergov.org/workday 8/27/2018 21Return to Table of ContentsReturn to Table of Contents
Benefits Beneficiary Designation
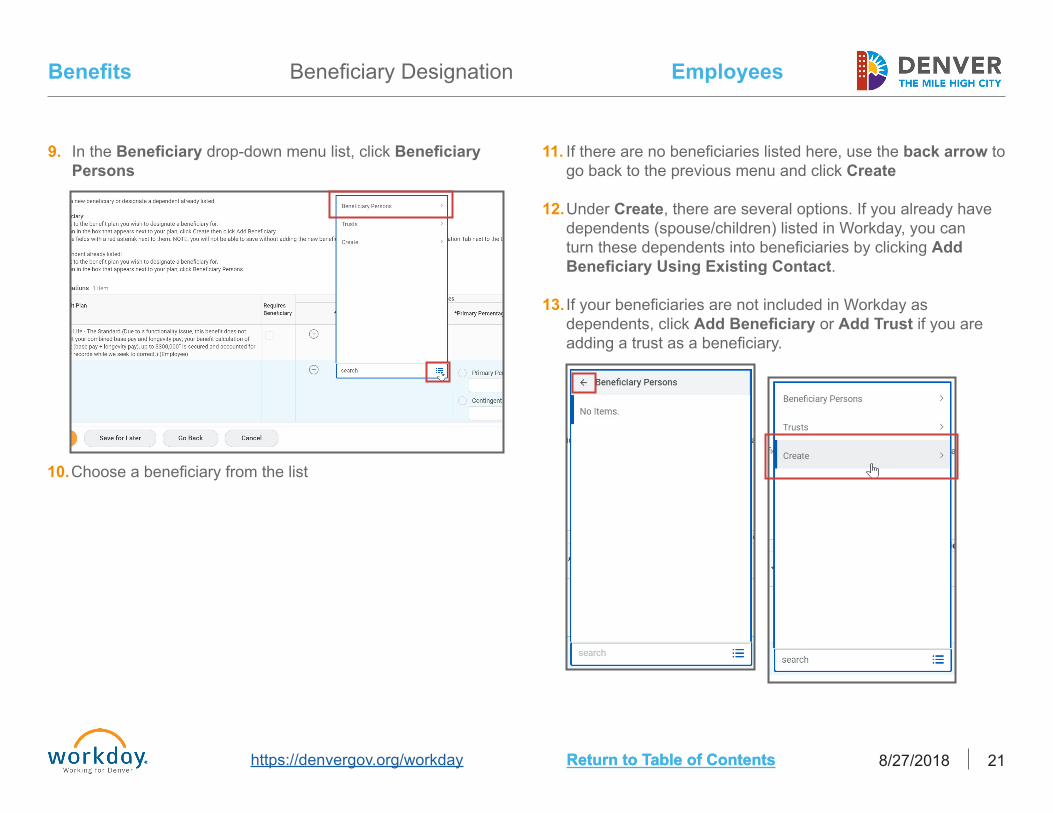
9. In the Beneficiary drop-down menu list, click Beneficiary Persons
10. Choose a beneficiary from the list
11. If there are no beneficiaries listed here, use the back arrow to go back to the previous menu and click Create
12. Under Create, there are several options. If you already have dependents (spouse/children) listed in Workday, you can turn these dependents into beneficiaries by clicking Add Beneficiary Using Existing Contact.
13. If your beneficiaries are not included in Workday as dependents, click Add Beneficiary or Add Trust if you are adding a trust as a beneficiary.
Employees
https://denvergov.org/workday 8/27/2018 22Return to Table of ContentsReturn to Table of Contents
Benefits Beneficiary Designation
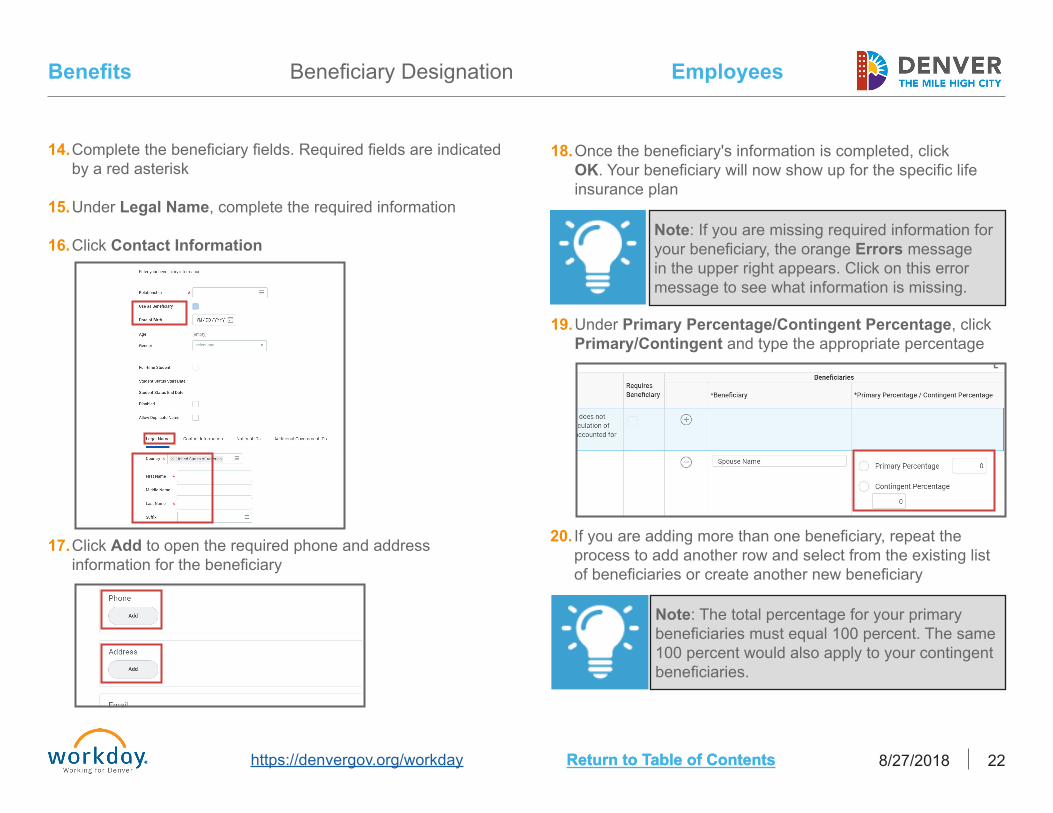
14. Complete the beneficiary fields. Required fields are indicated by a red asterisk
15. Under Legal Name, complete the required information
16. Click Contact Information Note: If you are missing required information for your beneficiary, the orange Errors message in the upper right appears. Click on this error message to see what information is missing.
Note: The total percentage for your primary beneficiaries must equal 100 percent. The same 100 percent would also apply to your contingent beneficiaries.
17. Click Add to open the required phone and address information for the beneficiary
18. Once the beneficiary's information is completed, click OK. Your beneficiary will now show up for the specific life insurance plan
19. Under Primary Percentage/Contingent Percentage, click Primary/Contingent and type the appropriate percentage
20. If you are adding more than one beneficiary, repeat the process to add another row and select from the existing list of beneficiaries or create another new beneficiary

Employees
https://denvergov.org/workday 8/27/2018 23Return to Table of ContentsReturn to Table of Contents
Benefits
21. Repeat this process for additional life insurance policies, if applicable. You can designate beneficiaries for your Basic Life Insurance, Additional Life Insurance and AD&D plans. For Spouse and Child Life Insurance plans, you are automatically the beneficiary, so there is no need to designate a beneficiary for those additional life plans. DERP pension plans are not stored in your Workday records. These beneficiaries are maintained by DERP
22. Click Continue
23. The beneficiary changes you have made are listed. Agree to your changes by clicking I Agree
24. Click Submit
Beneficiary Designation
25. Click Print to get a printed copy and/or click Done to finish the process
Approval Process
Employee Submits
OHR Benefits Office

This page is intentionally left blank.

Performance

This page is intentionally left blank.
Employees
https://denvergov.org/workday 8/27/2018 27Return to Table of ContentsReturn to Table of Contents
Performance Add and Edit Goals
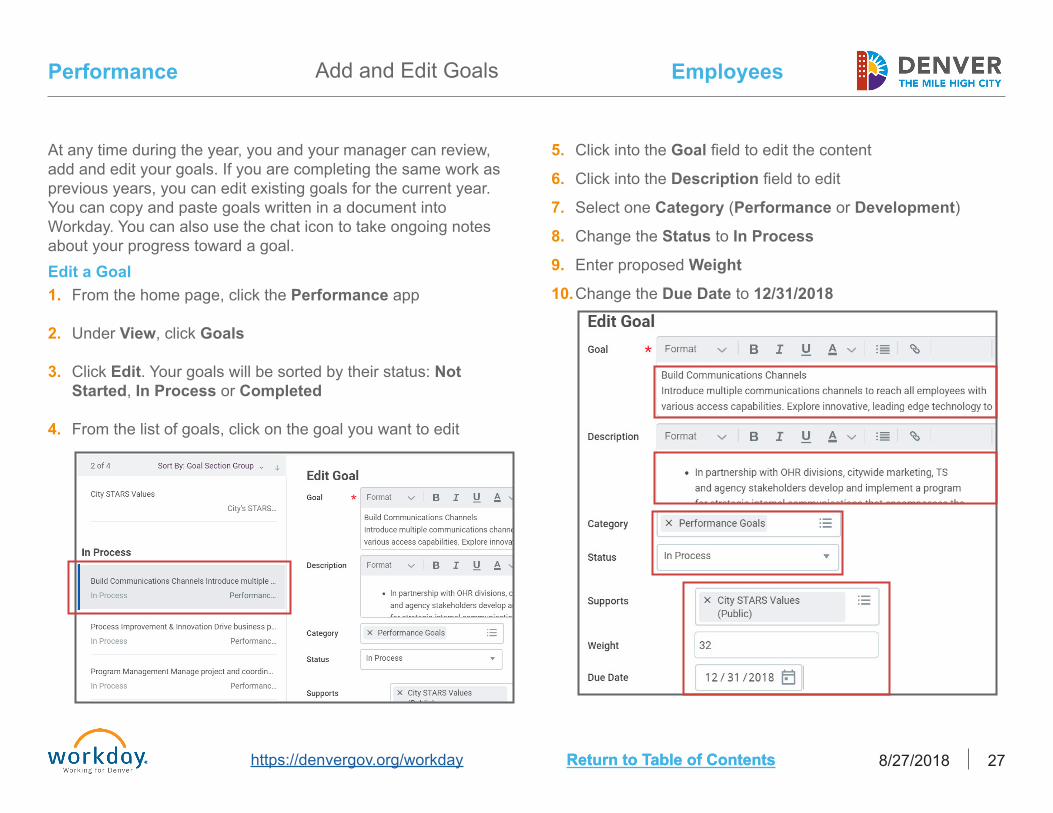
At any time during the year, you and your manager can review, add and edit your goals. If you are completing the same work as previous years, you can edit existing goals for the current year. You can copy and paste goals written in a document into Workday. You can also use the chat icon to take ongoing notes about your progress toward a goal.Edit a Goal1. From the home page, click the Performance app
2. Under View, click Goals
3. Click Edit. Your goals will be sorted by their status: Not Started, In Process or Completed
4. From the list of goals, click on the goal you want to edit
5. Click into the Goal field to edit the content
6. Click into the Description field to edit
7. Select one Category (Performance or Development)
8. Change the Status to In Process
9. Enter proposed Weight
10. Change the Due Date to 12/31/2018
Employees
https://denvergov.org/workday 8/27/2018 28Return to Table of ContentsReturn to Table of Contents
Performance
Add a New Goal
Add and Edit Goals
1. From the home page, click the Performance app
2. Under View, click Goals
3. Click Edit, then click Add
4. Complete the required fields
5. When you are finished, click Done. To add another goal, click Do Another
6. When you have added all your goals, click Submit to send the goal to your manager. Click Save for Later to save the goal in your Workday inbox and continue working on it later
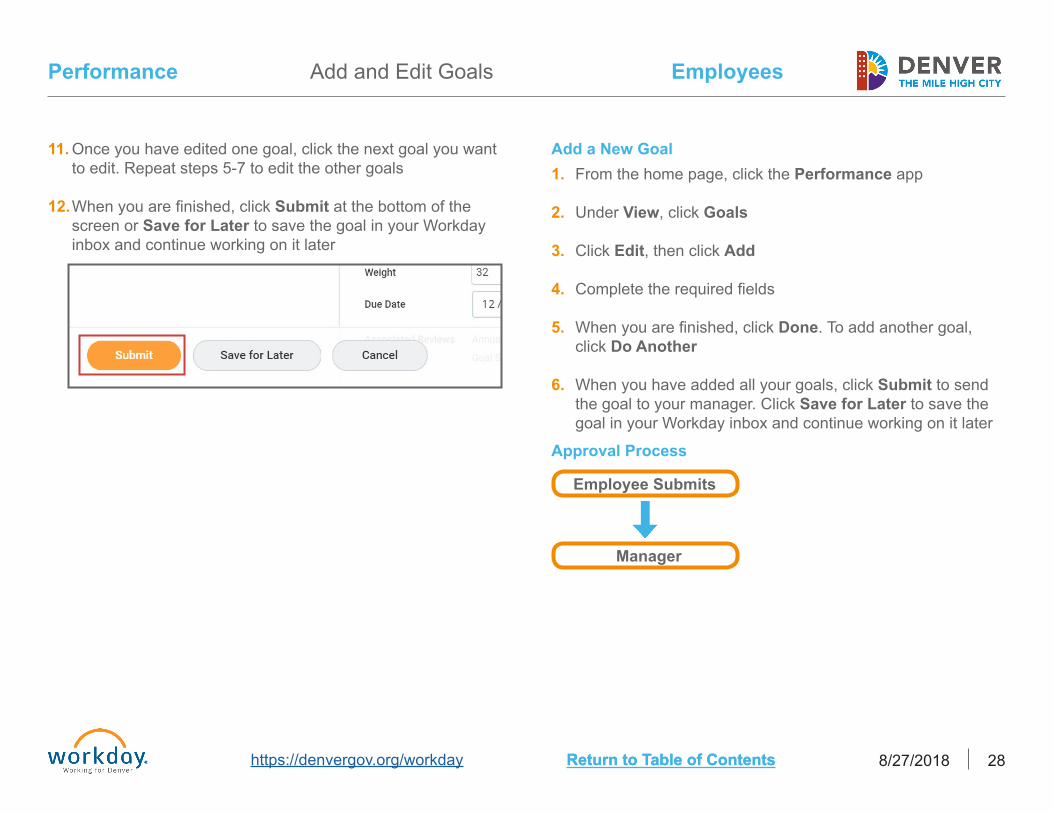
11. Once you have edited one goal, click the next goal you want to edit. Repeat steps 5-7 to edit the other goals
12. When you are finished, click Submit at the bottom of the screen or Save for Later to save the goal in your Workday inbox and continue working on it later
Approval Process
Employee Submits
Manager

Employees
https://denvergov.org/workday 8/27/2018 29Return to Table of ContentsReturn to Table of Contents
Performance Archive Goals
Once you set your new goals for the year, you may want to archive goals that are no longer needed. This process explains how to archive your previous goals so they don't appear on your profile or your Performance app. Once goals are archived, they can be unarchived if necessary.Archive a Goal1. From the home page, click the Performance app
2. Under Actions, click Archive
3. Click OK. Your name will be selected in the Worker field
4. Click Archive Goals. All your goals will appear with a check box in the Archive columns
5. From the list of goals, click the checkbox next to the goal you want to archive
6. Click as many goals as you would like to archive
7. When you are finished, click OK
Approval Process
Employee Submits
Manager
Employees
https://denvergov.org/workday 8/27/2018 30Return to Table of ContentsReturn to Table of Contents
Performance Ongoing Check-Ins
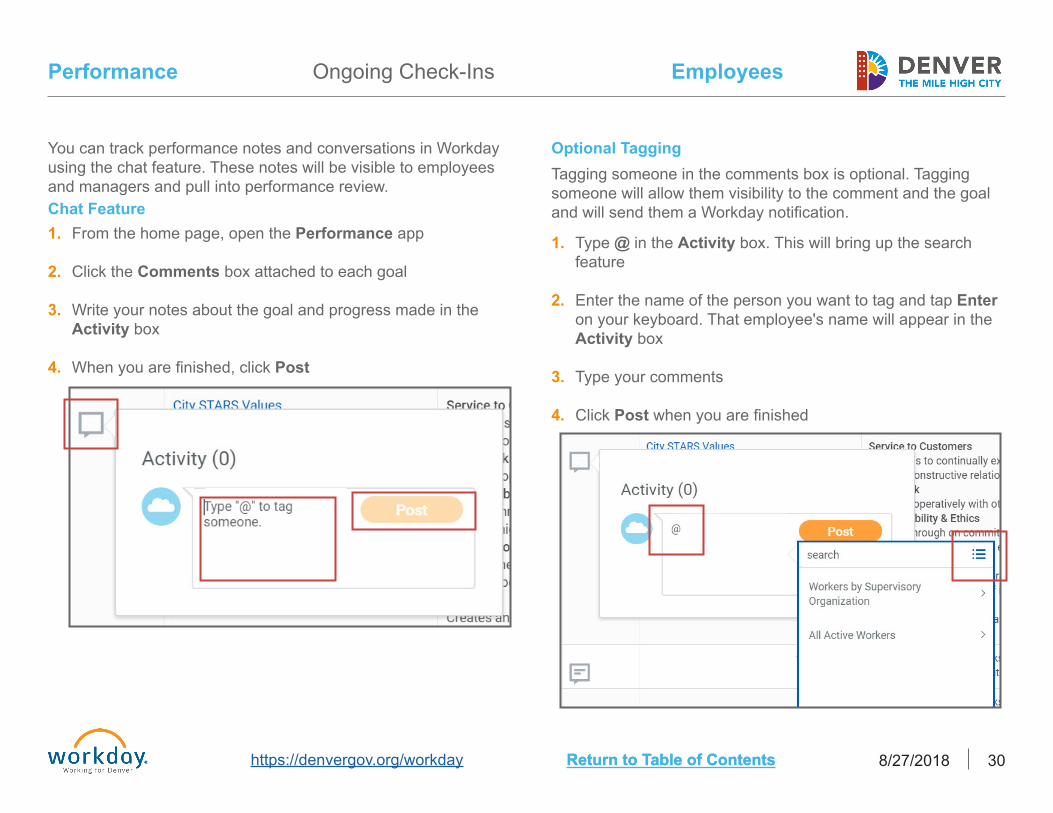
You can track performance notes and conversations in Workday using the chat feature. These notes will be visible to employees and managers and pull into performance review.Chat Feature1. From the home page, open the Performance app
2. Click the Comments box attached to each goal
3. Write your notes about the goal and progress made in the Activity box
4. When you are finished, click Post
Optional TaggingTagging someone in the comments box is optional. Tagging someone will allow them visibility to the comment and the goal and will send them a Workday notification.
1. Type @ in the Activity box. This will bring up the search feature
2. Enter the name of the person you want to tag and tap Enter on your keyboard. That employee's name will appear in the Activity box
3. Type your comments
4. Click Post when you are finished

Career with the City

This page is intentionally left blank.

Employees
https://denvergov.org/workday 8/27/2018 33Return to Table of ContentsReturn to Table of Contents
Career with the City Build a Talent Profile
In your Talent Profile you can share information such as job history, education, skills, certifications and language proficiency. Updating your Talent Profile allows managers and Human Resources to utilize that information for recruiting, career development and mobility. Keeping your Talent Profile updated also makes it easy to apply for jobs at the city.
Do not complete the Career Interests or Training tabs.
1. From any page, click your profile icon
2. Click View Profile
3. Click Career. The Talent Profile is completed in the Career section
Career InterestsDo not complete this tab.
Locate Career Section
Employees
https://denvergov.org/workday 8/27/2018 34Return to Table of ContentsReturn to Table of Contents
Career with the City
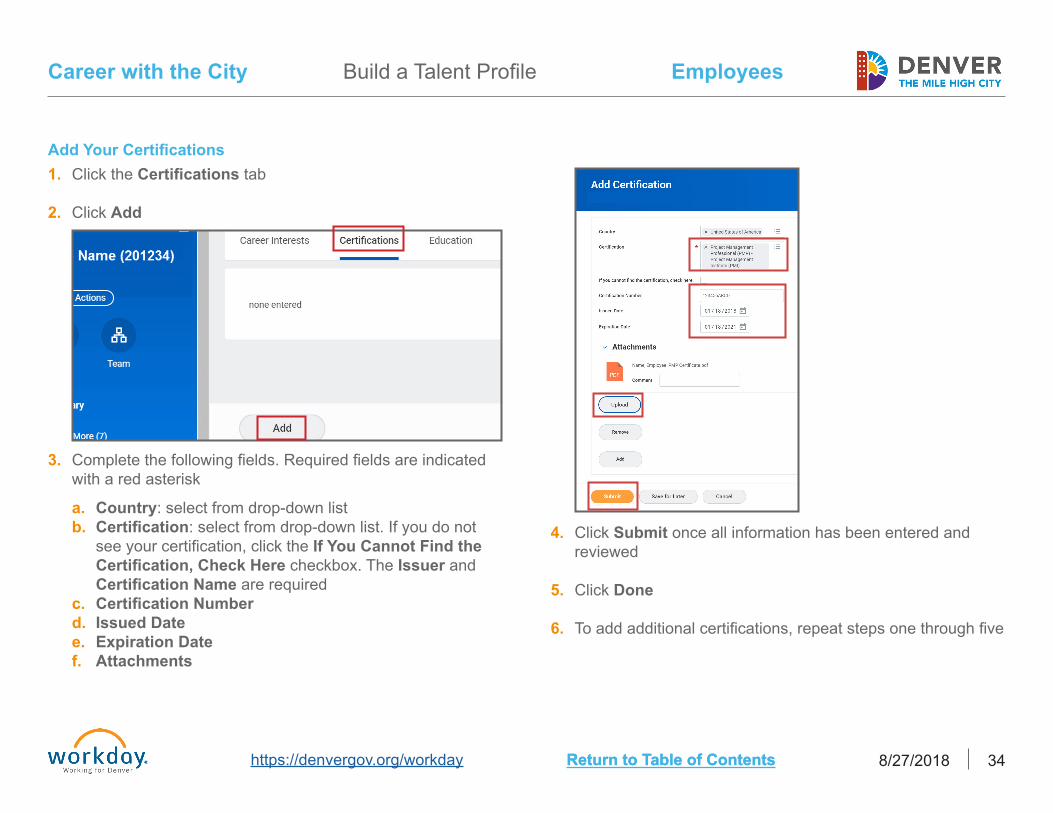
4. Click Submit once all information has been entered and reviewed
5. Click Done
6. To add additional certifications, repeat steps one through five
3. Complete the following fields. Required fields are indicated with a red asterisk
a. Country: select from drop-down listb. Certification: select from drop-down list. If you do not
see your certification, click the If You Cannot Find the Certification, Check Here checkbox. The Issuer and Certification Name are required
c. Certification Numberd. Issued Datee. Expiration Datef. Attachments
1. Click the Certifications tab
2. Click Add
Add Your Certifications
Build a Talent Profile
Employees
https://denvergov.org/workday 8/27/2018 35Return to Table of ContentsReturn to Table of Contents
Career with the City
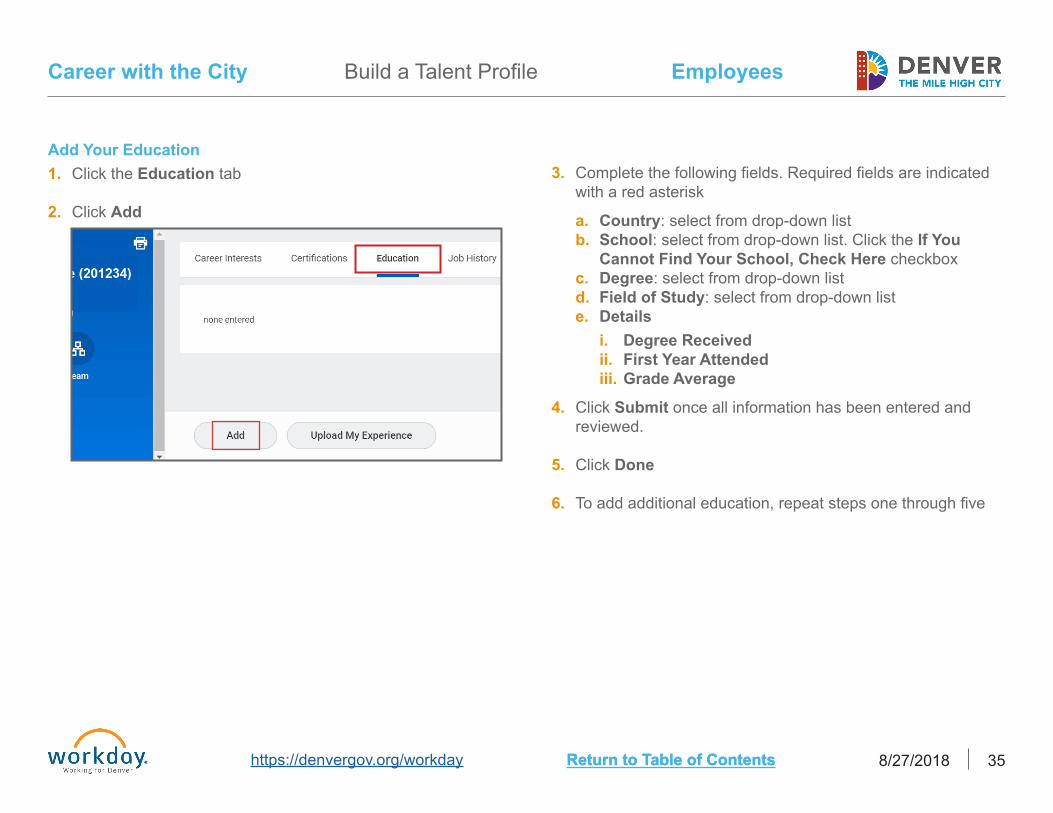
1. Click the Education tab
2. Click Add
Add Your Education3. Complete the following fields. Required fields are indicated
with a red asterisk
a. Country: select from drop-down listb. School: select from drop-down list. Click the If You
Cannot Find Your School, Check Here checkboxc. Degree: select from drop-down listd. Field of Study: select from drop-down liste. Details
i. Degree Receivedii. First Year Attended iii. Grade Average
4. Click Submit once all information has been entered and reviewed.
5. Click Done
6. To add additional education, repeat steps one through five
Build a Talent Profile

Employees
https://denvergov.org/workday 8/27/2018 36Return to Table of ContentsReturn to Table of Contents
Career with the City
1. Click the Job History tab
2. Click Add
Add Your Job History3. Complete the following fields. Required fields are indicated
with a red asterisk
a. Job Titleb. Company Name: select from drop-down list
i. If the company name is not listed, click the Create New checkbox to add the company
b. Start Date c. End Dated. Details
i. Responsibilities and Achievementsii. Locationiii. Referenceiv. Contact information
f. To save updated Job History, click the check mark icon.Click the X icon to remove an item
4. Click Submit once all information has been entered and reviewed
5. Click Done
6. To add additional job history, repeat steps one through five
Build a Talent Profile
Employees
https://denvergov.org/workday 8/27/2018 37Return to Table of ContentsReturn to Table of Contents
Career with the City
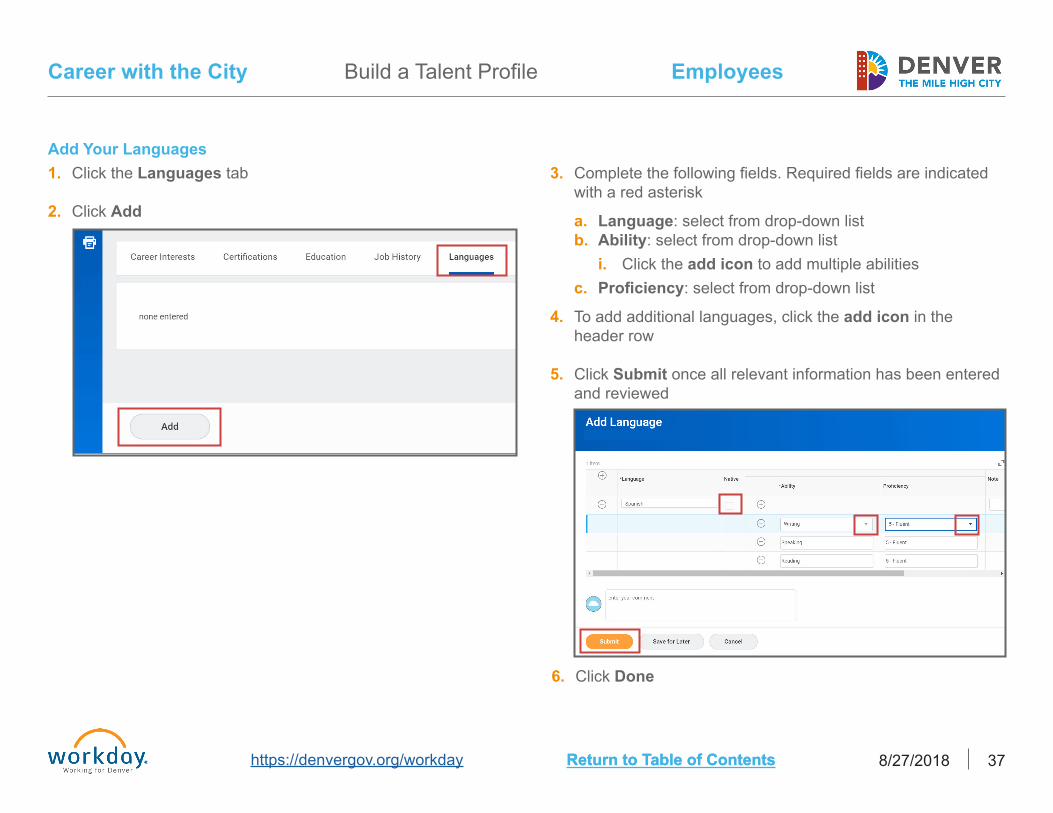
1. Click the Languages tab
2. Click Add
Add Your Languages3. Complete the following fields. Required fields are indicated
with a red asterisk
a. Language: select from drop-down listb. Ability: select from drop-down list
i. Click the add icon to add multiple abilities c. Proficiency: select from drop-down list
4. To add additional languages, click the add icon in the header row
5. Click Submit once all relevant information has been entered and reviewed
6. Click Done
Build a Talent Profile

Employees
https://denvergov.org/workday 8/27/2018 38Return to Table of ContentsReturn to Table of Contents
Career with the City
Complete Your Professional Profile
Training Do not complete this tab.
1. Click the Professional Profile tab
2. Under Skills, click Add
3. Complete the following fields. Required fields are identified with a red asterisk
i. Skill: Select from dropdown list or click Create New
5. Click the check mark when complete
6. To add additional skills, click Add and repeat steps four through five
7. Click the back button in your browser to return to the Talent Profile
8. Edit or Add to your Job History, Education and Skills in the Professional Profile tab as needed
The information you entered in the Education and Job History tabs will display in the Professional Profile tab. From here, you can edit and add to your education, skills and job history.
Approval ProcessThere is no approval required for this process.
Build a Talent Profile

Employees
https://denvergov.org/workday 8/27/2018 39Return to Table of ContentsReturn to Table of Contents
Career with the City Build a Talent Profile Using Resume
Upload Resume to Complete Talent Profile
Another way to complete your Talent Profile is by uploading your resume. Your Talent Profile is where you can share information such as job history, education, skills, certifications and language proficiency. Updating your Talent Profile allows managers and Human Resources to utilize that information for recruiting, career development and mobility. Keeping your Talent Profile updated also makes it easy to apply for jobs at the city.
Do not complete the Career Interests or Training tabs.
1. From any page, click your profile icon (it is either the Workday cloud, or your picture)
2. Click View Profile
3. Click Career. Talent Profile is completed in the Career section
4. Click the Professional Profile tab. Information added to the Professional Profile tab will also appear in the Job History and Education tabs
5. Under Upload My Experience, click Upload
6. Either drag and drop your resume into the box or click Select Files to find your resume
7. Click OK once the file is selected

Employees
https://denvergov.org/workday 8/27/2018 40Return to Table of ContentsReturn to Table of Contents
Career with the City
8. When the upload is successful, review your Education
9. Click the pencil icon to make any edits to the following:
a. Country: select from drop-down listb. School: select from drop-down list
i. If your school is not listed, select Other to add your school
c. Degree: select from drop-down listd. Field of Study: select from drop-down liste. Under Details, complete Degree Received, First Year
Attended and Grade Averagef. Click the check mark icon to save
7. Click the X icon to delete any duplicates or to remove an item
9. Review your Job History
10. Click the pencil icon to make any edits to the following fields:
a. Job Titleb. Company Name: select from drop-down list
i. If the company name is not listed, click the Create New checkbox to add the company
c. Start Date d. End Datee. Under Details, complete Responsibilities and
Achievements, Location, Reference and Contact Information
f. Click the check mark icon to save
9. Click Next
8. Click Next when complete
Build a Talent Profile Using Resume

Employees
https://denvergov.org/workday 8/27/2018 41Return to Table of ContentsReturn to Table of Contents
Career with the City
10. Thoroughly review your Education and Job History information
11. Click the pencil icon to make any changes
12. Click Submit
13. Click Done
14. To continue with your Talent Profile, click on your profile icon
15. Click Career
Add Your Certifications1. Click the Certifications tab
2. Click Add
3. Complete the following fields. Required fields are indicated with a red asterisk
a. Country: select from drop-down listb. Certification: select from drop-down list. If you do not
see your certification, click the If You Cannot Find the Certification, Check Here checkbox. The Issuer and Certification Name are required
c. Certification Numberd. Issued Datee. Expiration Datef. Attachments
Build a Talent Profile Using Resume

Employees
https://denvergov.org/workday 8/27/2018 42Return to Table of ContentsReturn to Table of Contents
Career with the City
4. Click Submit once all information has been entered and reviewed
5. Click Done
6. To add additional certifications, repeat steps one through five
1. Click the Languages tab
2. Click Add
Add Your Languages
3. Complete the following fields. Required fields are indicated with a red asterisk
a. Language: select from drop-down listb. Ability: select from drop-down list
i. Click the + icon to add multiple abilities c. Proficiency: select from drop-down list
6. Click Done Approval Process
4. To add additional languages, click the add icon in the header row
5. Click Submit once all relevant information has been entered and reviewed
There is no approval required for this process.
Build a Talent Profile Using Resume
Employees
https://denvergov.org/workday 8/27/2018 43Return to Table of ContentsReturn to Table of Contents
Career with the City Apply for a Job
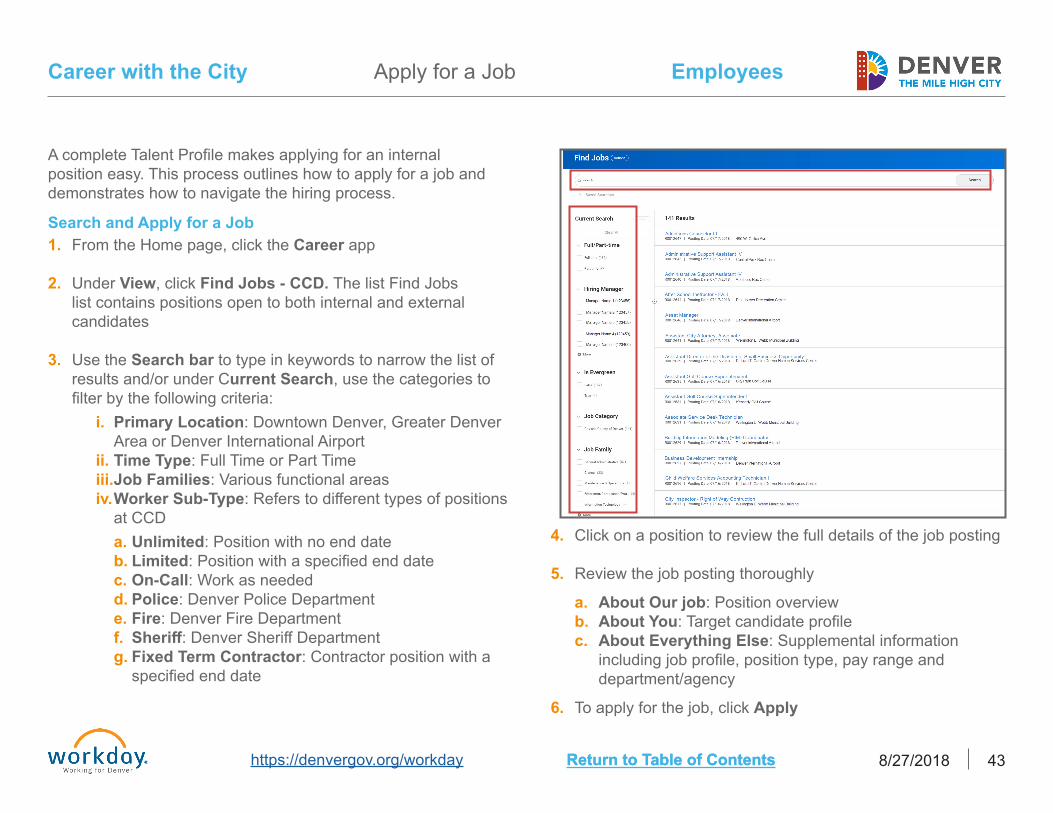
A complete Talent Profile makes applying for an internal position easy. This process outlines how to apply for a job and demonstrates how to navigate the hiring process.
1. From the Home page, click the Career app
2. Under View, click Find Jobs - CCD. The list Find Jobs list contains positions open to both internal and external candidates
3. Use the Search bar to type in keywords to narrow the list of results and/or under Current Search, use the categories to filter by the following criteria:
i. Primary Location: Downtown Denver, Greater Denver Area or Denver International Airport
ii. Time Type: Full Time or Part Timeiii. Job Families: Various functional areasiv. Worker Sub-Type: Refers to different types of positions
at CCD a. Unlimited: Position with no end dateb. Limited: Position with a specified end datec. On-Call: Work as neededd. Police: Denver Police Departmente. Fire: Denver Fire Departmentf. Sheriff: Denver Sheriff Departmentg. Fixed Term Contractor: Contractor position with a
specified end date
Search and Apply for a Job
4. Click on a position to review the full details of the job posting
5. Review the job posting thoroughly
a. About Our job: Position overviewb. About You: Target candidate profilec. About Everything Else: Supplemental information
including job profile, position type, pay range and department/agency
6. To apply for the job, click Apply

Employees
https://denvergov.org/workday 8/27/2018 44Return to Table of ContentsReturn to Table of Contents
Career with the City
7. On the Apply to Job page, if your Talent Profile has already been created, the information will appear under Job History, Education, Languages and Skills. If your Talent Profile has not been created, refer to Talent Profile section to complete
8. Click Select Files under Resume/Cover Letter.
a. Select your resume, cover letter and any other relevant documents from your files. You should always upload a new resume and cover letter for each new application even if a document is uploaded in your Talent Profile
9. Scroll down to answer Application Questions
10. Answer all the questions truthfully and accurately and review before clicking submit. Do not select None of the Above as a response because the system will report an error message and require a selection
11. Click Submit once your application is complete
12. Click Done
Apply for a Job

Employees
https://denvergov.org/workday 8/27/2018 45Return to Table of ContentsReturn to Table of Contents
Career with the City
Check the Status of Job Application 1. From the home page, click the Career app
2. Under View, click My Applications
3. A table will display with a list of all the positions you have applied for with one of the following stages:
a. Not Selected: No longer under considerationb. Application Under Review: Initial review of applicationc. Next Level Review: Additional review of applicationd. Assessment/Testing: Required testing in processe. Under Consideration: Participating in interviews and
finalist for hiref. Pre-Employment Screenings: Selected for hire and
pending required pre-employment contingenciesg. Processing Hire: Successfully completed pre-employment
contingencies and cleared to start
5. Check your Workday inbox regularly for communications. Candidates will be notified immediately when they are no longer in consideration for a position
Apply for a Job

This page is intentionally left blank.

Hiring

This page is intentionally left blank.

Employees
https://denvergov.org/workday 8/27/2018 49Return to Table of ContentsReturn to Table of Contents
Hiring Refer a Candidate
Employees can refer an internal or external candidate to a specific open position.
1. From the home page, click the Careers app
2. Under View, click Find Jobs - CCD
3. Select a position from the list
4. On View Job Posting Details, click the Refer button
5. Under Referral Details, enter the potential candidate's firstand last name
6. Under Contact Information, enter the potential candidate'semail address and phone number
7. Under Relationship Details, select your relationship to thepotential candidate
8. Under Comments, add any relevant information
9. Information under Referral Address is not required
10. Under Attach Resume/Cover Letter, upload a resume orany additional relevant documents
11. Click SubmitRefer a Candidate
Employees
https://denvergov.org/workday 8/27/2018 50Return to Table of ContentsReturn to Table of Contents
Hiring
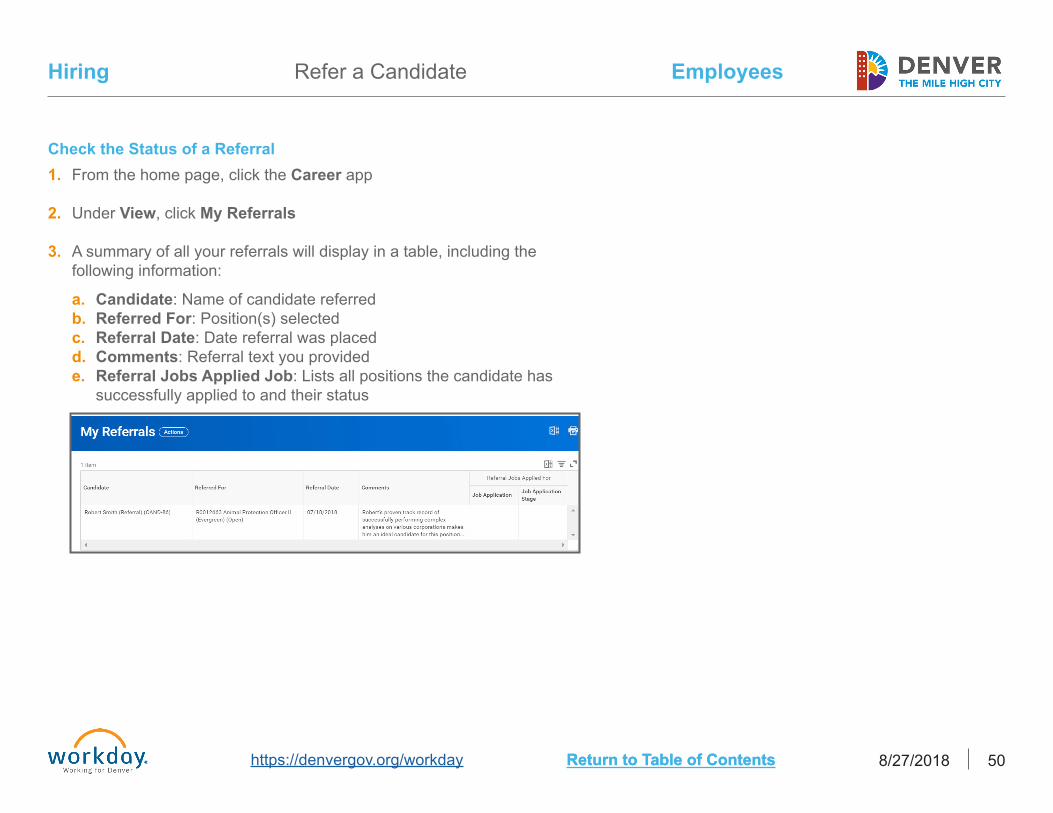
Check the Status of a Referral1. From the home page, click the Career app
2. Under View, click My Referrals
3. A summary of all your referrals will display in a table, including thefollowing information:
a. Candidate: Name of candidate referredb. Referred For: Position(s) selectedc. Referral Date: Date referral was placedd. Comments: Referral text you providede. Referral Jobs Applied Job: Lists all positions the candidate has
successfully applied to and their status
Refer a Candidate
Employees
https://denvergov.org/workday 8/27/2018 51Return to Table of ContentsReturn to Table of Contents
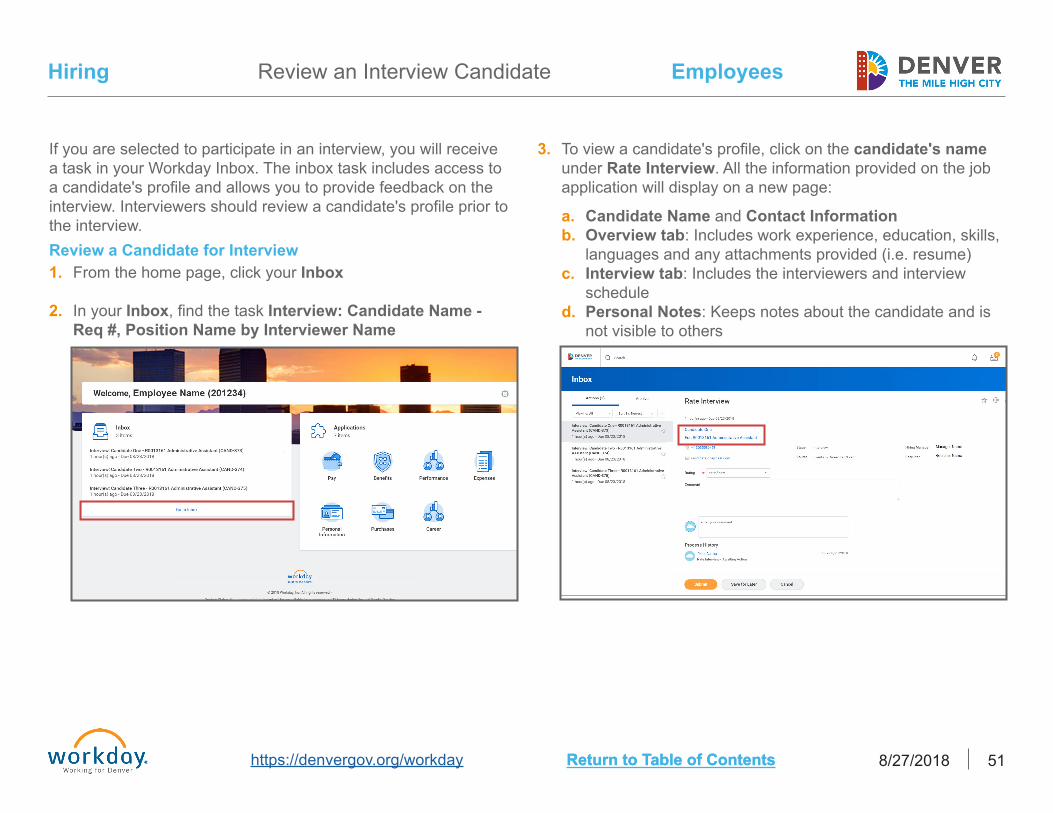
Hiring Review an Interview Candidate
If you are selected to participate in an interview, you will receive a task in your Workday Inbox. The inbox task includes access to a candidate's profile and allows you to provide feedback on the interview. Interviewers should review a candidate's profile prior to the interview.Review a Candidate for Interview1. From the home page, click your Inbox
2. In your Inbox, find the task Interview: Candidate Name -Req #, Position Name by Interviewer Name
3. To view a candidate's profile, click on the candidate's nameunder Rate Interview. All the information provided on the jobapplication will display on a new page:
a. Candidate Name and Contact Informationb. Overview tab: Includes work experience, education, skills,
languages and any attachments provided (i.e. resume)c. Interview tab: Includes the interviewers and interview
scheduled. Personal Notes: Keeps notes about the candidate and is
not visible to others
Employees
https://denvergov.org/workday 8/27/2018 52Return to Table of ContentsReturn to Table of Contents
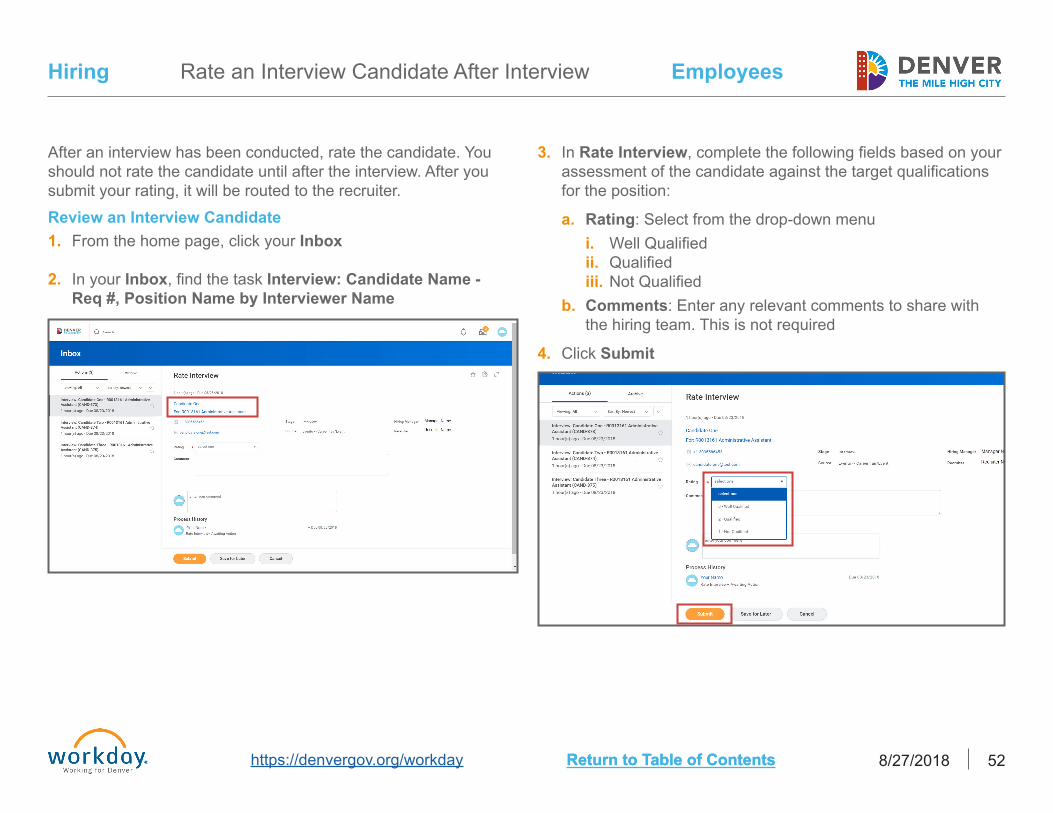
Hiring Rate an Interview Candidate After Interview
Review an Interview Candidate1. From the home page, click your Inbox
2. In your Inbox, find the task Interview: Candidate Name -Req #, Position Name by Interviewer Name
After an interview has been conducted, rate the candidate. You should not rate the candidate until after the interview. After you submit your rating, it will be routed to the recruiter.
3. In Rate Interview, complete the following fields based on yourassessment of the candidate against the target qualificationsfor the position:
a. Rating: Select from the drop-down menui. Well Qualifiedii. Qualifiediii. Not Qualified
b. Comments: Enter any relevant comments to share withthe hiring team. This is not required
4. Click Submit

Managers

This page is intentionally left blank.

Position Management

This page is intentionally left blank.

Managers
https://denvergov.org/workday 8/27/2018 57Return to Table of Contents
Position Management Create Position
The Office of Human Resources loads new positions approved through the annual budget process in Workday. Most new positions are created through the annual budget process and managers should not create new positions in Workday for these positions. However, sometimes departments/agencies are granted positions outside the budget process. Use this process to create a new position outside the budget process. Once the positions are approved, they will display on the org chart. If you would like to make the position available to fill, create a position first, then refer to the Create a Job Requisition: Existing Position process.Create a Position 1. Type Create Position in Search area
2. Your Supervisory Organization will appear, update it ifnecessary.
3. Click OK
4. Complete the required fields
a. Position Change Reason: If necessary, update to NewPosition
b. Job Posting Title: Enter the functional title. This is howthe position will be displayed on the org chart and the jobposting
c. Number of Positions: Update if necessaryd. Availability Date: Today's datee. Earliest Hire Date: Today's date (unless funding is not
available until a future date - not common)
Managers
https://denvergov.org/workday 8/27/2018 58Return to Table of Contents
Position Management
Approval Process
Agency Approver
Comp Partner
BMO Partner
Manager Submits
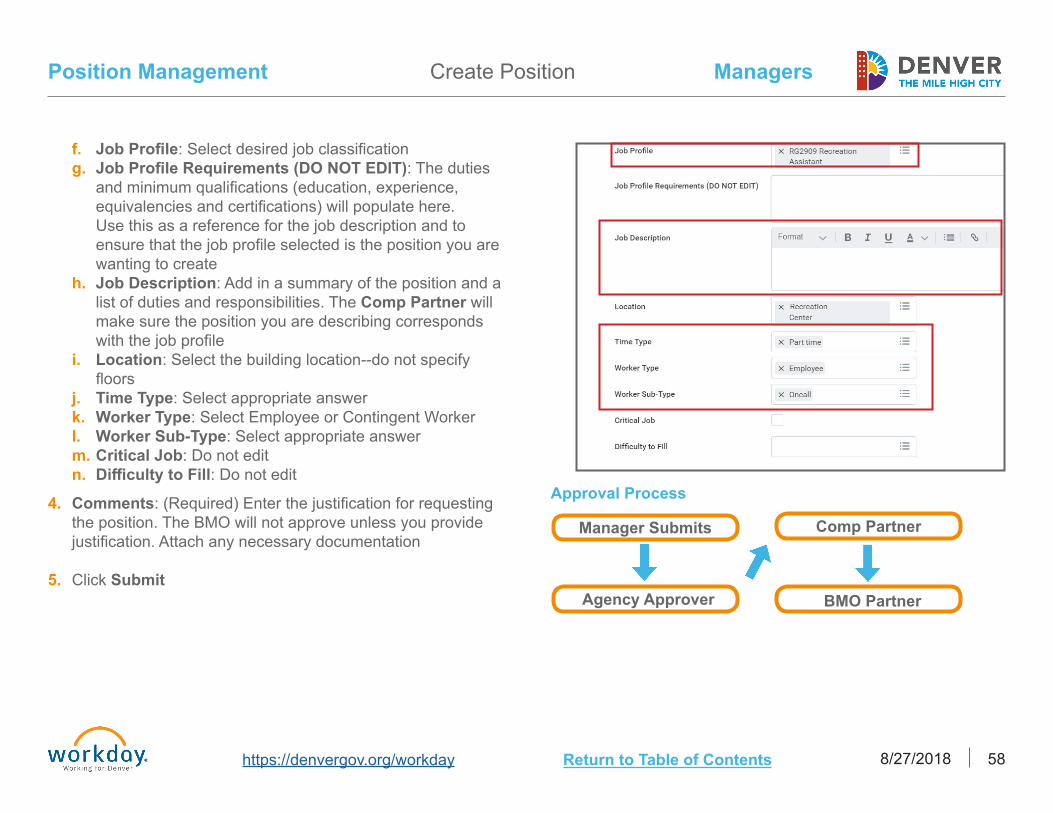
f. Job Profile: Select desired job classificationg. Job Profile Requirements (DO NOT EDIT): The duties
and minimum qualifications (education, experience,equivalencies and certifications) will populate here.Use this as a reference for the job description and toensure that the job profile selected is the position you arewanting to create
h. Job Description: Add in a summary of the position and alist of duties and responsibilities. The Comp Partner willmake sure the position you are describing correspondswith the job profile
i. Location: Select the building location--do not specifyfloors
j. Time Type: Select appropriate answerk. Worker Type: Select Employee or Contingent Workerl. Worker Sub-Type: Select appropriate answerm. Critical Job: Do not editn. Difficulty to Fill: Do not edit
4. Comments: (Required) Enter the justification for requestingthe position. The BMO will not approve unless you providejustification. Attach any necessary documentation
5. Click Submit
Create Position

Managers
https://denvergov.org/workday 8/27/2018 59Return to Table of Contents
Position Management Edit Position Restrictions: Job Profile Change
The Edit Position Restrictions task is used to make changes to a vacant position or when a position becomes vacant. This process demonstrates how to update the Job Profile (job classification specification).
1. From your org chart, click the position's related actionsbutton
2. Click Position Restrictions
3. Click Edit Position Restrictions
Making a Job Profile Change
4. Complete the required fields in Edit Position Restrictions
a. Position Change Reason: Select Job Profile Changeto Vacant Position
b. Job Posting Title: Enter the functional title. This is howthe position will show on the org chart and on the jobposting

Managers
https://denvergov.org/workday 8/27/2018 60Return to Table of Contents
Position Management
Approval Process
Agency Approver
HR Comp Partner
BMO Partner
Manager Submits
c. Job Profile: Close out of the current job profile andsearch/select the new job profile. Only select one jobprofile
d. Job Profile Requirements (DO NOT EDIT): This willautomatically populate the essential duties and minimumqualifications
e. Job Description: Enter a summary of the position anda list of duties and responsibilities. This information willbe reviewed by the Comp Partner to ensure the jobmatches the Job Profile
5. Use the Comments box to add the justification to the BMOon the change requested. The BMO will not approve unlessyou provide justification
6. Click Submit
Edit Position Restrictions: Job Profile Change

Managers
https://denvergov.org/workday 8/27/2018 61Return to Table of Contents
Position Management Update Position's Cost Center
The Change Organization Assignments task is used to update a position's cost center.
1. From your org chart, click the position's related actionsbutton
2. Click Organization
3. Click Change Organization Assignments
Updating a Position's Cost Center
4. Verify the required fields
a. Effective Dateb. Workerc. Job
5. Click OK
6. Click the pencil icon to edit the Cost Center field
7. Click the menu icon to open the Organizations list
8. Choose the new cost center
9. Click the check mark icon to save
10. In the comments, enter why you are changing the costcenter
11. Click SubmitApproval Process
Agency Approver
HR Comp Partner
BMO Partner
Manager Submits

Managers
https://denvergov.org/workday 8/27/2018 62Return to Table of Contents
Position Management Close Position
Once the Close Position process is completed, the closed position will no longer be available to fill. Supervisors will not be able to see the position in their org charts. The action can only be taken on vacant positions or when you initiate a separation.
Closing a Position1. From your org chart, click on the closing vacant position's
related actions button
2. Click Position Restrictions
3. Click Close Position
4. Complete the required fields in Close Position
a. Close Reason: Choose Close Position or Headcount >Close Position > No Longer Needed
b. Close Datec. Comments: Enter in the comments why you are closing
the position
5. Click Submit.Approval Process
BMO Partner
Manager Submits

Hiring

This page is intentionally left blank.

Managers
https://denvergov.org/workday 8/27/2018 65Return to Table of Contents
Hiring Create Job Requisition: Ready to Recruit
The Create Job Requisition task is used when requesting to fill a vacant position or when a position becomes vacant. You must have an open and approved job requisition to fill any position. Initiated job requisitions for competitive recruitments will route to your agency's agency approver to approve the request to fill. Then your recruiter will post the job and begin the recruiting process.
You cannot change the Position Restrictions (Job Profile, Worker Type, Worker Sub-Type, Time Type or Location) during the job req process. To change position restrictions, complete the Edit Position Restrictions task before requesting the job requisition--this is called fix then fill.
To determine which type of action you are trying to initiate with the job requisition, refer to the Appendix.Create a Job Requisition for an Existing Position 1. From your org chart, click the vacant position's related
actions button
a. If you are creating a job requisition on a filled position thatwill be vacated soon, search Create Job Req and selectthe Existing Position option
2. Click Job Change
3. Click Create Job Requisition

Managers
https://denvergov.org/workday 8/27/2018 66Return to Table of Contents
Hiring
6. Click the pencil icon to complete the highlighted fields onthe Recruiting Information tab
4. Review the fields on the Create Job Requisition screen
a. Copy Details from Existing Job Requisition: Ifyou would like to use a previous job description froma previous or existing job requisition, select the jobrequisition from the list
b. For Existing Position: Verify the correct position islisted
c. Worker Type: Do not change
5. Click OK to continue
a. Reason: Click Request Position to Fill and select oneof the options below in blue. If you want to select anoption that is not in blue, review the Create Job Req:Existing Position - Employee Job Change/Rehire
i. Ready to Recruit Employeeii. Employee Job Changeiii. Rehire - Oncall or Seasonal Workeriv. Ready to Recruit Internv. Contingent Workervi. Library
vii. Elected Appointedviii. Uniformed Officer Job Change
Create Job Requisition: Ready to Recruit
Note: Review the help text at the top of the screen above Recruiting Information for additional help with the Reason field.
b. Replacement For: If applicable, this will automaticallypopulate
c. Recruiting Start Date: Today's dated. Target Hire Date: Today's datee. Target End Date: Only used for limited positions. This is
the end date of the position

Managers
https://denvergov.org/workday 8/27/2018 67Return to Table of Contents
Hiring Create Job Requisition: Ready to Recruit
7. Click the check mark icon to save the changes
8. Click Next to continue
10. Complete the required fields on the Job Details tab
a. Job Position Title: Enter the functional title. This is howthe job will be posted on the job posting
b. Job Profile Requirements (DO NOT EDIT): The dutiesand minimum qualifications (education, experience,equivalencies and certifications) will automaticallypopulate
c. Job Description: Enter a summary of the position and alist of duties and responsibilities
d. Ideal Candidate Summary: Enter the profile of the idealcandidate including preferred qualifications, educationand/or degree, specific experience and skill. This will feedinto the job posting
9. Click the pencil icon to edit the Job Details

Managers
https://denvergov.org/workday 8/27/2018 68Return to Table of Contents
Hiring
Approval Process
Manager Submits
Agency Approver
Recruiter
e. Scheduled Weekly Hours: Modify for part-time and on-call positions
f. All other fields (Job Families for Job Profile, WorkerSub-Type, Time Type, Primary Location, PrimaryJob Posting Location) will automatically populate andcannot be changed. Leave Additional Locations andAdditional Job Postings blank
11. Click the check mark icon to save the changes
12. Click Next to continue to the Organizations tab. You willnot need to make any changes to the OrganizationalAssignments field
13. Click Next to move to the Attachments tab
Create Job Requisition: Ready to Recruit
14. In the Attachments tab, add any documents related to theposition or recruiting the position
15. Click Next to continue to the Summary tab
16. Review the Summary of the job requisition for accuracy andmake any necessary edits
17. Click Submit

Managers
https://denvergov.org/workday 8/27/2018 69Return to Table of Contents
Hiring Create Job Req: Existing Position - Employee Job Change/Rehire
The Create Job Requisition task is used when requesting to fill a vacant position or when a position becomes vacant. You must have an open and approved job requisition to fill any position. Initiated job requisitions for Non-Competitive Employee Job Changes and Rehires will route to your agency's agency approver to approve the employee movement, start date and compensation. Then, your onboarding coordinator will change the employee's current position in Workday or rehire the on-call/seasonal worker.
You cannot change the Position Restrictions (Job Profile, Worker Type, Worker Sub-Type, Time Type or Location) during the job requisition process. To change Position Restrictions, complete the Edit Position Restrictions task before requesting the job requisiton - this is called fix then fill.
To determine which type of action you are trying to initiate with the job requisition, refer to the Appendix.Create a Job Requisition for an Existing Position 1. From your org chart, click the related actions button on the
vacant position
a. If you are creating a job req on a filled position that willbe vacated soon, search Create Job Req and select theExisting Position option
2. Click Job Change
4. Review the fields in Create Job Requisition
a. Copy Details from Existing Job Requisition: If youwould like to use a previous job description, find theprevious job requisition
b. For Existing Position: Verify the correct position islisted
c. Worker Type: Do not change
5. Click OK to continue
3. Click Create Job Requisition
Managers
https://denvergov.org/workday 8/27/2018 70Return to Table of Contents
Hiring
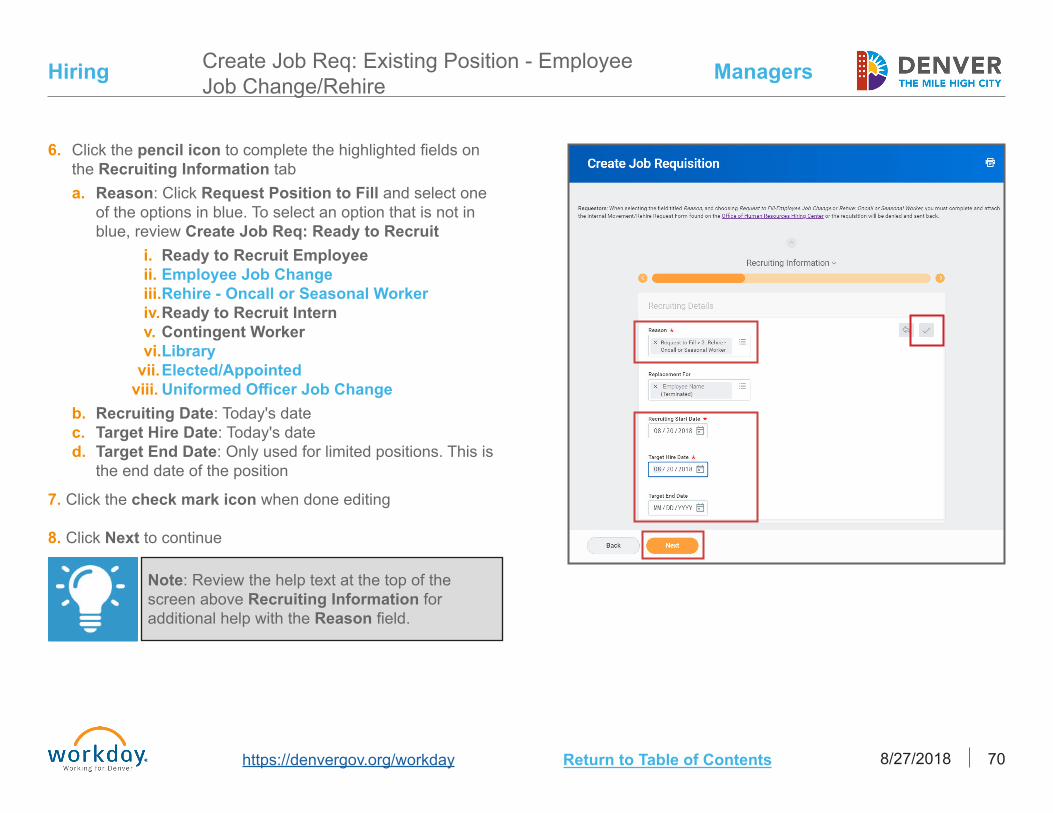
6. Click the pencil icon to complete the highlighted fields onthe Recruiting Information taba. Reason: Click Request Position to Fill and select one
of the options in blue. To select an option that is not inblue, review Create Job Req: Ready to Recruit
i. Ready to Recruit Employeeii. Employee Job Changeiii. Rehire - Oncall or Seasonal Workeriv. Ready to Recruit Internv. Contingent Workervi. Library
vii. Elected/Appointedviii. Uniformed Officer Job Change
b. Recruiting Date: Today's datec. Target Hire Date: Today's dated. Target End Date: Only used for limited positions. This is
the end date of the position
7. Click the check mark icon when done editing
8. Click Next to continue
Note: Review the help text at the top of the screen above Recruiting Information for additional help with the Reason field.
Create Job Req: Existing Position - Employee Job Change/Rehire
Managers
https://denvergov.org/workday 8/27/2018 71Return to Table of Contents
Hiring
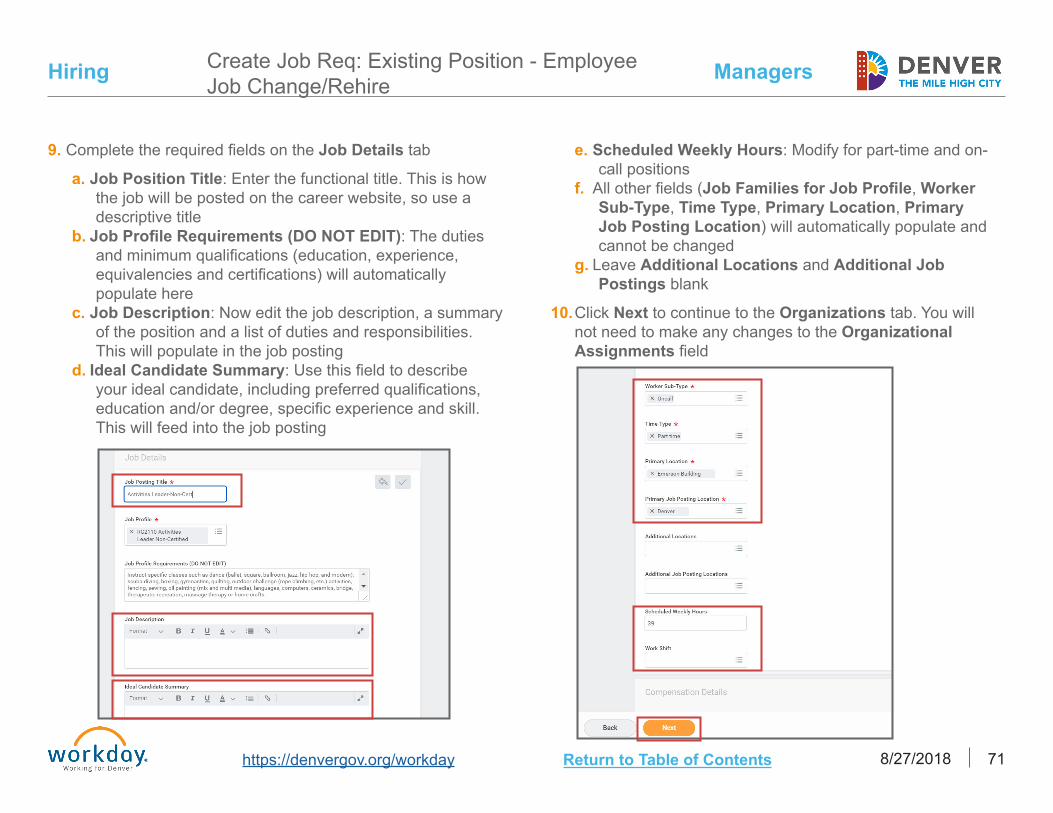
9. Complete the required fields on the Job Details tab
a. Job Position Title: Enter the functional title. This is howthe job will be posted on the career website, so use adescriptive title
b. Job Profile Requirements (DO NOT EDIT): The dutiesand minimum qualifications (education, experience,equivalencies and certifications) will automaticallypopulate here
c. Job Description: Now edit the job description, a summaryof the position and a list of duties and responsibilities.This will populate in the job posting
d. Ideal Candidate Summary: Use this field to describeyour ideal candidate, including preferred qualifications,education and/or degree, specific experience and skill.This will feed into the job posting
e. Scheduled Weekly Hours: Modify for part-time and on-call positions
f. All other fields (Job Families for Job Profile, WorkerSub-Type, Time Type, Primary Location, PrimaryJob Posting Location) will automatically populate andcannot be changed
g. Leave Additional Locations and Additional JobPostings blank
10. Click Next to continue to the Organizations tab. You willnot need to make any changes to the OrganizationalAssignments field
Create Job Req: Existing Position - Employee Job Change/Rehire

Managers
https://denvergov.org/workday 8/27/2018 72Return to Table of Contents
Hiring
11. Click Next to continue to the Attachments tab
12. In the Attachments tab, add the Non-Competitive orRehire Request form
13. Click Next to continue to the Summary tab
14. Review the Summary of the job requisition for accuracy andmake any necessary edits. Add comments to the AgencyApprover or Recruiter about this position
15. Click Submit.
Approval Process
Manager Submits
Agency Approver
OnboardingCoordinator
Create Job Req: Existing Position - Employee Job Change/Rehire
Managers
https://denvergov.org/workday 8/27/2018 73Return to Table of Contents
Hiring Reviewing Candidates
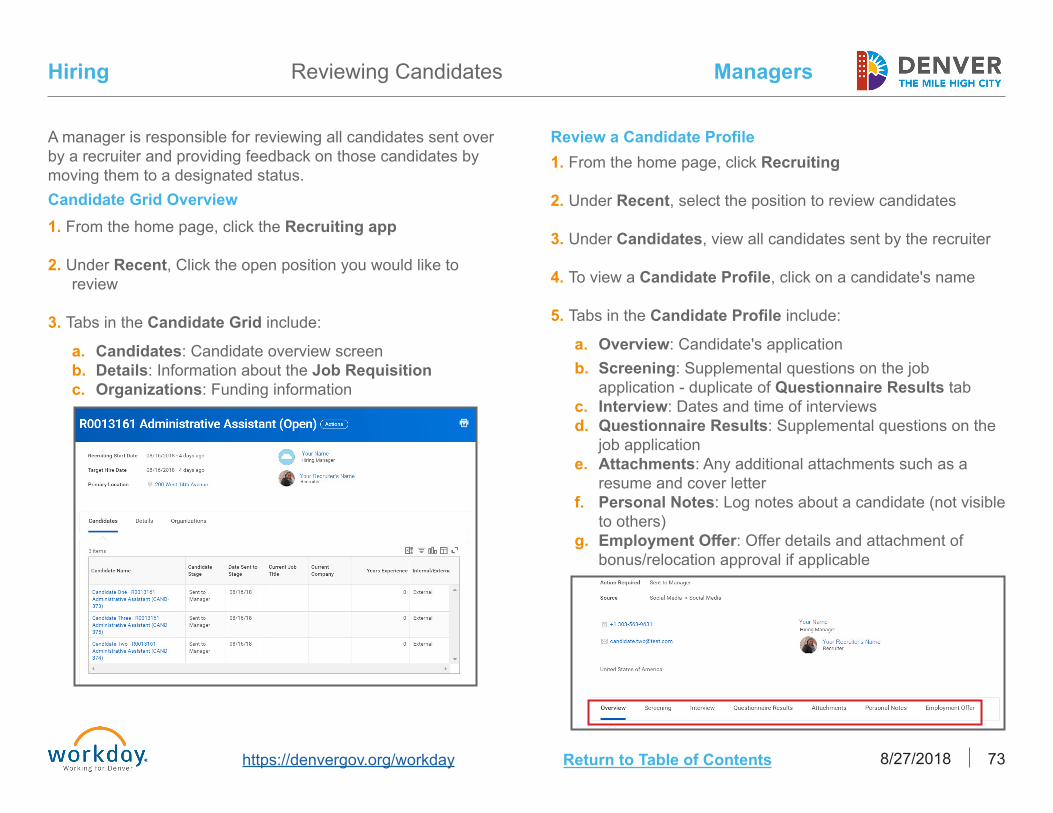
A manager is responsible for reviewing all candidates sent over by a recruiter and providing feedback on those candidates by moving them to a designated status.Candidate Grid Overview1. From the home page, click the Recruiting app
2. Under Recent, Click the open position you would like toreview
3. Tabs in the Candidate Grid include:
a. Candidates: Candidate overview screenb. Details: Information about the Job Requisitionc. Organizations: Funding information
Review a Candidate Profile1. From the home page, click Recruiting
2. Under Recent, select the position to review candidates
3. Under Candidates, view all candidates sent by the recruiter
4. To view a Candidate Profile, click on a candidate's name
5. Tabs in the Candidate Profile include:
a. Overview: Candidate's applicationb. Screening: Supplemental questions on the job
application - duplicate of Questionnaire Results tabc. Interview: Dates and time of interviewsd. Questionnaire Results: Supplemental questions on the
job applicatione. Attachments: Any additional attachments such as a
resume and cover letterf. Personal Notes: Log notes about a candidate (not visible
to others)g. Employment Offer: Offer details and attachment of
bonus/relocation approval if applicable

Managers
https://denvergov.org/workday 8/27/2018 74Return to Table of Contents
Hiring
6. Review the Candidate Profile and then select one of thefollowing statuses from the Move Forward options
a. Interestedb. Might Be Interestedc. Not Interested
Reviewing Candidates
Approval Process
Recruiter
Manager Submits
7. Click the back arrow in your browser to go back to theCandidate Grid and select the next candidate's name toreview

Employee Changes/Compensation

This page is intentionally left blank.
Managers
https://denvergov.org/workday 8/27/2018 77Return to Table of Contents
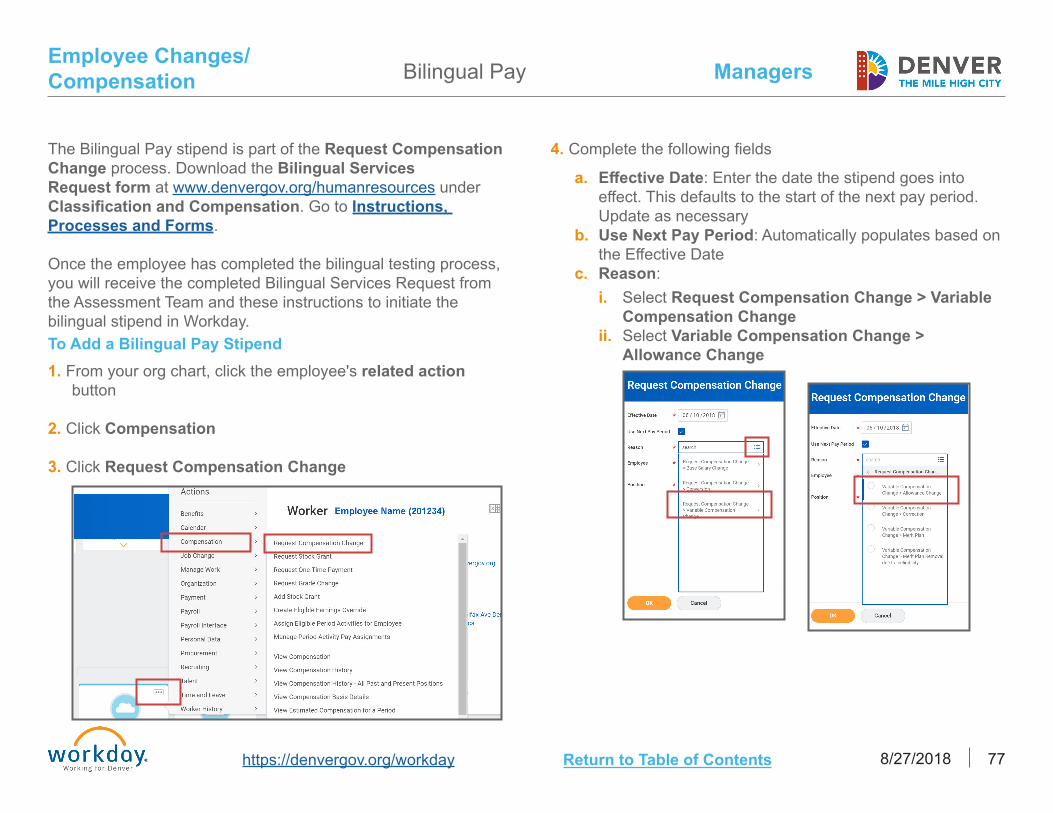
Employee Changes/Compensation Bilingual Pay
4. Complete the following fields
a. Effective Date: Enter the date the stipend goes intoeffect. This defaults to the start of the next pay period.Update as necessary
b. Use Next Pay Period: Automatically populates based onthe Effective Date
c. Reason:i. Select Request Compensation Change > Variable
Compensation Changeii. Select Variable Compensation Change >
Allowance Change
The Bilingual Pay stipend is part of the Request Compensation Change process. Download the Bilingual Services Request form at www.denvergov.org/humanresources under Classification and Compensation. Go to Instructions, Processes and Forms.
Once the employee has completed the bilingual testing process, you will receive the completed Bilingual Services Request from the Assessment Team and these instructions to initiate the bilingual stipend in Workday.To Add a Bilingual Pay Stipend 1. From your org chart, click the employee's related action
button
2. Click Compensation
3. Click Request Compensation Change
Managers
https://denvergov.org/workday 8/27/2018 78Return to Table of Contents
Employee Changes/Compensation Bilingual Pay
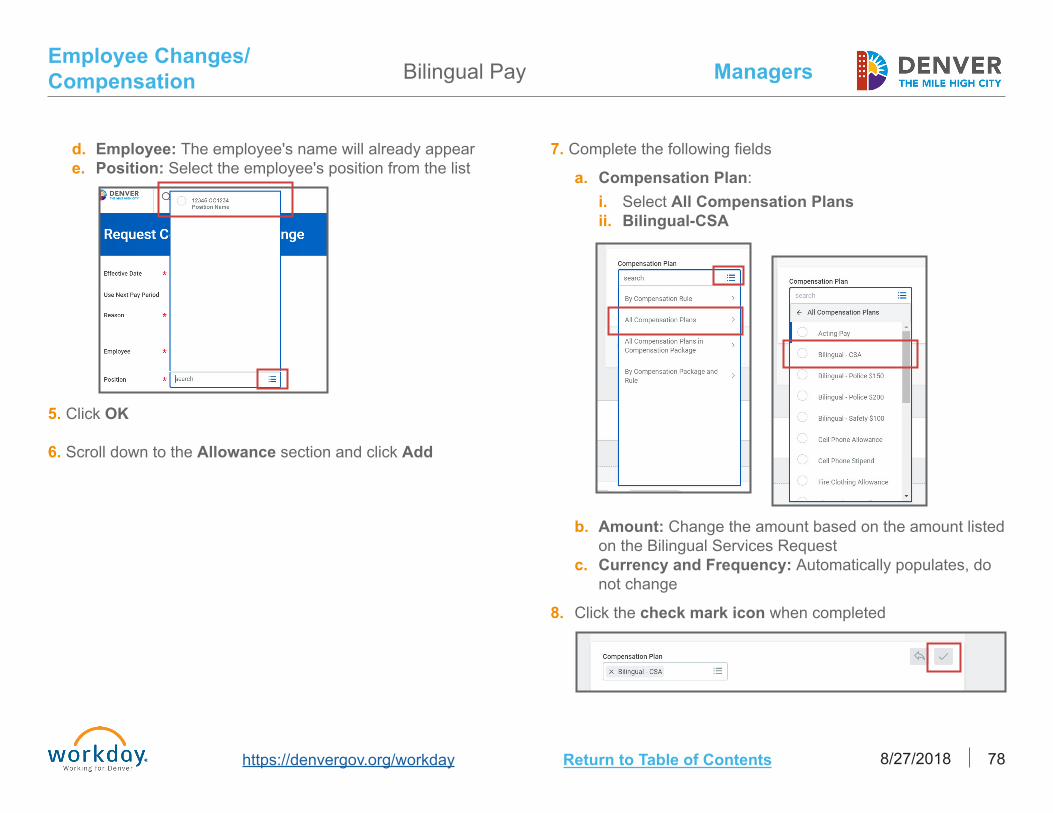
d. Employee: The employee's name will already appeare. Position: Select the employee's position from the list
5. Click OK
6. Scroll down to the Allowance section and click Add
7. Complete the following fields
a. Compensation Plan: i. Select All Compensation Plansii. Bilingual-CSA
b. Amount: Change the amount based on the amount listed on the Bilingual Services Request
c. Currency and Frequency: Automatically populates, do not change
8. Click the check mark icon when completed

Managers
https://denvergov.org/workday 8/27/2018 79Return to Table of Contents
Employee Changes/Compensation
To Remove a Bilingual Pay Stipend1. From your org chart, click the employee's related action
button
2. Click Compensation
3. Click Request Compensation Change
4. Follow steps 4-5 from the To Add a Bilingual Pay Stipendsection
5. Scroll down to the Allowance section and click the X icon
9. Scroll down to the Comments and Attachments
a. Comments: Enter comments about the requestb. Attachments: Select the completed Bilingual Services
Request file
10. Click Submit
Bilingual Pay
6. In the Comments field, enter why you are removing theBilingual Stipend
7. Click Submit
8. Click DoneApproval Process
HR Partner
Manager Submits
Managers
https://denvergov.org/workday 8/27/2018 80Return to Table of Contents
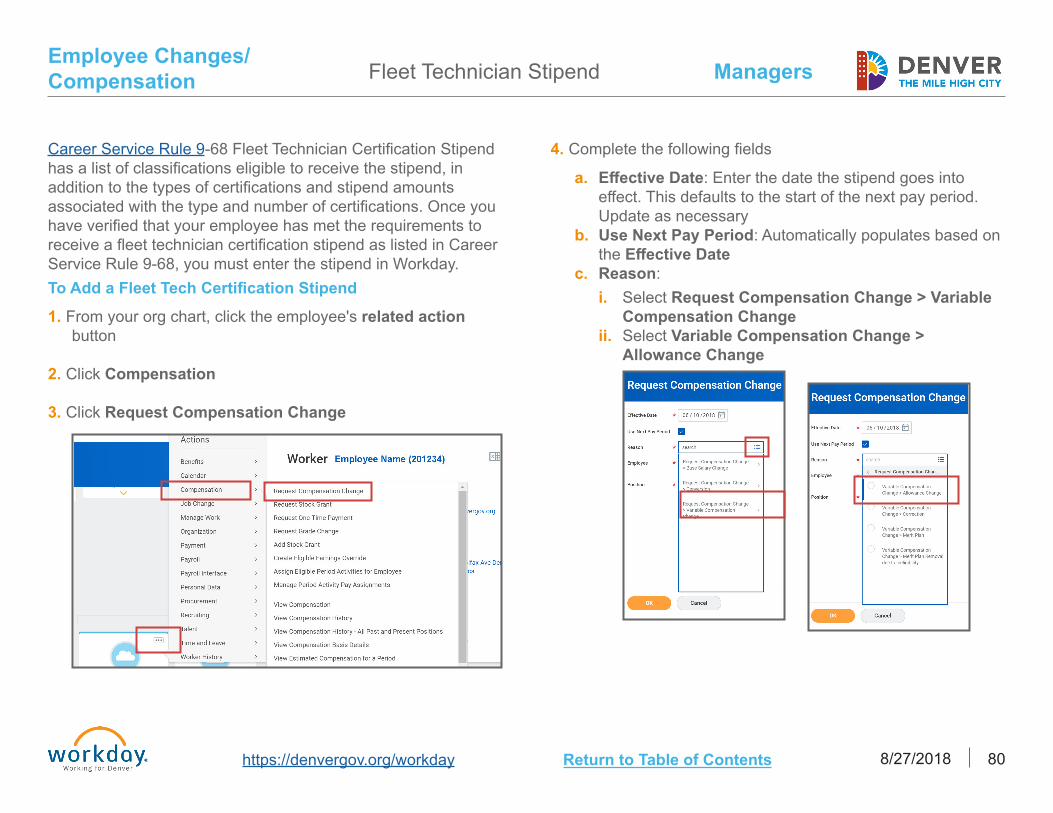
Employee Changes/Compensation Fleet Technician Stipend
4. Complete the following fields
a. Effective Date: Enter the date the stipend goes intoeffect. This defaults to the start of the next pay period.Update as necessary
b. Use Next Pay Period: Automatically populates based onthe Effective Date
c. Reason:i. Select Request Compensation Change > Variable
Compensation Changeii. Select Variable Compensation Change >
Allowance Change
Career Service Rule 9-68 Fleet Technician Certification Stipend has a list of classifications eligible to receive the stipend, in addition to the types of certifications and stipend amounts associated with the type and number of certifications. Once you have verified that your employee has met the requirements to receive a fleet technician certification stipend as listed in Career Service Rule 9-68, you must enter the stipend in Workday. To Add a Fleet Tech Certification Stipend1. From your org chart, click the employee's related action
button
2. Click Compensation
3. Click Request Compensation Change

Managers
https://denvergov.org/workday 8/27/2018 81Return to Table of Contents
Employee Changes/Compensation
d. Employee: The employee's name will automaticallypopulate
e. Position: Select the employee's position from the list
5. Click OK
6. Scroll down to the Allowance section and click Add
7. Complete the following fields
a. Compensation Plan:i. Select All Compensation Plans
b. Fleet Tech Certification Allowance
c. Amount: Change the amount based on the amountlisted in Career Service Rule 9-68D Fleet TechnicianCertification Stipend
d. Currency and Frequency: Automatically populates, donot change
8. Click the check mark icon when completed
Fleet Technician Stipend
Managers
https://denvergov.org/workday 8/27/2018 82Return to Table of Contents
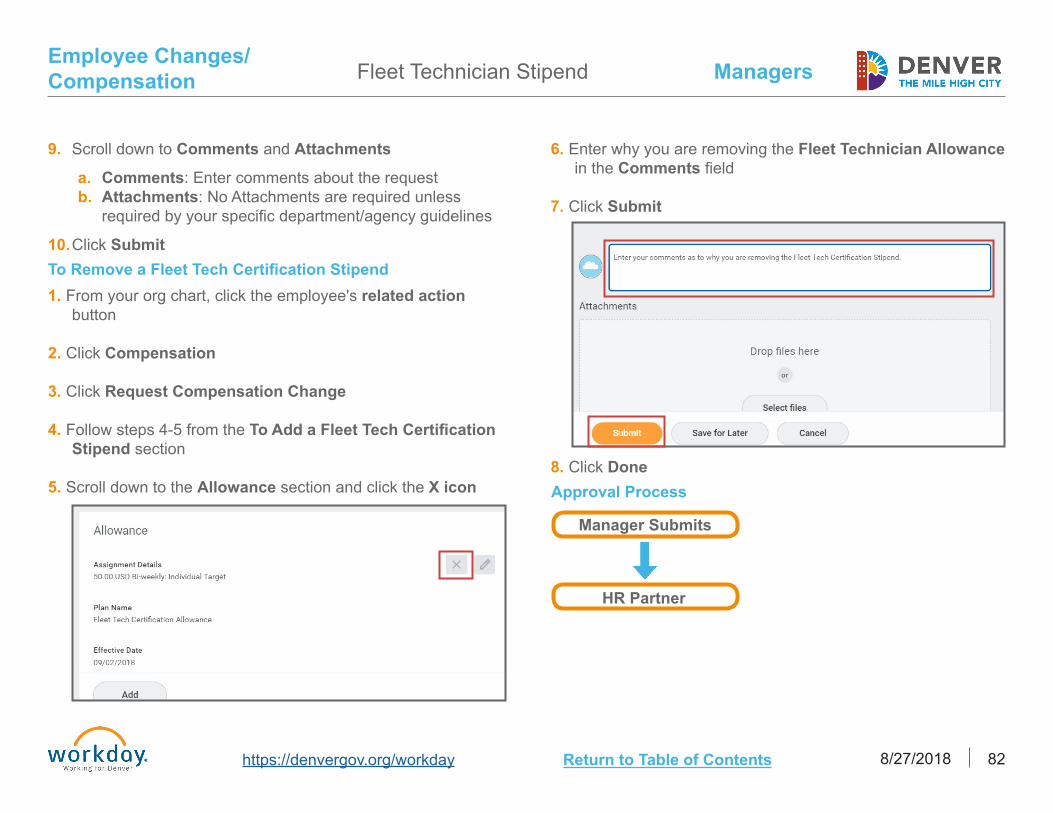
Employee Changes/Compensation
To Remove a Fleet Tech Certification Stipend1. From your org chart, click the employee's related action
button
2. Click Compensation
3. Click Request Compensation Change
4. Follow steps 4-5 from the To Add a Fleet Tech CertificationStipend section
5. Scroll down to the Allowance section and click the X icon
9. Scroll down to Comments and Attachments
a. Comments: Enter comments about the requestb. Attachments: No Attachments are required unless
required by your specific department/agency guidelines
10. Click Submit
6. Enter why you are removing the Fleet Technician Allowancein the Comments field
7. Click Submit
8. Click DoneApproval Process
HR Partner
Manager Submits
Fleet Technician Stipend
Managers
https://denvergov.org/workday 8/27/2018 83Return to Table of Contents
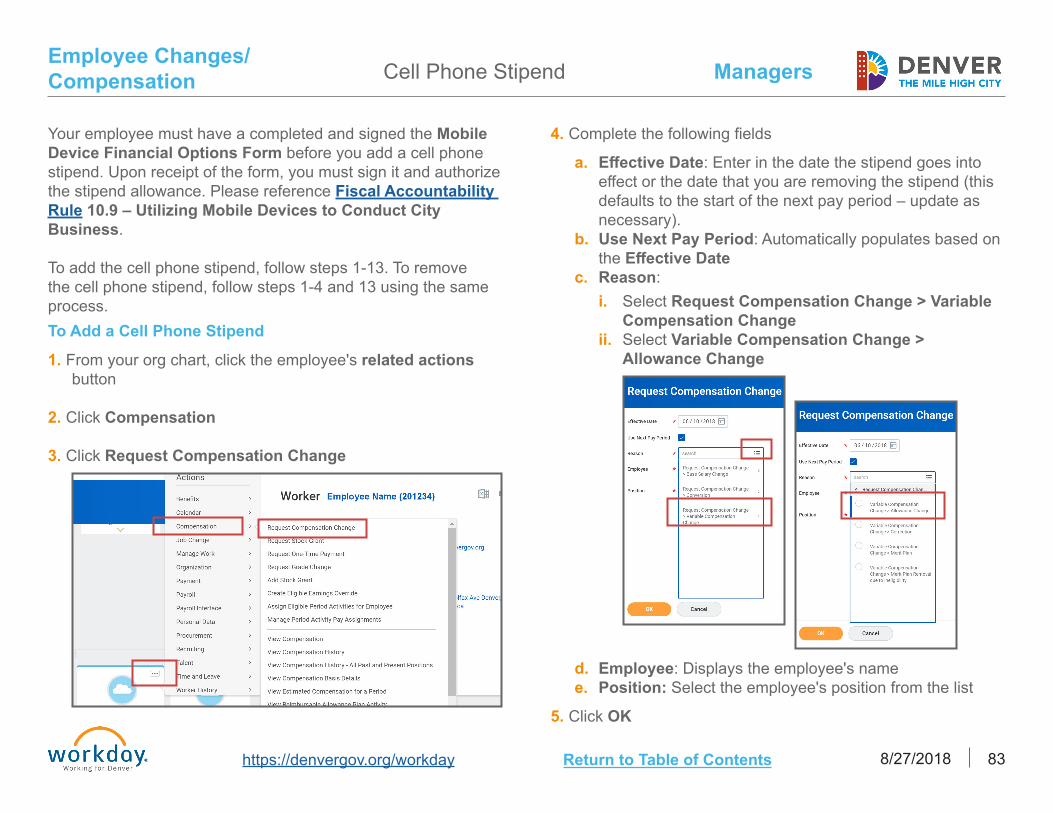
Employee Changes/Compensation Cell Phone Stipend
Your employee must have a completed and signed the Mobile Device Financial Options Form before you add a cell phone stipend. Upon receipt of the form, you must sign it and authorize the stipend allowance. Please reference Fiscal Accountability Rule 10.9 – Utilizing Mobile Devices to Conduct City Business.
To add the cell phone stipend, follow steps 1-13. To remove the cell phone stipend, follow steps 1-4 and 13 using the same process.To Add a Cell Phone Stipend
1. From your org chart, click the employee's related actionsbutton
2. Click Compensation
3. Click Request Compensation Change
4. Complete the following fields
a. Effective Date: Enter in the date the stipend goes intoeffect or the date that you are removing the stipend (thisdefaults to the start of the next pay period – update asnecessary).
b. Use Next Pay Period: Automatically populates based onthe Effective Date
c. Reason:i. Select Request Compensation Change > Variable
Compensation Changeii. Select Variable Compensation Change >
Allowance Change
d. Employee: Displays the employee's namee. Position: Select the employee's position from the list
5. Click OK

Managers
https://denvergov.org/workday 8/27/2018 84Return to Table of Contents
Employee Changes/Compensation
6. Scroll down to the Allowance section and click Add
7. Complete the following fields:
a. Compensation Plan:i. Select All Compensation Plansii. Cell Phone Stipend
b. The remaining information will automatically populate
9. Click the check mark icon when completed
Cell Phone Stipend
10. Scroll down to Comments and Attachments
a. Comments: Enter comments about the requestb. Attachments: Select the completed and signed Mobile
Device Financial Options Form file
13. Click Submit
1. From your org chart, click the employee's related actionsbutton
2. Click Request Compensation Change
3. Follow steps 4-5 from the To Add a Cell Phone Stipend
To Remove a Cell Phone Stipend

Managers
https://denvergov.org/workday 8/27/2018 85Return to Table of Contents
Employee Changes/Compensation
Note: It is your responsibility to remove the cell phone stipend to avoid an overpayment to the employee.
4. Scroll down to the Allowance section and click the X icon
5. Scroll down to Comments and Attachments
a. Effective Date: Enter the effective date. The effectivedate to stop the stipend should be the first Sunday of thepay period for the first check of the month the employeeshould stop receiving the stipend, or any date within theprior pay period (the pay period for the second paycheckof the previous month)
b. Comments: Enter comments about why the stipend isbeing removed.
17. Click Submit
Cell Phone Stipend
Approval Process
HR Partner
Manager Submits

Managers
https://denvergov.org/workday 8/27/2018 86Return to Table of Contents
Employee Changes/Compensation Update Employee Cost Center
The Change Organization Assignments task is used to update a position's cost center.
Updating Employee's Cost Center1. From your org chart, click the employee's related actions
button
2. Click Organization
3. Click Change Org Assignments
4. Complete the Effective Date field
5. Complete the Cost Center fields
6. Enter in the comments on why you are changing the costcenter
7. Click SubmitApproval Process
BMO Partner
Manager Submits

Managers
https://denvergov.org/workday 8/27/2018 87Return to Table of Contents
Employee Changes/Compensation End Additional Job
The End Additional Job business process is used when an employee is leaving their additional position(s). This task cannot be completed on an employee's primary position. If you need to end an employee's primary position, you will first need to switch their primary position.Determine if an Employee has an Additional Job1. From your org chart, click the name of your organization
directly above your name
2. Click the name of your organization again
3. Click the Members tab to view all members of theorganization
4. Look in the Position column. If an employee has anadditional job, a + appears next to their position number.This is an additional job for the employee

Managers
https://denvergov.org/workday 8/27/2018 88Return to Table of Contents
Employee Changes/Compensation End Additional Job
End Additional Job
1. From your org chart, click the employee's related actionsbutton
2. Click Job Change
3. Click End Additional Job
4. Complete End Additional Job information
a. End Date: Enter last day workedb. Reason: Completed for youc. Attachments: Click upload to select a resignation letter
from your computer's files and complete the fieldsi. Category: Select CCD - Termination Attachment
5. Click Submit
6. Click DoneApproval Process
HR Partner
Manager Submits

Managers
https://denvergov.org/workday 8/27/2018 89Return to Table of Contents
Employee Changes/Compensation Switch Primary Job
If you need to End Additional Job for an employee, the job you are ending cannot be the primary job. In this case, it may be necessary to complete the Switch Primary Job business process to end the additional job rather than the primary job.Determine if an Employee has an Additional Job
1. From your org chart, click the name of your organizationdirectly above your name
2. Click the name of your organization again
3. Click the Members tab to view all members of theorganization
4. Look in the Position column. If an employee has anadditional job, a + appears next to their position number.This is an additional job for the employee
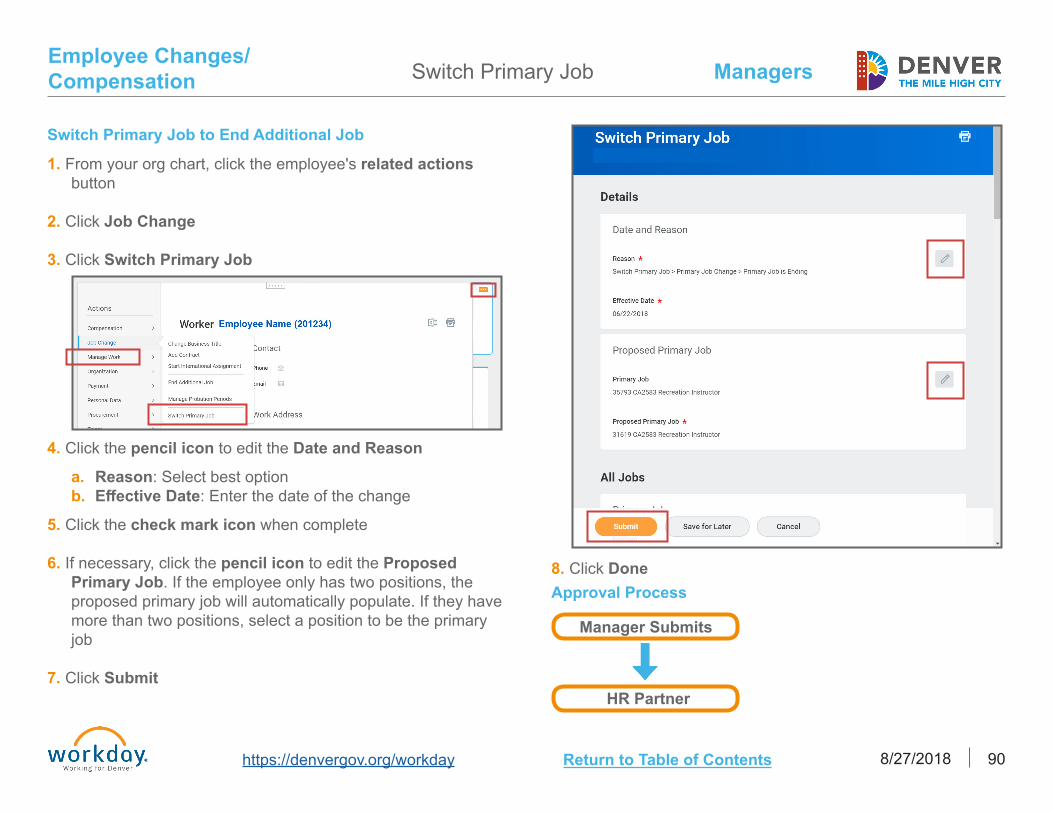
Managers
https://denvergov.org/workday 8/27/2018 90Return to Table of Contents
Employee Changes/Compensation
Switch Primary Job to End Additional Job
1. From your org chart, click the employee's related actionsbutton
2. Click Job Change
3. Click Switch Primary Job
Switch Primary Job
8. Click Done
4. Click the pencil icon to edit the Date and Reason
a. Reason: Select best optionb. Effective Date: Enter the date of the change
5. Click the check mark icon when complete
6. If necessary, click the pencil icon to edit the ProposedPrimary Job. If the employee only has two positions, theproposed primary job will automatically populate. If they havemore than two positions, select a position to be the primaryjob
7. Click Submit
Approval Process
HR Partner
Manager Submits
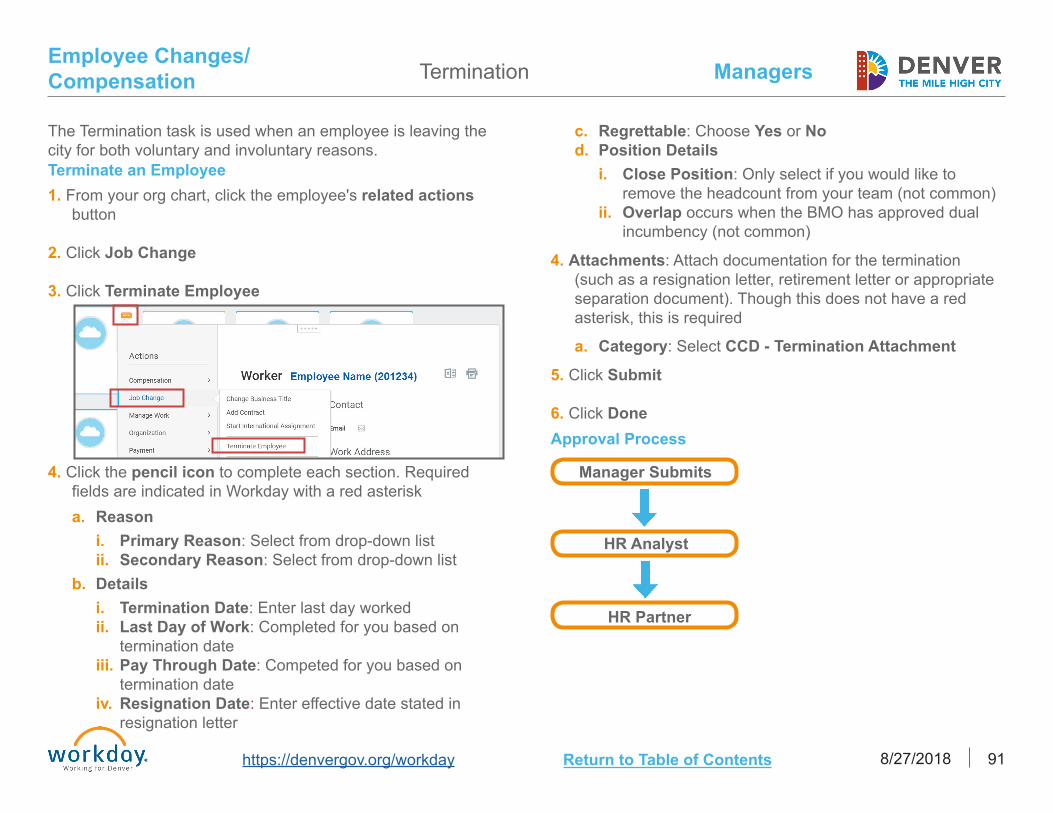
Managers
https://denvergov.org/workday 8/27/2018 91Return to Table of Contents
Employee Changes/Compensation Termination
The Termination task is used when an employee is leaving the city for both voluntary and involuntary reasons.Terminate an Employee1. From your org chart, click the employee's related actions
button
2. Click Job Change
3. Click Terminate Employee
4. Click the pencil icon to complete each section. Requiredfields are indicated in Workday with a red asteriska. Reason
i. Primary Reason: Select from drop-down listii. Secondary Reason: Select from drop-down list
b. Detailsi. Termination Date: Enter last day workedii. Last Day of Work: Completed for you based on
termination dateiii. Pay Through Date: Competed for you based on
termination dateiv. Resignation Date: Enter effective date stated in
resignation letter
c. Regrettable: Choose Yes or Nod. Position Details
i. Close Position: Only select if you would like toremove the headcount from your team (not common)
ii. Overlap occurs when the BMO has approved dualincumbency (not common)
4. Attachments: Attach documentation for the termination(such as a resignation letter, retirement letter or appropriateseparation document). Though this does not have a redasterisk, this is required
a. Category: Select CCD - Termination Attachment
5. Click Submit
6. Click DoneApproval Process
Manager Submits
HR Analyst
HR Partner

Managers
https://denvergov.org/workday 8/27/2018 92Return to Table of Contents
Employee Changes/Compensation
Working out of class is part of the request compensation change process. Reference to Career Service Rule 9-96 Work Assignment Outside of Job Classification. This is a temporary assignment and periods longer than one year require the approval of the OHR Executive Director. Add and remove the working out of class payment through the same task: Request Compensation Change > Variable Compensation Change.Add a Working Out of Class Payment1. From your org chart, click the employee's related actions
button
2. Click Compensation
3. Click Request Compensation Change
4. Complete the following fields:
a. Effective Date: Enter the date the additional pay goesinto effect (the beginning of the work week following thefifteenth day of the temporary assignment)
b. Reason:i. Select Request Compensation Change > Variable
Compensation Changeii. Select Variable Compensation Change >
Allowance Change
5. Click OK
6. Scroll down to the Allowance section, click Add
a. Compensation Plan: From the drop-down list selectCompensation Plans
b. Select Working Assignment
7. Click the check mark icon when complete
8. Complete the Comments and Attachments section
a. Comments: Enter vacant position number/classificationtitle
b. Attachments field: Attach the written notification to theemployee about working out of class
9. Click Submit
10. Click Done
Working Out of Class
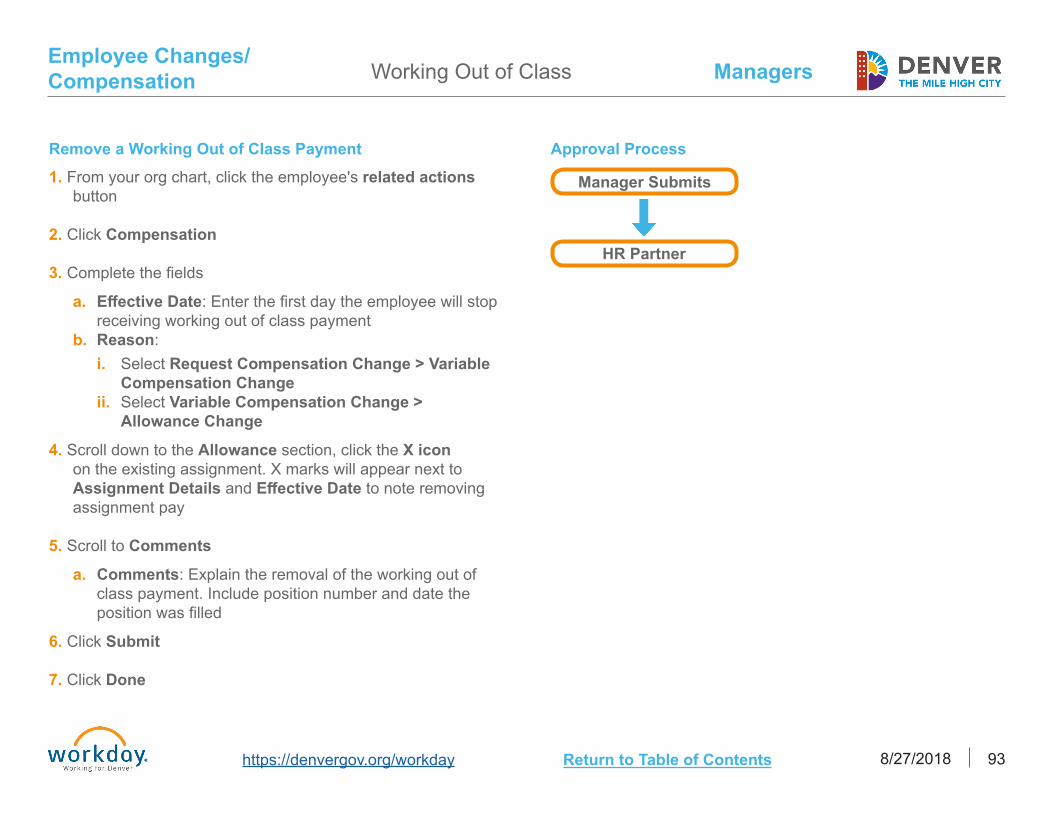
Managers
https://denvergov.org/workday 8/27/2018 93Return to Table of Contents
Employee Changes/Compensation Working Out of Class
Remove a Working Out of Class Payment1. From your org chart, click the employee's related actions
button
2. Click Compensation
3. Complete the fields
a. Effective Date: Enter the first day the employee will stop receiving working out of class payment
b. Reason: i. Select Request Compensation Change > Variable
Compensation Changeii. Select Variable Compensation Change >
Allowance Change
4. Scroll down to the Allowance section, click the X icon on the existing assignment. X marks will appear next to Assignment Details and Effective Date to note removing assignment pay
5. Scroll to Comments
a. Comments: Explain the removal of the working out of class payment. Include position number and date the position was filled
6. Click Submit
7. Click Done
Approval Process
Manager Submits
HR Partner

This page is intentionally left blank.

Performance

This page is intentionally left blank.
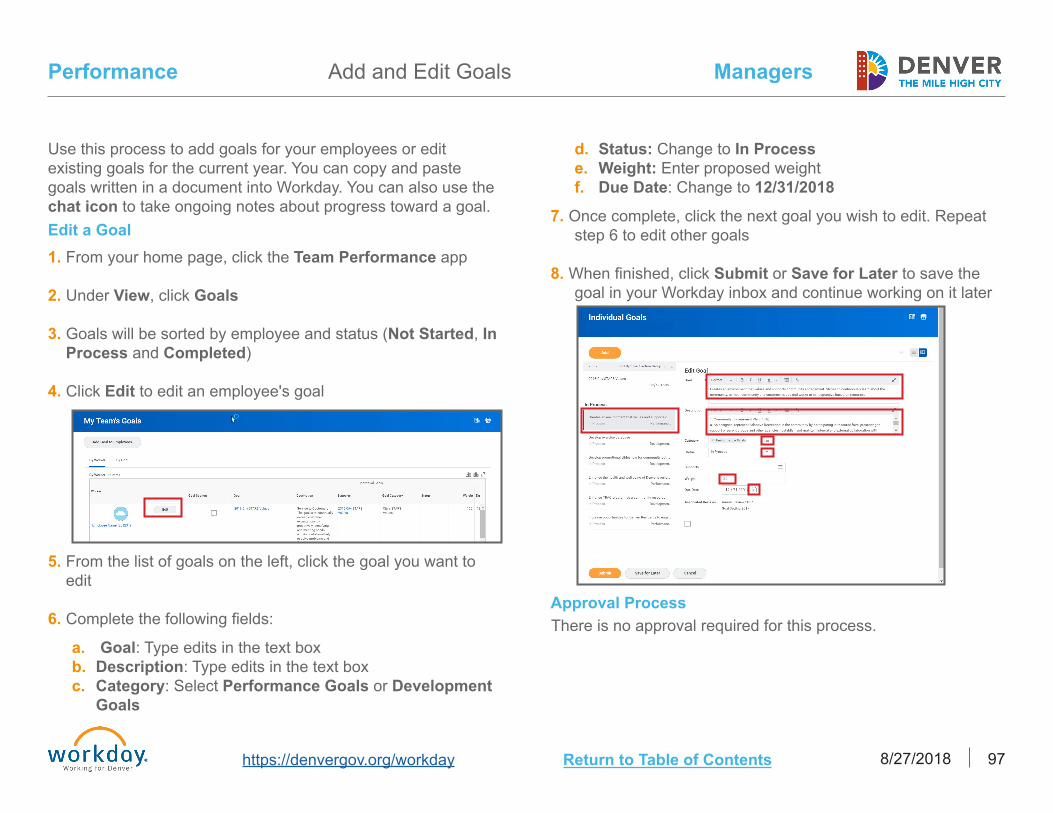
Managers
https://denvergov.org/workday 8/27/2018 97Return to Table of Contents
Performance Add and Edit Goals
Use this process to add goals for your employees or edit existing goals for the current year. You can copy and paste goals written in a document into Workday. You can also use the chat icon to take ongoing notes about progress toward a goal. Edit a Goal1. From your home page, click the Team Performance app
2. Under View, click Goals
3. Goals will be sorted by employee and status (Not Started, InProcess and Completed)
4. Click Edit to edit an employee's goal
5. From the list of goals on the left, click the goal you want toedit
6. Complete the following fields:
a. Goal: Type edits in the text boxb. Description: Type edits in the text boxc. Category: Select Performance Goals or Development
Goals
d. Status: Change to In Processe. Weight: Enter proposed weightf. Due Date: Change to 12/31/2018
7. Once complete, click the next goal you wish to edit. Repeatstep 6 to edit other goals
8. When finished, click Submit or Save for Later to save thegoal in your Workday inbox and continue working on it later
Approval ProcessThere is no approval required for this process.

Managers
https://denvergov.org/workday 8/27/2018 98Return to Table of Contents
Performance Archive Goals
Once you set your news goals for the year, you may want to archive goals that are no longer needed. This process explains how to archive your employee's previous goals so they do not appear on their profile or under the Team Performance app. Once goals are archived, they can be unarchived if necessary.
Archive a Goal1. From your home page, click the Team Performance app
2. Under Actions, click Archive Goals
3. Complete the Worker field: Type the employee's name orselect from the drop-down list
4. Click OK. All the employee's goals will appear with acheckbox in the Archive column
5. From the list of goals, click the checkbox next to the goal(s)you want to archive
6. Click OKApproval ProcessThere is no approval required for this process.

Managers
https://denvergov.org/workday 8/27/2018 99Return to Table of Contents
Performance
It may be appropriate for some jobs that have many employees doing the same work to have the same goals. This process explains how a manager can add those goals to appropriate employees at the same time. Employees will still see any cascaded goal in their profile.Copying Goals to Multiple Employees1. From your home page, click the Team Performance app
2. Click Add Goal to Employees
3. Choose Create a New Goal
4. In the Assign To section, select either Employees orOrganizations. Do not select both, or the goals will beduplicated.
a. You can add goals to employees within your supervisoryorganization.
b. If you select an organization, the Include SubordinateOrganizations box will appear. Check this box ifnecessary
5. Click OK
6. Complete the following fields:
a. Goal: Type the goal in the text boxb. Description: Type the description in the text boxc. Category: Select Performance Goals or Development
Goals
Copying Goals to Multiple Employees
d. Weight: Enter proposed weighte. Due Date: Select 12/31/2018f. Editable: Leave checked. Unchecking this box restricts
anyone from making any changes to this goal after it issubmitted, including deleting it
7. Once complete, click Add to add another goal to the samegroup. Repeat step six to add goal
8. Click Submit. You will see a green check mark to indicatethe process has been successfully completed
9. The employees can now see the goal in their profilesApproval ProcessThere is no approval required for this process.

Managers
https://denvergov.org/workday 8/27/2018 100Return to Table of Contents
Performance Print Performance Review
Create a PDF printable version of your employee's performance reviews to share with your employee. It is recommended that you always create a new PDF of the review to avoid any confusion with older versions on the employee's profile.Employee Profile1. Search for and select the employee's name in the search bar
2. Click Performance
3. Click Performance Reviews
4. Click Create New PDF to the right of Annual Review
5. When the pop-up appears, click Notify Me Later
6. A PDF of the review will become available in yournotifications. Click on the bell icon at the top right of thescreen
7. Click on the PDF to open the review
Approval ProcessThere is no approval required for this process.
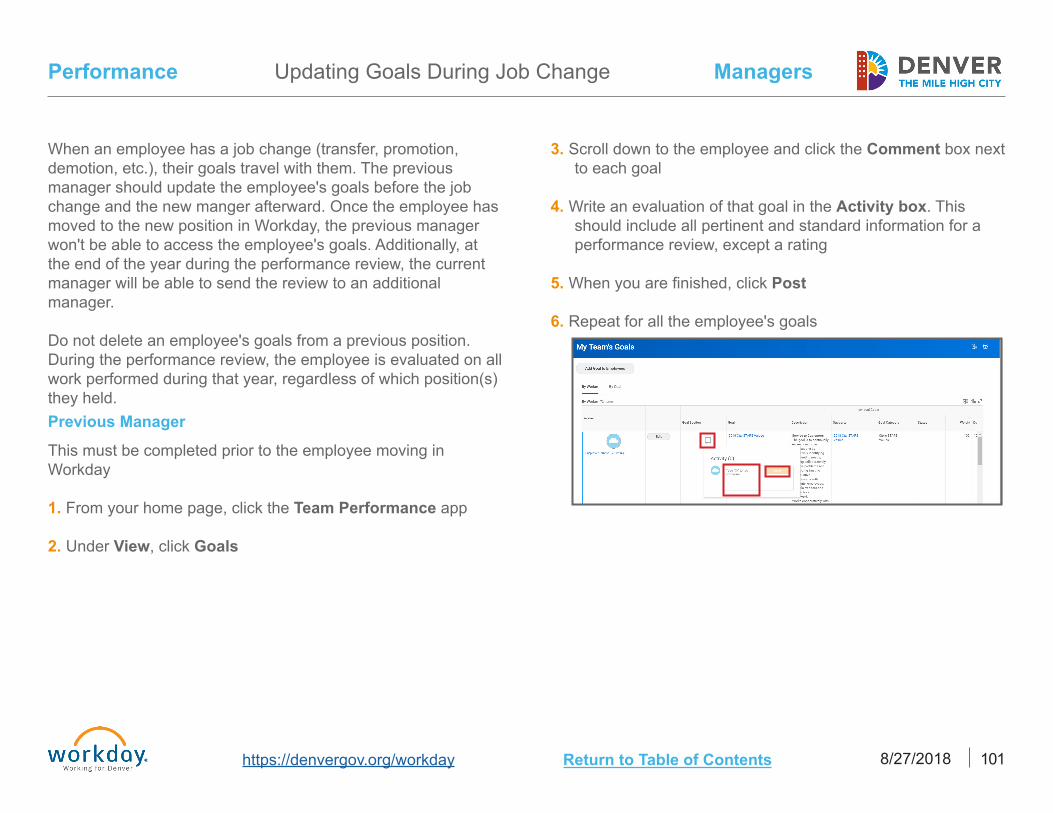
Managers
https://denvergov.org/workday 8/27/2018 101Return to Table of Contents
Performance Updating Goals During Job Change
When an employee has a job change (transfer, promotion, demotion, etc.), their goals travel with them. The previous manager should update the employee's goals before the job change and the new manger afterward. Once the employee has moved to the new position in Workday, the previous manager won't be able to access the employee's goals. Additionally, at the end of the year during the performance review, the current manager will be able to send the review to an additional manager.
Do not delete an employee's goals from a previous position. During the performance review, the employee is evaluated on all work performed during that year, regardless of which position(s) they held.Previous Manager
This must be completed prior to the employee moving in Workday
1. From your home page, click the Team Performance app
2. Under View, click Goals
3. Scroll down to the employee and click the Comment box nextto each goal
4. Write an evaluation of that goal in the Activity box. Thisshould include all pertinent and standard information for aperformance review, except a rating
5. When you are finished, click Post
6. Repeat for all the employee's goals

Managers
https://denvergov.org/workday 8/27/2018 102Return to Table of Contents
Performance Updating Goals During Job Change
Troubleshooting1. If the employee's previous manager didn't add goals, and the
employee has already moved to the new manger, the newmanager can work with the previous manager to get a copyof what the goals should have been and enter them
2. If the previous manager didn't provide an evaluation of thegoals prior to the move during the performance reviews atthe end of the year, the new manager will have the option tosend the review to the previous manager for evaluation. thisstep is called Additional Manager Evaluation
New ManagerOnce you can see the employee in your org chart, you will have access to all the employee's goals, including those from a previous position(s)
1. Access the employee's goals according to steps 1-4 in thePrevious Manager section
2. Click the Comment box to review the previous manager'scomments in each goal
3. Add new goals for the employee according to their newposition. Review Copying Goals to Multiple Employees
4. As you add new goals, adjust the weights of the new andprevious goals. It is recommended that goal weights beprorated to reflect the amount of time spent in each positionduring the year. The sum of all weights from the previousposition(s) and new position must total 100 percent
Approval ProcessThere is no approval required for this process.
Contingent Worker

This page is intentionally left blank.
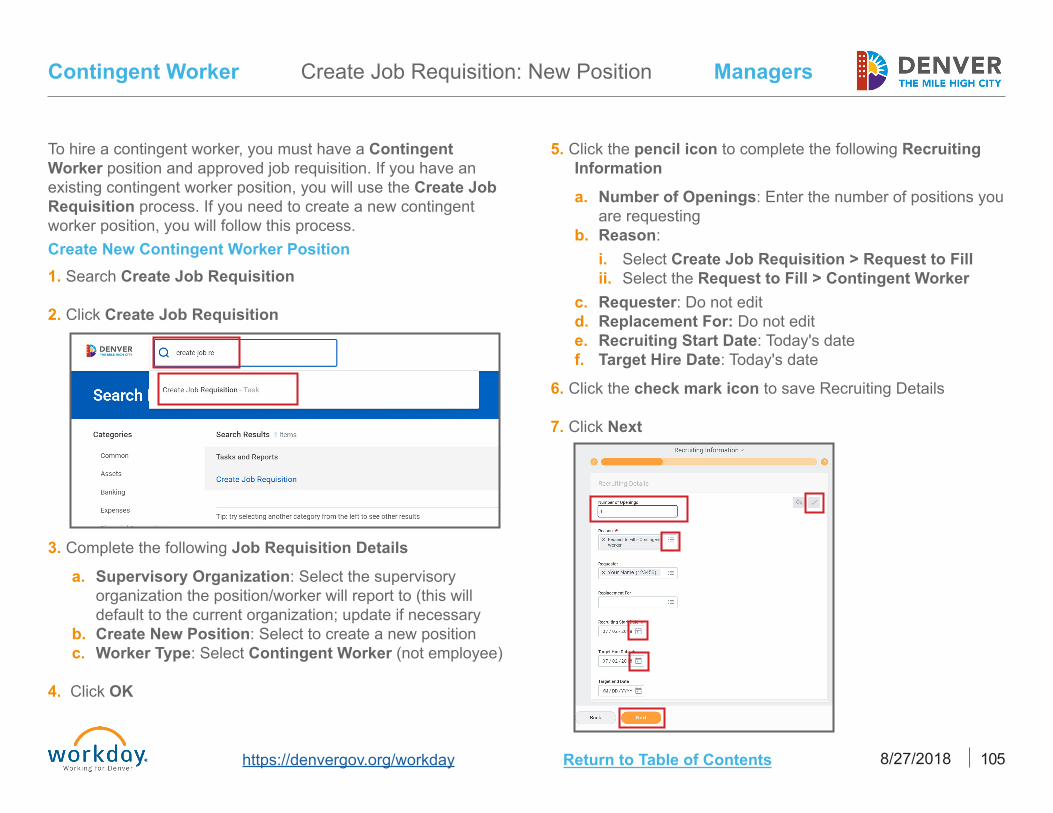
Managers
https://denvergov.org/workday 8/27/2018 105Return to Table of Contents
Contingent Worker Create Job Requisition: New Position
5. Click the pencil icon to complete the following RecruitingInformation
a. Number of Openings: Enter the number of positions youare requesting
b. Reason:i. Select Create Job Requisition > Request to Fillii. Select the Request to Fill > Contingent Worker
c. Requester: Do not editd. Replacement For: Do not edite. Recruiting Start Date: Today's datef. Target Hire Date: Today's date
6. Click the check mark icon to save Recruiting Details
7. Click Next
3. Complete the following Job Requisition Details
a. Supervisory Organization: Select the supervisoryorganization the position/worker will report to (this willdefault to the current organization; update if necessary
b. Create New Position: Select to create a new positionc. Worker Type: Select Contingent Worker (not employee)
4. Click OK
To hire a contingent worker, you must have a Contingent Worker position and approved job requisition. If you have an existing contingent worker position, you will use the Create Job Requisition process. If you need to create a new contingent worker position, you will follow this process.Create New Contingent Worker Position1. Search Create Job Requisition
2. Click Create Job Requisition

Managers
https://denvergov.org/workday 8/27/2018 106Return to Table of Contents
Contingent Worker Create Job Requisition: New Position
8. Click the pencil icon to complete the Job Details
a. Job Posting Title: Enter the descriptive title of theposition
b. Job Profile: Type Contingent Worker or Unpaid Internin the search field. Select WW1122 Contingent Workeror WW1122 Unpaid Interni. If you select Unpaid Intern, you will need to complete
the Job Description and Ideal Candidate Summaryfields
c. Worker Sub-Type: Select the most appropriate optiond. Time Type: Select Full Time or Part Timee. Primary Location: Enter the locationf. Scheduled Weekly Hours: Update to average number of
hours per week for the position
9. Click the check mark icon to save the Job Details
10. Click Next
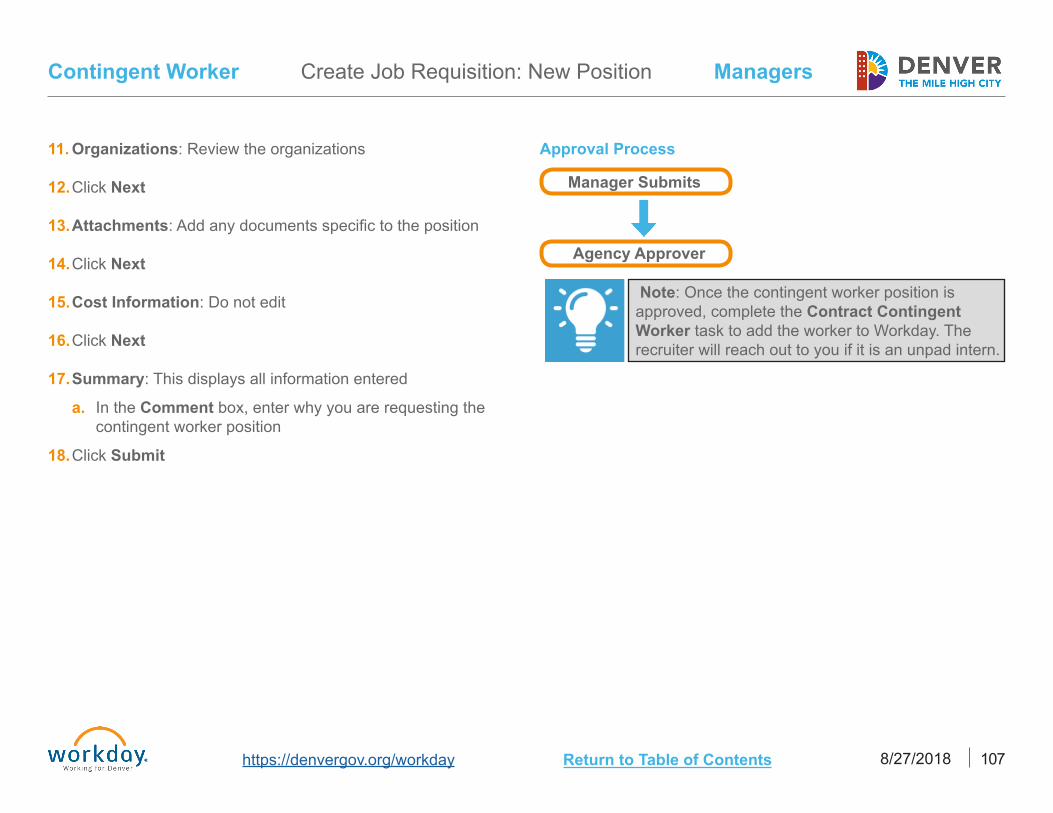
Managers
https://denvergov.org/workday 8/27/2018 107Return to Table of Contents
Contingent Worker
11. Organizations: Review the organizations
12. Click Next
13. Attachments: Add any documents specific to the position
14. Click Next
15. Cost Information: Do not edit
16. Click Next
17. Summary: This displays all information entered
a. In the Comment box, enter why you are requesting the contingent worker position
18. Click Submit
Approval Process
Agency Approver
Manager Submits
Create Job Requisition: New Position
Note: Once the contingent worker position is approved, complete the Contract Contingent Worker task to add the worker to Workday. The recruiter will reach out to you if it is an unpad intern.
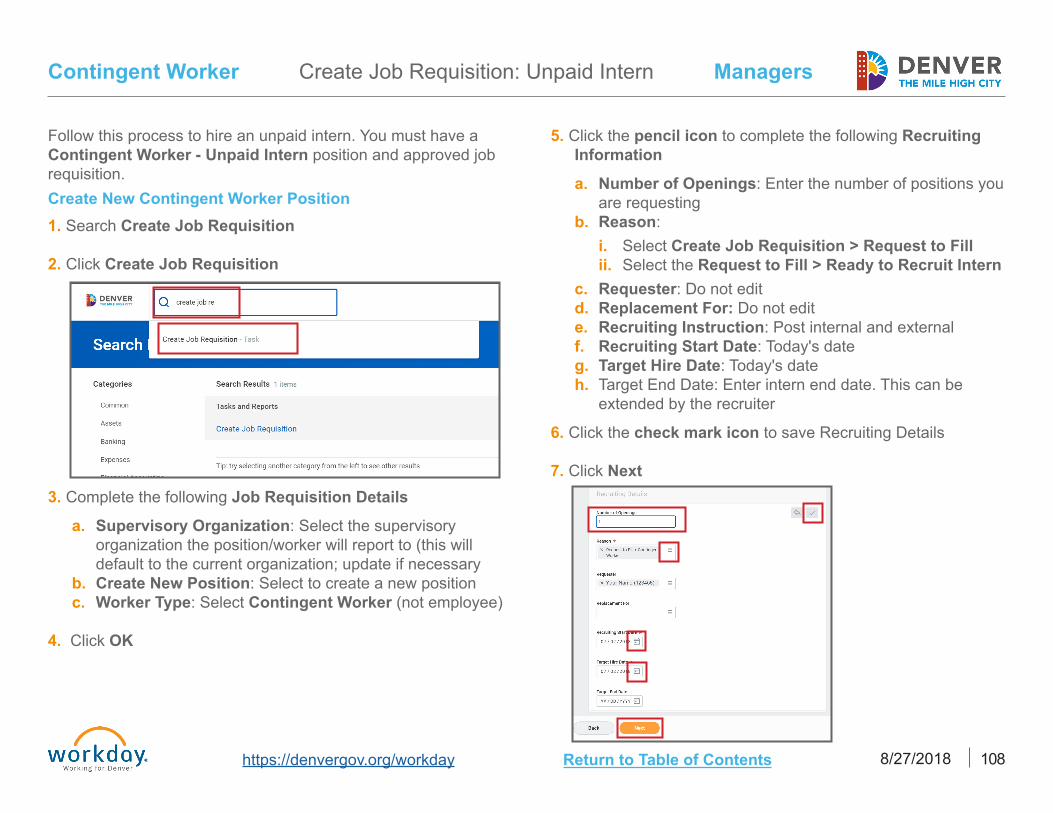
Managers
https://denvergov.org/workday 8/27/2018 108Return to Table of Contents
Contingent Worker Create Job Requisition: Unpaid Intern
5. Click the pencil icon to complete the following RecruitingInformation
a. Number of Openings: Enter the number of positions youare requesting
b. Reason:i. Select Create Job Requisition > Request to Fillii. Select the Request to Fill > Ready to Recruit Intern
c. Requester: Do not editd. Replacement For: Do not edite. Recruiting Instruction: Post internal and externalf. Recruiting Start Date: Today's dateg. Target Hire Date: Today's dateh. Target End Date: Enter intern end date. This can be
extended by the recruiter
6. Click the check mark icon to save Recruiting Details
7. Click Next3. Complete the following Job Requisition Details
a. Supervisory Organization: Select the supervisoryorganization the position/worker will report to (this willdefault to the current organization; update if necessary
b. Create New Position: Select to create a new positionc. Worker Type: Select Contingent Worker (not employee)
4. Click OK
Follow this process to hire an unpaid intern. You must have a Contingent Worker - Unpaid Intern position and approved job requisition. Create New Contingent Worker Position1. Search Create Job Requisition
2. Click Create Job Requisition
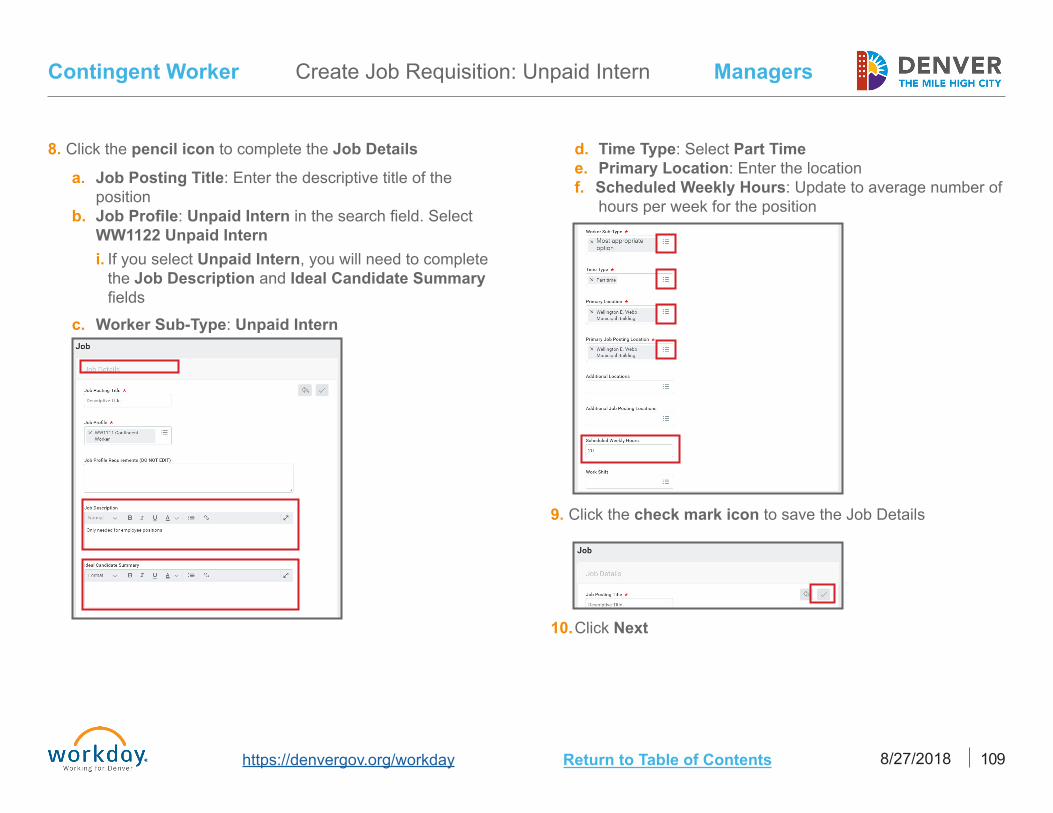
Managers
https://denvergov.org/workday 8/27/2018 109Return to Table of Contents
Contingent Worker Create Job Requisition: Unpaid Intern
8. Click the pencil icon to complete the Job Details
a. Job Posting Title: Enter the descriptive title of theposition
b. Job Profile: Unpaid Intern in the search field. SelectWW1122 Unpaid Interni. If you select Unpaid Intern, you will need to complete
the Job Description and Ideal Candidate Summaryfields
c. Worker Sub-Type: Unpaid Intern
d. Time Type: Select Part Timee. Primary Location: Enter the locationf. Scheduled Weekly Hours: Update to average number of
hours per week for the position
9. Click the check mark icon to save the Job Details
10. Click Next

Managers
https://denvergov.org/workday 8/27/2018 110Return to Table of Contents
Contingent Worker
11. Organizations: Review the organizations
12. Click Next
13. Attachments: Add any documents specific to the position
14. Click Next
15. Cost Information: Do not edit
16. Click Next
17. Assign Roles: Do not edit
18. Summary: This displays all information entered
a. In the Comment box, enter why you are requesting the contingent worker position
18. Click Submit
Create Job Requisition: Unpaid Intern
Note: Once the contingent worker position is approved, complete the Contract Contingent Worker task to add the worker to Workday. The recruiter will reach out to you if it is an unpad intern.
Approval Process
Agency Approver
Manager Submits
Recruiter
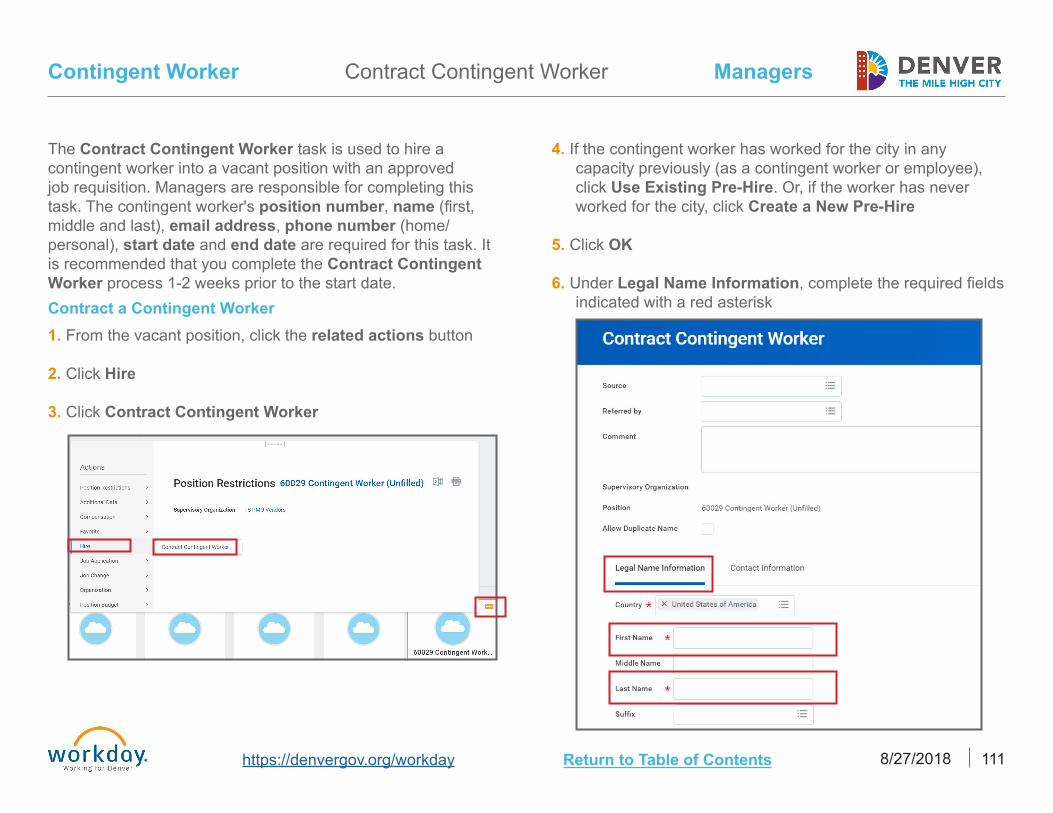
Managers
https://denvergov.org/workday 8/27/2018 111Return to Table of Contents
Contingent Worker Contract Contingent Worker
The Contract Contingent Worker task is used to hire a contingent worker into a vacant position with an approved job requisition. Managers are responsible for completing this task. The contingent worker's position number, name (first, middle and last), email address, phone number (home/personal), start date and end date are required for this task. It is recommended that you complete the Contract Contingent Worker process 1-2 weeks prior to the start date.Contract a Contingent Worker1. From the vacant position, click the related actions button
2. Click Hire
3. Click Contract Contingent Worker
4. If the contingent worker has worked for the city in anycapacity previously (as a contingent worker or employee),click Use Existing Pre-Hire. Or, if the worker has neverworked for the city, click Create a New Pre-Hire
5. Click OK
6. Under Legal Name Information, complete the required fieldsindicated with a red asterisk

Managers
https://denvergov.org/workday 8/27/2018 112Return to Table of Contents
Contingent Worker Contract Contingent Worker
10. Enter the Contract Start Date (the first day of work)
11. Enter the projected end date in the Contract End Date
7. Click Contact Information
8. Complete the following fields. The required fields areindicated with a red asterisk
a. Phone: Click Add to enter phone informationb. Address: Click Add to enter address informationc. Email: Click Add to enter email address information
9. Click OK

Managers
https://denvergov.org/workday 8/27/2018 113Return to Table of Contents
Contingent Worker Contract Contingent Worker
12. Type any comments about the position for the contingentworker. This is not required
13. Click Submit. This will launch a new task
14. Click Open
15. Review the cost center details. Typically, no changes arerequired. Click the pencil icon to update the cost center ifnecessary
16. Click Submit
Note: Once the task is approved, an employee ID is generated and the information will integrate with OIM for initial TS provisioning. Complete the New Computer User Request through SupportNow.
Approval ProcessThere is no approval required for this process.

Appendix

This page is intentionally left blank.
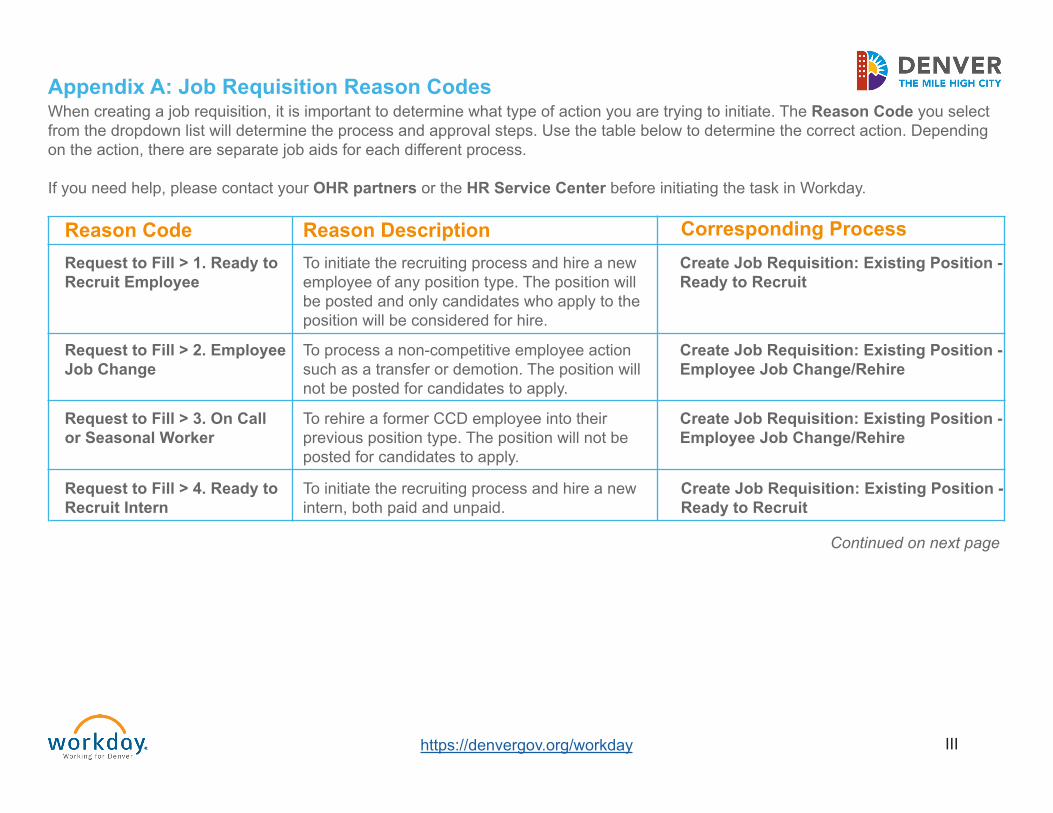
https://denvergov.org/workday III
Appendix A: Job Requisition Reason CodesWhen creating a job requisition, it is important to determine what type of action you are trying to initiate. The Reason Code you select from the dropdown list will determine the process and approval steps. Use the table below to determine the correct action. Depending on the action, there are separate job aids for each different process.
If you need help, please contact your OHR partners or the HR Service Center before initiating the task in Workday.
Request to Fill > 1. Ready to Recruit Employee
To initiate the recruiting process and hire a new employee of any position type. The position will be posted and only candidates who apply to the position will be considered for hire.
Create Job Requisition: Existing Position - Ready to Recruit
Reason Code Reason Description Corresponding Process
Request to Fill > 2. Employee Job Change
To process a non-competitive employee action such as a transfer or demotion. The position will not be posted for candidates to apply.
Create Job Requisition: Existing Position - Employee Job Change/Rehire
Request to Fill > 3. On Call or Seasonal Worker
To rehire a former CCD employee into their previous position type. The position will not be posted for candidates to apply.
Create Job Requisition: Existing Position - Employee Job Change/Rehire
Request to Fill > 4. Ready to Recruit Intern
To initiate the recruiting process and hire a new intern, both paid and unpaid.
Create Job Requisition: Existing Position - Ready to Recruit
Continued on next page

https://denvergov.org/workday IV
Request to Fill > 5. Contingent Worker
To contract a contingent worker: anyone who accesses the city's network, has badge acess to facilities, is doing work for or is anticipating to work for the city more than 40 hours per year, but is not classified as a city employee. Contingent workers include but are not limited to contractors, volunteers, unpaid interns, unpaid trainees, vendors, outside auditors and other non-paid worker types. For more information on Contingent Workers, reference the Personal Provisioning Policy.
Create Job Requisition: Contingent Worker
Request to Fill > 6. Library To hire an employee at Denver Public Library. Create Job Requisition: Existing Position - Employee Job Change/Rehire
Reason Code Reason Description Corresponding Process
Request to Fill > 7. Elected/Appointed
To hire an elected/appointed official without initiating the recruiting process. the position will not be posted for candidates to apply.
Create Job Requisition: Existing Position - Employee Job Change/Rehire
Request to Fill > 8. Uniformed Officer Job Change
To update a uniformed officer's position through job transfer or appointment.
Create Job Requisition: Existing Position - Employee Job Change/Rehire
Appendix A: Job Requisition Reason Codes - Continued
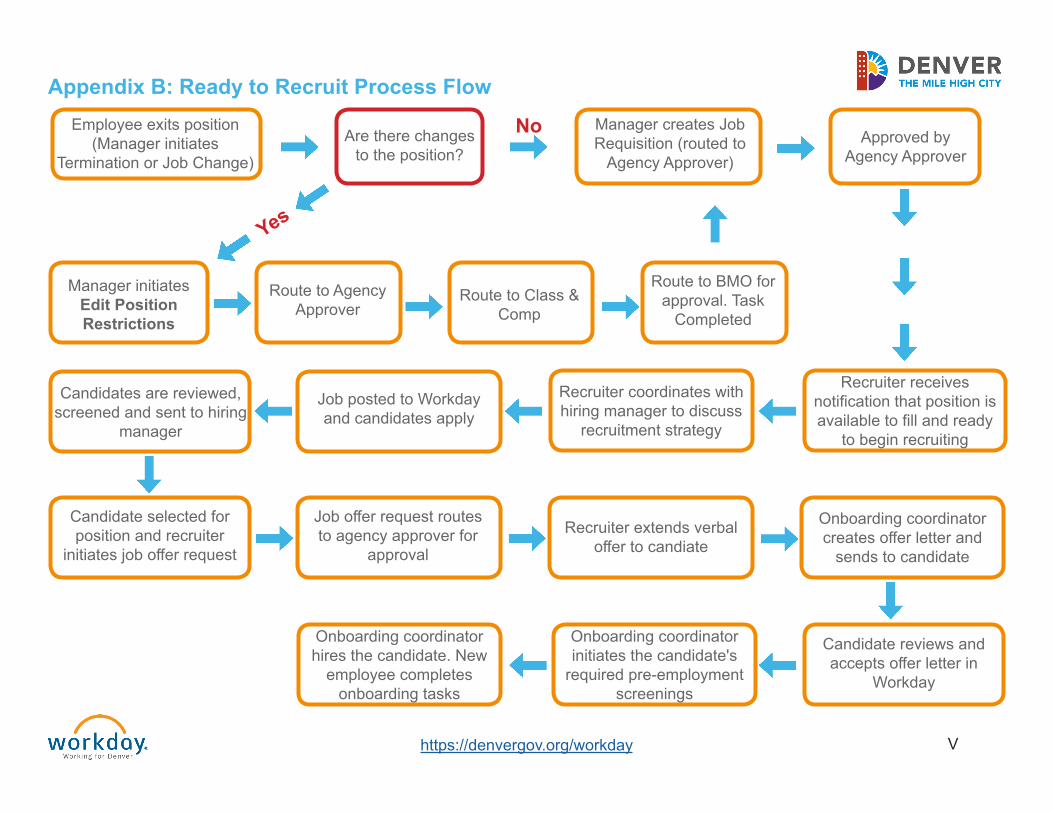
https://denvergov.org/workday V
Appendix B: Ready to Recruit Process Flow
NoEmployee exits position (Manager initiates
Termination or Job Change)Are there changes
to the position?
Manager creates Job Requisition (routed to
Agency Approver)Approved by
Agency Approver
Manager initiates Edit Position Restrictions
Route to Agency Approver
Route to Class & Comp
Route to BMO for approval. Task
Completed
Recruiter receives notification that position is available to fill and ready
to begin recruiting
Job offer request routes to agency approver for
approval
Candidate selected for position and recruiter
initiates job offer request
Candidates are reviewed, screened and sent to hiring
manager
Job posted to Workday and candidates apply
Recruiter coordinates with hiring manager to discuss
recruitment strategy
Yes
Recruiter extends verbal offer to candiate
Onboarding coordinator creates offer letter and
sends to candidate
Candidate reviews and accepts offer letter in
Workday
Onboarding coordinator initiates the candidate's
required pre-employment screenings
Onboarding coordinator hires the candidate. New
employee completes onboarding tasks
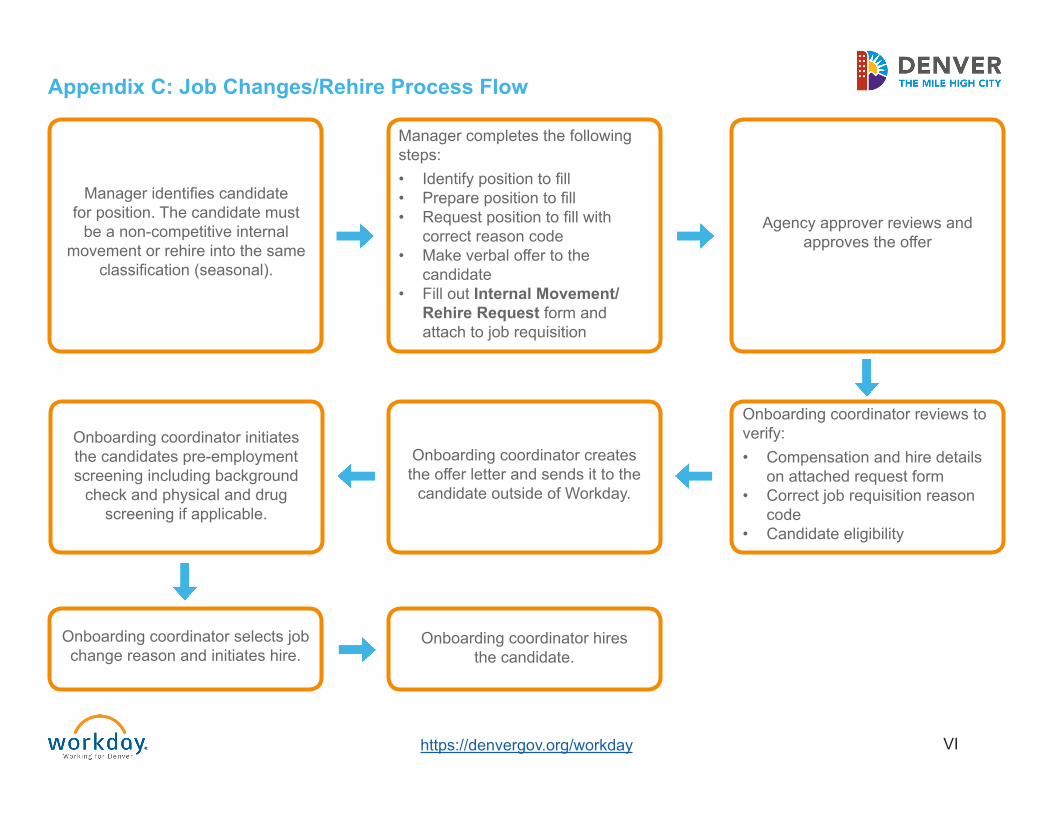
https://denvergov.org/workday VI
Onboarding coordinator hires the candidate.
Onboarding coordinator selects job change reason and initiates hire.
Onboarding coordinator initiates the candidates pre-employment screening including background
check and physical and drug screening if applicable.
Onboarding coordinator creates the offer letter and sends it to the
candidate outside of Workday.
Onboarding coordinator reviews to verify: • Compensation and hire details
on attached request form• Correct job requisition reason
code• Candidate eligibility
Agency approver reviews and approves the offer
Manager completes the following steps: • Identify position to fill• Prepare position to fill• Request position to fill with
correct reason code• Make verbal offer to the
candidate• Fill out Internal Movement/
Rehire Request form andattach to job requisition
Manager identifies candidate for position. The candidate must
be a non-competitive internal movement or rehire into the same
classification (seasonal).
Appendix C: Job Changes/Rehire Process Flow