Wire Cut, Wire EDM,Wire cut EDM,EDM Machines, Wire Cutting ...

Emergency Department Management (EDM) EDM Reception/Triage Assessment and Allergies Training
Reception
Reception Routines
Click on the button to proceed to the Patient Reception screen
Choose one of 4 reception forms based on how they present to the Emergency Department
Walk In
Walk In is the most common method for adding a patient to the tracker. This routine is used for all patients that appear in your triage area that have just “walked in” the door or for patients arriving via EMS without warning.
EMS
This routine is for the occasions when EMS informs the department that they are en route to your department with a patient. It allows you to indicate to all staff that there is a patient incoming, provide an estimated time of arrival (ETA) and block a treatment space to ensure its availability upon their arrival.
Transfer
For the rare occasions that a patient is brought from the ward (as an inpatient) into the Emergency Department for care, use the transfer routine. This allows you to place a patient on the tracker without affecting their admission status and will not create a duplicate account.
Call In
When a physician’s office calls to tell you that they are sending you a patient, use this routine. It is assumed that you will be able to obtain patient demographics (name, health care number) to add the patient to the tracker. Very similar functionality to the EMS routine and adds the patient to the incoming tracker.
Created: April 30, 2015 Revised: April 11, 2018
Page 1 of 21
Notes:
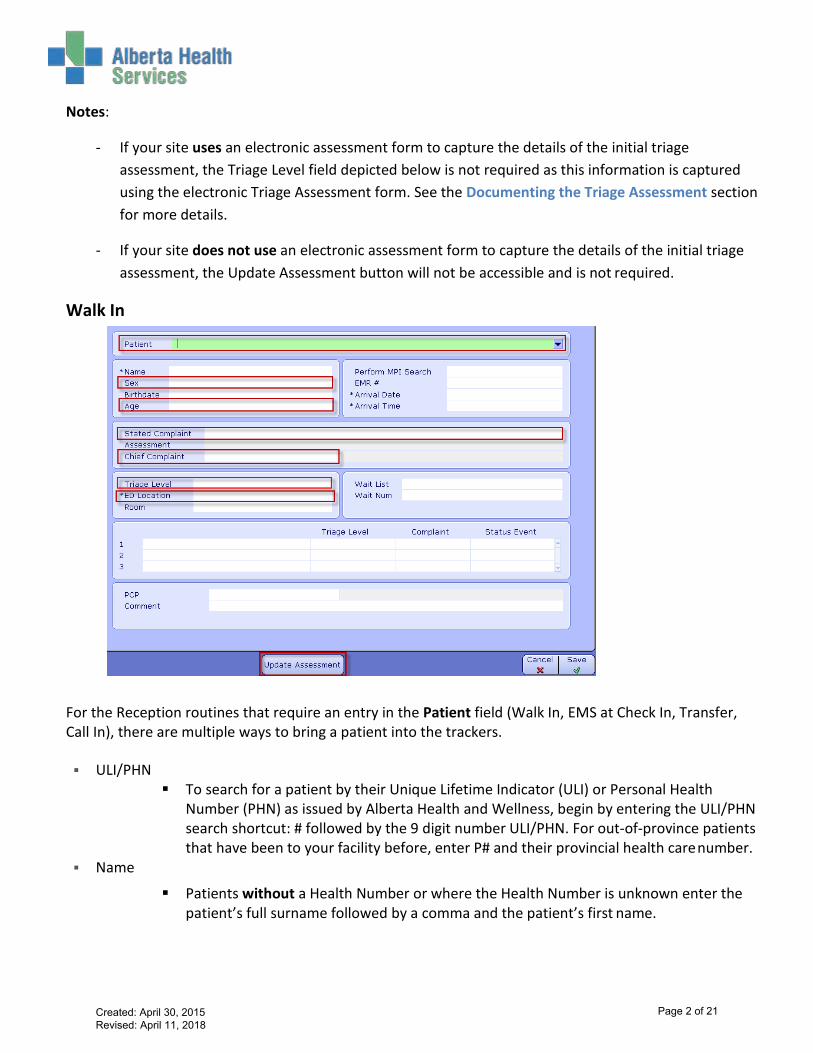
- If your site uses an electronic assessment form to capture the details of the initial triageassessment, the Triage Level field depicted below is not required as this information is capturedusing the electronic Triage Assessment form. See the Documenting the Triage Assessment sectionfor more details.
- If your site does not use an electronic assessment form to capture the details of the initial triageassessment, the Update Assessment button will not be accessible and is not required.
Walk In
For the Reception routines that require an entry in the Patient field (Walk In, EMS at Check In, Transfer, Call In), there are multiple ways to bring a patient into the trackers.
ULI/PHN
Name
To search for a patient by their Unique Lifetime Indicator (ULI) or Personal HealthNumber (PHN) as issued by Alberta Health and Wellness, begin by entering the ULI/PHNsearch shortcut: # followed by the 9 digit number ULI/PHN. For out-of-province patientsthat have been to your facility before, enter P# and their provincial health care number.
Patients without a Health Number or where the Health Number is unknown enter thepatient’s full surname followed by a comma and the patient’s first name.
Created: April 30, 2015 Revised: April 11, 2018
Page 2 of 21
Unknown Patient
Follow your hospital’s procedures for entering in a temporary patient name.
Complete required/relevant fields
Age
Sex
Stated Complaint
o A free text field to document what the patient is complaining of
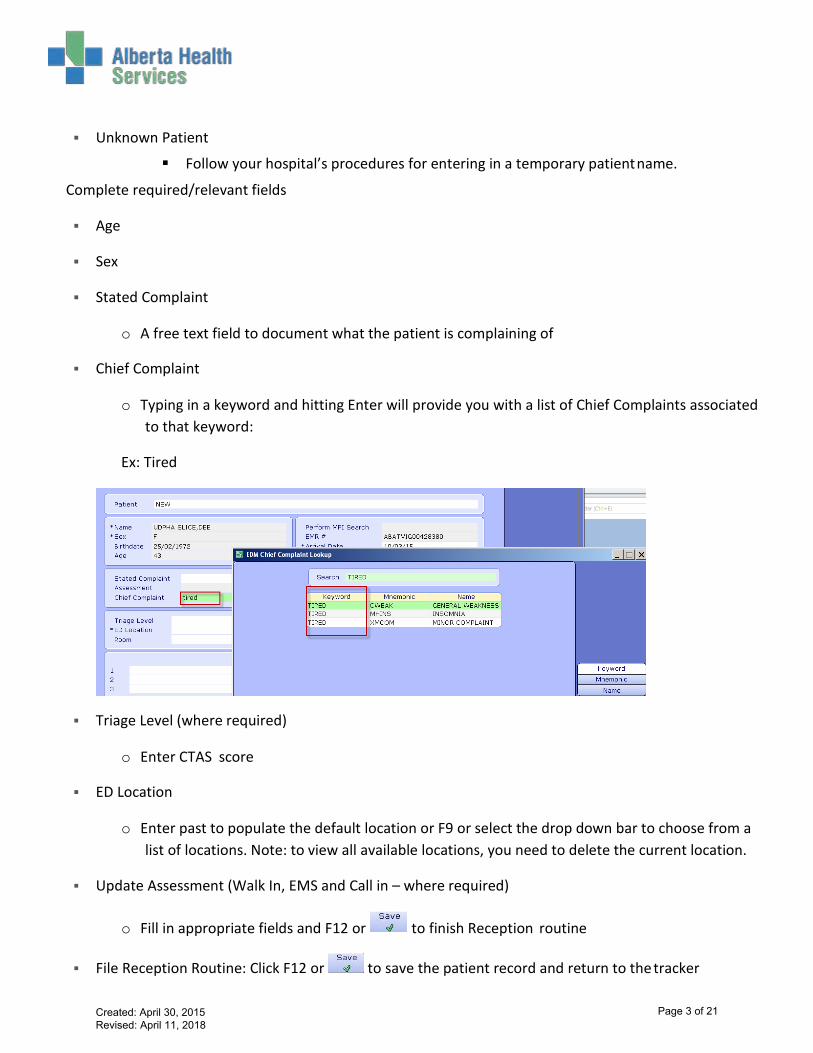
Chief Complaint
o Typing in a keyword and hitting Enter will provide you with a list of Chief Complaints associatedto that keyword:
Ex: Tired
Triage Level (where required)
o Enter CTAS score
ED Location
o Enter past to populate the default location or F9 or select the drop down bar to choose from alist of locations. Note: to view all available locations, you need to delete the current location.
Update Assessment (Walk In, EMS and Call in – where required)
o Fill in appropriate fields and F12 or to finish Reception routine
File Reception Routine: Click F12 or to save the patient record and return to the tracker
Created: April 30, 2015 Revised: April 11, 2018
Page 3 of 21

o Upon filing, the patient name will appear in the appropriate trackers.
EMS
This screen will automatically appear if accessing the Reception routine directly from the Incoming tracker.
In the Ambulance Company field, you will notice that there is a default company listed. You can change this to match the appropriate company by highlighting the field, deleting what is in there and clicking on the down arrow or pressing F9. Choose the right company and press Enter.
The Ambulance ID will be automatically generated with a number. This will become the patient’s temporary name that will appear on the trackers (typically, you will not know the patient name for the incoming EMS patients). You will be able to update this when you perform the Check In routine.
The Call Date and Time will automatically populate with the date and time you are completing this.
Triage Level will not be required until Check In.
Age and Sex must be entered.
Created: April 30, 2015 Revised: April 11, 2018
Page 4 of 21
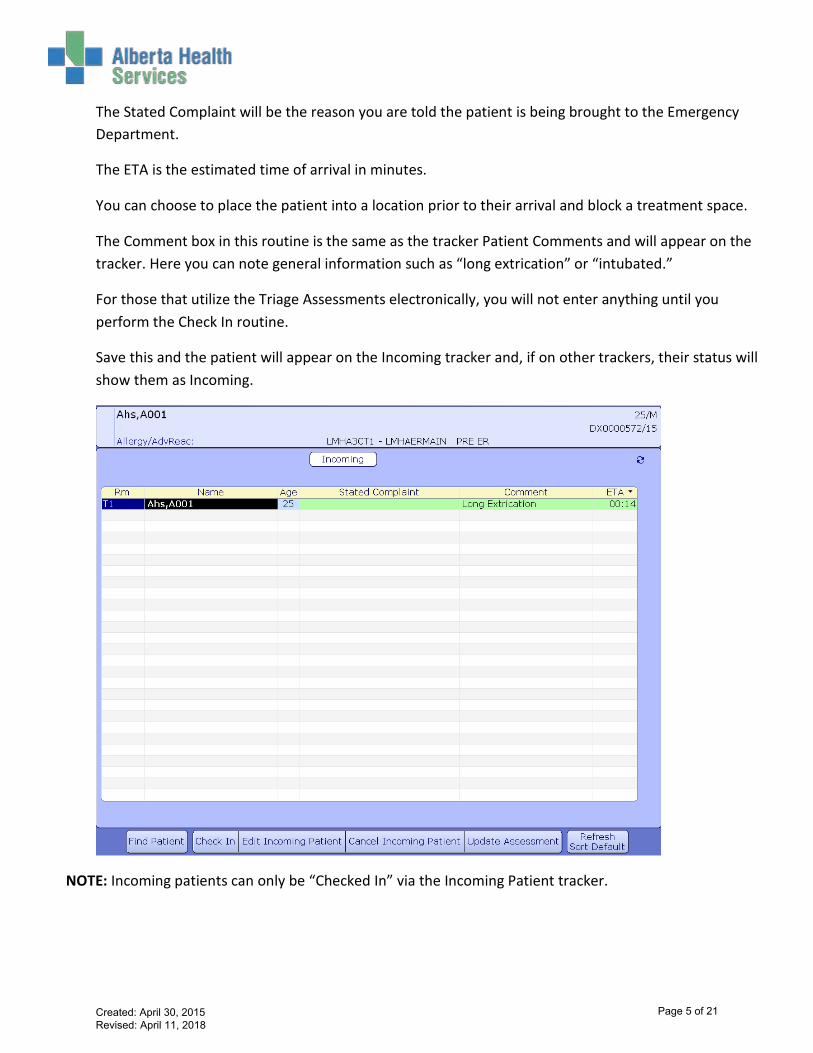
The Stated Complaint will be the reason you are told the patient is being brought to the Emergency Department.
The ETA is the estimated time of arrival in minutes.
You can choose to place the patient into a location prior to their arrival and block a treatment space.
The Comment box in this routine is the same as the tracker Patient Comments and will appear on the tracker. Here you can note general information such as “long extrication” or “intubated.”
For those that utilize the Triage Assessments electronically, you will not enter anything until you perform the Check In routine.
Save this and the patient will appear on the Incoming tracker and, if on other trackers, their status will show them as Incoming.
NOTE: Incoming patients can only be “Checked In” via the Incoming Patient tracker.
Created: April 30, 2015 Revised: April 11, 2018
Page 5 of 21

Check In
For both EMS and Call In patients, when the patient arrives, go to the Incoming Tracker (above) and select Check In from the bottom buttons. That will return you to the Reception Routine in order to update pertinent patient information.
Note that you will be brought directly to the Name field. From here, enter the patient’s health care number or LASTNAME,FIRSTNAME (same procedure as Walk In).
You will be required to add a Chief Complaint and Triage Level at this time (if your site uses the electronic assessment, complete the assessment and the Triage Level is required there).
Created: April 30, 2015 Revised: April 11, 2018
Page 6 of 21

Transfer
To bring an inpatient into the EDM Trackers, you must enter the patient’s account number.
Entering a patient account number is the most accurate. The account number is a visit number relatedto the patient’s current visit in a specific facility. A new Account Number is assigned each time a personis registered to the facility. This is the recommended option when receiving a patient through atransfer as this will immediately populate the demographic and admission details.
Patients can be searched for by unit number for a specific facility. The Unit Number is unique to theperson and all visits attached to one medical record
If the patient was originally admitted through the Emergency Department, you may see their original triage information appear upon entering their account number. That is normal and there is no need to change anything other than the patient’s location. NOTE: A patient departed from Emergency for admission may not appear on patient based trackers as their status will remain “Depart” (Admitted Patient for Red Deer) until you change it.
NO sites are using the electronic Triage Assessment for inpatients coming into the Emergency Department. Do not complete the assessment for these patients.
Patients brought in through the Transfer reception cannot be departed through the Departure Routine but must simply be departed by changing their Status to Depart (or, for Red Deer, Admitted Patient).
Created: April 30, 2015 Revised: April 11, 2018
Page 7 of 21
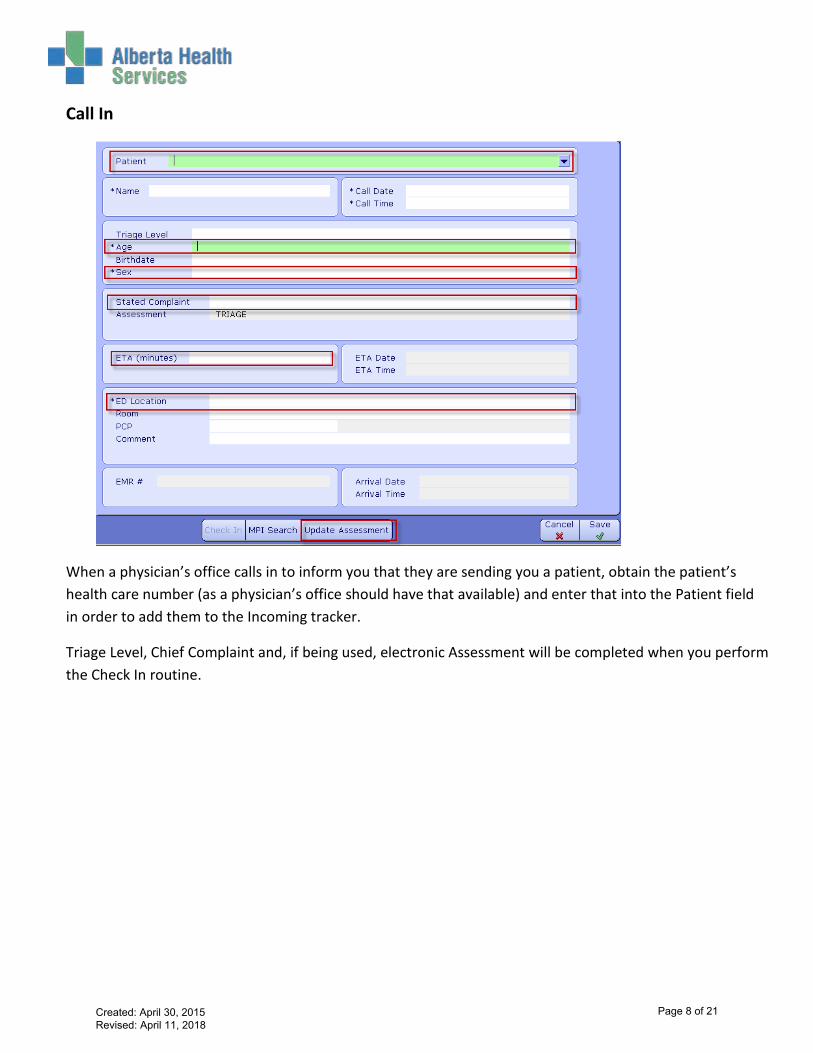
Call In
When a physician’s office calls in to inform you that they are sending you a patient, obtain the patient’s health care number (as a physician’s office should have that available) and enter that into the Patient field in order to add them to the Incoming tracker.
Triage Level, Chief Complaint and, if being used, electronic Assessment will be completed when you perform the Check In routine.
Created: April 30, 2015 Revised: April 11, 2018
Page 8 of 21
Documenting the Triage Assessment
The following section only applies if your site uses an electronic assessment form to capture the details of the initial triage assessment.
Note: at the time of document creation, the electronic triage assessment form will not be used when patient is received through an inpatient transfer. Check with your team lead for current process.
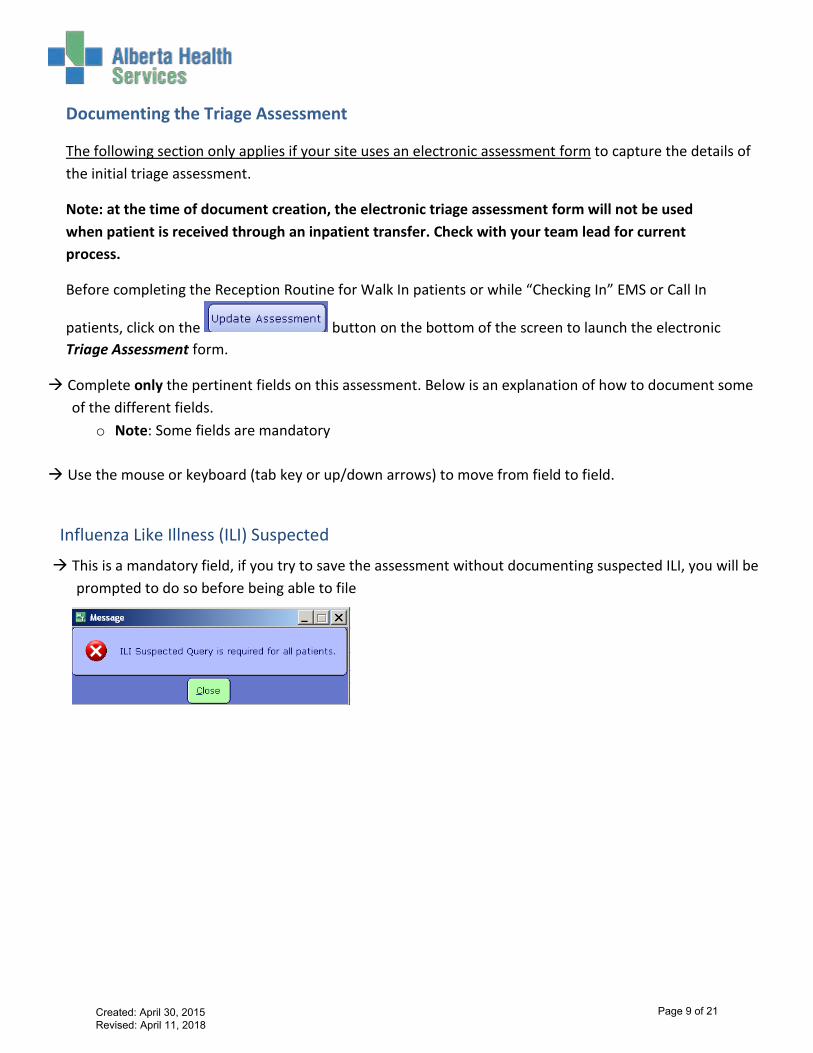
Before completing the Reception Routine for Walk In patients or while “Checking In” EMS or Call In
patients, click on the button on the bottom of the screen to launch the electronic Triage Assessment form.
Complete only the pertinent fields on this assessment. Below is an explanation of how to document someof the different fields.
o Note: Some fields are mandatory
Use the mouse or keyboard (tab key or up/down arrows) to move from field to field.
Influenza Like Illness (ILI) Suspected
This is a mandatory field, if you try to save the assessment without documenting suspected ILI, you will beprompted to do so before being able to file
Created: April 30, 2015 Revised: April 11, 2018
Page 9 of 21
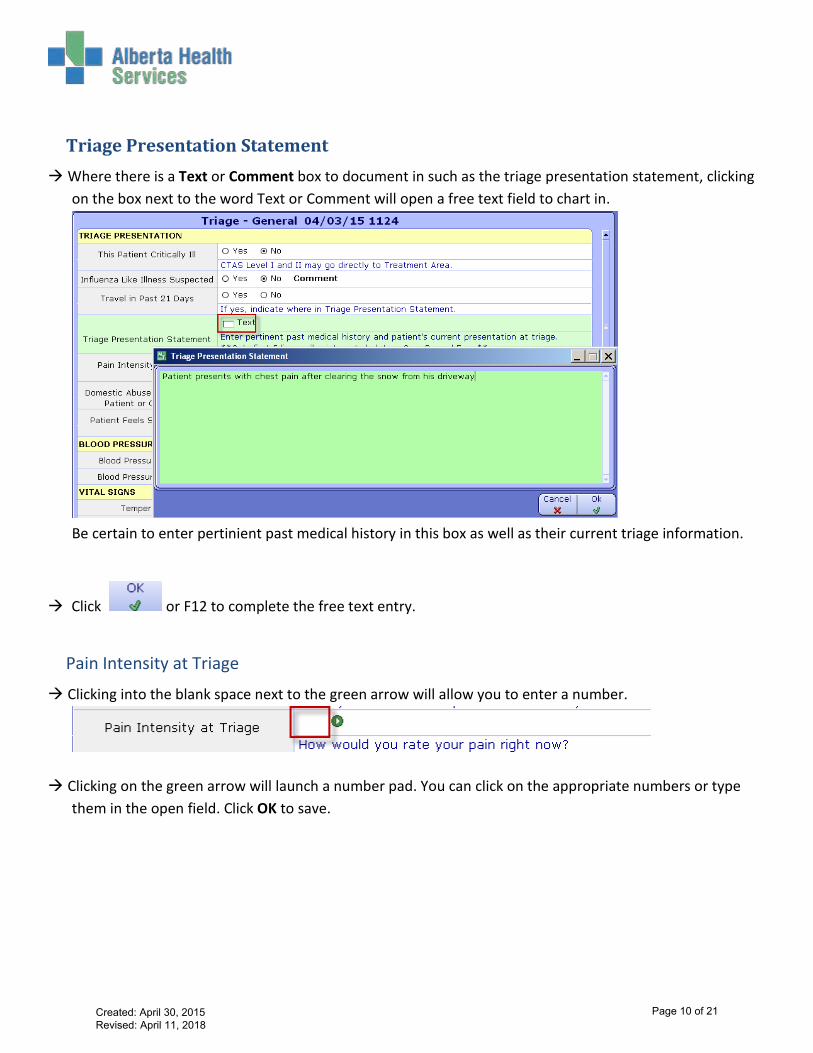
Triage Presentation Statement Where there is a Text or Comment box to document in such as the triage presentation statement, clicking
on the box next to the word Text or Comment will open a free text field to chart in.
Be certain to enter pertinient past medical history in this box as well as their current triage information.
Click or F12 to complete the free text entry.
Pain Intensity at Triage
Clicking into the blank space next to the green arrow will allow you to enter a number.
Clicking on the green arrow will launch a number pad. You can click on the appropriate numbers or typethem in the open field. Click OK to save.
Created: April 30, 2015 Revised: April 11, 2018
Page 10 of 21

*Note: All number fields in the assessment will respond the same way.
Vitals Enter the vitals by documenting in the free space next to each heading or by clicking on the green arrow
to bring up the keypad window
Should the need occur to repeat the patient blood pressure while they remain with you in Triage, click the Insert Occurrence button on the bottom of the screen.
You will see “Occurrence #2” appear immediately below the 1st occurrence:
Continue to complete only the pertinent fields.
Created: April 30, 2015 Revised: April 11, 2018
Page 11 of 21
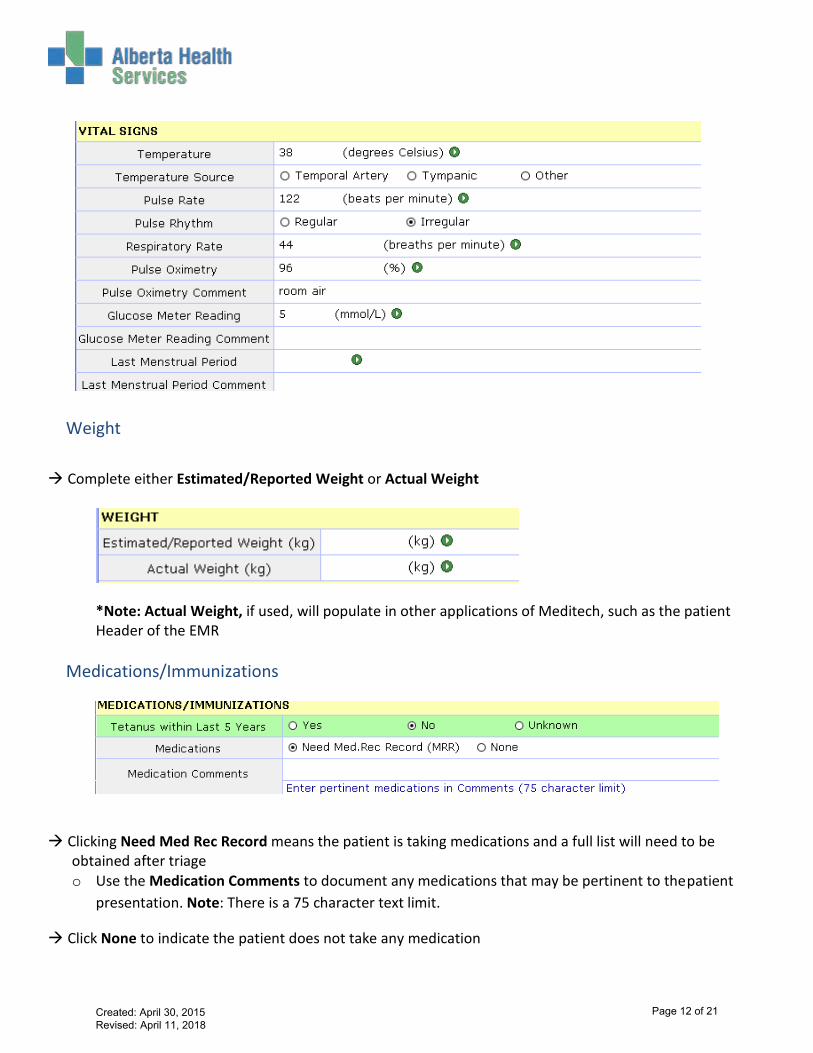
Weight Complete either Estimated/Reported Weight or Actual Weight
*Note: Actual Weight, if used, will populate in other applications of Meditech, such as the patient Header of the EMR
Medications/Immunizations
Clicking Need Med Rec Record means the patient is taking medications and a full list will need to be obtained after triage o Use the Medication Comments to document any medications that may be pertinent to the patient
presentation. Note: There is a 75 character text limit.
Click None to indicate the patient does not take any medication
Created: April 30, 2015 Revised: April 11, 2018
Page 12 of 21
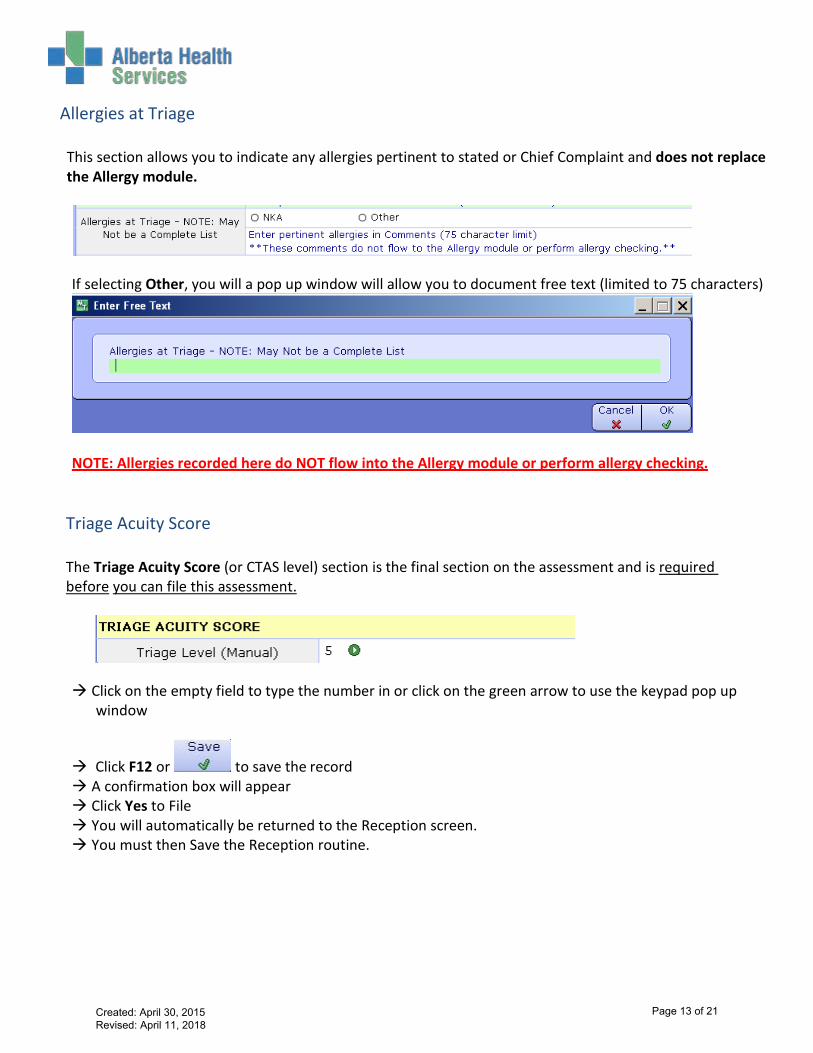
Allergies at Triage
This section allows you to indicate any allergies pertinent to stated or Chief Complaint and does not replace the Allergy module.
If selecting Other, you will a pop up window will allow you to document free text (limited to 75 characters)
NOTE: Allergies recorded here do NOT flow into the Allergy module or perform allergy checking.
Triage Acuity Score
The Triage Acuity Score (or CTAS level) section is the final section on the assessment and is required before you can file this assessment.
Click on the empty field to type the number in or click on the green arrow to use the keypad pop up
window
Click F12 or to save the record A confirmation box will appear Click Yes to File You will automatically be returned to the Reception screen. You must then Save the Reception routine.
Created: April 30, 2015 Revised: April 11, 2018
Page 13 of 21

Triage Reassessment (for sites performing electronic reassessments) As per standard care processes, patients may need to be reassessed. Follow the steps outlined below to complete reassessments as required.
1. Chose the appropriate patient from the Waiting Room tracker and click on the Interventions button on the
right hand panel
2. Highlight Triage Reassessment by clicking on it or check marking it and click on the document button at the
bottom of the screen
3. The Triage Reassessment General window will open.
Created: April 30, 2015 Revised: April 11, 2018
Page 14 of 21
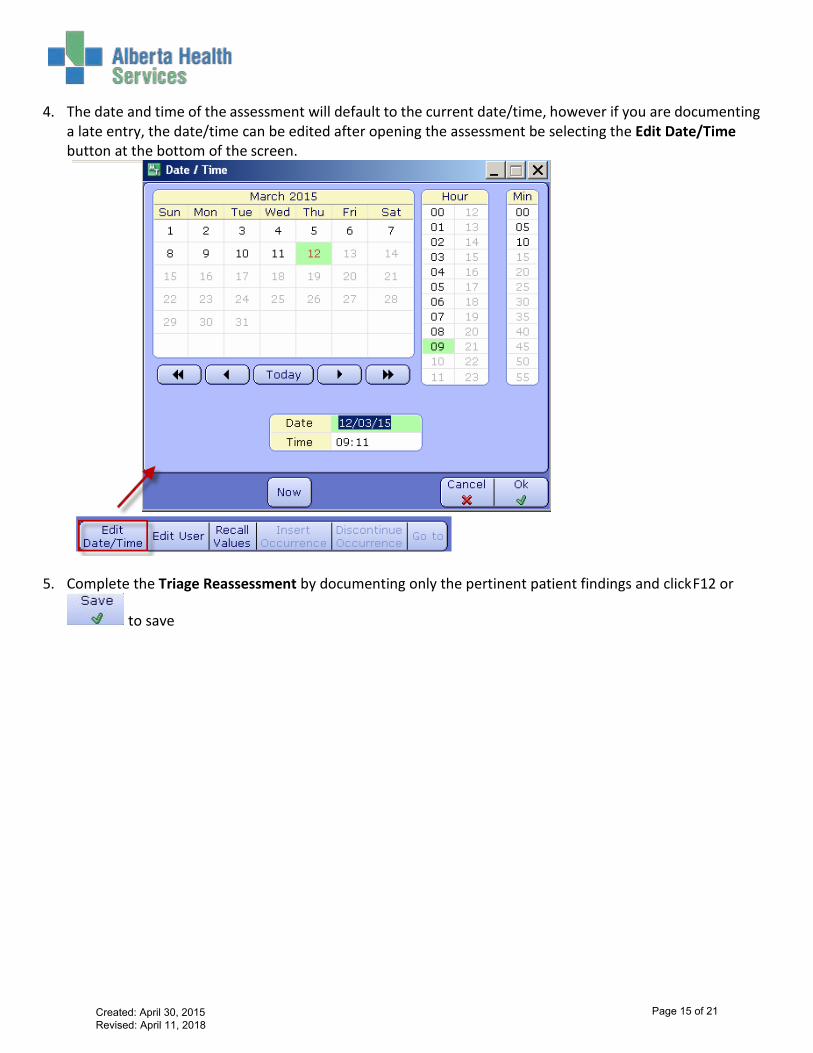
4. The date and time of the assessment will default to the current date/time, however if you are documenting a late entry, the date/time can be edited after opening the assessment be selecting the Edit Date/Time button at the bottom of the screen.
5. Complete the Triage Reassessment by documenting only the pertinent patient findings and click F12 or
to save
Created: April 30, 2015 Revised: April 11, 2018
Page 15 of 21
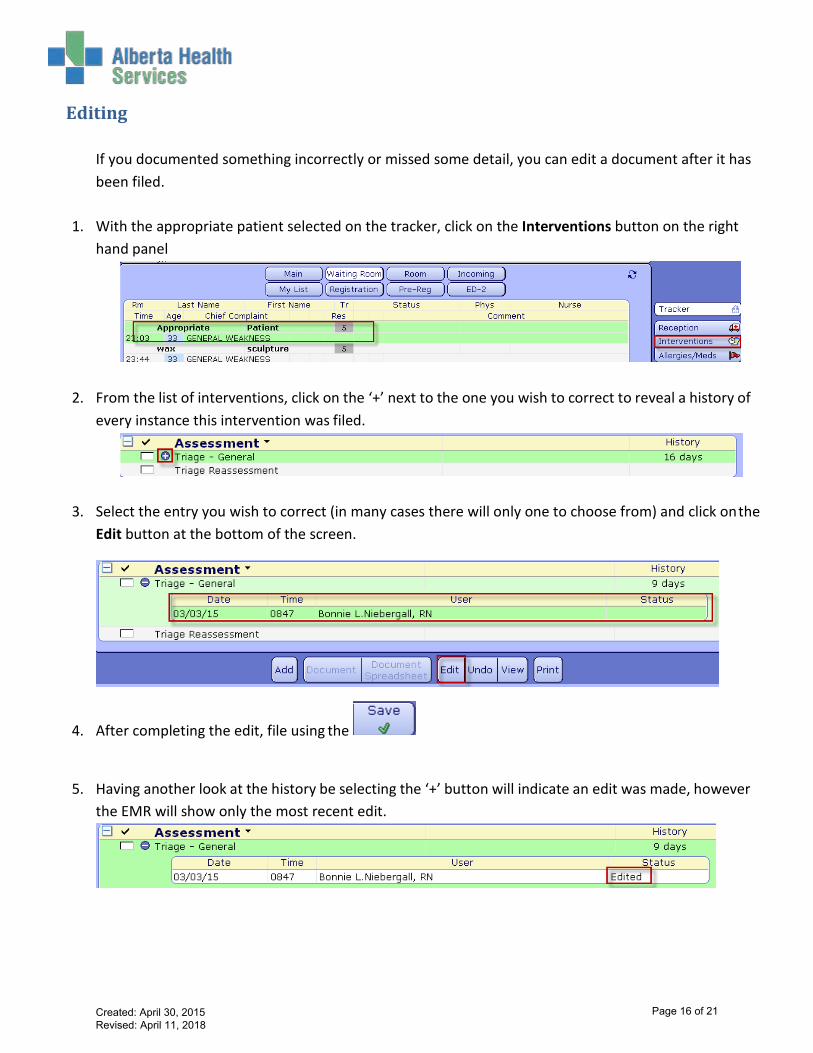
Editing
If you documented something incorrectly or missed some detail, you can edit a document after it has been filed.
1. With the appropriate patient selected on the tracker, click on the Interventions button on the right
hand panel
2. From the list of interventions, click on the ‘+’ next to the one you wish to correct to reveal a history of every instance this intervention was filed.
3. Select the entry you wish to correct (in many cases there will only one to choose from) and click on the Edit button at the bottom of the screen.
4. After completing the edit, file using the
5. Having another look at the history be selecting the ‘+’ button will indicate an edit was made, however the EMR will show only the most recent edit.
Created: April 30, 2015 Revised: April 11, 2018
Page 16 of 21

Removing Documentation (Undo)
If documentation is placed on the wrong patient in Meditech it will need to be removed. Ideally this is discovered while the patient is still within the department and this task can be completed by the person who entered the documentation. If this is not found until the patient has left or the person who entered it is no longer there, the manager or their designate has access to remove other people’s documentation. To remove documentation when the patient is still in the department: 1. With the appropriate patient selected on the tracker, click on the Interventions button on the right
hand panel
2. From the list of interventions, click on the ‘+’ next to the one you wish to correct to reveal a history of
every instance this intervention was filed.
3. Select the entry you wish to correct (in many cases there will only one to choose from) and click on the Undo button at the bottom of the screen.
Created: April 30, 2015 Revised: April 11, 2018
Page 17 of 21
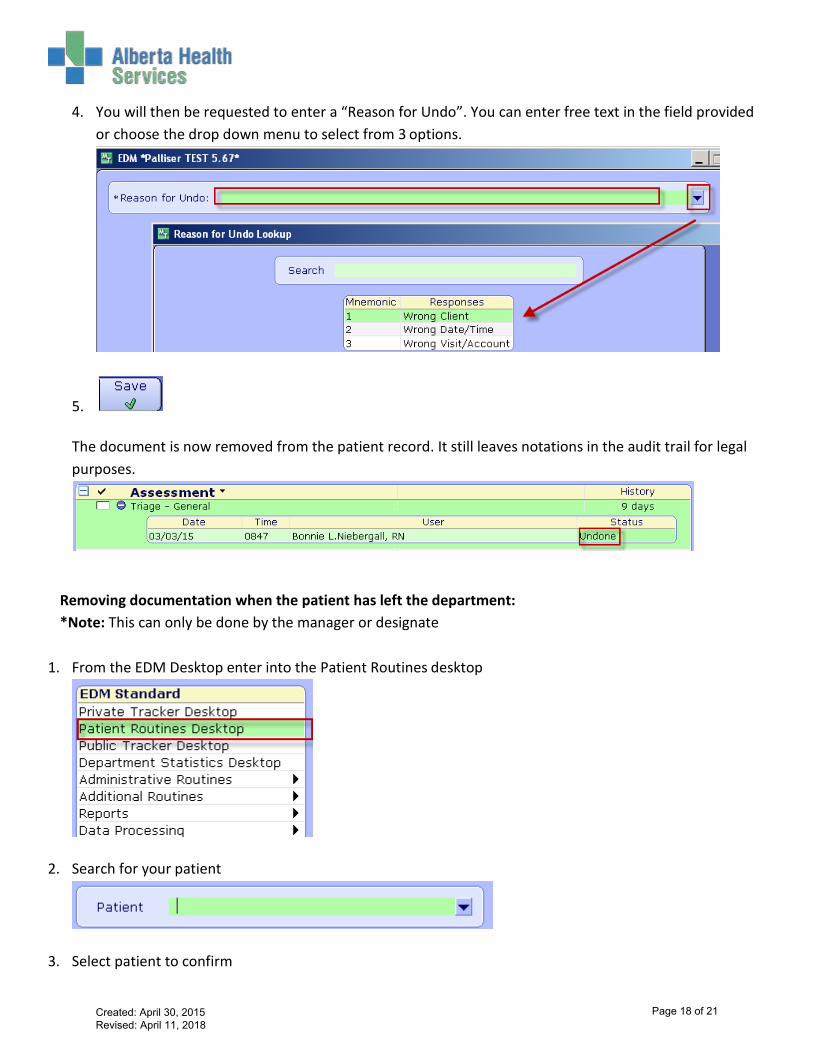
4. You will then be requested to enter a “Reason for Undo”. You can enter free text in the field provided or choose the drop down menu to select from 3 options.
5.
The document is now removed from the patient record. It still leaves notations in the audit trail for legal purposes.
Removing documentation when the patient has left the department: *Note: This can only be done by the manager or designate
1. From the EDM Desktop enter into the Patient Routines desktop
2. Search for your patient
3. Select patient to confirm
Created: April 30, 2015 Revised: April 11, 2018
Page 18 of 21
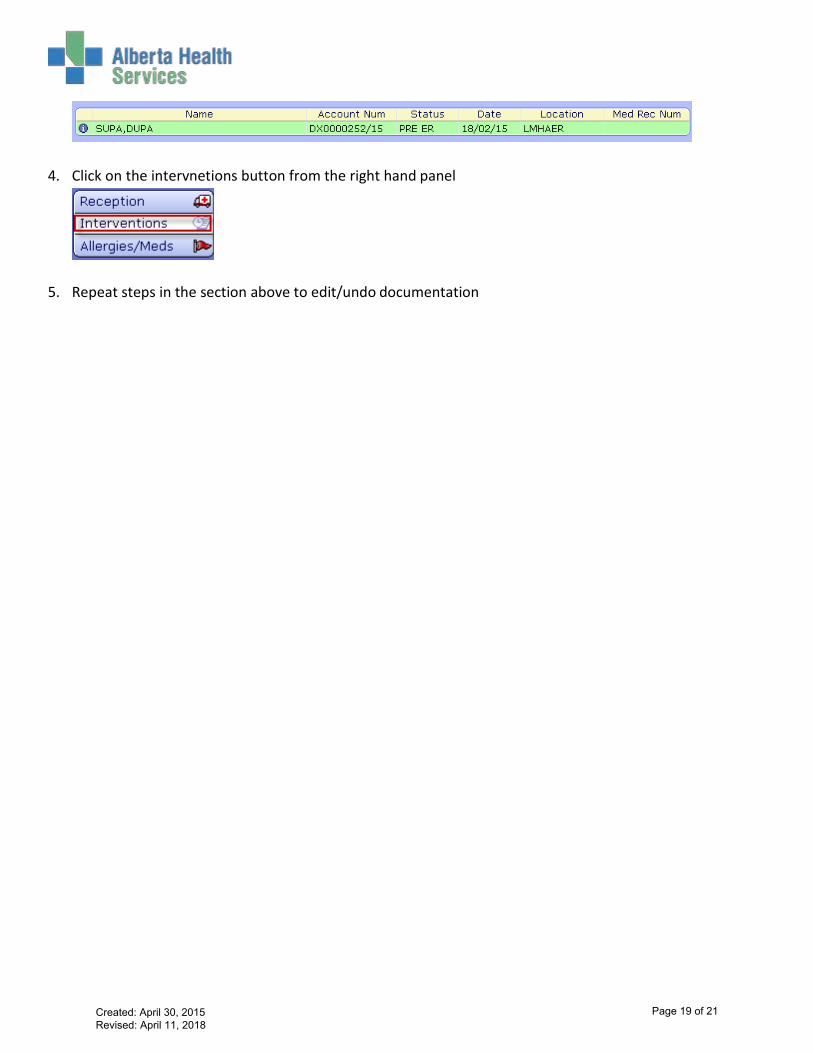
4. Click on the intervnetions button from the right hand panel
5. Repeat steps in the section above to edit/undo documentation
Created: April 30, 2015 Revised: April 11, 2018
Page 19 of 21
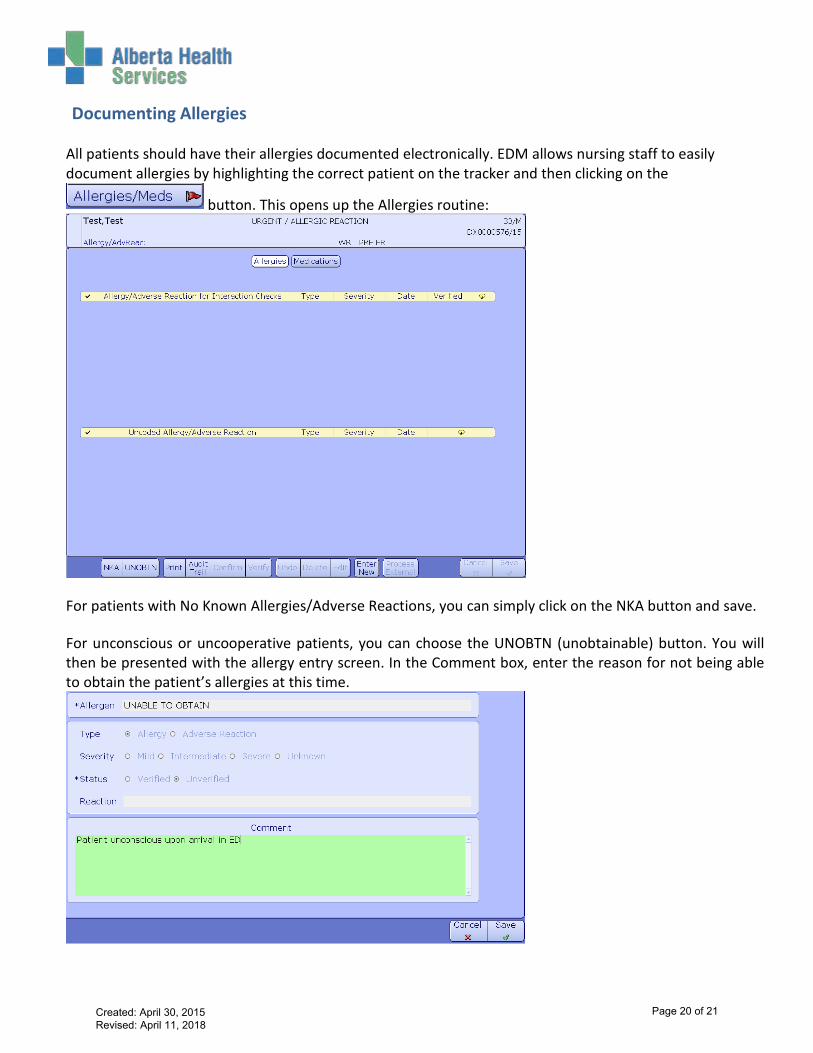
Documenting Allergies
All patients should have their allergies documented electronically. EDM allows nursing staff to easily document allergies by highlighting the correct patient on the tracker and then clicking on the
For patients with No Known Allergies/Adverse Reactions, you can simply click on the NKA button and save. For unconscious or uncooperative patients, you can choose the UNOBTN (unobtainable) button. You will then be presented with the allergy entry screen. In the Comment box, enter the reason for not being able to obtain the patient’s allergies at this time.
button. This opens up the Allergies routine:
Created: April 30, 2015 Revised: April 11, 2018
Page 20 of 21
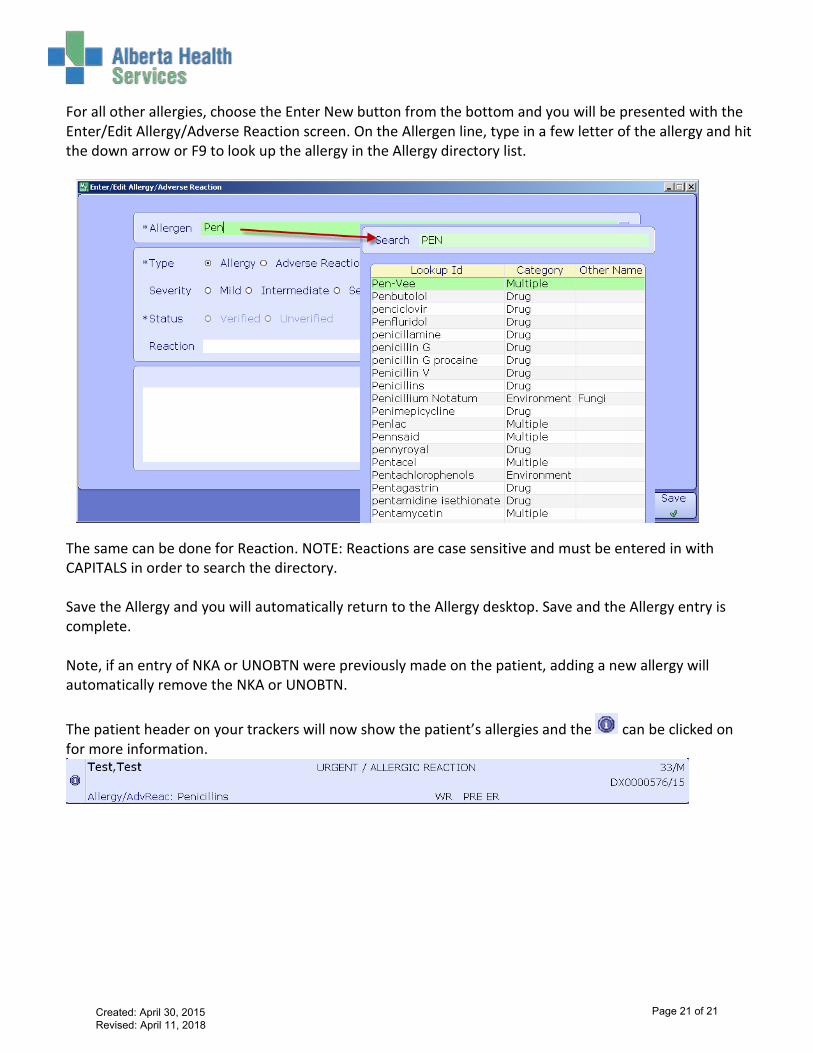
For all other allergies, choose the Enter New button from the bottom and you will be presented with the Enter/Edit Allergy/Adverse Reaction screen. On the Allergen line, type in a few letter of the allergy and hit the down arrow or F9 to look up the allergy in the Allergy directory list.
The same can be done for Reaction. NOTE: Reactions are case sensitive and must be entered in with CAPITALS in order to search the directory. Save the Allergy and you will automatically return to the Allergy desktop. Save and the Allergy entry is complete. Note, if an entry of NKA or UNOBTN were previously made on the patient, adding a new allergy will automatically remove the NKA or UNOBTN.
The patient header on your trackers will now show the patient’s allergies and the can be clicked on for more information.
Created: April 30, 2015 Revised: April 11, 2018
Page 21 of 21