EMC Data Domain and Symantec Enterprise Vault Integration ...
43
Integration Guide October 2011 EMC Data Domain and Symantec Enterprise Vault Integration Guide
Transcript of EMC Data Domain and Symantec Enterprise Vault Integration ...
Integration Guide
October 2011
EMC Data Domain and Symantec Enterprise Vault Integration Guide

2EMC Data Domain and Symantec Enterprise Vault Integration Guide
Copyright © 2011 EMC Corporation. All Rights Reserved. EMC believes the information in this publication is accurate as of its publication date. The information is subject to change without notice. The information in this publication is provided “as is.” EMC Corporation makes no representations or warranties of any kind with respect to the information in this publication, and specifically disclaims implied warranties of merchantability or fitness for a particular purpose. Use, copying, and distribution of any EMC software described in this publication requires an applicable software license. For the most up-to-date listing of EMC product names, see EMC Corporation Trademarks on EMC.com. All other trademarks used herein are the property of their respective owners. Part Number h8064.2
3EMC Data Domain and Symantec Enterprise Vault Integration Guide
Table of Contents
About this document ............................................................................................... 4 Audience ............................................................................................................................ 4
Related documents ............................................................................................................ 4
Configuration overview ............................................................................................ 5 Restrictions and noteworthy behaviors ............................................................................... 5
Prerequisites ...................................................................................................................... 5
Data Domain DDOS 4.x system configuration ........................................................... 6 Enable basic CIFS access on the Data Domain system ........................................................ 6
Configure the archive directory structure ............................................................................ 7
Configure CIFS shares on the Data Domain system ............................................................. 8
Enable the Retention Lock feature (optional) ...................................................................... 9
Data Domain DDOS 5.0 system configuration ......................................................... 10 Enable basic CIFS access on the Data Domain system ...................................................... 10
MTree Setup and Configuration ........................................................................................ 11
Configure a CIFS share in an MTree on the Data Domain system ....................................... 12
Enable the Retention Lock feature (optional) .................................................................... 13
Configuring Enterprise Vault archive storage with collections and migration ............ 15 Configure a Vault Store Partition ....................................................................................... 17
Define the archive policies ............................................................................................... 29
Using with the optional Retention Lock feature ....................................................... 31 General considerations .................................................................................................... 31
Create a Vault Store Partition for use with DD Retention Lock ........................................... 32
Using with the Data Domain Archiver ..................................................................... 39 About the Data Domain Archiver ....................................................................................... 39
Data Movement Policies ............................................................................................... 39
Deduplication............................................................................................................... 40
Storage ........................................................................................................................ 40
Mixed Use .................................................................................................................... 40
Recommended best practices........................................................................................... 41
Configuring data movement ............................................................................................. 41
Retention Lock ................................................................................................................. 43
4EMC Data Domain and Symantec Enterprise Vault Integration Guide
About this document This document explains how to configure an EMC® Data Domain® system as an archive target for the Symantec Enterprise Vault Software Suite. Please confirm you have the most recent version of the Integration Guide specific to your environment before proceeding to ensure you have the latest best practices information.
This document is applicable for the following versions of Symantec Enterprise:
Symantec Enterprise Vault 8 or 9
When using Symantec Enterprise Vault 8, EMC recommends Enterprise Vault 8 SP3 or later.
This document is applicable for the following versions of the Data Domain operating system (DDOS):
Data Domain systems running DDOS versions 4.8.x, 4.9.x, and 5.0.x
Data Domain Archiver running DDOS version 5.0.x
If your Data Domain system is a DD Archiver, refer to “Using with the Data Domain Archiver” on page 31 for additional information relevant to Archiver features.
Audience
This guide is intended for customers, technical field consultants, and customer engineers who have familiarity with either Data Domain operations and/or Symantec Enterprise Vault.
Related documents
The Data Domain and Symantec documents referred to in this guide provide additional information for configuring and using Data Domain and Symantec Enterprise Vault..
Symantec Enterprise Vault 8 documents are available on the Symantec website at http://www.symantec.com/business/support/index?page=content&id=TECH140747
Symantec Enterprise Vault 9 documents are available on the Symantec website at http://www.symantec.com/business/support/index?page=content&id=TECH140748
Documentation for the Data Domain system is available at:
https://my.datadomain.com/documentation
5EMC Data Domain and Symantec Enterprise Vault Integration Guide
Configuration overview Configuring a Data Domain system as an archive target for Symantec Enterprise Vault involves these basic steps:
1. Configure the Enterprise Vault software and environment to properly target the various filesystems, email databases, and/or SharePoint repositories you want to archive. See “Related documents” for a list of available Symantec Enterprise Vault guides and manuals.
2. Install and enable Data Domain licenses if required by your environment.
3. Create CIFS shares on the EMC Data Domain for use as Enterprise Vault “Vault Store/Groups/Partitions”.
4. Configure the shares created in step 3 within the context of the Enterprise Vault software, adding Data Domain as a “vault store.”
5. Create archive policies and schedules.
6. Perform a test archive and verify that it finishes successfully.
These steps are covered in more detail in this guide and in the Enterprise Vault and Data Domain product documentation.
Restrictions and noteworthy behaviors
There are two ways in which Data Domain can be configured with Enterprise Vault:
Recommended: Use Enterprise Vault collections and migration
This method provides the best overall performance and limits the number of files that are written to Data Domain. Data Domain currently has a “comfortable” limit of 100 million files. This method helps reduce the number of files the Data Domain handles in large Enterprise Vault implementations.
Restriction: DD Retention Lock cannot be used with this method.
Use EV to directly write savesets to Data Domain
This method creates many small files, and should only be used for smaller implementations where DD Retention Lock is absolutely required.
Prerequisites
The following are required when integrating Symantec Enterprise Vault with Data Domain:
One Data Domain system with DDOS 4.8, 4.9, or 5.0.x installed
The minimum DDOS version when using the Data Domain Archiver is DDOS 5.0.x.
A second Data Domain system if replication is to be configured.
6EMC Data Domain and Symantec Enterprise Vault Integration Guide
Symantec Enterprise Vault software
Enterprise Vault 8 SP3 is the minimum version required when using the Data Domain Retention Lock feature. It is also the minimum version recommended for integrating Enterprise Vault 8 with Data Domain.
The following licenses are required:
Data Domain Replication licenses, if replication is to be configured
A Data Domain Retention Lock license (required only if this feature is to be used)
A Data Domain Archiver license if the Data Domain system is a DD Archiver
Symantec Enterprise Vault licenses as appropriate for your configuration
Data Domain DDOS 4.x system configuration Follow the instructions in this section if you are using DDOS 4.8 or DDOS 4.9. If your Data Domain system is running DDOS 5.0, go to “Data Domain DDOS 5.0 system configuration” on page 10. The home page of the Data Domain GUI displays the DDOS version.
This section assumes that the Data Domain system is named ddhostname. You may need to use the fully-qualified domain name in your environment.
The Data Domain system should be joined to the same Microsoft Active Directory domain as the Enterprise Vault configuration. Please refer to the CIFS section of the Data Domain 4.x Administrator’s Guide for detailed instructions on how to configure a Data Domain system when using the CIFS protocol.
All Data Domain commands are executed via an SSH session. For Windows clients, use a freeware tool like PUTTY.exe to establish an SSH session with the Data Domain system.
Enable basic CIFS access on the Data Domain system 1. Establish an SSH session with the Data Domain system as sysadmin or as a user
with sysadmin privileges.
2. Determine the current CIFS access level by running the Data Domain OS command cifs show clients. The output in the example below shows that the access for the Data Domain share /backup is open to all hosts as indicated by the “*”:
# cifs show clients path client --------- ------- /backup * --------- ------
3. If the /backup path is not listed, or the client list does not include either ‘*’ or the archive host, use the cifs add client-list command to grant access to the
7EMC Data Domain and Symantec Enterprise Vault Integration Guide
archive server. This example grants access to /backup to the archive server client1:
# cifs add /backup client1
Using * as a client name allows all servers access to the specified path on the Data Domain system.
4. Verify the result:
# cifs show clients path client --------- ------- /backup client1 --------- -------
5. Repeat this procedure to add the archive server to the Data Domain replica if replication is configured.
You should now be able to map to the Data Domain /backup share as with any CIFS share.
Configure the archive directory structure 1. From the archive server (or another authorized administrative server), map a drive
to the Data Domain CIFS share /backup.
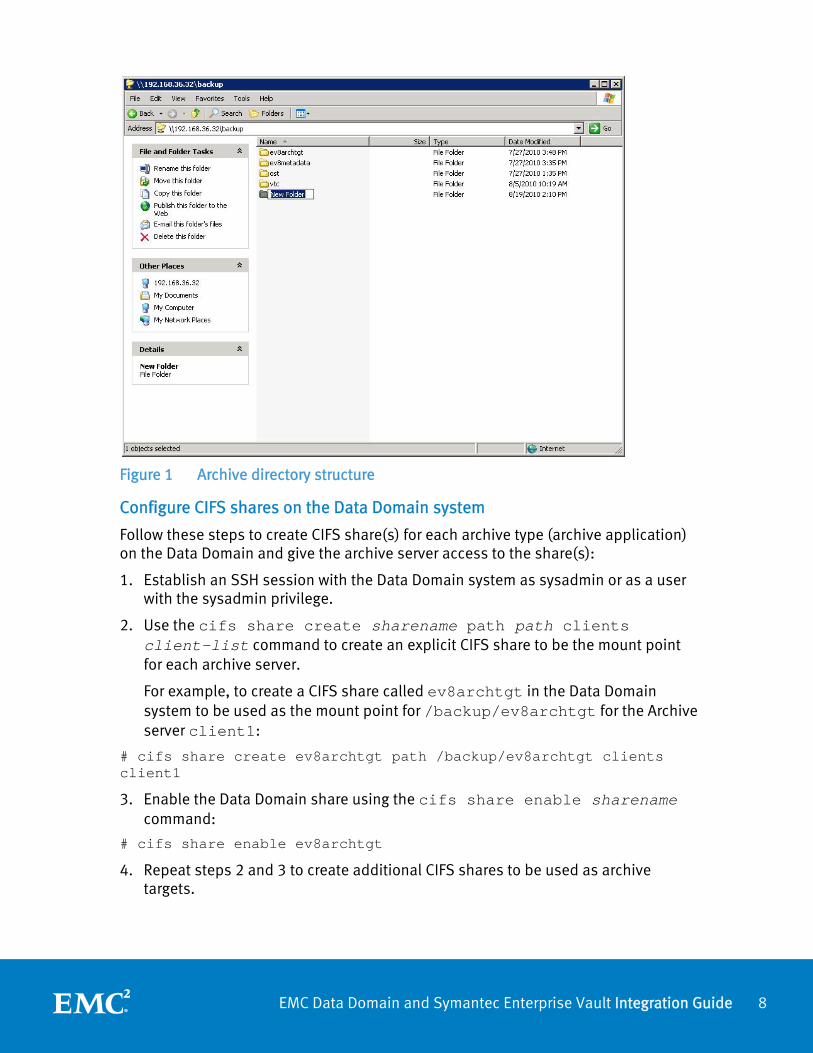
2. On this mapped drive, create the directory structure that you want for the archive configuration. EMC recommends that you create a separate folder for each Enterprise Vault Vault Store Partition. For example, create a folder called ev8archtgt. (See Figure 1.)
The directory structure is configuration- and use-case-dependent. Review your choices with your storage team and your EMC consultant, professional services team, or technical support representative.
8EMC Data Domain and Symantec Enterprise Vault Integration Guide
Figure 1 Archive directory structure
Configure CIFS shares on the Data Domain system
Follow these steps to create CIFS share(s) for each archive type (archive application) on the Data Domain and give the archive server access to the share(s):
1. Establish an SSH session with the Data Domain system as sysadmin or as a user with the sysadmin privilege.
2. Use the cifs share create sharename path path clients client-list command to create an explicit CIFS share to be the mount point for each archive server.
For example, to create a CIFS share called ev8archtgt in the Data Domain system to be used as the mount point for /backup/ev8archtgt for the Archive server client1:
# cifs share create ev8archtgt path /backup/ev8archtgt clients client1
3. Enable the Data Domain share using the cifs share enable sharename command:
# cifs share enable ev8archtgt
4. Repeat steps 2 and 3 to create additional CIFS shares to be used as archive targets.
9EMC Data Domain and Symantec Enterprise Vault Integration Guide
Alternatively, you can use the Data Domain Enterprise Manager web-based GUI to configure the appropriate shares.
You should now be able to map a drive on the archive server (or another authorized administrative server) to each Data Domain share as with any CIFS share. For example: \\<ddhostname>\<share name> or \\<Data Domain IP address>\<share name>.
Enable the Retention Lock feature (optional)
Data Domain Retention lock software enables you to easily implement deduplication with file locking to satisfy IT governance and compliance policies for active archive protection. Data Domain Retention Lock also enables electronic data shredding on a per-file basis to ensure that deleted files have been disposed of in an appropriate and permanent manner, in order to main confidentiality of classified material, limit liability, and enforce privacy requirements.
If using the Retention Lock feature, do the following steps to install the Retention Lock license, enable the feature, and specify the retention period during which the file cannot be deleted or modified. The default minimum retention period is 12 hours and the default maximum retention period is 5 years. The maximum retention period in a CIFS environment can be 70 years.
When using DDOS 4.x, you will have the ability to configure only a single retention lock period for the filesystem.
The retention period is specified in the format [number][unit]. Possible unit values are min, hr, day, mo, year.
For more information on the Retention Lock feature and its commands, please refer to the Data Domain Retention Lock Software User Guide.
1. Establish an SSH session with the Data Domain system as sysadmin or as a user with the sysadmin privilege.
2. Add the Data Domain Retention Lock license by entering this command:
# license add license_number
3. Enable the Retention Lock feature with this command:
# filesys retention-lock enable
4. Set the minimum or maximum retention period with this command:
# filesys retention-lock option set min-retention-period [number][unit]
# filesys retention-lock option set max-retention-period [number][unit]
5. Verify your retention lock settings with the following commands:
# filesys retention-lock status
# filesys retention-lock option show min-retention-period
# filesys retention-lock option show max-retention-period
10EMC Data Domain and Symantec Enterprise Vault Integration Guide
Data Domain DDOS 5.0 system configuration Follow the instructions in this section if you are using DDOS 5.0. If your Data Domain system is running DDOS 4.x, go to “Data Domain DDOS 4.x system configuration” on page 6. The home page of the Data Domain GUI displays the DDOS version.
This section assumes that the Data Domain system is named ddhostname. You may need to use the fully-qualified domain name in your environment.
The Data Domain system should be joined to the same Microsoft Active Directory domain as the Enterprise Vault configuration. Please refer to the CIFS section of the Data Domain 5.x Administrator’s Guide for detailed instructions on how to configure a Data Domain system when using the CIFS protocol.
All Data Domain commands are executed via an SSH session. For Windows clients, use a freeware tool like PUTTY.exe to establish an SSH session with the Data Domain system.
Enable basic CIFS access on the Data Domain system 1. Establish an SSH session with the Data Domain system as sysadmin or as a user
with sysadmin privileges.
2. Determine the current CIFS access level by running the Data Domain OS command cifs show clients. The output in the example below shows that the access for the Data Domain share /backup is open to all hosts as indicated by the “*”:
# cifs show clients path client --------- ------- /backup * --------- ------
3. If the /backup path is not list, or the client list does not include either ‘*’ or the archive host, use the cifs add client-list command to grant access to the archive server. This example grants access to /backup to the archive server client1:
# cifs add /backup *
Using * as a client name allows all servers access to the specified path on the Data Domain system.
4. Verify the result:
# cifs show clients path client --------- ------- /backup * --------- -------
5. Repeat this procedure to add the archive server to the Data Domain replica if replication is configured.

11EMC Data Domain and Symantec Enterprise Vault Integration Guide
You should now be able to map to the Data Domain /backup share as with any CIFS share.
MTree Setup and Configuration
DDOS 5.0 introduces MTrees (managed trees). An MTree is a logical partition of the namespace in the Data Domain filesystem that can be used to group files for management purposes such as a distinct snapshot schedule, replication, retention, etc.
EMC recommends that you create a separate MTree (at least one) which will contain the target CIFS share for the Enterprise Vault Vault Store Partition.
To create an MTree:
1. Click the Data Management > MTree tab.
2. In the MTree overview area, click Create. The Create MTree dialog box appears.
3. Enter a name for the MTree in the MTree Name text box. For example, enter ev9archdata as the MTree name.
4. Click OK. The new MTree displays in the MTree table (Figure 2).
Figure 2 Creating an MTree
12EMC Data Domain and Symantec Enterprise Vault Integration Guide
5. Repeat steps 2-4 to create one or more additional MTrees.
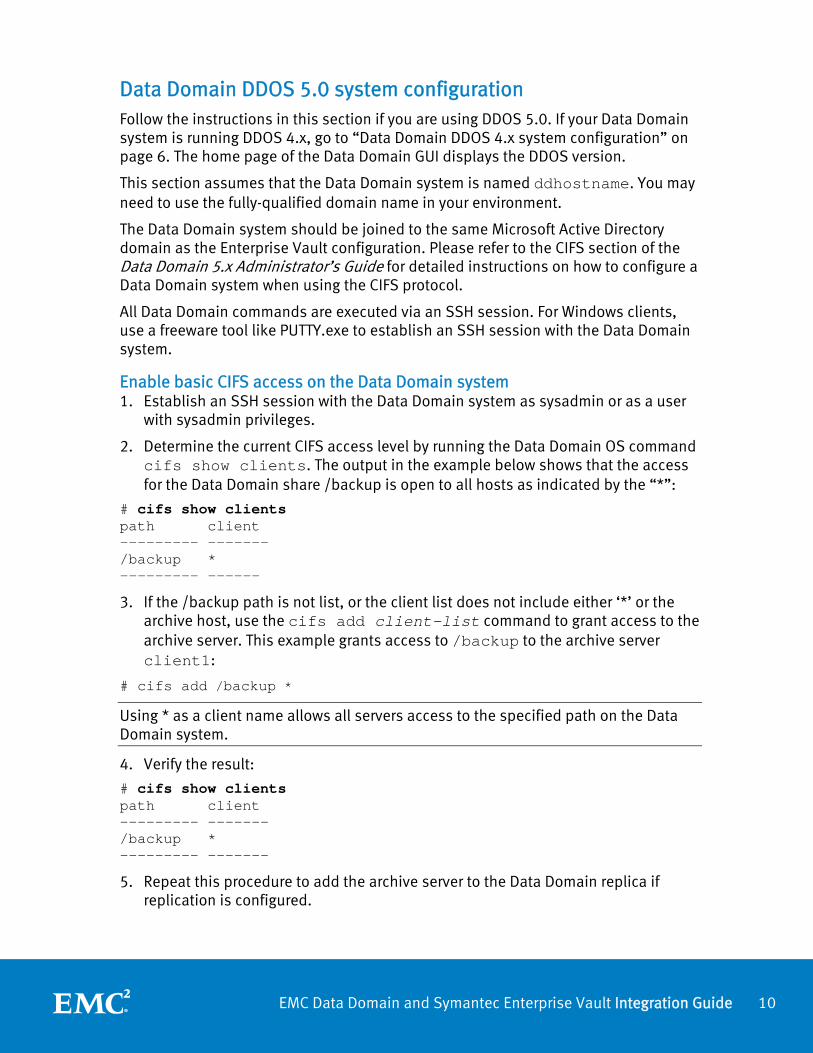
Configure a CIFS share in an MTree on the Data Domain system
Follow the steps in this section to create a CIFS share, archivefiledata, in the ev9archivedata MTree on the Data Domain system and give the archive (or authorized administrative) server access to the share using the Data Domain Enterprise Manager.
1. Click Data Management > MTree tab to navigate to the MTree view.
2. Select the MTree and click Create Share in the MTree Summary. The Create Shares dialog box appears (Figure 3).
3. In the Create Shares dialog box, enter the following information:
a. Enter a name for the share. For example, “archivefiledata”.
b. Add a client by clicking the plus sign ( + ) in the Clients area. The Client dialog box appears.
c. Enter the name of the client in the Client text box and click OK. Repeat this step for each client that you need to configure.
d. Click OK
Figure 3 Create Share dialog
4. Repeat steps 2 and 3 to create a share for another MTree.
13EMC Data Domain and Symantec Enterprise Vault Integration Guide
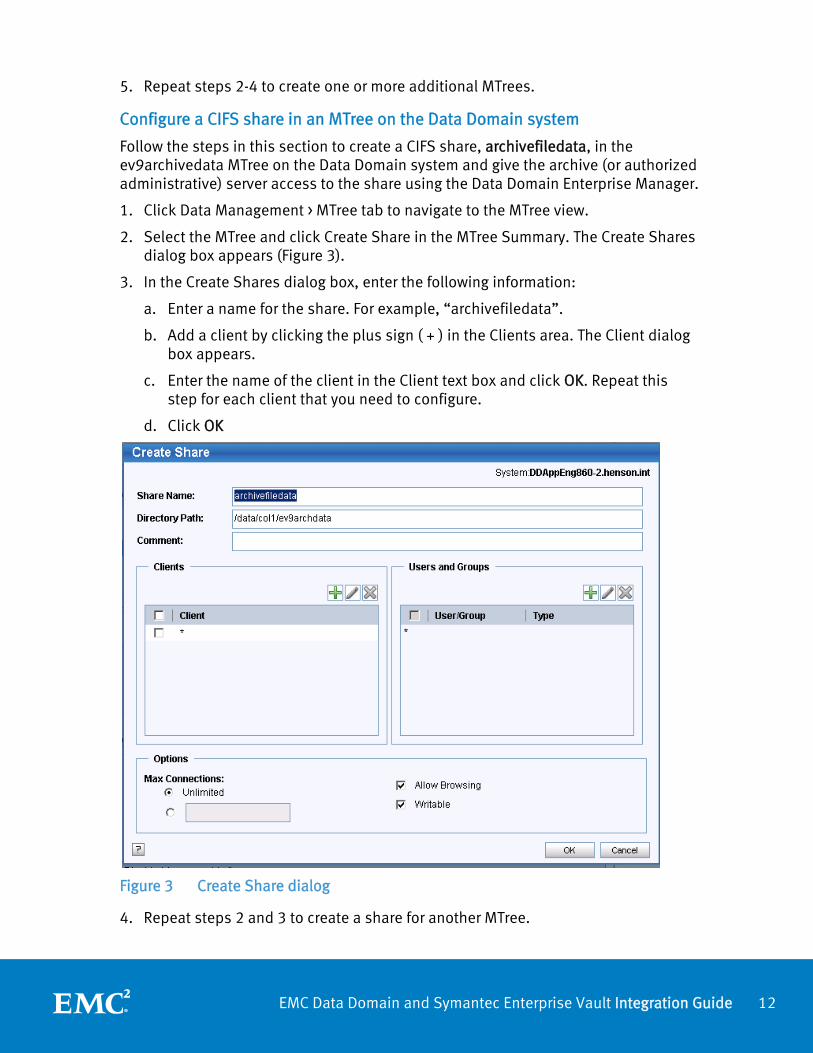
You can also create one or more shares for an MTree under Data Management > CIFS.
1. Select the Shares tab.
2. Click Create and enter the following information:
a. Enter a name for the share.
b. Enter the directory path for the share. This directory path will be /data/col1/<MTree name>.
c. Add a client by clicking the plus sign ( + ) in the Clients area. The Client dialog box appears.
d. Enter the name of the client in the Client text box and click OK. Repeat this step for each client that you need to configure.
e. Click OK.
3. Repeat step 2 for each additional share.
The directory path for the share created above will be used in the Vault Store partition configuration. Alternatively, you can use the Data Domain CLI to configure the appropriate shares.
You should now be able to map a drive on the archive server (or another authorized administrative server) to each Data Domain share as with any CIFS share. For example: \\<ddhostname>\<share name> or \\<Data Domain IP address>\<share name>.
Enable the Retention Lock feature (optional)
Data Domain Retention lock software enables you to easily implement deduplication with file locking to satisfy IT governance and compliance policies for active archive protection. Data Domain Retention Lock also enables electronic data shredding on a per-file basis to ensure that deleted files have been disposed of in an appropriate and permanent manner, in order to main confidentiality of classified material, limit liability, and enforce privacy requirements.
If using the Retention Lock feature, do the following steps to install the Retention Lock license, enable the feature, and specify the retention period during which the file cannot be deleted or modified. The default minimum retention period is 12 hours and the default maximum retention period is 5 years. The maximum retention period in a CIFS environment can be 70 years.
The retention period is specified in the format [number][unit]. Possible unit values are min, hr, day, mo, year.
With DDOS 5.0 and later, you will be able to have a different retention period for each MTree configured. It will also allow different retention periods for each Vault Store Partition configured with the “supports Retention Lock” option.
14EMC Data Domain and Symantec Enterprise Vault Integration Guide
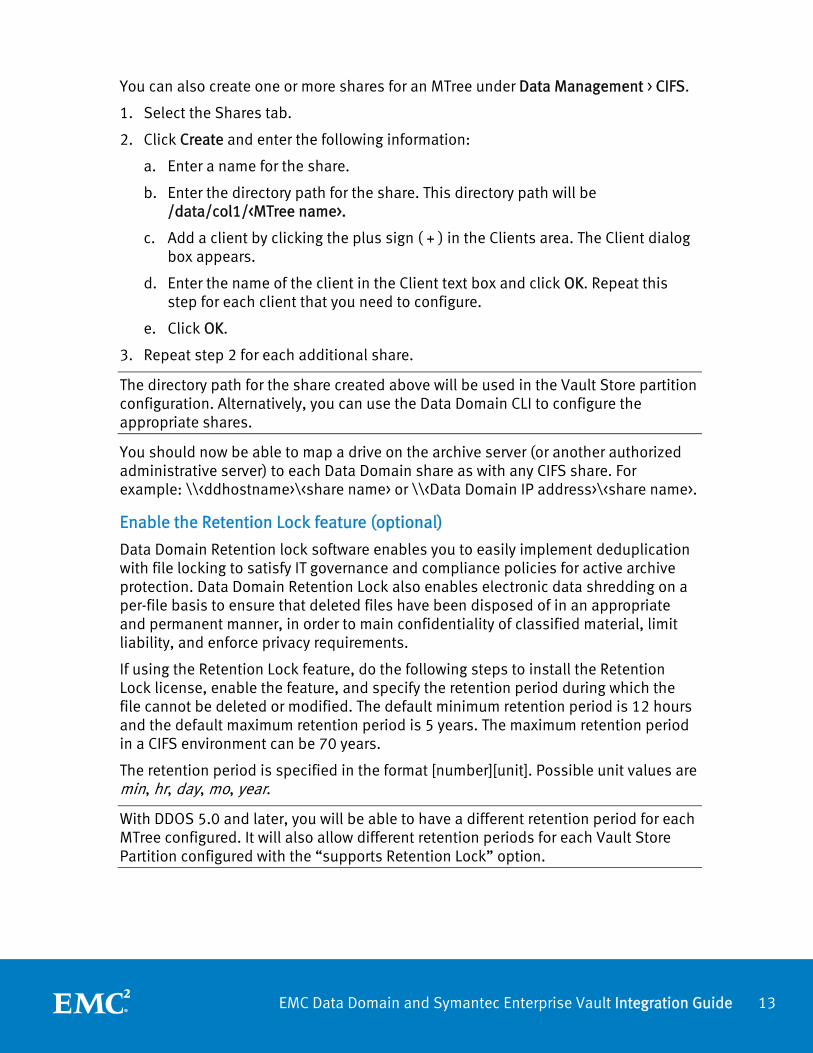
Add the Data Domain Retention Lock license:
1. Click the System Settings > Licenses tabs. If Retention Lock is not listed, add the retention lock license as follows:
a. In the Licensed Features pane, click Add. The Add License Key dialog box appears.
b. In the License Key text box, enter the license key.
c. Click OK. The added license appears in the license list.
2. Click the Data Management > MTree tabs. MTree summary information appears.
3. Select the MTree to which retention is to be applied and click on its Summary tab.
4. Scroll down to the Retention Lock area and click Edit. The Modify Retention Lock dialog box appears (Figure 4).
Figure 4 Modify Retention Lock dialog
5. Click the Enable check box to enable Retention Lock on the Data Domain system.
6. To modify the minimum or maximum retention period (the feature must be enabled first), modify the minimum or maximum time period:
a. Type a number for the interval in the text box (for example, 5 or 14).
b. From the drop-down list, select an interval (minutes, hours, days, years). To reset the minimum or maximum retention period to the default, click Default.
c. Click OK.
7. Repeat steps 3-6 for each additional MTree to which a Retention Period is to be applied.
For more information on the Retention Lock feature and its CLI commands, please refer to the Data Domain Retention Lock Software User Guide.
15EMC Data Domain and Symantec Enterprise Vault Integration Guide
Configuring Enterprise Vault archive storage with collections and migration This section covers the recommended method for configuring the Data Domain system as the archive repository for Enterprise Vault. When properly configured, this method employs the following data flow:
1. Enterprise Vault writes savesets to a location on primary storage that provides temporary storage for Vault Store Partition files. This location is a local NTFS volume or a network share with appropriate IO throughput and capacity to store several days/weeks of data. Its size will depend on the desired collection/migration / deletion schedule.
The size of the temporary storage for the Vault Store Partition file you will need can be calculated as follows:
Temporary Storage = C * ((X * B) + Y + Z) * SF
Where:
C = size of data archived per day
X = age of savesets before collections are created
Y = age of collections before they are migrated
Z = num days after migration before collections are deleted from temporary storage
B = number of days between backups (1 = backups every day)
SF = desired Safety Factor (i.e., 1.20 = 20%, 2.00 = 2 days, 3.00 = days, etc.)
2. The savesets are “collected” into 10MB .cab files based on age since last modified. Savesets cannot be collected until an Enterprise Vault backup occurs or is simulated.
3. The collections (.cab files) are migrated to a Data Domain share based on age since collected (last modified).
4. The original savesets and collections are deleted from primary storage.
DD Retention Lock cannot be used with this method. Refer to “Using with the optional Retention Lock feature” on page 31 for the configuration steps required for use with that feature.
Figure 5 illustrates data flow using this method over a two week period. For this example, Enterprise Vault writes savesets (.dsv) to TEMP daily. Its collection process “collects” those savesets that have resided on TEMP one day into 10MB .cab files. Its migration process copies those .cab files that are 3 days old to Data Domain renaming the original .cab file in TEMP to .archcab. The migration process also deletes .archcab files when they reach 7 days of age.
16EMC Data Domain and Symantec Enterprise Vault Integration Guide
Figure 5 Example Enterprise Vault Collection/Migration data flow
17EMC Data Domain and Symantec Enterprise Vault Integration Guide
Configure a Vault Store Partition
Follow the steps below to create a Vault Store Partition that Enterprise Vault will use to migrate collections to the Data Domain system. It is assumed that a Vault Store Group and Vault Store are already set up using your naming conventions and best practices.
1. Within the EV Administrator Console, right-click on the Vault Store in which the Vault Store Partition will be created. Select New > Partition… (Figure 6)
Figure 6 Create a new partition
2. Click Next.
3. Enter a name for the partition along with a description if desired.
4. Create the new partition in an Open state if planning to use the Data Domain right away. Click Next. (Figure 7)
18EMC Data Domain and Symantec Enterprise Vault Integration Guide
Figure 7 Vault Store partition parameters
5. Select NTFS Volume or Network Share as the Storage Type (Figure 8). This should be primary storage and will define a location that will temporarily house the data to be written to Data Domain during the “migration” process. Click Next.
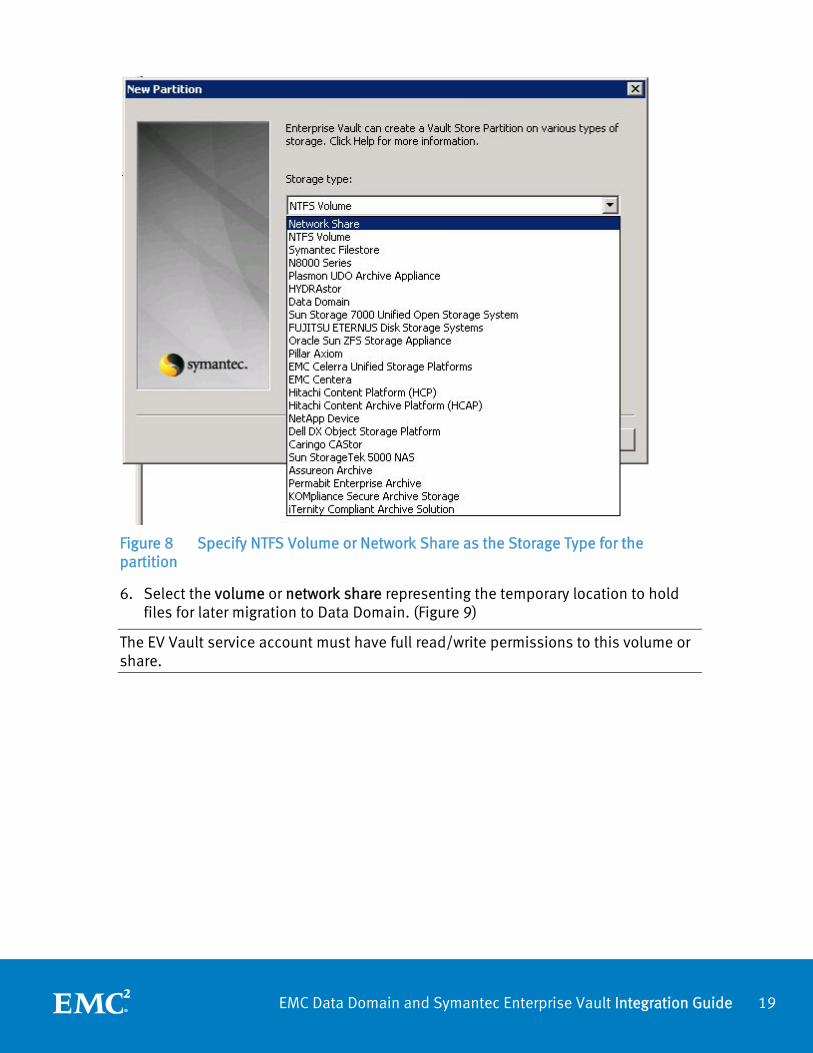
19EMC Data Domain and Symantec Enterprise Vault Integration Guide
Figure 8 Specify NTFS Volume or Network Share as the Storage Type for the partition
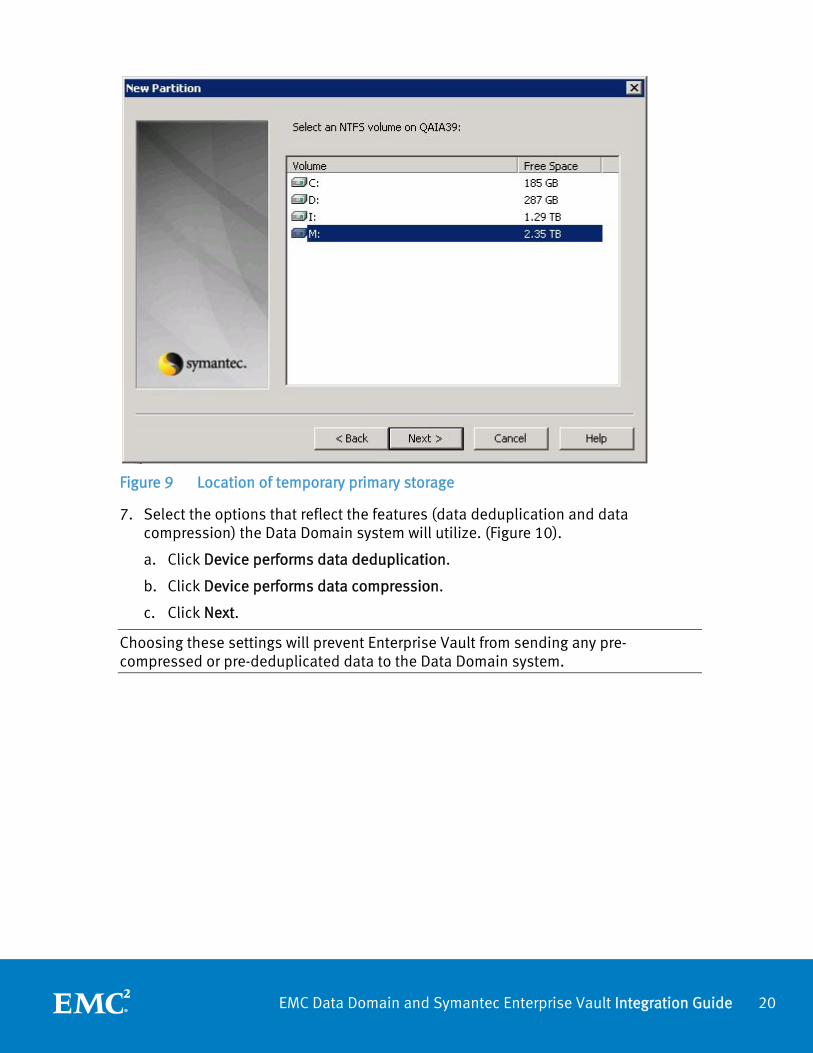
6. Select the volume or network share representing the temporary location to hold files for later migration to Data Domain. (Figure 9)
The EV Vault service account must have full read/write permissions to this volume or share.
20EMC Data Domain and Symantec Enterprise Vault Integration Guide
Figure 9 Location of temporary primary storage
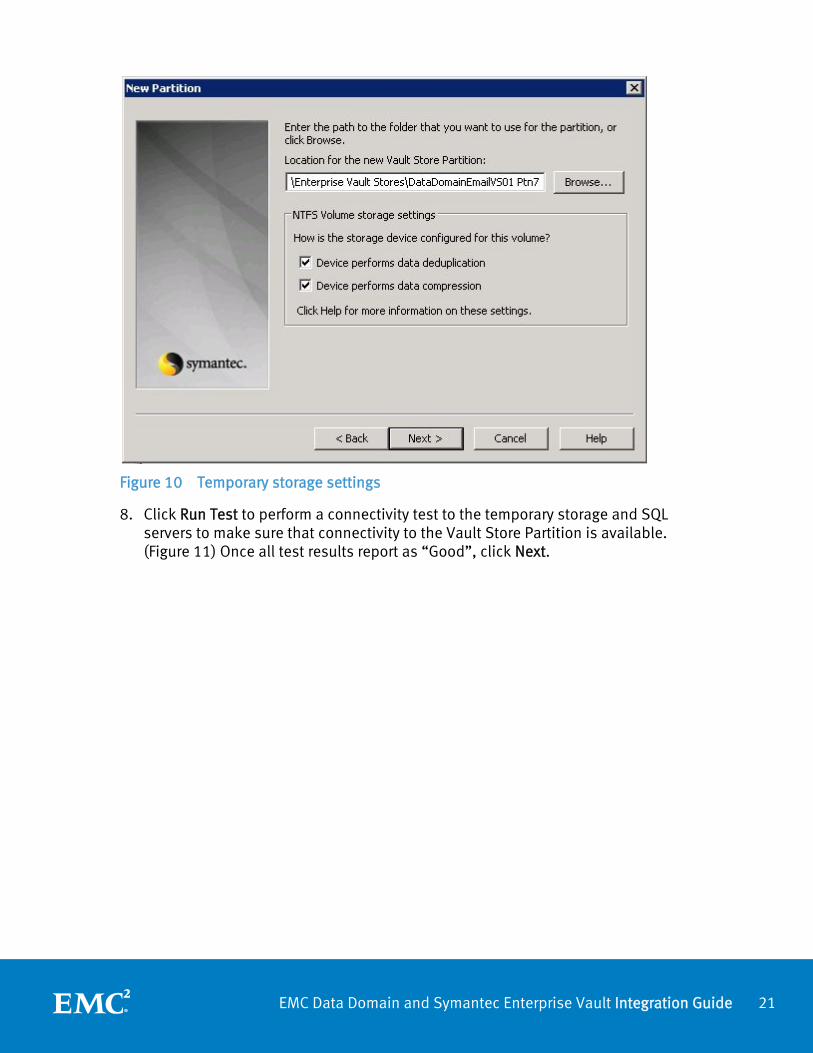
7. Select the options that reflect the features (data deduplication and data compression) the Data Domain system will utilize. (Figure 10).
a. Click Device performs data deduplication.
b. Click Device performs data compression.
c. Click Next.
Choosing these settings will prevent Enterprise Vault from sending any pre-compressed or pre-deduplicated data to the Data Domain system.
21EMC Data Domain and Symantec Enterprise Vault Integration Guide
Figure 10 Temporary storage settings
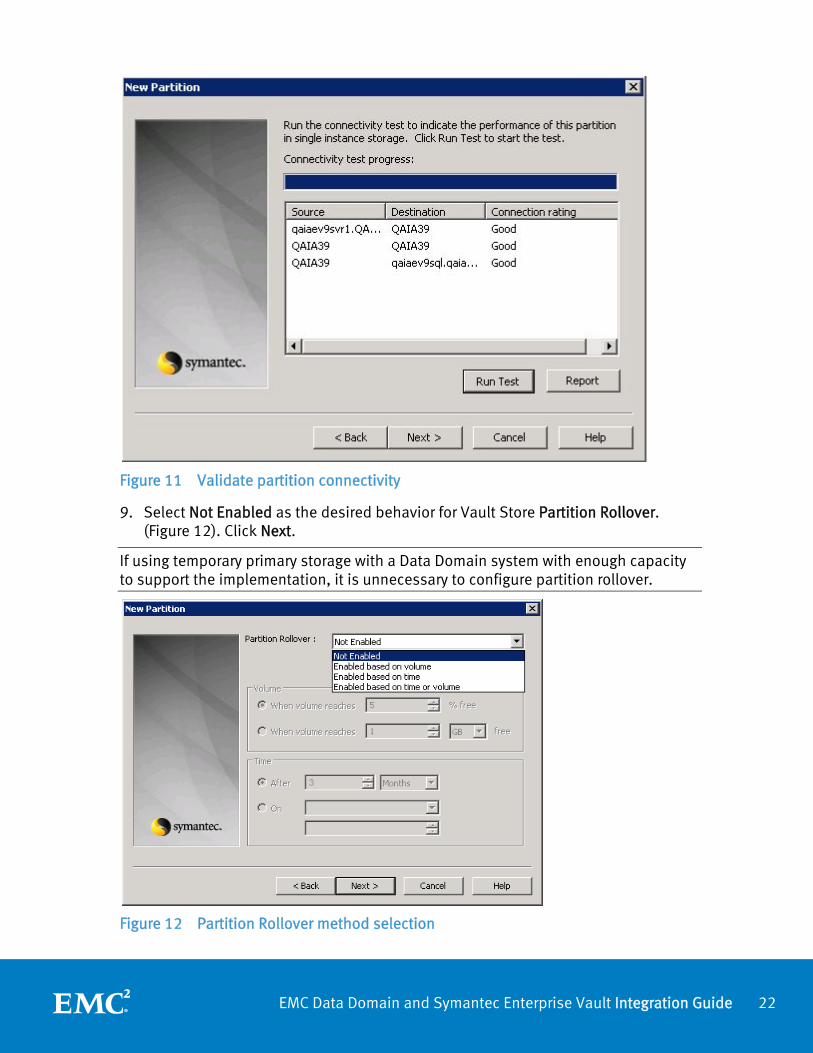
8. Click Run Test to perform a connectivity test to the temporary storage and SQL servers to make sure that connectivity to the Vault Store Partition is available. (Figure 11) Once all test results report as “Good”, click Next.
22EMC Data Domain and Symantec Enterprise Vault Integration Guide
Figure 11 Validate partition connectivity
9. Select Not Enabled as the desired behavior for Vault Store Partition Rollover. (Figure 12). Click Next.
If using temporary primary storage with a Data Domain system with enough capacity to support the implementation, it is unnecessary to configure partition rollover.
Figure 12 Partition Rollover method selection
23EMC Data Domain and Symantec Enterprise Vault Integration Guide
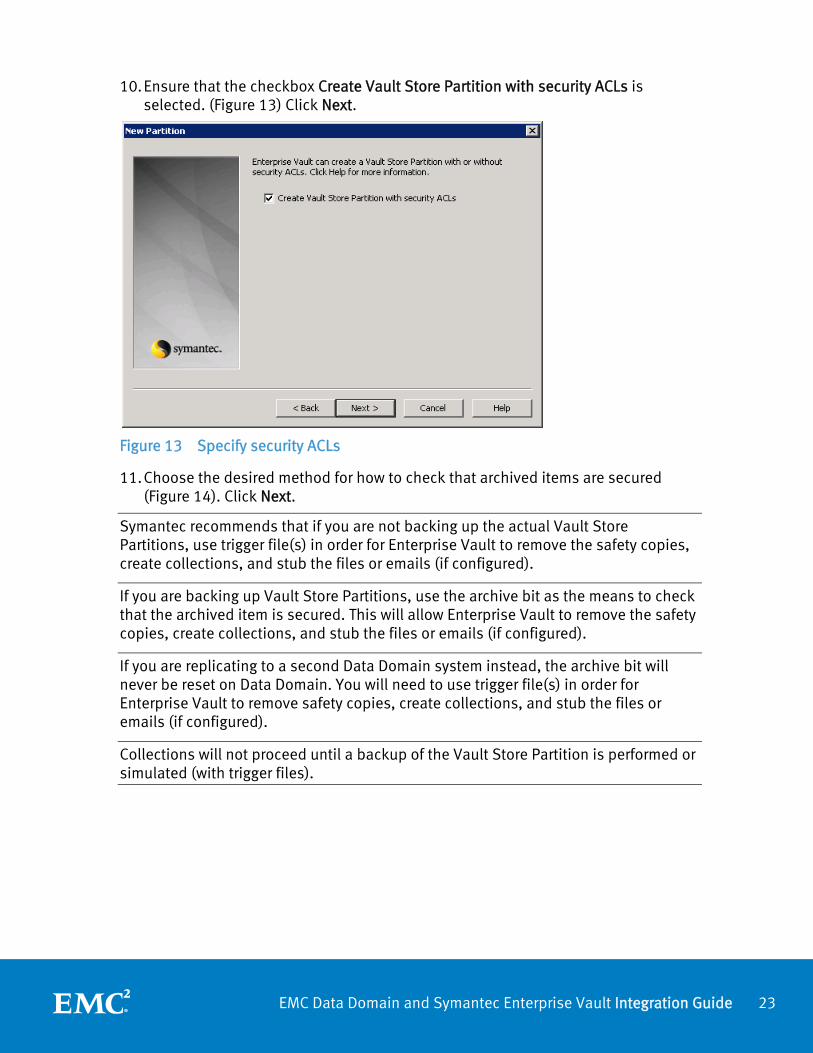
10. Ensure that the checkbox Create Vault Store Partition with security ACLs is selected. (Figure 13) Click Next.
Figure 13 Specify security ACLs
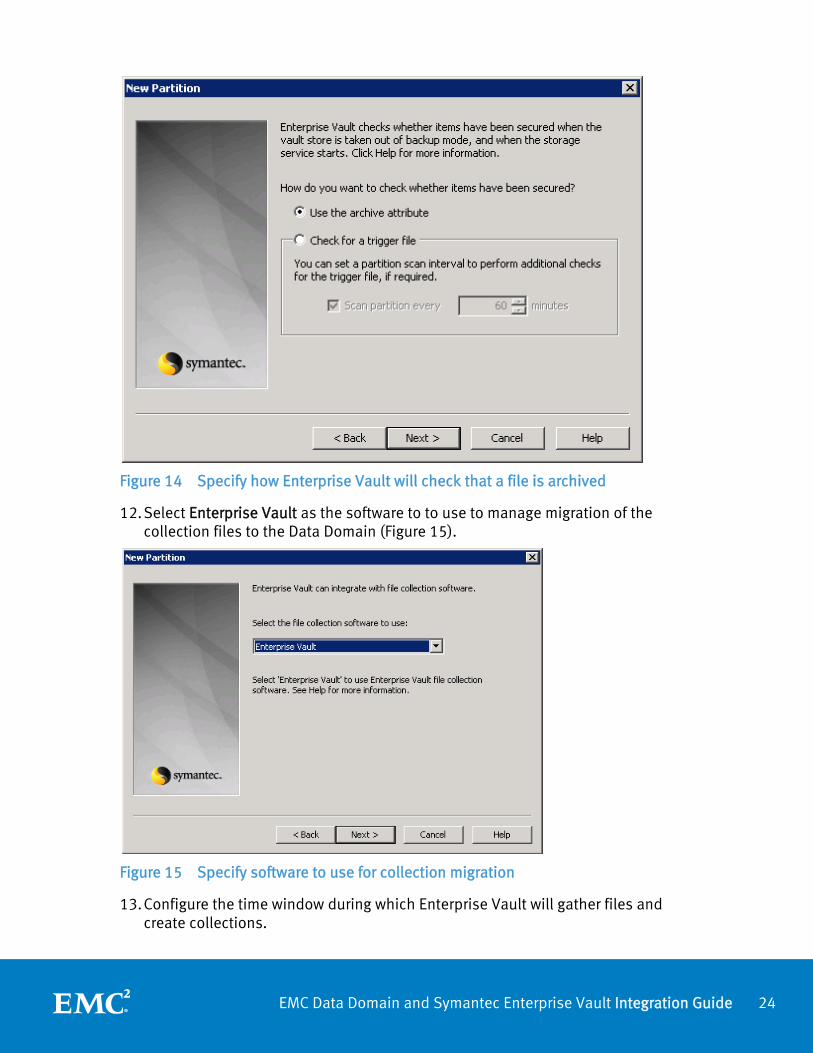
11. Choose the desired method for how to check that archived items are secured (Figure 14). Click Next.
Symantec recommends that if you are not backing up the actual Vault Store Partitions, use trigger file(s) in order for Enterprise Vault to remove the safety copies, create collections, and stub the files or emails (if configured).
If you are backing up Vault Store Partitions, use the archive bit as the means to check that the archived item is secured. This will allow Enterprise Vault to remove the safety copies, create collections, and stub the files or emails (if configured).
If you are replicating to a second Data Domain system instead, the archive bit will never be reset on Data Domain. You will need to use trigger file(s) in order for Enterprise Vault to remove safety copies, create collections, and stub the files or emails (if configured).
Collections will not proceed until a backup of the Vault Store Partition is performed or simulated (with trigger files).
24EMC Data Domain and Symantec Enterprise Vault Integration Guide
Figure 14 Specify how Enterprise Vault will check that a file is archived
12. Select Enterprise Vault as the software to to use to manage migration of the collection files to the Data Domain (Figure 15).
Figure 15 Specify software to use for collection migration
13. Configure the time window during which Enterprise Vault will gather files and create collections.
25EMC Data Domain and Symantec Enterprise Vault Integration Guide
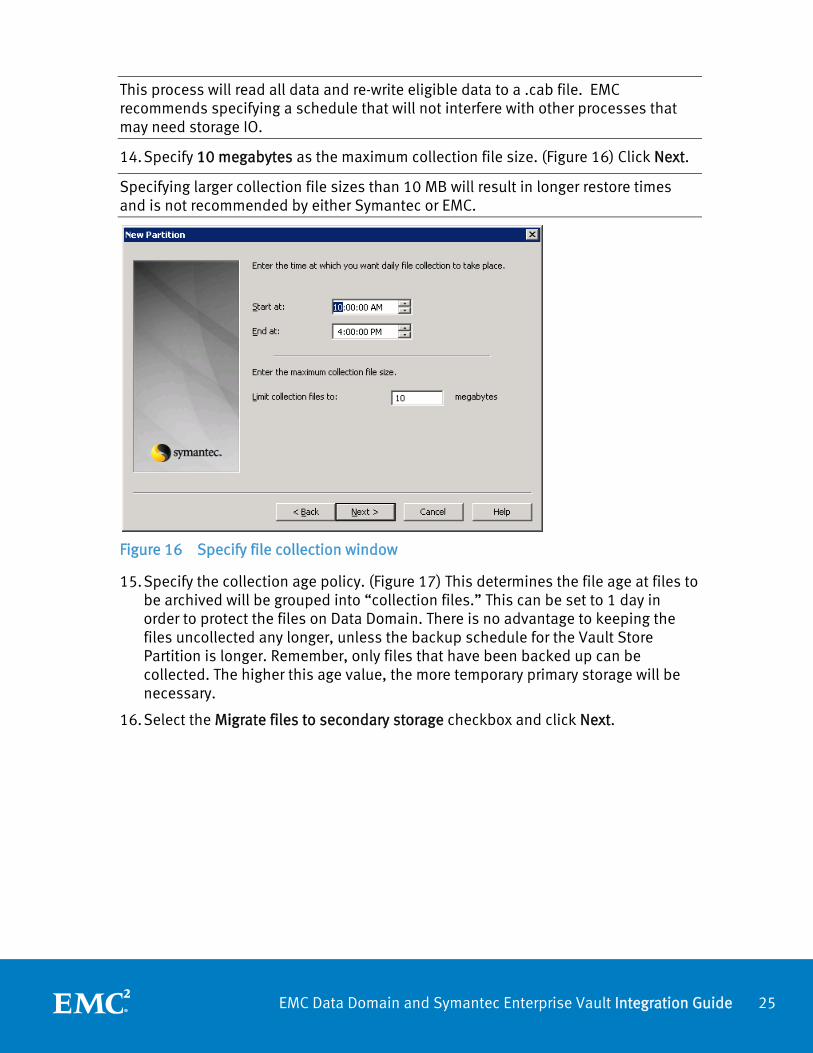
This process will read all data and re-write eligible data to a .cab file. EMC recommends specifying a schedule that will not interfere with other processes that may need storage IO.
14. Specify 10 megabytes as the maximum collection file size. (Figure 16) Click Next.
Specifying larger collection file sizes than 10 MB will result in longer restore times and is not recommended by either Symantec or EMC.
Figure 16 Specify file collection window
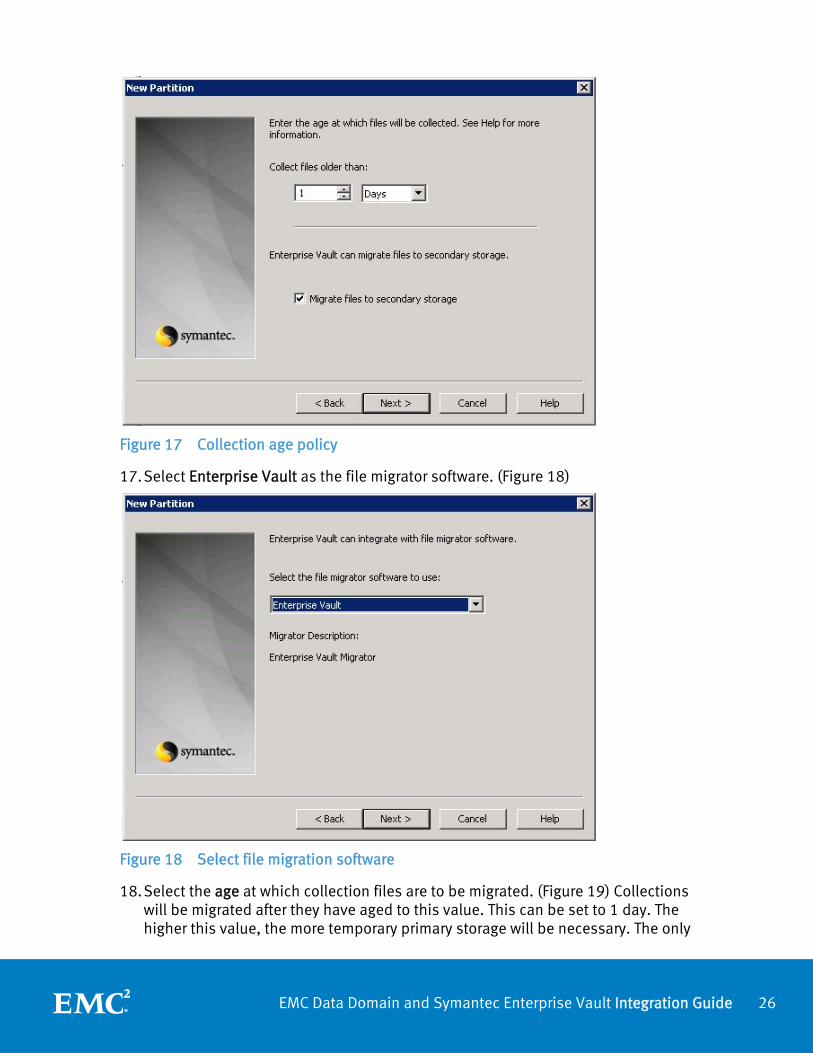
15. Specify the collection age policy. (Figure 17) This determines the file age at files to be archived will be grouped into “collection files.” This can be set to 1 day in order to protect the files on Data Domain. There is no advantage to keeping the files uncollected any longer, unless the backup schedule for the Vault Store Partition is longer. Remember, only files that have been backed up can be collected. The higher this age value, the more temporary primary storage will be necessary.
16. Select the Migrate files to secondary storage checkbox and click Next.
26EMC Data Domain and Symantec Enterprise Vault Integration Guide
Figure 17 Collection age policy
17. Select Enterprise Vault as the file migrator software. (Figure 18)
Figure 18 Select file migration software
18. Select the age at which collection files are to be migrated. (Figure 19) Collections will be migrated after they have aged to this value. This can be set to 1 day. The higher this value, the more temporary primary storage will be necessary. The only
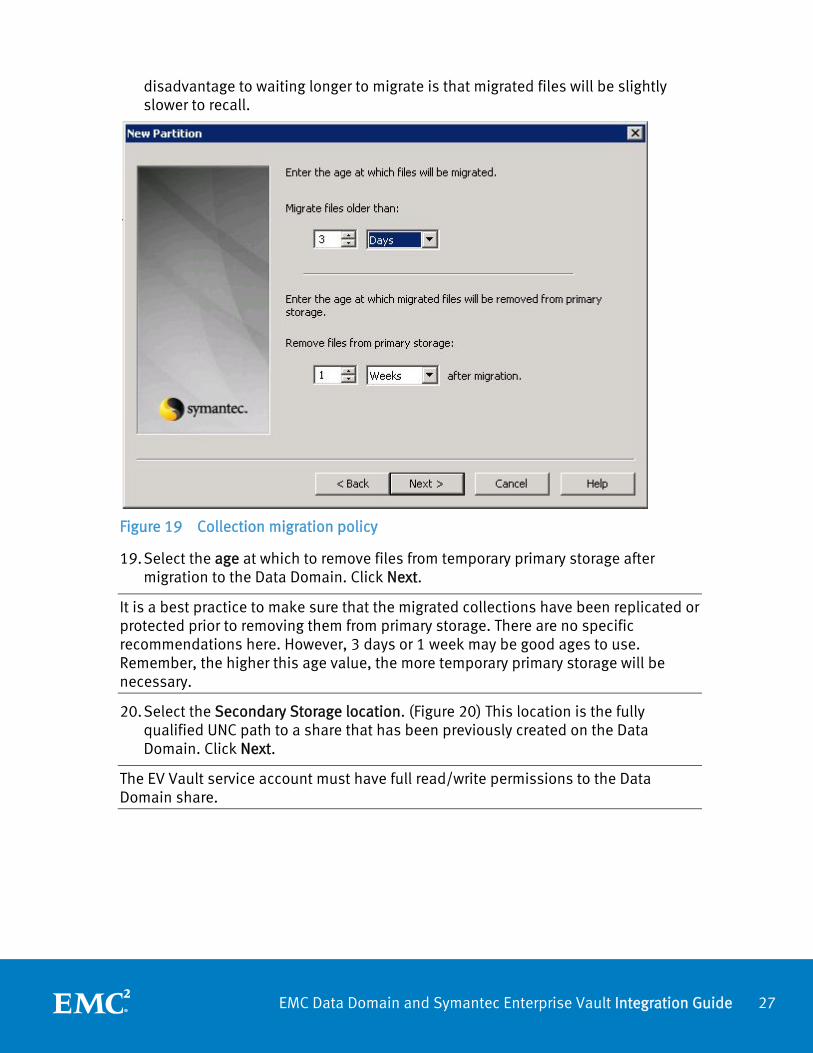
27EMC Data Domain and Symantec Enterprise Vault Integration Guide
disadvantage to waiting longer to migrate is that migrated files will be slightly slower to recall.
Figure 19 Collection migration policy
19. Select the age at which to remove files from temporary primary storage after migration to the Data Domain. Click Next.
It is a best practice to make sure that the migrated collections have been replicated or protected prior to removing them from primary storage. There are no specific recommendations here. However, 3 days or 1 week may be good ages to use. Remember, the higher this age value, the more temporary primary storage will be necessary.
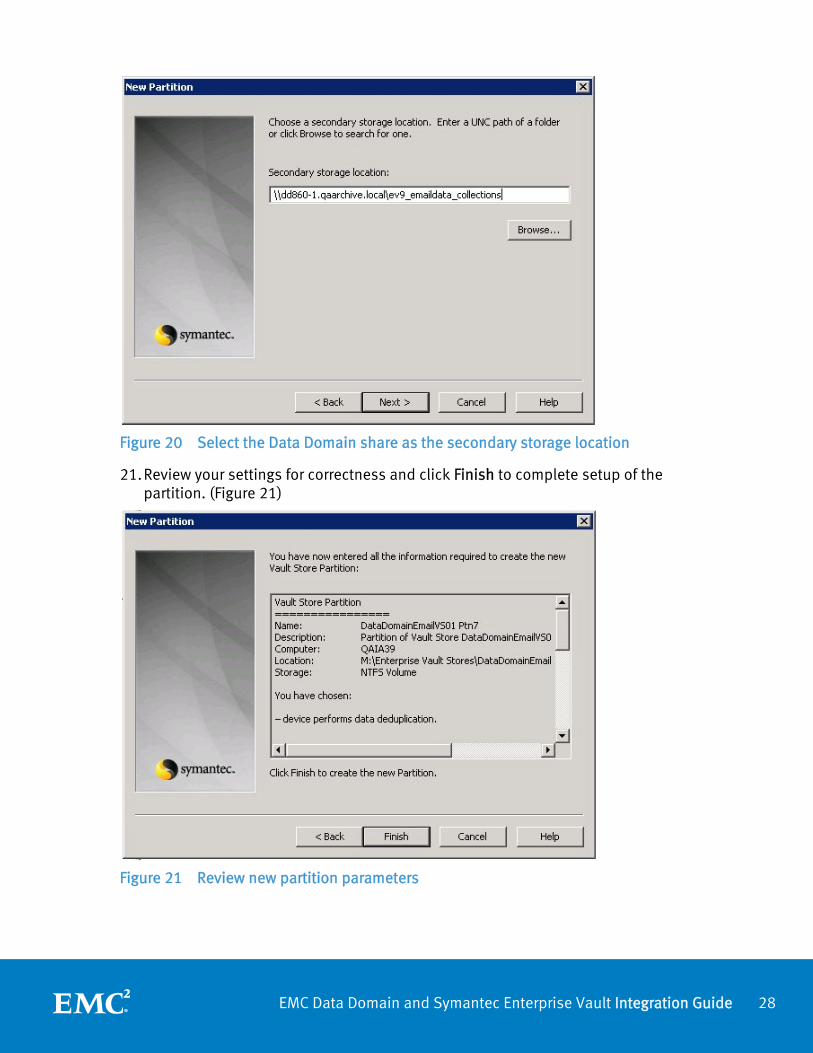
20. Select the Secondary Storage location. (Figure 20) This location is the fully qualified UNC path to a share that has been previously created on the Data Domain. Click Next.
The EV Vault service account must have full read/write permissions to the Data Domain share.
28EMC Data Domain and Symantec Enterprise Vault Integration Guide
Figure 20 Select the Data Domain share as the secondary storage location
21. Review your settings for correctness and click Finish to complete setup of the partition. (Figure 21)
Figure 21 Review new partition parameters
29EMC Data Domain and Symantec Enterprise Vault Integration Guide
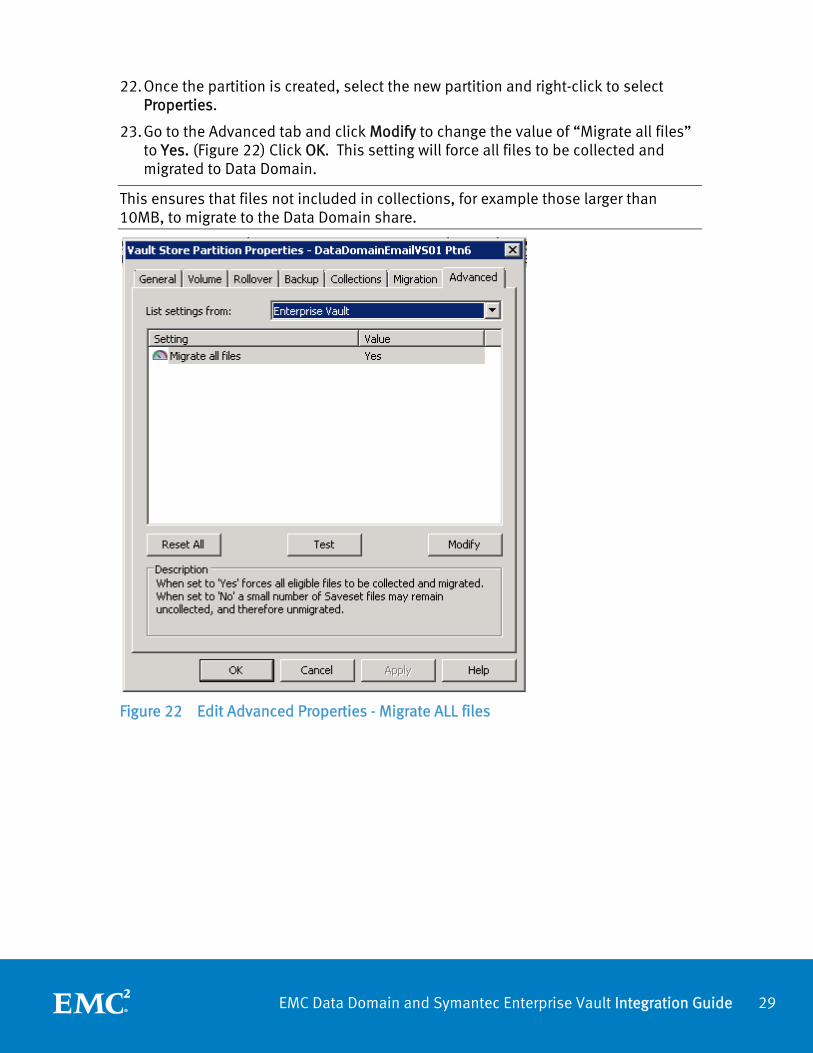
22. Once the partition is created, select the new partition and right-click to select Properties.
23. Go to the Advanced tab and click Modify to change the value of “Migrate all files” to Yes. (Figure 22) Click OK. This setting will force all files to be collected and migrated to Data Domain.
This ensures that files not included in collections, for example those larger than 10MB, to migrate to the Data Domain share.
Figure 22 Edit Advanced Properties - Migrate ALL files
30EMC Data Domain and Symantec Enterprise Vault Integration Guide
Define the archive policies After the Data Domain has been configured as an archive target, create an archive policy to move data from the archive source to Data Domain. This involves the following basic steps (refer to the Symantec documentation for detailed steps):
1. Define a Retention Category.
2. Define archive “targets” (file system, email, and/or SharePoint) within Enterprise Vault.
3. Configure the policy and apply the retention category desired.
4. Define the file matching criteria for moving data between tiers.
5. Specify the target Vault Store/Vault Store Group.
6. Create a custom schedule for the policy or modify the “Site Policy”.
The following documents may be useful for setting up archiving use cases you may want to implement. Refer to these documents for the detailed instructions involved in putting the above steps into practice.
For file system archiving: Setting_up_File_System_Archiving
For email archiving (Exchange): Setting up Exchange Server Archiving
For email archiving (Domino): Setting_up_Domino_Server_Archiving
For Microsoft SharePoint archiving: Setting_up_SharePoint_Server_Archiving
31EMC Data Domain and Symantec Enterprise Vault Integration Guide
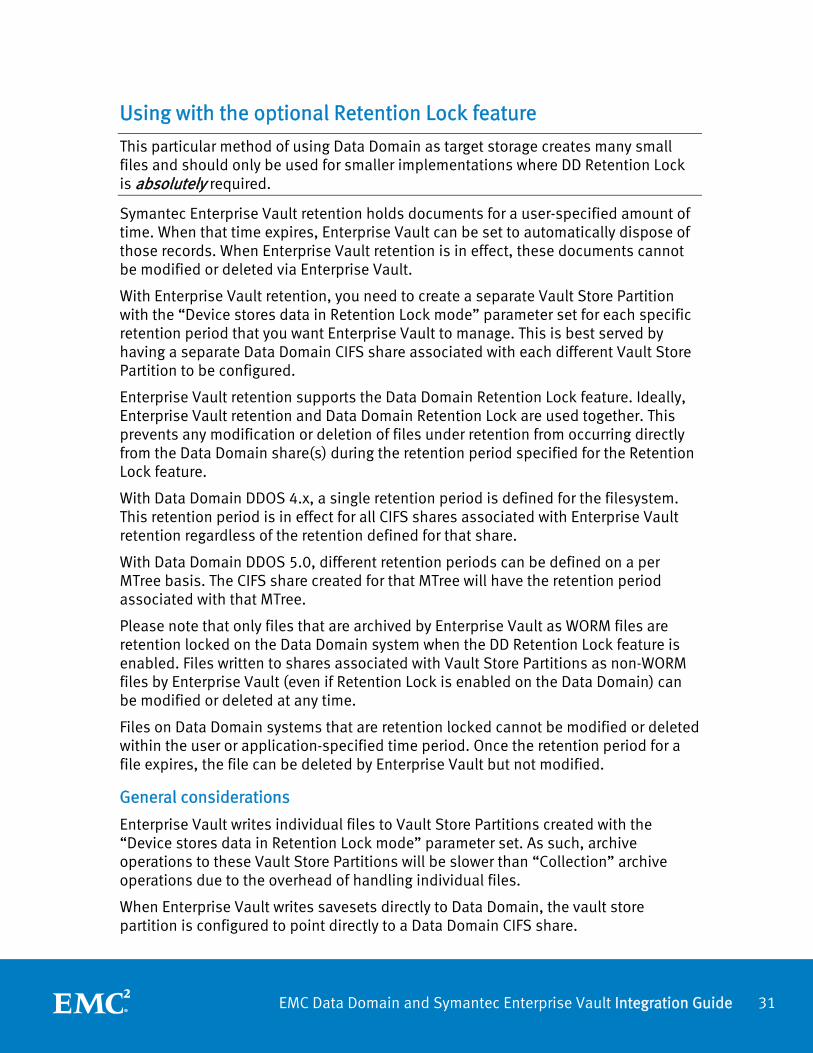
Using with the optional Retention Lock feature
This particular method of using Data Domain as target storage creates many small files and should only be used for smaller implementations where DD Retention Lock is absolutely required.
Symantec Enterprise Vault retention holds documents for a user-specified amount of time. When that time expires, Enterprise Vault can be set to automatically dispose of those records. When Enterprise Vault retention is in effect, these documents cannot be modified or deleted via Enterprise Vault.
With Enterprise Vault retention, you need to create a separate Vault Store Partition with the “Device stores data in Retention Lock mode” parameter set for each specific retention period that you want Enterprise Vault to manage. This is best served by having a separate Data Domain CIFS share associated with each different Vault Store Partition to be configured.
Enterprise Vault retention supports the Data Domain Retention Lock feature. Ideally, Enterprise Vault retention and Data Domain Retention Lock are used together. This prevents any modification or deletion of files under retention from occurring directly from the Data Domain share(s) during the retention period specified for the Retention Lock feature.
With Data Domain DDOS 4.x, a single retention period is defined for the filesystem. This retention period is in effect for all CIFS shares associated with Enterprise Vault retention regardless of the retention defined for that share.
With Data Domain DDOS 5.0, different retention periods can be defined on a per MTree basis. The CIFS share created for that MTree will have the retention period associated with that MTree.
Please note that only files that are archived by Enterprise Vault as WORM files are retention locked on the Data Domain system when the DD Retention Lock feature is enabled. Files written to shares associated with Vault Store Partitions as non-WORM files by Enterprise Vault (even if Retention Lock is enabled on the Data Domain) can be modified or deleted at any time.
Files on Data Domain systems that are retention locked cannot be modified or deleted within the user or application-specified time period. Once the retention period for a file expires, the file can be deleted by Enterprise Vault but not modified.
General considerations
Enterprise Vault writes individual files to Vault Store Partitions created with the “Device stores data in Retention Lock mode” parameter set. As such, archive operations to these Vault Store Partitions will be slower than “Collection” archive operations due to the overhead of handling individual files.
When Enterprise Vault writes savesets directly to Data Domain, the vault store partition is configured to point directly to a Data Domain CIFS share.
32EMC Data Domain and Symantec Enterprise Vault Integration Guide
Because Enterprise Vault is aware of all files written to target storage, if the same file is archived to a “collection” vault store partition and later written again to a “retention” vault store partition, the file actually remains as part of the “collection” Vault Store Partition and is not locked as it is already present in target storage.
Create a Vault Store Partition for use with DD Retention Lock
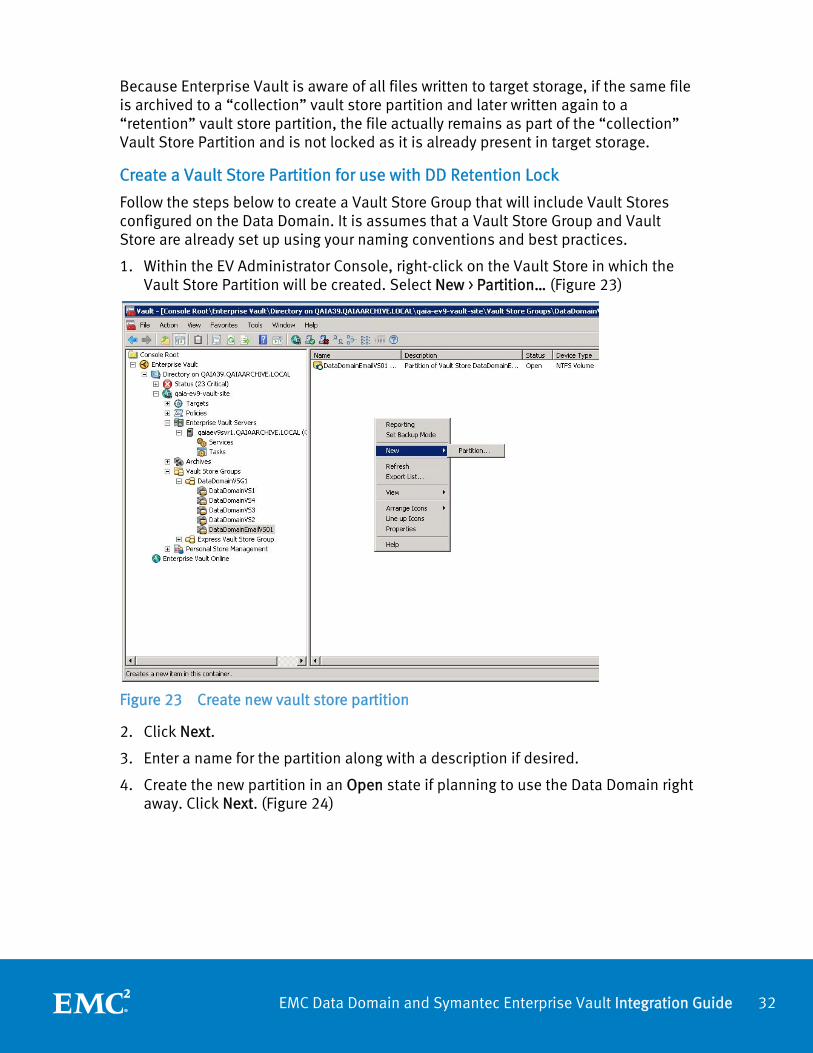
Follow the steps below to create a Vault Store Group that will include Vault Stores configured on the Data Domain. It is assumes that a Vault Store Group and Vault Store are already set up using your naming conventions and best practices.
1. Within the EV Administrator Console, right-click on the Vault Store in which the Vault Store Partition will be created. Select New > Partition… (Figure 23)
Figure 23 Create new vault store partition
2. Click Next.
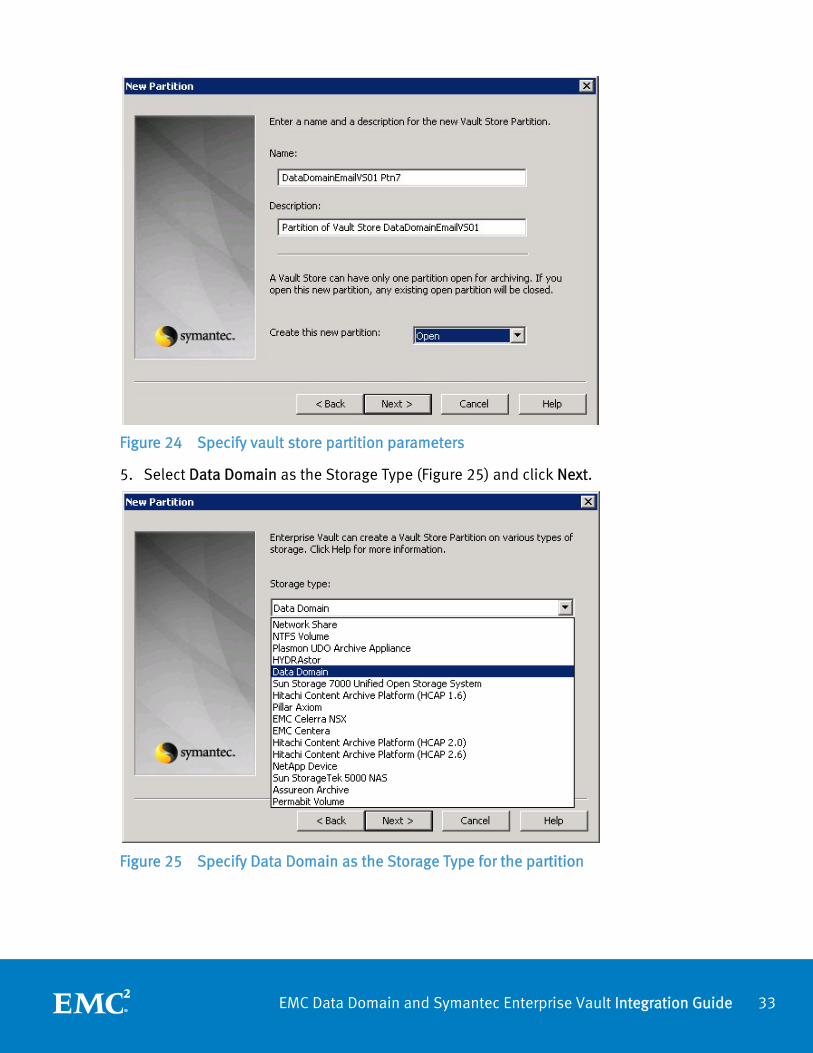
3. Enter a name for the partition along with a description if desired.
4. Create the new partition in an Open state if planning to use the Data Domain right away. Click Next. (Figure 24)
33EMC Data Domain and Symantec Enterprise Vault Integration Guide
Figure 24 Specify vault store partition parameters
5. Select Data Domain as the Storage Type (Figure 25) and click Next.
Figure 25 Specify Data Domain as the Storage Type for the partition
34EMC Data Domain and Symantec Enterprise Vault Integration Guide
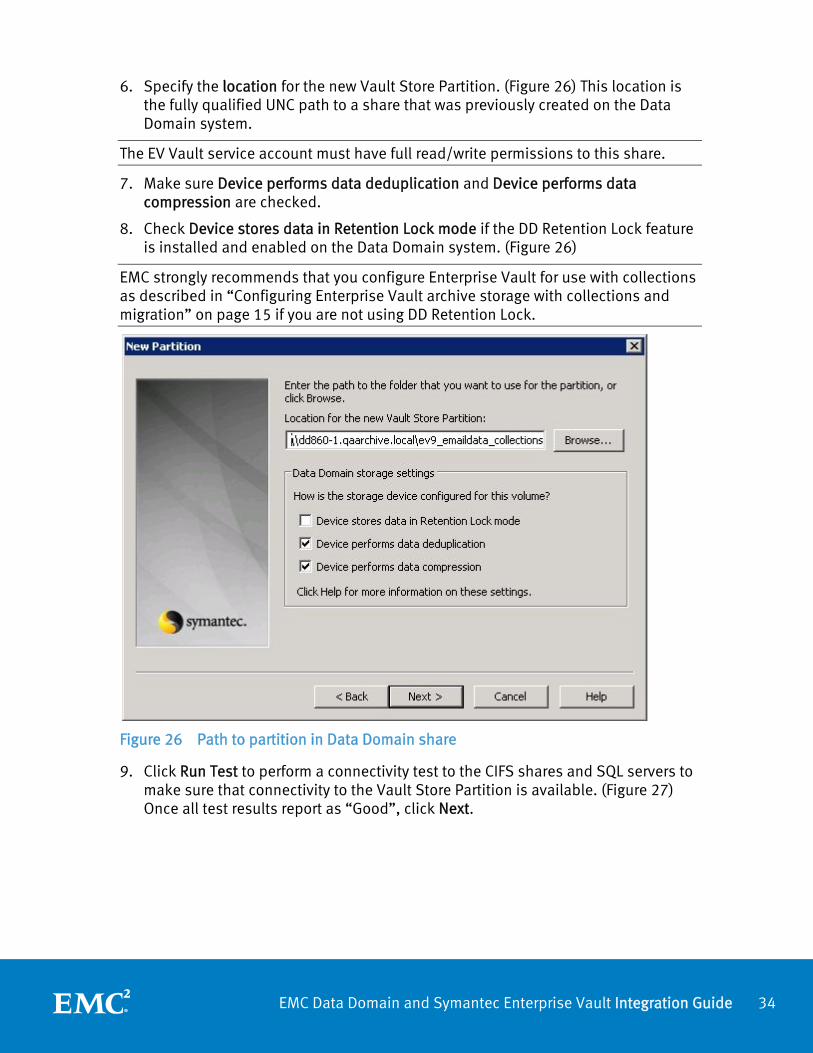
6. Specify the location for the new Vault Store Partition. (Figure 26) This location is the fully qualified UNC path to a share that was previously created on the Data Domain system.
The EV Vault service account must have full read/write permissions to this share.
7. Make sure Device performs data deduplication and Device performs data compression are checked.
8. Check Device stores data in Retention Lock mode if the DD Retention Lock feature is installed and enabled on the Data Domain system. (Figure 26)
EMC strongly recommends that you configure Enterprise Vault for use with collections as described in “Configuring Enterprise Vault archive storage with collections and migration” on page 15 if you are not using DD Retention Lock.
Figure 26 Path to partition in Data Domain share
9. Click Run Test to perform a connectivity test to the CIFS shares and SQL servers to make sure that connectivity to the Vault Store Partition is available. (Figure 27) Once all test results report as “Good”, click Next.

35EMC Data Domain and Symantec Enterprise Vault Integration Guide
Figure 27 Verify connectivity
10. Select Not Enabled as the desired behavior for Vault Store Partition Rollover. (Figure 28). Click Next.
If using temporary primary storage with a Data Domain system with enough capacity to support the implementation, it is unnecessary to configure partition rollover.
Figure 28 Partition Rollover method selection
36EMC Data Domain and Symantec Enterprise Vault Integration Guide
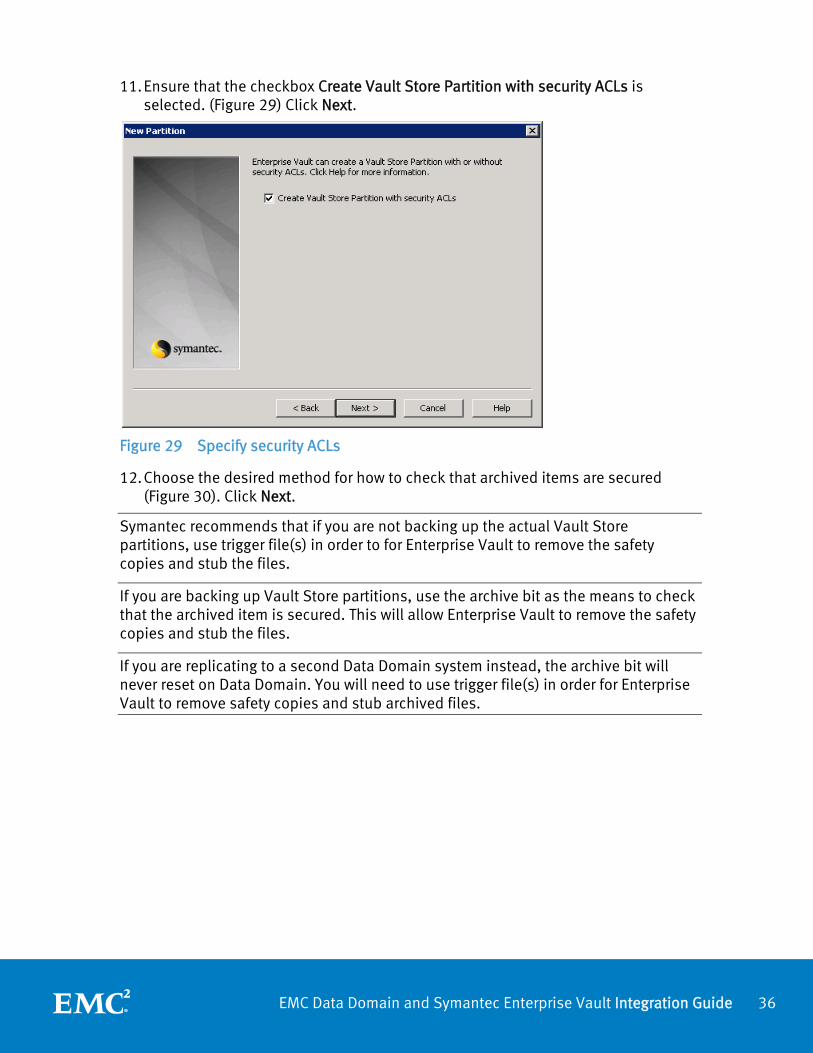
11. Ensure that the checkbox Create Vault Store Partition with security ACLs is selected. (Figure 29) Click Next.
Figure 29 Specify security ACLs
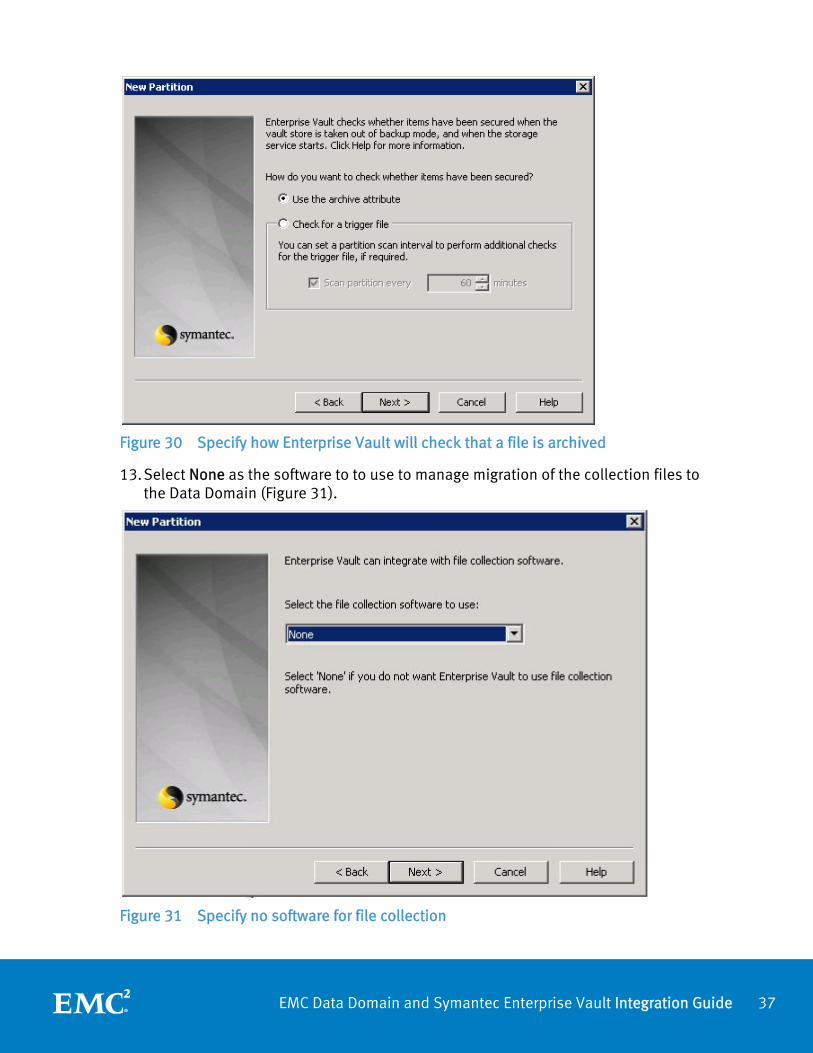
12. Choose the desired method for how to check that archived items are secured (Figure 30). Click Next.
Symantec recommends that if you are not backing up the actual Vault Store partitions, use trigger file(s) in order to for Enterprise Vault to remove the safety copies and stub the files.
If you are backing up Vault Store partitions, use the archive bit as the means to check that the archived item is secured. This will allow Enterprise Vault to remove the safety copies and stub the files.
If you are replicating to a second Data Domain system instead, the archive bit will never reset on Data Domain. You will need to use trigger file(s) in order for Enterprise Vault to remove safety copies and stub archived files.
37EMC Data Domain and Symantec Enterprise Vault Integration Guide
Figure 30 Specify how Enterprise Vault will check that a file is archived
13. Select None as the software to to use to manage migration of the collection files to the Data Domain (Figure 31).
Figure 31 Specify no software for file collection
38EMC Data Domain and Symantec Enterprise Vault Integration Guide
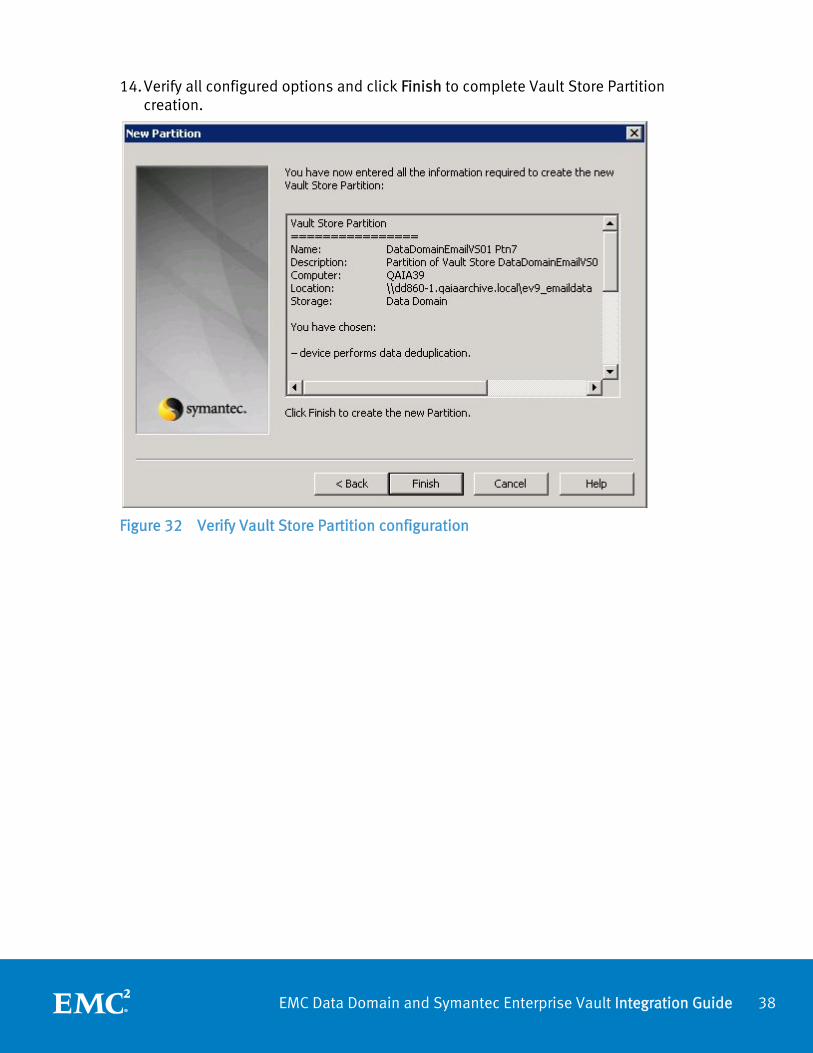
14. Verify all configured options and click Finish to complete Vault Store Partition creation.
Figure 32 Verify Vault Store Partition configuration
39EMC Data Domain and Symantec Enterprise Vault Integration Guide
Using with the Data Domain Archiver
The information in this section is applicable only to the Data Domain Archiver.
More information about the Data Domain Archiver can be found in the Data Domain user documentation for both DDOS 5.0 and the DD Archiver.
About the Data Domain Archiver
Data Domain Archiver addresses the long-term retention requirements of scale and cost by extending the proven Data Domain architecture with an internal tiering approach. There are two tiers, sharing a common controller, management, and namespace:
An active storage tier, which operates like a standard Data Domain system used for operational recovery
A highly scalable and cost-optimized archive storage tier, to which files are migrated internally when a policy threshold (time since last modification) is passed for long-term retention
These tiers are logical divisions of the storage attached to a single controller. Data is stored first to the active tier, and once it has been on the active tier without modification for a user-defined period of time, it is moved to the archive tier. The archive tier incorporates additional fault isolation and granular recoverability, larger capacity for archival data, improved manageability, and enhanced compression.
The DD Archiver active tier operates essentially the same way as a standard Data Domain system and is sized based upon the same guidelines. For example, one could size the active tier to hold weekly fulls and daily incrementals for up to 90 days. The active tier can be configured with one to four storage shelves, with up to 96 TB usable capacity.
The archive tier consists of one or more archive units. Each archive unit is a logical grouping of storage shelves, with its own deduplication context. Each archive unit can have one to four storage shelves, with up to 96 TB of usable capacity.
Data movement from the active tier to the archive tier is transparent to Enterprise Vault. Enterprise Vault operations with the DD Archiver are the same as those with a standard Data Domain system. All of the data in the two tiers is accessible, although there might be a slight delay on initial access to data in a “sealed” archive unit of the archive tier. The namespace of the system is global, and not affected by data movement. No partitioning of the file system is necessary to take advantage of the two-tiered file system.
Data Movement Policies
With the DD Archiver, the data movement policies are based on when a file was last modified. This movement policy can be set differently for each MTree. For example,
40EMC Data Domain and Symantec Enterprise Vault Integration Guide
files that might be updated periodically after movement to the DD Archiver need a different policy than ones that will not change.
For example, it is recommended that the data movement policy be set to no less than 90 days for archiving applications where users may be accessing the archived data on a regular basis.
Deduplication
The archive tier is comprised of one or more archive units, each of which may consist of one or more entire shelf’s worth of storage. In addition to the deduplication that occurs when data is first written to the active tier, there is additional compression on the contents of the data moved to an archive unit. There is no cross-deduplication among archive units.
Storage
The concept of tiering extends to the storage level. The active tier operates as if it were a standalone non-Archiver Data Domain system. The active tier must include at least one shelf worth of storage. In a sense, it acts as a cache for data that is not considered to be static. As always, the active tier should be adequately sized to hold the data that will be retained for only a short time as well as the data that accumulates for movement to the archive tier. Space reclamation occurs only on the active tier (in the current release). Space reclamation occurs via the “cleaning” process.
For the archive tier, an archive unit can consist of one to four shelves of storage. And, there can be multiple archive units within the archive tier. As one archive unit fills up, simply add an additional archive unit with one or more shelves of storage. For fault isolation purposes, the Archiver “seals” an archive unit when full allowing no additional data to be written to it. Its contents, however, are fully accessible. The Archiver then brings the next archive unit online allowing for incremental capacity growth for the long-term retention of data. Please note that space reclamation does not run on archive units (in the current release). Data moved to the archive tier that is subsequently modified or deleted will result in wasted space. Space reclamation does not run on an archive unit until all files within that unit have been expired and deleted by the application.
Mixed Use
When using the Archiver as a storage target for both backup and archive data, keep in mind the following:
Data Domain’s deduplication is optimized for co-locality of information. Performing backup and archive operations at the same time can potentially lower the deduplication ratios that could be achieved depending how and when the data is received. Schedule these operations for different times so they don’t impact (or have minimal impact) on each other.
41EMC Data Domain and Symantec Enterprise Vault Integration Guide
Create separate MTrees for archive data. The default data movement policy for an MTree is 14 days, which may be fine for backup data but not long enough for archived data to become static (subject to very little or no modification). If desired, create multiple MTrees for data that ages at different rates.
Data that is frequently accessed should have a longer file movement policy to give it time to become more static.
Size the active tier as you normally would for your backups and then calculate and add in the additional capacity needed to accommodate the archive data and its data movement policies.
Recommended best practices By design, once data is written to the Vault Store partitions, no changes or
modifications should occur.
Ensure that the active tier is adequately sized to hold data not yet static.
Avoid these common sizing errors:
Setting a data movement policy that is overly aggressive in which data is moved too soon. Modifying or deleting data that is present in an archive unit results in space that cannot be reclaimed until all data in that unit has been expired and deleted.
Setting a data movement policy that is too conservative for data that is not likely to change. Once active tier fills up, no more data can be written to the system.
Defining an undersized active unit, such that the active tier fills up prematurely. This can result in the use of overly aggressive movement policies to compensate for an undersized active tier.
Backup and/or archiving performance may be degraded while the “cleaning” or garbage collection process is running on the active tier. Try to schedule this process during light workloads or activity. Or, you can use the existing QoS functionality to manage cleaning and new backup data being writted to DDR.
Backup and/or archiving performance may be degraded while data movement to the archive tier is occurring. Try to schedule this process during light workloads or activity.
Configuring data movement
A file is moved from the active to the archive tier based on the date it was last modified. For data integrity, the entire file is moved.
You can specify the data movement age threshold after which data that has not been modified is to be moved from the active to the archive tier. You can specify different age thresholds for each of your defined MTrees.
To set a general data movement policy:

42EMC Data Domain and Symantec Enterprise Vault Integration Guide
1. Go to Data Management > File System and select the Configuration tab (Figure 33).
Figure 33 Data Movement Policy
2. Click the Data Movement Policy’s Edit button
Figure 34 Data Movement Policy dialog
43EMC Data Domain and Symantec Enterprise Vault Integration Guide
a. In the Data Movement Policy dialog box (Error! Reference source not found.), select the threshold number of days. When the data movement starts, all the files that have not been accessed for the specified threshold number of days are moved from the active tier to the archive tier.
b. Set a schedule for the data movement policy. For example, weekly, daily, b. Set a schedule for the data movement policy. For example, weekly, daily, specific days, and a time in hours and minutes).
c. A file system clean is recommended after the data movement. De-select this option if you do not want the clean to occur.
To configure the age threshold for an individual MTree:
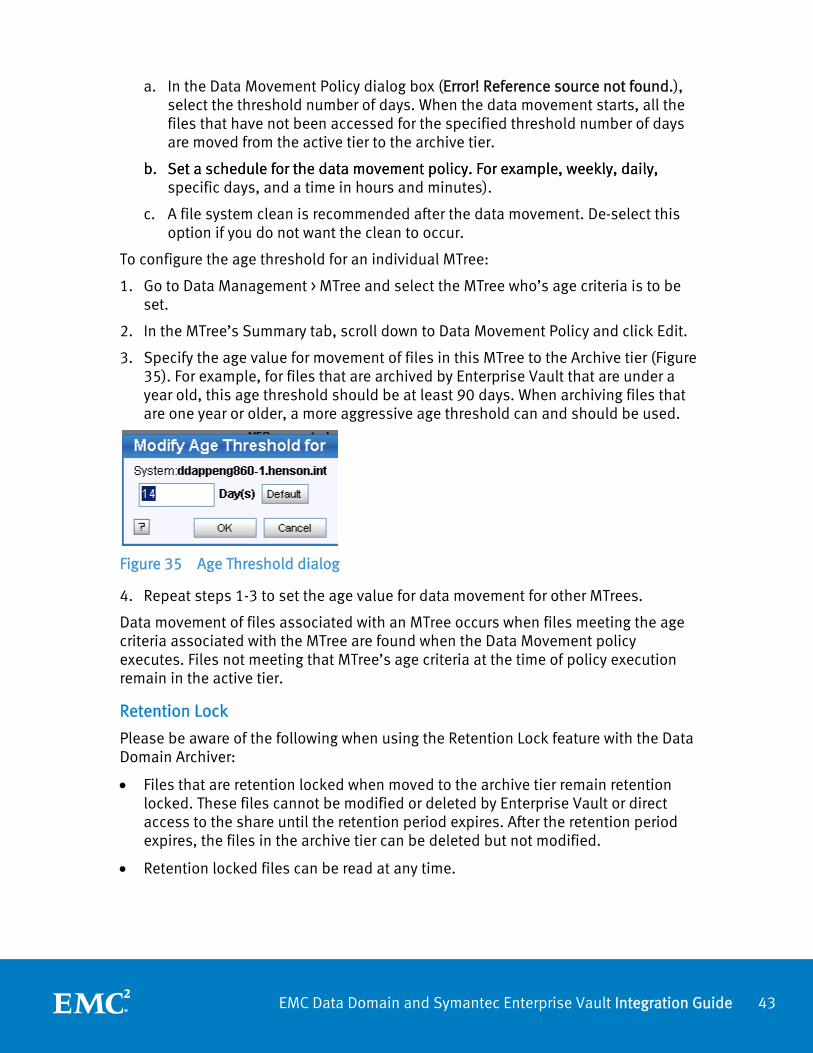
1. Go to Data Management > MTree and select the MTree who’s age criteria is to be set.
2. In the MTree’s Summary tab, scroll down to Data Movement Policy and click Edit.
3. Specify the age value for movement of files in this MTree to the Archive tier (Figure 35). For example, for files that are archived by Enterprise Vault that are under a year old, this age threshold should be at least 90 days. When archiving files that are one year or older, a more aggressive age threshold can and should be used.
Figure 35 Age Threshold dialog
4. Repeat steps 1-3 to set the age value for data movement for other MTrees.
Data movement of files associated with an MTree occurs when files meeting the age criteria associated with the MTree are found when the Data Movement policy executes. Files not meeting that MTree’s age criteria at the time of policy execution remain in the active tier.
Retention Lock
Please be aware of the following when using the Retention Lock feature with the Data Domain Archiver:
Files that are retention locked when moved to the archive tier remain retention locked. These files cannot be modified or deleted by Enterprise Vault or direct access to the share until the retention period expires. After the retention period expires, the files in the archive tier can be deleted but not modified.
Retention locked files can be read at any time.