EMC Backup & Recovery Manager · EMC Backup & Recovery Manager Release 1.1 Security Guide 5 ......
20
EMC ® Backup & Recovery Manager Release 1.1 Security Guide P/N 300-016-012 REV 05
-
Upload
nguyenkhanh -
Category
Documents
-
view
225 -
download
0
Transcript of EMC Backup & Recovery Manager · EMC Backup & Recovery Manager Release 1.1 Security Guide 5 ......

EMC®
Backup & Recovery ManagerRelease 1.1
Security GuideP/N 300-016-012REV 05

EMC Backup & Recovery Manager Release 1.1 Security Guide2
Copyright © 2012- 2014 EMC Corporation. All rights reserved. Published in the USA.
Published December, 2014
EMC believes the information in this publication is accurate as of its publication date. The information is subject to change without notice.
The information in this publication is provided as is. EMC Corporation makes no representations or warranties of any kind with respect to the information in this publication, and specifically disclaims implied warranties of merchantability or fitness for a particular purpose. Use, copying, and distribution of any EMC software described in this publication requires an applicable software license.
EMC2, EMC, and the EMC logo are registered trademarks or trademarks of EMC Corporation in the United States and other countries. All other trademarks used herein are the property of their respective owners.
For the most up-to-date regulatory document for your product line, go to the technical documentation and advisories section on the EMC online support website.

CONTENTS
Preface
Chapter 1 Security Configuration
Communication security.............................................................................. 10Port usage............................................................................................. 10Network encryption ............................................................................... 10Cryptographic modules in the Backup & Recovery Manager................... 11
Login, session and password protection...................................................... 11 Firewall rules............................................................................................... 12 REST API ..................................................................................................... 12 Data security............................................................................................... 12 Access control............................................................................................. 12
Default accounts ................................................................................... 13Authentication configuration................................................................. 13User authorization................................................................................. 13Component access control .................................................................... 14Certificate management ........................................................................ 14Web browser authentication using Apache............................................ 15Changing the Backup & Recovery Manager Apache from self-signed to issued................................................................................................... 17
EMC Backup & Recovery Manager Release 1.1 Security Guide 3

Contents
4 EMC Backup & Recovery Manager Release 1.1 Security Guide

PREFACE
As part of an effort to improve its product lines, EMC periodically releases revisions of its software and hardware. Therefore, some functions described in this document might not be supported by all versions of the software or hardware currently in use. The product release notes provide the most up-to-date information on product features.
Contact your EMC representative if a product does not function properly or does not function as described in this document.
Note: This document was accurate at publication time. New versions of this document might be released on the EMC online support website. Check the EMC online support website to ensure that you are using the latest version of this document.
PurposeThis document describes how to configure security features for the EMC Backup & Recovery Manager.
AudienceThis document is intended for the administrator who will be involved in managing the Backup & Recovery Manager.
Revision historyThe following table presents the revision history of this document.
Related documentationThe following EMC publications provide additional information:
◆ EMC Backup & Recovery Manager User Guide◆ EMC Backup & Recovery Manager Release Notes
Table 1 Revision history
Revision Date Description
05 December 5, 2014 Added Port 443 to Table 2, “Default ports,” on page 10.
04 October 20, 2013 Minor corrections to Table 2, “Default ports,” on page 10.
03 September 25, 2013 Updated for GA release
02 July 25, 2013 Updated for DA release
01 March 13, 2013 1st draft of this Security Guide
EMC Backup & Recovery Manager Release 1.1 Security Guide 5

Conventions used in this documentEMC uses the following conventions for special notices:
NOTICE is used to address practices not related to personal injury.
Note: A note presents information that is important, but not hazard-related.
IMPORTANT
An important notice contains information essential to software or hardware operation.
Typographical conventions
EMC uses the following type style conventions in this document:
Where to get helpEMC support, product, and licensing information can be obtained as follows:
Normal Used in running (nonprocedural) text for:• Names of interface elements, such as names of windows, dialog boxes,
buttons, fields, and menus• Names of resources, attributes, pools, Boolean expressions, buttons,
DQL statements, keywords, clauses, environment variables, functions, and utilities
• URLs, pathnames, filenames, directory names, computer names, links, groups, service keys, file systems, and notifications
Bold Used in running (nonprocedural) text for names of commands, daemons, options, programs, processes, services, applications, utilities, kernels, notifications, system calls, and man pages
Used in procedures for:• Names of interface elements, such as names of windows, dialog boxes,
buttons, fields, and menus• What the user specifically selects, clicks, presses, or types
Italic Used in all text (including procedures) for:• Full titles of publications referenced in text• Emphasis, for example, a new term• Variables
Courier Used for:• System output, such as an error message or script• URLs, complete paths, filenames, prompts, and syntax when shown
outside of running text
Courier bold Used for specific user input, such as commands
Courier italic Used in procedures for:• Variables on the command line• User input variables
< > Angle brackets enclose parameter or variable values supplied by the user
[ ] Square brackets enclose optional values
| Vertical bar indicates alternate selections — the bar means “or”
{ } Braces enclose content that the user must specify, such as x or y or z
... Ellipses indicate nonessential information omitted from the example
6 EMC Backup & Recovery Manager Release 1.1 Security Guide

Product information — For documentation, release notes, software updates, or information about EMC products, licensing, and service, go to the EMC online support website (registration required) at:
https://support.emc.com/
Technical support — For technical support resources that may enable you to resolve a product issue before you contact EMC Customer Service, go to:
◆ The Avamar Support page at, https://support.emc.com/products/759_Avamar-Server/Documentation/
◆ The NetWorker Support page at, https://support.emc.com/products/1095_NetWorker/Documentation/
◆ The Data Domain Support page at, https://my.datadomain.com/US/en/search.jsp
The Avamar and NetWorker and Data Domain Support pages provide access to:
◆ Product documentation
◆ How-to and troubleshooting information in the Support Topics section
◆ Hardware and software compatibility information
◆ Knowledge Base articles
If none of these resources resolve the issue, you can engage EMC Customer Service using live interactive chat by selecting Additional Resources > Live Chat on the (Avamar and NetWorker only) Support pages.
If more in-depth help is required or you have an existing open Service Request (SR), you can submit or review an SR through the EMC online support website at https://support.emc.com/:
◆ To open a new SR, select Support > Request Support > Create Service Request.
Note: To open an SR, you must have a valid support agreement. Contact your EMC sales representative for details about obtaining a valid support agreement or with questions about your account.
◆ To review an existing SR, select Support > Request Support > View Service Requests.
Your commentsYour suggestions will help us continue to improve the accuracy, organization, and overall quality of the user publications. Send your opinions of this document to:
Please include the following information:
◆ Product name and version
◆ Document name, part number, and revision (for example, 01)
◆ Page numbers
◆ Other details that will help us address the documentation issue
EMC Backup & Recovery Manager Release 1.1 Security Guide 7

8 EMC Backup & Recovery Manager Release 1.1 Security Guide
Security Configuration
CHAPTER 1Security Configuration
The following topics provide information on security configurations for the EMC® Backup & Recovery Manager:
◆ Communication security.......................................................................................... 10◆ Login, session and password protection.................................................................. 11◆ Firewall rules........................................................................................................... 12◆ Data security........................................................................................................... 12◆ Access control......................................................................................................... 12
9

Security Configuration
Communication securityCommunication security settings enable the establishment of secure communication channels between:
◆ Product components◆ Product components and external systems or components.
Port usage
The TCP ports listed in Table 2 on page 10 are the Backup & Recovery Manager default ports. Some of these ports can be changed. Various configuration files must be manually edited.
Network encryption
Table 3 on page 10 contains the Avamar encryption strategies that are employed by the Backup & Recovery Manager feature for communication between components.
For NetWorker, backup and archive data on UNIX and Windows hosts are encrypted with the aes Application Specific Module (ASM). The aes ASM provides 256-bit data encryption. Backup data is encrypted based on a user-defined pass phrase. If no pass phrase is specified, data is encrypted with a default pass phrase.
Table 2 Default ports
Component Port Description
Apache ActiveMQ 61610 Port for accepting SSL STOMP connections
Apache ActiveMQ 61619 Port for accepting SSL activemq connections
Apache Tomcat 8009 Port for accepting AJP connections in tomcat (localhost access only)
Apache Tomcat 9191 Port for accepting HTTP connections in tomcat (localhost access only)
SSH & SSH daemon (sshd)
1315 Default SSH port to the Backup & Recovery Manager server
Data Domain server 22 This port is a communication target on the DD server. This port is closed on the Backup & Recovery Manager server.
AvInstaller service 85438580
Ports to connect to the AvInstaller
Backup & Recovery Manager Web Application
443 Default port for secure HTTP connections. The Backup & Recovery Manager adaptors use this port to communicate with the Backup & Recovery Manager Web App.
Table 3 Encryption strategies
Communication Encryption type
Between web server and browser SSL with server authentication
Between ActiveMQ and Avamar components SSL with mutual authentication
10 EMC Backup & Recovery Manager Release 1.1 Security Guide

Security Configuration
Cryptographic modules in the Backup & Recovery Manager
Table 4 on page 11 is a list of cryptographic modules used in the Backup & Recovery Manager.
The cryptographic modules used in the Backup & Recovery Manager are not compliant with the Federal Information Processing Standard (FIPS 140-2).
Login, session and password protectionIt is recommended that you change the password for the ucas user, root and admin from the default (changeme) after the Backup & Recovery Manager server installation.
The Backup & Recovery Manager provides the following protection for the GUI login and password protection:
◆ Users are required to change the password at the first GUI login
◆ Password requirements are the following:
• Minimum of 9 characters
• Minimum of 1 lower case letter
• Minimum of 1 upper case letter
• Minimum of 1 number
• Minimum of 1 special character
◆ After 3 failed login attempts, the user is locked out of the system for 15 minutes
Note: This setting is hard coded and cannot be changed.
◆ The Backup & Recovery Manager automatically logs out of sessions if for any reason the connection between the client and server is lost:
• Common reasons for a login session to expire are:
– The Backup & Recovery Manager server is restarted
– The browser is closed completely while you are still logged in to the Backup & Recovery Manager
Table 4 Cryptographic modules
Backup & Recovery manager Cryptographic modules
AES128-SHA DHE-DSS-AES128-SHA EDH-DSS-DES-CBC-SHA EXP-RC2-CBC-MD5
AES256-SHA DHE-DSS-AES256-SHA EDH-DSS-DES-CBC3-SHA EXP-RC4-MD5
CAMELLIA128-SHA DHE-DSS-CAMELLIA128-SHA EDH-RSA-DES-CBC-SHA EXP-RC4-MD5
CAMELLIA256-SHA DHE-DSS-CAMELLIA256-SHA EDH-RSA-DES-CBC3-SHA RC2-CBC-MD5
DES-CBC-MD5 DHE-RSA-AES128-SHA EXP-DES-CBC-SHA RC4-MD5
DES-CBC-SHA DHE-RSA-AES256-SHA EXP-EDH-DSS-DES-CBC-SHA RC4-MDRC4-SHA
DES-CBC3-MD5 DHE-RSA-CAMELLIA128-SHA EXP-EDH-RSA-DES-CBC-SHA RC4-SHA
DES-CBC3-SHA DHE-RSA-CAMELLIA256-SHA EXP-RC2-CBC-MD5
Login, session and password protection 11
Security Configuration
– All browser windows (or tabs) that are logged into the Backup & Recovery Manager are closed, and not re-opened for 30 minutes or more
– Internet access is lost for more than 30 minutes
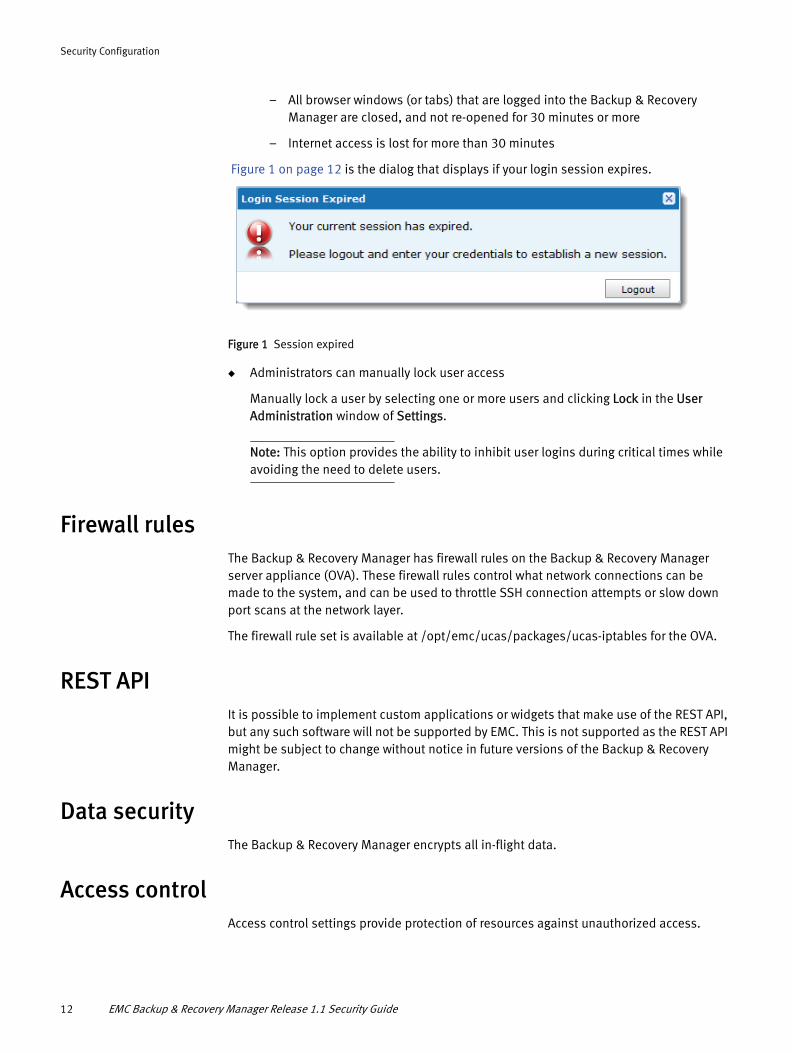
Figure 1 on page 12 is the dialog that displays if your login session expires.
Figure 1 Session expired
◆ Administrators can manually lock user access
Manually lock a user by selecting one or more users and clicking Lock in the User Administration window of Settings.
Note: This option provides the ability to inhibit user logins during critical times while avoiding the need to delete users.
Firewall rulesThe Backup & Recovery Manager has firewall rules on the Backup & Recovery Manager server appliance (OVA). These firewall rules control what network connections can be made to the system, and can be used to throttle SSH connection attempts or slow down port scans at the network layer.
The firewall rule set is available at /opt/emc/ucas/packages/ucas-iptables for the OVA.
REST APIIt is possible to implement custom applications or widgets that make use of the REST API, but any such software will not be supported by EMC. This is not supported as the REST API might be subject to change without notice in future versions of the Backup & Recovery Manager.
Data securityThe Backup & Recovery Manager encrypts all in-flight data.
Access controlAccess control settings provide protection of resources against unauthorized access.
12 EMC Backup & Recovery Manager Release 1.1 Security Guide
Security Configuration
Default accounts
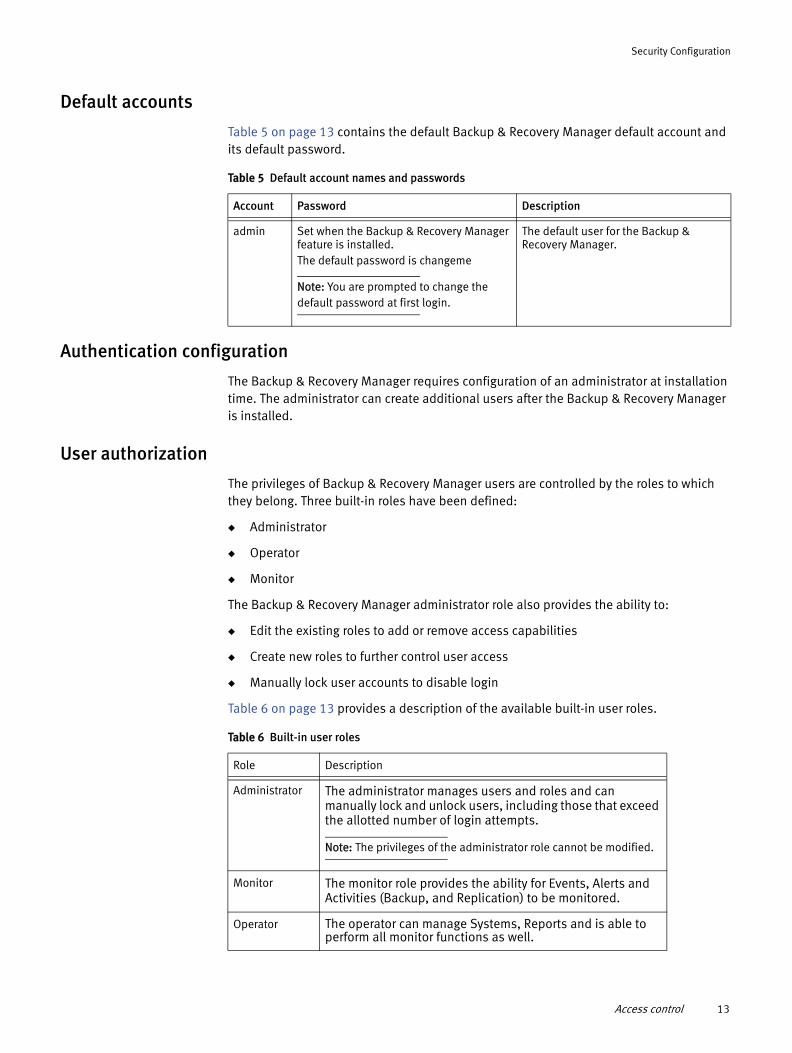
Table 5 on page 13 contains the default Backup & Recovery Manager default account and its default password.
Authentication configuration
The Backup & Recovery Manager requires configuration of an administrator at installation time. The administrator can create additional users after the Backup & Recovery Manager is installed.
User authorization
The privileges of Backup & Recovery Manager users are controlled by the roles to which they belong. Three built-in roles have been defined:
◆ Administrator
◆ Operator
◆ Monitor
The Backup & Recovery Manager administrator role also provides the ability to:
◆ Edit the existing roles to add or remove access capabilities
◆ Create new roles to further control user access
◆ Manually lock user accounts to disable login
Table 6 on page 13 provides a description of the available built-in user roles.
Table 5 Default account names and passwords
Account Password Description
admin Set when the Backup & Recovery Manager feature is installed. The default password is changeme
Note: You are prompted to change the default password at first login.
The default user for the Backup & Recovery Manager.
Table 6 Built-in user roles
Role Description
Administrator The administrator manages users and roles and can manually lock and unlock users, including those that exceed the allotted number of login attempts.
Note: The privileges of the administrator role cannot be modified.
Monitor The monitor role provides the ability for Events, Alerts and Activities (Backup, and Replication) to be monitored.
Operator The operator can manage Systems, Reports and is able to perform all monitor functions as well.
Access control 13

Security Configuration
Component access control
The following components of the Backup & Recovery Manager implement security features for access:
◆ Apache ActiveMQ Message Broker
◆ Apache Tomcat
◆ Mongo Database
Apache ActiveMQ Message BrokerAccess to the ApacheActiveMQ message bus and HTTP is controlled by SSL mutual authentication. In SSL, this is accomplished by exchanging certificates.
Apache TomcatApache Tomcat uses a certificate to authenticate itself to web clients.
Certificate management
Each Backup & Recovery Manager feature component that participates in SSL communications keeps its certificates in a Java KeyStore (JKS) file. The certificate is used for secure http access (https), and secure communication to the Backup & Recovery Manager adaptors.
“Key store” files contain certificates that components use to identify themselves as well as the certificates of entities they trust. Some components keep their certificates and the certificates of trusted entities in the same key store file while others keep the certificates of trusted entities in a separate file called a trust store. Although key store and trust store files have the same JKS format, the Backup & Recovery Manager feature trust store files have a .ts suffix whereas the key store files have a .ks suffix.
Note: JKS files can be managed with a Java tool called keytool. Keytool is part of the standard JDK, which is included in the Backup & Recovery Manager feature software.
In the Backup & Recovery Manager feature, there are JKS files for the following components:
◆ Message broker clients — containing a “key store” (and sometimes a “trust store”) containing certificates used for mutual authentication with the message broker
◆ Apache Tomcat — containing the certificate that Tomcat uses to authenticate itself to web clients
◆ Apache ActiveMQ message broker — containing a separate “key store” and “trust store” that are used for mutual authentication with clients
14 EMC Backup & Recovery Manager Release 1.1 Security Guide

Security Configuration
Table 7 on page 15 shows the location of the passwords for the key stores used by Apache Tomcat and ActiveMQ. The Backup & Recovery Manager file permissions are set to prevent access by anyone but the owner to read or modify them.
Web browser authentication using Apache
The Backup & Recovery Manager server and adaptors use the Apache web server to provide a secure web browser-based user interface. Web browser connections for these applications use secure socket layer/transport layer security (SSL/TLS) to provide authentication and data security.
When a web browser accesses a secure web page from an unauthenticated web server the SSL/TLS protocol causes it to display an authentication warning. An unauthenticated web server is one that does not authenticate itself using a trusted public key certificate.
The Apache web server provided with the Backup & Recovery Manager is installed with a self-signed certificate, not a trusted public key certificate. The self-signed certificate is sufficient to establish an encrypted channel between web browsers and the server, but it cannot be used for authentication. By using a secure second channel to verify the certificate’s fingerprint, authentication can be achieved with self-signed certificates.
If required, a self-signed certificate other than the one provided by EMC can be inserted. The certificate signing request (CSR) is used to apply for a trusted certificate. To provide server authentication, and thereby prevent web browser warnings complete the following tasks:
◆ “Task 1: Install a self-signed or trusted certificate”
◆ “Task 2: Create a private key”
◆ “Task 3: Generate a certificate signing request”
The tools used in these tasks are part of the OpenSSL toolkit. OpenSSL is provided with Backup & Recovery Manager.
Task 1: Install a self-signed or trusted certificate
IMPORTANT
Ensure that the trusted certificate is issued for the correct hostname. Configuring a hostname for the Backup & Recovery Manager appliance is a function that EMC cannot control and is the responsibility of the customer's IT department.
Table 7 Apache component passwords
Component JSK password location
Apache Tomcat apache-tomcat/conf/server.xml in the Connector element
Apache ActiveMQ apache-activemq/conf/activemq.xmlin the sslContext element
Access control 15

Security Configuration
To install either a self-signed, or trusted certificate for the Backup & Recovery Manager Apache database, perform the following:
1. Connect to the BRM server as the ucas user:
ssh ucas@SERVER -p1315
Note: The Backup & Recovery Manager server does not provide an ssh agent, use an ssh client of your choice and be sure to specify port 1315 as the port for command line ssh.
2. Change to root user:
su -
3. Save in a temporary location, the EMC-provided certificate files:
• ucasWebCert.pem
• ucas-web-private.key
4. Copy their own certificate files to /opt/emc/ucas/security.
5. Set the owner and group of the new certificate files to the following:
• Owner: ucas
• Group: ucas
6. Set the permissions of the new certificate files to 0644:
chmod 0644
7. Edit /opt/emc/ucas/apache-fips/conf/conf.d/ucas-sles-ssl-standalone.conf. Change references to the certificate files to point to the new certificate files.
8. Restart the Apache webserver.
Note: This procedure should only be performed by advanced system administrators with knowledge of Apache web browser authentication.
Task 2: Create a private key
A private key can be generated with pass phrase protection and without pass phrase protection. It can also be generated using a random key generation algorithm. Use the method that is appropriate for the level of security required by your organization.
To create a private key without a pass phrase and without additional randomness:
1. Open a command shell and log in to Backup & Recovery Manager server:
a. Log in to the server as admin.
b. Switch user to root by typing:
su -
16 EMC Backup & Recovery Manager Release 1.1 Security Guide
Security Configuration
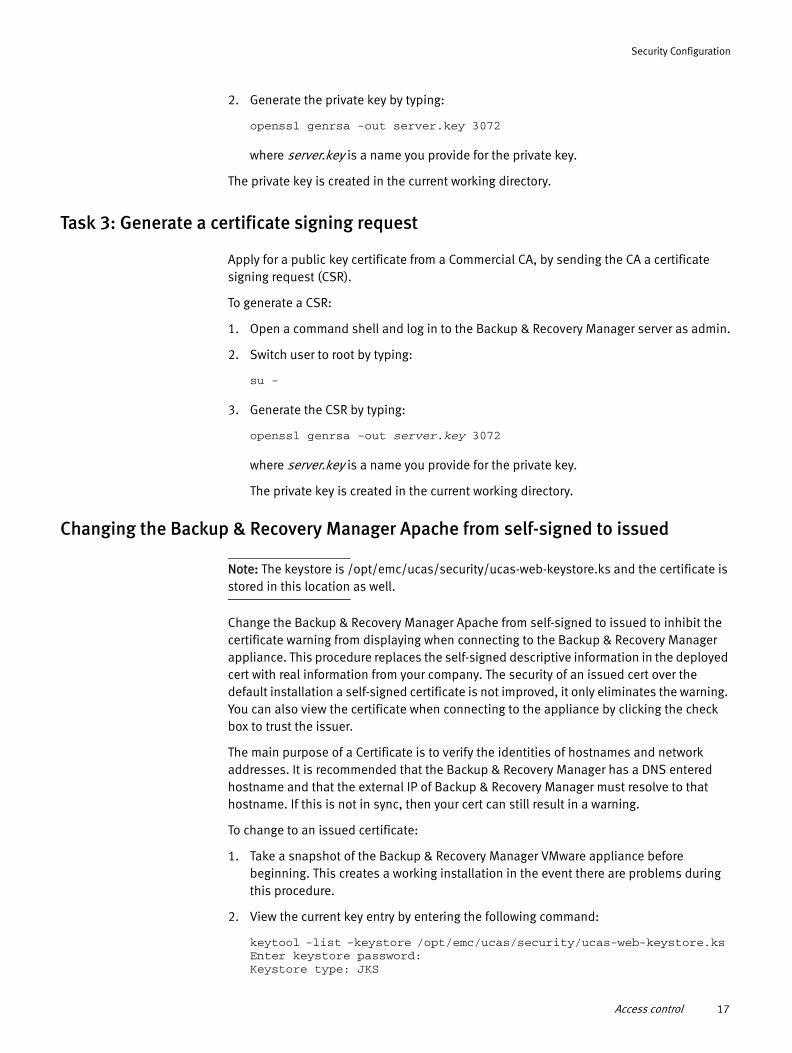
2. Generate the private key by typing:
openssl genrsa -out server.key 3072
where server.key is a name you provide for the private key.
The private key is created in the current working directory.
Task 3: Generate a certificate signing request
Apply for a public key certificate from a Commercial CA, by sending the CA a certificate signing request (CSR).
To generate a CSR:
1. Open a command shell and log in to the Backup & Recovery Manager server as admin.
2. Switch user to root by typing:
su -
3. Generate the CSR by typing:
openssl genrsa -out server.key 3072
where server.key is a name you provide for the private key.
The private key is created in the current working directory.
Changing the Backup & Recovery Manager Apache from self-signed to issued
Note: The keystore is /opt/emc/ucas/security/ucas-web-keystore.ks and the certificate is stored in this location as well.
Change the Backup & Recovery Manager Apache from self-signed to issued to inhibit the certificate warning from displaying when connecting to the Backup & Recovery Manager appliance. This procedure replaces the self-signed descriptive information in the deployed cert with real information from your company. The security of an issued cert over the default installation a self-signed certificate is not improved, it only eliminates the warning. You can also view the certificate when connecting to the appliance by clicking the check box to trust the issuer.
The main purpose of a Certificate is to verify the identities of hostnames and network addresses. It is recommended that the Backup & Recovery Manager has a DNS entered hostname and that the external IP of Backup & Recovery Manager must resolve to that hostname. If this is not in sync, then your cert can still result in a warning.
To change to an issued certificate:
1. Take a snapshot of the Backup & Recovery Manager VMware appliance before beginning. This creates a working installation in the event there are problems during this procedure.
2. View the current key entry by entering the following command:
keytool -list -keystore /opt/emc/ucas/security/ucas-web-keystore.ks Enter keystore password: Keystore type: JKS
Access control 17

Security Configuration
Keystore provider: SUNYour keystore contains 1 entryidhcp61.lss.emc.com, Aug 15, 2013, PrivateKeyEntry,Certificate fingerprint (SHA1): B4:17:93:30:41:AE:23:69:23:17:EC:27:1E:33:EA:08:F8:C9:A1:08
This displays the hostname previously configured for use with Backup & Recovery Manager.
3. Delete the default key entry:
keytool -delete -keystore /opt/emc/ucas/security/ucas-web-keystore.ks -alias idhcp61.lss.emc.com
The alias parameter should match the hostname of the Backup & Recovery Manager as shown in step 2 of this procedure.
4. Generate a new key pair for the new certificate.
keytool -genkeypair -keysize 3072 -alias idhcp61.lss.emc.emc -validity 1780 -keyalg RSA -ext san="DNS:idhcp61.lss.emc.com,DNS:idhcp61,IP:10.13.204.61,IP:127.0.0.1,DNS:localhost" -keystore ucas-web-keystore.ks
Enter keystore password: What is your first and last name? [Unknown]: fqdn_hostname_of_your_BRMWhat is the name of your organizational unit? [Unknown]: YOUR_ORG_UNITWhat is the name of your organization? [Unknown]: YOUR_COMPANYWhat is the name of your City or Locality? [Unknown]: YOUR_CITYWhat is the name of your State or Province? [Unknown]: YOUR_STATEWhat is the two-letter country code for this unit?[Unknown]: YOUR_COUNTRYIs CN=fqdn_hostname_of_your_BRM, OU=YOUR_ORG_UNIT, O=YOUR_COMPANY, L=YOUR_CITY, ST=YOUR_STATE,C=YOUR_COUNTRY correct? [no]: yes
For example, when generating the certificate use the fqdn, shortname, localhost and associated IP addresses as the subject and subject alternative name:
FQDN is idhcp61.lss.emc.comSHORTNAME is idhcp61ipaddress is 10.13.204.61LOCALHOST is 'localhost'LOCALHOST_IP is 127.0.0.1
At the command line, set the Subject Alternative Name = san, prefix DNS: before the hostnames, and IP: before any IP addresses.
5. Log in as the ucas user:
sh ucas@SERVER -p1315
6. Generate the certificate request (CSR):
keytool -certreq -keyalg RSA -alias idhcp61.lss.emc.com -keystore /opt/emc/ucas/security/ucas-web-keystore.ks -file /tmp/brm.csr
enter keystone password:changemecontent of /tmp/brm.csr:
18 EMC Backup & Recovery Manager Release 1.1 Security Guide

Security Configuration
-----BEGIN NEW CERTIFICATE REQUEST-----MIID2jCCAkICAQAwZTELMAkGA1UEBhMCVVMxCzAJBgNVBAgTAkNPMRMwEQYDVQQHEwpMb3Vpc3ZpbGxlMQwwCgYDVQQKEwNFTUMxDDAKBgNVBAsTA0JSUzEYMBYGA1UEAxMPQlJTIEVuZ2luZWVyaW5nMIIBojANBgkqhkiG9w0BAQEFAAOCAY8AMIIBigKCAYEAmFMN5s2hMVuJZjPYvVDIXFuMZOFcGRY0Dlksx76gTF08miWHe7AOhMy+WmN3Qczj9Zo6nm/uObroBtyyc1mYyfLA1T5qDP3JzKdIicG/Bi/kYYinauhtXpJbXlm2yrEASSvKV++cXYX32QYebkdkniNHj1I4DrdrbCZdPBE0YZcwM8AZGHdALYXllza7DgTW4A52LFwzH6DWz4MnBn8FZkP3udurZ6D0bFFKjNycw+rRaUfIwbXfy2pfgSH7H+3SfI7EufJeDTJlYeDaU7DFLQHdmrpG0tp23C0XSFyJWv+IUnet44FbLlHBE6d3XuaL/yXCFV1yY488iOJUa/SsRbFgUIzBKniTkHJFEdq9woJ1tUZjwxrINXhqM/PImOXFVhTuxeAzk19Oddd6DlfO06KtptBuWnic6/HgMLKWB/+XqXMrAS+6MtfDOkH2KHA+VceuLzBhFO6Y/MloxQ2QVZ6DBUkxH23/SK+9TYMHfipuA/AG+93lnOh2rqNZ7KGZAgMBAAGgMDAuBgkqhkiG9w0BCQ4xITAfMB0GA1UdDgQWBBRL7rbPOmW0goy/EgyWVVNTuPGmADANBgkqhkiG9w0BAQsFAAOCAYEAhcY8Zje3Gbk1PSxv6GQLHIdYvoRXNGujNJs0N6GEHud5BQKjVGde3vwtFxfOzuK0iPyz76QIQ+e+B50x1B+st1NPFzql8VrtT4MBIyDwFhQEDEDodKWqG7QTg4YVo8r0oC5HShiDe/IgTVZ6oa0g8j5PDxO0F4P3hw94FFpvXgoRh0sqykIYcLBjbboBbG/ClXWiFaGjSDD1Dj3K9sOtWJ+YyWXUIos+DZCBKgVf1TC77fGVpuTJzgD9ofSPFCXSvnzmpbFWhuFf1lC7NQtgmnZ6Gzld70M3K9m0kDmYZn/bJyAoEqyoBteDw2E0i/YOj+kIsGpojmvS6iKQ+gCt39IClBHu9l6U4oXK58lJ/EMGRWZrUxzsSxIXM3ydVhjc8SHZReqid/c3FQoXeDg7NKD90NzDOVupMoYRkNZmdzlm1dqLuvjvnjxxkCDFd04SCsaOBnbX1vnLj4jvHk0My3bBSiIBs9oEQ6oQ6vNklXMjRe1Ku9r10g78UjA55o4f-----END NEW CERTIFICATE REQUEST-----
7. Send the CSR to your certificate provider to issue a certificate and indicate that Apache SSL is the software from which the CSR was generated.
8. When you receive the new signed certificate, perform the following to prepare to swap certificates:
a. Shutdown web/tomcat services:
sudo service tomcat-ucas stop
b. Shut down the Backup & Recovery Manager web server:
sudo service apache-fips stop
9. Remove all existing certificates:
cd /opt/emc/ucas/securitydelete ucasWebCert.pemdelete ucasWebCert.cert
10. Perform the following for the signed certificate:
a. Rename the new certificate:
/opt/emc/ucas/security/ucasWebcert.pem
Access control 19

Security Configuration
b. Copy the certificate to the following location:
/opt/emc/ucas/security/ucasWebcert.cert
11. Regenerate the private key from the keystore:
java -cp /opt/emc/ucas/packages/ucas-model-jar-with-dependencies.jar com.emc.brsue.utils.DumpPrivateKey ./ucas-web-keystore.ks changeme idhcp61.lss.emc.com > /opt/emc/ucas/security/ucas-web-private.key
12. Set the permissions back to normal:
cd /opt/emc/ucas/securitysudo chown ucas:ucas *chmod 640 *
13. Import the CA cert:
sudo keytool -import -v -noprompt -trustcacerts -alias puppet.lss.emc.com -keystore /usr/java/ucasjre/lib/security/cacerts -file rootCA.pem
14. Restart the Backup & Recovery Manager Apache and Tomcat services:
# start tomcatsudo service tomcat-ucas start
# start apachesudo service apache-fips start
15. Verify that the Backup & Recovery Manager application has a new cert issued by your Certificate provider. This is rather than the default self-signed certificate.
# verify
16. If required, back this change out and revert to the original snapshot obtained in step 1 of this procedure:
# backout procedure
20 EMC Backup & Recovery Manager Release 1.1 Security Guide