Embedded HotSpot for Ricoh...
31
Embedded HotSpot for Ricoh MFP Installation and Configuration Guide © 2010 PrinterOn Corporation and Ricoh Americas Corporation
Transcript of Embedded HotSpot for Ricoh...

Embedded HotSpot for Ricoh MFP Installation and Configuration Guide © 2010 PrinterOn Corporation and Ricoh Americas Corporation

Print Release Appliance Installation and Configuration Guide 2 v1.4
The following terms are trademarks or registered trademarks of PrinterOn Corporation in Canada and other countries: PrinterOn, PrintWhere, PrintAnywhere, the Internet Printing Company, Print Simply Anywhere, the PrinterOn “bird”, the PrinterOn Logotype and the PrinterOn Signature. Other brands and their products are trademarks or registered trademarks of their respective holders and should be noted as such.
Copyright © 2010 PrinterOn Corporation and Ricoh Americas Corporation
Table of Contents
Print Release Appliance Installation and Configuration Guide 3 v1.4
1 Table of Contents
1 Table of Contents ..................................................................................... 3
2 Print Release Java App for Ricoh MFP overview .................................. 4
3 Before you begin ...................................................................................... 5 3.1 Verify installation requirements ............................................................................................... 5
4 Setting up the Print Release Java App ................................................... 6 4.1 Register the MFP that will use the Print Release Java App ...................................................... 6 4.2 Configure MFP for your PrintSpots™ portal at printeron.com ................................................... 8 Install the Print Release Java App ..................................................................................................... 11
5 Configuring Print Release Java App via web interface ....................... 15 5.1 Proxy Setting ........................................................................................................................ 15 5.2 Log ...................................................................................................................................... 16
6 Configure Ricoh Device Browser .......................................................... 22
7 Printing .................................................................................................... 27 7.1 Sending print jobs ................................................................................................................. 27 7.2 Retrieving print jobs .............................................................................................................. 28
8 Troubleshooting ..................................................................................... 30 8.1 Troubleshooting setup and network communication ............................................................... 30

Print Release Java App for Ricoh MFP overview
Print Release Appliance Installation and Configuration Guide 4 v1.4
2 Print Release Java App for Ricoh MFP overview This guide explains how to install and manage the Print Release Java App for Ricoh MFP.
This document assumes that you have familiarity with network configuration, including setting IP addresses, and working with DNS and DHCP servers, and proxy servers. You must also have Print Release Java App for Ricoh MFP software and the proper Ricoh Device Browser software ready to install on a supported MFP.
The Print Release Java App for Ricoh MFP is a compact, “plug and print” network application that provides easy and quick deployment of the Ricoh HotSpot Printing solution at your customer’s location. Once installed on the customer’s MFP, the Print Release Java App for Ricoh MFP auto-configures itself from the PrinterOn web site. Print jobs are securely downloaded from the PrinterOn web site and stored on the MFP. Users can release their print jobs using the Ricoh MFP touch-screen interface.
The Print Release Java App for Ricoh MFP uses a specialized embedded version of PrinterOn’s Print Delivery Station (PDS), which collects print jobs and releases them to your MFP. You can manage the Print Release Appliance PDS software via a web page interface.
Special note regarding the Embedded HotSpot MFP and the energy saving feature of the MFP: The Print Release Java App will not allow the MFP to enter “deep sleep” energy save mode. This is a known limitation and a future release is planned to address this limitation. If your customer requires that the MFP be permitted to enter “deep sleep” energy save mode, Ricoh also offers the HotSpot MFP Option which uses an external Print Release Appliance.
Before you begin
Print Release Appliance Installation and Configuration Guide 5 v1.4
3 Before you begin 3.1 Verify installation requirements Ensure that you have everything required to complete the installation:
o Print Release Java App with version
o MFP serial number, found on the configuration page of the MFP.
o PrintSpots™ Subscription Certificate from upgrade kit for registering the product
o New SD card containing version of the Ricoh Device Browser (Type B, D or E depending on the specific Ricoh MFP model)
o Network-connected Ricoh MFP o Installation requirements as reviewed with customer (Installation requirements
document is included in MFP upgrade kit along with Browser SD Card)

Setting up the Print Release Java App
Print Release Appliance Installation and Configuration Guide 6 v1.4
4 Setting up the Print Release Java App Before you set up the Print Release Java App, please review all of the requirements in the previous section.
To set up a Print Release Java App, you need to:
Article I. Locate the PrintSpots™ Subscription Certificate (included in the HotSpot MFP Integration Kit)
Article II. Register the HotSpot service at http://www.printeron.com/register-my-ricoh-service
Article III. Configure your PrintSpots™ service to use the Ricoh MFP
Article IV. Install the Print Release Java App and MFP Browser software
4.1 Register the MFP that will use the Print Release Java App Before you can set up the Print Release Java App, you must register the MFP at www.printeron.com/register-my-ricoh-service. An account has been created for each HotSpot MFP Integration Kit but you are required to enter the serial number from the sticker on the front of the white envelope that comes with the MFP upgrade kit. You must also include the customer name and a valid email address during the registration process and be able to open an automated email response to that account. The service will not be enabled until the link is opened inside the email response. The PrinterOn account owner will be the primary administrator of all printing services created within that account once registration is complete.
The HotSpot MFP Registration Service is available 24/7. To register a new MFP from a computer with Internet access, proceed as follows:
1. Open your Web browser. 2. Go to: http://www.printeron.com/register-my-ricoh-service
3. Select the option for registering the EMBEDDED MFP
4. Read Terms and conditions of use, and then click [Accept].
5. Complete all required fields, then click [Submit].

Setting up the Print Release Java App
Print Release Appliance Installation and Configuration Guide 7 v1.4
Note: A confirmation email is sent to the specified email address. 6. The recipient (email address specified in registration page) must follow the instructions in the email in order to complete the registration process. This includes a link that must be opened to complete the registration process. 7. The recipient (email address specified in registration page) will receive a confirmation email to confirm the registration process has been completed.
Number from sticker on front of white envelope

Setting up the Print Release Java App
Print Release Appliance Installation and Configuration Guide 8 v1.4
4.2 Configure MFP for your PrintSpots™ portal at printeron.com This procedure explains only the most common options you need to set when adding a Ricoh MFP. After you verify that your printing service is working correctly, the customer can further modify the printer settings to suit their needs by following the steps outlined in the Operation Manual.
1. Open your Web browser.
2. Go to: https://www.printeron.net/administrators.
Important: To ensure that your service is updated correctly, do not make changes to your service in multiple browser windows.
3. Click PrintSpots, [Manage my service].
Setting up the Print Release Java App
Print Release Appliance Installation and Configuration Guide 9 v1.4
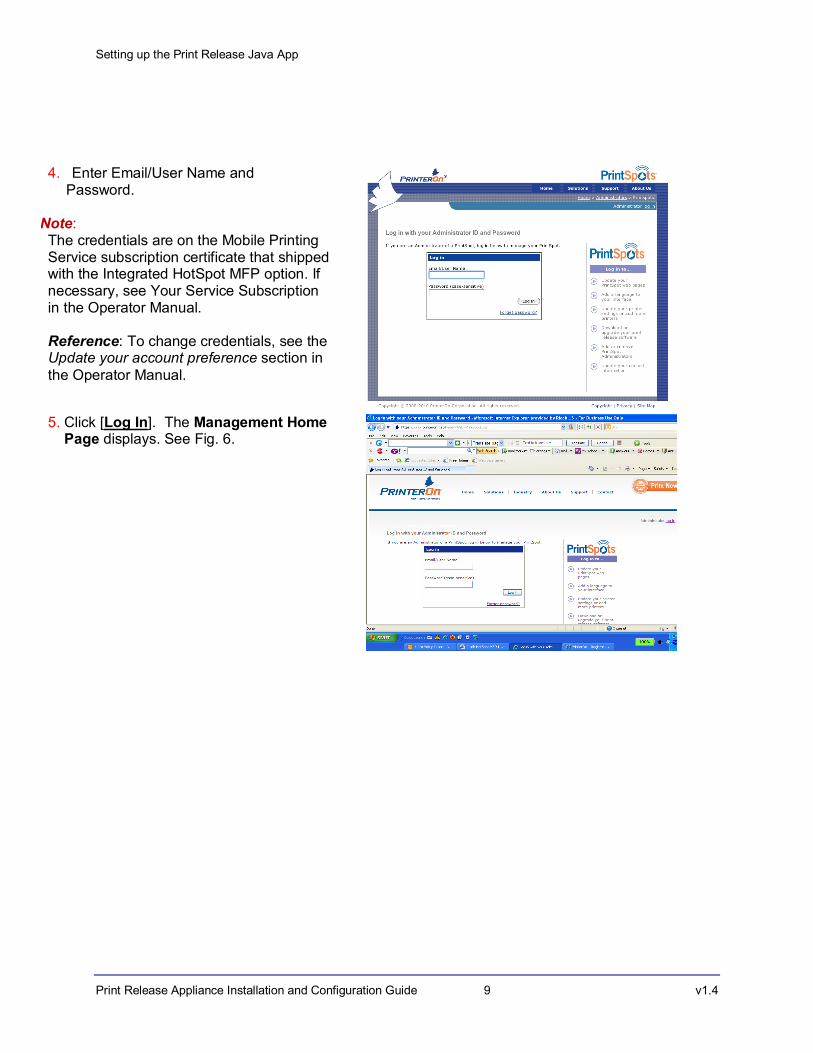
4. Enter Email/User Name and Password.
Note: The credentials are on the Mobile Printing Service subscription certificate that shipped with the Integrated HotSpot MFP option. If necessary, see Your Service Subscription in the Operator Manual. Reference: To change credentials, see the Update your account preference section in the Operator Manual.
5. Click [Log In]. The Management Home
Page displays. See Fig. 6.

Setting up the Print Release Java App
Print Release Appliance Installation and Configuration Guide 10 v1.4
To complete the Portal setup:
6. The Print Release Java App has already been pre-configured in the PrintSpot™ printing service management
page, but you must enter the MFP serial number.
7. On your PrinterOn printing service management page, click Software .
8. Under PDS type, Ricoh HotSpot Printer should already be selected.
9. Confirm the Machine ID listed on this page matches the label on the PrintSpots certificate. Remove the Machine ID and enter the serial number of your MFP. It is listed as the Unit Number on the device configuration page.
10. Click Save. (NOTE: If the Save button is unavailable, all changes have already been saved).
Setting up the Print Release Java App
Print Release Appliance Installation and Configuration Guide 11 v1.4
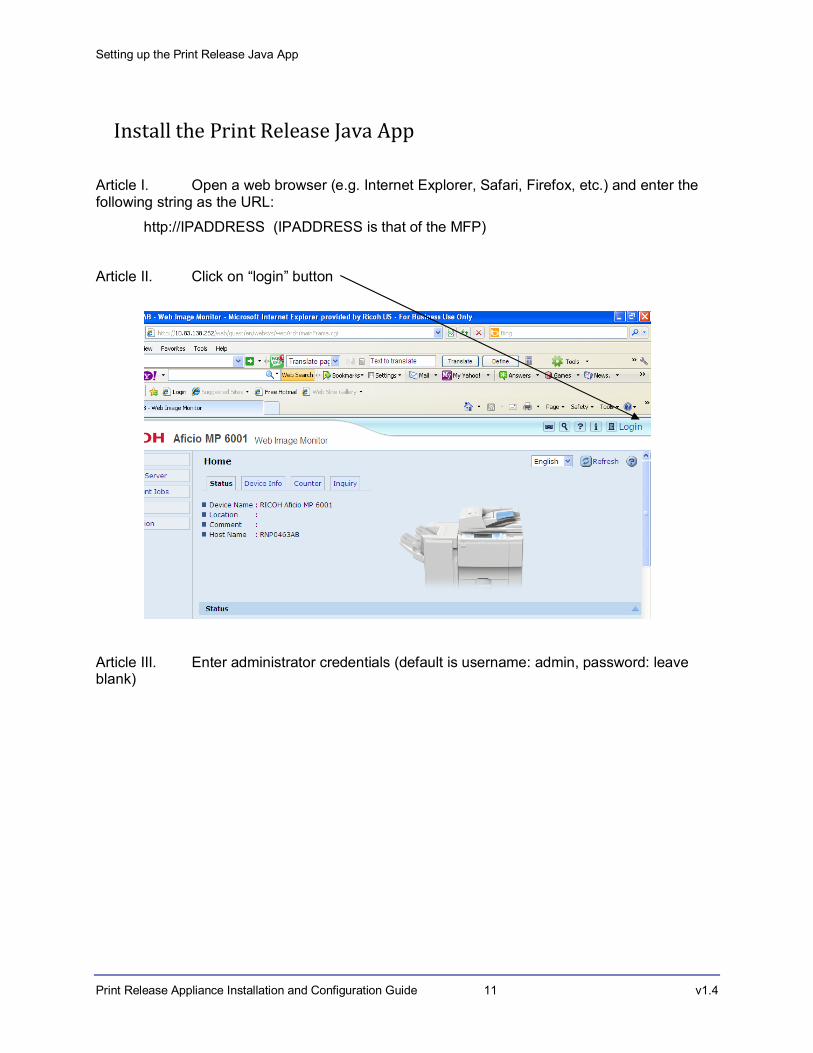
Install the Print Release Java App
Article I. Open a web browser (e.g. Internet Explorer, Safari, Firefox, etc.) and enter the following string as the URL:
http://IPADDRESS (IPADDRESS is that of the MFP)
Article II. Click on “login” button
Article III. Enter administrator credentials (default is username: admin, password: leave blank)

Setting up the Print Release Java App
Print Release Appliance Installation and Configuration Guide 12 v1.4
Article IV. Select link for configuration
Article V. Under Extended Feature Settings, choose install.

Setting up the Print Release Java App
Print Release Appliance Installation and Configuration Guide 13 v1.4
Article VI. Select local file and browse to the zip file containing the print release java application. Select Display Extended Feature List.
Article VII. To complete the Print Release Java App installation, select to install to hdd, auto start, and click radial button next to HotSpot Java App. After making the selection choose Install.

Setting up the Print Release Java App
Print Release Appliance Installation and Configuration Guide 14 v1.4
Article VII. After selecting Install the following screen will be displayed. Select OK to continue. The installation will complete. Press the back button to return to the Admin page of Web Image Monitor. You may restart the MFP and continue on to configure the java application for any special network needs such as proxy server configuration. Otherwise skip to Section 7 to install the browser software.

Configuring Print Release Java App via web interface
Print Release Appliance Installation and Configuration Guide 15 v1.4
5 Configuring Print Release Java App via web interface The Print Release Java App has a web page interface console for configuring operator access, changing network and proxy settings, and viewing the log file. This interface can be accessed in any web browser. To open the Print Delivery Station Administration console: Article I. Open the PDS privacy release page. In your web browser, go to http://<localhost>:8080/printeron/PDSJSP, where <localhost> is the IP address of the Print Release Appliance device.
1. At the top of the page, click on Login button.
2. When prompted enter the default login credentials (User ID = hotspot, Password = printeron) and click Log In.
To log out of the console: Click the LOG OUT button at the top right.
The Administration console 3 areas of interest: User List Management, Proxy Settings and Log Settings.
The User List Management allows you to change the Super Administrator password and to define local Operators, if required. Ricoh does not support or recommend the use of Administrators and Operators accounts as this will open a security hole could possibly allow unauthorized release of secure print jobs without release codes. DO NOT ALTER ANY SETTINGS ON THIS PAGE EXCEPT TO CHANGE THE ADMIN PASSWORD!!! To change an Admin password:
Edit the text in the Password field and click Save. 5.1 Proxy Setting The Proxy Tab allows you to configure the Print Release Application to work in network situations where all traffic has to go through an HTTP Proxy. For network proxies that do NOT use these particular features, the configured values on the Proxy Tab are ignored, so the default values do not need to be changed. To enable use of a Proxy: Article I. Check the Enable HTTP Proxy option.
1. Select either Use Web Proxy Automatic Discovery or Use Manual Configuration. Use Web Proxy Automatic Discovery allows you to attempt automatic detection of proxy configuration information on your local network using automatic detection protocols.
2. Discover or configure the required proxy settings. The available configuration settings for Proxy are described below.
3. Click Save and Test.

Configuring Print Release Java App via web interface
Print Release Appliance Installation and Configuration Guide 16 v1.4
Use Web Proxy Automatic Discovery - Enable this option to use automatic proxy detection protocols.
Discover Now – Click Discover Now to attempt to find a Proxy. If a Proxy is found and communication with the PrinterOn web site is successful, a “success” or “OK” message is displayed beside Proxy Resolution.
Manual Configuration (see below) must be used for authenticating proxies (those that require username/password credentials). For non-authenticating proxies, any username/password data is ignored.
Use Manual Configuration – Enable this option to configure a proxy manually.
Proxy Address – Specify the IP address or FQDN for your Proxy.
Proxy Port – Enter the communication port for your Proxy.
User Name and Password/Re-enter Password – Enter the User Name and Password for proxies which require Authentication.
Save and Test – Click to save all settings and test your proxy configuration.
5.2 Log The Log tab allows you to set the log level and to view the log file.
Click on a log file button to view the log for the indicated time period. The button label indicates creation time of the log. For example, Director20080514044114.276.log was created on 2008 05 14 at 04 hours 41 minutes 14.276 seconds. Print Release Appliance’s real time clock is set to UTC and does not use Daylight Saving Time. To set the log level:
Select the log level FINE in the drop down list and click Save Log Level.

Configuring Print Release Java App via web interface
Print Release Appliance Installation and Configuration Guide 17 v1.4
6 Install Ricoh Device Browser

Configuring Print Release Java App via web interface
Print Release Appliance Installation and Configuration Guide 18 v1.4

Configuring Print Release Java App via web interface
Print Release Appliance Installation and Configuration Guide 19 v1.4

Configuring Print Release Java App via web interface
Print Release Appliance Installation and Configuration Guide 20 v1.4

Configuring Print Release Java App via web interface
Print Release Appliance Installation and Configuration Guide 21 v1.4
12. Turn the system off and back on. Leave the SD Card in the machine until after the browser configuration is complete

Configure Ricoh Device Browser
Print Release Appliance Installation and Configuration Guide 22 v1.4
7 Configure Ricoh Device Browser
Configure Ricoh Device Browser
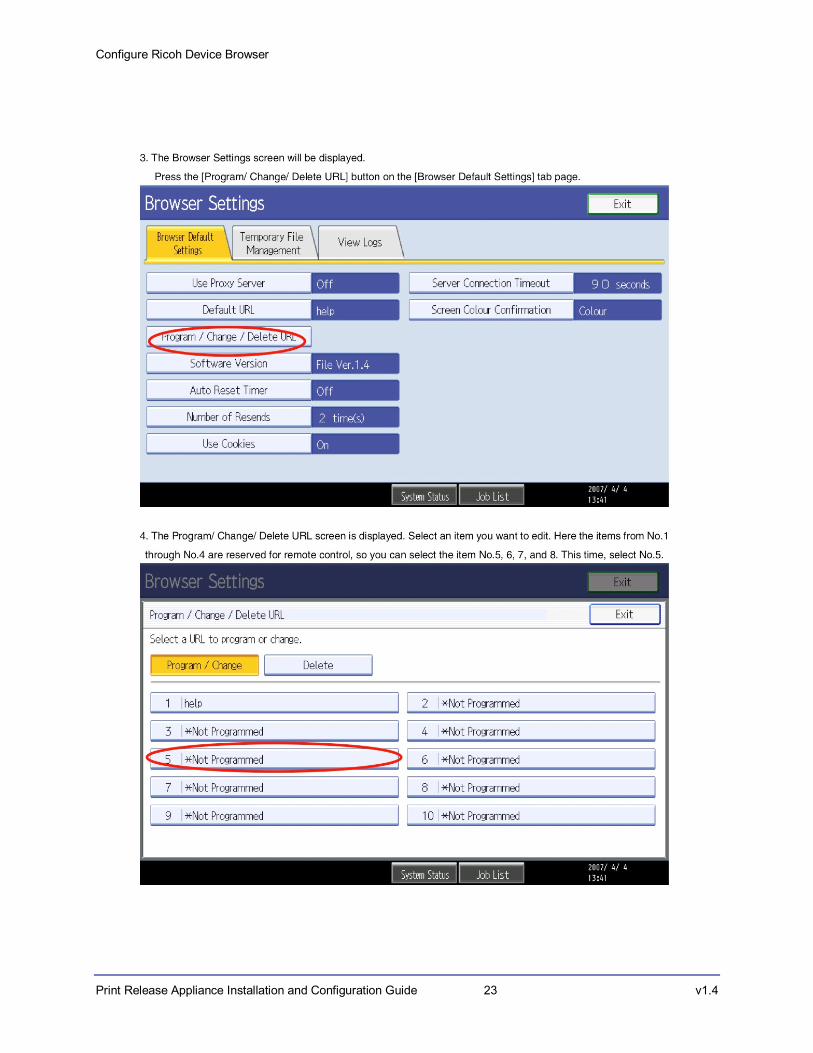
Print Release Appliance Installation and Configuration Guide 23 v1.4

Configure Ricoh Device Browser
Print Release Appliance Installation and Configuration Guide 24 v1.4
5. The Program/Change URL screen is displayed. Press the [Change] button and specify the URL name and the URL, then press the [next] button
6. The download file settings for pull-printing can be set on this page. Change auto delete to 3 days and the default character set to UTF-8. Press OK

Configure Ricoh Device Browser
Print Release Appliance Installation and Configuration Guide 25 v1.4
7. To specify the default URL, press the [Default URL] button on the Browser Settings screen.
7. The list of URLs registered with the Device Browser is displayed. Select the URL you want to specify as the defualt URL.

Configure Ricoh Device Browser
Print Release Appliance Installation and Configuration Guide 26 v1.4
You may now power off the machine and remove the Browser SD Card. The following step is optional and you should wait to remove the card if you choose to make HotSpot a default view on the MFP.

Printing
Print Release Appliance Installation and Configuration Guide 27 v1.4
8 Printing The following sections give brief instructions on how your users can print via a web browser or via email to your HotSpot enabled MFP(s) and how to retrieve print jobs at your device. 8.1 Sending print jobs Users can submit print jobs to your HotSpot MFP(s) through a web interface or via email. To print via a web browser: Article I. In a web browser, go to your printing service web page (for example, http://www.printeron.net/ricoh/700000).
1. If your printing service has more than one printer, select the one you would like to use in the available printers list. You will see details on the currently selected device.
2. Click Browse to locate the file on your computer that you want to print or enter the URL of the web page that you want to print.
3. Click Next. The document is uploaded for processing.
4. After the document processing completes, make note of the Release Code and set Remember your Release Code; you need it to retrieve your print job.
5. . Your documents are now ready to retrieve at the MFP.
To print via email: Article I. Forward your email message, and any attachments, to the email address assigned to the device. The email address for your printer can be found on the Printer Settings page in your PrintSpots
web services account. In your account, click Printers and then click on the name of the printer. Look for the Email address field on the Required Info tab, under “Using your printer with PrintWhere and Email Printing”. The email address will be similar to [email protected] and ensure that “Enable Email Printing” is checked.
1. Wait for a reply email from PrinterOn.
2. The reply email contains your Release Code. You need this code to retrieve your print job.

Printing
Print Release Appliance Installation and Configuration Guide 28 v1.4
8.2 Retrieving print jobs
Print jobs are generally held at the Print Release Appliance until a user enters their security Release Code on the Ricoh MFP touch-screen interface.
To retrieve your print jobs: Article II. Press the Printer key repeatedly until the Print Release screen is displayed:
2. Touch the empty box just below Privacy Release Code to enable data entry mode.
3. Enter your Release Code on either the touch-screen keypad or the 10-key area.
4. Touch “OK” on the touch-screen keypad.
5. Attributes are displayed with the number of jobs that match that release code, and the total number of pages.

Printing
Print Release Appliance Installation and Configuration Guide 29 v1.4
6. To confirm and print, select each item and then press Print on the touch-screen.
7. You can now retrieve your printouts from the Ricoh MFP.

Troubleshooting
Print Release Appliance Installation and Configuration Guide 30 v1.4
9 Troubleshooting If you have any problems installing your Print Release Java App or Browser software, please review the following troubleshooting information before contacting the Ricoh Solutions Hotline. 9.1 Troubleshooting setup and network communication Slow startup Problem: The Print Release Java App takes longer than five minutes to start up.
Symptoms: After five minutes, the Print Release Java App cannot be accessed on the local area network.
Solution: Power cycle the MFP. Attempt the power up sequence again. Make sure network settings are correct. Specifically Proxy settings as they will cause very slow startup if entered incorrectly. If proxy settings are entered incorrectly (or not at all) it may take some time for the PDSJSP webpage to become available. The proxy connections must time out first so be patient. It is best to configure the device with a laptop without being connected to the customer network when first entering proxy settings.
No network communication Problem: No communication to the network.
Symptoms: The network activity light beside the Ethernet connector does not illuminate or is not green.
Solution: Verify that the Ethernet cable is functioning. Verify that the cable is connected to a functioning Ethernet hub or switch. Follow standard network troubleshooting procedures for network MFP.
MFP Device Browser cannot be configured Problem: MFP Device Browser shows installed by cannot be configured and DOSS or other application has been installed.
Symptoms: MFP Device Browser successfully installs to HDD but does not show up in User Tools under Extended features. Solution: Power off MFP, then place MFP Device Browser SD card into any available SD card slot, power on MFP, try again. Be sure not to remove SD card until AFTER the device has been restarted and the browser software configured.
MFP Device Browser cannot connect Problem: MFP device browser does not connect to release page.
Symptoms: Device browser shows: Could not connect to URL or URL was not found.
Solution: Open user tools, extended features, browser settings, and select the second tab for temporary file settings. Set browser to use temporary files. Exit user tools and verify browser will now access release page.
Troubleshooting
Print Release Appliance Installation and Configuration Guide 31 v1.4
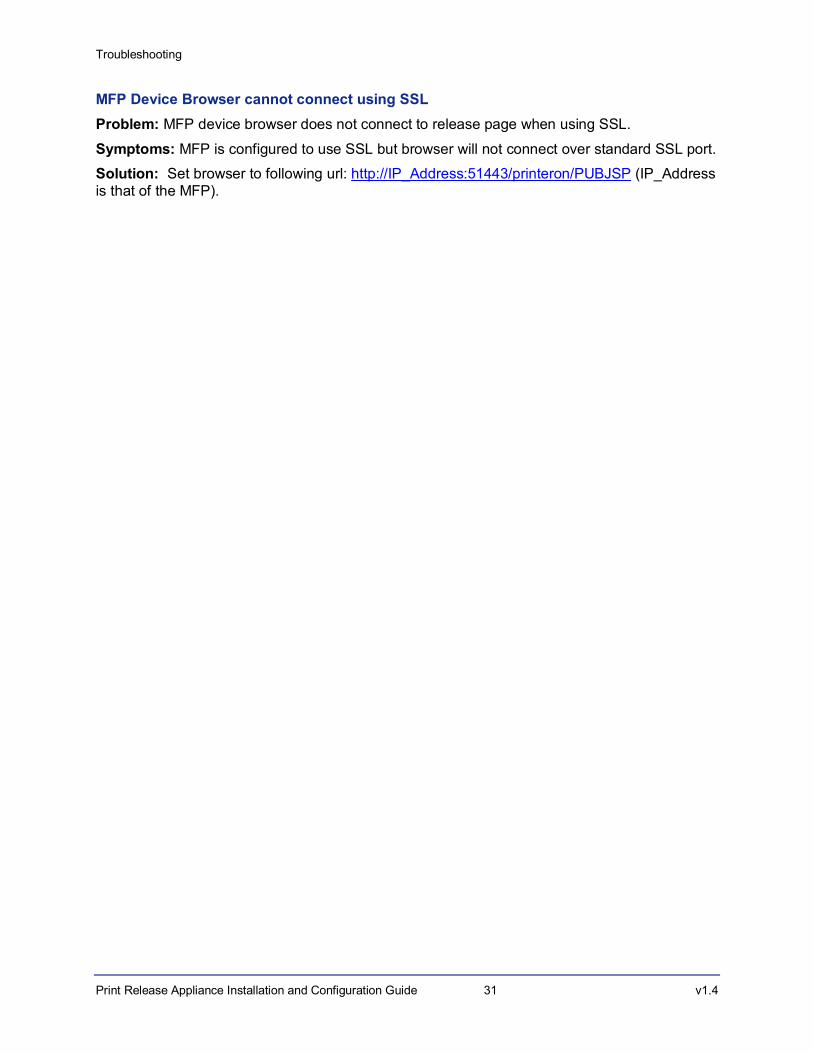
MFP Device Browser cannot connect using SSL Problem: MFP device browser does not connect to release page when using SSL.
Symptoms: MFP is configured to use SSL but browser will not connect over standard SSL port.
Solution: Set browser to following url: http://IP_Address:51443/printeron/PUBJSP (IP_Address is that of the MFP).