Embedded Computer - Lilliput official...
28
Embedded Computer User Manual
Transcript of Embedded Computer - Lilliput official...

Embedded Computer User Manual

Safety maintenance:
Please maintain your system properly to make sure its service life and reduce the damage risk.
It should avoid the humidity and extreme temperature when being used.
Avoid prolonged exposure of the unit to direct sunlight or strong ultraviolet light.
Do not drop the unit or let it be in any place with severe shock / vibration.
Please avoid the collision as the LCD screen is very easy to be scratched. Do not use any
sharp object to touch the screen.
To clean the outside fuselage, please turn off the power, unplug the power cord, scrub /
wipe with slightly damp soft cloth. When cleaning the screen, please wipe with the lint free
soft cloth.
Never attempt to disassemble or repair the machine, otherwise the unit may be damaged.
Do not place your unit or accessories together with other flammable liquids, gases, or other
explosive materials, to avoid danger.
Please unplug the power plug and remove the built-in battery if long-term no-use, or
thunder weather.

Content
1. Product Description......................................................................................................................11.1. Brief Introduction..............................................................................................................11.2. Optional Functions.............................................................................................................11.3. Basic Parameters................................................................................................................1
2. Structure Function Explanation....................................................................................................23. Extended Cable Definition............................................................................................................44. Settings for Serial Port by manual................................................................................................4
4.1. Definition for Serial Port Connection:...............................................................................44.2. Serial Port setting...............................................................................................................5
5. Instructions for 3G Card & TF Card.............................................................................................66. Testing for GPIO & CAN.............................................................................................................8
6.1. Console Login.............................................................................................................8
6.2. Application Software..................................................................................................8
6.3. Interface Application................................................................................................12
7. Accessories.................................................................................................................................17

YP-01160723

1
1. Product Description
1.1. Brief Introduction
7", 16:9 Digital touch wide screen, 800×480 physical resolution, with rich colors;
Comply with IP 64 Waterproof Standard;
Linux3.14.52 + Debian 8 operation system;
Micro SD (TF) card storage, making the data reading reliable, and daily expansion
convenient;
1.2. Optional Functions
GPS Receiver (external);
Wi-Fi 802.11 b/g/n & Bluetooth (built-in);
3G Modem Module (built-in);
Bluetooth(built-in);
CAN bus×2;
2200mAh Li-ion battery (built-in);
1.3. Basic Parameters
Configuration Parameters
System hardware
CPU: Freescale iMX.6 Quad core 800MHz;Flash: 8GB NAND FLASH;SDRAM: 1G (Optional 2G) DDR3 RAM;LAN: Ethernet100/100M (RJ45);
Interfaces
Micro SD(TF) card;USB Device 2.0×1, USB host 2.0×1;Earphone output port;DC power input;4×RS232 interfaces; (optional RS485 / RS422 interfaces);4×GPIO inputs, 6×GPIO outputs;
Touch Panel Capacitive
2
1
Display 7″ LED Backlit
Screen Resolution 800×480 (1152000 pixels)
Brightness 450cd/㎡Contrast 500:1
Viewing Angle 140°/ 120° (H/V)
Power supply DC 9-36V
Power Consumption (Normal mode)
≤9W
Power Consumption (Charging mode)
≤24W
Working Temperature -10℃ - 65℃Storage Temperature -25℃ - 80℃Dimension (LWD) 220 × 132 × 36.5 (mm)
Weight 830g
2. Structure Function Explanation
1.Power on/off button: Short press to power on the unit; Long press 3 seconds
to power off.
Red LED light: Battery charging.
Green LED light: Battery charging completed or connecting with DC adapter.
2.Backlight control: Adjust screen brightness among 5 levels.
3.Volume +: Increase the volume.
4.Volume -: Decrease the volume.

3
2
5.Capacitive Screen.
6.Speaker.
7.Front Camera (optional)
:
Take
photo; : Exit; : View photo album; : Next photo;
: Previous photo; : Return to take photo; : Delete photo;
1. Mini USB port: To connect with mini USB cable. (Not Available for Linux OS).
2. 3G card slot: Insert 3G SIM card to connect with wireless network.
3. Micro SD (TF) card slot: Insert micro SD (TF) card to store pictures and other data.
4. Earphone jack: to connect with stereo headphone
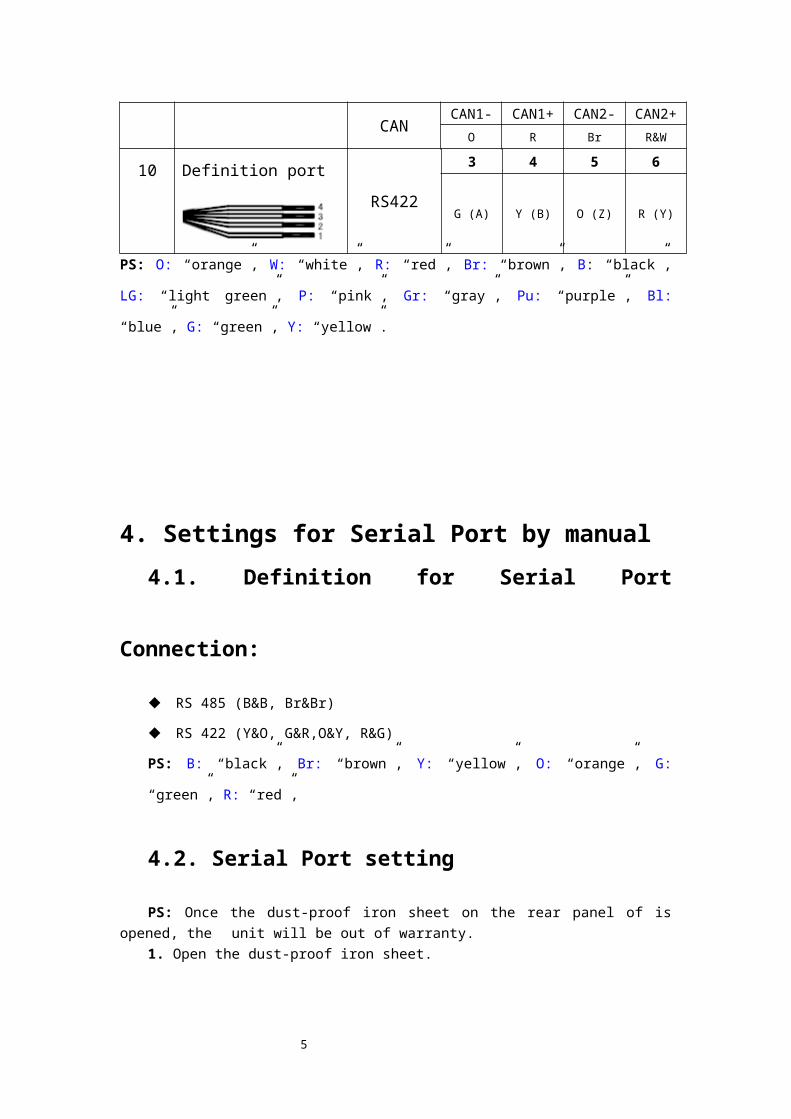
3. Extended Cable DefinitionNo. Item Specification
1 Convertor To connect with device cable2 Com 1 serial port RS232 serial port3 Com 2 serial port RS232 serial port or GPS port4 Com 4 serial port RS232 or RS422 serial port switch5 Serial port RS232 or RS485 serial port switch6 USB host port For data transmitting7 LAN port For network connection8 Power To connect with DC adapter9 Gpio port Gpio input 1 2 3 4

4
3
(0~5V)Gpio_57 Gpio_82 Gpio_87 Gpio_92
Br&W B&W LG P
Gpio output(0V or 5V)
5 6 7 8 9 10Gpio
_93
Gpio
_191
Gpio
_9
Gpio
_171
Gpio
_174
Gpio
_175
W Gr Pu Bl G Y
Gpio GND11B
CAN13 14 15 16
CAN1- CAN1+ CAN2- CAN2+
O R Br R&W
10 Definition port
RS422
3 4 5 6
G (A) Y (B) O (Z) R (Y)
PS: O: “orange”, W: “white”, R: “red”, Br: “brown”, B: “black”, LG: “light green”, P: “pink”, Gr:
“gray”, Pu: “purple”, Bl: “blue”, G: “green”, Y: “yellow”.
4. Settings for Serial Port by manual
4.1. Definition for Serial Port Connection:
RS 485 (B&B, Br&Br)
RS 422 (Y&O, G&R,O&Y, R&G)
PS: B: “black”, Br: “brown”, Y: “yellow”, O: “orange”, G: “green”, R: “red”,
4.2. Serial Port setting
PS: Once the dust-proof iron sheet on the rear panel of is opened, the unit will be out of warranty.
1. Open the dust-proof iron sheet.

5
4
2. Please find SW3 and SW33 adjustment control buttons on the main board, arrow mark is also shown on the main board.
COM3: Slide SW3 button to arrow mark to switch RS485, opposite to switch RS232. COM4: Slide SW33 button to arrow mark to switch RS422, opposite to switch RS232.
5. Instructions for 3G Card & TF Card
The 3G card, memory card and the card connectors on the device are
precision electronic components. When inserting the 3G card or memory card into the
card connectors, you much insert after aligning to the position accurately in case of
damaging the components. When removing the 3G card or memory card, please
slightly push the upper edge of the card to loosen the card, then pull it out.
The memory card will get heat after long time working. It is a normal phenomenon.
The data stored on the memory card may be damaged if the card is not used correctly,
or the power is cut off or the card is pulled out when reading data.
6
5
If you don’t use 3G card correctly, or cutting off the power or pulling out the 3G card
during the operation, the network will be interrupted automatically.
If you do not use micro SD card for a long time, please put it into packing box or bag.
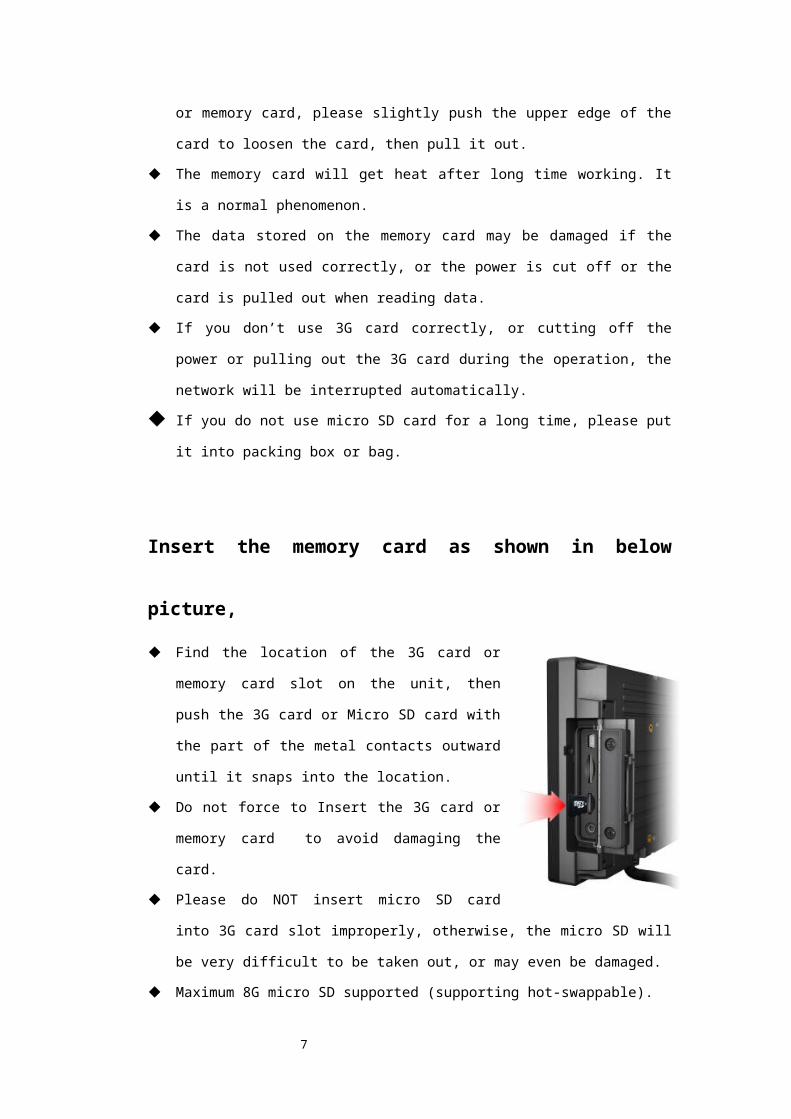
Insert the memory card as shown in below picture,
Find the location of the 3G card or memory card slot on
the unit, then push the 3G card or Micro SD card with
the part of the metal contacts outward until it snaps into
the location.
Do not force to Insert the 3G card or memory card to
avoid damaging the card.
Please do NOT insert micro SD card into 3G card slot
improperly, otherwise, the micro SD will be very difficult
to be taken out, or may even be damaged.
Maximum 8G micro SD supported (supporting hot-
swappable).
Testing method: In the state of power-on, the screen will automatically display the TF card
content after inserting the TF card, the screen will automatically close its window when
pulling out the TF card, its path is under “/media/TF card name/”.
Operation for TF card
Once power-on, the screen will automatically display the TF card content after inserting the
TF card, its path is under “/media/TF card name/”. Shown as below,

7
6
6. Testing for GPIO & CAN
Basic Operations
6.1. Console Login
① The product is connected to the PC COM1.
TF card path
8
7
② Setting up the PC serial port parameters as shown in Figure 1.
Figure 1
③ Username: root Password:(leave it blank). Login successful shown in Figure 2
Figure 2
6.2. Application Software
1、Soft keyboard Florence Virtual Keyboard shown in Figure 3.
Application Menu-->Accessories.Function buttons area are shown in the left of keyboard including hidden, set, move,
zoom in, zoom out.

9
8
Figure 3
2、Network settings: Wick Network Manager shown in Figure 4.
Application Menu-->Internet-->Wick Network Manager. Click on the task bar shown in Fig. 4 to open quickly.
Figure 4
Network: SSID Switch off Wi-Fi/Switch on Wi-Fi : on/off Wi-Fi.Disconnect All: Disconnect all connections.Refresh: Refresh the list to scan network.
It indicates the wired network. It indicates the wireless network.

10
9
Preferences: Set up as shown in Figure 5. Default setting: General Settings: Wireless interface=wlan1 Wired interface = eth0 External programs: DHCP Client=dhclient Other set Automatic Advanced Settings: Driver= nl80211 Backend=external
Disconnect:Disconnected Network. Connect: Connect Network. Properties:Shown in Figure 6. Setting IP, DNS, wireless passwords.
3、Browser: Bluetooth Manager shown in Figure 7.
Application Menu-->Internet-->Iceweasel.
Figure 7
Figure 5
Figure 6

11
10
4、Bluetooth: Bluetooth Manager shown in Figure 8.
Application Menu-->Settings-->Bluetooth Manager.
Click on the task bar to turn on Bluetooth quickly as shown in Fig.8.
Bluetooth device:Adapter: Visibility settings, the Bluetooth name set.
: Find a Bluetooth device. : Select the device to match. : Equipment Trust settings. : Remove the device. : Send File.
Figure 8
5、Multimedia shown in Figure 9.
Application Menu-->Multimedia.

12
11
Figure 9
6.3. Interface Application
1. RS232/RS485/RS422 run CuteCom application shown in Figure 10. Application Menu-->Other-->CuteCom.
Figure 10
Device : Input the device node / dev / ttymxc * by soft keyboard, please
refer to the connection interface selection and select the interface Remarks. Correspondence between the RS232 interface and the device node:

13
12
COM1 =/dev/ttymxc0 COM2 =/dev/ttymxc1
COM3 =/dev/ttymxc4COM4 =/dev/ttymxc3
Correspondence between the RS485 interface and the device node:RS485 =/dev/ttymxc4
Correspondence between the RS422 interface and the device node:RS422=/dev/ttymxc3
2. SIM card signal status strength see Figure 11. Application Menu-->Other-->3G.
Insert the SIM card from the SIM card location, reboot the system.
Figure 11
3、File Manager shown in Figure 12.
Insert TF card or USB flash disk, it will automatically pop-up and . Double-click the icon to open, or open from the Application . Application Menu-->File Manager.

14
13
Figure 12 Remarks: Mounted with file manager first when Access to external memory.
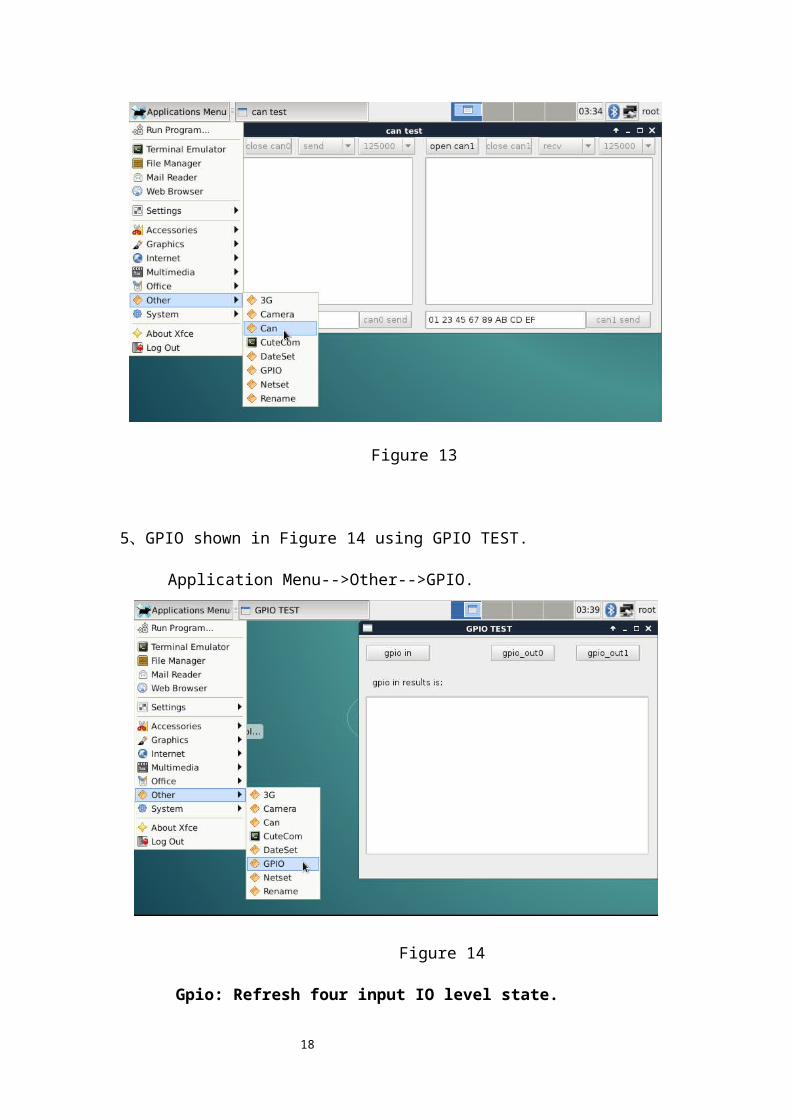
4、CAN bus CAN TEST shown in Figure 13.
Application Menu-->Other-->Can. Status settings: receive(recv), send(send). Baud rate settings: Default 125,000;
Figure 13
5、GPIO shown in Figure 14 using GPIO TEST.
Application Menu-->Other-->GPIO.

15
14
Figure 14Gpio: Refresh four input IO level state.Gpio_out 0: 6 IO output high level 5V.Gpio_out 1: 6 IO output low level 0V.
6、USB interface
Test function: USB HOST, USB MINI, Normal use, hot plug.
Test Methods: USB HOST interfaces are inserted into the mouse and keyboard,
if plug and play enabled; The screen will automatically display the contents inside if USB flash disk inserted, and the screen window will automatically turn off if plugged out, path at “/media/ USB flash disk name/” which means this function works; USB MINI: It can be used for refreshing the program, indicating that
this function is normal.
7、Network Port Test
Test function:Test unit via Ethernet 100 / 1000M (RJ45), it can access to the
Internet normally.
Test Methods:As shown in the following figure, click Start -> select "Other" ->
select "netset".

16
15
Double-click to open the following network configuration screen,
In the following figure after enter the IP address, gateway and DNS, Click OK to exit the screen. Then click "OK" for a network connection.After connected to the network. Open your browser and enter the URL, as shown below, to the Internet.

17
16
7. Accessories
Standard accessories:
1. Extended cable 1piece 2. DC 12V adapter 1piece3. Mini USB cable 1piece4. CD driver with SDK (N/A) 1piece

18
17
5. Capacitive Touch pen 1piece6. User Manual 1copy
Optional accessories:
1. GPS antenna 1piece (connect with COM2 port on the extended cable)
2. 75mm VESA rail slot 1piece3. 75mm VESA folding bracket 1piece4. 2200mAh Li-ion battery 1piece (built-in)5. Micro SD (TF) card 1piece
Due to constant effort to improve products and product
features, specifications may change without notice.
19
18