EM7160 - Evaluation Module for CDM7160 Instruction … manual(en... · USB memory stick (to install...
12
Rev. 02 EM7160 - Evaluation Module for CDM7160 Instruction Manual Table of Contents 1. Overview 2. Parts and Specifications 3. Setting the Method of Serial Communication 3-1) Switch settings for I2C bus mode 3-2) Switch settings for UART interface 3-3) Attaching CDM7160 4. Installing the Measurement Data Management Software and USB Driver 4-1) Installing the USB driver 4-2) Installing the measurement data management software 4-3) Installing Framework 3.5 SP1 4-4) Uninstalling the measurement data management software 5. Using EM7160 with the Measurement Data Management Software 5-1) Initial setting of the measurement data management software and measurement data collection 5-2) Saved data files 5-3) CO2 concentration chart created in Excel 6. How to Use EM7160 without Connecting to a Computer 7. Notes 7-1) Connection between EM7160 and a computer 7-2) Error messages of the measurement data management software
Transcript of EM7160 - Evaluation Module for CDM7160 Instruction … manual(en... · USB memory stick (to install...

Rev. 02
EM7160 - Evaluation Module for CDM7160
Instruction Manual
Table of Contents
1. Overview
2. Parts and Specifications
3. Setting the Method of Serial Communication
3-1) Switch settings for I2C bus mode
3-2) Switch settings for UART interface
3-3) Attaching CDM7160
4. Installing the Measurement Data Management Software and USB Driver
4-1) Installing the USB driver
4-2) Installing the measurement data management software
4-3) Installing Framework 3.5 SP1
4-4) Uninstalling the measurement data management software
5. Using EM7160 with the Measurement Data Management Software
5-1) Initial setting of the measurement data management software and measurement data collection
5-2) Saved data files
5-3) CO2 concentration chart created in Excel
6. How to Use EM7160 without Connecting to a Computer
7. Notes
7-1) Connection between EM7160 and a computer
7-2) Error messages of the measurement data management software

2
1. Overview
The EM7160 is an evaluation module that permits easy evaluation of the characteristics of the
CDM7160 carbon dioxide (CO2) sensor module. The module is equipped with a USB connector to
output CO2 concentration measurement data, a terminal for output of the concentration signal in PWM
format, and a terminal for output of a voltage signal converted from PWM output. After installing the
measurement data management software in an external computer and connecting EM7160 with the
included USB cable, this module can be powered through the USB cable. As measurement data output
is transferred to the computer, a chart of CO2 concentration is displayed on the computer monitor in
real time.
2. Parts and Specifications
Figure 1 - Parts
Specifications
Model no. EM7160
Name Evaluation module for CDM7160
Target gas Carbon dioxide
Input power supply via USB connector or 5.0 VDC
USB output 0 to 10,000 ppm CO2 (Note 1)
PWM output (1 kHz) duty ratio of 0 to 100% (corresponding to 0 to 5,000 ppm CO2)
Voltage output 0 to 5 V (corresponding to 0 to 5,000 ppm CO2)
Alarm output CMOS output (High at 1,000 ppm or more, Low at less than 900 ppm)
(Note 1)
Operating temperature/
humidity conditions 0C to 50C, 0 to 95% RH (without condensation)
Dimensions Approx. 50 x 55 x 19.6 mm (excluding protruding portion)
The height includes spacer and CDM7160 mounted.
Standard accessories CDM7160 CO2 sensor module (with pin terminals) x 1
USB memory stick (to install the measurement data management
software and USB driver) x 1
Mini-B USB cable x 1
Communication mode setting switches: SW2 SW3 SW4
5-VDC power supply input terminal
(power supply voltage
monitor terminal)
USB terminal
Ground (GND)
LED (TXD)
LED (RXD)
PWM output Alarm output Voltage output
Power supply switch (SW1)
Connectors for sensor attachment
CN2
CN1
Ground (GND)

3
Specifications of Measurement Data Management Software:
Supported OS: Japanese version of Windows® 7 and Windows® 8
English version of Windows® 7 (Note 2, Note 3)
Monitor screen display: Chart display (0~5000 ppm), CO2 concentrations (0~10,000 ppm)
Data file format: CSV file
Data recording interval: 2 seconds, 30 seconds, 60 seconds, 5 minutes, 10 minutes,
30 minutes, or 60 minutes
Data recording capacity: Measurement data for about 24 hours max. in a single file.
Note 1) For specifications of the CDM7160, see the CDM7160 Product Information.
Note 2) Windows and Excel are registered trademarks of Microsoft Corporation.
Note 3) Although the operation of the measurement data management software was tested on the
above operating systems, proper operation of this software is not guaranteed.
3. Setting the Method of Serial Communication
The I2C bus or UART interface can be chosen for serial communication between the CDM7160 CO2
sensor and this evaluation module.
Set the serial communication method by using the communication mode selection switches on the
EM7160 module before connecting the USB cable or the power supply.
Caution‼ Before changing the serial communication setting, be sure to turn off the power
switch (SW1) by setting it to the lower position as shown in Fig. 2.
3-1) Switch settings for I2C bus mode
Set switches SW2, SW3, and SW4 (1 to 4) as follows:
SW2, SW3: Set to I2C position (lower position as seen in Figure 2).
SW4-1, SW4-2: Set to ON position (upper position as seen in Figure 2).
SW4-3, SW4-4: Set to OFF position (lower position as seen in Figure 2).
Figure 2 - I2C Communication Setting
LED: TXD
LED: RXD
SW2 SW3 SW4
SW1

4
3-2) Switch settings for UART interface
Set switches SW2, SW3, SW4 (1 to 4) as follows:
SW2, SW3: Set to UART position (upper position as seen in Figure 3)
SW4-1, SW4-2,
SW4-3, SW4-4: Set to OFF position (lower position as seen in Figure 3).
Figure 3 - UART Communication Setting
3-3) Attaching CDM7160
The included CDM7160 sensor module is attached to the EM7160 evaluation module at the factory.
When replacing the CDM7160 or removing and remounting it, match the pin # of connectors CN1
and CN2 on EM7160 with the corresponding pin # of the CDM7160 (Figure 4).
Caution‼ Before mounting or removing CDM7160, be sure to turn off the power switch (SW1)
by setting it to the lower position as shown in Fig. 4.
Note) The standard CDM7160 CO2 sensor module is not equipped with pin terminals for connection.
If you purchase additional CDM7160 sensor modules, solder commercially available pin
terminals to the CDM7160 and mount onto the evaluation module.
Figure 4 - Attachment of CDM7160
Power supply (SW1)
LED: RXD
LED: TXD
SW2 SW3 SW4
Pin No.1
CDM7160
USB cable

5
4. Installing the Measurement Data Management Software and USB Driver
Before installing the USB driver, check the version of Windows OS on your computer by following
the description on the Microsoft website.
Microsoft website:
(1) Check the version of Windows:
https://answers.microsoft.com/en-us/windows/wiki/windows_10-windows_install/how-to-find-o
ut-the-version-of-windows-that-you/9cd9df62-b195-4875-8b9c-76dcc37aef65
(2) Check whether the Windows OS is a 32-bit version or a 64-bit version:
https://support.microsoft.com/en-us/kb/827218
Caution‼ Do not connect the evaluation module to the computer before completing
installation of the USB driver.
4-1) Installing the USB driver
Install the USB driver (FT232R-USB) from the included USB flash drive to the computer. The following
procedure and figures are for Windows 7. The procedure and screen display will vary according to the
version of Windows OS.
1. Open the [USB Driver] folder on the USB flash drive and double-click the applicable icon:
(1) 32-bit version of Windows OS
Double-click "dpinst-x86.exe."
(2) 64-bit version of Windows OS
Double-click "dpinst-amd64.exe."
2. When the license agreement is displayed, check the terms and conditions, select [I agree],
and click the [Next] button. Installation will commence.
3. When the USB driver is completely installed, click the [Finish] button to close the installation
screen.
4. Connect the USB terminal on the evaluation module to the USB port on the computer using
a USB cable (included).
5. Turn on the power switch SW1 of EM7160 and confirm that the USB driver is recognized on
the computer screen.
6. Open "Control Panel" from the "Start Menu" and select "View devices and printers."

6
7. Right-click the "FT232R USB UART" USB driver icon and select "Properties" (Figure 5).
Figure 5 - USB Driver Icon on the “View devices and printers” screen
8. Click the "Hardware" tab on the "Properties" screen and check the displayed COM port
number (Figure 6). Write down this number as this is necessary for initial setup of the data
management software. (See Sec. (5-1) (5) ).
Figure 6 - COM Port No.
4-2) Installing the measurement data management software
Copy the folder named "Conc Measure" from the USB flash drive and paste it to the desired
location on the computer (e.g. desktop).
Open the "Conc Measure" folder on the computer and confirm that “ConcMeasure.exe” and
ConcMeasure.exe.config file are present.
Measurement data management software executable file icon:
ConcMeasure.exe

7
4-3) Installiing Framework 3.5 SP1
If .NET Framework 3.5 SP1 software is not installed on your computer, download it from the
following Microsoft website:
(Japanese version)
https://www.microsoft.com/ja-jp/download/details.aspx?id=22
(English version)
http://www.microsoft.com/en-us/download/details.aspx?id=22
4-4) Uninstalling the measurement data management software
Delete the folder that contains the following two files from the computer:
- ConcMeasure.exe
- ConcMeasure.exe.config
5. Using EM7160 with the Measurement Data Management Software
After installing the measurement data management software and USB driver (FT232R-USB) on the
computer, connect EM7160 to the computer using a mini B-USB cable. In this way, CO2 concentration
and measurement data can easily be collected by the CDM7160 CO2 sensor module.
5-1) Initial setting of the measurement data management software and measurement data collection
(1) Mount the CDM7160 sensor module onto the EM7160 (see Sec.3-3)
(2) Connect the EM7160 to the computer with a mini B-USB cable.
The EM7160 is powered through the USB cable.
(3) Turn on the power switch (SW1) on EM7160 (see Fig. 7).
(4) Double-click the icon for the data management software
(ConcMeasure.exe) as installed on the computer to display
the startup screen shown in Figure 8.
Figure 7
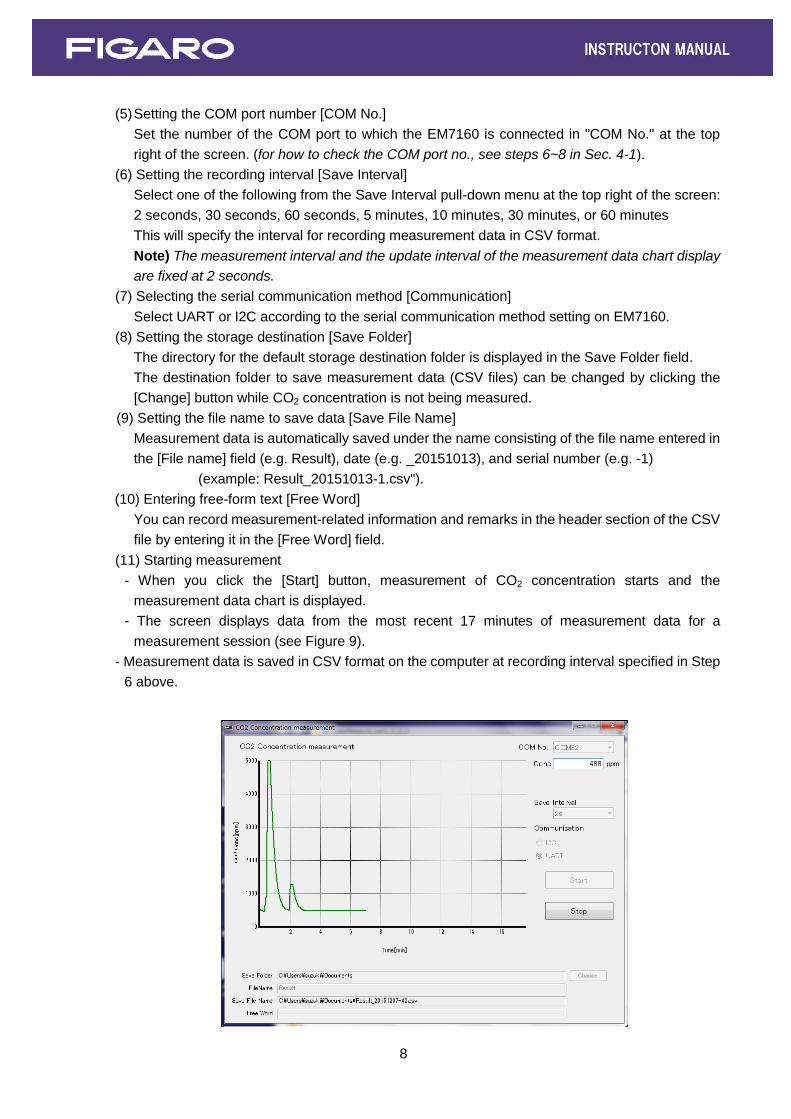
Figure 8 - Startup Screen
SW1 (power switch)
↑ ON ↓
OFF
8
(5) Setting the COM port number [COM No.]
Set the number of the COM port to which the EM7160 is connected in "COM No." at the top
right of the screen. (for how to check the COM port no., see steps 6~8 in Sec. 4-1).
(6) Setting the recording interval [Save Interval]
Select one of the following from the Save Interval pull-down menu at the top right of the screen:
2 seconds, 30 seconds, 60 seconds, 5 minutes, 10 minutes, 30 minutes, or 60 minutes
This will specify the interval for recording measurement data in CSV format.
Note) The measurement interval and the update interval of the measurement data chart display
are fixed at 2 seconds.
(7) Selecting the serial communication method [Communication]
Select UART or I2C according to the serial communication method setting on EM7160.
(8) Setting the storage destination [Save Folder]
The directory for the default storage destination folder is displayed in the Save Folder field.
The destination folder to save measurement data (CSV files) can be changed by clicking the
[Change] button while CO2 concentration is not being measured.
(9) Setting the file name to save data [Save File Name]
Measurement data is automatically saved under the name consisting of the file name entered in
the [File name] field (e.g. Result), date (e.g. _20151013), and serial number (e.g. -1)
(example: Result_20151013-1.csv").
(10) Entering free-form text [Free Word]
You can record measurement-related information and remarks in the header section of the CSV
file by entering it in the [Free Word] field.
(11) Starting measurement
- When you click the [Start] button, measurement of CO2 concentration starts and the
measurement data chart is displayed.
- The screen displays data from the most recent 17 minutes of measurement data for a
measurement session (see Figure 9).
- Measurement data is saved in CSV format on the computer at recording interval specified in Step
6 above.

9
Figure 9 - Measurement Data Display Example
(for how to display the storage destination and how to change the storage destination or storage
file name, see Sec. 5-2)
(12) Completion of measurement
Click the [Stop] button to terminate measurement.
When measurement is completed, measurement data is saved in the CSV format.
* Before attaching or removing the sensor module (CDM7160), be sure to turn off the
power switch (SW1).
5-2) Saved data files
(1) As a default setting, measurement data is saved in a CSV file in the Documents folder.
The Document folder can be browsed as follows:
- Windows 7:
Left-click Start Menu ⇒ Select Document
- Windows 8:
Right-click the Start button ⇒ Explorer ⇒ Select Document in the folder area
(2) The storage destination can be changed as follows when CO2 concentration is being not
measured:
- Folder name: Click the [Change] button at the right of the Save Folder field.
- File name: Directly enter the new file name in the File Name field.
(The default file name is "Result.")
The actual saved file name and its directory are displayed in the Save File Name field.
"_YYYYMMDD-N.csv" is automatically added after the file name displayed in the File Name field.
- YYYY: The Western calendar year (four digits) on the computer clock.
- MM: Month (two digits) on the computer clock
- DD: Day (two digits) on the computer clock
- N: Serial number beginning with 1 is automatically added.
* Measurement data covering about 24 hours can be stored in one file. If the measurement time
exceeds 24 hours, additional data is saved in a different file name (with serial number=N + 1).
(3) Saved CSV files can be imported to spreadsheet software such as Excel® to edit and
manipulate them after measurement is completed (Figure 10).

10
Figure 10 - Screen example of a CSV File opened in Microsoft Excel®
As shown in Figure 10:
● Rows 1 to 3: Name of the measurement data management software
Measurement day, start time
Recording interval (Save Interval)
● Rows 4 to 9: Entered free-form text
● Rows 11 or after:
- Column A: Sampling nos. for measured data are serially recorded from 0.
- Column B: Measured CO2 concentration (in ppm) is recorded in order.
5-3) CO2 concentration chart created in Excel
Figure 11 shows an example where the change in CO2 concentration is displayed in chart form using
the CSV file to which data is saved at a 30 second interval.
- Column D: The elapsed time (in seconds) is calculated by multiplying the sampling
numbers in Column A by 30.
- Column E: The CO2 concentration in Column B is used as is.

11
Figure 11 - Example of CO2 Concentration Chart
6. How to Use EM7160 without Connecting to a Computer
When using the EM7160 without connecting to a computer, connect the 5-VDC power supply between
the power supply input terminal and the ground terminal (see Figure 1).
- The PWM output terminal outputs the PWM output signal from CDM7160 with a cycle of 1 kHz.
The PWM duty ratio of 0 ~ 100% corresponds to the CO2 concentration of 0 ~ 5,000 ppm.
- The voltage output terminal outputs the concentration signal obtained by converting the PWM output
into voltage. The output voltage of 0 ~ 5 V corresponds to the CO2 concentration of 0 ~ 5,000 ppm.
- The alarm output terminal outputs the CMOS signal according to the CO2 concentration.
At standard CDM7160 settings, CMOS output is High when the CO2 concentration is 1,000 ppm or
higher, and output is Low when the CO2 concentration is less than 900 ppm.
7. Notes
7-1) Connection between EM7160 and a computer
- Be sure to mount the CDM7160 onto EM7160 before connecting EM7160 to a computer.
- Do not remove CDM7160 from EM7160 while EM7160 is connected to a computer.
- Do not remove the cable connecting EM7160 and a computer while CO2 concentration is being
measured by the measurement data management software.

12
7-2) Error messages of the measurement data management software
If an error message is displayed, check the following items:
(Note that the details of the error message may vary depending on the location and cause of error)
(1) Error message: [It failed on COM Port Open.]
- Check that the COM port setting is correct on the data management software.
"FT232R USB UART" should be displayed in Device Manager.
- Confirm that CDM7160 is properly mounted on EM7160.
(2) Error message: [It failed when Lamp Interval couldn’t get in I2C Communication.]
[Failed on Lamp Interval Data!]
- The serial communication method specified on the evaluation board does not match the
communication method selected on the data management software screen.
*The EM7160 evaluation module is an evaluation tool for the CDM7160.
This module is not designed to be embedded in other devices.
These specifications are subject to change without notice for functional improvement.
Figaro Engineering Inc.
1-5-11 Senba-nishi, Minoh, Osaka 562-8505 JAPAN
Tel: (81) 72-728-2561
e-mail: [email protected]
URL: www.figaro.co.jp