ELITE CROSSOVER - racedigitaldelay.com · Elite Crossover is small, it still offers the many of the...
63
- 1 - www.RaceDigitalDelay.com ELITE CROSSOVER Instruction Manual
Transcript of ELITE CROSSOVER - racedigitaldelay.com · Elite Crossover is small, it still offers the many of the...

- 1 -
www.RaceDigitalDelay.com
ELITE
CROSSOVER
Instruction
Manual

- 2 -
The
ELITE CROSSOVER
From
DIGITAL DELAY
2036 Fillmore Street
Davenport Iowa 52804 563-324-1046 www.RaceDigitalDelay.com
Congratulations on your purchase of the Elite
Crossover delay box from Digital Delay. Even though the
Elite Crossover is small, it still offers the many of the same
features found in our larger Delay Boxes like the Mega 450,
Elite 600, and the Elite 700. This means the Elite Crossover
is a very versatile and powerful Delay Box.
The Elite Crossover may seem overwhelming at first.
But even if you have never owned a Delay Box, the layout of
the screens, and the commonality of how data is entered and
viewed on the screens, eases the learning process of the Elite
Crossover.
The Elite Crossover comes with an external Relay
board and a 6.5 foot cable to connect them. If you require a
longer cable for your application please call Digital Delay.
Digital Delay also offers a wiring kit for the Elite
Crossover to help with the installation. Please call or check
our website for more information.

- 3 -
Basic Overview
The Elite Crossover is really two Delay Boxes in one,
a Bracket Delay Box and a Pro Delay Box each with their
own independent screens and settings. There are up to
twelve Bracket Mode screens and up to eleven Pro Mode
screens.
The Elite Crossover has the capability to run three 2-
Stage Timers at one time. The 2-Stage Timers are labeled
Timer 1, Timer 2, and Timer 3. Each of the Timers has its
own set of settings for both Bracket and Pro Modes.
The Elite Crossover can also shift the vehicle by time
or RPM, up to five shifts. Here again, the shifter has
separate shift points for both Bracket and Pro Mode.
The Startling Line Enhancer (S.L.E.) now has its own
output. In Pro Mode the S.L.E. now has a fixed Hold Time.
This allows the Transbrake solenoid to fully set before the
engine goes to full throttle. The all new S.L.E. Starting Line
Mode allows the driver to select if the Transbrake Button
will also set the S.L.E. or not.
The Line Lock has its own output and the Burn-out
feature allows the Line Locks to be activated during a burn-
out for a pre-set amount of time. The Line Lock Starting
Line Mode allows the driver to select if the Line Locks will
engage along with the Transbrake solenoid or not.
Along with being able to Tap Up and Down in the
same pass, the Elite Crossover has a Multi Tap feature. That
allows large amounts of time to be subtracted from the first
Delay started.
The Elite Crossover also has our Set and Go
pushbutton mode. Allowing all timing to start on the press
of the Transbrake button, instead of the release.
The Driver’s Reaction Tester has an LED for
practicing, giving the most realistic reaction times possible.
The Elite Crossover also keeps track of and displays your
average while practicing.

- 4 -
ELITE CROSSOVER Table of Contents
Basic Overview of the Elite Crossover…..………… Page 3
Getting Started……………………….…………..… Page 9
Initial Setup of the Elite Crossover...….…....…….... Page 10
Setting Setup Mode Screens……………………….. Page 10
Setup Mode Screens
Tap / Multi Tap Count……………..………. Page 11
Tap Up and Tap Down Amount…………… Page 12
Multi Tap Amount ……….…....…………... Page 13
How Late………....………………………… Page 14
Push-button Mode and Safety Lockout..........Page 15
S.L.E. Control……………………………… Page 16
Line Lock Control……………………..…… Page 17
Shift Control……………………………… Page 18
Timer 1, 2, and 3…..……..……………….... Page 19
P.T.S.O. Control………………………….... Page 20
Contrast…...…….....……………..……….... Page 21
Bracket Mode Screens Settings
Dial-ins………………………………..……. Page 22
Delay 1 and Delay 2………...……………… Page 23
Stage Times for Timers 1, 2, and 3..……….. Page 24
Time / RPM and Shift Point……………...... Page 25
Tach and Number of Cylinders…………….. Page 26
Driver’s Reaction Tester…............................ Page 27
Pro Mode Screens
Pro Screen………………………..……….... Page 28
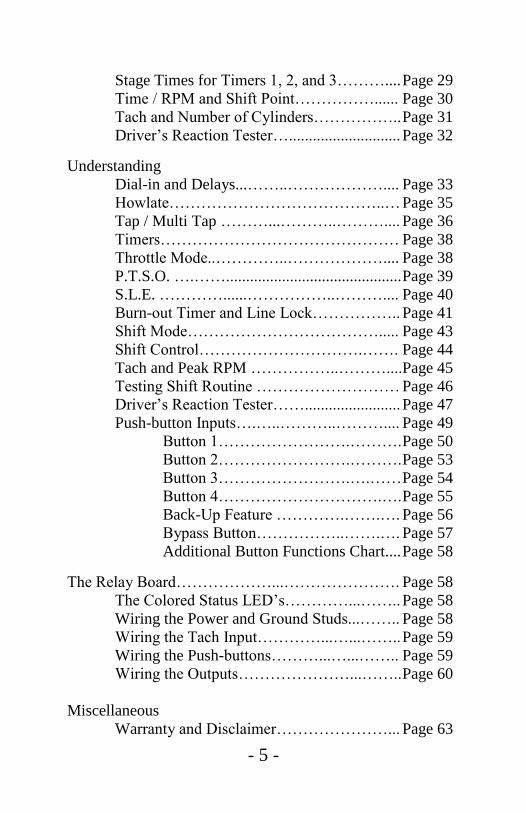
- 5 -
Stage Times for Timers 1, 2, and 3……….... Page 29
Time / RPM and Shift Point……………...... Page 30
Tach and Number of Cylinders…………….. Page 31
Driver’s Reaction Tester…............................ Page 32
Understanding
Dial-in and Delays...……..……………….... Page 33
Howlate…………………………………..… Page 35
Tap / Multi Tap ………...………..……….... Page 36
Timers……………………………………… Page 38
Throttle Mode..…………..……………….... Page 38
P.T.S.O. ….……............................................ Page 39
S.L.E. …………......……………..……….... Page 40
Burn-out Timer and Line Lock…………….. Page 41
Shift Mode………………………………..... Page 43
Shift Control………………………….……. Page 44
Tach and Peak RPM ……………..………....Page 45
Testing Shift Routine ……………………… Page 46
Driver’s Reaction Tester……........................ Page 47
Push-button Inputs….…..………..……….... Page 49
Button 1…………………….………. Page 50
Button 2…………………….………. Page 53
Button 3…………………….….…… Page 54
Button 4………………………….…. Page 55
Back-Up Feature ………….…….…. Page 56
Bypass Button……………..…….…. Page 57
Additional Button Functions Chart.... Page 58
The Relay Board………………...…………………. Page 58
The Colored Status LED’s…………...…….. Page 58
Wiring the Power and Ground Studs...…….. Page 58
Wiring the Tach Input…………...…...…….. Page 59
Wiring the Push-buttons………...…...…….. Page 59
Wiring the Outputs…………………...…….. Page 60
Miscellaneous
Warranty and Disclaimer…………………... Page 63

- 6 -
Categorized Contents
P.B. Modes
Setting P.B. Mode and Safety lockout.......… Page 15
Understanding Push-button Inputs…….….... Page 49
Understanding Push-button Modes……….... Page 49
Understanding Safety Lockout….…….….... Page 50
Back-up Feature……………………………. Page 56
Bypass Button…………………………….... Page 56
Additional Button Functions Chart……........ Page 57
Bracket Tap / Multi Tap
Tap / Multi Tap Count………………...…… Page 11
Tap Up and Tap Down Amount………….…Page 12
Multi Tap Amount……………………….… Page 13
Understanding Tap / Multi Tap ………….....Page 36
Additional Button Functions Chart……........ Page 57
Bracket 2 Stage Timers
Setting Stage times for Timers 1, 2, and 3.… Page 24
Setting Timer 1, 2, and 3 Throttle Modes ..... Page 19
Setting P.T.S.O. ………...………………..... Page 20
Understanding the P.T.S.O….…..……….... Page 39
Understanding the Timers..……..……….... Page 38
Understanding Throttle Mode..…..……….... Page 38
Bracket S.L.E.
Setting S.L.E. Throttle Mode……................. Page 16
Setting S.L.E. Starting Line Mode……......... Page 16
Understanding the S.L.E................................ Page 40
Understanding Button 3................................. Page 52
Additional Button Functions Chart……........ Page 57

- 7 -
Bracket Line Lock
Setting Burn-out Timer…….......................... Page 17
Setting Line Lock Mode…………………... Page 17
Understanding the Burn-out Timer………… Page 41
Understanding Line Lock Mode..….............. Page 42
Understanding Button 4…….……………… Page 55
Additional Button Functions Chart……........ Page 57
Bracket Shifts
Setting the Shift Mode ……….……………. Page 18
Understanding Max Shift Number………..... Page 43
Understanding Shift Mode……….....…….... Page 43
Setting Shift Control (Shift Points)................ Page 18
Understanding Shift Control Screen.…….... Page 44
Understanding Shift Points………....…….... Page 44
Understanding Shift by Time or RPM…....... Page 44
Understanding Tach and Peak RPM……...... Page 45
Testing the Shift features…….....…..…….... Page 46
Pro 2 Stage Timers
Setting Stage times for Timers 1, 2, and 3.… Page 29
Setting Timer 1, 2, and 3 Throttle Modes ..... Page 19
Setting P.T.S.O. ………...………………..... Page 20
Understanding the P.T.S.O….…..……….... Page 39
Understanding the Timers..……..……….... Page 38
Understanding Throttle Mode..…..……….... Page 38
Pro S.L.E.
Setting S.L.E. Throttle Mode……................. Page 16
Understanding Pro Mode S.L.E…................. Page 40
Understanding Button 3................................. Page 54
Additional Button Functions Chart……........ Page 57
Pro Line Lock
Setting Burn-out Timer…….......................... Page 17
Setting Line Lock Mode…………………... Page 17

- 8 -
Understanding the Burn-out Timer………… Page 41
Understanding Line Lock Mode..….............. Page 42
Understanding Button 4…….……………… Page 55
Additional Button Functions Chart……........ Page 57
Pro Shifts
Setting the Shift Mode ……….……………. Page 18
Understanding Max Shift Number………..... Page 43
Understanding Shift Mode……….....…….... Page 43
Setting Shift Control (Shift Points)................ Page 30
Understanding Shift Control Screen.…….... Page 44
Understanding Shift Points………....…….... Page 44
Understanding Shift by Time or RPM…....... Page 44
Understanding Tach and Peak RPM……...... Page 45
Testing the Shift features…….....…..…….... Page 46
The Reaction Tester Screen
Bracket…..…………………………………. Page 27
Pro…………...……………..………............. Page 32
Understanding Reaction Tester Screen…...... Page 47
Contrast
Adjusting the Contrast level……………….. Page 21
The Relay Board………………...…………………. Page 58
The Colored Status LED’s…………...…….. Page 58
Wiring the Power and Ground Studs...…….. Page 58
Wiring the Tach Input…………...…...…….. Page 59
Wiring the Push-buttons………...…...…….. Page 59
Wiring the Outputs…………………...…….. Page 60
Transbrake………………….……….Page 60
Line Lock………………….………. Page 61
Starting Line Enhancer…….….…… Page 61
Timers..………………………….…. Page 61
Shift…..………………………….…. Page 62

- 9 -
Getting Started
Before using the Elite Crossover, a basic
understanding of how the display and switches are
structured, is needed.
Basics for the Display and Switches There are several screens, each with its own values or
settings. Each screen shown on the display is divided into
three sections. The center section is used to indicate the
values or settings currently being shown on the left and right
sections of the display. The MENU switch located directly
under the center section of the display is used change what
screen is being shown on display. There are four
ADJUSTMENT switches located under both the left and
right sections of the display. The ADJUSTMENT switches
are used to make changes to the values or settings currently
being shown.
The PRO/BRACKET mode switch located at the
bottom right is used to select whether the Elite Crossover is
in Pro or Bracket mode. For each mode there is a home
screen, the Dial-ins for Bracket Mode and Pro Delay for Pro
Mode. The home screen is the screen that is shown when the
Elite Crossover is turned on or reset.
The SETUP/RESET switch located at the bottom left
has two functions. First, pressing this switch to the left
accesses the Setup screens. The Setup screens allow the
Elite Crossover to be tailored to meet the vehicle needs.
Secondly, moving the switch to the right resets the processor.
Resetting the Elite Crossover, returns back to the home
screen and cancels any timers that may be running. The
same as turning power off and back on.
The yellow LED right below the MENU switch is
used when practicing with the Driver’s Reaction Tester.

- 10 -
Initial Setup of the Elite Crossover
When the Elite Crossover arrives and you turn it on,
you will see the Bracket Mode Dial-In screen. With the
initial factory settings, the Elite Crossover will function as a
basic Crossover Delay Box, without any changes needed.
To use the additional features of the Elite Crossover,
information needs to be entered. Before entering times for
Pro or Bracket mode, it is recommended that you configure
the Setup screens first. The Setup screens are used to tell the
Elite Crossover how you want the push-button inputs and
outputs to function. Also the Max Number of Shifts setting
is used to disable unneeded Shift Point screens. Once these
initial Setup settings have been entered, most will not need to
be changed unless the setup of the vehicle is changed.
Setting Setup Screens There are thirteen Setup screens. The Setup screens
can be accessed from either Pro or Bracket mode. To enter
into Setup mode push the Setup/Reset switch to the left. To
show the Elite Crossover is in Setup mode the center section
of the display will flash. There are three ways to get back to
normal run mode. First is to reset the Elite Crossover, you
can either reset the Elite Crossover using the Setup/Reset
switch or turn the power off and back on. Secondly, the
Elite Crossover will automatically return to normal run mode
after 30 seconds of inactivity. Finally if a transbrake button
is pressed, the Elite Crossover will exit out of Setup mode
and return to normal run to make a pass.
Note: Using the Reset switch not only exits Setup but also
turns off any output that is active. This includes the
Transbrake output.

- 11 -
The Tap / Multi Tap Count Screen Setup Mode Screen 1
While the Tap Count screen is not a setup screen, it
was placed here for easy access. The Tap Count screen is
used to indicate how many times the Tap Up, Tap Down, and
the Multi Tap were used on the last pass. These three Tap
features allow you to make adjustments to your Delay time if
you feel you have released the Transbrake Push-button at the
wrong time.
The Tap Up and Down are shown on the left screen.
The Multi Tap is shown on the right screen.
Left Screen Adjustment Switches
Use any Adjustment Switch either or to clear all
the Tap Counts.
Right Screen Adjustment Switches
Use any Adjustment Switch either or to clear all
the Tap Counts.
Pro/Bracket Switch
The setting of the Pro/Bracket switch has no effect
when in Setup mode.
Setup/Reset Switch
Use the Setup/Reset switch to exit Setup mode.
Upon exiting the Elite Crossover will go to the home screen
for either Pro or Bracket mode depending on how the
Pro/Bracket switch is set.
Menu Switch
Use the Menu Switch to go to the Shift Control
screen. Use the Menu Switch to go to the Tap Up and Tap
Down Amount screen.
The Tap is explained on page 36.

- 12 -
Tap Up and Tap Down Amount Screen Setup Mode Screen 2
The Tap Up and Tap Down amounts are adjusted on
this screen. Any value from .000 - .099 can be entered for
either Tap amount.
Left Screen Adjustment Switches
Use the right two Adjustment Switches either or
to set the Tap Up amount.
Right Screen Adjustment Switches
Use the right two Adjustment Switches either or
to set the Tap Down amount.
Pro/Bracket Switch
The setting of the Pro/Bracket switch has no effect
when in Setup mode.
Setup/Reset Switch
Use the Setup/Reset switch to exit Setup mode.
Upon exiting the Elite Crossover will go to the home screen
for either Pro or Bracket mode depending on how the
Pro/Bracket switch is set.
Menu Switch
Use the Menu Switch to go to the Tap / Multi Tap
Count screen. Use the Menu Switch to go to the Multi Tap
Amount Screen.
The Tap is explained on page 36.

- 13 -
Multi Tap Amount Screen Setup Mode Screen 3
This screen has settings for the Multi Tap amount.
The Multi Tap amount can be set from 0 – 9. The Multi Tap
is used to subtract large amounts of delay.
Left Screen Adjustment Switches
Use the right Adjustment Switch either or to set
the Multi Tap amount.
Right Screen Adjustment Switches
The Adjustment Switches have no function on this
screen.
Pro/Bracket Switch
The setting of the Pro/Bracket switch has no effect
when in Setup mode.
Setup/Reset Switch
Use the Setup/Reset switch to exit Setup mode.
Upon exiting the Elite Crossover will go to the home screen
for either Pro or Bracket mode depending on how the
Pro/Bracket switch is set.
Menu Switch
Use the Menu Switch to go to the Tap Up and Tap
Down Amount Screen. Use the Menu Switch to go to the
How Late Screen.
NOTE: To turn off the Multi Tap feature set the Multi Tap
amount to zero.
The Multi Tap is explained on page 37.

- 14 -
How Late Screen Setup Mode Screen 4
This screen has the How Late information. A How
Late is automatically generated anytime two shots at the tree
are taken. If only one hit at the tree is taken the How Late
will be zero.
Left Screen Adjustment Switches
Use any Adjustment Switch either or to clear the
How Late information.
Right Screen Adjustment Switches
Use any Adjustment Switch either or to clear the
How Late information.
Pro/Bracket Switch
The setting of the Pro/Bracket switch has no effect
when in Setup mode.
Setup/Reset Switch
Use the Setup/Reset switch to exit Setup mode.
Upon exiting the Elite Crossover will go to the home screen
for either Pro or Bracket mode depending on how the
Pro/Bracket switch is set.
Menu Switch
Use the Menu Switch to go to the Multi Tap
Amount Screen. Use the Menu Switch to go to the Push-
button Mode and Safety Lockout screen.
NOTE: A How Late time is only shown when taking two
shots at the tree.
The How Late is explained on page 35.

- 15 -
Push-button Mode and Safety Lockout Setup Mode Screen 5
The Push-button mode is used to set how the
Transbrake button(s) functions. The Safety Lockout time is
used to disable the Transbrake buttons, to keep the driver
from accidently applying the Transbrake after the vehicle
leaves the starting line.
Left Screen Adjustment Switches
Use the right Adjustment Switch either or to set
the Push-button mode.
Right Screen Adjustment Switches
Use the right two Adjustment Switch either or to
set the Safety Lockout time.
Pro/Bracket Switch
The setting of the Pro/Bracket switch has no effect
when in Setup mode.
Setup/Reset Switch
Use the Setup/Reset switch to exit Setup mode.
Upon exiting the Elite Crossover will go to the home screen
for either Pro or Bracket mode depending on how the
Pro/Bracket switch is set.
Menu Switch
Use the Menu Switch to go to the How Late screen.
Use the Menu Switch to go to the S.L.E. Control screen.
NOTE: To turn off the Safety Lockout feature, set the
Safety Lockout time to zero.
The Push-button Modes are explained on page 49.

- 16 -
S.L.E. Control Setup Mode Screen 6
The Starting Line Enhancer (S.L.E.) Control screen is
used to set the S.L.E. Throttle mode and whether the S.L.E.
is engaged along with the Transbrake or not.
Left Screen Adjustment Switches
Use the Adjustment Switches either or to set the
S.L.E. Throttle mode. The S.L.E. Throttle Mode is used to
control whether the S.L.E. output will supply 12 Volts
“High” or remove 12 Volts “Low” when engaged.
Right Screen Adjustment Switches
Use the Adjustment Switches either or to select
Normal mode “Norm” for engaging S.L.E. with the Tap
Down PB only or Plus Starting Line “+Line” for engaging
S.L.E. with Tap Down PB or the with the Transbrake.
Pro/Bracket Switch
The setting of the Pro/Bracket switch has no effect
when in Setup mode.
Setup/Reset Switch
Use the Setup/Reset switch to exit Setup mode.
Upon exiting the Elite Crossover will go to the home screen
for either Pro or Bracket mode depending on how the
Pro/Bracket switch is set.
Menu Switch
Use the Menu Switch to go to the Push-button
Mode and Safety Lockout screen. Use the Menu Switch to
go to the Line Lock Control screen.
The S.L.E. modes are explained on page 40.

- 17 -
Line Lock Control Setup Mode Screen 7
The Line Lock Control screen is used to set the time
for the Burn-out Timer and whether the Line Locks will be
used for only the Burn-out or for the Burn-out and at the
Starting Line.
Left Screen Adjustment Switches
Use the Adjustment Switches either or to set the
Burn-out Time.
Right Screen Adjustment Switches
Use the Adjustment Switches either or to select
Normal mode “Norm” for Burn-out only or Plus Starting
Line “+Line” for Burn-out and Line Locks with Transbrake.
Pro/Bracket Switch
The setting of the Pro/Bracket switch has no effect
when in Setup mode.
Setup/Reset Switch
Use the Setup/Reset switch to exit Setup mode.
Upon exiting the Elite Crossover will go to the home screen
for either Pro or Bracket mode depending on how the
Pro/Bracket switch is set.
Menu Switch
Use the Menu Switch to go to the S.L.E. Control
screen. Use the Menu Switch to go to the Shift Control
screen.
NOTE: To turn off the Burn-out Timer feature, set the
Burn-out time to zero.
The Line Lock modes are explained on page 41.

- 18 -
Shift Control Setup Mode Screen 8
The Shift Control screen is used to set the Shift
Output Mode and the Max number of shifts.
Left Screen Adjustment Switches
Use the Adjustment Switches either or to set the
Shift Output mode. The Shift Output mode is used to control
whether the Shift output will supply 12 Volts “High” or
remove 12 Volts “Low” when a shift occurs.
Right Screen Adjustment Switches
Use the Adjustment Switches either or to set the
Max number of shifts. Set the Max number of shifts equal to
the number of shift your vehicle makes.
Pro/Bracket Switch
The setting of the Pro/Bracket switch has no effect
when in Setup mode.
Setup/Reset Switch
Use the Setup/Reset switch to exit Setup mode.
Upon exiting the Elite Crossover will go to the home screen
for either Pro or Bracket mode depending on how the
Pro/Bracket switch is set.
Menu Switch
Use the Menu Switch to go to the Line Lock
Control screen. Use the Menu Switch to go to the Timer 1
Throttle mode screen.
The Shift Control is explained on page 43.

- 19 -
Timer 1, 2, and 3 Screens Setup Mode Screens 9, 10, and 11
The next three screens are the 2-Stage Timer Throttle
Mode screens. The Throttle Mode is used to control whether
the output will supply 12 Volts (On) or remove 12 Volts
(Off) for each stage. Each Timer has a Throttle mode
associated with it. The Throttle Mode has two settings
shown as on/off or off/on. All of the Throttle mode screens
are adjusted in the same way.
Left Screen Adjustment Switches
Use any Adjustment Switch either or to reverse
the Throttle mode.
Right Screen Adjustment Switches
Use any Adjustment Switch either or to reverse
the Throttle mode.
Pro/Bracket Switch
The setting of the Pro/Bracket switch has no effect
when in Setup mode.
Setup/Reset Switch
Use the Setup/Reset switch to exit Setup mode.
Upon exiting the Elite Crossover will go to the home screen
for either Pro or Bracket mode depending on how the
Pro/Bracket switch is set.
Menu Switch
Use the Menu Switch to go to the Shift Control
Screen. Use the Menu Switch to go to the Timer 1, 2, and
3 Throttle mode screens then the P.T.S.O. screen.
The Throttle Mode is explained on page 38.

- 20 -
P.T.S.O. Setup Mode Screen 12
The (P.T.S.O) Programmable Throttle Stop Override
screen is used to set the P.T.S.O. amount and to show the
count of how many time the P.T.S.O. was used on the last
pass.
Left Screen Adjustment Switches
Use the Adjustment Switches either or to set the
P.T.S.O. amount.
Right Screen Adjustment Switches
Use the Adjustment Switches either or to clear
the P.T.S.O. count.
Pro/Bracket Switch
The setting of the Pro/Bracket switch has no effect
when in Setup mode.
Setup/Reset Switch
Use the Setup/Reset switch to exit Setup mode.
Upon exiting the Elite Crossover will go to the home screen
for either Pro or Bracket mode depending on how the
Pro/Bracket switch is set.
Menu Switch
Use the Menu Switch to go to the Timer 3 Throttle
mode screen. Use the Menu Switch to go to the Contrast
Control screen.
NOTE: To turn off the P.T.S.O. feature, set the P.T.S.O.
amount to zero.
The P.T.S.O. is explained on page 39.

- 21 -
Contrast Setup Mode Screen 13
The Contrast adjust screen is used to adjust the
display for optimal viewing. Any number from 1, the
lightest, to 9, the darkest, can be used.
Left Screen Adjustment Switches
Use the Adjustment Switches either or to set the
Contrast amount. A setting of 5 is standard.
Right Screen Adjustment Switches
The Adjustment Switches have no function on this
screen.
Pro/Bracket Switch
The setting of the Pro/Bracket switch has no effect
when in Setup mode.
Setup/Reset Switch
Use the Setup/Reset switch to exit Setup mode.
Upon exiting the Elite Crossover will go to the home screen
for either Pro or Bracket mode depending on how the
Pro/Bracket switch is set.
Menu Switch
Use the Menu Switch to go to the P.T.S.O. screen.
Use the Menu Switch to go to the Tap/Multi Tap Count
screen.
NOTE: The Contrast screen is the only setup screen that
doesn’t flash. This is to help with adjusting the contrast
without the distraction of the flashing.

- 22 -
Dial-ins Screen Bracket Mode Screen 1
The Dial-in screen is the “home” Bracket Mode
screen. This screen is where you enter the dial-ins, yours
and your opponents.
Left Screen Adjustment Switches
Use any Adjustment Switch either or to enter
your dial-in.
Right Screen Adjustment Switches
Use any Adjustment Switch either or to enter
your opponents dial-in (their dial).
Pro/Bracket Switch
Set the Pro/Bracket switch to view the Bracket
mode screens. Set the Pro/Bracket switch to view the Pro
mode screens.
Setup/Reset Switch
Use the Setup/Reset switch to enter Setup mode.
Use the Setup/Reset switch to reset the Elite Crossover.
When the switch is moved to the reset position, any timing
functions are canceled and all the outputs are turned off.
When the switch is then released all the outputs will return to
their initial setting, the same when the unit is first turned on.
Menu Switch
Use the Menu Switch to go to the Drivers Reaction
Tester screen. Use the Menu Switch to go to the Delay
screen.
The Dial-ins are explained on page 33.

- 23 -
Delay 1 and 2 Screen Bracket Mode Screen 2
The Delay1 and Delay 2 screen is the where you
enter the Delay Times. The Dial-ins and the Delay Times
are used to control how long the Transbrake solenoid stays
engaged after the push-button is released.
Left Screen Adjustment Switches
Use any Adjustment Switch either or to enter
your Delay 1 time. (First shot at tree)
Right Screen Adjustment Switches
Use any Adjustment Switch either or to enter
your Delay 2 time. (Second shot at the tree).
Pro/Bracket Switch
Set the Pro/Bracket switch to view the Bracket
mode screens. Set the Pro/Bracket switch to view the Pro
mode screens.
Setup/Reset Switch
Use the Setup/Reset switch to enter Setup mode.
Use the Setup/Reset switch to reset the Elite Crossover.
When the switch is moved to the reset position, any timing
functions are canceled and all the outputs are turned off.
When the switch is then released all the outputs will return to
their initial setting, the same when the unit is first turned on.
Menu Switch
Use the Menu Switch to go to the Dial-ins screen.
Use the Menu Switch to go to the Timer 1 screen.
The Delays are explained on page 33.

- 24 -
Timers 1, 2, and 3 Stage Time Screens Bracket Mode Screens 3, 4, and 5
The next three screens are the 2-Stage Timer screens.
The Timer screens are where the stage times are entered to
control down track events. All three Timers are adjusted and
work the same way.
Left Screen Adjustment Switches
Use any Adjustment Switch either or to enter
your Stage 1 time. (When the T-Stop closes)
Right Screen Adjustment Switches
Use any Adjustment Switch either or to enter
your Stage 2 time. (How long the T-Stop stays closed)
Pro/Bracket Switch
Set the Pro/Bracket switch to view the Bracket
mode screens. Set the Pro/Bracket switch to view the Pro
mode screens.
Setup/Reset Switch
Use the Setup/Reset switch to enter Setup mode.
Use the Setup/Reset switch to reset the Elite Crossover.
When the switch is moved to the reset position, any timing
functions are canceled and all the outputs are turned off.
When the switch is then released all the outputs will return to
their initial setting, the same when the unit is first turned on.
Menu Switch
Use the Menu Switch to go to the Delay 1 and 2
screen. Use the Menu Switch to go to the Timer 2, 3, and
then Shift 1 screen or the Drivers Reaction Tester if Shift
Max is set to zero.
The Timers are explained on page 38.

- 25 -
Shift Control Screens Bracket Mode Screens 6-10
The next five Shift Control screens are used to enter
up to five Shift Points and to select whether each of the shifts
will be a by time or RPM. All five of the Shifts are adjusted
and work the same way. Depending on the setting of the
Max Shift Count, some or all of the Shift Control screens
may be disabled.
Left Screen Adjustment Switches
Use any Adjustment Switch either or to enter
select if the shift will be for time or RPM.
Right Screen Adjustment Switches
Use any Adjustment Switch either or to enter the
time or RPM the shift will occur. (Shift point)
Pro/Bracket Switch
Set the Pro/Bracket switch to view the Bracket
mode screens. Set the Pro/Bracket switch to view the Pro
mode screens.
Setup/Reset Switch
Use the Setup/Reset switch to enter Setup mode.
Use the Setup/Reset switch to reset the Elite Crossover.
When the switch is moved to the reset position, any timing
functions are canceled and all the outputs are turned off.
When the switch is then released all the outputs will return to
their initial setting, the same when the unit is first turned on.
Menu Switch
Use the Menu Switch to go to the Timer 3 screen.
Use the Menu Switch to go to the next shift screen or the
Tach screen.
The Shift Control is explained on page 44.

- 26 -
Tach and Number of Cylinders Screen Bracket Mode Screen 11
The Tach and Number of Cylinders screen is used to
enter the number of cylinders and view the built-in Tach.
When the engine is off the Tach will show the peak RPM.
Left Screen Adjustment Switches
Use any Adjustment Switch either or to select the
number of cylinders.
Right Screen Adjustment Switches
Use any Adjustment Switch either or to clear the
peak RPM.
Pro/Bracket Switch
Set the Pro/Bracket switch to view the Bracket
mode screens. Set the Pro/Bracket switch to view the Pro
mode screens.
Setup/Reset Switch
Use the Setup/Reset switch to enter Setup mode.
Use the Setup/Reset switch to reset the Elite Crossover.
When the switch is moved to the reset position, any timing
functions are canceled and all the outputs are turned off.
When the switch is then released all the outputs will return to
their initial setting, the same when the unit is first turned on.
Menu Switch
Use the Menu Switch to go to the last Shift screen.
Use the Menu Switch to go to the Driver’s Reaction Tester
screen.
Tach and Number of Cylinders are explained on page 45.

- 27 -
Driver’s Reaction Tester Bracket Mode Screen 12
This screen allows you to test your reaction time
using the Push-buttons mounted in the vehicle. To practice,
for Push-button Modes 1 – 4 press and hold down the push-
button connected to the P.B. 1 terminal. For Push-button
Mode 5 press the button connected to P.B. 2. When the light
below the Menu switch comes on, for Push-button Modes
1 – 4 release the button being held. For Push-button Mode 5
press the button connected to P.B. 1. Your average is shown
on the left side and reaction time is shown on the right side.
Left Screen Adjustment Switches
Use any Adjustment Switch either or to clear the
current average reaction time.
Right Screen Adjustment Switches
The Adjustment Switches have no function on this
screen.
Pro/Bracket Switch
Set the Pro/Bracket switch to view the Bracket
mode screens. Set the Pro/Bracket switch to view the Pro
mode screens.
Setup/Reset Switch
Use the Setup/Reset switch to enter Setup mode.
Use the Setup/Reset switch to reset the Elite Crossover.
When the switch is moved to the reset position, all the
outputs are turned off. When the switch is then released all
the outputs will return to their initial setting.
Menu Switch
Use the Menu Switch to go to the Tach screen.
Use the Menu Switch to go to the Dial-ins screen.
The Driver’s Reaction Tester is explained on page 47.

- 28 -
Pro Screen Pro Mode Screen 1
The Pro screen is the “home” Pro Mode screen. This
screen is where you enter your pro delay time.
Left Screen Adjustment Switches
The Adjustment Switches have no function on this
screen.
Right Screen Adjustment Switches
Use any Adjustment Switch either or to enter
your pro delay.
Pro/Bracket Switch
Set the Pro/Bracket switch to view the Bracket
mode screens. Set the Pro/Bracket switch to view the Pro
mode screens.
Setup/Reset Switch
Use the Setup/Reset switch to enter Setup mode.
Use the Setup/Reset switch to reset the Elite Crossover.
When the switch is moved to the reset position, any timing
functions are canceled and all the outputs are turned off.
When the switch is then released all the outputs will return to
their initial setting, the same when the unit is first turned on.
Menu Switch
Use the Menu Switch to go to the Driver’s
Reaction Tester screen. Use the Menu Switch to go to the
Timer 1 screen.

- 29 -
Timers 1, 2, and 3 Stage Time Screens Pro Mode Screens 2, 3, and 4
The next three screens are the 2-Stage Timer screens.
The Timer screens are where the stage times are entered to
control down track events. All three Timers are adjusted and
work the same way.
Left Screen Adjustment Switches
Use any Adjustment Switch either or to enter
your Stage 1 time. (When the T-Stop closes)
Right Screen Adjustment Switches
Use any Adjustment Switch either or to enter
your Stage 2 time. (How long the T-Stop stays closed)
Pro/Bracket Switch
Set the Pro/Bracket switch to view the Bracket
mode screens. Set the Pro/Bracket switch to view the Pro
mode screens.
Setup/Reset Switch
Use the Setup/Reset switch to enter Setup mode.
Use the Setup/Reset switch to reset the Elite Crossover.
When the switch is moved to the reset position, any timing
functions are canceled and all the outputs are turned off.
When the switch is then released all the outputs will return to
their initial setting, the same when the unit is first turned on.
Menu Switch
Use the Menu Switch to go to the Pro screen. Use
the Menu Switch to go to the Timer 2, 3, then Shift 1
screen or if Shift Max is set to zero the Drivers Reaction
Tester.
The Timers are explained on page 38.

- 30 -
Shift Control Screens Pro Mode Screens 5-9
The next five Shift Control screens are used to enter
up to five Shift Points and to select whether each of the shifts
will be a by time or RPM. All five of the Shifts are adjusted
and work the same way. Depending on the setting of the
Max Shift Count, some or all of the Shift Control screens
may be disabled.
Left Screen Adjustment Switches
Use any Adjustment Switch either or to enter
select if the shift will be for time or RPM.
Right Screen Adjustment Switches
Use any Adjustment Switch either or to enter the
time or RPM the shift will occur. (Shift point)
Pro/Bracket Switch
Set the Pro/Bracket switch to view the Bracket
mode screens. Set the Pro/Bracket switch to view the Pro
mode screens.
Setup/Reset Switch
Use the Setup/Reset switch to enter Setup mode.
Use the Setup/Reset switch to reset the Elite Crossover.
When the switch is moved to the reset position, any timing
functions are canceled and all the outputs are turned off.
When the switch is then released all the outputs will return to
their initial setting, the same when the unit is first turned on.
Menu Switch
Use the Menu Switch to go to the Timer 3 screen.
Use the Menu Switch to go to the next shift screen or the
Tach screen if no more shifts.
The Shift Control is explained on page 43.

- 31 -
Tach and Number of Cylinders Screen Pro Mode Screen 10
The Tach and Number of Cylinders screen is used to
enter the number of cylinders and view the built-in Tach.
When the engine is off the Tach will show the peak RPM.
Left Screen Adjustment Switches
Use any Adjustment Switch either or to select the
number of cylinders.
Right Screen Adjustment Switches
Use any Adjustment Switch either or to clear the
peak RPM.
Pro/Bracket Switch
Set the Pro/Bracket switch to view the Bracket
mode screens. Set the Pro/Bracket switch to view the Pro
mode screens.
Setup/Reset Switch
Use the Setup/Reset switch to enter Setup mode.
Use the Setup/Reset switch to reset the Elite Crossover.
When the switch is moved to the reset position, any timing
functions are canceled and all the outputs are turned off.
When the switch is then released all the outputs will return to
their initial setting, the same when the unit is first turned on.
Menu Switch
Use the Menu Switch to go to the last Shift screen.
Use the Menu Switch to go to the Driver’s Reaction Tester
screen.
Tach and Number of Cylinders are explained on page 45.

- 32 -
Driver’s Reaction Tester Pro Mode Screen 11
This screen allows you to test your reaction time
using the Push-buttons mounted in the vehicle. To practice,
for Push-button Modes 1 – 4 press and hold down the push-
button connected to the P.B. 1 terminal. For Push-button
Mode 5 press the button connected to P.B. 2. When the light
below the Menu switch comes on, for Push-button Modes
1 – 4 release the button being held. For Push-button Mode 5
press the button connected to P.B. 1. Your average is shown
on the left side and reaction time is shown on the right side.
Left Screen Adjustment Switches
Use any Adjustment Switch either or to clear the
current average reaction time.
Right Screen Adjustment Switches
The Adjustment Switches have no function on this
screen.
Pro/Bracket Switch
Set the Pro/Bracket switch to view the Bracket
mode screens. Set the Pro/Bracket switch to view the Pro
mode screens.
Setup/Reset Switch
Use the Setup/Reset switch to enter Setup mode.
Use the Setup/Reset switch to reset the Elite Crossover.
When the switch is moved to the reset position, all the
outputs are turned off. When the switch is then released all
the outputs will return to their initial setting.
Menu Switch
Use the Menu Switch to go to the Tach screen.
Use the Menu Switch to go to the Pro screen.
The Driver’s Reaction Tester is explained on page 47.

- 33 -
Understanding the
Dial-ins and Delays
The Dial-in screen shows Your Dial-in and Their
Dial-in. The next screen, the Delay Screen shows both the
Delay 1 and Delay 2 times. These four time settings are used
to control how long the Transbrake solenoid stays engaged
after the push-button is released. The main feature here is
the ability to Crossover, to go off the opponent’s top yellow
light if you are the faster vehicle. The Elite Crossover always
does a subtraction of Your Dial-in time from Their Dial-in
time. If the result is greater than zero it’s added to Delay 1.
This new combined time of Delay 1 plus the difference of
the Dial-ins is called the Crossover time.
Example, when the vehicle is staged, the push-button
connected to the P.B. 1 terminal is pressed. When the push-
button is pressed the Transbrake will engage. When the
opponent’s top yellow light comes on, the button is released
and then the Crossover time starts counting down. When the
Crossover time reaches zero the Transbrake is released.
Thus, releasing the vehicle from the starting line and starting
the pass.
When it is desirable not to Crossover, set the Dial-ins
to the same number. When the Elite Crossover does the
subtraction of Your Dial-in time from Their Dial-in time the
difference will be zero. This result is then added to Delay 1
but because the added value was zero only the Delay 1 time
will be used as the delay amount for the Transbrake.
The Elite Crossover also allows a second hit at the
tree. This is where the Delay 2 time is used. Depending on
the Push-button Mode, the second hit at the tree can be done
with the same button connected to P.B. 1 or a second push-
button connected to P.B. 2, this is explained in
Understanding the Push-button Modes. The Delay 2 time is
usually set so that the second hit at the tree is on your top or

- 34 -
bottom yellow. The Delay 2 time can be used even if the
main Crossover delay is not being used, however this is not
commonly done.
For this example of two hits at the tree, two buttons
are used and the Push-button Mode is set to Two Hits with
Two Buttons. The vehicle would be staged and both push-
buttons would be pressed and held. This would engage the
Transbrake. When the opponent’s top yellow light comes
on, the button connected to P.B. 1 would be released. This
would start the countdown of the Crossover time. Then
when your bottom yellow light comes on the push-button
connected to P.B.2 would be released. This would start the
countdown of the Delay 2 time. When either the Crossover
time or the Delay 2 time reaches zero the Transbrake is
released. If the two times do not reach zero at the same time
a new How Late time is generated and stored in memory.
The How Late time is displayed on Setup screen number 4.
Note: No Delay Box including the Elite Crossover can tell
which hit at the tree is better, only which hit at the tree
reached zero first. This means that if the first release on the
opponent’s top yellow was a perfect light and the second
release on your bottom yellow was red, you will red light.
If you are new to using a Delay Box, a good way to
get started is to cancel out the Dial-ins, by either entering all
zeros, or the same number in both Dial-ins. Then enter
1.000 second for Delay 1 as this is a good starting value.
Make some time trial passes, releasing the push-button on
your top amber light. Adjust the Delay 1 time, by adding
more time for a red light or subtracting time if late, to get as
close to a perfect reaction time as possible. Once
Eliminations start, make sure to enter the Dial-ins for you
and your opponent. Release the push-button on the first
amber light that comes on, regardless of the side of the tree.

- 35 -
Understanding the
How late Screen
The How Late is only used when the Push-button
Mode is set for two shots at the tree, either P.B. Mode 2, 3,
or 4. When taking two shots, the quicker of the two will
release the Transbrake. The How Late time, shown on the
right section of the display, shows how much later the
Transbrake would have released using the other shot at the
tree. The left section of the display shows which shot at the
tree was used to release the Transbrake.
For example, if the Dly= shows a “2” it indicates that
Delay 2 was used to release the Transbrake. And if the How
Late time is “.012” it indicates that Delay 1 would have
released .012 seconds later. This means if your reaction time
was .010 on the time slip, add the How Late time of .012 to
the .010 for a total reaction time of .022 this is what your
reaction time would have been if Delay 1 had been used.
The How Late information is stored in memory until
a new delay cycle is started. Each time a delay cycle is
started the How Late time and Delay Used indicator are reset
to zero.
Note: No Delay box can tell which of the two shots at the
tree was better, only which was faster. This means the
Transbrake will release when either of the delay times
reaches zero, even if it results in a red light.

- 36 -
Understanding the
Tap / Multi Tap Screens
The three Tap features allow you to make
adjustments to your Delay time if you feel you have released
the Transbrake Push-button at the wrong time. The Tap
features only work while the Transbrake time is counting
down and only affects the first delay started. So if Delay 1 is
started before Delay 2 the Tap features only affects Delay 1.
Tap Count
The Tap Up and Tap Down counts are shown by the
left section of the screen. The Multi Tap count is shown on
the right section of the display. The counts are used to show
how many times the Tap Up, Tap Down, and Multi Tap
Push-buttons were pressed. If a Tap Up, Tap Down, or
Multi Tap button is not used during a pass the corresponding
Tap Count will be zero. The Tap Counts are stored until the
next time the Transbrake is used.
Tap Up
The Tap Up feature is used to keep from red lighting
if you released the Transbrake Push-button too early. The
right 2 digits of the Tap Up amount show the amount of time
that will be added each time the Tap Up button is pressed.
This Tap Up amount will only be added to the first delay
started. Any number from .000 to .099 can be used for the
Tap Up amount. The push-button connected to the P.B. 4
input is the Tap Up Push-button.

- 37 -
Tap Down
The Tap Down is used to keep from having a bad
light if you released the Transbrake push-button a little late.
The right 2 digits of the Tap Down amount show the amount
of time that will be subtracted each time the Tap Down
button is pressed. This Tap Down amount will only be
subtracted from the first delay started. Any number from
.000 to .099 can be used for the Tap Down amount. The
push-button connected to the P.B. 3 input is the Tap Down
Push-button.
Multi Tap
The Multi Tap is used to keep from having a bad
light if you released the Transbrake Push-button very late.
The Multi Tap feature works by taking several Tap Downs
with the single press of a button. An example is, if the Multi
Tap setting is set to 5, each time the Multi Tap button is
pressed it’s the same as pressing the Tap Down button five
times.
The Multi Tap setting is shown on the left section of
the screen. Any number from 0 to 9 can be used for the
Multi Tap setting. The right section of the display shows the
Multi Tap amount. The Multi Tap amount is calculated by
taking the Tap Down amount and multiplying it by the Multi
Tap setting. The Multi Tap amount is how much time will
be subtracted from the first delay started, each time the Multi
Tap button is pressed. The push-button connected to the
P.B. 2 input is the Multi Tap button. The Multi Tap feature
cannot be used when the P.B. Mode is set to 2.

- 38 -
Understanding the Timers
The Elite Crossover has three 2-Stage Timers. The
2-Stage Timers are used to control down-track events, using
a pre-programmed time. Some examples of what a 2-Stage
Timer may control are Throttle Stops, Nitrous solenoids, a
Lockup Converter, Electrically controlled shocks, and Lean-
out Valves.
Since all of the Timer screens function the same, the
information below and on the next page can be used for
Timer 1 Settings, Timer 2 Setting, or Timer 3 Settings.
Timing of a 2-Stage Timer starts at the release of the
Transbrake solenoid. When the Transbrake releases, the
Stage 1 time starts counting down. At the completion of
Stage 1, the time for Stage 2 starts counting down.
Another way of looking at the Stage timing is, Stage
1 is how far out the vehicle goes before the Stage 2 time
starts. The Stage 2 time would be how long a device is
active (its duration).
Throttle Stop example, Stage 1 would be how far out
the vehicle went in time before the Throttle Stop closed.
Stage 2 would be how long the Throttle Stop stayed closed.
Nitrous example, Stage 1 would be how far out the
vehicle went in time before the Nitrous turned on. Stage 2
would be how long the Nitrous stayed on. If it is desired to
have the Nitrous on for the rest of the pass, enter a Stage 2
time greater than the vehicle’s ET.
Understanding Throttle Mode
The Throttle Mode is used to control whether the
Timer output will supply 12 Volts (On) or remove 12 Volts
(Off) for the Stages. Each Timer has a Throttle Mode
associated with it. Each Timer’s Throttle Mode has two

- 39 -
settings off/on or on/off. The Throttle Mode for each Timer
can be checked or changed, when viewing the corresponding
Timers Setup screen. When viewing a Timers Setup screen,
the Stage 1 Throttle mode is shown on the left section of the
display and Stage 2 is shown on the right section of the
display. A Stage set to on, indicates +12Volts out for that
Stage. A Stage set to off indicates no Voltage out for that
Stage. Example, if the Stage 1 Throttle Mode is set to off
then no voltage will be put out for the duration of the Stage 1
time. As the Stage 2 Throttle Mode is always the opposite of
Stage 1, in this example the Throttle Mode for Stage 2 has to
be on. Therefore at the completion of Stage 1 the output will
switch and put out +12Volts for the duration of the Stage 2
time.
Understanding the P.T.S.O
P.T.S.O. stands for Programmable Throttle Stop
Override. The P.T.S.O. only affects Timer 1. The P.T.S.O.
feature can be thought of as a Tap Down for Timer 1. By
using a button connected to the P.B. 3 input, the P.T.S.O.
allows a programmable amount of time to be subtracted from
Stage 2 of Timer 1.
After the Transbrake releases the Elite Crossover
waits a quarter of a second before enabling the P.T.S.O.
This is to ensure that a late Delay Tap Down is not registered
as a P.T.S.O. Once the P.T.S.O. is enabled, each time the
Tap Down button is pressed while in either Stage 1 or 2 the
P.T.S.O. time amount is subtracted from Stage 2.
The P.T.S.O Count is the number of times the button
for the P.T.S.O. was pressed on the last pass.
NOTE: To turn off the P.T.S.O. enter all zeros for the
P.T.S.O. value.

- 40 -
Understanding the S.L.E.
S.L.E. stands for Starting Line Enhancer. The S.L.E.
feature is typically used in-conjunction with an in-line
linkage Throttle Stop. When activated, the S.L.E. will close
the Throttle Stop. This allows the driver to push the gas
pedal to wide open throttle position and have the engine rev
only to the preset RPM level.
Bracket Mode S.L.E.
In Bracket Mode the S.L.E. can be activated two
different ways. First, before the vehicle is staged, if the Tap
Down button is pressed the S.L.E. is activated. Secondly,
when the Plus Starting Line feature (+Line) is turned on,
pressing the Transbrake Push-button during the staging of
the vehicle will cause the S.L.E. to activate. Once activated,
the S.L.E. stays on until the Transbrake Push-button is
released and the Crossover time has been counted down.
Once the Crossover time is done, the Delay 1 time starts
counting down and the S.L.E. Output is turned off returning
the engine to full throttle. This means, when Crossing Over
the S.L.E. will turn off when the box starts counting down
your side of the tree.
Pro Mode S.L.E.
In Pro Mode the S.L.E. can only be activated by
pressing the Tap-Down button before the Transbrake is
engaged. When activated, the S.L.E. will close the Throttle
Stop. This allows the driver to push the gas pedal to wide
open throttle position and have the engine rev only to the
preset RPM level. Once activated the S.L.E. stays on until
the Push-button used to apply the Transbrake is pressed.
When the Push-button is pressed the Elite Crossover waits
about 1/4 of a second for the Transbrake to fully engage,
then turns off the S.L.E. returning the engine to full throttle.

- 41 -
S.L.E. Throttle Mode There are two S.L.E. Throttle Mode settings, High
and Low. If set to High, when the S.L.E. Output is activated
it will put out +12Volts. If set to Low, when the S.L.E.
output is activated it will remove +12Volts. To change the
S.L.E. Throttle mode, go to the S.L.E. Setup screen in. Then
use the adjust switches under the left section of the display to
select High or Low.
S.L.E. Starting Line Mode The S.L.E. Starting Line Mode only affects the
S.L.E. in Bracket Mode. When set to normal, shown as
“Norm” on the screen, the S.L.E. will only activate with the
Tap Down button. When set to plus starting line, shown as
“+Line” on the screen, the S.L.E. will activate with the Tap
Down button or with the Transbrake solenoid. This feature
is used when the driver wants to stage the vehicle without
having the gas pedal on the floor. Or if a Tap Down button
has not been installed in the vehicle. To set the S.L.E.
Starting Line mode to normal or plus starting line, go to the
S.L.E. Setup screen. Then use the adjust switches under the
right section of the display to select “Norm” or “+Line”.
Understanding the
Burn-out Timer and Line Lock Mode
The Burn-out Timer is used to control the length of
the burn-out. This has the benefit of making the length of
the burn-outs the same every time. The Burn-out Timer has
two modes of operation, one with the Tach wire connected
and one without the Tach wire connected.
With the Tach wire connected, the Elite Crossover
will wait to start counting down the Burn-out Time, until the
engine reaches 3500 RPM. With the Tach wire connected

- 42 -
and the engine running, when the Line Lock button is
pressed the Line Lock solenoid(s) is turned on. The Line
Lock button can be released at this point and the Line Lock
will stay engaged. Then when the Burn-out is started and the
engine RPM exceeds 3500 RPM the Burn-out Timer starts
timing. When the count reaches zero the timer will release
the Line Lock solenoid(s) allowing the vehicle to move
forward.
Without the Tach wire connected, the Elite Crossover
will start counting down the Burn-out Time when the Line
Lock push-button is released. When the Line Lock button is
pressed and held the Line Lock solenoid(s) is turned on. The
engine is then brought up to the desired RPM at which time
the Line Lock button is released. When the button is
released the Elite Crossover will start counting down the
Burn-out Time. When the count reaches zero the timer will
release the Line Lock solenoid(s) allowing the car to move
forward.
Line Lock Mode
The Line Lock Mode is used to select whether the
Line Locks will be used only for the burnout or for both the
burn-out and at the starting line. When the Line Lock Mode,
is set to normal, shown as “Norm” on the screen, the Line
Lock are only for the Burn-out. When the Line Lock mode
is set to plus starting line, shown as “+Line” on the screen,
the Line Locks work for the burn-out and with the
Transbrake solenoid at the starting line. Regardless of
whether in the Elite Crossover is in Pro or Bracket mode, the
Line Lock mode setting works the same.

- 43 -
Shift Mode Screen The Shift Mode screen is only accessible from Setup
mode. The Shift Mode screen should only need to be set up
once. These settings are used to tell the Elite Crossover how
many shifts are needed and when a shift occurs, whether the
shift output needs to apply or remove power.
Max Shift Number
The Max Shift Number is displayed on the right
section of the display. The Max Shift Count is used to tell
the Elite Crossover how many shifts are needed. Example, if
the Max Shift Count is a 2, the Elite Crossover will only do 2
shifts. Also the Max Shift Count is used to disable any Shift
Control screens that will not be used. This reduces the
number of screens that have to be cycled through with the
Menu switch.
NOTE: Setting the Max Shift Number to zero turns of the
shift feature. This would be done when some other device is
being used to shift the vehicle.
Shift Mode
The Shift Mode is used to select whether +12 Volts is
applied or removed from the output for the shift. Select a
setting of “LO” for shifter requiring the removal of +12Volts
to shift. This would be considered Normally Closed
contacts. Select a setting of “HI” for a shifter requiring
+12Volts to shift. This would be considered Normally Open
contacts. The Shift Mode is shown on the left section of the
screen. Use any of the left side adjustment switches, to
toggle between the “HI” and “LO” Shift Mode settings.

- 44 -
Understanding the
Shift Control Screens There are up to five Shift Control screens, one for
each shift point. The number of viewable Shift Control
screen is set by the Shift Max Count. When viewing a Shift
Control screen the center section of the display will show
“Sft” followed by the shift number you are viewing.
Example if the center section of the display is showing
“Sft2” you are looking at the second shift point.
Shift Points
The Shift Points are displayed on the right section of
the display. In both Bracket Mode and Pro Mode the Elite
Crossover can handle up to 5 shifts each pass. The 5 shifts
can be made by time, RPM, or a combination of both. The
shifts occur in sequence starting with Shift Number 1 and
progressing to Shift Number 5. As each shift is completed
the Elite Crossover checks to see if the next Shift Point
setting is valid. If the next shift point is invalid the shift
routine is terminated and no further shifts will occur. The
only invalid RPM setting is zero. If the next Shift Point is a
Time, the Elite Crossover checks to make sure that the time
setting for the Shift Point is greater than the amount of time
that has gone by since the release of the Transbrake. If the
amount of time is not greater, the next Shift Point is invalid.
NOTE: The Elite Crossover only checks for valid shifts, for
20 seconds after the Transbrake releases. After 20 seconds
the Shift routine is terminated and no further shifts will
occur.
Shift by RPM or Time
The time or RPM selection for each shift is shown on
the left section of the display. Elite Crossover can handle up
to five shifts on each pass. These five shifts can be made by

- 45 -
time, RPM, or a combination of both. To select if a shift will
be by time or RPM, while the shift point for the desired shift
is being shown, use any of the left adjust switches to switch
between time and RPM.
Changing the Shift Points
New for Elite Crossover: Each Shift Point now has
two memory slots, one for RPM and one for time. This
means the Elite Crossover will remember both the last RPM
and the last time value for each Shift Point.
After making sure the correct Shift Number and time
or RPM has been selected, the Shift Point can be changed
using the right side adjustment switches. Each of the 4
adjustment switches controls a single digit.
Understanding
the Tach Screen
Number of Cylinders
This setting is used in calculating the engine RPM for
the Tach and shifting by RPM. There are 5 cylinder settings
2, 4, 6, 8, and 10. The Number of cylinders is shown on the
left section of the display. Use any of the left adjustment
switches to change the setting.
Tach and Peak RPM
Anytime the engine is running, the right section of
the Tach screen, will function as a digital Tach, displaying
the engine RPM. When the engine is shut off the Peak RPM
is shown in place of the Tach. The Peak RPM value will be
the highest RPM the engine has reached since the last time
the Peak RPM cleared. Use any of the right side adjustment
switches can be used to clear the Peak RPM resetting it to
zero.

- 46 -
Testing the
Shift Routine
First test the Shift terminal for output. The easiest
way to test the shift output, is to toggle the Shift Mode
(explained on page 43) between the HI and LO settings.
Each time the Shift Output Mode changes states the shifter
should also move. If the shifter does not move, disconnect
all wires connected to the Shift terminal. Then using a
Digital Volt Meter or a test light, check the Shift terminal for
power. It should have 12 Volts when the Shift Output Mode
is set to LO and zero Volts when the Shift Output Mode is
set to HI. If the Elite Crossover passes the first test, move
onto the second test. If the output does not change, check to
see if the fuse for the shift output is good. If the fuse is
good, contact Digital Delay.
The second test is a time shift; this checks the input
side or the push-button side of the Elite Crossover. Set the
Elite Crossover to a one second shift on time. After entering
the shift, press and release the button connected to the P.B. 1
terminal. One second after the Transbrake releases, the
shifter should move from low gear to second gear. If the
Elite Crossover passes the second test continue on to the
final test. If the shifter does not move, check to see if when
the button connected to the P.B. 1 terminal is pressed and
held that the red LED for P.B. 1 lights up. If the LED does
not light check the button for proper operation and wiring
from the button to the P.B. 1 terminal. If you can’t find a
problem with the button or the wiring, disconnect the button
from the P.B. 1 terminal. Next test the P.B. 1 input, by using
a short piece of wire to jump from the power stud to the P.B.
1 terminal. When the wire is connected between the two
points the wire will act as a temporary button and the red
LED for P.B. 1 should light up. If the LED for P.B. 1 does
not light, contact Digital Delay.

- 47 -
The Final test is an RPM shift, this checks the Tach
input. Set the Elite Crossover to shift at 3000 RPM. Then
while looking at the Tach on the Elite Crossover start the
engine, once started the Tach should go from Peak RPM to
current engine RPM. Next while idling at 800 or more, press
and release the button connected to the P.B. 1 terminal.
After the Transbrake releases, the Elite Crossover will
compare the Shift Point against the current engine RPM for
20 seconds. Slowly bring the engine RPM up past the 3000
RPM shift point and then back down to an idle within the 20
second limit. The shifter should move, and hold for four
tenths of a second, when the RPM reaches 3000. After the
four tenths of a second the Shifter should release and the
Elite Crossover will move on to the second Shift Point. If all
three tests pass, all of the Elite Crossover shift features
are working.
If the Tach on the Elite Crossover does not work
check the wire from the ignition box Tach output to the Tach
terminal on the Elite Crossover. If the Tach is showing an
RPM but seems to be off, check the Number of Cylinders
setting. If you are still having problems, contact Digital
Delay.
Understanding the
Driver’s Reaction Tester
This improved feature in the Elite Crossover allows a
driver using the buttons mounted in the vehicle to test their
reaction time. This feature can also be used to test different
kinds of buttons and button locations in the vehicle for the
quickest release possible.
To practice, for Push-button Modes 1 – 4 press and
hold down the push-button connected to the P.B. 1 terminal.
For Push-button Mode 5 press the button connected to P.B.
2. When the light below the Menu switch comes on, for

- 48 -
Push-button Modes 1 – 4 release the button being held.
For Push-button Mode 5 press the button connected to
P.B. 1. The Elite Crossover will now display your reaction
time on the right section of the display. Keep in mind that
the Reaction time does not directly correlate to the Delay
times used on the Delay screen. This is because the Reaction
Tester does not take into account the vehicle’s roll out time.
A close approximation of the vehicle’s roll out can be
calculated by subtracting the average of 10 passes from your
normal Delay 1 time. If you take more than one practice
shot while in the Driver’s Reaction Tester, the left section of
the display will show average reaction time. If you let go of
the button too soon, before the bulb turns on, “Red” will be
shown on the right section of the display to indicate a red
light. If you do not let go of the button within .75 seconds
after the bulb comes on, “Miss” will be shown on the right
section of the display to indicate a missed light.
To exit the Driver’s Reaction Test Mode, use the
Menu switch. The Elite Crossover will also automatically
exit the Driver’s Reaction Test Mode after 30 seconds of
inactivity. Each time a push-button is pressed for a practice
hit, the 30 second timer resets.
The Driver’s Reaction Tester can also be used to
check different buttons and button locations for consistency
and speed. Start by getting a reaction time average, at least
10 passes. Then compare with an average from either
another push-button or the same button mounted in a
different location.
NOTE: Use any of the left side adjustment switches to clear
the average of the Driver’s Reaction times.
NOTE: When in the Driver’s Reaction Test Mode, the
Transbrake solenoid will not be activated.

- 49 -
Understanding the
The Push-button Inputs
The buttons are used to start all timing sequences of
the Elite Crossover. While up to four buttons can be
connected to the Elite Crossover at one time, for the Elite
Crossover to work a button must be connected to the P.B. 1
input terminal.
The Additional Button Functions Chart on page 57
shows the primary function along with any other functions
for each of the buttons. The primary, second, and third
function of each button is, depends on whether the Elite
Crossover is in Bracket or Pro Mode and what the Push-
button Mode is.
Push-button Modes
The 5 different Push-button Modes are listed below,
each button mode changes how the Elite Crossover handles
the input from the push-buttons to control the Transbrake,
allowing the driver to select the preferred method.
1) PB Mode 1 – one hit at the tree with one button:
Use this mode if you only planning on taking one
hit at the tree. This is the most commonly used
mode.
2) PB Mode 2 – two hits at the tree with two
buttons: Use this mode if you want to take two
hits at the tree with two separate buttons.
3) PB Mode 3 – two hits at the tree with one button:
Use this mode if you want to take two hits at the
tree with one button.
4) PB Mode 4 – two hits at the tree with one button:
Use this mode if you flinch a lot at the starting
line. In this mode you can cancel the first hit
because of a potential red light due to a flinch and
switch to a second hit.

- 50 -
5) PB Mode 5 – Set and Go: Use this mode if you
want the start the delay timing on the press of the
button instead of the release. One hit at the tree
using two buttons. Explained further on page 52.
Push-button Safety Lockout
The Push-button Safety Lockout Time is a safety
feature that keeps the Transbrake from being reapplied when
a button is accidentally bumped or pressed during a pass.
This safety feature only affects the Transbrake button(s) after
the vehicle leaves the starting line. The time entered is in
seconds and is the amount of time that any button used to
apply the Transbrake will be disabled after the Transbrake
releases. In most cases, the amount of time entered for the
Safety Lockout is just long enough to get the vehicle out of
low gear. This is because most Transbrake solenoids will
not function in high gear. However if the vehicle’s
Transbrake will function in high gear, a larger time is
recommended.
NOTE: A setting of 00 will turn this feature off.
Button 1 Functions
When in Bracket Mode
P.B. Mode Set to 1 This is the most commonly used setting. Press the
button down when staging the vehicle, and then release the
button, usually on the top yellow light. When the button is
released the Elite Crossover will start counting down the
Crossover/Delay 1 time.
If the button is pressed again the countdown is
terminated. Then when the button is then released again the
Elite Crossover will start counting down the full
Crossover/Delay 1 time again. This is helpful if the driver

- 51 -
flinches (lets go of the button before the top yellow comes
on).
P.B. Mode Set to 2 Uses two Push-buttons, one for each Delay time.
With Button 1 starting the Crossover/Delay 1 time and
Button 2 starting the Delay 2 time. The main benefit of this
setting is, it allows two shots at the tree, in case you missed
the tree with your first release. Also if the driver flinches on
the first hit, Button 1 can be pressed again to avoid a red
light. The downside is, having to use two separate Push-
buttons at the starting line is a loss of a button input for other
uses.
P.B. Mode Set to 3 Allows two shots at the tree with one button, this is
usually both top yellows but can be set for top and bottom on
the same side of the tree. When the button is released the
first time, the Crossover/Delay 1 time starts counting down.
The button is then pressed and released a second time, which
starts the Delay 2 time counting down. The Transbrake will
release when either of the delay times reaches zero, even if
this results in a red light.
The main benefit of this setting is, it allows two shots
at the tree using only one Push-button, in case you missed
the tree with your first release. The downside is you cannot
reset the first delay to stop a red light if you flinch. The
second press of the button switches to Delay 2 while
Crossover/Delay 1 time continues counting down.
P.B. Mode Set to 4
Similar to P.B. Mode 3. The main difference is that
when the button is pressed the second time, the
Crossover/Delay 1 time is canceled. When Button 1 is
released the first time, the Crossover/Delay 1 time starts
counting down. If Button 1 is then pressed a second time,

- 52 -
the Crossover/Delay 1 time is canceled. Then when Button 1
is released a second time, Delay 2 time starts counting down.
The Transbrake will only release on Crossover/Delay
1 if Button 1 is not pressed a second time. However if
Button 1 is pressed and released a second time the
Transbrake will be released when Delay 2 time reaches zero.
P.B. Mode Set to 5
This mode requires two buttons to operate the
Transbrake. If the Transbrake has not already been
activated, pressing Button 1 has no effect. If the Transbrake
has been set by Button 2, pressing Button 1, usually on the
top yellow light, starts the counting down of the
Crossover/Delay 1 time.
If the button is pressed again the Elite Crossover will
start counting down the full Crossover/Delay 1 time again.
This is helpful if the driver flinches (presses the button
before the top yellow comes on).
When in Pro Mode
P.B. Mode is set to 1, 2, 3, or 4
When the P.B. mode is set to 1, 2, 3, or 4 the Elite
Crossover will automatically use P.B. Mode 1 for Pro mode.
This is because P.B. modes 2, 3, and 4 won’t work with a
Pro Tree. Press the button down when staging the vehicle,
and then release the button when the three yellow lights
come on. When the button is released the Elite Crossover
will start counting down the Pro Delay time.
P.B. Mode Set to 5
This mode requires two buttons to operate the
Transbrake. If the Transbrake has not already been activated
pressing Button 1 has no effect. If the Transbrake has been
set by Button 2, when the three yellow lights on the tree
come on, press the Button 1 to start the countdown of the Pro
Delay time.

- 53 -
Button 2
When in Bracket Mode
P.B. Mode is Set to 1,3, or 4
The first function for Button 2 is to be the Back-up
button. This feature is used by vehicles that require the
Transbrake solenoid to be engaged to back-up. The Back-up
feature is explained on page 54.
The second function for Button 4 is Multi Tap,
allowing large amounts of time to be subtracted from the
first delay started. The Multi Tap feature is explained on
page 37.
There is no third function for Button 2 in Bracket
Mode.
P.B. Mode is Set to 2
Button 2 is only used to activate Delay 2. Each time
Button 2 is pressed the Transbrake solenoid is engaged and
the Delay 2 time value is loaded into a counter. When the
button is then released the counter starts timing down. When
the counter reaches zero the Transbrake solenoid is released.
P.B. Mode is Set to 5
The only function for Button 2 is to set the
Transbrake solenoid. When the button is pressed the
Transbrake will engage.
There is no second or third function for Button 2 in
Bracket Mode.
When in Pro Mode P.B. Mode is Set to 1, 2, 3, or 4
The first function for Button 2 is to be the Back-up
button. This feature is used by vehicles that require the
Transbrake solenoid to be engaged to back-up. The Back-up
feature is explained on page 49.

- 54 -
There is no second or third function for Button 2 in
Pro Mode.
P.B. Mode is Set to 5
The only function for Button 2 is to set the
Transbrake solenoid. When the button is pressed the
Transbrake will engage.
There is no second or third function for Button 2 in
Bracket Mode.
Button 3 Settings
When in Bracket Mode
Any P.B. Mode
The first function for Button 3 is to set the S.L.E. so
the vehicle can be staged with the gas pedal fully depressed.
The S.L.E. feature is explained on page 40.
The second function for Button 3 is to Tap Down,
allowing time to be subtracted from the first delay started.
The Tap Down feature is explained on page 36.
The third function for Button 2 is to activate the
P.T.S.O., a Timer 1 Tap feature. The P.T.S.O. feature is
explained on page 39.
When in Pro Mode
Any P.B. Mode
The first function for Button 3 is to set the S.L.E. so
the vehicle can be staged with the gas pedal fully depressed.
The S.L.E. feature is explained on page 40.
The second function for Button 3 is to activate the
P.T.S.O., a Timer 1 Tap feature. The P.T.S.O. feature is
explained on page 39.
There is no third function for Button 3 in Pro Mode.

- 55 -
Button 4 Settings
When in Bracket Mode
Any P.B. Mode
The first function for Button 4 is to activate the Burn-
out Timer for the Line Lock solenoid(s). The Burn-out
feature is explained on page 41.
The second function for Button 2 is Tap Up, allowing
time to be added to the first delay started. The Tap Up
feature is explained on page 36.
There is no third function for Button 4 in Bracket
Mode.
When in Pro Mode
Any P.B. Mode
The first function for Button 4 is to activate the
Burn-out Timer for the Line Lock solenoid(s). The Burn-out
feature is explained on page 41.
There is no second or third function for Button 4 in
Pro Mode.

- 56 -
Back-up Feature
If the P.B. Mode is set to 1, 3, or 4, a button
connected to the P.B. 2 input can be used to back up the
vehicle without starting a delay cycle. The advantage of
using a Back-up button over a bypass button is the current
for the Transbrake solenoid does not pass through the switch.
It is possible to wire more than one switch to the P.B. 2
input. Example, a toggle switch could be used for backing
up and then a separate push-button could be used for
Tapping up.
Note: If a toggle switch is going to be used to activate the
Back-up feature, care must be taken to remember to
turn off the switch to avoid damage to the solenoid
and Relay Board.
Bypass Button
If Button 2 is not going to be used to back up the
vehicle, a bypass button can be used. To wire in a bypass
button take one wire from your button and connect it to the
Power post on the Relay Board. Then connect the other wire
from the button to the Transbrake terminal on the Relay
Board.
Note: The button and wiring used for the bypass button will
need to be able to handle the current of the
Transbrake solenoid.

- 57 -

- 58 -
The Relay Board The Relay Board is where all the electrical
connections are made. The cable from the Elite Crossover
plugs into the socket on the Relay board, it will only fit in
one way. This is the only connection that is necessary
between the two. The Relay Board has two power studs, one
for ground and one for power. It also has a Tach input, four
push-button inputs, and 7 fused outputs.
The Colored Status LED’s.
The green LEDs are used to indicate whether the
Relay Board has power and if a fuse has blown. When
power is applied to the Relay Board the green LEDs will
light. If power is applied, and there is an unlit green LED,
the fuse for that output has blown indicating there is a
problem with the wiring or the device connected to that
output. Once the problem is fixed, replace the fuse with a
new one.
The yellow LEDs are used to indicate which output is
turned on and supplying battery power to a device.
The red LEDs are used to indicate that a button is
pressed (or active).
Wiring the Power and Ground Studs
The power stud should be connected to a power
source capable of supplying enough current to run all the
devices connected to the Elite Crossover’s outputs at the
same time. In most cases this will either be the Master
Cutoff switch or the Starter Solenoid. Use whichever one is
closer to the Relay Board. The gauge of the power wire
needs to be selected according to current load. To figure out
your total current load, add up the individual current draw of

- 59 -
each device connected to an output. Then use the list below
to see what gauge power wire you need.
1-15 Amps 14 gauge
16-25 Amps 12 gauge
26-40 Amps 10 gauge
41-60 Amps 8 gauge
61-80 Amps 6 gauge
81-120 Amps 4 gauge
The power stud can also be used as a power source
for each button that is connected to any of the push-button
inputs.
The ground stud should be connected to a non-
aluminum chassis ground with a 14 gauge wire. If additional
devices are going to use the ground stud as a common
connection point, the 14 gauge wire going to the chassis
should be increased to handle the additional current.
Wiring the Tach Input
If you are planning on shifting by RPM, the Tach
input needs to be connected to the Tach output on the
ignition box.
Wiring the Push-buttons
There are four push-button inputs, labeled P.B. 1,
P.B. 2, P.B. 3, and P.B. 4. P.B. 1 is always the primary
Transbrake push-button.
All four push-button inputs wire the same, so only
P.B. 1 will be explained, follow the same procedure for
the other push-buttons. Most push-buttons only have two

- 60 -
wires. Connect one wire to the power stud and the other
wire to the P.B. 1 terminal. No other connections to the
push-button wires should be made. If your push-button has
three wires you will only need to use two of them. The two
wires are the Common ( C ) and the Normally Open ( N O ).
The Normally Closed ( N C ) wire is not used.
Wiring the Outputs
The Relay board has seven outputs. They are Trans,
Line Lock, S.L.E., Timer 1, Timer 2, Timer 3, and Shift.
Each of the seven outputs has its own fuse. The Trans, Line
Lock, and S.L.E. outputs are each rated at 15 Amps max and
come with a 15 Amp fuse installed on the Relay Board. The
three Timer and the Shift outputs are each rated at 40 Amps
max and come with a 20 Amp fuse installed on the Relay
Board. Any of the 20 Amp fuses can be increased up to 40
Amps when needed. When wiring a device to any of the
outputs on the Relay Board it is important to use the correct
wire gauge for the current load. Use the list below to see
what wire gauge is needed for the device.
1-15 Amps 14 gauge
16-25 Amps 12 gauge
26-40 Amps 10 gauge
The Trans terminal is the Transbrake output. The
Trans output is where the Transbrake solenoid and the 2 step
wire would connect.
Connect one wire from your Transbrake solenoid to
the Trans terminal. Connect the other wire from the
Transbrake solenoid to ground. Also connect the red wire
from a 2 Step or the wire coming from the Launch terminal
on the ignition box to the Trans terminal.

- 61 -
The Line Lock terminal is a dedicated output for use
with a Line Lock solenoid(s). The Line Locks can be used to
hold the vehicle for a timed burn-out and/or to assist the
Transbrake solenoid at the starting line. If you want to use
either of the Line Lock features, connect one wire from your
Line Lock solenoid(s) to the Line Lock terminal. Connect
the other wire from the Line Lock solenoid(s) to a ground.
The Starting Line Enhancer (S.L.E.) terminal is a
dedicated output for use with a Linkage style Throttle Stop
to control the engine RPM at the starting line. If you want to
use the S.L.E. feature, connect one wire from your Linkage
Stop solenoid to the S.L.E. terminal. Connect the other wire
from the Linkage Stop solenoid to a ground.
If you want to use an Air Under the Carb Throttle
Stop as an S.L.E. you can use the S.L.E. output Terminal.
If you want to use an Electric Under the Carb
Throttle Stop as an S.L.E. you must wire in an external relay
to handle the higher current of the Electric Throttle stops.
The Timer terminals all work the same. So only the
Timer 1 will be explained. When you receive the Relay
Board the Timer 1 output will have a 20 Amp fuse. This can
be increased to a 40Amp fuse if more current is needed.
Depending on what is being controlled by Timer 1 the
Throttle mode can be set so the output will supply or remove
12 Volts. The Timer output cannot supply ground. One wire
from the device needs to be connected to the Timer 1
terminal and the other wire from the device needs to be
connected to ground.
Note: If the device to be controlled needs Ground,
instead of +12 Volts, an additional relay will need to
be installed between the device and the Relay Board.

- 62 -
To wire the additional relay;
Connect pin 85 to the desired Relay Board output.
Connect pin 86 and 30 to Ground.
Connect pin 87 to the device.
The Shift terminal is a dedicated output for use with
a Shift solenoid. The Shift output can be used to shift the
vehicle up to 5 times by either RPM or Time. Combinations
of RPM and time can also be used. If you want to use the
Shift feature, connect one wire from your Shift solenoid to
the Shift terminal. Connect the other wire from the Shift
solenoid to a ground.
CAUTION: Reading these instructions may cause
headaches and a strong desire to sleep!

- 63 -
WARRANTY AND
DISCLAIMER
Digital Delay Electronics, Inc. warrants the products it
manufactures against defects in materials and workmanship for a
period limited to one year from the date of shipment, provided the
products have been stored, handled, installed, and used under
proper conditions.
The company’s liability under this limited warranty
shall extend only to the repair or replacement of a defective
product, at the company’s option. Digital Delay Inc. and Digital
Delay Electronics, Inc. disclaims all liability for any affirmation,
promise, or representation with respect to the products.
The customer agrees to hold Digital Delay Inc. and
Digital Delay Electronics, Inc harmless from, defend, and
indemnify Digital Delay Inc. and Digital Delay Electronics, Inc
against damages, claims, and expenses arising out of subsequent
sales of or use of Digital Delay Inc. and Digital Delay Electronics,
Inc products, or products containing components manufactured by
Digital Delay Electronics, Inc. and based upon personal injuries,
deaths, property damage, lost profits, and other matters which
BUYER, its employees, or sub-contractors are or may be to any
extent liable, including without limitation, penalties imposed by
the Consumer Product Safety Act (P.L. 92-573) and liability
imposed upon any person pursuant to the Magnuson-Moss
Warranty Act (P.L. 93-637), as now in effect or as amended
hereafter.
No warranties expressed or implied, are created with
respect to the company’s products except those expressly
contained herein. The customer acknowledges the disclaimers and
limitations contained and relies on no other warranties or
affirmations.