
Electronic Titrator BDI-TIT - MRCLAB · User Manual Electronic Titrator BDI-TIT PLEASE READ THIS...
45
User Manual Electronic Titrator BDI-TIT PLEASE READ THIS MANUAL CAREFULLY BEFORE OPERATION 3, Hagavish st. Israel 58817 Tel: 972 3 5595252, Fax: 972 3 5594529 [email protected] MRC.3.17
Transcript of Electronic Titrator BDI-TIT - MRCLAB · User Manual Electronic Titrator BDI-TIT PLEASE READ THIS...

User Manual Electronic Titrator
BDI-TIT
PLEASE READ THIS MANUAL CAREFULLY BEFORE OPERATION
3, Hagavish st. Israel 58817 Tel: 972 3 5595252, Fax: 972 3 5594529 [email protected]
MRC.3.17

Content
1. Unpacking ............................................................ 1
2. Overview .............................................................. 2
3. Parts Description ................................................ 3
4. Assembly Instruction ........................................ 10
5. Operation ........................................................... 16
6. Function Setting ................................................ 21
7. Accessories ....................................................... 23
8. Calibration ......................................................... 29
9. Cleaning and Maintenance ............................. 30
10. Trouble Shooting ............................................ 35
11. Storage ............................................................. 37
12. Warranty .......................................................... 38
13. Limitations and Compatibility ........................ 38

Safety Reminder
CAUTION:Possible damage to instrument.
Caution notes indicate any condition or practice,
which if not strictly observed or remedied, could
result in damage or destruction of the instrument.

1
1. Unpacking
Apart from the user manual, the BDI-TIT
package should contain the following items.
Electronic Titrator Include: Titrating pipe X1
Titrating pipe cover X1
BDI-TIT X1
AC Adapter X 1
Controller X 1
Controller cable USB X 2
Bottle Adapter X 5(GL32; GL38; GL28; GL25; S40)
Magnetic Stirrer X 1
Remote Titrating pipe X 1
Remote Control Handle X 1
Stirrer Bar(20mm)X 1
Filling valve X 1
Dispensing valve X 1
Filling pipe X 2
Installation tools X 1
Stander
Please check that all the items are present and inform your supplier immediately if any of the above is missing.

2
2. Overview
A digital titrating instrument, BDI-TIT delivers accurate
and precise bottle-top titration.
Please refer to "Limitations and Compatibility" for liquid
compatibility prior to operation.
2.1 Specification
Volume Range 0.01mL-99.99mL
Increment 10μL
Precision R= 0.2%
CV=0.07%
Velocity 16 Stages
Battery
Capacity:4000mA/h
Fully charged in 4 hours
(please use standard charger)
working time:about 5 hours
2.2 Limitations of Use
Temperature:15 ~ 40°C
Vapor pressure:<500mbar
Viscosity:<500mm²/s
Humidity:20~90%

3
②
3. Parts Description
3.1 BDI-TIT
No. Description
①
Liquid Level
Observation
(in piston running state)
②
Return Valve
(to adjust the liquid
direction of dispensing )
③ Titrating pipe
④ Titrating pipe cover
⑤ Titrating pipe Tip
⑥ Bottle Adapter
⑦ Filling pipe
⑤
①
③
④
⑦
⑥

4
3.2 Remote Control Handle
No. Description
① Controller Port
(Micro USB)
② Main Body lock
③
Air Admission
Cap
(pressure balance)
①
③
Control Knob
Data
Connector
②

5
No. Description
① LCD Display(show BDI-TIT running state)
② Filling(press and hold for filling,release it to stop)
③ Dispensing(press and hold for fast titration,release it to stop)
④ Setting/magnetic stirrer(short press switching magnetic stirrer
on/off; press and hold 2s into setting interface)
⑤ Pre-Filling(press and hold 2s for piston to complete a aspirating
and dispensing process)
⑥ Knob(Turn Knob for dropwise titrating, short press Knob for reset
the liquid volume record to zero)
3.3 Controller
Allows for BDI-TIT control and function
setting. ①
②
③
⑥
⑤
④

6
No. Description
1 Magnetic Stirrer Data Port(USB)
2 Locating Slot(to ensure magnetic stirrer assembly in place)
3 Sensor Holder Assembly Slot
4 Magnetic Stirrer Fastening Slot(to fixation with controller)
④
③
Control Panel can be fully
adjustable up to an angle of 45°
①
②

7
No. Description
1 Power Switch(symbol “O”indicates Off,”-” indicates On)
2 Remote control handle Port
3 Communication port(non-function)
4 Charging/Communication port
5 Main Instrument Port
⑤ ①
②
③ ④

8
3.4 Magnetic Stirrer
No. Description
1 Stirring Plate(Max. Bar 20mm)
2 Communication port
3 Fastening key
4 Location key(to ensure magnetic stirrer assembly in place)
④
③
② ①

9
3.5 Display
Magnetic Stirring
Indication
Battery
Indication
Indication Arrow
(piston movement)
Liquid
Volume
Unit

10
4. Assembly Instruction
Step - 1: Turn the Main Instrument Lock clockwise to connect
titrating tip with Main Body.
Step - 2: Press the titrating pipe tail end into the location slot.
Location slot

11
Step - 3: Push the titration pipe tail end with a certain length.
Step - 4: Connect the titration pipe tail end with the Dispensing
valve.
12
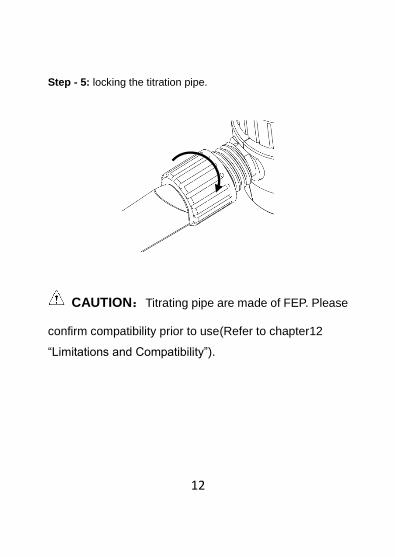
Step - 5: locking the titration pipe.
CAUTION:Titrating pipe are made of FEP. Please
confirm compatibility prior to use(Refer to chapter12
“Limitations and Compatibility”).

13
Step - 6: Connect filling pipe with filling valve.
Step - 7: Choose a suitable bottle adapter, then connect it
with BDI-TIT main body.

14
Step - 8: Turn bottle adapter to fasten main body and bottle.
CAUTION:
① Please enable that the adapter is fastened prior to
each use.
② For perfect titration, please do not move or touch
Main Instrument during operation to avoid
physical damage to your BDI-TIT.

15
Step - 9: Use USB cable to connect Main Instrument with
Controller.
Step - 10: Turn Return Valve to direction ①
If liquid is needed to be emptied from the barrel, turn Return
Valve to direction ②.
BDI-TIT basic system was assembled.
2
1

16
5. Operation
CAUTION: Do a complete process of aspirating and
dispensing before the first time work.
5.1 Titration
Step - 1: Power on.
Step - 2: Waiting self-check complete.

17
Step - 3: Long press Pre-filling button( ) 2 seconds to let
air out, leaving the piston at the bottom of the barrel finally.
Step - 4: Press and hold Filling button ( )to fill targeted
liquid until Indication Arrow showing that the piston is moving
downward.
Long press knob 2 seconds, do the same operation also.

18
Step - 5: Long press Dispensing button ( )for fast titration.
Turn Knob for dropwise titrating.
The dispensing liquid volume will been continue recording
and the volume will be show on the screen.
NOTE:
When recorded volume reaches the maximum value of 99.99ml,
the instrument will stop.Please press the knob to reset Liquid
Volume to zero.
CAUTION: There will may be some air bubble in the
barrel during the operation. These bubble dose not effect
the actual use.
If the bubble is bigger to effect the actual use, please

19
running several times aspirating and dispensing. If this
solution not works, please contact with the dealer or
manufacturer.
5.2 Liquid Emptying
If liquid is needed to be emptied from the barrel.
Step - 1: Turn Return Valve to direction ②.
2
1

20
Step - 2: Long press Dispensing button ( ),until the
piston run to the bottom of the barrel, make the liquid had been
emptying.
Step - 3: Turn Return Valve to direction ①.
Emptying operation was completed.
2
1

21
6. Function Setting
Press Setting button( )for about 2 seconds to enter
Function Setting interface.
Press Setting button( )to flick through pages.
Long press Setting button( )for about 2 seconds on any
page to exit Function Setting interface.
Page I: Aspiration speed within a range of 1-16. Turn Knob to
adjust and press for confirmation.

22
Page II: Dispensing speed within a range of 1-16. Turn Knob to
adjust and press for confirmation.
Page III: Magnetic stirrer speed within a range of off-5. Turn
Knob to adjust and press for confirmation.
NOTE: This function is effective after connecting the magnetic
stirrer only.

23
7. Accessories
7.1 Remote Control Handle
The Control Handle is fully map the operation of Control Panel,
easy to operate over a long distance.
Turn Knob for dropwise titrating, short press for reset liquid
volume record to zero, long press 2 second for filling liquid.
MAX. Length:90 cm
7.2 Magnetic Stirrer

24
Magnetic stirrer convenient user for mixing during the titration
experiments.
Step - 1: Connect Control Panel Fastening Slot with Magnetic
Stirrer Fastening Slot.
Step - 2: Turn the Magnetic Stirrer into horizontal position until
the Location Hole into the Location Slot.
Step - 3: Connect the USB Port under the Magnetic Stirrer with
the Control Panel.

25
7.3 Assemble Sensor Holder.
Step - 1: Fasten the Holder into place.
Step - 2: Press black button of the clamp and release until
reaching the appropriate altitude.

26
Assembly diagram
7.4 Remote Titrating pipe

27
Remote titrating pipe can effectively extend the titration
distance.
MAX. Length 1.5m
CAUTION:
Titrating pipe are made of FEP. Please confirm
compatibility prior to use(Refer to chapter12“Limitations
andCompatibility”).
Step - 1: Connect the titration pipe tail end with the Dispensing
valve.

28
Step - 2: locking the titration pipe.
Step - 3: Follow the figure to assemble the adapter and remote
titrating pipe.

29
8. CalibrationCalibration should take place at 20-25℃, kept constant within
1
2

30
±0.5℃. A dedicated calibration software will write calibration
values in your BDI-TIT, after the distilled water has been
repeatedly weighed up at least five times.
Hardware needed::
●Electronic balance with readability of 0.01 mg
●Distilled water
●X86-or X64-architectured PC with pre-loaded Windows
(XP/Vista / 7/8/10 )operating system
Software needed:
● Dedicated calibration software of BDI-TIT(For more information, please contact with your nearest
distributor.)
CAUTION:
If your BDI-TIT can not work properly after
calibration, please contact your nearest distributor for
assistance.
9. Cleaning and Maintenance
CAUTION: BDI-TIT cannot be autoclaved.

31
9.1 Cleaning the Outer Surface
The outer surface of your BDI-TIT is made of ABS, ideal for
easy cleaning with simply clean water.
9.2 Cleaning the Barrel
BDI-TIT barrel cleaning is repeatedly inhale row clear water
for cleaning.
Aspiration and dispensing at least 5 times, according to user's
actual situation to increase or decrease.
To ensure emptying remained in the barrel, the operation
reference “liquid emptying”
Step - 1: Turn Return Valve to direction①, long press Pre-filling
button make the piston stop at the barrel bottom

32
Step - 2: Press Filling and Dispensing button to aspiration and
dispensing simply clean water at least 5 times.
Step - 3: long press Pre-filling button make the piston stop at
the barrel bottom.
Step - 4: Ensure that into the tube is not submerged in a
liquid, Press filling button make piston run to the top of the
barrel.
Step - 5: Turn Return Valve to direction②, press Dispensing
button make piston run to the bottom of the barrel.
Step - 6: Cleaning work is finish,Turn Return Valve to
direction①
CAUTION: User is not recommended to remove and
2
1

33
cleaning of BDI-TIT barrel, if the barrel cleaning operation fail
to meet the cleaning requirements of users. please contact
the dealer or manufacturer professional services personnel
for cleaning.
Ensure BDI-TIT empty without liquid residue before delivery to
service personnel and inform details of last liquid handling.
9.3 Filling and Dispensing valve Replacement
Use the Installation tools to disassemble the old valve, replace the

34
new valve to the same position.
Valve has no fixed replacement cycle, problems after the
replacement.
The issue that could be has involvement with valve, please checking
the “Trouble Shooting”
CAUTION: The following operation must to use
installing tools to do.
Before disassemble, ensure to remove the dispensing and
filling pipe.
Disassemble Dispensing valve

35
Disassemble Filling valve
10. Trouble Shooting
Issue Possible Cause Solution

36
Piston
overflows with
liquid
Piston wears out. Contact with
manufacturer
Piston moves
with difficulty
Piston or its parts are
contaminated or
damaged due to
crystallization and
sedimentation.
① Do “Cleaning
the Barrel”
② Contact with
manufacturer
Failure to filling Filling valve is clogged. ① Replace
filling valve
② Contact with
manufacturer
Failure to refill;
refilling sucks
back into the
titration tip.
Dispensing valve is
contaminated or
titration tip damaged.
Bubbles in the
instrument/
Dispensing
volume is less
than the volume
displayed.
Filling pipe is loose or
damaged.
Replace filling
pipe
Filling pipe is away from
the liquid.
Chicking filling
pipe
Return pipe is not
installed or wrongly
Contact with
manufacturer

37
installed.
The instrument is not
fully refilled.
Checking
Operation
Filling valve is clogged
or damaged.
Checking filling
valve
Replace filling
valve
No display
Battery dead charging
Connection fail
USB cable
connection
checking
11. StorageDuring storage periods at constant temperature and humidity,

38
the recommended temperature range is from 0-40℃ and
humidity no more than 80%.
Please every month to charging for BDI-TIT if being unused
in long time , make sure there are 50% power in battery at
least.
12. WarrantyBDI-TIT electronic titrators are covered by one-year warranty
against defects in workmanship and materials. Please
contact us or your nearest distributor.
ANY WARRANTY WILL, HOWEVER, BE DEEMED AS VOID
WITH NORMAL WEAR AND TEAR OR FOR OPERATIONS
CONTRARY TO THE INSTRUCTIONS GIVEN IN THIS
MANUAL.
Each and every BDI-TIT has been calibrated and tested in
compliance with ISO8655-6 / DIN12650 when manufactured,
ensuring safe and comfortable operation.
13. Limitations and CompatibilityIt is recommended to confirm reagent’s compatibility with this

39
instrument when applied for special purposes, trace analysis for
example.
–The liquid-path construction of your BDI-TIT is made of
borosilicate glass, FEP and PTFE. Do not apply it in handling
liquids like hydrofluoric acid.
– The instrument would be clogged or damaged by solid
particles in turbid liquid like activated carbon.
– The plastic parts of your BDI-TIT would be in swelling condition if
concentrated acid and alkaline, and methylbenzene, benzene
and other nonpolar organic solvents are put into use.
– Keep your BDI away from the highly combustible carbon
disulfide.
– BDI-TIT cannot be autoclaved.
– Do not put your BDI-TIT in contact with corrosive gas like HCL
smog.
Compatibility(Max. Conc. 1 mol/L)
Acetic acid

40
Alcoholic potassium hydroxide solution
Ammonium iron (II) sulfate solution
Ammonium thiocyanate solution
Barium chloride solution
Bromide bromate solution
Cerium (IV) sulfate solution
EDTA solution
Hydrochloric acid
Hydrochloric acid in Acetone
Iodine solution*
Iodide Iodate solution*
Iron (II) sulfate solution
Nitric acid
Oxalic acid solution
Perchloric acid
Perchloric acid in glacial acetic acid

41
Potassium bromate solution
Potassium bromate bromide solution
Potassium dichromate solution
Potassium hydroxide solution
Potassium iodate solution
Potassium permanganate solution*
Potassium thiocyanate solution
Silver nitrate solution*
Sodium arsenite solution
Sodium carbonate solution
Sodium chloride solution
Sodium hydroxide solution
Sodium nitrite solution
Sodium thiosulfate solution
Sulfuric acid
Tetra-n-butylammonium hydroxide sol.

42
Triethanolamine in Acetone*
Zinc sulfate solution
CAUTION: This compatibility is against parts
which are directly in contact with liquid, if any of
above solution needs to be applied, contact with
manufacturer for consultation.


![Karl Fischer Moisture Titrator - MRCLAB · 2019-01-30 · Karl Fischer Moisture Titrator [Volumetric titration] Karl Fischer Moisture Titrator [Coulometric titration] 2 3 Unique flexibility](https://static.fdocuments.in/doc/165x107/5ea76e185906362b716d093d/karl-fischer-moisture-titrator-mrclab-2019-01-30-karl-fischer-moisture-titrator.jpg)

