Electronic Submission System - User procedures guide · 2018-05-21 · Electronic Submission System...
40
Electronic Submission System – User Guide 1 Electronic Submission System User procedures document MAY 2018
Transcript of Electronic Submission System - User procedures guide · 2018-05-21 · Electronic Submission System...

Electronic Submission System – User Guide 1
Electronic Submission System
User procedures document
MAY 2018
Electronic Submission System – User Guide 2
What’s new?
This user guide was updated in May 2018 to include recent changes to the
Electronic Submission System. These changes predominantly relate to the
look and feel of the screens, but any minor changes to functionality are
explained in this guide.

Electronic Submission System – User Guide 3
Contents
1. Accessing the system 4
Registering for system access 4
Activating your registration 7
If your registration request is rejected 7
Logging in 8
Logging out 9
Monthly Re-Authentication 9
2. Managing your profile and password 10
If you forget your password 10
Changing your password 11
Updating your profile 12
3. Understanding the user interface 14
Important notices 14
My Cases page 15
Mandatory fields 16
Error messages 16
Help text 17
Case pagination 17
Search 18
4. Creating a new case 19
Step 1: Creating a new case 19
Step 2: Choosing decisions 20
Step 3: Entering case details 21
Step 4: Adding issuers 23
Step 5: Adding other parties 24
Step 6: Inviting other users 25
Step 7: Choosing a primary contact 27
Step 8: Uploading documents 28
Step 9: Submitting the case 30
5. Working on an open case 32
Modifying case details on an open case 32
Case response information 33
Responding to comments on the case 34
Submitting further drafts for a case 39
Closing a case 40
Written Notice 40

Electronic Submission System – User Guide 4
1. Accessing the system
Under the Prospectus Rules and the Listing Rules, issuers are required to
submit certain types of investor documentation (e.g. draft prospectuses,
listing particulars and shareholder circulars) to us for approval ahead of
publication.
If you wish to submit documents to us on behalf of your firm, you will have
to first register with the Electronic Submission System for access. The
system allows companies' advisers to send documents to us in an electronic
form.
Registering for system access
Your registration is subject to approval. You can send documents to us via
this system only once you have been accepted as an approved user of the
system.
All individuals from your organisation who need to use the system must register individually for access. Sharing your username and password with other users is strictly prohibited.
To registration for system access, follow these three steps.
Step 1: Go to the ESS login page and click on Register for System Access

Electronic Submission System – User Guide 5
Step 2: Enter your registration details, then Submit
When providing your registration details, please note:
Your email address must to be your work email address. We do not
accept registrations from public domains such as Gmail or Yahoo.
Your email address will be used as your ESS username. Once
submitted, your email address cannot be changed.
Your contact telephone number must be your direct line, not a
switchboard number.
Your company information (company address, contact number and
fax) will be used on all cases where you are the named as the Primary
Contact.

Electronic Submission System – User Guide 6
Step 3: Click on I Accept to accept the terms and conditions
When you click I Accept, you will see the Registration confirmation
message and an email will be sent to your registered email address. At this
point, your request is now with us for approval. Click on OK to complete the
registration process.
You will be sent an email once the decision is taken.
If you choose Cancel in Step 3, the registration request you have created
will be void and no further action will be taken.

Electronic Submission System – User Guide 7
Activating your registration
Once we have approved your registration, an email will be sent to your
registered email address. This email will confirm your username and provide
a link to activate your account.
Click on the link in the email and you will be prompted to set a password
when you first log in.
Your password must be at least 8 characters long, with a mix of uppercase,
lowercase and at least one special character: !#$%-_=+<>
If your registration request is rejected
If your registration has been rejected, an email will be sent to your registered
email address. If you have any queries you can call our General
administrative help desk on the number provided in the email.

Electronic Submission System – User Guide 8
Logging in
When you log into ESS in future, you will need to enter your username and
password and click on Login. Enter the username in lowercase.
After 5 unsuccessful login attempts, your account will be locked for 30
minutes.
Whenever you log in, you will be asked to accept the FCA Terms and
Conditions for system usage. Tick the box marked I Accept and click Next
to continue.
You can view the FCA Privacy Statement using the on-screen link, or at
https://www.fca.org.uk/privacy

Electronic Submission System – User Guide 9
Logging out
You can log out of the system at any time by clicking on your user name in
the top right corner of the page and selecting Logout from the dropdown.
Please ensure you have saved all information you have entered
before you log out.
Monthly Re-Authentication
On the first login of every month, the system will automatically
re-authenticate your account. When you try to login, the system will send a
verification code to your registered email address and direct you to the page
below.
Enter the verification code and click Next. On entering a correct verification
code, you will be granted access to the system.
The code is one time and will expire once used. If you enter an incorrect
code, a new email will be sent to your email address.

Electronic Submission System – User Guide 10
2. Managing your profile and password
If you forget your password
If you forget your password, click on the Forgot Your Password? link on
the login page.
You’ll be asked to provide your email address. This is your registered email
address which is also your ESS username.
An email will be sent to your registered email address. The email will contain
a link which can be used only once – if you forget your password again, you
will have to request a new link.
When you click on the link within the email, you’ll be asked to provide a new
password. When choosing a new password, remember:
Passwords must be at least 8 characters, a mix of uppercase,
lowercase, and at least one special character: !#$%-_=+<>
The new password you choose cannot be one of the last 12 passwords
you have used before.

Electronic Submission System – User Guide 11
Changing your password
Once you have registered and successfully logged in, you can change your
password anytime by choosing Change Password on the home page.
You’ll then be asked to enter your current password and your new password.
When choosing a new password, remember:
Passwords must be at least 8 characters, a mix of uppercase,
lowercase, and at least one special character: !#$%-_=+<>
The new password you choose cannot be one of the last 12 passwords
you have used before.
When done, click on the Save button.

Electronic Submission System – User Guide 12
Updating your profile
Once your registration is approved and you have logged in, you can view and
update your profile details at any time by clicking on the My Profile link on
the home page.
You’ll now be able to view and update your profile details.

Electronic Submission System – User Guide 13
For security reasons, you cannot change your email address and company
name. These fields are displayed but cannot be edited.
Should your email address change while you are working with the same
organisation, you must contact our general administrative help desk who will
update your profile with your new email address.
Please keep your contact details up to date at all times. These
details will be used in our correspondence for all cases where you have been indicated as the Primary Contact.
Once you made all the changes required, you can choose to update the
contact details on all the cases where you are the named Primary Contact.
This can be done by selecting the option to Apply changes to Open Cases
where I am the Primary Contact in the Additional Options section.
Your address on closed (Approved, Withdrawn or Lapsed) cases will not be
updated.

Electronic Submission System – User Guide 14
3. Understanding the user interface
Important notices
On the login page, you will see a section for Important Notices. We update
this section regularly to keep you informed about news such as system
unavailability or recent changes.
Electronic Submission System – User Guide 15
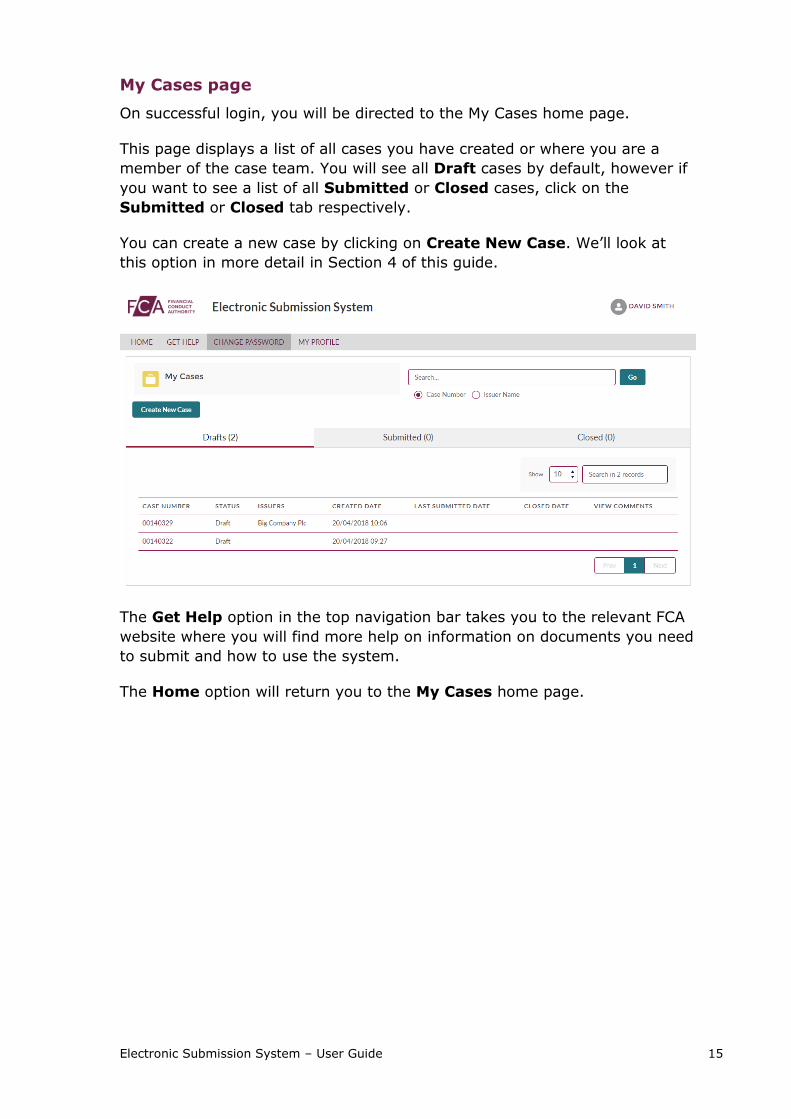
My Cases page
On successful login, you will be directed to the My Cases home page.
This page displays a list of all cases you have created or where you are a
member of the case team. You will see all Draft cases by default, however if
you want to see a list of all Submitted or Closed cases, click on the
Submitted or Closed tab respectively.
You can create a new case by clicking on Create New Case. We’ll look at
this option in more detail in Section 4 of this guide.
The Get Help option in the top navigation bar takes you to the relevant FCA
website where you will find more help on information on documents you need
to submit and how to use the system.
The Home option will return you to the My Cases home page.

Electronic Submission System – User Guide 16
Mandatory fields
Mandatory fields are marked with a red asterisk (*). You must enter a value
in these fields before you proceed to Save or Submit.
Error messages
When you click Save or Submit, an error message will be displayed if you
have not entered mandatory values or if the data you have entered is invalid.
Error messages are displayed at the top of the screen. They will disappear
automatically after a few seconds, or you can close them manually by clicking
on the cross.

Electronic Submission System – User Guide 17
Help text
Help text is provided for all important fields on all pages. Help text may be
displayed on the screen:
Help text can also be viewed by clicking on the icon next to a field.
Case pagination
By default, the system will display 10 cases at a time, but you increase the
number of cases shown on each page to 25, 50 or 100 using the dropdown
list next to the Show button.
To see more cases, use the Next or Previous buttons – these will only
become active when there are more cases than will fit on one page.

Electronic Submission System – User Guide 18
Search
You can search for cases by entering a case number or issuer name in the
search box and clicking Go.
You can enter a part of the Issuer Name or the Case Number. The search
results will only list relevant cases you have access to.
Electronic Submission System – User Guide 19
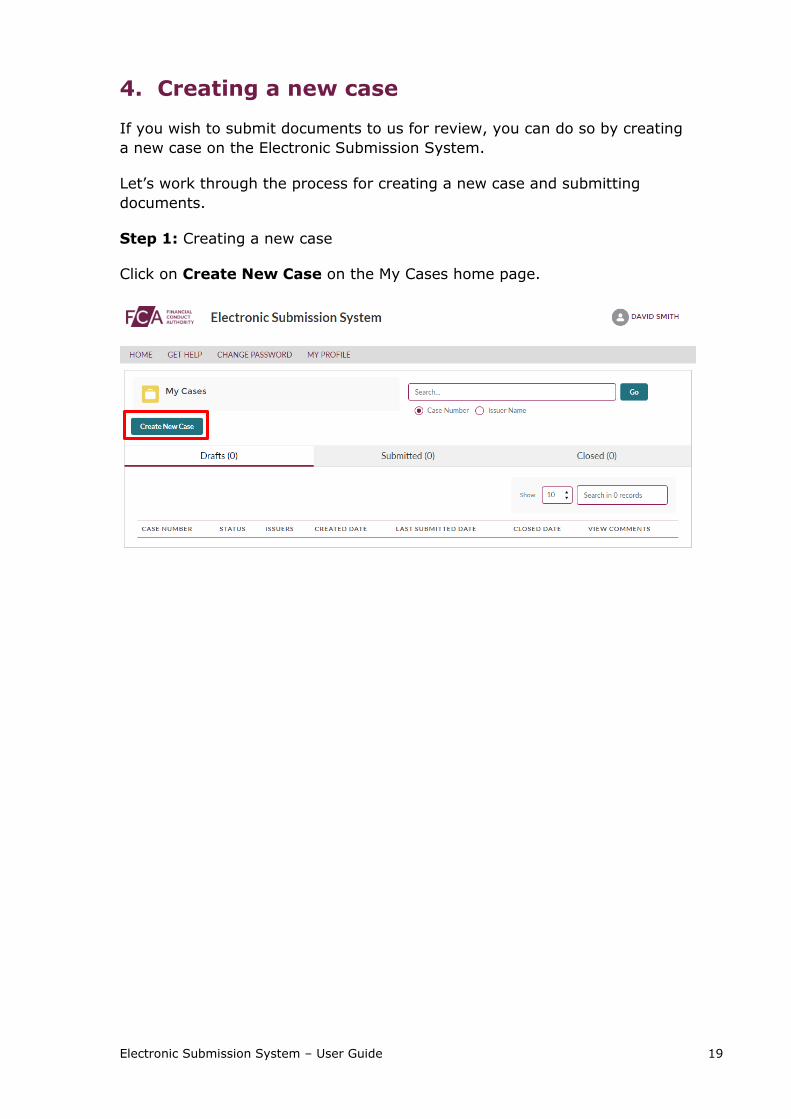
4. Creating a new case
If you wish to submit documents to us for review, you can do so by creating
a new case on the Electronic Submission System.
Let’s work through the process for creating a new case and submitting
documents.
Step 1: Creating a new case
Click on Create New Case on the My Cases home page.

Electronic Submission System – User Guide 20
Step 2: Choosing decisions
You will be asked to select the decision(s) you want to request from us. You
can select more than one decision at a time.
Depending on the decisions you choose, you may have to confirm if the case
is a Same Day Supplement (SDS). More information on the Same Day
Supplement service is available here:
https://www.fca.org.uk/markets/ukla/submit-draft-document/same-day-
service
Once you click on Save and Continue, a new case will be created. You will
need to enter more details and upload documents before you submit the case
to us for review.

Electronic Submission System – User Guide 21
Step 3: Entering case details
After completing Step 2, a new case will be created. This will have a unique
case number (shown top-left) and a Draft case status.
You must fill in all case information and upload documents before you submit
the case to us.
For information on case fields, click on the help icon next to the field.
If you do not have all the information required for us to review your case,
you can click on Save to save the case as Draft.
We do not progress a case unless the case is submitted. Please ensure that
you click on Submit (step 9) once you have filled in all required information
and uploaded all documents you want to review.

Electronic Submission System – User Guide 22
In Submitter Role, choose the primary role of your organisation on the
case.

Electronic Submission System – User Guide 23
Step 4: Adding issuers
You can add multiple issuers on a case by choosing Add Issuers on the case
view.
When the Add New Issuer box appears, complete the Issuer Name field
and click Add.
The issuer will be added to the list:
You can add multiple issuers to a case. If you want to add new issuer details,
this can be done at any point in the case lifecycle until the case is closed.
If your organisation is the case issuer, and have set the Submitter Role as
Issuer, your organisation will be added to this list by default. You do not need
to add it again.

Electronic Submission System – User Guide 24
Step 5: Adding other parties
If you have other Sponsors, Advisors or Guarantors working on a case, you
can add them to the case by choosing Add Party in the Other Parties
section.
When the Add New Party box appears, complete the Organisation Name
field, choose the Role from the dropdown list and click Add.
The organisation will be added to the list:
To remove an organisation from the case, click on Remove.
You can add multiple Sponsors, Advisors or Guarantors to the case.
If you want to add new or modify details of Organisation, it can be done at
any point in the case lifecycle until the case is closed.

Electronic Submission System – User Guide 25
Step 6: Inviting other users
By default, the system gives the case creator access to all cases he/she has
created. However, if you need to share case information with other people in
your company, you can do so by inviting new users to the case.
Note: You can only invite people with same email domain as you.
Please note that sharing usernames and passwords is against the
FCA terms and conditions for system usage. Any user wanting access to the information on the system must be invited to the
case using this option.
To add a new user, select Add Case User in the Case Users section.
When the Add New Case User box appears, complete the details (Title, First
Name, Last name and Email) and select Add.
You will then see this warning message. Please read this carefully.
Select OK to agree to the terms and conditions in this message.

Electronic Submission System – User Guide 26
The case user you have added will receive an invite on the email address
entered by you. This invite will contain a link to access the case.
If the user is not a registered user of Electronic Submission System, a
registration invitation will be sent to the user’s email address you have
provided. The user will only be able to access the case once their registration
is approved.
If you choose Cancel, the process will be terminated and no invitation email
will be sent to the user.
The new user will now be displayed in the Case User list.
The case creator is automatically added to the Case users list and is marked
as the ‘Submitter’ of the case.
If you want to add or remove case users, you can do so anytime until the
case is closed.
To prevent unauthorised access of the system, for all open cases we
recommend you remove users who have left your organisation or no longer
need access to an open case by using the Remove option.
You cannot remove the Primary contact from the case unless you first mark
some other user as the Primary Contact (see Step 7).

Electronic Submission System – User Guide 27
Step 7: Choosing a Primary Contact
Each case must have a Primary contact – this is the individual with which
we will liaise for correspondence related to the case. You can choose one of
the case users as Primary contact.
By default, the case creator is marked as the primary contact on the case.
You can change the primary contact at any point in the case lifecycle by
using the tick box option in the Case Users list.
Only approved users (i.e. those with an Active status) can be marked as the
primary contact.
You can update the contact details of the primary contact for the case at any
time until the case is closed by editing the Primary Contact Information.
Any address changes made here will apply only to this case and will not be
applied to be updated back on the user’s profile.
We recommend you keep the contact details up to date at all times.

Electronic Submission System – User Guide 28
Step 8: Uploading documents
You should submit your case for review only once you have added
all the relevant information and attached all documents needed for an initial submission.
To upload documents select the Case Documents tab on the case.
The top section of this page explains the four steps to upload a document:
1. Select File Category: Choose the Document Category you are
attaching (Main Document, Supplementary Document or Checklist).
2. Select Document Type: Depending on the Category you have chosen,
you will see a list of document types under that category. Select the
appropriate document type.
3. Blackline Version: If the document you are attaching is a backline
version of the document, choose Yes otherwise choose No.
4. Select the file: You can do this in two ways, either by selecting
Upload Files and browsing to the document you want to attach, or by
dragging and dropping the file onto the Or drop files link.

Electronic Submission System – User Guide 29
The system displays the following progress message and confirms when the
file has been uploaded.
You can attach more than one document to a case. To attach additional
documents, repeat Steps 1-4.
All the documents you have attached will be displayed here, in the
Document(s) ready for submission section of the page:
You cannot view documents uploaded to the system. The UKLA team will be
able to view these as part of the approval process.
If you wish to remove a document from the case before it is submitted to the
UKLA, you can do so by clicking the Remove button. You will not be able to
remove documents once a case has been submitted.

Electronic Submission System – User Guide 30
Step 9: Submit the case
Once you have entered all relevant information and attached all documents
that support the decisions you have requested from us, the final step is to
submit the case.
You can find out more about what needs to be included in your initial
submission here: https://www.fca.org.uk/publication/ukla/pn-903-2.pdf
To submit the case, select the Submit button.

Electronic Submission System – User Guide 31
You will be taken to the Submission Summary page where you will need to
select the Submit button at the foot of the page to complete the submission
process.
Once a case is submitted, the status of the case moves from Draft to Open.
The case will now be listed on the Submitted tab of the My Cases page.

Electronic Submission System – User Guide 32
5. Working on an open case
Once a case is submitted, the status changes to Open and we will start
working on it.
Modifying case details on an open case
You can update the details of an open case at any time on the case until the
case is closed. Any case information that cannot be updated once the case is
created (e.g. the requested decision) will be displayed as read only.

Electronic Submission System – User Guide 33
Case response information
When your case is first submitted, we will assign a reading team to the case,
identify the date by which a first response is due and confirm the fees
applicable.
This information will be sent by email to the Primary Contact.
This information – along with the payment status of the fees – is also
available to all members of your team working on the case on the Response
Information Tab.
Electronic Submission System – User Guide 34
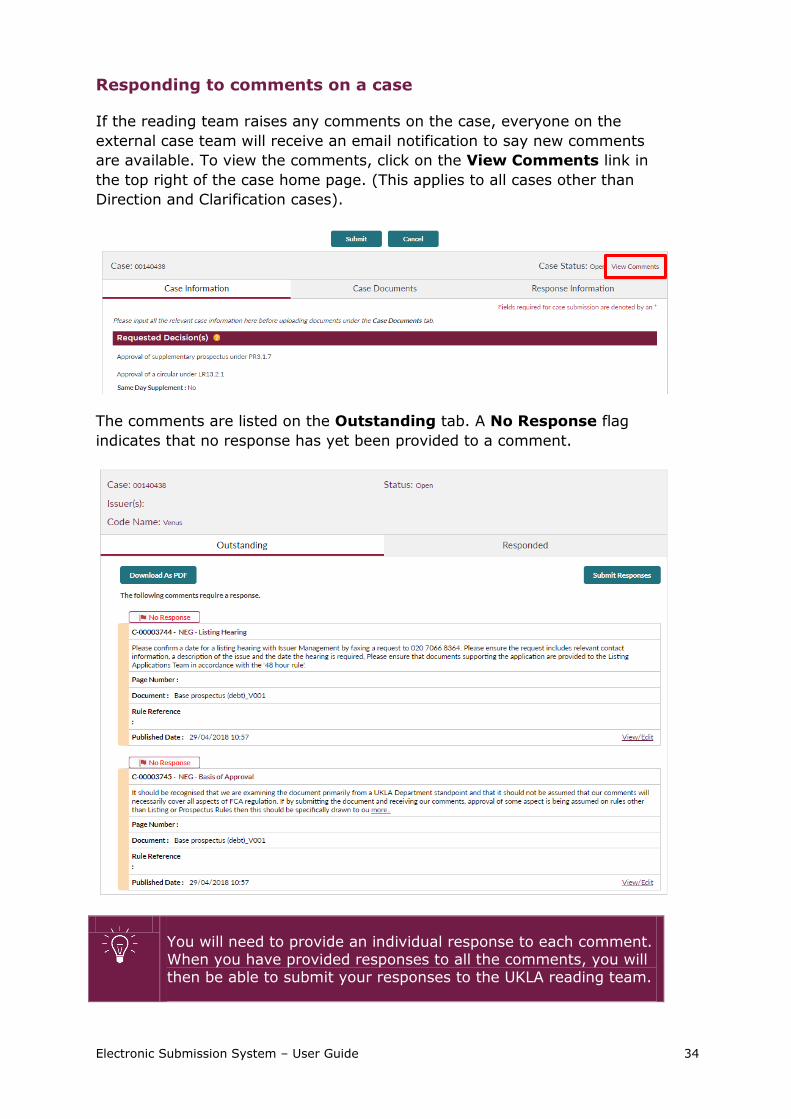
Responding to comments on a case
If the reading team raises any comments on the case, everyone on the
external case team will receive an email notification to say new comments
are available. To view the comments, click on the View Comments link in
the top right of the case home page. (This applies to all cases other than
Direction and Clarification cases).
The comments are listed on the Outstanding tab. A No Response flag
indicates that no response has yet been provided to a comment.
You will need to provide an individual response to each comment. When you have provided responses to all the comments, you will then be able to submit your responses to the UKLA reading team.

Electronic Submission System – User Guide 35
To view a comment and provide a response, click on the title of the
comment, or the View/Edit link.
Type your response to the comment in the text box, adding a page reference
below if appropriate, then Save & Exit.

Electronic Submission System – User Guide 36
When you have entered and saved your response to a comment, the No
Response flag will no longer be displayed.
When you have provided responses to all comments, you can submit these to
the reading team by selecting Submit Responses.
The Summary of Case Comments will be displayed, confirming what you are
about to submit. Complete the submission process by selecting Submit
Responses.

Electronic Submission System – User Guide 37
A confirmation of the submitted responses will then be displayed:
If the reading team has asked you to submit updated versions of any documents, please do so when you submit your responses.
The SLA period for the review by the reading team will only begin once the responses and any further versions of the documents have been received.
If you now view the comments on the case (by selecting View Comments
on the case home page), you will see that the comments are shown on the
Responded tab, along with the date and time at which the response was
submitted.
You cannot edit a response once it has been submitted.
You can view a response by clicking on the comment number link in the first
column of the table.
Alternatively, you can download all comments and responses as a PDF by
using the Download as PDF option.
Electronic Submission System – User Guide 38
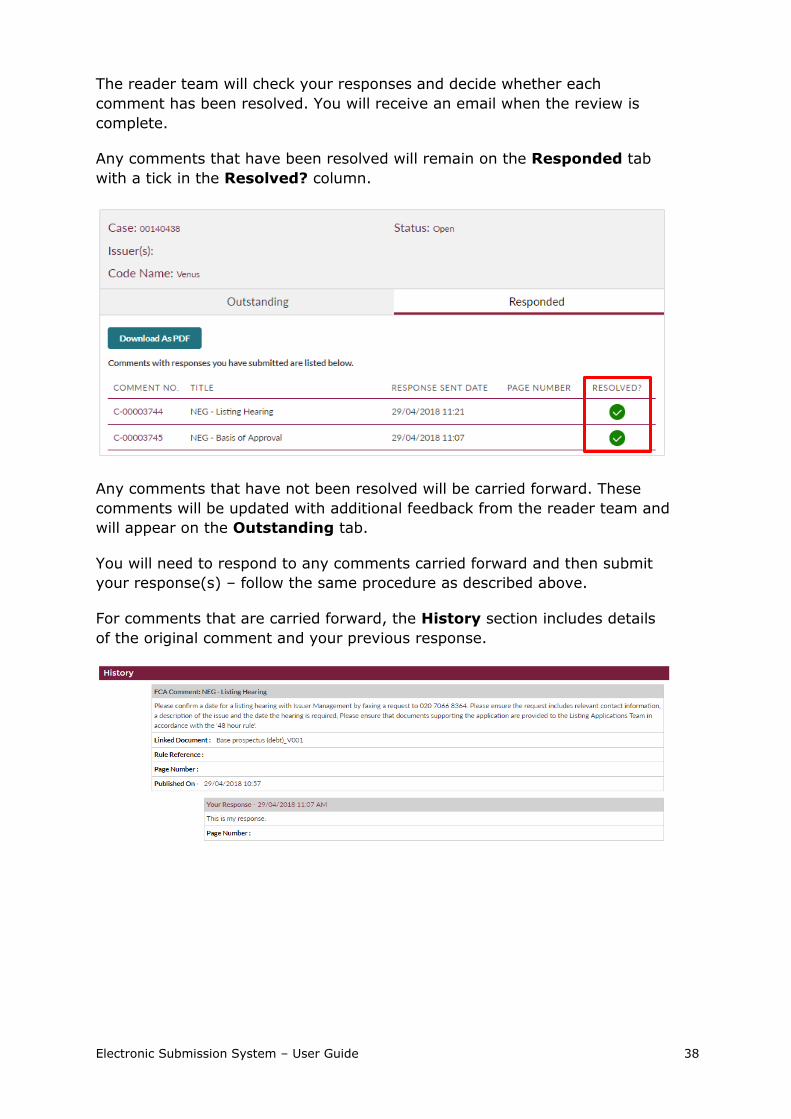
The reader team will check your responses and decide whether each
comment has been resolved. You will receive an email when the review is
complete.
Any comments that have been resolved will remain on the Responded tab
with a tick in the Resolved? column.
Any comments that have not been resolved will be carried forward. These
comments will be updated with additional feedback from the reader team and
will appear on the Outstanding tab.
You will need to respond to any comments carried forward and then submit
your response(s) – follow the same procedure as described above.
For comments that are carried forward, the History section includes details
of the original comment and your previous response.

Electronic Submission System – User Guide 39
Submitting further drafts for a case
Following the review of documents by the reading team, you may be required
to submit new documents or further drafts to the documents you have
already submitted.
To do so, follow the process described previously (Step 8: Uploading
documents).
When you submit further drafts, please take care to select the correct
Category and Document Type of the draft you are submitting. The system
will automatically update the version of the document to the next version.
Once a document is attached, it is automatically saved by the system and will
not be lost if you log out.
Only once you have uploaded all the documents, click on Submit to make it
available to us for review.
For further information on how to submit documents for approval, please visit
the FCA website: https://www.fca.org.uk/markets/ukla

Electronic Submission System – User Guide 40
Closing a case
On receiving the final versions of the documents under review, we will
approve the document(s) and close the case.
The status of the case will be Closed.
Once a case is closed, you cannot change any details on the case.
At any point, if you wish to withdraw or put the review process on hold, you
can do so by calling the general administrative help desk and quote your case
reference number.
Written Notice
For all cases which are not Direction and Clarification cases, we will email the
Written Notice to the Primary Contact and other case team members. This
notice will confirm the approval of documents you have submitted.
A copy of the written notice can be accessed from the Response
Information tab.