Electronic Displays, Inc. EDV111 Series LED Signs Allen ...
41
EDV111 Series - LED Signs Firmware Protocol 3.1 Electronic Displays, Inc. EDV111 Series LED Signs Allen Bradley AOI (Add on Instruction) Software Manual Version Control Version Date Author Change Description 2.0 07/21/2019 c.elston Updated for EDI ED-3500 Gateway 1.0 12/01/2012 c.elston Initial release
Transcript of Electronic Displays, Inc. EDV111 Series LED Signs Allen ...

EDV111 Series - LED Signs Firmware Protocol 3.1
Electronic Displays, Inc. EDV111 Series LED Signs
Allen Bradley AOI (Add on Instruction)
Software Manual
Version Control
Version Date Author Change Description
2.0 07/21/2019 c.elston Updated for EDI ED-3500 Gateway
1.0 12/01/2012 c.elston Initial release

Ethernet/IP EDV111 Series LED Signs - AOI Software Manual
Effective 07/29/2019 Page 2 Version 2.0
Electronic Displays, Inc. EDV111 Series LED Signs Allen Bradley AOI (Add on Instruction)
Software Manual
TABLE OF CONTENTS
1 INTRODUCTION ...................................................................................................................... 4
1.1 Supported PLC Controllers ......................................................................................... 4
1.2 Add-On Instructions .................................................................................................... 4
1.3 Supported LED Signs.................................................................................................. 5
2 SYSTEM BLOCK DIAGRAM ................................................................................................... 6
2.1 Typical Connection Diagram ....................................................................................... 6
2.2 Internal EDV111 Connection Diagram ........................................................................ 7
2.3 Single Sign Connection ............................................................................................... 8
2.4 Multiple Sign Connection (Less than 50 Feet apart) ................................................... 8
2.5 Multiple Sign Connection (More than 50 Feet apart) .................................................. 9
3 CUSTOMIZE THE IP ADDRESS EDI ED-3500 GATEWAY ................................................. 10
3.1 CUSTOMIZE SIGN COMMUNICATION SETTING RS232/485 ............................... 12
3.2 CUSTOMIZE ASCII SETTING .................................................................................. 13
3.3 VERIFY COMMUNICATION WITH SIGN (WITHOUT PLC LADDER) ..................... 14
4 QUICK START USING TEMPLATE PLC PROGRAM .......................................................... 17
4.1 Quick Start with Template PLC Program .................................................................. 17
4.2 Update Sign IP Address in Sample PLC Program .................................................... 18
4.3 Update Messages and Sign Format Tags ................................................................ 19
4.4 Create and Customize Ladder Logic ........................................................................ 20
5 IMPORTING WITH NEW PROGRAM OR EXISITING PLC PROGRAM .............................. 21
5.1 Start a new project with RS Logix 5000 .................................................................... 21
5.2 Create a New Ethernet Connection .......................................................................... 22
5.3 Importing Data-Types................................................................................................ 26
5.4 Importing Add-on Instructions ................................................................................... 28

Ethernet/IP EDV111 Series LED Signs - AOI Software Manual
Effective 07/29/2019 Page 3 Version 2.0
Electronic Displays, Inc. EDV111 Series LED Signs Allen Bradley AOI (Add on Instruction)
Software Manual
6 USING THE AOI INSTRUCTIONS IN THE PROJECT ......................................................... 32
6.1 Add AOIs to Ladder Programming via Drag and Drop ............................................. 32
6.2 Creating Unique Tags for AOI ................................................................................... 33
6.3 Creating Unique Tags for Sign Parameters .............................................................. 34
6.4 Setting up the Sign Tag ............................................................................................ 36
6.5 Mapping Sign Tag to AOI Function Block in Ladder Logic ....................................... 38
7 ELECTRONIC DISPLAY AOI INSTRUCTIONS .................................................................... 39
7.1 Send Sign Message AOI ........................................................................................... 39
7.2 Reset Sign AOI ......................................................................................................... 40
7.3 Setup Sign Variables AOI ......................................................................................... 40
7.4 Update Sign Variables AOI ....................................................................................... 41
7.5 Expert Sign AOI ........................................................................................................ 41

Ethernet/IP EDV111 Series LED Signs - AOI Software Manual
Effective 07/29/2019 Page 4 Version 2.0
Electronic Displays, Inc. EDV111 Series LED Signs Allen Bradley AOI (Add on Instruction)
Software Manual
1 INTRODUCTION
This manual is provided as a guide for using EVD111 series LED Signs with RS Logix 5000 software by Allen Bradley. This manual provides detailed configuration instructions to configure Ethernet/IP and importing AOIs (add-on-instructions) to RS Logix 5000 software projects.
1.1 Supported PLC Controllers
At this time only Allen Bradley CompactLogix and ControlLogix PLC CPUs that use RS Logix 5000 software are supported. Sample projects can be downloaded from the Electronic Displays, Inc. website. Allen Bradley Micrologix, SLC500 or PLC5 PLC CPUs are NOT supported using RS Logix 500 software. Please refer to the ASCII protocol manual for examples. Typically, you will need to connect the serial port from the PLC directly to the LED sign using the DF1 channel 0 port with these types of PLCs.
1.2 Add-On Instructions
Add-on instructions provided in this manual are used to make ladder logic based programming very easy. These set of AOIs can be imported into your project and reused in ladder flow.
Ethernet/IP EDV111 Series LED Signs - AOI Software Manual
Effective 07/29/2019 Page 5 Version 2.0
Electronic Displays, Inc. EDV111 Series LED Signs Allen Bradley AOI (Add on Instruction)
Software Manual
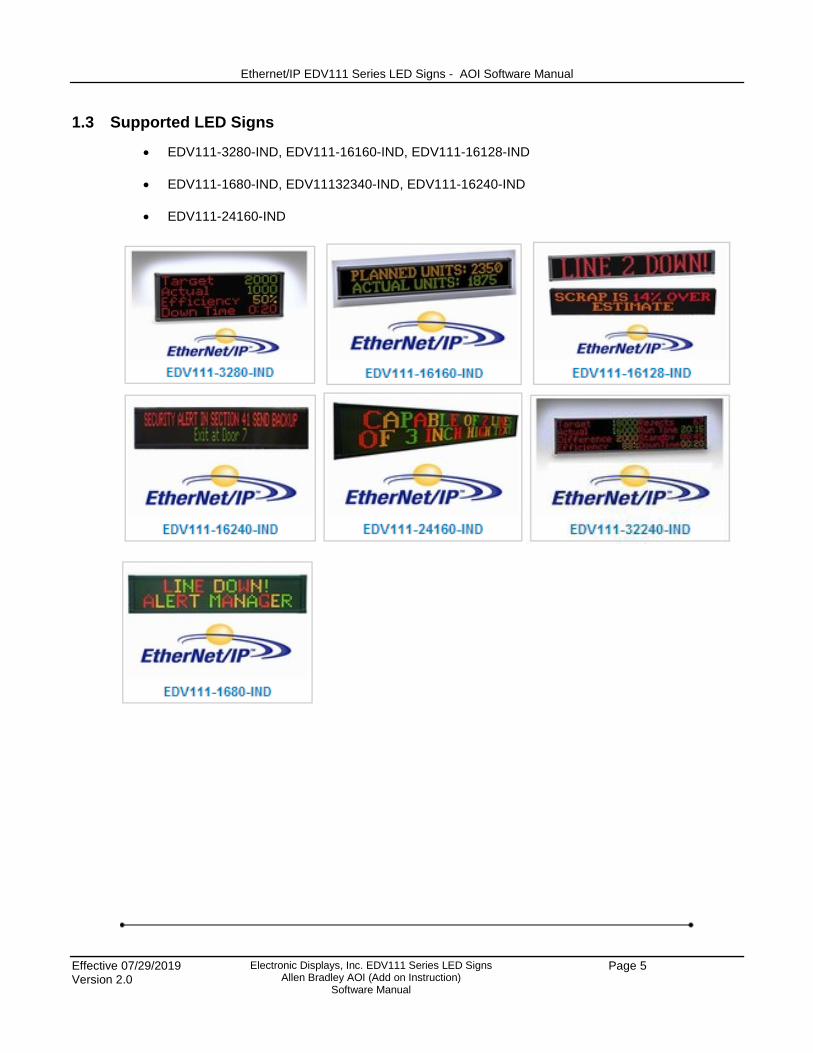
1.3 Supported LED Signs
EDV111-3280-IND, EDV111-16160-IND, EDV111-16128-IND
EDV111-1680-IND, EDV11132340-IND, EDV111-16240-IND
EDV111-24160-IND

Ethernet/IP EDV111 Series LED Signs - AOI Software Manual
Effective 07/29/2019 Page 6 Version 2.0
Electronic Displays, Inc. EDV111 Series LED Signs Allen Bradley AOI (Add on Instruction)
Software Manual
2 SYSTEM BLOCK DIAGRAM
EDV111 LED signs come equipped with an Electronic Displays ED-3500 gateway device that exchanges the Ethernet/IP protocol into ASCII serial strings compatible with the LED signs. This allows for the LED signs to be connected via an Ethernet CAT5 cable and not limited to a short distance RS-232 cable typically connected to traditional LED signs displays.
2.1 Typical Connection Diagram
Industrial PLC
Industrial Network Switch
EDV111 Series LED Sign
Ethernet/IP CAT5 Cable
Ethernet/IP CAT5 Cable

Ethernet/IP EDV111 Series LED Signs - AOI Software Manual
Effective 07/29/2019 Page 7 Version 2.0
Electronic Displays, Inc. EDV111 Series LED Signs Allen Bradley AOI (Add on Instruction)
Software Manual
2.2 Internal EDV111 Connection Diagram
EDI ED-3500 Gateway
EDV111 Series LED Sign
Ethernet/IP CAT5 Cable
RS-232/485
Shielded Cable
External 24VDC
Customer Supplied
IP Address
or
DEFAULT IP Address:
192.168.1.11
EDV111 Typical Internal Connections

Ethernet/IP EDV111 Series LED Signs - AOI Software Manual
Effective 07/29/2019 Page 8 Version 2.0
Electronic Displays, Inc. EDV111 Series LED Signs Allen Bradley AOI (Add on Instruction)
Software Manual
2.3 Single Sign Connection
Single sign connection must have an installed "Master" EDI ED-3500 gateway device.
EDV111 Series LED Sign (with EDI ED-3500 Gateway)
2.4 Multiple Sign Connection (Less than 50 Feet apart)
At least one EDV111 sign must have an installed "Master" EDI ED-3500 Gateway device. This master can reproduce RS-232 signals in a repeater fashion to slave signs by linking multiple EDV111 series signs together using a standard RS-232 cable. Signs must not be mounted more than 50 feet apart. Downstream "slave" signs will not require internal EDI ED-3500 Gateway.
EDV111 Series LED Sign (with EDI ED-3500 gateway)
sign address "01"
sign address "04" etc... (no internal EDI ED-3500 Gateway)
sign address "03" (no internal EDI ED-3500 Gateway)
Linked via RS-232 Cable
sign address "02" Less than 50 feet
Ethernet/IP only CAT5 cable
REQ: IP Address
Ethernet/IP only CAT5 cable
REQ: IP Address

Ethernet/IP EDV111 Series LED Signs - AOI Software Manual
Effective 07/29/2019 Page 9 Version 2.0
Electronic Displays, Inc. EDV111 Series LED Signs Allen Bradley AOI (Add on Instruction)
Software Manual
2.5 Multiple Sign Connection (More than 50 Feet apart)
Each sign will require an EDV111 to be internally installed as a "Master" EDI ED-3500 Gateway device.
EDV111 Series LED Sign
(with EDI ED-3500 Gateway)
EDV111 Series LED Sign
(with EDI ED-3500 Gateway)
EDV111 Series LED Sign
(with EDI ED-3500 Gateway)
Ethernet/IP only CAT5 cable
REQ: IP Address
Ethernet/IP only CAT5 cable
REQ: IP Address
Ethernet/IP only CAT5 cable
REQ: IP Address

Ethernet/IP EDV111 Series LED Signs - AOI Software Manual
Effective 07/29/2019 Page 10 Version 2.0
Electronic Displays, Inc. EDV111 Series LED Signs Allen Bradley AOI (Add on Instruction)
Software Manual
3 CUSTOMIZE THE IP ADDRESS EDI ED-3500 Gateway
Using Google Chrome or web browser. Type in ED-3500 IP address into URL bar.
192.168.1.11 (default IP)

Ethernet/IP EDV111 Series LED Signs - AOI Software Manual
Effective 07/29/2019 Page 11 Version 2.0
Electronic Displays, Inc. EDV111 Series LED Signs Allen Bradley AOI (Add on Instruction)
Software Manual
Press “Configuration Mode” to stop the Gateway.
Click on Network Configuration and change the IP Setting. “Restart Now” the Gateway.

Ethernet/IP EDV111 Series LED Signs - AOI Software Manual
Effective 07/29/2019 Page 12 Version 2.0
Electronic Displays, Inc. EDV111 Series LED Signs Allen Bradley AOI (Add on Instruction)
Software Manual
3.1 CUSTOMIZE SIGN COMMUNICATION SETTING RS232/485
Click on Port Configuration
Verify Serial Port is Enable Verify RS-232 or RS485
Verify Serial Settings
Verify wiring on correct terminals as pictured.
Consult with Electronic Display Technical Support to confirm your sign model number serial settings.
Default setting for EV111 series signs are shown below

Ethernet/IP EDV111 Series LED Signs - AOI Software Manual
Effective 07/29/2019 Page 13 Version 2.0
Electronic Displays, Inc. EDV111 Series LED Signs Allen Bradley AOI (Add on Instruction)
Software Manual
3.2 CUSTOMIZE ASCII SETTING
Click on ASCII
Verify Port “Serial Port”
Verify Receive Data is Enabled and 32 chars (default)
Verify Transmit Data is Enable and 496 chars (default)
IMPORTANT: To make sure sign is updating as fast as possible, confirm delimiters as shown in picture below.
Start “1” and STX 2
End “1” and EXT 3

Ethernet/IP EDV111 Series LED Signs - AOI Software Manual
Effective 07/29/2019 Page 14 Version 2.0
Electronic Displays, Inc. EDV111 Series LED Signs Allen Bradley AOI (Add on Instruction)
Software Manual
3.3 VERIFY COMMUNICATION WITH SIGN (WITHOUT PLC LADDER)
The ED-3500 supports an easy troubleshooting method to confirm communication and wiring without using a PLC
After configuration of IP Address Configuration, Port Configuration and ASCII Configuration, while the Gateway is in run mode, confirm “Mode: Running” in upper right corner.
Choose Diagnostics, then Diagnostic Info

Ethernet/IP EDV111 Series LED Signs - AOI Software Manual
Effective 07/29/2019 Page 15 Version 2.0
Electronic Displays, Inc. EDV111 Series LED Signs Allen Bradley AOI (Add on Instruction)
Software Manual
Choose ASCII then View
Next Choose Serial Port then View

Ethernet/IP EDV111 Series LED Signs - AOI Software Manual
Effective 07/29/2019 Page 16 Version 2.0
Electronic Displays, Inc. EDV111 Series LED Signs Allen Bradley AOI (Add on Instruction)
Software Manual
At the bottom copy and paste this ASCII command:
^B01^ADAHELLO^C
Confirm sign says “HELLO” on the display
Sign should be ready for PLC ladder logic.

Ethernet/IP EDV111 Series LED Signs - AOI Software Manual
Effective 07/29/2019 Page 17 Version 2.0
Electronic Displays, Inc. EDV111 Series LED Signs Allen Bradley AOI (Add on Instruction)
Software Manual
4 QUICK START USING TEMPLATE PLC PROGRAM
Download the sample PLC program from the Electric Displays website.
Electronic_Displays_122412.acd (or latest version supplied in ZIP file)
4.1 Quick Start with Template PLC Program
The purpose of the template sample program is provide a bases of settings and tags that are setup in the PLC along with sample ladder logic that can be written to send messages to the sign.
This template file is design to communicate with two signs. Sign #1 is a master sign which is connected via an RS-232 cable daisy chained to Sign #2.

Ethernet/IP EDV111 Series LED Signs - AOI Software Manual
Effective 07/29/2019 Page 18 Version 2.0
Electronic Displays, Inc. EDV111 Series LED Signs Allen Bradley AOI (Add on Instruction)
Software Manual
4.2 Update Sign IP Address in Sample PLC Program
Open the Ethernet Module setting and update the IP Address of the sample program. The sample program is setup with the default sign IP address of 192.168.1.11. If you customized your IP, you will need to update this target address below.

Ethernet/IP EDV111 Series LED Signs - AOI Software Manual
Effective 07/29/2019 Page 19 Version 2.0
Electronic Displays, Inc. EDV111 Series LED Signs Allen Bradley AOI (Add on Instruction)
Software Manual
4.3 Update Messages and Sign Format Tags
Open the Controller Tags and update the Sign01 and Sign02 tags with the message and formatting you desire. See the description or AOI help file to determine which options are available.

Ethernet/IP EDV111 Series LED Signs - AOI Software Manual
Effective 07/29/2019 Page 20 Version 2.0
Electronic Displays, Inc. EDV111 Series LED Signs Allen Bradley AOI (Add on Instruction)
Software Manual
4.4 Create and Customize Ladder Logic
Create ladder logic to enable the rungs in sequence to send message to the sign. If this is the first time you have connect the PLC to the sign, enable the Reset Sign function block, which erases all variable date allocated in the sign, then enable the SetupSignVaribles which will allocated memory space in the sign to accept dynamic variables that can be written to the sign using the UpdateSignVarible AOI. Send message to the sign by enabling the SendSignMessage AOI.

Ethernet/IP EDV111 Series LED Signs - AOI Software Manual
Effective 07/29/2019 Page 21 Version 2.0
Electronic Displays, Inc. EDV111 Series LED Signs Allen Bradley AOI (Add on Instruction)
Software Manual
5 IMPORTING WITH NEW PROGRAM OR EXISITING PLC PROGRAM
5.1 Start a new project with RS Logix 5000
Click File, New Project to start a new PLC project.
Choose PLC Type.
Choose PLC firmware revision.
Name your PLC Project.

Ethernet/IP EDV111 Series LED Signs - AOI Software Manual
Effective 07/29/2019 Page 22 Version 2.0
Electronic Displays, Inc. EDV111 Series LED Signs Allen Bradley AOI (Add on Instruction)
Software Manual
5.2 Create a New Ethernet Connection
In the controller tree view.
Right click the Ethernet ICON
Choose New Module

Ethernet/IP EDV111 Series LED Signs - AOI Software Manual
Effective 07/29/2019 Page 23 Version 2.0
Electronic Displays, Inc. EDV111 Series LED Signs Allen Bradley AOI (Add on Instruction)
Software Manual
Choose Communication.
Choose ETHERNET-MODULE (Generic Ethernet Module)
Click OK

Ethernet/IP EDV111 Series LED Signs - AOI Software Manual
Effective 07/29/2019 Page 24 Version 2.0
Electronic Displays, Inc. EDV111 Series LED Signs Allen Bradley AOI (Add on Instruction)
Software Manual
Name the Ethernet Connection: LED_SIGN (This will be the prefix name of the tags in the controller.)
Enter the Anybus Communicator Default IP address or your custom IP address: 192.168.1.11 or custom IP address (xxx.xxx.xxx.xxx)
Choose Comm Format Data-SINT (Important)
Enter Required Assembly Instance Input: 100 and 32 bytes Output: 150 and 496 bytes Configuration: 1 and 0 bytes
Click OK

Ethernet/IP EDV111 Series LED Signs - AOI Software Manual
Effective 07/29/2019 Page 25 Version 2.0
Electronic Displays, Inc. EDV111 Series LED Signs Allen Bradley AOI (Add on Instruction)
Software Manual
Choose RPI interval:
Default 10.0 ms is ok
Click OK
Confirm Controller Tags
Confirm Ethernet Module is configured

Ethernet/IP EDV111 Series LED Signs - AOI Software Manual
Effective 07/29/2019 Page 26 Version 2.0
Electronic Displays, Inc. EDV111 Series LED Signs Allen Bradley AOI (Add on Instruction)
Software Manual
5.3 Importing Data-Types
In the controller tree view
Right click User-Defined under "Data Types"
Choose Import Data Type
Browse to the folder containing Data Type
Import LEDSIGN.L5X file
Click OK

Ethernet/IP EDV111 Series LED Signs - AOI Software Manual
Effective 07/29/2019 Page 27 Version 2.0
Electronic Displays, Inc. EDV111 Series LED Signs Allen Bradley AOI (Add on Instruction)
Software Manual
Confirm no version conflicts
Click OK
Confirm Data Type "LEDSIGN"

Ethernet/IP EDV111 Series LED Signs - AOI Software Manual
Effective 07/29/2019 Page 28 Version 2.0
Electronic Displays, Inc. EDV111 Series LED Signs Allen Bradley AOI (Add on Instruction)
Software Manual
5.4 Importing Add-on Instructions
In the controller tree view
Right click Add-On Instruction
Choose Import Add-On Instruction

Ethernet/IP EDV111 Series LED Signs - AOI Software Manual
Effective 07/29/2019 Page 29 Version 2.0
Electronic Displays, Inc. EDV111 Series LED Signs Allen Bradley AOI (Add on Instruction)
Software Manual
Browse to the folder containing Add-On Instructions
Import all files with .L5X extension.
Do this process until all add-on instructions are imported.
Click OK

Ethernet/IP EDV111 Series LED Signs - AOI Software Manual
Effective 07/29/2019 Page 30 Version 2.0
Electronic Displays, Inc. EDV111 Series LED Signs Allen Bradley AOI (Add on Instruction)
Software Manual
Confirm no version conflicts
Click OK
Confirm all Add-on Instructions are imported

Ethernet/IP EDV111 Series LED Signs - AOI Software Manual
Effective 07/29/2019 Page 31 Version 2.0
Electronic Displays, Inc. EDV111 Series LED Signs Allen Bradley AOI (Add on Instruction)
Software Manual
Confirm AOIs are added to Toolbar in RS Logix 5000

Ethernet/IP EDV111 Series LED Signs - AOI Software Manual
Effective 07/29/2019 Page 32 Version 2.0
Electronic Displays, Inc. EDV111 Series LED Signs Allen Bradley AOI (Add on Instruction)
Software Manual
6 USING THE AOI INSTRUCTIONS IN THE PROJECT
6.1 Add AOIs to Ladder Programming via Drag and Drop
Click on the Add-On Toolbar
Drag and Drop the desired control AOI block to a new rung
TIP: You can also drag and drop from the Add-On Menu Tree on the left as well

Ethernet/IP EDV111 Series LED Signs - AOI Software Manual
Effective 07/29/2019 Page 33 Version 2.0
Electronic Displays, Inc. EDV111 Series LED Signs Allen Bradley AOI (Add on Instruction)
Software Manual
6.2 Creating Unique Tags for AOI
Under the AOI "Tag" parameter, begin to type a desired tag name.
Best Practice here might be to name the tag with the sign address. In this case, the default sign address is "01". Sign01Tag1 might be an example.
Be sure you scope your tag properly.

Ethernet/IP EDV111 Series LED Signs - AOI Software Manual
Effective 07/29/2019 Page 34 Version 2.0
Electronic Displays, Inc. EDV111 Series LED Signs Allen Bradley AOI (Add on Instruction)
Software Manual
6.3 Creating Unique Tags for Sign Parameters
Each sign, needs a "parameter" file which it retrieves all information and settings from the PLC to the sign.
Best practice would be to create a tag with the name of your sign.
Choose LEDSIGN as the

Ethernet/IP EDV111 Series LED Signs - AOI Software Manual
Effective 07/29/2019 Page 35 Version 2.0
Electronic Displays, Inc. EDV111 Series LED Signs Allen Bradley AOI (Add on Instruction)
Software Manual
Map the DATA TYPE of your "Sign" tag to the LEDSIGN data type. (This data type was imported earlier)
Ethernet/IP EDV111 Series LED Signs - AOI Software Manual
Effective 07/29/2019 Page 36 Version 2.0
Electronic Displays, Inc. EDV111 Series LED Signs Allen Bradley AOI (Add on Instruction)
Software Manual
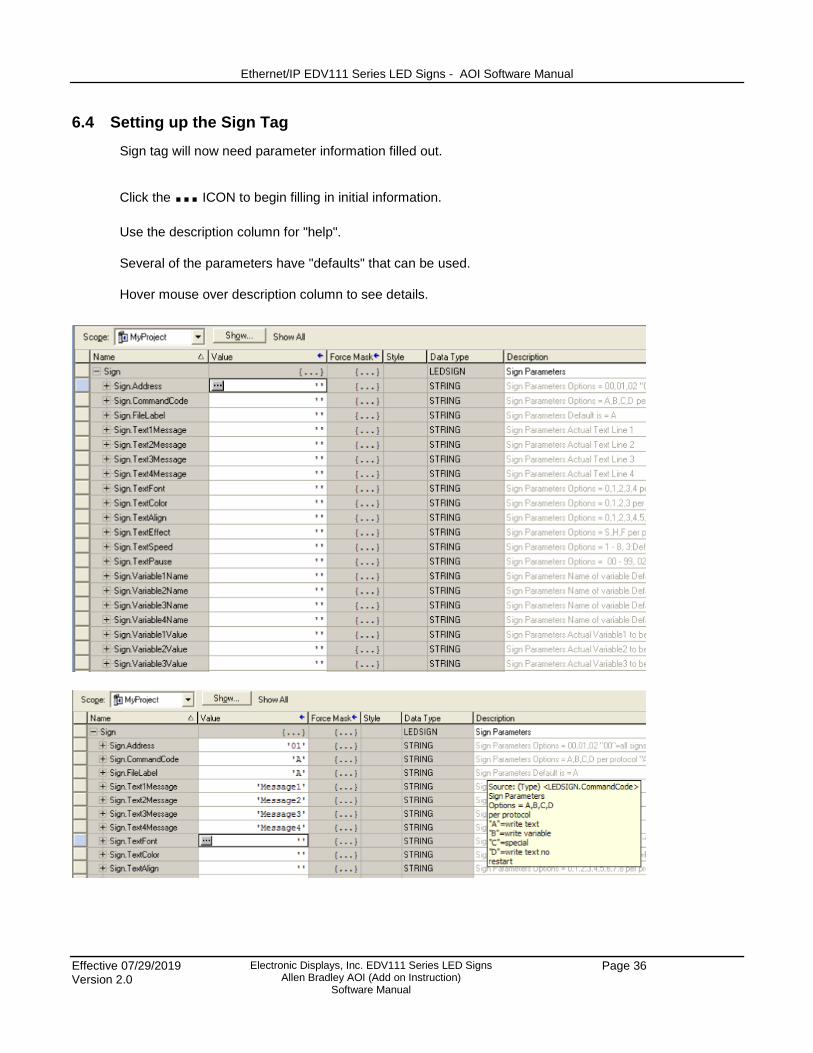
6.4 Setting up the Sign Tag
Sign tag will now need parameter information filled out.
Click the ... ICON to begin filling in initial information.
Use the description column for "help".
Several of the parameters have "defaults" that can be used.
Hover mouse over description column to see details.
Ethernet/IP EDV111 Series LED Signs - AOI Software Manual
Effective 07/29/2019 Page 37 Version 2.0
Electronic Displays, Inc. EDV111 Series LED Signs Allen Bradley AOI (Add on Instruction)
Software Manual
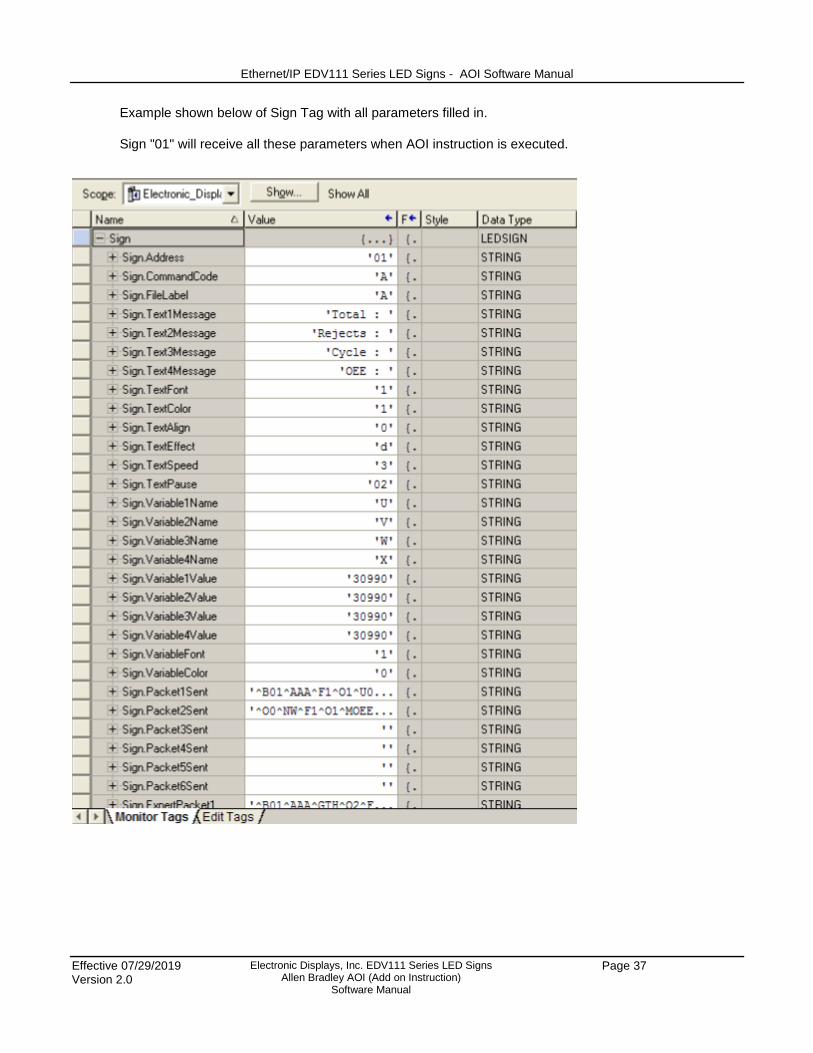
Example shown below of Sign Tag with all parameters filled in.
Sign "01" will receive all these parameters when AOI instruction is executed.

Ethernet/IP EDV111 Series LED Signs - AOI Software Manual
Effective 07/29/2019 Page 38 Version 2.0
Electronic Displays, Inc. EDV111 Series LED Signs Allen Bradley AOI (Add on Instruction)
Software Manual
6.5 Mapping Sign Tag to AOI Function Block in Ladder Logic
Begin mapping all the sign tags to the fields in the AOI function blocks.
Sign tag parameters are word for word matched.
Map all parameters.

Ethernet/IP EDV111 Series LED Signs - AOI Software Manual
Effective 07/29/2019 Page 39 Version 2.0
Electronic Displays, Inc. EDV111 Series LED Signs Allen Bradley AOI (Add on Instruction)
Software Manual
7 ELECTRONIC DISPLAY AOI INSTRUCTIONS
7.1 Send Sign Message AOI
Instruction used to send up to four messages to a sign. (see video tutorials)
Operand Type Description
SendSignMessage Tag Unique Tag
Address String Two character sign address "00"
CommandCode String Protocol Command "A,B,C,D"
Filelabel String Protocol Command "A" typically
ENText1Message Bool Flag to send message 1=send 0=no
Text1Message String Actual message in string to send
ENText2Message Bool Flag to send message 1=send 0=no
Text2Message String Actual message in string to send
ENText3Message Bool Flag to send message 1=send 0=no
Text3Message String Actual message in string to send
ENText4Message Bool Flag to send message 1=send 0=no
Text3Message String Actual message in string to send
ENtextFormats Bool Flag to format message 1=yes 0=no
TextFont String Protocol Command Font Size
TextColor String Protocol Command Color
Text Align String Protocol Command Text Align
TextAttribute String Protocol Command Text Styling
ENTextSpecials Bool Flag to format effects 1=yes 0=no
TextEffect String Protocol Command Text Special
TextSpeed String Protocol Command Text Speed
TextPause String Protocol Command Text Pause
ENVariable1Message Bool Flag to send variable 1=send 0 =no
Variable1Name String Protocol Command Variable Name
ENVariable2Message Bool Flag to send variable 1=send 0 =no
Variable2Name String Protocol Command Variable Name
ENVariable3Message Bool Flag to send variable 1=send 0 =no
Variable3Name String Protocol Command Variable Name
ENVariable4Message Bool Flag to send variable 1=send 0 =no
Variable4Name String Protocol Command Variable Name
ENVariableFormats Bool Flag to format variable 1=yes 0=no
VariableFont String Protocol Command Font Size
VariableColor String Protocol Command Color
VariableAtrribute String Protocol Command Text Styling
map_SignInput I:Data Ethernet/IP Input Data Mapping
map_SignOutput O:Data Ethernet/IP Output Data Mapping
Packet1Sent String 82 Length String Debug of Packet
Packet2Sent String 82 Length String Debug of Packet
Packet3Sent String 82 Length String Debug of Packet
Packet4Sent String 82 Length String Debug of Packet
Packet5Sent String 82 Length String Debug of Packet
Packet6Sent String 82 Length String Debug of Packet
EN Bool Instruction is enabled
DN Bool Instruction is done sending message
IP Bool Instruction is in progress sending
ER Bool Instruction failed to send message

Ethernet/IP EDV111 Series LED Signs - AOI Software Manual
Effective 07/29/2019 Page 40 Version 2.0
Electronic Displays, Inc. EDV111 Series LED Signs Allen Bradley AOI (Add on Instruction)
Software Manual
7.2 Reset Sign AOI
Instruction used to clean all variable data previously stored in sign. (see video tutorials)
7.3 Setup Sign Variables AOI
Instruction to write the memory area in the sign for variables up to 4 memory spots. (see video tutorials)
Operand Type Description
ResetSign Tag Unique Tag
Address String Two character sign address "00"
map_SignInput I:Data Ethernet/IP Input Data Mapping
map_SignOutput O:Data Ethernet/IP Output Data Mapping
Packet1Sent String 82 Length String Debug of Packet
Packet2Sent String 82 Length String Debug of Packet
Packet3Sent String 82 Length String Debug of Packet
EN Bool Instruction is enabled
DN Bool Instruction is done sending message
IP Bool Instruction is in progress sending
ER Bool Instruction failed to send message
Operand Type Description
SendSignMessage Tag Unique Tag
Address String Two character sign address "00"
Filelabel String Protocol Command "A" typically
ENVariable1Message Bool Flag to send variable 1=send 0 =no
Variable1Name String Protocol Command Variable Name
ENVariable2Message Bool Flag to send variable 1=send 0 =no
Variable2Name String Protocol Command Variable Name
ENVariable3Message Bool Flag to send variable 1=send 0 =no
Variable3Name String Protocol Command Variable Name
ENVariable4Message Bool Flag to send variable 1=send 0 =no
Variable4Name String Protocol Command Variable Name
map_SignInput I:Data Ethernet/IP Input Data Mapping
map_SignOutput O:Data Ethernet/IP Output Data Mapping
Packet1Sent String 82 Length String Debug of Packet
Packet2Sent String 82 Length String Debug of Packet
Packet3Sent String 82 Length String Debug of Packet
EN Bool Instruction is enabled
DN Bool Instruction is done sending message
IP Bool Instruction is in progress sending
ER Bool Instruction failed to send message

Ethernet/IP EDV111 Series LED Signs - AOI Software Manual
Effective 07/29/2019 Page 41 Version 2.0
Electronic Displays, Inc. EDV111 Series LED Signs Allen Bradley AOI (Add on Instruction)
Software Manual
7.4 Update Sign Variables AOI
Instruction to update variable memory space in the sign (see video tutorials)
7.5 Expert Sign AOI
Instruction to make your own packets and send to the sign. (see video tutorials)
Operand Type Description
UpdateSignVariables Tag Unique Tag
Address String Two character sign address "00"
Filelabel String Protocol Command "A" typically
ENVariable1Update Bool Flag to update variable 1=send 0 =no
Variable1Name String Protocol Command Variable Name
Variable1Value String Actual variable data to send
ENVariable1Update Bool Flag to update variable 1=send 0 =no
Variable2Name String Protocol Command Variable Name
Variable2Value String Actual variable data to send
ENVariable1Update Bool Flag to update variable 1=send 0 =no
Variable3Name String Protocol Command Variable Name
Variable3Value String Actual variable data to send
ENVariable1Update Bool Flag to update variable 1=send 0 =no
Variable4Name String Protocol Command Variable Name
Variable4Value String Actual variable data to send
map_SignInput I:Data Ethernet/IP Input Data Mapping
map_SignOutput O:Data Ethernet/IP Output Data Mapping
Packet1Sent String 82 Length String Debug of Packet
Packet2Sent String 82 Length String Debug of Packet
Packet3Sent String 82 Length String Debug of Packet
EN Bool Instruction is enabled
DN Bool Instruction is done sending message
IP Bool Instruction is in progress sending
ER Bool Instruction failed to send message
Operand Type Description
ExpertSign Tag Unique Tag
ExpertPacket1 String 82 Length String of Your Commands
ExpertPacket2 String 82 Length String of Your Commands
ExpertPacket3 String 82 Length String of Your Commands
ExpertPacket4 String 82 Length String of Your Commands
ExpertPacket5 String 82 Length String of Your Commands
ExpertPacket6 String 82 Length String of Your Commands
map_SignInput I:Data Ethernet/IP Input Data Mapping
map_SignOutput O:Data Ethernet/IP Output Data Mapping
Packet1Sent String 82 Length String Debug of Packet
Packet2Sent String 82 Length String Debug of Packet
Packet3Sent String 82 Length String Debug of Packet
Packet4Sent String 82 Length String Debug of Packet
Packet5Sent String 82 Length String Debug of Packet
Packet6Sent String 82 Length String Debug of Packet
EN Bool Instruction is enabled
DN Bool Instruction is done sending message
IP Bool Instruction is in progress sending
ER Bool Instruction failed to send message