Electric Masterbuilt Smoke Conversion -...
5
Converting an Electric Masterbuilt Smoker for External Smoke Generation (and also Improving Temperature Controller Response) I use an A-Mazin’ tubular smoke generator. I am very pleased with it- - eight hours of smoke! Wow!. The only problem is that it doesn’t fit very well inside my MasterBuilt electric smoker. I’ve posted earlier of my problems with the MasterBuilt- - poor smoke distribution and a wide temperature swing. Here’s a quick half-hour pair of modifications that should help by giving better smoke/heat distribution, and by reducing the amount of heated metal inside the smoke box enclosure. Wood Chip Box Removal: First, remove the wood chip portion of the smoker. It comes in two parts. One is a cylindrical chip addition scoop that goes through the side of the smoker. The other part is a tray assembly and box built to surround the heating element. In normal use, chips are added to the scoop portion, which is inserted through the side, then turn 180 degrees to dump the chips onto the heated metal tray. The result is half an hour or so of smoke. …not good enough. To start, remove the cylindrical scoop and set it aside. Inside the smoker, remove the metal chip tray. It slides out. Then, remove the four sheet metal screws holding the pair of bars below the box assembly and the two screws holding the assembly to the wall. Here’s a photo of the box as installed (chip tray removed). And following that is a photo of the cabinet with the smoker box removed. Note the bare heating element, center, and the round hole in the wall at right. Here’s the chip box which was just removed.
Transcript of Electric Masterbuilt Smoke Conversion -...

Converting an Electric Masterbuilt Smoker for External Smoke Generation
(and also Improving Temperature Controller Response)
I use an A-Mazin’ tubular smoke generator. I am very pleased with it- - eight hours of smoke! Wow!. The
only problem is that it doesn’t fit very well inside my MasterBuilt electric smoker. I’ve posted earlier of
my problems with the MasterBuilt- - poor smoke distribution and a wide temperature swing. Here’s a
quick half-hour pair of modifications that should help by giving better smoke/heat distribution, and by
reducing the amount of heated metal inside the smoke box enclosure.
Wood Chip Box Removal:
First, remove the wood chip portion of the smoker. It comes in two parts. One is a cylindrical chip
addition scoop that goes through the side of the smoker. The other part is a tray assembly and box built
to surround the heating element. In normal
use, chips are added to the scoop portion,
which is inserted through the side, then turn
180 degrees to dump the chips onto the heated
metal tray. The result is half an hour or so of
smoke. …not good enough.
To start, remove the cylindrical scoop and set it
aside. Inside the smoker, remove the metal
chip tray. It slides out. Then, remove the four
sheet metal screws holding the pair of bars
below the box assembly and the two screws
holding the assembly to the wall. Here’s a photo of the box as installed (chip tray removed).
And following that is a photo of the cabinet
with the smoker box removed. Note the bare
heating element, center, and the round hole in
the wall at right.
Here’s the chip box which was just removed.

Distributor Installation:
Next task is to install a heat and smoke distributor to improve
heat and smoke contact with the meats. The items used are
two “Char Broil” brand 11.5” Expandable Porcelain Steel
Grids. Each one is 6 inches wide and expands from 11.5 to 19-
5/8 inches long, more than enough to span the width of the
smoker.
The result is shown below, with two racks in place above the
new distributor. Note that the heating element is now bare,
no longer surrounded by metal. This should reduce the
“thermal inertia” of the system, resulting in a narrower
temperature swing as the heater control cycles.
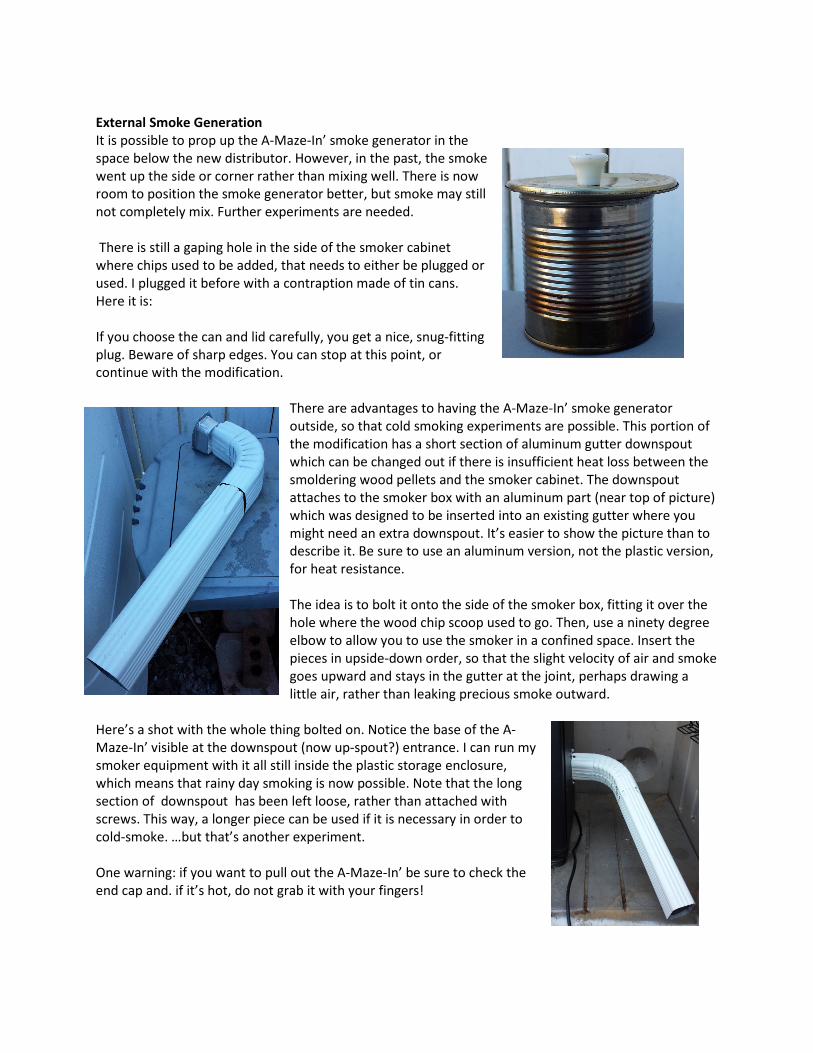
External Smoke Generation
It is possible to prop up the A-Maze-In’ smoke generator in the
space below the new distributor. However, in the past, the smoke
went up the side or corner rather than mixing well. There is now
room to position the smoke generator better, but smoke may still
not completely mix. Further experiments are needed.
There is still a gaping hole in the side of the smoker cabinet
where chips used to be added, that needs to either be plugged or
used. I plugged it before with a contraption made of tin cans.
Here it is:
If you choose the can and lid carefully, you get a nice, snug-fitting
plug. Beware of sharp edges. You can stop at this point, or
continue with the modification.
There are advantages to having the A-Maze-In’ smoke generator
outside, so that cold smoking experiments are possible. This portion of
the modification has a short section of aluminum gutter downspout
which can be changed out if there is insufficient heat loss between the
smoldering wood pellets and the smoker cabinet. The downspout
attaches to the smoker box with an aluminum part (near top of picture)
which was designed to be inserted into an existing gutter where you
might need an extra downspout. It’s easier to show the picture than to
describe it. Be sure to use an aluminum version, not the plastic version,
for heat resistance.
The idea is to bolt it onto the side of the smoker box, fitting it over the
hole where the wood chip scoop used to go. Then, use a ninety degree
elbow to allow you to use the smoker in a confined space. Insert the
pieces in upside-down order, so that the slight velocity of air and smoke
goes upward and stays in the gutter at the joint, perhaps drawing a
little air, rather than leaking precious smoke outward.
Here’s a shot with the whole thing bolted on. Notice the base of the A-
Maze-In’ visible at the downspout (now up-spout?) entrance. I can run my
smoker equipment with it all still inside the plastic storage enclosure,
which means that rainy day smoking is now possible. Note that the long
section of downspout has been left loose, rather than attached with
screws. This way, a longer piece can be used if it is necessary in order to
cold-smoke. …but that’s another experiment.
One warning: if you want to pull out the A-Maze-In’ be sure to check the
end cap and. if it’s hot, do not grab it with your fingers!
Performance:
With all that metal removed and with the distributor plates installed, the MasterBuilt
performs better. To check performance,
thermometer) in the stack outlet and ran a series of experiments as follows:
---Take a reading as the controller clicks from on to off. Record both the Ma
temperature and the meat thermometer’s temperature. Note the time.
---Take a series of readings every minute or so (it doesn’t matter if the timing is exact or not) as
the temperatures coast upward, stabilize, then fall. Keep taking r
fall low enough that the controller turns the heater on again. Note the time.
---Keep recording until the temperatures have gone downward, stopped falling, and moved back
upward again.
---When the controller clicks off again (f
time.
You now have enough information to determine cycle time,
between what the controller thinks the temperature is and what it ACTUALLY is. If you are a numbe
geek like me, you can type the readings into a spreadsheet, take averages, and see what the offset is
between smoker and reality. If you repeat this experiment at several temperature settings (may I
suggest 130, 160, and 250 degrees F?) you can fit a li
equation for your smoker. You can use that equation to generate a table of “Indicated” versus “Actual”
temperature, which saves time when you are ready to warm up your equipment for smoking sausages
or meats.
Results:
Cycle time 9 minutes at 120 degrees set point (139.1 +/
Actual degF = 11.03 + 1.064 * (measured temperature)
Cycle time 6 minutes at 160 degrees set point (181.6 +/
Actual degF = 34.16 + 0.920 * (measured tempe
Cycle time 5 minutes at 250 degrees (262.4 +/
One reason for variability: cycle time is influenced by ambient temperature. (The colder it is outside, the
faster heat is lost through the walls.)
cycle time: a short heat-up followed by a long decline.
With all that metal removed and with the distributor plates installed, the MasterBuilt hope
. To check performance, I hung a thermocouple temperature gauge (electronic meat
thermometer) in the stack outlet and ran a series of experiments as follows:
Take a reading as the controller clicks from on to off. Record both the MasterBuilt’s indicated
temperature and the meat thermometer’s temperature. Note the time.
Take a series of readings every minute or so (it doesn’t matter if the timing is exact or not) as
the temperatures coast upward, stabilize, then fall. Keep taking readings as the temperatures
fall low enough that the controller turns the heater on again. Note the time.
Keep recording until the temperatures have gone downward, stopped falling, and moved back
When the controller clicks off again (finished the complete cycle) record the readings and
You now have enough information to determine cycle time, size of the cycle (degrees), and an offset
between what the controller thinks the temperature is and what it ACTUALLY is. If you are a numbe
geek like me, you can type the readings into a spreadsheet, take averages, and see what the offset is
between smoker and reality. If you repeat this experiment at several temperature settings (may I
0 degrees F?) you can fit a line through all the data to give a performance
equation for your smoker. You can use that equation to generate a table of “Indicated” versus “Actual”
temperature, which saves time when you are ready to warm up your equipment for smoking sausages
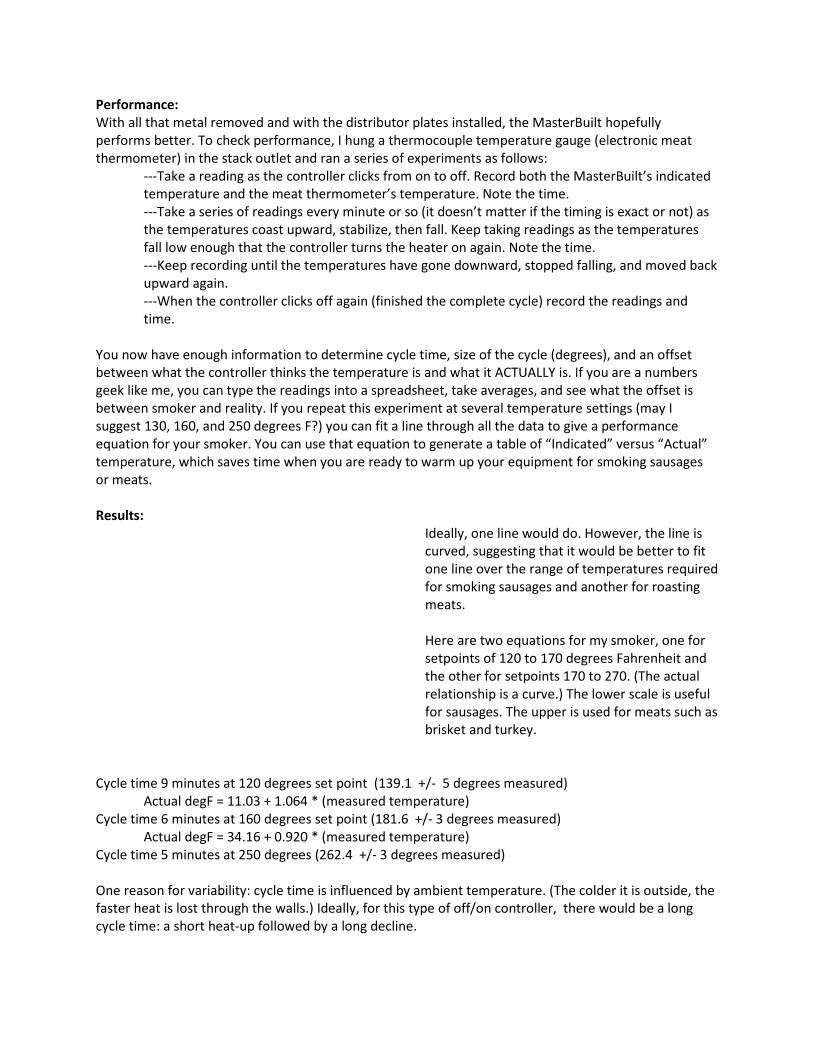
Ideally, one line would do. However, the line is
curved, suggesting that it would be better to fit
one line over the range of temperatures required
for smoking sausages and another for roasting
meats.
Here are two equations for my
setpoints of 120 to 170 degrees Fahrenheit and
the other for setpoints 170 to 270. (The actual
relationship is a curve.) The lower scale is useful
for sausages. The upper is used for meats such as
brisket and turkey.
Cycle time 9 minutes at 120 degrees set point (139.1 +/- 5 degrees measured)
Actual degF = 11.03 + 1.064 * (measured temperature)
Cycle time 6 minutes at 160 degrees set point (181.6 +/- 3 degrees measured)
Actual degF = 34.16 + 0.920 * (measured temperature)
Cycle time 5 minutes at 250 degrees (262.4 +/- 3 degrees measured)
ycle time is influenced by ambient temperature. (The colder it is outside, the
faster heat is lost through the walls.) Ideally, for this type of off/on controller, there would be a long
up followed by a long decline.
hopefully
I hung a thermocouple temperature gauge (electronic meat
sterBuilt’s indicated
Take a series of readings every minute or so (it doesn’t matter if the timing is exact or not) as
eadings as the temperatures
Keep recording until the temperatures have gone downward, stopped falling, and moved back
inished the complete cycle) record the readings and
size of the cycle (degrees), and an offset
between what the controller thinks the temperature is and what it ACTUALLY is. If you are a numbers
geek like me, you can type the readings into a spreadsheet, take averages, and see what the offset is
between smoker and reality. If you repeat this experiment at several temperature settings (may I
ne through all the data to give a performance
equation for your smoker. You can use that equation to generate a table of “Indicated” versus “Actual”
temperature, which saves time when you are ready to warm up your equipment for smoking sausages
Ideally, one line would do. However, the line is
curved, suggesting that it would be better to fit
one line over the range of temperatures required
for smoking sausages and another for roasting
smoker, one for
120 to 170 degrees Fahrenheit and
170 to 270. (The actual
The lower scale is useful
for sausages. The upper is used for meats such as
ycle time is influenced by ambient temperature. (The colder it is outside, the
n controller, there would be a long

Although I haven’t checked it, I suspect that the controller’s thermocouple is too short and poorly
placed, leading to it reading erroneously low. I’ll replace it in a future study.
There is a two-degree “dead band” built into the controller, meaning that the heating coil is energized at
two degrees below set point and is de-energized at set point. Decreasing this dead band would improve
control somewhat, but would not approach the level of quality that a PID controller could provide. I
have another home-built controller that I use with a hot plate in another MasterBuilt unit (originally
propane-fired), but it still exhibits plus or minus two or three degrees cycling, even with a half-degree
dead band.
Future Work:
The objective remains: control temnperature as close as possible to a limiting condition of 170 degrees
F, destroying trichinae but not breaking the fat. The present setup is not capable of approaching 170
degrees without severely overshooting.
The problem with “Bang-Bang” (off/on) controllers like the one in the MasterBuilt is that heat input is
either at maximum rate or zero. One modification which might help involves using a heating element
with rheostat running at constant rate to “base load” the smoker’s heat input, using the controller to
turn off/on the built-in heating element (with its output reduced by a second rheostat). The controller
would be manipulating a trim heater, not the full heat load. If this is cost effective, it may be the next
modification to try.
A PID controller would be preferable, but is expensive. The amount of expertise required to install one
may also be prohibitive. However, quality of temperature control would be considerably higher than the
current set-up.
Best regards,
“el Ducko”
Electric Smoker with external
smoke supply modification in stored position