Opportunities in gas and oil jobs heating up Westhill Consulting & Employment

Electric Bike User Manual
westhillbikes.com
HAVE A QUESTION? NEED HELP?Contact us on Facebook for a quick reply.

fb.com/westhillbikes • westhillbikes.com2
WarrantyWesthill bikes are covered by a limited 3-year warranty. Aside from general cycle maintenance, any work to the motor should be carried out by a Westhill technician or authorised dealer.
1. Warranty periodsThe statutory warranty valid at the time of delivery applies to:
Frame : 3 years
Motor: 2 years
Battery, Charger & Controller: 2 years
2. Warranty conditions2.1 Requirements
There is a defect in materials or workmanship or an error of information.
The cause of the change in the product is neither natural nor related to its functions, wear and tear or ageing.
The damage was not caused by use of the bike for other than the intended purpose.
2.2 Warranty exclusions
Damage caused by improper use or force majeure.
All parts subject to function-related wear and tear, unless this is the result of a defect in the manufacturing process or material.
Damage which results from improper or insufficient care and repairs, alterations or the replacement of parts by persons other than trained professionals.
Accidental damage or other external effects, provided these are not the result of defective products or information.
Repairs resulting from the use of second-hand parts or damage caused by this use.
Damage resulting from competitive use.
Special fittings, accessories or non-standard components, especially technical modifications.
Observing the required service intervals is also a condition of any warranty claims you may make.
2.3 The following are considered wear parts under the statutory warranty:
Tyres
Rims in combination with rim brakes
Spokes
Brake pads
Chains and toothed belts
Chain wheels, sprockets, bottom brackets and jockey wheels
Sliding bearings
Lamps for lighting system
Handlebar tape/handle grips
Hydraulic oils and lubricants
Gear-shift cables and brake cables
Paint finishes
Batteries (depletion of capacity to 60% is acceptable within first two years)
(1) Definitions
In this warranty the following terms shall have the following meanings: Westhill Bikes shall mean FW3 Limited; Westhill Product shall mean the FW3 Ltd; Product Warranty Period shall mean a period commencing on the original date of purchase as new
(2) Circumstances outside our control
FW3 Ltd shall not be liable for any failure in service as a result of FW3 Ltd, or FW3 Ltd agents employees or contractors being delayed, prevented or hindered in the performance of its obligations by reason of any circumstances beyond its reasonable control. Such circumstances include, but are not limited to fire, flood, Act of God, and civil disorder.
(3) Disclaimers
FW3 Ltd shall not be liable for any indirect, incidental, special or consequential damages losses or expenses (including without limitation lost profits, loss of use or loss of data, goodwill, reputation or lost business) arising directly or indirectly, from the purchase use or sale of the Product, whether or not FW3 Ltd was advised or aware of the possibility of such damages, losses or expenses. It is the customer’s responsibility to make lawful use of the products FW3 Ltd supplies.
3 fb.com/westhillbikes • westhillbikes.com
Westhill Bikes WarrantyRegister Now Through Facebook
The easiest way to register your new bike is through Facebook. Simply visit our
page www.fb.com/westhillbikes or scan the QR code below with your mobile
phone and message us with this information:
Your Name:
Your Email Address:
Your Postal Address:
Bike Model & Colour:
Purchase Date:
Where You Purchased From:
Be sure to register right away so your bike is covered!
Don’t have Facebook? Email the above details to [email protected]
to activate your Warranty.

fb.com/westhillbikes • westhillbikes.com4
ContentsWarranty ............................................................................................... 2
Warranty Registration ........................................................................... 3 Contents ................................................................................................ 4 Attention ............................................................................................... 5
1 Check Before Use .................................................................................. 5 2 Product Information .............................................................................. 6 2.1 Product Performance .................................................................................... 6
2.2 Product Specifications ................................................................................... 6
3 Assembly & Adjustments ....................................................................... 7 3.1 Assembling & Adjusting The Handlebar ....................................................... 7
3.2 Adjusting The Saddle .................................................................................... 8
3.3 Adjusting The Wheels ................................................................................... 8
3.4 Adjusting And Maintaining The Brakes ......................................................... 9
3.5 Gears ............................................................................................................. 9
3.5.1 Gear Display .................................................................................................. 9
3.5.2 Adjusting The Derailleur ............................................................................. 10
4 How To Use The Bike Controls ............................................................. 11 4.1 Bike Controls At A Glance .......................................................................... 11
4.2 Turning The Bike On/Off ............................................................................. 11
4.3 Increasing/Decreasing Speed ..................................................................... 11
4.4 Showing The Speed .................................................................................... 12
4.5 Walk Mode .................................................................................................. 12
4.6 Turning On The Headlight .......................................................................... 13
4.7 Battery Charge Indicator ............................................................................. 13
4.8 Showing The Mileage ................................................................................. 14
4.9 Error Codes ................................................................................................. 14
4.10 Control Panel Settings ................................................................................ 15
5 Battery ................................................................................................. 16 5.1 Charging The Battery .................................................................................. 16
5.2 Battery & Charger Maintenance.................................................................. 16
5.3 Battery Precautions ..................................................................................... 17
5.4 Charger Precautions .................................................................................... 17
6 Bicycle Inspection & Care ..................................................................... 18 6.1 Regular Cleaning ......................................................................................... 18
6.2 Regular Maintenance .................................................................................. 18
6.3 Lubricating The Bike ................................................................................... 19

5 fb.com/westhillbikes • westhillbikes.com
Attention
• Do not operate this electric bike without fully reading and understanding its
operation and limitations.
• Before riding each time ensure that all parts are in good order. If you have any
questions or concerns, please contact us via Facebook chat or by email.
• Ensure you observe traffic rules and regulations when using this electric bike.
• Passengers cannot be carried.
• When riding in rain, snow or slippery conditions reduce your speed and increase
the distance between yourself and other vehicles.
• We advise against performing maintenance operations that involve removing
parts or components. If this is necessary, please contact us for guidance.
• Do not ride through deep puddles. Water could enter the hub motor, causing
short circuits and irreparable damage.
• Do not allow individuals who are unfamiliar with the features and functions of this
e-bike to operate it without proper instruction.
• Do not modify the e-bike by yourself.
1. Check Before Use• Is the tyre pressure [3.4 - 5.1 bar] correct?
• Are the brakes working correctly?
• Are the batteries sufficiently charged?
• Is the handlebar attachment and saddle post correctly inserted and tightened?
• Are the wheel hub mounting nuts correctly tightened?
• Is the bell working correctly?
fb.com/westhillbikes • westhillbikes.com6
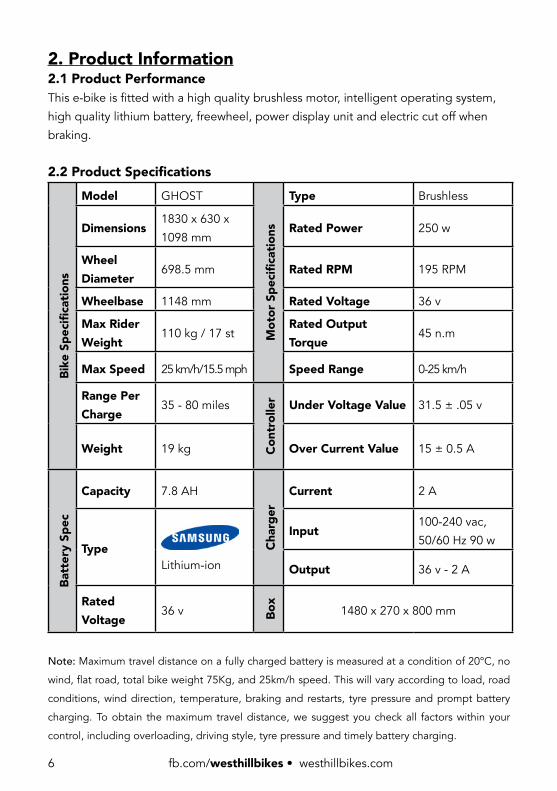
2. Product Information2.1 Product PerformanceThis e-bike is fitted with a high quality brushless motor, intelligent operating system,
high quality lithium battery, freewheel, power display unit and electric cut off when
braking.
2.2 Product Specifications
Bike
Spe
cific
atio
ns
Model GHOST
Mot
or S
peci
ficat
ions
Type Brushless
Dimensions1830 x 630 x
1098 mmRated Power 250 w
Wheel Diameter
698.5 mm Rated RPM 195 RPM
Wheelbase 1148 mm Rated Voltage 36 v
Max Rider Weight
110 kg / 17 stRated Output Torque
45 n.m
Max Speed 25 km/h/15.5 mph Speed Range 0-25 km/h
Range Per Charge
35 - 80 miles
Cont
rolle
r Under Voltage Value 31.5 ± .05 v
Weight 19 kg Over Current Value 15 ± 0.5 A
Batt
ery
Spec
Capacity 7.8 AH
Char
ger
Current 2 A
TypeLithium-ion
Input100-240 vac,
50/60 Hz 90 w
Output 36 v - 2 A
Rated Voltage
36 v Box
1480 x 270 x 800 mm
Note: Maximum travel distance on a fully charged battery is measured at a condition of 20°C, no
wind, flat road, total bike weight 75Kg, and 25km/h speed. This will vary according to load, road
conditions, wind direction, temperature, braking and restarts, tyre pressure and prompt battery
charging. To obtain the maximum travel distance, we suggest you check all factors within your
control, including overloading, driving style, tyre pressure and timely battery charging.

7 fb.com/westhillbikes • westhillbikes.com
3. Assembly & Adjustments 3.1 Assembling and adjusting the handlebar• Place the handlebar onto the handlebar stem, place on the cover, and fix with the
four screws provided. The tighten torque should not be less than 18 Nm.
Handlebar stem cover
Hexagon socket screws
Handlebar stem
• To align the handlebars, face your bike and hold the front wheel between your
legs. Turn the handlebars so that they are perpendicular to the front wheel.
• Tighten the screw that fixes the handlebar attachment to the frame. The tightening torque should be no less than 18 Nm.
Handlebar stem screw

fb.com/westhillbikes • westhillbikes.com8
3.2 Adjusting The Saddle• The saddle post must be inserted to at least the circular safety mark
engraved on the tube (shown below).• An ideal saddle height is when the knee is at a soft bend when you are
sat on the saddle with your foot on the pedal at it’s lowest point. Adjust the saddle to this height.
• The saddle should be parallel to the ground for maximum comfort. The tightening torque for the saddle mounting screw and saddle post mounting screw should not be less than 18 Nm.
Quick releaseSafety mark
(exaggerated for illustration)
3.3 Adjusting The Wheels • Tighten the screws to make sure the front and back wheels are fixed to
the front fork and frame. • Recommended tightening torques are as follows:
Front wheel hub: 18 NmRear wheel hub: 30 Nm

9 fb.com/westhillbikes • westhillbikes.com
3.4 Adjusting And Maintaining The Brakes• Make sure the rotors are true. Spin the wheel and, sighting against
the pads, watch for wobbles. If the rotor clears the pads and calliper, the bend probably isn’t worth straightening. If you spot a warp, try to straighten it by clamping a clean adjustable wrench along the rotor and bending toward true. Make sure everything that touches the rotor is clean. You don’t want any grease there to reduce the grip.
• If your brakes squeal, something is probably loose. Check all bolts holding the rotor on, as well as the calliper bolts and adapter bolts (if your bike is fitted with one).
• If everything’s snug, the rotor and pads should be cleaned.• If one lever pulls back farther than the other, try to equal out the travel
by dialing the lever limit screws in or out. If that doesn’t work, it’s time for a shop to bleed your hydraulic fluid.
• Inspect hydraulic system for leaks. Check the levers, callipers and all along the housing. Take a leaky system to a professional or contact us.
3.5 Gears3.5.1 Gear Display
Gear Display Gear up/downGear Changer
Control buttons
Gear display
Left Handlebar Right Handlebar

fb.com/westhillbikes • westhillbikes.com10
3.5.2 Adjusting The Derailleur• Adjust the lower bolt to make the guide wheel move to the free-wheel; align the
centre of the guide wheel and the outer line of the smallest sprocket.
• Turning the front chain-wheel, operate the gear lever to shift to the lowest gear,
then tighten the derailleur cable and fix it by the derailleur cable nut.
• Turn the low adjustment screw so that the guide pulley moves to a position
directly below the largest sprocket.
• Tighten the adjust nut when the real gear is lower than the gear shift shows;
loosen the adjust nut when the rear gear is upper than the gear shift shows. It is
OK when the gear changes correctly and smoothly.
Outer line of smallest sprocket
Top adjustment screwGuide pulley
Low adjustment screw
Largest sprocket
Guide pulley
Note: Be sure that the cable is securely in the groove.
Groove

11 fb.com/westhillbikes • westhillbikes.com
4 How to Use Bike Controls⚠ Start slowly and speed up gradually.
⚠ The power will automatically cut out if the e-bike overloads and automatically cut
back in after a short period if the e-bike is ridden normally.
⚠ Try to avoid knocking and bumping the screen and control panel.
⚠ Avoid direct contact with water.
⚠ Do not alter the settings of the control panel, it could affect your riding experience.
⚠ If your control panel does malfunction please let us know straight away.
4.1 Control Panel - At a Glance
Battery charge indicator
Error CodesSpeed:current, average, maximum
Units
LightsWalk mode
Distance: trip,overall, remaining
Up button
Down button
Control Buttons
Mode buttonM
4.2 Turning The Bike On/OffTo turn the control panel on or off press and hold the mode button M for several
seconds. The bike will automatically turn off if there is no activity for 10 minutes.
Tip: If the control screen does not turn on check that the battery is charged.
Tip: Charge your bike for at least 12 hours before you ride it for the first time and the
next two times you charge it.
4.3 Increasing/Decreasing SpeedTo increase speed press the up button . To decrease speed press the down button .
Always start off slowly and gradually speed up. Make sure your speed is appropriate
to riding conditions (weather, road surface, traffic/pedestrians etc).

fb.com/westhillbikes • westhillbikes.com12
4.4 Showing The SpeedPress the mode button M to view your current speed. Pressing the mode button again
will cycle through:
SPEED (current speed) AVG (average speed) MAX (maximum speed)
Battery charge indicator
Error CodesSpeed:current, average, maximum
Units
LightsWalk mode
Distance: trip,overall, remaining
Up button
Down button
Control Buttons
Mode buttonM
4.5 Walk ModeStand at the side of the bike with both hands on the handlebars and make sure the
way infront of you is clear. Press and hold the down button for three seconds to
enable cruise mode for the ebike. ‘Walk 1’ will be indicated on the control screen.
This will power the bike at a steady 6 km/h allowing you to walk alongside the bike
without needing to push.
Battery charge indicator
Error CodesSpeed:current, average, maximum
Units
LightsWalk mode
Distance: trip,overall, remaining
Up button
Down button
Control Buttons
Mode buttonM
⚠ Do not use this function
while riding the bike.

13 fb.com/westhillbikes • westhillbikes.com
4.6 Turning On The HeadlightPress and hold the up button to turn on the headlight. When the headlight is
switched on you will see a headlight symbol on the control screen. The rear light is
controlled by a button on top of the rear light.
Battery charge indicator
Error CodesSpeed:current, average, maximum
Units
LightsWalk mode
Distance: trip,overall, remaining
Up button
Down button
Control Buttons
Mode buttonM
4.7 Battery Charge IndicatorThe battery charge level is indicted by the bars at the top of the control screen. When
all the bars are lit up that means that the battery is fully charged. When only one large
bar is indicated on the right of the screen the bike needs prompt charging.
Fully Charged Charging Needed
Battery charge indicator
Error CodesSpeed:current, average, maximum
Units
LightsWalk mode
Distance: trip,overall, remaining
Up button
Down button
Control Buttons
Mode buttonM

fb.com/westhillbikes • westhillbikes.com14
4.8 Showing The MilagePress the mode button M to cycle through the mile indicator in the following order:
TRIP A single trip miles A
TRIP BSingle trip miles B
ODOTotal miles ridden
RMAINRemaining miles
Battery charge indicator
Error CodesSpeed:current, average, maximum
Units
LightsWalk mode
Distance: trip,overall, remaining
Up button
Down button
Control Buttons
Mode buttonM
4.9 Error CodesIf there is an error in the electrical function of the bike an error message will be
displayed on the control screen along with an error code. See the table below for error
code definitions:
⚠ The bike will not run if there is an error code. Please contact us immediately
Battery charge indicator
Error CodesSpeed:current, average, maximum
Units
LightsWalk mode
Distance: trip,overall, remaining
Up button
Down button
Control Buttons
Mode buttonM
Error Code Definition
21 Current abnormality
22 Throttle abnormality
23 Missing phase on motor
24 Motor hall signal abnormality
25 Brake power-off sensor abnormality
30 Controller/instrument communication
abnormality

15 fb.com/westhillbikes • westhillbikes.com
4.10 Control Panel SettingsAccessing the settings menuAfter power on press the up and down arrows simultaneously for three seconds.
From here press the mode button M briefly to scroll through the following settings:
St1 – to switch between the imperial (mph) and metric (km/h) system by pressing the
up and down buttons. Confirm the choice by pressing the mode button M again.
St3 – Set the wheel diameter by pressing the up and down arrows. Setting the correct
wheel diameter ensures the speedometer and mileage are accurate. Press the mode
button M to confirm your choice.
Press and hold the mode button M for 2 seconds to confirm and save your settings. To
exit without saving press and hold the down arrow for two seconds.

fb.com/westhillbikes • westhillbikes.com16
5 Battery5.1 Charging The Battery• Connect the charger cable to the bike.
• Plug the charger into the wall outlet. The LED on the battery charger will
illuminate RED when charging. The LED will change to GREEN when the battery is
fully charged.
• When the battery is fully charged, disconnect the charger from the wall outlet
before disconnecting the charger from the bike.
• Ensure that the cover over the charging port on the bike is closed and sealed.
• Charge the battery for 12 hours for the first 3 times you use it.
• Be sure to use the charger supplied together with the bike, use of other chargers
will invalidate the warranty.
5.2 Battery And Charger Maintenance• If the bike will not be used for an extended period, it should be kept at around
50% state of charge (or charge the battery for 2-3 hours if totally flat) and should
be placed in a dry and ventilated area. The battery should be charged for 2-3
hours every two months.
• The bike and charger should be kept in a clean, dry and ventilated area, avoid
contact with corrosive substances and keep away from excessive heat and open
flames.
• Storage conditions for the battery: temperature -20~35°C, relative humidity:
5~65%RH
• The charger should be disconnected from the bike when kept in storage.

17 fb.com/westhillbikes • westhillbikes.com
5.3 Battery Precautions• Never short circuit and discharge the battery.
• Keep the bike away from fire and excessive heat. Never put the bike or it’s battery
into fire.
• To avoid damage to the battery, never subject the bike to intense physical shock,
severe vibration or impact.
• Protect the bike from water and moisture. Protect the discharge and charge
terminals of the battery from rain or water logging.
• Operating temperature range when charge: 0~45°C
• Operating temperature range when discharged: -20~45°C
• Humidity whilst battery is in a working state: ≤80% RH
• Keep the battery away from children.
• If you have any questions about the bikes battery or its usage, please contact us
through Facebook or email.
• Never disassemble the bike or it’s battery.
5.4 Charger Precautions• Make sure the charger is as least 1M away from computers, TV’s, fridge, washing
machine and other electric appliances while charging.
• Use only the charger supplied with this e-bike.
• Only use the charger in a clean & dry place, free from smoke, dust and moisture.
• Once charging is complete disconnect the plug from the wall first, and then
disconnect the charger from the battery.
• Charge out of the reach of children.
• Never disassemble or refit the charger.
• Never put anything on the charger.
• Do not disconnect the battery output while charging.
• Do not switch on the e-bike while charging.
Westhill Bikes have teamed up with Samsung to ensure our bikes have what we believe are best batteries in the world!

fb.com/westhillbikes • westhillbikes.com18
6 Bicycle Inspection And Care6.1 Regular Cleaning• Wipe any dirty painted or plastic parts with a soft, damp cloth and a neutral
cleaning solution. Carefully dry the parts with a soft, dry cloth to finish.
• DO NOT use water to clean the e-bike, as the electrical and electronic systems
may get wet, resulting in personal injury or malfunction of the bicycle.
• DO NOT grease or use a greasy cloth to wipe down the electrical connectors,
brake pads, wheels, tyres or plastic parts.
• DO NOT use a pressure washer as this can force water into the electrical
components.
6.2 Regular Maintenance (Every 1-2 Months)Always carry out the following checks:
• Check the handlebar attachment and saddle post are correctly inserted and
tightened.
• Check the wheel hub mounting nuts are correctly tightened.
• Check the wheel rims are not cracked and that no spokes are loose or broken.
• Check the tyres are not worn or cut.
• Check the tyres are correctly inflated.
• Check the battery is sufficiently charged.
• Check the front and rear lights are working correctly.
• Check the front and rear brakes brake effectively.
• Check the cables are sufficiently greased, and that the brake pads are in good
condition.
• Check frame welds are in good condition and are free from corrosion or oxidation

19 fb.com/westhillbikes • westhillbikes.com
6.3 Lubricating The E-BikeTo maintain your e-bike in proper working order, be sure to carry out regular
lubrication, as indicated in the following illustration:
• Use specific transmission lubricants for the chain, freewheel and gears every 1–2
months, or if the drive line is dry.
• Do not lubricate or grease the speed controller, brake pads or wheel rims
Parts that can be lubricated Parts that should not be lubricated Head set Rear brake
Break cable Front break
Chain Rims
Tyres
Head set
Brake cable
Front brake
Rim Chain Tyre
Rear brake

04/18
HAVE A QUESTION? NEED HELP?
Contact us on Facebook for a quick reply.
THIS MANUAL SHOULD BE CONSIDERED A PERMANENT PART OF THE
ELECTRIC BICYCLE AND SHOULD REMAIN WITH IT IF RESOLD