EIL Portal - Applications · Page Rev. No Date Purpose Prepared by Reviewed by Approved by Template...
14
Rev. No Date Purpose Prepared by Reviewed by Approved by Template No. 5-0000-0001-T1 Rev. 1 Copyrights EIL – All rights reserved Page 1 of 14 General Operating Instructions EIL Portal
Transcript of EIL Portal - Applications · Page Rev. No Date Purpose Prepared by Reviewed by Approved by Template...
Rev. No Date Purpose Prepared by Reviewed by Approved by
Template No. 5-0000-0001-T1 Rev. 1 Copyrights EIL – All rights reserved
Page 1 of 14
General Operating Instructions
EIL Portal
Template No. 5-0000-0001-T2 Rev. 1 Copyrights EIL – All rights reserved
Page 2 of 14
General Operating Instructions
Table of Contents
1.0 Introduction ......................................................................................................................... 3
2.0 General Operating Instructions: .......................................................................................... 5 Annexure-I ...................................................................................................................................... 9
Template No. 5-0000-0001-T2 Rev. 1 Copyrights EIL – All rights reserved
Page 3 of 14
General Operating Instructions
1.0 Introduction
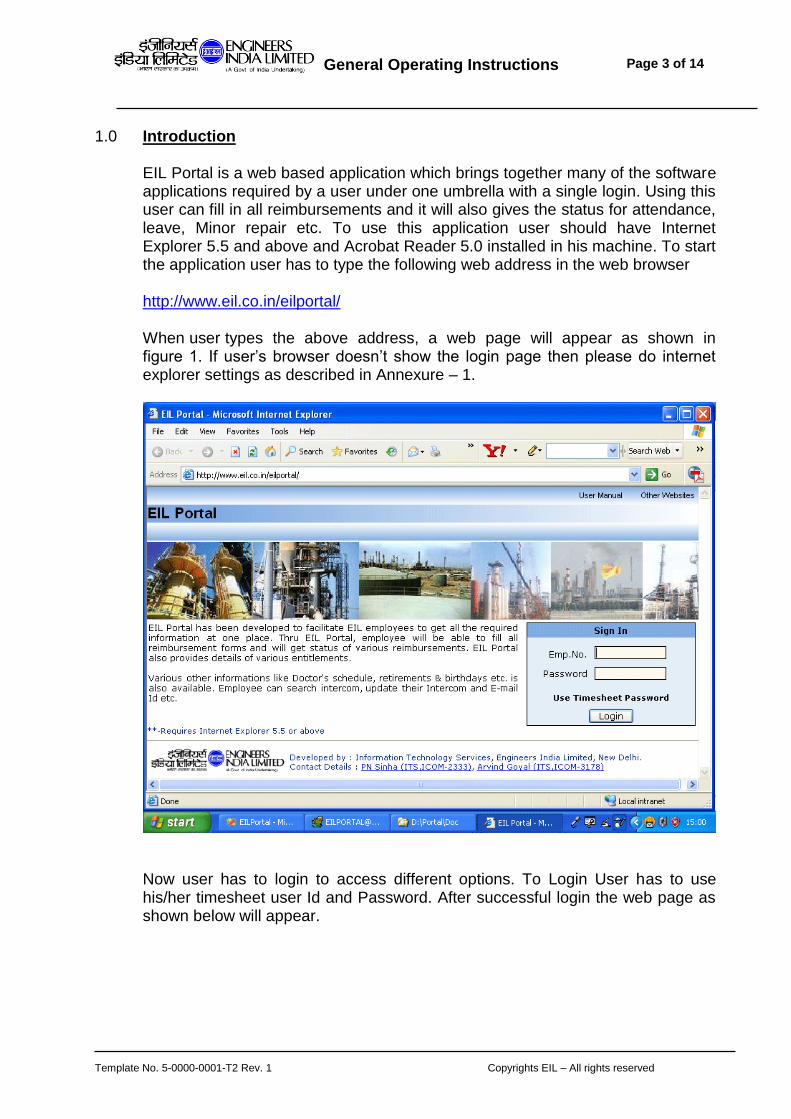
EIL Portal is a web based application which brings together many of the software applications required by a user under one umbrella with a single login. Using this user can fill in all reimbursements and it will also gives the status for attendance, leave, Minor repair etc. To use this application user should have Internet Explorer 5.5 and above and Acrobat Reader 5.0 installed in his machine. To start the application user has to type the following web address in the web browser
http://www.eil.co.in/eilportal/
When user types the above address, a web page will appear as shown in figure 1. If user’s browser doesn’t show the login page then please do internet explorer settings as described in Annexure – 1.
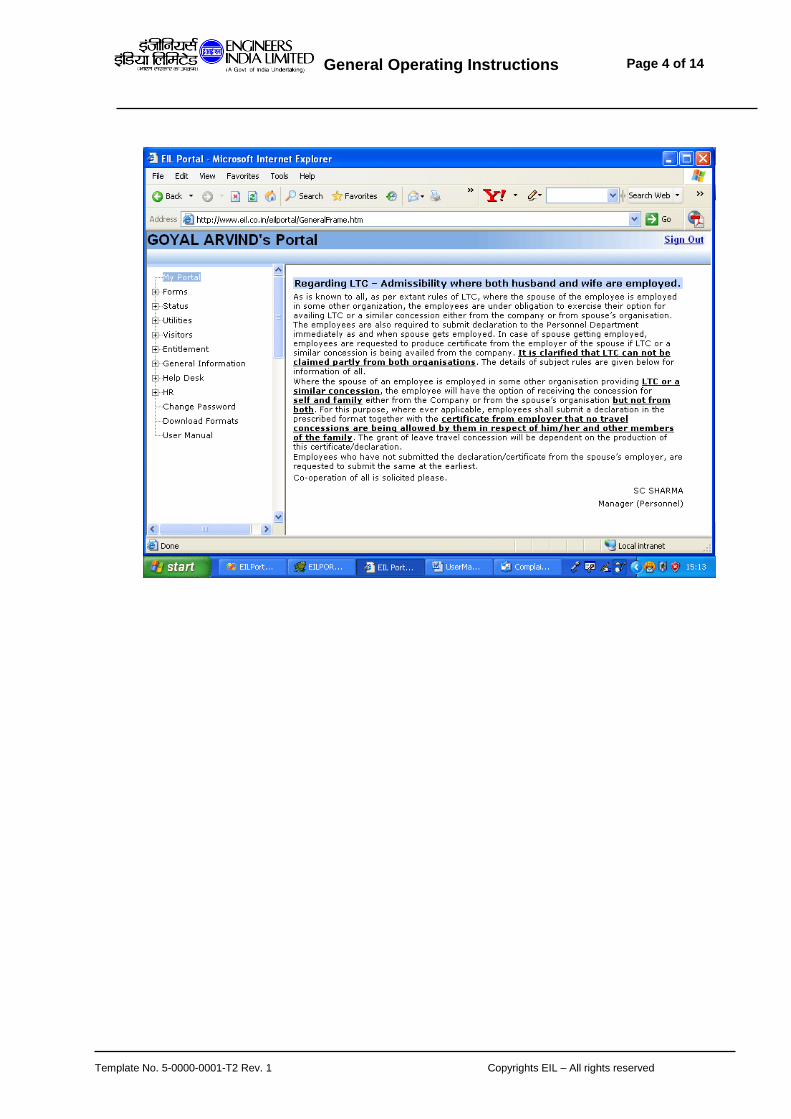
Now user has to login to access different options. To Login User has to use his/her timesheet user Id and Password. After successful login the web page as shown below will appear.
Template No. 5-0000-0001-T2 Rev. 1 Copyrights EIL – All rights reserved
Page 4 of 14
General Operating Instructions
Template No. 5-0000-0001-T2 Rev. 1 Copyrights EIL – All rights reserved
Page 5 of 14
General Operating Instructions
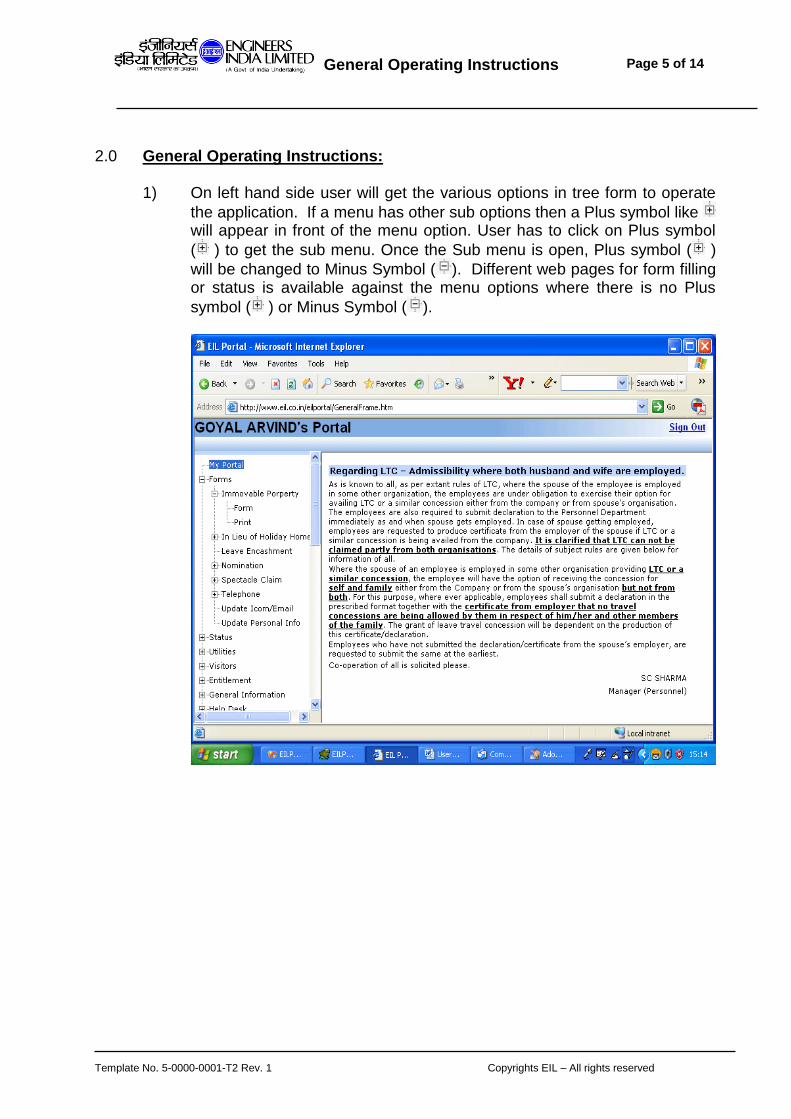
2.0 General Operating Instructions: 1) On left hand side user will get the various options in tree form to operate
the application. If a menu has other sub options then a Plus symbol like will appear in front of the menu option. User has to click on Plus symbol
( ) to get the sub menu. Once the Sub menu is open, Plus symbol ( )
will be changed to Minus Symbol ( ). Different web pages for form filling or status is available against the menu options where there is no Plus
symbol ( ) or Minus Symbol ( ).

Template No. 5-0000-0001-T2 Rev. 1 Copyrights EIL – All rights reserved
Page 6 of 14
General Operating Instructions
2) When user click on Form menu option under any head then system will show the various claims or details user has entered till now as shown below:
3) As shown in above picture, user will get the claim details. Here user has two options
a. To enter New Data b. To Edit Existing Data
4) To Enter New Data user has to click on New Button. When user clicks on the button then system will open a blank form with some default data as per module requirement.

Template No. 5-0000-0001-T2 Rev. 1 Copyrights EIL – All rights reserved
Page 7 of 14
General Operating Instructions
5) To Edit Existing Data, User has to click on Edit/View hyperlink appearing against that claim or data. When user clicks on that Link then the form will open with the saved data. If the data is already processed by the processing department, user will get the data but the save option will not be available for the user. In short, editing cannot be done once the data is processed. But user can print the data if print option is available.
6) In general the forms operations are similar. When user opens a form to fill
the data then the page as shown below will appear:
7) Here user will get the blank form. If some data is saved against that form
then the details will appear below in form of a table as shown above.
8) Each form is having three buttons,
a. Back : This option is used to go back to previous status page.
b. Save : This option is used to save the filled data.
c. Print : This option is getting print of the saved data.
9) Below these three buttons, If the data against that form has multiple records then user will get a table where the saved records will appear.
Template No. 5-0000-0001-T2 Rev. 1 Copyrights EIL – All rights reserved
Page 8 of 14
General Operating Instructions
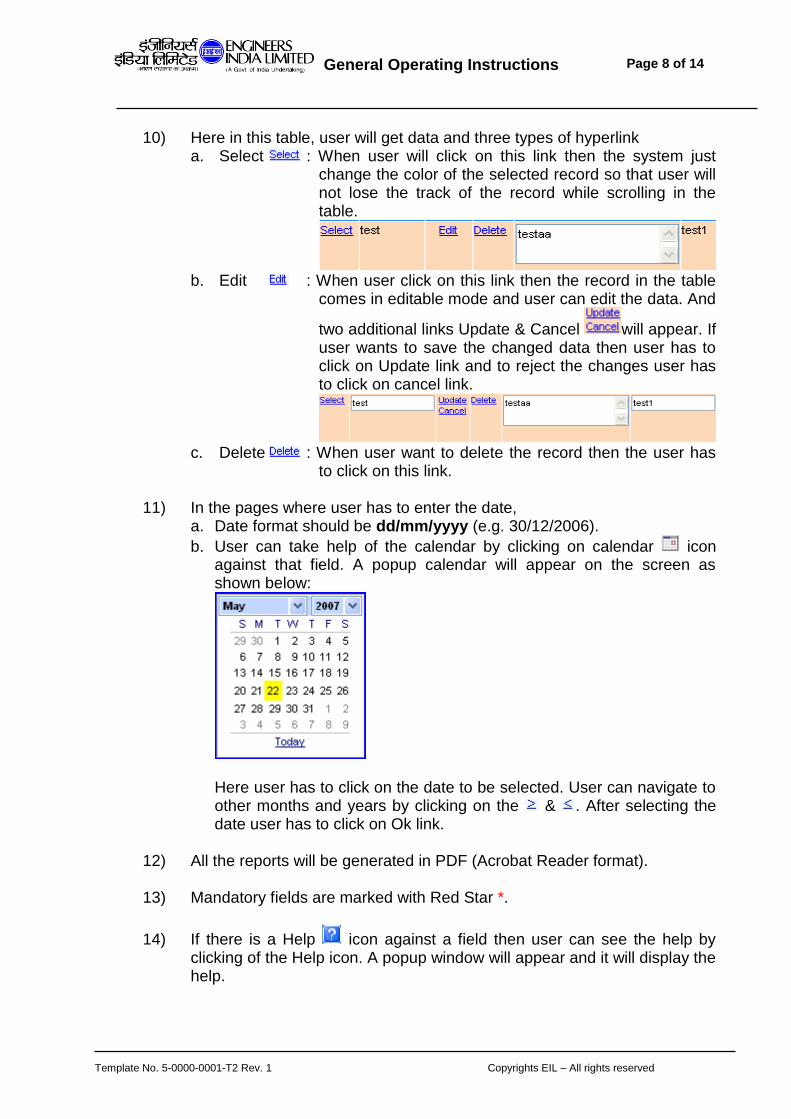
10) Here in this table, user will get data and three types of hyperlink
a. Select : When user will click on this link then the system just change the color of the selected record so that user will not lose the track of the record while scrolling in the table.
b. Edit : When user click on this link then the record in the table
comes in editable mode and user can edit the data. And
two additional links Update & Cancel will appear. If user wants to save the changed data then user has to click on Update link and to reject the changes user has to click on cancel link.
c. Delete : When user want to delete the record then the user has
to click on this link.
11) In the pages where user has to enter the date, a. Date format should be dd/mm/yyyy (e.g. 30/12/2006).
b. User can take help of the calendar by clicking on calendar icon against that field. A popup calendar will appear on the screen as shown below:
Here user has to click on the date to be selected. User can navigate to other months and years by clicking on the & . After selecting the date user has to click on Ok link.
12) All the reports will be generated in PDF (Acrobat Reader format). 13) Mandatory fields are marked with Red Star *.
14) If there is a Help icon against a field then user can see the help by clicking of the Help icon. A popup window will appear and it will display the help.

Template No. 5-0000-0001-T2 Rev. 1 Copyrights EIL – All rights reserved
Page 9 of 14
General Operating Instructions
Annexure-I
Internet Explorer Settings
Settings to be done to browse this site from the machines in LAN having internet connection
1) Start Internet Explorer 2) Select Tools Menu as shown below
Template No. 5-0000-0001-T2 Rev. 1 Copyrights EIL – All rights reserved
Page 10 of 14
General Operating Instructions
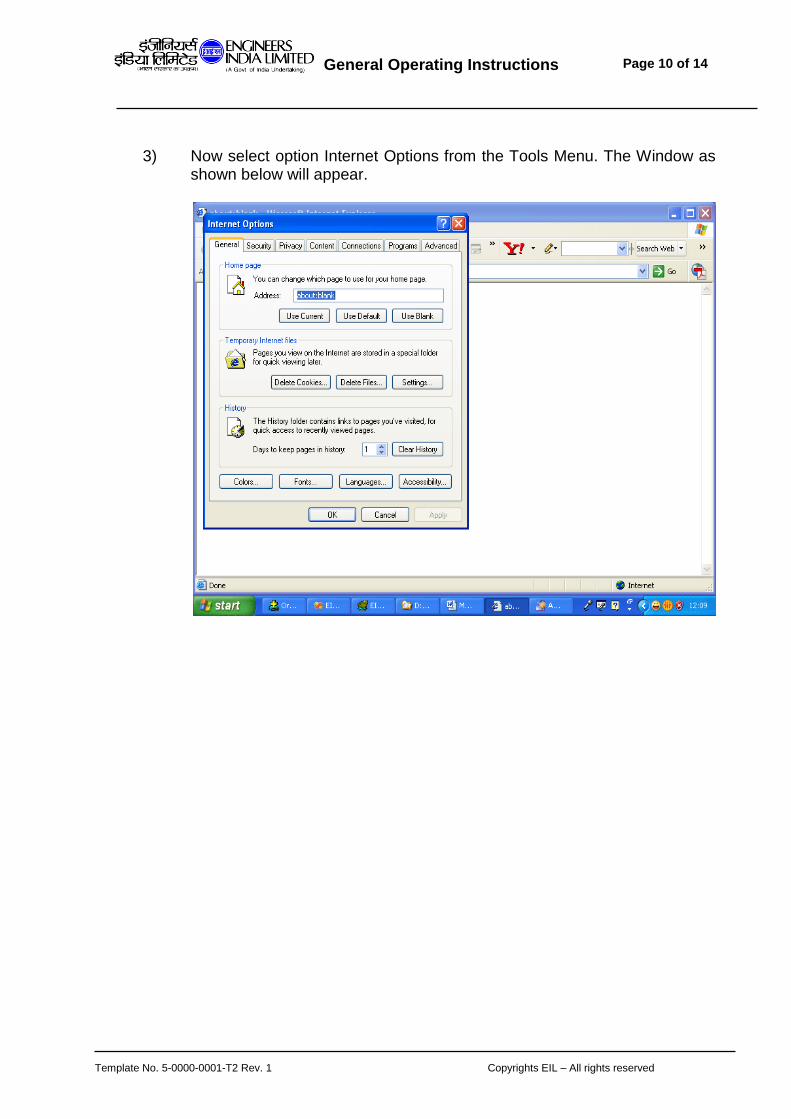
3) Now select option Internet Options from the Tools Menu. The Window as shown below will appear.
Template No. 5-0000-0001-T2 Rev. 1 Copyrights EIL – All rights reserved
Page 11 of 14
General Operating Instructions
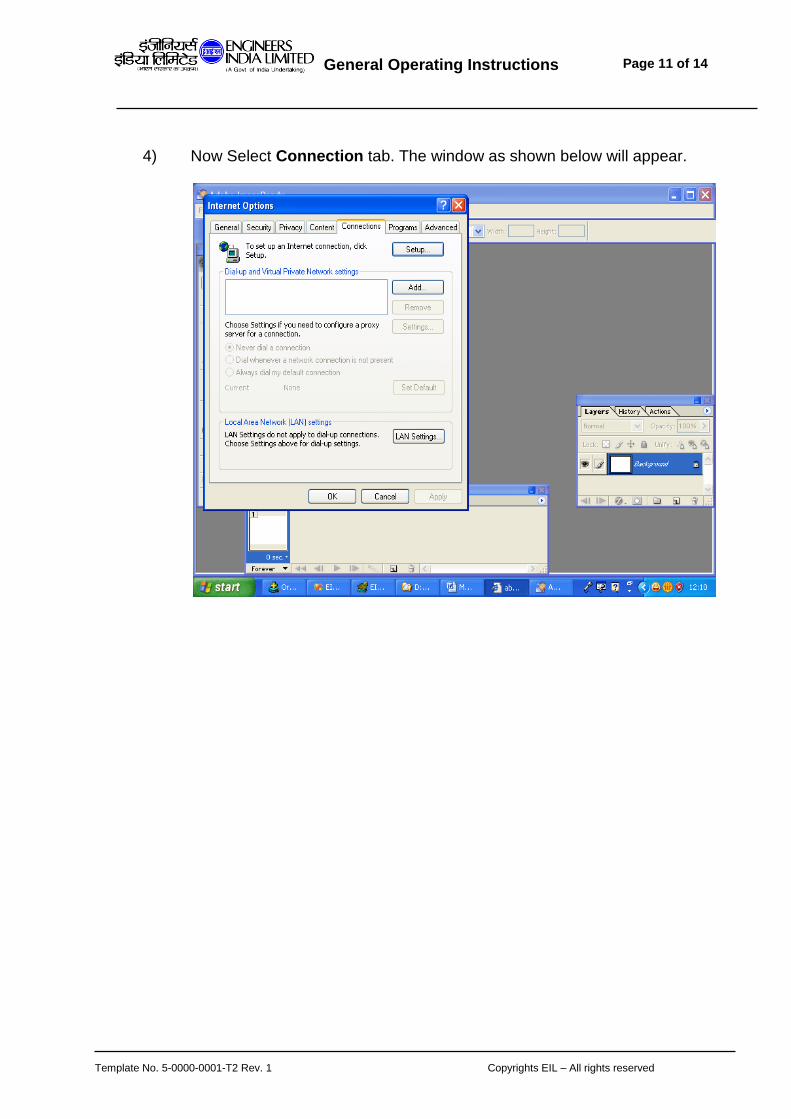
4) Now Select Connection tab. The window as shown below will appear.

Template No. 5-0000-0001-T2 Rev. 1 Copyrights EIL – All rights reserved
Page 12 of 14
General Operating Instructions
5) Now Click on LAN Settings button. The window as shown below will appear.

Template No. 5-0000-0001-T2 Rev. 1 Copyrights EIL – All rights reserved
Page 13 of 14
General Operating Instructions
6) Now Click on Advanced button. The window as shown below will appear.

Template No. 5-0000-0001-T2 Rev. 1 Copyrights EIL – All rights reserved
Page 14 of 14
General Operating Instructions
7) There is a field with the heading “Exception”. In this there could be some entries. If there is no entry then just type as explained below in (a.)
a. If the field is blank then just type *.eil.co.in
b. If there are some entries then type ;*.eil.co.in as shown below:
8) Now close all windows one by one by clicking on Ok button. 9) Now user can browse the site.