
EE 477 Final Report · Web view... which requires a 7.5V supply. Power regulation will be...
108
ECE 477 Final Report Spring 2010 Team 10 RAPTORS Team Members: #1: _ Jeff Kubascik _______________ Signature: ____________________ Date: _________ #2: __Joe Trefilek ________________ Signature: ____________________ Date: _________ #3: __Paul Scheffler ______________ Signature: ____________________ Date: _________ #4: __Matt Rockey _______________ Signature: ____________________ Date: _________ i
-
Upload
phungxuyen -
Category
Documents
-
view
213 -
download
1
Transcript of EE 477 Final Report · Web view... which requires a 7.5V supply. Power regulation will be...

ECE 477 Final Report Spring 2010Team 10 RAPTORS
Team Members:
#1: _ Jeff Kubascik_______________ Signature: ____________________ Date: _________
#2: __Joe Trefilek________________ Signature: ____________________ Date: _________
#3: __Paul Scheffler______________ Signature: ____________________ Date: _________
#4: __Matt Rockey_______________ Signature: ____________________ Date: _________
CRITERION SCORE MPY PTSTechnical content 0 1 2 3 4 5 6 7 8 9 10 3Design documentation 0 1 2 3 4 5 6 7 8 9 10 3Technical writing style 0 1 2 3 4 5 6 7 8 9 10 2Contributions 0 1 2 3 4 5 6 7 8 9 10 1Editing 0 1 2 3 4 5 6 7 8 9 10 1Comments: TOTAL
TABLE OF CONTENTSi

Abstract 1
1.0 Project Overview and Block Diagram 2
2.0 Team Success Criteria and Fulfillment 5
3.0 Constraint Analysis and Component Selection 6
4.0 Patent Liability Analysis 14
5.0 Reliability and Safety Analysis 18
6.0 Ethical and Environmental Impact Analysis 22
7.0 Packaging Design Considerations 26
8.0 Schematic Design Considerations 31
9.0 PCB Layout Design Considerations 35
10.0 Software Design Considerations 39
11.0 Version 2 Changes 44
12.0 Summary and Conclusions 46
13.0 References 47
Appendix A: Individual Contributions A-1
Appendix B: Packaging B-1
Appendix C: Schematic C-1
Appendix D: PCB Layout Top and Bottom Copper D-1
Appendix E: Parts List Spreadsheet E-1
Appendix F: FMECA Worksheet F-1
ii

AbstractThe RAPTORS project is a remotely operated drone aircraft with a real-time flight data
acquisition system. The project retrofits an existing model airplane with a custom radio
transceiver and sensing equipment for inertial and navigation data, including a GPS, barometer,
gyroscope, accelerometer, and camera. This data from the plane is transmitted to a ground station
transceiver via a wireless signal operating in the 430 Hz range with feedback-loop controlled
signal amplification. The receiving station is connected to a laptop which displays the data
onscreen in real-time. The ground station, in turn, inputs control commands from the pilot and
transmits them to the aircraft. Though federal regulations forbid civilian use of unmanned aerial
vehicles out of line-of-sight, this vehicle could ostensibly be used for such purposes.
1

1.0 Project Overview and Block DiagramThe project is comprised of four key elements: the aircraft, packet modem, aircraft inertial
and navigational sensors, and the ground station. The aircraft is a foam RC airplane which was
chosen based on characteristics such as stability, weight, power, and durability. The Easy Glider
Pro exhibits these characteristics [1]. The packet modem directly controls the aircraft with
commands via a joystick on the ground.
The design of the packet modem is based on the CC1101 RF transceiver chip from Texas
Instruments [2]. The transceiver is capable of operating in the 420MHz-450MHz band at a data
rate of 500 kbps. For legal operation in the US, the modem must be operated on the 70 cm
amateur radio band with an amateur radio license. The transceiver is only capable of 10mW
transmitting power, so a power amplifier was designed for long range transmission. A
microcontroller is interfaced with the transceiver and handles packet formatting, error correction,
buffering, and flow control.
The design utilizes a variety of sensing equipment including: an Accelerometer for
each of the 3 axes, a MEMS Gyroscope, a GPS module, a Barometric Pressure Sensor, and a
Camera. These sensors interface with the microcontroller which transmits the data to the ground
station via the packet modem.
The ground station consists of a second packet modem connected to a laptop via USB.
The packet modem design used in the aircraft was replicated in the ground station to simplify the
design. A program is executed on the laptop which displays a virtual cockpit based on the data
received from the aircraft sensors. A joystick is interfaced with the laptop to give the user real-
time manual control of the aircraft. Autonomous control is not utilized.
2

3

4

2.0 Team Success Criteria and Fulfillment
1. An ability to wirelessly transmit and receive packet data. 2. An ability to relay aircraft position and orientation utilizing inertial and navigational
sensors. 3. An ability to capture images and relay them serially to the ground station. 4. An ability to control the aircraft servo motors via a microcontroller interface. 5. An ability to amplify an RF signal to 1 watt PEP of transmission power.
All five of the success criteria were fulfilled twice, once before we placed the project in its
final packaging and once more after we placed the project in its final packaging. We have
achieved consistent and reliable wireless communication of packet data at speeds of around 60
kilobytes per second. We relay aircraft orientation, altitude, longitude, latitude, and speed 16
times per second. We relay 1 picture per second at a resolution of 320x160. The servos are
controlled via a joystick at our ground station. Our RF transmission signal has been amplified to
just over 2 Watts with ½ Watt reflection.
5

3.0 Constraint Analysis and Component Selection3.1 Introduction
The RAPTORS project is a remotely operated drone aircraft with a real-time flight data
acquisition system. The project will retrofit an existing model airplane with a custom designed
radio transceiver and sensing equipment for inertial and navigation data. The data from the plane
will be transmitted to a transceiver connected to a ground station (laptop) and displayed onscreen
in real-time. The ground station will, in turn, input control commands from the pilot and transmit
them to the aircraft. Space and weight are going to be critical factors in the design of the custom
electronics, since the boards must fit inside the aircraft, and not cause the total weight to exceed
aircraft limitations. Success of this project will be judged upon the following project-specific
success criteria.
1. An ability to wirelessly transmit and receive packet data.
2. An ability to relay aircraft position and orientation utilizing inertial and navigational
sensors.
3. An ability to capture images and relay them serially to the ground station.
4. An ability to control the aircraft servo motors via a microcontroller interface.
5. An ability to amplify an RF signal to 1 watt PEP of transmission power.
3.2 Design Constraint Analysis
There are several design constraints that will be considered in this report. These include
computation requirements, interface and peripheral requirements, power constraints, packaging
constraints, and cost constraints. Furthermore, the rationale behind specific component
selections will be explained and compared with other similar components. These constraints will
be heavily based on three key factors, weight, space, and reliability, as these are critical in a
model aircraft system.
Weight of any systems added to the aircraft must be carefully considered, as an
overburdened airplane will exhibit poor flight dynamics and consume more power at cruising
speed. The aircraft chosen for this project is the Multiplex Easy Glider Pro [1], along with the
recommended power pack and servo pack. The motor included in the power pack is a Himax
3516-1130 brushless motor, which is capable of operating at 350W peak power. According to
the manual, there is a requirement of 75W per pound of gross weight of the aircraft for sporty
6

flight characteristics. This limits the gross weight of the aircraft to about 4.5 lbs. The aircraft
loaded with standard systems has a gross weight of 1.75lbs, leaving a maximum of 2.75lbs
available for any custom modifications. However, having an aircraft as light as possible will be
easier to balance and also consume less power, extending the range of flight. Weight will play a
key role in peripheral requirements, power requirements, and packaging constraints.
Space is very limited in a model aircraft. The Easy Glider Pro has a small electronics bay
towards the front of the aircraft, which houses the servos, battery, and receiver. The electronics
bay measures 6x2x2 inches. Any electronics designed in the project must be able to fit in this
compartment. Space will be critical in peripheral requirements and packaging constraints.
Finally, reliability is critical in any aircraft system, as any failure in flight control systems
would result in loss of aircraft control. Reliability can be obtained through considerable
engineering factors, such as a large link budget in the wireless packet transceiver system, and
simplicity in system design and integration. Reliability will be prevalent in computation
requirements and interface requirements.
3.2.1 Computation Requirements
Computational requirements for this project will be minimal; the main purpose of the
microcontrollers will be to aggregate data and reroute it between peripherals. The MCU on the
sensor board will collect data from the accelerometer, gyroscope, barometric pressure sensor,
GPS module and the camera if a picture has been requested. It will then transmit this data to the
packet modem microcontroller via UART. The packet modem microcontroller is responsible for
arranging this data in packet form, adding a checksum to the packet and transmitting it via SPI to
the transceiver, as well as interpreting data received from the transceiver into servo control
signals. The advantage of separating the sensor board and packet modem is that servo control of
the airplane is independent of sensor and camera data. The data sent from the aircraft transceiver
is sent to the base station, where it is received by the base station MCU. This MCU is responsible
for checking the packet checksum, disassembling the packet and forwarding the data via a serial
interface to the computer, as well as receiving information on this serial line concerning flight
control data. On the computer, the received information will be transformed into visual
information for the user.
7

3.2.2 Interface Requirements
There are two subsystems which the interface requirements will need to be described in
detail: the packet modem and the sensor module. The packet modem is responsible for handling
RF communications between the aircraft and the ground station, as well as control of the aircraft.
The sensor module will measure the orientation and position of the aircraft and relay this to the
ground station through the packet modem.
For the packet modem, interface requirements are based on communicating with the
CC1101 RF transceiver chip [2], servo controllers, debugging interfaces, and an external serial
communications channel. Communications with the CC1101 RF transceiver chip will require a
standard 4-wire SPI interface as well as 2 GPIO pins. The servo controller interface will be
composed of 8 channels which will use PWM to control the 4 plane control surfaces and the
engine controller, with 3 extra for future expansion. The debugging interface will be comprised
of a single RS232 channel requiring a UART peripheral and 3 GPIO’s for driving LEDs. The
external serial communications channel will be a TTL level UART which will interface with
either the sensor module on the plane or a USB port which will interface to a laptop at the
ground station for bulk data transfer of sensor and control data.
The sensor module requires interfacing with a 3-axis accelerometer, a 2-axis gyroscope, a
GPS receiver, a camera module, a barometric pressure sensor, and a debug interface. The 3-axis
accelerometer will require 3 ADC channels. The 2-axis gyroscope will require 2 ADC channels.
The GPS receiver and camera module each have a TTL level UART interface. The camera
module will break the jpeg image into 64 byte chunks when transferring it to the sensor module,
thus requiring little memory on the microcontroller. The barometric pressure sensor will require
a 4-wire SPI interface. The debug interface will require a RS232 channel and 3 GPIO’s for
driving LEDs.
8

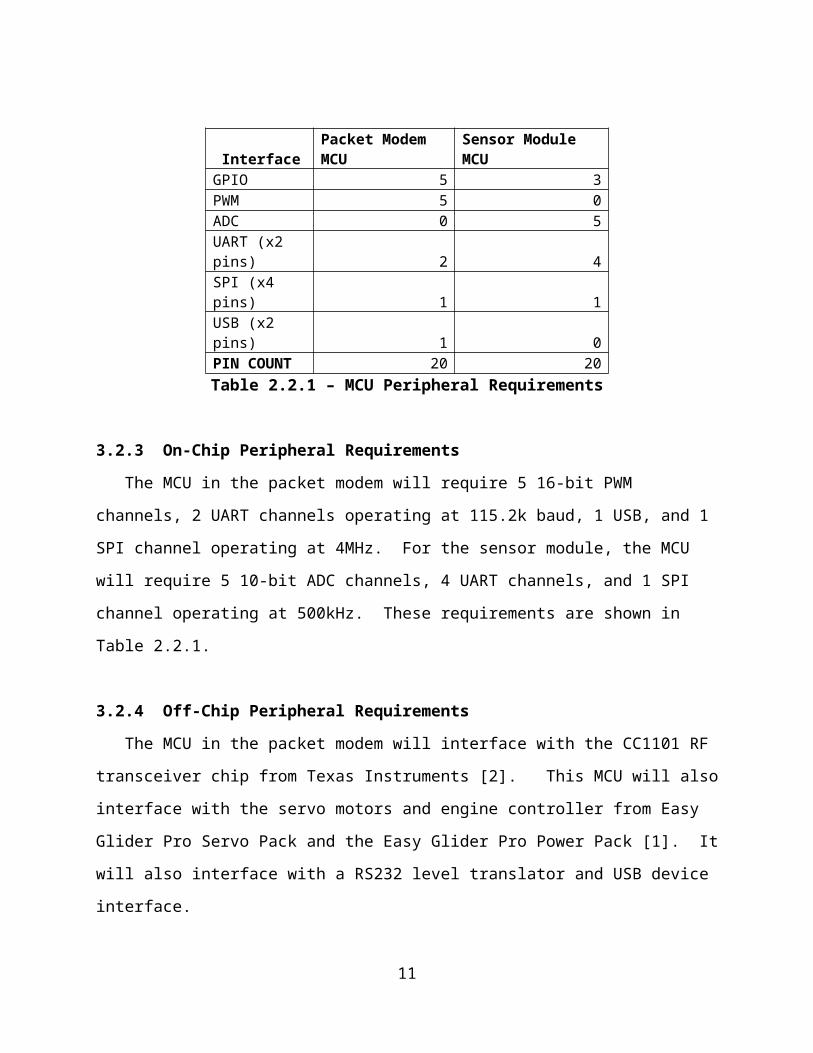
Interface Packet Modem MCU Sensor Module MCUGPIO 5 3PWM 5 0ADC 0 5UART (x2 pins) 2 4SPI (x4 pins) 1 1USB (x2 pins) 1 0PIN COUNT 20 20
Table 2.2.1 – MCU Peripheral Requirements
3.2.3 On-Chip Peripheral Requirements
The MCU in the packet modem will require 5 16-bit PWM channels, 2 UART channels
operating at 115.2k baud, 1 USB, and 1 SPI channel operating at 4MHz. For the sensor module,
the MCU will require 5 10-bit ADC channels, 4 UART channels, and 1 SPI channel operating at
500kHz. These requirements are shown in Table 2.2.1.
3.2.4 Off-Chip Peripheral Requirements
The MCU in the packet modem will interface with the CC1101 RF transceiver chip from
Texas Instruments [2]. This MCU will also interface with the servo motors and engine
controller from Easy Glider Pro Servo Pack and the Easy Glider Pro Power Pack [1]. It will also
interface with a RS232 level translator and USB device interface.
The MCU in the sensor module will interface with the GPS-08975 GPS module [3]. It will
also interface with the SEN-00252 3-axis accelerometer [4], the SEN-09413 2-axis gyroscope
[5], SEN-08161 barometric pressure sensor module [6], and the SEN-09334 camera module [7].
3.2.5 Power Constraints
The packet modem and sensor module located on the aircraft will be powered by the on
board rechargeable Lithium-Polymer battery pack which is already used to power the aircraft.
The battery has a nominal voltage of 11.1V and 4200mAh capacity [1]. Majority of the
peripherals on both subsystems operate with a nominal 3.3V supply, with exception to the RF
power amplifier, which requires a 7.5V supply. Power regulation will be located in the packet
9

modem, and will be shared with the sensor module. The base station packet modem will require
an external power source, which could be supplied by a lead-acid or NiMH battery pack.
The major consumer of power in the system, other than the aircraft engine, will be the power
amplifier in the packet modem. Presently, the design calls for a 1W power amplifier in the final
stage of the RF block. A linear regulator will be used to convert the battery voltage to 7.5V as a
low noise source is critical for RF amplification.
3.2.6 Packaging Constraints
The major concerns in packaging are weight and size, due to the limited space and weight
capacities of the aircraft. There is a small cargo bay in the fuselage of the aircraft which the
electronics must fit within, along with the existing servos, engine, and battery. Furthermore, the
aircraft weighs 1.75 lbs, while the engine is capable of supporting a gross weight of 4.5 lbs while
retaining a sporty flight characteristic, leaving 2.75 lbs available for our modifications.
Requirements are considerably more relaxed for the ground station equipment. Primary
concern in packaging is protecting the electronics from environmental damage and normal wear-
and-tear.
3.2.7 Cost Constraints
There are no commercially available complete systems that offer the same functionality as
what our project will provide. Other people have built custom systems that provide similar
functionality, however these are not available for retail purchase. However, the military has a
few micro-UAV solutions available which are similar in functionality. For instance, the Wasp
III small unmanned aircraft system developed by AeroVironment is a light-weight aircraft which
can be hand launched by an individual on the ground and then controlled via a remote [8]. The
aircraft has a cruise speed of 20-40 MPH and a maximum altitude of 1,000 feet. A display on
the remote gives the user real-time video feed from one of the two onboard cameras. These units
are relatively expensive, at a cost of about $49,000.
3.3 Component Selection Rationale
The most significant criteria for selecting the components for this project are cost and
ease of integration. Each part was selected to interface easily with the microcontroller without
10

requiring more peripherals than are available on a PIC24F series microcontroller from
Microchip, which was chosen because three of our team members have extensive experience
programming and debugging them. Specifically, the PIC24FJ256GB106 [9] was chosen since it
meets our peripheral requirements above, particular the need for 4 UART interfaces. An
alternative would be the ATmega640 from Atmel. However, the ATmega640 still only has
preliminary documentation, has more I/O pins that necessary, lower clock speed, and the team
has little previous experience with Atmel products.
The three-axis accelerometer, as with the other sensors, was sourced from the
extensive, well-supported selection at Sparkfun. Cost being a factor, the selection was quickly
narrowed down to three options: the MMA7260Q [4], which costs $19.95 and has an analog
interface, the $24.95 ADXL335, and the $27.95 ADXL345, which features and SPI interface.
Each of the accelerometers are sold with a breakout board from Sparkfun so research was done
in acquiring the ICs and simply integrating them into the PCB design, however none were
available in an leaded package. The MMA7260Q has a selectable range from 1.5 to 6g and the
ADXL335 has a maximum value of 3.3g. The ADXL345 was eliminated due to cost and the
complexity involved in implementing an additional SPI interface. Ultimately, the MMA7260Q
was selected due to the ability to select the range.
Like the accelerometer, no gyroscope ICs were found with a leaded package.
Therefore, it was determined that a breakout board from Sparkfun would again need to be
implemented. The selection of two-axis gyroscopes is less extensive than that for the
accelerometers, primarily varying only in range and orientation. It was determined that we
would need to collect pitch and roll data, as yaw could be measured using the GPS unit.
Sparkfun offers three modules to meet this specification: the LPR503AL [5], which has a
maximum range of 30°/second, the LPR530AL with a maximum range of 300°/second, and the
LPR5150AL with a maximum range of 1500°/second. Each interfaces with an analog interface
and costs $29.95. It was determined that the aircraft may move at greater than 30°/second, but
should stay below 300°/second during desired operation, so the LPR530AL was selected.
The GPS module GPS-08975 [3] has an operation voltage of 3.3V, a 5 Hz rate of
update, and a TTL level serial interface. This is convenient due to its voltage of operation and
the interface to the MCU. Another candidate for the GPS module was the GPS-00465 which
11

operates at 5V, and an RS-232 level serial interface. The voltage and interface are less
convenient. Since both of these modules have the same price the GPS-08975 was chosen.
As a camera the SEN-09334 [7] was chosen because it provides a 640x480 color
picture. It operates at 3.3 V which is convenient for our board and transmits data serially at
RS232 level. The key feature that makes this camera the best choice is that it converts the
image to JPEG on the module before sending allowing us to transmit images more rapidly
without compressing them ourselves in our embedded environment. Another comparable
camera is the SEN-08739 which also provides 640x480 color pictures. It has a voltage
operation range of 5 to 15 Volts and interfaces through RCA, which would require some sort of
custom video encoding hardware.
For wireless data transmission, the CC1101 low-power RF transceiver from Texas
Instruments [2] was chosen. The chip is capable of operating in the amateur radio band of 420-
450MHz band with a data rate of 500 kbps. Regulations are relaxed in the amateur band and
traffic is relatively light; only thing required is an amateur radio operator license and adhering to
part 97 of the FCC regulations [10], including transmitting a call sign once every 10 minutes.
An alternative would be the nRF24L01+ from Nordic Semiconductor, which operates in the
2.4GHz band with a data rate of up to 2 Mbit per second. The downside to this is that the
2.4GHz band is heavily used by commercial ISM products, and the design would need to comply
with part 15 of the FCC regulations [11] for unlicensed devices. Part 15 regulations are
considerably more stringent than part 97 regulations.
3.4 Summary
The RAPTORS project will retrofit an existing model airplane with a custom designed radio
transceiver and sensing equipment for inertial and navigation data. This will be relayed to a
ground station, giving a user a virtual cockpit of the vehicle. The user will also have a joystick
which will also remotely control the aircraft through the custom radio transceiver. The project’s
design constraints described in this report covered computation requirements, interface and
peripheral requirements, power constraints, packaging constraints, and cost constraints. These
constraints were heavily based on three key factors, weight, space, and reliability, as these are
critical in a model aircraft system.
12
The computation requirements, interface requirements, and peripheral requirements were
chosen to keep the design simple, yet functional, as this will produce a system which is more
reliable. With respect to power constraints, components were chosen such that they could
operate at 3.3V, as this keeps interfacing between peripherals simple. Since the aircraft’s engine
will consume considerably more power than the onboard electronics, power consumption is not a
big factor. Packaging constraints will need to be chosen based on weight and space, since this is
sparse. Cost is also not a critical factor, since existing solutions are in the tens of thousands price
range.
The rationale was also described for selection of microcontroller, accelerometer, gyroscope,
GPS module, camera, and transceiver components. Alternative components were also
considered for each of the components and an explanation was given for the given selection.
13

4.0 Patent Liability Analysis
4.1 Introduction
Project RAPTORS is largely an application of numerous, widely available components
and methods, so patenting much of the system would be somewhat of a challenge as much of the
project could be considered common knowledge. However, the system as a whole could
potentially be patented as no literally similar patents appear to exist. Some do incorporate
features and methods that could potentially infringe, and care would need to be taken to avoid
this.
4.2 Results of Patent and Product Search
4.2.1 Patent #7,014,141: Unmanned airborne reconnaissance system
This patent, filed on July 12, 2002, details an unmanned aircraft designed to be easily
transported into the field and flown from a power-assisted launch system. The aircraft can be
controlled via a radio link to a ground station or via preprogrammed instructions and has an
onboard camera for taking and transmitting images. Claim number 8, which states “An airborne
reconnaissance system comprising: an airborne vehicle having a fuselage and wings adapted to
be removed from the fuselage, the airborne vehicle including an onboard video camera and video
signal transmitter and a flight control system to remotely control a flight of the airborne vehicle
from a remote location…” [12] is the most significant that would present a concern where
infringement is concerned.
4.2.2 Patent #7,289,906: Navigation system applications of sigma-point Kalman filters
for nonlinear estimation and sensor fusion
This patent, filed on April 4, 2005, details a method by which a Kalman filter, in
conjunction with a Gaussian approximate random variable propagation technique, can be utilized
to gain a more accurate approximation of the position of an object based on noisy data. The data
is gathered by means of an inertial measurement unit (IMU) and GPS systems, which may be
integrated into a single package. the claims of greatest concern is number 12, which states “An
integrated navigation system for estimating the navigational state of an object, … the system
state space model specifying a time evolution of the system and its relationship to sensor
observations, comprising: measurement sensors producing observation data in the form of noisy
14

information about the navigational state, the measurement sensors including an integrated
measurement unit (IMU) … operating to provide information for estimating a set of navigational
state components that include position, velocity, attitude, and angular velocity…” [13].
4.2.3 Patent Application #20070020588: Low-cost flight training and synthetic
visualization system and method
This patent, filed January 9, 2006, consists of a sensor and data storage device for
collection position and navigational data from an in-flight vehicle. The data can also be
transmitted directly to a ground station which can render the data in real time on a video display
or simply display the information in an external software application. The claims of greatest
concern include claim 1, which describes “A flight training and synthetic visualization system
comprising: a. a self-contained mobile data recording unit, comprising: i. an inertial
measurement means to continuously sense three-dimensional orientation of said mobile data
recording unit in terms of yaw, pitch, and roll … v. a processor means to gather navigational
information captured by the components of said mobile data recording unit; … c. A data transfer
means for transferring said navigational information, calibration data, and status information
between said mobile data recording unit and said software engine” and claim 5, which describes
“The flight training and synthetic visualization system of claim 1, wherein said data transfer
means is a wireless radio connection” [14].
4.3 Analysis of Patent Liability
None of the patents described in section 4.2 exactly encompass all of the features of
Project RAPTORS in a literal manner, therefore literal infringement is not a concern. The project
does, however, utilize similar technologies and methods to those listed, and care must be taken to
ensure that they do not infringe under the doctrine of equivalents.
For the unmanned airborne reconnaissance system [12], similarities to Project RAPTORS
include the aircraft’s ability to take reconnaissance photos from an onboard camera and relay
them to the ground via a wireless link. Further, the aircraft can be controlled via the same
wireless link from the ground station. Differences to Project RAPTORS include the use of a
compact launching and storage system, as well as the inability to send navigation and inertial
15

data to the ground station. Further, Project RAPTORS does not utilize an onboard storage system
for collecting data, nor an onboard automated aircraft control system.
For the navigation system applications of sigma-point Kalman filters [13], Project
RAPTORS will be utilizing a Kalman filter in a similar manner to combine inertial data from our
sensor unit, however, the process by which this will be accomplished will not be as sophisticated
as the methods described in this patent. Further, the data utilized will only be coming from the
accelerometer and gyroscope sensors, and not utilized the data coming from the GPS unit.
Finally, for the aircraft telemetry and visualization system [14], similarities to Project
RAPTORS include the collection and transmission of flight and navigational data to a ground
station via RF link, which is then transferred to an external computer for analysis in real-time.
Differences include the lack of the ability to send control signals to the aircraft, and the inclusion
of on-board data storage to be exported at a later time. Given the vast similarities between the
system and Project RAPTORS’ sensor and telemetry functions, this patent presents the greatest
challenge to avoiding infringement.
Despite the differences between Project RAPTORS and the aforementioned patents, there
is a small possibility of infringement with them, therefore care must be taken to avoid such
issues.
4.4 Action Recommended
To avoid infringing on the unmanned airborne reconnaissance system [12], care must be
taken to note that Project RAPTORS will not be taking continuous video and that the aircraft
being used will not be utilizing an assisted launch system as the patent describes. For the Kalman
filter methods [13], a different usage of the Kalman filter must be used, such as neglecting GPS
data in the calculation. This would result in a slight drop in accuracy than the described method,
but would avoid infringing on the patent, since the Kalman filter itself is not patentable. Finally,
the patent described in [14] has not yet been granted so it is uncertain as to whether it will need
to be greatly taken into consideration. If it is granted, it is possible that enough differences exist
between the two devices to avoid infringement or to fight the allegations in court. Project
RAPTORS provides both a control and monitoring system without providing a video overlay, as
opposed to simply a data collector. Further, the concept of a simple telemetry system to relay
data is not novel and is therefore not patentable in its own right.
16

4.5 Summary
Three existing patents and patent applications have been presented that may conflict with
Project RAPTORS. The “Unmanned airborne reconnaissance system” patent [12] could
potentially be a problem where infringement is concerned, unless RAPTORS does not
incorporate a live video stream. Infringement on the method for using a Kalman filter [13] could
be avoided by not incorporating the GPS data into the method used by RAPTORS. Finally, the
patent application described in [14] could potentially cause an infringement problem, but the
patent has not yet been granted.
17

5.0 Reliability and Safety Analysis 5.1 Introduction
There are several dangers posed by our system, ranging in risk level from the possibility of
human injury to a minor annoyance. One serious hazard our vehicle could encounter is a loss of
control, which is a very real possibility in the case of a wireless aerial vehicle, whether from loss
of transmission or component failure. Such control loss may result in an accidental collision,
either with the ground, which could result in system damage, or with a person, which has the
potential to cause injury. Another potential risk is voltage regulator failure, which could cause a
fire or shock hazard also resulting in personal injury. There is significant reason, then, to ensure
that the system is reliable and has a very low failure rate to ensure that injury does not occur.
5.2 Reliability Analysis
On any circuit board, there are components that are more significant and prone to failure
than others. Generally, these devices are characterized by either a high complexity, signified by a
large number of pins, or a very high device junction temperature under load. Four components of
the RAPTORS projects have been identified as being at high risk of failure.
The RF Power MOSFET [15] on the two modem boards is sourcing a high amount of current
and dissipating a fair amount of heat, thus it seems an ideal candidate for failure evaluation. The
MIL-HDBK-217F document [16] doesn’t have a direct analog to this device, so it was assumed
the transistor was operating under 400 MHz when in reality it operates at about 420MHz. The
environmental conditions were also assumed to be approximately equivalent to that of an
airborne inhabitable cargo area, an assumption in all the MFFT analyses. After these
assumptions, all other parameters matched the entry for “Transistors, Low Frequency Si FET”.
Parameter name Description Value Comments λb Base Failure Rate 0.012 MOSFET v. JFETπT Temperature Factor 1.0 1.8 °C/W @ 1W + 25°CπA Application Factor 1.5 Linear Amplification < 2WπQ Quality Factor 8.0 RF Plastic PackageπE Environment Factor 13 Airborne Inhabited Cargo.Entire design: 1.872 Failures/106 hours
60.98 years MTTFTable 1: RF Power MOSFET MTTF Tabulation
Another device which seems like a likely point of failure in the RAPTORS project is the
PIC24FJ256GB106 Microcontroller [9], mostly due to the fact that it has the more pins than any
18

other device in the circuit. The device itself was assumed to be a “microprocessor”, with the
details of its operation specifying the parameters affecting the MFFT. The junction temperature
was assumed to be the worst case operating temperature under bias listed in the datasheet, about
100 °C. The manufacturing start date was assumed to date from around the same time as the
original revision of the PIC24F family introductory document.
Parameter name Description Value Comments C1 Die complexity 0.28 16-bit MOS deviceπT Temperature coeff. 1.5 Worst case operating
temperature (100 °C) and VHSIC CMOS
C2 Package Failure Rate 0.032 Non-hermetic SMT, 64 pinsπE Environment Factor 4.0 Airborne Inhabited CargoπQ Quality Factor 10 Unknown Screen LevelsπL Learning Factor 1.0 2.5 years, 6/07 – 2/10Entire design: 5.48 Failures/106 hours
20.831 years MTTFTable 2: PIC24F Microcontroller MTTF Tabulation
The RF Transceiver CC1101 [2] is another significant microcircuit with high complexity
and high pin count (20) that may be prone to failure for those very reasons. Analysis was
conducted using the same model as the microprocessor. Since no transistor count was given for
the specific device, several other similar devices were found that had comparable features with
transistor counts around 1,500 transistors, thus this count was used. In addition, the worst case
ambient temperature was used to find the temperature coefficient, and the initial datasheet
version date was used as the starting data of manufacture.
Parameter name Description Value Comments C1 Die complexity 0.050 1000 – 3000 transistors =
250 – 750 gatesπT Temperature coeff. 0.98 Worst case operating
temperature (85 °C) and VHSIC CMOS
C2 Package Failure Rate 0.012 Non-hermetic SMT, 20 pinsπE Environment Factor 4.0 Airborne Inhabited CargoπQ Quality Factor 10 Unknown Screen LevelsπL Learning Factor 1.0 3 years, 1/07 – 2/10Entire design: 0.97 Failures/106 hours
117.689 years MTTF Table 3: RF Transceiver CC1101 MTTF Tabulation
19

The 12V to 7.5V linear regulator LM317T [17] has a high possibility of failure due to the
amount of voltage being regulated and the heat dissipated by this device. In tabulating the MTTF
of this device, several assumptions were made, including the assumption that the regulator is a
linear transistor-based microelectronic component, and a linear bipolar device as classified by
MIL-HDBK-217F. The schematic was available and maximum TJ explicitly available, so these
assumptions from previous MTTFs were concrete values in this particular calculation.
Parameter name Description Value Comments C1 Die complexity 0.010 Linear device, <100
transistorsπT Temperature coeff. 58 Worst case operating
temperature (125 °C) and Linear Bipolar Device
C2 Package Failure Rate 0.0012 Non-hermetic DIP, 3 pinsπE Environment Factor 4.0 Airborne Inhabited CargoπQ Quality Factor 10 Unknown Screen LevelsπL Learning Factor 1.0 3 years, 1/06 – 2/10Entire design: 5.848 Failures/106 hours
19.52 years MTTF Table 4: Linear Regulator LM317T MTTF Tabulation
It seems that these devices are fairly reliable except for a few main parameters that are
lowering the overall MTTF: the environment and quality factors. Improving the quality factor is
difficult without purchasing MIL-SPEC components; this could be a viable quality improvement
option. As for the environment factor, ensuring that the devices and the circuit boards are as
secure as they possibly can be will go a long way toward improving the protection from
environmental hazards the project receives. Additionally, extra heatsinks would not be a bad
idea, since the temperature coefficient is a serious factor in most of these cases.
5.3 Failure Mode, Effects, and Criticality Analysis (FMECA)
FMECA analysis of the RAPTORS project must begin by defining criticality levels. The
RAPTORS project will use a three-tiered criticality rating system, as follows:
Low: No risk of personal injury or permanent system damage. Unexpected output or
behavior may be experienced, but does not directly affect the safety of the system. A
failure rate < 10-5 is acceptable for such situations.
Medium: No risk of personal injury, but permanent physical damage to the system is a
possibility. A failure rate < 10-6 is acceptable for such situations.
20

High: Unexpected output, permanent physical system damage, and personal injury are all
possible. High risk is incurred anytime there is any possibility of a resulting injury. A
failure rate < 10-9 is acceptable for such situations.
All failures or failure risks should fall clearly into one of these three rating categories. For a
comprehensive list of possible failures, see Appendix B.
5.4 Summary
The RAPTORS project is inherently more dangerous than a number of other microcontroller
applications; as a remote-controlled aerial vehicle, it has the potential for human injury through
collision, which is a serious safety risk. A number of events have the potential to cause such a
collision, including device failure, loss of signal, stuck port pins and erroneous configuration.
Care must be taken to ensure such an event does not occur.
21

6.0 Ethical and Environmental Impact Analysis
6.1 Introduction
The plane is built out of Elapor Foam and contains 4 servo motors, a brushless DC motor,
and is powered by a Lithium Polymer battery. Each of these parts comes with its own set of
Environmental problems and Ethical issues. The ethical issues that we face with this product are
based on the reliability of our parts and design as well as the customers using our product in
ways other than what we intend. The environmental problems that we face are pollution and
wastes from when the product is built, while the product is used, and when the product is being
disposed of. The amount of electricity the product consumes is also an environmental issue.
6.2 Ethical Impact Analysis
The primary ethical challenge presented by this product is the potential for end users
to use the product in ways other than the intended use. The intended use of this product is for
RC enthusiasts to be able to fly a RC aircraft with the additional flight instrumentation similar to
that of a real airplane. Other ethical challenges presented by this product are its potential to be
hacked and how the product reacts under a variety of different operating conditions.
The aircraft can be used in many ways other than its intended purpose. It could be
used for surveillance which may be viewed as an invasion of privacy. The aircraft could be
flown into unauthorized airspace such as too close to an airport. Due to the size, weight limit,
and power of the aircraft it could easily be outfitted to drop or shoot projectiles. Although we
cannot stop the end user from using our product in these ways we must include a disclaimer with
the product that states that we the manufacturer are not responsible for any misuse of the product
or any damage caused by the misuse of the product.
The market to which we will be selling this product will be very narrow. The
operators will probably have previous experience flying RC aircrafts. We will advise users that
if they have not previously flown RC aircrafts that they should start with a simulator or trainer
aircraft due to the expensive nature of our product. Users must also have an Operator's level or
higher license from the FCC to operate this product. In order to obtain this license the user must
have a certain level of technical knowledge. With this knowledge comes the responsibility to act
in an ethical way.
22

Federal Communication Commission regulations state that we are unable to conceal
the data that we transmit in any way. This means that the data we send must be transmitted in an
obvious way which allows the product to be hacked by third parties. All products transmit on the
same channel of the same frequency which means that users cannot safely operate two products
at the same time and place due to RF interference. Since we must abide by FCC regulations we
are unable to avoid these issues and have an obligation to notify the user of these issues.
While the product has not been extensively tested yet, before it is released we must
test operating conditions for which it is safe to fly the aircraft. The user may know from
previous experience that the aircraft should not be flown in rain or snow; however, we must
determine what operating conditions are safe. For example, the temperature and humidity ranges
that are safe must be determined. After we determine these ranges we must notify the end user
in the user manual of conditions in which are safe to operate the aircraft and conditions in which
are unsafe to operate the aircraft.
6.3 Environmental Impact Analysis
Components of the aircraft that could potentially harm the environment the most are the
foam body of the plane, the printed circuit board and components, the motor, and the lithium
polymer battery. A laptop computer is also required to use our product however the user is
responsible for obtaining, using, and disposing of the laptop.
The printed circuit board and components are a major concern for the environment. The
manufacturing of a PCB releases acid fumes, ammonia fumes, organic vapors, and CFCs into the
air. Acid and alkaline solutions, metals such as nickel, silver, copper, and lead are also used in
the process as well [20]. During the useful life of the product the PCB will not cause any harm
to the environment. At the end of the product’s life cycle the PCB will need to be recycled.
Companies such as AERC Recycling Solutions provide free PCB recycling which is the best way
to dispose of the PCB and components on it at the end of our product’s lifetime.
The body of the plane is made of Elapor Foam. Elapor Foam is similar to Styrofoam
however; it is much more durable and rigid. It is not biodegradable and therefore at the end of
the products life must be recycled. To assist the end user in recycling the foam body we should
direct them a section of our website which provides them with information on where to recycle
the foam body. The foam body will not have a negative impact on environment during its useful
23

lifecycle. During the manufacturing process of the foam chemicals that are harmful to the
environment are used however the end user has no responsibility to dispose of these chemicals.
The aircraft utilizes a brushless DC motor which when manufactured releases harmful
chemicals when the metal is being created. During the useful lifetime of the product the motor
has no harmful effects on the environment. Disposing of the motor is easier than most of the
other components because most garbage facilities extract objects such as these due to the value
of them after they are recycled.
The aircraft utilizes a 3200 mAh, 3 cell lithium ion polymer battery which has a nominal
voltage of 11.1 Volts. When making a lithium polymer battery lithium salts are dissolved a
plastic like dry polymer film [18]. Although this product could be used safely anytime when
there is enough light to see the aircraft it is not likely that it will be used more 20 minutes a day.
There are also occasions when the aircraft is visible but it is inappropriate to fly, for example
when there are wind gusts above 15 mph, when it is raining, or when it is extremely cold. Most
RC hobbyists do not fly their planes every day. One battery charge will allow for approximately
20 minutes of flight time and requires about 2 hours to charge. This being said, the amount of
energy used consumed by the aircraft during its useful lifetime is fairly small. If charged
improperly or short circuited the battery can catch fire, so the user must use only the charger
provided with our product and follow the charging instructions. At the end of a Lithium Polymer
battery life disposing of it improperly can be harmful to the environment. The lithium if directly
consumed by a person is fatal. That being said the easiest method of disposal is recycling. More
and more people are becoming eco-friendly and therefore awareness of the consequences of
improper battery disposal is growing. The end user can safely dispose of the battery
themselves[19]. That being said, it is unlikely that the end user will put forth the effort to do
properly dispose of it themselves. Many places nationwide such as RadioShack will recycle the
batteries for you free of charge, so we will encourage the end user to take the battery to a place
where it will be recycled.
6.4 Summary
This product faces many ethical and environmental issues; most of these issues arise from
the potential irresponsibility of the end user. Although it will not solve the problem, we will
need to have a disclaimer on the product that keeps us, the manufacturers, liable from any misuse
24

of the product. Since our product broadcasts at 430 MHz in order to operate the product one
must have at least a Technician Class Ham license as defined by the Federal Communications
Commission. If we require the end user to provide us with their amateur radio Call Sign we can
look it up on the internet to verify that they are legally permitted to operate our product. Since
the end user has obtained an amateur radio license, we are assured that the end user has a certain
level of technical knowledge. By providing these knowledgeable people with information on
how to properly care for and dispose of our product many environmental risks will be eliminated.
We can further reduce the risk by finding components that will cause less harm if they are
disposed of improperly, for example using RoHS compliant parts. If we follow these guidelines
we will reduce the possibility for ethical and environmental impact but it will not be completely
eliminated.
25

7.0 Packaging Design Considerations
7.1 Introduction
Given the constrained space inside the aircraft, our hardware will be roughly limited to a
2.5” by 3.5” footprint; however, we will have substantial vertical clearance to stack the
hardware. Another consideration is protection from abrupt movements of the aircraft due to
crashing, etc., which may damage the hardware. The ground station will need to be portable
enough to transport to the field, though the specific layout is not as constrained and will follow
closely to the aircraft layout.
7.2 Commercial Product Packaging
Many hobby projects have been done related to remote aircraft control and telemetry, in
addition to UAV technologies being developed by the Department of Defense and other
organizations, which we are unable to analyze. A commercial model aircraft telemetry system
was located and did provide insight into packaging concerns for our project. In addition, a
homebrew project was found that also provided some insight into lightweight packaging
considerations.
7.2.1 Product #1
The Seagull Telemetry system by Eagle Tree
Systems [21] is a modular data recorder and telemetry
system for model aircraft, helicopter, and high-power
rocketry applications. It features a 900 MHz transmitter
mounted in the aircraft that connects to a wide array of
airspeed, altitude, location, etc. sensors that are powered
from the aircraft battery. The sensors and transmitter
connect to a self-contained module via a standard pin
header connection and the assembly is installed into the aircraft and relays information to a
ground station. The ground station is a self-contained module which can provided data via LCD
display and audible alarms. It is powered by an internal 9V battery and can be connected to a
computer via a USB connection, where the data can be viewed live on a computer display.
26
Figure 7-1: Seagull Telemetry System

There are numerous advantages to the Seagull system in both construction and operation.
The aircraft module and all sensors are powered by the onboard battery, so no external battery is
required, which would add weight. The ground station can operate independently using an LCD
display and control buttons or on a computer via a USB port. The construction of the ground
station appears quite robust and solid, with very good environmental and shock protection for
use in the field. The aircraft module is designed for multiple applications and as such, the sensors
can be easily configured to meet the user’s needs through a standardized connection.
The disadvantages of the Seagull system are largely related to the aircraft module and
sensors. Because the module is designed for any application in its own enclosure, weight is
added to the aircraft that may have some adverse effects. Further, the sensors utilize a standard
non-locking pin header connection which may fail during a hard landing. The sensors are also
simply wrapped in plastic and do not appear to offer a solid mounting option to the aircraft,
which may present problems.
Many of the mounting problems that may be an issue will be avoided on our project because
we have the advantage of not aiming for a customizable solution and can design a system that
will work only for our aircraft. This will mean that all hardware can be solidly mounted inside
the fuselage without the need for its own enclosure, making the system lighter. Like the Seagull
system, our system will be powered by the aircraft battery, eliminating weight and other
problems that would arise from attempting to add a second battery. Further, the ground station
will be constructed to be robust enough to withstand use in the field.
7.2.2 Product #2 The Jonas Romblad Datalogger 2
[22] is a homebrew data collection and
telemetry system. In a similar fashion to
our system, it has a barometric pressure
sensor for altitude detection,
accelerometer, and GPS module for
airspeed and location tracking. In addition, the Datalogger monitors aircraft power usage and
ambient temperature. The function of this particular project differs from RAPTORS in that it is
27
Figure 7-2: Jonas Romblad Datalogger 2

meant to track all of this data and store it within a built in EEPROM and/or transmit the data via
wireless or cable to PC or palm pilot.
This system has its distinct advantages: the electronics involved are lightweight and fairly
compact, so fitting them inside the plane is not a problem. In addition, both the software and
hardware design are comparatively simple to implement next to our own system. However, the
capabilities of this system are outmatched by the RAPTORS system: even though RAPTORS
cannot log data, it is capable of wireless transmission of images and directly controlling the flight
of the plane, neither of which is supported by the Datalogger 2. There are other disadvantages to
the Datalogger 2 system as well. The system as it is shown on the website uses a fairly crude
antenna, making transmission interruptions and difficulties seem like a distinct possibility. In
addition, there is no real packaging provided for the system, making it extremely vulnerable to
both abuse and environmental factors.
7.3 Project Packaging Specifications
The aircraft is the major limiting factor to the layout of the hardware. A small area is
available between the control servos and battery pack in the forward fuselage, roughly 2.5 by 3.5
inches, as shown in Fig. 1. It is covered by a removable canopy, which could be hollowed to
accommodate the project, if necessary [1].
To conserve space and simplify the design, two PCBs will be utilized in the aircraft,
separated by a copper shielding to prevent interference. The lower board will contain the power
regulators and the RF circuitry, which will be duplicated in the ground station. The upper board
will contain the sensor microcontroller and connect to the sensor boards. Standoffs will be glued
to the body of the aircraft and the two boards will be separated by standoffs and a copper plate to
reduce the interference from the RF module. The standoffs will give a solid mechanical
connection of all of the hardware to the fuselage, minimizing the possibility of damage in the
event of a crash or other violent movement.
The camera module will be mounted facing forward in the canopy and a UART wire
assembly will connect it to the sensor board. The aircraft antenna will be a half- or full-dipole
mounted on the top of the aircraft and extending out roughly 8 inches.
For the ground station, a die cast aluminum project box [23] will be utilized containing a
duplicate of the power and RF board from the aircraft. Power from a 7.5V battery will be
28

supplied from a connector on one side of the project box, and a connection will be made to the
computer via a USB port on the opposite side. An omnidirectional antenna will be mounted on
the top, along with status LEDs, as needed. The ground station project box is resistant to
environmental conditions and will allow for operation in the field while minimizing potential
damage to the hardware. The board will be solidly mounted to a polycarbonate base using
standoffs, which will then be connected to the project box. The aluminum box will also provide a
ground plane for the antenna and shield the equipment from RF interference.
7.4 PCB Footprint Layout
The GPS, camera, gyroscope, accelerometer, and barometric pressure modules were
all chosen as a breakout board module because the integrated circuits used are not available in
packages with leads [3, 7, 5, 4, 6]. The modules will attach to the sensor board using standard
headers and standoffs for support. This will also allow for easier PCB layout as we have the
ability to run traces and place components under these modules, saving space. The Microchip
PIC24FJ256GB106 is available in two packages, the TQFP and QFN [9]. The 64-pin TQFP was
chosen because it would be smaller and has leads. For the RF transceiver chip, only one
packaging option is available (QFN), which is not ideal, but does allow the possibility to be
soldered to the PCB since the pads are extended to the side of the chip [2].
Due to the width and length constraints on the aircraft and to better allow for
duplication of the power and RF components on the ground station, we have opted for a modular,
stacked PCB configuration. On the aircraft, the power and RF board will be separated by a
copper sheet and standoffs to prevent RF interference. On the power and RF boards, the sections
will be separate by a large ground trace to prevent RF interference.
29

The dimensions for the components are as follows (dimensions in
inches):Component Width Length
GPS Module 1.25 1.25
Camera Module 1.125 0.8125
Gyroscope Module 0.625 0.75
Accelerometer Module 0.8 0.8
Barometric Pressure Sensor 0.75 0.688
Microcontroller 0.5 0.5
RF Transceiver 0.2 0.2
7.5 Summary
The packaging considerations for the RAPTORS project fall into two parts: the hardware on
the aircraft and that on the ground station. The aircraft hardware will utilize the aircraft as its
housing and be built to withstand the possible forces of the aircraft. The PCBs will be mounted
in such a way to minimize weight while making the most of the limited space on the aircraft. The
design will also allow the RF/Power PCB to be replicated in the ground station, which will be
mounted in a die cast aluminum box to provide proper shielding and the ability to withstand use
in the field.
30

8.0 Schematic Design Considerations8.1 Introduction
The RAPTORS project is a remotely operated drone aircraft with a real-time flight data
acquisition system. The project will retrofit an existing model airplane with a custom designed
radio transceiver and sensing equipment for inertial and navigation data. The data from the plane
will be transmitted to a transceiver connected to a ground station (laptop) and displayed onscreen
in real-time. The ground station will, in turn, input control commands from the pilot and
transmit them to the aircraft. The equipment in the plane will consist of a sensor module and a
packet modem, both powered by the PSU located in the packet modem. There will be three
discrete voltage levels in the system, since the transceiver, the servos and the remaining digital
components all require differing voltage levels.
8.2 Theory of Operation
The sensor module subsection of the design was developed to interface with inertial and
navigational sensors in the aircraft, collecting data and sending it to the packet modem via a TTL
UART interface. The GPS and gyroscope units have no special operating conditions, running on
the 3.3 volt power supply, where the GPS uses TTL UART and the gyroscope uses three analog
voltages [3] [5]. The gyroscope has built in filter caps which will prevent aliasing in the ADC.
The barometric pressure sensor will be configured to interface via a standard SPI (full duplex, 4
wire) system; the operating mode will be set to “High Speed” since it is desirable to provide the
highest possible number of refreshes per second [6]. In high speed mode, the sensor is capable
of 15-bit resolution, which will provide a resolution of 10 inches in elevation. The accelerometer
will be operated in 4g sensing mode by controlling discrete input pins on the module from the
microcontroller GPIO; the plane is not expected to exceed this range, but it may be changed in
the future through simple code changes on the microcontroller [4].
The JPEG Camera module has a number of different configurable modes [7]. It is
preferable to have an image with the maximum possible resolution that can be transferred to the
ground station in a short time period. The picture resolution, color depth, and quality are set via
the TTL level UART interface. Still pictures will be set to 12-bit color with 320x240 JPEG
resolution. For a real-time picture preview feed, an 80x60 thumbnail resolution will be used.
The packet size, which determines the segmentation size of picture data, will be set to the
31

maximum supported value, which is 512 bytes, and the UART interface will be configured to run
at the maximum supported rate of 115.2 kbps.
The sensor module described above sends the data, aggregated by the PIC24FJ256GB106
microcontroller, to the packet modem on the plane. The packet modem then takes this data and
transmits it wirelessly through an RF transceiver operating on the 70cm amateur radio band to
the packet modem located at the ground station. All together, the packet modem is responsible
for three services: wireless transmission and reception of data, servo motor control, and power
regulation.
The power regulation unit is responsible for powering all the components in both the packet
modem and sensor module, which altogether requires three discrete supply voltage levels. A
three-cell Lithium-Polymer battery was chosen as the power source for the entire plane, which
has effective voltage range of 8.4V to 12.6V. From this source, three different regulators are
utilized to step down the voltages to levels required for our components. For the RF amplifier
stages, a linear regulator is used to step down to 7.5 VDC. For the aircraft servo motor power
and control, a separate buck regulator steps the voltage down to 5 VDC. Finally, for the logic
components of the system, including the sensor modules and microcontrollers, a LDO linear
regulator drops the 5 volt buck regulator output down to 3.3 VDC, as only up to 500mA is
expected to be consumed by the logic.
The CC1101 RF transceiver chip is extremely configurable through on-chip registers which
are controlled by the microcontroller via the SPI interface [2]. There are several absolute
configuration details that must be considered in the design of the schematic. A crystal will be
used to supply a 26-27MHz to supply a reference signal to the transceiver chip, which will be
increased using an on chip PLL in order to transmit in the 433MHz range. The transmit power
output can be adjusted from -30dBm to 10 dBm, and will be varied to provide the minimum
power necessary to transmit to the other packet modem. A number of other aspects of the RF
transmission will be on-the-fly configurable by the microcontroller, such as the data controller
and the receiver filter bandwidth. This transmission will be broadcast to an identical system in
the ground station, transmitting sensor information from the sensor subsystem and receiving
servo control information.
The servo control system will control the four servo motors plus the motor controller that
came with the aircraft kit [1]. In order to control the angular position of each of the servos and
32

throttle of the motor, a 20ms periodic rectangular wave with a duty cycle varied between 5-10%
will be generated by the microcontroller’s PWM peripheral. There will be a total of eight servo
channels, four for the servos, one for the propeller motor control, and three for future expansion.
The ground station will have a second packet modem which will be a copy of the design
used in the airplane to simplify design. The servo control system will exist in the design, but will
remain unconnected. Instead of the UART interface used in the plane, a USB connector will
allow the packet modem communicate with an external device [9]. In this case, the device will
be a laptop which will display real-time sensor information and provide aircraft control signals.
8.3 Hardware Design Narrative
There are two microcontroller interfacing schemas to consider: the sensor interfacing
schema and the transmission schema.
For sensor interfacing, the serial interfaces are of utmost importance. Two of the sensor
modules, the accelerometer and gyroscope, provide an analog signal output, requiring usage of
the ADC ports on the uC, three pins and two pins respectively [4] [5]. In addition, two general
purpose I/O pins are necessary for configuration purposes enumerated in the previous section.
Four SPI pins are needed for communication with the barometer module, plus one configuration
GPIO [6]. The remaining ports are all general UARTs, which includes the JPEG camera module
(TTL level), the GPS module (TTL level), the debug interface (TTL level), and the packet
modem microcontroller (TTL level) [7] [3]. The module port assignments were chosen because
they required a certain interfacing as specified by the manufacturer, and UART was chosen for
the uC-to-uC communication because of its simplicity. One key advantage of the PIC24F family
of microcontrollers, general I/O pins can be reconfigured on-the-fly for all microcontroller
peripherals (such as UART, SPI, I2C, etc.) except USB and ADC, making pin assignment
extremely flexible and fairly straightforward [9].
For uC interfacing on the packet modem and ground station subsystems, there are less
interfaces, but an additional output port is used: the PWM. Five PWM port pins are necessary
for controlling the servo and motor system of the plane, another three will be provided for future
use. A TTL level UART will communicate with a debug interface, and a series of SPI port pins
are needed to communicate with the transceiver chip. Unique to the packet modem subsystem is
a TTL level UART for communication with the sensor module uC, and a set of special pins for
33

communication via USB to a laptop are unique to the ground system. USB was chosen because
our microcontroller specifically supports the USB protocol, and USB is a standard interface on
all modern laptops; also, Microchip provides extensive software libraries which can be used to
emulate a COM port within a Windows operating system [24].
8.4 Summary
The RAPTORS system, from a circuit standpoint, is designed to be as modular as possible,
while still maintaining a fast rate of communication between the plane and the ground station,
and a reasonable rate of data refresh from the sensors. An important part of modular design was
utilizing components such as the plane’s custom servos and a fast and configurable transceiver
chip. Adding these components introduces a new design issue, since these two components
require different supply voltages.
The microcontroller interfaces were selected because of either a necessity demanded by the
components selected as a part of our modular design philosophy, or a desire for interface
simplicity. Design is made much simpler by the microcontroller feature of reprogrammable I/O
pins that can be configured to be GPIO, SPI, or UART pins, leaving only the PWM, ADC and
USB interfaces to be routed to specific pins.
34

9.0 PCB Layout Design Considerations
9.1 Introduction
The circuit boards in the plane will consist of a sensor module board and a packet modem
board, both powered by PSU located on the packet modem board. There will be three discrete
voltage levels in the system, since the transceiver, the servos and the remaining digital
components all require differing voltage levels. A copy of the packet modem circuit board will
be used on the ground station.
There are three primary design constraints for these two circuit boards. Due to our boards
being located inside of the Easy Glider Pro we are limited to a space the size of 2”x4”[1]. The
second constraint is managing noise interference. With our packet modem broadcasting at 430
MHz from our plane we will be susceptible to RF interference from our own board. The final
constraint is due to power. We will be operating off of the airplane’s battery.
9.2 PCB Layout Design Considerations – Overall
The two circuit boards on the plane can be divided into 4 major sections. These sections are
Power Supply, RF amplifier and transceiver, Servo Control and Microcontroller, and Sensor
Board. The boards are divided into these sections in an effort to keep noise from propagating
from one section to another. We will also be placing a sheet of copper between the two circuit
boards to keep noise from propagating between the two boards. We will utilize placing
components on both sides of the board to help deal with the circuit board size limitations. As a
general rule, left to right traces will be run on the top layer of the board and top to bottom traces
will be run on the bottom of the board. This will help simplify running traces between
components. We will also use a trace width of 12 mil for signal lines, although in the amplifier
and transceiver the trace widths will vary to maintain an impedance of 50 Ohms. The maximum
trace width is 61 mil which is necessary to maintain the impedance of 50 Ohms on the receive
path of the wireless transmission area.
The sensor circuit board consists of the GPS module[3], the gyroscope module[5], the
accelerometer module[4], the barometric pressure sensor module[6], a PIC24FJ256GB106[9],
and four connectors. Two of these connect the sensor board to the camera [7]. Another section
located on the Packet Modem board is the Power Supply. The main components of it are
35

LM2596 switching regulator (5V), the AP1117Y33L-13 voltage regulator (3.3V), and the
LM317 adjustable voltage power regulator (7.5V).
The others are for debugging and programming. Since the PIC24FJ256GB106 allows peripheral pins to be reconfigured to many different pins there will be a minimal amount of trace
crossing. Each peripheral must be assigned to a pin in software before the peripheral is
configured. We have chosen the closest pin to each peripheral that minimizes trace crossings for
all sensors and serial ports. The sensors include the Gyroscope, the Accelerometer, the
Barometric Pressure Sensor, the GPS, and the Camera. The serial ports include a debug port and
a port which is used for communication between the packet modem board and the sensor board.
The connectors on this circuit board must be placed on 2” end facing the front of the aircraft for
them to be accessible.
One section located on the Packet Modem board is the Microcontroller and Servo Control
section. The main components in this section are a PIC24FJ256GB106, a MM74HCT541MTC
Line driver, and 10 connectors. One connector is used to supply power to the sensor board.
Another is reserved for debugging. The remaining connectors provide 8 channels which are used
to drive servos on the airplane, although we are currently planning to use only 5 of them. The
MM74HCT541MTC is a buffer and line driver which will be taking our eight 3.3 V PWM
signals and driving them at 5 V to control servo motors.
Another section located on the Packet Modem board is the Power Supply. The main
components of it are LM2596 switching regulator (5V), the AP1117Y33L-13 voltage regulator
(3.3V), and the LM317 adjustable voltage linear power regulator (7.5V). We will be pouring a
ground plane under this area to act as a heat sink as well as providing a heat sink for the LM317
regulator. The ground plane under the 3.3 V and 5 V power regulators are not expected to
dissipate more than ½ Watt of power, which is well within the specified range, so the ground
plane is only a precaution. The 7.5 V regulator however will dissipate up to 2 Watts which why
a heat sink has been chosen for it.
The final section, also located on the Packet Modem board, is the RF amplifier and
transceiver. This section takes up about 5 square inches of board space due to its 50 Ohm
impedance line requirements. To do this we will employ a coplanar waveguide. To make this
waveguide we used Wcalc to calculate our trace widths and spacing next to them [25]. This
allows our traces to be shorter and narrower than would be possible if we were to use a straight
36

trace with the same impedance. We will also divide this section of the board off with a ground
trace of 80 mils to keep any signals or noise in the plane from propagating in or out of the RF
portion of the board. A ground pour will also be made beneath the entire RF section to reduce
noise and it is also required by the coplanar waveguide.
9.3 PCB Layout Design Considerations – Microcontroller
The PIC24FJ256GB106 uses 4 bypass capacitors of 0.1uF each which we will place on the
bottom side of the board directly beneath the microcontroller. Placing these capacitors on the
bottom side of the board allows us access the microcontroller pins with ease however; it also
lowers the effectiveness of the bypass capacitors. The general rule applied earlier of the usage of
12 mil signal tracing will be maintained with the microcontroller. An external crystal oscillator
will be used. Due to this oscillator being located on the RF board it has been decided that an 8
MHz oscillator will be used. Using an 8 MHz oscillator instead of a higher frequency oscillator
reduces high frequency images, noise, and interference. This may seem slow, however, the
internal PLL of the microcontroller can allow the microcontroller to run at 32 MHz if the
computation power is required. The oscillator case will also be soldered to the board to reduce
noise as suggested by the manufacturer.
The PIC24FJ256GB106 allows peripherals to be programmed to many different pins.
Utilizing this feature allows us to place our peripherals in the direction of their respective
destinations on the circuit board. Each peripheral must be assigned to a pin in software before
the peripheral is configured. We have chosen the closest pin to each peripheral that minimizes
trace crossings for all sensors and serial ports. The sensors include the Gyroscope, the
Accelerometer, the Barometric Pressure Sensor, the GPS, and the Camera. The serial ports
include a debug port and a port which is used for communication between the packet modem
board and the sensor board. This vastly reduces the number of trace crosses required and
simplifies the board layout process.
9.4 PCB Layout Design Considerations – Power Supply
The power supply will be operated off of a 3 cell lithium polymer battery. The main
components of it are LM2596 switching regulator (5V), the AP1117Y33L-13 voltage regulator
(3.3V), and the LM317 adjustable voltage power regulator (7.5V). We will be pouring a ground
37

plane under this area to act as a heat sink as well as providing a heat sink for the LM317
regulator. This is required because the LM317 may be required to provide up to 2 Watts at 7.5
Volts. In order for this to happen we would have to transmit with 100% duty cycle. This will
only occur during the testing of our amplifier. When testing the amplifier we will need to see its
output in the frequency domain and measure the peak envelope power. During normal operation
the transmitter is expected to operate at near 50% duty cycle, resulting in a power dissipation of
1 Watt. The 3.3 V regulator could dissipate up to 0.68 Watts under full load. We will be placing
the capacitors within ¼ inch of the regulators. The power traces will be made at least 20 mils to
accommodate the higher current.
9.5 Summary
The three primary design constraints for this circuit board are size, noise interference, and
power. The choices of small package sizes for all components, the use of coplanar waveguides,
and the utilization of both sides of the circuit board have allowed us to overcome the size
constraint. The use of ground isolation, separation of the RF sections, copper plating between
the boards, a lower frequency oscillator and other preventive measures should help to make our
boards more noise immune. The final constraint power was dealt with by using wide traces for
the power lines and the use of ground planes to help reduce noise and heat.
38

10.0 Software Design Considerations 10.1 Introduction
Normally, a system such as RAPTORS would involve two software designs run
simultaneously in communication with each other, but the RAPTORS design split the vehicle
hardware into two separate parts, each with a microcontroller, as necessitated by space
limitations. Thus we have three separate software designs, each running on identical
microcontroller architectures but with three different purposes: one to gather and aggregate
sensor data, another to interface with and push the data out onto an RF transceiver, and the last
which receives the data from the aforementioned transceiver and sends via serial to the Virtual
Cockpit application. Flight control data from the user will be gathered on the ground and sent in
the opposite direction. This data is to be used by the vehicle’s primary microcontroller to control
the motor and servos inside the vehicle.
10.2 Software Design Considerations
The software that will be driving the RAPTORS project is written in C and compiled using
Microchip’s proprietary MPLAB C30 compiler. This advanced compiler automatically allocates
the stack and heap, and also automatically assigns variable addresses [26]. Most of this
assignment is done dynamically during compilation, but there are several important regions pre-
defined by the specific device being used, specifically the data and program memory locations.
The location of the application code is in the flash memory regions designated as “program
space”. The locations from 0x0 to 0x200 are filled by the goto instruction, the reset address, and
two vector tables. The application code then resides in the space from 0x200 to 0x2A9F8. The
user data is contained in a separate memory, called the “data space”, which also hosts the
“special function registers”, or SFRs, that house the addresses of the various peripherals. This
SFR resides from 0x0 to 0x7FE of the data memory, while the implemented data ram lives
between 0x800 and 0x47FE, giving effectively 16 kB of data memory [9]. The stack will start at
the top of this space and work its way downwards as needed.
Upon initialization, each of the three boards power up their respective peripherals and begin
operation; data and control packets are not exchanged until the ground station is on, and
aforementioned exchange is meaningless unless the Virtual Cockpit is also activated and
connected.
39

The main module of the software is driven by a loop which constantly polls several different
flags for a TRUE condition, also called a hybrid architecture. When an interrupt occurs, the
specific interrupt handler for that event is called. This handler usually either sets a flag, or sets a
flag and performs a data fetch from a register. Once the flag is set, the interrupt handler exits,
and the main function is free to deal with the peripheral and/or data that triggered the interrupt at
its leisure. This method of driving the software through interrupt-set flags was chosen so that the
code could still answer interrupt events and fetch data in a timely manner, but wouldn’t need to
spend an inordinate amount of time in the interrupt handler. This also allows prioritization of
peripheral handling without having to use priority interrupts.
There are several different components that utilize interrupts to drive the code, and various
interfacing methods connect these devices to the microcontroller. Two separate components, the
accelerometer and the gyroscope, require use of the A/D peripheral to interface with the
microcontroller [5,4]. Five A/D ports will be initialized for interfacing, three for the
accelerometer and two for the gyroscope. They will be configured to trigger an interrupt after a
single conversion, with a transition from sampling to conversion being triggered by a 50 ms
timer interrupt. They will then output data in an unsigned integer form, which can then be scaled
appropriately by the Virtual Cockpit.
One SPI interface on the sensor board and another on the two modem boards are required to
interface with the barometer and the transceiver, respectively [6,2]. The sensor side interface is
limited to 1MHz frequency, so both SPI ports will be initialized to use 667 kHz speed. Each of
the two modem boards will also have 5 PWM ports initialized for servo and motor control, set to
use a 20 ms period with a default 1.5 ms pulse width. The pulse width will be varied between
1.0-2.0 ms.
The GPS, Camera, and Debug modules are interfaced to the microcontroller using the
UART peripheral [3,7]. The GPS UART will be initialized with a baud rate of 57600 kbps; the
GPS data sheet incorrectly specifies 9600 bps. The remaining two UARTs will run at the max
speed supported by the Camera module, 115.2 kbps. All three will use 8-bit data mode, with
default stop bit polarity (‘1’) and parity settings (none). It should be noted that the sensor and the
plane microcontrollers will be interfaced together using an identically initialized UART at 115.2
kbps.
40

Three LEDs have been interfaced to general-purpose I/Os on each board for debugging
purposes. The debug interface is a UART, as mentioned above, but whereas the other UART
peripherals are TTL level, the debug interface is RS-232 level and will use an external board
with an external level translator. It is worth noting that the debug interface on the ground station
will be taken in implementation by a Serial-to-USB cable that will be used to transfer data to and
from the Virtual Cockpit application running on the laptop.
10.3 Software Design Narrative
The main module is the first module to run upon power-up. It is responsible for calling every
other module at the appropriate time. It begins by calling the initialization module, and then
enters a looped “if-elseif” branch structure that checks to see if interrupt handler flags have been
set. It checks on a priority basis, allowing the peripherals that require the fastest response time to
run the necessary module as quickly as possible. If a flag has been set, the module associated
with the set flag is called; upon exiting, polling resumes at the beginning of the” if” structure.
This module layout is similar in the code for all three microcontrollers, though the flags that are
monitored and the functions that are called will differ. On the sensor board specifically, there is a
heartbeat timer that triggers a timed function in main that runs error checking and various other
pieces of code.
The initialization module is also similar across all three code versions, though it differs in
the specifics of what it checks and initializes. The initialization module calls several subroutines
that initialize the various peripherals, which includes making sure the timer prescaler is set
correctly. Once these settings are correct, the module proceeds linearly through each of the
attached peripherals and queries them to see if they were started properly. When this start-up
self-check is complete, the routine exits.
The GPS module is entered when a new word has filled the GPS UART buffer. This module
begins by moving the word, which represents an ASCII character, to the next available space in a
long string. It then checks if the ASCII character represented by that word was “\n”. If it was,
then the string is complete, and after verifying the checksum it can be shifted out to another
temporary variable. From this point, the string moves into the filtering stage; for our purposes,
we only want NMEA standard RMC statements. We check to see if the statement is RMC; it if it
41

is not, we throw it out. From this point, it is shifted into the data packet as is; parsing for specific
values is handled in the virtual cockpit application.
The Barometer module is triggered by the DRDY signal coming from the Barometer unit.
Once entered, three memory access requests are sent to the barometer, via the SPI interface: a
read from the TEMPOUT register, a read from the DATARD8 register, and a read from the
DATARD16 register. The results of each of these reads are saved to separate variables. The
TEMPOUT register holds the two’s-complement of the 16-bit binary representation of the
current temperature, and once retrieved it must be converted before being meaningful.
Additionally, the two pressure data variables, one 8-bit and the other 16-bit, are joined to form an
integer representing pressure. Once the instantaneous pressure and temperature are gathered,
they are used in a sliding window average to smooth out the current readings. This same function
then takes the resulting averaged temperature and pressure, as well as an averaged standard
pressure gathered at initialization, and finds the current altitude of the plane [27], storing it as
well as the temperature and pressure to the data packet.
The Camera module is triggered by the receipt of a packet on the Camera UART. Upon
receipt, the packet is shifted to a temporary location to make space for the next packet, and is
then inspected to ascertain the intent of the packet. If the packet requires an ACK, the AutoAck
function is called, which assembles an ACK and sends it to the camera. If a new instruction is
needed by the camera, this is assembled and sent out. Finally, if it is discovered that this data is a
piece of picture data, it is placed into an image accumulation register until a packet is formed for
sending to the modem board uC. When a packet is formed, the image accumulation register is
dumped to the packet as is, even if more data is needed to fully assemble the image; image
assembly will be done at a later time. The image accumulation register is then cleared.
The Analog Capture module is triggered by a conversion complete interrupt from either the
Accelerometer or Gyroscope A/D converters, which occurs every 50 ms plus conversion time. It
retrieves the converted value from the conversion buffer in the respective module and stores it in
the global data packet.
The PWM module controls the PWM pulse width and it is triggered when an update is
received from the ground station that contains an engine speed or servo position value that
differs from the current value. In that case, the current values are overwritten with the new
values, and the motor module computes the new pulse width for the appropriate servo(s)/motor.
42

10.4 Summary
It has been shown that the application code for the RAPTORS project will be comprised of
three separate code versions, one to run on each of the three microcontrollers of which our
project is comprised. Initialization will be run from the ground up, with the ground station
syncing to the plane’s main board, and then the plane board syncing to the sensor board.
Additionally, once a uC has been activated by syncing, it will poll all peripherals to make sure
they started properly. Once initialization has completed, each uC will use an interrupt-set-flag-
based priority polling structure to collect data from various peripheral devices as soon as it is
received over its respective interface. Collected data will be forwarded to the proper location.
Debugging will be accomplished through a combination of development board use, plus 3 LEDs
and a debugging header on each board.
43

11.0 Version 2 Changes
The primary change we would like to make to our design if we were given another chance
would be to use a completely different camera. The primary benefit we gained by using the
current camera is the JPEG compression that it provides. Ideally, in version 2 we would
incorporate a streaming video similar to a webcam. If we were unable to find a video camera
with compression we would have to implement our own compression algorithm, perhaps using a
wavelet transform on a DSP.
Biasing of the RF MOSFET in the amplifier could use a negative feedback system so the
current bias would be relatively constant, instead of the current system that is susceptible to the
MOSFET heating up.
If we had another chance to design the system, we would like to either add another
transceiver chip or find a different transceiver chip in order to be able to implement full-duplex
communication. The current TI chip we’re currently using constrains operation to half-duplex,
and it would be immensely helpful to continuous operation to be able to achieve a simultaneous
up- and down-link.
It would have been nice to incorporate a Kalman filter to combine the gyroscope data with
the accelerometer data to provide more accurate pitch and roll measurement of the aircraft. This
was not implemented because it was considered an extraneous luxury and would eat up a lot of
processor power if implemented on the microcontroller.
Another change we could feasibly make would be to use a publicly documented amateur
radio protocol, which would allow for greater data bandwidth. Currently, we are classified as an
undocumented protocol, which means we can only use a 100kHz channel. Alternatively, we
could use spread spectrum to achieve greater bandwidth and still maintain our current protocol.
This would have an added bonus of noise immunity.
We would have liked to move our altitude calculation system to the ground station. The
current calculation relies on a initial sampling of the pressure when the sensor board is first
switched on; it compares this initial pressure sampling to the current sampling to calculate the
altitude. However, the way we have things programmed, the sensor board resets under certain
conditions (on purpose), so the initial pressure capture is replaced with a new capture in the
middle of the air, confusing the altitude calculation. If we take the pressure comparison sample
and store it on the Virtual Cockpit and do the calculation there, it would keep altitude constantly
44
accurate. Another improvement that could be made is to also check the altitude from the GPS
module. Although the altitude is in meters above sea level, when the product is first turned on
and the GPS locks we will know our elevation above sea level. We can then subtract that initial
value from the plane’s reading during flight to obtain another altitude measurement. The GPS is
only accurate within 3 meters however it could be used to provide a sanity check.
45

12.0 Summary and Conclusions
The objective of the RAPTORS project was to be able to deliver the following: an RC plane
outfitted with control, data gathering, and proprietary wireless modem systems; a ground station
with the same wireless modem designed to transmit control signals to and receive sensor data
from the aircraft and that interfaces with a PC running a proprietary control application; and a
Windows executable that interprets control data from a joystick and sends it to the ground station
and receives the sensor data from the ground station and displays it in a visual manner. All the
deliverables are in their final and complete state and are fully functional; the only exception is
the collection of camera data, which is functional but unreliable.
Collectively, the Team RAPTORS members gained experience in several different fields
throughout the process of design and construction. Some of these include embedded systems
design and programming, C# programming, RF and amplifier design, PCB design and
manufacturing processes, system design with respect to packaging constraints, intelligent
component selection, amateur radio licensing processes and regulations, and RC plane
navigation.
46

13.0 References
[1] Multiplex USA, “Easy Glider Pro,” Multiplex USA. [Online]. Available: http://www.multiplexusa.com/models/model-kits/easy_glider_pro.html. [Accessed: Feb 2, 2010].
[2] Texas Instruments, “CC1101 Low-Power Sub-1GHz RF Transceiver,” Texas Instruments. [Online]. Available: http://focus.ti.com/docs/prod/folders/print/cc1101.html. [Accessed: Feb 2, 2010].
[3] Sparkfun Electronics, “32 Channel LS20031 GPS 5Hz Receiver,” Sparkfun Electronics. [Online]. Available: http://www.sparkfun.com/commerce/product_info.php?products_id=8975. [Accessed: Feb 2, 2010].
[4] Sparkfun Electronics, “Triple Axis Accelerometer Breakout – MMA7260Q,” Sparkfun Electronics. [Online]. Available: http://www.sparkfun.com/commerce/product_info.php?products_id=252. [Accessed: Feb 2, 2010].
[5] Sparkfun Electronics, “Gyro Breakout Board – LPR530AL Dual 300°/s,” Sparkfun Electronics. [Online]. Available: http://www.sparkfun.com/commerce/product_info.php?products_id=9413. [Accessed: Feb 2, 2010].
[6] Sparkfun Electronics, “Breakout Board for MEMs Barometric Pressure Sensor – SCP1000,” Sparkfun Electronics. [Online]. Available: http://www.sparkfun.com/commerce/product_info.php?products_id=8161. [Accessed: Feb 2, 2010].
[7] Sparkfun Electronics, “JPEG Color Camera – UART Interface,” Sparkfun Electronics. [Online]. Available: http://www.sparkfun.com/commerce/product_info.php?products_id=9334. [Accessed: Feb 2, 2010].
[8] Wikipedia, “AeroVironment Wasp III,” Wikipedia, Jan 1, 2010. [Online]. Available: http://en.wikipedia.org/w/index.php?title=AeroVironment_Wasp_III&action=history. [Accessed: Feb 2, 2010].
[9] Microchip, “PIC24FJ256GB106,” Microchip. [Online]. Available: http://www.microchip.com/wwwproducts/Devices.aspx?dDocName=en531081. [Accessed: Feb 2, 2010].
[10] FCC, “Part 97 – Amateur Radio Service,” FCC. [Online]. Available: http://www.access.gpo.gov/nara/cfr/waisidx_08/47cfr97_08.html. [Accessed: Feb 2, 2010].
47

[11] FCC, “Part 15 – Radio Frequency Devices,” FCC. [Online]. Available: http://www.access.gpo.gov/nara/cfr/waisidx_08/47cfr15_08.html. [Accessed: Feb 2, 2010].
[12] Cox, Beverly, Dews, Hampton, Nyroth, Nicholas, “Unmanned airborne reconnaissance system,” U.S. Patent No. 7,014,141, July 12, 2002.
[13] van der Merwe, Rudolph, Wan, Eric A., Julier, Simon A., “Navigation system applications of sigma-point Kalman filters for nonlinear estimation and sensor fusion,” U.S. Patent No. 7,289,906, April 4, 2005.
[14] Batcheller, Barry D., Ohlsen, Tyler C., “Low-cost flight training and synthetic visualization system and method,” U.S. Patent No. 20070020588, January 9, 2006.
[15] STMicroelectronics, “RF POWER transistor PD54003-E Datasheet” STMicroelectronics. [Online]. Available: http://www.st.com/stonline/products/literature/ds/12235.pdf. [Accessed: Apr 8, 2010]
[16] Reliability Prediction of Electronic Equipment, MIL-HDBK-217F, Department of Defense, Washington D.C., 1991.
[17] National Semiconductor, “LM117/LM317 3-Terminal Adjustable Regulator,” National Semiconductor. [Online]. Available: http://www.national.com/ds/LM/LM117.pdf. [Accessed: Apr 7, 2010].
[18] Battery University, “Lithium-ion safety concerns” Battery University. [Online]. Available: http://batteryuniversity.com/index.htm [Accessed: Apr 12, 2010].
[19] Dragonfly Innovations, “How to Safely Dispose of Lithium, LiPO, LiPoly Battery Packs” Dragonfly Innovations Inc. [Online]. Available: http://www.rctoys.com/pr/2007/07/06/safely-dispose-of-lithium-polymer-lipo-lipoly-battery-packs/ [Accessed: Apr 12, 2010].
[20] Silicon Valley Toxics Coalition, “The Environmental Cost of Printed Circuit Boards” Silicon Valley Toxics Coalition. [Online]. Available: http://www.corpwatch.org/article.php?id=3433 [Accessed: Apr 12, 2010].
[21] Eagle Tree Systems. “Seagull Telemetry,” Eagle Tree Systems. [Online]. Available: http://www.eagletreesystems.com/Plane/plane.html. [Accessed: Feb. 9, 2010].
[22] Romblad, Jonas. “Self made data-logger V2.5,” June 4, 2005. [Online]. Available: http://home.arcor.de/d_meissner/d_logg2_engl.htm. [Accessed: Feb. 9, 2010].
[23] Hammond Manufacturing. “Hammond Manufactuing 1550F Enclosure,” Hammond Manufacturing. [Online]. Available: http://www.hammondmfg.com/pdf/1550F.pdf. [Accessed: Feb. 10, 2010].
48

[24] Microchip, “USB Framework for PIC18, PIC24 & PIC32”, Microchip. [Online]. Available: http://www.microchip.com/stellent/idcplg?IdcService=SS_GET_PAGE&nodeId=2680&dDocName=en537044. [Accessed: Feb 16, 2010].
[25] Dan McMahill, “Wcalc,” Wcalc. [Online]. Available: http://wcalc.sourceforge.net/. [Accessed: Feb 24, 2010].
[26] Microchip, “MPLAB C Compiler for PIC24 MCUs and dsPIC DSCs User’s Guide” Microchip. [Online]. Available: http://ww1.microchip.com/downloads/en/DeviceDoc/51284J.pdf. [Accessed: Mar 25, 2010].
[27] Georgia State University Department of Physics and Astronomy, “The Barometric Formula,” Georgia State University. [Online]. Available: http://hyperphysics.phy-astr.gsu.edu/hbase/Kinetic/barfor.html. [Accessed: Mar 5, 2010].
[28] Jordi Munoz, “Final Version of ArduIMU (Include Video),” DIY Drones. [Online]. Available: http://diydrones.com/profiles/blogs/705844:BlogPost:23188. [Accessed: Mar 5, 2010]
49

Appendix A: Individual Contributions
A.1 Contributions of Jeff Kubascik:Early in the project, Jeff extensively researched into the RF aspect of the project. He
researched into FCC regulations to ensure legal operation of the packet modem. He discovered
that an Amateur Radio license would allow use of the 420 MHz - 450 MHz with up to 1 W of
transmission power, according to FCC part 97. Since the project would use an unspecified
digital format, the regulations would limit the channel bandwidth to 100 kHz. Jeff also sourced a
RF transceiver IC from Texas Instruments which would allow operation in the 420 MHz – 450
MHz band with a wireless data rate of up to 500 kbps.
Jeff also did extensive research into RF amplification. He discovered that a two-stage
amplifier would be required to get the gain needed for at least 1W transmission. For the first
stage, he found an IC from RFMD which would provide 13.2dB of gain. For the second stage
amplifier, a more involved design was required due to the high RF power involved. He found a
RF N-channel MOSFET which can handle up to 3W transmission. To use the MOSFET, he
designed impedance matching networks using inductive traces and capacitors to match the gate
and drain impedances to 50 Ω, so there was minimal reflection interfacing with the antenna and
the RF transceiver. Then he did detailed analysis using MATLAB and Advacned Design System
by Agilent to verify it.
Jeff did the majority of the schematic capture for the RF portion of the packet modem.
He made schematic symbols and footprints for the RF transceiver IC, amplifier IC, RF
MOSFET, and the microcontroller. He also did the layout of the packet modem circuit board,
including the RF amplifier, RF transceiver, power supply and digital logic, and soldered all the
components on both packet modem boards, with exception of the RF transceiver, RF MOSFET,
and USB connector.
On the software side, Jeff wrote the code which interfaced with the CC1101 RF
transceiver chip. This code handled data flow between the microcontroller and the FIFO buffers
inside the chip, since the buffers were only 64 bytes in length and packets could be up to 254
bytes in length. This involved a complex state machine with extensive error trapping, as loss of
RF communications would result in the plane crashing. Jeff also wrote code which handles
packet assembly and disassembly on the UART interfaces between the packet modem and the
PC or sensor module, which is complied on both packet modems and the sensor module. Jeff
A-1

also helped develop the packet formats and wrote code on the packet modem which handles
packet routing.
A.2 Contributions of Joe Trefilek:Joe’s major contributions to the project included selecting sensors for the sensor board,
completing the sensor board schematic, assisting Paul with the sensor board PCB design,
working on the aircraft module hardware and assembly, and making the Virtual Cockpit
application. To do this, he worked closely with his teammates and assisted them in whatever
ways were necessary. He completed the packaging considerations and patent liability
homeworks.
Joe began the semester researching and selecting accelerometer, gyroscope, and
barometric pressure sensors to monitor the aircraft’s orientation and altitude. After researching
potential sensors and sensor modules, he narrowed down the search by estimating the maximum
readings that would be received from the aircraft. From there, it was a matter of weighing the
cost and ease of implementation to select the modules that were ultimately used.
Next, Joe began working on the schematic for the sensor board. This first entailed
recording the interfacing requirements for each sensor module and other peripherals that needed
to connect to the sensor board microcontroller. Next, microcontroller pin assignments were
determined based on the available peripherals, with effort taken to group the pins as closely as
possible to the ones for the same module. This would make the PCB layout a bit easier than if the
pins were assigned arbitrarily.
After completing the remaining connections that needed to be made on the schematic and
adding the remaining components, Joe assisted Paul with designing the PCB layout as he was
more experienced at designing circuit boards. During this process, it was determined that the pin
locations for a few of the sensor modules needed to be moved to make the process of designing
the PCB easier. Joe worked to resolve this situation in a similar manner as during the initial
schematic design, using the list of interfacing requirements he had compiled earlier.
For homework 4, Joe began considering the packaging constraints of the project. It was
decided that the aircraft module would entail two boards stacked on top of each other, and Joe
began looking into the hardware that would be required to accomplish this. Once the boards were
completed and the plane was built, he worked out how to fit the boards together, requiring some
A-2

deviation from the original plan to account for interference due to the location of the sensor
modules and incorrectly sized holes in the PCB.
As the specification for the data packets was finalized, Joe began work on the Virtual
Cockpit application, which would be used to generate command packets and display data and
camera packets from the aircraft. This first entailed finding a way to interface the joystick with a
C# application. Next, a method was developed to parse an arbitrary packet as it came in from the
serial bus, determine its type, and process it. This was made a bit more difficult by the changing
of the packet specifications and relied on a great deal of discussion with Matt and Jeff. From
there, better ways to display the data were implemented, including a set of graphical gauges that
Jeff found. Further, after discussing flight dynamics with an experienced model aircraft pilot, an
exponential control system was implemented, which give more precise control at lower values,
but still allows for the full range of motion.
A.3 Contributions of Paul Scheffler:Paul was tasked with designing the power supply system, writing the peripheral
software to interface with sensors, design and layout of the sensor printed circuit board, and the
final aircraft packaging. He was also tasked with assisting Matt in the development of packet
transmission software for the sensor board. Paul completed the PCB layout design
considerations homework and the Ethical and Environmental Impact Analysis.
Due to the various power requirements the project’s logic, amplifier, and servo control
system 3 different voltage levels were required. Paul was tasked with providing the required
power while keeping the footprint of the circuit as small as possible and keeping the project
within budget. There were many strict requirements involved with the design of the power
supply. The 7.5 volt power supply has a very small noise tolerance because it is amplifying the
RF transmissions. This means that a switching regulator cannot be used, so a linear regulator
must be used. The 7.5 volt power supply will also be dissipating up to 2 Watts of power which
brings its own heat issues. The 5 volt power supply had to provide up to 2 amps of current to
power the servos and the 3.3 volt regulator which it turn powered the 3.3 volt logic.
Paul was responsible for designing and laying out the sensor board PCB. This
included working with Joe to make the schematic. This included creating footprints for
components located on the sensor board. Due to some overlapping parts some footprints on the
A-3

sensor board were created by Jeff. Due to the space limitations imposed by the plane the sensor
board was made as small as possible. The final dimensions were 3” x 5”.
Due to previous experience working with Microchip microcontrollers, Paul worked,
with the assistance of Matt, to write the peripheral software for the UART, the PWM, and the
ATD. Each of these peripherals presented their own unique problems that had to be debugged.
After the peripheral software was written, Matt took to the lead writing the sensor software
which converted the captured data into meaningful data. Paul still assisted in the debugging of
the sensor board software. After Paul also ported some functions written by Jeff to the sensor
module which were used to correctly format, build, and calculate the checksum of packets.
These packets were then sent to the packet modem board in the plane which forwarded them to
the ground station.
Paul was responsible for putting the aircraft module into its final packaging. The final
packaging was made possible by removing a small portion of foam to allow the battery to slide
back an extra 3 inches. This allowed the packet modem board to slide into the plane. An
unforeseen problem caused by this is that it threw the center of gravity very far towards the back
of the plane. Many cables had to be made to allow packing to possible which Jeff assisted Paul
in making. To counteract this 2.5 oz of lead weights were added to the nose of the plane.
A.4 Contributions of Matt Rockey:As the leader of the software aspect of the project, Matt was tasked with outlining and
implementing the microcontroller software. He also shared website creation and maintenance
responsibilities with Joe, and took charge of getting documentation implemented by its assigned
due date.
Early in the design process, he focused mostly on research relating to programming,
poring over the datasheets for the 5 sensors to which the microcontroller would be interfacing,
and examining the protocols for data extraction or UART communication. Once he had
determined the method and means of communication for each one, he began to outline both
initialization and data retrieval code for each one.
At the same time, it was necessary to create a website for the team. Joe had created a
basic shell of a website, but it lacked a certain visual aesthetic, and many necessary links were
missing. Matt went through and updated the website, adding drop-down menus, adding links to
A-4
various documents on the server, and aggregating the datasheets on the server. As an extra help,
Matt also helped keep everyone aware of getting homework submitted on time, and made valid
contributions to generalized discussions of system functionality, such as the merits of various
antenna placement or failsafe systems.
The acquiring of a development board allowed Matt to begin software development,
but development did not begin in earnest until the PCB had been manufactured. It was at this
point that he began to transform his pseudo-code into actual C code to be compiled in MPLAB.
From that point on, he had a hand in most of the software development, with the exception of the
transceiver chip interfacing and the packet modem packet handling software. His development
involvement included sensor interfacing, packet and handshaking design, UART peripheral API
design, data organization and parsing, and timing structure.
Once software writing had finished, debugging was a serious issue, and Matt was a
key player in getting the code to the point where it was functional. Each of the sensors had
various issues to work out before they communicated properly with the microprocessor, and Matt
worked assisted with the debugging on most of these issues.
Once the debugging period had finished, Matt also took a lead in getting the user
manual and final report documents completed and ready for submission. He wrote a good portion
of these documents, and was responsible for the formatting and submission of these documents
as well.
A-5

Appendix B: Packaging
Figure B-1Modular Construction of the Aircraft Electronics.
Figure B-2Available volume in aircraft.
B-1

Figure B-3General Component Layout for Packet Modem
Figure B-4General Component Layout for Sensor Board
B-2
µC
Sensor Brd
XCVR
RF
PSU
Sevro Ctrl
Serv
o Se
rvo
Serv
o
Serv
o
Serv
o
Serv
o
USB
DBG
Prog
Gyro
3-Axis Accel.
Bar Sensor
GPS
µC
GPS
Camera RF Modem
Prog

Table B-1: Project Packaging Specifications
Aircraft
Item Qty. Price Total18-8 SS PHILLIPS MACHINE SCREW, 2-56 THREAD, 7/8" LENGTH 1 pack $4.66 $4.6618-8 SS MACHINE SCREW HEX NUT, 2-56 THREAD, 3/16" WIDTH, 1/16" HEIGHT 1 pack $2.77 $2.7718-8 SS PHILLIPS MACHINE SCREW, 4-40 THREAD, 1/4" LENGTH 1 pack $3.47 $3.4718-8 SS MACHINE SCREW HEX NUT, 4-40 THREAD, 1/4" WIDTH, 3/32" HEIGHT 1 pack $2.75 $2.75ALUMINUM ROUND SPACER, 3/16" OD, 5/8" LENGTH, #2 SCREW SIZE 15 $0.27 $4.05ALUMINUM ROUND SPACER, 3/16" OD, 1/8" LENGTH, #4 SCREW SIZE 12 $0.20 $2.40ALUMINUM ROUND SPACER, 3/16" OD, 3/8" LENGTH, #2 SCREW SIZE 12 $0.24 $2.88
TOTAL $22.98
Ground Station
Die Cast Aluminum Enclosure – 6.73” x 4.76” x 3.98” $18.00
(Hammond Manufacturing 1550E, holes cut by team at no cost to accommodate power input, USB cable, and antenna)
B-3

Appendix C: Schematic
C-1: Power Subsystem
C-1

C-2a: Transceiver Subsystem (Part A)
C-2

C-2b: Transceiver Subsystem (Part B)
C-3

C-3: Modem Microcontroller Subsystem
C-4

C-4: Sensor Subsystm
C-5

Appendix D: PCB Layout Top and Bottom Copper
Figure D-1: Packet Modem Layout Bottom Copper
Figure D-2: Packet Modem Layout Top Copper
D-1

Figure D-3: Sensor Board Layout Bottom Copper
Figure D-4: Sensor Board Layout Top Copper
D-2

Description Source Part # Qty Order Qty Unit Price Ext PriceGyro Breakout Board - LPR530AL Dual 300°/s SparkFun SEN-09413 1 1 29.9500 29.95Triple Axis Accelerometer Breakout - MMA7260Q SparkFun SEN-00252 1 1 19.9500 19.95Breakout Board - MEMs Barometric Pressure Sens SparkFun SEN-08161 1 1 34.9500 34.9532 Channel LS20031 GPS 5Hz Receiver SparkFun GPS-08975 1 1 59.9500 59.95JPEG Color Camera - UART Interface SparkFun SEN-09334 1 1 54.9500 54.95ANTENNA 433MHZ 1/4 WAVE SMA Digikey ANT-433-CW-HWR-SMA-ND 2 2 9.9800 19.96Heat Sink for LM317, Very Large Digikey CR493-ND 2 2 0.5000 1.00EMI/RFI Suppressors & Ferrites 95 OHM BULK Mouser 623-2743021446 4 5 0.1200 0.60PIC24FJ256GB106 Microchip PIC24FJ256GB106-I/PT 3 6 0.0000 0.00CRYSTAL 8.00 MHZ 18PF 49US Digikey X164-ND 3 4 0.5800 2.32CRYSTAL 26.000 MHZ 18PF HC49US Digikey 887-1029-ND 2 3 0.4600 1.38TRANS RF N-CH FET LDMOST PWRSO10 Digikey 497-5295-5-ND 2 2 10.9800 21.96Low-Power Sub-1GHz RF Transceiver TI CC1101RTKR 2 5 0.0000 0.005 Watt SPDT T/R Switch SMT, DC - 3 GHz Hittite HMC574MS8E 4 10 2.7400 27.40IC HEX INVERTER CMOS 14-TSSOP Digikey 74HC04DTR2GOSCT-ND 2 3 0.5300 1.59IC AMP HBT GAAS GEN-PUR SOT-89 Digikey 689-1021-1-ND 2 2 3.4000 6.80IC REG SIMPLE SWITCHER TO-263-5 Digikey LM2596S-5.0-ND 2 2 5.1800 10.36IC REG LDO 1.0A 3.3V SOT89-3 Digikey AP1117Y33LDICT-ND 2 3 0.9500 2.85IC REG ADJ 1.5A 3 TERM TO-220 Digikey LM317TFS-ND 2 3 0.5700 1.71Buffers & Line Drivers Octal 3-STATE Buffer Mouser 595-SN74HCT541PWE4 2 3 0.4200 1.26IC DRVR/RCVR MULTCH RS232 16SOIC Digikey 296-13094-1-ND 1 1 2.1000 2.10CAPACITORS 112 220 31.67CONNECTORS 69 169 50.84DIODES 17 25 8.19RESISTORS 37 105 6.92INDUCTORS 12 20 10.34 TOTAL 409.0000
Appendix E: Parts List SpreadsheetTable E-1: Parts List
E-1

ECE 477 Final Report Spring 2010
Appendix F: FMECA Worksheet
POWER SUBSYSTEMFailure
No.Failure Mode Possible Causes Failure Effects Method of
DetectionCriticality Remarks
1A Short circuit across any regulator
Regulator failure, Diode D1 failure
Unpredictable system behavior in all subsystems, overvolting, fire and risk of shock
Observation High Human injury risk, not only from loss of plane control, but from fire and shock as well.
1B Open circuit across Linear Regulator LM317T
Regulator failure, Solder joint failure
Loss of power to transceiver subsystem
Observation Medium Loss of functionality, but the motors will continue to function.
1C Open circuit across Linear Regulator AP1117V33L-13
Regulator failure,Solder joint failure
Loss of power to significant portions of all subsystems
Observation High Complete loss of functionality, loss of control, possible loss of motor power, injury possible
1D Open circuit across Buck Regulator LM2596
Regulator failure, Solder joint failure
Loss of power to all subsystems but the transceiver
Observation High Loss of power to motors causes current trajectory to be locked in, injury possible
Table F-1: FMECA Analysis of Power Subsystem
F-1

ECE 477 Final Report Spring 2010
TRANSCEIVER SUBSYSTEMFailure
No.Failure Mode Possible Causes Failure Effects Method of
DetectionCriticality Remarks
2A Transceiver CC1101 configuration erroneous
µC UART Tx failure, code bug, transceiver error, noisy circuit
Failure to transmit control information, transmitting on wrong frequency, transmitting with wrong power
Observation / None
Medium One externality occurs if transmitting on the wrong channel causes interference with another amateur radio band operator.
2B Reflected RF Incorrect impedance matching with antenna, vibrations changing value of variable resistors / capacitors,
Loss of transmission, multiple component failure within subsystem
Observation Medium Loss of transmission
Table F-2: FMECA Analysis of Transceiver Subsystem
F-2

ECE 477 Final Report Spring 2010
MODEM MICROCONTROLLER SUBSYSTEMFailure
No.Failure Mode Possible Causes Failure Effects Method of
DetectionCriticality Remarks
3A µC clocking failure
Oscillator failure, µC oscillator input pin stuck high, µC catastrophic failure
Loss of direct control, loss of servo and motor power
Observation High Potential for human injury through plane-person collision, due to lack of control and power
3B LED output pins stuck high/low
µC port failure, µC catastrophic failure
Debug LEDs show incorrect status
Observation / None
Low
3C Short across bypass capacitors
Overvolting bypass capacitors, bypass capacitor failure
Subsystem failure due to undervoltage from extra ripple
Observation High May assume a failure in the power subsystem. Low power can cause loss of control, causing injury.
3D PWM port pins stuck high /low
µC port failure, µC catastrophic failure
Loss of engine and servo control, unexpected servo and engine behavior
Observation High Assumes a sanity check is not performed
3E Board-to-Board UART port pins stuck high/low
µC port failure, µC catastrophic failure
Loss of communication with sensor module
Observation Low Sensor data will not be available to the user in this case, but no physical damage will result
Table F-3: FMECA Analysis of Packet Modem Microcontroller Subsystem
F-3

ECE 477 Final Report Spring 2010
SENSOR SUBSYSTEMFailure
No.Failure Mode Possible Causes Failure Effects Method of
DetectionCriticality Remarks
4A µC clocking failure
Oscillator failure, µC oscillator input pin stuck high, µC catastrophic failure
Loss of sensor subsystem communication and sensor data
Observation Low Does not directly cause device failure
4B LED output pins stuck high/low
µC port failure, µC catastrophic failure
Debug LEDs show incorrect status
Observation / None
Low
4C Short across bypass capacitors
Overvolting bypass capacitors, bypass capacitor failure
Subsystem failure due to undervoltage from extra ripple
Observation Low May assume a failure in the power subsystem
4D Board-to-Board UART port pins stuck high/low
µC port failure, µC catastrophic failure
Loss of communication with modem subsystem, sensor data not sent
Observation Low No resulting physical damage
Table F-4: FMECA Analysis of Sensor Subsystem
F-4